1
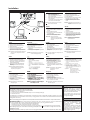
➂ ➁ ➀ Bass Control To adjust bass level to desired volume Power On/Off To switch on or off power (Green LED indicates that the power is On) Rotary Volume Control To adjust the volume higher or lower ➅ ➄ ➃ Power In To connect the adapter Line In To connect the Line In cable from the sound card/sound source. Control In Plug in the mini DIN connector Æ Satellite Out To connect the satellite speakers ~ EXPLANATION ~ Â Ã Ä Å Æ À Á Multimedia Speaker System A2.310 / MMS213 For US/Canada only IMPORTANT SAFETY INSTRUCTIONS - Read before operating equipment This product was designed and manufactured to meet strict quality and safety standards. There are, however, some installation and operation precautions which you should be particularly aware of. 1. Read these instructions - All the safety and operating instructions should be read before the appliance is operated. 2. Keep these instructions - The safety and operating instructions should be retained for future reference. 3. Heed all warnings - All warnings on the appliance and in the operating instructions should be adhered to. 4. Follow all instructions - All operating and use instructions should be followed. 5. Do not use this apparatus near water - for example, near a bathtub, washbowl, kitchen sink, laundry tub, in a wet basement or near a swimming pool, etc. 6. Clean only with a damp cloth. The appliance should be cleaned only as recommended by the manufacturer. 7. Install in accordance with the manufacturers Instructions. Do not block any of the ventilation openings. For example, the appliance should not be situated on a bed, sofa, rug, or similar surface or placed in a built-in installation, such as a bookcase or cabinet that may impede the flow of air through the ventilation openings. 8. Do not Install near any heat sources such as radiators, heat registers, stoves, or other apparatus (including amplifiers) that produce heat. AC Polarized Plug 9. Do not defeat the safety purpose of the polarized or grounding-type plug. A polarized plug has two blades with one wider than the other. Match wide blade of Plug to wide slot, fully insert. A grounding type plug has two blades and a third grounding prong. The wide blade or the third prong are provided for your safety. When the provided plug does not fit into your outlet, consult an electrician for replacement of the obsolete outlet. 10. Protect the power cord from being walked on or pinched particulary at plugs, convenience receptacles, and the point where they exit from the apparatus. 11. Only use attachments/accessories specified by the manufacturer. 12. Use only with a cart, stand, tripod, bracket, or table specified by the manufacturer, or sold with the apparatus. When a cart is used, use caution when moving the cart/ apparatus combination to avoid injury from tip-over. 13. Unplug this apparatus during lightning storms or when unused for long periods of time. 14. Refer all servicing to qualified service personnel. Servicing is required when the apparatus has been damaged in any way, such as power-supply cord or plug is damaged, liquid has been spilled or objects have fallen into the apparatus, the apparatus has been exposed to rain or moisture, does not operate normally, or has been dropped. 15.Warning! To reduce the risk of fire or electric shock, do not expose this appliance to rain or moisture. EL 4562-E004: 99/3 http://www.pcstuff.philips.com http://www.pcsound.philips.com Deep Bass, crisp highs and great looks! The Rhythmic Wave 310 includes a powerful, down-firing wooden subwoofer with bass reflex system, to add unbelievable depth to low frequencies. The system is optimized to produce superb sound quality across the whole frequency range. Connected to PC's, CD/MP3 players, game consoles and even TV's it adds realism to your music and brings games and web-sites to life! Ideal with a stereo soundcard. 4399 294 60201 Installation  ÁÃÀ English: Français: 1. 2. 3. 4. 5. 1. 2. 3. 4. 5. 6. Connect the satellite speaker. Connect to sound card/sound source. Connect the mini DIN plug into the control in. Connect the power supply. Switch On/Off the system using the power button on the satellite panel. Tune the system using sound card/sound source and the controls on the satellite speaker. Note: Do not insert the power plug into the AC outlet until all connections are made! Branchez lenceinte satellite. Connectez la carte son/source sonore. Branchez la mini fiche DIN sur lentrée Control. Branchez lalimentation. Mettez le système sous tension à laide de la touche dalimentation située sur lenceinte satellite. 6. Accordez le système au moyen de la carte son/ source sonore et des commandes sur lenceinte satellite Remarque: Nintroduisez pas la iche dans la prise CA tant que tous les branchements ne sont pas effectués ! Español: Deutsch: 1. Conecte el altavoz satélite. 2. Realice la conexión a la tarjeta o fuente de sonido. 3. Inserte el miniconector DIN en el terminal de entrada de control. 4. Conecte el cable de alimentación. 5. Active el sistema con el botón de encendido situado en el panel del satélite. 6. Afine el sistema utilizando la tarjeta o fuente de sonido y los controles del panel del satélite. 1. Den Satellitenlautsprecher anschließen. 2. An die Soundkarte/Signalquelle anschließen. 3. Den Mini-DIN-Stecker an die Buchse Control in anschließen. 4. Das Netzteil anschließen. 5. Das System mit Hilfe der Taste Power auf dem Bedienfeld des Satellitenlautsprechers einschalten. 6. Das System mit Hilfe der Soundkarte/Signalquelle und den Bedienelementenauf dem Bedienfeld des Satellitenlautsprechers einstellen. Observación: No inserte el conector de alimentación en la toma de corriente mientras no haya completado todas las conexiones Hinweis: Den Netzstecker nicht an eine Steckdose anschließen, bevor alle Verbindungen hergestellt worden sind. Italiano: Nederlands: Svenska: Suomi: 1. 2. 3. 4. 5. 1. 2. 3. 4. 5. 1. Anslut satellithögtalaren. 2. Anslut till ljudkort/ljudkälla. 3. Anslut mini-DIN-kontakten till Control In (regleringsingången). 4. Anslut strömförsörjningen. 5. Sätt på systemet med på-knappen på satellitpanelen. 6. Ställ in systemet via ljudkort/ljudkälla och knapparna på satellitpanelen 1. 2. 3. 4. 5. Nota: Non inserire la spina di alimentazione nella presa di corrente fino a che i collegamenti non sono stati tutti ultimati! Opmerking: Steek de netsteker pas in het stopcontact als alle aansluitingen gedaan zijn! Collegare laltoparlante satellite. Collegare alla scheda audio/sorgente audio. Collegare la spina mini DIN allingresso control. Collegare lalimentatore. Accendere il sistema utilizzando il pulsante di accensione posto sul pannello satellite. 6. Sintonizzare il sistema utilizzando la scheda audio/ sorgente audio e i comandi posti sul pannello satellite. Sluit de satellietluidspreker aan. Sluit aan op geluidskaart/geluidsbron. Sluit de kleine DIN-stekker aan op control in. Sluit het netsnoer aan. Zet het systeem aan met de aan-uitknop op het satellietpaneel. 6 Stem het systeem af met de geluidskaart/geluidsbron en de toetsen op het satellietpaneel Polski: 1. 2. 3. 4. 5. Podùàcz gùoúnik satelitarny. Podùàcz go ze êródùem dêwiæku/kartà dêwiækowà Wùóê wtyk mini DIN do wejúcia sterujàcego. Podùàcz przewód zasilajàcy do êródùa zasilania. Wùàcz system, uêywajàc przycisku zasilania na panelu gùoúnika satelitarnego. 6. Dostrój system, uêywajàc êródùa dêwiæku/karty dêwiækowej oraz kontrolek na panelu gùoúnika satelitarnego. Obs: Anslut inte nätkontakten till nätuttaget förrän alla anslutningar har gjorts! Ðóññêèé: 1. 2. 3. 4. 5. 1. Ïîäñîåäèíèòå ñàòåëëèòíóþ êîëîíêó. 2. Ïîäñîåäèíèòå çâóêîâóþ ïëàòó èëè äðóãîé èñòî÷íèê çâóêîâîãî ñèãíàëà. 3. Âñòàâüòå ìèíèàòþðíûé øòåêåð òèïà DIN â ãíåçäî äëÿ óïðàâëÿþùåãî âõîäíîãî ñèãíàëà. 4. Ïîäñîåäèíèòå èñòî÷íèê ïèòàíèÿ. 5. Âêëþ÷èòå ñèñòåìó ñ ïîìîùüþ êíîïêè ïèòàíèÿ íà ïàíåëè ñàòåëëèòà. 6. Íàñòðîéòå ñèñòåìó ñ ïîìîùüþ çâóêîâîé ïëàòû è ðåãóëÿòîðîâ, ðàñïîëîæåííûõ íà ïàíåëè ñàòåëëèòà. Ïðèìå÷àíèå: Íå ïîäñîåäèíÿéòå âèëêó ñåòåâîãî øíóðà êðîçåòêå ñåòèïåðåìåííîãî òîêà, ïîêàíå áóäóò âûïîëíåíû âñå íåîáõîäèìûå ñîåäèíåíèÿ! Açýklama: Güç kablosunu, tüm baðlantýlar yapýlmadan AC çýkýþýna sokmayýnýz! Norsk: Dansk: Portuguese: 1. 2. 3. 4. 5. Kople til satellitthøyttaleren. Kople til lydkortet/lydkilden. Kople mini DIN-pluggen til kontrollinngangen. Kople til strømtilførselen. Slå på systemet med strømknappen på satellittpanelet. 6. Still inn systemet ved hjelp av lydkortet/lydkilden og kontrollene på satellittpanelet. 1. 2. 3. 4. 5. Tilslut satellithøjttaleren. Tilslut til lydkortet/lydkilden. Tilslut mini-DIN-stikket til bøsningen Control In. Tilslut strømforsyningen. Tænd systemet ved hjælp af tænd-/slukknappen på satellitpanelet. 6. Afstem systemet ved hjælp af lydkortet / lydkilden og betjeningselementerne på satellitpanelet. 1 2 3 4 5 Merk: Ikke sett støpselet i en stikkontakt før alle tilkoplingene er gjort! Bemærk: Sæt netstikket ikke til i vekselstrømsudgangen, før alle tilslutninger er i orden! Nota: Não introduza a ficha eléctrica na tomada antes de fazer todas as ligações! Ligue as colunas satélite. Ligue a placa de som / fonte sonora. Ligue a tomada DIN mini em Control In. Ligue a energia eléctrica. Ligue/desligue a aparelhagem utilizando o botão respectivo na coluna satélite. 6 Ajuste a aparelhagem utilizando a placa de som/fonte de som e os controlos na coluna satélite. Important notes for users in the U.K. Mains plug This apparatus is fitted with an approved 13 Amp plug. To change a fuse in this type of plug proceed as follows: 1 2 3 Huom: Älä yhdistä pistotulppaa pistorasiaan,ennen kuin kaikki kytkennät ovat valmiit! Türkçe: Uydu hoparlörünü baðlayýnýz. Ses kartýný/ses kaynaðýný baðlayýnýz. Mini DIN fiþi kontrol giriþine baðlayýnýz. Güç kaynaðýný baðlayýnýz. Uydu paneli üzerindeki güç düðmesini kullanarak sistemi çalýþtýrýnýz. 6. Ses kartý/ses kaynaðýný ve uydu paneli üzerindeki kumandalarý kullanarak sistemi ayarlayýnýz. Uwaga: Nie wkùadaj przewodu zasilajàcego do gniazda sieciowego dopóki nie wykonasz wszystkich (innych) poùàczeñ! Liitä satelliittikaiutin. Liitä äänikorttiin/äänilähteeseen. Liitä minidin-pistoke Control In -sisääntuloon. Liitä virtalähde. Kytke järjestelmä päälle satelliittikaiuttimen virtakytkimestä. 6. Viritä järjestelmä äänikortin/äänilähteen ja satelliittikaiuttimen säädinten avulla. Remove fuse cover and fuse. Fix new fuse which should be a BS1362 5 Amp, A.S.T.A. or BSI approved type. Refit the fuse cover. If the fitted plug is not suitable for your socket outlets, it should be cut off and an appropriate plug fitted in its place. If the mains plug contains a fuse, this should have a value of 5 Amp. If a plug without a fuse is used, the fuse at the distribution board should not be greater than 5 Amp. Note: The severed plug must be disposed of to avoid a possible shock hazard should it be inserted into a 13 Amp socket elsewhere. How to connect a plug The wires in the mains lead are coloured with the following code: blue = neutral (N), brown = live (L). As these colours may not correspond with the colour markings identifying the terminals in your plug, proceed as follows: Connect the blue wire to the terminal marked N or coloured black. Connect the brown wire to the terminal marked L or coloured red. Do not connect either wire to the earth terminal in the plug, marked E (or ) or coloured green (or green and yellow). Before replacing the plug cover, make certain that the cord grip is clamped over the sheath of the lead - not simply over the two wires. Copyright in the U.K. Recording and playback of material may require consent. See Copyright Act 1956 and The Performer's Protection Acts 1958 to 1972. Norge Typeskilt finnes på apparatens underside. Observer: Nettbryteren er sekundert innkoplet. Den innebygde netdelen er derfor ikke frakoplet nettet så lenge apparatet er tilsluttet nettkontakten. For å redusere faren for brann eller elektrisk støt, skal apparatet ikke utsettes for regn eller fuktighet. Deutschland Hiermit wird bescheinigt, daß dieses Gerät in Übereinstimmung mit den Bestimmungen der Amtsblattverfügung funkentstört ist. 1046/1984 Der Deutschen Bundespost wurde das Inverkehrbringen dieses Gerätes angezeigt und die Berechtigung zur Überprüfung der Serie auf Einhaltung der Bestimmungen eingeräumt.