1
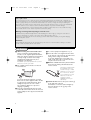
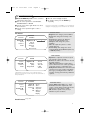
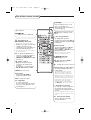
cover 2444.1
09-12-2005
11:25
Pagina 1
cover 2444.1
09-12-2005
11:25
Pagina 2
2444.1 en
09-12-2005
11:50
Pagina 1
Model: 42PF5320/79
Product No:
Thank you for purchasing this television set.
This handbook has been designed to help you install and
operate your TV set. We would strongly recommend that you
read it thoroughly.
We hope our technology meets entirely with your satisfaction.
English
Introduction
Help?
If this instruction manual does
not give an answer or if ‘Tips’ do
not solve your TV problem, you
can call your Local Philips
Customer or Service Centre. See
the supplied World-wide
guarantee booklet.
Please, have the Model and
Product number which you can
find at the back of your
television set or on the
packaging, ready, before calling
the Philips helpline.
Table of Contents
Preparation . . . . . . . . . . . . . . . . . . . . . . . . . . . . . . . . . . . . .2
To use the menus . . . . . . . . . . . . . . . . . . . . . . . . . . . . . . . .3
Remote control
. . . . . . . . . . . . . . . . . . . . . . . . . . . . . .4-5
The keys on the right side of the TV set . . . . . . . . . . . . . .6
Camcorder, video games, headphone . . . . . . . . . . . . . . . . . .6
Rear connections . . . . . . . . . . . . . . . . . . . . . . . . . . . . . . . .6
Recorder (VCR-DVD+RW) . . . . . . . . . . . . . . . . . . . . . .7
Devices with Component Video Output connectors . . .8
Devices with Progressive Scan output . . . . . . . . . . . . . 9
Devices with HDMI connector . . . . . . . . . . . . . . . . . .10
Devices with DVI connector to the HDMI connector
of the TV . . . . . . . . . . . . . . . . . . . . . . . . . . . . . . . . . . .10
Computer with VGA connector to the PC-VGA
connector of the TV . . . . . . . . . . . . . . . . . . . . . . . . . .11
Side connections . . . . . . . . . . . . . . . . . . . . . . . . . . . . . . . .12
Record with your recorder . . . . . . . . . . . . . . . . . . . . . . . .13
How to search for and store TV channels . . . . . . . . . . . . .14
Give name . . . . . . . . . . . . . . . . . . . . . . . . . . . . . . . . . .16
Editing of channels . . . . . . . . . . . . . . . . . . . . . . . . . . . .16
Features menu . . . . . . . . . . . . . . . . . . . . . . . . . . . . . . . . . .17
PIP (Picture in Picture) . . . . . . . . . . . . . . . . . . . . . . . .17
Child lock . . . . . . . . . . . . . . . . . . . . . . . . . . . . . . . . . . 18
Teletext . . . . . . . . . . . . . . . . . . . . . . . . . . . . . . . . . . . . . . .19
Using in PC monitor mode . . . . . . . . . . . . . . . . . . . . . . . .20
Using in HD (High Definition) mode . . . . . . . . . . . . . . . . .21
Tips . . . . . . . . . . . . . . . . . . . . . . . . . . . . . . . . . . . . . . . . . .22
3104 315 2444.1
°
Recycling
The materials used in your set are either reusable or can be recycled.
To minimise environmental waste, specialist companies collect used
appliances and dismantle them after retrieving any materials that can be used
again (ask your dealer for further details).
1
2444.1 en
09-12-2005
11:50
Pagina 2
Care of the screen
Do not touch, push or rub or strike the screen with anything hard as this may scratch, mar or damage the
screen permanently. Do not rub with dust clothes with chemical treatment. Do not touch the surface with bare
hands or greasy cloth (some cosmetics are detrimental to the screen). Unplug the TV before cleaning the
screen. When the surface becomes dusty, please wipe gently with absorbent cotton or other soft materials like
chamois soaks. Do not use acetone, toluene and alcohol because they cause chemical damage.
Do not use liquid cleaners or aerosol cleaners. Wipe off saliva or water drops as soon as possible. Their long
time contact with the screen causes deformations and colour fading.
Warning concerning stationary images on the TV screen
A characteristic of Plasma Display Panels is that displaying the same image for a long time can cause a
permanent after-image to remain on the screen. This is called phosphor burn in.
Normal use of the TV should involve the showing of pictures that contain constantly moving and changing
images that fill the screen.
Black Bars
When black bars appear at the left and right side of the screen, it is recommended to change to a picture
format so that the picture fills the entire screen.
Preparation
& Wall mounting instructions/Table stand
‘ To connect peripheral equipment, see p. 6.
How to mount the supplied wall mount
bracket, see the supplied Quick Start Guide.
Make sure that the wall mount is being fixed
securely enough so that it meets safety
standards.The weight of the TV (excl.
packaging) is about 42 kg.
Note: Other (not supplied) stands are optional
accessories. Consult your dealer.
é For ventilation, leave at least 5 cm free all
around the TV.
( Insert the mains cord supplied into the mains
at the bottom of the TV and in the wall socket
having a mains voltage of 198-264V.
To prevent damaging the power (AC) cord
which could cause a fire or electric shock, do
not place the TV on the cord.
§ Remote control: Pull out the plastic insulation
sheet from the battery, this will activate the
remote control.
CR 2025
To prevent any unsafe situations, no naked
flame sources, such as lighted candles, should
be placed in the vicinity. Avoid heat, direct
sunlight and exposure to rain or water.
The equipment shall not be exposed to
dripping or splashing.
“ Insert the aerial plug firmly into the aerial
socket x at the bottom of the TV. For best
picture quality use the suppressor-aerial cable
supplied.
2
The battery supplied with
the appliance does not
contain mercury or nickel
cadmium so as to protect
the environment. Please
do not discard your used
batteries, but use the
recycling methods
available (consult your
distributor).
è Switch the TV on : Press the power switch B
at the right side of the TV.
An indicator on the front of the TV lights up.
Press the -P+ keys or the B key on the
remote control.
2444.1 en
09-12-2005
11:50
Pagina 3
To use the menus
& Press the MENU key on the remote control to
( Use the cursor left/right to adjust.
summon the main menu.
é Use the cursor up/down to select Picture,
Sound, Features or Install.
“ Use the cursor in the right direction to select
the menu item.
‘ Use the cursor up/down again to select a
setting.
§ To exit the menus, press the MENU key
repeatedly.
Note: Items temporary not available or not relevant are
displayed in a light grey colour and cannot be selected.
TV menu
TV Menu
Picture π
Sound
Features
Install
Picture
Brightness π p
Brightness
Colour
Colour
Contrast
Contrast
Sharpness
Sharpness
Colour Temp
Hue
Colour Temp.
TV Menu
Sound
Picture
Sound π
Features
Install
Equalizer
Brightness π
Balance
Colour
(AVL)
Contrast
Dolby
Virtual
Sharpness
Colour Temp
π
120 Hz
500 Hz
1500 Hz
5 kHz
10 kHz
* Manufactured under license from Dolby Laboratories.
Dolby’ ‘Pro Logic’ and the double-D symbol are trademarks of
Dolby Laboratories.
TV Menu
Features
Picture
Sound
Features π
Install
Timer π
Brightness
Child Lock
Colour
Contrast+
Contrast
NR
Sharpness
PIP
Colour Temp
(Sleep)
Time
Start Time
Stop Time
Channel
Activate
Display
Picture menu:
• Brightness: this changes picture brilliance.
• Colour: this changes the intensity of the
colour.
• Contrast: this changes the difference
between the light and dark tones.
• Sharpness: this changes the picture
definition.
• Hue: this adjusts the picture to obtain
natural skintones.
• Colour Temp.: this changes the colour
rendering: Cool (bluer); Normal (balanced)
or Warm (redder).
Sound menu:
• Equalizer: to adjust the sound tone (from
bass 120 Hz to treble 10 kHz).
• Balance: this balances the sound on the left
and right speakers.
• (AVL (Automatic Volume Leveller): this is
used to limit increases in sound, especially on
programme change or advertising slots.)
• Dolby Virtual: simulates the surround sound
experience from two speakers using Dolby
Pro Logic* providing the listener with the
sensation of being surrounded by additional
speakers.
Features menu:
• Timer, Child lock and PIP: see p. 17-18.
• Contrast+: automatic adjustment of the
picture contrast which permanently sets the
darkest part of the picture to black.
• NR: attenuates picture noise (snow) in
difficult reception conditions.
Install menu: see p. 14
3
2444.1 en
09-12-2005
11:50
Pagina 4
Use of the remote control
B Standby
Press to switch the TV on or off
from or to standby mode.
When switched off, a red indicator
on the TV lights up.
x no function
®Ò‡π†
Video recorder or DVD keys
Q Surround mode
Virtual Dolby* Surround
Optimal with Dolby surround signals.
Enables you to experience the effect
of Dolby surround Pro Logic,
reproducing a rear sound effect. See
Sound menu, Dolby Virtual, p. 3.
Note:You can make the same selection in
the Sound menu, p. 3.
AV To display the Source list to
select TV or peripheral equipment
connected to CVI-1, AV, PCVGA/CVI-2, HDMI/PC-D or Side.
See also p. 6.
h Active control
Optimizes the picture quality
according to the quality of the
reception.
Press this key to switch between
On, On with sensor and Off.
MENU Main menu on/off
Cursor keys
Press the keys oœpπ to
navigate through the menus.
VOL To adjust the volume.
0/9 Digit keys
To select a TV channel.
For a two digit programme number,
enter the second digit before the
dash disappears.
æPIP (Picture in Picture) on/off
(p. 12)
ı List of programmes
To display/clear the list of
programmes. Use the keys oœ to
select a programme and the key π
to display it.
X Sound mode
To switch from Stereo or Nicam
Stereo to Mono or to choose
between Dual I or Dual II in case of
bilingual transmission.
When the sound mode is Mono, the
indication is displayed in red.
f:gb Teletext
Teletext keys. See p. 13.
OK Only applicable for DVD or
AUX mode. See p. 13.
¬ Interrupt the sound or restore it.
Smart picture a and sound M
To select predefined picture and
sound settings.
This Philips TV has been set at the
factory to look best in bright store
environments which use fluorescent
lighting. As your home will likely not be
as well lit as a store, we recommend
you that you cycle through the various
smart picture modes to find the one
that best suits your own viewing
conditions. Most consumers will find
that Natural is the correct choice.
P Programme selection
To move up or down a programme.
The number, (the name) and the
sound modes are displayed for a few
seconds.
For some TV programmes the title of the
programme appears at the bottom of the
screen.
0 Previous TV channel
Press to display the previously
selected TV channel.
4
2444.1 en
09-12-2005
11:50
Pagina 5
MODE* Press this key to switch between TV, DVD and AUX functions.
q 16:9 formats
The pictures you receive may be transmitted in 16:9 format (wide screen)
or 4:3 format (conventional screen).
4:3 picture sometimes have a black band at the top and the bottom of
the screen (letterbox format).
This function allows you to optimise the picture display on screen.
Using the different formats
Press the q key or use the keys pπ to select the different modes:
4:3, Movie Expand 14:9, Movie Expand 16:9, Subtitle Zoom, Superzoom
and Widescreen.
4:3
The picture is reproduced in 4:3 format and a black band is
displayed on either side of the picture.
Movie Expand 14:9
The picture is enlarged to 14:9 format, a thin black band
remains on both sides of the picture.
Movie Expand 16:9
The picture is enlarged to 16:9 format.This mode is
recommended when displaying pictures which have black
bands at the top and bottom (letterbox format).
Subtitle Zoom
This mode is used to display 4:3 pictures using the full
surface of the screen leaving the subtitles visible.
Superzoom
This mode is used to display 4:3 pictures using the full
surface of the screen by enlarging the sides of the picture.
Widescreen
This mode restores the correct proportions of pictures
transmitted in 16:9 using the full screen display.
Note: If you display a 4:3 picture in this mode, it will be enlarged
horizontally.
i Screen information
To display/remove the programme number, the name (if it exists), the
time, the sound mode and the time remaining on the timer.
Hold down for 5 seconds to permanently display the programme number
on the screen.
* Mode selector
The remote control lets you control the main functions of the VCR or DVD.
Press the MODE key to select the required mode: DVD or AUX (VCR).
The remote control indicator lights up to display the selected mode. It switches off automatically
after 20 seconds if left idle.The remote control automatically returns to TV mode.
The following keys are operational, depending on the equipment (see p. 13):
B, X, ®Ò‡π†, OK, MENU, cursor keys, -P+, digit keys, i, 0.
5
2444.1 en
09-12-2005
11:50
Pagina 6
Keys on the right side of the TV
Should your remote be lost or broken you can still
change some of the basic settings with the keys on
the right side of your TV.
-
VOLUME
+
MENU/OK
-
PROGRAM
+
POWER
Press:
• POWER : to switch the TV on or off.
• + VOLUME - : to adjust sound level.
• + PROGRAM - : to select programmes.
• MENU : to access or close menus.
The + PROGRAM - keys can be used to select an
adjustment and the + VOLUME - keys to make
that adjustment.
Rear connections
There is a wide range of audio and video devices that can be connected to your TV.The following
connection diagrams show you how to connect them to the TV.
CVI-1 can handle YPbPr and Audio L/R; AV CVBS,Y/C and Audio L/R; PC-VGA/CVI-2 VGA or YPbBr and Audio L/R;
HDMI/PC-D HDMI or DVI.
MONITOR OUT
/PC-D
6
PC-VGA/CVI-2
CVI-1
2444.1 en
09-12-2005
11:50
Pagina 7
Recorder (VCR-DVD+RW)
CABLE
4
3
IN
OUT
RECORDER
Note: Do not place your recorder too close to the screen as some recorders may be susceptible for signals from the
display. Keep a minimum distance of 0,5m from the screen.
& Connect the RF Antenna cable 1 to the RF IN socket of your recorder.
é Connect another RF cable 2 from the output OUT of your recorder to the TV’s input x
ANTENNA 75 Ω jack.
“ Better playback quality can be obtained if you also connect the Video, Audio Left and Right (only for
stereo equipment) AV cables 3 to the VIDEO, AUDIO L and R input jacks of AV.
‘ Press the AV key on the remote control repeatedly until AV is selected.
If your recorder has an S-VHS video jack:
For improved picture quality, connect an S-video cable 4 with the S-VIDEO input.
S-Video does not provide audio, so audio cables must still be connected to provide sound.
MONITOR OUT
VIDEO
L / Mono
6
R
IN
The MONITOR OUT connector can be used for daisy
chaining or to record programs from your TV 6. Only
when a recorder is connected to MONITOR OUT it is
possible to record an analog program from your TV. See
Record with your recorder, p. 13.
OUT
RECORDER
7
2444.1 en
09-12-2005
11:50
Pagina 8
Devices with Component Video Output Connectors (YPbPr)
CVI-1 can handle 480i, 480p, 576i, 576p, 720p and 1080i signals.
CVI-1
CVI-1
CABLE
4
2
3
OUT
1
IN
& Connect the RF Antenna cable 1 to the RF IN socket of your recorder.
é Connect another RF cable 2 from the output OUT of your recorder to the TV’s input ANTENNA
x 75 Ω jack.
“ Connect the three separate component video cables 3 to the device having component video
outputs (YPbPr), such as DVD-players, laser-disc players, videogame players, satellite receivers, or other
equipment and to the Y, Pb and Pr jacks of CVI-1 on the TV.
‘ Connect the audio cable 4 to the device’s AUDIO L and R jacks and to the L and R audio jacks of
CVI-1.
Note: the labels for the component video sockets may differ depending on the DVD player or the device
connected. Although the abbreviations may vary the letters B and R stand for blue and red component signals,
respectively, and Y indicates the luminance signal. Refer to the DVD player’s or device’s instructions for use for
definitions and connection details.
( Press the AV key on the remote control repeatedly until CVI-1 is selected.
8
2444.1 en
09-12-2005
11:50
Pagina 9
Devices with Progressive scan output
(e.g. a digital Set Top box, a video game console or Progressive scan DVD player (480p, 576p, 720p or
1080i)
PC-VGA/CVI-2
PC-VGA/CVI-2
2
1
DVD
& Connect the device with 2Fh YPbPr output to the VGA connector 1 (with the supplied adapter
cable VGA to cinch) and to the L and R AUDIO jacks 2 of PC-VGA/CVI-2.
See also the manual of your High Definition device.
é Press the AV key on the remote control repeatedly until PC-VGA/CVI-2 is selected.
Note: This television is designed to accept high definition signal standards 480p, 576p, 720p and 1080i as
specified by the Electronic Industries Association standard EIA770.3.
Digital devices from different manufacturers have the possibility of differing output standards which may cause
difficulties for the television to properly display.
Warning: In case you notice scrolling images, wrong colors or no colour, no picture, or even combinations of these
on your screen, check if the connections are done in the correct way or move your digital device further away
from your TV.
9
2444.1 en
09-12-2005
11:50
Pagina 10
Devices with HDMI (High Definition Multimedia Interface) connector
HDMI is the leading new standard for Digital High
Definition video and audio interconnection. Eg. with a
Digital Set top box, with HDMI-equipped devices like a
DVD-R, AV receiver...
The HDMI connector allows the following TV and
monitor display modes via the AV key on the remote
control, for High Definition (HD) and computer (PC)
equipment:
ENHANCED DEFINITION TV (EDTV)
720 x 576p
HIGH DEFINITION (HDTV)
1280 x720p
1920 x1080i
VGA (PC) 640 x 480
60 Hz
SVGA
800 x 600
60 Hz
XGA
1024 x 768
60 Hz
1280 x1024
60 Hz
HDMI/PC-D
PC-VGA/CVI-2
/PC-D
HDMI/PC-D
PC-VGA/CVI-2
/PC-D
1
& Connect the digital HDMI output of your HD device
(e.g. DVD player, Set Top Box..) to the HDMI/PC-D
connector of your TV 1.
Notes:
- Proper working is only guaranteed with HDMI compliant
consumer products.
- Digital devices from different manufacturers have the
possibility of differing output standards which may cause
for the television to properly display;
- If the set is cold, there may be a small “flicker” when the
set is turned on. This is normal, there is nothing wrong with
the set.
é Press the AV key on the remote control repeatedly
until HDMI/PC-D is selected.
“ Press the X key on the remote control repeatedly to
select HDMI Audio.
Computer or device with DVI connector to the HDMI connector of the TV
& In case a HD-DVI device (connected with a DVI to
HDMI/PC-D
PC-VGA/CVI-2
/PC-D
HDMI/PC-D
PC-VGA/CVI-2
/PC-D
HDMI
1
2
HDMI
DVI
10
DVI
HDMI cable) 1 is connected, also connect the audio
cable 2 (if audio is present) to the AUDIO outputs
of your HD device and the R (right) and L (left) CVI-2
inputs of the panel of the TV.
é Press the AV key on the remote control repeatedly
until HDMI/PC-D is selected.
“ Press the X key on the remote control repeatedly to
select PC-HD Audio.
2444.1 en
09-12-2005
11:50
Pagina 11
Computer with VGA connector to the PC-VGA connector of the TV
PC-VGA/CVI-2
PC-VGA/CVI-2
1
2
& Connect one end of a VGA cable 1 to the video card of the computer and the other end to the
VGA connector at the bottom of the TV.
Fix the connectors firmly with the screws on the plug.
é In case of a Multimedia computer, connect the audio cable 2 to the audio outputs of your
Multimedia computer and to the AUDIO R (right) and L (left) inputs.
“ Press the AV key on the remote control repeatedly until PC-VGA/CVI-2 is selected.
The VGA connector allows the following TV and monitor display modes:
VGA
640 x 480
60 Hz
SVGA
800 x 600
60 Hz
1024 x 768
60 Hz
XGA
1024 x 768
60 Hz
1280 x 1024 60 Hz
Note:
If possible, use the XGA1024x768@60Hz video mode to obtain the best image quality.
11
2444.1 en
09-12-2005
11:50
Pagina 12
(camcorder, video games, headphone,...)
Side connections
3
IN
2
IN
1
Camera, Game or Camcorder
& Connect your camera, game or camcorder as shown.
é Connect to VIDEO 2 and AUDIO L 3 for mono equipment. For stereo equipment also connect
AUDIO R 3.
S-VHS quality with an S-VHS camcorder is obtained by connecting the S-VHS cables with the SVIDEO input 1 and AUDIO inputs 3.
Do not connect cable 1 and 2 at the same time; This may cause picture distortion.
“ Press the AV key on the remote control.
‘ Press the cursor up/down to select REAR/SVHS.
( Press the cursor right.
Headphone
Insert the plug into the headphone socket L as shown.
The headphone impedance must be between 8 and 4000 Ohm. The headphone socket has a 3.5 mm jack.
12
2444.1 en
09-12-2005
11:50
Pagina 13
Record with your recorder
Record a TV program
You can record a TV program using your recorders tuner without affecting your TV.
& Select the channel number on your recorder.
é Set your recorder to record.
See the handbook for your recorder.
Switching channel numbers on your TV does not disturb recording !
Record a programme from MONITOR OUT
You can record a program on your recorder from the TV tuner, and from a device connected to AV or
the side connectors.
Note: you cannot record from a CVI or HDMI connected device.
& Select the programme you want to record and the correct input on your recorder.
é Set your recorder to record.
Do not switch to another TV channel, AV programme or programme from a device connected to the side while
recording. Switching to a programme from a device connected to CVI or HDMI does not disturb recording.
13
2444.1 en
09-12-2005
11:50
Pagina 14
How to search for and store TV channels
TV Menu
Picture
Sound
Features
Install π
To install your TV proceed as follows:
Language
Auto Store
Manual Store
Sort
Name
Channel Edit
& Press the MENU key on the remote control.
é Use the cursor up/down to select Install.
“ Press the cursor right to enter the Install menu.
‘ Use the cursor left/right to select your language.
Auto store
Auto Store
Channel π
TV π
o
p
œ
& Select Auto Store in the Install menu.
..........
freq
π
The autostore option label Start ? appears.
é Press the cursor right.
“ The progress of autoprogramming is displayed.
You can use the Sort menu to renumber the stored TV
channels.
Note: Channel numbers will always be written in Latin characters,
even when a language has been selected which uses other
characters.
Sorting TV channels
Install
Language
Auto Store
Manual Store
Sort π
Name
Channel Edit
14
....
10 p
11
12 π
13
& Select Sort in the Install menu and press the cursor right
é Select the TV channel you want to move using the cursor
up/down and press cursor right.
“ Select the new number and validate with the cursor left.
‘ Repeat steps é and “ for each TV channel you wish to
renumber.
( To exit the menus, press the MENU key repeatedly.
2444.1 en
09-12-2005
11:50
Pagina 15
Manual store
Install
Language
Colour System
Auto Store
Sound System
Manual Store π Search
Sort
Channel
Name
Fine tune
Channel edit
Store
Searching for and storing TV channels is done channel by
channel.You must go through every step of the Manual
Installation menu.
& Select Manual Store in the Install menu and press the
cursor right to enter.
é Select Colour system and press the cursor right.
“
‘
(
§
If Auto is selected, the respective colour system will be
automatically selected according to the transmission system.
If the reception is poor, select another colour system with the
cursor left/right.
Press the cursor down.
Select Sound system and press the cursor right. If Auto is
selected, the respective sound system will be automatically
selected according to the transmission system.
Note: if the reception is poor, select another sound system with
the cursor left/right.
Press the cursor down.
Search for a TV channel:
Press the cursor down to select Search and press the
cursor right to start searching.
Direct selection of a TV channel:
If you know the frequency, enter it directly with the digit keys 0 to
9. Ask for a list from your cable company or dealer, alternatively
consult the Table of frequencies on the inside backcover of this
handbook.
è Press the cursor down and enter the programme number
with the digit keys.
! Fine tune:
In case of poor reception, you can improve the reception by
adjusting the frequency with the cursor left/right.
ç To store your TV channel, select Store and press the cursor
right. Repeat steps é to ! to store another TV channel.
0 To exit from the menu press the MENU key on the remote
control repeatedly.
15
2444.1 en
09-12-2005
11:50
Pagina 16
Give name
Install
Language
Auto Store
Manual Store
Sort
Name π
Channel Edit
10
11
.........
It is possible to change the name stored in the memory or to
assign a name to a TV channel or external for which a name has
not yet been entered. A name with up to 5 letters or numbers
can be given to the programme numbers 0 to 99.
Note : It is not possible to rename the VGA source.
& Select Name in the Install menu and press the cursor right.
é Select the programme number.
“ Press the cursor right.
‘ Select the following character with the cursor up/down.
( Select the following position with the cursor right.
§ Select the following character.
è Press the cursor left repeatedly when finished.
! Select another programme number and repeat steps é to
è.
ç Press the MENU key to return to the TV menu. Press again
to exit the TV menu.
Note: space, numbers and other characters are located between
Z and A.
Editing of channels
Install
Language
Channel
Auto Store
Skipped
Manual Store
Sort
Name
Channel Edit π
This feature allows you to edit or skip channels from the
channel list which have bad of weak signals or channels which
you do not watch often.
Note: Once a channel is skipped, you cannot select it with the -P+
key; you can only access the channel with the digit keys.
& Select Channel edit in the Install menu;
é Press the cursor right to enter the channel list.
“ Select the channel you want to skip with the cursor
left/right.
‘ Press the cursor down to select Skipped On or Off.
( Press the cursor up/down to select another channel and
repeat step ‘.
§ Press the MENU key to return to the Install menu.
16
2444.1 en
09-12-2005
11:50
Pagina 17
Features menu
This menu lets you use the TV set as an alarm.
Timer
& Press the MENU key.
é With the cursor, select Features, then Timer.
TV Menu
Picture
Sound
Features π
Install
Features
Timer π
Child Lock
Contrast+
NR
PIP
“ Sleep (only available on certain versions): to select an
Brightness
Colour
Contrast
Sharpness
Colour Temp
(Sleep)
Time
Start Time
Stop Time
Channel
Activate
Display
automatic standby period.
‘ Time: enter the current time.
( Start Time: enter the start time.
§ Stop Time: enter the standby time.
è Channel: enter the number of the channel for the wake-up
alarm.
! Activate: the settings include:
• Once for a single alarm;
• Daily for each day,
• Off to cancel.
ç Display: press the cursor right to select On or Off,
according to if you want to display the current time on the
TV screen or not.
0 Press the B key on the remote control to put the TV set
in standby. It will automatically come on at the time
programmed. If you leave the TV set on, it will just change
programmes at the time entered (and will go to standby
mode at the Stop Time).
Note: By combining the Child lock and Timer functions, you can
restrict the period during which the TV set is used, for example by
your children.
PIP (Picture in Picture)
PIP Combinations
MAIN
PIP
TV/AV/VGA/SIDE
TV/AV/VGA/SIDE
HD DVI / HDMI
PC-D
HD DVI / HDMI
PC-D
TV/AV/VGA/SIDE
TV/AV/VGA/SIDE
&
é
“
‘
The Picture In Picture feature allows you to call up a
subscreen within your main screen enabling you to watch a
TV channel, a picture from a device connected to the VGA,
AV or SIDE connectors and a picture from a device
connected to HDMI/PC-D (e.g. Digital High Definition
device), at the same time.
Press the MENU key.
With the cursor, select Features, then PIP.
Press the cursor right to select the available PIP sizes: Off,
Small, Medium, Large or Side-by-side.
When having selected a size, and a device is connected to
HDMI/PC-D and switched on, the PIP window automatically
appears. Press the P- or P+ key or the digit keys to select
the TV/AV/VGA or SIDE pictures or to display the
HDMI/PC-D device window in the main screen.
Select Horizontal or Vertical to move the PIP window to
another corner of the main screen.
Note : you can also access the PIP window directly via the æ key
on the remote control.
- Press the æ key to display the PIP window;
- Press the æ key repeatedly to toggle through the various PIP
window sizes and select your desired size;
- Use the cursor left/right to move your PIP window horizontally or
vertically;
- Use the P-/+ key to change the programme on the PIP screen.
17
2444.1 en
09-12-2005
11:50
Pagina 18
Child lock
TV Menu
Picture
Sound
Features π
Install
Features
Timer
Child Lock
Contrast+
NR
Colour Temp
Timer Lock Channel
Child Lock π Change Code
Contrast+ Clear All
NR Lock All
PIP
Important: you have forgotten
your Access code
Remember that 0,7,1,1 is the
default Child lock code. If your
access code has been changed by
someone other than you (a child,
for example) or you have
forgotten the code, you can
always get in by inputting the
default code.
The Child lock feature receives and processes data sent by
broadcasters or other programme providers that contain
programme content advisories.When programmed by the
viewer, the TV can respond to the content advisories and block
program content that may be found objectionable.
Child lock allows parents to block out or “censor” any channels
they think children should not watch. A channel blocked cannot
be viewed until a correct access code is used to unlock the
channel for viewing.
& Press the MENU key.
é With the cursor, select Features, then Child lock.
“ Press the cursor right to enter the Child lock menu.
‘ You are asked to enter your Access Code.
• Press 0, 7, 1, 1 on the remote control.
Incorrect will appear on the screen.
• Press 0, 7, 1, 1 on the remote control again. New Code
will appear on the screen.
• Enter a new 4-digit code using the number keys. Confirm
Code will appear on the screen.
• Enter your new 4-digit code again. Confirmed will flash on
the screen briefly and the highlight bar goes back to Block
Channel.
Child lock features
Lock Channel
Select the TV channel you want to block. Press the cursor
right to lock the channel.
Repeat for any channels you want to lock from viewing.
Change Code
To change your lock Access Code. Enter your current
access code or the overriding code 0,7,1,1 and enter a new
personal access code.The previous code is erased and the
new code is stored.
Clear All
To unlock all locked programmes.
Lock All
To lock all channels and programming at once. In the OFF
mode, you go back to the individual locked channels.
18
2444.1 en
09-12-2005
Teletext
11:50
Pagina 19
Only English teletext supported
Teletext is an information system broadcast by certain channels which can be consulted like a
newspaper. It also offers access to subtitles for viewers with hearing problems or who are not familiar
with the transmission language (cable networks, satellite channels, etc.).
Press:
You will obtain:
b
Teletext
on/off
This is used to call teletext, and then exit.
The summary appears with a list of items that can be
accessed. Each item has a corresponding 3 digit page
number.
If the channel selected does not broadcast teletext, the indication
100 will be displayed and the screen will remain blank (in this
case, exit teletext and select another channel).
0/9
-P+
Selecting
a page
Enter the number of the page required using the 0 to 9
or -P+ keys. Example: page 120, enter 1 2 0.
The number is displayed top left, the counter turns and
then the page is displayed. Repeat this operation to view
another page.
If the counter continues to search, this means that the page is not
transmitted. Select another number.
OOOO
Direct
access to
the items
Coloured areas are displayed at the bottom of the screen.
The 4 coloured keys are used to access the items or
corresponding pages.
The coloured areas flash when the item or the page is not yet
available.
i
Contents
This returns you to the contents page (usually page 100).
Enlarge
a page
This allows you to display the top or bottom part of the
page and then return to normal size.
g
Stop subpage
acquisition
Certain pages contain subpages which are automatically
displayed successively.This key is used to stop or resume
subpage acquisition.The indication _ appears top left.
:
Double page
teletext
cursor
oœ
X
To activate or deactivate the double page teletext display
mode.The active page is displayed on the left and the
following page is displayed on the right. Press g if you
want to hold a page (i.e. the contents page).The active page
is then displayed on the right.To return to normal mode,
press X.
19
2444.1 en
09-12-2005
11:50
Pagina 20
Using in PC monitor mode
Your TV can be used as a computer monitor.
You must first of all connect the computer, adjust the resolution and refresh rate (see p. 10).
Notes:
- When using the TV as a PC monitor, slight diagonal interference lines may be observed when it is operated under
electromagnetic interference environment but will not affect the performance of this product.
- For better performance, a good quality HDMI/DVI/VGA cable with good noise isolation filter is recommended.
Choosing PC-VGA mode
& Press the AV key on the remote control to display the Source list.
é Use the keys oœ to select PC-VGA and then press π to switch the TV to PC-VGA mode.
“ To return to TV mode, repeat steps & and é, but select TV instead.
Choosing PC-D mode
& Press the AV key on the remote control to display the Source list.
é Use the keys oœ to select PC-D and then press π to switch the TV to PC-D mode.
“ To return to TV mode, repeat steps & and é, but select TV instead.
Using the PC menus
Press the MENU key to access the specific settings of the PC
monitor mode. Use the cursor keys to adjust them (the settings are
automatically saved).
PC menu
Picture π
Audio Selection
Features
Reset to Factory
Features
Phase
Clock
Format
PIP
Auto Adjust
Brightness
Contrast
Horizontal
Vertical
Colour Temp
Picture
• Brightness/Contrast: to adjust the brightness and contrast.
• Horizontal/Vertical*: to adjust the horizontal and vertical
placing of the image.
• Colour Temp: to adjust the colours (cool, normal or warm).
Audio selection
To choose the sound reproduced on the TV (PC/HD or TV).
Note:
- You must choose TV mode before going to PC/HD mode.
- To listen to the sound from a HD device in PC mode, take
care you also connected the audio cables to the HD device.
Features
• Phase/Clock*: eliminates the horizontal (Phase) and vertical
(Clock) interfering lines.
• Format: to choose between large screen (Fullscreen) or the
original (Native) format of the PC screens.
• PIP: change the Size and Position of the PIP window on the
screen when the æ key is used.
• Auto adjust*: position is set automatically.
Reset to Factory
To return to the factory settings.
* These adjustments are not available in PC-D mode.
20
2444.1 en
09-12-2005
11:50
Pagina 21
Using in HD (High Definition) mode
The HD (High Definition) mode allows you to enjoy clearer and sharper pictures through the CVI-1,
CVI-2 or HDMI input if you are using a HD receiver/equipment that can transmit high definition
programming.
You must first of all connect your HD equipment (see p. 7).
Choosing HD mode
& Press the AV key on the remote control to display the Source list.
é Depending on your connections, use the keys oœ to select CVI-1 (SD/HD), CVI-2 (SD/HD) or
HDMI and then press π to switch the TV to the selected HD mode.
“ To return to TV mode, repeat steps & and é, but select TV instead.
Using the HD menus
Press the MENU key to access the specific settings of the HD menu. Use the cursor keys to adjust them
(the settings are automatically saved).
Picture/Sound menu
The HD picture/sound settings are the same as the TV picture/sound settings and function exactly the
same way as in the TV menu.
Features
• PIP: to adjust the size and position of the PIP screen.
• Horizontal shift : to adjust the horizontal placing of the image.
• Vertical shift : to adjust the vertical placing of the image.
Kensington Security Slot (if present)
Your TV is equipped with a Kensington Security Slot, to prevent it from getting stolen. An antitheft Kensington lock has to be purchased separately.
The Kensington lock is a plastic-coated steel cable with a lock. One end has to be fixed to the
opening of the TV and locked with a special key.The other end is attached to a fixed point.
® Kensington and MicroSaver are registred US trademarks of ACCO World Corporation with issued
registrations and pending applications in other countries throughout the world. All other registered and
unregistered trademarks are the property of their respective owners.
21
2444.1 en
09-12-2005
11:50
Pagina 22
Tips
Poor Picture
• Have you selected the correct TV system in the manual installation menu?
• Is your TV or house aerial located too close to loudspeakers, non-earthed audio
equipment or neon lights, etc.?
• Mountains or high buildings can cause double pictures or ghost images.
Sometimes you can improve the picture quality by changing the direction of the
aerial.
• Is the picture or teletext unrecognisable? Check if you have entered the correct
frequency. See Store TV channels, Manual store,p. 9.
• Check the HDMI connection.
No Picture
• Are the supplied cables connected properly ? (The aerial cable to the TV, the
other aerial to your recorder, the VGA cables to the display, the power cables.)
• Has the child lock been switched off ?
• Is your PC switched on ?
• Do you see a black screen and the indicator in front of the TV lights up green,
this means that the display mode is not supported.
Switch your VGA- or HDMI-source to a correct mode.
• In case of weak or bad signal, consult your dealer.
No picture and
• Your TV has a protective mode in case there is too much heat build-up.
power switched on
Check the clearance around the vents of the device to be certain there are no
blocking walls or cabinets which would limit the air flow.
Digital distortion
The low quality of some digital picture material may be the cause of digital image
distortion. In this case select the Soft setting using the Smart picture key a on
the remote control.
No sound
• No sound on any channel? Check the volume isn’t at minimum.
• Is the sound interrupted with the mute key ¬?
• When no TV signal is detected, the TV automatically switches off the sound.
This is proper operation and does not indicate a malfunction.
No solution found Switch your TV off and then on again once. Never attempt to repair a defective
for your picture or TV yourself. Check with your dealer or call a TV technician.
sound problem ?
Menu
Have you selected the wrong menu? Press the MENU key again to exit from the
menu.
Remote control
• Check if the remote control is in the correct mode.
• If your TV no longer responds to the remote control, the batteries may be dead.
• You can still use the MENU key and the -/+ keys on the right side of your TV.
Standby
Your TV consumes energy in the standby mode. Energy consumption contributes
to air and water pollution. Power consumption: 2 W.
Control of
accessory devices
• The infrared signals of the screen may influence the reception sensibility of
other peripherals.
Solution: replace the batteries of the remote control of other devices.
E.g. keep away a wireless headphone from within a radius of 1 m.
Miscellaneous
.
.
.
.
.
.
22
Ambient temperature: + 5~ + 40°C
Mains: 50/60 Hz Auto Voltage ranging from 198 V to 264 V
Power consumption: around 160 W
Standby consumption: < 2 W
Weight (excl. packaging): 42 kg
Dimensions (wxhxd): 1240x680x104
2444.1 en
09-12-2005
11:50
Pagina 23
23
2444.1 en
24
09-12-2005
11:50
Pagina 24
cover 2444.1
09-12-2005
11:25
Pagina 3
cover 2444.1
09-12-2005
11:25
Pagina 4
Specifications are subject to change without notice
Trademarks are the property of Koninklijke Philips Electronics N.V. or their respective owners
2005 © Koninklijke Philips Electronics N.V. All rights reserved
www.philips.com
Printed in Belgium