1
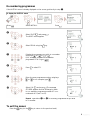
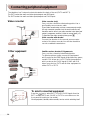
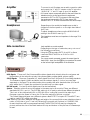
Introduction
Thank you for purchasing this television set.
This handbook has been designed to help you install and operate your TV set.
We would strongly advise you read it thoroughly.
We hope our technology meets entirely with your satisfaction.
Table of contents
Installation
Installing the television set . . . . . . . . . . . . . . . . . . . . . . . . . . . . . . . . . . . . . . . .2
Tuning in the TV channels . . . . . . . . . . . . . . . . . . . . . . . . . . . . . . . . . . . . . . . . .4
• Selecting the menu language and the country . . . . . . . . . . . . . . . . . . . . . . . .4
• Automatic store . . . . . . . . . . . . . . . . . . . . . . . . . . . . . . . . . . . . . . . . . . . . . . .4
• Re-numbering programmes . . . . . . . . . . . . . . . . . . . . . . . . . . . . . . . . . . . . . .5
• To exit the menus . . . . . . . . . . . . . . . . . . . . . . . . . . . . . . . . . . . . . . . . . . . . . .5
• Manual store . . . . . . . . . . . . . . . . . . . . . . . . . . . . . . . . . . . . . . . . . . . . . . . . . .6
• Naming programmes . . . . . . . . . . . . . . . . . . . . . . . . . . . . . . . . . . . . . . . . . . . .6
Operation
The keys on the TV set . . . . . . . . . . . . . . . . . . . . . . . . . . . . . . . . . . . . . . . . . . .2
The remote control keys . . . . . . . . . . . . . . . . . . . . . . . . . . . . . . . . . . . . . . . . . .3
• Displaying the programme number . . . . . . . . . . . . . . . . . . . . . . . . . . . . . . . .3
• Adjusting the current picture and sound settings . . . . . . . . . . . . . . . . . . . . .3
• 16:9 format . . . . . . . . . . . . . . . . . . . . . . . . . . . . . . . . . . . . . . . . . . . . . . . . . . .3
• Sleeptimer . . . . . . . . . . . . . . . . . . . . . . . . . . . . . . . . . . . . . . . . . . . . . . . . . . . .3
Using other menus: picture, sound, features . . . . . . . . . . . . . . . . . . . . . . . . . . .7
• Storing adjustments . . . . . . . . . . . . . . . . . . . . . . . . . . . . . . . . . . . . . . . . . . . .7
• Lock . . . . . . . . . . . . . . . . . . . . . . . . . . . . . . . . . . . . . . . . . . . . . . . . . . . . . . . . .7
• Timer menu . . . . . . . . . . . . . . . . . . . . . . . . . . . . . . . . . . . . . . . . . . . . . . . . . . .8
Video recorder key . . . . . . . . . . . . . . . . . . . . . . . . . . . . . . . . . . . . . . . . . . . . . .8
Teletext . . . . . . . . . . . . . . . . . . . . . . . . . . . . . . . . . . . . . . . . . . . . . . . . . . . . . . .9
Peripherals
• Connecting peripheral equipment . . . . . . . . . . . . . . . . . . . . . . . . . . . . . . . .10
• Video recorder . . . . . . . . . . . . . . . . . . . . . . . . . . . . . . . . . . . . . . . . . . . . . . .10
• Other equipment . . . . . . . . . . . . . . . . . . . . . . . . . . . . . . . . . . . . . . . . . . . . .10
• Amplifier, headphones . . . . . . . . . . . . . . . . . . . . . . . . . . . . . . . . . . . . . . . . . .11
• Side panel connections . . . . . . . . . . . . . . . . . . . . . . . . . . . . . . . . . . . . . . . . .11
Practical information
Glossary . . . . . . . . . . . . . . . . . . . . . . . . . . . . . . . . . . . . . . . . . . . . . . . . . . . . . .11
Tips . . . . . . . . . . . . . . . . . . . . . . . . . . . . . . . . . . . . . . . . . . . . . . . . . . . . . . . . .12
1
Installing the television set
æ Positioning the television set
Place your TV on a solid, stable surface.
To avoid any dangerous situations and operating fault, do not place
anything on the TV set and leave a space of at least 5cm around the
appliance.
 Connections
• Insert the aerial plug into the M socket at the rear of the set.
• Insert the mains plug into a wall socket (220-240 V / 50 Hz).
ê Remote control
Insert the two R6-type batteries (supplied) making sure they are the
right way round.
In an effort to help protect the environment, the batteries supplied with this
television do not contain mercury or nickel cadmium. Please do not discard your
used batteries if you have access to a recycling facility (if in doubt, consult your
dealer).
® Switching on
Press the on/off key to switch on the television.
A red indicator comes on and the screen lights up.
If the television remains in standby mode, press the P
control.
The indicator flashes when you use the remote control.
on the remote
The keys on the TV set
The television set has 4 keys which are located on the front or the top
of the set depending on the model.
The VOLUME - + (- a +) keys are used to adjust sound levels.
The PROGRAM - + (- a +) keys are used to select the required
programmes.
To access the menus, simultaneously hold down the VOLUME - and
VOLUME + keys.The PROGRAM - + keys may then be used to select an
adjustment and the VOLUME - + keys to make that adjustment.
To exit from the menus, hold down the 2 VOLUME - and VOLUME + keys.
Note: when the LOCK function is activated, these keys are unavailable (refer to
FEATURES menu on page 7).
2
The remote control keys
Screen information
To display / remove the programme
number, the name (if it exists), the
time, the sound mode and the
time remaining on the timer. Hold
down for 5 seconds to
permanently display the
programme number on the screen.
Sleeptimer
To select the length of time before
the set automatically switches to
standby (from 0 to 120 minutes).
Select EXT sockets
Press several times to select
EXT1, S-VHS2, EXT2 and on
certain models EXT3 and
S-VHS3.
Video recorder
(p. 8)
Smart sound controls
To access a series of settings:
VOICE, MUSIC,THEATRE and
return to PERSONAL.
Menu
To display or exit from the menus.
Cursor
These 4 keys are used to move
within the menus.
Volume
To adjust the sound level
Mute
To disable or enable the sound.
Sound mode
To switch from STEREO to
MONO or to choose between
Dual I and Dual II for
bilingual transmissions.
For TV sets fitted with NICAM
reception, depending on the
transmission, you can switch
from NICAM STEREO to
MONO or choose between
NICAM DUAL I, NICAM DUAL II
and MONO.
When the sound mode is switched
to MONO, the indication is
displayed in blue.
Picture adjustment
To activate / deactivate the
picture adjustment controls.
Standby
To set the TV to standby mode.
To switch the TV set on again,
press P
or
.
NEX TV IEW :
refer to the separate booklet
(only available on certain models).
Numerical keys
For direct access to programmes.
For a 2 figure programme number,
the 2nd figure must be entered
before the dash disappears.
Smart picture controls
To access a series of settings:
RICH, NATURAL, SOFT and
return to PERSONAL.
Incredible Surround
To activate / deactivate the
surround sound effect. In stereo,
this gives the impression that the
speakers are further apart. In mono,
a stereo spatial effect is simulated.
Selecting TV programmes
To move up or down a
programme.The number, (the
name) and the sound mode are
displayed for a few seconds.
For some programmes equipped with
teletext, the title of the programme
appears at the bottom of the screen.
Teletext features
(p. 9)
Previous programme
To access the previously viewed
programme.
16:9 formats
To access the picture formats
EXPAND 14/9* (the picture is
enlarged) and COMPRESS 16:9
(the picture is compressed
vertically).
* only available on certain models.
For more information, refer to the
Glossary on p.11.
3
Tuning-in the TV channels
Selecting the language and the country
Press the
key.The main
menu is displayed on the screen
Press 3 times to select
INSTALL.
Press
.The INSTALL menu
appears.The LANGUAGE
option is activated.
Select your language using the
keys.The menus appear
in the language selected.
Press to select COUNTRY.
Select your country using the
keys (GB for Great
Britain).
If you wish to exit the menus, press the
(or once on the
key).
key twice
Automatic store
Carry out the above operations, then:
Ú
Select AUTO STORE.
º
Press
.The search begins.
The search operation takes a few minutes.When the search is complete, the INSTALL menu reappears
automatically. If the transmitter or the cable network emits the automatic sort signal, the programmes
are correctly numbered. If this is not the case, the programmes found are numbered in descending
order from number 99, 98, 97, etc. Use the SORT menu to re-number the programmes.
Certains broadcasters or cable networks transmit their own sorting parameters (region, language, etc).Where
this is the case, indicate your choice using the
keys and confirm with .
To exit or interrupt the search, press the
key. If no picture is found,refer to the chapter entitled Tips on p. 12.
4
Re-numbering programmes
If the INSTALL menu is already displayed on the screen, go directly to step
æ.
To display the INSTALL menu
Press
.
Select INSTALL.
Press
Select SORT ( ) and press
The SORT menu appears.
Select FROM using the
.
.
key.
Display the programme you wish to re-number
using keys
to
(or
P ).
If, for example, you want to re-number
programme 97 as 5: type
.
Press
to select TO.
Enter the new programme number using keys
to . In our example, type .
Select OK ( ) and press
.The message
STORED appears and the exchange is made.
In our example, programme number 97 is renumbered as 5 (and 5 as 97).
Repeat operations  to Ú for as many programmes as you wish
to re-number.
To exit the menus:
Press the
key (or the
key to return to the previous level).
5
Manual store
This menu allows you to store each programme manually.
If the INSTALL menu is already displayed on the screen, go directly to step æ.
To display the INSTALL menu
Press
.
Select INSTALL.
Press
.
æ Select MANUAL STORE ( ) and press
.
The MANUAL STORE menu appears.
 Select SYSTEM ( ). Use
to select AUTO
(automatic reception*) or standard reception with,
according to the model:W. EUR (standard BG),E.EUR
(standard DK), UK (standard I) or FRANCE (standard LL’).
* For transmissions from France (standard LL’), select the
FRANCE option but not the AUTO option.
ê Select SEARCH and press .The search begins.
As soon as a programme is found, the search will stop. If
you know the frequency of the programme required,
enter its number directly using the
keys and go to
chapter †.
If no programme is found,refer to the Tips chapter on page 12).
® If reception is un-satisfactory, select FINE TUNE and hold
down key
or
.
† Select PROG. NO (programme number) and use the
or
to
keys to enter the desired number.
º Select STORE and press .The message STORED
appears.The programme is stored.
Repeat steps ê to Ú for each programme to be stored.
To exit: press the
key.
Naming programmes
If you wish, you can name the first 30 programmes
(0 to 29).
æ Select the programme you wish to name.
 In the MANUAL STORE menu, select NAME and press .
• Use the
keys to move around in the area which
displays the name (5 characters).
• Use the
keys to select the characters.
• Press
once the name is entered.
ê Select STORE ( ) and press .The name is stored.
® Press and repeat the operation for each programme
you wish to name.
To exit: Press the
key.
6
Using other menus
To display a menu
Press
.
Select the PICTURE, SOUND or
FEATURES.
Use the
keys to select an adjustment and
The
key is used to exit from the menu displayed.
Press
.The menu appears.
to make that adjustment.
Picture menu
You can adjust BRIGHTNESS, COLOUR, CONTRAST,
SHARPNESS and COLOUR TEMP
• SHARPNESS: modifies the clarity of the picture,
• COLOUR TEMP (colour temperature): adjusts the colour
temperature of the picture.Three options are available here:
COOL (blue white), NORMAL (balanced) or WARM (red white).
Sound menu
You can adjust TREBLE, BASS, BALANCE,AVL and
HEADPHONE.
• AVL (automatic volume leveller): used for automatic level control
in order to avoid sudden increases in volume (particularly when
changing channels or during advertisements).
• HEADPHONES: this menu is used to access the separate headphone
VOLUME control, the BALANCE and the SOUND MODE (you can
choose between DUAL I and DUAL II for bilingual transmission).
Storing adjustments automatically
Adjustments made in the PICTURE and SOUND menus and
to volume are stored automatically.
Values are stored under PERSONAL in the picture and sound
smart controls (
and
keys).
Features menu
You can adjust:
• TIMER (see next page),
• LOCK: Set to ON to lock the television keys. Switch off the
TV and hide the remote control.The TV cannot now be used
(only the remote control will enable you to switch the TV on).
To cancel: reset the LOCK to OFF.
• NR (Noise Reduction): Useful in case of poor reception to
reduce picture noise (snowy picture).
7
Timer menu
This menu allows you to use your TV as an alarm clock.
In the FEATURES menu:
æ Select TIMER ( ) and press
.The TIMER menu appears.
Use the key to select the following settings:
 TIME: enter the current time (
or
keys).
N.B.: Every time the TV is switched on, the clock is automatically updated on the
basis of the teletext information in programme No. 1. If the TV set does not feature
teletext, this update will not occur.
ê PROG. NO (programme number): enter the number of the programme.
® START TIME: enter the time at which you wish the TV to switch on.
† STOP TIME: enter the stop time (automatic stop).
Ú ACTIVATE (this setting is hidden at the bottom of the screen).
Use
to activate the programming ONCE or DAIL for every dayY.
The STOP position is used to cancel the timer.
º Press to set the TV to standby. It will automatically switch on at the time
programmed. If you leave the TV switched on, it will only change programme
at the time indicated.
The combination of the LOCK and TIMER functions may be used to limit the length
of time your television is in use, for example, by your children.The ONCE position
allows you to programme the start time or the stop time (but not the both)
Video recorder key
The
key, located on the side of the remote control
is used for the main functions of the video recorder.
Hold down the
key to access the following functions:
standby,
/
enter a programme number,
display the VCR menu*
selection*
adjustment*
P
v
s
u
q
r
;
programme selection,
record,
rewind,
stop,
play,
fast forward,
programming (on certain models),
validation.
* Some programming functions are not available on all models
(cursors, menu, OK key, etc.).
The remote control is compatible with all the video recorders in our
range as well as models which use the RC5 signalling standard.
OK
8
Teletext
Teletext is an information system, broadcast by certain TV channels, which can be consulted much like
a newspaper. It also provides sub-titles for people with hearing difficulties or those who are unfamiliar
with the language in which a particular programme is being broadcast (cable networks, satellite
channels, etc.).
Switch teletext on / off
To call up or exit from teletext.The main index page presents a list of items
to which you have access. Each item has a corresponding 3 digit page number.
If the channel selected does not broadcast teletext, the message P100 is displayed
and the screen stays black (in this case, exit from teletext and select another channel).
Selecting a teletext page
Use keys
to
or
P
to enter the page number required. E.g.:
page 120, type
.The number is displayed in the top left-hand
corner of the screen, the page counter starts searching and then the page
is displayed. Repeat the procedure to consult another page.
If > xxx < flashes briefly or the counter continues searching, this means that
the selected page is not broadcast. If this is the case, choose another number.
Direct access to an item
Coloured zones are displayed at the bottom of the screen.The 4
coloured keys are used to access the items or their corresponding pages.
The coloured zones flash when the page or the subject is not yet available
Stop the sequence of sub-pages
Certain pages have sub-pages which follow on automatically. Press the
key to disable and enable the sequence of sub-pages.The message
I appears in the top left-hand corner of the screen.
Index
To return to the main index page (generally page 100).
Enlarging a page
Press this key to display the upper part, the lower part and then to return
to the normal page size.
Reveal
Use this key to reveal / conceal hidden information (solutions to games).
Overlaying text on the TV picture
To activate / deactivate the screen overlay.
Favourite pages
For teletext programmes 0 to 29, you can store 4 favourite pages which
you can then access via the coloured keys .
With the television in teletext mode
æ Press the key.The “L” symbol and a red rectangle is displayed at the
bottom of the screen (the 1st time, the 4 rectangles are displayed in colour).
 Enter the 1st page number required.
ê Press the green key and enter the 2nd page number.
® Repeat the operation for the yellow and the blue keys.
† To end programming, press the
key for 3 seconds.The 4
rectangles are displayed in white, the pages are stored.
Ú Press the
key to leave the favourite pages.The previous subjects
reappear at the bottom of the screen.
To use the stored pages when in teletext mode, press the
select one of the coloured keys.
key and
9
Connecting peripheral equipment
The television has 2 external sockets situated at the back of the set (EXT1 and EXT2).
The EXT1 socket has audio and video inputs/outputs and RGB inputs.
The EXT2 socket has audio and video inputs/outputs and S-VHS inputs.
Video recorder
Video recorder (only)
Carry out the connections featured opposite. Use a
good quality euroconnector cable.
If your video recorder does not have a euroconnector socket,
the only connection possible is via the aerial cable.You will
therefore need to tune in your video recorder's test signal and
assign it programme number 0 (refer to manual store, p. 5).
To reproduce the video recorder picture, press .
Video recorder with decoder
Connect the decoder to the second euroconnector
socket of the video recorder.You will then be able to
record scrambled transmissions.
Other equipment
Satellite receiver, decoder, CDV, games, etc.
Carry out the connections featured opposite.
To optimise picture quality, connect the equipment
which produces the RGB signals (digital decoder, games,
certain CDV drives, etc.) to EXT1, and the equipment
which produces the S-VHS signals (S-VHS and Hi-8
video recorders) to EXT2 and all other equipment to
either EXT1 or EXT2.
To select connected equipment
Press the
key to select EXT1, S-VHS2 (S-VHS signals from the
EXT2 socket), EXT2 and S-VHS3 or EXT3 for connections on the
front panel (according to the model),
Most equipment (decoder, video recorder) carries out the switching itself.
10
Amplifier
To connect to a hi-fi system, use an audio connection cable
and connect the “L” and “R” outputs on the TV set to the
“AUDIO IN” “L” and “R” input on your hi-fi amplifier.
N.B.: sound output corresponds either to the sound from the
television tuner or to the sound from the equipment
connected to EXT1 or EXT3, but never to the sound from
the equipment connected to EXT2. If you have a VCR,
connect it to EXT1 in order to benefit from the sound output.
Headphones
Depending on the model, the headphones socket is
situated on the front panel or on the right-hand side of
the TV set.
To adjust headphone volume, use the HEADPHONE
setting in the SOUND menu (p. 7).
The headphone must have an impedance in the range 32 to
600 ohms.
Side connections
(only available on certain models)
Depending on the type of camcorder, carry out one of
the following connections.
Using the
key, select EXT3 for a VHS or 8mm
camcorder and S-VHS3 for an S-VHS or Hi-8
camcorder.
For a mono sound camcorder, connect the sound signal to
the AUDIO L. input. Use the
key to reproduce the sound
on the left and right loudspeakers of the television.
Glossary
RGB Signals: These are 3 Red, Green and Blue video signals which directly drive the red, green and
blue emitters in the cathode ray tube. Using these signals provides better picture quality.
S-VHS Signals: These are 2 separate Y/C video signals from the S-VHS and Hi-8 recording standards.
The luminance signals Y (black and white) and chrominance signals C (colour) are recorded
separately on the tape.This provides better picture quality than with standard video (VHS and 8
mm) where the Y/C signals are combined to provide only one video signal.
NICAM sound: Process by which digital sound can be transmitted.
System: Television pictures are not broadcast in the same way in all countries.There are different
standards: BG, DK, I, and L L’.The SYSTEM setting (p. 4) is used to select these different standards.
This is not to be confused with PAL or SECAM colour coding. Pal is used in the majority of
European countries, Secam in France, the CIS and the majority of African countries.
The United States and Japan use a different system called NTSC.The inputs EXT1 and EXT2 are
used to read NTSC coded recordings.
16:9: Refers to the ration between the length and height of the screen.Wide screen televisions have a
ration of 16/9, that of your TV set is 4/3.Warning: if you watch a 4/3 picture in COMPRES. 16:9
format, the picture will be compressed vertically.The EXTENS. 14:9 format, by enlarging the
picture, reduces the size of the black bands at the top and bottom of the pictures in cinemascope
format.
11
Tips
Poor reception
The proximity of mountains or high
buildings may be responsible for
ghost pictures, echoing or shadows.
In this case, try manually adjusting
your picture: see "fine tuning" (p.6) or
modify the orientation of the outside
aerial. Does your antenna enable you
to receive broadcasts in this
frequency range (UHF or VHF band)?
In the event of difficult reception
(snowy picture) switch the
NOISE.REDUCT on the FEATURES
menu to ON. (p. 7).
No picture
Have you connected the aerial socket
properly? Have you chosen the right
system? (p. 6) Is the contrast or the
brightness baddly adjusted ? Press
and readjust the PICTURE
menu. Poorly connected
euroconnector cables or aerial
sockets are often the cause of picture
or sound problems (sometimes the
connectors can become half
disconnected if the TV set is moved
or turned). Check all connections.
Picture adjustment
If the picture is not adjusted properly
or if you have trouble obtaining a
clear picture, select one of the smart
control presets
(p. 3), go into
the PICTURE menu and modify one
of the settings.The setting is stored
automatically.The picture is too blue
or too red! Adjust the COLOUR
TEMP (p. 7).
Peripheral equipment gives a black
and white picture
You have not selected the right
ß
12
socket with the
key: S-VHS2(or
S-VHS3) instead of EXT2 (or EXT3).
To play a video cassette, check that it
has been recorded under the same
standard (PAL, SECAM, NTSC) which
can be replayed by the video recorder.
No sound
If on certain channels you receive a
picture but no sound, this means that
you do not have the correct TV system.
Modify the SYSTEM setting (p. 6).
Remote control
The TV set does not react to the
remote control; the indicator on the
set no longer flashes when you use
the remote control? Replace the
batteries.
Standby
When you switch the TV set on it
remains in standby mode and the
indication LOCKED is displayed
when you use the keys on the TV set?
The LOCK function is switched on
(see p. 7).
If the set receives no signal for 15
mins, it automatically goes into
standby mode.
The set consumes energy when it is
switched on.To save electricity, we
recommend that you switch the TV
set off using the ON/OFF key.
Miscellaneous
The menus appear in a foreign
language? Select the LANGUAGE
option in the INSTALL menu (p. 4).
Still no results?
If your TV set breaks down, never
attempt to repair it yourself: contact
your dealer's after-sales service.
Recycling directive
Your TV set uses materials which are reusable or which can be recycled.
To minimise the amount of waste in the environment, specialist
companies recover used sets for dismantling and collection of reusable
materials (consult your dealer).