1
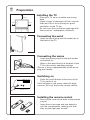
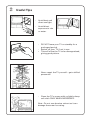
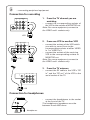
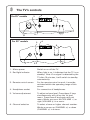
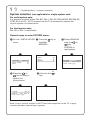
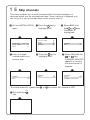
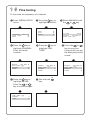
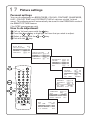
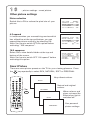
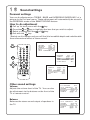
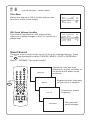
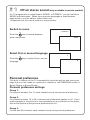
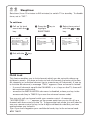
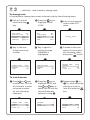
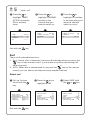
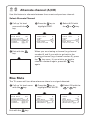
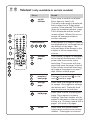
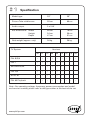
Colour Television
25"/29"
Instructions for use
25PT4223
25PT4273
25PT4823
25PT4873
29PT4273
29PT4823
29PT4873
3139 125 27243
2
Preparation
Installing the TV
4
10 cm
4
5 cm
5 cm
4
Place your TV set on a stable and strong
base.
Leave at least a free space of 5 cm on both
sides and 10 cm from the top for good
ventilation of the TV set.
Do not cover the ventilation openings with
items such as newspapers, cloths etc.
Connecting the aerial
4
Insert the aerial plug into the socket g at
the back of the TV.
Connecting the mains
4
Insert the mains plug into the wall socket
and switch on.
Refer to the specification at the back of the
TV for the correct operating voltage.
(Picture is only a representation of the actual
plug and socket)
Switching on
4
3
n
Press the on/off button at the front of the
TV to switch it on.
If the indicator is red, press either the digit,
channel, AV or B key on the remote control.
Installing the remote control
4
4
Remove the cover at the back of the remote
control.
Insert the correct type and size batteries
into the compartment, making sure that
they are the right way around.
3
Useful Tips
4
Avoid heat and
direct sunlight.
4
Avoid direct
exposure to rain
or water.
4
4
5
DO NOT leave your TV on standby for a
prolonged period.
Switch off your TV if not in use.
This will allow the TV to be demagnetised,
giving good picture.
4
Never repair the TV yourself – get a skilled
personnel!
4
Clean the TV’s screen with a slightly damp
soft cloth ONLY WHEN NECESSARY.
Note : Do not use abrasive solvent as it can
damage the screen’s coating.
4
Connecting peripheral equipment
Equipment such as VCR, Laser disc player, VCD etc. could be connected to
the video and audio (AV) sockets at the back of the TV. Switch off the TV and
equipment before making any connection.
Connection for playback
1.
VIDEO 2
in
VIDEO 1 MONITOR
in
out
VIDEO
L
AUDIO
R
S-VIDEO
VCR
VCR
OR
OR
VCD
Laser disc
player
2.
VIDEO 2
in
VIDEO
L
AUDIO
R
S-VIDEO
VCR
VIDEO 2
in
3.
VIDEO 1 MONITOR
in
out
VIDEO
L
AUDIO
R
S-VIDEO
VCR
Connect to S-Video socket
If you have a S-Video equipment, connect
to the S-Video socket for better picture
quality.
4 connect the corresponding socket of
the equipment to that of the TV.
5 to view the playback, select the Y/C
channel.
Note: If both the S-Video socket and the
Video socket of VIDEO 2 are connected,
S-Video input override the Video input.
VIDEO 1 MONITOR
in
out
75 Ω
g
Connect to AV sockets
You may choose to connect up VIDEO 1 in
or VIDEO 2 in or both.
4 connect the corresponding sockets of
the equipment to that of the TV.
5 to view the playback, select the first
AV channel (if connection is made to
sockets at VIDEO 1 in) or the second
AV channel (if connection is made to
sockets at VIDEO 2 in).
Note: For mono equipment, connect to
the VIDEO and L sockets only.
Connect to aerial socket
(only for VCR)
The playback on your VCR is considered a
TV channel by your TV if you connect via
the aerial socket. You must tune in to
your VCR’s test signal and assign the
channel number 0 to it. Refer to your
VCR’s instruction manual for more
details.
4 connect the RF cable to the VCR’s “RF
in” and connect the “RF out” of the VCR
to the aerial socket of the TV.
4 select channel 0 and tune in to to your
VCR’s signal.
5 to view the playback, select channel 0.
5
…connecting peripheral equipment
Connection for recording
VIDEO 2
in
1.
VIDEO 1 MONITOR
in
out
VIDEO
From the TV channel you are
watching
4
connect the corresponding sockets of
the VCR to the sockets at MONITOR out.
Note: For mono equipment, connect to
the VIDEO and L sockets only.
L
AUDIO
R
S-VIDEO
VCR
VIDEO 2
in
2.
VIDEO 1 MONITOR
in
out
From one VCR to another VCR
4
connect the sockets of the VCR which
you wish to record from to the
corresponding sockets at either VIDEO
in 1 or VIDEO in 2.
4 connect the sockets of the receiving
VCR to the corresponding sockets at
MONITOR out.
Note: For mono equipment, connect to
the VIDEO and L sockets only.
VIDEO
L
AUDIO
R
S-VIDEO
VCR 1
VCR 2
3.
4
VIDEO 2
in
75 Ω
g
VIDEO 1 MONITOR
in
out
VIDEO
From the TV antenna
connect the RF cable to the VCR’s “RF
in” and the “RF out” of the VCR to the
aerial socket of the TV.
L
AUDIO
R
S-VIDEO
VCR
Connection for headphones
4
connect the headphones to the socket
at the front of the TV.
The headphones impedance must be
between 8 and 4000 ohms.
n
Headphones
6
The TV’s controls
For 25” models
4
3
5
4
3
˝
˙
˚
¸
L VOLUME K
¸ CHANNEL˚
n
6
2
1
For 29” models
4
3
5
3
˝
˙
L VOLUME K
˚
¸
¸ CHANNEL˚
n
1
2
6
1. Mains power
Switch on or off the TV.
2. Red light indicator
When light is on, it indicates that the TV is on
standby. Note :If no signal is detected by the
TV after 10 minutes, it will switch to standby
automatically.
3. Remote control sensor
For the remote control to work, it must be
activated within the operating range of this
sensor.
4. Headphone socket
For connection of headphones.
5. Volume adjustment
To adjust volume level. Press these 2 keys
simultaneously will call up the 1st level
menu. Press these 2 keys again will exit
menu. Works as cursor left (VOLUME L) or
right (VOLUME K) in a menu.
6. Channel selection
To select a lower or higher channel number.
Works as cursor up (CHANNEL 6) or down
(CHANNEL 7) in a menu.
7
Using the remote control
For the remote control to work effectively, it has to be operated within the
recommended operating range to the remote control sensor on the TV.
45°
45°
10 m
2
AV
OSD
1
2
4
5
7
8
SLEEP
3
6
9
SMART
SMART
0
±
`
INC.
SURR.
MENU
A
b
CH
H
h
SURF A/CH
4
f
e
Result :
Press :
2
Standby
Switch off TV and a red indicator
lights up. To switch on TV again,
press
either the 0 to 9 ,
,
,
AV
or 2 key.
CH
CH
2
AV
OSD
SLEEP
1
2
3
4
5
6
7
8
9
SMART
AV channel
selection
Select the AV channels .
OSD
Screen
information
In TV mode : Switch on/off
information of a particular
channel.
In a menu : Exit menu.
SLEEP
Sleeptimer
Sets timer (from 15 minutes to
240 minutes) to switch TV to
standby. To disable timer, set to
“OFF”.
Digit
Key in numerals e.g. confidential
code in child lock and in channel
selection. For a 2-digit channel,
the second numeral must be
entered before the dash disappears.
Smart
Picture/
Smart
Sound
Select the presets for sound and
picture.
SMART
0
±
`
INC.
SURR.
MENU
A
b
AV
CH
H
h
SURF A/CH
4
f
e
0
to
9
SMART
`
SMART
±
8
…using the remote control
Press :
MENU
INC.
SURR.
2
AV
OSD
SLEEP
1
2
3
4
5
6
8
7
¬
9
SMART
SMART
0
±
`
A
CH
H
Menu
Call up the main menu. If there is
an existing menu, pressing this
key will bring you back to the
previous level menu. If you are in
the 1st level menu, pressing this
will exit the menu.
Incredible
Surround
Switch on to enhance stereo
sound from your TV.
Mute
Switch off the sound of the TV.
Press again to switch on the
sound.
Channel
selection
Select a higher or lower channel
number .
Volume
adjustment
Adjust the volume of the TV set.
CH
INC.
SURR.
MENU
Result :
A
b
h
SURF A/CH
4
f
e
Teletext function:
b
h
SURF A/CH
f
4
e
SURF A/CH
4
f
e
Refer to the section on “Teletext”.
Note: If your current channel is
capable of transmitting teletext but
is not in teletext mode, pressing
the h key will activate the teletext
clock at the top right hand corner
of the screen.
Surf or
alternate
channel
Surf mode : Add or delete channel
from the surf list. View channel in
the surf list.
A/CH mode : Return to the previous channel.
Sound
mode
Switch from stereo to mono sound
(for stereo transmission) or choose
between first language or second
language (for bilingual transmission).
9
Menus
1st level
2nd level
SYSTEM*
SEARCH
FINE TUNE
CHANNEL
STORE
H
H
H
H
HH
H
LANGUAGE
AUTO STORE
SWAP
SKIP
MANUAL
CHANNEL
SKIP
H
H
TIME
TIMER ACTIVE
CHANNEL
AT
FROM
TO
EXCHANGE
H
CHANGE CODE
CHANNEL
LOCK
CLEAR ALL
H
H
BRIGHTNESS
COLOUR
CONTRAST
SHARPNESS
HUE*
COL TEMP
CONTRAST PLUS*
NOISE REDUCE*
4:3 EXPAND*
16:9 COMPRESS*
VOLUME
BALANCE*
TREBLE*
BASS*
INCR SURROUND*
ULTRA BASS*
AVL
SLEEPTIMER
CHILD LOCK*
CLOCK*
SURF
BLUE MUTE*
INSTALLATION
3rd level
Note* : You may not see these items on your menu because it is applicable to
certain models only.
To call up the 1st level menu :
OSD
2
AV
OSD
SLEEP
1
2
3
4
5
6
7
8
Press
MENU
key.
To use the menus:
4 Press the cursor keys.
9
SMART
SMART
0
±
MENU
4
`
INC.
SURR.
MENU
to highlight
A
CH
H
SURF
b
h
A/CH
f
4
e
go down to the next
level or to select or
to execute
To exit from a menu:
4 Press
OR
4
MENU
key to go back to the previous level.
OSD
Press
key to exit.
10
Installing the TV
In order to view the programmes broadcasted, you have to do some simple
installation on the TV. Go into the INSTALLATION menu by using the keys
on your remote control.
Follow the following steps to enter INSTALLATION menu:
& Call up 1st level
menu with the
key.
MENU
OFF
B
31
31
31
■■■■■■■■
■■■■■■■■
■■■■■■■■
“ Select INSTALLATION
with the
or
key.
➧
➧
➧
BLUE MUTE
INSTALLATION
BRIGHTNESS ❙ ❙ ❙ ❙ ❙ ❙ ❙
❙❙❙❙❙❙❙
COLOUR
CONTRAST
❙❙❙❙❙❙❙
key to
é Press the
highlight
INSTALLATION.
SURF
A/CH
BLUE MUTE
OFF
INSTALLATION
B
31
BRIGHTNESS ❙ ❙ ❙ ❙ ❙ ❙ ❙
❙❙❙❙❙❙❙
31
COLOUR
■■■■■■■■
■■■■■■■■
LANGUAGE
ENGLISH
AUTO STORE
B
SWAP
B
Selecting the menu language
The TV is pre-set to a language for display of menus and screen information.
You may change it to another available language.
OSD
& Go into INSTALLATION é Select a language
with the
menu.
or
LANGUAGE is highkey.
lighted.
LANGUAGE
ENGLISH
AUTO STORE
B
SWAP
B
➧
➧
➧
LANGUAGE
ENGLISH
AUTO STORE
B
SWAP
B
“ Exit with the
key.
11
…installing the tv – system selection
System selection (not applicable for single system sets)
For multi-system sets:
It is possible to select either PAL-BG, PAL-I, PAL-DK, SECAM-BG, SECAM-DK,
NTSC M or AUTO. AUTO means that the TV automatically selects the
current system in transmission.
For dual-system sets:
PAL-DK or PAL-I is selectable.
General steps to enter SYSTEM menu:
& Go into INSTALLATION é Press the
menu.
highlight
MANUAL.
SWAP
SKIP
MANUAL
“ Select MANUAL
with the
or
key.
SYSTEM is
highlighted.
➧
➧
➧
LANGUAGE
ENGLISH
AUTO STORE
B
SWAP
B
key to
B
B
B
SYSTEM
AUTO
SEARCH
055 MHZ B
❙
FINE TUNE
■■■■■■ ■■■■■■
OSD
‘ Press the
or
key to select a
system for
transmission.
( Exit with the
key.
➧
➧
SYSTEM
PAL-I
SEARCH
055 MHZ B
❙
FINE TUNE
■■■■■■ ■■■■■■
Note: If your current system is AUTO and the reception on the TV is poor,
re-select another transmission system.
1 2 Tuning in TV channels
There are 2 ways to tune in channels : automatically (by AUTO STORE) or
manually (by MANUAL menu).
Auto store
Use to tune in channels automatically.
& Enter INSTALLATION
menu.
é Press the
key to
highlight AUTO
STORE.
➧
➧
➧
LANGUAGE
ENGLISH
AUTO STORE
B
SWAP
B
LANGUAGE
ENGLISH
AUTO STORE
B
SWAP
B
SKIP
B
“ Select AUTO
STORE with the
or
key.
AUTO STORE
CHANNEL
055 MHZ
1
The TV will automatically search and store all available channels starting from
channel number 1.
OSD
‘ Press
key once
will bring you back
to the previous level
menu. You can
continue with other
installation.
Press
MENU
OR
➧
➧
LANGUAGE
ENGLISH
AUTO STORE
B
SWAP
B
SKIP
B
key to exit.
13
…tuning in tv channels
Manual
This menu enables you to search and store every available channel manually.
& Enter INSTALLATION
menu.
é Press the
key to
highlight MANUAL .
SWAP
SKIP
MANUAL
➧
➧
➧
LANGUAGE
ENGLISH
AUTO STORE
B
SWAP
B
“ Select MANUAL with
the
or
key.
B
B
B
SYSTEM
AUTO
SEARCH
055 MHZ B
❙
FINE TUNE
■■■■■■ ■■■■■■
( If you wish to fine
key to
‘ Press the
tune the channel,
highlight SEARCH and
scroll down to
the
key to start
highlight FINE TUNE.
searching.
Press the
or
Searching stops once
key to fine tune.
a channel is available.
key to
§ Press the
highlight CHANNEL
and assign a number
to the channel that
you found.
➧
➧
➧
SYSTEM
AUTO
SEARCH
197 MHZ B
❙
FINE TUNE
CHANNEL
2
SYSTEM
AUTO
SEARCH
197 MHZ B
❙
FINE TUNE
CHANNEL
2
STORE
B
SEARCH
197 MHZ B
FINE TUNE
❙
CHANNEL
3
STORE
B
■■■■■■ ■■■■■■
è Press the
key to
highlight STORE and
press the
or
key to store the
channel.
! Exit with the
key.
➧
➧
FINE TUNE
CHANNEL
STORE
■■■■■■■■■■■■
❙
■■■■■■■■■■■■
3
B
OSD
■■■■■■■■■■■■
14
Swap
After the tuning of TV channels, you may wish to rearrange the channel
numbers according to your preference.
& Enter INSTALLATION
menu.
key to
é Press the
hightlight SWAP.
“ Select SWAP with the
or
key.
FROM is highlighted.
➧
➧
➧
LANGUAGE
ENGLISH
AUTO STORE
B
SWAP
B
‘ Select the channel
you wish to change
from with the
or
or digit key.
LANGUAGE
ENGLISH
AUTO STORE
B
SWAP
B
SKIP
B
MANUAL
B
( Press the
key to
highlight TO.
Select the channel
you wish to change
to with the
or
or digit key.
FROM
TO
EXCHANGE
2
4
B
§ Press the
key to
highlight EXCHANGE.
Press the
or
key to confirm
change. The word
“EXCHANGED”
appears.
➧
➧
➧
5
7
FROM
TO
EXCHANGE
5
4
B
FROM
TO
EXCHANGE
5
7
B
FROM
TO
EXCHANGED
7
5
To undo the change, press the
or
key. To rearrange more channels, press
the
to highlight FROM and repeat steps ‘ to §.
OSD
è Exit with the
key.
➧
15
Skip channels
This menu enables you to skip channels which have bad reception or
channels which you do not watched often. Once a channel is skipped, you
can only call it up via the digit keys on the remote control.
& Go into INSTALLATION
menu
‘ Enter a channel
number which you
wish to skip.
AUTO STORE
SWAP
SKIP
MANUAL
B
B
B
B
( Press the
key to
highlight SKIP.
CHANNEL
SKIP
CHANNEL
SKIP
§ Select YES with the
or
key.
CHANNEL DELETED
appears to confirm
that the channel is
skipped.
5
NO
CHANNEL
5
SKIP
YES
CHANNEL DELETED
To unskip channels, repeat step ‘ to § but select NO instead of YES.
OSD
è Exit with the
key.
2
NO
➧
➧
➧
5
NO
“ Select SKIP with
the
or
key.
CHANNEL is
highlighted.
➧
➧
➧
LANGUAGE
ENGLISH
AUTO STORE
B
SWAP
B
CHANNEL
SKIP
é Press the
key to
highlight SKIP.
➧
16
Fine tuning
To fine tune the frequency of a channel.
& Enter INSTALLATION
menu.
é Press the
key to
highlight MANUAL.
‘ Press the
key to
highlight CHANNEL.
Enter a channel
number.
➧
➧
➧
LANGUAGE
ENGLISH
AUTO STORE
B
SWAP
B
SWAP
SKIP
MANUAL
B
B
B
( Press the
key to
highlight FINE
TUNE.
SEARCH
055 MHZ B
❙
FINE TUNE
CHANNEL
5
STORE
B
■■■■■■ ■■■■■■
OSD
è Press the
key to
highlight STORE.
Press the
or
key to store changes.
■■■■■■■■■■■■
➧
➧
FINE TUNE
CHANNEL
STORE
! Exit with the
key.
❙
5
B
§ Press the
or
key to start fine
tuning until you get
the best picture and
sound.
➧
■■■■■■ ■■■■■■
SYSTEM
AUTO
SEARCH
055 MHZ B
❙
FINE TUNE
■■■■■■ ■■■■■■
➧
➧
SEARCH
055 MHZ B
❙
FINE TUNE
CHANNEL
5
STORE
B
“ Select MANUAL with
the
or
key.
SEARCH
055 MHZ B
❙
FINE TUNE
CHANNEL
5
STORE
B
■■■■■■■■■■■■
17
Picture settings
Personal settings
You can do adjustment on BRIGHTNESS, COLOUR, CONTRAST, SHARPNESS,
HUE*, COLOUR TEMP and CONTRAST PLUS of a picture via the 1st level
menu. This adjustment will automatically be stored in the PERSONAL mode of
the SMART PICTURE feature.
(*for NTSC programmes only)
How to do adjustment
& Call up 1st level menu with the
key.
é Press the
or
key to highlight the item that you wish to adjust.
“ Select or adjust
with the
or
key.
OSD
‘ Exit with the
key.
MENU
BLUE MUTE
INSTALLATION
BRIGHTNESS ❙ ❙ ❙ ❙ ❙ ❙ ❙
❙❙❙❙❙❙❙
COLOUR
❙❙❙❙❙❙❙
CONTRAST
OFF
B
31
31
31
■■■■■■■■
■■■■■■■■
■■■■■■■■
INSTALLATION
BRIGHTNESS ❙ ❙ ❙ ❙ ❙ ❙
COLOUR
❙❙❙❙❙❙❙
❙❙❙❙❙❙❙
CONTRAST
SHARPNESS ❙ ❙ ❙ ❙ ❙ ❙ ❙
■■■■■■■■
■■■■■■■■
■■■■■■■■
■■■■■■■■
B
26
31
31
31
BRIGHTNESS
COLOUR
CONTRAST
SHARPNESS
HUE
OSD
❙❙❙❙❙❙
❙❙❙❙❙❙❙
❙❙❙❙❙❙❙
❙❙❙❙❙❙❙
❙
■■■■■■■■
■■■■■■■
■■■■■■■■
■■■■■■■■
■■■■■■ ■■■■■■
26
30
31
31
0
2
AV
OSD
SLEEP
1
2
3
4
5
6
7
8
9
SMART
MENU
COLOUR
CONTRAST
SHARPNESS
HUE
COL TEMP
CONTRAST
❙ ❙ ❙ ❙ ❙ ❙ ❙ ❙ ❙ ❙ 48
SHARPNESS ❙ ❙ ❙ ❙ ❙ ❙ ❙ ❙ ❙ ❙ 46
❙
0
HUE
COL TEMP
NORMAL
CONTRAST PLUS OFF
SMART
0
±
■■■■
`
■■■■
■■■■■■ ■■■■■■
INC.
SURR.
MENU
SHARPNESS ❙ ❙ ❙ ❙ ❙ ❙ ❙
31
❙ 20
HUE
COL TEMP
NORMAL
CONTRAST PLUS OFF
NOISE REDUCE
OFF
■■■■■■■■
■■■■■■■■■■■■
A
b
CH
H
h
SURF A/CH
4
f
e
HUE
❙ 20
COL TEMP
COOL
CONTRAST PLUS OFF
NOISE REDUCE
OFF
4:3 EXPAND
OFF
■■■■■■■■■■■■
❙❙❙❙❙❙❙
30
❙ ❙ ❙ ❙ ❙ ❙ ❙ ❙ ❙ ❙ 48
❙❙❙❙❙❙❙
31
❙
0
NORMAL
■■■■■■■
■■■■
■■■■■■■■
■■■■■■ ■■■■■■
18
…picture settings – smart picture
Other picture settings
Noise reduction
Switch this to ON to reduce the pixel size of your
picture.
COL TEMP
NORMAL
CONTRAST PLUS OFF
NOISE REDUCE
ON
4:3 EXPAND
OFF
16:9 COMPRESS OFF
4:3 expand
In instances when you are watching movies which
has a black bar at the top and bottom, you can
expand the picture vertically, by selecting ON.
Note: You have to switch OFF this option before
activating “16:9 compress”.
CONTRAST PLUS
NOISE REDUCE
4:3 EXPAND
16:9 COMPRESS
❙❙❙❙❙❙❙
VOLUME
■■■■■■■■
OFF
ON
ON
OFF
30
16:9 compress
Select ON to view details hidden at the top and
bottom of the screen.
Note: You have to switch OFF “4:3 expand” before
activating this option.
NOISE REDUCE
4:3 EXPAND
16:9 COMPRESS
❙❙❙❙❙❙❙
VOLUME
❙
BALANCE
■■■■■■■■
■■■■■■ ■■■■■■
ON
OFF
ON
30
0
Smart Picture
These are some picture presets on the TV for your viewing pleasure. Press
SMART
the ` key repeatedly to select RICH, NATURAL, SOFT or PERSONAL.
Very vibrant colours.
2
AV
OSD
SLEEP
1
2
3
4
5
6
7
8
9
SMART
RICH
Natural and original
colours.
SMART
0
±
`
SMART
MENU
NATURAL
`
INC.
SURR.
SOFT
A
b
CH
H
h
Warm colours and
gives a cinema like
effect when light is
switched off.
SURF A/CH
4
f
e
PERSONAL
Your personal
picture settings.
19
Sound settings
Personal settings
You can do adjustment on TREBLE , BASS and INCREDIBLE SURROUND* of a
picture via the 1st level menu. These adjustment will automatically be stored in
the PERSONAL mode of the SMART SOUND feature.
How to do adjustment
& Call up 1st level menu with the
key.
é Press the
or
key to highlight the item that you wish to adjust.
“ Select or adjust with the
or
key.
OSD
‘ Exit with the
key.
*Switch on this feature and you will feel the incredible depth and unbelievable
three-dimensional effect of stereo sound.
MENU
OSD
2
AV
OSD
SLEEP
1
2
3
4
5
6
7
8
30
0
30
30
OFF
■■■■■■■■
■■■■■■ ■■■■■■
■■■■■■■■
■■■■■■■■
9
SMART
MENU
VOLUME
❙❙❙❙❙❙❙
BALANCE
❙
❙❙❙❙❙❙❙
TREBLE
BASS
❙❙❙❙❙❙❙
INCR SURROUND
BALANCE
❙
❙❙❙❙❙❙❙❙❙❙❙❙
TREBLE
BASS
❙❙❙❙❙❙❙
INCR SURROUND
ULTRA BASS
■■■■■■ ■■■■■■
SMART
0
±
`
■■
■■■■■■■■
INC.
SURR.
MENU
A
CH
H
TREBLE
❙❙❙❙❙❙❙❙❙❙❙❙
BASS
❙❙❙❙❙❙❙❙❙
INCR SURROUND
ULTRA BASS
AVL
■■
■■■■■
b
h
0
55
30
OFF
OFF
SURF A/CH
4
f
e
55
40
ON
OFF
OFF
Other sound settings
Volume
Adjusts the volume level of the TV. You can also
do adjustment via the buttons on the front of the
TV or remote control.
4:3 EXPAND
16:9 COMPRESS
❙❙❙❙❙❙❙
VOLUME
❙
BALANCE
TREBLE
❙❙❙❙❙❙❙❙❙❙❙❙
OFF
ON
30
0
55
■■■■■■■■
■■■■■■■■ ■■■■■■■■
■■
Balance
Balances the stereo sound output of speakers in
the TV.
16:9 COMPRESS
VOLUME
❙❙❙❙❙❙❙
❙
BALANCE
❙❙❙❙❙❙❙❙❙❙❙❙
TREBLE
BASS
❙❙❙❙❙❙❙❙❙
■■■■■■■■
■■■■■■ ■■■■■■
■■
■■■■■
ON
30
0
55
40
20
…sound settings – smart sound
Ultra Bass
Switch this feature to ON to further enhance the
bass level of the sound output.
BASS
❙❙❙❙❙❙❙❙❙
INCR SURROUND
ULTRA BASS
AVL
SLEEPTIMER
40
ON
ON
OFF
OFF
INCR SURROUND
ULTRA BASS
AVL
SLEEPTIMER
CHILD LOCK
ON
ON
OFF
OFF
B
■■■■■
AVL-Auto Volume Leveller
This feature if switched on will automatically
adjust any sudden changes in the TV’s volume to a
preset level.
Smart Sound
These are some sound presets on the TV for your viewing pleasure. Press
SMART
the ± key repeatedly to select THEATRE, MUSIC, VOICE or PERSONAL*.
(Note *: “NORMAL” for certain model)
Emphasizes low and high
frequencies to give sensation to
the action and a wider sound
ambience.
2
AV
OSD
SLEEP
1
2
3
4
5
6
7
8
9
SMART
±
`
MUSIC
INC.
SURR.
MENU
A
b
Emphasizes bass frequency
so that music is dynamic.
SMART
0
±
SMART
THEATRE
CH
H
h
SURF A/CH
4
f
e
VOICE
PERSONAL
Emphasizes speech
frequency.
Your personal
sound settings.
21
Off air stereo sound (only available in certain models)
If a TV programme is transmitted in NICAM* or STEREO*, you can switch to
MONO and back again. When there are two languages in simultaneous
transmission, you are able to select either one.
(*Dependant on the sound system in transmission)
Switch to mono
STEREO*
4
Press the e key to switch between
stereo and mono.
Select first or second language
MONO
Y
4
Press the
language.
e
key to select first or second
Z
Personal preference
This built in feature of the TV automatically store the picture and sound settings that you last made to a particular channel in the PERSONAL mode of
Smart Picture or Smart Sound.
Personal preference settings
Group 1 :
For channel number 0 to 11, each channel has its own personal preference.
Group 2:
For channel number 12 to 99, one personal preference applies to all. If you
make changes to the picture or sound settings of any channel in this group,
this will be stored as the personal preference for all.
Group 3:
For the two AV channels, each channel has its own personal preference.
22
Sleeptimer
Sets timer (from 15 minutes to 240 minutes) to switch TV to standby. To disable
timer, set to “OFF”.
To set timer
& Call up 1st level
menu with the
key.
é Press the
key to
highlight
SLEEPTIMER.
MENU
OFF
B
31
31
31
ULTRA BASS
AVL
SLEEPTIMER
CHILD LOCK
CLOCK
■■■■■■■■
■■■■■■■■
■■■■■■■■
‘ Exit with the
➧
➧
➧
BLUE MUTE
INSTALLATION
BRIGHTNESS ❙ ❙ ❙ ❙ ❙ ❙ ❙
COLOUR
❙❙❙❙❙❙❙
❙❙❙❙❙❙❙
CONTRAST
“ Select time period
with the
or
key.
OFF
OFF
OFF
B
B
ULTRA BASS
AVL
SLEEPTIMER
CHILD LOCK
CLOCK
OFF
OFF
15
B
B
OSD
key.
➧
Child Lock
This feature enables you to lock channels which you do not wish others e.g.
children to watch. You have a choice to lock all channels (inclusive of the two
AV channels) or individual channel (up to a maximum of 5 channels). If one try
to lock the 6th channel, a message “FULL” appears. Once a channel is locked:
4 if you call channels up with the CHANNEL 7 or 6 keys on the TV, there will
be no picture and sound.
4 access to the INSTALLATION sub-menu is disabled, unless you key in the
access code (key in TWICE if you use the universal access code).
You can only call up channels with your remote control. A message
“ACCESS CODE –␣ –␣ –␣ –” appears on the screen each time you try to call up a
channel with the controls on the TV. To bypass the lock mode, you will need to
use your remote control to key in the 4-digit confidential code that you have
entered when you locked it.
Tips: If you have forgotten your confidential code, key in the universal code
0711 TWICE.
23
…child lock – lock channels, change code
To change code
It is possible to change the pre-set universal code by the following steps.
&Call up 1st level
menu with the
key.
MENU
OFF
B
31
31
31
■■■■■■■■
■■■■■■■■
■■■■■■■■
‘ Key in the new
4-digit code once
to enter.
OFF
OFF
B
B
A/CH
( Key in again to
confirm change.
CHANNEL is
highlighted.
XXXX
7
NO
CONFIRM CODE
CHANNEL
LOCK
ACCESS CODE
----
§ Proceed to the next
section if you wish to
lock channels, otherOSD
wise press
to exit.
➧
➧
➧
CHANGE CODE
CHANNEL
LOCK
AVL
SLEEPTIMER
CHILD LOCK
CLOCK
SURF
“ Key in the universal
access code 0711
twice.
➧
➧
➧
BLUE MUTE
INSTALLATION
BRIGHTNESS ❙ ❙ ❙ ❙ ❙ ❙ ❙
❙❙❙❙❙❙❙
COLOUR
CONTRAST
❙❙❙❙❙❙❙
é Press the
key to
highlight CHILD
LOCK.
---7
NO
CHANGE CODE
CHANNEL
LOCK
CLEAR ALL
XXXX
7
NO
B
To lock channels
& Press
or
key
to select ALL (to lock
all channels) or enter
a channel number
(to lock individual
channels).
XXXX
ALL
NO
B
CHANNEL
LOCK
CLEAR ALL
“ Repeat steps & to
é for other channels
which you wish to OSD
lock. Exit with the
key.
➧
➧
➧
CHANGE CODE
CHANNEL
LOCK
CLEAR ALL
é Press the
key to
highlight LOCK and
the
or
key to
select YES to lock the
channel/channels
selected in step &.
6
YES
B
CHANGE CODE
CHANNEL
LOCK
XXXX
3
NO
24
…child lock – unlock channels, clock
To unlock channels
& Press the
key to
highlight CHANNEL
and key in the
channel you wish to
unlock.
XXXX
3
YES
B
CHANGE CODE
CHANNEL
LOCK
CLEAR ALL
“ To unlock all channels,
press the
key to
highlight CLEAR ALL.
Press the
key to
confirm.
➧
➧
➧
CHANGE CODE
CHANNEL
LOCK
CLEAR ALL
é Press the
key to
highlight LOCK.
Press the
or
key to select NO.
XXXX
3
NO
B
CHANNEL
LOCK
CLEAR ALL
3
NO
B
Repeat steps & to “ for other channels which you wish to unlock. Exit with
OSD
the
key.
Clock
Sets timer to switch to another channel at a specified time when the TV is
switched on or on standby.
& Call up 1st level
menu with the
key.
MENU
OFF
B
31
31
31
■■■■■■■■
■■■■■■■■
■■■■■■■■
SLEEPTIMER
CHILD LOCK
CLOCK
SURF
BLUE MUTE
“ Key in the present
time with digit key.
Start with the hour
(2 digits) and then
the minutes (2 digits).
➧
➧
➧
BLUE MUTE
INSTALLATION
BRIGHTNESS ❙ ❙ ❙ ❙ ❙ ❙ ❙
❙❙❙❙❙❙❙
COLOUR
CONTRAST
❙❙❙❙❙❙❙
é Press the
key to
highlight CLOCK.
OFF
B
B
A/CH
OFF
TIME
04:-TIMER ACTIVE
OFF
CHANNEL
2
25
…clock, surf
‘ Press the
( Press the
to
highlight TIMER
ACTIVE and select
ON to activate
timer.
§ Press the
highlight CHANNEL
and key in the
channel that you
want to switch to.
to
highlight AT and key
in the time when you
want the channel
switch to occur.
➧
➧
➧
TIME
04:30
TIMER ACTIVE
ON
CHANNEL
2
AT
--:--
to
TIME
04:30
TIMER ACTIVE
ON
CHANNEL
5
AT
--:--
TIMER ACTIVE
ON
CHANNEL
5
AT
06:10
OSD
Exit with the
key.
Surf
There are 2 selectable functions:
1. Surf : Create a list of channels (maximum 8) whereby when you press the
f
key on the remote control, you are able to quickly view through all
these channels.
2. A/CH : When this is selected and if you press the f key on the remote
control, you are able to see the previously watched channel.
SURF A/CH
SURF A/CH
Select surf
& Call up 1st level
menu with the
key.
MENU
highlight SURF.
■■■■■■■■
■■■■■■■■
■■■■■■■■
key.
CHILD LOCK
CLOCK
SURF
BLUE MUTE
INSTALLATION
“ Select SURF with
the
or
key.
➧
OFF
B
31
31
31
OSD
Exit with the
key to
➧
➧
BLUE MUTE
INSTALLATION
BRIGHTNESS ❙ ❙ ❙ ❙ ❙ ❙ ❙
❙❙❙❙❙❙❙
COLOUR
CONTRAST
❙❙❙❙❙❙❙
é Press the
B
B
A/CH
OFF
B
CHILD LOCK
CLOCK
SURF
BLUE MUTE
INSTALLATION
B
B
SURF
OFF
B
26
…surf – add channels, call up channels
To add channels to a surf list
Note : To execute this feature, the channel number must be visible on the
OSD
screen. Should the channel number disappear, simply press the
key once
to call it up.
& Select a channel.
é Press the SURF key
within 4 seconds or
while the channel
number is still visible.
“ADDED“ appears
below the channel
number. This means
the channel is added
to the surf list.
“ Repeat step & to
é for other
channels which you
wish to add to the
surf list.
➧
➧
➧
5
3
ADDED
5
ADDED
To call up channels from the surf list
SURF A/CH
& Press the f key once
and the TV will switch to
the next channel on the
surf list OR
A/CH
Press and hold the f
key to cycle through all
the channels on the surf
list.
é Stop as soon as
soon as you find
the channel which
you wish to call up.
SURF
➧
➧
5
SURF
3
SURF
27
…surf – delete channels from a surf list
Deleting channels from a surf list
Note : To execute this feature, the channel number must be visible. Should
OSD
key once to call it up.
the channel number disappear, simply press the
& Press and hold the
f
key to cycle
through all the
channels in the surf
list.
SURF A/CH
é Stop as soon as
soon as you find
the channel which
you wish to delete.
7
7
SURF
SURF A/CH
‘ Press the f key
while the channel
number is still
visible. “DELETED“
appears below the
channel number.
This means the
channel is deleted
from the surf list.
( Repeat step & to
‘ for other
channels which
you wish to delete
from the surf list.
3
SURF
§ Exit with the
key.
➧
➧
➧
7
DELETED
➧
➧
➧
5
SURF
OSD
“ Press the
key to
call up the channel
number.
OSD
28
Alternate channel (A/CH)
Use this feature to alternate between the current and previous channel.
Select Alternate Channel
& Call up 1st level
menu with the
key.
MENU
OFF
B
31
31
31
■■■■■■■■
■■■■■■■■
■■■■■■■■
‘ Exit with the
key.
CHILD LOCK
CLOCK
SURF
BLUE MUTE
INSTALLATION
“ Select A/CH with
the
or
key.
➧
➧
➧
BLUE MUTE
INSTALLATION
BRIGHTNESS ❙ ❙ ❙ ❙ ❙ ❙ ❙
COLOUR
❙❙❙❙❙❙❙
❙❙❙❙❙❙❙
CONTRAST
é Press the
key to
highlight SURF.
B
B
SURF
OFF
B
CHILD LOCK
CLOCK
SURF
BLUE MUTE
INSTALLATION
B
B
A/CH
OFF
B
OSD
➧
When you are viewing a channel (e.g channel
number 6) and if you wish to go back to the
previous channel (e.g. channel number 3), press
the f key once. If you wish to go back to
channel number 6 again, press the f key
again.
SURF A/CH
SURF A/CH
Blue Mute
The TV screen will turn blue whenever there is no signal detected.
& Call up 1st level menu
with the
key.
MENU
OFF
B
31
31
31
■■■■■■■■
■■■■■■■■
■■■■■■■■
OSD
key.
“ Select ON with the
or
key.
➧
Exit with the
➧
➧
BLUE MUTE
INSTALLATION
BRIGHTNESS ❙ ❙ ❙ ❙ ❙ ❙ ❙
COLOUR
❙❙❙❙❙❙❙
❙❙❙❙❙❙❙
CONTRAST
key to
é Press the
highlight BLUE MUTE.
CLOCK
B
SURF
SURF
BLUE MUTE
OFF
INSTALLATION
B
31
BRIGHTNESS ❙ ❙ ❙ ❙ ❙ ❙ ❙
■■■■■■■■
CLOCK
B
SURF
SURF
BLUE MUTE
ON
INSTALLATION
B
31
BRIGHTNESS ❙ ❙ ❙ ❙ ❙ ❙ ❙
■■■■■■■■
29
Teletext (only available in certain models)
Result :
Press :
on/off
teletext
Press once to switch on teletext.
Press again to switch off.
The main index page is displayed.
Each subject has a 3 digit page
number. If the selected TV channel
does not broadcast teletext, page
100 is displayed and the screen
remains black. When this occurs,
switch off teletext and select
another channel.
coloured keys
Direct access to a subject. Subjects
are displayed in 4 coloured bars at
the bottom of the page. The
coloured keys allow access to the
subject in the corresponding
colours.
b
0
2
to
9
AV
OSD
SLEEP
1
2
3
4
5
6
8
7
9
SMART
SMART
0
±
`
INC.
SURR.
MENU
A
CH
¬
teletext
page
The number (3 digits) is displayed
at the top left hand corner of the
screen and the counter starts
searching. The counter will stop
searching once the page is found.
If the counter continue searching,
this means the page is not available. Select another page.
previous/
next page
Displays the previous ( ) or the
next ( ) teletext page .
h
enlarge
page
Press once to enlarge the top half
of a page. Press again to enlarge
the bottom half. Press the third
time to return to normal size.
g
hold page
Press once to hold a rotating sub
page. Press again to resume
rotating. The total number of sub
pages is indicated on the top right
corner, e.g. 1/2 which means this is
page 1 of a total of 2 pages.
f
reveal
Press once will reveal hidden
information (solutions to puzzles,
riddles). Press again to conceal.
0
to
b
b
h
SURF A/CH
4
g
f
9
h
g
f
30
Before calling for service
Please make these simple checks before calling for service as problems
pertaining to TV installation and adjustment are not covered under your
warranty.
Symptoms
What you should do
Colour patch
(unevenness)
4
4
Switch off the TV with the mains power button
and wait for at least 20 minutes before switching
on again.
Keep your TV away from any speakers or
magnetic objects.
“Ghosts”or double
images or Teletext
garbled (for sets
with Teletext only)
4
Use of a highly directional antenna may improve
the picture as this symptom may be due to
obstruction by high rise buildings or hills.
No picture
4
Check that the antenna at the back of the TV is
properly connected.
Possible TV station problem. Try another
channel.
4
Good picture but
no sound
4
4
Increase the volume.
Check that the TV is not muted. If it is, press the
¬ key on the remote control to cancel mute.
Good sound but
poor colour or no
picture
4
Adjust the contrast and brightness setting.
Snowish picture
and noise
4
Check the antenna connection.
Horizontal dotted
lines
4
Switch off any nearby electrical appliances e.g.
hairdryer, vacuum cleaner etc. as these may
have caused interference.
One white line
across
4
Switch off the TV immediately and call for after
sales service.
TV not responding
to remote control
4
4
Check batteries and replace them if necessary.
Check that the remote control is operating within
the recommended range.
Message
“ACCESS CODE
– – – –”
4
The child lock function is switched on. Key in
your 4-digit access code to go into TV mode. If
you do not know the access code, key in 0711
twice.
If you wish to switch off the child lock, refer to
the section on “Child Lock–To unlock channels”.
31
Specification
Model type
25”
29”
Picture Tube visible area
59 cm
68 cm
Audio output
2x5W
Set dimensions: Width
Height
Depth
68 cm
54 cm
47 cm
76 cm
58 cm
51 cm
Nett weight (approx. only)
26 kg
36 kg
TV System
Versions
56
57
67
68
69
74
75
79
94
PAL B/G/H
•
•
•
•
•
•
•
•
•
PAL I
•
•
•
•
•
•
SECAM BG/DK
•
•
•
•
•
•
PAL D/K
•
•
•
•
•
•
NTSC M
•
•
•
•
•
•
PAL 60 Playback
•
•
•
•
•
•
•
•
•
Note : For operating voltage, frequency, power consumption and model
and version number, please refer to the type sticker at the back of the set.
www.philips.com