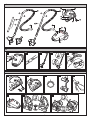
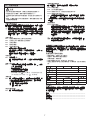
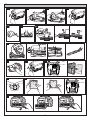
1
MC-CG467, MC-CG465
MC-CG463, MC-CG461
Operating Instructions
Vacuum Cleaner
ENGLISH
Model No.
Instrucciones de Manejo
Aspiradora
ESPAÑOL
真空吸塵器
中文
操作説明書
GB
Keep pages 3 and 10 open when reading this manual, to make easier identify the different parts of the
product.
We would recommend that you carefully study these Operating Instructions before attempting to operate
the unit, and that you note the Important Safety Instructions ···································································
This product complies with the European directives 73/23/EEC and 89/336/EEC and with the Australian
Standards AS 3350.2.2 (1995) and Australian EMC requirements for the C-Tick Mark.
中文
閲讀本手冊時,打開第3頁和第10頁,以便于識別本產品不同的零件。
我們建議您在使用本裝置前,認真學習這些操作説明並注意重要的安全説明。 ·······································
本產品遵照歐洲73/23EEC以及89/336/EEC的指示並且具有澳洲AS3350.2.2(1995)基準以及澳洲EMC需
求的C-Tick標章.
E
Mantenga las páginas 3 y 10 abiertas para una fácil identificación de las piezas cuando lea este
manual.
Antes de poner en marcha la aspiradora, le recomendamos que lea atentamente este Manual de
Instrucciones para el correcto funcionamiento del aparato. ·····································································
Este producto cumple con las directivas europeas 73/23/CEE y 89/336/CEE y con las normas australianas
AS 3350 2.0 (1995) y los requisitos EMS australianos la Marca C-Tick.
2
Page 4
6頁
Página 8
A
B
B-1
B-2
B-4
B-3
B-5
C
C-2
C-1
C-6
C-3
C-7
C-4
C-8
3
C-5
ENGLISH
IMPORTANT SAFETY INSTRUCTIONS FOR THE USER
Before using the vacuum cleaner, please observe these basic precautions.
WARNING: To reduce the risk of fire, electric shock, or injury
• This appliance is not intended for use by young children or infirm person without supervision; young children should be
supervised to ensure that they do not play with the appliance.
• Do not use the appliance if the mains lead or plug is damaged or faulty.
• This appliance is provided with a mains lead and if this becomes damaged, it must be repaired by an Authorised Service Centre
or a qualified person in order to avoid any hazard.
• Unplug from the socket when not in use and before cleaning the appliance or undertaking maintenance operations.
• Turn off the appliance before removing the plug. Do not pull on the mains, always pull on the plug body itself.
• Do not handle plug or vacuum cleaner with wet hands.
• Do not use wet filters after wash, make sure they are completely dry to avoid damaging the cleaner.
• Do not vacuum flammable or combustible substances, neither use in areas where they may be present.
• Do not vacuum hot ash, embers or large and sharp objects.
• Do not vacuum water or other liquids.
• Keep the vacuum cleaner away from heat sources such as radiators, fires, direct sunlight, etc.
• This vacuum cleaner is fitted with a thermal cut-out device which automatically turns off the cleaner to prevent overheating of the
motor. When this happens, disconnect the cleaner from the mains socket and check the dust compartment and filters as they
may be full or clogged with fine dust. Check for any other obstructions in the hose or tube. After removing the obstruction, leave
the cleaner to cool down until the thermal cut-out resets after approximately 60 minutes.
A- IDENTIFICATION OF MAIN PARTS
A)
B)
C)
D)
E)
F)
G)
H)
I)
J)
K)
L)
M)
N)
O)
P)
Q)
R)
S)
C - HOW TO OPERATE YOUR CLEANER
Turbine nozzle (Only MC-CG467)
Ionizer nozzle (Only MC-CG465)
Floor nozzle
Connection pipe
Hose
Suction regulator
Curved wand
Telescopic wand (MC-CG467)
(MC-CG465, MC-CG463)
Extension wand (MC-CG461)
Hose inlet
Dust indicator
Dust cover
ON /OFF Switch pedal
Cord rewind pedal
Crevice nozzle
Dusting brush
Exhaust cover
Plug
Variable power control button
C-1
C-2
C-3
C-4
C-5
C-6
B - HOW TO ASSEMBLE YOUR CLEANER
B-1
B-2
B-3
B-4
B-5
C-7
Insert connection pipe into hose inlet until it locks. When
removing hose assembly, pull out connection pipe with
pushing down two connection buttons.
NOTE: Do not bend, pull and step on the hose or put
anything heavy on it.
Connect the two extension wands by inserting one into
the other and twisting together. (depending on model)
Insert the hose unit into the upper end of the connected
extension wand or telescopic wand and the floor nozzle
to the other end.
(depending on model ).
Insert the hose unit into the upper end of the telescopic
wand. Twist the telescopic wand so that the round hole
will fit into the tab on the hose unit. (When removing the
hose, push the tab down whilst pulling on the telescopic
wand)
Attach the Turbine Nozzle to the other end (depending
on model)( Removal as per reverse procedure)
You can adjust the length of telescopic wand by pushing
button. (depending on model)
C-8
4
Pull out the power cord and put the plug into the
wall socket.
Gently press at the centre of the switch pedal to turn
ON the vacuum cleaner.
Press the pedal again to turn it OFF.
Power control
To increase or decrease the power, turn the variable
power control button.
Switching between carpet and flooring
Flooring: Press lever A
Carpet: Press lever B
*Switching 3 positions for MC-CG467.
Flooring (PARQUET): Set position A
Carpet (short): Set position B
Carpet (long or hard to push): Set position C
The curved wand of the hose is attached with a manual
suction regulator, which allows you to briefly reduce the
suction level.
After you finish vacuuming, remove the plug from
the wall socket and press the cord rewind pedal.
When rewinding the power cord, press the cord rewind
pedal by holding the plug so that it does not become
damaged.
Storage position
Insert the wand holder straight into the wand
supporter.
Park system
For short breaks during vacuuming, slide the hook
attached to the nozzle pipe into the slot on the rear side
of the cleaner.
NOTE: When you use park position, we suggest the
appliance is switched off.
Maintaining the Pre-motor Filter
D - MAINTENANCE AND SERVICING
Perform the procedure given below when the suction power is
not restored after maintaining the filter.
D-10 Open the dust cover.
D-11 Remove the pre-motor filter.
D-12 Wash gently with water and then allow to dry in a
shaded location.
D-13 Replace to its original location.
NOTE: Make sure you remember to replace the filter. If the filter
is not installed, it will cause motor failure.
• Do not wash the filter in a washing machine or dry it with a
dryer or other source of hot air.
CAUTIONS
• The plug must be removed from the socket-outlet
before cleaning or maintaining the appliance.
• To avoid injury, keep your fingers and hands away
from the beater bar.
• DO NOT use hot air or hot surface to dry filters. Keep
at room temperature for approximately 24 hours.
• IMPORTANT: Before re-installing the washable filters,
make sure they are completely dry to avoid damaging
the cleaner.
Filter care
D-14 Exhaust filter
Exhaust filter, is installed in the rear side of the vacuum
cleaner. This filter retains any small dust particles which
may be present in the expelled air.
lt is advisable to change the clean air filter once or twice
a year, depending on use. To change the filter, hold the
exhaust cover (as illustrated). After changed the filter,
set the exhaust cover to its position (as illustrated).
Indicator for replacing the dust bag
Turn the power control to the highest setting and lift the nozzle
off the floor. If the dust indicator turns red, the dust bag is full
and requires replace the dust bag.
NOTE: If the dust bag is not properly installed, the cover will
not close. Be sure to check that the bag is properly
installed before operating, otherwise dust will leak out.
The dust bag can easily lay on the dust cover packing or
clip between bag collar and body, so be sure to properly
extend it into the vacuum cleaner body.
NOTE:
IMPORTANT: Never use the cleaner without the correct filters
properly installed. Failure to do so may result in
damage to the motor.
What to do if your cleaner does not work
Replacing the dust bag
D-1
D-2
D-3
D-4
D-5
Lift dust cover catch and raise dust cover until it
clicks properly.
Remove bag collar from bag holder and pull out dust
bag.
Set the dust bag.
Close dust cover.
When using a cloth bag
Slide the bag clip to open the dust bag, pour out the dirt,
then slide the bag clip back to its original position.
(Please don’t throw away the bag clip.)
Next slide the cardboard back inside the bag frame slot,
and cover with the dust cover.
Check that the appliance is correctly plugged in and that the
electrical socket is working. In case that the thermal cut-out
device has operated, wait until it resets after approximately
60 minutes. If after having checked the mentioned points, the
cleaner does not work, take it to an Authorised Service Centre to
be repaired.
What to do when the suction performance
reduces
• Stop the cleaner and unplug from the socket.
• Check whether the wands, hose and accessories are blocked or
not. If they are blocked, remove the obstruction.
• Check that the dust compartment is full. If it is full, empty it.
• Check that Pre-motor Filter or Exhaust Filter is blocked with
dust. If they are blocked, clean them out or replace.
Floor nozzle
D-6
Inspect once a month.
Using an old toothbrush or similar tool, clean any dirt or
lint from the brush.
Ionizer nozzle
D-7
SPECIFICATIONS
(1) Insert key or other object into the screw slot and turn
it to the left to move “ ” to the ▲ position and roll
down the brush cover ring.
(2) Take out the return brush.
(3) Remove the dirt attached to the return brush.
(4) Assemble the return brush according to the
original.
(5) Move the top of the brush cover from “ ” to ▲
position. Then insert a key or other object into the
screw slot and turn to the right to move “ ” to the
▲ position.
MC-CG461
1500 W
1500 W
1300 W
280 mm x 425 mm x 260 mm
Net weight
4.5 kg
Extension wands
Crevice nozzle
Dusting brush
Floor nozzle
After removing the brush cover with a coin, remove the
beater bar from the belt.
Then cut across threads, strings, hairs, etc. from the
beater bar with a pair of scissors. (Removal as per
reverse procedure)
NOTE: Take care not to cut the brush.
Do not wash in water.
MC-CG463
Nominal input
(W x L x H)
Metal x2/
Telescopic
Telescopic
√
√
√
√
√
√
Turbine nozzle
Ionizer nozzle
√
√
Floor nozzle
REMINDER FOR CUSTOMER
The model and serial number of this product may be found on the
nameplate located at the underside of your cleaner. You should
note the model and serial number in the spaces provided and
retain this book as a permanent record of your purchase.
Vacuum cleaner body
D-9
MC-CG465
1800 W
Dimensions
Turbine nozzle
D-8
MC-CG467
Max. Input
Model Number. .............................................................................
Serial No. ......................................................................................
Date Purchased. ...........................................................................
Where Purchased. ........................................................................
Wipe with a soft cloth soaked with water.
5
中文
對用戶的重要説明
使用真空吸尘器以前,请遵照这些基本注意事项。
警告:为降低火灾、触电或伤害的危险
• 本裝置不是供無監管的兒童和體弱人員使用。應看管好兒童,確保他們不玩本裝置。
• 如果電源線或插頭損壞或有故障,不要使用本裝置。
• 本裝置裝有一根電源線,為避免任何危險,如果它損壞,必須由指定的服務中心或合格的人員進行修理。
• 當不使用時或清理本裝置或進行保養操作前,要從插座上拔下插頭。
• 拆下插頭以前,要關閉此裝置。不要拔電源線,一定要拔插頭本體。
• 不要用濕手接觸插頭或真空吸塵器。
• 沖洗後,不要使用濕過濾器,要確保過濾器完全干燥,以避免損壞吸塵器。
• 不要吸易燃或可燃物,也不要在可能有易燃、可燃物的區域使用。
• 不要吸熱灰、燃屑或大的和尖銳的物體。
• 不要吸水或其它液體。
• 使真空吸塵器遠離熱源,如暖氣、火、陽光直射等。
• 此真空吸塵器裝有熱切斷裝置,它可以自動關閉吸塵器以防止吸塵器過熱。當出現這些情況時,要將吸塵器與電源插座斷開並檢
查灰塵艙和過濾器是否灰塵已滿或被灰塵堵塞。檢查軟管或管中是否有異物。清除異物後,讓吸塵器冷卻,直到約 60 分鐘後切
斷裝置復位。
C - 吸塵器的操作
A - 主要零件的識別
A)
B)
C)
D)
E)
F)
G)
H)
I)
J)
K)
L)
M)
N)
O)
P)
Q)
R)
S)
渦輪吸嘴 (僅對 MC-CG467)
負離子吸嘴(僅對 MC-CG465)
地板吸嘴
連接管
軟管
手動吸力控制鈕
彎杆
伸縮管 (MC-CG467)
(MC-CG465/CG463)
加長管 (MC-CG461)
吸氣進口
灰塵袋檢查指示器
防塵蓋
ON/OFF開關踏板
繞綫踏板
縫隙吸嘴
除塵刷
排氣罩
插頭
變動式電源控制按鈕
C-1
C-2
C-3
C-4
C-5
C-6
C-7
C-8
B - 吸塵器的組裝方法
B-1
B-2
B-3
B-4
B-5
將軟管連接管插入吸氣進口直到鎖住為止。拆卸軟管組
件時,請按下兩個連接按鈕,拔出軟管連接管。
注:不要彎曲、拉或踩在軟管上或把重物放在軟管上。
把軟管裝置插入連接好的加長管的上端並把地板吸嘴插
入另一端。(視型號而定)
將軟管裝置插入連接好的加長管或伸縮管的上端,並把
地板吸嘴插入另一端。(視型號而定)
將軟管裝置插入伸縮管的上端。轉動伸縮管使圓型洞口
能對準插入軟管裝置的凸出處(要取下軟管時,請按下
該凸出處同時拉出伸縮管)。
把渦輪吸嘴裝到另一端。(視型號而定)
通過按動按鈕,可以調節伸縮杆的長度。(視型號而定)
6
拉出電源線並把插頭插入牆壁上的插座。
慢慢地踩下ON/OFF開關踏板的中央以打開吸塵器。
再次踩下踏板,關閉吸塵器。
動力控制旋鈕
為增大或減小動力,轉動動力控制旋鈕。
在地毯和地板之間轉換
地板:按下柄A
地毯:按下柄B
*對于MC-CG467,在3個位置轉換。
地板:(PARQUET):調到A位置
地毯:(短):調到B位置
地毯:(長):調到C位置
軟管的彎管處裝有一個手動吸力調節器,可以暫時地減
小吸力。
完成吸塵後,從牆壁插座上拔下插頭並踩下繞綫踏板。
回繞電源綫時,握住插頭,踩下繞綫踏板,以免損壞插
頭。
存放位置
把吸嘴座直接插入吸嘴支架。
放置位置
在吸塵時,對于暫時的中斷,可把裝在吸嘴上的鈎輕輕
滑入吸塵器後部的導槽。
注:當利用放置位置時,我們建議關閉裝置的電源。
保養電機預過瀘器
D - 保養和維護
保養過瀘器後,當吸力不能恢復時,進行以下步驟。
D-10 打開灰塵蓋。
注意
D-11 拆下電機預過瀘器。
•進行清理及維修本電器時,請務必先將插頭由插座取下。
•為避免造成人身傷害,請將手指與手遠離吸入口。
•不要用熱空氣或熱表面干燥過瀘器。應在室溫下放置約24小
時。
•重要:在重新安裝可沖洗的過瀘器前,確保過瀘器完全干燥
以避免損壞吸塵器。
D-12 慢慢用水沖洗,然後在陰涼處使其干燥。
更換灰塵袋的指示
過瀘器維護
把電源控制裝置轉到最高設定並把吸嘴抬離地板。如果真空計
變爲紅色,説明灰塵袋已滿,需要更換灰塵袋。
注:如果灰塵袋不合適,蓋將不會完全封閉。操作前,一定要
檢查灰塵袋已正確地裝好,否則將會泄漏灰塵。可以很
容易地把灰塵袋放在灰塵蓋密封上或灰塵袋套圈與殼體
之間的唇部。因此一定要正確地將灰塵袋延伸到吸塵器
殼體内。
D-14 排氣過瀘器
排氣過瀘器裝在吸塵器的後側。此過瀘器留住排出的空
氣中可能存在的少量灰塵微粒。
建議根據使用情況,每年一次或兩次,用干淨的過瀘器
進行更換,更換干淨的過瀘器時,握住排氣罩(如圖所
示)並把它拆下。更換過瀘器後,把排氣罩裝回原位(
如圖所示)。
D-13 重新將它裝回原位。
注:一定要記住把過瀘器裝回原處。如果沒裝過瀘器,會造成
電機損壞。
•不要在洗衣機内沖洗過瀘器或用烘干箱及其它熱氣源干燥
過瀘器。
更換灰塵袋
注:
重要:在沒有正確裝好過瀘器的情況下,不要使用吸塵器,否
則會造成電機損壞。
D-1
提起灰塵蓋鎖扣並正確地抬起灰塵蓋。
D-2
從袋座上拆下袋套圈並拉出灰塵袋。
D-3
安裝灰塵袋。
D-4
關閉灰塵蓋。
吸塵器不工作時的措施
D-5
使用集塵布袋時
滑動袋夾來將集塵布袋打開。
在清理垃圾後只要再次將之滑動封閉起來。(不要將袋
夾丟掉)
重新將卡板滑入集塵袋插槽然後將前蓋蓋上。
檢查裝置的插頭是否正確地插入並檢查插座是否正常。如果熱切
斷裝置已經工作,等待,直到它約60分鐘後復位。如果檢查了上
面所述的部位以後,吸塵器仍不工作,要把它送到指定的服務中
心進行修理。
吸塵性能下降時的措施
• 關閉吸塵器,從插座上拔下插頭。
• 檢查管、軟管和附件是否被堵塞。
如果被堵塞,清除異物。
• 檢查灰塵艙是否已滿,如果已滿,把它倒空。
• 檢查主過瀘器A或B是否被灰塵堵塞。如果堵塞,進行清潔或更
換。
地板吸嘴
D-6
每月檢查一次。
用一把舊牙刷或類似的工具,清潔刷子上的贓物或棉纖
維。
負離子吸嘴
D-7
① 將鑰匙柄等物插入螺釘槽并向左轉動,使“ "移至
▲處,拆下捲刷蓋。
② 取出旋轉刷頭。
③ 清除附著在旋轉刷頭的塵土。
④ 按照原樣安裝旋轉刷頭。
⑤ 將刷子蓋上的“ ”移至▲處,然後將鑰匙柄等物
插入螺釘槽并向右轉動,使“ ”移至▲處。
技術規格
MC-CG465
MC-CG461
1800 W
1500 W
一般輸入功率
1500 W
1300 W
尺寸 (W×L×H)
280 mm x 425 mm x 260 mm
4.5 kg
淨重
加長杆
D-8
縫隙吸嘴
用一枚硬幣拆下刷蓋以後,從皮帶上拆下拍打器棒,然
後用一把剪刀橫着剪斷拍打器棒上的綫、繩、頭髮等。
(按相反的步驟安裝)
注:請勿剪短吸入口刷頭長度。
請勿以水清洗。
MC-CG463
最大輸入功率
渦輪吸嘴
除塵刷
地板吸嘴
金屬伸縮
√
伸縮树脂
√
√
√
√
√
渦輪吸嘴
負離子
√
√
地板吸嘴
用戶備忘
本產品的型號和系列號可以在吸塵器下面的銘牌上找到。您要在
提供的空格上記下型號和系列號並把此記錄作爲您購買吸塵器的
永久記錄保留。
真空吸塵器殼體
D-9
MC-CG467
用一塊浸水的軟布擦拭。
型號 ..............................................................................................
系列號 ...........................................................................................
購買日期 .......................................................................................
購買地點 .......................................................................................
7
ESPAÑOL
ADVERTENCIAS IMPORTANTES PARASU SEGURIDAD
Para evitar cualquier riesgo de incendio, descarga eléctrica o daños personales, lea atentamente las siguientes
precauciones de seguridad antes de poner en marcha la aspiradora.
• No permita que la aspiradora sea utilizada por niños o personas incapacitadas sin vigilancia.
• No utilice la aspiradora con el cable o la clavija dañada.
• Esta aspiradora está provista de un cable eléctrico, el cual, en caso de estar dañado, deberá ser reemplazado por un Servicio
Técnico Autorizado o bien por una persona cualificada a fin de evitar posibles daños personales.
• Desenchufe la aspiradora cuando no la utilice o bien cuando realice cualquier servicio de mantenimiento.
• No desenchufe la aspiradora sin antes haberla parado. Cuando desenchufe, no tire del cordón sino de la clavija.
• No coja la clavija ni la aspiradora con las manos mojadas.
• No utilice los filtros húmedos después de haberlos lavado.
• No aspire sustancias inflamables o combustibles.
• No aspire cenizas incandescentes, ascuas ni objetos cortantes.
• No aspire agua ni otros líquidos.
• Mantenga la aspiradora apartada de focos de calor tales como, radiadores, estufas, etc.
• La aspiradora incorpora un protector térmico de seguridad, el cual provoca que la aspiradora se pare en caso de que se
obstruya la entrada de aspiración y se provoque un sobrecalentamiento del motor. En caso de que esto ocurra, desenchufe
la aspiradora y compruebe si el contenedor de polvo y los filtros están obstruidos, compruebe también los tubos y manguera.
Elimine el atasco y espere unos 60 minutos antes de reanudar el trabajo.
A- IDENTIFICACIÓN DE LAS PARTES PRINCIPALES
A)
B)
C)
D)
E)
F)
G)
H)
I)
J)
K)
L)
M)
N)
O)
P)
Q)
R)
S)
C - CÓMO UTILIZAR LA ASPIRADORA
C-1
Cepillo de turbina (Sólo MC-CG467)
Tobera de ionizador (Sólo MC-CG465)
Cepillo grande
Manguito canexión
Manguera
Regulador manual de aspiración
Tubo curvado
Tubo telescópico (MC-CG467)
(MC-CG465, MC-CG463)
Tubo alargador (MC-CG461)
Entrada de aspiración
Indicador de llenado
Tapa saco
Pedal interruptor
Pedal de recogida del cable
Boquilla rinconera
Brocha pequeña
Rejilla de expulsión
Enchufe
Botón de control de potencia variable
C-2
C-3
C-4
C-5
C-6
B - CÓMO MONTAR LA ASPIRADORA
B-1
B-2
B-3
B-4
B-5
Inserte el manguito conexión en la entrada de aspiración
hasta que quede fijado. Para desmontar la manguera,
presione los botones de conexión en ambos lados y tire
del manguito conexión.
NOTA: No doble, estire o pise la manguera, así como
evite poner cosas pesadas encima de ella.
Conecte los dos tubos alargadores insertando uno
dentro del otro y girándolos al unísono. (dependiendo
del modelo)
Inserte la manguera en el extremo superior del tubo
alargador o del tubo telescópico conectado e inserte el
cepillo para suelos en el otro extremo (dependiendo del
modelo).
Inserte la manguera en el extremo superior del
tubo telescópico. Gire el tubo telescópico de forma
que el orificio redondo quede fijado en la pestaña
de la manguera. (Cuando retire la manguera,
presione la pestaña hacia abajo mientras tira del tubo
telescópico)
Conecte el cepillo de turbina al otro extremo (dependiendo
del modelo) (Para extraerlo, realice el procedimiento
inverso)
Prolongue el tubo telescópico a la longitud deseada
presionando el botón. (dependiendo del modelo)
C-7
C-8
8
Estire el cordón totalmente y conecte la clavija a la
toma de corriente.
Presione en el centro del pedal interruptor para
poner en marcha la aspiradora.
Para pararla, presione de nuevo el pedal.
Control de potencía
Para aumentar o disminuir la potencia, gire el botón de
control de potencia variable.
Selector de limpieza en alfombra o suelo
Para suelo: Posición A
Para alfombra: Posición B
*3 posiciones de cambio en los modelos MCCG467.
Suelos (PARQUET): posición A
Alfombras (pequeñas): posición B
Alfombras (grandes o difíciles de mover): posición C
El tubo curvado de la manguera incorpora un regulador
manual de aspiración, el cual le permite reducir
ligeramente el nivel de aspiración.
Después de haber terminado la limpieza, desenchufe
la aspiradora y recoja el cordón presionando el
pedal.
Cuando recoja el cable, coja la clavija para evitar que
golpee.
Posición de almacenamiento
Inserte la fijación del tubo en el soporte del mismo.
Sistema de aparcamiento
En caso de interrupciones momentáneas durante la
tarea de limpieza, coloque el anclaje del cepillo en el
alojamiento de la parte posterior de la aspiradora.
NOTA: Es aconsejable parar la aspiradora cuando se
realice dicha operación.
Mantenimiento del Filtro Central
D - MANTENIMIENTO Y REPARACIÓN
Si después del mantenimiento del Filtro Central, la aspiración
no mejora, proceda según se indica a continuación.
D-10 Abra la tapa saco.
D-11 Extraiga el filtro pre-motor.
D-12 Lave el filtro con agua y séquelo a la sombra.
D-13 Coloque el filtro de nuevo en su alojamiento.
PRECAUCIONES
• Antes de limpiar o realizar el mantenimiento de la
aspiradora, desenchúfela de la toma de corriente.
• Para evitar daños, mantenga las manos alejadas del
agitador.
• Para secar los filtros, NO utilice secadores o
radiadores. Séquelos a temperatura ambiente durante
24 horas aproximadamente.
• IMPORTANTE: Antes de volver a reinstalar los
filtros que se han lavado, asegúrese de que estén
completamente secos.
NOTA: Asegúrese de recolocar el fittro. De no hacerlo, podría
causar fallos al motor.
• No lave el filtro en la lavadora ni utilice secadores o radiadores
para secarlo.
Mantenimiento del filtro
D-14 Filtro Expulsión
EI filtro expulsión está instalado en la parte posterior
de la aspiradora. La función de éste es retener las
partículas pequeñas de polvo que puedan acompañar
al aire expulsado. Es aconsejable cambiar el filtro una
o dos veces al año, según la suciedad acumulada. Para
cambiar el filtro, abra la tapa tal como se muestra en
el dibujo. Después de cambiar el filtro, coloque la tapa
expulsión tal como se muestra en el dibujo.
Indicador de cambio de bolsa
Coloque el botón de control de potencía en la posición de MAX.
y levante el cepillo del suelo. Si en esta condición el indicador
de llenado aparece en rojo, indica que la bolsa está llena y
debe sustituirse.
NOTA: Si la bolsa no está correctamente colocada, la tapa
na podrá cerrarse. Asegúrese que la bolsa está
correctamente colocada para evitar fugas de polvo.
La bolsa puede quedar mal instalada sobre la junta
de goma o pellizcada entre el cartón y la carcasa, por
favor asegúrese de extenderla correctamente de la
aspiradora.
NOTA:
IMPORTANTE: Para evitar dañar el motor de la aspiradora,
no utilizarla sin los filtros correctamente
instalados.
Qué hacer si la aspiradora no funciona
Cómo cambiar la bolsa
D-1
D-2
D-3
D-4
D-5
Compruebe que la aspiradora esté correctamente conectada a
la toma de corriente y que haya suministro de energía en dicha
toma. En caso de que el disyuntor térmico haya funcionado,
espere unos 60 minutos hasta que reinicie.Si después de haber
comprobado los puntos indicados, la aspiradora no funciona,
llévela a un Servicio Técnico Autorizado.
Presione el cierre de la tapa y levante la tapa hasta
que quede fijada.
Saque la bolsa del soporte tirando del cortón.
Coloque la bolsa.
Cierre la tapa.
Cuando utilice una bolsa de tela
Deslice el clip para abrir la bolsa, vacíe la suciedad y, a
continuación, vuelva a deslizar el clip de la bolsa hasta
su posición original. (No tire el clip de la bolsa.)
A continuación, vuelva a insertar el cartón en la ranura
de la estructura de la bolsa y cúbrala con la tapa.
Qué hacer cuando la aspiradora reduce el poder
de aspiración
• Pare la aspiradora y desenchúfela de la toma de corriente.
• Compruebe que los tubos, manguera y accesorios no estén
obstruidos. Si existe algún atasco, elimínelo.
• Compruebe si el contenedor de polvo está lleno. Si está lleno,
vacíelo.
• Compruebe si el filtro pre-motor o el filtro expulsión están muy
sucios. Si están sucios, lávelos o sustitúyalos.
Cepillo grande
D-6
Compruebe el estado del cepillo una vez al mes.
Limpie la brocha del cepillo con un cepillo de dientes
viejo o algo similar, para eliminar la suciedad o fibras.
Tobera de ionizador
D-7
ESPECIFICACIONES
(1) Inserte una llave o un objeto similar en la ranura en
forma de cruz y gire a la izquierda para mover “ ”
hasta la posición ▲ y baje el anillo de la tapa del
cepillo.
(2) Extraiga el cepillo de retorno.
(3) Quite la suciedad adherida al cepillo de retorno.
(4) Monte el cepillo de retorno de acuerdo con el
original.
(5) Mueva la parte superior de la tapa del cepillo de la
posición “ ” a la posición ▲. A continuación, inserte
una llave o un objeto similar en la ranura en forma
de cruz y gire a la derecha para colocar “ ” en la
posición ▲.
MC-CG461
Potencia nominal
de entrada
1500 W
1300 W
280 mm x 425 mm x 260 mm
Peso neto
4.5 kg
Tuba extensible
Boquilla rinconera
Borcha pequeña
Cepillo grande
Después de extraer la cubierta de la brocha con la ayuda
de una moneda, retire la barra de la correa.
A continuación, corte los hilos, cordeles, cabellos, etc.
de la barra con unas tijeras. (Para extraerlo, realice el
procedimiento inverso)
NOTA: procure no cortar la brocha.
No lo lave con agua.
MC-CG463
1500 W
(A x L x Al)
Metal x 2/
Telescópio
Telescópio
√
√
√
√
√
√
√
√
Cepillo de
turbina
Tobera de
ionizador
Cepillo grande
RECUERDO DE SU COMPRA
Para cualquier reclamación o consulta sobre este aparato, le
aconsejamos tome nota de los datos detallados. El número de
serie y modelo, se encuentran en la placa de características
situada en la parte inferior de la aspiradora.
N° de Modelo. ...............................................................................
N° de Serie. ..................................................................................
Fecha de compra. ........................................................................
Lugar de compra. .........................................................................
Cuerpo de la aspiradora
D-9
MC-CG465
1800 W
Dimensiones
Cepillo de turbina
D-8
MC-CG467
Potencia máxima
de entrada
Limpie la aspiradora con un paño húmedo.
9
D
D-5
D-3
D-2
D-1
D-7
D-6
D-8
D-9
D-12
D-10
D-11
D-13
D-14
10
D-4
11
Matsushita Electric Industrial Co., Ltd.
1500 hayashida-cho, Higashiomi City, Shiga 527-8501, Japan
http://www.panasonic.co.jp/global/
© 2006 Matsushita Electric Industrial Co., Ltd. All rights Reserved.
C01ZYP00A
S0406-05
Printed in P.R.C.