1
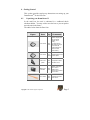
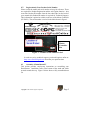
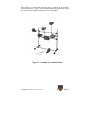
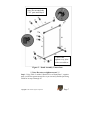
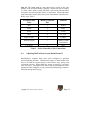
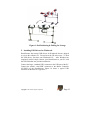
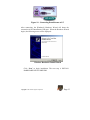
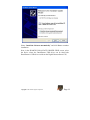
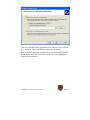
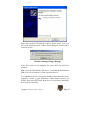
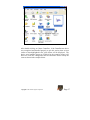
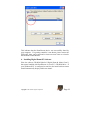
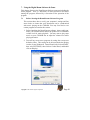
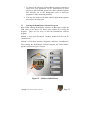
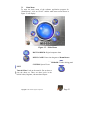
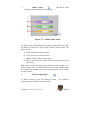
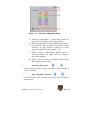
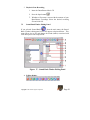
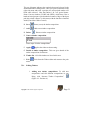
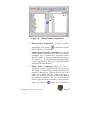
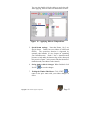
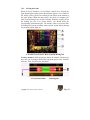
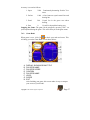
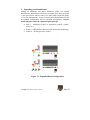
TABLE OF CONTENTS 1. INTRODUCTION 1 2. FEATURES 1 3. MINIMUM PC SYSTEM REQUIREMENTS 2 4. GETTING STARTED 3 4.1 Unpacking your DrumXtreme™ 3 4.2 Registration & Your Product Serial Number 5 4.3 Assembly of DrumXtreme™ 5 4.4 Adjusting Pad Positions on your DrumXtreme™ 11 5. INSTALLING USB DRIVERS FOR WINDOWS® 12 6. INSTALLING DIGITAL DRUM PC SOFTWARE 18 7. USING THE DIGITAL DRUM SOFTWARE & GAME 20 7.1 Before Starting the DrumXtreme Software Program 20 7.2 Starting the DrumXtreme Software Program 21 7.3 Main Menu 23 7.4 Digital Drum Operation Menu 24 7.5 Sound Bank Timbre Editing Panel 30 7.6 Music Game Menu 34 8. WARNINGS 38 9. EXPANDING YOUR DRUMXTREME 39 10. TROUBLESHOOTING / FAQ 40 11. DRUMXTREME LIMITED WARRANTY 50 12. CONTACTING TECHNICAL SUPPORT 52 Copyright© 2003 Pacific Digital Corporation Page ii 1. Introduction Welcome to DrumXtremeTM, the next generation in digital music playing and recording instruments. With the DrumXtreme you will be able to play the backbeat to your favorite music, or create, play, and record your own music. DrumXtreme is easy to install and use, providing a full size professional drum ensemble consisting of 5 pads and a foot pedal. Each of the pads emulate the drum elements including hi-hat, snare, crash, tom, base, t-tom, and ride. The DrumXtreme is easy to install and use, and comes complete with tutorial software that is ideal for the beginner, and also the experienced drummer to sharpen skills, with plenty of drills and exercises. 2. Features Complete 'drum rack' easily configures to optimum personal playing positions Easy to assemble, store, and transport Requires smaller total area to use than an acoustic drum set 7.5" pads with sensitivity adjustment for true drum feeling and response 5 pads included, up to 6 pads supported 1 foot pedal included, up to 3 pedals supported Advanced sampling technology for high quality audio Easy USB installation. USB connection provides power (no wall outlets required). PC-based software provides easy to follow video tutorials The drum tutorial system uses identifiable colors on the pads and on your computer monitor to guide you through lessons. Ideal for quick learning and skill development Pads have 'choke' capability while playing crash or ride Seamless operation with your PC audio system Includes PC drumming 'game' with three levels of difficulty Includes 110 sound combinations from 10 varying sound collections - user configurable The following items are included in the DrumXtreme kit: Five (5) Percussion pads with sensitivity adjustment Seven (7) cables to connect the percussion pads, foot pedal, and choke control to the controller One (1) Easy to assemble drum stand One (1) Foot Pedal One (1) Master controller One (1) Set of drumsticks One (1) Manual with complete instructions and documentation One (1) USB cable One (1) Software CD: Digital Drum control software & Music Game (also includes tutorial and documentation) One (1) Music CD: practice music for learning exercises 3. Minimum PC System Requirements The DrumXtreme has the following minimum system requirements: IBM compatible PC Pentium II 300MHz or higher with at least 128 MB of memory Microsoft Windows® XP, Windows® 2000, Windows® 98SE, or Windows® ME CD-ROM: 8X speed or faster Keyboard & Mouse USB port (either USB 1.1 or USB 2.0) VGA compatible display (or higher) Direct X video/graphics & sound-card drivers 100MB of free hard-disk space for software installation Sound Card Speakers or Earphones Copyright© 2003 Pacific Digital Corporation Page 2 4. Getting Started This section provides step-by-step instructions on setting up your DrumXtremeTM for the first time. 4.1 Unpacking your DrumXtreme™ In the retail box, the unit is cushioned in a cardboard shockabsorbent holder. You may wish to save the box so you can pack or store the unit in the future. The tables below show the Parts List: Figure Item Qty. Comments Drum DX-8 One piece Special Purple pad for Cymbal & Choke (Tone Mute). The back of this pad has two plugs and a manual button/switch for choke control (Tone Mute). Drum DX-5 Four Standard drum and pieces cymbal pads. Foot Drum pedal One piece This pedal is used for Bass Drum. Master box SV-BOX One piece Master Controller. Your drum’s Model# and Serial# are printed on the back. Drum sticks One pair Professional wood drum sticks. Copyright© 2003 Pacific Digital Corporation Page 3 Drum stand The detailed parts One list for the stand is group shown in the following table. Cables 1. Seven audio source cables. Eight (Please use the pieces special mono cable line.) 2. One USB cable. CD Discs 1. Data CD (Installation Two program, teaching pieces disc, and game grogram) 2. Music CD Manual . One This Manual (includes warranty information) Table 1 – Major Parts List Table 2 – Detailed List of Stand Parts Make sure all of these parts are included before continuing. If something is missing from the above tables, contact customer service at: 1-888-9990732. Copyright© 2003 Pacific Digital Corporation Page 4 4.2 Registration & Your Product Serial Number Please record the model and serial number to keep for reference. These are required for Product Registration and the web-Update function. Also record the Product ID number from the bar-coded label on the back of your manual (this Product ID number is required for Technical Support). This information is printed on a label on the rear of the Master Controller (SV-BOX). The serial number is circled in the label shown in Figure 1. Master Controller Box Figure 1 – Product Serial Number Label In order to receive technical support, you should register online at: http://www.PacificDigital.com soon after your purchase date. 4.3 Assembly of DrumXtreme™ This section provides step-by-step instructions on assembling your DrumXtreme. Installation starts at the bottom of the stand and works upward towards the top. Figure 2 below shows a fully assembled drum set. Copyright© 2003 Pacific Digital Corporation Page 5 Keep Figure 2 in mind while following Steps 1 through 10 to assemble your DrumXtreme. Figure 3 shows detailed assembly connections which are referenced in assembly instruction steps 1 through 10 Figure 2 – Example of Assembled Stand . Copyright© 2003 Pacific Digital Corporation Page 6 Note: Do not attach the 5 “D” parts until Step 4 Connect and tighten every joint with a screwdriver Figure 3 – Stand Assembly Connections ** Note: Do not over tighten screws! ** Step 1: Using Table 2 entitled “Detailed List of Stand Parts”, organize parts A to H into separate areas/piles so you can easily find the part being called for in steps 2 through 10. Copyright© 2003 Pacific Digital Corporation Page 7 Step 2: Slide two (2) Part C clamps on each of the two stand base bars [Part B1 (2 sets)]. One part C clamp will face vertical, and the other Part C clamp will face horizontal. Use Parts F screws and nuts to fasten all Part C clamps. Figure 4 – Part C Clamp Assembly Install (2) each rubber feet Part A1 to the ends of each stand base bar (part B1). The flat part of rubber feet A1 faces the floor. Install (1) horizontal bar (Part B2) to the horizontal clamp (Part C) of each of the stand base assemblies (B1/C/A1 combination). Step 3: Insert (2) vertical bars (Part B2) to the remaining B1/C/A1 base assembly combinations (vertical). Insert (2) part C clamps to the ends of (1) bar part B2. Slide this combination on the (2) vertical bars Part B2. See illustrations in Figures 3, 4, and 5. Adjust to be about ½ way down and tighten. Figure 5 – Part C Clamp Assembly Step 4: Slide (1) Part D clamp down the left hand vertical bar (B2). This will be used later for your yellow snare-drum pad. Slide (3) part D clamps on the remaining horizontal bar part B2. Install (2) part C clamps Copyright© 2003 Pacific Digital Corporation Page 8 to the ends of this bar part B2. Slide this combination onto the vertical bars Part B2. See illustration in Figure 5. Adjust the upper bar combination to be almost to the top (about 4 to 5 inches down from top). Slide the remaining Part D clamp on the left vertical bar Part B2. This will be used later for your red Hi-Hat pad. Step 5: Install a rubber cap part A2 to the top of each of the vertical bars part B2. Tighten all bar-connection screws and be sure the rack is stable. Tighten all screws for parts C clamps. Tighten all screws for Part D clamps until they are snug, but can be moved and turned. Step 6: Install the Master Controller (SV-BOX) by using the Part G clamp to mount the Part SV-BOX to the lower (center) horizontal bar Part B2 as shown below in Figure 6 using (4) Part H screws. The multiple connection ports of the Master Controller should face up for easy access. Adjust and tighten. Note: Do not tighten the screws too hard. Figure 6 – Attaching the Master Controller Step 7: Each of the Percussion Pads are color coded. Use the illustrations in Figure 7 for pad assembly. Insert (10) Part A3 to each end of (5) drum-arm rods Parts B3. Attach (5) Part E adjustable brackets to each of the percussion pads (one part DX-8 and 4 part DX-5) using Part F screws and nuts. The gear side of Part E adjustable bracket matches with the gear side of the pads (Parts DX-8 & DX-5). Tighten finger tight only at this point. Copyright© 2003 Pacific Digital Corporation Page 9 Figure 7 – Pad Rods & Pad Assembly Step 8: Referring to Figure 7, slide (5) Part B3 drum-arm rods into the hole of each of the remaining Part D clamps. Tighten finger tight only at this point. Use the diagram above for reference. Step 9: Referring to Figure 8, note that Percussion Pad Part DX-8 (hitop) has an extra port connection and a pressure switch/button, which is used to control “choke” (Tone-Mute) of cymbal 5 (pad 5). During drum play this switch can be pressed by the drummers’ finger to activate the feature. The DX-8 percussion pad is color coded purple and should be mounted on the right of the drum stand. Install each of the Part DX8/DX-5 Percussion Pad to the rod/clamp (B3/D) combinations. Tighten the screws when complete (do not over-tighten). Switch Figure 8 -Pad DX-8 (hi-top) Copyright© 2003 Pacific Digital Corporation Page 10 Step 10: The sound made by each drum head is based on the port number of the SV-BOX Master Controller. Connect one end of each of (7) audio source cables to each DX-8/DX-5 percussion pads and BD-6 foot pedal. Percussion pad DX-8 has (2) connections. Connect the other ends of the audio source cables to the ports of the Master Controller (SVBOX) as per Table 3. Percussion Pad Color Master Controller Port Function Red 1 Hi-Hat Yellow 2 Snare Green 3 T-Tom Blue 4 TT-Tom Purple A (left) 5 Cymbal Purple B (right) 7 Cymbal 5 Choke (Tone-Mute) Foot Pedal 9 Bass Table 3 - Pad to Controller Cable Connections 4.4 Adjusting Pad Positions on your DrumXtreme™ DrumXtreme’s complete 'drum rack' easily configures to optimum personal playing positions. DrumXtreme requires a much smaller total area to use than an acoustic drum set and features easy storing, and convenient carrying. When folded for storage or carrying, it occupies even less space! The figure below shows how the Pad positions can be adjusted to either configure to your personal optimal playing position or folded for storage and carrying. Copyright© 2003 Pacific Digital Corporation Page 11 Figure 9 -Pad Positioning & Folding for Storage 5. Installing USB Drivers for Windows® DrumExtreme has custom USB drivers for Windows® that are shipped to you on the software CD. Do not insert the CD at this time. To load the USB drivers, first boot your Windows® PC. After Windows has completely loaded, simply connect your DrumXtreme to your PC with the USB cable that was provided with the kit. Connect the larger “standard USB” connector to the USB port of the PC. Connect the smaller “mini-USB” connector to the Master Controller (SV-BOX) of the DrumXtreme. Figure 10 shows a typical USB connector on the back of a typical PC. Copyright© 2003 Pacific Digital Corporation Page 12 Figure 10 – Connecting DrumXtreme to PC After connecting, the Windows® Hardware Wizard will detect the connection of the DrumXtreme USB port. When the Hardware Wizard begins, the following screen will be displayed: Windows Hardware Found Wizard Click “Next” to begin installation. The next step is INSTALL HARDWARE DEVICE DRIVERS. Copyright© 2003 Pacific Digital Corporation Page 13 Select “Install the Software automatically” and click Next to continue installation. Next, in the SEARCH FOR (LOCATE) DRIVER FILES screen, select the device where the DrumXtreme USB driver can be found (the DrumXtreme’s USB driver resides on the Digital Drum software CD). Copyright© 2003 Pacific Digital Corporation Page 14 Insert the CD-ROM into the appropriate device and select the CD-ROM drive checkbox. Then click Next to continue the installation. After Windows® finds and installs the driver, the COMPLETING THE HARDWARE WIZARD screen will be displayed. Click “Finish” to complete the installation. Copyright© 2003 Pacific Digital Corporation Page 15 Some older versions of Windows® require a system restart. If so, you will see the following screen. If this screen is displayed, click on Yes to restart the system. Windows Settings Change Message If the above screen is not displayed, the system does not need to be restarted. Note: Once the DrumXtreme USB driver is installed the DrumXtreme USB device will be listed as a “Game Controller Device”. To verify that the device was properly installed, check under the “Game Controller” section of your Windows® Control Panel (left-click on START, then select SETTINGS, then click on Control Panel, and double click on Game Controller). Copyright© 2003 Pacific Digital Corporation Page 16 After double-clicking on Game Controllers, if the DrumXtreme device was recognized and installed properly as per this section, then an item similar to that highlighted in the circle below will be displayed. The device serial number (shown as VD10-66 in the example picture) will differ for each user configuration and will therefore not be exactly the same as shown in the example below. Copyright© 2003 Pacific Digital Corporation Page 17 This indicates that the DrumXtreme device was successfully found by your computer. If a gaming controller is not shown, please remove the USB cable from your system and re-insert one more time to re-invoke the Hardware Found Wizard. 6. Installing Digital Drum PC Software Place the software CD-ROM (labeled “Digital Drum & Music Game”) that comes bundled with DrumXtreme in your PC’s CD-ROM drive. If your Windows® PC is configured to auto-run, the install software menu should automatically display within one minute. Copyright© 2003 Pacific Digital Corporation Page 18 Figure 11 – Software Install Menu If the above software menu does not automatically display after one minute, click your mouse on START, then RUN, then browse to your CD drive and select INSTALL.EXE from the CD drive to run the install program. Once the above pictured software menu is displayed, click on “INSTALL” and follow the on-screen instructions to launch the InstallShield wizard which will install the software application to your PC’s hard-drive. Install Shield Wizard Program Follow the on screen instructions to install the software to your PC’s hard-drive. After the installation is complete, the DrumXtreme software icon will automatically be located on your Windows Desktop. Copyright© 2003 Pacific Digital Corporation Page 19 7. Using the Digital Drum Software & Game This chapter discusses the DrumXtreme Software program including the Game program. First is a discussion of what you need to do before starting the program, followed by a discussion of the operation of the program. 7.1 Before Starting the DrumXtreme Software Program This section shows how to verify your computer’s settings and lists some checks to insure that your drum-beats can be synchronized with music playing on the CD-ROM. You may first need to exit certain programs as noted in this section. 1. Before launching the Drum Extreme software, please enable (unmute) your volume control and set the speakers to a comfortable volume level for music playback. You may want to play some music on your CD-ROM first to adjust the volume level while playing the music. 2. Turn-off any screen-saver programs by setting the screen-saver default as None. This setting can be accessed under the Display section of your Windows® Control Panel (left-click on START, then select SETTINGS, then click on Control Panel, and double click on Display). Copyright© 2003 Pacific Digital Corporation Page 20 3. To improve the efficiency of DrumXtreme software, and also to insure that your drum-beats can be synchronized to music playing on the CD-ROM, please close other software programs that normally run in the background (such as Anti-virus programs or other monitoring software). 4. You may also need to close other software application programs that may be currently open. 7.2 Starting the DrumXtreme Software Program Note: While running DrumXtreme software, do not remove either the USB cable or the Music CD during play without first exiting the program. There are two ways to start the DrumXtreme software program. Method 1: From your Windows® Desktop, double-click the icon for “DrumXtreme” Method 2: Click “Start” and then “Programs”, and select “DrumXtreme” After starting the DrumXtreme software program, the “Initial Menu” appears as shown in Figure 12 below. Figure 12 – Software Initial Menu Copyright© 2003 Pacific Digital Corporation Page 21 The options available in the above initial opening menu are: A. PLAY: Enters the main menu of the software application program for “DrumXtreme”. B. UPDATE: On-line update over the Internet: You must first have registered to become a member and to update your information. You will need the serial number from the label on the back of the Master Controller for this function. C. PDC WEB: This will connect you to the Pacific Digital website: www.PacificDigital.com D. HELP: Contains explanations of software operation and includes a Tutorial film. E. EXIT: This will close and exit the software program. 7.2.1 Selecting JoyStick Controller & CD-ROM Drive to Configure DrumXtreme Important Note: To operate the DrumXtreme software, you will have to perform the CD-ROM and JOYSTICK selection in the Digital Drum menu as described in section 7.4.1 Copyright© 2003 Pacific Digital Corporation Page 22 7.3 Main Menu To enter the main menu of the software application program for “DrumXtreme”, click on “PLAY” and the main menu screen shown in Figure 13 will display. Figure 13 – Main Menu DIGITAL DRUM: Digital computer drum MUSIC GAME: Enters into the game of DrumXtreme SOUNDBANK: Timbre editing panel SYSTEM: System Tester EXIT Tutorial Film: Links to the tutorial film on how to play the drum set. There are three levels in the tutorial video; Beginner, Advanced and Expert. Copyright© 2003 Pacific Digital Corporation Page 23 7.4 Digital Drum Operation Menu If you selected “Digital Drum,” from the main menu, the Digital drum operation screen will appear as shown in Figure 14. Figure 14 – Digital Drum Operation Menu A. JOYSTICK: selects the controller to use for the software programs B. CD-ROM: position of CD-ROM C. Timbre composing switch D. BANK NAME: name of timbre composition E. BANK: timbre list F. MIXER: volume control Copyright© 2003 Pacific Digital Corporation Page 24 G. ADJUST: sensitivity control H. MAIN: displays general volume current setting (to adjust use MIXER) I. CD: displays music volume current setting (to adjust use MIXER) J. DRUM: displays drum volume current setting (to adjust use MIXER) EXIT: exits this menu and goes to prior K. menu L. Drum display: when drumming, the related pad being struck will be highlighted. M. Play control: STOP PLAY PREVIOUS TRACK NEXT TRACK EJECT N. O. P. Q. R. Save Recorded File – Use this button to save and name the recording of your drum play. You can record your drum play along with the music CD supplied with the DrumXtreme. Track Title – This window displays the name of the track title currently selected. Play Recording – Use this button to play your recorded drum play. Stop Recording/Play Back – Use this button to stop a recording or a playback Start Recording – Use this button to start a recording. Copyright© 2003 Pacific Digital Corporation Page 25 S. Time Code – This is the total elapsed time from the beginning of the Music CD to the current position. T. CD Counter – This is the total elapsed time from the beginning of the track to the current position. U. Open Previously Recorded File – Use this button to open a previously recorded file. V. Speed – This is a representation of the tempo of the selected DrumXtreme Music CD audio track (beats per minute), with 1 being low speed and 10 being high speed. 7.4.1 1. Using the Digital Drum Operation Menu CD-ROM selection: This selects the CD-ROM drive to use for all the DrumXtreme software programs and is required to begin using the software. Insert the music CD into the CD drive you intend to use. Select the CD-ROM drive by clicking the two triangular arrows on the left and right of this control button to switch it. When the proper CD-ROM drive is detected, the red ball will become green. Once it is green, leave this setting in place. 2. JOYSTICK selection: This selects the controller to use for all the DrumXtreme software programs and is required to begin using the software. Select the joystick controller by clicking the two triangular arrows on the left and right of this control button to switch between controllers. When the DrumXtreme device is found correctly, the red ball will become green. Once it is green, leave this setting in place. 3. Selecting timbre: The DrumXtreme digital computer drum is pre-configured with ten sets of timbres. Click the buttons for ▼ or ▲ to switch current timbre composition. You may also press F1-F12 keys on your keyboard for fast selection of 10 sets of timbres. Copyright© 2003 Pacific Digital Corporation Page 26 4. Volume control: will appear when clicking the mixer button The “Mixer” panel Figure 15 – Volume Mixer Panel To adjust volume, click and hold the left button of the mouse and “drag” the setting to either left or right to adjust volume controls (Main, CD, Drum) of each. A. Main: refers to all volume controls. B. CD: refers to music volume control. C. DRUM: refers to drum volume control. D. EXIT: Closes the mixer volume control panel and returns to the prior menu. Note: If the volume in the display area cannot be shown normally (ie. if it always shows zero), it indicates that the function is not available and if not available the drummer must use the system speaker volume control to adjust volume. 5. Sensitivity adjustment: To adjust sensitivity, click the Sensitivity button. adjustment panel will appear as shown below: Copyright© 2003 Pacific Digital Corporation The sensitivity Page 27 Figure 16 – Sensitivity Adjustment Panel A. Sensitivity enable/disable: (a check-mark enables, an empty check box without a check-mark disables). B. Sensitivity adjustment: Click and hold the left button of the mouse and “drag” the setting to either left (increase sensitivity) or right (decrease sensitivity) to adjust sensitivity controls for pads 1-6 (pads 1 to 6). C. HI-HAT Control : enables/disables Hi-Hat Control (a check-mark enables, an empty check box without a check-mark disables). D. EXIT: Closes the sensitivity adjustment control panel and returns to the prior menu. 6. Selecting a music track: After inserting CD, click “Previous Track ◄” or “Next Track ►” to choose a selection. 7. Start / Stop Music Selection: Click “PLAY ►” to start the music selection, or click “STOP ■” to stop the music. Copyright© 2003 Pacific Digital Corporation Page 28 8. Changing the CD: When changing the CD, please click “EJECT” to eject and remove the CD. 7.4.2 Recording Your Drum Play This section refers to controls N to V shown in Figure 14, the Digital Drum Operation Menu. With the DrumXtreme recording facility you can: 1. • Record your drum play when using the Music CD that came with the DrumXtreme. • Name and Save the composition • Playback the composition with the DrumXtreme Music CD. Record Drum Play 1. Insert the DrumXtreme Music CD into your CD-ROM drive 2. Select a song on the Music CD using the “Next Track” or “Previous Track” buttons 3. Press the record button 4. Begin playing with the music 5. To end recording, press the Stop button. 2. Save and Name Your Recording 1. After completing a recording session, press the “Save the Recorded File” button. 2. The Windows “Save” screen will appear. Type in the name you desire and press OK. This will store the drum play on your hard drive for later use. (Must be used with the DrumXtreme CD on the proper track). Copyright© 2003 Pacific Digital Corporation Page 29 3. Playback Your Recording 1. Insert the DrumXtreme Music CD 2. Press the Open button. 3. Windows will present a screen with the contents of your DrumXtreme recordings. Select the desired recording file and click OK. 7.5 Sound Bank Timbre Editing Panel , from the main menu, the SoundIf you selected “Sound Bank” Bank (Timbre) editing panel screen will appear as depicted below. This menu allows you to see and change the sound (timbre) associated with each drum pad in each composition. Figure 17 – Sound Bank Timbre Editing Panel A. Editing display: Copyright© 2003 Pacific Digital Corporation Page 30 This set of buttons indicates the particular drum pad selected in the sound-bank/timbre editing menu. After you open a bank name in the right side menu and select a position, the selected pad number will blink while selected. Note that Drums 1 & 5 are special drums: Drum 1 has two timbres (CLOSE and OPEN), while Drum 5 has a hand-activated pressure switch under the bottom of edge of the drum pad (this switch is Drum 7 in this menu) with the function of muffled sound (Tone Mute Choke Control). B. Save: Stores (saves) the timbre composition. C. Add: Adds a new timbre composition. D. Delete: Deletes a timbre composition. E. Name of timbre composition: Name-input of timbre composition. F. Apply: Applies the timbre to drum setting. G. Details of timbre composition: This area gives details of the timbre composition of all drums. H. Timbre list: All of the timbres are listed in this area. I. 7.5.1 Exit: menu. Exits from the Timbre editor and returns to the prior Editing Timbres 1. Adding new timbre compositions: To add new compositions and edit different compositions to your liking, click “Increase Timbre Composition” (Figure 18 – Position A). Copyright© 2003 Pacific Digital Corporation Page 31 Figure 18 – Adding Timbre Compositions 2. Deleting timbre compositions: To delete a timbre to delete the selected composition, click “Delete” timbre. (Figure 18 – Position B). 3. Opening details of timbre compositions: To examine or edit a timbre composition, you must first open the tree-shaped list to examine the composition details where the timbre is assigned to each drum pad (Figure 18 – Position C). This is particularly useful after adding a new composition so that you can edit the timbres associated with each drum pad. 4. Editing timbre composition: When you select a composition and one of its drum pads that you want to edit (Figure 19 – Position D2), all timbres available to be assigned to that pad are listed on the left side of the screen (see “position mark D1”). When you select a timbre, you will hear its unique sound played through the speakers or earphones. Once you are sure that you want to apply that particular timbre to that particular drum, click “APPLY’ Copyright© 2003 Pacific Digital Corporation (Figure 19 – Position D3). Page 32 You can also double-click the timbre to apply the edit. After applying, the new timbre for that drum is in effect. Figure 19 – Applying Edits to Compositions 5. Special drum settings: Note that Drums 1 & 5 are special drums. Drum1 has two timbres (CLOSE and OPEN). The open/close function is supported by optional pedal number 10 (see chapter on expanding your DrumExtreme). Drum 5 has a hand-activated pressure switch under the bottom edge of the drum pad (this switch is Drum 7 in this menu) with the function of muffled sound (Tone Mute Choke control). 6. Saving timbre edits & changes: When finished: click “SAVE” 7. to save the changes. Exiting the Timbre Edit Menu: Click “EXIT” to return to the prior menu with your timbre changes in effect. Copyright© 2003 Pacific Digital Corporation Page 33 7.6 Music Game Menu If you selected “Music Game”, from the main menu, the game screen will appear as shown below. Each of the areas in the menu that you can click with your mouse (shown as A – P) are summarized here. Figure 20 – Music Game Menu A. Previous B. Joystick C. CD-ROM D. Next E. Ready to use CD music F. Displays name of music selection G. Rank H. Play (Start Game) I. Display of Master volume current setting (to adjust use MIXER) J. Display of Music volume current setting (to adjust use MIXER) K. Display of Drum volume current setting (to adjust use MIXER) L. MIXER M. Exit N. Selection of difficulty level O. Skin P. Game mode 1. First insert the DrumXtreme Music CD disc into your CD-ROM drive. After entering the game menu, select the joystick device Copyright© 2003 Pacific Digital Corporation Page 34 you want to use with (B) and then select the CD-ROM . drive letter you are using with (C) 2. Use the previous and next buttons to select the music track desired from the music CD. The name of music track will be displayed in the central window (F) of the game menu. You can “audition” the music to see if it is really the track you want to use for the game. After making your final selection , or the game will not work properly. remember to click (E) 3. Directly beneath the name of the music track being displayed, there are three volume displays (MASTER, MUSIC, DRUM) . If you want to adjust the volume, you can click the Mixer button (L) 4. Then click “Play” drum to the music. to enter the volume adjustment screen. to start the game and enjoy playing the 5. When game is over, click (G) scores. to check your rank and 6. There are three difficulty-setting levels for the game, which you . The difficulty level is shown by the can select with (N) number of drumsticks displayed (one, two, or three). 7. There are two sets of game interfaces (skins) you can choose from with button (O) . 8. There are two selections for the game control mode: Player & Computer. Player Control is the basic mode for self-playing with you controlling the program; Computer Control is a teaching mode in which player simply selects the name of music and computer will then start game automatically. This selection is accomplished by button (P). Copyright© 2003 Pacific Digital Corporation . Page 35 7.6.1 Playing the Game When (E) shows “Ready to Use CD Music” and PLAY is clicked, the game begins and the game picture shown below appears. Six columns of red, orange, yellow, green, blue, and purple will appear on the monitor in the game picture. When the music plays, the screen of computer will show crystals falling in one or more columns. When the crystals fall on the beating line (see D in picture below), you should strike the corresponding colored drum pad. For instance, when a red crystal falls on beating line, beat the red drum; when a yellow crystal falls on beating line, beat the yellow drum, etc. A. Track B. Score board C. Beat crystal D. Beating line Accuracy monitor: While playing the drums, the monitor will show you how well you are doing in hitting the right drum pad on time. Possible ranks are: Poor, Good, Perfect, and Super. 1.Crystal central line Copyright© 2003 Pacific Digital Corporation 2.Beating line Page 36 Accuracy is scored as follows: 1. Super 2500 Continuously drumming “Perfect” five times 2. Perfect 1000 A line between crystal central line and beating line 3. Good 500 Crystal lies in the green area when beating. 4. Poor 0 Crystal lies beyond the beating area. Stopping the Game: The game can be stopped by pressing “ESC” on your keyboard during the game. This will return you to the game menu. 7.6.2 Game Rank to check your rank and scores. This When game is over, click (G) will bring you to the Game Rank screen shown below: A. B. C. D. E. F. G. DISPLAY SHOWING SONG TITLE PLAYER'S NAME PLAYER'S SCORE CONFIRM PLAYER'S NAME LEVEL SCORE H. EXIT After finishing your game, this screen makes it easy to compare your scores to your friends. Copyright© 2003 Pacific Digital Corporation Page 37 8. Warnings a. Do not open the plastic case of the Master Controller (SV-BOX) at any time. There is risk of electric shock and damage to the Master Controller unit. There are no user-serviceable parts inside. Opening the plastic case voids the product warranty. b. Keep your DrumXtreme out of direct sunlight. DIRECT SUNLIGHT MAY CAUSE DAMAGE. c. Do not place your DrumXtreme too near a wall or in an enclosed, poorly ventilated or high-temperature room. Lack of ventilation or extreme temperatures may cause damage to the DrumXtreme Master Controller (SV-BOX) and/or the drum heads. d. Be sure that you place your DrumXtreme on a stable surface. If the DrumXtreme topples over, it could cause damage to the unit or injury to the player(s). e. Use only drumsticks when playing the DrumXtreme. Using hard or sharp objects can cause damage to the drum heads. f. Use only a soft cloth to clean. Do not use liquid cleaners to clean. Using liquid cleaners may cause damage to the Master Controller (SVBOX) and/or the drum heads. g. Extended playing of the DrumXtreme may cause bolts and/or connections to loosen. Tighten bolts and connections as necessary to avoid collapse or temporary loss of connection(s) to the Master Controller (SV-BOX). h. To avoid possible injury, small children should be supervised by an adult when near the DrumXtreme. Copyright© 2003 Pacific Digital Corporation Page 38 9. Expanding your DrumXtreme Adding an additional pad and/or additional pedals can expand DrumXtreme. DrumXtreme allows you to expand your drum set to add 1 more pad (Pad 6) and/or to add 1 to 2 more pedals (Pedal 8 & Pedal 10) to your configuration. Figure 21 below shows DrumXtreme in both its standard configuration and its expanded configuration. Contact Pacific Digital to order the expansion option package. Pad 6 – additional Cymbal or instrument (cowbell, cymbal, drum, etc.) Pedal 8 – additional bass drum (used for double-bass drumming) Pedal 10 – Hi-Hat open/close control Figure 21 - Expanded Drum Configuration Copyright© 2003 Pacific Digital Corporation Page 39 10. Troubleshooting / FAQ Q1: My computer cannot locate the USB Device. A1: 1.Verify the connection of the USB cable from the DrumXtreme to your computer USB port 2. Inspect device installation in Game Controllers: 3. Go to Start, Settings, Control Panel 4. In the Control Panel, double-click on Game Controllers 5.If Game Controllers is displaying the USB Human Interface Device your computer has successfully found the drum device, otherwise, please unplug and plug in the USB cable again. Copyright© 2003 Pacific Digital Corporation Page 40 Q2: When using the software, the images appear, but no sound can be heard. A2: 1. Check the connection of your computer speakers to your computer sound card. 2. Check the volume settings on your computer volume control. i. Go to Start, Entertainment Settings, Accessories, ii. Click on Volume Control iii. Verify that the volume control settings for each device are adjusted to the desired level. iv. Verify that the Volume Control, Wave and CD Audio are not muted. 3. Verify that the computer Sound Card is properly installed. a. Go to Start, Settings, Control Panel b. In control panel, double click on Sounds and Multimedia. Copyright© 2003 Pacific Digital Corporation Page 41 c. Select the Audio Tab. d. For sound playback, the preferred device should list your currently installed sound card. If no options under preferred device are available you may need to reinstall you sound card and sound card drivers. (See sound card manual for instructions.) Q3: When starting the Program, the sound of the beating drum can be heard, but the sound of the music cannot. Copyright© 2003 Pacific Digital Corporation Page 42 A3: 1. Check to see if the CD-ROM sound cable is connected properly. (see CD-ROM users manual) 2. Check to be sure that CD Audio is not muted in the computer Volume Control (see A2). Q4: When starting the Program, the sound of the music can be heard, but the sound of the beating drum cannot. A4: 1. Digital Drum may not be properly connected or installed. (See A1). 2. Please check to ensure that the JOYSTICK is properly configured in the soul drum software. a. Start the Soul Drum software. b. Select Digital Drum c. In digital drum adjust the Joystick ID, till the drum device is found. Q5: When playing Digital Drum and the Music Game, rhythm and notes cannot be coordinated with each other. A5: 1. Check to ensure that there is no other synthesizer software already installed on your computer (e.g.,YAMAHA SYXG, Roland VCC88…) The installation of those programs has changed your Windows Operating System default settings. A simple uninstall of those programs will not correct the problem. You must re-install the Windows Operating System to correct the problem and have optimal playing of the DrumXtreme. Copyright© 2003 Pacific Digital Corporation Page 43 2. Please check to ensure that your computer supports the minimum system requirements of the program. 3. If you are using Windows®2000 or Windows®XP, you may need to enable or disable the “digital CD playback” mode of your CD-ROM. If your CD-ROM supports “Digital CD Playback”, enable the function. If your CD-ROM does not support “Digital CD Playback”, then disable the function. If you do not know if your CD-ROM supports “Digital CD Playback”, ask the manufacturer of your PC. To enable or disable “Digital CD Playback” follow step a-d below: a. Right-click your mouse on the “My Computer” icon on your Windows® desktop and select “Properties” (alternatively you can select “System” in Control Panel and doubleclick the left mouse button to open it). b. Select the “Hardware” tab, and click “Device Manager” c. After opening “Device Manager”, click “+” to open the tree structure under the picture of CD-ROM drive, and right-click your mouse on the icon of the CD-ROM drive, then select “Properties”. (If there are more than two CDROM drives, please select the one you will use for playing the DrumXtreme Music CD). d. Select the “Properties” tab and you will see “Enable Digital Playback for this CD-ROM Device” near the middle of this tab. Click the square in front of the item “Enable Digital Playback for this CD-ROM Device” to enable/disable this function (a check-mark enables, an empty check box without a checkmark disables). Copyright© 2003 Pacific Digital Corporation Page 44 Q6: I have a YAMAHA 724 chip sound card and do not get any sound when using the Drum Xtreme? A6: The DrumXtreme does not support the sound card for the YAMAHA 724 chip. Call Pacific Digital at 888-999-0732 for consultation regarding sound cards. Q7: Why are there two to three sounds of the drum heard when playing the Digital Drum and the Music Game at once? A7: Please adjust the sensitivity level to low sensitivity 6-8 for a heavy beating player and adjust the sensitivity level to a higher level 1-3 for softer playing. Low sensitivity setting. (For heavy beating player) Hi sensitivity settings. Q8: How can I produce the best sound quality? A8: The Pacific Digital Drum Xtreme using hi quality sound samples. For the best the quality sound output, we advise installing the drum unit on a computer with a 16bit or higher sound card, and 3 piece or greater speaker system, with separate sub woofer. Copyright© 2003 Pacific Digital Corporation Page 45 Q9: Can the DrumXtreme be used with professional stage audio devices? A9: The sound source produced by the DrumXtreme may be taken out of the line out on your computer system to a professional stage audio device. Q10: The sound volume output is normal when using the GAME or DIGITAL DRUM, but the volume decreases significantly when playing the tutorial films. A10: If your sound card supports 5.1 channel output, set the channel out to 2-way output. See your sound card manual for instructions. Q11: I am hearing a loud echoing sound while playing the GAME and DIGITAL DRUM. A11: If your sound card supports 3-dimensional Sound Space Simulation or Echo, disable it when using the DrumXtreme device. See your sound card manual for instructions. Q12: I am having trouble installing the DrumXtreme software. A12: 1. You may not have properly installed the DrumXtreme Program. Please uninstall the DrumExtreme program and reinstall it. Copyright© 2003 Pacific Digital Corporation Page 46 2. Please check your Windows User Account and make sure that you are an Administrator of your computer, if you are using Windows 2000 or Windows XP. The rights to the DrumXtreme game are limited to the Computer Administrator only. To check your Windows User Account, please follow the instructions below: 3. Go to Start, Settings, Control Panel. 4. Open Administrative Tools. 5. Open Computer Management. 6. If your account is a “Limited Account,” please change your account status by clicking on “Change Account Type;” then choose “Computer Administrator” to change your account status and priviledges available to you. After you have completed the account status change, you may log in again. Q13: Can the DrumXtreme Device support other Games? A13: The DrumXtreme supports DrumMIDI and BandJam. Q14: I am having trouble running the Main Program. A14: 1. You may not have properly installed the DrumXtreme Program. Please uninstall the DrumExtreme Program and reinstall it. 2. Please check your Windows User Account and make sure that you are the Computer Administrator. The rights to the DrumXtreme game are limited to the Computer Administrator only. To check your Windows User Account, please follow the instructions below: 3. Open the Control Panel and choose User Accounts. 4. If your account is a “Limited Account,” please change your account status by clicking on “Change Account Type;” then choose “Compuer Administrator” to change your account status and privileges available to you. After you have completed the account status change, you may log in again. Copyright© 2003 Pacific Digital Corporation Page 47 Q15: While playing the GAMES, the sound becomes suddenly loud or quiet, or my computer crashes. A15: Please check to ensure that you have installed the 5.1 Channel Sound Card. Because the 5.1 Channel Sound Card is pre-set with a speaker protection device, you can simply turn down the Volume Control button of the Sound Card. Q16: Can the DrumXtreme Device support other Games? A16: The DrumXtreme supports DrumMIDI and BandJam. Q17: Please explain error messages when executing games and digital computer drum. A17: There are a number of error messages as noted below: This message means the DrumXtreme could not be found. 1. Check to make sure the USB cable is connected between the DrumXtreme Master Controller and computer. 2. Check to make sure the selected Joystick or CD-ROM on the Main Menu (see Figure 14) is green. (see Question 1) above. The messages below mean your sound card program and sound card system are not in normal working mode. Copyright© 2003 Pacific Digital Corporation Page 48 Verify that your sound card is installed properly and works normally (see Question 2). Restart your computer and then verify the Joystick and/or CD-ROM indicators are green. Copyright© 2003 Pacific Digital Corporation Page 49 11. DrumXtreme Limited Warranty Pacific Digital Corporation warrants this product to be free from manufacturing defects for a period of one (1) year from the date of invoice to the end user (Customer). In the event that this product should fail during this period, Pacific Digital Corporation reserves the right to either replace or repair the product at its own discretion. If the product becomes defective during the Warranty period, Pacific Digital will repair or replace any defective component part at no charge to the original owner, subject to the limitations and requirements listed. THE FOLLOWING IS REQUIRED BY PACIFIC DIGITAL CORPORATION when requesting warranty service: Check your resellers return policy first. All purchased products must be returned to original reseller within their return policy time period. If the product is out of reseller’s return period, all returns to Pacific Digital Corporation for warranty repair within the warranty period must be authorized by Pacific Digital with a Return Material Authorization (RMA) number. To obtain an RMA number, contact tech-support at 888999-0372 or send an email to [email protected] to obtain an RMA. The product must be packed in the original shipping carton or in suitable packing offering a similar degree of protection. To avoid scratches or other damage to the product during shipping, separate items such as the cables, power cords, etc. Each should be individually wrapped and placed in the same package. Limitations: The limited warranty provided by Pacific Digital Corporation does not cover: • The cost of returning the product to Pacific Digital (i.e. this is the user’s responsibility) • The drumhead and the drumsticks are not covered in the warranty • Any product with serial numbers or identification altered or removed • Exterior cosmetic damage • Damage, defect or failure caused by or resulting from: improper installation or operation of the unit from incorrect voltages or power supply; improper service by a non- Copyright© 2003 Pacific Digital Corporation Page 50 • • authorized service facility; abuse, neglect, accidents, misuse, fire, flood, or acts of God; unauthorized modification by end user; installation removal or on site service. Damages resulting from loss of use, loss of data, loss of time or inconvenience, cost of temporary replacement unit or spares, property damage caused by this unit or its failure to work, or any other incidental or consequential damages Damage caused by installation/operating software which may or may not be supplied with the product is not covered by this Limited Warranty. Separate End-User License Agreement provisions and restrictions apply. Customer’s acceptance of Pacific Digital’s RMA number reflects acceptance to the terms and conditions of Pacific Digital's Warranty and Return Policy, as set by Pacific Digital. All requests for RMA numbers must include product serial numbers and proof of purchase. Customer agrees to assume shipping charges on return shipments to Pacific Digital and Pacific Digital agrees to assume shipping charges back to customer. All returns are for repair or replacement at Pacific Digital's discretion. There are no returns for credit or refunds. This warranty excludes defects or damage due to misuse, abuse, or neglect. The foregoing warranty is in lieu of all other warranties, express or implied, including but not limited to implied warranties of merchantability and fitness for a particular purpose. In no event shall Pacific Digital Corporation be liable for special, indirect, incidental, or consequential damages whether in contract, tort, or negligence. Copyright© 2003 Pacific Digital Corporation Page 51 12. Contacting Technical Support Pacific Digital Corporation 2052 Alton Pkwy Irvine, CA 92606 Phone: 888-999-0732 Fax: 949-252-9397 WEB: www.PacificDigital.comand Information During installation, record the following information. This information will be needed to contact technical support. When calling the Technical Support Department, MAKE SURE TO HAVE THE FOLLOWING INFORMATION READILY AVAILABLE, BECAUSE IT IS NECESSARY IN ORDER TO RECEIVE TECHNICAL SUPPORT. RETAILER INFORMATION Date of Purchase:___________Invoice #:_______________ Product Purchased From:____________________________ Seller's Tech Support Phone #:________________________ DrumXtreme PRODUCT INFORMATION PDC Part #: U-30161 Model# ________PDC Serial #:_______ Name of Software:________________________________________ Software Version:________________________________ OTHER INFORMATION ABOUT THE PC YOU USE TO RUN THE DrumXtreme SOFTWARE Processor Speed:_________________________________ Brand of Computer:_______________________________ RAM Size:______________________________________ Operating System:________________________________ CD-ROM Speed:_________________________________ Copyright© 2003 Pacific Digital Corporation Page 52 The Pacific Digital part number for this DrumXtreme User’s Manual is: 1866-SD-01-1 (revised April 2-2003). The Pacific Digital model number for this DrumXtreme model is: 2096-SD (U-30161 for North America, or E-30170 for Europe). Copyright 2003 Pacific Digital, Corporation. All rights reserved. Specifications and items shown subject to change without notice. Pacific Digital and the stylized P logo are registered trademarks of Pacific Digital Corporation, and DrumXtremeTM is a trademark of Pacific Digital Corp. All other trademarks are the property of their respective owners. Pacific Digital Corporation Irvine, California Tel: 949-252-1111 Fax: 949-252-9397 www.PacificDigital.com Copyright© 2003 Pacific Digital Corporation Page 53