1
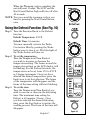
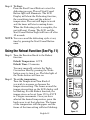
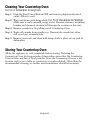
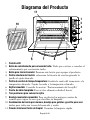
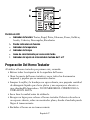
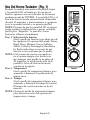
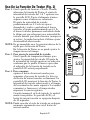
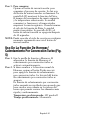
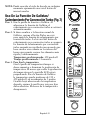
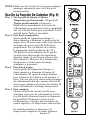
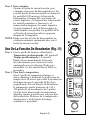
User Manual
Digital
Oven
Countertop
Horno Digital para
Mostrador
Manual de Instrucciones
MODEL/MODELO
TSSTTVDG01
Visit us at www.oster.com
P.N. 147418 Rev.1
IMPORTANT SAFEGUARDS
When using electrical appliances, basic safety precautions should always
be followed, including the following:
READ AND SAVE THESE
INSTRUCTIONS
• READ ALL INSTRUCTIONS, PRODUCT LABELS AND WARNINGS
BEFORE USING THE COUNTERTOP OVEN.
• Do not touch hot surfaces. Always use oven mitts when handling hot
materials and allow metal parts to cool before cleaning. Allow the unit to cool
thoroughly before putting in or taking off parts. Always use the oven handles
when moving the unit.
• When the unit is not in use and before cleaning, press the “Start/Cancel”
button and remove the countertop oven from the power outlet.
• To protect against risk of electrical shock, do not immerse the appliance in
water or any other liquids.
• Close supervision is always necessary when this or any appliance is used near
children. This appliance is not for use by children.
• Do not operate this or any appliance with a frayed or damaged cord or plug
or after the appliance malfunctions or is dropped or has been damaged in
any manner. Return the countertop oven to the nearest Authorized Sunbeam
Appliance Service Center for examination, repair or electrical or mechanical
adjustment.
• Do not use attachments not recommended by the manufacturer; they may
cause fire, electric shock or personal injury.
• Do not use outdoors or for commercial purposes.
• Do not use this appliance for other than its intended use.
• Do not let the cord dangle over the edge of a tabletop or countertop or touch
hot surfaces.
• Do not place the appliance near a hot gas or electric burner or in a heated
oven.
• Extreme caution should be used when using containers constructed of material
other than metal or glass.
• A fire may occur if the countertop oven is covered or touching flammable
materials, including curtains, draperies, walls, etc., when in operation. Do not
store any items on top of the appliance when in operation.
• When using countertop oven, pull the unit out a minimum of 6 inches away
from the wall or other cords.
English-2
• Do not store any materials, other than manufacturer’s recommended
accessories, in this unit when not in use.
• Do not place any flammable materials in oven, such as paper, cardboard,
plastic or any materials that may catch fire or melt.
• Do not cover the oven tray or rack with metal foil. This will cause overheating
of the appliance.
• Oversized foods or metal utensils must not be inserted in the appliance as they
may create a fire or risk of electrical shock.
• Do not clean with metal scouring pads. Pieces can break off the pad and touch
electrical parts involving a risk of electrical shock.
• Use extreme caution when removing pan or disposing of hot grease or other
hot liquids.
• To turn this appliance off, press the “Start/Cancel” button and remove cord
from outlet. The LCD will turn off after 30 seconds.
This Unit Is for Household Use Only
Short Power Supply Cord Instructions
A short power-supply cord is provided to reduce the risk resulting from
becoming entangled in or tripping over a longer cord. An extension cord
may be used if care is exercised in its use. If an extension cord is used, the
electrical rating of the cord must be at least as great as the electrical rating
of the appliance. The extension cord should be arranged so that it will not
drape over the countertop or tabletop where it can be pulled on by children
or tripped over unintentionally.
For Products Purchased in the United States and Canada Only
To reduce the risk of electrical shock, this appliance has a polarized plug (one
blade is wider than the other). This plug fits a polarized outlet only one way;
if the plug does not fit fully into the outlet, reverse the plug. If it still does not
fit, contact a qualified electrician. Do not attempt to defeat this safety feature.
SAVE THESE INSTRUCTIONS
English-3
Product Diagram
11
1
2
3
10
4
5
6
7
8
9
1. LCD Display
2. Turbo Convection Heat Button – Use to activate or cancel
turbo convection heat.
3. Start/Cancel Button – Press this button to turn the appliance off.
4. Function Selector Knob – Select cooking function by turning knob
to desired setting.
5. Time/Temperature Control Knob – Adjust the dial thermostat to
the desired temperature/ Adjust the dial to the desired time
6. Removable Wire Rack – See “Positioning Rack” section.
7. Tempered Glass Door – For front viewing of food.
8. Three Rack Positions
9. Removable Crumb Tray – For crumb or fallen food particles collection.
Pulls out for easy cleaning.
10.Baking Pan/Cookie Sheet in One and Broil Rack – Use for all your baking
needs, broiling and grilling needs.
11.Easy Clean Interior Walls – Allows fast clean up.
English-4
a
c
b
d
e
f
LCD Display
a. Functions Indicator – Toast, Bagel, Pizza, Bake, Broil,
Cookies, Roast, Warm, Defrost, Reheat
b. Function Indicator Arrow
c. 1-7 color shade setting indicator
d. Time Indicator
e. Turbo Convection Heat Icon
f. Temperature Indicator
Preparing Your Toaster Oven
If you are using your toaster oven for the first time, please:
•Remove any stickers from the surface of the oven.
•Open oven door and remove all printed documents and paper from
inside the toaster oven.
•Clean the rack and pan with hot water, a small amount of dishwashing
liquid and a nonabrasive sponge or cleaning pad.
DO NOT IMMERSE THE BODY OF THE UNIT IN WATER.
•Dry the unit thoroughly before using.
•Select a location for the toaster oven. The location should be in an open
area on a flat counter where the plug will reach an outlet.
•Plug the toaster oven into an electrical outlet.
English-5
Using Your Toaster Oven (See Fig. 1)
Plug the unit in. The unit will emit two long
“beeps” and the LCD screen will illuminate. The
function option will appear with an indicator on
the preset TOAST function. The LCD and the
Start/Cancel button light will be illuminated for
30 seconds and then go out if no other buttons or
knobs are pressed or moved.
PLEASE NOTE: once the blue LCD display goes
out – you can press or move any button or knob to
“wake up” the display and operate as normal.
Step 1. Select Function
Turn the Function Knob to choose one of
the following 10 options from the menu:
Toast, Bagel, Pizza, Bake, Broil, Cookies,
Roast, Warm, Defrost and Reheat. The
indicator arrow will move from function to
function as the knob is turned.
NOTE: If the cooking process is not started or no
further button is pressed or knob is turned
within 30 seconds the blue backlight and
the Start/Cancel Button Light will turn off.
Step 2. Temperature:
Turn the temperature/time knob to increase
or decrease the temperature setting.
Step 3. Time:
Turn the temperature/time knob to
increase or decrease the cooking time. The
maximum time setting is 60 minutes.
NOTE: Press the temperature / time knob to toggle
between the tempertaure and time selction.
English-6
Figure 1
Using the Toast Function (See Fig. 2)
Step 1. Turn the Function Knob to the Toast
function. When you select the Toast function,
the 1-7 color shade setting indicator will
become visible on the LCD. Both upper and
lower heating elements will heat.
Default Color Shade Setting is 4. This will
be the default every time the Toaster Oven
is unplugged and plugged back in. If the
Toaster Oven remains plugged in since
the last time you have selected a different
shade for the Toast function (even if not
activated), the unit will remember the last
shade setting you selected.
NOTE: The bottom rack position is recommended
for toasting.
The temperature or time is not adjustable
for the Toast function.
Step 2. To adjust the shade color:
Turn the Temperature/Time Knob to adjust
the shade color. The color shade-setting
indicator will show your selection as you turn
the knob. The frame around the shade setting
indicator on the LCD display will be blinking.
Step 3. To Start:
Press the Start/Cancel Button to start the
toasting process. The red Start/Cancel
Button light will illuminate. The LCD
Display will show the Toast Function, the
shade color selection and the countdown
time. The unit will begin to operate and the
timer will start counting down. (Step 3)
When the Toasting is complete, the unit
will emit 3 beeps. The LCD and the Start/
Cancel Button Light will turn off after 30
seconds.
NOTE:You can cancel the toasting cycle at any
time by pressing the Start/Cancel Button
once.
English-7
Figure 2
Using the Bagel Function (See Fig. 3)
Step 1. Turn the Function Knob to the Bagel
function. When you select the Bagel function,
the 1-7 color shade setting indicator will
become visible on the LCD. Only upper
heating element will heat. Default Color
Shade Setting is 4. This will be the default
every time the Toaster Oven is unplugged
and plugged back on. If the Toaster Oven
remains plugged-in since the last time you
have selected a different shade for the Bagel
function (even if not activated), the unit
will remember the last shade setting you
selected.
NOTE: The bottom track position is recommended
for bagel toasting. For best results toast bagel
with cut side up.
The temperature or time is not adjustable
for the Bagel function once it has started.
Step 2. To adjust the shade color:
Turn the Temperature/Time Knob to adjust
the shade color. The color shade-setting
indicator will show your selection as you turn
the knob. The frame around the shade-setting
indicator on the LCD display will be blinking.
Step 3. To Start:
Press the Start/Cancel Button to start the
bagel toasting process. The red Start/Cancel
Button light will illuminate. The LCD
Display will show the Bagel Function, the
shade color selection and the countdown
time. The unit will begin to work and the
timer will start counting down.
When the Bagel toasting is complete, the
unit will emit 3 beeps. The LCD and the
Start/Cancel Button Light will turn off after
30 seconds.
NOTE:You can cancel the bagel toasting cycle
at any time by pressing the Start/Cancel
Button once.
English-8
Figure 3
Using the Pizza/ Turbo Convection Heat
Function (See Fig. 4)
Step 1. Turn the Function Knob to the Pizza
function. When you select the Pizza
function, the Turbo Convection Heat will
automatically activate.
Step 2. If you wish to switch to the regular Pizza
function, press the Turbo button once to
turn off the Turbo Convection Heat default
selection. The blue light of the Turbo
Convection Heat button will turn off.
The Turbo Convection Heat Function turns
on a built-in fan that circulates hot air in
the oven chamber, cooking your food faster
and more evenly.
Default Temperature: 400ºF.
Default Time: 16 minutes.
Step 3. To set the temperature:
Turn the Temperature/Time Knob if
you wish to increase or decrease the
temperature setting. The frame around the
temperature setting on the LCD display
will be blinking. For the Pizza Function, the
temperature can be set from 350 to 450ºF
in 25-degree increments. Once you have
selected the desired temperature, press the
knob once to set that selection. The frame
of the temperature will disappear and the
frame of the time setting will start blinking.
Step 4. To set the time:
Turn the Temperature/Time Knob if you
wish to increase or decrease the cooking
time. The maximum time setting for Pizza
is 60 minutes (1 hour). Once you have
selected the desired cooking time, press the
Start button to initiate the cooking process.
The frame of the time will disappear.
English-9
Figure 4
Step 5. To Start:
Press the Start/Cancel Button to start the
cooking process. The red Start/Cancel
Button light will illuminate. The LCD
Display will show the Pizza Function,
the countdown time and the selected
temperature. The unit will begin to work
and the timer will start counting down.
When the Pizza function cycle is complete,
the unit will emit 3 beeps. The LCD and the
Start/Cancel Button Light will turn off after
30 seconds.
NOTE:You can cancel the cooking cycle at any
time by pressing the Start/Cancel Button
once.
Using the Bake/ Turbo Convection Heat
Function (See Fig. 5)
Step 1. Turn the Function Knob to the Bake
function. When you select the Bake
function, the Turbo Convection Heat will
automatically activate.
Step 2. If you wish to switch to the regular Bake
function, press the Turbo button once to
turn off the Turbo Convection Heat. The
blue light of the Turbo Convection Heat
button will turn off.
The Turbo Convection Heat Function turns
on a built-in fan that circulates hot air in
the oven chamber, cooking your food faster
and more evenly.
Default Temperature: 325ºF.
Default Time: 30 minutes.
English-10
Step 3. To set the temperature:
Turn the Temperature/Time Knob if
you wish to increase or decrease the
temperature setting. The frame around the
temperature setting on the LCD display
will be blinking. For the Bake Function, the
temperature can be set from 150 to 450ºF
in 5-degree increments. Once you have
selected the desired temperature, press the
knob once to set that selection. The frame
of the temperature will disappear and the
frame of the time setting will start blinking.
Step 4. To set the time:
Turn the Temperature/Time Knob if you
wish to increase or decrease the cooking
time. The maximum time setting for Bake
is 60 minutes (1 hour). Once you have
selected the desired cooking time, press the
Start button to initiate the cooking process.
The frame of the time will disappear.
Step 5. To Start:
Press the Start/Cancel Button to start the
cooking process. The red Start/Cancel
Button light will illuminate. The LCD
Display will show the Bake Function,
the countdown time and the selected
temperature. The unit will begin to work
and the timer will start counting down.
When the Baking cycle is complete, the unit
will emit 3 beeps. The LCD and the Start/
Cancel Button Light will turn off after 30
seconds.
NOTE: You can cancel the cooking cycle at any
time by pressing the Start/Cancel Button
once.
English-11
Figure 5
Using the Broil Function (See Fig. 6)
Step 1. Turn the Function Knob to the Broil
function. When you select the Broil function,
the upper heating elements will heat.
Default Temperature: 450ºF.
Default Time: 10 minutes.
Step 2. To set the temperature:
Turn the Temperature/Time Knob if
you wish to increase or decrease the
temperature setting. The frame around the
temperature setting on the LCD display
will be blinking. For the Broil Function, the
temperature can be set from 400 to 450ºF
in 25-degree increments. Once you have
selected the desired temperature, press the
knob once to set that selection. The frame
of the temperature will disappear and the
frame of the time setting will start blinking.
Step 3. To set the time:
Turn the Temperature/Time Knob if you
wish to increase or decrease the cooking
time. The maximum time setting for Broil
is 60 minutes (1 hour). Once you have
selected the desired cooking time, press the
Start button to initiate the cooking process.
The frame of the time will disappear.
Step 4. To Start:
Press the Start/Cancel Button to start the
broiling process. The red Start/Cancel
Button light will illuminate. The LCD
Display will show the Broil Function,
the countdown time and the selected
temperature. The unit will begin to work
and the timer will start counting down.
When the Broiling cycle is complete, the
unit will emit 3 beeps. The LCD and the
Start/Cancel Button Light will turn off after
30 seconds.
NOTE:You can cancel the broiling cycle at any
time by pressing the Start/Cancel Button
once.
English-12
Figure 6
Using the Cookies/Turbo Convection Heat
Function (See Fig. 7)
Step 1. Turn the Function Knob to the Cookies
function. When you select the Cookies
function, the Turbo Convection Heat will
automatically activate.
Step 2. If you wish to use the regular Cookies
function, press Turbo button once to turn
off the Turbo Convection Heat. The blue
light of the Turbo Convection Heat button
will turn off.
The Turbo Convection Heat Function turns
on a built-in fan that circulates hot air in
the oven chamber, cooking your food faster
and more evenly.
Default Temperature: 350ºF.
Default Time: 11 minutes.
Step 3. To set the temperature:
Turn the Temperature/Time Knob if
you wish to increase or decrease the
temperature setting. The frame around the
temperature setting on the LCD display will
be blinking. For the Cookies Function, the
temperature can be set from 150 to 450ºF
in 5-degree increments. Once you have
selected the desired temperature, press the
knob once to set that selection. The frame
of the temperature will disappear and the
frame of the time setting will start blinking.
Step 4. To set the time:
Turn the Temperature/Time Knob if you
wish to increase or decrease the cooking
time. The maximum time setting for
Cookies is 60 minutes (1 hour). Once
you have selected the desired cooking
time, press the Start button to initiate the
cooking process. The frame of the time will
disappear.
English-13
Figure 7
Step 5. To Start:
Press the Start/Cancel Button to start the
cooking process. The red Start/Cancel
Button light will illuminate. The LCD
Display will show the Cookies Function,
the countdown time and the selected
temperature. The unit will begin to work
and the timer will start counting down.
When the Cookies function cycle is
complete, the unit will emit 3 beeps. The
LCD and the Start/Cancel Button Light will
turn off after 30 seconds.
NOTE:You can cancel the cooking cycle at any
time by pressing the Start/Cancel Button
once.
Using the Roast/Turbo Convection
Function (See Fig. 8)
Step 1. Turn the Function Knob to the Roast
function. When you select the Roast
function, the Turbo Convection Heat is will
automatically activate.
Step 2. If you wish to use the regular Roast
function, press the Turbo button once to
turn off the Turbo Convection Heat. The
blue light of the Turbo Convection Heat
button will turn off.
The Turbo Convection Heat Function turns
on a built-in fan that circulates hot air in
the oven chamber, cooking your food faster
and more evenly.
Default Temperature: 350ºF.
Default Time: 60 minutes.
English-14
Step 3. To set the temperature:
Turn the Temperature/Time Knob if
you wish to increase or decrease the
temperature setting. The frame around the
temperature setting on the LCD display will
be blinking. For the Roast Function, the
temperature can be set from 150 to 450ºF
in 5-degree increments. Once you have
selected the desired temperature, press the
knob once to set that selection. The frame
of the temperature will disappear and the
frame of the time setting will start blinking.
Step 4. To set the time:
Turn the Temperature/Time Knob if you
wish to increase or decrease the cooking
time. The maximum time setting for Roast
is 60 minutes (1 hour). Once you have
selected the desired cooking time, press the
Start button to initiate the cooking process.
The frame of the time will disappear.
Step 5. To Start:
Press the Start/Cancel Button to start the
cooking process. The red Start/Cancel
Button light will illuminate. The LCD
Display will show the Roast Function,
the countdown time and the selected
temperature. The unit will begin to work
and the timer will start counting down.
When the Roasting cycle is complete, the
unit will emit 3 beeps. The LCD and the
Start/Cancel Button Light will turn off after
30 seconds.
NOTE:You can cancel the cooking cycle at any
time by pressing the Start/Cancel Button
once.
English-15
Figure 8
Using the Warm Function (See Fig. 9)
Step 1. Turn the Function Knob to the Warm function.
Default Temperature: 150ºF.
Default Time: 60 minutes.
You may manually activate the Turbo
Convection Heat by pressing the Turbo
button once to turn it on. The blue light of
the Turbo button will turn on.
Step 2. To set the temperature:
Turn the Temperature/Time Knob if
you wish to increase or decrease the
temperature setting. The frame around the
temperature setting on the LCD display will
be blinking. For the Warm Function, the
temperature can be set from 150 to 200ºF
in 25-degree increments. Once you have
selected the desired temperature, press the
knob once to set that selection. The frame
of the temperature will disappear and the
frame of the time setting will start blinking.
Step 3. To set the time:
Turn the Temperature/Time Knob if you
wish to increase or decrease the warming
time. The maximum time setting for Warm
is 60 minutes (1 hour). Once you have
selected the desired warming time, press
the Start button to initiate the warming
process. The frame of the time will
disappear.
Step 4. To Start:
Press the Start/Cancel Button to start the
warming process. The red Start/Cancel
Button light will illuminate. The LCD
Display will show the Warm Function,
the countdown time and the selected
temperature. The unit will begin to work
and the timer will start counting down.
English-16
Figure 9
When the Warming cycle is complete, the
unit will emit 3 beeps. The LCD and the
Start/Cancel Button Light will turn off after
30 seconds.
NOTE:You can cancel the warming cycle at any
time by pressing the Start/Cancel Button
once.
Using the Defrost Function (See Fig. 10)
Step 1. Turn the Function Knob to the Defrost
function.
Default Temperature: 450ºF.
Default Time: 16 minutes.
You may manually activate the Turbo
Convection Heat by pressing the Turbo
button once to turn it on. The blue light of
the Turbo button will turn on.
Step 2. To set the temperature:
Turn the Temperature/Time Knob if
you wish to increase or decrease the
temperature setting. The frame around the
temperature setting on the LCD display will
be blinking. For the Defrost function, the
temperature can be set from 150 to 450ºF
in 5-degree increments. Once you have
selected the desired temperature, press the
knob once to set that selection. The frame
of the temperature will disappear and the
frame of the time setting will start blinking.
Step 3. To set the time:
Turn the Temperature/Time Knob if you
wish to increase or decrease the defrosting
time. The maximum time setting for
Defrost is 60 minutes (1 hour). Once
you have selected the desired defrosting
time, press the Start button to initiate the
cooking process. The frame of the time will
disappear.
English-17
Figure 10
Step 4. To Start:
Press the Start/Cancel Button to start the
defrosting process. The red Start/Cancel
Button light will illuminate. The LCD
Display will show the Defrosting function,
the countdown time and the selected
temperature. The unit will begin to work
and the timer will start counting down.
When the Defrosting cycle is complete, the
unit will emit 3 beeps. The LCD and the
Start/Cancel Button Light will turn off after
30 seconds.
NOTE:You can cancel the defrosting cycle at any
time by pressing the Start/Cancel Button
once.
Using the Reheat Function (See Fig. 11)
Step 1. Turn the Function Knob to the Reheat
function.
Default Temperature: 325ºF.
Default Time: 15 minutes.
You may manually activate the Turbo
Convection Heat by pressing the Turbo
button once to turn it on. The blue light of
the Turbo button will turn on.
Step 2. To set the temperature:
Turn the Temperature/Time Knob if
you wish to increase or decrease the
temperature setting. The frame around the
temperature setting on the LCD display will
be blinking. For the Reheat function, the
temperature can be set from 150 to 450ºF
in 5-degree increments. Once you have
selected the desired temperature, press the
knob once to set that selection. The frame
of the temperature will disappear and the
frame of the time setting will start blinking.
English-18
Figure 11
Step 3. To set the time:
Turn the Temperature/Time Knob if you wish
to increase or decrease the reheating time.
The maximum time setting for Reheat is 60
minutes (1 hour). Once you have selected the
desired reheating time, press the Start button
to initiate the reheating process. The frame of
the time will disappear.
Step 4. To Start:
Press the Start/Cancel Button to start the
reheating process. The red Start/Cancel
Button light will illuminate. The LCD
Display will show the Reheat Function,
the countdown time and the selected
temperature. The unit will begin to work
and the timer will start counting down.
When the Reheating cycle is complete, the
unit will emit 3 beeps. The LCD and the
Start/Cancel Button Light will turn off after
30 seconds.
NOTE:You can cancel the reheating cycle at any
time by pressing the Start/Cancel Button
once.
English-19
Positioning Pan
• To accommodate a wide variety of foods the oven has two rack positions.
The rack can be inserted in the oven in the upper or lower rack guides. The
rack will fit into either of the rack guides inside of the Countertop Oven.
(See Figure Below)
• Before removing the rack allow the unit to cool.
• To remove the rack, open the oven door and pull the rack towards the
front of the oven. The rack will slide on the rack guides on the inside of the
oven.
PLEASE NOTE: the oven rack may tilt downward causing food to shift
when the rack is pulled out, proceed with caution.
• Positioning of the oven rack will depend on the size of the food and
desired browning. Move the rack to the lower rack position to prevent top
browning and move the rack to the upper rack position to prevent bottom
burning.
• For best toasting results, position the rack in the lower rack guide.
Rack Guide
Options
English-20
Cleaning Your Countertop Oven
DO NOT IMMERSE IN LIQUIDS.
Step 1. Press the Start/Cancel Button OFF and remove plug from electrical
outlet. Allow to cool.
Step 2. Wipe unit down with damp cloth. DO NOT IMMERSE IN WATER.
Make sure to only use mild, soapy water. Abrasive cleaners, scrubbing
brushes and chemical cleaners will damage the coating on this unit.
Step 3. Remove crumb tray by pulling out of Countertop Oven.
Step 4. Shake off crumbs from crumb tray. Cleaning the crumb tray often
will avoid any accumulations.
Step 5. Remove wire rack and clean with damp cloth or place in top rack of
dishwasher.
Storing Your Countertop Oven
Allow the appliance to cool completely before storing. If storing the
Countertop Oven for long periods of time make certain that the Countertop
Oven is clean and free of food particles. Store the Countertop Oven in a dry
location such as on a table or countertop or cupboard shelf. Other than the
recommended cleaning, no further user maintenance should be necessary.
English-21
1 Year Limited Warranty
Sunbeam Products, Inc. doing business as Jarden Consumer Solutions or if in
Canada, Sunbeam Corporation (Canada) Limited doing business as Jarden
Consumer Solutions (collectively “JCS”) warrants that for a period of one year
from the date of purchase, this product will be free from defects in material
and workmanship. JCS, at its option, will repair or replace this product or any
component of the product found to be defective during the warranty period.
Replacement will be made with a new or remanufactured product or component.
If the product is no longer available, replacement may be made with a similar
product of equal or greater value. This is your exclusive warranty. Do NOT
attempt to repair or adjust any electrical or mechanical functions on this product.
Doing so will void this warranty.
This warranty is valid for the original retail purchaser from the date of initial retail
purchase and is not transferable. Keep the original sales receipt. Proof of purchase
is required to obtain warranty performance. JCS dealers, service centers, or retail
stores selling JCS products do not have the right to alter, modify or any way
change the terms and conditions of this warranty.
This warranty does not cover normal wear of parts or damage resulting from any
of the following: negligent use or misuse of the product, use on improper voltage
or current, use contrary to the operating instructions, disassembly, repair or
alteration by anyone other than JCS or an authorized JCS service center. Further,
the warranty does not cover: Acts of God, such as fire, flood, hurricanes and
tornadoes.
What are the limits on JCS’s Liability?
JCS shall not be liable for any incidental or consequential damages caused by the
breach of any express, implied or statutory warranty or condition.
Except to the extent prohibited by applicable law, any implied warranty or
condition of merchantability or fitness for a particular purpose is limited in duration
to the duration of the above warranty.
JCS disclaims all other warranties, conditions or representations, express, implied,
statutory or otherwise.
JCS shall not be liable for any damages of any kind resulting from the purchase,
use or misuse of, or inability to use the product including incidental, special,
consequential or similar damages or loss of profits, or for any breach of contract,
fundamental or otherwise, or for any claim brought against purchaser by any
other party.
Some provinces, states or jurisdictions do not allow the exclusion or limitation
of incidental or consequential damages or limitations on how long an implied
warranty lasts, so the above limitations or exclusion may not apply to you.
This warranty gives you specific legal rights, and you may also have other rights
English-22
that vary from province to province, state to state or jurisdiction to jurisdiction.
How To Obtain Warranty Service
In the U.S.A.
If you have any question regarding this warranty or would like to obtain warranty
service, please call 1-800-334-0759 and a convenient service center address will be
provided to you.
In Canada
If you have any question regarding this warranty or would like to obtain warranty
service, please call 1-800-667-8623 and a convenient service center address will be
provided to you.
In the U.S.A., this warranty is offered by Sunbeam Products, Inc. doing business as
Jarden Consumer Solutions located in Boca Raton, Florida 33431. In Canada, this
warranty is offered by Sunbeam Corporation (Canada) Limited doing business as
Jarden Consumer Solutions, located at 20 B Hereford Street, Brampton, Ontario
L6Y 0M1. If you have any other problem or claim in connection with this product,
please write our Consumer Service Department.
PLEASE DO NOT RETURN THIS PRODUCT TO ANY OF THESE
ADDRESSES OR TO THE PLACE OF PURCHASE.
English-23
PRECAUCIONES IMPORTANTES
Cuando se utilicen artefactos eléctricos deben seguirse siempre las
precauciones básicas de seguridad incluyendo las siguientes:
LEA Y GUARDE ESTAS
INSTRUCCIONES
• LEA TODAS LAS INSTRUCCIONES, ETIQUETAS DEL PRODUCTO
•
•
•
•
•
•
•
•
•
•
•
•
Y ADVERTENCIAS ANTES DE UTILIZAR EL HORNO PARA
MOSTRADOR.
No toque las superficies calientes. Utilice siempre guantes para hornos cuando
manipule materiales calientes y deje que las piezas metálicas se enfríen antes de
limpiarlas. Deje que la unidad se enfríe por completo antes de colocar o quitar
piezas. Use las asas del horno para moverlo de un lugar a otro.
Si el horno no está en uso y antes de limpiarlo, presione el botón de “Iniciar/
Cancelar” y desconecte el cable del tomacorriente.
Para protegerse contra el riesgo de descargas eléctricas, no sumerja el artefacto
en agua ni en otros líquidos.
Se requiere estricta supervisión cuando se utilice este o cualquier otro artefacto
cerca de los niños. Este artefacto no debe ser utilizado por niños.
No utilice ningún electrodoméstico que tenga un enchufe o cable dañado
o raído, o después de que el artefacto haya presentado fallas, se haya
caído o haya sufrido cualquier otro daño. Devuelva el horno al Centro de
Servicio Autorizado de Artefactos Sunbeam más cercano para su inspección,
reparación, ajuste eléctrico o mecánico.
No utilice aditamentos no recomendados por el fabricante ya que esto puede
ocasionar incendios, descargas eléctricas o lesiones personales.
No utilice en exteriores o para fines comerciales.
No utilice este producto para otros fines distintos a los recomendados.
No deje que el cable eléctrico cuelgue del borde de la mesa o la mesada ni que
entre en contacto con superficies calientes.
No coloque el electrodoméstico cerca o sobre un quemador caliente, ya sea de
gas o eléctrico, ni dentro de un horno caliente.
Se debe emplear extrema precaución al utilizar contenedores que no sean de
metal o vidrio.
Si se cubre el horno para mostrador o éste entra en contacto con materiales
inflamables, incluyendo cortinas, tapices, paredes, etc., durante su
funcionamiento, podría producirse un incendio. No coloque ningún artículo
sobre el electrodoméstico mientras esté en funcionamiento.
Español-24
• Al utilizar el horno de mesa, colóquelo a una distancia mínima de 15 cm (6
pulgadas) de la pared o de otros cables.
• No almacene dentro de la unidad ningún material, distinto a los accesorios
recomendados por el fabricante, cuando no esté en uso.
• No introduzca materiales inflamables en el horno, tales como papel, cartón,
plástico, o cualquier otro material que pueda incendiarse o derretirse.
• No forre la bandeja o la parrilla del horno con papel de aluminio. Esto
ocasionará que el artefacto se sobrecaliente.
• No deben introducirse alimentos demasiado grandes ni utensilios metálicos
dentro del artefacto, ya que pueden producir incendios o descargas eléctricas.
• No limpie con estropajos metálicos. Podrían desprenderse pedazos del
estropajo y entrar en contacto con las piezas eléctricas, lo cual generaría un
riesgo de descargas eléctricas.
• Debe emplearse extrema precaución al sacar la bandeja o desechar grasas u
otros líquidos calientes.
• Para apagar el electrodoméstico, presione el botón de “Iniciar/Cancelar” y
saque el cable del tomacorriente. El display se apagará después de 30 segundos.
Esta unidad es sólo para uso doméstico
Instrucciones del cable de alimentación corto
Se proporciona un cable de alimentación corto para disminuir los riesgos
originados por enredos o tropiezos con cables largos. Se puede utilizar una
extensión si se emplean las debidas precauciones. Si se usa una extensión, la
capacidad nominal indicada de la misma debe ser por lo menos igual o mayor
a la del artefacto. La extensión debe colocarse de manera que no cuelgue del
mostrador o de la mesa, donde los niños podrían halarla o podría ocasionar
tropiezos accidentales.
Únicamente para productos comprados en Estados Unidos y Canadá
Para disminuir el riesgo de descarga eléctrica este artefacto cuenta con un
enchufe polarizado (una clavija es más ancha que la otra). Este enchufe entra
de una sola manera en un tomacorriente polarizado; si el enchufe no entra por
completo en el tomacorriente, inviértalo. Si aún no encaja, comuníquese con
un electricista calificado. No intente alterar esta característica de seguridad.
CONSERVE ESTAS
INSTRUCCIONES
Español-25
Diagrama del Producto
11
1
2
3
10
4
5
6
7
8
9
1. Pantalla LCD
2. Botón de calentamiento por convección turbo: Úselo para activar o cancelar el
calentamiento por convección turbo.
3. Botón para iniciar/cancelar: Presione este botón para apagar el producto.
4. Perilla selectora de función: seleccione la función de cocción girando la
perilla al ajuste deseado.
5. Perilla de control de tiempo/temperatura: Gradúe la rueda del termostato a la
temperatura deseada / Ajuste la rueda a la temperatura deseada.
6. Rejilla removible: Consulte la sección “Posicionamiento de la rejilla”
7. Puerta de vidrio templado: Para ver los alimentos desde el frente.
8. Tres posiciones para colocar la rejilla
9. Bandeja recolectora removible: Para recolectar las migajas o restos de
comida que caigan. Se saca para facilitar su limpieza.
10.Combinación de fuente para hornear, bandeja para galletas y parrilla para asar:
úselas para todas sus tareas de horneado y asado.
11.Paredes interiores fáciles de limpiar: Permiten la limpieza rápida.
Español-26
a
c
b
d
e
f
Pantalla de LCD
a. Indicador de función: Tostar, Bagel, Pizza, Hornear, Dorar, Galletas,
Asado, Calentar, Descongelar, Recalentar
b. Flecha indicadora de función
c. Indicador de temperatura
d. Indicador de tiempo
e. Icono de calentamiento por convección turbo
f. Indicador del ajuste de intensidad de tostado del 1 al 7
Preparación Del Horno Tostador
Al utilizar el horno tostador por primera vez, recuerde:
•Retirar todas las etiquetas de la superficie del horno.
•Abrir la puerta del horno tostador y sacar todos los documentos
impresos y papeles que se encuentren dentro.
•Limpiar la rejilla y la bandeja con agua caliente, una pequeña cantidad
de detergente líquido para lavar platos y una esponja no abrasiva o
una almohadilla limpiadora. NO SUMERGIR EL CUERPO DE LA
UNIDAD EN AGUA.
•Secar bien la unidad antes de utilizarla.
•Escoger un lugar para colocar el horno tostador. Deberá colocarlo en
un espacio abierto, sobre un mostrador plano, donde el enchufe pueda
llegar al tomacorriente.
•Enchufar el horno en un tomacorriente.
Español-27
Uso Del Horno Tostador (Fig. 1)
Enchufe la unidad; ésta emitirá dos pitidos largos
y la pantalla LCD se iluminará. La opción de
función aparecerá con un indicador en la función
predeterminada de TOSTAR. La pantalla LCD y el
botón de inicio/cancelar permanecerán iluminados
durante 30 segundos y posteriormente se apagarán
si no se oprimen botones o se mueven perillas.
NOTA: Después de que la pantalla LCD se apague
puede oprimir cualquier botón o mover cualquier
perilla para “despertar” la pantalla y hacer
funcionar el horno normalmente
Paso 1. Selección de la función
Gire la perilla de función para elegir una de
las siguientes 10 opciones del menú: Tostar,
Bagel, Pizza, Hornear, Dorar, Galletas,
Asado, Calentar, Descongelar, Recalentar.
La flecha indicadora se moverá de una
función a otra conforme gire la perilla.
NOTA: Si el proceso de cocción no empieza o
no se oprime ningún otro botón ni se
gira ninguna otra perilla en un plazo de
30 segundos, la luz de fondo azul de la
pantalla y la luz del botón de iniciar/
cancelar se apagarán.
Paso 2. Temperatura:
Gire la perilla de temperatura/tiempo para
aumentar o disminuir la graduación de
temperatura.
Paso 3. Tiempo:
Gire la perilla de temperatura/tiempo para
aumentar o disminuir el tiempo de cocción.
El tiempo de cocción máximo es de 60
minutos.
NOTA: Oprima la perilla de temperatura/tiempo
para seleccionar entre las opciones de
temperatura y tiempo.
Español-28
Figura 1
Uso De La Función De Tostar (Fig. 2)
Paso 1. Gire la perilla de función a Tostar. Cuando
seleccione la función de Tostar, el ajuste de
intensidad de tostado del 1 al 7 aparecerá en
la pantalla LCD. Tanto el elemento térmico
superior como el inferior se calentarán.
El ajuste de intensidad de tostado
predeterminado es 4. Cada vez que se
desenchufe y vuelva a enchufarse el horno
tostador, el ajuste predeterminado será 4. Si
el horno tostador permanece enchufado desde
la última vez que seleccionó una intensidad de
tostado distinta para dicha función (aunque no
se active), la unidad recordará el último ajuste
de intensidad seleccionado.
NOTA: Es recomendado usar la posición inferior de la
rejilla para la función de Tostar.
En la función de Tostar no se puede ajustar la
temperatura ni el tiempo.
Paso 2. Para ajustar la intensidad de tostado:
Gire la perilla de temperatura/tiempo para
ajustar la intensidad de tostado. El ajuste de
la intensidad de tostado mostrará su selección
conforme gire la perilla. El marco que rodea
el indicador de la función de tostado en la
pantalla LCD estará parpadeando
Paso 3. Para comenzar:
oprima el botón de iniciar/cancelar para
comenzar el proceso de tostado. La luz roja
del botón de iniciar/cancelar se iluminará. La
pantalla LCD mostrará la función de Tostar, la
intensidad de tostado seleccionada y el tiempo
del cronómetro de cuenta regresiva. La unidad
comenzará a funcionar y el temporizador
empezará la cuenta regresiva.
Cuando termine el ciclo de tostado, la unidad
emitirá tres pitidos. La pantalla LCD y el
botón de iniciar/cancelar se apagarán después
de 30 segundos.
NOTA:Puede cancelar el ciclo de tostado en cualquier
momento oprimiendo una vez el botón de
iniciar/cancelar.
Español-29
Figura 2
Uso De La Función De Bagel (Rosquilla De
Pan) (Fig. 3)
Paso 1. Gire la perilla de función a Bagel. Cuando
seleccione la función de Bagel, el ajuste de
intensidad de tostado del 1 al 7 aparecerá en
la pantalla LCD. Sólo ajuste de intensidad de
tostado predeterminado es 4. Cada vez que se
desenchufe y vuelva a enchufarse el horno tostador,
el ajuste predeterminado será 4. Si el horno
tostador permanece enchufado desde la última vez
que seleccionó una intensidad de tostado distinta
para la función de Bagel (aunque no se active), la
unidad recordará el último ajuste de intensidad
seleccionado.
NOTA: Es recomendado usar la posición inferior de la
rejilla para la función de Bagel. Para mejores
resultados coloque la rosquilla de pan con la
parte cortada hacia arriba.
En la función de Bagel no se puede ajustar la
temperatura ni el tiempo una vez que haya
comenzado.
Paso 2. Para ajustar la intensidad de tostado:
Gire la perilla de temperatura/tiempo para
ajustar la intensidad de tostado. El ajuste de
la intensidad de tostado mostrará su selección
conforme gire la perilla. El marco que rodea el
indicador de la función de tostado en la pantalla
LCD estará parpadeando.
Paso 3. Para comenzar:
Oprima el botón de iniciar/cancelar para
comenzar el proceso de tostado de la rosquilla de
pan. La luz roja del botón de iniciar/cancelar se
iluminará. La pantalla LCD mostrará la función
de Bagel, la intensidad de tostado seleccionada y
el tiempo del cronómetro de cuenta regresiva. La
unidad comenzará a funcionar y el temporizador
empezará la cuenta regresiva.
Cuando termine el ciclo de tostado de la
rosquilla de pan, la unidad emitirá tres pitidos.
La pantalla LCD y el botón de iniciar/cancelar
se apagarán después de 30 segundos.
Español-30
Figura 3
NOTA:Puede cancelar el ciclo de tostado de la rosquilla
de pan en cualquier momento oprimiendo una
vez el botón de iniciar/cancelar.
Uso De La Función De Pizza/ Calentamiento
Por Convección Turbo (Fig. 4)
Paso 1. Gire la perilla de función a Pizza. Al seleccionar
la función de Pizza, el calentamiento por
convección turbo se activará automáticamente.
Paso 2. Si desea cambiar a la función normal de Pizza,
oprima el botón Turbo una vez para apagar
la selección predeterminada de calentamiento
por convección turbo. La luz azul del botón de
calentamiento por convección turbo se apagará.
La función de calentamiento por convección
turbo enciende un ventilador incorporado que
hace circular aire caliente en la cámara del
horno que permite cocinar los alimentos más
rápida y uniformemente.
Temperatura predeterminada: 400 grados F.
Tiempo predeterminado: 16 minutos.
Paso 3. Para fijar la temperatura:
Gire la perilla de temperatura/tiempo si
desea aumentar o disminuir la graduación
de temperatura. El marco que rodea la
graduación de temperatura en la pantalla
LCD estará parpadeando. Para la función de
Pizza la temperatura puede graduarse de 350
a 450 grados F, en incrementos de 25 grados.
Cuando haya seleccionado la temperatura
deseada, oprima la perilla una vez para fijar
dicha selección. El marco de la temperatura
desaparecerá y el del ajuste de tiempo
comenzará a parpadear.
Paso 4. Para fijar el tiempo:
Gire la perilla de temperatura/tiempo si desea
aumentar o disminuir el tiempo de cocción. El
ajuste de tiempo máximo para hornear pizzas
es 60 minutos (1 hora). Una vez que haya
seleccionado el tiempo de cocción deseado,
oprima el botón de iniciar para comenzar el
proceso de cocción. El marco del indicador de
tiempo desaparecerá.
Español-31
Figura 4
Paso 5. Para comenzar:
Oprima el botón de iniciar/cancelar para
comenzar el proceso de cocción. La luz roja
del botón de iniciar/cancelar se iluminará. La
pantalla LCD mostrará la función de Pizza,
el tiempo del cronómetro de cuenta regresiva
y la temperatura seleccionada. La unidad
comenzará a funcionar y el temporizador
empezará la cuenta regresiva. Cuando termine
el ciclo de la función de Pizza, la unidad
emitirá tres pitidos. La pantalla LCD y el
botón de iniciar/cancelar se apagarán después
de 30 segundos.
NOTA:Puede cancelar el ciclo de cocción en cualquier
momento oprimiendo una vez el botón de
iniciar/cancelar.
Uso De La Función De Hornear/
Calentamiento Por Convección Turbo (Fig.
5)
Paso 1. Gire la perilla de función a Hornear. Al
seleccionar la función de Hornear, el
calentamiento por convección turbo se
activará automáticamente.
Paso 2. Si desea cambiar a la función normal de
Hornear, oprima el botón Turbo una vez
para apagar la función de calentamiento
por convección turbo. La luz azul del botón
de calentamiento por convección turbo se
apagará.
La función de calentamiento por convección
turbo enciende un ventilador incorporado que
hace circular aire caliente en la cámara del
horno que permite cocinar los alimentos más
rápida y uniformemente.
Temperatura predeterminada: 325 grados F.
Tiempo predeterminado: 30 minutos.
Español-32
Paso 3. Para fijar la temperatura:
Gire la perilla de temperatura/tiempo si
desea aumentar o disminuir la graduación
de temperatura. El marco que rodea la
graduación de temperatura en la pantalla
LCD estará parpadeando. Para la función
de Hornear la temperatura puede graduarse
de 150 a 450 grados F, en incrementos de
5 grados. Cuando haya seleccionado la
temperatura deseada, oprima la perilla una
vez para fijar dicha selección. El marco de la
temperatura desaparecerá y el del ajuste de
tiempo comenzará a parpadear.
Paso 4. Para fijar el tiempo:
Gire la perilla de temperatura/tiempo si desea
aumentar o disminuir el tiempo de cocción.
El ajuste de tiempo máximo para la función
de Hornear es 60 minutos (1 hora). Una vez
que haya seleccionado el tiempo de cocción
deseado, oprima el botón de iniciar para
comenzar el proceso de cocción. El marco del
indicador de tiempo desaparecerá.
Paso 5. Para comenzar:
Oprima el botón de iniciar/cancelar para
comenzar el proceso de cocción. La luz roja
del botón de iniciar/cancelar se iluminará. La
pantalla LCD mostrará la función de Hornear,
el tiempo del cronómetro de cuenta regresiva
y la temperatura seleccionada. La unidad
comenzará a funcionar y el temporizador
empezará la cuenta regresiva.
Cuando termine el ciclo de Hornear, la unidad
emitirá tres pitidos. La pantalla LCD y el
botón de iniciar/cancelar se apagarán después
de 30 segundos.
NOTA: Puede cancelar el ciclo de cocción en cualquier
momento oprimiendo una vez el botón de
iniciar/cancelar.
Español-33
Figura 5
Uso De La Función De Dorar (Fig. 6)
Paso 1. Gire la perilla de función a Dorar. Al
seleccionar la función Dorar los elementos
térmicos superiores se calentarán.
Temperatura predeterminada: 450 grados F.
Tiempo predeterminado: 10 minutos.
Paso 2. Para fijar la temperatura:
Gire la perilla de temperatura/tiempo si
desea aumentar o disminuir la graduación
de temperatura. El marco que rodea la
graduación de temperatura en la pantalla
LCD estará parpadeando. Para la función de
Dorar la temperatura puede graduarse de 400
a 450 grados F, en incrementos de 25 grados.
Cuando haya seleccionado la temperatura
deseada, oprima la perilla una vez para fijar
dicha selección. El marco de la temperatura
desaparecerá y el del ajuste de tiempo
comenzará a parpadear.
Paso 3. Para fijar el tiempo:
Gire la perilla de temperatura/tiempo si desea
aumentar o disminuir el tiempo de cocción.
El ajuste de tiempo máximo para Dorar
es 60 minutos (1 hora). Una vez que haya
seleccionado el tiempo de cocción deseado,
oprima el botón de iniciar para comenzar el
proceso de cocción. El marco del indicador de
tiempo desaparecerá.
Paso 4. Para comenzar:
Oprima el botón de iniciar/cancelar para
comenzar el proceso de dorado. La luz roja
del botón de iniciar/cancelar se iluminará. La
pantalla LCD mostrará la función de Dorar,
el tiempo del cronómetro de cuenta regresiva
y la temperatura seleccionada. La unidad
comenzará a funcionar y el temporizador
empezará la cuenta regresiva.
Cuando termine el ciclo de Dorar, la unidad
emitirá tres pitidos. La pantalla LCD y el botón
de iniciar/cancelar se apagarán después de 30
segundos.
Español-34
Figura 6
NOTA:Puede cancelar el ciclo de dorado en cualquier
momento oprimiendo una vez el botón de
iniciar/cancelar.
Uso De La Función De Galletas/
Calentamiento Por Convección Turbo (Fig. 7)
Paso 1. Gire la perilla de función a Galletas. Al
seleccionar la función de Galletas, el
calentamiento por convección turbo se activará
automáticamente. Paso 2. Si desea cambiar a la función normal de
Galletas, oprima el botón Turbo una vez
para apagar la función de calentamiento por
convección turbo. La luz azul del botón de
calentamiento por convección turbo se apagará.
La función de calentamiento por convección
turbo enciende un ventilador incorporado que
hace circular aire caliente en la cámara del
horno que permite cocinar los alimentos más
rápida y uniformemente.
Temperatura predeterminada: 350 grados F.
Tiempo predeterminado: 11 minutos.
Paso 3. Para fijar la temperatura:
Gire la perilla de temperatura/tiempo si
desea aumentar o disminuir la graduación de
temperatura. El marco que rodea la graduación
de temperatura en la pantalla LCD estará
parpadeando. Para la función de Galletas
la temperatura puede graduarse de 150 a
450 grados F, en incrementos de 5 grados.
Cuando haya seleccionado la temperatura
deseada, oprima la perilla una vez para fijar
dicha selección. El marco de la temperatura
desaparecerá.
Español-35
Figura 7
Paso 4. Para fijar el tiempo:
Gire la perilla de temperatura/tiempo si desea
aumentar o disminuir el tiempo de cocción.
El ajuste de tiempo máximo para la función
de Galletas es 60 minutos (1 hora). Una vez
que haya seleccionado el tiempo de cocción
deseado, oprima el botón de iniciar para
comenzar el proceso de cocción. El marco
del tiempo desaparecerá y el del ajuste de
temperatura comenzará a parpadear..
Paso 5. Para comenzar:
Oprima el botón de iniciar/cancelar para
comenzar el proceso de cocción. La luz roja
del botón de iniciar/cancelar se iluminará. La
pantalla LCD mostrará la función de Galletas,
el tiempo del cronómetro de cuenta regresiva
y la temperatura seleccionada. La unidad
comenzará a funcionar y el temporizador
empezará la cuenta regresiva.
Cuando termine el ciclo de la función de
Galletas, la unidad emitirá tres pitidos. La
pantalla LCD y el botón de iniciar/cancelar se
apagarán después de 30 segundos.
NOTA:Puede cancelar el ciclo de cocción en cualquier
momento oprimiendo una vez el botón de
iniciar/cancelar..
Uso De La Función De Asar/ Convección
Turbo (Fig. 8)
Paso 1. Gire la perilla de función a Asar. Al
seleccionar la función de Asar, el
calentamiento por convección turbo se
activará automáticamente.
Paso 2. Si desea cambiar a la función normal de
Asar, oprima el botón Turbo una vez (Paso
2) para apagar la función de calentamiento
por convección turbo. La luz azul del botón
de calentamiento por convección turbo se
apagará.
Español-36
La función de calentamiento por
convección turbo enciende un ventilador
incorporado que hace circular aire caliente
en la cámara del horno que permite cocinar
los alimentos más rápida y uniformemente.
Temperatura predeterminada: 350 grados F.
Tiempo predeterminado: 60 minutos.
Paso 3. Para fijar la temperatura:
Gire la perilla de temperatura/tiempo si
desea aumentar o disminuir la graduación
de temperatura. El marco que rodea la
graduación de temperatura en la pantalla
LCD estará parpadeando. Para la función
de Asar la temperatura puede graduarse
de 150 a 450 grados F, en incrementos de
5 grados. Cuando haya seleccionado la
temperatura deseada, oprima la perilla una
vez para fijar dicha selección. El marco de
la temperatura desaparecerá y el del ajuste
de tiempo comenzará a parpadear.
Paso 4. Para fijar el tiempo:
Gire la perilla de temperatura/tiempo si
desea aumentar o disminuir el tiempo de
cocción. El ajuste de tiempo máximo para
la función de Asar es 60 minutos (1 hora).
Una vez que haya seleccionado el tiempo
de cocción deseado, oprima el botón
de iniciar para comenzar el proceso de
cocción. El marco del indicador de tiempo
desaparecerá.
Paso 5. Para comenzar:
Oprima el botón de iniciar/cancelar para
comenzar el proceso de cocción. La luz roja
del botón de iniciar/cancelar se iluminará.
La pantalla LCD mostrará la función de
Asar, el tiempo del cronómetro de cuenta
regresiva y la temperatura seleccionada.
Cuando termine el ciclo de Asar, la unidad
emitirá tres pitidos. La pantalla LCD y
el botón de iniciar/cancelar se apagarán
después de 30 segundos.
Español-37
Figure 8
NOTA:Puede cancelar el ciclo de cocción en cualquier
momento oprimiendo una vez el botón de
iniciar/cancelar.
Uso De La Función De Calentar (Fig. 9)
Paso 1. Gire la perilla de función a Calentar.
Temperatura predeterminada: 150 grados F.
Tiempo predeterminado: 60 minutes.
Puede activar manualmente la función de
calentamiento por convección turbo oprimiendo
una vez el botón Turbo para encenderla. La luz
azul del botón Turbo se encenderá.
Paso 2. Para fijar la temperatura:
Gire la perilla de temperatura/tiempo si
desea aumentar o disminuir la graduación de
temperatura. El marco que rodea la graduación
de temperatura en la pantalla LCD estará
parpadeando. Para la función de Calentar
la temperatura puede graduarse de 150 a
200 grados F, en incrementos de 25 grados.
Cuando haya seleccionado la temperatura
deseada, oprima la perilla una vez para fijar
dicha selección. El marco de la temperatura
desaparecerá y el del ajuste de tiempo
comenzará a parpadear.
Paso3. Para fijar el tiempo:
Gire la perilla de temperatura/tiempo si
desea aumentar o disminuir el tiempo de
calentamiento. El ajuste de tiempo máximo
para la función de Calentar es 60 minutos (1
hora). Una vez que haya seleccionado el tiempo
de calentamiento deseado, oprima el botón de
iniciar para comenzar el proceso de calentar. El
marco del indicador de tiempo desaparecerá.
Paso 4. Para comenzar:
Oprima el botón de iniciar/cancelar para
comenzar el proceso de calentamiento. La luz
roja del botón de iniciar/cancelar se iluminará.
La pantalla LCD mostrará la función de
Calentamiento, el tiempo del cronómetro de
cuenta regresiva y la temperatura seleccionada.
La unidad comenzará a funcionar y el
temporizador empezará la cuenta regresiva.
Español-38
Figura 9
Cuando termine el ciclo de Calentamiento, la
unidad emitirá tres pitidos. La pantalla LCD y
el botón de iniciar/cancelar se apagarán después
de 30 segundos.
NOTA:Puede cancelar el ciclo de calentamiento en
cualquier momento oprimiendo una vez el
botón de iniciar/cancelar.
Uso De La Función De Descongelar (Fig. 10)
Paso 1. Gire la perilla de función a Descongelar.
Temperatura predeterminada: 450 grados F.
Tiempo predeterminado 16 minutos.
Puede activar manualmente la función
de calentamiento por convección turbo
oprimiendo una vez el botón Turbo para
encenderla. La luz azul del botón Turbo se
encenderá.
Paso 2. Para fijar la temperatura:
Gire la perilla de temperatura/tiempo si
desea aumentar o disminuir la graduación de
temperatura. El marco que rodea la graduación
de temperatura en la pantalla LCD estará
parpadeando. Para la función de Descongelar
la temperatura puede graduarse de 150 a
450 grados F, en incrementos de 5 grados.
Cuando haya seleccionado la temperatura
deseada, oprima la perilla una vez para fijar
dicha selección. El marco de la temperatura
desaparecerá y el del ajuste de tiempo
comenzará a parpadear.
Paso 3. Para fijar el tiempo:
Gire la perilla de temperatura/tiempo si
desea aumentar o disminuir el tiempo de
descongelado. El ajuste de tiempo máximo para
la función de Descongelar es 60 minutos (1
hora). Una vez que haya seleccionado el tiempo
de descongelado deseado, oprima el botón de
iniciar para comenzar el proceso de cocción. El
marco del indicador de tiempo desaparecerá.
Español-39
Figura 10
Paso 4. Para comenzar:
Oprima el botón de iniciar/cancelar para
comenzar el proceso de descongelado. La luz
roja del botón de iniciar/cancelar se iluminará.
La pantalla LCD mostrará la función de
Descongelar, el tiempo del cronómetro de
cuenta regresiva y la temperatura seleccionada.
La unidad comenzará a funcionar y el
temporizador empezará la cuenta regresiva.
Cuando termine el ciclo de Descongelar, la
unidad emitirá tres pitidos. La pantalla LCD
y el botón de iniciar/cancelar se apagarán
después de 30 segundos.
NOTA:Puede cancelar el ciclo de descongelado en
cualquier momento oprimiendo una vez el
botón de iniciar/cancelar.
Uso De La Función De Recalentar (Fig. 11)
Paso 1. Gire la perilla de función a Recalentar. .
Temperatura predeterminada: 325 grados F.
Tiempo predeterminado: 15 minutos.
Puede activar manualmente la función
de calentamiento por convección turbo
oprimiendo una vez el botón Turbo para
encenderla. La luz azul del botón Turbo se
encenderá
Paso 2. Para fijar la temperatura:
Gire la perilla de temperatura/tiempo si
desea aumentar o disminuir la graduación de
temperatura. El marco que rodea la graduación
de temperatura en la pantalla LCD estará
parpadeando. Para la función de Recalentar
la temperatura puede graduarse de 150 a
450 grados F, en incrementos de 5 grados.
Cuando haya seleccionado la temperatura
deseada, oprima la perilla una vez para fijar
dicha selección. El marco de la temperatura
desaparecerá y el del ajuste de tiempo
comenzará a parpadear.
Español-40
Figura 11
Paso 3. Para fijar el tiempo:
Gire la perilla de temperatura/tiempo si desea
aumentar o disminuir el tiempo de recalentado.
El ajuste de tiempo máximo para la función
de Recalentar es 60 minutos (1 hora). Una vez
que haya seleccionado el tiempo de recalentado
deseado, oprima el botón de iniciar para
comenzar el proceso de recalentar. El marco del
indicador de tiempo desaparecerá.
Paso 4. Para comenzar:
Oprima el botón de iniciar/cancelar para
comenzar el proceso de recalentado. La luz
roja del botón de iniciar/cancelar se iluminará.
La pantalla LCD mostrará la función de
Recalentar, el tiempo del cronómetro de
cuenta regresiva y la temperatura seleccionada.
La unidad comenzará a funcionar y el
temporizador empezará la cuenta regresiva.
Cuando termine el ciclo de Recalentar, la
unidad emitirá tres pitidos. La pantalla LCD y
el botón de iniciar/cancelar se apagarán después
de 30 segundos.
NOTA:Puede cancelar el ciclo de recalentado en
cualquier momento oprimiendo una vez el
botón de iniciar/cancelar.
Español-41
Posicionamiento De La Rejilla
• El horno posee dos posiciones para colocar la rejilla lo que le permite
adaptarse a una amplia variedad de alimentos. La rejilla puede introducirse
en el horno en las guías superiores o en las inferiores. La rejilla encajará
en cualquiera de las guías que se encuentran en el interior del horno para
mostrador. (Ver la figura abajo)
• Deje que la unidad se enfríe antes de sacar la rejilla.
• Para sacarla, abra la puerta del horno y hale la rejilla hacia adelante. La
rejilla se deslizará por las guías localizadas en el interior del horno.
NOTA: tenga cuidado al halar la rejilla del horno hacia afuera ya que ésta
podría inclinarse hacia abajo y ocasionar que los alimentos se deslicen.
• La posición de la rejilla del horno dependerá del tamaño de los alimentos
y la intensidad de dorado. Coloque la rejilla en la posición más baja para
evitar que se tueste la parte superior y colóquela en la posición más alta
para evitar que se queme la parte inferior.
• Para obtener los mejores resultados al tostar, coloque la rejilla en la guía
inferior.
Opciones de
Guías para
Rejillas
Español-42
Limpieza Del Horno Para Mostrador
NO SUMERJA EN LÍQUIDOS.
Paso 1. Oprima el botón de iniciar/cancelar para apagarlo y saque el enchufe
del tomacorriente. Deje que se enfríe.
Paso 2. Limpie la unidad con un paño húmedo. NO SUMERJA EN AGUA.
Asegúrese de usar únicamente agua y un jabón suave. Los limpiadores
abrasivos, cepillos para frotar y limpiadores químicos dañarán el
recubrimiento de la unidad.
Paso 3. Saque la bandeja recolectora del horno para mostrador.
Paso 4. Sacuda las migajas de la bandeja recolectora. La limpieza frecuente de
la bandeja recolectora evitará que se produzcan acumulaciones.
Paso 5. Saque la rejilla y límpiela con un paño húmedo o colóquela en el
anaquel superior del lavaplatos automático
Almacenamiento Del Horno Para Mostrador
Deje que el electrodoméstico se enfríe por completo antes de guardarlo. Si se
va a almacenar el horno para mostrador por períodos prolongados de tiempo,
asegúrese de que esté limpio y desprovisto de partículas de alimentos. Guarde
el horno para mostrador en un lugar seco, como por ejemplo en una mesa,
mesada o en el estante de un aparador. No es necesario ningún otro tipo de
mantenimiento, salvo la limpieza recomendada en este manual.
Español-43
Garantía limitada de 1 año
Sunbeam Products, Inc., que opera bajo la razón social Jarden Consumer
Solutions, y en Canadá, Sunbeam Corporation (Canada) Limited, que opera bajo
la razón social Jarden Consumer Solutions (en conjunto denominadas “JCS”),
garantiza que este producto no presentará defectos ni en el material ni en la mano
de obra durante el período de un año a partir de la fecha de compra. JCS, a su
discreción, reparará o reemplazará este producto o cualquier componente del
mismo que se considere defectuoso durante el período de garantía. El reemplazo se
efectuará por un producto o componente nuevo o reacondicionado. Si el producto
ya no estuviera disponible, puede reemplazarse por un producto similar de igual o
mayor valor. Esta es su garantía exclusiva. NO intente reparar ni ajustar ninguna
de las funciones eléctricas o mecánicas de este producto. Si lo hace, anulará la
garantía.
Esta garantía tiene validez para el comprador minorista original a partir de la fecha
de la compra inicial y la misma no es transferible. Conserve el recibo de venta
original. Para hacer valer la garantía es necesaria la prueba de la compra. Los
distribuidores de JCS, los centros de servicio ni las tiendas minoristas que vendan
productos de JCS no tienen potestad para alterar, modificar ni cambiar de forma
alguna los términos y condiciones de esta garantía.
Esta garantía no ampara el desgaste normal de las piezas ni los daños que se
produzcan a consecuencia de cualquiera de las siguientes circunstancias: uso
negligente o inadecuado del producto, uso con un voltaje o corriente inapropiados,
uso contrario a las instrucciones de funcionamiento, desensamblaje, reparación o
alteración por parte de terceros ajenos a JCS o un Centro de Servicio Autorizado
de JCS. Asimismo, la garantía no ampara: actos de fuerza mayor tales como
incendios, inundaciones, huracanes y tornados.
¿Cuáles son los límites de la responsabilidad de JCS?
JCS no será responsable por daños accidentales o resultantes ocasionados por el
incumplimiento de alguna garantía o estipulación expresa, implícita o estatutaria.
Salvo en la medida en que lo prohíban las leyes pertinentes, alguna garantía
o estipulación implícita sobre la comerciabilidad o adecuación para un fin
determinado tendrá una duración limitada al plazo de la garantía antes mencionada.
Sunbeam desconoce cualesquiera otras garantías, estipulaciones o representaciones,
expresas, implícitas, estatutarias o de cualquier otra naturaleza.
Sunbeam no será responsable por daños de ningún tipo que resulten de la compra,
utilización o uso inadecuado del producto, o la imposibilidad de uso del mismo,
incluyendo daños accidentales, especiales, resultantes o similares o la pérdida
de ganancias, ni por ningún incumplimiento contractual, fundamental o de otra
naturaleza, ni por ninguna acción emprendida por terceros en contra del comprador.
Español-44
Algunas provincias, estados o jurisdicciones no permiten la exclusión o limitación
de los daños accidentales o resultantes ni las limitaciones en cuanto a la duración
de una garantía implícita, por lo tanto, es posible que las limitaciones o exclusiones
anteriores no se apliquen en su caso.
Esta garantía le otorga derechos legales específicos pero quizás usted goce además
de otros derechos que varían de un estado, una provincia o una jurisdicción a otra.
Cómo obtener servicio en garantía
En EE.UU.
Si tiene preguntas relativas a esta garantía o desea obtener servicio en garantía,
sírvase llamar al 1-800-334-0759 y se le proporcionará la dirección de un centro de
servicio que le resulte conveniente.
En Canadá
Si tiene preguntas relativas a esta garantía o desea obtener servicio en garantía,
sírvase llamar al 1-800-667-8623 y le proporcionaremos la dirección de un centro
de servicio que le resulte conveniente.
En EE.UU., esta garantía la ofrece Sunbeam Products, Inc., bajo la razón social
Jarden Consumer Solutions, ubicada en Boca Raton, Florida 33431. En Canadá,
esta garantía la ofrece Sunbeam Corporation (Canada) Limited, bajo la razón social
Jarden Consumer Solutions, ubicada en 20 B Hereford Street, Brampton, Ontario
L6Y 0M1. Si tiene algún problema o reclamo en relación a este producto, sírvase
escribir a nuestro departamento de atención al cliente.
LE ROGAMOS QUE NO DEVUELVA ESTE PRODUCTO A NINGUNA DE
LAS DIRECCIONES ANTERIORES NI AL LUGAR DONDE LO ADQUIRIÓ.
Español-45
For product questions contact:
Jarden Consumer Service
USA: 1.800.334.0759
Canada: 1.800.667.8623
www.oster.com
© 2011 Sunbeam Products, Inc. doing business as Jarden Consumer
Solutions. All rights reserved. Distributed by Sunbeam Products, Inc. doing
business as Jarden Consumer Solutions, Boca Raton, Florida 33431. Jarden
Consumer Solutions is a subsidiary of Jarden Coporation (NYSE : JAH)
Para preguntas sobre los productos llame:
Jarden Consumer Service
EE.UU.: 1.800.334.0759
Canadá: 1.800.667.8623
www.oster.com
© 2011 Sunbeam Products, Inc. operando bajo el nombre de
Jarden Consumer Solutions. Todos los derechos reservados.
Distribuido por Sunbeam Products, Inc. operando bajo el nombre de
Jarden Consumer Solutions, Boca Raton, Florida 33431. Jarden Consumer
Solutions es una subsidiaria de Jarden Coporation (NYSE : JAH)
CBA- 081211
Printed in China
Impreso en China