1
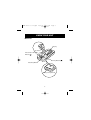
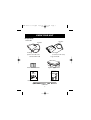
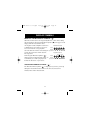
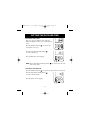
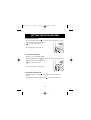
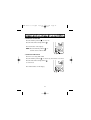
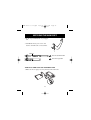
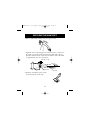
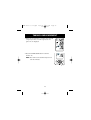
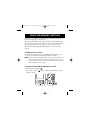
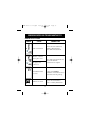
HEM-7300 e-s r2.qxd
11/2/07
4:50 PM
Page 1
INSTRUCTION MANUAL
ENGLISH
ESPAÑOL
Women’s Advanced
Automatic Blood Pressure Monitor
with Two Cuffs
Model Elite 7300W
HEM-7300 e-s r2.qxd
11/2/07
4:50 PM
Page 2
TABLE OF CONTENTS
Before Using the Monitor
Introduction . . . . . . . . . . . . . . . . . . . . . . . . . . . . . . . . . . . . . . . . . . . . . . . . . . .3
Safety Information . . . . . . . . . . . . . . . . . . . . . . . . . . . . . . . . . . . . . . . . . . . . . .4
Operating the Device . . . . . . . . . . . . . . . . . . . . . . . . . . . . . . . . . . . . . .4
Care and Maintenance . . . . . . . . . . . . . . . . . . . . . . . . . . . . . . . . . . . . .6
Before Taking a Measurement . . . . . . . . . . . . . . . . . . . . . . . . . . . . . . . . . . . . .7
Operating Instructions
Know Your Unit . . . . . . . . . . . . . . . . . . . . . . . . . . . . . . . . . . . . . . . . . . . . . . . .8
Unit Display . . . . . . . . . . . . . . . . . . . . . . . . . . . . . . . . . . . . . . . . . . . . . . . . . .10
Display Symbols . . . . . . . . . . . . . . . . . . . . . . . . . . . . . . . . . . . . . . . . . . . . . .11
Irregular Heartbeat Symbol ( ) . . . . . . . . . . . . . . . . . . . . . . . . . . .11
Movement Error Symbol ( ) . . . . . . . . . . . . . . . . . . . . . . . . . . . . .11
Heartbeat Symbol/Hypertension Indicator ( ) . . . . . . . . . . . . . . .12
Average Value Symbol ( ) . . . . . . . . . . . . . . . . . . . . . . . . . . . . . . .12
Battery Installation . . . . . . . . . . . . . . . . . . . . . . . . . . . . . . . . . . . . . . . . . . . .14
Setting the Date and Time . . . . . . . . . . . . . . . . . . . . . . . . . . . . . . . . . . . . . . .16
Setting the Medication Reminder Alarm . . . . . . . . . . . . . . . . . . . . . . . . . . .20
Applying the Arm Cuff . . . . . . . . . . . . . . . . . . . . . . . . . . . . . . . . . . . . . . . . .24
Taking a Measurement . . . . . . . . . . . . . . . . . . . . . . . . . . . . . . . . . . . . . . . . .28
Using the Guest Mode . . . . . . . . . . . . . . . . . . . . . . . . . . . . . . . . . . . .30
Using the Memory Function . . . . . . . . . . . . . . . . . . . . . . . . . . . . . . . . . . . . .31
Averaging Function . . . . . . . . . . . . . . . . . . . . . . . . . . . . . . . . . . . . . .31
To Display the Measurement Values . . . . . . . . . . . . . . . . . . . . . . . . .31
To Delete All Values Stored in the Memory . . . . . . . . . . . . . . . . . . .33
Care and Maintenance
Care and Maintenance . . . . . . . . . . . . . . . . . . . . . . . . . . . . . . . . . . . . . . . . . .34
Error Indicators and Troubleshooting Tips . . . . . . . . . . . . . . . . . . . . . . . . . .36
FCC Statement . . . . . . . . . . . . . . . . . . . . . . . . . . . . . . . . . . . . . . . . . . . . . . .38
Warranty . . . . . . . . . . . . . . . . . . . . . . . . . . . . . . . . . . . . . . . . . . . . . . . . . . . .39
Specifications . . . . . . . . . . . . . . . . . . . . . . . . . . . . . . . . . . . . . . . . . . . . . . . .40
2
HEM-7300 e-s r2.qxd
11/2/07
4:50 PM
Page 3
Before Using the Monitor
INTRODUCTION
Thank you for purchasing the Omron® Elite 7300W IntelliSense®
Women’s Advanced Automatic Blood Pressure Monitor.
Fill in for future reference.
DATE PURCHASED: __________________
SERIAL NUMBER: ____________________
Staple your purchase receipt here
Your new digital blood pressure monitor uses the oscillometric method of
blood pressure measurement. This means the monitor detects your
blood’s movement through your brachial artery and converts the
movements into a digital reading. An oscillometric monitor does not need
a stethoscope so the monitor is simple to use.
The Elite 7300W comes with the following components:
• Monitor
• Standard Arm Cuff
• Large Arm Cuff
• 4 “AAA” Batteries
• Stylish Zipper Case
• Instruction Manual printed in English and Spanish
• Quick Guide
• Warranty Card
• Cuff Guide
The Elite 7300W IntelliSense® Women’s Advanced Automatic Blood
Pressure Monitor is intended for home use.
While the Omron Elite 7300W is designed for women, it has also been
clinically proven accurate for all adults, regardless of gender. So you can
be assured that this product can be used by men and women.
SAVE THESE INSTRUCTIONS
3
HEM-7300 e-s r2.qxd
11/2/07
4:50 PM
Page 4
SAFETY INFORMATION
To assure the correct use of the product basic safety measures should
always be followed including the warnings and cautions listed in this
instruction manual.
SAFETY SYMBOLS USED IN THIS INSTRUCTION MANUAL
WARNING
Indicates a potentially hazardous situation
which, if not avoided, could result in death or
serious injury.
CAUTION
Indicates a potentially hazardous situation
which, if not avoided, may result in minor or
moderate injury to the user or patient or
damage to the equipment or other property.
OPERATING THE DEVICE
Contact your physician for specific information about your blood
pressure. Self-diagnosis and treatment using measured results may
be dangerous. Follow the instructions of your physician or licensed
healthcare provider.
If battery fluid should get in your eyes, immediately rinse with plenty
of clean water. Contact a physician immediately.
People with severe blood flow problems, or blood disorders, should
consult a doctor before using the unit. Cuff inflation can cause
internal bleeding.
Read all of the information in the instruction manual and any other
literature in the box before operating the unit.
4
HEM-7300 e-s r2.qxd
11/2/07
4:50 PM
Page 5
SAFETY INFORMATION
OPERATING THE DEVICE (continued)
This device is intended for use in measuring blood pressure and pulse
rate in the adult population. Do not use this device on infants or
persons who cannot express their intentions.
Inflating to a higher pressure may result in bruising where the cuff is
applied.
Operate the device only as intended. Do not use the device for any
other purpose.
Dispose of the device, components and optional accessories according
to applicable local regulations. Unlawful disposal may cause
environmental pollution.
Do not use a cellular phone near the device. It may result in an
operational failure.
Use only Omron authorized parts and accessories. Parts and
accessories not approved for use with the device may damage the unit.
Use only 1.5V alkaline batteries with this device.
Do not use other types of batteries. This may damage the unit.
5
HEM-7300 e-s r2.qxd
11/2/07
4:50 PM
Page 6
SAFETY INFORMATION
CARE AND MAINTENANCE
Do not subject the monitor to strong shocks, such as dropping the unit
on the floor.
Do not submerge the device or any of the components in water.
Store the device and the components in a clean, safe location.
Changes or modification not approved by Omron Healthcare will void
the user warranty. Do not disassemble or attempt to repair the unit or
components.
6
HEM-7300 e-s r2.qxd
11/2/07
4:50 PM
Page 7
BEFORE TAKING A MEASUREMENT
To ensure a reliable reading follow these recommendations:
1. Avoid eating, drinking alcohol, smoking, exercising, and bathing for
30 minutes before taking a measurement. Rest for at least 15 minutes
before taking the measurement.
2. Stress raises blood pressure. Avoid taking measurements during
stressful times.
3. Measurements should be taken in a quiet place.
4. Remove tight-fitting clothing from your arm.
5. Sit in a chair with your feet flat on the floor. Rest your arm on
a table so that the cuff is at the same level as your heart.
6. Remain still and do not talk during the measurement.
7. Keep a record of your blood pressure and pulse readings for your
physician. A single measurement may not provide an accurate
indication of your true blood pressure. You need to take and record
several readings over a period of time. Try to measure your blood
pressure at about the same time each day for consistency.
8. Wait 2-3 minutes between measurements. The wait time allows the
arteries to return to the condition prior to taking the blood pressure
measurement. You may need to increase the wait time depending on
your individual physiological characteristics.
7
HEM-7300 e-s r2.qxd
11/2/07
4:50 PM
Page 8
Operating Instructions
KNOW YOUR UNIT
Main Unit:
Display
Air Jack
Date/Time Setting
Button ( )
Memory Button (
Start/Stop Button
Battery Compartment
8
)
HEM-7300 e-s r2.qxd
11/2/07
4:50 PM
Page 9
KNOW YOUR UNIT
Components:
Arm Cuffs
Air Tube
Air Tube
Air Plug
(Connects to Air Jack)
Air Plug
(Connects to Air Jack)
Standard Arm Cuff
Large Arm Cuff
Stylish Zipper Case
Four “AAA” Batteries
QUICK GUIDE
Thank you for purchasing the Omron¤ Elite 7300W IntelliSense¤
Women s Advanced Automatic Blood Pressure Monitor.
INSTRUCTION MANUAL
There are two cuffs included in this unit, standard size and large size.
This sheet simply explains how to choose the correct size cuff with Cuff
Guide. However, please read the instruction manual thoroughly before
using the unit.
Women’s Advanced
Automatic Blood Pressure Monitor
with Two Cuffs
Model Elite 7300W
1. Make a loop with your Cuff Guide.
2. Fit the looped Cuff Guide on your upper
arm.
ESPAÑOL
3. Cuff Guide shows your correct cuff.
Use the cuff with same colored sticker.
Use the Standard Cuff
ENGLISH
Orange
(9"-13")
Use the Cuff Guide to get your
upper arm size, then choose
the right size cuff.
Use the Large Cuff
Purple
(13"-17")
Use the Cuff Guide to get your
upper arm size, then choose
the right size cuff.
5318770-0A
Quick Guide
Instruction Manual
Cuff Guide
9
HEM-7300 e-s r2.qxd
11/2/07
4:50 PM
Page 10
UNIT DISPLAY
Systolic Blood Pressure
Diastolic Blood Pressure
Heartbeat Symbol/
Hypertension Indicator
Deflation Symbol
Memory Symbol
Average Value Symbol
Medication Symbol
Pulse Display
Date/Time Display
Low Battery Indicator
Guest Symbol
Movement Error Symbol
Irregular Heartbeat Symbol
10
HEM-7300 e-s r2.qxd
11/2/07
4:50 PM
Page 11
DISPLAY SYMBOLS
IRREGULAR HEARTBEAT SYMBOL (
)
When the monitor detects an irregular rhythm two or more times during
the measurement, the Irregular Heartbeat Symbol ( ) will appear on the
display with the measurement values.
N ormal H ear tb eat
An irregular heartbeat rhythm is defined as
a rhythm that is more than 25% slower or
25% faster from the average rhythm
detected while the monitor is measuring the
systolic blood pressure and the diastolic
blood pressure.
Blood
pressure
If the Irregular Heartbeat Symbol ( )
displays with your measurement results, we
recommend you consult your physician.
Follow the directions of your doctor.
Blood
pressure
Pulse
Irregular Heartbeat
Short Long
Pulse
MOVEMENT ERROR SYMBOL ( )
The Movement Error Symbol (
) is displayed if you move your body
during the measurement. Please remove the arm cuff, and wait 2-3
minutes. Take another measurement.
11
HEM-7300 e-s r2.qxd
11/2/07
4:50 PM
Page 12
DISPLAY SYMBOLS
HEARTBEAT SYMBOL/HYPERTENSION INDICATOR (
)
TAKING A MEASUREMENT
The Heartbeat Symbol ( ) flashes on the display during the
measurement. The Heartbeat Symbol ( ) flashes at every
heartbeat.
When the measurement is complete, the Heartbeat Symbol ( )
flashes on the display with your blood pressure and pulse rate if the
reading is above 135 for the Systolic Blood Pressure value and/or 85
for the Diastolic Blood Pressure value.
USING THE MEMORY FUNCTION
The Heartbeat Symbol ( ) flashes when the blood pressure
reading stored in the memory is above 135 for the Systolic Blood
Pressure value and/or 85 for the Diastolic Blood Pressure value.
AVERAGE VALUE SYMBOL ( )
The Average Value Symbol (
) is displayed when you press the
Memory button (
display screen.
). The most recent average reading appears on the
12
HEM-7300 e-s r2.qxd
11/2/07
4:50 PM
Page 13
DISPLAY SYMBOLS
The American Heart Association recommends the following guideline for
upper limit of normal for home blood pressure readings:
AHA Home Guideline for Upper Limit of Normal BP
Systolic Blood Pressure
135 mmHg
Diastolic Blood Pressure
85 mmHg
This is a general guideline because blood pressure depends on
age and morbidity. The AHA recommends a lower home blood
pressure goal for certain patients, including diabetic patients,
pregnant women, and patients with renal failure1.
The monitor is not intended to be a diagnostic device.
WARNING
Contact your physician for specific information about your blood
pressure. Self-diagnosis and treatment using measured results may be
dangerous. Follow the instructions of your physician or licensed
healthcare provider.
Omron Healthcare recommends you contact your physician if the
Heartbeat Symbol ( ) flashes on the display with your measurement
values.
1
American Heart Association Scientific Statement 2004
13
HEM-7300 e-s r2.qxd
11/2/07
4:50 PM
Page 14
BATTERY INSTALLATION
t
1. Press the indicator on the battery cover
and slide the cover off in the direction of
the arrow.
Battery Cover
2. Install 4 “AAA” size batteries so the +
(positive) and – (negative) polarities match
the polarities of the battery compartment as
indicated.
3. Replace the battery cover.
14
HEM-7300 e-s r2.qxd
11/2/07
4:50 PM
Page 15
BATTERY INSTALLATION
BATTERY REPLACEMENT
Low Battery Indicator
When the Low Battery Indicator appears on the display screen, turn the
monitor off and remove all the batteries. Replace with four new batteries
at the same time.
WARNING
If battery fluid should get in your eyes, immediately rinse with plenty
of clean water. Contact a physician immediately.
NOTES: • Turn the unit off before replacing the batteries. If the batteries
are removed while the unit is still on, the date and time will
be reset to that of the previous use. However, the
measurement results are not deleted.
• When the batteries are replaced, you may need to reset the
date and time. If the year is flashing on the display screen,
refer to “Setting the Date and Time”.
• The supplied batteries may have a shorter life.
CAUTION
Dispose of the device, components and optional accessories
according to applicable local regulations. Unlawful disposal may
cause environmental pollution.
15
HEM-7300 e-s r2.qxd
11/2/07
4:50 PM
Page 16
SETTING THE DATE AND TIME
Set the monitor to the current date and time before taking a measurement
for the first time. If the date and time are not set correctly, the
measurement values stored in the memory and the average values may
not be correct.
The Blood Pressure Monitor automatically stores up to 84 individual
measurements values with the dates and times.
The monitor can also calculate an average reading based on the three
most recent measurements taken within 10 minutes.
NOTES: • If only two readings are stored in the memory for the
10-minute period, the average is based on the two readings.
• If one reading is stored in the memory for the 10-minute
period, this reading is displayed as the average.
1. TO START THE SETTING
Press and hold the Date/Time Setting button
( ) to adjust the date and time.
The year flashes on the display.
16
HEM-7300 e-s r2.qxd
11/2/07
4:50 PM
Page 17
SETTING THE DATE AND TIME
2. SETTING THE YEAR
The year can be set between 2008 and 2030.
When the display reaches 2030, it will return to
2008.
Press the Memory button (
increments of one year.
) to advance by
Press the Date/Time Setting button (
to set the current year.
)
The month flashes on the display.
NOTE: Press and hold the Memory button (
time values faster.
) to advance the date and
3. SETTING THE MONTH
Press the Memory button (
) to advance by increments of one month.
Press the Date/Time Setting button (
to set the current month.
The day flashes on the display.
17
)
HEM-7300 e-s r2.qxd
11/2/07
4:50 PM
Page 18
SETTING THE DATE AND TIME
4. SETTING THE DAY
Press the Memory button (
) to advance by increments of one day.
Press the Date/Time Setting button
( ) to set the current day.
The hour flashes on the display.
5. SETTING THE HOUR
The time is set using AM or PM.
Press the Memory button (
) to advance by increments of one hour.
Press the Date/Time Setting button
( ) to set the current hour.
The minute flashes on the display.
6. SETTING THE MINUTE
Press the Memory button (
minute.
) to advance by increments of one
Press the Date/Time Setting button (
18
) to turn the monitor off.
HEM-7300 e-s r2.qxd
11/2/07
4:50 PM
Page 19
SETTING THE DATE AND TIME
RESETTING THE DATE AND TIME
To adjust the date or time after it has been setup when you first use
the unit.
Start with the monitor in the off position.
1. Press and hold the Date/Time Setting button (
).
The Medication Symbol ( ) No.1 and the current setting (on or
oFF) will appear on the display.
Press the Date/Time Setting button repeatedly until the year flashes on
the display.
2. Refer to “Setting the Date and Time”.
The Medication Symbol ( ) No.1 and the current setting (on or
oFF) will appear on the display, after the minute has been set.
3. Press the START/STOP button to turn the monitor off.
NOTE: If you need to change the Date and Time, always adjust the
Date and Time setting before taking the next measurement.
19
HEM-7300 e-s r2.qxd
11/5/07
12:48 PM
Page 20
SETTING THE MEDICATION REMINDER ALARM
The Medication Reminder Alarm can be set to sound twice a day to alert
the user to take a medication. The Medication Reminder Alarm can be
set for either AM or PM alerts. Only set the Medication Reminder Alarm
after the date and time has been set. The Medication Reminder Alarm is
set to off at the time of purchase.
NOTES: • Press the START/STOP button to stop the Medication
Reminder Alarm.
• The Medication Reminder Alarm will automatically stop
sounding after one minute.
• The Medication Reminder Alarm will not sound when the
monitor is taking a measurement.
1. TO START THE SETTING
Press and hold the Date/Time Setting
button ( ).
The Medication Symbol ( ) No.1 and the
oFF setting appear on the display.
20
HEM-7300 e-s r2.qxd
11/2/07
4:50 PM
Page 21
SETTING THE MEDICATION REMINDER ALARM
2. SETTING ON OR OFF
Press the Memory button (
) to select on.
Press the Date/Time Setting button (
).
The hour flashes on the display.
NOTE: Press the Memory button ( ) to
alternate between on or oFF.
3. SETTING THE HOUR
The time is set using AM or PM.
Press the Memory button (
) to advance by increments of one hour.
Press the Date/Time Setting button (
to set the hour.
The minute flashes on the display.
21
)
HEM-7300 e-s r2.qxd
11/2/07
4:50 PM
Page 22
SETTING THE MEDICATION REMINDER ALARM
4. SETTING THE MINUTE
Press the Memory button (
minute.
) to advance by increments of one
Press the Date/Time Setting button
( ) to set the minute.
The Medication Symbol ( ) No.2 and the
oFF setting appears on the display.
5. SETTING THE MEDICATION REMINDER ALARM 2
Repeat steps from 2 to 4 to set the Medication
Reminder Alarm 2.
The year flashes on the display, after the
Medication Reminder Alarm 2 has been set.
22
HEM-7300 e-s r2.qxd
11/2/07
4:50 PM
Page 23
SETTING THE MEDICATION REMINDER ALARM
6. TO TURN THE MONITOR OFF
If the date and time are correct, press the START/STOP button to turn
the monitor off.
To change the date and time refer to “Resetting the Date and Time” on
page 19.
23
HEM-7300 e-s r2.qxd
11/2/07
4:50 PM
Page 24
APPLYING THE ARM CUFF
CAUTION
Read all of the information in the instruction manual and any other
literature in the box before operating the unit.
CAUTION
This device is intended for use in measuring blood pressure and pulse
rate in the adult population. Do not use this device on infants or
persons who cannot express their intentions.
USE CUFF GUIDE TO CHOOSE THE RIGHT CUFF
There are two cuffs included in this unit, standard size and large size.
Use the Cuff Guide to determine which size cuff is right for you, based
on the circumference of your arm.
1. Make a loop with your Cuff Guide.
24
HEM-7300 e-s r2.qxd
11/2/07
4:50 PM
Page 25
APPLYING THE ARM CUFF
2. Fit the looped Cuff Guide on your upper
arm.
3. Cuff Guide shows your correct cuff.
Use the cuff with same colored sticker.
Orange
Use the Standard Cuff
Use the Large Cuff
Purple
APPLYING THE CUFF ON THE LEFT ARM
1. Make sure the air plug is securely inserted in the main unit.
25
HEM-7300 e-s r2.qxd
11/2/07
4:50 PM
Page 26
APPLYING THE ARM CUFF
2. Remove tight-fitting clothing from your upper left arm.
3. Apply the cuff to your left upper arm so the blue arrow is centered on
the inside of your arm and aligned with your middle finger. The air
tube runs down the inside of your arm. The bottom of the cuff should
be approximately 1/2" above your elbow.
1/2 inch (1 - 2 cm)
Blue Arrow
4. Wrap the cuff firmly in place around
your arm using the closure strip.
26
Air Tube
HEM-7300 e-s r2.qxd
11/2/07
4:50 PM
Page 27
APPLYING THE ARM CUFF
APPLYING THE CUFF ON THE RIGHT ARM
When taking a measurement using the right arm use this instruction
for Step 3 on page 26.
Apply the cuff to your right upper arm so the blue arrow and the air tube
runs along the inside of your elbow. The bottom of the cuff should be
approximately 1/2'' above your elbow.
NOTE: Be careful not to rest your arm on the air tube. This will restrict
the flow of air to the cuff.
27
HEM-7300 e-s r2.qxd
11/2/07
4:50 PM
Page 28
TAKING A MEASUREMENT
1. Sit in a chair with your feet flat on the floor. Place your left arm on a
table so the cuff is level with your heart.
2. Press the START/STOP button.
All symbols appear on the display.
The cuff starts to inflate automatically. As the cuff inflates, the monitor
automatically determines your ideal inflation level.
This monitor detects your blood pressure and pulse rate during
inflation. The Heartbeat Symbol ( ) flashes at every heartbeat. Do
not move your arm and remain still until the entire measurement
process is completed.
NOTE: To stop the inflation or measurement, press the START/STOP
button. The monitor will stop inflating, start deflating and will
turn off.
28
HEM-7300 e-s r2.qxd
11/2/07
4:50 PM
Page 29
TAKING A MEASUREMENT
3. When the measurement is complete, the arm cuff
completely deflates. Your blood pressure and
pulse rate are displayed.
4. Press the START/STOP button to turn the
monitor off.
NOTE: The monitor will automatically turn off
after two minutes.
29
HEM-7300 e-s r2.qxd
11/2/07
4:50 PM
Page 30
TAKING A MEASUREMENT
USING THE GUEST MODE
The monitor is designed to take measurements and store the
measurement values in the memory for one person. The monitor can also
be used to take a single measurement for other persons using the GUEST
Mode. Measurements taken using the Guest Mode are not stored in the
memory.
1. Press and hold the START/STOP button for 3
seconds.
The Guest Symbol (
display.
) appears on the
2. Release the START/STOP button.
The cuff starts to inflate automatically.
NOTE: To stop the inflation, press the START/STOP button. The
monitor will stop inflating, start deflation and turn off.
3. Inflation stops and the measurement is started. When the measurement
is completed, your blood pressure and pulse rate appear on the display.
30
HEM-7300 e-s r2.qxd
11/2/07
4:50 PM
Page 31
USING THE MEMORY FUNCTION
Every time you complete a measurement the monitor stores the blood
pressure and pulse rate in the memory.
The monitor automatically stores up to 84 sets of measurement values
(blood pressure and pulse rate). When 84 sets of measurement values are
stored, the oldest record is deleted to save the most recent values.
Measurements taken using the GUEST Mode are not stored in the
memory.
AVERAGING FUNCTION
The monitor calculates the average reading based on the three most
recent sets of measurement values taken within 10 minutes.
NOTE: If two sets of measurement values are stored in the memory for
the 10 minutes period, the average is based on the two sets of
measurement values. If one set of measurement values is stored,
this is displayed as the average.
TO DISPLAY THE MEASUREMENT VALUES
1. Press the Memory button (
The Average Symbol (
reading is shown.
).
) appears on the display when the average
31
HEM-7300 e-s r2.qxd
11/2/07
4:50 PM
Page 32
USING THE MEMORY FUNCTION
2. Press the Memory button ( ) to display the most recent set of
measurement values on the screen. The values are displayed from the
most recent to the oldest.
NOTE: The date and time are
alternately displayed with the
measurement values.
Press the Memory button ( ) to
display the next set of values.
Press and hold the Memory button
( ) to display the values faster.
Alternating display
3. Press the START/STOP button to turn the power off.
32
HEM-7300 e-s r2.qxd
11/2/07
4:50 PM
Page 33
USING THE MEMORY FUNCTION
TO DELETE ALL VALUES STORED IN THE MEMORY
You cannot partially delete values stored in the memory.
1. Press the Memory button (
) to turn the monitor on.
2. Press the Memory button (
again.
)
While holding it down, press
the START/STOP button
together for more than 5
seconds.
3. Press the START/STOP button to turn the monitor off.
NOTE: The monitor will automatically turn off after two minutes.
33
HEM-7300 e-s r2.qxd
11/2/07
4:50 PM
Page 34
Care and Maintenance
CARE AND MAINTENANCE
To keep your digital blood pressure monitor in the best condition and
protect the unit from damage, follow the directions listed below:
Keep the monitor in the Stylish Zipper
Case when not in use.
Do not forcefully bend the arm cuff or air tube. Do not fold tightly.
Clean the monitor with a soft dry cloth. Do not use any abrasive
or volatile cleaners. Do not attempt to clean the cuff.
CAUTION
Do not submerge the device or any of the components in water.
Do not subject the monitor to extreme hot or cold temperatures,
humidity or direct sunlight.
CAUTION
Store the device and the components in a clean, safe location.
CAUTION
Do not subject the monitor to strong shocks, such as dropping the
unit on the floor.
Remove the batteries if the unit will not be used for three months or
longer. Always replace all the batteries with new ones at the same time.
34
HEM-7300 e-s r2.qxd
11/2/07
4:50 PM
Page 35
CARE AND MAINTENANCE
Use the unit consistent with the instruction provided in this manual.
CAUTION
Changes or modification not approved by Omron Healthcare will
void the user warranty. Do not disassemble or attempt to repair the
unit or components.
CAUTION
Use only Omron authorized parts and accessories. Parts and
accessories not approved for use with the device may damage
the unit.
35
HEM-7300 e-s r2.qxd
11/2/07
4:50 PM
Page 36
ERROR INDICATORS AND TROUBLESHOOTING TIPS
ERROR INDICATORS
SYMBOL
CAUSE
CORRECTION
Remove the arm cuff. Read,
“Taking a Measurement”.
Take another measurement.
Cuff over-inflated
Monitor could not
detect pulse wave.
Take another measurement and
remain still until the
measurement is complete.
Air plug is not
connected.
A malfunction has
occured.
Contact your OMRON
distributor or Customer Services
as mentioned on the package.
Batteries are worn
Replace the four batteries.
Refer to “Battery Installation.”
36
HEM-7300 e-s r2.qxd
11/2/07
4:50 PM
Page 37
ERROR INDICATORS AND TROUBLESHOOTING TIPS
TROUBLESHOOTING TIPS
PROBLEM
CAUSES AND SOLUTIONS
No power.
Replace all four batteries with new
ones.
No display appears on the unit. Check the battery installation
for proper placement of the
battery polarities.
Measurement values appear
too high or too low.
Blood pressure varies constantly.
Many factors including stress, time
of day, and how you wrap the cuff,
may affect your blood pressure.
Review the sections “Before Taking
a Measurement” and “Taking a
Measurement”.
37
HEM-7300 e-s r2.qxd
11/2/07
4:50 PM
Page 38
FCC STATEMENT
NOTE:
POTENTIAL FOR RADIO/TELEVISION INTERFERENCE (for U.S.A. only)
This product has been tested and found to comply with the limits for a Class B
digital device, pursuant to part 15 of the FCC rules.
These limits are designed to provide reasonable protection against harmful
interference in a residential installation. The product generates, uses, and can
radiate radio frequency energy and, if not installed and used in accordance
with the instructions, may cause harmful interference to radio communications.
However, there is no guarantee that interference will not occur in a particular
installation. If the product does cause harmful interference to radio or television
reception, which can be determined by turning the product on and off, the
user is encouraged to try to correct the interference by one or more of the
following measures:
• Reorient or relocate the receiving antenna.
• Increase the separation between the product and the receiver.
• Connect the product into an outlet on a circuit different from that to which
the receiver is connected.
• Consult the dealer or an experienced radio/TV technician for help.
POTENTIAL FOR RADIO/TELEVISION INTERFERENCE (for Canada only)
This digital apparatus does not exceed the Class B limits for radio noise
emissions from digital apparatus as set out in the interference-causing equipment
standard entitled “Digital Apparatus”, ICES-003 of the Canadian Department of
Communications.
Cet appareil numérique respecte les limites de bruits radioeléctriques applicables
aux appareils numériques de Clase B prescrites dans la norme sur le materiel
brouilleur: “Appareils Numériques”, ICES-003 édictée par le minister des
communications.
Changes or modifications not expressly approved by the party responsible for
compliance could void the user’s authority to operate the equipment.
38
HEM-7300 e-s r2.qxd
11/2/07
4:50 PM
Page 39
WARRANTY
®
Your Omron Elite 7300W IntelliSense® Women’s Advanced Automatic Blood
Pressure Monitor, excluding the arm cuffs, is warranted to be free from defects in
materials and workmanship appearing within 5 years from the date of purchase,
when used in accordance with the instructions provided with the monitor. The arm
cuffs are warranted to be free from defects in materials and workmanship
appearing within one year from the date of purchase when the monitor is used in
accordance with the instructions provided with the monitor. The above warranties
extend only to the original retail purchaser.
We will, at our option, repair or replace without charge any monitor or arm cuff
covered by the above warranties. Repair or replacement is our only responsibility
and your only remedy under the above warranties.
To obtain warranty service contact Omron Healthcare for the address of the repair
location. Shipping instructions and repair information is available by calling
1-800-634-4350 or visit our website at www.omronhealthcare.com.
Enclose the Proof of Purchase. Include $5.00 for the return shipping and handling.
Include a letter, with your name, address, phone number, and description of the
specific problem. Pack the product carefully to prevent damage in transit. Because
of possible loss in transit, we recommend insuring the product with return receipt
requested.
ALL IMPLIED WARRANTIES, INCLUDING BUT NOT LIMITED TO
THE IMPLIED WARRANTIES OF MERCHANTABILITY AND FITNESS
FOR PARTICULAR PURPOSE, ARE LIMITED TO THE DURATION OF
THE APPLICABLE WRITTEN WARRANTY ABOVE. Some states do not
allow limitations on how long an implied warranty lasts, so the above limitation may
not apply to you.
OMRON SHALL NOT BE LIABLE FOR LOSS OF USE OR ANY OTHER
INCIDENTAL, CONSEQUENTIAL OR INDIRECT COSTS, EXPENSES
OR DAMAGES. Some states do not allow the exclusion or limitation of incidental
or consequential damages, so the above exclusions may not apply to you.
This warranty gives you specific legal rights, and you may also have other rights
which may vary from state to state.
FOR CUSTOMER SERVICE
Visit our web site at:
www.omronhealthcare.com
Call toll free:
1-800-634-4350
39
HEM-7300 e-s r2.qxd
11/2/07
4:50 PM
Page 40
SPECIFICATIONS
Model:
Display:
Measurement Range:
Accuracy/Calibration:
Inflation:
Deflation:
Rapid Air Release:
Pressure Detection:
Measurement Method:
Pulse Wave Detection:
Power Source:
Battery Life:
Elite 7300W
LCD Digital Display
Pressure: 0 to 299 mmHg, Pulse: 40 to 180/min.
Pressure: ±3mmHg or 2% of reading
Pulse: ±5% of reading
Automatic by electric pump
Automatic rapid deflation pressure
Automatic exhaust valve
Electrostatic capacity semi-conductor pressure sensor
Oscillometric method
Capacitance type pressure sensor
4 “AAA” batteries (1.5V Alkaline)
Approximately 300 uses when used 3 times a day with new
alkaline batteries when inflated to 170mmHg at 73ºF
(23ºC).
50ºF to 104ºF (10ºC to 40ºC) /15 to 90% RH
Operating Temperature
/Humidity:
Storage Temperature
-4ºF to 140ºF (-20ºC to 60ºC) /10 to 95% RH
/Humidity/Air Pressure: /700 - 1060 hPa
Main Unit Weight:
Approximately 8 1/2 oz. (240 g)
not including batteries
Main Unit Dimensions: Approximately 6 3/16" (l) × 2 15/16" (w) × 1 7/32" (h)
(157 mm × 74 mm × 30.6 mm)
Cuff Size:
Standard Cuff
Approximately 5 3/4" (w) × 17 1/2" (l)
(146 mm × 446 mm)
Cuff tube 23 5/8" (l) (600 mm)
Large Cuff
Approximately 6 7/8" (w) × 25 11/16" (l)
(174 mm × 652 mm)
Cuff tube 35 7/16" (l) (900 mm)
Cuff Circumference:
Standard Cuff fits arm circumferences 9" to 13"
(220 mm to 320 mm)
Large Cuff fits arm circumferences 13" to 17"
(320 mm to 420 mm)
40
HEM-7300 e-s r2.qxd
11/2/07
4:50 PM
Page 41
SPECIFICATIONS
Memory:
Contents:
UPC Code:
Up to 84 readings
Main Unit, Standard and Large Arm Cuffs,
Instruction Manual, 4 “AAA” batteries,
Stylish Zipper Case, Quick Guide, Warranty Card and
Cuff Guide
0 73796 73000 0
NOTE: These specifications are subject to change without notice.
41
HEM-7300 e-s r2.qxd
11/2/07
4:50 PM
Manufactured by OMRON HEALTHCARE
Made in China
Distributed by:
OMRON HEALTHCARE, INC.
1200 Lakeside Drive
Bannockburn, Illinois 60015
www.omronhealthcare.com
Copyright © 2007 Omron Healthcare, Inc.
Page 42