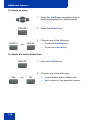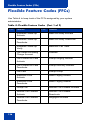
1
Title page
Nortel Networks Communication Server 1000
IP Phone 2002
User Guide
Revision history
Revision history
September 2004
Standard 3.00. This document is up-issued to support
Nortel Networks Communication Server 1000 Release 4.0.
October 2003
Standard 2.00. This document is up-issued to support
Succession 3.0 Software.
November 2002
Standard 1.00. This document is issued to support Meridian 1
Release 25.40 and Succession Communication Server for
Enterprise 1000, Release 2.0.
3
Revision history
4
Contents
Contents
About the IP Phone 2002 . . . . . . . . . . . . . . . . . . . . . . . . . . . 11
Basic features . . . . . . . . . . . . . . . . . . . . . . . . . . . . . . . . . . . . . 11
Telephone controls . . . . . . . . . . . . . . . . . . . . . . . . . . . . . . . . . 13
Telephone display . . . . . . . . . . . . . . . . . . . . . . . . . . . . . . . . . 18
Call features and Flexible Feature Codes . . . . . . . . . . . . . . . 19
Security features . . . . . . . . . . . . . . . . . . . . . . . . . . . . . . . . . . . 19
Enter and edit text . . . . . . . . . . . . . . . . . . . . . . . . . . . . . . . . 22
Enter text using the dialpad . . . . . . . . . . . . . . . . . . . . . . . . . . 22
Edit text using the soft keys . . . . . . . . . . . . . . . . . . . . . . . . . . 22
Connect the IP Phone 2002 components . . . . . . . . . . . . . . 24
Before you begin . . . . . . . . . . . . . . . . . . . . . . . . . . . . . . . . . . 24
Steps . . . . . . . . . . . . . . . . . . . . . . . . . . . . . . . . . . . . . . . . . . . 24
Configure options on the IP Phone 2002 . . . . . . . . . . . . . . 26
Use the Telephone Option menu . . . . . . . . . . . . . . . . . . . . . . 27
Adjust volume . . . . . . . . . . . . . . . . . . . . . . . . . . . . . . . . . . . . . 28
Adjust display screen contrast . . . . . . . . . . . . . . . . . . . . . . . . 34
Select a language . . . . . . . . . . . . . . . . . . . . . . . . . . . . . . . . . . 35
Select Date/Time format . . . . . . . . . . . . . . . . . . . . . . . . . . . . . 36
Display diagnostics . . . . . . . . . . . . . . . . . . . . . . . . . . . . . . . . . 37
Choose Local DialPad Tone . . . . . . . . . . . . . . . . . . . . . . . . . . 38
Choose Ring type . . . . . . . . . . . . . . . . . . . . . . . . . . . . . . . . . . 39
Enable Call Timer . . . . . . . . . . . . . . . . . . . . . . . . . . . . . . . . . . 40
Enable OnHook Default Path . . . . . . . . . . . . . . . . . . . . . . . . . 41
Change feature key labels . . . . . . . . . . . . . . . . . . . . . . . . . . . 42
View set information . . . . . . . . . . . . . . . . . . . . . . . . . . . . . . . . 44
5
Contents
Configure call log options . . . . . . . . . . . . . . . . . . . . . . . . . . . . 44
Configure the Callers List log . . . . . . . . . . . . . . . . . . . . . . 45
Configure New Call indication . . . . . . . . . . . . . . . . . . . . . 46
Configure Preferred Name Match . . . . . . . . . . . . . . . . . . 47
Configure Area Code set-up . . . . . . . . . . . . . . . . . . . . . . 48
Configure Name Display format . . . . . . . . . . . . . . . . . . . . 50
Make a call . . . . . . . . . . . . . . . . . . . . . . . . . . . . . . . . . . . . . . . 52
Use Off-hook dialing . . . . . . . . . . . . . . . . . . . . . . . . . . . . . . . . 52
Use On-hook dialing . . . . . . . . . . . . . . . . . . . . . . . . . . . . . . . . 52
Use Handsfree dialing . . . . . . . . . . . . . . . . . . . . . . . . . . . . . . 53
Use the Directory applications . . . . . . . . . . . . . . . . . . . . . . . . 55
Make a call using Corporate Directory . . . . . . . . . . . . . . . 56
Make a call using Personal Directory . . . . . . . . . . . . . . . . 57
Make a call using Callers List . . . . . . . . . . . . . . . . . . . . . . 58
Make a call using Redial List . . . . . . . . . . . . . . . . . . . . . . 59
Use Predial . . . . . . . . . . . . . . . . . . . . . . . . . . . . . . . . . . . . . . . 59
Use AutoDial . . . . . . . . . . . . . . . . . . . . . . . . . . . . . . . . . . . . . . 60
Activate Ring Again . . . . . . . . . . . . . . . . . . . . . . . . . . . . . . . . 63
Redial the last number called . . . . . . . . . . . . . . . . . . . . . . . . . 64
Use Speed Call . . . . . . . . . . . . . . . . . . . . . . . . . . . . . . . . . . . . 65
Make a System Speed Call . . . . . . . . . . . . . . . . . . . . . . . . . . 66
Make a call using Hot Line . . . . . . . . . . . . . . . . . . . . . . . . . . . 66
Make an Intercom call . . . . . . . . . . . . . . . . . . . . . . . . . . . . . . 67
Answer a call . . . . . . . . . . . . . . . . . . . . . . . . . . . . . . . . . . . . . 68
While on an active call . . . . . . . . . . . . . . . . . . . . . . . . . . . . . 69
Place a call on hold . . . . . . . . . . . . . . . . . . . . . . . . . . . . . . . . 69
Transfer a call . . . . . . . . . . . . . . . . . . . . . . . . . . . . . . . . . . . . . 70
Use Timed Reminder Recall . . . . . . . . . . . . . . . . . . . . . . . . . . 71
6
Contents
Use Attendant Recall . . . . . . . . . . . . . . . . . . . . . . . . . . . . . . . 72
Use Call Park . . . . . . . . . . . . . . . . . . . . . . . . . . . . . . . . . . . . . 73
Record a Calling Party Number . . . . . . . . . . . . . . . . . . . . . . . 75
Display incoming calls . . . . . . . . . . . . . . . . . . . . . . . . . . . . . . 76
Trace a Malicious call . . . . . . . . . . . . . . . . . . . . . . . . . . . . . . . 76
Incoming calls . . . . . . . . . . . . . . . . . . . . . . . . . . . . . . . . . . . . 78
Activate Automatic Answerback . . . . . . . . . . . . . . . . . . . . . . . 78
Activate Call Pickup . . . . . . . . . . . . . . . . . . . . . . . . . . . . . . . . 78
Use Call Waiting . . . . . . . . . . . . . . . . . . . . . . . . . . . . . . . . . . . 81
While away from your desk . . . . . . . . . . . . . . . . . . . . . . . . . 83
Use Call Forward . . . . . . . . . . . . . . . . . . . . . . . . . . . . . . . . . . 83
Use Internal Call Forward . . . . . . . . . . . . . . . . . . . . . . . . . . . . 84
Use Remote Call Forward . . . . . . . . . . . . . . . . . . . . . . . . . . . 85
Secure your telephone . . . . . . . . . . . . . . . . . . . . . . . . . . . . . . 87
Talk with more than one person . . . . . . . . . . . . . . . . . . . . . 89
Use the Call Join feature . . . . . . . . . . . . . . . . . . . . . . . . . . . . 89
Set up a Conference call . . . . . . . . . . . . . . . . . . . . . . . . . . . . 90
Use the Conferee Selectable Display
and Disconnect feature . . . . . . . . . . . . . . . . . . . . . . . . . . . . . . 92
Use Group Call . . . . . . . . . . . . . . . . . . . . . . . . . . . . . . . . . . . . 93
Work without interruption . . . . . . . . . . . . . . . . . . . . . . . . . . 96
Activate Make Set Busy . . . . . . . . . . . . . . . . . . . . . . . . . . . . . 96
Additional call features . . . . . . . . . . . . . . . . . . . . . . . . . . . . 97
Use AutoDial Transfer . . . . . . . . . . . . . . . . . . . . . . . . . . . . . . 97
Use the Buzz feature . . . . . . . . . . . . . . . . . . . . . . . . . . . . . . . 98
Use Call Page Connect to make an announcement . . . . . . . . 99
Use Centrex/Exchange Line Switchhook Flash . . . . . . . . . . 100
7
Contents
Charge a call or charge a forced call . . . . . . . . . . . . . . . . . . 100
Use Enhanced Override . . . . . . . . . . . . . . . . . . . . . . . . . . . . 104
Use Forced Camp-on feature . . . . . . . . . . . . . . . . . . . . . . . . 105
Override a busy signal . . . . . . . . . . . . . . . . . . . . . . . . . . . . . 106
Use Privacy Release . . . . . . . . . . . . . . . . . . . . . . . . . . . . . . 107
Use Radio Page . . . . . . . . . . . . . . . . . . . . . . . . . . . . . . . . . . 107
Use Voice Call . . . . . . . . . . . . . . . . . . . . . . . . . . . . . . . . . . . 109
Additional features . . . . . . . . . . . . . . . . . . . . . . . . . . . . . . . 111
Personal Directory . . . . . . . . . . . . . . . . . . . . . . . . . . . . . . . . 111
Callers List . . . . . . . . . . . . . . . . . . . . . . . . . . . . . . . . . . . . . . 114
Redial List . . . . . . . . . . . . . . . . . . . . . . . . . . . . . . . . . . . . . . . 117
Virtual Office . . . . . . . . . . . . . . . . . . . . . . . . . . . . . . . . . . . . . 119
Virtual Office login . . . . . . . . . . . . . . . . . . . . . . . . . . . . . 119
Virtual Office on your Remote telephone . . . . . . . . . . . . 121
Virtual Office on your Office telephone . . . . . . . . . . . . . 122
Virtual Office logout . . . . . . . . . . . . . . . . . . . . . . . . . . . . 123
Media Gateway 1000B . . . . . . . . . . . . . . . . . . . . . . . . . . . . . 126
Test Local Mode . . . . . . . . . . . . . . . . . . . . . . . . . . . . . . . 127
Resume Normal Mode . . . . . . . . . . . . . . . . . . . . . . . . . . 127
Hospitality features . . . . . . . . . . . . . . . . . . . . . . . . . . . . . . 129
Set Automatic Wake-Up . . . . . . . . . . . . . . . . . . . . . . . . . . . . 129
Activate Message Registration . . . . . . . . . . . . . . . . . . . . . . . 131
Use Maid Identification . . . . . . . . . . . . . . . . . . . . . . . . . . . . . 133
Display Room Status . . . . . . . . . . . . . . . . . . . . . . . . . . . . . . 134
Flexible Feature Codes (FFCs) . . . . . . . . . . . . . . . . . . . . . 136
Accessories . . . . . . . . . . . . . . . . . . . . . . . . . . . . . . . . . . . . 138
IP Phone Key Expansion Module (KEM) . . . . . . . . . . . . . . . 138
8
Contents
Terms you should know . . . . . . . . . . . . . . . . . . . . . . . . . . 139
Index . . . . . . . . . . . . . . . . . . . . . . . . . . . . . . . . . . . . . . . . . . 147
9
Contents
10
About the IP Phone 2002
About the IP Phone 2002
The Nortel Networks IP Phone 2002 brings voice and data to the desktop
by connecting directly to a Local Area Network (LAN) through an Ethernet
connection.
Note 1: Not all features are available on all telephones. Consult your
system administrator to verify which features are available for your
use.
Note 2: In this guide, programmable line (DN)/feature key labels
display beside the key, and soft key labels display directly above the
key. Figure 1 shows key labels.
Figure 1: Programmable line (DN)/feature key and soft key
labels
Basic features
The IP Phone 2002 supports the following features:
•
four programmable line (DN)/feature keys (self-labeled)
•
four soft keys (self-labeled) providing access to a maximum of ten
features
11
About the IP Phone 2002
Note 1: Your IP Phone 2002 may not be configured to support soft
key functionality. Consult your system administrator.
•
multi-field LCD display screen
•
speaker for on-hook dialing or on-hook listening
•
volume control bar for adjusting ringer, speaker, handset, and
headset volume
•
six specialized fixed keys:
— Quit
— Directory
— Message (Inbox)
— Outbox/Shift (reserved for future development)
— Services
— Expand to PC
•
four call processing fixed keys:
— Hold
— Goodbye
— Handsfree
— Mute
•
shared LAN access with a PC
•
headset jack with On/Off key
•
automatic network configuration
•
hearing-aid compatibility
12
About the IP Phone 2002
Figure 2 shows the IP Phone 2002.
Figure 2: IP Phone 2002
Telephone controls
Note: Your IP Phone 2002 may come with optional key caps. Text in
parenthesis indicate labels appearing on the key caps. For example,
(Services).
Use the Volume control bar to adjust the
volume of the ringer, handset, headset,
speaker, and the Handsfree feature. Press
the right side of the rocker bar to increase
volume, the left side to decrease volume.
13
About the IP Phone 2002
Programmable line (DN)/feature keys are
extra DNs or feature keys used to access
additional features.
A steady LCD light beside a line (DN) key
indicates that the feature or line is active. A
flashing LCD indicates the line is on hold or
the feature is being programmed.
(Goodbye)
(Hold)
(Message)
Use the Goodbye key to terminate an active
call.
Press the Hold key to put an active call on
hold. Press the line (DN) key beside the
flashing LED indicator to return to the caller
on hold.
Press the Message (Inbox) key to access
your voice mailbox.
Use the Navigation keys to scroll through
menus and lists appearing on the LCD
display screen.
14
About the IP Phone 2002
(Services)
Press the Services key and use the
navigation keys to access the following
items:
•
Telephone Options:
— Volume adjustment
— Contrast adjustment
— Language
— Date/Time
— OnHook Default Path
— Display diagnostics
— Local Dialpad Tone
— Ring type
— Change feature key label
— Set Information
•
Password Admin:
— Station Control Password
•
Display Network Diagnostics Utilities
Note: Only your system administrator
or service provider can use Display
Network Diagnostics Utilities to perform
Internet diagnostics.
15
About the IP Phone 2002
•
Virtual Office Login and Virtual Office
Logout (if Virtual Office is configured)
•
Test Local Mode and Resume Local
Mode (if Media Gateway 1000B is
configured)
Note 1: Press the Services key to exit
from any menu or menu item.
•
The Password Admin menu many not
be available on your IP Phone 2002.
Consult your system administrator.
Press the Headset key to answer a call
using the headset or to switch a call from the
handset or handsfree to the headset.
Press the Speaker key to activate
handsfree. The speaker LED indicator lights
to indicate when handsfree is active.
(Directory)
(Mute)
16
Press the Directory key to access directory
services.
Press the Mute key to listen to the receiving
party without transmitting. Press the Mute
key again to return to two-way conversation.
The Mute key applies to handsfree, handset,
and headset microphones. The Mute LED
indicator flashes when the Mute option is in
use.
About the IP Phone 2002
Soft keys (self-labeled) are located below
the display area. The LCD label above the
key changes, based on the active feature.
Note: When a triangle appears before a
key label, the feature is active.
Press the More.. key to access the next
layer of Soft keys (self-labeled).
When a message is left for the user, the
Message waiting indicator flashes. Also,
this indicator flashes when the set ringer is
ON.
(Quit)
(Expand)
Press the Quit key to end an active
application. Pressing the Quit key does not
affect the status of calls currently on your
telephone.
The Expand to PC key is a fixed key
reserved for future development.
The Outbox/Shift key is a fixed key that is
reserved for future development.
17
About the IP Phone 2002
Telephone display
The IP Phone 2002 has two display areas:
•
The upper display area contains single-line information for items such
as caller number, caller name, feature prompt string, user-entered
digits, date and time information, and set information.
•
The lower display area provides soft key label information.
Figure 3 shows an idle LCD display screen.
Figure 3: IP Phone 2002 LCD display screen
18
About the IP Phone 2002
Call features and Flexible Feature Codes
System administration is required for call features and Flexible Feature
Codes (FFCs). Contact your system administrator to configure these
features and codes on your telephone.
Call features and FFCs must be assigned to your telephone and
supported by system software.
Security features
Your Station Control Password (SCPW) enables the following security
features:
•
Electronic Lock to prevent others from making calls from your
telephone.
•
Password-protected telephone features (for example, Personal
Directory, Redial List and Callers List).
Your initial SCPW is defined by your system administrator. Please contact
your system administrator for detailed information.
To change your SCPW:
1. Press the Services key.
(Services)
2. Press the Up/Down navigation keys to
scroll and highlight Password Admin.
3. Press the Select key.
19
About the IP Phone 2002
4. Use the dial pad to enter your password
at the prompt.
5. Press the Up/Down navigation keys to
scroll and highlight New Password.
6. Press the Select key.
7. Use the dial pad to enter the new
password.
8. Press Select to accept the new
password.
Note: If you have been locked out of
your IP Phone 2002, or have forgotten
your SCPW, please contact your system
administrator.
Note: The default setting for Password Protection is off.
To turn Password Protection On/Off:
1. Press the Directory key.
(Directory)
2. Press the Up/Down navigation keys to
scroll and highlight Change Protection
Mode.
20
About the IP Phone 2002
3. Use the dial pad to enter your password
(if Password Protection is enabled).
4. Press the Enter key.
5. Press the Up/Down navigation keys to
highlight one of the following:
— Enable Password Protection
— Disable Password Protection
6. Choose one of the following:
— Yes to accept the selection.
— No to return to the Directory menu.
7. Press the Done key.
21
Enter and edit text
Enter and edit text
You can enter and edit text on your IP Phone 2002 using the following
methods:
•
Enter and edit text using the telephone dialpad.
•
Edit text using the soft keys.
Enter text using the dialpad
You can use the dialpad to enter text when you use features such as
Personal Directory, Redial List, and Callers List.
For example, if you want to use the letter “A”, press the number 2 key
once. If you want the letter “C”, press the number 2 key three times.
Note: No letters are associated with the number 1 or the 0 keys.
Edit text using the soft keys
You can use soft keys to edit text when you use features such as
Personal Directory, Redial List, and Callers List.
To edit an entry in your Personal Directory, press the Directory key, and
select the desired entry from your Personal Directory.
To edit text:
1. Press the Edit soft key.
2. Press the Left/Right navigation keys to move through the text.
3. Select the appropriate editing soft key for the operation you want to
perform.
4. If the key you want is not visible, press the More.. soft key to access
additional soft keys (self-labeled).
5. Press the Up navigation key to access the symbols.
6. Press the Left/Right navigation keys to move to a specific symbol.
22
Enter and edit text
7. Press the Choose soft key to select a symbol.
8. Press the Next soft key to submit your changes.
Table 1 describes the soft key editing functions on the IP Phone 2002.
Table 1: Editing soft key description
Key
Description
Cancel
Action is cancelled.
Choose
Select a symbol.
Clear
Clear the input field.
Case
Switch the next character to either uppercase
or lowercase.
Delete
Backspace one character.
Done/Select/Enter
Meaning depends on application.
More..
Access additional soft keys.
23
Connect the IP Phone 2002 components
Connect the IP Phone 2002
components
Before you begin
CAUTION
Damage to Equipment
Do not plug the IP Phone 2002 into a regular
telephone jack. This results in severe damage
to the IP Phone. Consult your system
administrator to ensure that you plug your set
into a 10/100BaseT Ethernet jack.
Steps
1. Connect one end of the handset cord to the handset jack (identified
with a handset icon) on the back of the telephone. Connect the other
end to the jack on the handset.
2. Choose one of the following connections:
a. For a telephone not sharing LAN access with a PC, connect one
end of the CAT5 line cable to the LAN ethernet port located on
the back of the telephone (identified with a LAN icon). Plug the
other end of the CAT5 line cable into the IP network.
b. For a telephone sharing LAN access with a PC, connect one end
of the CAT5 line cable to the LAN ethernet port located on the
back of the telephone (identified with a LAN icon) and the other
end to the IP network. Insert a second CAT5 line cable into the
PC ethernet port located on the back of the telephone (identified
with a PC icon) and the other end into the computer's Ethernet
port.
3. Contact your installation technician for the proper power option. This
telephone can be powered by an AC adapter or over a LAN.
4. Thread the cord around the strain relief, retaining hook, and channel
provided for a secure power connection.
24
Connect the IP Phone 2002 components
5. Secure the telephone footstand to the telephone base. Use the angle
grip on the top back of the telephone to change position.
Figure 4 shows connections on the IP Phone 2002.
Figure 4: IP Phone connections
25
Configure options on the IP Phone 2002
Configure options on the
IP Phone 2002
The IP Phone 2002 Services menu lists the following submenus:
•
The Telephone Option menu enables you or your system
administrator to configure telephone preferences.
•
Password Admin menu enables you or your system administrator to
change the Station Control Password.
•
The Virtual Office Login and Test Local Mode (for branch office)
menus are listed when an IP Phone 2002 Class of Service is set for
Virtual Office and branch office. For more information, see page 119.
Note: The Password Admin, Virtual Office Login, and Test Local
Mode menus may not be available on your IP Phone 2002.
Consult your system administrator.
The Telephone Option menu offers the following options:
Volume adjustment…
Display diagnostics
Contrast adjustment
Local DialPad Tone
Language…
Ring type…
Date/Time format…
Change feature key label
OnHook Default path
Set Info
Note: When an option has a sublist, an ellipses (…) appears after the
option.
26
Configure options on the IP Phone 2002
Use the Telephone Option menu
To use the Telephone Option menu:
1. Press the Services key.
(Services)
2. Press the Up/Down navigation keys to
scroll and highlight Telephone Option.
3. Press the Select key.
4. Use the Up/Down navigation keys to
scroll and highlight an option (for
example, Language…).
5. Press the Select key. The display
provides information required to adjust
your selection.
6. Choose one of the following:
or
— Press the Select key to save
changes and return to the
Telephone Option menu.
— Press the Cancel key to keep
existing settings.
27
Configure options on the IP Phone 2002
Adjust volume
To adjust the volume, press the Services key and select Volume
adjustment…from the Telephone Option menu. Choose one of the
following:
•
Ringer
•
Handset
•
Handsfree
•
Buzzer
To adjust Ringer volume:
1. Press the Up/Down navigation keys to
scroll and highlight Ringer.
2. Press the Select key.
3. To increase or decrease the volume, do
one of the following:
or
— Press the Lower/Higher soft keys.
— Press the Up/Down navigation keys.
28
Configure options on the IP Phone 2002
4. Choose one of the following:
or
— Press the Select key to save the
volume level and return to the
Telephone Option menu.
— Press the Cancel key to keep
existing settings.
29
Configure options on the IP Phone 2002
To adjust Handset listen volume:
1. Press the Up/Down navigation keys to
scroll and highlight Handset listen.
2. Press the Select key.
or
3. To increase or decrease the volume, do
one of the following:
— Press the Lower/Higher soft keys.
— Press the Up/Down navigation keys.
4. Choose one of the following:
or
— Press the Select key to save the
volume level and return to the
Telephone Option menu.
— Press the Cancel key to keep
existing settings.
To adjust the Handsfree listen volume:
1. Press the Up/Down navigation keys to
scroll and highlight Handsfree listen.
2. Press the Select key.
30
Configure options on the IP Phone 2002
or
3. To increase or decrease the volume, do
one of the following:
— Press the Lower/Higher soft keys.
— Press the Up/Down navigation keys.
4. Choose one of the following:
or
— Press the Select key to save the
volume level and return to the
Telephone Option menu.
— Press the Cancel key to keep
existing settings.
31
Configure options on the IP Phone 2002
To adjust the Headset listen volume:
1. Press the Up/Down navigation keys to
scroll and highlight Headset listen.
2. Press the Select key.
or
3. To increase or decrease the volume, do
one of the following:
— Press the Lower/Higher soft keys.
— Press the Up/Down navigation keys.
4. Choose one of the following:
— Press the Select key to save the
volume level and return to the
Telephone Option menu.
or
— Press the Cancel key to keep
existing settings.
To adjust the Buzzer volume:
1. Press the Up/Down navigation keys to
scroll and highlight Buzzer.
2. Press the Select key.
32
Configure options on the IP Phone 2002
or
3. To increase or decrease the volume, do
one of the following:
— Press the Lower/Higher soft keys.
— Press the Up/Down navigation keys.
4. Choose one of the following:
or
— Press the Select key to save the
volume level and return to the
Telephone Option menu.
— Press the Cancel key to keep
existing settings.
33
Configure options on the IP Phone 2002
Adjust display screen contrast
To adjust the LCD display screen contrast, press the Services key and
select Contrast adjustment from the Telephone Option menu.
Note: If you have a Nortel Networks IP Phone KEM attached to your
telephone, adjusting the telephone’s LCD screen contrast also
adjusts the display screen contrast setting for the IP Phone KEM.
To adjust display screen contrast:
or
1. To increase or decrease the display
contrast level, choose one of the
following:
— Press the Lower/Higher soft keys.
— Press the Up/Down navigation keys.
2. Choose one of the following:
or
— Press the Select key to save the
contrast level and return to the
Telephone Option menu.
— Press the Cancel key to keep
existing settings.
34
Configure options on the IP Phone 2002
Select a language
The display is available in multiple languages. To choose a language,
press the Services key and select Language… from the Telephone
Option menu.
To select a language:
1. Press the Up/Down navigation keys to
scroll and highlight the desired language
(for example, German [Deutsche]).
2.
or
Choose one of the following:
— Press the Select key to save the
language and return to the
Telephone Option menu.
— Press the Cancel key to keep
existing settings.
35
Configure options on the IP Phone 2002
Select Date/Time format
Several Date/Time formats are available. Formats are based on the
12-hour and 24-hour clocks. To select a date/time format, press the
Services key and select Date/Time… from the Telephone Option menu.
To select date and time format:
1. Press the Up/Down navigation keys to
scroll and highlight the desired format.
Sample formats appear on the upperright side of the display area.
2. Choose one of the following:
or
— Press the Select key to save the
format and return to the
Telephone Option menu.
— Press the Cancel key to keep
existing settings.
36
Configure options on the IP Phone 2002
Display diagnostics
The Display diagnostics option tests the telephone’s display screen and
indicator lights. To access display diagnostics, press the Services key
and select Display Diagnostics from the Telephone Option menu.
To select Display diagnostics:
1. Press the Up/Down navigation keys to
scroll through the list to view display
capabilities.
2. Press the Cancel key to return to the
Telephone Option menu.
37
Configure options on the IP Phone 2002
Choose Local DialPad Tone
The Local DialPad Tone option produces Dual-Tone Multi-Frequency
(DTMF) sounds, a single tone, or no sound when you press a key on the
dialpad. To choose a local dialpad tone, press the Services key and
select Local DialPad Tone from the Telephone Option menu.
To choose a Local DialPad Tone:
1. Press the Up/Down navigation keys to
highlight one of the following dialpad
tones:
— None to disable all tones.
— Short Click to enable a single tone
for all keys.
— DTMF to turn on a separate DTMF
tone for each key.
2. Choose one of the following:
or
— Press the Select key to save the
tone selection and return to the
Telephone Option menu.
— Press the Cancel key to keep
existing settings.
38
Configure options on the IP Phone 2002
Choose Ring type
The Ring type… option sets the telephone’s ring tone. To choose a ring
type, press the Services key and select Ring type… from the Telephone
Option menu.
To choose a ring type:
1. Press the Up/Down navigation keys to
scroll and highlight one of the ring types.
2. Press the Play key to sample the ring
tone.
3. Choose one of the following:
— Press the Select key to save the ring
type and return to the Telephone
Option menu.
— Press the Stop key and use the
Up/Down navigation keys to select a
different ring type.
— Press the Cancel key to keep
existing settings.
39
Configure options on the IP Phone 2002
Enable Call Timer
The call timer measures how long you are on each call. To enable call
timer, press the Services key and select Call Timer from the Telephone
Option menu.
To enable Call Timer:
1. Choose one of the following:
or
— To turn on the Call timer, press the
On key.
— To turn off the Call timer, press the
Off key.
2. Choose one of the following:
or
— Press the Select key to save the
setting and return to the Telephone
Option menu.
— Press the Cancel key to keep
existing settings.
40
Configure options on the IP Phone 2002
Enable OnHook Default Path
The OnHook Default Path option allows you to use a headset or the
Handsfree feature to operate your IP Phone while it is on-hook.To enable
OnHook Default Path, press the Services key and select OnHook
Default Path from the Telephone Option menu.
To enable Onhook Default Path:
1. Press the Up/Down navigation keys to
highlight one of the following:
— Handsfree enable
— Headset enable
2. Choose one of the following:
or
— Press the Select key to save the
default path and return to the
Telephone Option menu.
— Press the Cancel key to keep
existing settings.
41
Configure options on the IP Phone 2002
Change feature key labels
The Change feature key label option renames the label displayed next to
each feature key or restores the default labels to the keys. To rename
feature key labels, press the Services key and select Change feature
key labels from the Telephone Option menu.
Note: If a feature key is configured as an autodial key, the label does
not change if the autodial key configuration changes.
To rename the labels:
1. Press the Select key.
2. Press the feature key that is being
changed.
Note: If you enter a prime DN key, an
error message displays.
3. Enter the new information for the feature
key label. To enter special characters,
press the Up navigation key. For
information about entering text, refer to
“Enter text using the dialpad” on
page 22.
4. Choose one of the following:
or
— Press the Select key to save the
changes and return to the
Telephone Option menu.
— Press the Cancel key to keep
existing settings.
42
Configure options on the IP Phone 2002
Restore the default labels
To restore default labels, press the Services key and select
Change feature key labels from the Telephone Option menu.
1. Press the Select key.
2. Use the Up/Down navigation keys to
scroll and highlight one of the following:
a. Restore all key labels
— Press Yes to change all feature keys
to default values.
b. Restore one key label
— Press the Select key.
— Press the feature key.
— Press Yes to change the selected
feature key label to the default value.
Note: When labels are changed to
default values, you cannot undo the
change. The label settings must be reentered.
43
Configure options on the IP Phone 2002
View set information
The set information option displays the following set-specific information:
•
IP Address
•
Hardware ID of the IP Phone
•
Current firmware version
To view set information, press the Services key and select Set Info from
the Telephone Option menu.
To view set information:
1. Press the Up/Down navigation keys to
scroll through the list to view the set
information.
2. Press the Cancel key to return to the
Telephone Option menu.
Configure call log options
Use the call log option to configure the following preferences:
•
Callers List log
•
New call indication
•
Preferred Name Match
•
Area code set-up
44
Configure options on the IP Phone 2002
Configure the Callers List log
You can configure the Callers List to log all incoming calls or only
unanswered calls. The default setting is “Log all calls”. To log
unanswered calls only, press the Services key and select Call Log
Option from the Telephone Option menu.
To log only unanswered calls:
1. Press the Up/Down navigation keys to
scroll and highlight the Log Mode
option.
2. Press the Select key.
3. Press the Up/Down navigation keys to
scroll and highlight Log unanswered
calls.
4. Choose one of the following:
or
— Press the Select key to save the
setting.
— Press the Cancel key to keep
existing settings.
45
Configure options on the IP Phone 2002
Configure New Call indication
You can configure the IP Phone 2002 to display a message to indicate a
new incoming call was received. The default setting is “On”. To configure
new call indication, press the Services key and select Call Log Option
from the Telephone Option menu.
To configure New Call indication:
1. Press the Select key to select Incoming
Calls.
2. Press the Select key.
3. Press the Up/Down navigation keys to
scroll and highlight New Call Indication.
4. Press the Select soft key.
5. Press the Up/Down navigation keys to
scroll and highlight one of the following:
— New call indication off
— New call indication on
46
Configure options on the IP Phone 2002
6. Choose one of the following:
or
— Press the Select soft key to save the
setting.
— Press the Cancel key to keep
existing settings.
Configure Preferred Name Match
You can configure the IP Phone 2002 to display the name of the caller as
defined in your Personal Directory. The default setting is “Off”. To
configure Preferred Name Match, press the Services key and select
Call Log Option from the Telephone Option menu.
To configure Preferred Name Match:
1. Press the Up/Down navigation keys to
scroll and highlight Preferred Name
Match.
2. Press the Select soft key.
3. Press the Up/Down navigation keys to
scroll and highlight one of the following:
— Preferred name match on
— Preferred name match off
4. Choose one of the following:
or
— Press the Select soft key to save the
setting.
— Press the Cancel key to keep
existing settings.
47
Configure options on the IP Phone 2002
Configure Area Code set-up
The Area Code set-up menu enables a user to save up to 3 area codes.
When an incoming call arrives with an area code that matches one of the
3 stored area codes, the incoming call number is re-ordered to display the
telephone number followed by the area code (as opposed to the area
code followed by the telephone number). This re-ordering is also
performed when a user scrolls through their Callers List. To configure the
area code, press the Services key and select Call Log Option from the
Telephone Option menu.
To configure default area codes (3 maximum):
1. Press the Up/Down navigation keys to
scroll and highlight Area Code Setup.
2. Press the Select key.
3. Press the Up/Down navigation keys to
scroll and highlight one of the following:
— Area Code # 1
— Area Code # 2
— Area Code # 3
4. Press the Select key.
5. Use the dialpad to enter the number at
the prompt.
48
Configure options on the IP Phone 2002
6. Choose one of the following:
or
— Press the Select soft key to save the
setting.
— Press the Cancel key to keep the
existing settings.
To edit area code display:
1. Press the Up/Down navigation keys to
scroll and highlight Area Code Setup.
2. Press the Select soft key.
3. Press the Up/Down navigation keys to
scroll and highlight one of the following:
— Area Code # 1
— Area Code # 2
— Area Code # 3
4. Press the Select soft key.
5. Use the dialpad to edit the number.
49
Configure options on the IP Phone 2002
6. Choose one of the following:
or
— Press the Select soft key to save the
setting.
— Press the Cancel key to keep
existing settings.
Configure Name Display format
You can configure the IP Phone 2002 to display the name of the incoming
calling party in the following formats:
•
first name/last name
•
last name/first name
To configure name display format, press the Services key and select
Call Log Option from the Telephone Option menu.
To configure name display format:
1. Press the Up/Down navigation keys to
scroll and highlight Name display
format.
2. Press the Select soft key.
3. Press the Up/Down navigation keys to
scroll and highlight one of the following:
— first name, last name
— last name, first name
50
Configure options on the IP Phone 2002
4. Choose one of the following:
or
— Press the Select soft key to save the
setting.
— Press the Cancel key to keep
existing settings.
51
Make a call
Make a call
This section describes features associated with making a call. There are
several ways to make a call from an IP Phone 2002.
Use Off-hook dialing
1. Lift the handset.
2. Dial the number.
3. To terminate the call, choose one of the
following:
— Replace the handset into the cradle.
— Press the Goodbye key.
(Goodbye)
Use On-hook dialing
1. Leave the handset in the cradle.
2. Press the line (DN) key.
52
Make a call
3. Dial the number when the dial tone
sounds.
4. When the called party answers, lift the
handset.
5. To terminate the call, choose one of the
following:
— Replace the handset into the cradle.
(Goodbye)
— Press the Goodbye key.
Use Handsfree dialing
Use Handsfree dialing to use a built-in microphone and speaker, or a
headset, instead of the handset. While on an active call, you can switch
between Handset and Handsfree mode.
1. Press the Handsfree key.
2. If a headset is connected, press the
Headset key.
3. Dial the number.
53
Make a call
To discontinue a handsfree call:
Press the Goodbye key.
(Goodbye)
To mute a handsfree call:
(Mute)
(Mute)
1. Press the Mute key. The LED indicator
flashes.
2. Press the Mute key again to return to a
two-way handsfree conversation.
To switch from Handsfree to Handset mode:
Lift the handset.
To switch from Handset mode to Handsfree mode:
1. Press the Handsfree key.
2. Replace the handset.
54
Make a call
To use a headset:
1. Connect the headset to the headset jack
or the handset jack.
2. Press the Headset key.
To switch from Handsfree to headset:
3. Press the Headset key.
Use the Directory applications
You can make calls using various Directory applications available on your
IP Phone 2002. The applications include:
•
Corporate Directory
•
Personal Directory
•
Callers List
•
Redial List
55
Make a call
Make a call using Corporate Directory
The Corporate Directory feature provides an alphabetical list of entries
using last names. You can search by name, view additional information
on each entry, and dial Corporate Directory numbers.To use Corporate
Directory, press the Directory key and select Corporate Directory.
To search for a specific number:
1. When prompted, use the dial pad to
enter the desired name in the
lastname/firstname format.
2. Press the Search key to find the desired
name.
Note: A successful search displays the
first match on the screen.
3. Choose one of the following:
— Press the Dial key to dial the
resulting number.
— If there is no match to the search
query, start a new search or change
the information in the initial search.
— Press the Cancel key to exit without
dialing.
To scroll to a specific number:
1. Press the Up/Down navigation keys to
scroll and highlight a name in Corporate
Directory.
56
Make a call
2. Choose one of the following:
— Press the Dial key to dial the
resulting number.
or
— Press the Cancel key to exit without
dialing.
Make a call using Personal Directory
The Personal Directory feature allows you to store a maximum of 100
entries consisting of names and numbers. To use Personal Directory,
press the Directory key and select Personal Directory. For information
on how to configure and use Personal Directory, refer to “Personal
Directory” on page 111.
To use Personal Directory:
1. Press the Up/Down navigation keys to
scroll and highlight a name in the
Personal Directory.
2. Choose one of the following:
or
— Press the Dial key to dial the
resulting number.
— Press the Cancel key to exit without
dialing.
57
Make a call
Make a call using Callers List
The Callers List feature automatically stores up to a maximum of 100
callers. After 100 callers have been stored, each additional caller
overwrites the oldest entry. To use Callers List, press the Directory key
and select Callers List. For information on how to configure and use
Callers List refer to “Callers List” on page 114.
To use the Callers List:
1. Press the Up/Down navigation keys to
scroll and highlight a name in the
Callers List.
2. Choose one of the following:
or
— Press the Dial key to dial the
resulting number.
— Press the Cancel key to exit without
dialing.
58
Make a call
Make a call using Redial List
The Redial List feature automatically stores a maximum of 20 previously
dialed telephone numbers. To use Redial List, press the Directory and
select Redial List. For information on how to configure and use Redial
List, refer to “Redial List” on page 117.
To use Redial List:
1. Press the Up/Down navigation keys to
scroll and highlight a name in the Redial
List.
2. Choose one of the following:
or
— Press the Dial key to dial the
resulting number.
— Press the Cancel key to exit without
dialing.
Use Predial
Use the Predial feature to enter, preview, and edit numbers before
dialing.
To use Predial:
1. Without selecting the line key, enter the
number to be dialed.
2. Press a line key to dial the number.
59
Make a call
3. Lift the handset when the called party
answers or, if in Handsfree mode, begin
to speak.
To edit a Predial number:
1. Use the dialpad to enter the number.
2. Choose one of the following:
— To erase all numbers, press the
Clear key. Re-enter the numbers to
be dialed.
— To change numbers one-at-a-time,
press the Delete key to backspace.
Re-enter the number.
3. Press a line key to dial the number.
Use AutoDial
Use the AutoDial feature to display, store, and automatically dial
telephone numbers.
60
Make a call
To store an AutoDial number:
1. Without lifting the handset, press the
appropriate AutoDial key.
Note: The display screen displays the
word “Autodial” next to the appropriate
key.
2. Using the dial pad, dial the telephone
number (including access code) to be
stored on the selected AutoDial key.
3. Press the AutoDial key a second time to
store the number on the selected key.
Note: Once a number has been stored,
the word “Autodial” disappears, and the
stored number displays.
4. Assign a label to the key.
Note: After assigning the label, the
number disappears and only the label
appears on the screen next to the key.
To display an AutoDial number:
1. Press the Display key.
2. Press an AutoDial key in the upper
display area to display the number
associated with that key.
61
Make a call
To use AutoDial:
1. Lift the handset.
2. Press an AutoDial key in the upper
display area to dial the number
associated with that key.
62
Make a call
Activate Ring Again
Use the Ring Again feature if you receive a busy tone or if there is no
answer. Your IP Phone rings when the person you called becomes
available. Ring Again automatically redials the number.
To activate Ring Again:
1. Dial a number and receive a busy tone
or no answer.
2. Choose one of the following:
— Press the Ring Again key.
— Enter the RingAgain Activate FFC.
To call a Ring Again party when you receive notification:
1. After receiving the notification ring, lift
the handset, or if you are using the
headset, go to Step 2.
2. Press the Ring Again key to
automatically dial the number.
63
Make a call
To deactivate Ring Again before notification:
Choose one of the following:
— Press the RingAgain key a second
time.
— Press the RingAgain Deactivate
FFC.
Redial the last number called
Use the Last Number Redial feature to automatically redial the last dialed
number.
To use Last Number Redial:
Choose one of the following:
1. To redial using the handset:
a. Lift the handset.
b. Press the line (DN) key.
2. To redial without lifting the handset,
press the line (DN) key twice (the last
number dialed is automatically redialed).
64
Make a call
Use Speed Call
Use the Speed Call feature to place internal and external calls by dialing a
one-, two-, or three-digit code to store, edit, and automatically dial
frequently called telephone numbers.
To store a Speed Call number:
1. Press the Speed Call Controller key.
The triangular icon flashes, indicating
programming mode.
2. At the prompt:
— Enter a one-, two-, or three-digit
code (0-999).
— If required, dial the access code.
3. Press the Speed Call Controller key
again to save the code and number. The
flashing icon turns off.
To make a Speed Call:
1. Lift the handset.
2. Press the Speed Call Controller key.
3. Dial the Speed Call code to
automatically dial the number.
65
Make a call
Make a System Speed Call
Use the System Speed Call feature to dial Speed Call codes that override
dialing restrictions placed on your telephone.
To make a System Speed Call:
1. Lift the handset.
2. Choose one of the following:
or
— Press the System Speed Call key.
— Press the System Speed Call
Controller (SScCtl) key.
3. Dial the Speed Call code to
automatically dial the number.
Make a call using Hot Line
Use the Hot Line feature to automatically dial a specific number.
To use Hot Line:
Press Hot Line to automatically dial the
number.
66
Make a call
Make an Intercom call
Use the Intercom feature to call a member of your intercom group by
pressing the code assigned to each member.
To make an Intercom call:
1. Lift the handset.
2. Press the Intercom key.
3. Dial the one- or two-digit code for the
desired intercom group member.
To answer an Intercom call while on a line other than your Intercom
group line:
1. Choose one of the following keys:
(Hold)
— Press the Hold key to put the current
call on hold.
— Press the Goodbye key to end the
call.
(Goodbye)
2. Press the Intercom key and begin to
speak.
67
Answer a call
Answer a call
Each incoming call causes the telephone to ring, the LCD indicator
flash, and the Message Indicator lamp to flash.
to
To answer a call:
Choose one of the following:
68
•
Lift the handset.
•
Press the Handsfree button located on
the left side of the handset.
•
Press the line (DN) key beside the LCD
indicator as it flashes.
•
Press the Headset key if a headset is
connected to your telephone.
While on an active call
While on an active call
This section describes features available during an active call.
Place a call on hold
Use the Hold feature when talking on one line and another call arrives on
a second line. Retain the original call by putting it on hold and then
answer the second call.
To place a call on hold:
(Hold)
Press the Hold key. The LCD indicator
flashes beside the line on hold.
Note: If Automatic Hold is enabled, the
active call is automatically put on hold
when you answer the second call.
To retrieve a call on hold:
Press the line (DN) key beside the
flashing LCD indicator.
69
While on an active call
Transfer a call
Use the Transfer feature to redirect a call to the appropriate person.
To use the Transfer feature to direct a call to a third party:
1. Press the Transfer key. The other party
is on hold and a dial tone sounds. The
LCD indicator light flashes steadily.
2. Dial the DN to which the call is to be
transferred or use Personal Directory,
Redial List, or Callers List to select a
number to dial.
3. When that number rings or a person
answers, press the Transfer key to
connect the calling party.
To return to the original call, if the transfer is incomplete:
If the person called is not available,
press the line (DN) key (next to the LCD
indicator) to reconnect to the original
call.
70
While on an active call
Use Timed Reminder Recall
Use the Timed Reminder Recall feature to receive a reminder tone when
a transferred call is not answered.
To use Timed Reminder Recall:
1. Press the Transfer key. The call is put
on hold.
2. Dial the number to which the call is being
transferred.
3. Choose one of the following to start the
recall timer:
— Press the Transfer key.
— Replace the handset before the
extension answers.
Note: If the transfer is complete, the
recall timer stops.
71
While on an active call
If the transferred call is not answered, your telephone rings:
1. Lift the handset to reconnect to the
original caller.
2. Choose one of the following:
— Press the Transfer key and repeat
the transfer.
(Goodbye)
— If the transfer is picked up while you
are on the line, press the Goodbye
key to complete the transfer.
Use Attendant Recall
Use the Attendant Recall feature to contact an attendant during a call and
to connect the call to the attendant.
To contact the attendant while on a call:
1. Press the Attendant Recall key and
stay on the line until the attendant
answers.
2. Press the Goodbye key. The caller
remains connected to the attendant.
(Goodbye)
72
While on an active call
Use Call Park
Use the Call Park feature to hold temporarily (park) and retrieve a call
from any telephone. Using Call Park does not tie up a line. When
configured network-wide, Call Park can be used across networks. A
System Park Extension can be set to automatically park most calls.
To park a call on the System Park DN or your own DN:
During an active call, press the Park key
twice.
Note: By default, the call is parked on
your DN unless a System Park is
enabled to automatically park calls on
the system.
To park a call on a DN other than the System Park DN or your own
DN:
1. Press the Park key.
2. Dial the DN where you want to park the
call.
3. Press the Park key.
73
While on an active call
To park a call using the SPRE code or FFC:
1. Choose one of the following.
or
— Press the Transfer key.
— Press the Conference key.
2. Dial the Call Park FFC.
3. To use an alternate DN from the System
Park DN or your own DN, dial the DN
where you want to park the call.
Otherwise, proceed to Step 4.
4. Choose one of the following.
or
— Press the Transfer key.
— Press the Conference key.
To retrieve a parked call:
1. Lift the handset.
2. Press the Park key.
74
While on an active call
3. Dial the DN where you parked the call.
Note: If a parked call is not retrieved
within a specified period of time, it rings
back to your telephone or to the
attendant.
Record a Calling Party Number
Use the Calling Party Number feature to record a caller’s number, or to
charge a call to an account number, during an established call.
To record a caller’s number for accounting purposes:
1. Press the Call Party key. The caller is
placed on hold.
2. Dial a charge account number or the
caller’s number.
Note: For information on using the
Charge key, see “Charge a call or
charge a forced call” on page 100.
3. Press the Call Party key to return to the
call.
75
While on an active call
Display incoming calls
Use the Display feature to display a second incoming caller’s number and
name (if available) during an active call, without interfering with the call in
progress.
To view the information on an incoming call while on a call in
progress:
1. Press the Display key.
2. Press the flashing line (DN) key. The call
waiting information displays.
Note: When used with other feature
keys, the Display key displays
information associated with those
feature keys.
Trace a Malicious call
Use the Malicious Call Trace feature to trace nuisance calls within your
system.
Note: This is not a default feature. Contact your system administrator
to configure this feature on your telephone.
To use Call Trace while on a call:
Press the Call Trace key.
76
While on an active call
To use Call Trace without a Call Trace key:
1. Choose one of the following:
or
— Press the Transfer key.
— Press the Conference key.
2. Dial the SPRE code followed by 83 or
dial the Call Trace FFC to automatically
reconnect.
77
Incoming calls
Incoming calls
This section describes features that are used with incoming calls.
Activate Automatic Answerback
When the Automatic Answerback feature is active, your set automatically
answers in Handsfree mode after one ring; however, calls are not
forwarded to the voice message service.
To activate Automatic Answerback:
Press the Automatic Answerback key.
To deactivate Automatic Answerback:
Press the Automatic Answerback key
again.
Activate Call Pickup
Use the Call Pickup feature to pick up calls from any telephone in the
same pickup group or another pickup group.
To answer a call in your own call pickup group:
1. Lift the handset.
78
Incoming calls
2. Choose one of the following:
— Press the Pickup key.
— Enter the Pickup Ringing Number
FFC.
To answer an incoming call in another call pickup group:
1. Lift the handset.
2. Press the Group Pickup key or enter
the Pickup Group FFC.
3. Dial the pickup group number of the
ringing telephone.
To answer a call at a specific extension in any pickup group:
1. Lift the handset.
2. Choose one of the following:
— Press the Pickup key.
— Enter the Pickup Directory
Number FFC.
79
Incoming calls
3. Dial the DN of the telephone that is
ringing (in your call pickup group). If the
pickup DN or group number is invalid (an
overflow burst tone sounds and the
screen displays Goodbye and try again),
press the Goodbye key.
80
Incoming calls
Use Call Waiting
The Call Waiting feature alerts you to an incoming call by producing a
tone. It also puts the current call on hold while you answer the new call.
To answer an incoming call while on another call:
(Hold)
1. When the incoming call tone sounds,
press the Hold key to put the current call
on hold.
Note: If Automatic Hold is enabled, it is
not necessary to press the Hold key.
2. Press the Call Waiting key.
To return to the first telephone call:
1. Choose one of the following:
(Hold)
— Press the Hold key to put the
second call on hold.
— Press the Goodbye key to end the
second call.
(Goodbye)
2. Press the line (DN) key associated with
the first call.
81
Incoming calls
If you do not have a Call Waiting key:
1. Press the Goodbye key to end the
current call.
(Goodbye)
2. Press the line (DN) key beside the
flashing status icon to answer the
incoming call.
82
While away from your desk
While away from your desk
This section describes features to use when you are away from your
desk.
Use Call Forward
Use the Call Forward feature to direct incoming calls to ring on another
line (DN). If the telephone is ringing, the call cannot be forwarded.
To forward your calls or change the forward number:
1. Choose one of the following:
— Press the Forward key.
— Lift the handset and enter the Call
Forward All Calls Activate FFC.
2. Dial the DN where you want to forward
your calls.
3. Press the Forward key.
To deactivate Call Forward:
Choose one of the following:
•
Press the Forward key.
•
Lift the handset and enter the Call
Forward All Calls Deactivate FFC.
83
While away from your desk
To reinstate Call Forward to the same number:
Press the Forward key twice.
Use Internal Call Forward
Use Internal Call Forward to accept only calls originating at internal DNs
to ring at another DN. Calls originating outside your telephone system still
ring at your telephone. Current incoming calls cannot be forwarded.
To forward internal calls:
1. Choose one of the following:
— Press the Internal Call Forward
key.
— Lift the handset and enter the
Internal Call Forward Activate
FFC.
2. Dial the DN to which your internal calls
will be forwarded.
3. Press the Internal Call Forward key.
84
While away from your desk
To deactivate Internal Call Forward:
Choose one of the following:
— Press the Internal Call Forward
key.
— Lift the handset and enter the
Internal Call Forward Deactivate
FFC.
To reinstate Call Forward to the same number:
Press the Internal Call Forward key
twice.
Use Remote Call Forward
Use the Remote Call Forward feature to forward calls (from any
telephone other than your own) to any telephone.
To activate Remote Call Forward:
1. Lift the handset.
2. If calling from a telephone outside the
system, dial your direct system access
number and wait for dial tone.
3. Dial the Remote Call Forward Activate
FFC to activate the feature.
4. Dial your Station Control Password. A
dial tone sounds.
85
While away from your desk
5. Choose one of the following:
— Dial your DN.
— To forward calls to the previous call
forward telephone number, press
the # key. (Do not perform steps 6
and 7).
6. Dial the number to which calls are being
forwarded. If calls are forwarded to an
invalid number, a fast busy signal
sounds.
7. Press the # key.
To deactivate Remote Call Forward:
1. Lift the handset.
2. If calling from a telephone outside the
system, dial the direct system access
number and wait for the dial tone.
3. Dial the Remote Call Forward
Deactivate FFC.
4. Dial your Station Control Password.
86
While away from your desk
5. After hearing the dial tone, dial your DN.
6. Press the # key.
Secure your telephone
Use the Electronic Lock feature to prevent others from making calls from
your telephone. The Electronic Lock feature is controlled using your
Station Control Password (SCPW). To change your Station Control
Password, please refer to “Security features” on page 19.
To lock your telephone:
1. Lift the handset.
2. Dial the Electronic Lock Activate FFC.
3. Dial your Station Control Password.
4. Choose one of the following:
(Goodbye)
— If dialing locally, press the Goodbye
key.
— If dialing the FFC remotely, dial your
DN.
87
While away from your desk
To unlock your telephone:
1. Lift the handset.
2. Dial the Electronic Lock Deactivate
FFC.
3. Dial your Station Control Password.
4. Choose one of the following:
(Goodbye)
— If dialing locally, press the Goodbye
key.
— If dialing the FFC remotely, dial your
DN.
88
Talk with more than one person
Talk with more than one person
This section describes features that enable conversations between more
than two people.
Use the Call Join feature
Use the Call Join feature to connect a call to a current active call. This
creates a conference between the two callers and yourself.
To connect a call on hold (on a different line) to your current call:
1. Press the Conference key.
2. Press the line key that has the number of
the caller you want to connect to your
current call.
3. Press the Conference key to join the
person on hold to your conversation.
89
Talk with more than one person
Set up a Conference call
Use the Conference feature to set up a conference call for three or six
people including yourself. The number of people the conference feature
supports depends on your telephone's configuration.
To set up a conference call:
1. While on a call, press the Conference
key to place the party on hold. You
receive a dial tone.
2. Dial the number of the person you want
to add to the conference call. You can
talk privately to the person you are
adding at this time.
Note: If you press the Directory key,
you can also use Corporate Directory,
Personal Directory, Redial List, and
Callers List to find and dial the number
of the person you want to add to the
conference call.
3. Press the Conference key a second
time to conference all parties together.
If the person you attempt to add to the conference is unavailable:
1. Press the Goodbye key.
(Goodbye)
90
Talk with more than one person
2. Press the line (DN) key beside the
flashing status icon to return to your
original call.
91
Talk with more than one person
Use the Conferee Selectable Display
and Disconnect feature
Use the Conferee Selectable Display and Disconnect feature to list active
conferees and disconnect a conferee from the conference call.
To view active conferees:
1. While on a conference call, press the
Conferee Selectable Display key to
turn on the LCD indicator. Each key
press changes the screen to show a
different active conferee.
Note: This action has no effect on the
display of other telephones involved in
the conference.
(Goodbye)
2. Press the Goodbye key. If configured,
the Conference Count Display returns
an updated total count of conferees. The
LCD indicator turns off.
To disconnect a conferee:
1. While on a conference call, press the
Conferee Selectable Display key until
the conferee you want to disconnect
appears on the screen.
2. Press the line (DN) key on which the
conference call is established.
92
Talk with more than one person
3. Choose one of the following:
(Goodbye)
— For a single conferee, press the
Goodbye key. If configured, the
Conference Count Display returns
an updated total count of conferees.
The LCD indicator turns off.
— For multiple conferees, repeat steps
1 and 2 until all conferees are
disconnected. Then press the
Goodbye key.
Use Group Call
Use the Group Call feature to automatically call members of a predefined
group, one at a time, until they all answer.
To call group members:
1. Lift the handset.
93
Talk with more than one person
2. Press the Group Call key or enter the
Group Call FFC.
— The feature automatically calls all
group members. The icon flashes
until all members answer.
— The telephone numbers of the group
members appear on the display as
they answer. When the last person
answers, the Group Call indicator
lights steadily.
— When a person in your group is on a
conference call or another group
call, they are not connected to your
group call.
— After everyone in the group has
answered, only the person who
made the group call can put the call
on hold.
To answer a Group Call:
1. Lift the handset. Note the following about
Notification Tones:
— If you are on a call and receive three
10-second tones, this is the
notification of a group call on your
current extension.
— If you are on a call on another line
when a group call is made, you
receive a long tone through the
handset or speaker.
— If you are already on a conference
call or another group call, you do not
receive notification of a group call.
94
Talk with more than one person
To end a Group Call:
Press the Goodbye key.
(Goodbye)
Note: When the person who made the
group call disconnects, the call
terminates for all members of the group.
However, the members of the group call
can disconnect from the call and not
affect other members on the call.
95
Work without interruption
Work without interruption
This section describes a feature that provides uninterrupted work time.
Activate Make Set Busy
Use the Make Set Busy feature to make your telephone appear busy to all
callers.
To activate Make Set Busy:
Choose one of the following:
— Press the Make Set Busy key.
— Lift the handset and enter the Make
Set Busy Activate FFC.
To deactivate Make Set Busy:
Choose one of the following:
— Press the Make Set Busy key a
second time to deactivate the
feature.
— Lift the handset and enter the Make
Set Busy Deactivate FFC.
96
Additional call features
Additional call features
Contact your system administrator to determine if the following call
features are available on your telephone.
Use AutoDial Transfer
Use the AutoDial Transfer feature to transmit digits through your AutoDial
key to the Central Office after a Trunk Switchhook Flash. You must be on
a Central Office/Exchange (CO) trunk call from or to a Central Office (CO)
that offers Centrex or exchange line-type features.
To use AutoDial Transfer when picking up an incoming trunk call:
1. Press the Centrex Switchhook Line
Flash key and wait for interrupted dial
tone.
2. Press the AutoDial key to call the
number desired.
3. Press the Goodbye key to end the call.
(Goodbye)
97
Additional call features
Use the Buzz feature
Use the Buzz feature to notify another person of a call, a visitor, or a
request. Two telephones that are linked together enable one person to
signal the other. The person signaled hears a buzz.
To buzz the telephone linked to your telephone:
Press the Buzz key.The telephone
linked to your telephone buzzes as long
as you press the key.
98
Additional call features
Use Call Page Connect to make an
announcement
Use the Call Page Connect feature to make an announcement over a
paging system.
Note: A Page key on an attendant console overrides and disconnects
the telephones. The telephones must re-access the page trunk.
To connect to Call Page:
1. Lift the handset.
2. Dial the Page Trunk Access Code to
complete the connection to the page
system.
3. Make your announcement.
4. Press the Goodbye key.
(Goodbye)
99
Additional call features
Use Centrex/Exchange Line Switchhook
Flash
Use the Centrex/Exchange Line Switchhook Flash feature during an
established call to use a Centrex service, such as Call Transfer or ThreeWay Calling.
To use Centrex/Exchange Line Switchhook Flash:
1. While on a call, press the Centrex Line
Switchhook Flash key. A special dial
tone sounds.
2. Dial the codes for your custom Centrex
feature.
3. Press the Goodbye key to end the call.
(Goodbye)
Charge a call or charge a forced call
Use the Call Charge feature to charge a call to a specific account.
The Forced Charge feature charges long-distance calls from a telephone
restricted to local calls.
To charge a local or long-distance call to an account before you dial:
1. Lift the handset.
100
Additional call features
2. Press the Charge key or dial the Call
Detail Recording FFC.
3. Dial the charge account number.
4. When the dial tone sounds, dial the
number.
To charge a call in progress:
1. Choose one of the following:
or
— Press the Transfer key.
— Press the Conference key.
2. Choose one of the following:
— Press the Charge key.
— Dial the Call Detail Recording FFC.
3. Dial the charge account number.
4. Press the line (DN) key to return to the
call.
101
Additional call features
To charge a call to an account when you transfer a call:
1. Press the Transfer key. The call is on
hold.
2. Choose one of the following:
— Press the Charge key.
— Dial the Call Detail Recording FFC.
3. Dial the charge account number.
4. After the dial tone, dial the number to
where the call is to be transferred.
5. Press the Transfer key when you hear
the telephone ring.
Note: You can talk privately to the
person at the transfer number before you
press the Transfer key.
102
Additional call features
To charge a call to an account when you add someone to a
conference call:
1. Press the Conference key. The call is
placed on hold.
2. Choose one of the following:
— Press the Charge key.
— Dial the Call Detail Recording FFC.
3. Dial the charge account number.
4. Dial the number of the person you want
to add to the conference.
5. Press the Conference key.
103
Additional call features
Use Enhanced Override
Use the Enhanced Override feature to override an active call after you
attempt a Forced Camp-on. Use Enhanced Override to make a simple
call or a consultation call, such as placing a call on hold and calling
another party.
To use Enhanced Override:
You receive a busy signal after dialing a
telephone number.
1. Choose one of the following:
— Press the Override key.
— Enter the Override FFC to initiate a
Forced Camp-on.
If either person on the call disconnects at
this time, you receive an overflow (fast
busy/engaged) signal.
2. Choose one of the following:
— Press the Override key again.
— Enter the Override FFC again.
The other two persons on the call
receive an override tone and a
conference call is established between
the three of you. If anyone disconnects,
the other two persons remain connected.
(Goodbye)
104
3. To terminate the call, press the
Goodbye key.
Additional call features
Use Forced Camp-on feature
Use the Forced Camp-on feature to automatically ring another telephone
(internal or external) immediately after that telephone disconnects from its
current call.
To use Forced Camp-on:
You receive a busy signal after dialing a
telephone number.
1. Choose one of the following:
— Press the Override key.
— Enter the Override FFC, to initiate a
Forced Camp-on.
Note: The person you called receives a
tone, and you receive a ring/ringback
signal or a busy/engaged signal,
depending on the options chosen. You
are now camped-on to the number you
dialed.
2. Hang-up the telephone.
3. When the person you called finishes
their call, your telephone automatically
dials the number and both telephones
ring.
Answering a call camped-on to your extension:
When your telephone rings, lift the
handset.
Note: You can program your telephone
for either Camp-on or Call Waiting, but
not both.
105
Additional call features
Override a busy signal
Use the Override feature to override a busy signal and interrupt another
call.
To override a busy/engaged signal:
1. Dial a telephone number and receive a
busy signal.
2. Choose one of the following:
— Press the Override key.
— Enter the Override FFC. The people
in the targeted call receive a tone for
approximately one second. After
Override joins you to their call, a
short tone repeats every 16
seconds.
3. To terminate the call, press the
Goodbye key.
(Goodbye)
106
Additional call features
Use Privacy Release
Use the Privacy Release feature to enable one or more people who share
your DN to join a call.
To use Privacy Release in an established state:
Press the Privacy Release key during a call.
A person joins the call by pressing the
shared number (DN) key on their telephone
(Multiple Appearance DN feature).
Use Radio Page
Use an Radio Page feature to page a person and stay on the line until
they answer. The paged person answers the call after entering a special
Page Meet-me code from any telephone.
To use Automatic Preselection (Meet-me page):
1. Lift the handset.
2. Dial the Radio Paging Access FFC.
The paging tone sounds (two beeps
followed by a dial tone).
3. Dial the number of the party you want to
page. After dialing, the ringback tone
sounds.
Note: The paged person can use any
telephone to enter a Radio Paging
Answer FFC, plus their own DN
number.
107
Additional call features
or
(Goodbye)
4. If your call goes unanswered for a preset
time period and a 15-second highpitched tone sounds followed by silence,
press the Goodbye key or replace the
handset.
To use Automatic Post selection:
The called party is either busy on the telephone or away from their desk.
To page the called party, there is no need to redial the number of the
called party.
1. Press the Radio Page key. A special
dial tone sounds.
2. Dial the Radio Paging Access FFC.
The ringback tone sounds.
Note: The paged person can use any
telephone to enter a Radio Paging
Answer FFC, plus their own DN
number.
or
(Goodbye)
108
3. If your call goes unanswered for a preset
time period and a 15-second highpitched tone sounds followed by silence,
press the Goodbye key or replace the
handset.
Additional call features
To answer a Radio Page:
If you carry a Radio Pager, a page indicates that someone dialed your
DN. If the Radio Page system is set up to function in Meet-me mode, you
can answer the page call from any telephone.
1. Lift the handset.
2. Dial the Radio Paging Answer FFC.
The paging tone sounds.
3. Dial your own DN to connect to the
paging caller. If the caller has hung up,
a steady high-pitched (Number
Unavailable) tone sounds.
Use Voice Call
Use the Voice Call feature to page another person or make an
announcement through someone else’s telephone speaker.
To make a voice call:
1. Lift the handset.
2. Press the Voice Call key and make the
announcement.
3. Press the Goodbye key.
(Goodbye)
109
Additional call features
To respond to a voice call:
Your telephone rings once and the caller's
voice transmits through your speaker. Lift the
handset.
110
Additional features
Additional features
Personal Directory
Use the Personal Directory feature to create and store up to 100 directory
entries. A Personal Directory entry can contain:
•
last name (up to 24 characters)
•
first name (up to 24 characters)
•
telephone numbers (up to 31 characters)
To use Personal Directory, press the Directory key and select Personal
Directory.
Note: If password control has been enabled, enter your SCPW at the
prompt.
To add an entry:
1. Press the AddNew soft key.
Note: If the message “Directory is full”
appears, one or more entries must be
deleted to add a new entry.
2. Press the Next soft key.
3. Use the dial pad to enter the telephone
number.
111
Additional features
4. Press the Next soft key.
5. Use the dial pad to enter the name.
6. Choose one of the following:
or
— Press the Done key to save the new
entry.
— Press the Cancel key to return to the
Add screen.
To edit an entry:
1. Press the Up/Down navigation keys to
scroll and highlight the desired entry.
2. Press the Edit soft key and perform your
edits.
3. Choose one of the following:
or
— Press the Done key to save the
changes.
— Press the Cancel key.
112
Additional features
To delete an entry:
1. Press the Up/Down navigation keys to
scroll and highlight the entry.
2. Press the Delete soft key.
3. Choose one of the following:
or
— Press the Confirm key.
— Press the Cancel key.
113
Additional features
To search for an entry:
1. Press the Up/Down navigation keys to
scroll and highlight the desired entry.
2. Choose one of the following:
or
— Press the Dial key to dial the
resulting number.
— Press the Cancel key to exit without
dialing.
Callers List
The Callers List feature logs all incoming calls. Callers List can store up to
100 entries in the list. When the list is full, the system over-writes the
oldest entry. Use the Callers List feature to review missed calls and to dial
calls. The Callers List contains:
•
the caller’s last and first name (if available)
•
the DN of the caller
•
the time/date of the call
•
the number of times the caller calls
Entries in the Callers List are sorted by the time the call was received.
Note: Calling Party Name Display (CPND) is affected depending on
the preferred name match option. If preferred name match is on, the
CPND appears according to your settings. If the preferred name
match option is off, the CPND appears according to the system
settings.
To access the Callers List, press the Directory key and select Callers List.
Note: If password control has been enabled, enter your SCPW at the
prompt.
114
Additional features
To dial an entry:
1. Press the Up/Down navigation keys to
scroll and highlight the desired entry.
2. Press the Dial key.
To delete an entry:
1. Press the Up/Down navigation keys to
scroll and highlight the desired entry.
2. Press the Delete key.
3. Choose one of the following:
or
— Press the Confirm key.
— Press the Cancel key.
115
Additional features
To delete the entire Callers List:
1. Press the Delete key.
2. Choose one of the following:
or
— Yes to delete entire Callers List.
— No to return to the previous screen.
116
Additional features
Redial List
The Redial List feature logs all outgoing calls. Redial List can store up to
20 entries in the list. When the list is full, the system over-writes the oldest
entry. Use the Redial List feature to review calls made and to redial
previously dialed calls. The Redial List contains:
•
the last and first name of the dialed party (if available)
•
the DN of the dialed party
•
the time/date of the last dialed occurrence
Entries in the Redial List are sorted by the time the call was received.
Note: Calling Party Name Display (CPND) is affected depending on
the preferred name match option. If preferred name match is on, the
CPND appears according to your settings. If the preferred name
match option is off, the CPND appears according to the system
settings.
To access Redial List, press the Directory key and select Redial List.
Note: If password control has been enabled, enter your SCPW at the
prompt.
To dial an entry:
1. Press the Up/Down navigation keys to
scroll and highlight the desired entry.
2. Press the Dial key.
117
Additional features
To delete an entry:
1. Press the Up/Down navigation keys to
scroll and highlight the desired entry.
2. Press the Delete key.
3. Choose one of the following:
or
— Press the Confirm key.
— Press the Cancel key.
To delete the entire Redial List:.
1. Press the Delete key.
2. Choose one of the following:
or
— Yes to delete entire Callers List.
— No to return to the previous screen.
118
Additional features
Virtual Office
When you are away from your office telephone, use the Virtual Office
feature to transfer calls, and all of your office telephone’s features, to a
remote telephone.
Note 1: Consult your system administrator to verify if the Virtual
Office feature is available for your use.
Note 2: When designated as the office telephone, the IP Phone 2002
can be activated for Virtual Office by an IP Phone 2004, an
IP Softphone 2050, or another IP Phone 2002.
Note 3: When logged into an IP Phone 2004 or an IP Softphone 2050
using Virtual Office, feature keys 4, 5, and the Shift key are not
available to the IP Phone 2002.
Note 4: A Virtual Office login from an IP Phone 2004 to an
IP Phone 2002 or IP Softphone 2050 might be blocked in certain
situations. Consult your system administrator.
Virtual Office login
To activate Virtual Office on your Office telephone from your Remote
telephone:
1. Press the Services key.
(Services)
2. Press the Up/Down navigation keys to
scroll and highlight Virtual Office Login.
3. Press the Select key.
119
Additional features
4. At the prompt, enter your User ID.
5. Press the Select key.
6. At the prompt, enter the home Station
Control Password (SCPW).
Note 1: If the User ID is not found
locally, the message “Locating Remote
Server” displays.
Note 2: After three failed login attempts,
wait one hour before attempting to log in
again or contact your system
administrator to reset your password.
For more information, see “Security
features” on page 19.
A successful login transfers all the
features, time, date, and tones to your
remote telephone from your office
telephone.
120
Additional features
Virtual Office on your Remote telephone
The following figures show various IP Phones logged on to an
IP Phone 2002 using Virtual Office.
Figure 5: Logged on to an IP Phone 2002
Figure 6: Logged on to an IP Phone 2002 using an
IP Phone 2004
121
Additional features
Figure 7: Logged on to an IP Phone 2002 using an
IP Softphone 2050.
A User information line appears on all displays listing the number of your
office telephone.
Virtual Office on your Office telephone
When activated for Virtual Office
by a remote telephone, your
office telephone is logged out
and no longer operational.
A Logged Out message displays
on your telephone alerting you
that it is being used for Virtual
Office.
122
Additional features
To regain operation of a telephone being used for Virtual Office:
Choose one of the following:
1. To completely disconnect your office
telephone from the remote telephone:
a. Press the Home key.
b. Enter your User ID and password
(this logs the office telephone back
on to your office network).
2. To use your office telephone as the
remote telephone for Virtual Office,
press the Virtual key to log in to another
IP Phone.
Virtual Office logout
To log out from a remote telephone:
1. Press the Services key.
(Services)
2. Press the Up/Down navigation keys to
scroll and highlight Virtual Office
Logout.
3. Press the Select key.
123
Additional features
Troubleshoot Virtual Office
When you use Virtual Office, error messages may display on-screen.
Table 2 lists error messages and actions to correct the causes.
Table 2: Troubleshoot Virtual Office (Part 1 of 3)
Displayed Message
Probable Cause
Actions
Busy, try again
Remote IP Phone is
active (not idle).
Wait for remote IP
Phone to become idle
and try again.
ACD is logged in.
Log out ACD IP
Phone before Virtual
Office from another
IP Phone.
Make-Set-Busy is
inactive on ACD IP
Phone.
Set Make-Set-Busy
active on ACD IP
Phone.
Incorrect User ID
entered.
Enter correct User ID.
User ID is not in
Gatekeeper
database.
Notify system
administrator.
Invalid ID (2)
Incorrect User ID
entered.
Enter correct User ID.
Invalid ID (3)
Incorrect User ID
entered.
Enter correct User ID.
User ID in
Gatekeeper database
points to originating
Call Server.
Notify system
administrator.
Invalid ID (1)
124
Additional features
Table 2: Troubleshoot Virtual Office (Part 2 of 3)
Displayed Message
Probable Cause
Actions
Locked from Login
Three failed attempts
to enter the correct
Station Control
Password.
Wait one hour for the
lock to clear
automatically, or
notify system
administrator to clear
lock.
Permission Denied
(1)
Remote telephone
has no Station
Control Password.
Notify system
administrator.
Permission Denied
(3)
Incorrect User ID
entered.
Enter correct User ID.
Remote telephone
has no Station
Control Password.
Notify system
administrator.
Incorrect User ID
entered.
Enter correct User ID.
Attempt to log in to a
remote IP Phone
2004 or IP Softphone
2050 from an
IP Phone 2002
(some restrictions
apply).
Go to an
IP Phone 2004 or
IP Softphone 2050
and try again, or
consult your local
system administrator.
Incorrect User ID
entered.
Enter correct User ID.
Remote telephone
does not have VOUA
Class of Service.
Notify system
administrator.
Permission Denied
(4)
Permission Denied
(5)
125
Additional features
Table 2: Troubleshoot Virtual Office (Part 3 of 3)
Displayed Message
Probable Cause
Actions
Permission Denied
(6)
Incorrect User ID
entered.
Enter correct User ID.
Incorrect Station
Control Password
entered.
Select Retry, and try
again with the correct
Station Control
Password.
Server Unreachable
(1)
Network problem.
Notify system
administrator, if
problem persists.
Server Unreachable
(2)
Network problem.
Notify system
administrator, if
problem persists.
Media Gateway 1000B
The Media Gateway 1000B (MG 1000B) telephone can operate in Normal
or Local mode.
Normal Mode
The telephone registers with the Main Office and receives telephone
services from the Main Office. At any time during Normal Mode, you can
check local mode functionality (make and receive calls) by enabling Local
Mode and returning to Normal Mode. After testing, you can return to
Normal Mode by using the Resume Normal Mode command or by waiting
for ten minutes.
Local Mode
If the WAN connection goes down, the IP Phone loses communication
with the Main Office TPS. It then registers with the MG 1000B and
receives telephone services from the MG 1000B. Features such as
Personal Directory, Redial List, and Callers List are not available when
operating in Local Mode. When in Local Mode, the telephone displays
“LOCAL MODE”.
126
Additional features
Test Local Mode
Use Test Local Mode to check local mode functionality (make and receive
telephone calls). This is useful when provisioning has changed for an
IP Phone on an MG 1000B Controller.
1. Press the Services key.
(Services)
2. Press the Up/Down navigation keys to
scroll and highlight Test Local Mode.
3. Press the Select key (the telephone
resets and registers to the branch office).
Resume Normal Mode
Use the Resume Normal Mode command to return to Normal Mode after
testing survival functionality.
Note: If the Resume Normal Mode command is not performed after
testing, the telephone automatically returns to Normal Mode in ten
minutes.
1. Press the Services key.
(Services)
2. Press the Up/Down navigation key to
scroll and highlight Resume Normal
Mode.
127
Additional features
3. Press the Select key (the telephone
registers back to the Main Office).
Troubleshoot MG 1000B
When using MG 1000B, error messages may display on your screen.
Table 3 lists error messages and actions to correct the causes.
Table 3: Troubleshoot MG 1000B
Display Message
Probable Cause
Actions
Local Mode
Test Local mode.
Press the Services
key, and then select
Resume Normal
Mode.
Network problem.
Contact system
administrator if
problem persists.
Gatekeeper unable to
find end point from
Branch User ID.
Notify system
administrator.
Branch User ID not
found in any
equipped TN.
Notify system
administrator.
Local Mode
Invalid ID (1)
Local Mode
Invalid ID (2)
128
Hospitality features
Hospitality features
Hospitality features are intended for hotel operations.
Set Automatic Wake-Up
Use the Automatic Wake-Up feature to receive a timed reminder call.
From your telephone, you can program the system to automatically place
a call to yourself at a predetermined time. When you answer the call,
recorded music plays for up to 30 seconds, followed by a prerecorded
announcement or the attendant.
To enter the time for an Automatic Wake-Up call:
1. Lift the handset.
2. Dial the Automatic Wake-Up Request
FFC.
3. Dial the Automatic Wake-Up time in a
24-hour time format (hhmm). A tone
sounds to confirm your entered time.
Note: In a 24-hour time format,
7:30 a.m. is entered as 0730;
9:45 p.m. is entered as 2145.
4. Press the Goodbye key.
(Goodbye)
129
Hospitality features
To quit an Automatic Wake-Up call:
1. Lift the handset.
2. Dial the Automatic Wake-Up Quit FFC.
3. Press the Goodbye key.
(Goodbye)
To verify the time for the Automatic Wake-Up call:
1. Lift the handset.
2. Dial the Automatic Wake-Up Verify
FFC.
3. Dial the Automatic Wake-Up time in a
24-hour time format (hhmm). If your
query matches the preset time, a
confirmation tone sounds.
Note: In a 24-hour time format,
7:30 a.m. is entered as 0730;
9:45 p.m. is 2145.
4. Press the Goodbye key.
(Goodbye)
130
Hospitality features
Activate Message Registration
Use the Message Registration feature to read, change, or reset meters
that log your hotel telephone calls.
To read meters:
1. Press the Message Registration key.
2. Dial the room DN.
3. Press the Message Registration key.
To change a meter:
1. Press the Message Registration key.
2. Dial the room DN.
3. Dial the correct meter count.
4. Press the * key.
131
Hospitality features
5. Press the Message Registration key.
To reset a meter to zero:
1. Press the Message Registration key.
2. Dial the room DN.
3. Press the * key.
4. Press the Message Registration key.
132
Hospitality features
Use Maid Identification
Use the Maid Identification feature to track the cleaning status of rooms.
The maid enters the information from the telephone in each room.
To enter cleaning status:
1. Press the Room Status key.
2. Dial the DN for the room for which the
cleaning status is being changed.
3. Dial one of the following cleaning status
codes:
1 = Cleaning requested
2 = Cleaning in progress
3 = Room cleaned
4 = Room passed inspection
5 = Room failed inspection
6 = Cleaning skipped
7 = Not for sale
The interrupted dial tone sounds.
4. Press the * key.
5. Dial the Maid ID. If you dial the wrong
Maid ID, press the * key and redial the
ID.
133
Hospitality features
6. Press the Room Status key.
Display Room Status
Use the Room Status feature to print the status of a room using the
Display Module.
To read the status of a room:
1. Press the Room Status key.
2. Dial the DN for the room. The DN
displays followed by a two-digit
code.The first digit indicates the
occupancy status:
0 = Room vacant
1 = Room occupied
The second digit indicates the cleaning
status of the room:
1 = Cleaning requested
2 = Cleaning in progress
3 = Room cleaned
4 = Room passed inspection
5 = Room failed inspection
6 = Cleaning skipped
7 = Not for sale
3. Press the Room Status key.
134
Hospitality features
Changing the status of a room:
1. Press the Room Status key.
2. Dial the DN for the room. The DN
displays followed by a two-digit
code.The second digit indicates the
occupancy status:
0 = Room vacant
1 = Room occupied
The second digit indicates the cleaning
status of the room:
1 = Cleaning requested
2 = Cleaning in progress
3 = Room cleaned
4 = Room passed inspection
5 = Room failed inspection
6 = Cleaning skipped
7 = Not for sale
3. Dial the status code for the room. A
three-digit code appears. The first digit
indicates the occupancy status, the
second is the old cleaning status, and
the third is the new status.
4. Press the Room Status key.
135
Flexible Feature Codes (FFCs)
Flexible Feature Codes (FFCs)
Use Table 4 to keep track of the FFCs assigned by your system
administrator.
Table 4: Flexible Feature Codes (Part 1 of 2)
FFC
136
Feature
FFC
Feature
Automatic Wake-Up
Activate
Make Set Busy Activate
Automatic Wake-Up
Deactivate
Make Set Busy Deactivate
Automatic Wake-Up
Verify
Malicious Call Trace
Call Detail Recording
Charge Account
Override
Call Forward All Calls
Activate
Pickup Ringing Number
Call Forward All Calls
Deactivate
Pickup Directory Number
Call Park
Pickup Group
Electronic Lock
Activate
Radio Paging Access
Electronic Lock
Deactivate
Radio Paging Answer
Group Call
Remote Call Forward Activate
Internal Call Forward
Activate
Remote Call Forward
Deactivate
Internal Call Forward
Deactivate
RingAgain Activate
Flexible Feature Codes (FFCs)
Table 4: Flexible Feature Codes (Part 2 of 2)
FFC
Feature
FFC
Feature
RingAgain Deactivate
Virtual Office Terminal Log Off
Station Control
Password Change
Virtual Office Terminal Log On
137
Accessories
Accessories
IP Phone Key Expansion Module (KEM)
The Nortel Networks IP Phone Key Expansion Module (KEM) is an
optional hardware module that provides additional line appearances and
feature keys on your IP Phone 2002. You can connect up to two KEMs to
your IP Phone 2002, providing a total of 48 additional keys.
For more information about the IP Phone Key Expansion Module,
consult the “Nortel Networks IP Phone Key Expansion Module (KEM)
User Guide”.
138
Terms you should know
Terms you should know
Attendant
A telephone operator in your organization.
AutoDial
A telephone number programmed on the AutoDial key for onetouch dialing.
Callers List
A list of all incoming calls (maximum 100 entries).
Calling Party Name Display (CPND)
Information appearing on the LCD display screen such as the
caller’s name and telephone number. The system must have
CPND enabled.
Category 5 (CAT5)
Balanced 100 Ohm cable and associated connecting hardware
whose transmission characteristics are specified up to 100 MHz.
It is used by 10BaseT, 100BaseT4, and 100BaseTX installations.
The cable normally has four pairs of copper wire. Category 5 is
the most popular cable used in new installations today.
Communication Server 1000
An office communication system.
Date/Time display
The current date and time when the telephone is in an idle state.
Directory key
Enables access to Corporate Directory, Personal Directory,
Redial List, and Callers List.
139
Terms you should know
Directory Number (DN)
A number consisting of one to seven digits for a telephone. Also
known as an extension number.
Expand to PC
A fixed key on your telephone reserved for future feature
development. An audible non-working tone is generated along
with a display message “Service not available” if this key is
pressed.
Fastbusy
A signal given when all outgoing lines are busy.
Feature display
An area that shows status information about the feature in use. It
also displays the name and status of the active session.
Fixed key
The hard-labeled keys on your telephone.
Flexible Feature Codes (FFCs)
Specialized codes entered using the dial pad that enable features
(for example, Automatic Wake-Up call).
Goodbye key
A fixed key used to end an active call.
Handsfree
A method of conversing with the party on the other end of the line
without lifting your handset.
Headset key
A fixed key used to answer a call using the headset.
140
Terms you should know
Hold key
A fixed key used to place an active call on hold.
Information display
Any display of call activity, lists, prompts, and status of calls.
On the IP Phone 2002, the information area is a 1-line by
24-character display. If the text message exceeds this area, a
scroll arrow icon indicates that you must use the scroll keys to
view the remaining text.
Information line
A 1-line by 24-character area that displays date and time or application information.
Interrupted dial tone
A broken or pulsed dial tone, heard when you access some
features on your telephone.
IP Phone Key Expansion Module (KEM)
An optional hardware module which provides additional line
appearances and feature keys to your IP Phone. Up to two KEMs
can be attached to your IP Phone 2002, providing a total of 48
keys.
Message (Inbox)
A fixed key which connects to your voice messaging system
when the key is pressed.
Message waiting indicator/Incoming call indicator
An LCD or an LED that indicates the status of a feature by the
flash, wink, steady on, or off.
141
Terms you should know
More..
An option allowing access to the multiple layers of the soft keys.
Soft keys are the four keys located directly below the display
area.
Mute key
A fixed key used to listen to the caller without transmitting.
Navigation keys
Up/Down and Left/Right keys used to scroll through menus and
lists appearing on the LCD display screen.
Off-hook
Any line selected to make a call or receive an incoming call.
The term off-hook is applied whether (a) the end-user lifts up the
handset, (b) the end-user presses a line key, (c) the call is
automatically answered at the set, or (d) a line is automatically
selected for an outgoing call.
Outbox/Shift
A fixed key reserved for future feature development. An audible
non-working tone is generated along with a display message
“Service not available” if this key is pressed.
Paging tone
A special tone heard when using the Radio Paging feature. You
hear two beeps followed by dial tone.
Password Admin
A menu used by you and the system administrator to change
your Station Control Password (SCPW).
Personal Directory
A list of user-defined names and numbers (maximum of 100
entries).
142
Terms you should know
Primary directory number
The main extension number on your telephone.
Private Line
A feature that can be assigned to your telephone. With this line,
you can reach an outside number without dialing a code to
access an outside line. Internal extensions cannot be dialed from
a private line.
Programmable line (DN)/feature keys (self-labeled)
The four keys located at the sides of the upper area of the
display.
Quit key
A fixed key on your telephone that is used to exit applications.
Redial List
A list of previously dialed telephone numbers (maximum 20
entries).
Ringback/ring tone
A sound indicating that a call you have made is ringing at its
destination.
Secondary directory number
A second incoming/outgoing line for your telephone.
Services key
A fixed key used to access options such as Telephone Options,
Password Admin, Display Network Diagnostics Utilities, Virtual
Office Login, Virtual Office Logout, Test Local Mode, and
Resume Normal Mode.
Shared directory number
A DN (extension) that is shared by two or more persons.
143
Terms you should know
Soft keys (self-labeled)
A set of keys programmed by your system administrator. These
four keys located directly below the display area have four
programmable layers. The layers are accessed through the
More.. key. These keys are also used to configure parameters in
the Telephone Option menu.
Speaker key
A fixed key used to activate Handsfree.
Special dial tone
The three consecutive tones followed by dial tone that you hear
when accessing telephone features.
Station Control Password (SCPW)
Enables security features on your phone to prevent others from
making calls from your telephone and to prevent access to your
Personal Directory, Redial List, and Callers List.
Status Messages
A message displayed to inform the user of important information.
A right arrow appears if more than one Status Message is
present. Examples of Status Messages include: Message
Waiting, All Lines Forwarded to: 6453, Do Not Disturb On, Ring
Again active, Ringer is OFF, and Line x Unavailable.
System or Switch
Your office communication system.
Switchhook
A button that the handset presses down, disconnecting your call
when you replace the handset. The handset (when lifted)
releases the switchhook and you either answer an incoming call
or you receive a dial tone to make a call.
144
Terms you should know
User Interface
Screen displays that interact with the end user as a result of an
action or event.
Volume control bar
A rocker bar you press to increase or decrease the volume of the
ringer, handset, headset, speaker and the Handsfree feature.
145
Terms you should know
146
Index
Index
A
About the IP Phone 2002 11
Answer a call 68
Attendant 139
Attendant Recall 72
AutoDial 60, 139
AutoDial Transfer 97
Automatic Answerback 78
Automatic Wake-Up 129
B
Basic features 11
Buzz feature 98
C
Call features and Flexible Feature
Codes 19
Call Forward 83
Call Join 89
Call Page 99
Call Page Connect 99
Call Park 73
Call Pickup 78
Call Timer 40
Call Waiting 81
Callers List 58, 139
Calling Party Name Display (CPND) 139
Calling Party Number 75
Camp-on, Forced 105
Cat 5 139
Centrex/Exchange Line Switchhook Flash 100
Change feature key labels 42
Charge a call or charge a forced
call 100
Communication Server 1000 139
Conferee Selectable Display and
Disconnect 92
Conference call 90
Configure area Code set-up 48
Configure call log options 44
Configure Callers List log 45
Configure Name Display format 50
Configure New Call indication 46
Configure options 26
Configure Preferred Name Match
47
Connect the components 24
Contrast adjustment 34
Corporate Directory 56
D
Date/Time display 139
Date/Time format 36
Directory applications 55
Directory key 16, 139
Directory Number (DN) 140
Display diagnostics 37
Display incoming calls 76
Display Network Diagnostics Utilities 15
147
Index
E
Electronic Lock 87
Enhanced Override 104
(KEM) 141
L
Expand to PC key 17, 140
Language display 35
F
Line (DN) key 14
Fastbusy signal 140
Local Area Network (LAN) 11
Feature display 140
Local DialPad Tone 38
Fixed key 140
Local mode 126
Flexible Feature Code (FFC) 79,
140
M
Flexible Feature Codes (FFCs)
136
G
Goodbye key 14, 140
Group Call 93
H
Handsfree 140
Handsfree dialing 53
Headset key 16, 140
Hold key 14, 141
Last Number Redial 64
Maid Identification 133
Make Set Busy 96
Malicious Call Trace 76
Media Gateway 1000B 126
Meet - me page 107
Meridian 1 144
Message (Inbox) key 14, 141
Message Registration 131
Message waiting indicator 17, 141
More key 17, 142
Mute key 16, 142
Hospitality features 129
N
Hot Line 66
Navigation keys 14, 142
I
Normal mode 126
Indicator status 141
O
Information display 141
Off-hook 142
Information line 141
Intercom call 67
Internal Call Forward 84
Interrupted dial tone 141
IP Phone Key Expansion Module
148
Off-hook dialing 52
Onhook Default Path 41
On-hook dialing 52
Outbox/Shift key 17, 142
Override a busy signal 106
Index
P
Speaker key 16, 144
Paging tone 142
Special dial tone 144
Password Admin 142
Speed Call 65
Personal Directory 57, 142
Station Control Password (SCPW)
144
Place a call on hold 69
Predial feature 59
Primary directory number 143
Privacy Release 107
Private Line 143
Status Messages 144
Switchhook 144
System or Switch 144
System Speed Call 66
Programmable line (DN)/feature
keys (self-labeled) 14, 143
T
Q
Telephone display 18
Quit key 17, 143
Telephone Options 27
Telephone controls 13
Test Local Mode 127
R
Timed Reminder Recall 71
Radio Page 107
Transfer a call 70
Record a Calling Party Number 75
Redial List 59, 143
U
Remote Call Forward 85
User Interface 145
Resume Normal Mode 127
Ring Again 63
Ring type 39
Ringback/ring tone 143
Room Status 134
S
Secondary Directory Number 143
Secure your telephone 87
Security features 19
Services key 15, 143
Set information 44
V
Virtual Office 119
Virtual Office login 119
Virtual Office logout 123
Virtual Office on your Office telephone 122
Virtual Office on your Remote telephone 121
Voice Call 109
Volume adjustment 28
Volume control bar 13, 145
Shared Directory Numbers 143
Soft keys (self-labeled) 17, 144
149
Index
150
Nortel Networks Communication Server 1000
IP Phone 2002
User Guide
Copyright © 2004 Nortel Networks
All Rights Reserved
Information is subject to change without notice. Nortel Networks reserves
the right to make changes in design or components as progress in
engineering and manufacturing may warrant.
SL-1, Meridian 1, and Succession are trademarks of Nortel Networks.
Document Release: Standard 3.00
Date: September 2004
Produced in Canada
Internet address
http://www.nortelnetworks.com