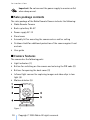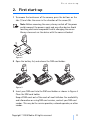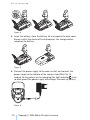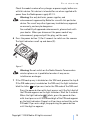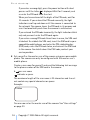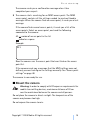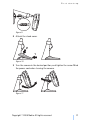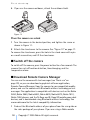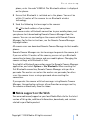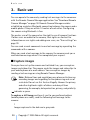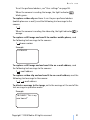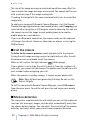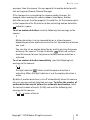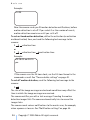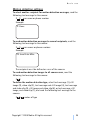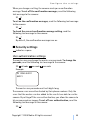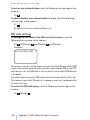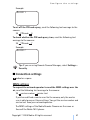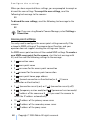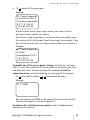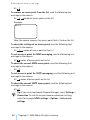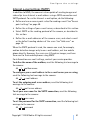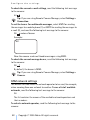
1
Nokia Remote Camera
User guide
DECLARATION OF CONFORMITY
We, NOKIA CORPORATION declare under our sole responsibility that the product PT-6
is in conformity with the provisions of the following Council Directive: 1999/5/EC.
A copy of the Declaration of Conformity can be found at
http://www.nokia.com/phones/declaration_of_conformity/.
Copyright © 2004-2005 Nokia. All rights reserved.
Reproduction, transfer, distribution or storage of part or all of the contents in this
document in any form without the prior written permission of Nokia is prohibited.
Nokia, Nokia Connecting People, and N-Gage are registered trademarks of Nokia
Corporation. Other product and company names mentioned herein may be trademarks
or tradenames of their respective owners.
Bluetooth is a registered trademark of Bluetooth SIG, Inc.
Nokia operates a policy of continuous development. Nokia reserves the right to make
changes and improvements to any of the products described in this document without
prior notice.
Under no circumstances shall Nokia be responsible for any loss of data or income or
any special, incidental, consequential or indirect damages howsoever caused.
The contents of this document are provided “as is”. Except as required by applicable
law, no warranties of any kind, either expressed or implied, including, but not limited
to, the implied warranties of merchantability and fitness for a particular purpose, are
made in relation to the accuracy, reliability or contents of this document. Nokia
reserves the right to revise this document or withdraw it at any time without prior
notice.
The availability of particular products may vary by region. Please check with the Nokia
dealer nearest to you.
Export Controls
This device may contain commodities, technology or software subject to export laws
and regulations from the US and other countries. Diversion contrary to law is
prohibited.
CLASS 1 LED PRODUCT
EN 60825-1/A2:2001
Issue 2 EN, 9233582
For your safety
Read these simple guidelines. Not following them may be dangerous or illegal.
SWITCH ON SAFELY
Do not switch the device on when wireless phone use is prohibited or when it may
cause interference or danger.
ROAD SAFETY COMES FIRST
Do not install the device in a vehicle. Do not use the device or your mobile phone
to control or configure the device while driving; park the vehicle first.
INTERFERENCE
All wireless devices may be susceptible to interference, which could affect
performance.
SWITCH OFF IN HOSPITALS
Follow any restrictions. Switch the device off near medical equipment.
SWITCH OFF IN AIRCRAFT
Follow any restrictions. Wireless devices can cause interference in aircraft.
SWITCH OFF WHEN REFUELLING
Don't use the device at a refuelling point. Don't use near fuel or chemicals.
SWITCH OFF NEAR BLASTING
Follow any restrictions. Don't use the device where blasting is in progress.
USE SENSIBLY
Use only in the normal position as explained in the product documentation.
QUALIFIED SERVICE
Only qualified personnel may repair this product.
ENHANCEMENTS AND BATTERIES
Use only approved enhancements and batteries. Do not connect incompatible
products.
BACKUP COPIES
Remember to make back-up copies or keep a written record of all important
information.
CONNECTING TO OTHER DEVICES
When connecting to any other device, read its user guide for detailed safety
instructions. Do not connect incompatible products.
Copyright © 2005 Nokia. All rights reserved.
3
Contents
1. Introduction ...................................................................................... 6
About your camera............................................................................................................ 7
Network services................................................................................................................ 7
Battery information .......................................................................................................... 8
Batteries and power supply..........................................................................................................8
Charge and discharge ....................................................................................................................8
Wet and damp conditions............................................................................................... 9
Sales package contents..................................................................................................10
Camera features...............................................................................................................10
2. First start-up ..................................................................................11
Mount the camera...........................................................................................................15
Switch off the camera....................................................................................................18
Download Remote Camera Manager .........................................................................18
Nokia support on the Web............................................................................................19
3. Basic use..........................................................................................20
Capture images ................................................................................................................20
Call the camera ................................................................................................................22
Motion detection .............................................................................................................22
Motion detection settings ......................................................................................................... 25
Use motion detection with Remote Camera Manager...................................................... 27
Timed imaging ..................................................................................................................27
Timed imaging settings .............................................................................................................. 29
Use timed imaging with Remote Camera Manager ........................................................... 31
Thermometer.....................................................................................................................31
Thermometer settings ................................................................................................................. 32
Use the thermometer with Remote Camera Manager ...................................................... 33
4. User settings ...................................................................................33
Define the master user...................................................................................................33
Add users............................................................................................................................34
User settings.................................................................................................................................. 36
Define the user settings with Remote Camera Manager ................................................. 38
5. Configure the settings ...................................................................38
Camera settings ...............................................................................................................38
Image and video settings........................................................................................................... 38
4
Copyright © 2005 Nokia. All rights reserved.
General camera settings ............................................................................................................ 40
Time and date settings ............................................................................................................... 42
Notification settings ................................................................................................................... 44
Security settings.............................................................................................................. 45
User authentication settings..................................................................................................... 45
PIN code settings ......................................................................................................................... 46
Connection settings........................................................................................................ 47
MMS settings ................................................................................................................................ 47
Access point settings .................................................................................................................. 48
Internet e-mail settings (SMTP)............................................................................................... 51
GSM network settings ................................................................................................................ 52
Configure the camera with a PC................................................................................. 53
Establish a cable connection .................................................................................................... 54
Establish a Bluetooth connection............................................................................................ 54
6. Light indicators.............................................................................. 55
7. Enhancements ................................................................................ 57
8. Care and maintenance .................................................................. 57
9. Additional safety information ...................................................... 58
10. Technical specifications .............................................................. 61
11. List of commands ........................................................................ 62
Copyright © 2005 Nokia. All rights reserved.
5
Introduction
1. Introduction
The Nokia Remote Camera is an imaging device with a motion detector,
thermometer, and microphone. With the camera you can capture still
images and video clips remotely, and send them to your multimedia
messaging (MMS) enabled mobile phone, or to an e-mail address. You
control and configure the camera with text messages (SMS) or with the
Remote Camera Manager application that can be downloaded from the
camera to a compatible phone. See “Download Remote Camera
Manager” on page 18.
The camera can be used outdoors when powered with the Nokia power
supply AC-12 found in the camera sales package. Do not expose the
camera to rain.
To use the Nokia Remote Camera, you need the following:
• A GPRS enabled mobile subscription with a SIM card and MMS
service.
• An MMS and SMS enabled mobile phone with a colour display.
• GSM/GPRS network coverage and MMS service coverage with
adequate signal strength in the phone and camera premises.
• An available e-mail address, if you want to receive images to your email.
Note: National laws and regulations may place restrictions on
recording images and regarding further processing and use of
such data. Do not use this feature illegally. Honour the privacy
and other legitimate rights of others and obey all laws
governing, for example, data protection, privacy, and publicity.
Note: Only devices that offer compatible multimedia message
or e-mail features can receive and display multimedia
messages.
Important: E-mail messages or multimedia message objects
may contain viruses or otherwise be harmful to your device or
PC. Do not open any attachment if you are not sure of the
trustworthiness of the sender.
6
Copyright © 2005 Nokia. All rights reserved.
Introduction
Note: Check how large MMS messages your compatible mobile
phone is capable of receiving. Your network operator may also
restrict the size of MMS messages. Ask your network operator
for details.
The images and messages sent from the camera are charged to the
subscription of the SIM card in the camera.
Your device supports the sending of text messages beyond the normal
160-character limit. If your message exceeds 160 characters, it is sent
as a series of two or more messages.
■ About your camera
The wireless device described in this guide is approved for use on the
GSM 900/1800 network. Contact your service provider for more
information about networks.
When using the features in this device, obey all laws and respect the
privacy and legitimate rights of others.
Warning: To use any features in this device, the device must be
switched on. Do not switch the device on when wireless device
use may cause interference or danger.
■ Network services
To use the device you must have service from a wireless service provider.
Some networks may have limitations that affect how you can use
network services. For instance, some networks may not support all
language-dependent characters and services.
Before you can use any of these network services, you must subscribe to
them through your service provider and obtain instructions for their use
from your service provider.
Note: For availability, rates, and information on using SIM
services, contact your SIM card vendor, e.g. network operator,
service provider, or other vendor.
Copyright © 2005 Nokia. All rights reserved.
7
Introduction
■ Battery information
The Nokia Remote Camera contains a back-up battery which is used
when there is a mains power cut. Therefore, the camera is not switched
off during a mains power cut, unless the back-up battery runs out.
Batteries and power supply
Check the model number of any power supply before use with this
device. This device is intended for use when supplied with power from
the Nokia power supply AC-12.
Warning: Use only batteries, power supplies, and
enhancements approved by Nokia for use with this particular
model. The use of any other types may invalidate any approval
or warranty, and may be dangerous.
For availability of approved enhancements, please check with your
dealer.
When you disconnect the power cord of any enhancement, grasp and
pull the plug, not the cord.
Your device and its enhancements may contain small parts. Keep them
out of reach of small children.
Always switch the device off and disconnect the power supply before
removing the battery.
Charge and discharge
The back-up battery can be used hundreds of times but it will eventually
wear out. When the usage time is noticeably shorter than normal, buy a
new battery. Use only Nokia approved batteries.
If left unused, a fully charged battery will lose its charge over time.
Temperature extremes can affect the ability of your battery to charge.
Use the battery only for its intended purpose. Never use any charger or
battery that is damaged.
Do not short-circuit the battery. Accidental short-circuiting can occur
when a metallic object such as a coin, clip, or pen causes direct
connection of the positive (+) and negative (-) terminals of the battery.
(These look like metal strips on the battery.) This might happen, for
8
Copyright © 2005 Nokia. All rights reserved.
Introduction
example, when you carry a spare battery in your pocket or purse. Shortcircuiting the terminals may damage the battery or the connecting
object.
Leaving the battery in hot or cold places will reduce the capacity and
lifetime of the battery. A device with a hot or cold battery may not work
temporarily, even when the battery is fully charged. Battery
performance is particularly limited in temperatures well below freezing.
Do not dispose of batteries in a fire! Dispose of batteries according to
local regulations. Please recycle when possible. Do not dispose as
household waste.
■ Wet and damp conditions
The operating temperature for the device is -20ºC to +50ºC. You can use
the device (including the Nokia power supply AC-12) in normal outdoor
conditions within the limits of the operating temperature. Do not
submerge the device in water. Do not install the device in places where
it can get exposed to rain. Attach the outdoor shield to the camera when
using the camera outdoors.
If the device or the system connector has been exposed to salt water,
wipe it clean with a soft cloth dipped in freshwater to avoid corrosion.
The device must be carefully wiped dry.
Before opening the back cover, dry the device to prevent water from
reaching the interior of the device. The SIM card and battery are not
water resistant.
Never charge the device when the power connector is wet or damp.
Never use a damp device with enhancements that have an electrical
function.
Note: Make sure the interior of your device and the back cover
seals are dry, clean, and free of any foreign objects. Foreign
objects may damage the seals against water.
Important: Enhancements to be used with this device do not
meet the same durability or water resistance specifications as
the device itself.
Copyright © 2005 Nokia. All rights reserved.
9
Introduction
Important: Do not connect the power supply to a mains outlet
when damp or wet.
■ Sales package contents
The sales package of the Nokia Remote Camera includes the following:
• Nokia Remote Camera
• Back-up battery BL-5C
• Power supply AC-12
• Stand cover
• Assembly kit for mounting the camera onto a wall or ceiling
• Outdoor shield for additional protection of the camera against heat
and rain
• User guide
■ Camera features
The camera has the following parts:
• Light indicators (1)
• Button for switching on the camera and entering the PIN code (2)
• Buttons for opening the back cover (3)
• Infrared light sources for capturing images and video clips in low
light (4)
• Motion detector (5)
Figure 1
10
Copyright © 2005 Nokia. All rights reserved.
First start-up
2. First start-up
1 To remove the back cover of the camera, press the buttons on the
side (1) and slide the cover in the direction of the arrow (2).
Note: Before removing the cover, always switch off the power
and disconnect the power supply and any other device. Avoid
touching electronic components while changing the covers.
Always store and use the device with the covers attached.
Figure 2
2 Open the battery lid, and release the SIM card holder.
Figure 3
3 Insert your SIM card into the SIM card holder as shown in Figure 4.
Close the SIM card holder.
Keep all SIM cards out of the reach of small children. For availability
and information on using SIM card services, contact your SIM card
vendor. This may be the service provider, network operator, or other
vendor.
Copyright © 2005 Nokia. All rights reserved.
11
First start-up
Figure 4
4 Insert the battery, close the battery lid, and replace the back cover.
Always switch the device off and disconnect the charger before
removing the battery.
Figure 5
5 Connect the power supply to the mains outlet, and connect the
power supply to the bottom of the camera stand. Wait for 15
seconds for the camera to start charging (the light indicator starts
to blink green).The power supply also charges the back-up battery.
Figure 6
12
Copyright © 2005 Nokia. All rights reserved.
First start-up
Check the model number of any charger or power supply before use
with this device. This device is intended for use when supplied with
power from the Nokia power supply AC-12.
Warning: Use only batteries, power supplies, and
enhancements approved by Nokia for use with this particular
device. The use of any other types may invalidate any approval
or warranty, and may be dangerous.
For availability of approved enhancements, please check with
your dealer. When you disconnect the power cord of any
enhancement, grasp and pull the plug, not the cord.
6 Press the power button (1) for 2 seconds to switch on the camera.
The light indicators scroll up and down (2).
Figure 7
Warning: Do not switch on the Nokia Remote Camera when
wireless phone use is prohibited or when it may cause
interference or danger.
7 If the PIN code query is disabled on the SIM card, proceed to step 8.
If the PIN code query is enabled on the SIM card, the light indicators
blink the letter
and you must enter the PIN code of the SIM card:
Press the power button with short presses until the first digit of
the PIN code appears on the light indicators. Wait for 3 seconds.
When the light indicator
blinks, press the power button
with short presses until the second digit of the PIN code appears
on the light indicators. Repeat until you have entered the entire
PIN code. If you miss a digit, keep pressing the power button
until the digit re-appears.
Copyright © 2005 Nokia. All rights reserved.
13
First start-up
If you enter a wrong digit, press the power button with short
presses until the letter is displayed. Wait for 3 seconds, and
re-enter the PIN code from the start.
When you have entered all the digits of the PIN code, wait for
10 seconds. If you entered the PIN code correctly, the light
indicators scroll up and down until the camera is connected to
the network. The camera stores the PIN code in its memory and
uses it automatically each time the camera is switched on.
If you entered the PIN code incorrectly, the light indicators blink
red, and you must enter the PIN code again.
If you enter a wrong PIN code three times in a row, the SIM card
is blocked. To unblock the SIM card, insert the SIM card to your
compatible mobile phone, and enter the PIN unblocking key
(PUK) code, enter the PIN code twice, and reinsert the SIM card
in the camera. For details about the PUK code, contact your
service provider.
8 Set yourself as the master user of the camera using your own mobile
phone. The camera can only be configured with the master user’s
mobile phone.
Create a user name for yourself, and send the following text message
to the phone number of the SIM card in the camera:
6
your user name
indicates a space.
The maximum length of the user name is 20 characters and it must
not contain any special characters or spaces.
Example:
6 Helen
You are now set as the master user of the camera. See “User settings”
on page 33.
14
Copyright © 2005 Nokia. All rights reserved.
First start-up
The camera sends you a confirmation message when it has
completed your request.
9 The camera starts searching for an MMS access point. The MMS
access point contains all the settings needed to send multimedia
messages. When the camera finds an access point, it sends you a text
message.
If the camera finds several access points, it sends you a list of the
access points. Select an access point, and send the following
command to the camera:
42
number of access point in the list
indicates a space.
Example:
42 3
Now the camera uses the access point that was third on the access
point list.
If the camera sends you a message that the MMS settings were not
defined, you must configure the settings manually. See “Access point
settings” on page 48.
The camera is now ready for use.
■ Mount the camera
Warning: In order to comply with RF exposure requirements for
mobile transmitting devices, a minimum distance of 20 cm
must be maintained between the camera and all persons.
Do not place the camera in direct sunlight. The temperature of the
camera may become too high.
Do not expose the camera to rain.
Copyright © 2005 Nokia. All rights reserved.
15
First start-up
Note on motion detection
Motion detection is based on changes in the surrounding temperature,
and thus it may react to flows of warm air, for example, when opening a
door, if the camera is pointed towards the door. Also the distance from
which the camera detects motion depends on the surrounding
temperature: the greater the difference between the surrounding
temperature and human body temperature, the farther the camera
detects motion.
The camera does not detect motion if there are walls or windows
obstructing heat between the moving object and the camera.
Figure 8 presents the coverage area of the motion detector. Position the
camera so that the detected persons walk across the coverage area; not
directly towards the camera.
Figure 8
Coverage area in normal room temperature
Motion detector
Normal, zoom: off
(default mode)
Normal, zoom: on
Sensitive, zoom: off
Sensitive, zoom: on
Maximum detection Maximum detection
distance
width
5 metres
3.5 metres
5 metres
8 metres
8 metres
2 metres
6 metres
3.5 metres
Mount the camera on a wall or ceiling
1 Place the camera on the wall or ceiling, and attach it with the
assembly kit available in the sales package.
16
Copyright © 2005 Nokia. All rights reserved.
First start-up
Figure 9
2 Attach the stand cover.
Figure 10
3 Turn the camera in the desired position, and tighten the screw. Mind
the power cord when turning the camera.
Figure 11
Copyright © 2005 Nokia. All rights reserved.
17
First start-up
4 If you use the camera outdoors, attach the outdoor shield.
Figure 12
Place the camera on a desk
1 Turn the camera in the desired position, and tighten the screw as
shown in Figure 11.
2 Attach the stand cover to the camera. See “Figure 10” on page 17.
To remove the stand cover, press the hole in the stand cover with a pin
or a small screw driver, and lift the stand cover.
■ Switch off the camera
To switch off the camera, press the power button for a few seconds. The
camera then sets off motion detection, timed imaging, and the
temperature alarm.
■ Download Remote Camera Manager
You can use the camera with text messages (see “Basic use” on
page 20), or you can download a graphical software application,
Remote Camera Manager, from the camera to your compatible mobile
phone, and use the camera with Bluetooth wireless technology or text
messages. The application is compatible with devices such as the Nokia
3650, Nokia 3660, Nokia 6600, Nokia 6630, Nokia 6670, Nokia 7610,
Nokia 7650 phones, and the N-Gage and N-Gage QD mobile game deck
devices, and is downloaded using Bluetooth wireless technology. See
www.nokia.com for the latest compability information.
1 Find out the Bluetooth address of your phone from the user guide or
the sales package of your phone. If you are using a Nokia mobile
18
Copyright © 2005 Nokia. All rights reserved.
First start-up
phone, enter the code *#2820#. The Bluetooth address is displayed
on the phone.
2 Ensure that Bluetooth is switched on in the phone. You must be
within 10 metres of the camera to use Bluetooth wireless
technology.
3 Send the following text message to the camera:
82
Bluetooth address of your phone
The camera creates a Bluetooth connection to your mobile phone, and
your phone starts downloading Remote Camera Manager from the
camera. You can use and configure the camera with Remote Camera
Manager. For further instructions, see the Remote Camera Manager
help application.
All camera users can download Remote Camera Manager to their mobile
phones.
Remote Camera Manager uses text messages to operate the camera, but
if you are within 10 metres of the camera, you can set up a Bluetooth
connection between the camera and your mobile phone. Changing the
camera settings with Bluetooth is free.
To establish a Bluetooth connection, open the Remote Camera Manager
application, and select Options > Use Bluetooth. When creating the
first Bluetooth connection, Remote Camera Manager asks you for a
passcode. The master user enters the master user passcode; for other
users the camera issues a unique passcode when creating the
connection.
If you operate the camera with text messages using Remote Camera
Manager, the application retrieves all confirmation messages sent by
the camera automatically from the inbox.
■ Nokia support on the Web
See www.nokia.com/support or your local Nokia Web site for the latest
version of this guide, additional information, downloads, and services
related to your Nokia product.
Copyright © 2005 Nokia. All rights reserved.
19
Basic use
3. Basic use
You can operate the camera by sending text messages to the camera or
with the Remote Camera Manager application. See “Download Remote
Camera Manager” on page 18. Remote Camera Manager enables
establishing a wireless Bluetooth connection between the camera and a
mobile phone if they are within 10 metres of each other. Configuring
the camera using Bluetooth is free.
The master user of the camera has the right to use all camera functions.
If other users are added to the camera, their rights are limited. For
information on user rights and adding new users, see “User settings” on
page 33.
You can send several commands in one text message by separating the
commands with a comma.
When you send a text message to the camera, the camera sends you a
confirmation message when it has completed your request.
■ Capture images
Once you have set up the camera and switched it on, you can capture
images and video clips. The camera sends the images and video clips to
your mobile phone or e-mail address. You can capture images by
sending a text message or using Remote Camera Manager.
Note: National laws and regulations may place restrictions on
recording images and regarding further processing and use of
such data. Do not use this feature illegally. Honour the privacy
and other legitimate rights of others and obey all laws
governing, for example, data protection, privacy, and publicity.
indicates a space.
To capture a still image and have it sent to your preferred address
(mobile phone or e-mail), send the following text message to the
camera:
1
Images captured in the dark are in greyscale.
20
Copyright © 2005 Nokia. All rights reserved.
Basic use
To set the preferred address, see “User settings” on page 36.
When the camera is sending the image, the light indicator
blinks green.
To capture a video clip and have it sent to your preferred address
(mobile phone or e-mail), send the following text message to the
camera:
1
1
When the camera is sending the video clip, the light indicator
orange.
is
To capture a still image and send it to another mobile phone, send
the following text message to the camera:
1
phone number
Example:
1 8765432
To capture a still image and and send it to an e-mail address, send
the following text message to the camera:
1
e-mail address
To capture a video clip and and send it to an e-mail address, send the
following text message to the camera:
1
1
e-mail address
To attach a message to the image, write the message at the end of the
text message in quotation marks.
Example:
1 8765432 "This is my
new house!"
Copyright © 2005 Nokia. All rights reserved.
21
Basic use
The size of the image messages and network conditions may affect the
time in which the image messages are received. The camera notifies you
with a text message if the image sending fails.
If sending the image fails, the camera automatically tries to resend the
image later.
To capture an image with Remote Camera Manager, start the Remote
Camera Manager application on your mobile phone, select Imaging, and
select whether to capture a still image or record a video clip. You can ask
the camera to send the image to your mobile phone or to another
mobile phone or e-mail address.
If you use a Bluetooth connection, the camera sends you the captured
still images free of cost. However, video clips are always sent using the
GSM network.
■ Call the camera
To listen to the camera premises, make a phone call to the camera.
During the call, image messages are put on hold and sent after the call.
All camera users are allowed to call the camera.
When a call is active, the light indicator
blinks orange.
If your phone is set to hide the caller's identity from the recipients of
your calls, you cannot call the camera. The camera must be able to verify
your number before accepting your call.
When the camera is sending images, it cannot answer phone calls.
Note: Obey all local laws governing listening. Do not use this
feature illegally.
To call the camera with Remote Camera Manager, select Call camera
from the main menu. To end the call, press the end key on your mobile
phone.
■ Motion detection
The camera has a motion detector with which you can set the camera to
send you text messages, images, or video clips automatically every time
the camera detects motion. You can adjust the sensitivity of the motion
detector, and select which camera users receive motion detection
22
Copyright © 2005 Nokia. All rights reserved.
Basic use
messages from the camera. You can operate the motion detector with
text messages or Remote Camera Manager.
If the temperature surrounding the camera rapidly changes, for
example, when moving the camera indoors to outdoors, motion
detection may not function properly. To avoid this, let the camera adjust
to the temperature for 30 minutes before activating motion detection.
indicates a space.
To set on motion detection, send the following text message to the
camera:
2
Motion detection is set on immediately or in a timed manner,
depending on which mode was active the last time motion detection
was used.
You can also set on motion detection by quickly pressing the power
button on the camera. The light indicator
blinks red, and you
have 60 seconds to leave the premises before motion detection is
activated.
To set on motion detection immediately, send the following text
message to the camera:
2
1
The light indicator
blinks red while motion detection is
activating. When the light indicator is red, the motion detection is
active.
By default, motion detection is set off automatically when the camera
has sent you one motion detection message. To define the number of
motion detection events before the automatic deactivation, select
the desired number of events (0-99), and send the following text
message to the camera:
2
4
number of events
Copyright © 2005 Nokia. All rights reserved.
23
Basic use
Example:
2 4 25
Now the camera sends you 25 motion detection notifications, before
motion detection is set off. If you select 0 as the number of events,
motion detection remains on until you set it off.
To set on timed motion detection, define the activation (or activation
and deactivation) time, and send the following text message to the
camera:
2
2
activation time
2
activation time
or
2
deactivation time
Example:
2 2 08:00 am 04:15
pm
If the camera uses the 24 hour clock, use the 24-hour format in the
commands as well. See “Time and date settings” on page 42.
To set off motion detection, send the following text message to the
camera:
2
0
The size of the image messages and network conditions may affect the
time in which the image messages are received.
The camera notifies you with a text message if sending the motion
detection images fails. The camera automatically tries to resend the
images later.
The camera sends various notifications to the master user, for example,
when a power cut occurs. See “Notification settings” on page 44.
24
Copyright © 2005 Nokia. All rights reserved.
Basic use
Motion detection settings
To select another recipient for motion detection messages, send the
following text message to the camera:
2
3
user name or phone number
Example:
2 3 Jane
To send motion detection messages to several recipients, send the
following text message to the camera:
2
3
user names or phone numbers
Example:
2 3 Jane Peter Mike
The recipients must be defined as users of the camera.
To send motion detection images to all camera users, send the
following text message to the camera:
2
3
To define the motion detection type, select text message (1), still
image (2), video clip (3), text message and still image (4), text message
and video clip (5), still image and video clip (6), or text message, still
image, and video clip (7); and send the following text message to the
camera:
2
5
number of type
Copyright © 2005 Nokia. All rights reserved.
25
Basic use
Example:
252
Now the camera sends you a still image each time it detects motion.
The default type is still image.
To define the number (1-3) of still images captured when motion
has been detected, send the following text message to the camera:
2
6
number of images
Example:
262
Now the camera captures two images each time it detects motion.
The default number is 1.
If the images are too large to be sent as one MMS message, they are
sent as several MMS messages.
To adjust the sensitivity of the motion detector, select normal (1) or
sensitive (2), and send the following text message to the camera:
2
7
number
The default value is normal.
To see the current motion detection settings of the camera, send the
following text message to the camera:
2
?
To see the value of a single motion detection setting, send the
following text message to the camera:
2
26
?
number of the setting
Copyright © 2005 Nokia. All rights reserved.
Basic use
For example, if you want to see how many images the camera
captures when it detects motion, send the following text message to
the camera:
2?6
Use motion detection with Remote Camera Manager
To use motion detection with Remote Camera Manager, select Motion
detection from the main menu. You can set motion detection on and
off, choose recipients for motion detection messages, and select the
type for motion detection notifications. You can also select how many
times the camera detects motion before it deactivates the motion
detector. To set on motion detection at a certain time, define the start
and end times in the Detection time field. To remove the set times,
select Options > Clear time. When you have made all the necessary
configurations, select Options > Send to send the changed settings to
the camera. To see the current motion detection settings in the camera,
select Options > Get current settings.
The camera saves the latest motion detection events to its image
memory. To retrieve these images or video clips later, select Options >
Retrieve. This feature is available only when using a Bluetooth
connection between the camera and the mobile phone. Switching off
the camera empties the image memory of the camera.
■ Timed imaging
The clock in the camera enables timed imaging. You can set the camera
to send still images and video clips at defined intervals. You can also set
the camera to send images every day at a certain hour. You can select
which camera users receive timed images. Control timed imaging with
text messages or Remote Camera Manager.
indicates a space.
Copyright © 2005 Nokia. All rights reserved.
27
Basic use
To set on timed imaging, send the following text message to the
camera:
4
Timed imaging is set on with the settings that were active the last
time timed imaging was used.
To set on timed imaging and define the interval (hours and minutes)
in which the images are captured, send the following text message to
the camera:
4
1
hh:mm
Example:
4 1 2:00
Now the camera captures images in two hour intervals. The shortest
possible interval is 5 minutes.
To set the camera to capture images at a certain hour, send the
following text message to the camera:
4
2
time
Example:
4 2 08:15 am
Now the camera captures an image every day at 8:15 a.m.
If the camera uses the 24 hour clock, use the 24-hour format in the
commands as well. See “Time and date settings” on page 42.
In one message you can define 1-3 different times when images are
captured.
28
Copyright © 2005 Nokia. All rights reserved.
Basic use
Example:
4 2 08:15 am 11:45
am 03:30 pm
The size of the image messages and network conditions may affect
the time in which the image messages are received.
The camera notifies you with a text message if sending the timed
images fails. The camera automatically tries to resend the images
later.
By default, timed imaging is deactivated automatically when the
camera has sent one timed imaging message. To define the number of
timed images before the automatic deactivation, select the desired
number of images (0-99) and send the following text message to the
camera:
4
4
number of images
Example:
4 4 25
Now the camera sends you 25 images before setting off the timed
imaging function. If you select 0 as the number of images, timed
imaging remains on until you set it off.
To set off timed imaging, send the following text message to the
camera:
4
0
Timed imaging settings
To send timed images to another recipient, send the following text
message to the camera:
Copyright © 2005 Nokia. All rights reserved.
29
Basic use
4
3
user name or phone number
Example:
4 3 Jane
To send timed images to several recipients, send the following text
message to the camera:
4
3
user names or phone numbers
Example:
4 3 Jane Peter Mike
The recipients must be defined as users of the camera.
To send timed images to all camera users, send the following text
message to the camera:
4
3
To define the timed image type, select still image (1) or video clip (2),
and send the following text message to the camera:
4
5
number of type
Example:
452
The default type is still image.
To see the current timed imaging settings of the camera, send the
following text message to the camera:
30
Copyright © 2005 Nokia. All rights reserved.
Basic use
4
?
To see the value of a single timed imaging setting, send the following
text message to the camera:
4
?
number of setting
For example, if you want to see the interval in which the camera
captures images, send the following text message to the camera:
4?1
Use timed imaging with Remote Camera Manager
If you want to use timed imaging with Remote Camera Manager, select
Timed imaging from the main menu. You can set timed imaging on and
off, select whether to capture images or video clips, and choose the
camera users to whom the timed images are sent. You can set the
camera to send 1-3 images at a certain time every day or at defined
intervals. You cannot set both of these timed imaging types on at the
same time. When the camera has captured the number of timed images
you have defined, timed imaging is set off. When you have made all the
necessary configurations, select Options > Send to send the changed
settings to the camera. To see the current timed imaging settings in the
camera, select Options > Get current settings.
■ Thermometer
The camera contains a thermometer, which enables monitoring the
temperature in the camera premises. The camera records the
temperatures during the last 24 hours, and sends the information as a
text message at request. You can also set the camera to send you a text
message automatically when the temperature in the camera premises
reaches a defined limit. Control the thermometer functions with text
messages or Remote Camera Manager.
The thermometer provides general measurements for personal use that
may vary from scientific measurements.
Copyright © 2005 Nokia. All rights reserved.
31
Basic use
indicates a space.
To check the temperature in the camera premises, send the following
text message to the camera:
3
To check the temperature in the camera premises during the past 24
hours, send the following text message to the camera:
3
1
You can set the camera to notify you with a text message when a
certain temperature is reached in the camera premises. To set the
temperature notification on and define the low and high
temperature limits, send the following text message to the camera:
3
2
low limit
high limit
Example:
3 2 10 35
Now the camera sends you a text message when the temperature in
the camera premises drops to 10 degrees or rises to 35 degrees.
When the camera has sent you a notification about a reached
temperature limit, the temperature notification is set off
automatically.
To set off the temperature notification, send the following text
message to the camera:
3
0
Thermometer settings
The SIM card in the camera determines which temperature scale is used:
Celsius or Fahrenheit. To change the temperature scale, select Celsius
(1) or Fahrenheit (2), and send the following text message to the
camera:
3
32
3
number of scale
Copyright © 2005 Nokia. All rights reserved.
User settings
Example:
331
Now the camera uses Celsius as the temperature scale.
To check the current thermometer settings, send the following text
message to the camera:
3
?
Use the thermometer with Remote Camera Manager
If you want to use the thermometer with Remote Camera Manager,
select Thermometer from the main menu. To see the temperatures in
the camera premises during the last 24 hours, select Options > Current
temperature. You can set the temperature alarm on and off, and define
the temperature limits. When you have made all the necessary
configurations, select Options > Send to send the changed settings to
the camera. To see the current thermometer settings in the camera,
select Options > Get current settings.
4. User settings
■ Define the master user
Only the master user is able to add or remove users for the camera. A
maximum of 10 users, including the master user, can be defined to the
camera. There can only be one master user at a time.
The master user has access to all camera functions and can define
access rights for other users. See “User settings” on page 36.
When you define a new master user, the old master user remains as a
regular camera user.
The camera identifies the users by their phone numbers and user names.
Copyright © 2005 Nokia. All rights reserved.
33
User settings
indicates a space.
To set a new master user, select whether to send all images to the
master user’s mobile phone (1) or e-mail address (2), and send the
following text message to the camera:
6 master user passcode
address number
user name
phone number
e-mail
Example:
6 12345 Jane
98765432
[email protected] 1
Now Jane is set as the master user and the camera sends all images
to Jane’s mobile phone.
The predefined master user passcode is 12345. See “User
authentication settings” on page 45 for information on how to
change the passcode. It is recommended that you change the
passcode as soon as possible. Keep the new code safe and separate
from your phone and camera. Do not give the code to others as
changing some of the camera settings is possible only with the
master user passcode.
The maximum length of the user name is 20 characters, and it must
not contain any special characters or spaces.
It is not mandatory to define the e-mail address.
To check the information of the master user, send the following text
message to the camera:
6
master user passcode
?
If there is no master user defined, this command does not function.
■ Add users
indicates a space.
34
Copyright © 2005 Nokia. All rights reserved.
User settings
To add a user, select whether to send all images to the user’s mobile
phone (1) or e-mail address (2), and send the following text message to
the camera:
5
user name
phone number
e-mail address
number
Example:
5 Mark 12345678
[email protected] 2
Now the camera adds Mark as a user and sends all images to Mark’s
e-mail address.
It is not mandatory to define the e-mail address.
If the new user’s user name or phone number corresponds to those of
an existing user, the new user replaces the old user.
To remove a user, send the following text message to the camera:
5
0
user name or phone number
Example:
5 0 Mark
The master user cannot be removed.
To check the current user list, send the following text message to the
camera:
5
?
To check the information of a user, send the following text message to
the camera:
5
?
user name or phone number
Copyright © 2005 Nokia. All rights reserved.
35
User settings
Example:
5 ? Mark
User settings
The master user can set the camera to a normal access mode or
extended access mode.
In the normal access mode, the users can:
• Capture images and videos.
• Check the temperature in the camera premises.
• Make a phone call to the camera and listen to the camera premises.
• Set motion detection on and off.
In the extended access mode, the users can:
• Capture images and videos.
• Check the temperature in the camera premises.
• Make a phone call to the camera and listen to the camera premises.
• Set motion detection on and off with their own settings.
• Set timed imaging on and off with their own settings.
• Set temperature notification on and off with their own settings.
• Select whether to receive images to a phone number or e-mail
address.
• Select the motion detection type (still image, video clip, or text
message).
• Select the timed imaging type (still image or video clip).
To set on the normal access mode, send the following text message to
the camera:
8
36
1
Copyright © 2005 Nokia. All rights reserved.
User settings
To set on the extended access mode, send the following text message
to the camera:
8
2
To check the current access mode, send the following text message to
the camera:
8
?
The default access mode is normal.
To set the camera to send a message to the master user every time a
user sets camera functions on or off, send the following text message
to the camera:
9
1
To set this feature off, send the following text message to the camera:
9
0
To check whether this feature is on or off, send the following text
message to the camera:
9
?
The default value is off.
The master user can select whether to send images to a user’s mobile
phone or e-mail address. To set the mobile phone as the address
where all images are sent, send the following text message to the
camera:
7
user name or phone number
1
Example:
7 Jane 1
To set the e-mail address as the address where all images are sent,
send the following text message to the camera:
7
user name or phone number
2
Copyright © 2005 Nokia. All rights reserved.
37
Configure the settings
To check the address used, send the following text message to the
camera:
7
user name or phone number
?
Example:
7 Jane ?
By default, images are sent to phone numbers.
Define the user settings with Remote Camera Manager
If you want to change the user information in the camera, select
Settings > Users. To see the current user list, select Options >
Download user list. To set up a new user, select Options > Add user. To
remove a user from the camera, select the user, and select Options >
Remove user. You can change the master user’s information, but not
remove the master user from the camera.
5. Configure the settings
■ Camera settings
indicates a space.
Image and video settings
To set the image resolution, select compact (1), normal (2), high (3) or
highest (4) resolution, and send the following text message to the
camera:
10
38
number of resolution
Copyright © 2005 Nokia. All rights reserved.
Configure the settings
Example:
10 3
Now the camera uses high resolution when capturing images.
To check the current resolution, send the following text message to
the camera:
10
?
The default resolution is high.
To define the size of video clips, select normal (1) or large (2), and send
the following text message to the camera:
11
number of size
Normal is 100 kB and suitable for MMS messages. Large is 300 kB
and can be sent as Internet e-mail only, not as an MMS message. See
“Internet e-mail settings (SMTP)” on page 51.
The default video clip size is normal.
To check the current size, send the following text message to the
camera:
11
?
To include audio in video clips, send the following text message to the
camera:
12
1
To exclude audio from video clips, send the following text message to
the camera:
12
0
To check the current audio settings, send the following text message
to the camera:
12
?
By default, audio is included in video clips.
To set the zoom on, send the following text message to the camera:
Copyright © 2005 Nokia. All rights reserved.
39
Configure the settings
13
1
To set the zoom off, send the following text message to the camera:
13
0
To check the current zoom setting, send the following text message to
the camera:
13
?
By default, the zoom is off.
Tip: If you are using Remote Camera Manager, you find these
settings in Settings > Camera. If you want to check the current
camera settings, select Options > Get current settings. When
you have made all the necessary configurations, select Options >
Send to send the changed settings to the camera.
General camera settings
To set a name for the camera, send the following text message to the
camera:
14
name of the camera
The name can be 20 characters long and must not contain any
spaces.
To get a list of available languages for the camera, send the following
text message to the camera:
18
To set the language for the camera, select the desired language from
the list, and send the following text message to the camera:
18
number of language in the list
Example:
18 3
40
Copyright © 2005 Nokia. All rights reserved.
Configure the settings
The camera now uses the third language in the list when replying to
your text messages.
To set the camera to use the language of the SIM card, send the
following text message to the camera:
18
0
To check the current language, send the following text message to the
camera:
18
?
By default, the camera uses the language of the SIM card in the
camera.
To check the status of the back-up battery of the camera, send the
following text message to the camera:
20
?
To restore the pre-configured factory settings to the camera, send
the following text message to the camera:
26
master user passcode
Sending this message clears the user settings and restarts the
camera.
To check the IMEI code and the hardware and software versions of
the camera, send the following text message to the camera:
28
?
The master user can check how many messages the camera has sent. To
check the number of messages sent, send the following text message
to the camera:
31
?
To clear the message counter, send the following text message to the
camera:
31
0
Copyright © 2005 Nokia. All rights reserved.
41
Configure the settings
Time and date settings
Each time the camera receives a text message with which a new master
user is created, the camera starts using the time and date found in that
text message.
To set the clock of the camera in 24-hour format, send the following
text message to the camera:
22
hh:mm
Example:
22 13:35
To set the clock of the camera in 12-hour format am, send the
following text message to the camera:
22
hh:mm
am
Example:
22 08:35 am
To set the clock of the camera in 12-hour format pm, send the
following text message to the camera:
22
hh:mm
pm
By default, the camera selects the time format automatically.
To check the current time from the camera, send the following text
message to the camera:
22
?
To set the date of the camera, send the following text message to the
camera:
23
42
yyyy
mm
dd
Copyright © 2005 Nokia. All rights reserved.
Configure the settings
Example:
23 2004 06 22
To check the current date, send the following text message to the
camera:
23
?
To set the date format, select year-month-day (1), month-day-year
(2), or day-month-year (3); and send the following text message to the
camera:
24
number
By default, the camera selects the date format automatically.
To check the current date format, send the following text message to
the camera:
24
?
To set the camera to update the date and time automatically using
the information in the GSM network, send the following text message to
the camera:
25
1
The camera restarts automatically after the automatic update is set
on.
This feature is available only if the network supports it.
Do not send any other commands in this text message.
To set off the automatic time and date update, send the following
text message to the camera:
25
0
To check whether the automatic time and date update is in use, send
the following text message to the camera:
25
?
By default, the automatic time update is off.
Copyright © 2005 Nokia. All rights reserved.
43
Configure the settings
Tip: If you are using Remote Camera Manager, select Settings >
Time settings. When you have made all the necessary
configurations, select Options > Send to send the changed
settings to the camera. To see the current time settings in the
camera, select Options > Get current settings.
Notification settings
The master user can set the camera to send notification text messages
when:
• The battery is low, and the camera shuts down.
• The temperature in the camera premises drops too low or rises too
high for the camera to operate, and the camera shuts down.
• The camera switches on after a power cut.
• The camera switches on after a temperature limit violation.
• There is a power cut, and the back-up battery is in use.
• Motion detection is disabled.
• Timed imaging is disabled.
• Motion detection is on, and the camera is shut down with the power
button.
To set on the notifications, send the following text message to the
camera:
29
1
To set off the notifications, send the following text message to the
camera:
29
0
To check whether the notifications are in use, send the following text
message to the camera:
29
?
By default, the notifications are in use.
If you are using Remote Camera Manager, select Settings > General
to find this setting.
44
Copyright © 2005 Nokia. All rights reserved.
Configure the settings
When you change a setting, the camera sends you a confirmation
message. To set off the confirmation messages, send the following
text message to the camera:
30
0
To set on the confirmation messages, send the following text message
to the camera:
30
1
To check the current confirmation message setting, send the
following text message to the camera:
30
?
By default, the confirmation messages are on.
■ Security settings
indicates a space.
User authentication settings
The master user can change the master user passcode. To change the
passcode, send the following text message to the camera:
32
old code
new code
new code
Example:
32 12345 54321
54321
The master user passcode must be 5 digits long.
The camera users are authenticated by their phone numbers. Only the
users that the master user has added to the user list are able to use the
camera. By setting off the user authentication, you allow the camera to
let everyone capture images. To set off user authentication, send the
following text message to the camera:
33
0
Copyright © 2005 Nokia. All rights reserved.
45
Configure the settings
To set on user authentication, send the following text message to the
camera:
33
1
To check whether user authentication is in use, send the following
text message to the camera:
33
?
By default, the user authentication is on.
PIN code settings
To change the PIN code of the SIM card in the camera, send the
following text message to the camera:
34
old PIN code
new PIN code
new PIN code
Example:
34 1234 4321 4321
The master user can set the camera to query for the PIN code of the SIM
card in the camera each time the camera is switched on. When the PIN
code query is on, the SIM card is secure, and its use in other GSM devices
is disabled.
You only need to enter the PIN code manually during the first start-up.
The camera stores the PIN code in its memory, and uses it automatically
in later start-ups.
To set on the PIN code query, send the following text message to the
camera:
35
46
PIN code
1
Copyright © 2005 Nokia. All rights reserved.
Configure the settings
Example:
35 4321 1
To set off the PIN code query, send the following text message to the
camera:
35
PIN code
0
To check whether the PIN code query is on, send the following text
message to the camera:
35
PIN code
?
Example:
35 4321 ?
Tip: If you are using Remote Camera Manager, select Settings >
Security.
■ Connection settings
indicates a space.
MMS settings
To request the network operator to send the MMS settings over the
air, send the following text message to the camera:
39
service number
service text
If you have defined a master user for the camera, only the master
user is able to request these settings. You get the service number and
service text from your network operator.
The MMS settings of the Nokia Remote Camera are the same as
those of the Nokia 7610 phone.
Copyright © 2005 Nokia. All rights reserved.
47
Configure the settings
When you have requested these settings, you are prompted to accept or
discard the new settings. To accept the new settings, send the
following text message to the camera:
99
To discard the new settings, send the following text message to the
camera:
88
Tip: If you are using Remote Camera Manager, select Settings >
Connection.
Access point settings
You only need to configure the access point settings manually if the
automatic MMS settings of the camera do not function, and your
operator does not support sending the settings over the air.
An MMS access point contains all the needed MMS settings. To create a
new MMS access point for the camera, start the text message with
40, and then add the following settings to the message:
• 1
connection name
• 2
access point name
• 3
user name for the access point connection
• 4
password for the access point connection
• 5
access point home page address
• 6 1 (normal connection authentication) or 6
connection authentication)
• 7
1 (connection security on) or 7
• 8
1 (temporary session mode) or 8
2 (secure
0 (connection security off)
2 (permanent session mode)
• 9 IP address of the camera or 9 0 if you want the camera to
select the IP address automatically
• 10
IP address of the primary name server
• 11
IP address of the secondary name server
• 12
IP address of the proxy server
48
Copyright © 2005 Nokia. All rights reserved.
Configure the settings
• 13
number of the proxy port
Example:
40 1 home 2 operator
3 helenmill 4 4321 5
http://mms.operator.fi
6 2 7 1 8 1 9 0 10
123.145.167.189
The connection name, access point name, user name, and the
password cannot contain any spaces.
If you do not need to configure a setting for the access point, leave
the number of this setting out from the message. For example, if you
do not need to enter your user name and password, leave them out.
Example:
40 1 home 2 operator
5 http://
mms.operator.fi 6 2 7
1 8 1 9 0 10
123.145.167.189
To modify any of the access point settings, start the text message
with 41, enter the number of the access point on the access point list,
and write the rest of the text message. For example, to edit the
connection name, send the following text message to the camera:
41
access point number
1
new connection name
Example:
41 2 1 MMS
Now the camera sets MMS as the name of the connection for the
second access point on the access point list.
To obtain a list of defined access points, send the following text
message to the camera:
Copyright © 2005 Nokia. All rights reserved.
49
Configure the settings
40
?
To remove an access point from the list, send the following text
message to the camera:
40
0
number of access point on the list
Example:
40 0 3
Now the camera removes the access point that is third on the list.
To check the settings of an access point, send the following text
message to the camera:
40
?
number of access point on the list
To set an access point for MMS messaging, send the following text
message to the camera:
42
number of access point on the list
To check the current MMS access point, send the following text
message to the camera:
42
?
To set an access point for SMTP messaging, send the following text
message to the camera:
43
number of access point on the list
To check the current SMTP access point, send the following text
message to the camera:
43
?
Tip:If you are using Remote Camera Manager, select Settings >
Connection. To see the current camera connection settings,
select for example MMS settings > Options > Get current
settings.
50
Copyright © 2005 Nokia. All rights reserved.
Configure the settings
Internet e-mail settings (SMTP)
In addition to MMS, the camera is also capable of sending images and
video clips to an Internet e-mail address using a GPRS connection and
SMTP protocol. To use the Internet e-mail option, do the following:
• Define and use an access point suited for sending e-mail. See “Access
point settings” on page 48.
• Define the settings of your e-mail server, as described in this section.
• Select SMTP as the sending protocol of the camera, as described in
this section.
• Define the e-mail addresses of the camera users, and select e-mail
as the default sending address of the users. See “Add users” on
page 34.
When the SMTP protocol is used, the camera can send, for example,
motion detection images only to an e-mail address, not to a mobile
phone directly. However, the users can still capture images, and have
them sent to their mobile phones using MMS.
For information on e-mail settings, contact your service provider.
To define the name of the mailbox, send the following text message to
the camera:
44
1
mailbox name
To configure your e-mail address in the e-mail server you are using,
send the following text message to the camera:
44
2
e-mail address
To set the outgoing mail server address, send the following text
message to the camera:
44
3
mail server address
To set your user name for the SMTP connection, send the following
text message to the camera:
44
4
user name
To set the password for the SMTP connection, send the following text
message to the camera:
44
5
password
Copyright © 2005 Nokia. All rights reserved.
51
Configure the settings
To check the current e-mail settings, send the following text message
to the camera:
44
?
Tip: If you are using Remote Camera Manager, select Settings >
Connection.
To set the bearer for multimedia messages, select MMS for sending
the messages to a mobile phone (1) or SMTP for sending the messages to
e-mail (2), and send the following text message to the camera:
38
number of bearer
Example:
38 1
Now the camera sends multimedia messages using MMS.
To check the current message bearer, send the following text message
to the camera:
38
?
By default, the bearer is MMS.
Tip: If you are using Remote Camera Manager, select Settings >
Camera.
GSM network settings
The master user can select the network operator to be used, for example,
when roaming from one network to another. To see a list of available
networks, send the following text message to the camera:
36
The list contains the names of the available network operators and
their numbers.
To select a network operator, send the following text message to the
camera:
52
Copyright © 2005 Nokia. All rights reserved.
Configure the settings
36
number of operator on the operator list
Example:
36 2
Now the camera uses the network operator that is second on the
operator list.
To set the camera to select the network operator automatically,
send the following text message to the camera:
36
0
To check which network operator is currently in use, send the
following text message to the camera:
36
?
By default, the automatic network selection is on.
To set the phone number for the short message centre, send the
following text message to the camera:
37
phone number of short message centre
If the phone number is wrong, the camera cannot send you any
messages.
Most operators have the phone number of their short message
centre ready on the SIM card; you do not need to change it.
To check the current short message centre phone number, send the
following text message to the camera:
37
?
■ Configure the camera with a PC
If you want to configure the camera with PC software, you can
download the Nokia Remote Camera PC Configurator software at
www.nokia.com. PC Configurator supports the Windows 2000/XP
operating system, and requires 15 MB of free disk space. To use PC
Configurator, you need a compatible PC that connects to the camera
Copyright © 2005 Nokia. All rights reserved.
53
Configure the settings
with Bluetooth wireless technology or the DKU-2 data cable available as
a separate enhancement. For more information about PC connectivity,
see the online help of PC Configurator.
Establish a cable connection
1 Open the back cover of the camera, and connect the DKU-2 data
cable to the data connector of the camera and to a PC. See “Figure
3” on page 11.
2 Switch on the camera, and wait until your PC detects the camera.
3 From the PC Configurator main menu, select File > Connection
settings, and select the correct COM port. Click OK.
You can now start using PC Configurator.
Establish a Bluetooth connection
If your PC supports Bluetooth wireless technology, you can connect the
PC to the camera using Bluetooth. For information about starting
Bluetooth on your PC and the Bluetooth address of the PC, refer to the
user guide of your PC or the PC Bluetooth device.
1 Make sure that the Bluetooth radio in the PC is enabled, the PC is
within 10 metres of the camera, and there are no obstacles between
the camera and the PC.
2 Send the following text message to the camera:
83
Bluetooth address of the PC
The camera accepts this message from the master user only.
3 The camera connects to the PC. When the PC prompts for the
Bluetooth passcode, enter the current master user passcode.
If this does not work, do the following:
1 Send the following text message to make the Bluetooth radio of the
camera visible:
81
1
2 Open the Bluetooth device discovery application on your PC. The
54
Copyright © 2005 Nokia. All rights reserved.
Light indicators
application displays the available Bluetooth devices.
3 Select the camera, and create a serial port connection to it. For more
information, refer to the user guide of your PC or the PC Bluetooth
device. When you start the PC Configurator software, select the
corresponding serial port from the PC Configurator connection
settings.
4 After creating the connection, you can set the camera Bluetooth
radio back to the hidden mode with the following text message:
81
0
If the master user has not been created for the camera, anyone can
create a Bluetooth connection between the camera and a PC.
6. Light indicators
The camera has light indicators that show the status of the camera
functions. See “Figure 1” on page 10.
Start-up
When the camera is starting up, the light indicators are green, and they
scroll up and down.
Battery status
The battery LED
shows the status of the back-up battery:
Green: The battery is full.
Green blink: The camera is connected to an external power source, and
the battery is charging.
Orange: The battery is half empty.
Red: The battery is weak; charge the battery.
Signal strength status
The signal strength LED
shows the status of the GSM network:
Green: Good signal strength
Copyright © 2005 Nokia. All rights reserved.
55
Light indicators
Orange: Adequate signal strength
Red: Poor signal strength
Red blink: No network connection
Camera status
The camera LED
shows the status of the camera:
Green: The camera is in idle mode.
Green blink: The camera is sending an image.
Orange: The camera is shooting a video clip.
Orange blink: An audio call is on.
Red: Motion detection is on.
Red blink: Motion detection is activating.
SIM card status
Status
Red & green
blink
Orange blink
Red & green
blink
Orange blink
Red & green
blink
Orange blink
Red blink
Red blink
Red blink
Red blink
Red blink
Red blink
Insert SIM card
correctly
SIM card
rejected
Insert PIN code
Insert PUK code
Product failure,
contact service
If you want to avoid bringing too much attention to the camera, you can
set the light indicators off.
To set off the light indicators of the camera, send the following text
message to the camera:
19
0
To set on the light indicators of the camera, send the following text
message to the camera:
19
56
1
Copyright © 2005 Nokia. All rights reserved.
Enhancements
To check whether the light indicators are in use, send the following
text message to the camera:
19
?
7. Enhancements
The available enhancements for the Nokia Remote Camera are:
• Nokia Mobile Charger LCH-12: multi-voltage charger that plugs into
the cigarette lighter and charges the camera battery.
• Nokia Battery BL-5C: Li-Ion based battery that provides power in a
thin and light package.
• Nokia Connectivity Cable DKU-2: a USB cable for connecting a
compatible PC and the camera. This cable supports the use of PC
Configurator software. The cable needs its own driver to function.
Keep all accessories and enhancements out of the reach of small
children.
When you disconnect the power cord of any accessory or enhancement,
grasp and pull the plug, not the cord.
8. Care and maintenance
Your device is a product of superior design and craftsmanship and
should be treated with care. The suggestions below will help you protect
your warranty coverage.
Do not use or store the device in dusty, dirty areas. Its moving parts and
electronic components can be damaged.
Do not store the device in hot areas. High temperatures can shorten the
life of electronic devices, damage batteries, and warp or melt certain
plastics.
Copyright © 2005 Nokia. All rights reserved.
57
Additional safety information
Do not store the device in cold areas. When the device returns to its
normal temperature, moisture can form inside the device and damage
electronic circuit boards.
Do not attempt to open the device other than as instructed in this guide.
Do not drop, knock, or shake the device. Rough handling can break
internal circuit boards and fine mechanics.
Do not use harsh chemicals, cleaning solvents, or strong detergents to
clean the device.
Do not paint the device. Paint can clog the moving parts and prevent
proper operation.
Use a soft, clean, dry cloth to clean any lenses (such as camera, motion
detector, and light sensor lenses).
All of the above suggestions apply equally to your device, battery,
charger, or any enhancement. If any device is not working properly, take
it to the nearest authorized service facility for service.
9. Additional safety information
Operating environment
Remember to follow any special regulations in force in any area and
always switch off your device when its use is prohibited or when it may
cause interference or danger. Use the device only in its normal operating
positions. To maintain compliance with radio frequency exposure
guidelines only use enhancements approved by Nokia for use with this
device.
Medical devices
Operation of any radio transmitting equipment, including wireless
phones, may interfere with the functionality of inadequately protected
medical devices. Consult a physician or the manufacturer of the medical
device to determine if they are adequately shielded from external RF
energy or if you have any questions. Switch off your device in health
care facilities when any regulations posted in these areas instruct you to
58
Copyright © 2005 Nokia. All rights reserved.
Additional safety information
do so. Hospitals or health care facilities may be using equipment that
could be sensitive to external RF energy.
Pacemakers
Pacemaker manufacturers recommend that a minimum separation of 6
in. (15.3 cm) be maintained between a wireless device and a pacemaker
to avoid potential interference with the pacemaker. These
recommendations are consistent with the independent research by and
recommendations of Wireless Technology Research. Persons with
pacemakers should always keep the device more than 6 in. (15.3 cm)
from their pacemaker when the device is switched on.
If you have any reason to suspect that interference is taking place,
switch off your device immediately.
Hearing aids
Some digital wireless devices may interfere with some hearing aids. If
interference occurs, consult your service provider.
Vehicles
Do not install the camera in a vehicle. Do not use the Nokia Remote
Camera or your mobile phone to control or configure the camera while
driving; park the vehicle first.
Remember road safety always comes first!
Using your device while flying in aircraft is prohibited. Switch off your
device before boarding an aircraft. The use of wireless teledevices in an
aircraft may be dangerous to the operation of the aircraft, disrupt the
wireless telephone network, and may be illegal.
Potentially explosive environments
Switch off your device when in any area with a potentially explosive
atmosphere and obey all signs and instructions. Potentially explosive
atmospheres include areas where you would normally be advised to turn
off your vehicle engine. Sparks in such areas could cause an explosion or
fire resulting in bodily injury or even death. Switch off the device at
refuelling points such as near gas pumps at service stations. Observe
restrictions on the use of radio equipment in fuel depots, storage, and
distribution areas, chemical plants or where blasting operations are in
Copyright © 2005 Nokia. All rights reserved.
59
Additional safety information
progress. Areas with a potentially explosive atmosphere are often but
not always clearly marked. They include below deck on boats, chemical
transfer or storage facilities, vehicles using liquefied petroleum gas
(such as propane or butane), and areas where the air contains chemicals
or particles such as grain, dust or metal powders.
60
Copyright © 2005 Nokia. All rights reserved.
Technical specifications
10. Technical specifications
Operating temperature Full functionality: -20ºC to +40ºC
Reduced functionality: +40ºC to +50ºC
Relative humidity
4%...100%
Lighting
The camera captures colour images in
normal lighting conditions. For low light
conditions the camera includes an infrared
light source. Images captured with infrared
light are in greyscale. The coverage area of
the infrared light is approximately 5 metres.
Focus area
Minimum 0.5 meters
Resolution
Still image: 1152 x 864 (highest), 640 x 480
(high), 320 x 240 (normal), 160 x 120 (basic)
Video clip: 176 x 144
Video clip length
MMS: 10 seconds minimum
SMTP: 30 seconds minimum
Image format
. jpeg
Video format
H.263
Camera view angle
Normal: 55 degrees
Zoomed: 28 degrees
Normal: 5 metres
Motion detection
coverage area in room Sensitive: 8 metres
temperature
The distance from which the camera detects
motion depends on the surrounding
temperature.
Audio connection
Normal speech within 4 metres
Back-up battery
In standby: up to 12 hours
operating time in room When motion detection is active: up to 5
temperature
hours
Protection class
IP 54
Environmental class
ETSI 300 019-2-4, class 4.2H
Copyright © 2005 Nokia. All rights reserved.
61
List of commands
11. List of commands
Action
Capture a still image
Capture a video clip
Set on motion detection using the previous
settings
Set on motion detection immediately
Set on timed motion detection
Message
1
1 1
2
2 1
2 2 activation
time deactivation
time
Define the number of motion detection events 2 4 number of
events 0-99
Set motion detection off
2 0
Set on timed imaging using the previous
4
settings
Set on timed imaging and define the interval 4 1 hh:mm
for images
Set the camera to capture images at a certain 4 2 time
hour
Define the number of timed images
4 4 number of
events 0-99
Set timed imaging off
4 0
Check the temperature in the camera premises 3
Check the temperature in the camera premises 3 1
during the past 24 hours
Set the temperature notification on and define 3 2 low
the low and high temperature limits
limit high limit
Set temperature notification off
3 0
Check the value of a setting
Number of setting ?
62
Copyright © 2005 Nokia. All rights reserved.