1
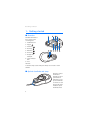
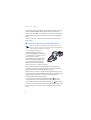
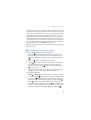
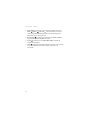
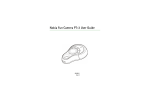
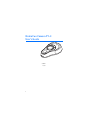
Nokia Fun Camera PT-3
User’s Guide
9356921
Issue 1
1
DECLARATION OF CONFORMITY
We, NOKIA CORPORATION, declare under our sole responsibility that the product
PT-3 is in conformity with the provisions of the following Council Directive: 1999/5/EC.
A copy of the Declaration of Conformity can be found at
http://www.nokia.com/phones/declaration_of_conformity/.
Copyright © 2003 Nokia. All rights reserved.
Reproduction, transfer, distribution or storage of part or all of the contents in this document
in any form without the prior written permission of Nokia is prohibited.
Nokia, Nokia Connecting People and Pop-Port are trademarks or registered trademarks of
Nokia Corporation. Other product and company names mentioned herein may be trademarks
or trade names of their respective owners.
Nokia operates a policy of continuous development. Nokia reserves the right to make
changes and improvements to any of the products described in this document without prior
notice.
Under no circumstances shall Nokia be responsible for any loss of data or income or any
special, incidental, consequential or indirect damages howsoever caused.
The contents of this document are provided "as is". Except as required by applicable law, no
warranties of any kind, either express or implied, including, but not limited to, the implied
warranties of merchantability and fitness for a particular purpose, are made in relation to the
accuracy, reliability or contents of this document. Nokia reserves the right to revise this
document or withdraw it at any time without prior notice
The availability of particular accessories may vary by region. Please check with the Nokia
dealer nearest to you.
9356921/ Issue 1
2
Contents
Contents
Introduction .............................. 4
1. Getting started ..................... 5
Overview...................................................
Optical viewfinder and strap ..............
Inserting batteries..................................
Display.......................................................
Battery and LED......................................
5
5
6
6
7
2. Using the camera.................. 8
Taking a picture...................................... 8
Using the flash........................................ 8
Transferring pictures to
a compatible phone............................... 9
Using the keys and display settings 10
Care and maintenance .......... 12
Battery information............... 13
3
Introduction
Introduction
The stand-alone Nokia Fun Camera PT-3 enables you to take pictures
while on the move. To view pictures taken with the Nokia Fun Camera
PT-3, you need a compatible mobile phone with a Pop-PortTM connector,
such as the Nokia 3100, Nokia 6100, Nokia 6610, Nokia 6800 or Nokia
7210. For information on the compatibility of other phone models,
check with your dealer.
Take pictures in JPEG format, the number depends on the image quality,
and save them in the camera memory. You can then send them to a
compatible phone.
The Nokia Fun Camera PT-3 sales package include the camera, 2 AAA
batteries, carrying strap, optical viewfinder and the user´s guide.
The Nokia Fun Camera PT-3 supports an image capture resolution of
640x480 pixels. As this guide contains simulated screen images, the
image resolution in this guide may appear different.
Read this user’s guide carefully before using the Nokia Fun Camera PT-3.
Before connecting to a compatible phone, read the user´s guide of that
phone, which provides more detailed information. Do not use this user’s
guide in place of your phone’s user's guide, which provides important
safety and maintenance information.
4
Getting started
1. Getting started
■ Overview
The Nokia Fun Camera
PT-3 consists of the
following parts:
1. Viewfinder hole
2. Trigger
3. Power key
4. Flash key
5. Menu key
6. Arrow key
7. Display with
backlight
8. Status indicator
LED
9. Lens
10. Flash
Your device may contain small parts. Keep it out of reach of small
children.
■ Optical viewfinder and strap
An add-on optical
viewfinder is
available for use in
your Nokia Fun
Camera PT-3. Just
put the viewfinder
on the hole to start
using it. The frame
inside the optical
viewfinder shows
5
Getting started
the image that will be captured. When using the optical viewfinder,
keep the camera approximately 20 cm from your eye to optimise the size
of the object in the picture.
To use the strap, thread the strap through the holes as in the picture and
tighten it.
■ Inserting batteries
The Nokia Fun Camera PT-3 uses 2 AAA batteries as its power source.
See also Battery information on page 13.
1. Rotate the lid open.
2. Lift the battery door to open the battery case.
3. Check the battery polarity indicators and insert the batteries. Make
sure you insert them correctly.
■ Display
The Nokia Fun Camera PT-3 camera has a
display with a backlight. When the camera is
switched on, the display shows the memory
and battery capacity and preselections with
icons. The default settings on the display are
shown in the picture. See Using the keys and
display settings on page 10.
6
Getting started
■ Battery and LED
The battery capacity icon
remaining.
indicates the level of battery power
Note that you are able to take pictures when the battery capacity icon
has dropped to one block, but you cannot use the flash. If you try to take
pictures with the flash and there is not enough energy left in the
battery, both the red LED and the flash icon
blink for 2 seconds and
the error sound is played. For the last 10 pictures, the red LED blinks
continuously.
The LED indicates the current status of the camera. It has the following
options:
• The LED is green and blinking, the flash is being activated.
• The LED is green and continuously on, the camera is ready for use.
• The LED is red and blinking, there is an error in the camera. Note that
the icon corresponding to where the error is also blinks.
• The LED is red and continuously on, you have taken a picture with
low battery capacity.
7
Using the camera
2. Using the camera
■ Taking a picture
Before you can take any pictures, make sure you have inserted the
batteries properly in the camera. When using the features in this
product, obey all laws and honour privacy and legitimate rights of
others.
1. Press the power key
. The camera is ready for use and the green
LED is on. The default picture settings are: flash Auto, sounds On and
picture quality Lower. See Using the keys and display settings on
page 10.
2. Point the camera towards the object you want to take a picture of.
You can use the optical viewfinder or just look through the
viewfinder hole when taking a picture. Note that the viewfinder hole
only approximately shows the picture to be captured. Do not point
the camera directly at a strong light or at the sun.
3. Press the trigger
to take the picture. Note that you should not
move the camera until the sound is played.
4. The counter on the display shows how many more pictures you can
take. You can take up to 53 lower quality pictures , up to 26 higher
quality pictures and up to 12 photo quality pictures . See Using
the keys and display settings on page 10.
Note that if you switch the power on, press Menu key and leave the
camera in the Menu setting mode for more than 15 seconds, it returns
to the main display. If the camera is not used for 2 minutes, the power is
switched off automatically.
Note that when taking pictures, the camera must not be connected to a
compatible phone.
■ Using the flash
The Nokia Fun Camera PT-3 has a key for its flash,
. When you switch
the power on, the flash is switched on by default. The letter A is shown
next to the flash icon
. In Auto mode, the flash checks the current
8
Using the camera
light conditions and uses the flash when needed. The other options for
the flash are On and Off. In On mode the flash is used every time a
picture is taken. In Off mode the flash is not used. Note that using the
flash consumes the battery more quickly. See also Battery and LED on
page 7.
Do not use the flash on people at close range. Do not cover the flash
while using it.
■ Transferring pictures to a compatible phone
Note: The phone must be switched on to use this function. Do not
switch on the phone when the use of a wireless phone is prohibited or
when it may cause interference or danger.
You can transfer pictures to a
compatible Nokia phone just by
connecting the Nokia Fun Camera PT3 to the Pop-PortTM connector of the
phone. The transfer starts
automatically. Before connecting the
camera and the compatible phone,
turn the power on in both devices.
Note that you cannot take pictures
when the camera is connected to a phone.
All the pictures will be transferred to the phone at the same time,
starting from the latest picture. The pictures are transferred until all
pictures are copied or until the phone memory is full.
During transfer, a counter on the camera display indicates how many
pictures remain to be transferred. Before the transfer, the counter shows
the total number of pictures to be sent, and it starts counting
downwards while transferring proceeds.
You can pause your transfer by pressing the trigger
once. To
continue the transfer from the paused picture, press trigger again.
If the picture transfer fails, the red LED and send icon
blink. There is
also an error sound. You need to delete files in the phone memory to free
up some space. To start retransferring the pictures, press the trigger
again.
9
Using the camera
After transfer, the pictures are stored in the camera memory and can be
transferred to a phone again. The phone shows a notification of the files
received on the phone display. You can save, open, view details or delete
the transferred pictures in your phone. Note that in order to view the
pictures later or to send them via multimedia message or e-mail, you
need to save the pictures in the phone. Depending on your phone, you
can send the picture to a computer by e-mail or transfer it using either a
data cable, Bluetooth or an infrared connection and a PC Suite (the PC
Suite may be provided on a CD ROM with the phone).
After picture transfer, disconnect the camera from your phone and close
the connector lid.
■ Using the keys and display settings
The Nokia Fun Camera PT-3 has the following keys:
• menu key
to view and scroll through the menu settings. The
different settings are indicated by icons on the display. To exit the
menu settings without any changes, press and hold the menu key
.
• arrow key
selects the subsetting that you want.
• trigger
confirms the selection. The selected icon is shown and
the camera returns to the main display. To continue specifying
settings, press the menu key
again. You also press the trigger
to take a picture.
Note that the selections are not retained in the camera memory if
you change or remove the batteries while the camera is on.
The available settings are:
• Delete to delete all/delete the last picture. To delete all pictures,
press the menu key
repeatedly until the delete icon blinks. Press
the arrow key
to select whether you want to delete ALL or just
the latest picture. Confirm the deletion by pressing the trigger
.
• Timer
to switch the timer On or Off. The preset time is 10
seconds. Select Timer and press the trigger
to confirm the Timer
selection. To start the Timer, press the trigger once more. Note that
pictures taken with Timer are Higher
quality and Round .
10
Using the camera
• Image type The pictures are compressed into 3 different file sizes:
Photo , Higher
and Lower . The Lower quality is the most
compressed and the Photo quality the least. The image quality is
better when the compression is low.
• Round image
to switch the round image format On or Off. The
picture shape is round when On is selected.
• Sound
to switch the sounds On or Off. If Off is selected, all
sounds are switched off.
• Send
activated and available only when the camera is connected
to a compatible phone. Shows the number of pictures to be
transferred.
11
Care and maintenance
Care and maintenance
Your camera is a product of superior design and craftsmanship and should be
treated with care. The suggestions below will help you to fulfil any warranty
obligations and to enjoy this product for many years.
• Keep the device dry. Precipitation, humidity and all types of liquids or
moisture can contain minerals that will corrode electronic circuits. If your
device does get wet, remove the batteries and allow the device to dry
completely before replacing it.
• Do not use or store the device in dusty, dirty areas. Its moving parts can be
damaged.
• Do not leave the device in direct sunlight or other bright lights. Its internal
components or display can be damaged.
• Do not store the camera in hot areas. High temperatures can shorten the life
of electronic devices, damage batteries, and warp or melt certain plastics.
• Do not store the camera in cold areas. When the device returns to its normal
temperature, moisture can form inside the device and damage electronic
circuit boards.
• Do not attempt to open the device other than as instructed in this guide.
• Do not drop, knock or shake the device. Rough handling can break internal
circuit boards and fine mechanics.
• Do not use harsh chemicals, cleaning solvents, or strong detergents to clean
the device.
• Do not paint the device. Paint can clog the moving parts and prevent proper
operation.
• Use a soft, clean, dry cloth to clean any lenses.
If your device is not working properly, take it to your nearest authorized service
facility for service. Only qualified personnel may install or repair this device.
12
Battery information
Battery information
This device is intended for use when supplied with power from Alkaline 1.5V 8003
Micro LR03 AM4 MN2400 Ministilo AAA batteries. The use of any other types
may invalidate any approval or warranty, and may be dangerous. Always switch
the device off before removing batteries. Always change both batteries at the
same time. Do not mix batteries of different types, brands, or ages.
Do not try to recharge the batteries unless the manufacturer of the batteries has
intended the batteries to be rechargeable.
If left unused, a fully charged battery will lose its charge over time. Leaving the
battery in hot or cold places, such as in a closed car in summer or winter
conditions, will reduce the capacity and lifetime of the battery. Battery
performance in particularly limited in temperatures well below freezing.
Use the batteries only for their intended purpose. Never use any battery that is
damaged. Always keep batteries away from small children.
Do not short-circuit the battery. Accidental short-circuiting can occur when a
metallic object such as a coin, clip, or pen causes direct connection of the
positive (+) and negative (-) terminals of the battery. This might happen, for
example, when you carry a spare battery in your pocket or purse. Short-circuiting
the terminals may damage the battery or the connecting object.
Do not dispose of batteries in a fire! Dispose of batteries according to local
regulations. Please recycle when possible. Do not dispose of as household waste.
13