1
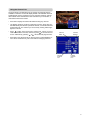
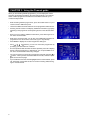
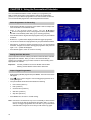
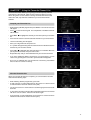
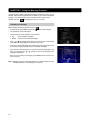
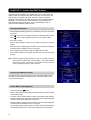
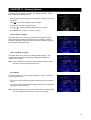
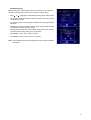
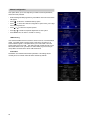
Owner’s Manual
Part 2
Operating System
TM
DIGITAL MULTIMEDIA TERMINAL
MANUFACTURED BY NOKIA
1
Important Information
Please be aware that ASTRO will update your Digital Multimedia Terminal (DMT) with
new software from time to time. This can change the functionality of the DMT. Therefore, it is important that your DMT be put in Stand-By mode whenever it is not in use, as
this is the mode in which it will receive this new software. It is important that you leave
your ASTRO Smart Card 1 inserted at all times in order to receive this new software, and
to ensure that your DMT functions correctly, as described in this manual.
ASTRO operates a policy of continuous development. Therefore
we reserve the right to make changes and improvements to any of
the products described in this manual without prior notice.
In the event of significant changes being made to the Operating
System of your DMT, ASTRO will endeavour to amend, update or
reissue this manual.
ASTRO is a trademark of MEASAT Broadcast Network Systems
Sdn. Bhd. (240064-A)
Copyright © 1999. MEASAT Broadcast Network Systems Sdn.
Bhd. (240064-A). All rights reserved.
2
CONTENTS
CHAPTER 1 : Basic Operations
CHAPTER 2 : Changing Channels
Using Numeric Keypad (0..9)
Using the Programme Buttons P+ or P-
4
4
4
4
Using the Channel List
CHAPTER 3 : Using the Channel Guide
5
6
CHAPTER 4 : Using the Channel Pilot
Programme Information of Current Channel
7
7
Programme Information of Other Channels
CHAPTER 5 : Using the Parental Lock
7
8
Preset Channels to be Locked
Watching Locked Channels
Restore Parental Lock
CHAPTER 6 : Using the Personalized Scheduler
Select Programmes for Recording
Setting the Video Recorder
Inspect Tagged Programmes
CHAPTER 7 : Using the Favourite Channel List
Compile your Favourite List
View the Favourite List
8
9
9
10
10
10
10
11
11
11
CHAPTER 8 : Using the Message Function
To Read your Messages
12
12
CHAPTER 9 : Update List of Services
CHAPTER 10 : Update New DMT Software
13
14
Through the Main Menu
Switching the Mains AC Power
14
14
Set the DMT to Stand-By Mode
CHAPTER 11 : Viewing Options
14
15
CHAPTER 12 : Check your Satellite Signal
CHAPTER 13 : Installation Setup and Setting
18
19
Auto Configuration
Manual Configuration
Technical Parameters
CHAPTER 14 : ASTRO Customer Service
19
20
22
22
3
CHAPTER 1 : Basic Operations
When you switch ON the mains AC power switch on the wall socket,
your DMT will be put into Stand-By mode. In Stand-By mode, you will
notice that the front panel display will show the current time. While in
Stand-By mode, you will need to switch ON the DMT in order to view
ASTRO programmes. To switch ON your DMT perform any one of the
following:
• Press the Stand-By
control.
Button on either the DMT front panel or remote
Stand-By
Mode
ON
Mode
• Press any of the Numeric Keypad Buttons ( 0 … 9 ) on your remote
control.
• Press either the P+ or P- button on your remote control.
CHAPTER 2 : Changing Channels
There are 3 basic ways to surf through the list of available channels
broadcast by ASTRO. In all cases, a channel banner will appear on the
top of your TV screen displaying basic information related to the channel
selected. ASTRO channels can be selected using the following methods:
Using the Numeric Keypad (0…9)
Channel
Number
Current
Programme
Short Channel
Name
Elapsed
Time
Your DMT remote control contains a set of numerical buttons labeled
from 0 to 9 . If you know the ASTRO channel which you want to
watch, simply key in the channel number on the numeric keypad by
pressing the numeric keys in quick succession.
Using the Programme Buttons P+ or PPressing P+ or P- selects the next higher or lower channel number to the
one currently selected.
Start Time
4
Stop Time
Using the Channel List
The channel list is an alternative way of viewing the channels that are
available on ASTRO. The list will display details of all available channels
superimposed over the programme you are currently watching, and will
also indicate which channels have been selected as your favourites, or
channels that have been locked.
• Press OK to display the channel list whilst viewing any channel.
• The display will show a total of 6 channels at a time, along with symbols that identify the status of a particular channel, such as favourite and
locked channels. The channel you are currently viewing will be highlighted on this list.
or
to move through the channel list. When you have
• Press
reached the bottom of the list, continue to press
to scroll to the next
screen. Alternatively, pressing
or
will scroll a full page at a time.
Channel
Name
Channel
Number
• Press OK to view the channel you want to watch or press MENU to remove the channel list from your screen without changing channels.
Favourite
Channel
Icon
Locked
Channel
Icon
5
CHAPTER 3 : Using the Channel guide
When you are watching ASTRO programmes, you can display the current
and future programme information using the Channel Guide. The Channel
Guide contains programme information for all available channels up to 7
consecutive days ahead.
• While watching ASTRO programmes, press the GUIDE button on your
remote control or DMT front panel.
• The list of available channels and their current programmes will be shown.
• Pressing the INFO button will display additional information (synopsis)
pertaining to the programme currently being shown on the selected channel.
• When you have read the additional information, press INFO again to return to the Channel Guide.
• While in the Channel Guide, you can also view additional information for
programmes to be shown in the near future (up to 7 days ahead).
• Press MENU to display the “Future Programme” dialog box.
• Using , , , or buttons, you can now view future programmes by
specifying your date and time of interest.
• Once the preferred date and time has been specified, press OK to display
the list of future programmes, or alternatively, you can press MENU to return to the Channel Guide without any changes.
• You can now select your channel or programme of interest using the or
buttons. When you have reached the bottom of the list, continue to press
to scroll to the next page.
• If you would like to view the channel highlighted in the Channel Guide, press
OK. Otherwise, press GUIDE to return to normal TV viewing without changing the viewed channel.
6
CHAPTER 4 : Using the Channel Pilot
Channel Pilot displays the same information as the Channel Guide but in
a different form. The main purpose of the Channel Pilot is to be able to
acquire programme information on the current and next programmes on
every channel very quickly, while being able to watch the selected
programme at the same time. The Channel Pilot can also be very useful
when you want to know about additional information on the current or
upcoming programmes immediately.
Programme Information of Current Channel
Short
Channel
Name
Favourite
Channel
Icon
Locked
Channel
Icon
Next
Current
Programme Programme
Duration
(Time Bar)
Channel
Number
• While watching ASTRO programmes, press INFO to activate the Channel Pilot.
• The Channel Pilot will appear on the bottom part of the screen, along
with pictures of the currently viewed programme in the background.
• The Channel Pilot contains both the current and next programme names
and their respective duration. It also tells you whether the selected
channel is one of your favourites and if it is a parental locked channel.
• Using and you can highlight the current or next programme on the
same channel.
• To view additional information on the highlighted programme, press
INFO (Info+).
• This screen contains additional information (Synopsis) on the highlighted programme.
• To return to the Channel Pilot, press INFO again.
Dual Language Icon
• Press MENU to return to normal TV viewing.
Programme Information Other Channels
• While watching ASTRO programmes, press INFO.
• Use the
and
buttons to scroll through the available channels.
Note that if the Favourite channel function is active, you will be scrolling through your favourite list.
• Or alternatively, use the numeric keypad to select your channel of interest.
• Note that although the channel on your Channel Pilot banner has
changed, the actual channel being viewed remains the same.
Maturity
Rating
Synopsis
• Now you can use the
and
buttons to highlight the current or next
programme. To view additional information on the highlighted programme, press INFO.
• This screen contains additional information (Synopsis) on the highlighted programme.
• To return to the Channel Pilot banner, press INFO again.
• If you would like to view the channel indicated in the Channel Pilot, press
OK to select. Otherwise, press MENU to return to normal TV viewing
without changing the viewed channel.
7
CHAPTER 5 : Using the Parental Control Feature
Parental Lock is a parental control feature which enables you to block
access to any particular channel. When a locked channel is selected for
viewing, your PIN code will be prompted. Only those who know your PIN
code will be able to unlock the channel for viewing. Below are 3 basic
means of using the parental lock feature.
Preset Channels to be Locked
First you must preset the channels which you want to lock when the
parental lock feature is active.
• While watching ASTRO programmes, press MENU. The main menu screen
will appear.
• Select the “List of Services” option by pressing 3 on the numeric keypad.
• Press
or
to highlight the channel you want to lock.
• Press OK to lock
• Enter your PIN code. Note that an asterisk V will be displayed in the 4-digit
field as you enter each digit.
• If necessary, press
to move back and make amendments if you have
entered a wrong code.
• Press OK to confirm the code.
symbol will appear along-side the selected channel to confirm your
• A
choice.
• Press
confirm.
or
to highlight other channels to be locked and press OK to
• Repeat this step until you have identified all the channels you want to lock.
• If you have mistakenly locked a channel, you can unlock it by pressing OK
symbol beside it disappears.
so that the
• Once you have completed selecting the channels you want to lock, press
MENU twice to return to normal TV viewing.
Note : Remember to put your DMT in Stand-By mode after locking channels
and before leaving the unit unattended to ensure that the locked channels are stored in the memory.
8
Watching Locked Channels
Once you have locked all the required channels, you can regain access to
these channels by performing the following.
• When you select a channel that has been locked you will not be able to see
or hear the locked channel, and the banner on the right will be displayed.
• Press OK to unlock.
• The PIN code entry dialog box will appear Enter your 4–digit PIN code, and
press OK
• If the PIN code entered is correct, the channel will appear on the TV screen,
otherwise the banner will prompt you to try again.
Note : Once any Channel has been unlocked, all other locked channels will
also be unlocked until the DMT is put into Stand-By again.
Restore Parental Lock
Once all channels have been unlocked, you can re-lock all the preset
channels by performing the following steps:
• While temporarily in unlocked mode, press the Stand-By
button.
• When the timer appears on the front panel of the DMT, press the P+ and
P- button to switch ON the DMT.
The parental lock status is now restored. When a locked service is selected,
PIN code entry will be required again.
9
CHAPTER 6 : Using the Personalized Scheduler
The “Personalized Scheduler” function enables you to programme your
DMT to switch ON and OFF at the beginning and end of a selected programme, for up to 8 different programmes. Your video recorder can then be
set to record ASTRO programmes at the designated time and date.
Select Programmes for Recording
• While watching ASTRO programmes, press GUIDE. Refer to Chapter 3 for
more information on the Channel Guide.
• While in the Channel Guide screen, use the
, ,
and
buttons to navigate the cursor to the programme which you would like
the DMT to automatically switch ON (e.g. for recording purposes)
• Press the OK button to tag the selected programme into your personalized
scheduler.
• Note that a ✓ symbol will be displayed beside the tagged programme.
• You can store a maximum of 8 programmes in your personalized scheduler.
• Alternatively, to delete a tagged programme from your personalized
scheduler, navigate the cursor to the tagged programme and press OK
again. The ✓ symbol will disappear.
• Press GUIDE again to return to normal TV viewing.
Setting the Video Recorder
These steps above will now activate your DMT to switch ON at the selected
appropriate time and date. But if you want to record the ASTRO programme, you must also set up your video recorder to start recording at the
appropriate time and date.
Important :
It is NOT possible to record one ASTRO channel while
watching another ASTRO channel at the same time.
Inspect Tagged Programmes
• While watching ASTRO programmes press MENU. The main menu screen
will appear.
• Press 5 on the numeric keypad. A list of all tagged programmes for recording will appear.
• Your personalized scheduler list will indicate the following
o
Item number (column 1)
o
Date (column 2)
o
Channel name (column 3)
o
Start time (column 4)
o
Stop time (column 5)
• Press MENU twice to return to normal viewing.
Note : Unforeseen circumstances may occur occasionally in which ASTRO
may be forced to alter the programme time and/or date. In such instance, the tagged programme time and date in your personalized
scheduler will no longer be correct and you will need to tag again.
10
CHAPTER 7 : Using the Favourite Channel List
The favourite function allows you to group your most frequently watched
channels into a favourite list, which are then easier and faster to access.
When using the P+ and P- buttons to change channels with the favourite
mode set to ON, only channels contained in your favourite list will be
selected.
Compile your Favourite List
• While watching ASTRO programmes press MENU. The main menu screen
will appear.
• Press 3 on the numeric keypad. The complete list of available channels
will be shown.
• Press
list.
or
to highlight the channel you want to be part of your favourite
• Press the FAV button to add the selected channel into your favourite list.
• The PIN code dialog box will appear.
• Enter your 4-digit PIN code and press OK.
• A ✰ symbol will appear along side the channel name to indicate it has been
selected as your favourite channel.
or to highlight other channels which you would also like to be
• Press
part of your favourite list, and press FAV to add.
• Repeat this step until you have identified all of your favourite channels.
• If you have mistakenly added a channel into your favourite list, you can
remove it by pressing FAV so that the I symbol beside it disappears.
• Once you are satisfied with your favourite list of channels, press MENU
twice to return to normal TV viewing.
View the Favourite List
When your favourite list has been compiled, you can activate the favourite
mode with the following steps.
• While watching ASTRO programmes, press FAV.
• A white coloured ✰ symbol will appear on the screen for a short moment
to indicate that the favourite mode is active (ON).
• You can now use the P+ and P- buttons to scroll through your list of favourite
channels.
• To turn off the favourite mode and allow all ASTRO channels to be viewed
with the P+ and P- buttons. Press the FAV button again.
• A red coloured ★ symbol will appear on the screen for a short moment to
indicate that the favourite mode is inactive (OFF).
11
CHAPTER 8 : Using the Message Function
Your DMT has the ability to display messages that have been sent to you by
ASTRO, perhaps about a special offer or details of your current subscription
package. You will know that a new message has been sent to you by
ASTRO when the
symbol appears on your TV screen.
To Read your message
While watching ASTRO programmes, press
.
• Or alternatively, press MENU followed by 6 on the numeric keypad.
• The “Message” screen will appear.
• The message screen is divided into two sections.
o Top
: list of available messages
o Bottom : content of the selected message
or
to highlight the message you want to read. Note that the
• Press
most recent message appears at the top of the screen.
• The bottom section will display the content of the message while the cursor is being navigated through the list of available messages.
• If the content of the message is too long and cannot be displayed in one
page, you can press the
ous page respectively.
or
buttons to view the next page or previ-
• When you have read your messages, press MENU twice to return to normal TV viewing.
Note : Messages cannot be manually deleted. The old messages are automatically deleted as new messages are received.
12
CHAPTER 9 : Update List of Services
This function is normally only used when first installing your DMT or when
you wish to search for new channels that may have been newly launched by
ASTRO.
• While watching ASTRO programmes, press MENU. The main menu screen
will appear.
• Press
2 on the numeric keypad.
• Check the satellite signal bar to ensure that it is green in colour.
• Press OK to begin downloading the current list of services.
• Your DMT will now search for the latest list of services broadcast by ASTRO.
• As the channels are being downloaded, you will notice that the number of
services found will increase until the entire ASTRO list of services is found.
• As the download process ends, the complete list of channels that have been
found and stored will be displayed.
• Press OK to return to normal TV viewing.
13
CHAPTER 10 : Update New DMT Software
Your DMT has the capability to be updated over the air. This process may
update certain menu functions and add new features. But don’t worry, the
basic operation of the DMT will remain the same. When the software
update process is initiated, the DMT will search for new software broadcast
by ASTRO. If a newer version of DMT software is being broadcast, the
DMT will automatically update itself. There are additionally 3 ways to
acquire the DMT software update manually.
Through the Main Menu
• While watching ASTRO programmes, press MENU. The main menu screen
will appear.
• Press 1 on the numeric keypad to select the “Installation Setup” option.
• Press 4 on the numeric keypad to select the “Auto update” option.
• Press OK to confirm
• Wait for approximately 5 minutes for your DMT to perform the software
update.
• While your DMT is updating itself, animation on the front panel will appear
to indicate that the update process is in progress.
• Upon completing the software update, the DMT will reset itself.
• If the software update is successful, the DMT will show the last viewed
channel.
Note : Software update will only commence if you are currently running an
older version of software that needs updating. If your DMT software
is already up to date, activating the “Auto update” function will cause
an error message to appear. This is normal.
Switching the Mains AC Power
By switching OFF the mains AC power on the wall socket and then back
ON again, the DMT will automatically perform a software update if necessary, as describe earlier.
Set the DMT to Stand-By-Mode
• Press the Stand-By
button.
• While on Stand-By your DMT will automatically perform a software update
as described earlier.
• If a newer version of DMT software is being broadcast, the DMT will automatically update itself. Otherwise, the DMT will remain in Stand-By mode
and the front panel will display the current time.
• While your DMT is updating itself, animation on the front panel will appear
to indicate that the update process is in progress.
• Upon completing the software update, the DMT will reset itself and goes
into Stand-By mode with the current time displayed on the front panel.
14
CHAPTER 11 : Viewing Options
Your DMT offers 6 settings to maximize your viewing enjoyment. To edit
these options follow the steps below.
• While watching ASTRO programmes, press MENU. The main menu screen
will appear.
• Press 4 on the numeric keypad to select “Options”
• Press
or
• Press
or
to select the required option
to make the required adjustment for each option.
• Press MENU twice to return to normal TV viewing
Preferred Audio Language
This option allows you to select your preferred audio language. The preferred audio language will be heard whenever it is available in ASTRO’s
broadcast. Otherwise, a default language (usually the original language) for
the selected channel will be heard.
Preferred Subtitle Language
This option allows you to select your preferred subtitle language. The
selected preferred subtitle language will be displayed first whenever
subtitles are requested.
Note : Some programmes may already contain subtitles within the picture
area which cannot be changed or turned off.
Screen Width
This option enables you to tell your DMT whether you have a 4:3 (normal)
or 16:9 ( widescreen) TV.
• If you chose “normal”, ASTRO programmes will be shown in the normal 4:3
format.
• If you select “wide” the DMT will automatically display any 16:9 widescreen
programs in the correct format.
Note : Availability of the 16:9 picture format is dependent on ASTRO’s broadcast. All of ASTRO’s broadcast are in the 4:3 format today.
15
Channel Info.
This option allows you to disable or enable the channel banner that appears
on the screen whenever a channel is selected.
• Select ON to display the channel banner.
• Select OFF to not display the channel banner.
Set PIN
This option allows you to change your PIN code. You will need to know your
current PIN code before you can make any changes. The default PIN code
is “0000”.
• Press
or
to highlight the “Set PIN” option, and press OK
• Enter your current 4-digit PIN code
• Note that an asterisk ★ will be displayed in the 4-digit field as you enter
each digit.
to move back and make amendments if you have
• If necessary, press
entered a wrong code.
• Press OK to confirm.
• Enter your new 4-digit PIN code and press OK.
• Enter your new 4-digit PIN code again to re-confirm, and then press OK
to complete the process.
• You will be advised to remember your new PIN code for future use.
• Press OK to confirm.
Note : Should you fail to enter the current PIN code correctly, you will be given
2 more tries. If you fail to enter the correct PIN code in these subsequent re-tries, you will be barred from using the current PIN code for
a duration of 30 minutes. Should you forget your PIN code, contact
your ASTRO Customer Service Officer.
16
Set Maturity Rating
Maturity Rating is a Parental Control function that allows you to restrict the
viewing of certain programmes with “18 and above” maturity rating.
• Press
or
to highlight the “Set Maturity Rating” option and press OK.
• The U Rating is always ticked to indicate that programmes with U rating
can always be viewed.
• The 18 Rating can be enable (ticked) or disabled (crossed) by pressing the
OK button.
• Disabling (crossing) the check box beside 18 will restrict programmes with
“18 and above” rating from being viewed.
• Enabling (ticking) it will open up all available programmes to be viewed irrespective of the maturity rating of the programmes.
• Press MENU to return to the “Options” screen
• Press MENU twice to return to normal TV viewing.
Note : The availability of this function is dependent on the content of ASTRO’s
broadcasts.
17
CHAPTER 12 : Check your Satellite Signal
Your DMT is equipped with a signal strength indicator to show the
relative signal strength of your satellite antenna/dish. If for any reason,
your satellite antenna/dish is out of alignment with the Measat Satellite,
the signal strength indicator will show a low signal strength condition. In
this case, you may be required to consult your local installer. To check
your satellite signal condition follow these steps:
• While watching ASTRO programmes, press MENU. The main menu
screen will appear.
• Press 2 to select the “Satellite Signal” option.
• For an acceptable signal strength condition, the signal must be green
in colour.
Good Signal
• Press MENU twice to return to normal TV viewing.
Note : The ASTRO signal is sensitive to adverse weather conditions, which
may affect your signal strength. Therefore, it is normal that you may
experience some signal outage during heavy thunderstorms. Your
signal and programme should recover automatically as soon as the
thunderstorm is over.
Poor Signal
18
CHAPTER 13 : Installation Setup and Setting
The options contained within the installation setup menu enable you to
check the status of your DMT. This is not something you should ever need
to do during normal operation. It is only required in the unlikely event of a
problem occurring with your DMT. In this case, this option will help
ASTRO’s Customer Service Officers to understand the problem and help
you to resolve it as quickly as possible.
Auto configuration
This option will automatically re-configure your DMT’s technical parameters
back to the ASTRO default settings. This option is useful when you have
accidentally altered the settings and do not know how to reset them back.
• While watching ASTRO programmes press MENU. The main menu screen
will appear.
• Press 1 on the numeric keypad to select the “Installation Setup” option.
• Press 1 on the numeric keypad to select the “Auto configuration” option.
• Upon completing the automatic re-configuration, the screen opposite will
be shown.
• Pressing OK will begin to update the current list of services (See Chapter
9)
• Or alternatively, press MENU twice to return to normal TV viewing.
19
Manual configuration
This option allows you to manually edit your DMT’s technical parameters,
and is PIN code protected.
• While watching ASTRO programmes, press MENU. The main menu screen
will appear.
• Press 1
to select the “Installation Setup” option
• Press 2 to select the “Manual configuration” option Enter your 4-digit
PIN code and press OK
• Press
or
to select the required options
• Press
or
to make the required adjustment for each option.
• Press MENU twice to return to normal TV viewing.
LNB Powering
Your ASTRO satellite antenna contains a device known as Low Noise Block
(LNB). Your DMT needs to supply power to this device in order for it to
receive ASTRO signals. This option allows you to switch ON or OFF the
power supply sent to the LNB. This setting should normally be ON, but you
will need to switch it OFF (on all but one of the DMTs) if you have two (or
more) DMTs connected to the same LNB and antenna.
Polarization
Polarization is an ASTRO transmission parameter. This setting should
normally be set to Vertical unless otherwise advised by ASTRO.
20
Base Frequency
Base frequency is an ASTRO transmission parameter. This setting should
normally be set to 10.982 GHz unless otherwise advised by ASTRO.
Code Rate
Code rate is an ASTRO transmission parameter. This setting should
normally be set to 7/8 unless otherwise advised by ASTRO.
Symbol Rate
Symbol rate is an ASTRO transmission parameter. This setting should
normally be set to 30.0 Mbauds unless otherwise advised by ASTRO.
Modulation Channel
Modulation channel is the RF output channel of your DMT. You can select
your DMT’s RF output channel in the UHF band ranging from channel 21 to
69. Note that if you decide to change this setting, your television will need
to be re-tuned in order to receive the ASTRO RF signal on the newly
selected UHF channel. If you are experiencing interference from other local
TV transmission while using the UHF antenna input on your TV to revive
ASTRO, you may need to experiment with this setting.
Note : If you are using an A/V connection into the Audio and Video inputs of
your TV or Home Theater system then this RF frequency setting has
no effect.
21
Technical Parameters
This option contains technical information pertaining to the operations and
reception status of your DMT. The information displayed is for review only.
This information is only intended for trouble shooting purposes, while you
are being advised by ASTRO’s Customer Service Officers over the telephone.
• While watching ASTRO programmes press MENU. The main menu screen
will appear.
• Press 1
to select the “Installation Setup” option.
• Press 3 to select the “Technical Parameters” option. Press
or
to
flip between page 1 and page 2 of the technical information presented.
• Press MENU twice to return to normal TV viewing.
CHAPTER 14 : ASTRO Customer Service
Should you encounter any difficulties in operating your DMT, please do not
hesitate to contact ASTRO’s Customer Service for assistance. The contact
number in the respective areas are as follows :
Areas
Customer Service Numbers
Kuala Lumpur, Selangor, N. Sembilan, Pahang
03-583 4188
Perak, Kelantan, Terengganu
05-210 4188
Pulau Pinang, Kedah, Perlis, Langkawi
04-240 4188
Johor, Melaka
07-289 5188
Sarawak
082-29 4188
Sabah
088-29 0488
Important :
22
Calls will be charged at local rates for the same area code.
You may choose to use the telephone number closest to you
for a cheaper rate.
23
NOKIA is a registered trademark of Nokia Corporation
ASTRO is a trademark of MEASAT Broadcast Network
Systems Sdn. Bhd (240064-A)
66 76949-11
24
www.nokia.com
www.astro.com.my
© 9927