1
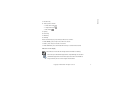
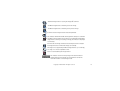
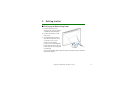
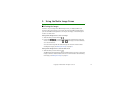
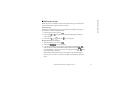
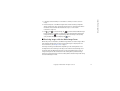
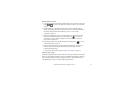
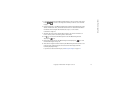
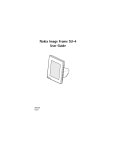
User Guide for Nokia Image Frame SU-4
9310658
Issue 1
DECLARATION OF CONFORMITY
We, NOKIA CORPORATION, declare under our sole responsibility that the product
SU-4 is in conformity with the provisions of the following Council Directive: 1999/5/EC.
A copy of the Declaration of Conformity can be found at
http://www.nokia.com/phones/declaration_of_conformity/.
Copyright © 2003 Nokia. All rights reserved.
Reproduction, transfer, distribution or storage of part or all of the contents in this document in any form
without the prior written permission of Nokia is prohibited.
Nokia and Nokia Connecting People are trademarks or registered trademarks of Nokia Corporation. Other
product and company names mentioned herein may be trademarks or tradenames of their respective
owners.
Nokia operates a policy of continuous development. Nokia reserves the right to make changes and
improvements to any of the products described in this document without prior notice.
Under no circumstances shall Nokia be responsible for any loss of data or income or any special,
incidental, consequential or indirect damages howsoever caused.
The contents of this document are provided "as is". Except as required by applicable law, no warranties of
any kind, either express or implied, including, but not limited to, the implied warranties of
merchantability and fitness for a particular purpose, are made in relation to the accuracy, reliability or
contents of this document. Nokia reserves the right to revise this document or withdraw it at any time
without prior notice
The availability of particular products may vary by region. Please check with the Nokia dealer nearest to
you.
Contents
Contents
FOR YOUR SAFETY ................................................................................................4
Introduction...........................................................................................................5
Power supply................................................................................................................................................. 5
Technical data .............................................................................................................................................. 5
Image format ................................................................................................................................................ 6
1. Overview.............................................................................................................8
2. Getting started ................................................................................................12
Setting up the Nokia Image Frame ......................................................................................................12
Switching the power on and off ...........................................................................................................13
3. Using the Nokia Image Frame ........................................................................14
Viewing the images...................................................................................................................................14
Editing the images ....................................................................................................................................15
Switching the screensaver on and off.................................................................................................16
Modifying the display brightness..........................................................................................................16
Sending an image from the Nokia Image Frame..............................................................................16
Receiving images with the Nokia Image Frame ...............................................................................17
Care and maintenance ........................................................................................20
Copyright © 2003 Nokia. All rights reserved.
3
FOR YOUR SAFETY
Read these simple guidelines. Breaking the rules may be dangerous or illegal. Further
detailed information is given in this manual.
QUALIFIED SERVICE
Only qualified personnel may install or repair the Nokia Image Frame
equipment.
CONNECTING TO OTHER DEVICES
When connecting to any other device, read its user's guide for detailed safety
instructions. Do not connect incompatible products.
BACKUP COPIES
Remember to make backup copies of all important data.
WATER-RESISTANCE
Your Nokia Image Frame is not water-resistant. Keep it dry.
IMPORTANT:
Only use chargers in dry conditions. Never supply power to the device with a
charger when the device or charger or their parts are damp or wet. If the device
has been exposed to salt water, wipe it immediately with a cloth dampened with
fresh water to avoid corrosion. The device must then be carefully wiped dry.
Do not point the IR (infrared) beam at anyone's eye or allow it to interfere with
other IR devices. This device is a Class 1 Laser product.
Copyright © 2003 Nokia. All rights reserved.
4
Introduction
Introduction
The Nokia Image Frame SU-4 is an enhancement product, which enables you to
view the digital images taken or received by your IrDA-enabled Nokia phone or
other compatible devices. You can connect the Nokia Image Frame to the devices
using its infrared (IR) port. You can place the Nokia Image Frame on a table and
view the images either one-by-one or as a slide show. The Nokia Image Frame
comes supplied with three pre-loaded images, and you can conveniently add new
images from a compatible device and delete old images.
Read this user’s guide carefully before using the Nokia Image Frame.
■ Power supply
Check the model number of any charger used to supply power before use with this device.
The Nokia Image Frame is intended for use with the ACP-12 charger.
Warning! Use only chargers approved by the manufacturer for use with this
particular enhancement. The use of any other types will invalidate any approval or
warranty applying to the enhancement, and may be dangerous.
For availability of approved chargers, please check with your dealer.
When you disconnect the power cord of any enhancement, grasp and pull the plug, not the
cord.
■ Technical data
• Weight: 425g
Copyright © 2003 Nokia. All rights reserved.
5
• Width (max) / height (max) / depth (max):
170 mm / 129 mm / 123.0 mm
• Display: 5.1" transmissive backlit STN color LCD 320 x 240 horizontal
orientation, 4096 colors. The image resolution in these materials may appear
different.
• Operating temperature: 0 oC to 40 oC
• Compatibility: The Nokia Image Frame SU-4 is compatible with phones and
other devices that support image sending over infrared (IrDA). Note that if
image sending cannot be activated from the phone (IrDA Send feature), the
Nokia Image Frame can pull the images from the compatible Nokia phone
when the phone’s IR connection has been activated.
• IrDA standards: IrOBEX 1.3 receive/send, IrTranP receive
• Supported image format: JPEG and GIF (not animated GIF)
• Supported image size: max 1024 * 768, up to 200 kB. Due to different
techniques of image processing, even up to 1 MB.
■ Image format
The Nokia Image Frame converts all the received images to JPEG format with the
320x240 pixel resolution. If the resolution of the received image differs from this
resolution, the Nokia Image Frame scales the image so that it fits optimally on the
display.
When you send images from the Nokia Image Frame, they are sent with the JPEG
format, since the Nokia Image Frame does not store the original formats of the
Copyright © 2003 Nokia. All rights reserved.
6
Introduction
received images. You should therefore remember to make backup copies of your
original images.
Copyright © 2003 Nokia. All rights reserved.
7
1. Overview
The Nokia Image Frame has the following main parts:
1. Display
2. Infrared (IR) port
3. Control keys
4. Table support
You can use the Nokia Image Frame
through the control keys on top of
the device. The control keys are:
1. Power on/off key
2. Show/Brightness key
Copyright © 2003 Nokia. All rights reserved.
8
Overview
3. Rotation key
4. Three-position switch:
• Slide show mode
• Image view mode
• Edit mode
5. Up key
6. Down key
7. Mark key
8. IrDA key
There are three ways to press the keys. These are as follows:
• Press briefly - press a key for less than one second
• Press - press a key for at least one second
• Press and hold - press and hold down the key for at least three seconds
Indicators on the display
This indicator shows that the image has been marked for viewing.
The memory in the Nokia Image Frame is full, 50 images are stored in
the Nokia Image Frame. If the memory becomes full in the middle of
image transfer, the rest of the images are discarded.
Copyright © 2003 Nokia. All rights reserved.
9
The Nokia Image Frame is rotating the image 90o clockwise.
The Nokia Image Frame is switching to the next image.
The Nokia Image Frame is switching to the previous image.
Confirms that the image has been successfully deleted.
This indicator blinks when the Nokia Image Frame attempts to establish
the IrDA connection. When the connection is established and the Nokia
Image Frame is sending or receiving an image, the indicator is displayed
continuously.
Confirms that the images have been successfully received or sent (the
receiving device has confirmed the images as received).
The image is not supported by the Nokia Image Frame. It is, for example,
too large or not in the compatible format.
An error occurred during the image transfer.
This indicator shows how many images have been marked for
viewing and how many images in total have been stored. The
maximum number of stored images is 50.
Copyright © 2003 Nokia. All rights reserved.
10
Overview
The progress bar is shown while the Nokia Image Frame processes
the received images.
Copyright © 2003 Nokia. All rights reserved.
11
2. Getting started
■ Setting up the Nokia Image Frame
1. Connect the lead from the
charger to the socket at the back
of the Nokia Image Frame (1).
2. Connect the charger to an AC
wall socket.
3. Set the Nokia Image Frame on
the table with the control keys
on the top. If most of your
images are in the upright
position, you can turn the Nokia
Image Frame upright so that the
control keys are on the right side
of the display.
You can turn the table support (2) at the back to change the angle of the Nokia
Image Frame display.
Copyright © 2003 Nokia. All rights reserved.
12
Getting started
■ Switching the power on and off
Press
to switch on the Nokia Image Frame.
Press
to switch off the power.
Unplug the Nokia Image Frame when not in use.
Copyright © 2003 Nokia. All rights reserved.
13
3. Using the Nokia Image Frame
■ Viewing the images
If there is only one image in the Nokia Image Frame, it is displayed when you
switch on the power. If there is more than one image in the Nokia Image Frame,
you can set the Nokia Image Frame to show just one image, or several images in
rotation as a slide show.
Setting Nokia Image Frame to show one image:
1. Slide the three position switch to
.
2. Press briefly
or
to scroll through the images and select the image you
want to view. If you press and hold
or , the images scroll automatically
at 3-second intervals.
You can scroll through all the marked images. For more information about
marking the images, see Editing the images on page 15.
Setting Nokia Image Frame to show the slide show:
• Slide the three position switch to
.
The Nokia Image Frame displays all the marked images in rotation so that each
image is shown for 30 seconds at a time. For more information about marking
the images, see Editing the images on page 15.
Copyright © 2003 Nokia. All rights reserved.
14
Using the Nokia Image Frame
■ Editing the images
When the power is switched on and the edit mode activated, you can delete the
images and mark the images you want for viewing.
Deleting images:
Remember to make backup copies of your images by, for example, sending and
saving them to another compatible device.
1. Slide the three position switch to
2. Press briefly
or
want to delete.
3. Press and hold
.
until the Nokia Image Frame displays the image you
and
until the
icon is displayed.
Marking the images for viewing:
1. Slide the three position switch to
2. Press briefly
or
.
to scroll the images.
3. If you want to be able to view an image, mark it by pressing briefly
while the image is displayed. The Nokia Image Frame displays the
all marked images. If you want to unmark an image, press briefly
the marked image is displayed.
icon for
while
When the Nokia Image Frame receives new images, it automatically marks
them. If you do not want to view the new images, unmark them as explained
above.
Copyright © 2003 Nokia. All rights reserved.
15
Rotating images:
You can rotate the images both in the edit mode and when you are viewing the
images.
When the image you want to rotate is displayed, press
to rotate the image 90o
clockwise. The Nokia Image Frame stores the orientation of the image, and the
next time the Nokia Image Frame displays the image, it uses the new orientation.
■ Switching the screensaver on and off
You can activate the screensaver, if you want to turn off the display without
turning off the device. Press and hold
to activate the screensaver.
You can turn the display back on by pressing any control key.
The Nokia Image Frame activates the screensaver automatically if no keys have
been pressed for 18 hours.
■ Modifying the display brightness
When the power is switched on, you can modify the brightness of the display by
pressing briefly . There are five brightness levels, and each time you press ,
the level is raised by one. When the highest brightness level is used and you press
, the Nokia Image Frame returns to the lowest brightness level.
■ Sending an image from the Nokia Image Frame
When the power is switched on, select the image you want to send on the display
of the Nokia Image Frame.
Copyright © 2003 Nokia. All rights reserved.
16
Using the Nokia Image Frame
1. If needed, activate the IR port of the device to which you want to send an
image.
2. Direct the IR ports of the Nokia Image Frame and the receiving compatible
device toward each other, and ensure that there are no obstructions between
the devices. The maximum allowed distance is up to 1.5 m and the
transmission angle 15o.
3. Press
and
to send the image. The
icon blinks while the Nokia Image
Frame attempts to establish a connection to the receiving device. During the
image transfer the
icon stops blinking. When the image is successfully
sent, the Nokia Image Frame displays the
icon.
■ Receiving images with the Nokia Image Frame
When the power is switched on, the Nokia Image Frame can receive images. Note
that the Nokia Image Frame converts the received images to display them. For
more information, see Image format on page 6.
The image receiving procedure differs depending on the sending device. If the
sending device can send images over IR, you can send the selected images from
the device while the Nokia Image Frame is in the passive IR reception mode. If
image sending cannot be activated from the sending device, the Nokia Image
Frame can pull all the images from the sending device’s default image folder using
the active IR reception mode.
Copyright © 2003 Nokia. All rights reserved.
17
Receiving images over IR:
1. If you want the images in the Nokia Image Frame to be in a certain order, press
briefly
or
to scroll to the image after which you want to store the new
images.
2. Direct the IR ports of the Nokia Image Frame and the compatible sending
device toward each other, and ensure that there are no obstructions between
the devices. The maximum allowed distance is up to 1.5 m and the
transmission angle 15o.
3. When the sending device starts to send the images, the Nokia Image Frame
enters the passive IR reception mode and displays the
icon. For more
information on how to initiate sending from the other device, refer to the
user’s guide of that device.
4. During the image transfer, the Nokia Image Frame displays the
the received images one by one.
icon and
5. After the images have been received, the Nokia Image Frame returns to the
previous mode, and the images are stored as the next images after the
currently displayed image.
If you want to edit the new images, see Editing the images on page 15.
Pulling images over IR:
The Nokia Image Frame pulls all the images from the image source device’s default
directory. The maximum number of images in the Nokia Image Frame is 50. If this
limit is reached during the image transfer, the transfer is disconnected so that
only 50 images in total are stored to the Nokia Image Frame.
Copyright © 2003 Nokia. All rights reserved.
18
Using the Nokia Image Frame
1. If you want the images in the Nokia Image Frame to be in a certain order, press
briefly
or
to scroll to the image after which you want to store the new
images.
2. Direct the IR ports of the Nokia Image Frame and the compatible image source
device toward each other, and ensure that there are no obstructions between
the devices. The maximum allowed distance is up to 1.5 m and the
transmission angle 15o.
3. Activate the image source device’s IR connection. For more information on
how to do this, refer to the user’s guide of that device.
4. Press
to enter the active IR reception mode. The Nokia Image Frame
displays the
icon.
5. During the image transfer, the Nokia Image Frame displays the
the received images one by one.
icon and
6. After all the images have been received, the Nokia Image Frame returns to the
previous mode, and the images are stored as the next images after the
currently displayed image.
If you want to edit the new images, see Editing the images on page 15.
Copyright © 2003 Nokia. All rights reserved.
19
Care and maintenance
Your Nokia Image Frame SU-4 is a product of superior design and craftsmanship and should
be treated with care. The suggestions below will help you to fulfil any warranty obligations
and to enjoy this product for many years.
• Keep all enhancements out of the reach of small children.
• Keep the Nokia Image Frame dry. Precipitation, humidity and all types of liquids or
moisture can contain minerals that will corrode electronic circuits.
• Do not use or store the Nokia Image Frame in dusty, dirty areas. Its moving parts can be
damaged.
• Do not store the Nokia Image Frame in hot areas. High temperatures can shorten the life
of electronic devices, damage batteries, and warp or melt certain plastics.
• Do not store the Nokia Image Frame in cold areas. When it warms up (to its normal
temperature), moisture can form inside, which may damage electronic circuit boards.
• Do not attempt to open the Nokia Image Frame. Non-expert handling may damage it.
• Do not drop, knock or shake the Nokia Image Frame. Rough handling can break internal
circuit boards.
• Do not use harsh chemicals, cleaning solvents, or strong detergents to clean the Nokia
Image Frame.
• Do not paint the Nokia Image Frame. Paint can clog the moving parts and prevent proper
operation.
If the Nokia Image Frame is not working properly, take it to your nearest qualified service
facility. The personnel there will assist you and, if necessary, arrange for service.
Copyright © 2003 Nokia. All rights reserved.
20
Care and maintenance
For environmentally sound recycling; contact your local Nokia service point or check local
regulations for correct disposal of household electronics.
Copyright © 2003 Nokia. All rights reserved.
21