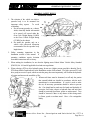
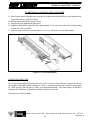
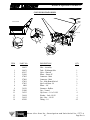
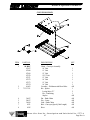
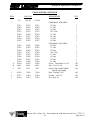
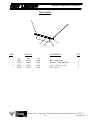
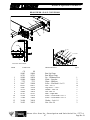
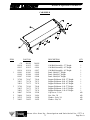
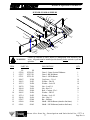
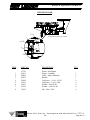
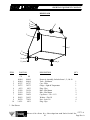
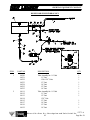
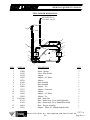
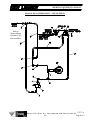
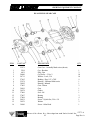
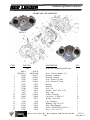
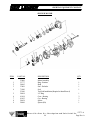
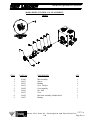
1
HIGHWAY EQUIPMENT COMPANY GENERAL MANUAL FOR MODEL L2020G4 SAFETY GUIDELINES INSTALLATION OPERATION MAINTENANCE TROUBLESHOOTING PARTS LIST Dealer Sticker This unit may have been built with SPECIAL FEATURES. Provide SERIAL NUMBER when ordering parts. SERIAL NO. __________________ IMPORTANT: READ THE SAFETY GUIDELINES AND ALL INSTRUCTIONS CAREFULLY BEFORE OPERATING HIGHWAY EQUIPMENT COMPANY – NEW LEADER DIVISION 1330 76TH AVE SW, CEDAR RAPIDS, IOWA 52404-7052 PH. (319) 363-8281 www.highwayequipment.com FAX (319) 632-3081 MODEL L2020G4 UNIT SERIAL NUMBER__________________ MANUAL NUMBER: 97373-A EFFECTIVE 6/2006 HIGHWAY EQUIPMENT COMPANY 1330 76TH AVE SW CEDAR RAPIDS, IOWA 52404-7052 PHONE (319) 363-8281 FAX (319) 632-3081 www.highwayequipment.com BUILDING THE BEST SINCE 1939 Copyright 2003 Highway Equipment Company, Inc. HIGHWAY EQUIPMENT COMPANY TABLE OF CONTENTS Warranty...................................................................................................4 Preface......................................................................................................5 Safety........................................................................................................6 Safety Decal Installation and Maintenance ............................................8 Safety Decal Illustrations ......................................................................9 General Description...................................................................................19 Dimensions & Capacities ...........................................................................20 Installation Instructions ...............................................................................21 Pump & PTO Requirements.................................................................21 Truck Requirements.............................................................................22 Hydraulic Pump Installation..................................................................23 Hydraulic Pump Drive Shaft Installation................................................23 Mounting Spreader Body.....................................................................24 Fender Installation................................................................................28 Electric Dump Valve Control................................................................28 Hydraulic Hose Installation...................................................................29 Electrical Connections..........................................................................32 Light Installation...................................................................................32 Spinner Sensor ....................................................................................32 Filling Hydraulic System.......................................................................32 Checking Installation............................................................................32 Initial Start-Up...........................................................................................33 Field Testing..............................................................................................34 General Operating Procedures ...................................................................35 Lubrication & Maintenance........................................................................36 Hydraulic System ................................................................................36 Hydraulic Hose....................................................................................37 Conveyor Chain...................................................................................38 #5 Conveyor Belt ................................................................................39 Conveyor Gear Case ..........................................................................44 Lubrication of Bearings ........................................................................45 Clean Up.............................................................................................45 Fasteners.............................................................................................45 Lubricant & Hydraulic Oil Specifications ....................................................46 Lubrication & Maintenance Chart...............................................................47 Troubleshooting.........................................................................................48 Torque Chart.............................................................................................51 P l e a s e G i v e P a r t N o . , D e s c r i p t i o n a n d U n i t S e r i a l N o . 97373-A 2 Page Rev. A HIGHWAY EQUIPMENT COMPANY TABLE OF CONTENTS CONTINUED Instructions for Ordering Parts....................................................................52 Legend for Parts List Symbols....................................................................52 Parts List Mounting Angle ...................................................................................53 Feedgate & Jack ................................................................................54 #5 Bottom...........................................................................................56 Conveyor Idler ....................................................................................58 Conveyor Drive ...................................................................................59 Encoder...............................................................................................60 Conveyor Chain Oiler..........................................................................61 Conveyor Chain...................................................................................62 Chain Shield ........................................................................................64 Wipers ................................................................................................66 Fenders ...............................................................................................68 Inverted V...........................................................................................72 Cab Shield...........................................................................................73 Ladder ................................................................................................74 Hillside Flow Divider............................................................................75 Material Divider...................................................................................76 Spinner Guard & Shields......................................................................77 24” Hydraulic Fans ..............................................................................78 Spinner Sensor ....................................................................................80 Reservoir.............................................................................................81 Reservoir/Pump Hydraulics..................................................................82 Twin Spinner Hydraulics ......................................................................84 Mark Series Control Hydraulics...........................................................85 Raven Control Hydraulics ....................................................................88 Manual Dual Hydraulics.......................................................................90 Gear Cases..........................................................................................94 Spinner Motor .....................................................................................96 Conveyor Motors ................................................................................98 Spinner Control Valve..........................................................................100 Lights ..................................................................................................101 Decals .................................................................................................102 Mark V Valve .....................................................................................104 G4 Spread Pattern ....................................................................................Tab P l e a s e G i v e P a r t N o . , D e s c r i p t i o n a n d U n i t S e r i a l N o . 97373-A 3 Page Rev. A INSERT NEW LEADER (NL) WARRANTY TAB SAFETY HIGHWAY EQUIPMENT COMPANY PREFACE PLEASE ! ALWAYS THINK SAFETY FIRST !! The purpose of this manual is to familiarize the person (or persons) using this unit with the information necessary to properly install, operate, and maintain this system. These instructions cannot replace the following: the fundamental knowledge that must be possessed by the installer or operator, the knowledge of a qualified person, or the clear thinking necessary to install and operate this equipment. Since the life of any machine depends largely upon the care it is given, we suggest that this manual be read thoroughly and referred to frequently. If for any reason you do not understand the instructions, please call your authorized dealer or our Cedar Rapids, Iowa, Product Support Department at (319) 363-8281. It has been our experience that by following these installation instructions, and by observing the operation of the spreader, you will have sufficient understanding of the machine enabling you to troubleshoot and correct all normal problems that you may encounter. Again, we urge you to call your authorized dealer or our Cedar Rapids Product Support Department if you find the unit is not operating properly, or if you are having trouble with repairs, installation, or removal of this machine. We urge you to protect your investment by using genuine HECO parts and our authorized dealers for all work other than routine care and adjustments. Highway Equipment Company reserves the right to make alterations or modifications to this equipment at any time. The manufacturer shall not be obligated to make such changes to machines already in the field. This Safety Section should be read thoroughly and referred to frequently. ACCIDENTS HURT !!! ACCIDENTS COST !!! ACCIDENTS CAN BE AVOIDED !!! P l e a s e G i v e P a r t N o . , D e s c r i p t i o n a n d U n i t S e r i a l N o . 97373-A 5 Page Rev. A HIGHWAY EQUIPMENT COMPANY SAFETY TAKE NOTE! THIS SAFETY ALERT SYMBOL FOUND THROUGHOUT THIS MANUAL IS USED TO CALL YOUR ATTENTION TO INSTRUCTIONS INVOLVING YOUR PERSONAL SAFETY AND THAT OF OTHERS. FAILURE TO FOLLOW THESE INSTRUCTIONS CAN RESULT IN INJURY OR DEATH. In this manual and on the safety signs placed on the unit, the words “DANGER,” “WARNING,” “CAUTION,” and “IMPORTANT” are used to indicate the following: DANGER Indicates an imminently hazardous situation that, if not avoided, WILL result in death or serious injury. This signal word is to be limited to the most extreme situations and typically for machine components that, for functional purposes, cannot be guarded. WARNING Indicates a potentially hazardous situation that, if not avoided, COULD result in death or serious injury, and includes hazards that are exposed when guards are removed. It may also be used to alert against unsafe practices. CAUTION Indicates a potentially hazardous situation that, if not avoided, MAY result in minor or moderate injury. It may also be used to alert against unsafe practices. IMPORTANT! Is used for informational purposes in areas which may involve damage or deterioration to equipment but generally would not involve the potential for personal injury. The need for safety cannot be stressed strongly enough in this manual. At Highway Equipment Company, we urge you to make safety your top priority when operating any equipment. We firmly advise that anyone allowed to operate this machine be thoroughly trained and tested, to prove they understand the fundamentals of safe operation. The following guidelines are intended to cover general usage and to assist you in avoiding accidents. There will be times when you will run into situations that are not covered in this section. At those times the best standard to use is common sense. If, at any time, you have a question concerning these guidelines, please call your authorized dealer or our factory at (319) 363-8281. P l e a s e G i v e P a r t N o . , D e s c r i p t i o n a n d U n i t S e r i a l N o . 97373-A 6 Page Rev. A HIGHWAY EQUIPMENT COMPANY SAFETY AVOID ACCIDENTS Most accidents, whether they occur in industry, on the farm, at home, or on the highway, are caused by the failure of some individual to follow simple and fundamental safety rules or precautions. For this reason, most accidents can be prevented by recognizing the real cause and doing something about it before the accident occurs. Regardless of the care used in the design and construction of any type of equipment, there are many conditions that cannot be completely safeguarded against without interfering with reasonable accessibility and efficient operation. A CAREFUL OPERATOR IS THE BEST INSURANCE AGAINST AN ACCIDENT. THE COMPLETE OBSERVANCE OF ONE SIMPLE RULE WOULD PREVENT MANY THOUSAND SERIOUS INJURIES EACH YEAR. THAT RULE IS: NEVER ATTEMPT TO CLEAN, OIL MACHINE WHILE IT IS IN MOTION . OR ADJUST A NATIONAL SAFETY COUNCIL CAUTION If spreader is used to transport chemicals, check with your chemical supplier regarding DOT (Department of Transportation) requirements. P l e a s e G i v e P a r t N o . , D e s c r i p t i o n a n d U n i t S e r i a l N o . 97373-A 7 Page Rev. A HIGHWAY EQUIPMENT COMPANY SAFETY DECALS MAINTENANCE INSTRUCTIONS 1. Keep safety decals and signs clean and legible at all times. 2. Replace safety decals and signs that are missing or have become illegible. 3. Replaced parts that displayed a safety sign should also display the current sign. 4. Safety decals or signs are available from your dealer's Parts Department or our Cedar Rapids factory. INSTALLATION INSTRUCTIONS 1. Clean Surface Wash the installation surface with a synthetic, free-rinsing detergent. Avoid washing the surface with a soap containing creams or lotion. Allow to dry. 2. Position Safety Decal Decide on the exact position before application. Application marks may be made on the top or side edge of the substrate with a lead pencil, marking pen, or small pieces of masking tape. NOTE: Do not use chalk line, china marker, or grease pencil. Safety decals will not adhere to these. 3. Remove the Liner A small bend at the corner or edge will cause the liner to separate from the decal. Pull the liner away in a continuous motion at a 180-degree angle. If the liner is scored, bend at score and remove. 4. Apply Safety Decal a. Tack decal in place with thumb pressure in upper corners. b. Using firm initial squeegee pressure, begin at the center of the decal and work outward in all directions with overlapping strokes. NOTE: Keep squeegee blade even—nicked edges will leave application bubbles. c. Pull up tack points before squeegeeing over them to avoid wrinkles. 5. Remove Pre-mask If safety decal has a pre-mask cover remove it at this time by pulling it away from the decal at a 180 degree angle. NOTE: It is important that the pre-mask covering is removed before the decal is exposed to sunlight to avoid the pre-mask from permanently adhering to the decal. 6. Remove Air Pockets Inspect the decal in the flat areas for bubbles. To eliminate the bubbles, puncture the decal at one end of the bubble with a pin (never a razor blade) and press out entrapped air with thumb moving toward the puncture. 7. Re-Squeegee All Edges. P l e a s e G i v e P a r t N o . , D e s c r i p t i o n a n d U n i t S e r i a l N o . 97373-A 8 Page Rev. A HIGHWAY EQUIPMENT COMPANY SAFETY DECALS CONTINUED P l e a s e G i v e P a r t N o . , D e s c r i p t i o n a n d U n i t S e r i a l N o . 97373-A 9 Page Rev. A HIGHWAY EQUIPMENT COMPANY GENERAL SAFETY RULES Operation Section 1. Before attempting to operate this unit, read and be sure you understand the operation and maintenance manual. Locate all controls and determine the use of each. Know what you are doing! 2. When leaving the unit unattended for any reason, be sure to: a. Take power take-off out of gear. b. Shut off conveyor and spinner drives. c. Shut off vehicle engine and unit engine (if so equipped). d. Place transmission of the vehicle in “neutral” or “park”. e. Set parking brake firmly. f. Lock ignition and take keys with you. g. Lock vehicle cab. h. If on steep grade, block wheels. These actions are recommended to avoid unauthorized use, runaway, vandalism, theft and unexpected operation during start-up. 3. Do not read, eat, talk on a mobile phone or take your attention away while operating the unit. Operating is a full-time job. 4. Stay out of the body while conveyor is operating. If it is necessary to get into the body for any reason, be sure all power is shut off, vehicle brakes are set, and the engine starting switch is locked and keys removed. All controls should be tagged to prohibit operation and tags should be placed and later removed only by the person who was working in the body. 5. Guards and covers are provided to help avoid injury. Stop all machinery before removing them. Replace guards and covers before starting spreader operation. 6. Stay clear of any moving members, such as shafts, couplings and universal joints. Make adjustments in small steps, shutting down all motions for each adjustment. 7. Before starting unit, be sure everyone is clear and out of the way. P l e a s e G i v e P a r t N o . , D e s c r i p t i o n a n d U n i t S e r i a l N o . 97373-A 10 Page Rev. A HIGHWAY EQUIPMENT COMPANY GENERAL SAFETY RULES Operation Section 8. Be careful in getting on and off this unit, especially in wet, icy, snowy or muddy conditions. Clean mud, snow or ice from steps and footwear. 9. Do not allow anyone to ride on any part of unit for any reason. 10. Keep away from spinners while they are turning: a. Serious injury can occur if spinners touch you. b. Rocks, scrap metal or other material can be thrown off the spinner violently. Stay out of discharge area. 11. Inspect spinner fins, spinner frame mounting and spinner fin nuts and screws every day. Look for missing fasteners, looseness, wear and cracks. Replace immediately if required. Use only new SAE grade 5 or grade 8 screws and new self-locking nuts. 12. Inspect all bolts, screws, fasteners, keys, chain drives, body mountings and other attachments periodically. Replace any missing or damaged parts with proper specification items. Tighten all bolts, nuts and screws to specified torques according to the torque chart in this manual. 13. Shut off engine before filling fuel and oil tanks. Do not allow overflow. Wipe up all spills. Do not smoke. Stay away from open flame. FIRE HAZARD! P l e a s e G i v e P a r t N o . , D e s c r i p t i o n a n d U n i t S e r i a l N o . 97373-A 11 Page Rev. A HIGHWAY EQUIPMENT COMPANY GENERAL SAFETY RULES Operation Section 14. Starting fluids and sprays are extremely flammable. Don’t smoke. Stay away from flame or heat! 15. All vehicles should be equipped with a serviceable fire extinguisher of 5 BC rating or larger. 16. Hydraulic system and oil can get hot enough to cause burns. Before working on the system, wait until oil has cooled. 17. Wear eye protection while working around or on unit. 18. Read, understand and follow instructions and precautions given by the manufacturer or supplier of materials to be spread. Improper selection, application, use or handling may be hazardous to people, animals, plants, crops or other property. 19. Cover all loads that can spill or blow away. Do not spread dusty materials where dust may create pollution or a traffic visibility problem. 20. Turn slowly and be careful when traveling on rough surfaces and side slopes, especially with a loaded spreader. Load may shift causing unit to tip. P l e a s e G i v e P a r t N o . , D e s c r i p t i o n a n d U n i t S e r i a l N o . 97373-A 12 Page Rev. A HIGHWAY EQUIPMENT COMPANY GENERAL SAFETY RULES Operation Section 21. When using metering device, shut off spinner before placing box on hook or when removing it. Handle box with care to avoid injury. 22. Read and understand the precautionary decals on the spreader. Replace any that become defaced, damaged, lost or painted over. Replacement decals can be ordered from your equipment dealer or from Highway Equipment Company by calling (319) 363-8281. P l e a s e G i v e P a r t N o . , D e s c r i p t i o n a n d U n i t S e r i a l N o . 97373-A 13 Page Rev. A HIGHWAY EQUIPMENT COMPANY GENERAL SAFETY RULES Maintenance Section 1. Maintenance includes all lubrication, inspection, adjustments (other than operational control adjustments such as feedgate openings, conveyor speed, etc.) part replacement, repairs and such upkeep tasks as cleaning and painting. 2. When performing any maintenance work, wear proper protective equipment—always wear eye protection—safety shoes can help save your toes—gloves will help protect your hands against cuts, bruises, abrasions and from minor burns—a hard hat is better than a sore head! 3. Use proper tools for the job required. Use of improper tools (such as a screwdriver instead of a pry bar, a pair of pliers instead of a wrench, a wrench instead of a hammer) not only can damage the equipment being worked on, but can lead to serious injuries. USE THE PROPER TOOLS. 4. Before attempting any maintenance work (including lubrication), shut off power completely. DO NOT WORK ON RUNNING MACHINERY! 5. When guards and covers are removed for any maintenance, be sure that such guards are reinstalled before unit is put back into operation. 6. Check all screws, bolts and nuts for proper torques before placing equipment back in service. Refer to torque chart in this manual. 7. Some parts and assemblies are quite heavy. Before attempting to unfasten any heavy part or assembly, arrange to support it by means of a hoist, by blocking or by use of an adequate arrangement to prevent it from falling, tipping, swinging or moving in any manner which may damage it or injure someone. Always use lifting device that is properly rated to lift the equipment. Do not lift loaded spreader. NEVER LIFT EQUIPMENT OVER PEOPLE. P l e a s e G i v e P a r t N o . , D e s c r i p t i o n a n d U n i t S e r i a l N o . 97373-A 14 Page Rev. A HIGHWAY EQUIPMENT COMPANY GENERAL SAFETY RULES Maintenance Section 8. If repairs require use of a torch or electric welder, be sure that all flammable and combustible materials are removed. Fuel or oil reservoirs must be emptied, steam cleaned and filled with water before attempting to cut or weld them. DO NOT weld or flame cut on any tank containing oil, gasoline or their fumes or other flammable material, or any container whose contents or previous contents are unknown. 9. Keep a fully charged fire extinguisher readily available at all times. It should be a Type ABC or a Type BC unit. 10. Cleaning solvents should be used with care. Petroleum based solvents are flammable and present a fire hazard. Don’t use gasoline. All solvents must be used with adequate ventilation, as their vapors should not be inhaled. 11. When batteries are being charged or discharged, they generate hydrogen and oxygen gases. This combination of gases is highly explosive. DO NOT SMOKE around batteries—STAY AWAY FROM FLAME— don’t check batteries by shorting terminals as the spark could cause an explosion. Connect and disconnect battery charger leads only when charger is “off”. Be very careful with “jumper” cables. 12. Batteries contain strong sulfuric acid—handle with care. If acid gets on you, flush it off with large amounts of water. If it gets in your eyes, flush it out with plenty of water immediately and get medical help. 13. Hydraulic fluid under high pressure leaking from a pin hole are dangerous as they can penetrate the skin as though injected with a hypodermic needle. Such liquids have a poisonous effect and can cause serious wounds. Get medical assistance if such a wound occurs. To check for such leaks, use a piece of cardboard or wood instead of your hand. The fine spray from a small hydraulic oil leak can be highly explosive—DO NOT SMOKE—STAY AWAY FROM FLAME OR SPARKS. P l e a s e G i v e P a r t N o . , D e s c r i p t i o n a n d U n i t S e r i a l N o . 97373-A 15 Page Rev. A HIGHWAY EQUIPMENT COMPANY GENERAL SAFETY RULES Installation Section 1. The selection of the vehicle on which a spreader body is to be mounted has important safety aspects. To avoid overloading: a. Do not mount spreader on a chassis which, when fully loaded with material to be spread, will exceed either the Gross Axle Weight Rating (GAWR) or the Gross Vehicle Weight Rating (GVWR) for the chassis. b. Do install the spreader only on a vehicle with cab-to-axle dimension recommended for the spreader body length shown. 2. Follow mounting instructions in the Installation section of this manual. If mounting conditions require deviation from these instructions refer to factory. 3. When making the installation, be sure that the lighting meets Federal Motor Vehicle Safety Standard (FMVSS) No. 108 and all applicable local and state regulations. 4. When selecting a PTO to drive hydraulic pump, do not use a higher percent speed drive than the TruckPTO-Pump Match Graph indicates in the Installation section of this manual. Too high a percent PTO will drive pump at excessive speed, which can ruin the pump, but more importantly, will overheat the hydraulic oil system and increase the possibility of fire. 5. When truck frame must be shortened, cut off only the portion that extends behind rear shackle in accordance with the truck manufacturer’s recommendations. If a torch is used to make the cut, all necessary precautions should be taken to prevent fire. Cuts should not be made near fuel tanks and hydraulic oil reservoirs, fuel, brake, electric or hydraulic lines and such lines should be protected from flame, sparks or molten metal. Tires should be removed if there is any chance of their being struck by flame, sparks or molten metal. Have a fire extinguisher handy. P l e a s e G i v e P a r t N o . , D e s c r i p t i o n a n d U n i t S e r i a l N o . 97373-A 16 Page Rev. A HIGHWAY EQUIPMENT COMPANY GENERAL SAFETY RULES Installation Section 5. Do not weld on vehicle frame as such welding can lead to fatigue cracking and must be avoided. When drilling holes in frame member, drill only through the vertical web portions− do not put holes in top or bottom flanges. Refer to truck manufacturer’s recommendations. 6. Be sure that welds between mounting bars and sill or between mounting angles and spreader cross sills are sound, full fillet welds. Center mounting angles so that good fillet welds can be made on three sides—and edge bead weld is not a satisfactory weld for this service. Use dry, E6013 or E7018 rod for normal steels. On stainless steel bodies use SAE grade 5 bolts—welding is recommended if type 308 welding rod is available. 7. Install controls so that they are located of convenient use. Position them so that they do not interfere with any vehicle control and that they do not interfere with driver or passenger or with access to or exit from the vehicle. 8. Check for vehicle visibility, especially toward the rear. Reposition or add mirrors so that adequate rearward visibility is maintained. 9. Add Caution, Warning, Danger and Instruction decals as required. Peel off any label masking which has not been removed. 10. Install all guards as required. 11. Check installation completely to be sure all fasteners are secure and that nothing has been left undone. P l e a s e G i v e P a r t N o . , D e s c r i p t i o n a n d U n i t S e r i a l N o . 97373-A 17 Page Rev. A HIGHWAY EQUIPMENT COMPANY NOTES: P l e a s e G i v e P a r t N o . , D e s c r i p t i o n a n d U n i t S e r i a l N o . 97373-A 18 Page Rev. A TAB OP & MAINT HIGHWAY EQUIPMENT COMPANY GENERAL DESCRIPTION The Model L2020G4 is a hopper-type spreader intended for spreading free-flowing granular agricultural materials, such as chemical fertilizers, agricultural limestone and gypsum. It is intended for truck chassis or flotation vehicle mounting. It also may be incorporated into a towed trailer unit. The unit is powered hydraulically and provides independent variable speed control for the spinner. The conveyor has full automatic ground speed coordinated control by means of a motorized valve with shaft sensor or Mark series control system. The hydraulic pump, which provides the hydraulic power, is a gear-type pump that is driven by means of a transmission PTO. The conveyor runs the full length of the hopper bottom to deliver material to the spinners through an adjustable metering gate at the rear of the hopper body. It is driven by an orbital type hydraulic motor integrally mounted to a 6 to 1 ratio spur gear box. The standard conveyor is a number five straight belt on ten foot through thirteen foot units and a number four Belt-over-chain on fourteen foot through sixteen foot units. The distributor spinner assembly has two 24 inch diameter dished discs. Each disc has four formed and heat treated fins. Each fin’s angle can be adjusted. The spinner is fully adjustable by means of a rotating handle. This product is intended for commercial use only. P l e a s e G i v e P a r t N o . , D e s c r i p t i o n a n d U n i t S e r i a l N o . 97373-A 19 Page Rev. A HIGHWAY EQUIPMENT COMPANY DIMENSIONS & CAPACITIES Dimensions Body Length Overall A Inside B Frame C 10’ (3.05m) 11’ (3.35m) 12’ (3.66m) 12’6” (3.81m) 13’ (3.96m) 148” (376cm) 160” (406cm) 172” (437cm) 178” (452cm) 184” (467cm) 120” (305cm) 132” (335cm) 144” (366cm) 144” (381cm) 156” (396cm) 111” (282cm) 123” (312cm) 135” (343cm) 141” (358cm) 147” (373cm) 14’ (4.27m) 15’ (4.57m) 16’ (4.88m) 196” (498cm) 208” (528cm) 220” (559cm) 168” (427cm) 180” (457cm) 192” (488cm) 159” (404cm) 171” (434cm) 183” (465cm) Cab to Axle or Cab to Tandem CA/CT 84” (213cm) CA 84” (213cm) CA 102” (259cm) CA 102” (259cm) CA 102-108” (259-274cm) CT 120” (305cm) CT 130” (330cm) CT 138” (351cm) CT Capacities-Struck — Cubic Yards (Meters3) Cubic Feet Body Spreader Weight Standard Length Approx. Pounds – As Shipped 10’ (3.05m) 7.07 (5.41) 191 3745 lbs. 11’ (3.35m) 7.83 (5.99) 211 3815 lbs. 12’ (3.66m) 8.58 (6.56) 231 3885 lbs. 12’6” (3.81m) 8.58 (6.56) 231 3920 lbs. 13’ (3.96m) 9.33 (7.13) 252 3955 lbs. 14’ (4.27m) 10.09 (7.71) 272 4025 lbs. 15’ (4.57m) 10.84 (8.29) 293 4095 lbs. 16’ (4.88m) 11.59 (8.86) 313 4165 lbs. P l e a s e G i v e P a r t N o . , D e s c r i p t i o n a n d U n i t S e r i a l N o . 97373-A 20 Page Rev. A HIGHWAY EQUIPMENT COMPANY INSTALLATION INSTRUCTIONS Recommended sequence of installation is: 1. Mounting of PTO and pump drive. 2. Installation of radar (if applicable) 3. Mounting of spreader. 4. Installation of controller and encoder (if applicable) 5. Installation of hydraulic hose and electrical wiring. 6. Installation of optional parts. 7. Filling of hydraulic tanks and lubrication. 8. Checking for leaks and proper functioning. Pump and truck requirements must be determined prior to installation of the L2020G4. IMPORTANT! PUMP AND PTO REQUIREMENTS: Hydraulic Requirements Maximum Pressure: Flow: 3100 PSI 30-34 GPM (Gallons per Minute) Sizing Data Required: Since the amount of material per acre to be spread depends upon the match between pump size, pump speed (which depends upon engine speed and PTO percent), conveyor delivery rate and feedgate opening, it is essential that a correct match between these factors be made. This matching is called “sizing.” 1. Correct sizing requires accurate and complete information. A. Engine governed operating speed. B. Transmission make and model. C. PTO Data 1. Make and model of PTO. 2. PTO percentage of engine RPM. 3. Direction of PTO Rotation (Engine direction or opposite of engine direction). IMPORTANT! Excessive engine speed will cause more hydraulic oil to be pumped than is required to drive spinners and conveyor and may result in overheating the oil. Too low an engine speed may not provide sufficient hydraulic oil flow to maintain spread width or to keep the conveyor running at the speed required to deliver the desired quantity of material being spread. NOTE: It may be necessary to select a higher percentage PTO or a larger pump than standard with lower speed engines, such as diesels and heavy duty gasoline engines. Consult your dealer in such cases. It is desirable to install a tachometer in order to maintain proper engine speeds. P l e a s e G i v e P a r t N o . , D e s c r i p t i o n a n d U n i t S e r i a l N o . 97373-A 21 Page Rev. A HIGHWAY EQUIPMENT COMPANY INSTALLATION INSTRUCTIONS CONTINUED 2. Pump PTO Selection: The following chart shows pumps available through Highway Equipment Company (HECO): HECO Pump Part No. Pump CID 86664 3.87 Theoretical Pump GPM (100% efficiency) 30 86665 4.38 34 Pump RPM 1800 1800 To determine PTO (Power Take-Off) percentage: (PTO RPM ÷ OPTIMAL TRUCK ENGINE RPM) x 100 = PTO% To determine Engine RPM: PTO RPM ÷ (PTO% ÷ 100) = Engine RPM IMPORTANT! Do not select a PTO % and an engine RPM resulting in more than 3000 PTO RPM. Driving the pumps (referenced above) at speeds greater than 3000 RPM will result in premature failure of the pump and other hydraulic components. TRUCK REQUIREMENTS In mounting the L2020G4 spreader on a truck, the following questions must be considered: 1. Is the CA/CT (Cab to Axle/Cab to Tandem) dimension of the truck correct for the length of the spreader? See the Dimensions charts on page 20. This will assist in matching spreader to truck. 2. Is the truck’s GAWR (Gross Axle Weight Rating) and the GVWR (Gross Vehicle Weight Rating) adequate to carry the fully loaded spreader? Refer to your New Leader dealer. He knows where to find the GAWR and GVWR for most trucks, and how to calculate the weight distribution on each axle and total loaded vehicle weight. P l e a s e G i v e P a r t N o . , D e s c r i p t i o n a n d U n i t S e r i a l N o . 97373-A 22 Page Rev. A HIGHWAY EQUIPMENT COMPANY INSTALLATION INSTRUCTIONS CONTINUED HYDRAULIC PUMP INSTALLATION A mounting bracket for the hydraulic pump is shipped with the spreader. It may be necessary to modify this bracket to fit your truck since many variable factors such as PTO make and model, muffler position, transmission make and model, etc., all affect the mounting position. DO NOT WELD THE BRACKET TO THE TRUCK FRAME. To do so may void the truck manufacturer’s warranty. Position the mounting bracket so that the pump drive shaft will be as straight possible. In no case should the angle of any universal joint exceed 15º. The pump shaft and PTO shaft should be parallel. (Figure 1) HYDRAULIC PUMP DRIVE SHAFT INSTALLATION The pump drive shaft included may be too long for some installations. It may be cut and redrilled as necessary. When redrilling the shaft, be sure that universal joints are properly “timed”, as shown in Figure 1. Install the slip joint at the end of the pump drive shaft. Failure to install the slip joint will result in bearing failure in pump, PTO or both. Parallel Shafts Not To Exceed 15 Degrees Parallel Forks Figure 1 - Timing of Universal Joints RADAR & CONTROLLER INSTALLATION CAUTION All holes in the truck cab walls, floor and firewall for control wires, hoses and cables are to be grommeted, plugged and sealed to prevent entrance of engine fumes, dust, dirt, water and noise. See control manual for installation instructions of radar, control box and cable routing. P l e a s e G i v e P a r t N o . , D e s c r i p t i o n a n d U n i t S e r i a l N o . 97373-A 23 Page Rev. A HIGHWAY EQUIPMENT COMPANY INSTALLATION INSTRUCTIONS CONTINUED MOUNTING OF SPREADER BODY Truck Frame Length The length from the rear of the cab to the rear end of the frame should be approximately as shown on “Dimensions and Capacities” chart under “C”. Shorten truck frame as necessary, making sure to follow truck manufacturer’s specifications so as not to void truck warranty. Filler Strips IMPORTANT! Do not weld to truck frame; it may void truck warranty. A level top surface is necessary for mounting. Add steel shim bars or strips the same thickness as fish plates or other obstructions and as wide as the truck frame channel top flange. Shims must be drilled to clear any rivet or bolt heads. Units with rubber mounting pads do not require wood filler strips—continue to Positioning Body on next page. Rubber mounting pads may be ordered or follow instructions below if not so equipped. Hardwood filler strips (not supplied) 1” by 3” must be installed the full length of the truck frame. Cut filler strips to length and place on truck frame rails. If frame has rivets in top flange, mark position of rivets on filler strips, remove and counterbore for rivet head clearance. Secure filler strips and steel shims (if applicable) to frame top flange by bending anchor clips around them as shown in Figure 2. Attach three anchor clips per steel shim and per wood filler strip. Locate anchor clips between spreader body cross tubes. Attach anchor clips by driving a 1/4” sheet metal screw through clip into wood filler strip as shown in Figure 2. Hardwood Filler Strip Fish Plate Anchor Clip Shim Bar Truck Frame Rail 1/4” Sheet Metal Screw Truck Frame Rail Hardwood Filler Strip Anchor Clip Shim Bar - Tack Weld to Fish Plate (Not Truck Frame) Truck Frame Rail 1/4” Sheet Metal Screw Figure 2 - Wood Filler Strips & Anchor Clips P l e a s e G i v e P a r t N o . , D e s c r i p t i o n a n d U n i t S e r i a l N o . 97373-A 24 Page Rev. A HIGHWAY EQUIPMENT COMPANY INSTALLATION INSTRUCTIONS CONTINUED Positioning Body Use only lifting devices that meet or exceed OSHA standard 1910.184. Never WARNING exceed work load limits or lift equipment over people. Empty spreader before lifting. Loads may shift or fall if improperly supported, causing injury. Keep unit supported until mounting is complete. Unit could slip off chassis, causing WARNING injury or damage to unit. Using a suitable lifting device, lift empty spreader onto truck frame. Position body centrally with respect to truck frame rails and approximately 4" from rear of cab. Check position of spreader at rear to insure rear mounting angle can be installed on truck frame and centered on rear cross tube. Installing Front Mounting Angles IMPORTANT! DO NOT PUT HOLES INTO TOP OR BOTTOM FLANGES—to do so may void truck manufacturer’s warranty. When drilling holes in frame member, drill only through vertical web portions. Assemble two front mounting angle springs and hardware. Use a 3/8" shim between cross tube mounting plate and truck frame mounting angle. Position assembly under second cross tube from front and against truck frame, make sure springs do not contact cross tube. Mark position of mounting angle holes on truck frame. Drill 9/16" holes where marked and install mounting assembly using 1/2" hardware supplied. Weld mounting plate to bottom of cross tube on three sides, and remove 3/8" shim (Figure 4, page 27). Tighten spring assembly until spring compressed height is 4". There should be a 3/8" space between cross tube mounting plate and truck frame mounting angle (Figure 3, page 26). Repeat this procedure on other side of truck frame, on same cross tube. NOTE: It may be necessary to mount front mounting angle springs on first cross tube on some vehicles due to obstructions such as spring shackles etc. Installing Center Mounting Angles (10 Foot and 11 Foot Bodies) Position center mounting angles at a convenient cross tube near center of body with slotted faces against truck frame. Weld mounting angle to bottom of cross tube on three sides (Figure 4, page 27). Do not install hardware, these mounting angles are for side to side support only (Figure 3, page 26). Installing Center Mounting Angles (12 Foot to 16 Foot Bodies) Position center mounting angles at a convenient cross tube near center of body with slotted faces against truck frame and mark location of slots on truck frame. Drill 9/16” diameter holes through truck frame approximately 3/4” from bottom of slots (Figure 3). Weld mounting angle to bottom of cross tube on three sides (Figure 4). Install hardware and tighten to recommended torque. NOTE: Position of center mounting angles will vary due to obstructions such as spring shackles, etc. P l e a s e G i v e P a r t N o . , D e s c r i p t i o n a n d U n i t S e r i a l N o . 97373-A 25 Page Rev. A HIGHWAY EQUIPMENT COMPANY INSTALLATION INSTRUCTIONS CONTINUED Figure 3 - Mounting Angle Installation Installing Rear Mounting Angles CAUTION IMPORTANT! Make sure drill will not puncture gas tank or harm any other obstruction before drilling holes. DO NOT WELD ON VEHICLE FRAME! Such welding can lead to fatigue cracking and must be avoided. Position rear mounting angles with the slotted faces against the side of the truck frame and centered on rear cross sill. Mark slot locations on truck frame. Drill 9/16" diameter holes through truck frame at bottom end of slots (Figure 3). Weld mounting angle to bottom of cross tube on three sides (Figure 4). Install hardware and tighten to recommended torque. P l e a s e G i v e P a r t N o . , D e s c r i p t i o n a n d U n i t S e r i a l N o . 97373-A 26 Page Rev. A HIGHWAY EQUIPMENT COMPANY INSTALLATION INSTRUCTIONS CONTINUED Securing Spreader Body to Frame Connect welders ground directly to one of the items being welded anytime an arc welder is used on the vehicle or anything connected to the vehicle. Disconnect power IMPORTANT! cable from control box! Failure to do so can result in damage to components on both the vehicle and/or spreader, in which case the warranty will be null and void by manufacturer. Install mounting angles and tighten mounting bolts to recommended torque. Weld mounting angles to spreader cross tubes by welding on front, outer and rear sides (Figure 4). Make sure welds between mounting angles and spreader cross tubes are sound full fillet welds. Center mounting angles so good fillet welds can be made on three sides, an edge bead weld is not a satisfactory weld for this service. Use dry E6013 or E7018 rod for mild steel spreaders and type 308 welding rod on stainless steel. Wood filler strip installation shown. Figure 4 - Welding Instructions P l e a s e G i v e P a r t N o . , D e s c r i p t i o n a n d U n i t S e r i a l N o . 97373-A 27 Page Rev. A HIGHWAY EQUIPMENT COMPANY INSTALLATION INSTRUCTIONS CONTINUED FENDER INSTALLATION Figure 5 - Fender Angle Installation Attach fender angles to spreader body as shown in Figure 5. Use upper set of holes for full or super floatation fenders and lower set of holes for semi-float and truck chassis mount fenders. Do not tighten hardware at this time. NOTE: Some fenders have angles in place of panels shown. Attach fenders on top of angles/panels as shown in Figure 6. Tighten all hardware. Figure 6 - Fender Installation ELECTRIC DUMP VALVE CONTROL INSTALLATION Figure 7 - Electric Dump Valve Control Manual hydraulics only: Splice wire from switch into wire with two amp to four amp fuse using tap connector. (See location of tap connector in Figure 7.) Ground ring terminal to chain shield hardware. Mount switch in dash or control panel in a location that is easily accessible while operating vehicle. P l e a s e G i v e P a r t N o . , D e s c r i p t i o n a n d U n i t S e r i a l N o . 97373-A 28 Page Rev. A HIGHWAY EQUIPMENT COMPANY INSTALLATION INSTRUCTIONS CONTINUED HYDRAULIC HOSE INSTALLATION Determine the pressure port of the pump. Install the pressure hose into this port as shown in Figure 8. Connect the suction hose to the opposite port and to the tank outlet on the reservoir. If necessary, use plastic tie straps to support hoses so that they will not catch on field obstructions, contact the muffler or moving parts. Figure 8 - Hydraulic Pump Installation Use thread sealer on all fittings, except "O" ring and JIC adapters, "O" ring valves and motors, etc. When using thread sealer, do not put it on the first three threads of the fitting. Too much on the fitting or on the first three threads will force it into the oil stream where it could damage the system. CAUTION If a threaded connection is tightened too tightly, the fitting or housing into which the fitting is placed could be distorted and an unstoppable leak could occur. Assemble the system as shown in the Hydraulics Parts List. Place the hose clamps as needed to keep hoses away from hot or moving parts. Do not let hoses hang so low as to be snagged. Do not stretch hoses tight. The hydraulic hoses supplied are as follows: Pressure Line: Two wire braid hose, one end fitting crimped on, other end fitting to be field installed after cutting hose to length. See assembly instructions on the following page. Suction Line: Single spiral wire reinforced to be cut to length. Fittings to be assembled with double hose clamps. All Return Lines: Double cotton braid with crimped end fittings. P l e a s e G i v e P a r t N o . , D e s c r i p t i o n a n d U n i t S e r i a l N o . 97373-A 29 Page Rev. A HIGHWAY EQUIPMENT COMPANY INSTALLATION INSTRUCTIONS CONTINUED WARNING Do not use one manufacturer's hose with another manufacturer's fittings. Such use will void any warranty and may cause premature burst or leak of hydraulic fluids! Severe injury and/or fire could result! Reusable Non-Skive Type Ends Step 1 Cut hose to length required using a fine tooth hacksaw or cut-off machine. Clean hose bore. Step 2 Liberally lubricate hose cover with hose assembly lube. Place socket in vise and turn hose into socket counterclockwise until it bottoms. When assembling long lengths of hose, it may be preferred to put hose in the vise just tight enough to prevent from turning, and screw socket onto the hose counterclockwise until it bottoms. Step 3 Liberally lubricate nipple threads and inside of hose. Use heavy weight oil. Step 4 Screw nipple clockwise into socket and hose. Leave 1/32" to 1/16" clearance between nipple hex and socket. Disassemble in reverse order. Used with permission of the Aeroquip Company P l e a s e G i v e P a r t N o . , D e s c r i p t i o n a n d U n i t S e r i a l N o . 97373-A 30 Page Rev. A HIGHWAY EQUIPMENT COMPANY INSTALLATION INSTRUCTIONS CONTINUED Installation Guide WRONG WRONG RIGHT RIGHT 1. Use elbows and adapters in the installation to relieve strain on the assembly, and to provide easier and neater installations that are accessible for inspection and maintenance. Remember that metal end fittings cannot be considered as part of the flexible portion of the assembly. 2. Install hose runs to avoid rubbing or abrasion. Clamps are often needed to support long runs of hose or to keep hose away from moving parts. It is important that the clamps be of the correct size. A clamp that is too large will allow the hose to move in the clamp causing abrasion at this point. WRONG WRONG RIGHT RIGHT 3. In straight hose installations allow enough slack in the hose line to provide for changes in length that will occur when pressure is applied. This change in length can be from +2% to -4%. 4. Do not twist hose during installation. This can be determined by the printed layline on the hose. Pressure applied to a twisted hose can cause hose failure or loosening of the connections. WRONG WRONG RIGHT RIGHT 5. Keep hose away from hot parts. High ambient temperature will shorten hose life. If you cannot route it away from the heat source, insulate it. 6. Keep the bend radii of the hose as large as possible to avoid hose collapsing and restriction of flow. Follow catalog specs on minimum bend radii. (Used with the permission of The Weatherhead Company.) P l e a s e G i v e P a r t N o . , D e s c r i p t i o n a n d U n i t S e r i a l N o . 97373-A 31 Page Rev. A HIGHWAY EQUIPMENT COMPANY INSTALLATION INSTRUCTIONS CONTINUED ELECTRICAL CONNECTIONS Connect all electrical control circuits. The supply conductor should be connected to the accessory terminal of the truck ignition switch through the fifteen amp. circuit breaker provided in the control panel. All wiring should be approved automotive insulated wire, supported adequately with insulating ties or straps, and located where it will not interfere with any control or access. Make sure wiring does not contact any moving parts or sharp edge and is kept away from any hydraulic line or any heated part. LIGHT INSTALLATION Light installation must comply with all applicable requirements prescribed by FMVSS/CMVSS 108, state and local regulations. See “Lights” parts list and instructions below for example of installation. Use two belt reflector mounts to attach rear red reflectors if mudflaps are not installed. Mount three lamp cluster to rear endgate. Mount red lamps on back of fenders facing rearward and amber lamps at the opposite end of fenders facing forward. SPINNER SENSOR The spinner sensor must be mounted under the right-hand spinner disc in the holes provided. Rotate the disc so that one of the cap screws is directly above the sensor. Position the sensor 1/8-inch or less below the cap screw and tighten the sensor hardware. If the distance between the sensor and the spinner cap screw is more than 1/8 inch, the sensor may net get a good RPM reading. See “Spinner Sensor” parts list for illustration. FILLING HYDRAULIC SYSTEM IMPORTANT! DO NOT attempt to run pump without first filling hydraulic oil reservoir and opening suction line gate valve, or pump may be ruined. Fill reservoir with hydraulic oil as specified in the “Lubricant Specifications” section of this manual. Be sure oil is clean, free from dirt, water and other contaminants. Lubricate all points requiring lubrication per “Lubrication Chart” in this manual. CHECKING INSTALLATION See “Initial Start-Up” procedure. P l e a s e G i v e P a r t N o . , D e s c r i p t i o n a n d U n i t S e r i a l N o . 97373-A 32 Page Rev. A HIGHWAY EQUIPMENT COMPANY INITIAL START-UP WARNING Stand clear of moving machinery. NOTE: Do not load spreader with material. 1. Check over entire unit to be sure all fasteners are in place and properly tightened per “Fastener Torque Chart” in this manual. 2. Make sure no other persons are in vicinity of truck or spreader. 3. Make sure no loose parts are in unit or on conveyor or spinner. 4. Open feedgate until it is completely clear of conveyor. 5. Check oil level in hydraulic reservoir; fill as necessary. Refer to "Lubricant Specification'' section of this manual for proper oil. Completely open gate valve under reservoir. 6. Set throttle so engine runs at about 1000RPM. Engage PTO driving pump. Allow pump to run and circulate oil for several minutes. Increase warm-up time in cold weather. 7. Manual spinner control valve: Move to position ''3''. PWM spinner control valve: Run at 300 RPM. Spinner should run at slow speed. Allow to run until it is operating smoothly and all air has been purged. 8. Manual spinner control valve: Move to position ''0''. PWM spinner control valve: Run at 0 RPM. 9. Place control in manual mode (see control manual) and run conveyor until it’s operating smoothly. 10. Manual spinner control valve: Move to position ''5'. PWM spinner control valve: Run at 500 RPM. Allow both spinner and conveyor to run. Shut down system. WARNING DO NOT check leaks with hands while system is operating as high pressure oil leaks can be dangerous! DO NOT check for leaks adjacent to moving parts while system is operating as there may be danger of entanglement! 11. Check all connections in hydraulic system to make sure there are no leaks. 12. Check hydraulic oil reservoir and refill to “FULL” mark on sight gauge. Unit is now ready for field testing. P l e a s e G i v e P a r t N o . , D e s c r i p t i o n a n d U n i t S e r i a l N o . 97373-A 33 Page Rev. A HIGHWAY EQUIPMENT COMPANY FIELD TESTING The following procedure is a guide: 1. Field test over any suitable course which allows vehicle to be driven at speeds to be used while spreading. 2. Make sure unit has been properly serviced, that oil reservoir is full and gate valve under reservoir is fully open. Do not load spreader. 3. Manual spinner control valve: Set to position “7”. PWM spinner control valve: Run at 700 RPM. DANGER Take proper safety precautions when observing conveyor and spinner speed while vehicle is in motion! These may include use of suitable mirrors clamped to permit observation by a safely seated observer, following the spreader in another vehicle at a safe distance, or other suitable means. Do not stand on fenders, in body or on any part of spreader as there is danger of falling off the vehicle or into moving parts! Use great care in performing this test! 4. Turn control to ''on'' position. Engage PTO and allow to run at fast idle long enough to bring hydraulic oil up to operating temperature. Spinners should revolve at moderate speed. Conveyor should not move. 5. Set program in control console to operational mode and begin forward travel. Move conveyor switch to ''on'' position. Conveyor should start immediately when vehicle moves and should continue to run at speeds which vary directly with the vehicles field speed; the conveyor should speed up as truck speed increases and slow down as truck speed reduces. Spinner speed should remain constant when engine speed is above minimum operating range. P l e a s e G i v e P a r t N o . , D e s c r i p t i o n a n d U n i t S e r i a l N o . 97373-A 34 Page Rev. A HIGHWAY EQUIPMENT COMPANY GENERAL OPERATING PROCEDURES 1. Make sure unit has been properly serviced and is in good operating condition. Field test unit prior to first use, prior to each spreading season's use, and following overhaul or repair work, to verify that all components and systems are functioning properly. See “Field Testing” section. 2. Fill body with material to be spread. 3. Drive to location where spreading is to be done. 4. Adjust spinner control valve for material being applied to give spread width desired. See “G4 Spread Pattern” section. 5. Adjust spinner to give spread pattern desired. See “G4 Spread Pattern” section. 6. Set feedgate opening to obtain yield desired. Measure actual material depth. 7. Make sure shut-off valve on hydraulic reservoir is fully opened. 8. Turn on power to controller and set program to desired values. 9. Engage pump drive PTO. CAUTION Drive only at speeds which permit good control of vehicle! 10. Drive at speeds that allow engine to turn at proper RPM. Higher transmission gears may be used with speeds to 30 MPH. If lower speeds must be used, shift transmission into lower gears so engine speed can be maintained to allow adequate hydraulic oil delivery from pump. IMPORTANT! CHANGE THE HYDRAULIC OIL FILTER AFTER THE FIRST WEEK (OR NOT MORE THAN 50 HOURS) OF OPERATION ON A UNIT. P l e a s e G i v e P a r t N o . , D e s c r i p t i o n a n d U n i t S e r i a l N o . 97373-A 35 Page Rev. A HIGHWAY EQUIPMENT COMPANY LUBRICATION & MAINTENANCE PREVENTATIVE MAINTENANCE PAYS! The handling and spreading of commercial fertilizers is a most severe operation with respect to metal corrosion. Unless a frequent, periodic preventative maintenance program is established, rapid damage to spreading equipment can occur. Proper cleaning, lubrication and maintenance will give you longer life, more satisfactory service and more economical use of your equipment. WARNING Shut off all power and allow all moving parts to come to rest before performing any maintenance operation. HYDRAULIC SYSTEM Proper oil in the hydraulic system is one of the most important factors for satisfactory operation. Utmost cleanliness in handling the oil cannot be stressed enough. Keep hydraulic oil in original closed containers, clean top of container before opening and pouring, and handle in extremely clean measures and funnels. Refer to “Lubricant and Hydraulic Oil Specifications” section of the manual for selection of the proper hydraulic fluid for use in the hydraulic system. Service Schedule 1. Check hydraulic oil daily by means of sight gauge on reservoir. Add oil if required. Periodically inspect hoses and fittings for leaks. WARNING DO NOT check leaks with hands while system is operating as high pressure leaks are very dangerous! DO NOT check for leaks adjacent to moving parts while system is operating as there may be danger of entanglement! 2. Change hydraulic oil filter after first week (or not more than 50 hours) of operation on a unit. 3. After first filter change, replace filter when indicator reaches Red Zone. 4. Drain reservoir through drain plug (not through suction outlet), flush, and refill and change filter element annually. Oil and filter should also be changed whenever oil shows any signs of breaking down under continued high-pressure operation. Discoloration of oil is one sign of breakdown. P l e a s e G i v e P a r t N o . , D e s c r i p t i o n a n d U n i t S e r i a l N o . 97373-A 36 Page Rev. A HIGHWAY EQUIPMENT COMPANY LUBRICATION & MAINTENANCE CONTINUED HYDRAULIC HOSE Hose assemblies in operation should be inspected frequently for leakage, kinking, abrasion, corrosion or any other signs of wear or damage. Worn or damaged hose assemblies should be replaced immediately. Clean Clean assembly by blowing out with clean compressed air. Assemblies may be rinsed out with mineral spirits if the tube stock is compatible with oil, otherwise hot water at 150 degrees F maximum may be used. Inspect Examine hose assembly internally for cut or bulged tube, obstructions, and cleanliness. For segment style fittings, be sure that the hose butts up against the nipple shoulder; band and retaining ring are properly set and tight, and segments are properly spaced. Check for proper gap between nut and socket or hex and socket. Nuts should swivel freely. Check the layline of the hose to be sure the assembly is not twisted. Cap the ends of the hose with plastic covers to keep clean. Test The hose assembly should be hydrostatically tested at twice the recommended working pressure of the hose. Test pressure should be held for not more than one minute and not less than 30 seconds. When test pressure is reached, visually inspect hose assembly for: 1. Any leaks or signs of weakness. 2. Any movement of the hose fitting in relation to the hose. Any of these defects are cause for rejection. Testing should be conducted in approved test stands with adequate guards to WARNING protect the operator. Storage and Handling Hose should be stored in a dark, dry atmosphere away from electrical equipment, and the temperature should not exceed 90° F. P l e a s e G i v e P a r t N o . , D e s c r i p t i o n a n d U n i t S e r i a l N o . 97373-A 37 Page Rev. A HIGHWAY EQUIPMENT COMPANY LUBRICATION & MAINTENANCE CONTINUED CONVEYOR CHAIN Hose down unit and remove any material build-up on sprockets and under chain. IMPORTANT! The conveyor will move away from the bottom panel if material accumulates under the conveyor or on the sprockets. The more material that accumulates, the closer the chain will come to the chain shields. If the conveyor should catch a chain shield, it could permanently damage the conveyor, the chain shields or the unit. Do not remove material while conveyor or spinner is running! Lubricate conveyor chain daily. Shut down spinner and run conveyor slowly to lubricate chain. Use a mixture of 75% fuel oil and 25% SAE 10 oil in a pressurized hand spray gun. Spray oil mixture between links of chain through openings provided at rear end of sill or from front outside body when clearance is adequate. After each unit washing, allow to dry, then lubricate. DANGER Stay out of body when conveyor is running. Stay clear of all moving parts. Entanglement of clothes, any part of your body or anything you have in your hands can cause serious injury. Do not use a bar, rod or hammer on conveyor while it is moving—if it gets caught it could cause injury! If a chain oiler is used, fill oiler reservoir daily with a mixture of 75% fuel oil and 25% SAE 10 oil. Before each filling of unit with material to be spread, open petcock and run conveyor until full length of chain has been oiled, then shut petcock. Proper chain tension is also a factor in chain and sprocket life (Figure 15). Measure from rear of unit forward to achieve proper chain tension. Make sure chain is tensioned equally on both sides. This adjustment is made on each side of the unit at the idler bearings. Chain Tension to be Measured from Rear of Sill – Proper Tension 36” to 40” Figure 9 - Adjusting Chain Tension Conveyor chains that are too tight will tend to stretch, causing excess sprocket wear and eventually breakage. Excess slack presents the possibility of chain catching on sub-frame parts. Bent or distorted chain bars will cause damage as well. Straighten or replace bent or distorted chain bars immediately. Please Give Part No., Description and Unit Serial No. 38 97373-A Page Rev. B HIGHWAY EQUIPMENT COMPANY LUBRICATION & MAINTENANCE CONTINUED #4 CONVEYOR BELT Standard belt for the #4 chain has a nylon fabric that is impervious to moisture, weathering or normal action except oil. • • Inspect belt fastener occasionally for wear or "raveling" of belt grip area. Make sure belt connecting pin is positioned correctly as shown in Figure 10. IMPORTANT! Pin must not rotate. If pin ends are not bent down and tight against lacing, the ends may cut into the chain shield sealers or belt wipers. BOTH PIN ENDS MUST BE BENT DOWN & TIGHT AGAINST ENDS OF LACING Figure 10 – Conveyor Belt Pin Installation #5 CONVEYOR BELT Maintenance The conveyor belt should be checked daily for proper tension and tracking. See Adjustment section. Do not be alarmed as sides of belt wear unless belt is out of track. The belt will continue to operate satisfactorily with up to 1” total worn from the sides. Inspect belt lacing frequently for wear or “raveling” of belt grip area and loosening hardware. Retighten loose nuts and peen end of lacing screw into slot of nut as required. Please Give Part No., Description and Unit Serial No. 39 97373-A Page Rev. B HIGHWAY EQUIPMENT COMPANY LUBRICATION & MAINTENANCE CONTINUED Adjustment 1. TENSION Belt tension should be just tight enough to prevent slippage—no tighter. If the “flats” on the conveyor drive pulley are visible through the belt, tension is high enough. 2. TRACKING Empty spreader to check tracking by doing the following: A. Make sure truck engine is shut off and move spinner control valve to “0” position. Start truck engine and engage pump drive PTO. Spinners should not turn. If they do, correct the problem before proceeding. WARNING Do not work near rotating spinners. Severe injury can result from contact with moving parts. B. Run truck engine, place controller in manual mode (see control manufacturer’s manual) and run conveyor at slow speed. Gradually increase speed until tracking is visual. CAUTION Use great care to avoid entanglement with any moving parts. A properly adjusted belt will either remain in a steady position centered on the pulley or more often will “wander” back and forth 1/4 to 1/2 inch across the pulley, but remain generally centered. The conveyor belt sides should not curl or scuff. Improper tracking is usually due to three basic causes. These problems and their respective solutions follow: PROBLEM 1: (Figure 11) Belt tracks to one side, contacts side of conveyor. Contact is more severe at the front and may not quite touch at the rear. SOLUTION: Tighten idler bearing at side in contact with belt. Make this adjustment one turn at a time. Operate conveyor 10 to 15 minutes at a high speed to allow belt to react to the adjustment. Repeat if necessary. Belt contacts this side Belt contacts this side Figure 11 Please Give Part No., Description and Unit Serial No. 40 97373-A Page Rev. B HIGHWAY EQUIPMENT COMPANY LUBRICATION & MAINTENANCE CONTINUED PROBLEM 2: (Figure 12) Belt contacts one side at front and contacts other side at rear. SOLUTION: If adjusting as in Problem 1 does not remedy the situation, adjustment of the drive pulley is necessary. Mark the position of the adjustment screw (RH side) on the side of the unit. Determine which illustration shows the problem to figure out which direction the drive shaft should be moved. Loosen the adjustment screw to move the shaft forward; tighten the screw to move the shaft rearward. NOTE: The illustration is exaggerated. Only move the adjustment screw 1/4 turn at a time after loosening the bolts holding the bearing. Usually, 1/64 to 1/32 inch adjustment is all that is necessary. Retighten bearing. Operate conveyor for 10 to 15 minutes at a high speed to allow belt to react to adjustment. The problem should change to Problem 1. Adjust as in Problem 1 to track belt properly. Belt contacts here Belt contacts here Belt contacts here Figure 12 PROBLEM 3: (Figure 13) Belt contacts side as in Problem 1, but contacts more heavily at a point approximately three feet from rear. SOLUTION: Realign snubber pulley. Note the point or side of contact from the illustration. This side of the snubber is too low. NOTE: This pulley moves up and down ONLY. Loosen belt and raise or lower as necessary. Loosen the two bolts holding the snubber bearing on the side to be adjusted after marking the old position. Move approximately 1/16 inch at a time and retighten. Retighten belt the exact number of turns previously loosened. Operate conveyor 10 to 15 minutes to allow belt to react to adjustment. Refer to Problem 1 and readjust. If readjustment does not compensate, repeat. Belt contacts this side, but most firmly at this point Snubber higher on this side Belt contacts this side, but most firmly at this point Figure 13 Please Give Part No., Description and Unit Serial No. 41 97373-A Page Rev. B HIGHWAY EQUIPMENT COMPANY LUBRICATION & MAINTENANCE CONTINUED If, after continued adjustment, the belt does not track properly, check the following: 1. Check for twisted spreader body. Shims must be placed between spreader cross tubes and the mounting surface to eliminate any twist in the body structure. 2. Check for crowned Idler Pulley by placing a straight edge on the pulley. If properly crowned, the straight edge will contact the center pulley leaving 1/16 inch gap between the straight edge and both pulley ends. Replace the pulley if crown is not present. 3. Check for lacing squareness by removing the belt. This should be done as a last resort. If the lacing is not square to the belt ends, contact your dealer for service. 4. Sight down the body under the belt shields. The only point which should come close to or slightly contact the belt, is the lowest point on the shield. If the belt contacts the shield firmly at any other point, tracking will be impossible and you should see your dealer immediately. Only your dealer can correct the situation. Shield The belt shields along each side of the belt inside the unit should be just contacting the belt when the belt is properly adjusted and the unit is empty (Figure 14). If a shield has clearance along its length, it can be moved down until it just contacts the belt by loosening the fastener bolts, allowing the shield to slide downward and tightening the bolts. If the shield is tending to cut into the belt along its full length, loosening the bolts and raising the shield until it just contacts the belt will correct the problem. If the shield cuts the belt at one or more points or if it gaps at one or more points, it should be replaced. BELT SHIELD ZERO CLEARANCE INSIDE HOPPER BELT Figure 14 - #5 Bottom IMPORTANT! Don’t lubricate the #5 belt. Use of lubricants will cause the belt to deteriorate and fail prematurely. Please Give Part No., Description and Unit Serial No. 42 97373-A Page Rev. B HIGHWAY EQUIPMENT COMPANY LUBRICATION & MAINTENANCE CONTINUED Removal & Replacement Tools and Equipment Required: 1. 1 1/2” Hex Wrench 2. 25 to 30 Feet of 1/4” to 3/8” Rope. 3. 3 or 4 Pieces of 2 x 4 Lumber about 3 Feet Long. 4. 10 Feet of 14 or 16 Gauge Soft Iron Wire. NOTE: Two people MUST be used for this procedure. Parts Required: See Parts Pages. Procedure: 1. Set spinner control valve at “0” position to stop spinners. 2. Remove both belt shields, clean thoroughly and repaint. 3. Adjust processor to Manual operation. Select a slow Manual Speed so tracking is visual. 4. Move the front idler adjustment bolts to extreme rear position. 5. Shut down spreader. Pull out splice pin to separate belt splice. 6. Insert pin into one side of belt splice. Attach a winch to the belt splice and remove belt. NOTE: If the splice pin cannot be removed, cut belt and remove belt by hand. 7. Using any suitable tool, remove any caked material from the drive pulley, snubber pulley, idler pulley and from inside the frame channels. Clean and repaint as required. 8. Thread OLD splice pin through one end of new belt splice. Connect wire to pin about 1/4” in from each side of the belt, forming a loop. 9. Thread the rope along the top of the belt channel, around the front idler pulley, over the snubber pulley, and under the drive pulley. CAUTION Make sure power is shut off before performing this threading operation. 10. Tie end of rope under drive pulley to wire loop. Wrap other end of rope once around drive pulley and out to rear. 11. Start conveyor drive so drive pulley turns slowly. One person should pull on rope while other feeds belt into unit from rear. Pull new belt under drive pulley, over snubber pulley, along frame channels, around front idler pulley and back to drive pulley. CAUTION Use extreme care to avoid entanglement! Someone must stay at controls to stop conveyor instantly if required. CAUTION Use extreme care to avoid entanglement! Stand well back from drive pulley. 12. Shut off all power and insert lumber under belt to support its weight as shown in Figure 14. P l e a s e G i v e P a r t N o . , D e s c r i p t i o n a n d U n i t S e r i a l N o . 97373-A 43 Page Rev. A HIGHWAY EQUIPMENT COMPANY LUBRICATION & MAINTENANCE CONTINUED 13. Insert a plastic tube in each splice and across the full width of the belt and pull the two ends together at the center of the rear face of the drive pulley. 14. Insert the splice pin (flexible, plastic covered). 15. Snug the belt up by tightening the idler pulley. 16. Tighten the belt until the edge of the belt is approximately 2” above the lower edge of the sill lower flange on each side. Remove lumber. 17. Adjust for proper tracking as outlined in the Belt Conveyor Adjustment section of this manual. Figure 14 – #5 Belt Installation CONVEYOR GEAR CASE Oil in a new unit should be drained after first two weeks (or not more than 100 hours) of operation and gear case should be thoroughly flushed with light oil. Refer to “Lubricant Specifications” section for proper grade oil. Refill gear case with one pint (.47 liters) of recommended lubricant. After initial change, oil should be changed every 2,000 hours of operation or annually, whichever occurs first. Check gear case oil level monthly. P l e a s e G i v e P a r t N o . , D e s c r i p t i o n a n d U n i t S e r i a l N o . 97373-A 44 Page Rev. A HIGHWAY EQUIPMENT COMPANY LUBRICATION & MAINTENANCE CONTINUED LUBRICATION OF BEARINGS Grease in a bearing acts to prevent excessive wear of parts, protects ball races and balls from corrosion and aids in preventing excessive heat within the bearing. It is very important the grease maintains its proper consistency during operation. It must not be fluid and it must not channel. Lubricate bearings by pumping grease slowly until it forms a slight bead around the seals. This bead indicates adequate lubrication and also provides additional protection against the entrance of dirt. Make sure all fittings are thoroughly cleaned before grease is injected. Points to be lubricated by means of a grease gun have standard grease fittings. CLEAN UP IMPORTANT! High pressure wash can inject water and/or fertilizer into control components, causing damage. Use caution when cleaning these areas. Thoroughly wash unit every two to three days during the operating season to maintain minimal maintenance operation. Hose unit down under pressure to free all sticky and frozen material. It is important the unit be thoroughly cleaned at the end of each operating season. All lubrication and maintenance instructions should be closely followed. Repaint worn spots to prevent formation of rust. FASTENERS Tighten all screw fasteners to recommended torque’s after first week of operation and annually thereafter. If loose fasteners are found at any time, tighten to the recommended torque. Replace any lost or damaged fasteners or other parts immediately. Check body mounting hardware every week. P l e a s e G i v e P a r t N o . , D e s c r i p t i o n a n d U n i t S e r i a l N o . 97373-A 45 Page Rev. A HIGHWAY EQUIPMENT COMPANY LUBRICANT & HYDRAULIC OIL SPECIFICATIONS The lubricant distributor and/or supplier is to be held responsible for results obtained from their products. Procure lubricants from distributors and/or suppliers of unquestionable integrity, supplying known and tested products. Do not jeopardize your equipment with inferior lubricants. No specific brands of oil are recommended. Use only products qualified under the following oil viscosity specifications and classification recommended by reputable oil companies. IMPORTANT! HYDRAULIC SYSTEM Use premium quality lubricants with 100-200 SUS or 20-43 cSt viscosity at operating temperatures. The hydraulic fluid’s specifications in the table below are for normal operating conditions. Extreme environments or dirty conditions may require the use of different oils. Consult your New Leader dealer or the Product Support Department at Highway Equipment Company for systems operating outside normal conditions. Ideal Oil Operating Temperature Recommended Premium Lubricant Lubricant Specifications: Viscosity Index Viscosity at 40°C, cst Viscosity at 100°C, cst Acceptable Fluid Example 140 - 190° F Automotive Engine Oil Greater than 130 Less than 115 Greater than 14 Valvoline All-Fleet Plus SAE 15W-40 GEAR CASE LUBRICANT Lubricate these assemblies with non-corrosive type SAE 90 E.P. (extreme pressure) gear oil conforming to MIL-L2105 B multi-purpose gear lubricating oil requirements (API Service GL 4) with ambient temperatures from 40° to 100° F. Ambient temperatures below 40° F. require SAE 80 E.P. lubricant; above 100° F. use SAE 140 E.P. grade oil. GREASE GUN LUBRICANT Use a waterproof ball and roller bearing lithium base lubricant with a minimum melting point of 300° F. This lubricant should have a viscosity which assures easy handling in the pressure gun at prevailing atmospheric temperatures. The grease should conform to NLGI No. 2 consistency. CHAIN OILER LUBRICANT Use a mixture of 75% No. 1 or No. 2 diesel fuel or kerosene mixed with 25% SAE 10 engine oil. IMPORTANT! Don’t lubricate the #5 belt. Use of lubricants will cause the belt to deteriorate and fail prematurely. P l e a s e G i v e P a r t N o . , D e s c r i p t i o n a n d U n i t S e r i a l N o . 97373-A 46 Page Rev. A HIGHWAY EQUIPMENT COMPANY LUBRICATION & MAINTENANCE CHART WARNING Shut off all power and allow all moving parts to come to a rest before performing any maintenance operation. The spreader should be regularly lubricated with the lubricants recommended in this manual in accordance with the following chart: LOCATION PLACES Transmission PTO Slip Yoke 1 Universal Joint 2 Hydraulic System Reservoir 1 Filter 1 Conveyor - All Except #5 Conveyor Dragshaft Bearings 2 Idler Shaft Bearings 2 Idler Adjusting Screws 2 Chain 2 Strands Chain Oiler (If so equipped) 1 Conveyor - #5 Conveyor Dragshaft Bearings 2 Idler Shaft Bearings 2 Snubber Pulley Bearings 2 Idler Adjusting Screws 2 Conveyor Gear Case 1 Feedgate Jack Assembly Gears 1 Tube 1 Spinner Grease Zerks – Jack & Shaft 4 METHOD FREQUENCY Grease Gun Grease Gun Weekly Monthly Check Daily; Change Annually Check Daily; Change when indicator is red Grease Gun Grease Gun Hand Grease Spray Oil Oil Mixture Weekly Daily Weekly Daily Daily Grease Gun Grease Gun Grease Gun Hand Grease Weekly Weekly Weekly Monthly Gear Box Oil Check Monthly, Change Annually Hand Grease Grease Gun Annually Monthly Grease Gun Weekly NOTE: Unusual conditions, such as excessive dust, temperature extremes or excessive moisture may require more frequent lubrication of specific parts. * See Lubricant and Hydraulic Oil Specifications for types of lubricants and oil to be used. Please Give Part No., Description and Unit Serial No. 47 97373-A Page Rev. B HIGHWAY EQUIPMENT COMPANY TROUBLESHOOTING Symptom: Spinner motors do not turn when spinner control valve is in running position or conveyor does not run in manual mode. See reasons 1, 2, 3, 4, 5, 7, 8 & 9. Symptom: Spinners turn but conveyor does not run in manual mode. See reasons 6, 8, 9, 10 & 11. Symptom: Console in operation mode, but the conveyor does not move when the machine moves. See reasons 6, 8, 9, 10 & 11. Symptom: Spinner speed does not stay constant. See reasons 4, 5, 12, 13 & 14. Symptom: Spinners run with cab control in “Off” position. See reason 15. Symptom: Hydraulic oil overheats (200° F. or hotter). See reasons 1, 4, 6, 16, 17, 18 & 19. Symptom: Light flashes and buzzer sounds intermittently. Conveyor runs in jerks. See reasons 20, 21, 22 & 27. Symptom: Conveyor does not run with cab control “On”, PTO engaged and vehicle driving forward. See reasons 23, 24 & 25. Symptom: Conveyor runs when control switch in cab is in “Off” position. See reasons 16 & 26. Symptom: Conveyor starts to run when PTO is engaged. See reasons 16, 23, 26 & 27. Symptom: Controller application or programming. Refer to the control manual’s Troubleshooting section. P l e a s e G i v e P a r t N o . , D e s c r i p t i o n a n d U n i t S e r i a l N o . 97373-A 48 Page Rev. A HIGHWAY EQUIPMENT COMPANY TROUBLESHOOTING CONTINUED Reason: Correction: 1. Hydraulic oil level low. 2. Shut-Off valve on oil reservoir not open. 3. Hydraulic Pump is not rotating. Add hydraulic oil to reservoir up to “Full” mark. Open valve fully by turning counter-clockwise until it stops. 1. PTO is disengaged. Shift into engagement. 2. Drive line has failed. Repair or replace. 3. Key in pump shaft has failed. Replace key. 4. U-joint pin or key has failed. Replace pin or key. In-line relief valve pressure should be 3100 PSI. Set spinner control valve to “0”. Disconnect pressure line, coming from rear port on spinner control valve, at control. Reconnect this line to flow meter inlet port. Disconnect return line from control where it joins the return tube running to the reservoir. Connect flow meter load valve to return tube. Open load valve fully, run truck engine at about 2750 RPM. Slowly close load valve until pressure reaches 31000 PSI. If this pressure cannot be reached, set up relief valve adjustment until gauge reads 3100 PSI. CAUTION: Do not set pressure above 3100 PSI. With flow meter arranged to check relief valve setting above, open load valve fully. Read flow rate with truck engine running at 2750 RPM. Close load valve until pressure reads 1000 PSI. Flow rate should not decrease more than three (3) GPM. If flow loss is greater, replace pump. Using relief valve testing adapter and flow meter, test valve for opening pressure. If not 2000 PSI, replace relief valve. Free up. If not possible, replace as required. Free up conveyor. Replace motor. 4. In-line relief valve set too low. 5. Worn pump. 6. Mark Series relief valve open to return line. 7. Jammed or frozen spinner motors. 8. Jammed or frozen conveyor. 9. Jammed or frozen conveyor hydraulic motor. 10. Conveyor hydraulic motor shaft key sheared. 11. Mark Series control gears stripped or unpinned. 12. Pump speed is not adequate to provide sufficient flow to maintain spinner speed. 13. Insufficient hydraulic oil flow at normal driving speeds. Replace key. Remove Mark series service hole cover. With hydraulics off, when control is run in manual mode the idler arm should rotate freely. If it doesn’t, examine for stripped gears or unpinned gears. Replace as required. Check also for jammed valve spool. If jammed, replace control unit. Increase engine speed. Check PTO-Pump matching. If insufficient flow results, install higher percent PTO or use larger pump (Special). P l e a s e G i v e P a r t N o . , D e s c r i p t i o n a n d U n i t S e r i a l N o . 97373-A 49 Page Rev. A HIGHWAY EQUIPMENT COMPANY TROUBLESHOOTING CONTINUED Reason: Correction: 14. Defective spinner control valve. Replace valve metering spool spring. If no improvement, replace spinner control valve. None required. This is a normal condition. To stop spinners, set spinner control valve at “O” position, disconnect PTO, or shut off vehicle engine. 15. Cab control is for conveyor only— spinners run anytime vehicle engine is running, PTO is engaged and spinner control valve is in a running position. 16. Excessive oil is being pumped. 1. PTO percentage too high. Change PTO to smaller percentage or use smaller pump. 2. Pump is too large. Do not exceed 30 GPM pumping rate. Change to smaller pump or use smaller percentage PTO. 3. Pressure drop in control valve is sufficient to run lightly 17. Worn motor (spinner or conveyor). 18. Improper or deteriorated hydraulic oil. 19. Pinched or obstructed hose, hydraulic line or fitting. 20. Driving too fast for application rate. 21. Synco-Matic Mark series cog-belt drive has failed. 22. Synco-Matic Mark series control gear has failed. 23. Defective radar. 24. Defective gear train in Mark series valve. 25. Locked spool in Mark series valve. 26. Control processor’s power is in “Off” position. 27. Involves the controller. loaded conveyor motor. Shut off pump drive by disengaging PTO shaft. Motor heats up at an excessive rate (check for this heating when system is cold). Replace motor. Replace hydraulic oil with proper specification oil and replace filter. Clear obstruction or replace part. Straighten kinked hoses. Shift truck transmission to a lower gear. Will not normally occur if within maximum application rates. Cog-belt is broken or disengaged. Reset or replace. Cog drive pulleys may be unpinned—re-pin to shaft. Examine gears for stripping or being disconnected. Replace. Check speed on console. Repair or replace radar as required. Remove cover from Mark series control valve. Idler arm should rotate around connection gear. If not, replace gear train. Check as for defective gear train above. If arm does not rotate, check for stripped gears in gear train. Replace gears if stripped. With new gears, the idler gears will not turn with hand pressure, check for locked valve spool. Replace Mark series valve if spool is jammed. Turn on control processor. Refer to control manual. P l e a s e G i v e P a r t N o . , D e s c r i p t i o n a n d U n i t S e r i a l N o . 97373-A 50 Page Rev. A HIGHWAY EQUIPMENT COMPANY STANDARD TORQUES NATIONAL COARSE (NC) CAP SCREWS CAP SCREW GRADE IDENTIFICATION - MARKINGS ON HEAD SAE GRADE 2 NO MARKINGS SAE GRADE 5 THREE MARKS - 120 DEGREES APART SAE GRADE 8 SIX MARKS - 60 DEGREES APART USE GRADE 2 TORQUES FOR STAINLESS STEEL FASTENERS AND CARRIAGE BOLTS. TORQUE - FOOT-POUNDS CAP SCREW GRADE 2 GRADE 5 GRADE 8 SIZE DRY LUBE DRY LUBE DRY LUBE 1/4” 5 4 8 6 12 9 5/16” 11 8 17 13 25 18 3/8” 20 15 30 23 45 35 7/16” 30 24 50 35 70 55 1/2” 50 35 75 55 110 80 9/16” 65 50 110 80 150 110 5/8” 90 70 150 110 220 170 3/4” 100 120 260 200 380 280 7/8” 140 110 400 300 600 460 1” 220 160 580 440 900 650 P l e a s e G i v e P a r t N o . , D e s c r i p t i o n a n d U n i t S e r i a l N o . 97373-A 51 Page Rev. A HIGHWAY EQUIPMENT COMPANY INSTRUCTIONS FOR ORDERING PARTS Order from the AUTHORIZED DEALER in your area. 1. Always give the pertinent model and serial number of the spreader. 2. Give part name, part number and the quantity required. 3. Give the correct street address to where the parts are to be shipped, and the carrier if there is a preference. Unless claims for shortages or errors are made immediately upon receipt of goods they will not be considered. Any part returns should be directed through the dealer from which they were purchased. When broken goods are received, a full description of the damage should be made by the carrier agent on the freight bill. If this description is insisted upon, full damage can always be collected from the transportation company. No responsibility is assumed for delay or damage to merchandise while in transit. Our responsibility ceases upon delivery of shipment to the transportation company from whom a receipt is received showing that shipment was in good condition when delivered to them. Therefore, claims (if any) should be filed with the transportation company and not with Highway Equipment Company. If your claims are not being handled (by the transportation company) to your satisfaction, please call the Parts Manager at Highway Equipment Company (319) 363-8281 for assistance. In the parts list the following symbols and abbreviations stand for: * - Not Shown AR – As Required CS – Carbon Steel SS – Stainless Steel The parts listed under the different steel types (CS and 304 SS) are for that type of unit and do not necessarily mean the part is made of that type of steel. P l e a s e G i v e P a r t N o . , D e s c r i p t i o n a n d U n i t S e r i a l N o . 97373-A 52 Page Rev. A HIGHWAY EQUIPMENT COMPANY MOUNTING ANGLE ITEM 1 2 3 4 5 6 7 8 9 10 PART NO. 31856 20131 20695 20680 81847 81000 81848 41762 20195 20697 DESCRIPTION Angle – Mounting Cap Screw - 1/2 x 2 Washer – Flat 1/2 Washer – Flat 1/2 Angle – Mounting Spring Mounting – Bar Nut – Lock 5/8 Cap Screw – 5/8 x 6 1/2 Washer – Flat 5/8 QTY 4 12 12 12 2 4 2 4 4 4 P l e a s e G i v e P a r t N o . , D e s c r i p t i o n a n d U n i t S e r i a l N o . 97373-A 53 Page Rev. A HIGHWAY EQUIPMENT COMPANY FEEDGATE AND JACK 4,5 10,11 7 6 12,13,14 1 2 8,9 3 JACK P l e a s e G i v e P a r t N o . , D e s c r i p t i o n a n d U n i t S e r i a l N o . 97373-A 54 Page Rev. A HIGHWAY EQUIPMENT COMPANY FEEDGATE AND JACK CONTINUED ITEM 1 2 3 4 5 6 7 A B C D E F G 8 9 10 11 12 13 14 PART NO. CS 2885 2884 NA 98508 85002 20918 14382 40704 84210 84211 84212 84213 84214 84215 84216 20074 20678 20138 20680 20006 20710 20642 * 84221 409 SS 36384 36384 36385 98509 85002 20918 14382 40704 84210 84211 84212 84213 84214 84215 84216 36296 72054 80798 39016 40750 36418 36412 84221 DESCRIPTION 304 SS 36384 36384 36385 98510 85002 20918 14382 40704 84210 84211 84212 84213 84214 84215 84216 36296 72054 80798 39016 40750 36418 36412 84221 Slide - Feedgate RH Slide - Feedgate LH Guide - Feedgate Feedgate Weldment U-Joint Pin - Roll Handle Jack Washer - Thrust Bearing - Thrust Washer Bushing Gear - Miter Pin - Groove Pin - Roll Cap Screw - 3/8 x 2 3/4 Nut - Lock 3/8 Cap Screw - 1/2 x 3 3/4 Nut - Hex 1/2 Cap Screw - 1/4 x 1 1/4 Washer - Lock 1/4 Nut - Hex 1/4 Jack Service Kit, Includes A – G QTY 1 1 2 1 1 2 1 1 1 1 1 2 2 1 1 1 1 1 1 6 6 6 P l e a s e G i v e P a r t N o . , D e s c r i p t i o n a n d U n i t S e r i a l N o . 97373-A 55 Page Rev. A HIGHWAY EQUIPMENT COMPANY #5 BOTTOM ITEM NOTE: 1 2 3 4 5 6 7 8 9 PART NO. DESCRIPTION CS SS 53982 53982 #5 Belt Assembly – 10’ Unit 53983 53983 #5 Belt Assembly – 11’ Unit 53984 53984 #5 Belt Assembly – 12’ Unit 55454 55454 #5 Belt Assembly – 12’6” Unit 53985 53985 #5 Belt Assembly – 13’ Unit The above assemblies include Items 3 and 19. 6465 6465 Bearing 32468 32468 Bearing 39597 39597 Belt Only 10’ Unit 39598 39598 Belt Only 11’ Unit 39599 39599 Belt Only 12’ Unit Belt Only 12’6” Unit 39600 39600 Belt Only 13’ Unit 39572 43793 Pulley – Drive, Use with Single Pinion 54736 54737 Pulley – Drive, Use with Dual Pinion 33875 36366 Pulley - Snub 81343 81344 Pulley - Idler 81345 81345 Spacer - Pipe 81354 81354 Screw - Set, 3” 36417 36417 Nut - Hex, 5/8 QTY 2 2 1 1 1 1 1 1 1 1 2 1 1 P l e a s e G i v e P a r t N o . , D e s c r i p t i o n a n d U n i t S e r i a l N o . 97373-A 56 Page Rev. A HIGHWAY EQUIPMENT COMPANY #5 BOTTOM CONTINUED ITEM 10 11 12 13 14 15 16 17 18 19 PART NO. CS SS 20319 36409 20712 36420 20644 36414 36507 36507 7895 7895 39110 39110 36508 36508 22511 22511 30725 30725 20925 20925 53995 53995 53992 53992 53993 53993 53994 53994 33884-23 33884-23 39603 39603 39604-23 39604-23 DESCRIPTION Bolt – Carriage 3/8 x 1 1/4 Washer – Lock 3/8 Nut – Hex 3/8 Take-up Assembly, Includes Items 13–18 Bracket – Take-up Weldment Nut Weldment Chain Tightener Weldment Bearing – Take-up Collar – Set Pin – Roll Kit – Belt Splicing, Consisting of: Fastener - Hinge 1 Bolt Fastener - Hinge 2 Bolt Fastener - Hinge 3 Bolt Tape - Belt Stiffener Pin - Hinge Tube - Sealer QTY 12 12 12 2 2 2 2 2 2 2 1 4 2 4 2 1 2 P l e a s e G i v e P a r t N o . , D e s c r i p t i o n a n d U n i t S e r i a l N o . 97373-A 57 Page Rev. A HIGHWAY EQUIPMENT COMPANY CONVEYOR IDLER 12,13,14 12,13,14 1 7,10 11 9 3 2 8 4 5 6 ITEM 1 2 3 4 5 6 7 8 9 10 11 12 13 14 PART NO. CS 36508 7895 39110 20925 30725 22511 97051 48279 2135 20743 36509 20318 20712 20644 SS 36508 7895 39110 20925 30725 22511 97051 48279 2135 20743 36509 36408 36420 36414 DESCRIPTION Chain Tightener Weldment Take-up Weldment Nut Weldment Pin – Roll 1/4 x 1 1/2 Collar – Set 1” Bearing – Take-up Sprocket – Idler Shaft – Idler Key – Square Screw – Set 5/16 x 3/8 Nut – Hex 1-8NC Bolt – Carriage 3/8 x 1 Washer – Lock 3/8 Nut – Hex 3/8 QTY 2 2 2 2 2 2 2 1 2 4 2 12 12 12 P l e a s e G i v e P a r t N o . , D e s c r i p t i o n a n d U n i t S e r i a l N o . 97373-A 58 Page Rev. A HIGHWAY EQUIPMENT COMPANY CONVEYOR DRIVE 13,14 6 10 11,12 3,4,5 1 3,4,5 7,8,9 2 1 7,8,9 2 6 15,16 ITEM 1 2 3 4 5 6 7 8 9 10 11 12 13 14 15 16 PART NO. CS 77899 98090 6465 88276 20743 6131 82882 20068 20712 20644 82550 20833 2716 20128 20680 37010 DESCRIPTION SS 77899 98090 6465 88276 20743 6131 82885 36399 36420 36414 82552 20833 2716 20128 20680 37010 Shaft – Drive Single Pinion Shaft – Drive Dual Pinion Bearing Sprocket Screw – Set 5/16 x 3/8 Key – Square 1/2 x 1 1/2 Guide – Bearing Cap Screw - 3/8 x 1 1/4 Washer – Lock 3/8 Nut – Hex 3/8 Bracket - Torque Arm LH Pin – Cotter 1/4 x 1 1/2 Washer – Flat 3/4 Cap Screw - 1/2 x 1 1/4 Nut – Lock 1/2 Key – Square 1/2 x 1 1/2 Gear Case Assembly – Refer to “Control Hydraulics” QTY 1 1 2 2 4 2 4 8 8 8 1 1 2 2 2 2 P l e a s e G i v e P a r t N o . , D e s c r i p t i o n a n d U n i t S e r i a l N o . 97373-A 59 Page Rev. A HIGHWAY EQUIPMENT COMPANY ENCODER 3 2 NOTE: #2, #3 and #4 Conveyors only. ITEM PART NO. 1 2 3 88247 56263 86772 86772-X1 1 DESCRIPTION Bracket – Rear Shaft Sleeve – Rate Sensor Encoder – 180 with Hardware Encoder – 360 with Hardware QTY 1 1 1 1 P l e a s e G i v e P a r t N o . , D e s c r i p t i o n a n d U n i t S e r i a l N o . 97373-A 60 Page Rev. A HIGHWAY EQUIPMENT COMPANY CONVEYOR CHAIN OILER Front View 11,12,13 3 4 10 14 1 5 7 2 8 9 5 14 14 14 6 ITEM 1 2 3 4 5 6 7 8 9 10 11 12 13 14 PART NO. 98052 98051 82917 21990 97802 97806 97801 97803 6006 34129 21980 36393 36418 36412 82920 DESCRIPTION Oiler – Assembly Tank – Weldment Oiler Valve – Shut-off Elbow – Street 45° Connector – Male Connector – Male Tee – Male Branch Swivel Nut- Lock Brass 1/4 Elbow – 90° Grommet – Rubber Cap – Vented Cap Screw – 1/4 x 3/4 SS Washer – Lock 1/4 SS Nut – Hex – 1/4 SS Tubing – 1/4 QTY 1 1 1 2 2 1 2 1 1 1 4 4 4 4.5 P l e a s e G i v e P a r t N o . , D e s c r i p t i o n a n d U n i t S e r i a l N o . 97373-A 61 Page Rev. A HIGHWAY EQUIPMENT COMPANY PINTLE CHAIN CONVEYOR 1 1 5 4 5 2 3 2 5 4 4 #2 – Cross bars every other link ITEM 1 2 3 4 5 DESCRIPTION #3 81884 81885 81886 81887 81888 81889 81890 81891 36699 36697 20817 36697 20817 5 #3 – Cross bars every link PART NO. #2 81869 81870 81871 81872 81873 81874 81875 81876 36699 4 Chain – Assembly 10’ Unit 11’ Unit 12’ Unit 12’6” Unit 13’ Unit 14’ Unit 15’ Unit 16’ Unit Link – Pintle Chain Crossbar Weldment Pin – Pintle Chain Pin – Cotter QTY 1 1 1 1 1 1 1 1 AR AR AR AR P l e a s e G i v e P a r t N o . , D e s c r i p t i o n a n d U n i t S e r i a l N o . 97373-A 62 Page Rev. A HIGHWAY EQUIPMENT COMPANY CONVEYOR CHAIN ITEM PART NO. 1 2 3 #4 BOC 97067 97068 97069 97070 97071 97072 97073 97074 81403 73317-X1 4 5 6 7 8 36697 20817 36699 6251 6245 DESCRIPTION Chain – Conveyor Assembly 10’ Unit 11’ Unit 12’ Unit 12’6” Unit 13’ Unit 14’ Unit 15’ Unit 16’ Unit Crossbar – Weldment with Rivet Holes Kit – Splicer Lacing Strips 23” Pin - Connecting Staples Pin – Pintle Chain Pin – Cotter Link – Pintle Chain Belt – Conveyor (Specify Unit Length) Rivet QTY 1 1 1 1 1 1 1 1 AR 1 2 1 AR AR AR AR AR AR P l e a s e G i v e P a r t N o . , D e s c r i p t i o n a n d U n i t S e r i a l N o . 97373-A 63 Page Rev. A HIGHWAY EQUIPMENT COMPANY CHAIN SHIELDS B A C END VIEW ITEM PART NO. CS 1 409 SS DESCRIPTION QTY 304 SS 97713-AC 97713-AD 97715-AA 97714 97715-AB 97715-AC 97715-AD 97715-AE 97730-AC 97730-AD 97732-AA 97716 97732-AB 97732-AC 97732-AD 97732-AE 97747-AC 97747-AD 97749-AA 97720 97749-AB 97749-AC 97749-AD 97749-AE 97713-AG 97713-AH 97715-AF 97731 97715-AG 97715-AH 97715-AI 97715-AJ 97730-AG 97730-AH 97732-AF 97733 97732-AG 97732-AH 97732-AI 97732-AJ 97747-AG 97747-AH 97749-AF 97737 97749-AG 97749-AH 97749-AI 97749-AJ Chain Shield – RH #2 & #3 Chain 10’ Unit 11’ Unit 12’ Unit 12’6” Unit 13’ Unit 14’ Unit 15’ Unit 16’ Unit Chain Shield – LH #2 & #3 Chain 10’ Unit 11’ Unit 12’ Unit 12’6” Unit 13’ Unit 14’ Unit 15’ Unit 16’ Unit 1 1 1 1 1 1 1 1 1 1 1 1 1 1 1 1 P l e a s e G i v e P a r t N o . , D e s c r i p t i o n a n d U n i t S e r i a l N o . 97373-A 64 Page Rev. A HIGHWAY EQUIPMENT COMPANY CHAIN SHIELDS CONTINUED ITEM PART NO. DESCRIPTION CS 409 SS 304 SS 97815 97816 97817 97873 97818 97819 97820 97821 97833 97834 97835 97874 97836 97837 97838 97839 97851 97852 97853 97875 97854 97855 97856 97857 97824 97825 97826 97876 97827 97828 97829 97830 20624 88931 7687 97842 97843 97844 97877 97845 97846 97847 97848 56258 88931 7687 97860 97861 97862 97878 97863 97864 97865 97866 56258 88931 7687 20318 20712 20644 71829 36420 36414 71829 36420 36414 2 A B C 3 4 5 Chain Shield – RH #4 BOC 10’ Unit 11’ Unit 12’ Unit 12’6” Unit 13’ Unit 14’ Unit 15’ Unit 16’ Unit Chain Shield – LH #4 BOC 10’ Unit 11’ Unit 12’ Unit 12’6” Unit 13’ Unit 14’ Unit 15’ Unit 16’ Unit Screw – Truss Head 1/4 x 1/2 Nut – Tee 1/4 x 1/4 Sealer - Belt, #4 BOC Shield (Specify Unit Length) Bolt – Carriage 3/8 x 1 Washer – Lock 3/8 Nut – Hex 3/8 QTY 1 1 1 1 1 1 1 1 1 1 1 1 1 1 1 1 AR AR AR AR AR AR P l e a s e G i v e P a r t N o . , D e s c r i p t i o n a n d U n i t S e r i a l N o . 97373-A 65 Page Rev. A HIGHWAY EQUIPMENT COMPANY FRONT WIPER 2 ITEM 1 2 3 4 4 1 3 PART NO. CS 39426 39408 20583 20642 409 39426 43605 32466 36412 DESCRIPTION 304 39426 54230 32446 36412 Belt – Front Wiper Retainer – Front Wiper Belt Screw – Truss 1/4 x 3/4 Nut – Hex 1/4 QTY 1 1 5 5 P l e a s e G i v e P a r t N o . , D e s c r i p t i o n a n d U n i t S e r i a l N o . 97373-A 66 Page Rev. A HIGHWAY EQUIPMENT COMPANY REAR WIPER - #2 & #3 CONVEYORS 4,5 1 2 3 6,7,8 5,10 3 9 11,12,13 1 BOTTOM VIEW DETAIL ITEM 1 2 3 4 5 9 7 8 9 10 11 12 13 PART NO. CS 98083 96741 98049 98000 3735 20617 88931 20067 20712 20644 96743 56258 32446 36418 36412 DESCRIPTION SS 98084 96741 98050 98000 3735 56400 88931 36398 36420 36414 96743 56258 32446 36418 36412 Rear Lip Group Rear Wiper Group Lip – Weldment Rear Sealer – Sprocket Wiper – Belt Rear Screw – Flat Head 1/4 x 1/2 Nut – Tee 1/2 Cap Screw – 3/8 x 1 Washer - Lock 3/8 Nut - Hex 3/8 Plate – Wiper Belt Screw – Truss Head 1/4 x 1/2 Screw – Truss Head 1/4 x 3/4 Washer – Lock 1/4 Nut – Hex 1/4 QTY 1 2 2 11 16 5 5 5 1 5 2 2 2 P l e a s e G i v e P a r t N o . , D e s c r i p t i o n a n d U n i t S e r i a l N o . 97373-A 67 Page Rev. B HIGHWAY EQUIPMENT COMPANY FENDERS & MUDFLAPS – TRUCK & SEMI-FLOAT TIRES ITEM 1 PART NO. DESCRIPTION CS 81416 81417 81418 81419 81420 81421 81422 409 SS 81441 81442 81443 81444 81445 81446 81447 304 SS 81464 81465 81466 81467 81468 81469 81470 81487 81488 81489 81490 81491 81492 81493 81512 81513 81514 81515 81516 81517 81518 81535 81536 81537 81538 81539 81540 81541 Fender – Truck Tires for: 10’ Unit 11’ Unit 12’ Unit 13’ Unit 14’ Unit 15’ Unit 16’ Unit Fender – Semi-Float Tires for: 10’ Unit 11’ Unit 12’ Unit 13’ Unit 14’ Unit 15’ Unit 16’ Unit QTY 2 2 2 2 2 2 2 2 2 2 2 2 2 2 P l e a s e G i v e P a r t N o . , D e s c r i p t i o n a n d U n i t S e r i a l N o . 97373-A 68 Page Rev. A HIGHWAY EQUIPMENT COMPANY FENDERS & MUDFLAPS – TRUCK & SEMI-FLOAT TIRES CONTINUED ITEM 2 3 5 6 7 8 9 10 11 12 13 PART NO. CS 83124 46445 81428 83021 81499 46434 71930 46435 71931 20318 20693 20712 20644 7793 20067 36844 409 SS 83124 46445 81428 83021 81499 71900 71990 71901 71991 36408 36425 36420 36414 7793 36398 36844 DESCRIPTION 304 SS 83124 46445 81428 83021 81499 71872 71960 71873 71961 36408 36425 36420 36414 7793 36398 36844 Material - Non-skid Inches Angle – Mounting Angle – Mounting Long Angle – Mounting for Semi Angle – Mounting Long for Semi Bracket – Mudflap RH Bracket – Mudflap RH for Semi Bracket – Mudflap LH Bracket – Mudflap LH for Semi Bolt - Carriage, 3/8 x 1 Washer - Flat, 3/8 Washer - Lock Nut - Hex, 3/8 Mudflap - NEW LEADER, Truck only Cap Screw - 3/8 x 1 Rod - Mudflap QTY AR AR AR AR AR 1 1 1 1 AR AR AR AR 2 12 AR P l e a s e G i v e P a r t N o . , D e s c r i p t i o n a n d U n i t S e r i a l N o . 97373-A 69 Page Rev. A HIGHWAY EQUIPMENT COMPANY FENDERS – FULL & SUPER FLOATATION TIRES 1 8 4 3 5 11 9 10 3 6 2 3 7 ITEM PART NO. CS 409 SS DESCRIPTION QTY 304 SS 1 81554 81555 81556 81557 81558 81559 81560 81582 81583 81584 81585 81586 81587 81588 81606 81607 81608 81609 81610 81611 81612 87239 81555-X2 81556-X2 81557-X1 81558-X1 87245 87251 87237 81583-X1 81584-X1 81585-X1 87243 87247 87253 81606-X1 81607-X1 81608-X1 81609-X1 87241 87249 87255 Fender - RH, Full for: 10’ Unit 11’ Unit 12’ Unit 13’ Unit 14’ Unit 15’ Unit 16’ Unit Fender - RH, Super for: 10’ Unit 11’ Unit 12’ Unit 13’ Unit 14’ Unit 15’ Unit 16’ Unit 1 1 1 1 1 1 1 1 1 1 1 1 1 1 P l e a s e G i v e P a r t N o . , D e s c r i p t i o n a n d U n i t S e r i a l N o . 97373-A 70 Page Rev. A HIGHWAY EQUIPMENT COMPANY FENDERS – FULL & SUPER FLOATATION TIRES CONTINUED ITEM PART NO. CS 409 SS DESCRIPTION 304 SS 2 3 4 5 6 7 8 9 10 11 QTY 81697 81698 81699 81700 81701 81702 81703 81720 81721 81722 81723 81724 81725 81726 81742 81743 81744 81745 81746 81747 81748 87240 81698-X2 81699-X2 81700-X1 81701-X1 87246 87252 81569 81569-X1 83252-X1 83253-X1 81573 83254-X1 81574 83255-X1 20318 20693 20712 20644 87238 81721-X1 81722-X1 81723-X1 87244 87248 87254 81569 81569-X1 83252-X1 83253-X1 81597 83254-X1 81598 83255-X1 36408 36425 36420 36414 81742-X1 81743-X1 81744-X1 81745-X1 87242 87250 87256 81569 81569-X1 83252-X1 83253-X1 81621 83254-X1 81622 83255-X1 36408 36425 36420 36414 Fender - LH, Full for: 10’ Unit 11’ Unit 12’ Unit 13’ Unit 14’ Unit 15’ Unit 16’ Unit Fender - LH, Super for: 10’ Unit 11’ Unit 12’ Unit 13’ Unit 14’ Unit 15’ Unit 16’ Unit Angle – Mounting for Full Angle – Mounting for Super Support – Front RH for Super only Support – Front LH for Super only Support – Rear RH for Full Support – Rear RH for Super Support – Rear LH for Full Support – Rear LH for Super Bolt - Carriage, 3/8 x 1 Washer - Flat, 3/8 Washer - Lock Nut - Hex, 3/8 1 1 1 1 1 1 1 1 1 1 1 1 1 1 AR AR 1 1 1 1 1 1 AR AR AR AR P l e a s e G i v e P a r t N o . , D e s c r i p t i o n a n d U n i t S e r i a l N o . 97373-A 71 Page Rev. A HIGHWAY EQUIPMENT COMPANY INVERTED “V” ITEM 1 2 3 4 5 6 7 8 9 10 11 12 PART NO. CS 82625 20692 20677 20291 82613 82614 82615 82616 20176 20682 81261 20128 20695 20714 20646 409 SS 82626 36424 42221 42639 82617 82618 82619 82620 58800 41762 81262 36402 36426 36422 36416 DESCRIPTION 304 SS 82626 36424 42221 42639 82621 82622 82623 82624 58800 41762 81263 36402 36426 36422 36416 Bar - Adjusting. Weldment Washer - Flat, 5/16 Nut - Hex, 5/16 Lock Bolt - Carriage, 5/16 x 1 Inverted “V” (10’ Unit) Inverted “V” (11’ - 12’6” Units) Inverted “V” (13’ - 14’ Units) Inverted “V” (15’ - 16’ Unit) Screw - Cap Nut - Hex, Locking 5/8 Hanger Weldment Cap Screw - 1/2 x 1 1/4 Washer - Flat, 1/2 Washer - Lock, 1/2 Nut - Hex, 1/2 QTY AR AR AR AR 1 1 1 1 AR AR AR AR AR AR AR P l e a s e G i v e P a r t N o . , D e s c r i p t i o n a n d U n i t S e r i a l N o . 97373-A 72 Page Rev. A HIGHWAY EQUIPMENT COMPANY CAB SHIELD ITEM 1 2 3 4 5 6 7 PART NO. CS 81910 81913 81916 81901 81904 81907 31788 39813 39819 31789 39815 39821 20067 20644 20712 20693 409 SS 81912 81915 81918 81903 81906 91909 79167 79170 79175 79169 79173 79177 36398 36414 36420 36425 DESCRIPTION 304 SS 81911 81914 81917 81902 81905 81908 79166 79171 79174 79168 79172 79176 36398 36414 36420 36425 Cab Shield Assembly - 57” Height Cab Shield Assembly - 63” Height Cab Shield Assembly - 69” Height Panel - Shield, 57” Height Panel - Shield, 63” Height Panel - Shield, 69” Height Support Weldment - R.H. 57” Height Support Weldment - R.H. 63” Height Support Weldment - R.H. 69” Height Support Weldment - L.H. 57” Height Support Weldment - L.H. 63” Height Support Weldment - L.H. 69” Height Cap Screw - 3/8 x 1 Nut - Hex, 3/8 Washer - Lock, 3/8 Washer - Flat, 3/8 QTY 1 1 1 1 1 1 1 1 1 1 1 1 AR AR AR AR P l e a s e G i v e P a r t N o . , D e s c r i p t i o n a n d U n i t S e r i a l N o . 97373-A 73 Page Rev. A HIGHWAY EQUIPMENT COMPANY LADDER ITEM PART NO. 46458 46460 53955 53951 1 2 3 4 72795 72777 72779 72778 5 6 7 8 9 72797 72796 20644 20069 20068 DESCRIPTION Group - Ladder Group - Ladder for Units with Raised Fenders Group - Ladder for 96” Wide Units Group - Ladder for 96” Wide Units with Raised Fenders Ladder - Upper Ladder - Upper for Units with Raised Fenders Ladder - Upper for 96” Wide Units Ladder - Upper for 96” Wide Units with Raised Fenders Ladder - Lower Ladder - Lower for Units with Raised Fenders Nut - Hex, 3/8 Cap Screw - 3/8 x 1 1/2 Cap Screw - 3/8 x 1 1/4 QTY 1 1 1 1 1 1 8 2 6 P l e a s e G i v e P a r t N o . , D e s c r i p t i o n a n d U n i t S e r i a l N o . 97373-A 74 Page Rev. A HIGHWAY EQUIPMENT COMPANY HILLSIDE FLOW DIVIDER ITEM 1 2 3 4 5 6 7 8 9 PART NO. 36413 36419 36424 34580 56879 56880 56878 82288 56926 20677 DESCRIPTION Nut – Hex 5/16 SS Washer – Lock 5/16 SS Washer – Flat 5/16 SS Cap Screw - 5/16 x 1 SS Bracket – Clamp SS Angle – Clamp SS Panel – Divider SS for #5 Conveyor Panel – Divider SS for #4 BOC Support Weldment, SS Nut – Lock 5/16 SS QTY 4 4 8 6 1 1 1 1 1 2 P l e a s e G i v e P a r t N o . , D e s c r i p t i o n a n d U n i t S e r i a l N o . 97373-A 75 Page Rev. A HIGHWAY EQUIPMENT COMPANY MATERIAL DIVIDER 2 5 4 3 1 6 8 10 9 10 7 11 ITEM 1 2 3 4 5 6 7 8 9 10 11 PART NO. CS 87107 SS 87107 87037 87045 36425 36420 20673 20065 20067 20712 20693 20644 87381 87037 87045 36425 36420 20673 36293 20067 36420 20693 36414 87381 DESCRIPTION Divider – Material Assembly, Includes Items 1 & 2 Divider – Weldment Deflector – Rear Weldment Washer – Flat 3/8 SS Washer – Lock 3/8 SS Nut – Wing 3/8 Cap Screw – 3/8 x 3/4 Cap Screw – 3/8 x 1 Washer – Lock 3/8 Washer – Flat 3/8 Nut – Hex 3/8 Mount – Divider Weldment QTY 1 1 1 1 1 2 2 2 2 4 1 Mount Item 11 on truck to hold Item 2 when not in use. P l e a s e G i v e P a r t N o . , D e s c r i p t i o n a n d U n i t S e r i a l N o . 97373-A 76 Page Rev. A HIGHWAY EQUIPMENT COMPANY SPINNER GUARD & SHIELDS 9 10 11 14 12 4 13 8 6 4,5,6,8 4 2 15 1 5 6 8 WARNING ITEM 1 2 3 4 5 6 7 8 9 10 11 12 13 14 15 4 7 Guards are intended to reduce hazard of entanglement with machinery and injury. All guards must be installed per this drawing before spreader is put into operation. PART NO. CS 87026 87027 87031 20067 20693 20712 20678 20644 20368 20695 20714 20646 87067 82960 82961 3 5 SS 87026-X1 87027-X1 87031-X1 36398 36425 36420 72054 36414 36940 36426 36422 36416 87068 82964 82965 DESCRIPTION Guard – Center Section Weldment Guard – RH Weldment Guard – LH Weldment Cap Screw - 3/8 x 1 Washer – Flat 3/8 Washer – Lock 3/8 Nut – Lock 3/8 Nut - Hex 3/8 Bolt – Carriage 1/2 x 1 Washer – Flat 1/2 Washer - Lock 1/2 Nut – Hex 1/2 Bar – Stiffener Shield – RH Weldment (Attach to fan frame) Shield – LH Weldment (Attach to fan frame) QTY 1 1 2 16 12 10 6 10 2 2 2 2 2 1 1 P l e a s e G i v e P a r t N o . , D e s c r i p t i o n a n d U n i t S e r i a l N o . 97373-A 77 Page Rev. A HIGHWAY EQUIPMENT COMPANY 24” HYDRAULIC FANS 15 13 34 36 32 1 37 4 39,40 31 26,27 28,29 8 11,12,14 33 35 19 10 9 38 31 2 5 25 11,13 10 16,17,18,19 20 30 6 ITEM 1 2 3 4 5 6 24 22 PART NO. 7 21 SS 87093 87106 87106 87105 87105 87000 87013 87021 87065 87032 87024 87069 87082 87021 87023 87032-X1 87024 11,12,14 23 DESCRIPTION CS 87094 3 QTY 24” Hydraulic Fan Assembly NOTE: Assembly does not include guards. Fan – LH Assembly, 1 Includes Items 32 & 34-40 Fan – RH Assembly, 1 Includes Items 33-40 Plate – Back 1 Mount – Motor Weldment 1 Shaft – Support Weldment 1 Plate – Shaft Mount 1 Guard – Spinner Weldment 1 Handle 1 P l e a s e G i v e P a r t N o . , D e s c r i p t i o n a n d U n i t S e r i a l N o . 97373-A 78 Page Rev. A HIGHWAY EQUIPMENT COMPANY 24” HYDRAULIC FANS CONTINUED ITEM 7 8 9 10 11 12 13 14 15 16 17 18 19 20 21 22 23 24 25 26 27 28 29 30 31 32 33 34 35 36 37 38 39 40 41 42 43 44 PART NO. CS 87170 87053 43510 23800 20128 20695 20714 20680 20127 20067 20693 20712 20644 6072 6547 87048 40576 85002 20010 20005 20691 20710 20642 20918 72294 27056-X4 27056-X5 10877 20004 20676 25870 25871 20034 20677 * 20368 * 20695 * 20714 * 20646 SS 87170 87053 43510 23800 36402 36426 36422 39016 36401 36398 36425 36420 36414 6072 6547 87048 40576 85002 34865 36395 36423 36418 36412 20918 72294 27056-X4 27056-X5 10877 20004 20676 25870-X1 25871-X1 20034 20677 36940 36426 36422 36416 DESCRIPTION Jack – Coated Assy Angle – Valve Mount Valve – Flow Divider Motor – Hydraulic Cap Screw - 1/2 x 1 1/4 Washer – Flat 1/2 Washer – Lock 1/2 Nut – Lock 1/2 Cap Screw - 1/2 x 1 Cap Screw - 3/8 x 1 Washer – Flat 3/8 Washer – Lock 3/8 Nut – Hex 3/8 Zerk – Grease Pin – Clevis Pin – Clevis Pin – Hair U-Joint Cap Screw – 1/4 x 2 1/4 Cap Screw – 1/4 x 1 Washer – Flat 1/4 Washer – Lock 1/4 Nut – Hex 1/4 Pin – Roll Washer – Rubber Disc – Distributor RH Disc – Distributor LH Hub Cap Screw - 1/4 x 7/8 Nut - Lock 1/4 Fin - RH Weldment Fin – LH Weldment Cap Screw – 5/16 x 3/4 Nut – Lock 5/16 Bolt – Carriage 1/2 x 1 Washer – Flat 1/2 Washer – Lock 1/2 Nut – Hex 1/2 QTY 1 1 1 2 12 4 10 4 2 4 4 4 5 4 1 1 2 1 1 1 1 2 2 2 2 1 1 2 12 12 4 4 24 24 4 4 4 4 * - Not Shown – Used to attach spinner to sills. P l e a s e G i v e P a r t N o . , D e s c r i p t i o n a n d U n i t S e r i a l N o . 97373-A 79 Page Rev. A HIGHWAY EQUIPMENT COMPANY SPINNER SENSOR 5,7,8 GUARD REMOVED FOR CLARITY 1 4,6,7,8 2 3 ITEM 1 2 3 4 5 6 7 8 PART NO. DESCRIPTION 97310 89011 89009 86672 42448 36393 36423 36418 36412 Sensor – Kit Spinner Sensor – Assembly Cable – Sensor Extension Bracket Cap Screw – 1/4 x 1-1/2 SS Cap Screw – 1/4 x 3/4 SS Washer – Flat 1/4 SS Washer – Lock 1/4 SS Nut – Hex 1/4 SS QTY 1 1 1 2 2 2 4 4 P l e a s e G i v e P a r t N o . , D e s c r i p t i o n a n d U n i t S e r i a l N o . 97373-A 80 Page Rev. A HIGHWAY EQUIPMENT COMPANY RESERVOIR 7 6 8 9 2 3 1 7 8 5 9 ITEM 1 2 3 4 5 6 7 8 9 10 4 PART NO. CS 86484 86464 96747 38575 6033 39158 39159 20069 20693 20678 * 6031 SS 86484 86464 96747 38575 6033 39158 39159 34858 36425 72054 6031 DESCRIPTION Reservoir Assembly, Includes Items 1, 2, 4 & 10 Tank – Weldment Cap – Filler Gauge – Sight & Temperature Plug – Pipe Belt – Flex Mount Belt – Flex Mount Cap Screw - 3/8 x 1 1/2 Washer – Flat 3/8 Nut – Lock 3/8 Plug – Pipe QTY 1 1 1 1 2 2 4 4 4 1 * - Not Shown P l e a s e G i v e P a r t N o . , D e s c r i p t i o n a n d U n i t S e r i a l N o . 97373-A 81 Page Rev. A HIGHWAY EQUIPMENT COMPANY RESERVOIR/PUMP HYDRAULICS ITEM 1 2 PART NO. 98520 98521 98522 98523 98524 98525 98525 98111 98112 98113 98114 98115 98117 98119 98122 DESCRIPTION Tube Assembly for: 10’ Unit 11’ Unit 12’& 12’6” Units 13’ Unit 14’ Unit 15’ Unit 16’ Unit Tube Assembly for: 10’ Unit 11’ Unit 12’ Unit 12’6” Unit 13’ Unit 14’ Unit 15’ Unit 16’ Unit QTY 1 1 1 1 1 1 1 1 1 1 1 1 1 1 P l e a s e G i v e P a r t N o . , D e s c r i p t i o n a n d U n i t S e r i a l N o . 97373-A 82 Page Rev. B HIGHWAY EQUIPMENT COMPANY RESERVOIR/PUMP HYDRAULICS CONTINUED ITEM 3 4 5 6 7 8 9 10 11 PART NO. 29803 98109 29840 81336 34761 29807 21409 34724 39845 A 43530 B 43534 C 6029 12 86464 38575 87349 13 34726 14 56449 15 24502 16 21878-72 17 34845 18 86664 86665 19 29780 20 29766 21 6288 DESCRIPTION Adapter - O-ring Valve – Relief 3100 PSI Adapter - 90° Elbow Hose - 1” Dia. x 17 7/8” Fitting - Socketless Adapter - 90° Elbow Valve – Gate Adapter - Close Nipple Filter - Oil Filter Element Indicator Plug - Pipe Tank - Hydraulic Gauge - Sight & Temperature Cap - Filler Adapter - 45° Elbow End – Hose End – Hose Hose – Suction Adapter Pump – 3.85 CID Pump – 4.38 CID Bushing Adapter Clamp – Hose QTY 1 1 1 1 1 1 1 1 1 1 1 3 1 1 1 1 1 2 1 1 1 1 1 1 2 P l e a s e G i v e P a r t N o . , D e s c r i p t i o n a n d U n i t S e r i a l N o . 97373-A 83 Page Rev. B HIGHWAY EQUIPMENT COMPANY TWIN SPINNER HYDRAULICS PRESSURE FROM CONTROL VALVE RETURN 16 TO TANK 4 15 13 5 14 9 1 3 9 6 11 10 7 10 9 2 1 9 6 12 8 ITEM 1 2 3 4 5 6 7 8 9 10 11 12 13 14 15 16 PART NO. 23800 43510 29788 29847 29789 87049 87112 29809 34717 34763 34816 29825 34195-180 87115 87166 98104 34709 DESCRIPTION Motor - Spinner Valve - Flow Divider Adapter Adapter - 90° Elbow Adapter Hose Assembly Hose Assembly Adapter - Tee Adapter - Connector Adapter Adapter - 90° Elbow Adapter - Tee Hose – Drain Line Hose – Return Assy, Use w/ Mark Hydraulics Hose – Return Assy, Use w/ Manual/Raven Hyd. Hose – Pressure Assembly Adapter – Elbow 90°, Manual Hydraulics only QTY 2 1 1 1 1 2 1 1 4 2 1 1 1 1 1 1 1 P l e a s e G i v e P a r t N o . , D e s c r i p t i o n a n d U n i t S e r i a l N o . 97373-A 84 Page Rev. A HIGHWAY EQUIPMENT COMPANY MARK SERIES CONTROL HYDRAULICS – SINGLE PINION Refer to “Reservoir/Pump Hydraulics” for tube assemblies. ITEM 1 2 3 4 5 6 7 8 9 10 11 12 13 PART NO. 32485 29803 29781 20011 20676 81340 29726 34843 29835 79759 29847 29838 88376 56265 84956 43501 46395 46396 DESCRIPTION Valve – Control Adapter – Connector Adapter – Tee Cap Screw – 1/4 x 2 1/2 Nut – Lock, 1/4 Hose – Return Assembly Hose Assembly Plug Adapter – Reducing Adapter – 90° Tapped Adapter – 90° Elbow Adapter – 90° Elbow Mark V Gear Case Assembly – 1.5” Motor Mark V Gear Case Assembly – 2” Motor Mark IV.4 Gear Case Assembly – 1.5” Motor Gear Case – Single Motor – Hydraulic, 1.5” Motor – Hydraulic, 2” QTY 1 1 1 2 2 1 1 1 1 1 1 1 1 1 1 1 1 1 P l e a s e G i v e P a r t N o . , D e s c r i p t i o n a n d U n i t S e r i a l N o . 97373-A 85 Page Rev. A HIGHWAY EQUIPMENT COMPANY MARK SERIES CONTROL HYDRAULICS – DUAL PINION Refer to “Reservoir/Pump Hydraulics” for tube assemblies. ITEM 1 2 3 4 5 6 7 8 9 PART NO. 32485 29803 29781 20011 20676 42996 56111 34843 29835 DESCRIPTION Valve - Control Adapter - Connector Adapter - Tee Cap Screw - 1/4 x 2 1/2 Nut - Lock, 1/4 Hose - Return Assembly Hose Assembly Plug Adapter - Reducing QTY 1 1 1 2 2 1 1 1 1 P l e a s e G i v e P a r t N o . , D e s c r i p t i o n a n d U n i t S e r i a l N o . 97373-A 86 Page Rev. A HIGHWAY EQUIPMENT COMPANY MARK SERIES CONTROL HYDRAULICS – DUAL PINION CONTINUED ITEM 10 11 12 13 14 15 16 17 18 PART NO. 79759 29847 29838 29753 56107 29778 56121 29850 88377 88378 88379 84957 55971 Modified 55972 82462 46395 DESCRIPTION Adapter - 90° Tapped Adapter - 90° Elbow Adapter - 90° Elbow Adapter - Connector Hose Assembly Adapter - Connector Hose Assembly Adapter - Tee Mark V Gear Case Assembly – 1” Motors Mark V Gear Case Assembly – 1.25” Motors Mark V Gear Case Assembly – 1.5” Motors Gear Case – Dual Mark IV.4 Assembly Gear Case – Dual Standard 55970 82459 38897 Motor – Hydraulic 1” 1.25” 1.5” QTY 1 1 1 1 1 1 1 1 1 1 1 1 1 1 EACH 1 EACH 1 EACH P l e a s e G i v e P a r t N o . , D e s c r i p t i o n a n d U n i t S e r i a l N o . 97373-A 87 Page Rev. A HIGHWAY EQUIPMENT COMPANY RAVEN CONTROL HYDRAULICS – SINGLE PINION Refer to “Reservoir/Pump Hydraulics” for tube assemblies. P l e a s e G i v e P a r t N o . , D e s c r i p t i o n a n d U n i t S e r i a l N o . 97373-A 88 Page Rev. A HIGHWAY EQUIPMENT COMPANY RAVEN CONTROL HYDRAULICS – SINGLE PINION CONTINUED ITEM 1 2 3 4 5 6 7 8 9 10 11 12 13 14 15 16 17 18 19 20 21 22 23 24 25 26 27 28 PART NO. DESCRIPTION 86771-X1 96694 96695 32485 34501 42034 76536-X1 36296 36420 36414 75037 87281 29753 79550 29850 85260 29783 29778 81796 42774 29827 29757 29769 29752 29764 34725 34732 29847 29838 57301 57302 36671 38897 38898 Valve – Servo Raven 25 GPM O-Ring – Kit Cover – Motor Drive Valve – Control Cap Screw – 1/4 x 2-1/2 Nut – Lock 1/4 Hose – 3/4 x 28 Cap Screw – 3/8 x 2-3/4 Washer – Lock 3/8 Nut – Hex 3/8 Valve – Relief 2000 PSI Hose – 3/4 x 27-1/2 Adapter – Connector Hose – 1 x 30 Adapter – Run Tee Hose – 1 x 32-1/2 Adapter – Run Tee Adapter Hose – 1 x 42 Gasket – Valve Mount Adapter – Elbow 90° Adapter – Connector Adapter – Tee Adapter – Connector Adapter – Elbow 90° Adapter – Elbow 90° Tapped Adapter – Elbow 90° Adapter – Elbow 90° Adapter – Elbow 90° Gear Case Assembly – 1.5” Motor Gear Case Assembly – 2” Motor Gear Case – Single Pinion Assembly Motor – Hydraulic 1.5” Motor – Hydraulic 2” QTY 1 1 1 1 2 2 1 2 2 2 1 1 1 1 2 1 1 1 1 1 1 2 1 1 1 1 1 1 1 1 1 1 1 1 P l e a s e G i v e P a r t N o . , D e s c r i p t i o n a n d U n i t S e r i a l N o . 97373-A 89 Page Rev. A HIGHWAY EQUIPMENT COMPANY MANUAL DUAL HYDRAULICS – SINGLE PINION Refer to “Reservoir/Pump Hydraulics” for tube assemblies. P l e a s e G i v e P a r t N o . , D e s c r i p t i o n a n d U n i t S e r i a l N o . 97373-A 90 Page Rev. A HIGHWAY EQUIPMENT COMPANY MANUAL DUAL HYDRAULICS – SINGLE PINION CONTINUED ITEM 1 2 3 4 5 6 7 8 9 10 11 12 13 14 15 16 17 18 19 20 21 22 PART NO. 29773 29850 29807 29840 78948 29827 21505 29809 71473 79557 29778 32485 29838 82527 84109 20011 20691 20676 29847 34715 29788 57301 57302 36671 38897 38898 DESCRIPTION Adapter – Elbow 90° Adapter – Tee Adapter – Elbow 90° Adapter – Elbow 90° Valve – Dump with Relief Adapter – Elbow 90° Adapter – Bushing Adapter – Tee Hose Assembly Hose – Return Assembly Adapter – Connector Valve – Control Adapter – Elbow 90° Hose – Return Assembly Hose – Return Assembly Cap Screw – 1/4 x 2 1/2 Washer – Flat 1/4 Nut – Lock 1/4 Adapter – Elbow 90° Adapter – Tee Adapter – Connector Gear Case Assembly – 1.5” Motor Gear Case Assembly – 2” Motor Gear Case – Single Pinion Assembly Motor – Hydraulic 1.5” Motor – Hydraulic 2” QTY 1 2 1 1 1 1 1 1 1 1 1 2 2 1 1 2 2 2 2 1 1 1 1 1 1 1 P l e a s e G i v e P a r t N o . , D e s c r i p t i o n a n d U n i t S e r i a l N o . 97373-A 91 Page Rev. A HIGHWAY EQUIPMENT COMPANY MANUAL DUAL HYDRAULICS – DUAL PINION Refer to “Reservoir/Pump Hydraulics” for tube assemblies. P l e a s e G i v e P a r t N o . , D e s c r i p t i o n a n d U n i t S e r i a l N o . 97373-A 92 Page Rev. A HIGHWAY EQUIPMENT COMPANY MANUAL DUAL HYDRAULICS – DUAL PINION CONTINUED ITEM 1 2 3 4 5 6 7 8 9 10 11 12 13 14 15 16 17 18 19 20 21 22 23 24 25 PART NO. 29773 29850 29807 29840 78948 29827 21505 29809 80886 80888 29778 32485 29838 82532 84598 54773 82599 34711 20011 20691 20676 29847 34715 29788 57303 82463 57304 37985 55970 82459 38897 DESCRIPTION Adapter – Elbow 90° Adapter – Tee Adapter – Elbow 90° Adapter – Elbow 90° Valve – Dump with Relief Adapter – Elbow 90° Adapter – Bushing Adapter – Tee Tube Assembly Tube Assembly Adapter – Connector Valve – Control Adapter – Elbow 90° Hose – Return Assembly Hose – Return Assembly Hose Assembly Hose Assembly Adapter – Tee Cap Screw – 1/4 x 2 1/2 Washer – Flat 1/4 Nut – Lock 1/4 Adapter – Elbow 90° Adapter – Tee Adapter – Connector Gear Case Assembly – 1” Motors Gear Case Assembly – 1.25” Motors Gear Case Assembly – 1.5” Motors Gear Case – Dual Pinion Assembly Motor – Hydraulic 1” Motor – Hydraulic 1.25” Motor – Hydraulic 1.5” QTY 1 2 1 1 1 1 1 1 1 1 1 2 2 1 1 1 1 1 2 2 2 2 1 1 1 1 1 1 2 2 2 P l e a s e G i v e P a r t N o . , D e s c r i p t i o n a n d U n i t S e r i a l N o . 97373-A 93 Page Rev. A HIGHWAY EQUIPMENT COMPANY SINGLE PINION GEAR CASE ITEM 1 2 3 4 5 6 7 8 9 10 11 12 13 PART NO. 43501 2564 6031 20040 20711 27465 44403 37002 37003 38981 37005 37006 37007 37008 DESCRIPTION Gear Case – Assembly Mark series (shown) Cap - Breather Plug - Pipe Cap Screw - 5/16 x 2 Washer - Lock, 5/16 Bushing - Pipe, 1/8” x 7/8X Housing – Outboard, Mark series Housing - Inboard Gear - Pinion Gear Gasket Seal - Oil Bearing Bearing QTY 1 2 9 9 1 1 1 1 1 1 1 1 3 P l e a s e G i v e P a r t N o . , D e s c r i p t i o n a n d U n i t S e r i a l N o . 97373-A 94 Page Rev. A HIGHWAY EQUIPMENT COMPANY GEAR CASE – SINGLE PINION STYLE I STYLE II ITEM PART NO. 36671 1 2 3 4 5 6 7 8 9 10 11 12 13 14 15 16 17 Style I 304269-AA 37001 37002 37003 38981 37007 37008 37006 38979 6031 37005 20040 20711 2564 27465 21490 38980 37010 DESCRIPTION QTY Gear Case – Assembly Single Pinion Style II 304269-AB 304559 304560 304561 304562 37007 37008 37006 38979 6031 304563 20040 20711 2564 27465 21490 38980 37010 Parts – Service, Includes 1–17 Housing – Outboard Housing – Inboard Gear – Pinion 11 Tooth Gear – Driven 67 Tooth Bearing Bearing Seal – Oil Washer – Flat 2-1/2 x 11/32 Plug – Pipe Gasket – Housing Cap Screw – 5/16NC x 2 Washer – Lock 5/16 Cap – Breather Bushing – Pipe 1/8 x 3/8 Plug – Pipe Magnetic Screw – Allen Head 5/16-18 x 1 Key – 1/2 x 1/2 x1-1/2 Please Give Part No., Description and Unit Serial No. 94B 1 1 2 1 2 4 1 2 1 1 10 10 1 1 1 1 2 97373-A Page Rev. A HIGHWAY EQUIPMENT COMPANY DUAL PINION GEAR CASE ITEM 1 2 3 4 5 6 7 8 9 10 11 12 13 14 15 16 PART NO. 55971 2564 6031 20040 20711 27465 55974 38982 37003 38981 38978 37006 37007 37008 20431 38979 38980 DESCRIPTION Gear Case – Assembly Mark series (shown) Cap - Breather Plug - Pipe Cap Screw - 5/16 x 2 Washer - Lock, 5/16 Bushing - Pipe, 1/8” x 7/8X Housing – Outboard Mark series Housing - Inboard Gear - Pinion Gear Gasket Seal - Oil Bearing Bearing Screw - Nylock Set, 5/16 x 3/4 Washer Screw - Allen Head QTY 1 2 10 10 9 1 1 2 1 1 1 2 4 1 2 1 P l e a s e G i v e P a r t N o . , D e s c r i p t i o n a n d U n i t S e r i a l N o . 97373-A 95 Page Rev. A HIGHWAY EQUIPMENT COMPANY GEAR CASE – DUAL PINION STYLE I STYLE II ITEM PART NO. 37985 1 2 3 4 5 6 7 8 9 10 11 12 13 14 15 16 17 Style I 304268-AA 38983 38982 37003 38981 37007 37008 37006 38979 6031 38978 20040 20711 2564 27465 21490 38980 37010 DESCRIPTION QTY Gear Case – Assembly Dual Pinion Style II 304268-AB 304557 304558 304561 304562 37007 37008 37006 38979 6031 304564 20040 20711 2564 27465 21490 38980 37010 Parts – Service, Includes 1–17 Housing – Outboard Housing – Inboard Gear – Pinion 11 Tooth Gear – Driven 67 Tooth Bearing Bearing Seal – Oil Washer – Flat 2-1/2 x 11/32 Plug – Pipe Gasket – Housing Cap Screw – 5/16NC x 2 Washer – Lock 5/16 Cap – Breather Bushing – Pipe 1/8 x 3/8 Plug – Pipe Magnetic Screw – Allen Head 5/16-18 x 1 Key – 1/2 x 1/2 x1-1/2 Please Give Part No., Description and Unit Serial No. 95B 1 1 2 1 2 4 1 2 1 1 10 10 1 1 1 1 2 97373-A Page Rev. A HIGHWAY EQUIPMENT COMPANY SPINNER MOTOR ITEM 1 2 3 4 5 6 7 8 9 PART NO. 23800 33777 28485 33809 71980 23940 28494 41014 41013 28454 28486 DESCRIPTION Motor Assembly Ring - Retainer Shaft Seal - Excluder Seal Tool Seal Installation (Required to Install Item 4) “O” Ring Cone - Bearing Cup - Bearing Spacer Spacer (Kit) QTY 1 1 1 1 1 2 2 1 1 P l e a s e G i v e P a r t N o . , D e s c r i p t i o n a n d U n i t S e r i a l N o . 97373-A 96 Page Rev. A HIGHWAY EQUIPMENT COMPANY SPINNER MOTOR CONTINUED ITEM 10 11 12 13 14 15 16 17 18 19 20 21 22 23 PART NO. 6089 28490 58797 28495 23806 23819 23818 23820 28498 23822 23812 23833 24458 72547 72548 DESCRIPTION Ring - Snap Plate - Shaft End Plug Bushing Bearing Seals - Pocket (Makes 12 Seals) Plate Gasket Housing Set - Gear Cover - Port End Washer Cap Screw Key Kit - Overhaul (Includes Items 1,3-7,9,13,15 & 17) Kit - Seal (Includes Items 3-5) QTY 1 1 2 1 4 1 2 2 1 1 1 4 4 1 P l e a s e G i v e P a r t N o . , D e s c r i p t i o n a n d U n i t S e r i a l N o . 97373-A 97 Page Rev. A HIGHWAY EQUIPMENT COMPANY CONVEYOR MOTOR ITEM 1 2 3 4 5 PART NO. 55970 55972 82459 82462 38897 46395 38898 46396 30665 73471 73555 73556 73473 73474 DESCRIPTION Motor - Hydraulic, 1” Motor - Hydraulic, 1” Modified Motor - Hydraulic, 1 1/4” Motor - Hydraulic, 1 1/4” Modified Motor - Hydraulic, 1 1/2” Motor - Hydraulic, 1 1/2” Modified Motor - Hydraulic, 2” Motor - Hydraulic, 2” Modified Cap Screw - 5/16 x 7/8 Seal Flange - Mounting (Used on Standard Motors) Flange - Mounting (Used on Modified Motors) Seal Seal - “O” Ring QTY 4 1 1 1 1 1 P l e a s e G i v e P a r t N o . , D e s c r i p t i o n a n d U n i t S e r i a l N o . 97373-A 98 Page Rev. A HIGHWAY EQUIPMENT COMPANY CONVEYOR MOTOR CONTINUED ITEM 6 7 8 9 10 11 12 13 14 15 16 17 18 19 PART NO. 37385 37401 3065 37386 73480 47062 83014 16946 37388 47063 83015 37394 37395 47064 37398 37399 37400 37381 47065 83016 16937 16938 * 73477 * 73472 39137 DESCRIPTION Race - Bearing Bearing - Thrust Needle Key Shaft - Output Keyed Seal - “O” Ring Drive (Used on 1” Motors) Drive (Used on 1 1/4” Motors) Drive (Used on 1 1/2 & 2” Motors) Plate - Spacer Gerotor - 1” Gerotor - 1 1/4” Gerotor - 1 1/2” Gerotor - 2” Spacer - 1” * No Spacer (Item 14) on 1 1/4” Motor Spacer - 1 1/2” Spacer - 2” Cap - End Washer - Seal Cap Screw (Used on 1” Motors) Cap Screw (Used on 1 1/4” Motors) Cap Screw (Used on 1 1/2” Motors) Cap Screw (Used on 2” Motors) Seal - “O” Ring Washer - Back-up Seal Kit (Includes Items 2,4,5,10,16,18 & 19) QTY 1 1 1 1 3 1 1 1 1 1 1 1 1 1 1 1 1 7 7 7 7 7 1 1 P l e a s e G i v e P a r t N o . , D e s c r i p t i o n a n d U n i t S e r i a l N o . 97373-A 99 Page Rev. A HIGHWAY EQUIPMENT COMPANY SPINNER CONTROL VALVE ITEM 1 2 3 4 5 6 7 8 9 10 PART NO. DESCRIPTION 32485 N.S. 20735 24555 24556 24557 28474 24559 24563 24566 24574 24558 Valve - Hydraulic Body - Adjustable Divider Screw - Set, 1/4 x 1/4 Plug Spring Spool - Rotary Kit - Seal (Includes Items 6 & 7) Ring - Snap “O” Ring Screw - Thumb Spool Handle QTY 1 1 2 1 1 1 2 2 1 1 1 N.S. - Not Serviced Separately P l e a s e G i v e P a r t N o . , D e s c r i p t i o n a n d U n i t S e r i a l N o . 97373-A 100 Page Rev. A HIGHWAY EQUIPMENT COMPANY LIGHTS ITEM PART NO. 1 2 3 4 5 6 7 8 9 10 11 12 13 14 15 16 AR - As Required 6114 20572 20709 20641 21986 6198 38611 20003 20691 20642 6108 3824 6107 3775 6110 21580 DESCRIPTION Cluster - Light, Red Screw - Machine 3/16 x 3/4 Washer - Lock 3/16 Nut - Hex 3/16 Grommet - Rubber Clamp - Wire Bracket - Front Light, Amber Cap Screw - 1/4 x 3/4 Washer - Flat 1/4 Nut - Hex 1/4 Clearance Lamp - Amber Mount - Belt Reflector Reflector - Red Bracket - Rear Light, Red Clearance Lamp - Red Wire - 14 Gauge, Black QTY Inches 1 33 33 33 AR AR 2 24 24 24 2 4 4 2 2 AR P l e a s e G i v e P a r t N o . , D e s c r i p t i o n a n d U n i t S e r i a l N o . 97373-A 101 Page Rev. A HIGHWAY EQUIPMENT COMPANY DECALS 19 17 2 NEW LEADER 3 4 16 - ON RIGHTHAND SIDE ONLY 13 8 9 10 12 14 11 17 19 21 NEW LEADER 21 18 L2020G4 7 1 5 6 20 15 P l e a s e G i v e P a r t N o . , D e s c r i p t i o n a n d U n i t S e r i a l N o . 97373-A 102 Page Rev. A HIGHWAY EQUIPMENT COMPANY DECALS CONTINUED ITEM 1 2 3 4 5 6 7 8 9 10 11 12 13 14 15 16 17 18 19 20 21 PART NO. 368 364 150034 321 6541 23769 71526 39138 55630 55631 87110 39200 8665 8664 39379 21477 87164 87165 87126 87127 87122 87129 87123 87109 87163 87162 31736 31740 DESCRIPTION Decal - Flying Material Decal - Warning, Stay Out of Box Decal - Caution, Improper Operation Decal - Caution, Material to be Spread Decal - Oil Lube Chart Decal - Feedgate Slide Scale Decal - Important, Adjust Spinner Decal - Warning, Hot Components Decal - Warning, No Step Decal - Warning, Guard is for Your Protection Decal - Scale Spinner Decal - Fender Capacity Decal - Caution, Hydraulic Oil Only Decal - Caution, Keep Valve Open Decal - Filter Decal - Important, Conveyor Chain Life Decal - New Leader, Black Decal - New Leader, White Decal - L2020G4, Black Decal - L2020G4, White Decal - G4 Black/Red Decal - G4 Black/White Decal - G4 White/Red Decal - G4 Decal - Striping White Decal - Striping Black Paint - Touch Up, New Leader Red Paint - Touch Up, White QTY 1 2 1 1 1 1 1 1 2 2 1 2 1 1 1 1 3 3 1 1 3 3 3 1 AR AR AR AR P l e a s e G i v e P a r t N o . , D e s c r i p t i o n a n d U n i t S e r i a l N o . 97373-A 103 Page Rev. A HIGHWAY EQUIPMENT COMPANY MARK V CONTROL VALVE ASSEMBLY CONTROL VALVE/GEAR CASE ITEM 1 2 3 4 5 6 7 8 9 10 11 12 13 14 15 16 * - Not Shown PART NO. DESCRIPTION 88378 * 88376 89758 55971 43501 84940 74524 44442 82459 44456 44454 20724 47276 36419 47277 82462 * 46395 44409 29854 Control Valve/Dual Gear Case, 1 1/4 Motors Assy Control Valve/Single Gear Case, 1 1/2 Motor Assy Valve Assembly Gear Case – Dual Gear Case – Single Valve Adapter Kit Gasket Cap Screw Motor – Hydraulic 1 1/4 Dual Gear Case Only Screw – Socket Head Screw – Socket Head Washer – Seal Saddle – Motor Washer Cap Screw Motor – Hydraulic 1 1/4 Modified, Dual Gear Case Motor – Hydraulic 1 1/2, Single Gear Case Port Adapter O-Ring QTY 1 1 1 1 1 1 2 4 1 2 2 2 1 4 4 1 1 2 2 P l e a s e G i v e P a r t N o . , D e s c r i p t i o n a n d U n i t S e r i a l N o . 97373-A 104 Page Rev. A HIGHWAY EQUIPMENT COMPANY MARK V CONTROL VALVE ASSEMBLY VALVE P l e a s e G i v e P a r t N o . , D e s c r i p t i o n a n d U n i t S e r i a l N o . 97373-A 105 Page Rev. A HIGHWAY EQUIPMENT COMPANY MARK V CONTROL VALVE ASSEMBLY – VALVE CONTINUED ITEM 1 2 3 4 5 6 7 8 9 10 11 12 13 14 PART NO. 89758 84934 84935 84936 44483 83645 20724 84937 84938 13207 83642 83643 84939 96451 DESCRIPTION Valve Assembly Reed Switch Board Bolt Housing Screw – Machine Screw – Machine Washer – Seal Cover – Service Assembly Bolt – O-Ring Seal – O-Ring Motor Assembly Screw – Socket Head Cap Assembly Decal – Mark V QTY 1 1 2 1 4 1 6 1 3 1 1 4 1 1 P l e a s e G i v e P a r t N o . , D e s c r i p t i o n a n d U n i t S e r i a l N o . 97373-A 106 Page Rev. A HIGHWAY EQUIPMENT COMPANY MARK SERIES CONTROL VALVE ASSEMBLY – VALVE ADAPTER ITEM 1 2 3 4 5 6 PART NO. DESCRIPTION QTY 84940 44440 44439 84941 84942 44445 Valve Adapter Kit Pulley – Drive Belt – Timing Pulley – Timing Adapter Seal 1 1 1 1 1 1 P l e a s e G i v e P a r t N o . , D e s c r i p t i o n a n d U n i t S e r i a l N o . 97373-A 107 Page Rev. A HIGHWAY EQUIPMENT COMPANY MARK SERIES CONTROL VALVE ASSEMBLY IDLER ITEM 1 2 3 4 5 6 7 8 9 PART NO. 83640 44431 44433 44434 44428 44461 44432 44429 44435 DESCRIPTION Idler Assembly Spacer Bushing Gear – Resolve Gear Assembly Pin – Roll Gear Idler Arm Assembly, Includes Item 9 Bearing QTY 1 1 2 1 1 1 1 1 1 P l e a s e G i v e P a r t N o . , D e s c r i p t i o n a n d U n i t S e r i a l N o . 97373-A 108 Page Rev. A HIGHWAY EQUIPMENT COMPANY MARK V CONTROL VALVE ASSEMBLY VALVE BLOCK ITEM 1 2 3 4 5 6 7 8 9 10 11 12 13 14 15 PART NO. 89759 83627 83623 83624 83632 83625 44464 44449 84944 84945 83636 83626 36423 89769 89760 88887 DESCRIPTION Block – Valve Assembly Plug Valve – Relief Assembly O-Ring Ring – Back-up O-Ring Ring – Snap Shim – Nylon Bearing Shaft – Input Assembly Gear – Idler Assembly O-Ring Washer – Flat .25 SS Cartridge – Check Cartridge – Metering, Spool/Liner & Nut O-Ring – Kit Service QTY 1 1 1 1 1 1 1 1 2 1 1 1 1 1 1 1 P l e a s e G i v e P a r t N o . , D e s c r i p t i o n a n d U n i t S e r i a l N o . 97373-A 109 Page Rev. A TAB G4 Spread Pattern