1
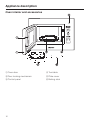
Operating and Installation Instructions Microwave Oven To prevent accidents and damage to the appliance, please read these instructions before installing or using the microwave. en - US, CA M.-Nr. 09 798 350 Contents IMPORTANT SAFETY INSTRUCTIONS. . . . . . . . . . . . . . . . . . . . . . . . . . . . . . . . . 4 Appliance description . . . . . . . . . . . . . . . . . . . . . . . . . . . . . . . . . . . . . . . . . . . . . 16 Oven interior and accessories . . . . . . . . . . . . . . . . . . . . . . . . . . . . . . . . . . . . . . . . 16 Control panel . . . . . . . . . . . . . . . . . . . . . . . . . . . . . . . . . . . . . . . . . . . . . . . . . . . . . 17 Included accessories . . . . . . . . . . . . . . . . . . . . . . . . . . . . . . . . . . . . . . . . . . . . . . 17 Before first use. . . . . . . . . . . . . . . . . . . . . . . . . . . . . . . . . . . . . . . . . . . . . . . . . . . 18 Principle of operation . . . . . . . . . . . . . . . . . . . . . . . . . . . . . . . . . . . . . . . . . . . . . 19 How does a microwave oven work? . . . . . . . . . . . . . . . . . . . . . . . . . . . . . . . . . . . 19 Functions . . . . . . . . . . . . . . . . . . . . . . . . . . . . . . . . . . . . . . . . . . . . . . . . . . . . . . . 20 What can a microwave oven do?. . . . . . . . . . . . . . . . . . . . . . . . . . . . . . . . . . . . . . 20 What operating modes does a microwave have? . . . . . . . . . . . . . . . . . . . . . . . . . 20 Microwave Solo mode . . . . . . . . . . . . . . . . . . . . . . . . . . . . . . . . . . . . . . . . . . . 20 Automatic Programs . . . . . . . . . . . . . . . . . . . . . . . . . . . . . . . . . . . . . . . . . . . . . 20 Suitable cookware for microwave ovens. . . . . . . . . . . . . . . . . . . . . . . . . . . . . . 21 Material and shape . . . . . . . . . . . . . . . . . . . . . . . . . . . . . . . . . . . . . . . . . . . . . . . . 21 The plate cover . . . . . . . . . . . . . . . . . . . . . . . . . . . . . . . . . . . . . . . . . . . . . . . . . . . 24 Clock display . . . . . . . . . . . . . . . . . . . . . . . . . . . . . . . . . . . . . . . . . . . . . . . . . . . . 25 Setting the clock . . . . . . . . . . . . . . . . . . . . . . . . . . . . . . . . . . . . . . . . . . . . . . . . . . 25 Resetting the clock . . . . . . . . . . . . . . . . . . . . . . . . . . . . . . . . . . . . . . . . . . . . . . . . 25 Turning off the clock display . . . . . . . . . . . . . . . . . . . . . . . . . . . . . . . . . . . . . . . . . 25 Operation . . . . . . . . . . . . . . . . . . . . . . . . . . . . . . . . . . . . . . . . . . . . . . . . . . . . . . . 26 Opening the door. . . . . . . . . . . . . . . . . . . . . . . . . . . . . . . . . . . . . . . . . . . . . . . . . . 26 Placing dishes in the microwave . . . . . . . . . . . . . . . . . . . . . . . . . . . . . . . . . . . . . . 26 Turntable. . . . . . . . . . . . . . . . . . . . . . . . . . . . . . . . . . . . . . . . . . . . . . . . . . . . . . 26 Closing the door . . . . . . . . . . . . . . . . . . . . . . . . . . . . . . . . . . . . . . . . . . . . . . . . . . 26 Starting a program . . . . . . . . . . . . . . . . . . . . . . . . . . . . . . . . . . . . . . . . . . . . . . . . . 26 "Door" message . . . . . . . . . . . . . . . . . . . . . . . . . . . . . . . . . . . . . . . . . . . . . . . . 27 Interrupting or resuming a program . . . . . . . . . . . . . . . . . . . . . . . . . . . . . . . . . . . 28 Changing the settings . . . . . . . . . . . . . . . . . . . . . . . . . . . . . . . . . . . . . . . . . . . . . . 28 Cancelling a program . . . . . . . . . . . . . . . . . . . . . . . . . . . . . . . . . . . . . . . . . . . . . . 28 At the end of a program. . . . . . . . . . . . . . . . . . . . . . . . . . . . . . . . . . . . . . . . . . . . . 28 Automatic "Keep warm" function . . . . . . . . . . . . . . . . . . . . . . . . . . . . . . . . . . . . . . 28 Minute + (programmable) . . . . . . . . . . . . . . . . . . . . . . . . . . . . . . . . . . . . . . . . . . . 29 System lock . . . . . . . . . . . . . . . . . . . . . . . . . . . . . . . . . . . . . . . . . . . . . . . . . . . . . . 29 Timer . . . . . . . . . . . . . . . . . . . . . . . . . . . . . . . . . . . . . . . . . . . . . . . . . . . . . . . . . . . 30 Reprogramming the timer. . . . . . . . . . . . . . . . . . . . . . . . . . . . . . . . . . . . . . . . . 30 Timer + Cooking Program . . . . . . . . . . . . . . . . . . . . . . . . . . . . . . . . . . . . . . . . 30 2 Contents Automatic programs . . . . . . . . . . . . . . . . . . . . . . . . . . . . . . . . . . . . . . . . . . . . . . 31 Automatic defrosting . . . . . . . . . . . . . . . . . . . . . . . . . . . . . . . . . . . . . . . . . . . . . . . 31 Automatic cooking . . . . . . . . . . . . . . . . . . . . . . . . . . . . . . . . . . . . . . . . . . . . . . . . . 31 Popcorn Æ . . . . . . . . . . . . . . . . . . . . . . . . . . . . . . . . . . . . . . . . . . . . . . . . . . . . . . 32 Recipes for the automatic programs ° . . . . . . . . . . . . . . . . . . . . . . . . . . . . . 33 Reheating . . . . . . . . . . . . . . . . . . . . . . . . . . . . . . . . . . . . . . . . . . . . . . . . . . . . . . . 35 Cooking. . . . . . . . . . . . . . . . . . . . . . . . . . . . . . . . . . . . . . . . . . . . . . . . . . . . . . . . . 36 Defrosting / Defrosting and reheating or cooking . . . . . . . . . . . . . . . . . . . . . . 37 Canning. . . . . . . . . . . . . . . . . . . . . . . . . . . . . . . . . . . . . . . . . . . . . . . . . . . . . . . . . 38 Suggested uses . . . . . . . . . . . . . . . . . . . . . . . . . . . . . . . . . . . . . . . . . . . . . . . . . . 39 Saving your favorite programs . . . . . . . . . . . . . . . . . . . . . . . . . . . . . . . . . . . . . . 40 Changing settings . . . . . . . . . . . . . . . . . . . . . . . . . . . . . . . . . . . . . . . . . . . . . . . . 42 Cleaning and care . . . . . . . . . . . . . . . . . . . . . . . . . . . . . . . . . . . . . . . . . . . . . . . . 44 Oven interior and inside of door . . . . . . . . . . . . . . . . . . . . . . . . . . . . . . . . . . . . . . 44 Appliance front . . . . . . . . . . . . . . . . . . . . . . . . . . . . . . . . . . . . . . . . . . . . . . . . . . . 45 Included accessories . . . . . . . . . . . . . . . . . . . . . . . . . . . . . . . . . . . . . . . . . . . . . . 46 Frequently Asked Questions . . . . . . . . . . . . . . . . . . . . . . . . . . . . . . . . . . . . . . . 47 After sales service . . . . . . . . . . . . . . . . . . . . . . . . . . . . . . . . . . . . . . . . . . . . . . . . 50 Caring for the environment . . . . . . . . . . . . . . . . . . . . . . . . . . . . . . . . . . . . . . . . . 52 Electrical connection . . . . . . . . . . . . . . . . . . . . . . . . . . . . . . . . . . . . . . . . . . . . . . 53 Installation . . . . . . . . . . . . . . . . . . . . . . . . . . . . . . . . . . . . . . . . . . . . . . . . . . . . . . 54 Building-in dimensions . . . . . . . . . . . . . . . . . . . . . . . . . . . . . . . . . . . . . . . . . . . . . 54 Contact details . . . . . . . . . . . . . . . . . . . . . . . . . . . . . . . . . . . . . . . . . . . . . . . . . . 59 3 IMPORTANT SAFETY INSTRUCTIONS When using electrical appliances always observe basic safety precautions, including the following: WARNING - To reduce the risk of burns, electric shock, fire, injury to persons, or exposure to excessive microwave energy: Read all instructions before installing or using the oven. Read and follow the specific, "PRECAUTIONS TO AVOID POSSIBLE EXPOSURE TO EXCESSIVE MICROWAVE ENERGY" in the "IMPORTANT SAFETY INSTRUCTIONS" section of this manual. This appliance is intended for residential use only. Only use the appliance for its intended purpose. Install or locate this appliance only in accordance with the provided installation instructions. This appliance complies with current safety requirements. Improper use of the appliance can lead to personal injury and material damage. 4 Intended use ~ The appliance is intended for use in domestic households and similar working and residential environments. This appliance is not intended for outdoor use. ~ The microwave oven is intended for domestic use only to cook, defrost, reheat and can food. Any other use is not permitted. ~ Do not use the microwave oven to store or dry flammable materials. If such items are dried in the microwave oven, the moisture contained in the material evaporates, causing the items to dry out and spontaneously combust. IMPORTANT SAFETY INSTRUCTIONS ~ Persons who lack physical, sensory or mental abilities, or experience with the appliance should not use it without supervision or instruction by a responsible person. Safety with children ~ All children must be kept away from the microwave oven unless constantly supervised. ~ Children must not be allowed to clean or maintain the microwave oven without supervision. ~ Please supervise any children in the vicinity of the microwave oven and do not let them play with the appliance. ~ Danger of suffocation! Ensure that any plastic wrapping, bags, etc. are disposed of safely and kept out of the reach of children. 5 IMPORTANT SAFETY INSTRUCTIONS Technical safety ~ A damaged microwave oven can be dangerous. Always check for visible signs of damage. Never use a damaged appliance. ~ If the power cord is damaged, it must be replaced by a Miele authorized technician in order to protect the user from harm. ~ Operating a damaged microwave oven can result in microwave leakage and pose a danger to the user. Do not use the appliance if: – The door is warped – The door hinges are loose – Holes or cracks are visible in the casing, the door or the walls of the oven interior. ~ Any contact with live connections or tampering with the electrical or mechanical components of the microwave oven will endanger your safety and may lead to appliance malfunctions. Do not open the casing of the appliance under any circumstances. 6 ~ To avoid damaging the microwave oven, make sure that the connection data (voltage and frequency) on the data plate correspond to the building's power supply before connecting the appliance. If in doubt, consult a qualified electrician. ~ Do not use a power bar or extension cord to connect the microwave oven to electricity. IMPORTANT SAFETY INSTRUCTIONS ~ To guarantee the electrical safety of this appliance, continuity must exist between the appliance and an effective grounding system. This appliance must be grounded. Connect only to properly grounded outlet. It is imperative that this basic safety requirement be met. If there is any doubt, have the electrical system of the house checked by a qualified electrician.The electrical safety of the microwave oven can only be guaranteed if it has been connected to a grounding system that complies with applicable safety regulations. Compliance with this fundamental safety requirement is extremely important in order to eliminate damage caused by a missing or disconnected grounding system (e.g. electric shock). When in doubt, have the building's wiring system inspected by a qualified electrician. ~ Repair work should only be performed by a Miele authorized service technician. Repairs by unqualified persons can cause considerable danger to users. ~ Any repairs not performed by a Miele authorized service technician will void the warranty. ~ The microwave oven must be disconnected from the power supply during repair work, cleaning or maintenance. ~ Miele can only guarantee the safety of the appliance when genuine original Miele spare parts are used. Defective components must only be replaced by genuine original Miele spare parts. ~ For safety reasons, the microwave oven may only be used when it has been fully installed. 7 IMPORTANT SAFETY INSTRUCTIONS ~ If the microwave oven is installed behind a cabinet door, it may only be used with the cabinet door open. Do not close the cabinet door when the appliance is in use. Heat and moisture can build up behind the door and cause damage to the appliance and cabinetry. Do not close the door until the appliance has cooled down completely. ~ The microwave oven may not be used in mobile installations (e.g. on ships). Proper use PRECAUTIONS TO AVOID POSSIBLE EXPOSURE TO EXCESSIVE MICROWAVE ENERGY Do not attempt to operate this oven with the door open since open-door operation can result in harmful exposure to microwave energy. It is important not to damage or tamper with the safety interlocks. Do not place any object between the oven front and the door or allow soil or cleaner residue to accumulate on sealing surfaces. Do not operate the oven if it is damaged. It is particularly important that the oven door closes properly and that there is no damage to the: (1) door (bent), (2) hinges and latches (broken or loosened), (3) door seals and sealing surfaces. The oven should not be adjusted or repaired by anyone except properly qualified service personnel. 8 IMPORTANT SAFETY INSTRUCTIONS ~ Always ensure that food is sufficiently heated. Many factors will affect the overall cooking time, including the type, amount and nature of the food, its initial temperature, and changes to the recipe. Some foods may contain microorganisms which are only destroyed by thorough cooking. Therefore, when cooking or reheating food, it is particularly important that food is heated at adequate temperatures for a sufficient amount of time. When in doubt, select a longer cooking or reheating time. ~ It is important that enough heat is allowed to spread evenly throughout the food being cooked. This can be achieved by stirring and/or turning the food, and by observing a sufficiently long standing time, which should be added to the time needed for cooking, reheating or defrosting. Standing times are "resting" times in which the heat is uniformly distributed in the food. ~ Always remember that times for cooking, reheating and defrosting in a microwave oven are usually considerably shorter than in the case of traditional methods of food preparation. Excessively long cooking times can lead to food drying out and burning, or may even cause it to catch fire. Do not dry bread, rolls, flowers, herbs, etc., in the microwave oven as these could also catch fire. ~ Do not use the microwave oven to heat up pads or cushions filled with cherry pits, wheat grains, lavender or gel, such as those used in aromatherapy. These pads can ignite when heated even after they have been removed from the appliance. ~ The microwave oven is not suitable for cleaning or disinfecting items. Items can get extremely hot and there is a danger of burning when the item is removed from the appliance. 9 IMPORTANT SAFETY INSTRUCTIONS ~ The microwave oven can be damaged if it is used without food or when loaded incorrectly. Therefore, do not use the appliance to warm empty dishes or to dry herbs or other similar items. ~ Always ensure that food or a browning dish has been placed in the microwave oven and that the turntable is in position before switching on the appliance. ~ Do not cook or reheat food or liquids in sealed containers, jars or bottles. Otherwise, pressure will build up and can cause the bottle or container to explode. 10 ~ When heating food and drinks, remember that the heat is created in the food itself, and that the container will normally be cooler. The dish is only warmed by the heat of the food. The temperature of the container is not an indication of the temperature of the food or liquid it contains. Check the food for the desired temperature after removing it. This is particularly important when preparing food for babies. Shake or stir baby milk and food thoroughly after heating, and try it yourself first to ensure that it will not burn the baby. IMPORTANT SAFETY INSTRUCTIONS ~ The boiling stick ensures that liquids heat up evenly, allowing bubbles to form at the right time. place the boiling wand supplied into the cup or glass. When boiling and, in particular, when reheating liquids using microwave power without the boiling wand, the boiling point of the liquid may be reached without the typical production of bubbles. The liquid does not boil evenly throughout. This "boiling delay" can cause a sudden buildup of bubbles when the container is removed from the microwave oven or when it is shaken. This can ultimately lead to the liquid boiling over suddenly and explosively. Burn hazard! The formation of bubbles can be so strong that the pressure forces the appliance door open. Risk of injury and damage! When reheating liquids, always 11 IMPORTANT SAFETY INSTRUCTIONS ~ To avoid fueling any flames, do not open the appliance door if you see smoke coming from the food in the oven interior. Interrupt the current process by turning off the appliance and disconnecting it from the power. Do not open the door until the smoke has dissipated. ~ Never leave the microwave oven unattended when cooking with oil or fat. ~ Due to the high temperatures radiated by the microwave oven, nearby flammable objects can catch fire while the appliance is in use. Do not use the microwave oven to heat the room. ~ If using alcohol in your recipes, please be aware that high temperatures can cause the alcohol to vaporize and even to ignite on hot surfaces. Do not heat undiluted alcohol in the appliance. Fire hazard! ~ Do not use the microwave oven to heat up or can food in closed containers, such as tins or jars, as pressure will build up in the container and may cause it to explode. 12 ~ Food which is stored in the oven interior or left there to be kept warm can dry out, and the moisture released can lead to corrosion damage in the microwave oven. The control panel, countertop and surrounding cabinetry can also be damaged. Always cover food that is left in the appliance. IMPORTANT SAFETY INSTRUCTIONS ~ To avoid corrosion on the stainless steel surfaces of the microwave oven, thoroughly wipe away any splashes on the interior walls from food or liquids containing salt immediately after they occur. ~ The oven interior can get hot during use. Burn hazard! Clean the appliance interior and accessories as soon as they have cooled down. Waiting too long can make cleaning unnecessarily difficult and, in extreme cases, impossible. Under certain conditions, strong grease and gunk buildup can damage the appliance and even be dangerous. Fire hazard! Please follow the instructions on cleaning in "Cleaning and care". containing wire. Do not use bowls with milled rims, or plastic containers without a fully removed aluminum lid (see "Suitable cookware for microwave ovens"). These items can be damaged or cause a fire hazard. ~ Do not leave the microwave oven unattended when reheating or cooking food in disposable containers made of plastic, paper or other flammable materials. Before using disposable containers, make sure they are suitable for use in microwave ovens. See "Suitable cookware for microwave ovens". ~ Fire hazard! Using microwave power with plasticware that is not microwave safe can cause it to melt and damage the appliance. Do not use any containers, dishware or utensils made of or containing metal. Do not use aluminum foil, lead crystal glassware, temperature-sensitive plastics, wooden dishes, metal clips, plastic clips with metal parts or paper twist ties 13 IMPORTANT SAFETY INSTRUCTIONS ~ Do not reheat food in the microwave oven in heat-retaining bags intended for normal ovens, such as bags used for grilled chicken. ~ Eggs can be cooked without their shells using microwave power only if the yolk membrane has been punctured several times first. Otherwise, the pressure may cause the egg yolk to explode. ~ When eggs are cooked with their shells in the microwave oven, they may explode, even after being removed from the oven interior. Only cook eggs in their shells in the microwave using a specially designed egg boiler. Do not reheat hard-boiled eggs in the microwave oven. ~ Food with a thick skin or peel, such as tomatoes, sausage, potatoes and eggplant, should be pierced or cut in several places before heating in order to allow steam to escape and prevent the food from bursting. 14 ~ Cookware with hollow knobs or handles is not suitable for use in the microwave. Moisture gathered in the hollow recesses can cause pressure to build up, and the item can explode (unless the recesses are sufficiently ventilated). We recommend that you do not use these types of dishes for cooking in the microwave oven. ~ To check the food temperature, interrupt the cooking process. Only use a thermometer specifically approved for use with food to measure the temperature. Do not use thermometers containing mercury or liquid, as these are not suitable for use at very high temperatures and can break easily. IMPORTANT SAFETY INSTRUCTIONS ~ Do not use a steam cleaner to clean the microwave oven. The steam may reach electrical components and cause a short circuit. Stainless steel surfaces ~ Adhesives will damage the stainless steel surface and cause it to lose its resistance to grease and grime. Do not use sticky notes, transparent adhesive tape, masking tape or other types of adhesive on the stainless steel surface. ~ Stainless steel is easily scratched. Even magnets can cause scratching. Accessories ~ Only use genuine original Miele accessories and spare parts. Using accessories or spare parts from other manufacturers will void the warranty, and Miele cannot accept liability for damage caused by the use of such parts. SAVE THESE INSTRUCTIONS AND REVIEW THEM PERIODICALLY 15 Appliance description Oven interior and accessories a Oven door d Turntable b Door locking mechanism e Plate cover c Control panel f Boiling stick 16 Appliance description Control panel g Clock/Timer display h Selector knob for microwave power i Selector knob for entering time and weight j Automatic program buttons k Clock button m l Timer button l m Memory button (for saving a 1- to 3stage program sequence) n Stop/Cancel button o Start / Add one minute / Minute + button (programmable) c p Door release a Included accessories Plate cover The cover supplied must only be used in the Microwave Solo mode. It prevents food from drying out and the oven interior from becoming dirty, and it accelerates the heating process. Boiling stick When heating liquids, the boiling stick should always be placed in the container. It helps heat liquids evenly. These products and other useful accessories can be ordered via the Miele website or from your Miele dealer. 17 Before first use Allow the microwave to sit unpacked for approx. 2 hours after transport before using it for the first time. During this time, the temperature of the appliance can equalize with the room temperature. This is important for the correct electronic functioning of the appliance. ,Danger of suffocation! Ensure that any plastic wrapping, bags, etc. are disposed of safely and kept out of the reach of children. ^ Check the appliance for any damage. Do not use the microwave oven if: – The door is warped. – The door hinges are loose. – Holes or cracks are visible on the casing. Operating the appliance with this type of damage will result in microwave leakage and pose a danger to the user. ^ Clean the oven interior and all accessories with a soft sponge and warm water. ^ Remove all packaging material when unpacking the appliance. ^ Place the enclosed quick guide to the frame behind the door (as illustrated), making sure they do not block any of the vents. Do not remove the plate cover to the microwave outlet in the oven interior or the film that covers the inside of the door. 18 Principle of operation How does a microwave oven work? Because the heat is produced directly in the food: The microwave oven contains a highfrequency tube called a magnetron. It converts electrical energy into electromagnetic waves called microwaves. These microwaves are then distributed evenly throughout the oven interior and reflected by its metal walls, which allows the microwaves to reach the food from all sides. Distribution of the microwaves is optimized by an activated turntable. – The food can generally be cooked using microwaves without adding much liquid or cooking oil. In order for microwaves to reach the food, they must be able to penetrate the cooking container being used. Microwaves can penetrate porcelain, glass, cardboard and plastics, but not metal. Therefore, you should not use containers which are either made of metal or contain it in any form, such as gold or silver trim. The metal reflects the microwaves, which may cause sparking to occur. The microwaves cannot be absorbed. The production of microwaves stops whenever the program is interrupted or the microwave oven door is opened. During operation, the closed and intact door prevents microwaves from escaping the appliance. – Defrosting, heating and cooking is faster than when using a conventional oven. – Nutrients, such as vitamins and minerals, are generally retained. – The color, texture and taste of food are hardly affected. The microwaves will pass through any suitable cookware and find their way directly into the food. All food contains moisture molecules which, when subjected to microwave energy, begin to oscillate at a rate of 2.5 billion times per second. The friction caused by these vibrations creates heat, which first starts developing around the outside of the food and then slowly penetrates it towards the center. The more water a food contains, the faster it is reheated or cooked. 19 Functions What can a microwave oven do? With a microwave oven, food can be cooked, reheated or defrosted very quickly. You can use the microwave oven in the following ways: – Food can be defrosted, reheated or cooked by entering a power setting and a time. – Frozen ready-made meals can be defrosted and then reheated or cooked. – The microwave oven can also be used as a "little kitchen sidekick," e.g. to proof dough, to melt chocolate and butter, to dissolve gelatin, to prepare glazes or to can small amounts of fruit, vegetables and meat. 20 What operating modes does a microwave have? Microwave Solo mode Suitable for defrosting, reheating and cooking. Automatic Programs You can choose from the following automatic programs: – Five defrosting programs (N: Ad 1 to Ad 5), – Three cooking programs for frozen food (N °: AC 1 to AC 3 ), – And four cooking programs for fresh food (°: AC 1 to AC 4). These programs are weight-dependent, which means that you will need enter the weight of the food. The weight can be displayed in grams (g) or pounds (lb). See "Changing settings" for more information. Suitable cookware for microwave ovens Microwaves Material and shape The material and shape of the container used affect the reheating and cooking time. Flat containers with a circular or oval shape generally work best, since the food will heat more evenly than in square or rectangular containers. – are reflected by metal, Cookware with hollow knobs or handles in which moisture can accumulate is not suitable for use in microwave ovens, except when these hollow recesses are sufficiently ventilated. Otherwise, there is a danger of a pressure buildup, which may cause the recesses to explode. Risk of injury! Metal – pass through glass, porcelain, plastic and cardboard, Metal containers, aluminum foil, metal utensils, and dishware containing metal (decoration such as gold rims or cobalt blue) must not be used in the microwave oven. Metal reflects microwaves and thus hinders the cooking process. Avoid using plastic containers where the aluminum lid has not been completely removed. – and are absorbed by food. ,Fire hazard! Containers that are not microwave safe can be destroyed and may damage the microwave oven. 21 Suitable cookware for microwave ovens Exceptions: Glassware – Ready-made meals in aluminum foil trays- Heat-resistant glass or ceramic glass are ideal for use with microwave power. can be defrosted and reheated in the microwave oven. Important: Remove the lid and make sure the foil tray is at least 1" (2.5 cm) from the oven walls at all times. Since food will only be heated from the top in this case, it is better to remove it from the aluminum foil tray and transfer it to a microwave safe container. The heat distribution will then be more even. When using aluminum foil trays, crackling and arcing can occur. Make sure that the aluminum foil is at least 1" (2.5 cm) from the oven walls at all times. It may not touch the walls. Crystal glassware is unsuitable because it contains lead which could cause the glass to crack in the microwave oven. Porcelain Porcelain is a suitable material. Do not use porcelain that has metal trim, such as a gold edge, or hollow knobs or handles. Earthenware Decorated earthenware is only suitable if the decoration is beneath the glaze. Earthenware can get very hot. – Metal meat skewers or clamps These should only be used if they are very small in comparison to the size of the cut of meat. Glazes and colors Some glazes and colors contain metal substances. This makes the dishes they cover unsuitable for use in the microwave oven. Wood Wooden containers are not suitable. Moisture contained in the wood evaporates during the cooking process, causing the wood to dry and crack. 22 Suitable cookware for microwave ovens Plastics Plasticware must only be used in the Microwave Solo mode. It must be heat-resistant and able to withstand temperatures of at least 230°F (110°C). Otherwise, the plastic may melt and fuse with the food. Special microwave-safe plasticware is also available from retail stores. Plasticware made of melamine is not suitable for use in the microwave oven. It absorbs microwave energy and becomes very hot. Before purchasing plasticware, make sure the material is microwave safe. Disposable containers Disposable containers made of plastic must meet the requirements indicated under "Plastics" to be suitable for use in the microwave. Do not leave the appliance unattended when reheating or cooking food in disposable containers made of plastic, paper or other flammable materials. Protect the environment by avoiding the use of disposable containers. Plastic cooking bags can be used for cooking and reheating food. They should be pierced beforehand so that steam can escape. This prevents a buildup of steam and reduces the risk of the bag bursting. Specially designed steam cooking bags that do not need to be pierced are also available. Follow the instructions listed on the packaging. Do not use metal clips, plastic clips with metal parts or paper twist ties containing wire. They can ignite when heated. 23 Suitable cookware for microwave ovens The plate cover – Prevents too much steam from escaping, especially during longer reheating times. – Speeds up the cooking process. – Prevents food from drying out. – Helps keep the oven interior clean. ,Sealed containers and glass jars, such as jars of baby food, must be opened before they are placed in the microwave oven. Do not cook or reheat food or liquids in sealed containers, jars or bottles. With baby bottles, the screw top and nipple must be removed. Otherwise, pressure can build up causing the bottle or container to explode. Do not use a lid or cover if: – Food coated with breadcrumbs is being cooked. – Cooking meals which are to be given a crisp finish. ,The plate cover must only ever be used with the Microwave Solo mode. Always cover food with the microwavesafe cover supplied. You can also use microwave-safe plastic wrap in place of the plate cover. Use plastic wrap that is recommended for use in a microwave oven. Heat can cause common household plastic wrap to become deformed and fuse with the food. 24 Because the cover can only withstand temperatures of up to 230°F (110°C), it should only be used in the microwave oven and solely in the Microwave Solo mode. At temperatures in excess of 230°F (110°C), the plastic can melt and fuse with the food. The cover should not form a seal with the container. If the cover is used with a container which only has a narrow diameter, there may not be enough room for condensation to escape through the side openings. The cover will overheat and may begin to melt. Clock display ,The microwave oven may not be operated until it has been properly installed in a cabinet. Setting the clock ^ Connect the appliance to the power supply. "12:00" and the m symbol will flash in the display until the current time of day is set. Until then, the clock counts upwards from 12:00, since it starts as soon as the appliance is connected to the power supply. Resetting the clock ^ Press the m button. The m symbol will flash in the display and the current hour will light up for a few seconds. ^ Use the selector knob to change the hour. ^ Press the m button to confirm the selection, or wait a few seconds. The m symbol will flash and the current minute setting will light up for a few seconds. ^ Use the selector knob to change the minutes. ^ Press the m button to confirm the selection, or wait a few seconds. Turning off the clock display ^ Press and hold the m button until the display goes dark. Pressing and holding in the m button again to display the clock again. ^ Turn the selector knob to set the hour. ^ Press the m button. ^ Then, turn the selector knob to set the minutes. ^ Press the m button to confirm the selection, or wait a few seconds. The new time setting is then applied. The colon between hours and minutes will flash. 25 Operation Opening the door Closing the door ^ Press the a button to open the door. ^ Push the door shut. If the microwave oven is in use, opening the door will interrupt the current program. Placing dishes in the microwave Ideally, the dish should be placed in the middle of the oven interior. Turntable The turntable helps the food to cook, reheat or defrost evenly. If the door was opened while the microwave was in use, press the Start button to resume the interrupted program. The appliance will not start again if the door has not been closed properly. Starting a program Use the appropriate selector to choose the microwave power level and the cooking time. Do not operate the microwave without the turntable in place. The turntable begins turning automatically when a program is started. Do not cook, reheat or defrost food directly on the turntable. Check that the dish is not larger in size than the turntable. Turn or stir food during cooking, or turn the dish, so that it heats up evenly. ^ Use the power selector to choose the desired power level. The h symbol and the power level selected will appear in the display. "0:00" will flash. You can choose from 7 different power levels. The higher the power level, the more microwaves reach the food. 26 Operation When heating up foods that cannot be stirred or turned during cooking, or foods with very different consistencies, it is best to use a lower microwave power level. – The frequency with which the food is stirred or turned. Frequent stirring or turning heats the food more evenly, and it is therefore ready in less time. This ensures the heat is distributed evenly. Heat for long enough to cook the food properly. – The amount of food. As a general rule: Double the quantity = nearly twice the time For a smaller quantity of food, the cook time decreases proportionately. – The shape and material of the dishware. ^ Press the Start button to start the program. The interior lighting comes on. ^ Set the required time using the selector knob. You can choose any length of time between 10 seconds and 90 minutes. Exception: If the maximum power level is selected, you can set a time of up to 15 minutes. If you continue to cook at full power, the machine will automatically decrease to a 600 W power level to protect from overheating (indicated in the display). The time required depends on: – The initial temperature of the food. Food taken from the refrigerator will need longer to reheat, cook, etc. than food already at room temperature. A program can only be started if the door is closed. "Door" message The "Door" message in the display is a reminder that the appliance cannot be used without food inside it. Operating the microwave without food can damage the appliance. If the door has been closed for 20 minutes or longer when the Start button is pressed, the word door will appear in the display to remind you to open the door and make sure there is food in the appliance before you press Start. You cannot start a program until you do this. – The type and texture of the food. Fresh vegetables contain more water and cook more quickly than stored vegetables. 27 Operation Interrupting or resuming a program Cancelling a program ^ Press the "Stop/C" button twice. At any time you can . . . . . . interrupt a program: ^ Press the "Stop/C" button, or open the appliance door. The time stops counting down. . . . resume a program: ^ Close the door and press the "Start" button. The program will continue. Changing the settings After starting the program, if you determine that . . . . . . the microwave power level is too high or too low: ^ Select a new power level. . . . the time entered is too short or too long: ^ Interrupt the program (press the "Stop/C" button once), use the selector knob to set a new time, and resume the program (press the "Start" button), or alternatively: ^ Press the "Start" button during operation to increase the cooking time. Each push of the button increases the time by another minute. (Exception: The time increases by 30 seconds when the microwave oven is being used at maximum power.) 28 At the end of a program An signal will sound when the cooking program is complete. The oven interior lighting goes out. As a reminder, the signal will sound briefly every 5 minutes for 20 minutes once the program is complete. ^ If you wish to stop the signal, press the "Stop/C" button. Automatic "Keep warm" function The automatic keep-warm function will turn on automatically at 80 W for a maximum of 15 minutes approx. 2 minutes after the end of a cooking program that was run at a power level of least 450 W, provided that the door remains closed and no buttons are pressed. h, 80 W and H:H will appear in the display. Opening the door or operating one of the buttons or selectors while the automatic keep-warm function is in progress will cancel the function. The automatic keep-warm function cannot be set as a separate function. Operation Minute + (programmable) System lock Pressing the "Start /c" button is sufficient to start the appliance operating at maximum power. Three cooking times are stored in the memory: The system lock prevents unauthorized operation of the appliance. ^ 30 sec: Press "Start /c" once ^ 1 min: Press "Start /c" twice To activate the system lock ^ Press and hold the "Stop/C" button until an signal sounds and the key symbol appears in the display: ^ 2 min: Press "Start /c" three times Pressing "Start /c" four times in a row will return you to the first saved time, etc. The cooking time can be increased during operation by pressing the "Start" button. Each time the "Start" button is pressed, the duration is increased by another 30 seconds. Reprogramming saved times You can change the saved cooking times. ^ Use the "Start /c" button to select the time you wish to reprogram (press once, twice or three times) and hold the "Start /c" button. ^ While holding the "Start" button, change the time using the selector knob (max. 15 minutes). The modified program will run when the "Start /c" button is released. The key symbol will go out after a short time. The key symbol will reappear whenever a button is pressed or a selector is turned. If there is a power outage, the system lock will need to be reactivated. To deactivate the system lock ^ If you would like to deactivate the system lock, press and hold the "Stop/C" button again until an signal sounds. If there is a loss of power, the reprogrammed times will no longer be saved and must be reset. 29 Operation Timer Timer + Cooking Program The timer can be used to keep track of other activities in the kitchen, e.g. boiling eggs. The time set counts down in one-second increments. The timer can be used at the same time as a cooking program and will count down in the background. ^ Press the l button. "00:00" flashes in the display and the l symbol appears. ^ Press the l button while the program is in progress. "00:00" flashes in the display and the l symbol appears. ^ Set the desired time using the selector knob. ^ Set the desired time using the selector knob. ^ Press the "Start" button to start the timer. It will also start on its own after a few seconds if the "Start" button is not pressed. ^ After a few seconds the timer will begin to count down. A few seconds after this, the display will change again to show the current cooking time counting down. The l symbol indicates that the time is counting down in the background. ^ When the set time has elapsed, an signal sounds, the clock appears, and the I symbol flashes. ^ Press the "Stop/C" button once and the l symbol disappears. Reprogramming the timer ^ Press the "Stop/C" button. The current timer countdown is interrupted. ^ Set a new timer duration as described above. 30 Do not press the "Start" button to start the timer in this case. This will increase the duration of the current cooking program by one minute. Remaining time ^ Press the l button. The remaining time on the timer will show in the display. Automatic programs All automatic programs are weight dependent. The weight can be displayed in either pounds (lb) or grams (g), see "Settings". Once a program is selected, enter the weight of the food. The microwave then automatically calculated the time according to the weight entered. Automatic cooking Three programs are available for frozen and fresh food. The recommended "standing time" for these programs is approx. 2 minutes. Cooking frozen food N ° AC 1 # Vegetables (0.3 – 1.3 lb)/(100 – 600 g) When cooking is complete, allow the food to stand at room temperature for the suggested "standing time" to allow the heat to distribute evenly throughout the food. AC 3 Casseroles (0.5 – 1.3 lb)/(200 – 600 g) Automatic defrosting Cooking fresh food ° Five programs are available for defrosting different types of food (N). AC 1 # Vegetables (0.3 – 1.3 lb)/(100 – 600 g) The recommended "standing time" for Ad 3 is up to 30 minutes depending on the weight. Approx. 10 minutes is recommended for the remaining programs. AC 2 À Potatoes (0.3 – 1.7 lb)/(100 – 800 g) Ad 1 ¹ Steak, cutlets (0.5 – 2.2 lb)/(200 – 1000 g) AC 2 ¿ Frozen dinner (can be stirred) (0.7 – 2.2 lb)/(300 – 1000 g) AC 3 $ Fish (1.2 – 3.3 lb)/(500 – 1500 g) AC 4 Æ Popcorn (0.06 – 0.22 lb)/(30 – 100 g) Ad 2 º Ground meat (0.5 – 2.2 lb)/(200 – 1000 g) Ad 3 Chicken (2.0 – 4.0 lb)/(900 – 1800 g) Ad 4 ½ Cakes (0.3 – 3.1 lb)/(100 – 1400 g) Ad 5 ¾ Bread (0.5 – 2.2 lb)/(200 – 1000 g) 31 Automatic programs ^ Press the relevant button until the desired program appears in the display. Example: To select program Ad 3 (defrosting chicken) press "N" three times. lb or g will flash in the display, and the selected program will light up along with the Microwave symbol "h". ^ If desired press "M", to toggle between the lb and g settings. ^ Enter the weight using the "Weight selector". ^ Press "Start". The cooking duration, which was calculated according to the weight entered, will being to count down and the Microwave symbol h will light up. A signal will sound halfway through the cooking time. ^ Interrupt the program to turn or stir the food then continue the program. If desired the time can be extended by a few minutes during operating by pressing the "Start" button repeatedly until the desired time shows in the display. It is only possible to extend the time by a few minutes. A signal will sound when the program is complete, and the interior lighting of the microwave will go out. Popcorn Æ This automatic programme is suitable for making microwave popcorn. The programme is not suitable for making popcorn from kernals. Only use this automatic programme for popcorn which is specifically labelled as microwave popcorn. ^ Place the packet on the turntable according to the instructions on the packaging. Ensure that the bag can inflate freely. A build-up of heat could be caused by the bag touching the interior wall and becoming stuck. ^ Stop the programme before the end if the popping noises become infrequent. Follow the instructions on the packaging. The bag will be very hot. Remove it with care. 32 Recipes for the automatic programs ° Here you will find a few suggested recipes for the "Cooking fresh food °" program, which you can add to or modify as desired. It is important to follow the weight guidelines for each program. If these weights are exceeded, the food will not be sufficiently cooked. AC 1 # Vegetables Place the prepared vegetables in a container. Depending on the freshness and moisture content of the vegetables, add 3-4 tbsps. water and a little salt or other seasoning. Enter the weight including the water, place the covered cooking container on the turntable and cook. Halfway through the cooking time, a signal will sound, prompting you to turn or stir the food. When cooking vegetables in a sauce, the weight entered must include the sauce. Do not exceed the maximum weight guidelines. Carrots in a chervil cream sauce (serves 2) Preparation time: 25 - 35 minutes 3/4 lb (350 g) carrots, washed and peeled 1/3 tbsp (5 g) butter 1/4 cup (50 ml) vegetable stock (instant) 1/3 cup (75 g) crème fraîche 1 tbsp. white wine Salt and pepper A pinch of sugar 1 /2 tsp mustard 1-2 tbsp fresh chervil, chopped, or 1 tbsp dried chervil, chopped Approx. 1 tbsp thickener Cut the carrots into sticks or slices (approx. 1/8 in (3-4 mm) thick) and place in a cooking container. Combine the rest of the ingredients to make a smooth sauce, and pour over the carrots. Cover and cook. Stir when the signal sounds halfway through the cooking time. Setting: Cooking fresh food AC 1 # Weight: 1.2 lbs (525 g) Place cooking container on the turntable 33 Recipes for the automatic programs ° AC 2 À Potatoes This program can be used to cook peeled, new and bouillon potatoes. Enter the weight for the potatoes and the cooking liquid. For peeled potatoes, peel, wash and drain the potatoes and place them in a cooking container. Season with a little salt, cover and cook. When cooking new potatoes, add approx. 1 tbsp water per potato. If cooking the potatoes in their skins, pierce the skins several times with a fork or skewer before cooking, then cover the container and cook. Golden curried potatoes (serves 3) Preparation time: 25 - 35 minutes 1.2 lbs (500 g) peeled potatoes 1 onion, finely diced 3/4 tbsp (10 g) butter 1 – 2 tbsp curry powder 1 cup (250 ml) vegetable stock (instant) 1/4 cup (50 ml) cream 1/4 lb (125 g) peas (frozen) Salt and pepper Cut the potatoes into large cubes (approx. 1 1/8 x 1 1/8 in (3 x 3 cm)), or use small potatoes. Place all of the ingredients into a suitable container and mix well. Cover and cook. Stir when the signal sounds halfway through the cooking time. Setting: Cooking fresh food AC 2 À Weight: 2.2 lbs (1000 g) Place cooking container on the turntable 34 AC 3 $ Fish Fish curry (serves 4) Preparation time: 35 - 45 minutes 2/3 lb (300 g) pineapple pieces 1 bell pepper, red 1 small banana 1.1 lbs (500 g) firm white fish 3 tbsp lemon juice 2 tbsp (30 g) butter 1/2 cup (100 ml) white wine 1/2 cup (100 ml) pineapple juice Salt, sugar and chili pepper 2 tbsp thickener Dice the fish and place in a suitable container. Drizzle with lemon juice. Quarter the peppers, remove the seeds and pith and cut into narrow strips. Peel and slice the banana. Add to the fish along with the pepper and pineapple pieces and mix well. Add the butter. Mix together the wine, juice, spices and thickener to make a smooth sauce and pour over the fish. Mix everything thoroughly, then cover and cook. Setting: Cooking fresh food AC 3 $ Weight: approx. 2.6 lbs (1200 g) Place cooking container on the turntable Reheating Select the following microwave power levels to reheat food and drinks: Drinks . . . . . . . . . . . . . . . . . . . . . 900 W Food . . . . . . . . . . . . . . . . . . . . . . 600 W Food for babies and toddlers . . . 450 W ,Be sure that baby/toddler food does not become too hot. Heat for only 1/2 to 1 minute at 450 W. If you are unsure whether a sufficiently high temperature has been reached, continue reheating a little longer. Larger amounts of food should be stirred or turned from time to time during cooking. Stir the food from the outside towards the middle, as food heats more quickly from the outside. After reheating Tips for reheating Always use a lid or plate cover for reheating food, except when a drier finish is desired, e.g. breaded poultry/ meat. ,Always remove the lids from jars, especially jars of baby food. Remove the screw cap and nipple before warming baby bottles. When reheating liquids, place the boiling stick supplied with the appliance into the cup or glass. Never reheat hard boiled eggs in a microwave oven, even without the shell. The eggs can explode. Food taken straight from the refrigerator will take longer to reheat than food stored at room temperature. The cooking time required depends on the texture of the food, its initial temperature and the amount to be cooked. Be careful when removing dishes from the appliance. They may be hot. Although heat is not normally produced in the cookware itself by the microwaves (apart from stoneware), heat is transferred from the food to the container, which can cause the container to become hot. Allow food to stand at room temperature for a few minutes after reheating so that the heat can spread evenly throughout the food and so that a consistent temperature is reached. ,After reheating food/drinks, especially for babies and small children, stir it or shake the container and check that the temperature does not pose any danger. Always ensure that food is sufficiently reheated. 35 Cooking Place the food in microwave-safe cookware and cover it. When cooking, it is recommended to initially select a power level of 900 W and then, when the food is hot, reduce the power level to 450 W for a more gentle continued cooking. For dishes such as rice or pudding, first select a power level of 900 W, and then reduce it to 150 W for simmering. Tips for cooking The cooking time for vegetables depends on their texture. Fresh vegetables contain more water than vegetables which have been stored and usually cook more quickly. Add a little water to vegetables which have been kept stored. Food taken straight from the refrigerator will take longer to cook than food which has been kept at room temperature. Stir or turn food from time to time during cooking to help it cook more evenly. Ensure that foods which spoil quickly, such as fish, are thoroughly cooked for an appropriate length of time. Food with a thick skin or peel, such as tomatoes, sausages, potatoes (cooked in their skins) and eggplant, should be pierced or the skin cut in several places before cooking to allow steam to escape and prevent the food from bursting. When cooking eggs in their shells in the microwave oven, you must use a specially designed egg boiler. Otherwise, the eggs will explode, even after being removed from the oven interior. Eggs can be cooked without their shells in the microwave oven only if the yolk membrane has been punctured several times first. The pressure could otherwise cause the egg yolk to explode. After cooking Be careful when removing dishes from the appliance. They may be hot. Although heat is not normally produced in the cookware itself by the microwaves (apart from stoneware), heat is transferred from the food to the container, which can cause the cookware to become hot. Allow food to stand at room temperature for a few minutes (standing time) after cooking so that the heat can spread evenly throughout the food and so that a consistent temperature is reached. 36 Defrosting / Defrosting and reheating or cooking Do not refreeze partially or fully defrosted food. Consume defrosted food as soon as possible, as it will lose its nutritional value and spoil if left for too long. Defrosted food may only be refrozen after it has been cooked. Defrost Select the following microwave power settings to defrost food: – 80 W for defrosting very delicate food, such as cream, butter, cream cakes and cheese. – 150 W for defrosting all other foods. Remove the frozen food from its packaging and place in a microwavesafe container. Do not cover. Turn, stir or separate the food about halfway through the defrosting time. To defrost meat, unpack the frozen meat and place it on an overturned plate in a glass or porcelain container so that the meat juice can drip off and be collected. Turn from time to time during defrosting. Defrosting followed by reheating or cooking Deep-frozen food can be defrosted and immediately reheated or cooked. After defrosting, select 900 W and then 450 W. Remove the food from its packaging and place in a covered microwave-safe container for defrosting and reheating or cooking. Exception: Ground beef should be left uncovered while cooking. Foods containing large amounts of liquid, such as soups and vegetables, should be stirred several times during the process. Carefully separate and turn slices of meat halfway through. Turn pieces of fish at the halfway mark. After defrosting followed by reheating or cooking Allow the food to stand at room temperature for a few minutes so that the heat can spread evenly throughout the food. When defrosting poultry, be sure to strictly observe food hygiene rules. Do not use the liquid from the defrosted poultry. Risk of salmonella poisoning! Always follow USDA guidelines on food safety. 37 Canning You can use the microwave to can small amounts of fruit, vegetables and meat in glass jars. Prepare the items as you normally would. Do not fill the jars more than 1" (2.5 cm) below the rim. Only use clear adhesive tape or microwave-safe clips to close the jars. Never use metal clips or jars with screw-on lids. Do not use metal cans. When cans are used, excess pressure is produced which may cause the cans to explode. Risk of injury and damage! The amount of time required for the contents in all jars to start bubbling evenly is as follows: 1 jar. . . . . . . . . . . . . . approx. 3 minutes 2 jars . . . . . . . . . . . . . approx. 6 minutes 3 jars . . . . . . . . . . . . . approx. 9 minutes 4 jars . . . . . . . . . . . . approx. 12 minutes This is enough time for canning fruit and cucumbers. For vegetables, reduce the power to 450 W once the contents start bubbling. Cook - Carrots for approx. 15 minutes - Peas for approx. 25 minutes. After canning For best results, use no more than four 1 pint (1/2 - -liter) jars at a time when canning. Place the jars on the turntable. Remove jars from the oven interior, cover with a towel and leave to set in a location protected from drafts for approx. 24 hours. Remove the clips or the adhesive tape and make sure that all glasses are sealed properly. Set the power level to 900 W and bring the jar contents to a boil. The amount of time required for this depends on: – The initial temperature of the contents. – The number of jars. 38 Suggested uses Food Time (min) Notes Quantity Power level (in W) Melting butter 1/4 lb (100 g) 450 1:00 – 1:10 Do not cover. Melting chocolate 1/4 lb (100 g) 450 3:00 – 3:30 Do not cover. Stir halfway through melting. Dissolving gelatin 1 packet + 5 tbsp water 450 00:10 – 00:30 1 packet + 1 cup (250 ml) liquid 450 4–5 Do not cover. Stir halfway through heating. Starter made with 1/2 cup (100 g) flour 80 3–5 Cover and leave to proof. Popcorn 1 tbsp (20 g) popcorn 900 3–4 Place popcorn in a 1-liter container, cover and cook. Sprinkle with sugar or salt after cooking. Chocolate marshmallows 3/4 oz (20 g) 600 00:10 – 00:20 Place on a place, do not cover. 1/2 cup (125 ml) 150 1–2 Heat uncovered at low power to bring out flavor. 1/4 lb (100 g) 900 2–3 Place on paper towel, do not cover. Softening ice cream 1/2 gallon (500 g) 150 2 Place open ice cream container in microwave oven. Skinning tomatoes 3 tomatoes 450 6–7 Cut a cross into the top of each tomato, cover, and heat in a little water. The skins will slip off easily. The tomatoes can get very hot. 1 lb (300 g) strawberries, 1 1/2 cups (300 g) sugar 900 7–9 Mix the fruit and sugar in a deep container, cover and cook Preparing flan topping/fruit glaze Yeast dough Salad dressings Bacon Preparing strawberry jam Do not cover. Stir halfway through dissolving. The information provided in this chart is intended as a guide only. 39 Saving your favorite programs One favorite program can be saved into memory. This program can be used for your most frequently cooked recipe. The program can have up to 3 stages (for example: 2 minutes at 600 W, followed by 10 minutes at 450 W, and finally 3 minutes at 300 W). Programming (The example given is for a three-stage program.) ^ First, select the power level for the first stage. ^ Then, select the duration. ^ Press the "M" button. "1" will appear in the display, and "2" will flash. ^ Next, select the second power level and duration. ^ Press the "M" button again. "2" will appear in the display, and "3" will flash. ^ Now, select the third power level and duration and press the "M" button. After the third step, you can use the "M" button to scroll through your entry and check it. 40 ^ Once you have finished programming, turn the power selector to the 12 o'clock position. ^ Start the program to save the entry. Do not run the entire program unless there is food in the appliance. If there is no food in the appliance, press the Stop/C button twice as soon as you have started the program to prevent the appliance from being damaged. One- and two-stage programs can be saved in the same way. The programming process is completed by moving the power selector to the 12 o'clock position and then pressing the Start button. Pressing the M button shows the next stage. Changing an entry ^ You can override the previously saved program by entering a new program. Saving your favorite programs Using the favorite program ^ Turn the power selector to the 12 o'clock position. ^ Press the "M" button. ^ Press the "Start" button. If there is a loss of power, the program will no longer be saved and must be reentered. 41 Changing settings Some of the appliance's factory default settings can be changed if desired. The other settings can be changed in the same way. See the chart on the following page for the different options available. The original factory settings are marked in the chart with a star*. ^ When you have finished making the desired changes, press the "Stop/C" button. To change a setting, proceed as follows: ^ Press and hold the m and "M" buttons at the same time until P I and X appear in the display. Then release them. If you press them for too long, the time of day will appear again in the display. ^ Use the selector knob to choose the setting that you wish to change (P I to P 5 and P 0). Turn it until the desired setting shows in the display. ^ Then, press the "M" button to call up the setting. S will appear in the display to show that the setting can be changed. ^ Turn the selector knob if you wish to change the setting (see table) and confirm your entry by pressing the M button (for P 5 and P 0, press and hold the "M" button for approx. 4 seconds). The change is then saved to the memory. P will appear in the display again, together with the number for the setting. 42 Changes to the settings remain saved during a power outage. Changing settings Settings Available settings (* factory default) P I 12 h * 12-hour clock display. 24 h 24-hour clock display. Time of day P 2 Automatic "Keep warm" function S I * S 0 The keep-warm function is activated. The keep-warm function is deactivated. P 3 "Door" message S I * The "Door" message appears if the door has not been opened in the last 20 minutes before Start is pressed. Start is then blocked. The "Door" message does not appear. S 0 P 4 Reminder signal S I * S 0 The reminder signal sounds briefly every 5 minutes for 20 minutes after the end of the program. The reminder signal is deactivated. S 0 * Demo mode is not activated. When the P 5 Demo mode active demo mode is deactivated, "_ _ _ _" (for presentations in dealer showrooms or will briefly appear in the display. at trade shows) The appliance is set to demo mode. When a S I button or selector is operated, MES_ shows briefly in the display. The appliance can be operated, but the microwave function does not work. P 6 Unit of weight S I * S 0 Food weight is displayed in pounds (lb). Food weight is displayed in grams (g). P 0 Factory default settings S I * Factory default settings have been restored, or have not been changed. Factory default settings have been changed. S O 43 Cleaning and care Do not use a steam-cleaner to clean the microwave oven. Steam can reach the live electrical components of the appliance and cause a short circuit. Oven interior and inside of door ,The oven interior can get hot during use. Burn hazard! Clean the appliance interior as soon as the microwave has cooled down. Waiting too long can make cleaning unnecessarily difficult and, in extreme cases, impossible. Under certain conditions, heavy grease and grime can damage the appliance and even be dangerous. Fire hazard! The oven interior and inside of the door can be cleaned using a damp cloth with a mild cleaner or liquid dish soap mixed with water. Wipe dry with a soft cloth. For grease and grime, heat a glass of water for 2 to 3 minutes until the water begins to boil. The steam will collect on the walls and soften the buildup. The oven interior can now be wiped clean (with a liquid dish soap if necessary). Do not remove the plate cover to the microwave outlet in the oven interior or the film that covers the inside of the door. Do not let water or any objects penetrate the vents in the appliance. Wring out cloths before using them to wipe out the oven interior to prevent moisture from getting into the openings. Do not use abrasive cleaners, since these will scratch the appliance surfaces. To neutralize odors in the microwave oven, put a cup of water with some lemon juice in the oven interior and heat for a few minutes, or until boiling. 44 Cleaning and care The door should be kept clean at all times and checked at regular intervals for any signs of damage. ,If you notice any damage to the door, do not use the appliance until the defect has been repaired by a Miele authorized technician. Do not turn the support manually, as this could damage the drive motor. Appliance front Do not let water or any object get into or block the air vents in the door frame. To clean the oven interior: It is best to remove any grease and grime on the appliance front immediately. If it remains on the surface for a longer period of time, it may become impossible to remove, causing the surfaces to discolor or change. ^ Remove the turntable and wash it either in the dishwasher or by hand with a liquid dish soap and water. Clean the front with a clean sponge and a solution of hot water and dish soap. After cleaning, dry the front with a soft cloth. A clean, damp microfiber cloth can also be used without cleaner. All of the appliance surfaces are easily scratched. Scratches on glass surfaces may even lead to breakage under certain conditions. Contact with unsuitable cleaners can alter or discolor the surfaces. ^ Always keep the roller ring and the oven floor below the turntable clean so that the turntable can turn smoothly. ^ Clean the contact surfaces between the turntable and the roller ring. 45 Cleaning and care To avoid damaging the surfaces when cleaning, do not use any of the following: Included accessories – Cleaning products containing soda, ammonia, acid or chloride The boiling stick is dishwasher safe. – Lime removers – Abrasive cleaning products, such as scouring powder, scouring liquid, or pumice stones – Cleaners containing solvents – Stainless steel cleaners – Dishwasher cleaner – Oven sprays – Glass cleaners – Hard, abrasive sponges and brushes, such as pot scrubbers – Eraser sponges – Sharp metal scrapers 46 Boiling stick Plate cover Wash and dry the plate cover after each use. The plate cover can be washed in a dishwasher. However, discoloration caused by natural dyes, e.g. from carrots, tomatoes or ketchup, may occur. This discoloration is permanent but will not affect the stability of the cover. Frequently Asked Questions ,Repairs to this appliance must only be carried out by a Miele authorized service technician in strict accordance with current local and national safety regulations. Repairs and other work by unqualified persons may pose a danger to the user. However, you can resolve the following minor problems yourself: What to do if . . . . . . a program will not start. Check whether: ^ The appliance door is closed properly. ^ The system lock has been activated (see "System lock"). ^ The word "Door" appears in the display. The door has remained closed for 20 minutes or longer (see "door" message). ^ The appliance is properly plugged into an electrical outlet. ^ The main circuit breaker has tripped. If this is the case, there could be a fault in the appliance, the building's electricity supply or another appliance (unplug the power cord from the outlet and contact a qualified electrician or Miele, see "After sales service"). . . . a noise can be heard after the cooking process is complete. This is not a malfunction. The cooling fan will continue to run for a while after the cooking process to dispel any moisture from the oven interior and prevent it from settling on the control panel or surrounding cabinetry. It will switch off automatically. . . . the display does not light up. Check whether: ^ The clock display has been switched off (press and hold the m button for a few seconds). 47 Frequently Asked Questions . . . the turntable does not turn smoothly. ^ Check whether the oven floor underneath the turntable is clean. ^ Check whether the contact areas between the turntable and the support are clean. Remove any food or grime. . . . food is not adequately defrosted, heated or cooked at the end of the selected cooking time. ^ Check whether an appropriate power level was selected for the time entered. The lower the power level, the more time necessary. ^ Check whether the program was interrupted and not resumed. . . . the microwave function is working but not the oven lighting. ^ You can operate the appliance as usual, but the lamp has blown. To replace the lamp, contact Miele. . . . strange noises are heard when the microwave oven is in use. Check whether ^ The food is covered with aluminum foil. If so, remove it. ^ Sparks are being created by the use of crockery with a metallic finish (see "Suitable cookware for microwave ovens"). . . . the clock in the display is not accurate. If there has been a loss of power, the time automatically switches back to the original setting of 12:00. You must reset the clock. ^ Set the correct time of day. 48 Frequently Asked Questions . . . food cools down too quickly. In the microwave oven, food begins to cook from the outside first. From there, the heat moves towards the inside of the food. If the food was cooked at a high power level, it is possible that the heat may not have reached the center of the food yet, causing it to be hot on the outside but cold in the middle. During the standing time, the heat is then transferred to the center of the food. This may leave the food warm in the middle but cold on the outside. When reheating food with different consistencies, such as plated meals, it is therefore useful to select a lower power level and lengthen the cooking time. . . . the microwave oven switches off during a cooking, reheating or defrosting program. There may be insufficient air circulation. Check whether ^ The air inlet or outlet is blocked. Remove any objects if necessary. For safety reasons, the appliance may automatically switch off if it overheats. Cooking can be resumed after a cool-down period. If the microwave oven switches off repeatedly, please contact the Miele. ,If you are not able to solve the problem by following the instructions above, do not, under any circumstances, open the appliance casing. This microwave oven should only be repaired by a Miele authorized technician. 49 After sales service In the event of a fault which you cannot easily fix yourself, please contact the Miele Technical Service Department: U 1-800-999-1360 [email protected] V 1-800-565-6435 [email protected] When contacting Technical Service please quote the serial number and model of your microwave. This information is visible on the silver data plate. MieleCare MieleCare, our Extended Service Contract program, gives you the assurance of knowing that your appliance investment is covered by 5 years of worry free ownership. MieleCare is the only Extended Service Contract in the industry that guarantees repairs by a Miele Authorized Service Provider using genuine Miele parts. Only genuine Miele parts installed by factory trained professionals can guarantee the safety, reliability, and longevity of your Miele appliance. Please note that unless expressly approved in writing by Miele’s Service department, Extended Service Contracts offered by other providers for Miele products will not be recognized by Miele. Our goal here is to prevent unauthorized (and untrained) service personnel from working on your Miele products, possibly doing further damage to them, you and/or your home. To learn more about MieleCare Extended Service Contracts, please contact your appliance dealer or visit us online at: http://mieleusa.com/mielecare 50 Installation Instructions Caring for the environment Disposal of packaging material Disposal of your old appliance The cardboard box and packing materials protect the appliance during shipping. They have been designed to be biodegradable and recyclable. Old appliance may contain materials that can be recycled. Please contact your local recycling authority about the possibility of recycling these materials. Ensure that any plastic wrappings, bags, etc. are disposed of safely and kept out of the reach of children. Danger of suffocation!Ensure that any plastic wrap is disposed of safely and kept out of the reach of children. Danger of suffocation! Before discarding an old appliance ensure that it presents no danger to children while being stored for disposal. Unplug it from the outlet, cut off its power cord and remove any doors to prevent hazards. 52 Electrical connection ,CAUTION: Before servicing, disconnect the power supply by either removing the fuse, shutting off the power main or manually "tripping" the circuit breaker. Power supply The microwave comes equipped with a power cord with a NEMA 5-15 P molded plug ready plug ready for connection to a: 120 V, 15 A, 60 Hz power supply. Installation work and repairs should only be performed by a qualified technician in accordance with all applicable codes and standards. Repairs and service by unqualified persons could be dangerous and the manufacturer will not be held responsible. WARNING: THIS APPLIANCE MUST BE GROUNDED Installer: Please leave these instructions with the consumer. Before connecting the appliance to the power supply, make sure that the voltage and frequency listed on the data plate correspond with the household electrical supply. This data must correspond in order to prevent machine damage. Consult an electrician if in doubt. Only operate the appliance after it has been installed into cabinetry. The appliance must be plugged into an appropriate outlet that is installed and grounded in accordance with all local codes and ordinances. 53 Installation Building-in dimensions When building in the appliance, ensure that the vents located at the front of the appliance are not blocked, and that there is adequate ventilation to the rear of the unit (see illustrations). Do not block the ventilation gaps! Tall cabinet This microwave is suitable for installation into a tall cabinet. A minimum installation height of 33 7/16" (850 mm) must be maintained. 3 452,5 During transport be sure to lift the appliance by the housing, not by the frame. The framework is not sturdy enough to support the weight of the appliance while being carried. 5 >850 59 54 20 Installation Installation accessories (supplied) 4 x 16mm 3 Only operate the appliance after it has been installed into cabinetry. ^ Position the fitting bracket on the center line. Use the mark on the bracket as a guide. ^ Mark the center line of the cabinet. 55 Installation ^ Fit a screw a in to the center of the first long hole. ^ Check the alignment of the unit, then fit another screw a into the other long hole. ^ Tighten both screws. ^ Place the appliance in the niche. Using both hands on the back of the microwave interior move it into place. The microwave will engage into position once it is correctly installed. ^ Check the alignment. ^ If it is not aligned correctly, pull the appliance out of the niche and realign it by slightly adjusting the bracket on the long holes. ^ Once correctly aligned, to prevent the unit from moving insert a third screw a into the middle of the bracket. 56 ^ Slide the unit into the niche, pulling the plug and cable through the back. ^ Connect the electrical supply. ^ Push the appliance all the way in to the niche as described above. 57 58 Please have the model and serial number of your appliance available before contacting Technical Service. U.S.A. Canada Miele, Inc. Importer Miele Limited National Headquarters 9 Independence Way Princeton, NJ 08540 Phone: 800-843-7231 609-419-9898 609-419-4298 Fax: www.mieleusa.com Technical Service & Support Nationwide Phone: 800-999-1360 888-586-8056 Fax: [email protected] Headquarters and Miele Centre 161 Four Valley Drive Vaughan, ON L4K 4V8 www.miele.ca Customer Care Centre Phone: 800-565-6435 905-532-2272 [email protected] Germany Manufacturer Miele & Cie. KG Carl-Miele-Straße 29 33332 Gütersloh 59 M 6040 SC en - US, CA M.-Nr. 09 798 350 / 00