1
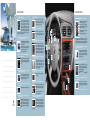
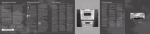
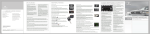
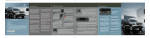
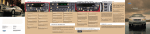
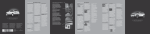
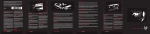
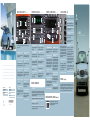
AM/FM STEREO C A SSET TE
AM/FM STEREO SINGLE CD
(IF EQUIPPED)
A U T O M AT I C C L I M AT E C O N T R O L
(IF EQUIPPED)
MESSAGE CENTER
(IF EQUIPPED)
NEW
02 INFO BUTTON
This feature shows the following control displays:
06
01
02
01
01
06
02
03
04
07
03 RESET BUTTON
04
01
02
03
08
05
05
01 AM/FM SELECT
In radio mode, press to select the AM or FM1 or
FM2 frequency bands.
08
08
For information on other available audio systems or the CD changer system, please refer
to your Owner’s Guide.
09
01 AM/FM SELECT
06 SETTING THE CLOCK
In radio mode, press to select the AM/FM1/FM2
frequency bands.
Press and hold the H control to set the hour.
Press and hold the M control to set the minute.
06 SETTING THE CLOCK
02 VOLUME/POWER CONTROL
Press and hold the H control to set the hour.
Press and hold the M control to set the minute.
Press the control to turn the audio system on or
off. Turn the control to raise or lower the volume.
03 SEEK FUNCTION
08 COMPRESSION
In radio mode, press to find the next listenable
station up or down the band. In CD mode, press
to move to the next/previous selection on the CD.
Press to bring soft and loud passages together
for a more consistent listening level.
02 VOLUME/POWER CONTROL
07 TAPE SELECT
Press the control to turn the audio system on or
off. Turn the control to raise or lower the volume.
To begin tape play while in radio mode, press the
tape control.
Guide, which contains more detailed information concerning the features of your
Press to eject a CD.
03 SEEK FUNCTION
08 DOLBY ® NOISE REDUCTION
In radio mode, press to find the next listenable station up or down the band. In tape mode, press to
move to the next/previous selection on the tape.
Press to activate the system, which reduces tape
noise and hiss while playing a tape. Press again
to deactivate.
04 SIDE 1-2
09 SCAN FUNCTION
Press to change tape direction.
In radio mode, press to hear a sampling of all
listenable stations. In tape mode, press to hear
a brief sampling of all selections.
05 TUNE ADJUST
In radio mode, press to move to the next
frequency up or down the band.
September 2003
Second Printing
Quick Reference
Mercury Sable
Litho in U.S.A.
05 TUNE ADJUST
In radio mode, press to move to the next
frequency up or down the band. In CD changer
mode (if equipped), press to select a disc in
the changer.
05 A/C CONTROL
Press to manually enable or disable the air
conditioning in all modes except defrost.
07 CD SELECT
Distributes outside air through the windshield
defroster ducts. Can be used to clear ice or fog
from the windshield.
To begin CD play while in radio mode, press the
CD control.
02 REAR WINDOW DEFROSTER
Select AM, FM1, or FM2 band, then select a station. Next, press and hold a numbered preset
control until the sound returns.
06 RECIRCULATION CONTROL
Press to clear the rear window of ice or fog. Press
the control again to turn off the defroster. The
defroster turns off automatically after 10 minutes
or when the ignition is turned to the OFF position.
Activating the rear window defroster will also
activate the heated mirrors (if equipped).
Press to play CD tracks in random order.
Press to recirculate interior air within the cabin. This
provides maximum cooling efficiency, particularly in
extremely hot and humid weather, and also helps to
reduce dust and undesired outside odors from
reaching the interior of your vehicle. Press the
recirculation button again to allow fresh, outside air
to enter the cabin. Recirculation mode should not
be used without the A/C on in order to reduce
excess humidity build-up inside the vehicle.
10 SCAN FUNCTION
03 FAN SPEED
In radio mode, press to hear a sampling of all
listenable stations. In CD mode press to hear
a brief sampling of all selections.
To adjust manually, use the control to raise or
lower the fan speed.
07 MANUAL OVERRIDE CONTROLS
04 AUTOMATIC OPERATION
When pressed, these four controls will override
automatic operation. All controls allow you to
determine where airflow is directed. To return to
automatic operation, press AUTO.
E S S E N T I A L I N F O R M AT I O N
ROADSIDE ASSISTANCE
10 SETTING THE MEMORY PRESETS
For a more detailed description of the RESET control,
please refer to your Owner's Guide.
01 FRONT WINDOW DEFROSTER
about your vehicle and consult the appropriate section when questions arise.
Ford Motor Company
Customer Relationship Center
P.O. Box 6248
Dearborn, Michigan 48121
(800) 392-3673
03
04
10
09 SHUFFLE
04 EJECT
your occupants. Always read your entire Owner’s Guide carefully when first learning
Press this control to select and reset functions shown in
the INFO menu and SETUP menu.
09
10
vehicle and important safety warnings to help reduce the risk of injury to you and
For a more detailed description of the INFO controls,
please refer to your Owner's Guide.
02
07
07
06
03
This Quick Reference Guide is not intended to replace your vehicle’s Owner’s
Odometer | Distance to Empty | Average Fuel Economy
Trip Odometer | Trip Elapsed Drive Time | Compass
(if equipped) | Outside air temperature (if equipped)
05
To fully assist if you should have a vehicle concern, Ford Motor Company offers a complimentary roadside
assistance program. This program is separate from the New Vehicle Limited Warranty. The service is available:
24 hours, 7 days a week for the New Vehicle Limited Warranty period of three years or 36,000 miles, whichever
comes first. Roadside assistance will cover:
Changing a flat tire | Jump-starts | Limited fuel delivery | Lock-out assistance | Towing of your vehicle
*F4F4J19G217AA*
ROADSIDE ASSISTANCE CENTERS
4F4J-19G217-AB
United States: (800) 241-3673 | Canada: (800) 665-2006
For complete details on any roadside assistance concern, see the Roadside Emergencies section or the
Customer Assistance section in your Owner’s Guide.
In this mode, the system will automatically determine fan speed and airflow location to achieve
the temperature selected. Press AUTO to engage
the automatic temperature control.
08 TEMPERATURE SELECTION
To control the temperature, select the desired
temperature by pressing the temperature controls.
REAR WINDOW WIPER & WA SHER
( Wa g o n O n l y )
The rear wiper and washer control is located under the headlamp controls. Press
the wiper control to activate the rear wiper. Press again to turn off the wiper. Press
the washer control to activate the rear washer.
With the ignition in the ON position, the message center,
located on your instrument cluster, displays important
vehicle information through a constant monitor of vehicle
systems. You may select display features on the message
center for a display of status preceded by a brief indicator
chime. The system will also notify you of potential vehicle
problems with a display of system warning followed by
a long indicator chime.
01 SET BUTTON
Setup menu controls the following displays:
Language | Units (English Metric) | System Check
For a more detailed description of the Setup menu,
please refer to your Owner's Guide.
COMPA SS
SYSTEM WARNINGS
System warnings alert you to possible problems or
malfunctions in your vehicle operating systems.
In the event of a multiple warning situation, the message
center will cycle the display to show all warnings by
displaying each one for several seconds.
The message center will display the last selected feature
if there are no more warning messages. This allows you
to use the full functionality of the message center after
you acknowledge the warning by pressing the RESET
control and clearing the warning message.
If any warning stays on or continues to come on, contact
your dealer as soon as possible. For a more detailed
description of system warnings please refer to your
Owner’s Guide.
(If Equipped)
The compass reading may be affected when you drive near large buildings, bridges, power lines and powerful broadcast antennas. Magnetic or metallic objects placed in, on or near the vehicle may also affect compass accuracy.
Usually, when something affects the compass readings, the compass will correct itself after a few days of operating
your vehicle in normal conditions. If the compass still appears to be inaccurate, a manual calibration my be necessary. Refer to Compass zone/calibration adjustment in the Driver Controls chapter of your Owner’s Guide.
04
SABLE
QUICK REFERENCE GUIDE
04
SABLE
I N T E R I O R F E AT U R E S
A D D I T I O N A L F E AT U R E S
QUICK REFERENCE GUIDE
01 HEADLAMP AND PANEL DIMMER CONTROL
07 TRACTION CONTROL (IF EQUIPPED)
REMOTE ENTRY SYSTEM (IF EQUIPPED)
Rotate clockwise to the first position to turn on the parking
lamps,instrument panel lamps, license plate lamps and tail lamps. Rotate
to the second position to also turn on the lowbeam headlamps.
Pull control out, when exterior lamps are on, to turn on the fog
lamps (if equipped). Rotate counterclockwise to activate autolamp
(if equipped), which provides light-sensitive automatic on-off control of
the exterior lights and keeps the lights on for a fixed period of time after
the ignition is turned OFF. Use the panel dimmer control, located to the right of the headlamp
control, to adjust the brightness of the instrument panel during headlamp and parking lamp
operation, and to turn on or off the overhead dome lamp.
This system helps your vehicle make better use of available traction,
especially on slippery road surfaces. The system defaults to ON,
however, should you become stuck, try switching the traction control system
off. For more information, please consult your Owner’s Guide.
Press this control once to unlock the driver’s door. Press again within
3 seconds to unlock all doors and liftgate (wagon only).
Press this control once to lock all doors and liftgate (wagon only).
Pressing the control a second time within 3 seconds will chirp the horn
to confirm that all doors are closed and locked.
08 AUXILIARY POWER POINT
Press this control to activate the panic alarm. To deactivate, press the
control again, or turn the ignition to ON.
06
Located above the coin holder on the lower portion of the instrument panel,
the auxiliary power point is an additional power source for electrical
accessories. Improper use of the power outlet can cause damage not covered
by your warranty.
12
Press this control to unlatch the trunk or liftgate (wagon only).
03
05
The interior lights will turn on when the remote is used to unlock the doors or sound the
panic alarm. The interior lights will turn off if the ignition switch is turned to the ON position, or after 25
seconds of illumination. The dome lamp control must not be set to the OFF position for the illuminated entry
system to operate. The remote-control entry features only operate with the ignition in the LOCK position.
02 TURN SIGNAL, HIGH BEAM & WIPER/WASHER CONTROL
04
02
Push down to activate the left turn signal or up to activate the right turn signal.
Pull stalk toward you to briefly flash the high beams. Push stalk away from you
to turn on the headlamp high beams.
Rotate the end of the control away from you to increase or toward you to
decrease the speed of the wipers. Pushing the end of the stalk briefly causes
a single swipe (no wash). Push and hold to activate the washer.
For extended wiper blade quality, occasional cleaning of the wiper blades is required.
09 GEARSHIFT/OVERDRIVE CONTROL
Overdrive D is the normal drive position for the best fuel economy. Switch to the
second drive position D only when driving with a heavy load, towing a trailer, driving
up or down steep hills, or when additional engine braking is desired. This vehicle is
equipped with a brake-shift interlock feature that prevents the gearshift lever from being
moved from P (Park) when the ignition is in the ON position unless the brake pedal is
depressed. If your vehicle is equipped with a console-mounted gearshift lever, you must
also press the thumb button on the side of the gearshift lever to move the gearshift lever
from P (Park).
01
SECURILOCK™ PASSIVE ANTI-THEFT SYSTEM
03 SERVICE ENGINE SOON WARNING LAMP
From the advanced Personal Safety System to the bountiful amenities, every
This lamp momentarily illuminates to ensure the system is functional. If the light
comes on after the engine is started, refer to your Owner’s Guide. To help prevent
activation, always secure your fuel cap by turning it clockwise until you hear
three clicks.
10
we invite you to explore this easy-to-use Quick Reference Guide. Using the
04 POWER ADJUSTABLE FOOT PEDALS (IF EQUIPPED)
To operate, the speed control must be ON and the vehicle's speed must be at or
above 30 mph. To set a speed, press SET/ACC. To set a higher speed, press
SET/ACC again, and hold until you reach the desired speed. To set a lower
speed, press and hold CST until you reach the desired speed. Pressing RES will
return to a previously set speed. To turn the speed control off, press the OFF
button or depress the brake pedal to disengage.
Press to activate the hazard flashers. Press the control again to turn the flashers off.
KEYLESS ENTRY SYSTEM (IF EQUIPPED)
13
08
Illuminates when the fuel cap may not be properly installed. Continued driving
with this light on may cause the “SERVICE ENGINE SOON” warning light to come
on. Refer to Fuel Filler cap in the Maintenance and Specifications chapter of your
Owner’s Guide.
06 ABS WARNING LAMP (IF EQUIPPED)
13 PASSENGER FRONTAL AIRBAG DEACTIVATION SYSTEM
This lamp illuminates briefly when the ignition is turned to the ON position.
If the lamp stays on, does not illuminate or flashes, after the engine is
started, seek service immediately. In an emergency, apply continuous force on
the brake pedal to prevent wheel lock when braking on slippery surfaces – do
not pump your brakes. Note: It is normal to feel a pedal pulsation or hear a
noise when the ABS system is activated.
The “PASSENGER AIRBAG OFF” light will be unlit for properly seated adults
(airbag on) or unlit for an empty seat (airbag off). The “PASSENGER AIRBAG OFF”
light will be lit (airbag off) for smaller people and properly restrained child safety
seats. Even with an automatic on/off system, properly restrain children age 12
and under in the rear seat whenever possible. For additional information on the
Passenger Airbag Deactivation System, refer to the Airbags section in the Seating and Safety Restraints
chapter of your Owner’s Guide.
NEW
With this control you can unlock the trunk/liftgate or lock/unlock the doors
without using a key. First, enter your five-digit program code, which will
unlock the driver's door only, and then press the corresponding quick key:
Unlock all doors and the liftgate (wagon only) . . . . . . . . . . . . . . . . . . . . . . 3-4
Unlock the trunk or liftgate (wagon only) . . . . . . . . . . . . . . . . . . . . . . . . . . 5-6
Lock all doors . . . . . . . . . . . . . . . . . . . . . . . . . . . . . 7-8 and 9-0 simultaneously
Press to release the trunk. The control is located on the instrument panel to
the left of the steering wheel.
Please note that if the fuel cap is not properly installed, “CHECK FUEL CAP”
warning may be displayed in the Message Center.
described to the left of the instrument panel image. For more information,
please consult your Owner’s Guide.
11
12 CHECK FUEL CAP
05 HAZARD FLASHER CONTROL
ture you would like to learn more about. Each numbered feature is briefly
10
11 TRUNK RELEASE (IF EQUIPPED)
Press and hold the rocker control to adjust the accelerator and brake pedals
toward you or away from you. Adjust the pedals only when the vehicle is
stopped and the gearshift lever is in the P (Park) position. The adjustment
allows for approximately three inches of maximum travel.
image of the instrument panel located in the center of the guide, locate the fea-
The SecuriLock passive anti-theft system is an engine immobilization system.
This system prevents the engine from being started unless a coded key
programmed to your vehicle is used. Please note that for security purposes,
your coded keys cannot be copied. If you would like spare coded keys, they
can be purchased from your dealership.
10 SPEED CONTROL (IF EQUIPPED)
Sable seeks to provide you with safety, comfort, and enjoyment on the road.
In order to help you fully appreciate the countless features of your new Sable,
07
09
SIDE VIEW MIRROR CONTROL
Move the mirror selector control to L to adjust the left mirror, or R to
adjust the right mirror. Next, move the mirror control in the direction you wish
to tilt the mirror. Return the selector control to the center position to lock the
mirrors in place.