1
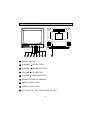
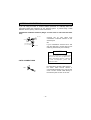
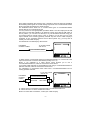
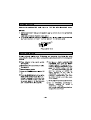
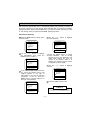
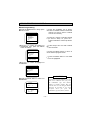
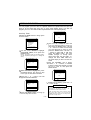
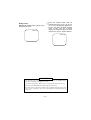
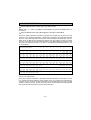
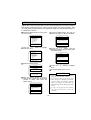
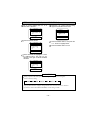
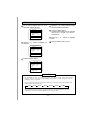
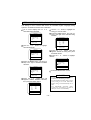
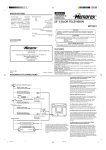
R
MT1132
13'' Color Television
Owner's Manual
VIDEO INPUT
R
VOLUME
VIDEO
CHANNEL
POWER
AUDIO
As an ENERGY STAR
®
Partner, MEMCORP has
®
determined that this product meets the ENERGY STAR
guidelines for energy efficiency.
BEFORE YOU OPERATE YOUR NEW TELEVISION
To get the most from your new color television, read and follow this Owner's Manual
carefully.
INSTALLATION GUIDELINES
Place your TV in a room with adequate ventilation.
Keep your TV set away from sources of direct heat, such as heat registers or direct
sunlight.
Do not place your TV on soft surfaces, such as rugs or blankets.
Leave enough room for air to circulate around the bottom, top and back of the set.
ANTENNA CONNECTIONS
For best picture quality, we recommend that you use an outdoor antenna. Follow in structions on page 6 for proper antenna hookup.
POWER CONNECTION
Your TV works on normal household current (120 volts, 60 Hz).
For safety purposes, your TV's electrical plug has one blade wider than the other. If
you cannot insert the plug fully into the socket, try reversing it.
In the space provided, record the serial and model numbers, located on the rear of the
unit.
Serial No.
Model No.
CAUTION
RISK OF ELECTRIC SHOCK
DO NOT OPEN
CAUTION: TO REDUCE THE RISK OF ELECTRIC SHOCK, DO
NOT REMOVE COVER (OR BACK). NO USER SERVICEABLE
PARTS INSIDE. REFER SERVICING TO QUALIFIED SERVICE
PERSONNEL.
The lightning flash with the arrowhead symbol within an
equilateral triangle, is intended to alert the user to the
presence of uninsulated "dangerous voltage" within the
product's enclosure that may be of sufficient magnitude
to constitute a risk of electric shock to someone.
The exclamation point within an equilateral triangle is
intended to alert the user to the presence of important
operating and maintenance (servicing) instructions in
the literature accompanying the appliance.
WARNING: TO REDUCE THE RISK OF FIRE OR ELECTRIC SHOCK,
DO NOT EXPOSE THIS APPLIANCE TO RAIN OR MOISTURE.
–1–
FEATURES
On-screen graphics guide you through setup features and operations
Automatic programming of channels allows easy selection of stations available in your
viewing area
Sleep timer programs the TV to turn itself off at a preset time
One day timer programs the TV to come on once at a preset time
Weekly timer programs the TV to come on at a preset time every day
26-button infrared remote control allows remote operation
VHF/UHF/CATV tuning allows reception of standard broadcasts or cable TV channels
Close caption decoder displays captions or half-screen text
V-Block function
SPECIFICATIONS
AC Power Input:
AC Power Consumption:
Chassis Construction:
Picture Tube:
Speaker:
Tuner:
Remote Control:
Receiving Channels:
VHF
UHF
CATV
Mid Band
Super Band
Hyper Band
Ultra Band
Sub Mid Band
Cabinet:
Antenna Input Impedance:
120V, 60Hz
77Watts
IC Solid State
13" (measured diagonally)
3.5 x 2 in. (90 x 50 mm) Oval, 8 ohms
181 Channel, Freq. Synthesized
Infrared, Direct Access
26 Key, 2 "AA" batteries
2–13
14–69
14–22
23–36
37–65
66–94, 100–125
1, 95–99
Monitor Style
75 ohm (VHF/UHF) Coaxial Input
CAUTION: TO PREVENT ELECTRIC SHOCK, MATCH WIDE BLADE
OF PLUG TO WIDE SLOT, FULLY INSERT.
–2–
3180-P3
LOCATION OF CONTROLS
EXT.ANT.
UHF/VHF
VIDEO INPUT
R
VOLUME
VIDEO
8
7
6
CHANNEL
POWER
AUDIO
5
4
3
2
1
9
1 POWER SWITCH
2 CHANNEL
(UP) BUTTON
3 CHANNEL
(DOWN) BUTTON
4 VOLUME
(UP) BUTTON
5 VOLUME
(DOWN) BUTTON
6 REMOTE CONTROL SENSOR
7 AUDIO IN (PUT) JACK
8 VIDEO IN (PUT) JACK
9 VHF / UHF EXT. ANT. JACK (REAR OF SET)
–3–
REMOTE CONTROL
The REMOTE CONTROL unit requires two 1.5 volt "AA" size batteries. The BATTERY
COMPARTMENT is located on the back of the unit. To open, press down of the lid and
slide toward the bottom of the unit. Install the batteries exactly as shown by the diagram
in the compartment.
NOTE: If one or both of the batteries are reversed, the REMOTE CONTROL will not
operate and the unit may be damaged.
This REMOTE CONTROL units uses an INFRARED WIRELESS CONTROL SYSTEM.
This means that the remote commands are sent out as invisible light. For best
operation, aim the REMOTE CONTROL unit directly at the REMOTE CONTROL
SENSOR window on the lower center front of the TV. Please note that furniture or other
solid objects can block the path of the infrared light. Dark walls might absorb the light.
Do not allow strong sunshine to fall on the TV set front panel as this may affect the
operation of the remote control. In this case, tune the TV away from the light or darken
the room slightly.
INPUT
VIDEO
AUDIO
VOLUME
VIDEO INPUT
CHANNEL
R
VOLUME
VIDEO
POWER
CHANNEL
AUDIO
POWER
TV/VIDEO
SLEEP
1
2
3
4
5
7
8
9
100
0
RECALL
MENU
–
6
+
TV/CAP/TEXT CH1/2
Q.REV
CHANNEL
MUTE
VOLUME
–4–
eet
24 F
15˚ 15˚
POWER
Remote Control
Number Buttons
Press to select a channel. For
channels 1-9, press 0, then the
channel you want to watch. For
example, for channel 6, press 0,
6. For channels 100-125, press
the 100 button, then press the
last two digits of the channel
you want to watch. For
example, for channel 116, press
100, 1,6. Note :Make sure you
press the second or third digit
of a channel within a few
seconds of pressing the first
digit. If you don't, you'll have to
start over
- and + Buttons
Press to adjust or select
functions listed in on-screen
displays.
MENU Button
Press to call up the main menu
screen. Also, press to enter data
when going to the next step of
an operation.
TV/CAP (tion) / TEXT Button
When you are watching a
closed caption program, press
this button to switch between
the standard TV screen, closed
captioning, and half-screen
text. See page 17 for details.
POWER
TV/VIDEO
SLEEP
1
2
3
4
5
6
7
8
9
100
0
RECALL
MENU
–
+
TV/CAP/TEXT CH1/2
Q.REV
CHANNEL
MUTE
VOLUME
MUTE Button
Press once to eliminate sound.
Press again to hear sound.
VOLUME (Up/Down) Buttons
Press to raise or lower the
sound.
–5–
POWER Button
Press to turn the TV on or off.
TV/VIDEO Button
Pressing this button permits
the TV to be used as a
monitor to view program
sources such as a VCR, Video
Disc, ect. press again to
resume normal TV function.
SLEEP Button
Press to start the sleep time or
to display the time left in a
sleep timer. See page 15 for
details.
RECALL Button
Press to display the channel
being viewed. Press again to
display the time. Press again
to remove the
on-screen display. Note: If the
RECALL button is pressed
when the TV is in closed
caption mode (See page 17
for details), captions or text
will not be displayed.
CH1/CH2 Button
Switches between channel 1
and channel 2 of the closed
caption mode. See page 17 for
details.
Q. REV. (Quick Review)
Button
Press to return to the previous
channel. For example, if you
were watching channel 2,
then use the Number buttons
to switch to channel 6,
pressing the Q.REV button
will return the TV to channel 2.
CHANNEL (Up/Down)
Buttons
Press to scroll up or down
through the channels.
ANTENNA CONNECTIONS
If you are using an indoor or outdoor antenna (antennas no included)
t
follow the
instructions below that correspond to your antenna system. If youI are using a cable
television service (CATV), refer to CATV connections.
Combination VHF/UHF Antenna (Single 75 ohm cable or 300 ohm twin-lead
wire)
75 ohm
OR
ANT
Connect the 75 ohm cable from
combination VHF/UHF antenna to the
antenna jack.
OR
Transformer
(not included)
300 Ohm
If your combination antenna has a 300
ohm twin-lead wire, use the 300-75 ohm
matching transformer (not included)
NOTES
To prevent problems it is recommended
that you use only the specified transformer. (Transformer Part No.:1398-017)
To order a transformer, please call
1-800-321-6993.
CATV CONNECTIONS
ANT
For subscribers to basic cable service.
For basic cable service without a
converter/descrambler box, connect the
CATV 75 ohm coaxial cable directly to
the antenna jack on back of the unit.
–6–
Some cable companies offer "premium pay" channels in which the signal is scrambled.
Descrambling these signals for normal viewing requires the use of a descrambler device
which is generally provided by the cable company.
The illustrations below show how to connect these types of converter/descrambler
devices with the TV's VHF antenna jack.
You may need a two-set signal splitter (sometime called a "two-set coupler) and an A/B
switch box from the cable installer or an electronic supply store. With the A/B switch in
the "B" position, you can then tune directly to any non-scrambled channels using your
TV's tuning system or remote control. In the "A" position, you can tune your TV to the
output channel of the decoder (generally Channel 3/4) and use the cable company's
equipment to tune scrambled channels. Since cable systems vary, you may wish to
consult your local cable company.
For subscribers to scrambled pay cable service
INCOMING
COAXIAL CABLE
To 75 ohm Coaxial
Jack On TV
Converter/Descrambler
VIDEO INPUT
R
VOLUME
VIDEO
CHANNEL
POWER
AUDIO
To allow viewing of all channels through converter/descrambler. TV must be set to the
output channel of the converter/ descrambler (usually ch 3 or 4).
NOTE: If you subscribe to a cable service which requires you to use a
converter/descrambler box, follow the connections shown above.
If your basic cable channels are unscrambled an are using a converter/descrambler for
premium channels, follow the connections shown below.
For subscribers of unscrambled basic cable with a converter/descrambler box for
viewing premium channels.
To 75 ohm Coaxial
Jack On TV
INCOMING
COAXIAL
CABLE
Converter/Descrambler
SPLITTER
A/B Switch
A
B
VIDEO INPUT
R
VOLUME
VIDEO
CHANNEL
AUDIO
A – Allows viewing of scrambled channel through converter/descrambler box.
B – Allows full use of TV tuner and Remote Control.
NOTE: For other cable connections, consult your cable company.
–7–
POWER
input
SELECTING A LANGUAGE
The menu screen that appears when you press the MENU button can be programmed to
appear in English, French, or Spanish. Follow the directions below to program the menu
screen to appear in a language other than the one that is now on-screen when you press
the MENU button.
1 Press the MENU button to bring up the
menu-screen.
3 Press the MENU button until the menu
screen is in the language you want to
select.
MENU SUN - - : - - AM
4 Use the + or – button to highlight
EXIT.
CLOCK SET
PROGRAM TIMER
V-BLOCK SET
PICTURE ADJUST
CH PROGRAM
LANGUAGE
EXIT
MENU SUN - - : - - AM
CLOCK SET
PROGRAM TIMER
V-BLOCK SET
PICTURE ADJUST
CH PROGRAM
LANGUAGE
EXIT
[+] / [-] : MENU SELECT
[MENU] : ENTER
2 Use the + or – button to highlight
LANGUAGE.
[+] / [-] : MENU SELECT
[MENU] : EXIT
MENU SUN - - : - - AM
CLOCK SET
PROGRAM TIMER
V-BLOCK SET
PICTURE ADJUST
CH PROGRAM
LANGUAGE
EXIT
5 Press the MENU button to exit.
[+] / [-] : MENU SELECT
[MENU] : ENTER
–9–
SETTING THE CLOCK
1 Press the MENU button twice to bring
up the menu screen and select
CLOCK SET.
CLOCK SET
TUE 1 : 35 AM
EXIT
CLOCK SET
SUN - - : - - AM
EXIT
[MENU]
[+] / [-]
:
:
[MENU]
[+] / [-]
8 Use the + or – button to select AM or
PM.
CLOCK SET
CLOCK SET
TUE 1 : 35 PM
EXIT
TUE - - : - - AM
EXIT
:
:
[MENU]
[+] / [-]
MOVE
ADJUST
3 Press the MENU button to go to the
next step.
MOVE
ADJUST
10 Press the + or – button to exit.
CLOCK SET
TUE 1 : - - AM
EXIT
:
:
:
:
9 Press the MENU button. EXIT will flash.
4 Use the + or – button to select the
correct hours(s).
[MENU]
[+] / [-]
MOVE
ADJUST
7 Press the MENU button to go to the
next step.
MOVE
ADJUST
2 Use the + or – button to select the
correct day of the week.
[MENU]
[+] / [-]
:
:
MOVE
ADJUST
5 Press the MENU button to go to the
next step
6 Use the + or – button to select the
correct minute(s).
– 10 –
NOTES
To display the day and time at any time.
Press the RECALL button twice. To
remove the display, press the RECALL
button again.
To correct the day or time, follow step
1 to bring up the clock set menu. Then
press the MENU button until the
section of the display you want to
correct is flashing. Use the + or –
button to correct the day or time.
Finally, press the MENU button until
EXIT is flashing, then press the + or –
button to exit.
You may have to reset the clock if there
is a power outage or if you unplug the
TV.
PROGRAMMING CHANNELS
With automatic programming, the TV automatically places every channel you receive in
its memory, allowing you to scan through those channels when you press the CHANNEL
(Up/Down) buttons. With manual programming, you tell the TV what channels you want
to scan through when you press the CHANNEL (Up/Down) buttons.
Automatic Programming
1 Press the MENU button to bring up the
menu screen.
4 Use the + or – button to highlight
AUTO SEARCH.
MENU TUE 1 : 35PM
CH PROGRAM
CLOCK SET
PROGRAM TIMER
V-BLOCK SET
PICTURE ADJUST
CH PROGRAM
LANGUAGE
EXIT
AIR / CABLE
AUTO SEARCH
CH MEMORY
EXIT
[+] / [-] : MENU SELECT
[MENU] : ENTER
[+] / [-] : SELECT
[MENU]: START
2 Use the + or – button to highlight
CH PROGRAM, then press the
MENU button to select it.
CH PROGRAM
AIR / CABLE
AUTO SEARCH
CH MEMORY
EXIT
CABLE
CABLE
5 Press the MENU button to select
AUTO SEARCH. The TV will flip
through all of its 125 channels in the
cable mode, placing the ones you
receive in its memory. When it is
finished, the channel program screen
will appear on-screen again.
6 Use the + or – button to highlight
EXIT.
[+] / [-] : SELECT
[MENU]: AIR/CABLE
CH PROGRAM
3 If you have a cable connected to the
TV, press the MENU button until
CABLE appears to the right of
AIR/CABLE. If you have an antenna
connected to the TV, press the
MENU button until AIR appears to
the right of AIR/CABLE.
AIR / CABLE
AUTO SEARCH
CH MEMORY
EXIT
CABLE
[+] / [-] : SELECT
[MENU]: EXIT
7 Press the MENU button to exit.
CH PROGRAM
AIR / CABLE
AUTO SEARCH
CH MEMORY
EXIT
CABLE
NOTES
NOTES
To stop automatic programing while it
is in progress, press the MENU button.
[+] / [-] : SELECT
[MENU]: AIR/CABLE
– 11 –
ADDING/DELETING CHANNELS
Manual Programming
1 Press the MENU button to bring up the
menu screen.
MENU
TUE 1 : 35PM
CLOCK SET
PROGRAM TIMER
V-BLOCK SET
PICTURE ADJUST
CH PROGRAM
LANGUAGE
EXIT
5 Press the CHANNEL (Up or Down)
button or Number buttons to select the
channel you want to add to or delete
from the TV's memory.
6 Press the + button to add the channel
(it will turn white). Or, press the –
button to delete the channel (it will turn
red).
[+] / [-] : MENU SELECT
[MENU] : ENTER
2 Use the + or – button to highlight CH
PROGRAM, then press the MENU
button to select it.
7 Follow steps 5 and 6 to add or delete
other channels.
CH PROGRAM
AIR / CABLE
AUTO SEARCH
CH MEMORY
EXIT
8 Press the MENU button to return to
the channel program screen.
CABLE
9 Press the MENU button to exit while
EXIT is highlighted.
[+] / [-] : SELECT
[MENU] : AIR/CABLE
3 Use the + or – button to highlight CH
MEMORY.
CH PROGRAM
AIR / CABLE
AUTO SEARCH
CH MEMORY
EXIT
CABLE
[+] / [-] : SELECT
[MENU] : ENTER
NOTES
4 Press the MENU button to select CH
MEMORY.
CH MEMORY
CABLE
10
[+]
: ADD
[-]
: DELETE
[MENU] : EXIT
– 12 –
If you don't program channels, you will
still receive channels when you press
the CHANNEL (Up) and (Down)
buttons or Number buttons. But you
will also have to scan through channel
that have no reception or very poor
reception when you press the
CHANNEL (Up) and (Down) buttons.
SETTING THE TIMERS
You can program your TV to turn on a specific channel at a preset time once (one day
timer) or at the same time every day or every week (weekly timer). You also can
program your TV to turn itself off after a specified amount of time (Sleep timer).
ONE DAY TIMER
One Day Timer
1 Press the MENU button to bring up the
menu-screen.
ON TIME
OFF TIME
CH
- - : - - AM
- - : - - AM
10
EXIT
MENU
TUE 1: 35PM
[MENU] : MOVE
[+] / [-] : ADJUST
CLOCK SET
PROGRAM TIMER
V-BLOCK SET
PICTURE ADJUST
CH PROGRAM
LANGUAGE
EXIT
[+] / [-] : MENU SELECT
[MENU] : ENTER
2 Use the + or – button to highlight
PROGRAM TIMER, then press the
MENU button.
NOTE : Clock time must be set before Step 2
can be completed. (See page 10 – Setting the
clock)
PROGRAM TIMER
ONE DAY
WEEKLY
EXIT
OFF
OFF
[+] / [-] : SELECT
[MENU]: ENTER
6 Use the + or – button to select the
hour you want the timer to come on,
then press the MENU button. Use the
+ or – button to select the minute(s)
you want the timer to come on, then
press the MENU button. Use the + or
– button to select AM or PM, then
press the MENU button. The OFF
TIMER changes to exactly three
three hours after the ON TIME. To
change the OFF TIME follow the
the same steps you did to set the ON
TIME.
7 Use the CHANNEL (Up or Down)
buttons, + or – buttons, or Number
buttons to select the channel you want
the TV to come on, then press the
MENU button.
ONE DAY TIMER
3 While ONE DAY is highlighted, press
the MENU button. The OFF (or ON)
to the right of ONE DAY will flash.
4 Press the + or – button until ON
appears beside ONE DAY.
ON TIME
OFF TIME
CH
1 : 00 PM
2 : 00PM
22
EXIT
[MENU]
[CH
/
: MOVE
] : ADJUST
PROGRAM TIMER
ONE DAY
WEEKLY
EXIT
8 While EXIT is blinking, press the + or
– button to exit.
ON
OFF
NOTES
[+] / [-] : ON/OFF
[MENU]: ENTER
5 Press the MENU button to bring up
the one day timer screen
– 13 –
To cancel a timer, follow steps 1
through 3. At step 4, use the + or –
button to turn the ON to OFF.
The one day timer has priority when
the same time value is set for the ON
TIME field of both the one day timer
and the weekly timer.
Weekly Timer
1 Press the MENU button to bring up the
menu screen.
MENU
TUE 1 : 35PM
CLOCK SET
PROGRAM TIMER
V-BLOCK SET
PICTURE ADJUST
CH PROGRAM
LANGUAGE
EXIT
[+] / [-] : MENU SELECT
[MENU] : ENTER
2 Use the + or – button to highlight
PROGRAM TIMER, then press the
MENU button.
NOTE : Clock time must be set before Step 2
can be completed. (See page 10 – Setting the
clock)
PROGRAM TIMER
ONE DAY
WEEKLY
EXIT
OFF
OFF
6 Use the + or – button to select the
hour you want the timer to come on,
then press the MENU button. Use the
+ or – button to select the minute(s)
you want the timer to come on, then
press the MENU button. Use the + or
– button to select AM or PM, then
press the MENU button. Follow the
same steps to set the time off.
7 Use the CHANNEL (Up or Down)
buttons, + or – buttons, or Number
buttons to select the channel you want
the TV to come on, then press the
MENU button.
8 Press the MENU button to select the
day(s) of the week you do not want the
TV to come on. Once that day is
flashing, use the + or – button to
unselect that day of the week (the TV
will not come on) signified in red or
reselect that day of the week (the TV
will come on) signified in white.
WEEKLY TIMER
[+] / [-] : SELECT
[MENU] : ENTER
ON TIME
1 : 00 PM
3 Press the + or – button to select
WEEKLY, then press the MENU
button. The word OFF (or ON) to the
right of WEEKLY will flash.
4 Press the + or – button until ON
appears beside WEEKLY.
OFF TIME
2 : 00 PM
CH
22
SUN MON TUE WED THU FRI SAT
EXIT
[MENU] : MOVE
[+] / [-] : ADJUST
9 While EXIT is blinking, press the + or
– button to exit.
PROGRAM TIMER
ONE DAY
WEEKLY
EXIT
OFF
ON
NOTES
[+] / [-] : ON / OFF
[MENU] : ENTER
5 Press the MENU button to bring up
the weekly timer screen.
WEEKLY TIMER
ON TIME
- - : - - AM
OFF TIME
- - : - - AM
CH
10
SUN MON TUE WED THU FRI SAT
EXIT
[MENU] : MOVE
[+] / [-] : ADJUST
– 14 –
To cancel a timer, follow steps 1
through 3. Then use the + or – button
to turn the ON to OFF.
The timer will come on only on the days
that appear in white on the weekly
timer screen.
You may have to reprogram the timer if
there is a power outage or if the TV is
unplugged.
Sleep Timer
1 Press the SLEEP button to bring up the
sleep timer screen.
SLEEP 00
2 Press the SLEEP button until the
desired sleep time (10, 20, 30, 40, 50,
60, 70, 80 or 90 minutes) appears onscreen. The timer will begin counting
down to zero, and the on-screen
display will disappear. When the timer
reaches zero, the TV will turn itself off.
SLEEP 60
NOTES
To check the time remaining for a sleep timer, press the SLEEP button.
The time remaining will appear on-screen.
To cancel a sleep timer, follow step 1 to bring up the sleep timer screen.
Then press the SLEEP button until 00 appears on-screen.
You must select a sleep time within three seconds of bringing up the sleep
timer screen. Otherwise, the screen will disappear and you will have to
start over.
– 15 –
ADJUSTING THE PICTURE
1 Press the MENU button to bring up the
menu screen.
MENU
TUE 1 : 35PM
CLOCK SET
PROGRAM TIMER
V-BLOCK SET
PICTURE ADJUST
CH PROGRAM
LANGUAGE
EXIT
5 Use the + or – button to adjust the
picture. The bar scale at the bottom of
the screen shows the level of
adjustment.
6 Press the MENU button until the
picture adjust screen appears.
7 Use the + or – button to highlight
EXIT, then press the MENU buton to
exit.
[+] / [-] : MENU SELECT
[MENU] : ENTER
PICTURE ADJUST
2 Use the + or – button to highlight
PICTURE ADJUST, then press
the MENU button.
ADJUST
RESET
EXIT
PICTURE ADJUST
[+] / [-] : SELECT
[MENU] : EXIT
ADJUST
RESET
EXIT
Picture Adjustments
[+] / [-] : SELECT
[MENU] : ENTER
3 Press the MENU button while ADJUST
is highlighted.
FUNCTION
– Button
+ Button
CONTRAST
Weaker
Stronger
BRIGHT(ness)
Darker
Lighter
COLOR
Paler
Deeper
Skin tones
to green
Skin tones
to purple
Softer
Sharper
TINT
CONTRAST
SHARPNESS
63
4 Press the MENU button until the
adjustment you want to make
(CONTRAST, BRIGHTNESS, COLOR,
TINT or SHARPNESS – see chart at
right for details) appears at the bottom
of the screen.
– 16 –
NOTES
To reset the picture adjustments to their
original state, follow steps 1 and 2
above. Use the + or – button to
highlight RESET, then press the MENU
button. To exit, press the MENU button
while EXIT is highlighted.
3180 – P17
CLOSED CAPTION MODE
Close caption mode allows you to read the
words of a broadcast on-screen while you
are hearing them.
There are two types of closed captioning:
Captions – Dialogue and descriptions
of the action appear in a box at the
bottom of the screen.
Text – Words appear on the screen.
This is often used for channel guides.
Often, you can access captions or text in
more than one language.
Note: To obtain closed captioning, the TV
station must be broadcasting a program in
closed captioning. If the TV station is not
broadcasting a program in closed captioning,
you cannot view captions or text. Refer to your
TV guide for information about which shows are
available in closed captioning.
1 Press the TV/CAP(tion)/Text button
until CAPTION or TEXT – whichever
you want – appears in the lower right
corner of the screen.
CAPTION
CH 1
2 Press the CH1/CH2 button to select
English (CH1) or foreign language
(CH2) captions or text.
USING THE AUDIO AND VIDEO JACKS
The AUDIO and VIDEO IN (put) jacks on
the front of the TV allow you to receive
audio (sound) and video (picture) from
external sources, such as VCR, Video
Disc, etc. Follow the instructions below to
play video from an external source.
1 Use audio/video cables (not included) to
connect to the AUDIO and VIDEO IN
(put) jacks on the front of the TV to audio
and video output jacks on an external
source.
2 Press the TV/VIDEO button on remote
control to select the VIDEO mode and the
VIDEO indication will appear on the screen.
3 Operate the VCR, Video Disc or etc. as
described in its owner's manual. The TV
will monitor playback.
VIDEO INPUT
R
VOLUME
VIDEO
CHANNEL
POWER
AUDIO
VIDEO OUT
AUDIO OUT
VCR
NOTES
You must return the TV to TV mode for regular TV viewing.
If the TV does not receive a signal an external source, the VIDEO display will appear on
screen.
– 17 –
CABLE TV OPERATION
1 Press the MENU button to bring up the main menu screen.
2 Use the + or – button to highlight CH PROGRAM, then press the MENU button to
select it.
3 Press the MENU button until CABLE appears to the right of AIR/CABLE.
On CATV (Cable Television) systems, programs are brought into the home on VHF
channels 2–13, mid-band channels A–I, super band channels J–W, hyper band channels
AA–CCC, ultra band channels W+30–W+84 and sub midband channels (5A, A5–A1).
When CATV is selected, the numbers will change color from yellow to green to indicate
the TV is in the cable mode. Channels 2 through 13 are selected directly. Channel A can
be tuned in by selecting number 14 on this TV, channel B by selecting number 15, and
so on as follows:
Channel number on TV
Corresponding CATV Channel
14
A
15
B
16
C
17
D
18
E
19
F
20
G
21
H
22
I
23
J
24
K
25
L
26
M
27
N
28
O
29
P
30
Q
31
R
32
S
33
T
34
U
35
V
36
W
37
AA
W+1
38
BB
W+2
39
CC
W+3
40
DD
W+4
41
EE
W+5
42
FF
W+6
43
GG
W+7
44
HH
W+8
45
II
W+9
46
JJ
W+10
47
KK
W+11
48
LL
W+12
49
MM
W+13
50
NN
W+14
51
OO
W+15
52
PP
W+16
53
QQ
W+17
54
RR
W+18
55
SS
W+19
56
TT
W+20
57
UU
W+21
58
VV
W+22
59
WW
W+23
60
XX
W+24
61
YY
W+25
62
ZZ
W+26
63
AAA
W+27
64
BBB
W+28
65
CCC
W+29
66
67
68
69
70
71
W+30
W+31
W+32
W+33
W+34
W+35
72
73
74
75
76
77
78
79
80
81
82
83
84
85
86
87
W+36
W+37
W+38
W+39
W+40
W+41
W+42
W+43
W+44
W+45
W+46
W+47
W+48
W+49
W+50
W+51
88
89
90
91
92
93
94
95
A5
96
A4
97
A3
98
A2
99
A1
100
101
102
103
W+52
W+53
W+54
W+55
W+56
W+57
W+58
W+59
W+60
W+61
W+62
104
105
106
107
108
109
110
111
112
113
114
115
116
117
118
119
W+63
W+64
W+65
W+66
W+67
W+68
W+69
W+70
W+71
W+72
W+73
W+74
W+75
W+76
W+77
W+78
120
121
122
123
124
125
1
5A
W+79
W+80
W+81
W+82
W+83
W+84
NOTE: The actual number of channels received depends upon channel reception in your
area or your cable system
Most CATV systems use letters to designate channels but others use numbers. To tune
in a numbered channel, select the same number on the TV. Consult your local Cable TV
company to find out which of these channels are receivable and which type of Cable
system is used in your area. (Some cable TV systems use scrambled or encoded signals
and require special converters to receive these channels.)
– 18 –
SETTING V-BLOCK
V-Block allow users to program their TV set to automatically block an incoming program
that contains a particular level of violence, sexual content and strong language . User
can easily block program based on the age based ratings, the content based ratings, or
a combination of the two.
1 Press the MENU button to bring up the
menu-screen.
MENU
5 Press the MENU button. The OFF (or
ON) to the right of V-BLOCK will flash.
SUN 11:23 AM
V-BLOCK SET
CLOCK SET
PROGRAM TIMER
V-BLOCK SET
PICTURE ADJUST
CH PROGRAM
LANGUAGE
EXIT
V-BLOCK
CHANGE RATING
CHANGE NUMBER
EXIT
0000
[+] / [-] : ON/OFF
[MENU]: ENTER
[+] / [-] : MENU SELECT
[MENU] : ENTER
2 Use the + or - button to highlight
V-BLOCK SET.
MENU
OFF
SUN 11:23 AM
6 Press the + or - button until ON
appears beside V-BLOCK, then press
the MENU button.
CLOCK SET
PROGRAM TIMER
V-BLOCK SET
PICTURE ADJUST
CH PROGRAM
LANGUAGE
EXIT
V-BLOCK SET
V-BLOCK
CHANGE RATING
CHANGE NUMBER
EXIT
ON
0000
[+] / [-] : MENU SELECT
[MENU] : ENTER
[+] / [-] : SELECT
[MENU]: ENTER
3 Press the MENU button.
V-BLOCK SET
7 Press the + or - button to highlight
EXIT.
PASS NUMBER
? ? ? ?
8 Press the MENU button to exit.
NOTES
[+] / [-] : EXIT
[MENU]: ENTER
4 Use the number buttons to input a
pass number "0000" (the preset pass
number is 0000), then press the
MENU button.
V-BLOCK SET
V-BLOCK
OFF
CHANGE RATING
CHANGE NUMBER 0000
EXIT
[+] / [-] : SELECT
[MENU]: ENTER
– 19 –
If you don't want to block any incoming
program, set V-BLOCK to OFF.
If you turn on the TV set for the first
time, setting the V-BLOCK to ON alone
will not enable the blocking function
unless you change the preset state for
MPAA Rating and TV Rating from OFF
to ON.
In case you forget the pass number
call your nearest Service Center for
assistance.
SETTING MPAA RATING (CHANGE RATING-1)
4 Press the + or - button until any rating
appears beside MPAA RATING.
1 Go to menu display item no. 6 of
SETTING V-BLOCK.
V-BLOCK SET
V-BLOCK SET
V-BLOCK
CHANGE RATING
CHANGE NUMBER
EXIT
ON
MPAA RATING
TV RATING
OPTION RATING
LOADING
EXIT
0000
PG-13
TV-PG-DLSV
OFF
OFF
[+] / [-] : SELECT
[MENU] : ENTER
[+] / [-] : SELECT
[MENU] : ENTER
2 Press the MENU button.
5 Press the MENU button, and press the
+ or - button to highlight EXIT.
V-BLOCK SET
MPAA RATING PG-13
TV RATING
TV-PG-DLSV
OPTION RATINGOFF
LOADING
OFF
EXIT
6 Press the MENU button to exit.
[+] / [-] : SELECT
[MENU] : ENTER
3 MPAA RATING is highlighted. Press
the MENU button. The OFF (or any
ratings) to the right of MPAA RATING
will flash.
V-BLOCK SET
MPAA RATING PG-13
TV RATING
TV-PG-DLSV
OPTION RATINGOFF
LOADING
OFF
EXIT
[+] / [-] : SELECT
[MENU] : ENTER
NOTES
Rating sequence will rotate from lower to higher rating and X is the highest
(most restrictive) rating.
OFF
G
PG
PG-13
R
NC-17
X
All programs that have a higher rating than the one selected will also be blocked.
If you don't want to block MPAA RATING, set this rating to OFF.
– 20 –
SETTING TV RATING-1 (CHANGE RATING-2)
1 Go to menu display item no. 2 of
SETTING MPAA RATING.
5 Press the MENU button.
Content-based Rating can be selected
only for TV-Y7, TV-PG, TV-14 and TV
-MA Ratings.
V-BLOCK SET
MPAA RATING
TV RATING
OPTION RATING
LOADING
EXIT
4 Press the + or - button until any rating
appears beside TV RATING.
PG-13
TV-PG-DLSV
OFF
OFF
6 Press the + or - button to highlight
EXIT.
[+] / [-] : SELECT
[MENU] : ENTER
2 Use the + or - button to highlight TV
RATING
7 Press the MENU button to exit.
V-BLOCK SET
MPAA RATING
TV RATING
OPTION RATING
LOADING
EXIT
PG-13
TV-PG-DLSV
OFF
OFF
[+] / [-] : SELECT
[MENU] : ENTER
3 Press the MENU button.
V-BLOCK SET
MPAA RATING PG-13
TV RATING
TV-PG-DLSV
OPTION RATING OFF
LOADING
OFF
EXIT
[+] / [-] : SELECT
[MENU] : ENTER
NOTES
TV RATING contains two rating categories, age-based ratings and content-based
ratings, and user can block programming using either or both categories. See the
following table 1 for details.
Age-based rating sequence will rotate from lower to higher rating and TV-MA is the
highest (most restrictive) rating.
OFF
TV-Y
TV-Y7
TV-G
TV-PG
TV-14
TV-MA
All programs that have a higher rating than the one selected will also be blocked.
If you don't want to block TV RATING, set this rating to OFF.
– 21 –
Table 1 indicates the only valid combinations of age and content based ratings with
an "X" in the appropriate boxes. For example, TV-14-S,V is a valid rating, as is TV14. However, TV-14-FV is not a valid rating.
Age-based
Rating
FV
D
L
S
V
TV-PG
X
X
X
X
TV-14
X
X
X
X
X
X
X
TV-Y
TV-Y7
X
TV-G
TV-MA
TABLE 1
Content-based Rating:
FV ..... Fantasy Violence
D ..... Sexually Suggestive Dialogue
L ..... Adult Language
S ..... Sexual Situations
V ..... Violence
SETTING TV RATING - 2 (CONTENT RATING)
From item no. 4 of SETTING TV RATING -1 the selected age-based rating will flash,
press the MENU button to confirm selection and at the same time DLSV will appear
with D flashing. The Rating will flash in this sequence :
D
L
S
V
To select all, press the MENU button after every flashing ra ting to confirm selection.
If you want to delete any of the D, L, S, V Rating, when the selected Rating is
flashing press the + or - button and the Rating will change to yellow blank. Press the
MENU button, the yellow blank will disappear and the rating is deleted then the next
rating will start flashing.
NOTES
If user chooses to block program base on age-rating without any content rating therefore
program will be blocked only base on age-rating while D, L, S, V Rating will be ignored.
If users chooses to block program with combination of age and content rating therefore
all programs with a more restrictive age rating but a similar content rating than the one
selected will also be blocked.
– 22 –
For example :
If user chooses to block any program with TV-PG-V rating, all entries in that column
are automatically blocked as shown in table 2. At the same time it will cause no
blocking of any program with D, L, S rating. Similarly, the same will happen if user
chooses to block other rating such as D, L or S.
Age-based
Rating
FV
D
L
S
V
TV-PG
U
U
U
B
TV-14
U
U
U
B
U
U
B
TV-Y
TV-Y7
U
TV-G
TV-MA
TABLE 2 : B = BLOCKED, U = UNBLOCKED
V-BLOCK OPERATION
When the TV set receives any input signal with the selected rating level, the TV
automatically enable program blocking and V-BLOCK message is display on screen
together with the rating level as shown below. The channel blocking should always
cease if the input source is changed or if no rating data is received or if the channel
is changed.
V-BLOCK
TV-PG-DLSV
MPAA RATING and TV RATING cannot be selected simultaneously so only one
rating system can be used at a time.
If you don't want to block MPAA RATING, set this Rating to OFF.
– 23 –
CHANGING A PASS NUMBER
1 Go to menu display item no. 4 of
SETTING V-BLOCK.
4 Use the number buttons [0] ~ [9] to
input a pass number you want.
V-BLOCK SET
V-BLOCK SET
V-BLOCK
CHANGE RATING
CHANGE NUMBER
EXIT
V-BLOCK
CHANGE RATING
CHANGE NUMBER
EXIT
OFF
0000
1234
[0] - [9] : NUMBER
[MENU] : ENTER
[+] / [-] : SELECT
[MENU] : ENTER
2 Use the + or - button to highlight
CHANGE NUMBER.
5 Press the MENU button.
V-BLOCK SET
V-BLOCK SET
V-BLOCK
CHANGE RATING
CHANGE NUMBER
EXIT
OFF
OFF
PASS NUMBER
1 2 3 4
0000
[+] / [-] : NO
[MENU] : YES
[+] / [-] : SELECT
[MENU] : ENTER
3 Press the MENU button. The numbers
to the right of CHANGE NUMBER will
flash.
6 If pass number is correct then press
the MENU button and select exit. If not
correct, press the + or - button to
return to menu display of item 2 then
re-enter the number you desire.
V-BLOCK SET
V-BLOCK
CHANGE RATING
CHANGE NUMBER
EXIT
OFF
7 Press the + or - button to select EXIT.
0000
8 Press the MENU button to exit.
[0] / [9] : NUMBER
[MENU] : ENTER
– 24 –
SETTING OPTION RATING (CHANGE RATING-3)
This setting is use to receive data service for Canadian English Language Rating
System in accordance with EIA-744-A Standard.
1 Go to menu display item no. 2 of
SETTING MPAA RATING.
6 Press the MENU button. The OFF (or
ON) to the right of the selected rating
will flash.
V-BLOCK SET
MPAA RATING
TV RATING
OPTION RATING
LOADING
EXIT
5 Use the + or - button to highlight the
rating you want to select.
PG-13
TV-PG-DLSV
OFF
OFF
OPTION RATING
C
C8+
G
PG
14+
18+
EXIT
[+] / [-] : SELECT
[MENU] : ENTER
2 Use the + or - button to highlight
OPTION RATING.
V-BLOCK SET
MPAA RATING
TV RATING
OPTION RATING
LOADING
EXIT
: OFF
: OFF
: OFF
: OFF
: OFF
: OFF
[+] / [-] : ON/OFF
[MENU]: ENTER
7 Press the + or - button until ON
appears beside the rating then press
the MENU button.
PG-13
TV-PG-DLSV
OFF
OFF
8 Press the + or - button to highlight
EXIT.
[+] / [-] : SELECT
[MENU] : ENTER
V-BLOCK SET
3 Press the MENU button. The OFF (or
ON) to the right of OPTION RATING
will flash.
MPAA RATING
TV RATING
OPTION RATING
LOADING
EXIT
[+] / [-] : SELECT
[MENU] : ENTER
V-BLOCK SET
MPAA RATING
TV RATING
OPTION RATING
LOADING
EXIT
PG-13
TV-PG-DLSV
OFF
OFF
9 Press the MENU button to exit.
[+] / [-] : ON/OFF
[MENU] : ENTER
NOTES
4 Press the + or - button until ON
appears beside OPTION RATING,
then press the MENU button.
OPTION RATING
C
C8+
G
PG
14+
18+
EXIT
PG-13
TV-PG-DLSV
ON
OFF
: OFF
: OFF
: OFF
: OFF
: OFF
: OFF
[+] / [-] : SELECT
[MENU]: ENTER
– 25 –
If you don't want to block OPTION
RATING, set this Rating to OFF.
For threshold selectable rating system
if any rating is set to ON then other
higher rating will automatically set to
ON.
For individually selectable rating
system user can choose to set ON or
OFF for each level individually.
SETTING LOADING
1 Go to menu display item no. 8 of
SETTING OPTION RATING.
3 Press the + or - button until ON
appears beside LOADING then press
the MENU button.
V-BLOCK SET
MPAA RATING
TV RATING
OPTION RATING
LOADING
EXIT
4 Press the MENU button to exit.
PG-13
TV-PG-DLSV
ON
OFF
[+] / [-] : SELECT
[MENU] : ENTER
2 Press the MENU button. The OFF (or
ON) to the right of LOADING will flash.
V-BLOCK SET
MPAA RATING
TV RATING
OPTION RATING
LOADING
EXIT
PG-13
TV-PG-DLSV
ON
OFF
[+] / [-] : ON/OFF
[MENU] : ENTER
NOTES
If you don't want to load any OPTION RATING, set LOADING to OFF.
With LOADING set to ON, if there is Option Rating signal being decoded, a "PRCC
LOADING " message appears in red on TV screen as shown below.
PRCC LOADING
If there is error in loading, the "PRCC LOADING" message will change
color from red to white and data will not load.
Until loading is completed, if loading is interrupted by a channel change then
data will not load .
When TV set received new "PRCC LOADING" data it will overwrite the current
option rating stored in the memory and all ratings set to "OFF".
– 26 –
BEFORE REQUESTING SERVICE
Before requesting service, check the following list of problems and solutions. You may
be able to solve the problem yourself.
PROBLEM
SOLUTION
No Power
Make sure the unit is plugged in.
Unplug the unit from the electrical outlet for 60 seconds.
Then plug it in and turn it on again.
No Picture
Make sure the antenna is properly connected at the back
of the TV.
Make sure the antenna is not broken.
Adjust the brightness and contrast controls.
No Sound
Use the VOLUME (Up/Down) buttons to turn up the
volume.
Make sure the sound is not muted by pressing the MUTE
button.
No Color
Make sure the show is being transmitted in color by
checking to see if another channel is in color.
Adjust the color control.
Wrong Color
Adjust the color and tint controls.
Picture Too
Light/Dark
Adjust the brightness and contrast controls.
Picture Interference
Check the antenna for shorted or broken wires.
Reposition the antenna.
Try another channel to make sure there is no station
trouble or local interference (such as electric motors). If
possible, minimize by adjusting the antenna.
Remote control
Doesn't Work
Make sure batteries are inserted in the remote control.
Make sure the remote control is aimed directly at the
remote sensor on the TV.
Big black box
on screen
Press the TV/CAP/TEXT button until the CAP or TEXT
box disappears from the screen.
PRINTED IN MALAYSIA
1111-31810M178 MC9910 - 1