1
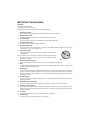
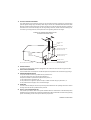
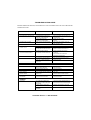
R
PORTABLE CD PLAYER
AM / FM STEREO RADIO WITH
CASSETTE RECORDER
MODEL : MP3114
BEFORE OPERATING THIS PRODUCT,
PLEASE READ THESE INSTRUCTIONS COMPLETELY
IMPORTANT SAFEGUARDS
CAUTION :
• Read all of these instructions.
• Save these instructions for later use.
• Follow all warnings and instructions marked on the audio equipment.
1. READ INSTRUCTIONS
All the safety and operating instructions should be read before the product is operated.
2. RETAIN INSTRUCTIONS
The safety and operating instructions should be retained for future reference.
3. HEED WARNINGS
All warnings on the product and in the operating instructions should be adhered to.
4. FOLLOW INSTRUCTIONS
All operating and use instructions should be followed.
5. WATER AND MOISTURE
The product should not be used near water- for example, near a bathtub, washbowl, kitchen sink, laundry tub , in
a wet basement, or near a swimming pool, etc.
6. CARTS AND STANDS
The product should be used only with a cart or stand that is recommended by
the manufacturer.
6 A. An appliance and cart combination should be moved with care. Quick stops,
excessive force, and uneven surfaces may cause the appliance and cart
combination to overturn.
7. WALL OR CEILING MOUNTING
The product should be mounted to a wall or ceiling as recommended by the manufacturer.
8. HEAT
The product should be situated away from heat sources such as radiators, heat registers, stoves, or other products
( including amplifiers ) that produce heat.
9. VENTILATION
The product should be situated so that its location or position does not interfere with its proper ventilation. For
example, the product should not be situated on a bed, sofa, rug, or similar surface that may block the ventilation
openings; or, placed in a built-in installation, such as a bookcase or cabinet that may impede the flow of air through
the ventilation openings.
10. POWER SOURCES
The product should be connected to a power supply only of the type described in the operating instructions or as
marked on the product.
11. GROUNDING OR POLARIZATION
Precautions should be taken so that the grounding or polarization means of a product is not defeated.
12. POWER-CORD PROTECTION
Power-supply cords should be routed so that they are not likely to be walked on or pinched by items placed upon
or against them, paying particular attention to cords at plugs, convenience receptacles, and the point where they
exit from the product.
13. CLEANING
The product should be cleaned only as recommended by the manufacturer.
14. POWER LINES
An outdoor antenna should be located away from power lines.
15. OUTDOOR ANTENNA GROUNDING
If an outside antenna is connected to the receiver, be sure the antenna system is grounded so as to provide some
protection against voltage surges and built up static charges. Section 810 of the National Electrical Code, ANSI/
NFPA 70 provides information with respect to proper grounding of the mast and supporting structure, grounding of
the lead-in wire to an antenna discharge unit, size of grounding conductors, location of antenna-discharge unit,
connection to grounding electrodes, and requirements for the grounding electrode. See Figure.
EXAMPLE OF ANTENNA GROUNDING AS PER
NATIONAL ELECTRICAL CODE
ANTENNA LEAD
IN WIRE
GROUND CLAMP
ANTENNA DISCHARGE UNIT
(NEC SECTION 810-20)
ELECTRIC
SERVICE
EQUIPEMENT
GROUNDING CONDUCTORS
(NEC SECTION 810-21)
GROUND CLAMPS
NEC - NATIONAL ELECTRICAL CODE
POWER SERVICE GROUNDING
ELECTRODE SYSTEM
(NEC ART 250, PART H)
16. NONUSE PERIODS
The power cord of the product should be unplugged from the outlet when left unused for a long period of time.
17. OBJECT AND LIQUID ENTRY
Care should be taken so that objects do not fall and liquids are not spilled into the enclosure through openings.
18. DAMAGE REQUIRING SERVICE
The product should be serviced by qualified service personnel when :
A. The power-supply cord or the plug has been damaged; or
B. Objects have fallen or liquid has been spilled into the product ; or
C. The product has been exposed to rain ; or
D. The product does not appear to operate normally or exhibits a marked change in performance ; or
E. The product has been dropped, or the enclosure damaged.
19. SERVICING
The user should not attempt to service the product beyond that described in the operating instructions. All other
servicing should be referred to qualified service personnel.
20. NOTE TO CATV SYSTEM INSTALLER
This reminder is provided to call the CATV system installer’s attention to Article 820-40 of the NEC that provides
guidelines for proper grounding and, in particular, specifies that the cable ground shall be connected to the grounding
system of the building, as close to the point of cable entry as practical.
PRINTED IN HONG KONG
WARNING :
To reduce the risk of fire or electric shock, do not expose it is appliance to rain or moisture.
CAUTION :
Use of controls or adjustments or performance of procedures other than those specified may
result in hazardous radiation exposure.
CAUTION
RISK OF ELECTRIC SHOCK DO NOT OPEN
To reduce the risk of electric shock, do not remove cover ( or back ).
No user serviceable parts inside. Refer servicing to qualified service personnel
The lightning flash with arrowhead symbol within an equilateral symbol, with an
equilateral triangle, is intended to alert user to the presence of uninsulated “
dangerous voltage “ within the products enclosure that may be of sufficient
magnitude to constitute a risk of electric shock to persons
The exclamation point within an equilateral triangle is intended to alert the user
to the presence of important operating and maintenance ( servicing ) instruction
in the literature accompanying the appliance.
CAUTION
For Compact Disc Units only.
INVISIBLE LASER RADIATION WHEN OPEN AND
INTERLOCK FAILED OR DEFEATED.
AVOID DIRECT EXPOSURE TO LASER BEAM.
LOCATION OF CONTROLS
1.
FUNCTION selector
2.
3.
FM mode button
VOLUME control
4.
5.
CASSETTE function keys
SKIP up / down button
6.
REPEAT button
CD LED display
7.
8.
CASS door
STOP button
9. PLAY / PAUSE button
10. TUNING knob
11. DIAL pointer
12. FM stereo indicator
13. BAND selector
14. CD door
15. HANDLE arm
16. FM antenna
17. BATTERY compartment
18. AC cord
19. AC / DC power socket
20. Headphone socket
PREPARATION FOR USE:
1. AC mains operation
•
•
Set the power selector to AC position.
Take out the built-in AC power cord which is located
inside the battery line cord compartment connect the
corresponding end to AC household mains outlet.
Make sure the voltage is compatible.
2. Battery operation
•
Set power selector to DC position.
•
•
Remove battery compartment cover.
Put in 8 batteries (UM-2 or equivalent) in correct polarity
•
as indicated. (Heavy duty batteries are recommend )
Replace the cover properly.
E-1
NOTE :
Check your batteries regular, old or discharged batteries should be replaced.
If the unit is not going to be used for some time or is being run exclusively on alternative power. Take away the batteries
to avoid leakage and damage.
Whenever convenient, use the power supply if you want to conserve battery life. Make sure you remove the
AC cord from wall socket before inserting batteries.
3. Headphones
Be sure your headphone has 3.5mm diameter stereo plug, with an impedance of 32 OHMS, When headphone is
connected, The speakers will automatically disconnected. Adjust the volume control to the desired level.
LISTENING TO RADIO
Operation
1.
Set the function selector to “ TUNER ” position.
2.
3.
Select the desired radio frequency band with band selector.
Turn the Tuning control to set the Dial Pointer against the station frequency as desired.
4.
Adjust Volume controls for the desired volume level.
PLAYING COMPACT DISC
•
Getting start
1.
Set the Function selector to “CD” position. Life to open the CD compartment.
Put a CD into the compartment and close the CD door.
2.
After a few seconds, the unit will scan the disc and the display will show the total number of tracks on the disc.
PLAY/PAUSE MODE
1.
If PLAY/ PAUSE button is pressed during Stop mode, The first track will be
played and the PLAY / PAUSE Led will be turned on.
2.
If PLAY / PAUSE button is pressed during Play mode, go to Pause mode
and the Play / Pause Led will be flashing.
•
STOP MODE
1.
If Stop button is pressed during Play or Pause mode. Go to Stop mode and display total number of track all
indicator Led are turned off.
•
Selecting a desired track
1.
2.
or
Press Skip
Press PLAY / PAUSE
Selecting a desired track at the Stop mode
until the desired track appears on the Led display.
to start play.
The selected track number appear on the Led display.
E-2
Selecting a desired track during Play mode
1.
or
until the desired track appears on the Led display.
Press Skip
The selected track number appear on the Led display.
•
If you press Skip
•
Searching for a particular passage during play
once it will skip to the beginning of the current track and play the track again.
Press and hold Skip
or
until the desired passage is located. During the search the sound is played
faster than normal at a reduced volume. Play returns to normal when Skip
or
is released.
•
Repeat mode
Press the repeat button before or during play. A single track or all the tracks can be repeated.
Each press switches the repeat mode.
LISTENING TO TAPE
General operation
Stop / Eject key
Press to Stop all deck operations. Press again to open the cassette doors
Fast Forward Key &
Fast rewind key
Press to start rapid tape winding in either Forward or Reverse direction. Press Stop / Eject
keys when the cassette spools stop turning.
Play key
Press to start playing tape.
Pause key
Press to stop tape operation temporarily. Press again to resume tape operation.
Record key
Press together with Play key to start recording.
Playback
•
•
Set the Function selector to tape position.
Put in your cassette tape.
•
•
Press Play key to activate playback.
Adjust the Volume control to the desired level.
•
•
Use Pause key when you want to stop Playback temporarily.
Press Stop / Eject key when finished.
RECORDING
A. Recording form Radio
•
Set in Tuner mode.
•
•
Tune in your station and put in your cassette tape.
Press Record key and the Play key of deck at the same time to start recording.
•
Press Stop / Eject key when finished.
B. Recording form CD
•
Set function selector to “ CD “ position.
•
Insert a cassette suitable for recording, press Pause key then press Record key. Recording function will be on
standby.
•
•
Activate the CD player, and then press (to release) Pause key to start recording.
To stop recording, first press Stop button on CD player- then press the Stop / Eject key on tape deck.
E-3
SPECIFICATION
POWER SOURCE :
AC :
120V ~ 60Hz
BATTERIES :
8 X C CELLS (LR14 OR EQUIVALENT)
RADIO FREQUENCY COVERAGE
FM:
AM:
88 -108MHz
530 - 1710kHz
RECORDING SYSTEM
RECORDING SYSTEM:
DC BIAS
ERASING SYSTEM :
MAGNETIC ERASE
GENERAL
SPEAKER
POWER OUTPUT
16 OHMS
0.8 WATT AT 10% T.H.D. PER CHANNEL
HEADPHONES :
3.5MM STEREO JACK PLUG, 8 - 32 Ω
CD PLAYER
PICK UP:
ENCODING :
3-BEAM, SEMICONDUCTOR LASER
1 BIT LINEAR 8 X OVERSAMPLING
E-4
TROUBLESHOOTING GUIDE
BEFORE REQUESTING SERVICE, PLEASE REFER TO THE FOLLOWING CHART FOR THE SYMPTOM AND
POSSIBLE SOLUTION.
SYMPTOMS
POSSIBLE CAUSES
POSSIBLE SOLUTIONS
FUNCTION SELECTOR SWITCH
SET FUNCTION SELECTOR SWITCH TO
CD PLAYER
CD PLAYER WILL NOT OPERATE
NOT SET TO CD POSITION
CD POSITION.
CD NOT INSTALLED OR
INSERT CD WITH LABEL
INSTALLED UPSIDE DOWN.
SIDE UP.
DISC IS DIRTY OR SCRATCHED.
CD SKIP WHILE PLAYING.
WIPE DISC WITH A SOFT CLOTH OR
TRY ANOTHER DISC.
RADIO
FM STEREO INDICATOR
DOESN’T LIGHT
NOISE OR SOUND DISTORTED
ON AM OR FM BROADCASTS
NO SOUND
STATION NOT PROPERLY TUNED.
BAND/FM MODE SWITCH IS SET
TO FM POSITION OR STATION IS
BROADCASTING IN MONO.
FM TELESCOPIC ANTENNA NOT
EXTENDED OR WEAK STATION.
STATION NOT PROPERLY TUNED.
FUNCTION SELECTOR SWITCH
NOT SET TO RADIO POSITION.
VOLUME CONTROL IS AT MINIMUM
POSITION.
RETUNE THE FM STATION.
SET BAND/FM MODE SWITCH TO FM
STEREO POSITION OR TUNE TO A
STEREO BROADCAST STATION.
FM - EXTEND THE TELESCOPIC
ANTENNA.
AM - ROTATE UNIT UNTIL BEST
RECEPTION IS OBTAINED.
RETUNE AM OR FM STATION.
SET FUNCTION SELECTOR SWITCH
RADIO POSITION.
INCREASE VOLUME.
CASSETTE
NO SOUND
CASSETTE DOES NOT PLAY
THE PLAYBACK
SOUND DISTORTION OR SLOW
ERRATIC SPEED.
WEAK OR DISTORTED
RECORDING.
FUNCTION SELECTOR SWITCH NOT
SET TO TAPE POSITION.
NO RECORDING ON TAPE.
PLAY BUTTON IS NOT PRESSED
OR THE TAPE MUST BE REWOUND.
DIRTY HEAD, TAPE TOO OLD OR
WORN OUT.
CASSETTE TAPE IS POOR QUALITY
OR BATTERIES ARE WEAK.
SET FUNCTION SELECTOR SWITCH TO
TAPE POSITION.
CHECK CASSETTE.
PRESS THE PLAY BUTTON OR REWIND
THE TAPE.
CLEAN THE HEAD OR REPLACE
PRE-RECORDED CASSETTE TAPE.
CHANGE TO ANOTHER CASSETTE TAPE.
CHECK BATTERIES.
AC CORD NOT CONNECTED
PROPERLY OR WEAK OR DEAD
BATTERIES.
HEADPHONE PLUGGED INTO
PHONE JACK.
VOLUME CONTROL SET TO
MINIMUM.
CHECK AC CORD CONNECTIONS OR
REPLACE WEAK OR DEAD BATTERIES.
GENERAL
NO SOUND
REMOVE HEADPHONE PLUG FROM
JACK.
INCREASE THE VOLUME
Customer Service : 1-800-919-3647
R
LIMITED WARRANTY
AUDIO
We at MEMOREX believe you will be pleased with your new Audio Product. Please read this Warranty carefully.
Memorex warrants this product to be free from manufacturing defects purchase in and if used in, the United States.
Should you find your unit is not operating properly during the terms of full coverage of this warranty, ninety (90) days,
you should contact your original place of purchase for an exchange with a valid receipt. If necessary, Memorex will
provide one of the following options (at Memorex's discretion), providing the manufacturing defect is verified along with
the date of purchase.
1. Repair service for ninety (90) days of original purchase at no charge for labor and parts.
2. Replacement of your defective unit with either a new, refurbished or equivalent model at no
charge for ninety (90) days from the date of original purchase.
This warranty is void if the product is:
A ) Damaged through negligence, abuse, misuse, accident, or acts of God.
B ) Used in commercial applications or rentals.
C ) Modified or repaired by anyone other than Memorex or their expressly authorized representative.
D ) Damage resulting from the improper connection to equipment of other manufacturers.
This warranty does not cover:
A) Cost incurred in the shipping of the product to and from the Memorex authorized repair facility listed.
B) Damage or improper operation caused by the failure to follow the operating instructions provided
with the product.
C) Routine adjustments to the product which can be performed by the customer as outlined in the
owner's manual.
D) Damage to compact disc
E) Signal reception problems caused by external factors.
F) Products not purchased in the United States.
G) Damage to the products used outside the United States.
In the event that service is required under this warranty, please call our toll free number at
1-800-919-3647 for instructions.
THIS WARRANTY IS NON-TRANSFERABLE AND APPLIES SOLELY TO THE ORIGINAL PURCHASER AND DOES NOT EXTEND
TO SUBSEQUENT OWNERS OF THE PRODUCT. ANY APPLICABLE IMPLIED WARRANTIES, INCLUDING THE WARRANTY
OF MERCHANTABILITY, ARE LIMITED IN DURATION TO A PERIOD OF THE EXPRESSED WARRANTY AS PROVIDED HEREIN
BEGINNING WITH THE DATE OF THE ORIGINAL PURCHASE AT RETAIL AND NO WARRANTIES, WHETHER EXPRESSED OR
IMPLIED SHALL APPLY TO THE PRODUCT THEREAFTER. MEMOREX MAKES NO WARRANTY AS TO THE FITNESS OF THE
PRODUCT FOR ANY PARTICULAR PURPOSE OR USE.
THE EXTENT OF MEMOREX'S LIABILITY UNDER THIS LIMITED WARRANTY IS THE REPAIR OR REPLACEMENT PROVIDED
ABOVE AT THE SOLE DISCRETION OF MEMOREX. IN NO EVENT SHALL MEMOREX'S LIABILITY EXCEED THE PURCHASE
PRICE PAID BY THE PURCHASER. UNDER NO CIRCUMSTANCES SHALL MEMCORP BE LIABLE FOR ANY LOSS, DIRECT,
INDIRECT, INCIDENTAL, FORESEEN, UNFORESEEN, SPECIAL, OR CONSEQUENTIAL DAMAGE ARISING OUT OF OR IN
CONNECTION WITH THE USE OF THIS PRODUCT.
THIS WARRANTY IS VALID ONLY IN THE UNITED STATES. THIS WARRANTY GIVES YOU SPECIFIC LEGAL RIGHTS,
HOWEVER, YOU MAY HAVE OTHER RIGHTS WHICH MAY VARY FROM STATE TO STATE. SOME STATES DO NOT ALLOW
LIMITATIONS ON IMPLIED WARRANTIES OR EXCLUSION OF CONSEQUENTIAL DAMAGE, THEREFORE THESE
RESTRICTIONS MAY NOT APPLY TO YOU.
©2000, Memorex is a registered trademark of Memorex Telex N.V.
MEMCORP Inc.
7145 West 20 th Avenue Hialeah, FL 33014 U.S.A.
© 2000, Memorex is a trademark of Memorex Telex. N.V.
Printed in Hong Kong
Visit Our Website : www.memorex. com