1
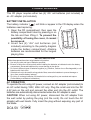
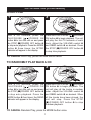
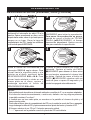
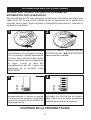
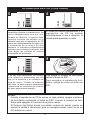
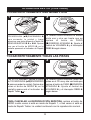
MD6460
User’s Guide
PERSONAL COMPACT DISC PLAYER
WITH 60 SECOND DIGITAL MOTION
PROOF ANTI-SHOCK PROTECTION
Before operating this product,
please read these instructions completely.
SAFETY PRECAUTIONS
CAUTION
RISK OF ELECTRIC SHOCK
DO NOT OPEN
CAUTION: TO REDUCE THE RISK OF ELECTRIC SHOCK, DO NOT
REMOVE COVER (OR BACK). NO USER-SERVICEABLE PARTS
INSIDE. REFER SERVICING TO QUALIFIED SERVICE PERSONNEL.
DANGEROUS VOLTAGE:
The lightning flash with arrowhead symbol, within an equilateral
triangle is intended to alert the user to the presence of uninsulated
dangerous voltage within the product’s enclosure that may be of
sufficient magnitude to constitute a risk of electric shock to persons.
ATTENTION:
The exclamation point within an equilateral triangle is intended to
alert the user to the presence of important operating and
maintenance (servicing) instructions in the literature accompanying
the appliance.
DANGER:
This product utilizes a Class 1 laser to read Compact Discs.
This laser Compact Disc Player is equipped with safety
switches to avoid exposure when the CD door is open and the
safety interlocks are defeated. Invisible and hazardous laser
radiation when open and interlock failed or defeated. Avoid
direct exposure to beam. Please do not attempt to defeat or
bypass the safety switches.
FCC WARNING:
This equipment may generate or use radio frequency energy. Changes
or modifications to this equipment may cause harmful interference
unless the modifications are expressly approved in the instruction manual. The user could lose the authority to operate this equipment if an
unauthorized change or modification is made.
SURGE PROTECTORS:
It is recommended to use a surge protector for AC connection.
Lightning and power surges ARE NOT covered under warranty for this
product.
1
SAFETY PRECAUTIONS (CONTINUED)
INFORMATION:
This equipment has been tested and found to comply with the limits for a Class
B digital device, pursuant to Part 15 of the FCC Rules. These limits are
designed to provide reasonable protection against harmful interference in a residential installation. This equipment generates, uses and can radiate radio frequency energy and, if not installed and used in accordance with the instructions, may cause harmful interference to radio communications. However, there
is no guarantee that interference will not occur in a particular installation. If this
equipment does cause harmful interference to radio or television reception,
which can be determined by turning the equipment off and on, the user is
encouraged to try to correct the interference by one or more of the following
measures:
• Reorient or relocate the receiving antenna.
• Increase the separation between the equipment and receiver.
• Connect the equipment into an outlet on a circuit different from that to which
the receiver is connected.
• Consult the dealer or an experienced radio/TV technician for help.
ATTENTION:
POUR ÉVITER LES CHOC ÉLECTRIQUES, INTRODUIRE LA LAME LA
PLUS LARGE DE LA FICHE DANS LA BORNE CORRESPONDANTE DE
LA PRISES ET POUSSER JUSQU’AU FOND.
•
•
•
•
•
Do not open the CD compartment while the CD is rotating.
Always keep the CD compartment closed when not in use.
Keep all foreign objects out of the CD compartment.
Place the unit on a stable surface.
Avoid installing the unit in locations described below:
• Places exposed to direct sunlight or close to heat radiating
appliances such as electric heaters.
• On top of other stereo equipment that radiates too much
heat.
• Places lacking ventilation or dusty places.
• Places subject to constant vibration.
• Humid or moist places.
2
Dear Customer:
Selecting fine audio equipment such as the unit you’ve just purchased is only the start of
your musical enjoyment. Now it’s time to consider how you can maximize the fun and
excitement your equipment offers. This manufacturer and the Electronic Industries
Association’s Consumer Electronics Group want you to get the most out of your equipment
by playing it at a safe level. One that lets the sound come through loud and clear without
annoying blaring or distortion and, most importantly, without affecting your sensitive
hearing.
Sound can be deceiving. Over time your hearing “comfort level” adapts to higher volumes of
sound. So what sounds “normal” can actually be loud and harmful to your hearing. Guard
against this by setting your equipment at a safe level BEFORE your hearing adapts.
To establish a safe level:
• Start your volume control at a low setting.
• Slowly increase the sound until you can hear it comfortably and clearly, and without
distortion.
Once you have established a comfortable sound level:
• Set the dial and leave it there.
Taking a minute to do this now will help to prevent hearing damage or loss in the future.
After all, we want you listening for a lifetime.
We Want You Listening For A Lifetime
Used wisely, your new sound equipment will provide a lifetime of fun and enjoyment. Since
hearing damage from loud noise is often undetectable until it is too late, this manufacturer
and the Electronic Industries Association’s Consumer Electronics Group recommend you
avoid prolonged exposure to excessive noise. This list of sound levels is included for your
protection.
Decibel
Level
30
40
50
60
70
80
Example
Quiet library, soft whispers
Living room, refrigerator, bedroom away from traffic
Light traffic, normal conversation, quiet office
Air conditioner at 20 feet, sewing machine
Vacuum cleaner, hair dryer, noisy restaurant
Average city traffic, garbage disposals, alarm clock at two feet
THE FOLLOWING NOISES CAN BE DANGEROUS UNDER CONSTANT
EXPOSURE:
C
IND
U
EIA
EST. 1924
S
S
N
ELECT
R
NI
O
O C I A TI
IES
3
O
TR
Information courtesy of the Deafness Research Foundation.
We
Want You
LISTENING
For A Lifetime
S
Subway, motorcycle, truck traffic, lawn mower
Garbage truck, chain saw, pneumatic drill
Rock band concert in front of speakers, thunderclap
Gunshot blast, jet engine
Rocket launching pad
A
90
100
120
140
180
LOCATION OF CONTROLS
2
1
7
8
3
9
4
10
1. DC 4.5V Jack
2.
3.
4.
5.
6.
7.
8.
9.
10.
12
6
13 14
15 16 17
11. Skip/Search o Button
12. STOP (■)/POWER OFF
Button
13. Skip/Search n Button
14. DBBS (Bass Boost) Switch
15. VOLUME Control
16. Headphones Jack
(Side of Unit)
17. LINE OUT Jack (Side of Unit)
z (Rear of Unit)
ESP Button
Display
PROG (Program) Button
PLAY/PAUSE (®p)/POWER
ON Button
HOLD (ON/OFF) Switch
Battery Compartment
(Under CD Compartment)
MODE Button
CD Door OPEN Switch
CD Compartment
11
5
4
POWER SOURCES
This CD player requires either two (2) “AA” cell batteries (not included) or
an AC adapter (not included).
BATTERY INSTALLATION
The battery indicator (
) will blink or appear in the CD display when the
batteries need replacing.
1. Open the CD compartment, then open the
– –+
battery compartment door by pressing in on
the tab and then lifting it. To prevent the
possibility of losing the cover, it cannot
be removed.
2. Insert two (2) “AA” cell batteries (not
+ –+
included) according to the polarity diagram
inside the battery compartment. Alkaline
batteries are recommended for the longest
playing time.
+
–
BATTERY PRECAUTIONS
Follow these precautions when using batteries in this device:
1. Use only the size and type of batteries specified.
2. Be sure to follow the correct polarity when installing the batteries as indicated next to the battery
compartment. Reversed batteries may cause damage to the device.
3. Do not mix different types of batteries together (e.g. Alkaline, Carbon-zinc or Rechargeable) or old
batteries with fresh ones.
4. If the device is not to be used for a long period of time, remove the batteries to prevent damage or
injury from possible battery leakage.
5. Do not try to recharge batteries not intended to be recharged; they can overheat and rupture.
(Follow battery manufacturer’s directions.)
AC OPERATION
To operate the unit using AC power, connect an AC adapter (not included) to
an AC outlet having 120V, 60Hz AC only. Plug the small end into the DC
4.5V jack on the unit and connect the other end into the AC outlet. The
batteries are automatically disconnected when the AC adapter is used.
CAUTION: When not using AC power, disconnect the AC adapter from
the wall outlet by pulling the plug (not the cord). Do not touch the AC
adapter with wet hands. Fully insert the plug without exposing any part of
the blade.
DC4.5V z
5
BASS BOOST
OPERATION
1
TURNING POWER ON/OFF
1
2
To emphasize the bass, slide the
DBBS switch to the ON position. For
normal bass, slide the DBBS switch to
1
the OFF position.
1
To turn the unit on, press the
PLAY/PAUSE (®p)/POWER ON button
❶.
To turn the unit off, Press the STOP
(■)/POWER OFF button ❷ while in the
Stop mode.
HOLD
1
Slide to the ON position to disable the buttons; “Hold” will briefly appear in the
display. When pressing the buttons on the CD compartment lid, "Hold" will briefly
appear in the display. Slide to the OFF position to enable the buttons. For the HOLD
function, only the buttons on the CD compartment lid will be disabled, not the other
controls/switches.
AUTO POWER OFF
2 for approximately one minute, the
When the unit is stopped (Standby mode)
power will automatically turn off.
Radio Sound Through a Home Audio System
By using a home audio connection cable (not included), superb radio sound can
be heard through your home audio system. Before making any connections, turn
off the power to all equipment.
Plug a connection cable (not included) between the LINE OUT jack on the side
of the CD player and the amplifier’s AUX or CD input jack. (Do not connect it to
the amplifier’s PHONO jack.)
NOTE: If the radio interferes with TV reception, move the unit away from the TV
or turn off the power to this unit.
6
CD OPERATION
TO PLAY A CD (Standard, CD-R and CD-RW)
1
2
Open the CD compartment lid by
sliding the CD OPEN switch to the
right. Gently press a disc, label side up,
onto the spindle2 until it locks in place.
Close the CD compartment lid. Insert
headphones into the PHONES jack.
Press the PLAY/PAUSE (®p)/POWER
ON button to start playback. To pause
playback, press the PLAY/PAUSE
( ®p )/POWER ON button again, the
elapsed time will blink. Press once
again to resume 2playback.
3
3
4
4
1
2
Adjust the VOLUME control ❶ and
DBBS switch ❷ as desired. To skip
forward or backward through the tracks
on the disc, press the SKIP/SEARCH
o 3 or n 4 button. To search forward
or backward through the tracks on the
disc, press and hold the SKIP/SEARCH
o 3 or n 4 button.
When the disc is through playing, it will
stop. Press the STOP (■)/POWER OFF
button to stop the disc before it is
finished; the total number of tracks will
2 STOP (■)/POWER
appear. Press the
OFF button again while in the Stop mode
to turn the unit off or wait approximately
60 seconds and the unit will automatically
turn off.
NOTES:
• This unit is capable of playing standard CDs or 3” singles; no adapter is required.
• If a disc is inserted incorrectly, dirty, damaged or not present at all, the display will
show “no disc”.
• As each track is played, the track number and elapsed time are shown in the display.
• To remove the disc, open the CD compartment, hold the edge of the CD, gently
press the center pivot and lift the CD.
• The maximum play time for a CD in this unit is 74 minutes.
• “- - - -” will appear in the display when the CD door is open.
7
CD OPERATION (CONTINUED)
60 SECOND MOTION PROOF ELECTRONIC ANTI-SHOCK SYSTEM
This CD player has a built-in Anti-Shock System that cuts down on CD skipping,
which is useful when using the CD player in the car or while jogging/walking.
Follow the steps below to activate and understand the Anti-Shock System:
1
2
Open the CD compartment lid by
sliding the CD OPEN switch to the
right. Gently press a disc, label side
2
up, onto the spindle
until it locks in
place. Close the CD compartment lid.
Insert headphones into the PHONES
jack.
With a CD inserted, press the
PLAY/PAUSE ( ®p )/POWER ON
button to turn the unit on.
3
4
The Anti-Shock System will start
automatically, the sound will mute for a
moment and the display will show the
Anti-Shock indicator with no bars in it.
Within a few seconds, the Anti-Shock
indicator will fill to indicate music
signals are stored in memory.
2
CONTINUED ON THE NEXT PAGE
8
5
CD OPERATION (CONTINUED)
6
If the CD player is subject to vibration
during playback, the bars will
disappear one by one. During the
vibration, the music should continue to
play the signals stored in the memory
until the CD player can read the music
data properly from the disc. At this
time, the indicator will probably show
fewer bars indicating the music signals
stored in memory are low.
If all the bars disappear and the CD
player is subject to immediate vibration,
the unit may skip.
7
8
If no more vibration occurs, the
music signals are once again stored
into the memory and the indicator
returns to full. When the memory is
full, the top bar will blink and the
disc rotation speed will drop to save
power consumption.
To turn the Anti-Shock System off,
press the ESP button.
To turn the Anti-Shock System on,
press the ESP button again.
2
NOTES:
• When the CD player is used in a stable location, turn the Anti-Shock System
off by pressing the ESP button. When the Anti-Shock System is off, battery
consumption is less.
• The Anti-Shock System provides for continuous sound output when the unit
is subject to vibration, but it will not correct errors, such as a defective or
dirty CD.
9
CD OPERATION (CONTINUED)
TO REPEATEDLY PLAY BACK ONE TRACK
2
1
1
2
3
1
4
2
3
With a CD inserted, press the
PLAY/PAUSE (®p)/POWER ON
button ❶ to turn the unit on, then select
a track using the SKIP/SEARCH o 2
or n 3 button. Press the MODE button
❹ once; the Repeat 1 indicator
1
will appear in the display.
The unit will then play the same track
over and over until the STOP
(■)/POWER OFF button ❶ is pressed.
Adjust the VOLUME control ❷ and
DBBS switch ❸ as desired.
1
2
ALL
TO REPEATEDLY PLAY BACK ALL TRACKS
1
1
2
2
3
With a CD inserted, press the
PLAY/PAUSE (®p)/POWER ON
button ❶ to turn the unit on. Press the
MODE button ❷ twice; the Repeat All
ALL will appear in the
indicator
display.
The unit will then play all the tracks on
the CD over and over until the STOP
(■)/POWER OFF button ❶ is pressed.
Adjust the VOLUME control ❷ and
DBBS switch ❸ as desired.
TO CANCEL REPEAT PLAYBACK, press the MODE button four times if in
Repeat 1 mode, or three times if in Repeat All mode. The unit will continue
normal playback.
10
INTRO PLAY
CD OPERATION (CONTINUED)
2
1
2
1
1
4
3
2
3
With a CD inserted, press the
PLAY/PAUSE (
)/POWER ON
button ❶ to turn the unit on and press
the STOP (■)/POWER OFF button ❷
to stop auto playback. Press the MODE
button ❸ three times; the INTRO
indicator will appear in the display.
Press the PLAY/PAUSE (
)/POWER
ON button ❶ to begin playback. The unit
will play the first 10 seconds of each
track. Adjust the VOLUME control ❷
and DBBS switch ❸ as desired. Press
the STOP (■)/POWER OFF button ❹
to stop Intro playback.
TO CANCEL Intro Play, press the Mode button twice.
TO RANDOMLY PLAY BACK A CD
1
2
2
1
1
4
3
2
3
With a CD inserted, press the
PLAY/PAUSE (
)/POWER ON
button ❶ to turn the unit on and press
the STOP (■)/POWER OFF button ❷
to stop auto playback. Press the
MODE button ❸ four times; the RAND
indicator will appear in the display.
Press the PLAY/PAUSE (
)/POWER
ON button ❶ to begin playback. The
unit will play all the tracks in random
order. Adjust the VOLUME control ❷
and DBBS switch ❸ as desired. When
all the tracks have been played, the
unit will stop. Press the STOP
(■ )/POWER OFF button ❹ to stop
Random playback.
TO CANCEL Random Play, press the MODE button once.
11
CD OPERATION (CONTINUED)
TO PROGRAM THE MEMORY (UP TO 24 TRACKS)
2
3
2
1
3
1
1
With a CD inserted, press the
PLAY/PAUSE (®p)/POWER ON button 1
to turn the unit on and press the STOP
(■)/POWER OFF button 2 to stop auto
playback. Press the PROG button 3; the
Track (00), program number (P-01) and
PROG indicator will appear in the CD
display.
2
Select the first track to be played back
using the SKIP/SEARCH o 1 or n ❷
button, then press the PROG button ❸
again. Repeat this step to program
additional tracks up to a maximum of 24
tracks.
4
3
1
1
2
2
3
Press
the
PLAY/PAUSE
(®p)/POWER ON button ❶ to begin
Programmed playback and adjust the
VOLUME control ❷ and DBBS switch
❸ as desired.
To skip forward or backward through
the programs, press the SKIP/
SEARCH o 1 or n ❷ button. When
the disc is through playing, it will stop.
NOTES:
• Press the STOP (■)/POWER OFF button to stop the disc before it is finished.
• As each program is played, the track number is shown in the display.
• To clear the memorized program, press and hold the PROG button while in
the Stop mode until the PROG indicator disappears in the display.
• Programming is the ability to preselect the order in which a series of tracks
will be played.
• Each track may be stored in the program memory as many times as desired
(up to 24 tracks).
12
CARE AND MAINTENANCE
Caring for Compact Discs
• Treat the compact disc carefully. Handle the
compact disc only by its edges. Never allow your
fingers to come in contact with the shiny,
unprinted side of the compact disc.
• Do not attach adhesive tape, stickers, etc. to
the compact disc label.
• Clean the compact disc periodically with a soft, lint-free, dry cloth. Never use
detergents or abrasive cleaners to clean the compact disc. If necessary, use a
CD cleaning kit.
• If a compact disc skips or gets stuck on a section of the disc, it is probably dirty
or damaged (scratched).
B E NZEN E
C LE A N E R
• When cleaning the compact disc, wipe in straight lines from the center of the
compact disc to the outer edge of the compact disc. Never wipe in circular
motions.
• This unit is designed to play only compact discs bearing the
identification logo as shown here. Other compact discs may not
conform to the CD standard and may not play properly.
• Compact discs should be stored in their cases after each use to avoid
damage.
• Do not expose compact discs to direct sunlight, high humidity, high
temperatures or dust, etc. Prolonged exposure or extreme temperatures can
warp the compact disc.
• Do not stick or write anything on either side of the compact disc. Sharp writing
instruments, or the ink, may damage the surface.
Cleaning the Unit
• To prevent fire or shock hazard, disconnect your unit from the AC power
source when cleaning.
• The finish on your unit may be cleaned with a dust cloth and cared for as other
furniture. Use caution when cleaning and wiping the plastic parts.
• Mild soap and a damp cloth may be used on the front panel.
13
TROUBLESHOOTING GUIDE
If you experience a problem with this unit, check the chart below before
calling for service.
SYMPTOM
Unit will not
turn on.
Disc will not play.
Erratic CD playback.
No sound from
headphones.
ESP not working.
CAUSE
Batteries inserted
incorrectly.
Weak or dead
batteries.
AC adapter
not connected.
CD compartment
not closed.
Disc inserted
incorrectly.
Dirty or defective
disc.
Moisture
condensation
on disc.
Dirty or defective
disc.
Headphone
plug not inserted
correctly.
VOLUME control
set to minimum.
Weak batteries.
Defective disc.
ESP is not activated.
14
SOLUTION
Insert batteries
correctly.
Replace batteries.
Check AC adapter
connection.
Close CD compartment.
Reinsert disc correctly.
Try another disc.
Wipe disc with soft
cloth.
Clean or replace disc.
Reinsert headphone
plug correctly.
Increase volume.
Replace batteries.
Try another disc.
Press the ESP button.
SPECIFICATIONS
Power requirements......................................2 x LR6 "AA" alkaline battery
DC In 4.5V adapter (center positive)
D/A conversion ...................................1-bit DAC eight times oversampling
Frequency response ............................................20~20,000Hz (+1,-3 dB)
Anti-shock. .......................................................................60 second buffer
Output level. ..........................................Line output: 0.6 Vms (47K ohms)
Headphone: 16mW (32 ohms)
FOR ADDITIONAL SET-UP OR OPERATING ASSISTANCE, PLEASE
VISIT OUR WEBSITE AT
WWW.MEMOREXELECTRONICS.COM
OR CONTACT CUSTOMER SERVICE AT (954) 660-7100.
PLEASE KEEP ALL PACKAGING MATERIAL FOR AT LEAST 90
DAYS IN CASE YOU NEED TO RETURN THIS PRODUCT TO YOUR
PLACE OF PURCHASE OR MEMOREX.
FOR PARTS AND ACCESSORIES, CONTACT FOX INTERNATIONAL AT
1-800-321-6993.
15
Memcorp, Inc.
Weston, FL
Printed in Hong Kong
Visit our website at www.memorexelectronics.com
MD6460
Guía del Usuario
REPRODUCTOR DE DISCO COMPACTO
PERSONAL CON PROTECCIÓN ANTISALTOS DIGITAL DE 60 SEGUNDOS A
PRUEBA DE MOVIMIENTOS
Antes de operar este producto,
sírvase leer este instructivo en su totalidad.
MEDIDAS DE SEGURIDAD
CUIDADO
RIESGO DE DESCARGA
ELÉCTRICA. NO ABRIR
ADVERTENCIA: Para reducir el riesgo de descargas eléctricas no saque la cubierta o
la tapa posterior. Allí no se encuentran partes que puedan ser reparadas por el usuario.
Lleve su unidad a un Centro de Servicio Autorizado.
ADVERTENCIA: La figura de la flecha con forma de rayo dentro de un
triángulo está hecho para alertar al usuario de la presencia de cables sin
aislar de "voltaje peligroso" dentro del gabinete, de tal magnitud que
puede causar un riesgo de descarga eléctrica a las personas.
ADVERTENCIA: El signo de exclamación dentro de un triángulo está
hecho para alertar al usuario de la existencia de instrucciones
importantes tanto de servicio como de funcionamiento y mantenimiento
que vienen con la unidad.
PELIGRO:
Este producto utiliza un láser de Clase 1 para leer los discos
compactos. Este reproductor de discos compactos con láser está
equipado con interruptores de seguridad para evitar el contacto
cuando la puerta del CD está abierta y el intercierre de seguridad
está vencido. Radiación láser invisible y riesgosa cuando está
abierto y el intercierre está averiado o vencido. Evite la exposición
directa al haz de luz. Le rogamos que no intente vencer o
circunvalar los interruptores de seguridad.
AVISO DE LA FCC:
Este equipo genera o puede usar energía de frecuencia radial. Cualquier cambio o modificación al equipo, puede causar interferencia nociva, a menos que
estas modificaciones esten expresamente indicadas en el manual de instrucciones. El usuario puede perder el derecho de operar este equipo si efectuara
un cambio o modificación no autorizadas.
PROTECTORES DE OLEADA:
Se recomienda para utilizar un protector de oleada para la conexión de la CA.
Las oleadas del relámpago y de la energía no se cubren bajo garantía para
este producto.
1
MEDIDAS DE SEGURIDAD
AVISO DE LA FCC:
Este equipo genera o puede usar energía de frecuencia radial. Cualquier
cambio o modificación al equipo, puede causar interferencia nociva, a
menos que estas modificaciones esten expresamente indicadas en el manual de instrucciones. El usuario puede perder el derecho de operar este
equipo si efectuara un cambio o modificación no autorizadas.
Este sistema está de acuerdo con los límites exigidos por la Clase B para
dispositivos electrónicos tal como se especifican en la Parte 15 del
Reglamento FCC. Estos límites ofrecen una protección razonable contra
la interferencia de radio o televisión, aún cuando esté operando correctamente. Para eliminar cualquier interferencia, usted puede intentar una o
más de las siguientes medidas correctivas:
• Re-oriente o cambie de posición la antena receptora.
• Aumente la distancia existente entre el sistema y el radio o televisión.
• Use distintos toma-corrientes para el radio o la televisión.
• Si el problema subsiste, consulte a un técnico especializado en
radio/televisión.
ATTENTION:
POUR ÉVITER LES CHOC ÉLECTRIQUES, INTRODUIRE LA LAME LA
PLUS LARGE DE LA FICHE DANS LA BORNE CORRESPONDANTE DE
LA PRISES ET POUSSER JUSQU’AU FOND.
• No abra el compartimiento del CD mientras el CD esté girando.
• Siempre mantenga el compartimiento del CD cerrado cuando no se esté
usando.
• No meta objetos extraños en el compartimiento del CD.
• Coloque la unidad sobre una superficie estable.
• Evite instalar la unidad en los lugares descritos a continuación:
• Lugares expuestos a la luz directa del sol o cerca de aparatos que
irradian calor como calentadores eléctricos.
• Arriba de otros equipos estereofónicos que irradian demasia
do calor.
• Lugares con poca ventilación o polvorientos.
• Lugares sujetos a una vibración constante.
• Lugares húmedos.
2
Estimado Cliente:
Escoger un fino equipo de sonido como la unidad que usted acaba de comprar es sólo el
principio de su placer musical. Ahora es momento de considerar cómo puede usted
maximizar la diversión y el entusiasmo que su equipo le ofrece. Este fabricante y el Grupo
de Electrónica de Consumo de la Asociación de la Industria Electrónica desean que usted
le saque el máximo provecho a su equipo en un nivel seguro. Uno que le permite escuchar
el sonido fuerte y claro sin la irritante distorsión o estridencia y, más importante aún, sin
afectar su sensible oído.
El sonido puede engañar. Con el tiempo el "nivel de confort" de su oído se adapta a
volúmenes más alto de sonido. De manera que lo que suena "normal" puede en realidad
ser fuerte y dañino para su oído. Cuídese de esto poniendo su equipo en un nivel seguro
ANTES que se adapte su oído.
Para establecer un nivel seguro:
• Inicie el control de volumen en un ajuste bajo.
• Aumente lentamente el sonido hasta que usted pueda oírlo confortable y claramente y sin
distorsión.
Una vez que usted haya establecido un nivel confortable de sonido:
• Ajuste el volumen y déjelo ahí.
El tomarse un minuto para hacerlo ahora le ayudará a prevenir daños o pérdida de su oído
en el futuro. Después de todo, deseamos que siga oyendo durante toda su vida.
Deseamos que siga oyendo durante toda su vida
Si se usa sabiamente, su nuevo equipo de sonido le brindará una vida de diversión y
placer. Como los daños a los oídos por ruidos fuertes muchas veces no se puede detectar
hasta que sea demasiado tarde, este fabricante y el Grupo de Electrónica de Consumo de
la Asociación de la Industria Electrónica recomiendan que evite exponerse por períodos
prolongados a ruidos excesivos. Esta lista de niveles de sonido se incluye para su
protección.
Nivel de
Decibeles
30
40
50
60
70
80
Ejemplo
Biblioteca silenciosa, susurros
Sala de estar, refrigerador, recámara alejada del tráfico
Tráfico ligero, conversación normal, oficina silenciosa
Aire acondicionado a 20 pies, máquina de coser
Aspiradora, secadora de pelo, restaurante ruidoso
Tráfico citadino promedio, triturador de basura, despertador a dos pies
EL SIGUIENTE RUIDO PUEDE SER DAÑINO BAJO EXPOSICIÓN CONSTANTE:
C
IND
U
EIA
EST. 1924
S
S
N
ELECT
R
NI
O
O C I A TI
IES
3
O
TR
La información es cortesía de la Fundación de Investigación de Sordera.
We
Want You
LISTENING
For A Lifetime
S
Metro, motocicleta, tráfico de camiones, podadora de césped
Camión de la basura, sierra de cadena, taladro neumático
Concierto de banda de Rock frente a bocinas, truenos
Disparo de arma, motor de jet
Lanzamiento de cohetes
A
90
100
120
140
180
UBICACIÓN DE LOS CONTROLES
2
1
7
8
3
9
1. Enchufe de entrada de 4.5V
DC z (atrás de la unidad)
2. Botón de ESP
3. Pantalla
4. Botón de PROG (Programa)
5. Botón de TOCAR/PAUSA
(®p)/Encendido
6. Interruptor de SOSTENER
(encendido/apagado)
7. Compartimiento de pilas
(abajo del compartimiento del
CD)
8. Botón de MODO
4
10
11
9.
10.
11.
12.
13.
14.
5
12
6
13 14
15 16 17
Botón para Abrir Puerta de CD
Compartimiento del CD
Botón de Brincar/Buscar o
Botón de PARO (■)/Apagado
Botón de Brincar/Buscar n
Interruptor de DBBS
(incremento de bajos)
15. Control de VOLUMEN
16. Enchufe de Audífonos
(en un lado de la unidad)
17. Enchufe de LÍNEA DE SALIDA
(en un lado de unidad)
4
FUENTES DE ENERGÍA
Este reproductor de CD requiere dos (2) pilas de celda "AA" (no incluidas)
o un adaptador de corriente alterna (no incluido).
INSTALACIÓN DE PILAS
El indicador de la pila (
) parapaderá en la pantalla del CD cuando las
pilas están bajas.
1. Abra el compartimiento del CD, luego abra la
puerta del compartimiento de la pila haciendo
– –+
presión en la lengüeta y levantándola. Para
evitar la posibilidad de perder la tapa, ésta
no puede quitarse.
2. Introduzca dos (2) pilas de celda "AA" (no
incluidas) de acuerdo al diagrama de polaridad
+ –+
dentro del compartimiento de la pila. Se
recomienda el uso de pilas alcalinas para una
mayor duración.
+
–
CUIDADO DE LAS PILAS
Cuando use pilas tome las siguientes precauciones:
1. Use únicamente el tamaño de pila que indica el fabricante.
2. Asegúrese de seguir la polaridad indicada en el compartimiento cuando instale su pila. De no
hacerlo, usted puede dañar su unidad.
3. No mezcle tipos de pila diferentes, por ejemplo alcalinas, con Carbono de Cinc, así como tampoco
debe mezclar pilas usadas con nuevas.
4. Si no va a usar su unidad por un largo período de tiempo, saque la pila para evitar que vaya a
oxidarse y dañar las terminales.
5. Nunca intente recargar pilas que no han sido hechas para este fín, ya que pueden recalentarse y
explotar. (Siga las instrucciones del fabricante de las pilas).
OPERACIÓN CON CORRIENTE ELÉCTRICA
Para operar la unidad usando corriente eléctrica, conecte un adaptador de
corriente alterna (no incluido) a un contacto eléctrico de 120V, 60Hz.
Enchufe el extremo angosto en el enchufe de 4.5V en atrás en la unidad y
conecte el otro extremo en un contacto eléctrico. Las pilas se desconectan
automáticamente cuando se utiliza un adaptador de corriente alterna.
PRECAUCIÓN: Cuando no use energía eléctrica, desconecte el adaptador
del contacto eléctrico jalando del enchufe (pero no del cable). No toque el
adaptador con las manos mojadas. Introduzca la clavija por completo sin que
quede expuesta parte de la clavija.
DC 4.5V
z
5
OPERACIÓN
INCREMENTO DE BAJOS
1
ENCENDIDO/APAGADO
1
2
Para enfatizar los bajos, deslice el
botón de DBBS a la posición de ON.
Para los bajos normales, deslice el
1
interruptor de DBBS
a la posición de
OFF.
1
Para encender la unidad, oprima el
botón de TOCAR/PAUSA (®p)/
ENCENDIDO 1.
Para apagar la unidad, oprima el
botón de PARO (■)/APAGADO 2.
SOSTENER
1
Deslice a la posición de ON para desactivar los botones; "Hold" aparecerá brevemente en
la pantalla. Cuando oprima los botones en la tapa del compartimiento de CD, "Hold"
(sostener) aparecerá brevemente en la pantalla. Deslice a la posición de OFF para activar
los botones. Para la función de SOSTENER, solamente los botones en la tapa del
compartimiento del CD se desactivarán, pero no así los demás controles e interruptores.
AUTO APAGADO
Cuando se detiene la unidad (modo de2Espera) aproximadamente por 1 minuto,
la unidad se apagará automáticamente.
El Sonido de la Radio a Través de un Estéreo Modular
Al usar una cable de conexión a un estéreo modular (no incluido), se escuchará un
sonido de radio de primera a través del estéreo modular. Antes de hacer cualquier
conexión, apague todo el equipo.
Conecte un cable de conexión (no incluido) entre el enchufe de LÍNEA DE SALIDA
por el lado del reproductor de CD y el enchufe de entrada al CD o AUX del
amplificador. (No lo conecte en el enchufe de los AUDÍFONOS del amplificador.)
NOTA: Si la radio interfiere con la recepción del televisor, aleje la unidad del
televisor o apague la unidad.
6
OPERACIÓN DEL CD
REPRODUCIR UN CD (Estándar, CD-R y CD-RW)
1
2
Abra la tapa del compartimiento del CD
deslizando el interruptor de abrir CD a la
derecha. Oprima suavemente un disco, con la
etiqueta hacia arriba, sobre el eje hasta que se
2
asegure en su lugar.
Cierre la tapa del
compartimiento del CD. Inserte los audífonos
en el enchufe para AUDÍFONOS.
Oprima el botón de TOCAR/PAUSA (®p)/
ENCENDIDO para iniciar la reproducción.
Para poner la reproducción en pausa,
oprima de nuevo el botón de TOCAR/
PAUSA (®p)/ENCENDIDO, el tiempo
transcurrido parpadeará. Oprima una vez
más para reanudar2la reproducción.
3
3
4
4
1
2
Cuando el disco termine de tocar, se
detendrá. Oprima el botón de PARO
(■)/APAGADO para detener el disco antes
de que termine; aparecerá el número total
de pistas. Oprima
2 de nuevo el botón de
PARO (■ )/APAGADO mientras está en
modo de paro o espere 60 segundos y la
unidad se apagará automáticamente.
Ajuste el control de VOLUMEN 1 y el
interruptor DBBS 2 según desee. Para
brincar hacia la siguiente pista o a la
anterior en el disco, oprima el botón
BRINCAR/BUSCAR O 3 o N 4. Para
brincar hacia adelante o atrás en una
misma pista en el disco, oprima y
mantenga oprimido el botón de
BRINCAR/BUSCAR O 3 o N 4..
NOTAS:
• Esta unidad puede tocar discos de tamaño estándar o sencillos de 3"; no se requiere adaptador.
• Si el disco se inserta incorrectamente, o está sucio, dañado o no hay ninguno presente,
la pantalla mostrará "no disco".
• A medida que se toca cada pista, se muestra en la pantalla el número de pista y el
tiempo transcurrido.
• Para quitar el disco, abra el compartimiento del CD con la unidad en modo de Paro o apagada,
luego sostenga la orilla del CD y oprima suavemente el pivote del centro y levante el CD.
• El tiempo máximo de un CD es 74 minutos para esta unidad.
• "- - - -" aparecerá en la pantalla cuando la puerta del CD esté abierta.
7
OPERACIÓN DEL CD (CONTINÚA)
SISTEMA ELECTRÓNICO ANTI-SALTOS A PRUEBA DE
MOVIMIENTOS POR 60 SEGUNDOS
Este reproductor de CD tiene integrado un sistema de Anti-Saltos que elimina los
saltos en el CD, lo cual es útil cuando se usa el reproductor en el automóvil o
mientras trota o corre. Siga los pasos a continuación para activar y entender el
sistema de Anti-Saltos:
1
2
Abra la tapa del compartimiento del
CD deslizando el interruptor de abrir
CD a la derecha. Oprima suavemente
un disco, con la2 etiqueta hacia arriba,
sobre el eje hasta que se asegure en
su lugar. Cierre la tapa del
compartimiento del CD. Inserte los
audífonos en el enchufe para
AUDÍFONOS.
Con un CD adentro, oprima el botón de
TOCAR/PAUSA (®p)/ENCENDIDO
para encender la unidad.
3
4
El Sistema de Anti-Saltos iniciará
automáticamente, el sonido se pondrá
en silencio por un momento y la pantalla
mostrará el indicador de Anti-Saltos sin
ninguna barra en él.
En unos cuantos segundos, el
indicador de Anti-Saltos se llenará
para indicar que se están guardando
señales de música en la memoria.
2
CONTINÚA EN LA PRÓXIMA PÁGINA
8
5
OPERACIÓN DEL CD (CONTINÚA)
6
Si el reproductor de CD se somete a
vibraciones durante la reproducción, las
barras desaparecerán una por una.
Durante la vibración, la música debe
continuar tocando las señales en la
memoria hasta que el reproductor de CD
pueda leer adecuadamente del disco con
la información de la música. En este
momento, el indicador probablemente
mostrará menos barras indicando que
están bajas las señales de música
almacenadas en la memoria.
Si todas las barras desaparecen y el
reproductor de CD se somete
inmediatamente a una a vibración, la
unidad puede presentar un salto.
7
8
Si no hay más vibraciones, las señales
de la música se almacenaan una vez
más en la memoria y el indicador se
llena de nuevo. Cuando la memoria
esté llena, la barra superior parpadeará
y disminuirá la velocidad de rotación
del disco para ahorrar energía.
Para apagar el sistema de Anti-Saltos,
oprima el botón de ESP.
Para encender el sistema de AntiSaltos, oprima de nuevo el botón de
ESP.
2
NOTAS:
• Cuando el reproductor de CD se usa en un lugar estable, apague el sistema
de Anti-Saltos oprimiendo el botón de ESP. Cuando el sistema de AntiSaltos está apagado, el consumo de la pila es menor.
• El Sistema Anti-Saltos brinda una salida continua de sonido cuando se
somete la unidad a vibraciones, pero no corregirá errores, como los de un
CD defectuoso o sucio.
9
OPERACIÓN DEL CD (CONTINÚA)
TOCAR REPETIDAMENTE UNA MISMA PISTA
2
1
1
2
3
1
4
2
3
Con un CD insertado, oprima el botón de
TOCAR/PAUSA (®p)/ENCENDIDO 1
para encender la unidad y luego
seleccione una pista utilizando el botón de
BRINCAR/BUSCAR O 2 o N 3. Oprima
una vez el botón de MODO 4 ; en la
pantalla aparecerá el indicador de Repetir
ALL
1
.
La unidad tocará entonces la misma
pista una y otra vez hasta que se
oprima
el
botón
de
PARO
(■)/ENERGÍA APAGADA 1. Ajuste el
control de VOLUMEN 2 y el interruptor
DBBS 3 según desee.
1
2
TOCAR REPETIDAMENTE TODAS LAS PISTAS
1
1
2
2
3
Con un CD insertado, oprima el botón
de TOCAR/PAUSA (®p)/ENCENDIDO
1 para encender la unidad. Oprima dos
veces el botón de MODO 2 ; en la
pantalla aparecerá el indicador de
Repetir Todas ALL .
La unidad tocará entonces todas las
pistas en el CD una y otra vez hasta que
oprima el botón de PARO (■)/ENERGÍA
APAGADA 1 . Ajuste el control de
VOLUMEN 2 y el interruptor DBBS 3
según desee.
PARA CANCELAR LA REPRODUCCIÓN REPETIDA, oprima el botón de
MODO cuatro veces si está en modo de Repetir 1, o tres veces si está en
modo de Repetir Todas. La unidad continuará con la reproducción normal.
10
OPERACIÓN DEL CD (CONTINÚA)
TOCAR LA INTRODUCCIÓN
2
1
2
1
1
4
3
2
3
Con un CD insertado, oprima el botón de
TOCAR/PAUSA (®p)/ENCENDIDO 1
para encender la unidad y luego oprima el
botón de PARO (■)/APAGADO 2 para
detener la reproducción automática.
Oprima tres veces el botón de MODO 3;
en la pantalla aparecerá el indicador
INTRO.
Oprima el botón de TOCAR/PAUSA
(®p)/ENCENDIDO 1 para empezar la
reproducción. La unidad reproducirá los
primeros 10 segundos de cada pista. Ajuste
el control de VOLUMEN 2 y el interruptor
DBBS 3 según desee. Oprima el botón de
PARO (■ )/APAGADO 4 para detener la
reproducción de la introducción.
PARA CANCELAR la reproducción de la introducción, oprima dos veces el botón
de Modo.
REPRODUCIR UN CD EN MODO ALEATORIO
1
2
2
1
1
4
3
2
3
Con un CD insertado, oprima el botón
de
TOCAR/PAUSA
(®p)/
ENCENDIDO 1 para encender la
unidad y luego oprima el botón de
PARO (■)/APAGADO 2 para detener
la reproducción automática. Oprima
cuatro veces el botón de MODO 3; en
la pantalla aparecerá el indicador
RAND.
Oprima el botón de TOCAR/PAUSA
(®p)/ENCENDIDO 1 para empezar la
reproducción. La unidad reproducirá
todas las pistas en orden aleatorio. Ajuste
el control de VOLUMEN 2 y el interruptor
DBBS 3 según desee. Cuando se hayan
reproducido todas las pistas, la unidad se
detendrá. Oprima el botón de PARO
( ■ )/APAGADO 4 para detener la
reproducción aleatoria.
PARA CANCELAR la reproducción Aleatoria, oprima una vez el botón de Modo.
11
OPERACIÓN DEL CD (CONTINÚA)
PROGRAMAR LA MEMORIA (HASTA 24 PISTAS)
2
3
2
1
3
1
1
Con un CD adentro, oprima el botón de
TOCAR/PAUSA (®p)/ENCENDIDO 1
para encender la unidad y luego oprima el
botón de PARO ( ■ )/APAGADO 2 para
detener la reproducción automática.
Oprima el botón de PROG 3; la Pista (00),
número de programa (P-01) e indicador de
PROG aparecerán en la pantalla del CD.
2
Escoja la primera pista a tocar usando el
botón de BRINCAR/BUSCAR o 1 o n
❷ , luego oprima de nuevo el botón de
PROG 3. Repita este paso para
programar todas las pistas deseadas
hasta un máximo 24 pistas.
4
3
1
1
2
2
3
Oprima el botón de TOCAR/PAUSA
(®p)/ENCENDIDO 1 para iniciar la
reproducción programada y ajuste los
controles de VOLUMEN ❷ y el
interruptor de DBBS 3 según desee.
Para saltar hacia adelante o atrás por
los programas, oprima el botón de
BRINCAR/BUSCAR o 1 o n ❷ .
Cuando el disco termine de tocar, se
detendrá.
NOTAS:
• Oprima el botón de PARO (■)/APAGADO para detener el disco antes de que termine.
• A medida que se toque cada programa, se mostrará el número de pista en la pantalla.
• Para borrar el programa memorizado, oprima y mantenga oprimido el botón de
PROG mientras está en modo de Paro hasta que el indicador de PROG
desaparezca de la pantalla.
• Programar es la habilidad de escoger de antemano el orden en el cual se
reproducirá una serie de pistas.
• Cada pista puede guardarse en la memoria del programa tantas veces como
se desee (hasta 24 pistas).
12
CUIDADO Y MANTENIMIENTO
Cuidado a los discos compactos
• Trate el disco con cuidado. Maneje el disco sólo
por sus orillas. Nunca permita que sus dedos
toquen el lado brilloso y sin impresión del disco.
• No pegue cinta adhesiva, calcomanías, etc.
sobre la etiqueta del disco compacto.
• Limpie el disco compacto periódicamente con una tela suave, seca y sin pelusas.
Nunca use detergentes ni limpiadores abrasivos para limpiar el disco. Si es
necesario, use un juego de limpieza para CD.
• Si el disco salta o se atora en una sección del disco, probablemente esté sucio o
dañado (rayado).
• Cuando limpie el disco, frote en línea recta del centro hacia la orilla exterior del
disco compacto. Nunca frote con movimientos circulares.
B E NZEN E
C LE A N E R
• Esta unidad fue diseñada sólo para tocar discos compactos que lleven el
logotipo que se muestra aquí. Es posible que otros discos no cumplan con la
norma de CD y no se escuchen bien.
• Los discos compactos deben guardarse en sus cajas después de
usarlos para evitar daños.
• No exponga los discos compactos a los rayos directos del sol, mucha
humedad, altas temperaturas o polvo, etc. La exposición prolongada o las
temperaturas extremas puede doblar el disco compacto.
• No pegue ni escriba nada sobre ninguno de los lados del disco compacto. Los
instrumentos filosos o bien la tinta pueden dañar la superficie.
Limpieza de la unidad
• Para prevenir los riesgos de incendio o choque eléctrico, desconecte su
unidad de la fuente de AC cuando la esté limpiando.
• El acabado de su unidad puede limpiarse con un trapo seco como cuidaría
cualquier otro mueble. Tenga cuidado al limpiar y restregar las partes de
plástico.
• Puede usar un jabón neutro y un trapo húmedo para limpiar el panel frontal.
13
GUÍA DE DIAGNÓSTICO
ISi usted experimenta problemas con esta unidad, verifique la tabla
abajo antes de llamar a servicio.
SÍNTOMA
La unidad no
enciende.
CAUSA
SOLUCIÓN
Pilas débiles
Cambie las pilas.
Pilas no insertadas
Inserte correctamente.
Adaptador AC
Verifique la conexión
o muertas.
correctamente.
Disco no toca.
no conectado.
Compartimiento de
de CD.
incorrectamente.
correctamente.
Reinserte disco
Disco sucio o
Pruebe otro disco.
defectuoso.
Condensación
Frote el disco con
de humedad
en audífonos.
un trapo suave.
en el disco.
Clavija de audífonos
no insertada
correctamente.
Reinserte la
clavija correctamente.
Control de volumen
Aumente el volumen.
Pilas débiles.
Cambie las pilas.
en mínimo.
ESP no
funciona
Cierre el compartimiento
CD no cerrado.
Disco insertado
No hay sonido
del adaptador AC.
Disco defectuoso.
ESP no está activado.
14
Pruebe otro disco.
Oprima el botón de
ESP.
ESPECIFICACIONES
Requisitos de energía........................2 x pilas alcalinas LR6 tamaño "AA"
............Adaptador de DC de 4.5V (centro positivo)
Conversión D/A ......................... Sobremuestreo de 8 veces DAC de 1 bit
Respuesta de Frecuencia ..................................20~20,000 Hz (+1,-3 dB)
Anti-salto. .........................................Memoria intermedia de 60 segundos
Nivel de salida. ..............................Salida de línea: 0.6 Vms (47K ohmios)
Audífonos: 16mW (32 ohmios)
PARA OBTENER AYUDA ADICIONAL CON RESPECTO A LA
CONFIGURACIÓN U OPERACIÓN, SÍRVASE VISITAR NUESTRO
SITIO WEB EN
WWW.MEMOREXELECTRONICS.COM
O COMUNÍQUESE CON SERVICIO AL CLIENTE AL (954) 660-7100.
SÍRVASE GUARDAR LOS MATERIALES DEL EMPAQUE AL MENOS
DURANTE 90 DÍAS POR SI ACASO NECESITARA REGRESAR EL
PRODUCTO A SU DISTRIBUIDOR O A MEMOREX.
PARA OBTENER PARTES Y ACCESORIOS, COMUNÍQUESE CON
FOX INTERNATIONAL AL 1-800-321-6993.
15
Memcorp, Inc.
Weston, FL
Impreso en Hong Kong
Visite nuestro sitio web en www.memorexelectronics.com