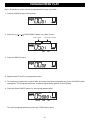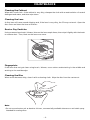
1
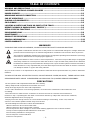
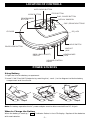
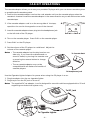
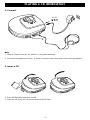
R
PERSONAL COMPACT DISC PLAYER
WITH 40-SECOND DIGITAL
ANTI SKIP PROTECTION
MODEL # MD6440cp
BEFORE OPERATING THIS PRODUCT PLEASE
READ THESE INSTRUCTIONS COMPLETELY
OPERATING INSTRUCTIONS
ROHM IC MANUAL COVER
TABLE OF CONTENTS
WARNING AND PRECAUTIONS ............................................................................................................. P.1
LOCATION OF CONTROLS & POWER SOURCES ................................................................................ P.2
POWER SOURCES ................................................................................................................................... P.3
HEADPHONE AND HI-FI CONNECTION ................................................................................................ P.3
CAR KIT OPERATIONS ............................................................................................................................ P.4
PLAYING A CD IMMEDIATELY ................................................................................................................ P.5
CD PLAYBACK .......................................................................................................................................... P.6
LOCATING A PARTICULAR TRACK OR POINT OF THE TRACK .......................................................... P.6
REPEAT PLAYBACK & RANDOM PLAY ( SHUFFLE ) ............................................................................ P.6
INTRO & SPECIAL FUNCTIONS ............................................................................................................. P.7
PROGRAMMED PLAY .............................................................................................................................. P.8
MAINTENANCE ........................................................................................................................................ P.9
PRODUCT SPECIFICATIONS ................................................................................................................... P.10
GENERAL INFORMATION ....................................................................................................................... P.11
LIMITED WARRANTY .............................................................................................................................. P.12
WARNINGS
TO REVENT FIRE OR SHOCK HAZARDS, DO NOT EXPOSE THIS UNIT TO RAIN OR MOISTURE.
This symbol is intended to alert the user to the presence of uninsulated "dangerous voltage" within the
products enclosure that may be of sufficient magnitude to constitute a risk of electric shock to persons.
This symbol is intended to alert the user to the presence of important operating and maintenance (servicing)
instructions in the literature accompanying the appliance.
This product utilizes a Class 1 laser to read Compact Discs. This laser Compact Disc Player is equipped
with safety switches to avoid exposure when the CD door is open and the safety interlocks are defeated.
Invisible laser radiation is present when the CD Player's lid is open and the system's interlock has failed or
been defeated. It is very important that you avoid direct exposure to the laser beam at all times. Please do
not attempt to defeat or bypass the safety switches.
Any use of the controls or an adjustment to the procedures other than those specified herein may result in hazardous
radiation.
TO REDUCE THE RISK OF ELECTRIC SHOCK, DO NOT REMOVE COVER (OR BACK). THERE ARE NO USERSERVICEABLE PARTS INSIDE. PLEASE REFER ANY SERVICING TO QUALIFIED SERVICE PERSONNEL.
PRECAUTIONS
• Do not open the CD compartment while the CD is rotating.
• Always keep the CD compartment closed when not in use.
• Keep all foreign objects out of the CD compartment.
• If TV or radio interference occurs during operation, move the unit to a different location within the room
or building.
• Place the unit on a stable surface. A vibration or shock to the unit can cause the CD mechanism to
mistrack or skip. If operating the unit under circumstances which may subject the unit to these conditions,
utilize the digital Anti-shock, See page 11.
• Playing some CD's at high volume can cause vibration leading to mistracking. In this case, lower the
volume or relocate the speakers further away from the unit.
• Avoid installing the unit in the locations described below:
• Where it will be in direct contact with water.
• Where it will be in direct contact with a magnet.
• Places exposed to direct sunlight or close to heat radiating appliances such as electric heaters.
• On top of stereo equipment that radiates too much heat.
• Places lacking ventilation or dusty places.
• Places subject to constant vibration.
• Humid or moist places.
-1-
LOCATION OF CONTROLSS
ANTI-SHOCK BUTTON
STOP BUTTON
MODE BUTTON
PLAY / PAUSE BUTTON
PROGRAMMED
BUTTON
DISPLAY WINDOW
SKIP / SEARCH BUTTONS
CD DOOR
DC JACK
HOLD SWITCH
DOOR OPEN BUTTON
LINE OUT
JACK
DBBS ( BASS BOOST )
SWITCH
HEADPHONES
JACK
VOLUME CONTROL
KNOB
POWER SOURCES
Using Battery
1. Open the lid of the battery compartment.
2. Insert 2 "AA" Size (UM-3) batteries by matching the ( + and - ) to the diagram inside the battery
compartment and close the lid.
Step 1
Step 2
Step 3
Note: For battery operation the AC power adaptor must be disconnected from DC IN jack.
When to Change the Battery
When the battery is used up, "
" indicator flashes in the LCD display. Replace all the batteries
with new batteries.
-2-
Using on the AC Power Adaptor
Use only the supplied AC power adaptor.
to a wall outlet
120V / 60Hz
AC Power
Adaptor
DC 6V
HEADPHONE AND HI-FI CONNECTION
Listening with the Headphones
Connect the plug of the stereo headphones (included) or earphones (not included) into the PHONES
(GREEN) socket.
Caution: Avoid excessive volume levels and listening to sound for a long period of time when using
headphones, as this may impair your hearing.
Connecting to component audio systems
Connect the patch cord ( Not Included ) into the LINE OUT ( BLACK ) socket of the unit and the
CD / AUX inputs of an audio system.
Note: Always switch the power off before making any connections between the player and another
unit.
-3-
CAR KIT OPERATIONS
The cassette adaptor allows you to use your portable CD player with your car stereo cassette system
or protable audio cassette system.
1. Position the cassette adaptor cord so the cord extends out from the cassette player when the
cassette is inserted. Insert the cassette adaptor in the same direction as you would insert an audio
cassette tape.
2. If the cassette adaptor cord is on the wrong side of the tape,
reposition the cord to the opposite corner of the channel.
A
B
3. Insert the cassette adaptor stereo plug into the headphones jack
on the left side of the CD player.
4. Turn on the cassette player. Press PLAY on the cassette player.
5. Press PLAY on the CD player.
6. Set the volume of the CD player to a mid-level. Adjust the
volume of the cassette player.
Notes: • The cassette adaptor has the play head on one
side only. If you insert the cassette and no
To Cassette Deck
sound is heard, try turning the cassette over
or pressing the reverse button to change
direction.
• The car cassette adaptor may not be
compatible with all makes and models of
cassette players.
To Headphones Jack
Use the Cigarette Lighter Adaptor for power when using the CD player in a car.
1. Plug the adaptor into the car cigarette lighter.
2. Plug the pin into the DC jack on the unit.
Notes: The supplied DC car adaptor / cord is designed for use with vehicles equipped with a 12 volt
negative ground electrical system only.
To DC Jack
To Cigarette Lighter
-4-
PLAYING A CD IMMEDIATELY
1. Connect
DC 6V
Headphone
Note
1. Refer to "Power Sources" for details on using with batteries.
2. Connect the headphones firmly. A loose connection may cause static noise during playback.
2. Insert a CD
1. Press OPEN button and open the lid.
2. Place the CD firmly on the pivot and close the CD door.
-5-
CD PLAYBACK
1. Connect the earphones (included) or optional headphones into the Phones jack.
2. Press the Door Open button to open the CD compartment door.
3. Insert a disc with the label side facing up.
4. Close the CD compartment door until a click is heard.
5. Set the VOLUME control to minimum.
6. Press the PLAY/PAUSE (
) button , the unit power will turn on automatically and starts playback.
The total number of tracks and playing time appears on the display. During playback, the track
number and the elapsed playing time will be displayed.
7. Adjust the VOLUME control to your desired listening level.
8. To stop playback temporarily, press the PLAY/PAUSE (
) button once. The elapsed time and
track number will flash on the display. Press the PLAY/PAUSE (
) button again to resume
playback.
9. To stop playback, press the STOP button once.
10.To turn the unit off, press the STOP twice.
Notes :
• When the CD door is accidentally opened during playback, “ - - “ will appear on the display.
• Wait until the disc is fully stopped before pressing the OPEN button.
• This unit can play 3” (8cm) single CDs without an adaptor.
LOCATING A PARTICULAR TRACK OR POINT OF THE TRACK
1. Press the BACKWARD (
) button once to go back to the beginning of the current track.
) button repeatedly to go back to previous tracks.
2. Press the BACKWARD(
3. Press the FORWARD (
) button repeatedly to go to next tracks.
4. Press and hold either FORWARD (
) or BACKWARD (
) button to search backwards of
forwards, at high speed, a particular point of track.
Notes : Low level audio will be heard during the search process to assist in locating the correct point
in the track.
REPEAT PLAYBACK
1. To repeat the same track, press the MODE button once. The REPEAT 1 indicator (
) will
appear on the display
2. To repeat the entire CD, Press the MODE button twice. The REPEAT ALL indicator (
)
will appear on the display.
3. To cancel the repeat mode, simply press the MODE button repeatedly until the REPEAT indicator
disappear from the display.
RANDOM PLAY (SHUFFLE)
1. Press the MODE button 4 times to enter the Random mode, “SHUFF” appears on the display.
2. Press the PLAY/PAUSE button, CD will start playback in randomly order.
Note : If the SHUFFLE mode is selected during the playback, the function will commence once the
current track is ended.
3. Press the MODE button again to return to the Normal Playback mode.
-6-
INTRO
1. Press the MODE button 3 times to enter the intro mode, “INTRO” appears on the display.
2. Press the PLAY/PAUSE button, CD will player the first 10 seconds of each track on the CD.
SPECIAL FUNCTIONS
Dynamic Bass Boost
Set the BASS BOOST switch to “ON” position to enjoy a more powerful bass sound.
Note :
Since Bass Boost performance will change depending on the volume level, sound maybe
distorted due to high volume is set. Lower the volume level until the sound quality is improved.
Hold function
The HOLD switch disables the buttons from operating to prevent play from starting or stopping due
to accidental operation. For normal use, leave the switch in the off position.
To prevent battery drain :
Set the HOLD switch to the on position when carrying the unit in a bag. The PLAY/PAUSE button will
not function even if the button is pressed accidentally.
To prevent play from being interrupted :
Set the HOLD switch to the on position after starting play. “HOLD” appears.
If the operating buttons do not function when pressed.....
1. Check whether the HOLD switch is on or not.
2. Remove the batteries and/or disconnect the AC adaptor from the unit. Wait a few seconds,
then reinstall the batteries or reconnect the AC adaptor.
3. If the buttons still do not function, insert new batteries.
Anti-shock Function
• If in use, the player is likely to receive shocks or vibrations (i.e. whilst walking or in a moving
vehicle),press the ANTI-SHOCK button to provide uninterrupted playback.
• When the button is pressed, the display will show (
) and the function is initialised.
When (
) appears on the display, the data buffer is full.
• Should be player receive continuously, the sound can mute for a very short while and will resume
once the player has stabilised from the shock.
Note :
• When using the Anti-shock function, the disc will rotate faster then normal playback and memory
is active. Only use the ANTI-SHOCK function when necessary to preserve the battery life.
• The Anti-shock function will not correct the errors arising from the use of defective scratched or
dirty discs.
-7-
PROGRAMMED PLAY
Up to 20 tracks on a disc can be programmed for play any order.
1. Press the PROG button during stop.
PROG
ANTI-S
TRACK
2. Press the
or
MIN
SEC
SKIP/SEARCH button to select a track.
Track number
Programme number
PROG
ANTI-S
TRACK
MIN
SEC
3. Press the PROG button.
PROG
ANTI-S
TRACK
MIN
SEC
4. Repeat steps 2 and 3 to programme tracks.
5. To check the programme contents after all tracks have been programmed, press the PROG button
repeatedly. The programmed track numbers sequentially appear on the display.
6. Press the PLAY/PAUSE button to start programmed play.
PROG
ANTI-S
TRACK
-
MIN
SEC
To cancel programmed play, press the STOP button twice.
-8-
MAINTENANCE
Cleaning the Cabinet
Wipe with a soft cloth. If the cabinet is very dirty, dampen the cloth with a weak solution of neutral
detergent and water, and then wipe clean.
Cleaning the Lens
A dirty lens will cause sound skipping and, if the lens is very dirty, the CD may not work. Open the
disc cover and clean the lens as follows :
Dust or Dry Particles
Using a camera lens brush / blower, blow on the lens couple times, then wipe it lightly with the brush
to remove dust. Then, blow on the lens once more.
Fingerprints
If the lens does not get clean using brush / blower, use a cotton swab starting in the middle and
working to the outside edge.
Cleaning the Disc
When a disc becomes dirty, clean it with a cleaning cloth. Wipe the disc from the centre out.
Note:
• Do not use solvents such as benzine. thinner, commercially available cleaners or anti-static spray
intended for analog discs.
-9-
PRODUCT SPECIFICATIONSDE
AUDIO
D / A conversion
1-BIT DAC eight times oversampling
Frequency response
20 - 20,000Hz ( +1 / -3 dB )
Anti shock
40 seconds buffer
Wow and flutter
Below measurable limits
No. of channels
2 channels ( stereo )
Output level
Line output : 0.6 Vrms ( 47 kΩ )
Headphone : 15mW ( 32Ω )
Bass boost effect ( 100 Hz )
+6dB
PICK-UP
System
Compact disc digital audio system
Laser diode
Material : GaAIAs
Properties
Wavelength : λ = 780 nm
Emission duration : continuous
Laser output : < 44.6µW
Error correction
Cross-interleave Reed-solomon code
GENERAL
Power requirements
• 2 x LR6 “AA” battery
• DC in 6V jack accepts AC power adaptor ( centre positive )
Power consumption
0.8W ( DC 3V )
Under normal condition
Dimension
Approx. 134 (W) x 30 (H) x 146 (D) mm
Weight
Approx. 250g not including battery
- 10 -
GENERAL INFORMATIONIDE
Troubleshooting Guide
CUSTOMER SERVICE : 1-800-919-3647
SYMPTOM
CAUSE
SOLUTION
CD Player will not turn on
Dead or weak batteries
Replace batteries
AC adaptor not connected
properly
Check AC adaptor connection
Disc inserted incorrectly
Reinsert disc with label side
Disc will not play
facing up
Defective compact disc
Try another compact disc
CD compartment not closed
Close lid securely
Moisture has formed inside
the CD deck
Take out the CD and leave the
CD compartment door open for
about an hour to dry
moisture condensation
No sound from headphones
Headphone plug not
Reinsert headphone cord into
inserted properly
Headphones jack
Volume control set to
minimum
Increase the volume
Weak batteries
Replace with fresh batteries,
or use AC power
Sound is skipping
Defective compact disc
Try another compact disc
The compact disc or pickup
lens is dirty
Clean or replace the compact
disc or clean the pickup lens
Strong vibrations
Place the CD Player on a level
surface that is stable
( no vibrations )
- 11 -
R
LIMITED WARRANTY
AUDIO
We at MEMOREX believe you will be pleased with your new Audio Product. Please read this Warranty
carefully. Memorex warrants this product to be free from manufacturing defects purchase in and if
used in, the United States.
Should you find your unit is not operating properly during the terms of full coverage of this warranty,
ninety (90) days, you should contact your original place of purchase for an exchange with a valid
receipt. If necessary, Memorex will provide one of the following options (at Memorex's discretion),
providing the manufacturing defect is verified along with the date of purchase.
1.Repair service for ninety (90) days of original purchase at no charge for labor and parts.
2.Replacement of your defective unit with either a new, refurbished or equivalent model at no
charge for ninety (90) days from the date of original purchase.
This warranty is void if the product is:
A ) Damaged through negligence, abuse, misuse, accident, or acts of God.
B ) Used in commercial applications or rentals.
C ) Modified or repaired by anyone other than Memorex or their expressly authorized representative.
D ) Damage resulting from the improper connection to equipment of other manufacturers.
This warranty does not cover:
A) Cost incurred in the shipping of the product to and from the Memorex authorized repair facility listed.
B) Damage or improper operation caused by the failure to follow the operating instructions provided
with the product.
C) Routine adjustments to the product which can be performed by the customer as outlined in the
owner's manual.
D) Damage to compact disc
E) Signal reception problems caused by external factors.
F) Products not purchased in the United States.
G) Damage to the products used outside the United States.
In the event that service is required under this warranty, please call our toll free number at
1-800-919-3647 for instructions.
THIS WARRANTY IS NON-TRANSFERABLE AND APPLIES SOLELY TO THE ORIGINAL PURCHASER AND DOES NOT EXTEND
TO SUBSEQUENT OWNERS OF THE PRODUCT. ANY APPLICABLE IMPLIED WARRANTIES, INCLUDING THE WARRANTY OF
MERCHANTABILITY, ARE LIMITED IN DURATION TO A PERIOD OF THE EXPRESSED WARRANTY AS PROVIDED HEREIN
BEGINNING WITH THE DATE OF THE ORIGINAL PURCHASE AT RETAIL AND NO WARRANTIES, WHETHER EXPRESSED OR
IMPLIED SHALL APPLY TO THE PRODUCT THEREAFTER. MEMOREX MAKES NO WARRANTY AS TO THE FITNESS OF THE
PRODUCT FOR ANY PARTICULAR PURPOSE OR USE.
THE EXTENT OF MEMOREX'S LIABILITY UNDER THIS LIMITED WARRANTY IS THE REPAIR OR REPLACEMENT PROVIDED
ABOVE AT THE SOLE DISCRETION OF MEMOREX. IN NO EVENT SHALL MEMOREX'S LIABILITY EXCEED THE PURCHASE
PRICE PAID BY THE PURCHASER. UNDER NO CIRCUMSTANCES SHALL MEMCORP BE LIABLE FOR ANY LOSS, DIRECT,
INDIRECT, INCIDENTAL, FORESEEN, UNFORESEEN, SPECIAL, OR CONSEQUENTIAL DAMAGE ARISING OUT OF OR IN
CONNECTION WITH THE USE OF THIS PRODUCT.
THIS WARRANTY IS VALID ONLY IN THE UNITED STATES. THIS WARRANTY GIVES YOU SPECIFIC LEGAL RIGHTS, HOWEVER,
YOU MAY HAVE OTHER RIGHTS WHICH MAY VARY FROM STATE TO STATE. SOME STATES DO NOT ALLOW LIMITATIONS
ON IMPLIED WARRANTIES OR EXCLUSION OF CONSEQUENTIAL DAMAGE, THEREFORE THESE RESTRICTIONS MAY NOT
APPLY TO YOU.
©2000, Memorex is a registered trademark of Memorex Telex N.V.
- 12 -
Memcorp, Inc.
Weston, FL33331
© 2000 Memorex is a trademark of Memorex Telex. N.V.
Printed in Hong Kong
Visit Our Website : www.memorex. com