1
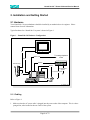
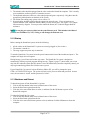
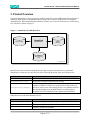
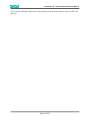
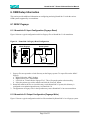
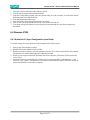
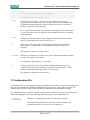
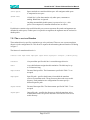
NumaLink-3.0™ Version 2 Users Guide and Service Manual April 2004 NumaLink-3.0™ Users Guide and Service Manual Part Number 900-000201-001 © Copyright 2004 by Numa, Inc. All Rights Reserved PROPRIETARY RIGHTS NOTICE No part of this material may be reproduced or transmitted in any form or by any means, electronic, mechanical, or otherwise, including photocopying and recording or in connection with any information storage or retrieval system, without the permission in writing from Numa Inc. Numa Inc. has taken reasonable preventative measures to ensure the accuracy of the information contained in this manual. However, Numa Inc. makes no warranties or representations with respect to the information contained herein; and Numa Inc. shall not be liable for damages resulting from any errors or omissions herein or from the use of the information contained in this manual. The information in this document is subject to change without notice and should not be construed as a commitment by Numa, Inc. RESTRICTED RIGHTS NOTICE Use, duplication, or disclosure by the U.S. Government is subject to restrictions as set forth in subparagraph (c) (1) (ii) of the Rights in Technical Data and Computer Software clause at DFARS 252,227-7013. SOFTWARE NOTICE The software described in this document is furnished under a license and may be used or copied only in accordance with the terms of such license. No responsibility is assumed for the use or reliability of the software or equipment that is not supplied by Numa, Inc. TRADEMARKS Numa and the Numa logo are registered trademarks of Numa Inc. NumaStation, NumaLink-3.0 and NumaStore are trademarks of Numa, Inc. Microsoft, Windows 2000 and Windows XP are registered trademarks or trademarks of Microsoft Corporation. pcAnywhere is a trademark of Symantec Corporation. All other trademarks and registered trademarks are the property of their respective holders. For more information contact Numa®: Phone: 603-883-1909 Fax: 603-883-0839 Email: [email protected] Web Site: www.numa-inc.com Address: Numa, Inc 10 Northern Blvd Unit 12 Amherst, NH 03031 Page 1 of 33 NumaLink-3.0™ Users Guide and Service Manual Table of Contents 1. Introduction ............................................................................................................................................. 3 2. Installation and Getting Started............................................................................................................. 4 2.1 HARDWARE............................................................................................................................................ 4 2.1.1 Cabling ........................................................................................................................................ 4 2.1.2 Startup ......................................................................................................................................... 5 2.1.3 Shutdown and Reboot................................................................................................................. 5 2.2 SOFTWARE ............................................................................................................................................ 6 2.2.1 Installation Directories ................................................................................................................. 6 2.2.2 License ........................................................................................................................................ 6 2.2.3 Removing NumaLink-3.0............................................................................................................. 7 3. Product Overview.................................................................................................................................... 8 3.1 A TYPICAL TRANSLATION ........................................................................................................................ 9 4. Configuration......................................................................................................................................... 11 4.1 GENERAL............................................................................................................................................. 11 4.1.1 NumaLInk-3.0 DICOM Application Entity Information ............................................................... 12 4.2 TRANSLATIONS .................................................................................................................................... 13 4.2.1 Customization............................................................................................................................ 15 4.2.2 DICOM....................................................................................................................................... 15 4.3 STATUS ............................................................................................................................................... 17 5. Technical Support................................................................................................................................. 19 5.1 LOGGING AND ERROR REPORTING ........................................................................................................ 19 5.2 REMOTE DIAGNOSTICS ......................................................................................................................... 19 5.3 TROUBLESHOOTING ............................................................................................................................. 20 5.4 FREQUENTLY ASKED QUESTIONS ......................................................................................................... 21 6. OEM Setup Information ........................................................................................................................ 24 6.1 ADAC PEGASYS .................................................................................................................................. 24 6.1.1 NumaLink-3.0 Input Configuration (Pegasys Read).................................................................. 24 6.1.2 NumaLink-3.0 Output Configuration (Pegasys Write) ............................................................... 24 6.2 GE STARCAM ...................................................................................................................................... 25 6.2.1 NumaLink-3.0 Input Configuration (StarCam Read) ................................................................. 25 6.3 MARCONI ODYSSEY ............................................................................................................................. 25 6.3.1 NumaLink-3.0 Input Configuration (Odyssey Read) ................................................................. 25 6.4 SIEMENS ICON.................................................................................................................................... 26 6.4.1 NumaLink-3.0 Input Configuration (Icon Read)......................................................................... 26 7. Command Line Interface and Configuration File............................................................................... 27 7.1 COMMAND LINE.................................................................................................................................... 27 7.2 CONFIGURATION FILE ........................................................................................................................... 28 7.2.1 The translate Directive......................................................................................................... 29 7.2.2 The out_remote_ae Directive ................................................................................................ 31 7.2.3 The control_* Directives ....................................................................................................... 32 Page 2 of 33 NumaLink-3.0™ Users Guide and Service Manual 1. Introduction “ Since we cannot know all that there is to be known about anything, we ought to know a little about everything.” Blaise Pascal NumaLink-3.0 is an OEM-to-OEM nuclear medicine image translator that supports translation among a number of OEM data formats. NumaLink-3.0 also provides translation to the DICOM 3.0 standard for nuclear medicine as well as communication directly with DICOM 3.0 compliant applications (DICOM by Merge). A translation type is defined as a translation from one specified OEM format to another. NumaLink-3.0 will support one or more translation types, as specified in a customer-modifiable configuration. Data paths are specified for each defined translation type; optionally, various translation and customization parameters may also be specified per translation type. Debug capabilities allow a translation to be divided into input, customization and output phases; the results of each phase can be examined. The NumaLink-3.0 Graphic User Interface (GUI) provides user-friendly configuration and control. Alternatively, a command line interface supports all features of the GUI as well as several extensions for debugging. Logging is provided to maintain a history of translations and any resulting errors. Caching is provided, which, in conjunction with debugging, allows translations to be re-executed without re-transferring the input files. Subsequent section in this guide discuss: • • • • • • Installation and getting started An overview of NumaLink-3.0 How to configure translations using the GUI Technical Support OEM configuration information Command line and configuration file Page 3 of 33 NumaLink-3.0™ Users Guide and Service Manual 2. Installation and Getting Started 2.1 Hardware Your NumaLink-3.0 system hardware should be installed by an authorized service engineer. Please contact Numa for more information. Typical hardware for a NumaLink-3.0 system is shown in Figure 1. Figure 1 – NumaLink-3.0 Hardware Configuration AC Monitor To analog telephone outlet Modem Line Video Network ACPower strip Mouse Hub To Destination System To Source System AC Keyboard Keyboard Mouse NL_UserMan_004 2.1.1 Cabling Refer to Figure 1: 1. Make sure that the AC power cable is plugged into the power outlet of the computer. This is a threepronged slot, often located in the rear corner of the system. Page 4 of 33 NumaLink-3.0™ Users Guide and Service Manual 2. The monitor cable should be plugged into the video card on the NumaLink computer. This is usually color-coded blue, and has a picture of a monitor next to it. 3. The keyboard and mouse cables are color-coded purple and green, respectively. Plug these into the appropriately labeled outlets on the back of the system. 4. For modem line cabling setup, please refer to section 5.2. 5. Network cables should be plugged into the appropriate network ports. If your system has two separate Ethernet cards, make sure that the cables go to the correct ports. See Figure 7 for a sample interconnectivity diagram. You may need to contact the Numa, Inc. Technical Support Staff for assistance. NOTE Do not plug two network cables into the same Ethernet card. This includes both 10base2 (coaxial) and 10/100baseT (CAT5). Doing so will damage the Ethernet card. 2.1.2 Startup Before starting the NumaLink system, check the following: 1. All the cables on the NumaLink-3.0 system are securely plugged in. (See section ) 2. The monitor is turned on. 3. The surge suppressor power strip is turned on. To start the NumaLink-3.0 system, locate the power button on the front of the machine and press it. The computer will begin its boot sequence. During boot-up, you will not need to take any action. The NumaLink-3.0 system is designed to automatically load any required programs during boot-up. Figure 9 (page 17) shows what your screen may look like when the system has fully booted. Once the NumaLink system has completely started, you may begin transferring patient files from the source system. If your NumaLink-3.0 system is built on Windows 2000 or XP, you will be prompted to press CTRL+ALT+DELETE to log on. The system will ask you for your user name and password. In most cases, the user name is “numa” and the password is “numa”. 2.1.3 Shutdown and Reboot To shut down (power off) the NumaLink-3.0 system: 1. Click on the Start button in the lower left hand corner of the screen. 2. Select the Shut Down option from the list. 3. Click the circle next to Shut Down to select it, and then click the OK button to power off the NumaLink computer. To reboot the NumaLink-3.0 system: 1. Click on the Start button in the lower left hand corner of the screen. 2. Select the Shut Down option from the list. 3. Click the circle next to the Restart option to select it, and then click the OK button to reboot the computer. Page 5 of 33 NumaLink-3.0™ Users Guide and Service Manual 2.2 Software This section applies only if you are installing NumaLink-3.0 software on a system that is not installed and configured by Numa. NumaLink-3.0 can be installed on Windows 98, windows NT 4.0 or Windows 2000. To install NumaLink-3.0 on your system, execute the following image: NumaLink-3.0_<version>.exe 1. Read the welcome window; press “Next”. 2. Enter the name of the Program Manager group to which to add Numa icons (we suggest “Numa”, which is the default); press “Next”. 3. Press “Next” to continue the installation. 4. Press “Finish” to complete the installation. To start NumaLink-3.0, do one of the following: • Select StartÆProgramsÆNumaÆNumaLink • Execute C:\Program Files\Numa\NumaLink\NumaLink.exe 2.2.1 Installation Directories The installation of NumaLink-3.0 creates the following directories: Directory Description C:\Program Files\Numa\Documents Numa product documents C:\Program Files\Numa\Lib Numa run-time support libraries C:\Program Files\Numa\Licenses Numa License directory C:\Program Files\Numa\Logs Numa logs directory (NumaLink-3.0 logs may also be placed elsewhere; see section 4.1) C:\Program Files\Numa\NumaLink NumaLink-3.0 product directory 2.2.2 License A license, provided by Numa either as a text file or in hardcopy, is required to run NumaLink-3.0. An example license is shown in Error! Reference source not found.. The license provided by Numa must be placed in the following file: <system-disk>\Program Files\Numa\Licenses\NumaLink-3.0.lic Figure 2 – NumaLink-3.0 License Example Numa license begins [2] 20-Dec-1999 11:54:50 Product: NumaLink-3.0 Page 6 of 33 NumaLink-3.0™ Users Guide and Service Manual Version: Licensee: Expires: A1 Numa, Inc — INTERNAL USE ONLY, ALL OTHER USE PROHIBITED June 1, 2000 CHECKSUM: ++9GZCZW3J8VWSEQ9QSQNZRZCOOHT5VJPY— Numa license ends If an appropriate license cannot be found, a message is displayed as shown in Figure 3. Contact Numa immediately if you have any problems with your NumaLink-3.0 licenses. Figure 3 – License Error Message NLF_NoLicense: No valid NumaLink-3.0 license found (5) 2.2.3 Removing NumaLink-3.0 To remove NumaLink-3.0 from your system, execute the following program: C:\Program Files\Numa\Numalink\unwise.exe 1. Select “Automatic”, press “Next”. 2. Press “Finish” to remove NumaLink-3.0. Page 7 of 33 NumaLink-3.0™ Users Guide and Service Manual 3. Product Overview In general, NumaLink-3.0 discovers nuclear medicine image files in one OEM format that are placed in a configured input directory, and translates them to image files in another OEM format in a configured output directory. While performing this translation, it makes use of various directories in a work directory tree. This flow is shown in Figure 4. Figure 4 – NumaLink-3.0 OEM Data Flow NumaLink (nmtrans.exe) Input Directory Output Directory Work Directory Tree NL_UserMan_001 Input files are removed from the input directory as they are processed. Input files are not deleted immediately; instead, they are moved to one of the following directories in the work directory tree: Directory Use <work-directory>\cache All files that have been translated successfully <work-directory>\trash All files that could not be translated successfully <work-directory>\staging Any files that are considered part of an incomplete translation set (for example, if GSPECT studies are in separate time bin files and one of the bins is missing; files in the staging directory are combined with files that subsequently appear in the input directory, in the hope that at incomplete set will eventually become complete and translatable) Other directories in the work directory tree are: Directory Use <work-directory>\intm_1 Temporary storage for intermediate format dumps before customization <work-directory>\intm_2 Temporary storage for intermediate format dumps after customization <work-directory>\nifimg Temporary storage for pixel data Page 8 of 33 NumaLink-3.0™ Users Guide and Service Manual The entire work directory tree is purged periodically of files that are older than a certain number of days, as specified in the general translator configuration. As a rule, NumaLink-3.0 does not specify how the image files get to the input directory, or what happens to them after they are written to the output directory. (In many cases, Numa can provide utilities that facilitate or automate the transfer of files from and to various OEM systems; see section Error! Reference source not found. for more information.) There are two exceptions to this rule: 1. A translation can be configured to execute a specified post-processing command after the translation is performed. This feature can be used to further process or move output files. 2. For DICOM outputs, the translation can be configured to perform a store of the output files to a DICOM Application Entity. Such a store consumes the output files and removes them from the output directory. For translations to DICOM, NumaLink-3.0 can either write the date to DICOM Part 10 files as shown in Figure 4, or it can initiate a DICOM store operation to another DICOM Application Entity as shown in Figure 5. Figure 5 – NumaLink-3.0 DICOM Data Flow DICOM Standard Interface Image placed in input directory for translation and remote storage Image stored remotely NumaLink Image placed in input directory for translation to local file Translated image written to Part 10 comformant file in local directory NL-CONF-002 More information on NumaLink-3.0 DICOM conformance can be found in section 4.2.2. 3.1 A Typical Translation NumaLink-3.0 takes the following steps to perform a typical translation. 1. The input directory is checked periodically for input files; if no files are found, NumaLink-3.0 schedules another directory check, then sleeps and re-performs this step. Page 9 of 33 NumaLink-3.0™ Users Guide and Service Manual 2. If one or more input files are found, NumaLink-3.0 schedules a file stability check, sleeps for a file stability delay period and proceeds to step 3. 3. If the input files are stable, NumaLink-3.0 proceeds to step 4; if not, it schedules a directory check, then sleeps and goes to step 1. 4. NumaLink-3.0: a. reads the stable files and maps all information in them to an intermediate translation format; b. applies any customization rules as specified by the translation configuration; c. maps the intermediate translation format to the output format and writes the output files, or performs a DICOM write to a configured DICOM Application entity; d. executes a post-processing command if specified; e. returns to step 1. Multiple concurrent translations can be performed, and depending on the configured wait times, they can all be in different states at any given point in time. Page 10 of 33 NumaLink-3.0™ Users Guide and Service Manual 4. Configuration To start the NumaLink-3.0 GUI, double-click on the following executable image: <system-disk>\Program Files\Numa\NumaLink\NumaLink.exe 4.1 General Figure 6 shows the NumaLink-3.0 Graphic User Interface (GUI) with its General configuration tab. Each configuration item is described in Table 4-1 – General Configuration Settings . Figure 6 – General Configuration Tab Table 4-1 – General Configuration Settings Item Description Audit log Full path for the NumaLink-3.0 audit log. The audit log receives all informational and error messages generated by the translator. (See also Verbosity below.) Error log Full path for the NumaLink-3.0 error log. The error log receives only error messages generated by the translator. Page 11 of 33 NumaLink-3.0™ Users Guide and Service Manual Config. File Full path for the NumaLink-3.0 configuration file. The configuration file is the repository of all information provided on the Translations tab (section Error! Reference source not found.). This file is best left under control of the NumaLink-3.0 GUI; in some circumstances, you may need to modify it manually to access features that are not yet supported by the GUI (see section 7). Cache age limit (days) Number of days to save cached input files (input files that have been successfully translated). Delay between translations Delay in seconds between checks for translation work; applicable only if the translator is running in background mode (see below). Verbosity Controls the amount of information that is placed in the NumaLink-3.0 audit log. Three settings are available: • Verbose – logs a large number of informational messages, as well as any error messages; recommended only for analyzing problems, as the log grows quickly in this setting. • Normal – logs a small number of information messages as well as any error messages; recommended setting for most cases. • Quiet – logs only error messages; results in minimum log growth Start translator in [background | manual] mode Determines the mode of operation of the translator: • background – The translator loops indefinitely, periodically checking for translation work. • manual – the translator checks once for translation work and then exits (typically used while analyzing problems). Automatically save changes Save any configuration changes automatically on exit. Automatically start translator Start the translator automatically when the GUI is started. Save Save general configuration settings now. Discard Discard changes to general settings; reverts to previous settings. Start Translator Start the Translator. General configuration, and the configuration of at least one valid translation, must be completed before the translator can be started successfully. Stop Translator Stop the translator. Translator [Running | Shutting Down | Stopped | Error] Indicates the current status of the translator (for more status information, see section Error! Reference source not found.) Exit NumaLink Stop the translator if it is running, then exit the NumaLink-3.0 GUI. 4.1.1 NumaLInk-3.0 DICOM Application Entity Information NumaLink-3.0 uses the following DICOM Application Entity information by default: AE Title NumaLink_3_0 Page 12 of 33 NumaLink-3.0™ Users Guide and Service Manual Port 104 This information can me modified by editing the file C:\Program Files\Numa\NumaStore\ini\numastore.ini and appropriately editing the following lines: AE_Title=NumaLink_3_0 ListenPort=104 (In a future release, these modifications will be supported directly in the NumaLink-3.0 GUI.) (DICOM by Merge) 4.2 Translations Figure 7 shows the Translations tab, through which you can add, delete and modify translation definitions. Each translation configuration item is described in Table 4-2. To configure the first translation, press the New button. Page 13 of 33 NumaLink-3.0™ Users Guide and Service Manual Figure 7 – Translations Tab Table 4-2 – Translations Settings Item Description Translations A list of currently configured translations. To copy, modify or delete an existing translation, first select the translation from this list Label A descriptive label associated with the translations. (These labels are displayed in the Translations list box.) Input format A drop down list of supported input formats; the selected format defines the OEM data format expected as input to this translation. Input path Directory path of the input directory; files placed in this directory will be translated according to this translation definition. Output format A drop down list of supported output formats; the selected format defines the OEM data format created as output of this translation. Output path Directory path of the output directory; output files created by this translation will be written to this directory. (See also the DICOM button, below.) Work path Directory path of a work directory; this directory is used by NumaLink-3.0 while performing work for this translation. Page 14 of 33 NumaLink-3.0™ Users Guide and Service Manual Stability delay The number of seconds to wait, after translation input files have been detected, to determine whether they are stable. (See section 3.1 for more information.) Post-translation application An application (executable image, script, etc) that is executed after work is done for this translation. Copy to New Create a new translation, setting its parameters from the selected existing translation. Customize Set various customization parameters for this translation; see section Error! Reference source not found. for details. Update Apply changes to the selected translation. New Create a new translation. DICOM set DICOM configuration parameters for the selected translation; see section 4.2.2 for details. Delete Delete the selected translation Reset Discard any unsaved changes to the selected translation. Save Translations Save the current translations. Reload Translations Discard the current translations and reload previously saved translations. 4.2.1 Customization Customization is the process of further defining a translation to meet various site-specific needs. You customize a translation by selecting it and pressing the “Customize” button (see Figure 7). The customization dialog and settings are described in detail in Numa Translation Customizations: C:\Program Files\Numa\Documents\Numa Translation Customizations.doc 4.2.2 DICOM The DICOM dialog, shown in Figure 8, allows you to provide DICOM Application Entity (AE) information related to a translation. The dialog is enabled only for output formats that support the DICOM standard. (There are currently no input formats that support DICOM AEs.) If DICOM AE information is provided for an output format, the translation includes a DICOM request to store the translated data to one or more specified AEs. Each DICOM configuration item is described in Table 4-3. Page 15 of 33 NumaLink-3.0™ Users Guide and Service Manual Figure 8 – DICOM dialog Table 4-3 – DICOM Settings Item Description Output format (Read only) Output format specified for this translation. Perform DICOM Store If checked, the translation results in a DICOM store request to all remote AEs that are associated with the translation. Otherwise, the translation results in one or more DICOM Part 10 files written to the translation's specified output directory. Application Entities A list of remote AEs associated with this translation. The following controls apply to the AE selected from this list. Transfer syntax The transfer syntax to be applied to the selected remote AE. Descriptive name An optional, free-form descriptive name you can apply to the AE AE title The Application Entity Title of the selected AE Node The node name or IP address of the selected AE NOTE: Testing indicates that the fastest connections times are achieved by supplying the node name here, and listing the node name and corresponding IP address in: (NT, 2000, XP) C:\WINNT\system32\drivers\etc\Hosts (95, 98) C:\Windows\Hosts Port The port number for the selected AE Echo Test [not yet supported] New Create a new AE entry Copy to New Copy the selected AE entry to a new entry Delete Delete the selected AE entry OK Exit the dialog and apply any changes to the translation Page 16 of 33 NumaLink-3.0™ Users Guide and Service Manual Cancel Quit the dialog without applying changes For more information on DICOM AEs, refer to the following: • NumaLink-3.0 DICOM Conformance Statement C:\Program Files\Numa\Documents\ NumaLink-3.0 Conformance Statement.doc • Digital Imaging and Communications in Medicine (DICOM) 3.0 http://medical.nema.org/dicom.html 4.3 Status Error! Reference source not found. shows the Status tab, which displays the current status of the NumaLink-3.0 translator. The Status tab reflects the latest entries in the NumaLink-3.0 audit log. The NumaLink-3.0 GUI switches to the Status tab automatically when you start the translator. Figure 9 – Status Tab Page 17 of 33 NumaLink-3.0™ Users Guide and Service Manual The Clear Status Window button clears existing messages form the Status window; it does not affect the audit log. Page 18 of 33 NumaLink-3.0™ Users Guide and Service Manual 5. Technical Support 5.1 Logging and Error Reporting NumaLink-3.0 logs messages that indicate the progress of translations; these messages can also help in understanding and resolving translation problems. You can see the messages in two ways: 1. Messages from the current translation session are shown in the Status tab of the NumaLink-3.0 GUI; see section 4.3. 2. Messages from all sessions are appended into log files that, by default, are stored in C:\Program Files\Numa\Logs The full paths to the log files are displayed in the General tab of the NumaLink-3.0 GUI, as shown in section 4.1. The verbosity of these messages is configurable, also on the General tab. We recommend the Normal setting for most situations; if you are reporting a translation error to the Numa Technical Support Staff, you may be asked to rerun the translation with the Verbose message setting. 5.2 Remote Diagnostics NumaLink-3.0 translation systems come with remote diagnostics software pre-installed and configured. This software, called pcAnywhere, allows the Numa Technical Support Staff to dial in to the NumaLink system for troubleshooting and software upgrades. NOTE In order to receive remote support, the NumaLink-3.0 system must be connected to a dedicated analog phone line that does not run through a PBX phone system. This is also called a D.I.D. (Direct In-Dial) line. If you have to dial a number (such as 9) to get an outside line, then the line is not a D.I.D. line. Digital (PBX) phone lines such as those in hospitals will damage the modem, so please double-check with the personnel in charge of the phone system at your site. When attaching the phone line to the back of the NumaLink-3.0 computer, please make sure that it is plugged into the appropriate jack. The modem will have two jacks side by side; plug the phone line into the one labeled “TELCO” (it may instead have a picture of the plastic connector for the line); see Figure 10. Figure 10 – Proper Telephone Line Connection Page 19 of 33 NumaLink-3.0™ Users Guide and Service Manual TELCO PHONE The phone line should be plugged in here NL_UserMan_005 The pcAnywhere software is setup to automatically start each time the system boots up. You can verify the status of pcAnywhere by locating the clock in the lower right hand corner of the screen. Next to the clock will be a small computer icon, which indicates that pcAnywhere is setup to receive a call; see Figure 11. Figure 11 – pcAnywhere Icon NL_UserMan_006 If you do not see the “pcAnywhere…” icon, you may double-click the “Wait for Connection” icon located on the left side of the screen; see Figure 12. Figure 12 – "Wait for Connection" Icon NL_UserMan_007 5.3 Troubleshooting Before placing a service call to Numa, please run through the following troubleshooting checklist and FAQ. 1. Are all cables plugged into the appropriate ports? (See section 2.1.1.) 2. Are the computers and monitors of the NumaLink-3.0 system, the source system and the destination system turned on? (See section 2.1.2. Page 20 of 33 NumaLink-3.0™ Users Guide and Service Manual 3. If the systems are powered on, have you rebooted the NumaLink-3.0 system, the source system, and the destination system? (See section 2.1.3.) 4. Have you properly transferred a file from the source system? (See sections 5.4 and 6.) 5.4 Frequently Asked Questions What types of data can I send through my NumaLink-3.0 system? Your NumaLink-3.0 computer only supports raw, unprocessed data. This includes the following study types: • • • • • • Static Dynamic Multi-Phase Dynamic SPECT (planar/MUGA) Gated SPECT Whole Bodies Some “Screen Save” data is supported from the following manufacturers: • • • GE StarCam ADAC Pegasys Sopha XT When should I reboot my NumaLink-3.0 computer? If your normal procedure is to shut down your nuclear medicine equipment nightly, then do the same with the NumaLink-3.0 system. If you leave your nuclear medicine equipment running all the time, Numa recommends rebooting the system once a week, preferably on a Monday. You should also reboot the NumaLink-3.0 system if you are experiencing trouble transferring files. Can I load other software onto my NumaLink-3.0 computer? We strongly recommends that you do not load any software onto your NumaLink-3.0 system. Doing so could cause the system to malfunction. If your system is covered under warranty by Numa Inc., loading unauthorized software onto the NumaLink-3.0 computer is in violation of the warranty terms and will void the warranty. What about screen savers? Screen savers take up a large amount of memory and resources on your NumaLink-3.0 system, may result in slow transfer times and may also cause the system to malfunction. Instead, you may turn off the monitor without disrupting normal system function. Page 21 of 33 NumaLink-3.0™ Users Guide and Service Manual How do I know that a study I sent has been translated? You can check the NumaLink-3.0 status window. Figure 13 shows a typical status window after a successful translation. Figure 13 – Example of Successful Translation A study that I sent did not show up on the destination system. What should I do? Page 22 of 33 NumaLink-3.0™ Users Guide and Service Manual Reboot the NumaLink-3.0 computer. If the studies still do not come over, reboot the source and destination systems as well. Try to determine if the data comes over to the NumaLink-3.0 system, and also if it leaves the Numa system, but cannot be seen or processed at the destination. Check the following: • • • • Does this happen with only one patient, or all patients? Does this happen with only one study type, or all study types? If the problem only happens with one patient, is there anything different in the acquisition (different parameters than normal)? If the problem is with one study type, has the transfer of that type worked before? Do other patients who have had the same study come across? This information will assist the Numa Technical Staff in the troubleshooting process Studies that I sent to my ADAC Pegasys computer do not show up in the patient list, even though they were successfully transferred. Your Pegasys system may have the incorrect date range set, and the studies you sent may be out of range. Adjust the date range field in the patient list on the Pegasys to reflect the acquisition date of the study you sent. You may also need to specify a date in the future if the date on the ADAC system is incorrect. Page 23 of 33 NumaLink-3.0™ Users Guide and Service Manual 6. OEM Setup Information This section provide additional information on configuring and using NumaLink-3.0 with the various OEM systems supported by its translations. 6.1 ADAC Pegasys 6.1.1 NumaLink-3.0 Input Configuration (Pegasys Read) Figure 14 shows a typical configuration to deliver Pegasys files to NumaLink-3.0 for translation. Figure 14 – NumaLink-3.0 Pegasys Read Configuration ADAC Pegasys Numa System NumaPull NumaLink 2 1 3 2 local disk local disk NL_UserMan_002 1. Pegasys files are exported to a local directory on the Pegasys system. To export files on the ADAC Pegasys: a. Right click on the ADAC desktop. b. Right click on User Custom Menu. c. Left click on “Transfer Native Pegasys Files”. This will open the patient selection utility. d. Select the patients you wish to transfer and click the “Proceed” button. 2. Numa Pull transfers the files to a local directory on the NumaLink-3.0 system; this directory is configured as a translation input directory in NumaLink-3.0. 3. The appearance of Pegasys files in the input directory causes NumaLink-3.0 to start a translation. 6.1.2 NumaLink-3.0 Output Configuration (Pegasys Write) Figure 15 shows a typical configuration to deliver files translated by NumaLink-3.0 to a Pegasys system. Page 24 of 33 NumaLink-3.0™ Users Guide and Service Manual Figure 15 – NumaLink-3.0 Pegasys Write Configuration Numa System NumaLink ADAC Pegasys AutoFTP 1 2 2 local disk 3 local disk NL_UserMan_003 1. Completing a translation, NumaLink-3.0 writes Pegasys files to a configured output directory. 2. AutoFTP transfers the Pegasys files to a local directory on the Pegasys system. 3. AutoFTP shells a procedure on the Pegasys to add the transferred file to the Pegasys database. 6.2 GE StarCam 6.2.1 NumaLink-3.0 Input Configuration (StarCam Read) To transfer patient studies from your GE StarCam to the NumaLink-3.0 system: 1. At the > prompt on the StarCam console, type the command NSND and press the Enter key. This will bring up the Network Send screen used to select a station and patient. 2. Press the Help key to bring up a list of available StarLink stations. Select the entry for the NumaLink system, (This entry name will vary, it may be “numa” or “adac” or “odyssey” – contact Numa if you need assistance) then press the SEL key to select the entry. 3. Press the Enter key to navigate to the Patient ID field. Press the Help key to bring up a patient list. Using the arrow keys, select the patient you wish to transfer and press the SEL key to select the patient. This will bring you back to the main Network Send screen. 4. To send the patient, press the Send Form key. 6.3 Marconi Odyssey 6.3.1 NumaLink-3.0 Input Configuration (Odyssey Read) To transfer patient studies from your Marconi Odyssey computer to the Numa computer: Page 25 of 33 NumaLink-3.0™ Users Guide and Service Manual 1. First open a new workbench on the Odyssey console. 2. Click on the File menu and select Patient Index. 3. From the Clinical Index window, select the patient study you wish to transfer, or click on the Patient Index button to select individual files. 4. Click the Done button when ready. 5. Open the Utilities menu and select Interfile Conversion. 6. Click on the Convert and Send button, then select NUMA from the list. 7. Click Done to begin the Interfile conversion process and send studies to the Numa computer for translation. 6.4 Siemens ICON 6.4.1 NumaLink-3.0 Input Configuration (Icon Read) To transfer images from your Siemens ICON computer to the Numa system: 1. Open up the ICON desktop software. 2. Double click on the Database Utilities folder. 3. When the patient list appears, select the patient(s) from the list on the left and click the Select button. The patients you selected should appear in right hand window. 4. When you are ready to transfer the patients to the Numa computer, click on the Utilities menu and select “Copy”. 5. Select the volume corresponding to the NumaLink-3.0 computer (usually “sendpatientsto…) and click the “Copy” button. You should see a file transfer status indicator appear. When this closes, all patient files should be on the Numa computer. Page 26 of 33 NumaLink-3.0™ Users Guide and Service Manual 7. Command Line Interface and Configuration File The NumaLink-3.0 translator can be run without the GUI, by making use of its command line interface, which is augmented by an editable configuration file. In this manner, a specific translation can be scripted to execute in response to another system event. The command line interface is fairly straightforward; it is described in section 7.1. The configuration file can be simple or complex, depending on the number of translations configured and the customization requirements for each translation. We suggest that the best way to become acquainted with the configuration file is to experiment with configuration settings through the NumaLink-3.0 GUI and examine the results of those settings in the configuration file. The non-customization elements of the configuration file are described in section 7.2. The customization elements are described in Numa Translation Customizations. 7.1 Command Line The translation command line syntax is as follows: nmtrans [ -a path –b –c –d n –e path -f file -t seconds ] Arguments in [ ] are optional. The arguments are: -a file Audit log file specification – specifies a file for writing an audit log. The audit log receives messages detailing translation work. The process must have write and file create access to this directory. If “0” is specified for the path, audit messages are not logged. -b Background mode – the translator is detached from the process that started it and runs until explicitly stopped. The default is interactive mode (i.e., not background mode); the translator performs the specified translation on the specified input directory and then exits. This argument is mutually exclusive with –d. -c Customization – the translator calls the customization module prior to the write portion of the translation, allowing site-specific customization of the write. The default is non-customization mode. -C n Cache age limit – cache items older than n days will be purged. The default cache age limit is ten days. -d n Debug – breaks the translation process into separate phases. The phases are specified by n as follows: 1 – Read; reads input files into intermediate format 2 – Customize; performs site-specific customization on the intermediate format Page 27 of 33 NumaLink-3.0™ Users Guide and Service Manual data 3 – Write; writes intermediate format to output files This argument is mutually exclusive with –b. -e file Error log file specification – specifies a file for writing an error log and supplementary error information. The error log receives any error messages that are generated during translation. The process must have write, file create and directory create access to this directory. If “0” is specified for the path, error messages are not logged. In interactive mode (-b) error messages are always displayed on the standard error device, regardless of this argument. -f file Configuration file specification. The configuration file indicates the translation types to be performed, and is specified in section 7.2. -q Quiet output. This causes only error messages to be displayed. The default is normal output – a small number of informational messages and any error messages. This argument is mutually exclusive with –v. -t seconds Wait time – the number of seconds to wait before rechecking the input file path(s) for work. The default is 30 seconds. This argument is ignored unless –b is specified. -v Verbose output. This causes a large number of informational messages to be displayed as well as any error messages. The default is normal output – a small number of informational messages and any error messages. This argument is mutually exclusive with –q. 7.2 Configuration File A configuration file is used to designate the types of translation to be done. Each type of translation type must specify at minimum an OEM format and path for input as well as output, and a work path. The translation type may also include remote DICOM AE information and customization settings. The configuration file is a text file. Each line of text specifies one directive; the type of each directive is denoted by a leading keyword. The following general rules apply to the configuration file: ; (semicolon) ! (exclamation) Comment – everything to the right on the same line is ignored. The semicolon delimiter may be used freely to mark comments; the exclamation delimiter is reserved for use by Numa, Inc. Page 28 of 33 NumaLink-3.0™ Users Guide and Service Manual (white space) Spaces and tabs are considered white space. All contiguous white space is interpreted as one space. (blank line) A blank line is a line that contains only white space, comments or nothing. Blank lines are ignored. “” Anything surrounded by double quotes is preserved as is (i.e., whit spaces is not compressed, comment delimiters have no effect). Each directive contains a keyword followed by one or more arguments. Keywords and arguments are delimited by white space; if white space is required in an argument, the argument must be enclosed in double quotes. 7.2.1 The translate Directive The translate directive specifies a translation type to be performed. There are one or more translation directives in the configuration file. This directive captures the information gathered from the GUI dialog in Figure 7. The format of a translation directive is: translate label input-format input-path output-format output-path work-path [ stability-delay ] translate A keyword that specifies this line is a translation type directive. label A user-defined name assigned to this translation. The label may be up to 30 characters long. input-format Format of the input files. The format names specified in Table 7-1 are accepted. input-path Input file path – specifies the directory from which the translator receives its translation work. The process must have read access to this directory. Each translation in a configuration files must specify a different input file path. output-format Format of the output files. The format names specified in Table 7-1 are accepted. output-path Output file path – specifies the directory to which the translator writes its translation results. The process must have write and file create access to this directory. Page 29 of 33 NumaLink-3.0™ Users Guide and Service Manual work-path Work path – specifies a working directory that the translator uses for temporary storage, debug output etc for this translation type. The process must have write, file create and directory create access to this directory. Each translation in a configuration files must specify a different work path. Several subdirectories are created in the work path for use by the translator:. stability-delay Number of seconds to wait before rechecking the input path, when determining whether files are stable and ready for translation. This value is optional; if not supplied, the delay time specified in the command line (-t) is used. This argument is ignored unless –b is specified on the command line (that is, no translation delays are imposed in interactive mode). For the input-path, output-path and work-path arguments, it is assumed that a trailing path delimiter is not included in the path definitions. For example, on Win32 systems the user supplies c:\trans\work instead of c:\trans\work\ Table 7-1 – Translation Formats Name Format Read Write ADAC ADAC (Pegasys) Yes Yes DICOM DICOM (ACR NEMA) Yes Yes ECLIPSE Eclipse Yes Yes GE_ELSCINT_S GE Elscint (SBACK) Yes Yes GE_GENIE_D GE Genie (DICOM) Yes GE_STARCAM GE StarCam Yes NUMA Numa (private) Yes Yes PICKER Marconi (Interfile) Yes Yes SIEMENS Siemens (ICON) SMV_IF SMV Interfile Yes SOPHA Sopha (NXT/F83) Yes TOHSIBA_V Toshiba (VI/DI) Yes Yes Yes For each translation type, the data flows from the specified input to the specified output path. There is no limit on the number of translation types that can be specified in a configuration file. Page 30 of 33 NumaLink-3.0™ Users Guide and Service Manual 7.2.2 The out_remote_ae Directive The out_remote_ae directive allows you to configure remote DICOM Application Entities (AEs) for DICOM write. It must follow a translation directive, and it is associated with the translation directive that immediately precedes it. This directive applies only to translation directives that specify a DICOM format as the output format; otherwise, it is ignored. It corresponds to the DICOM remote AE information described in section 4.2.2. The presence of an out_remote_ae directive means that the translation will result in a DICOM C-STORE request to the specified remote AE. If an out_remote_ae directive is not present, the translation simply writes DICOM Part 10 files in the output directory specified in the associated translate directive. There can be multiple instance of this directive per translation; each on indicates a separate remote AE to which to perform the C-STORE. The out_remote_ae directive has the following format: out_remote_ae ae-title node port { friendly-name | "" } { transfer-syntax | "" } out_remote_ae A keyword that specifies this line is a DICOM remote AE output directive. ae-title The formal title of the remote AE for access (defined by remote AE's configuration) node The node on which the remote AE exists; may be a node name (e.g., barney) or TCP/IP address (e.g., 152.8.300.24) port The TCP/IP port number on which the remote AE listens for requests (defined by remote AE's configuration) friendly-name An arbitrary descriptive name given to the remote AE to aid in selection (maximum 16 characters; must not include white space; if a friendly name is not provided, this argument must be "") transfer-syntax The transfer syntax to be used when communicating with this AE; must be one of the following: • IMPL_LIT_END (implicit little endian) • EXPL_LIT_END (explicit little endian) (explicit big endian) • EXPL_BIG_END If a transfer syntax is not provided, this argument must be "", and the transfer syntax defaults to implicit little endian. The following is an example of a valid configuration file including an out_remote_ae directive: Page 31 of 33 NumaLink-3.0™ Users Guide and Service Manual ; nmtrans_config.dat – sample configuration file translate AtoD ADAC c:\trn\ADC_in DICOM c:\trn\DCM_out out_remote_ae numastore remnode 104 "" "" c:\trn\tran1 20 This configuration file will invoke a translation of input files in ADAC Pegasys format to DICOM format, followed by a request to remote AE "numastore" (on node "remnode", listening on port 104) to store the DICOM files. 7.2.3 The control_* Directives Control directives specify zero or more customization controls that are associated with a translation. The customization control directives are described in Numa Translation Customizations. Page 32 of 33