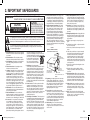
1
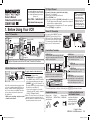
RF Output Channel
If you need additional operating assistance after reading this owner’s manual
or to order replacement accessories,
please call
Owner’s Manual
Video Cassette Recorder
If channel 3 is already occupied for broadcasting,
Hint
1) Set your TV to channel 4.
• The RF output channel
2) Insert a pre-recorded tape into this unit.
does not change when
3) Press [PLAY B] once.
you adjust tracking during
4) After a few seconds, hold [PLAY B] on the unit for 3 seconds.
playback. In this case, stop
the playback, and start
• The RF output channel will change to channel 4 from channel 3
the playback again. After
and you will see a playback picture.
that, hold [PLAY B] on the
• When a picture does not appear on the TV screen, repeat step 4.
VCR for 3 seconds again.
5) Press [STOP C] to stop playback.
TOLL FREE : 1-800-605-8610
http://www.funai-corp.com
CMWV405
1. Before Using Your VCR
Stereo TV Connection
Basic TV Connection
Cable TV Antenna
Signal
or
(Back of TV)
Cable TV Antenna
Signal
or
Connect
RF Cable
(not supplied)
RF Cable
(not supplied)
4
(Back of VCR)
2
Disconnect
You can use the AUDIO OUT jack and
VIDEO OUT jack on the back of the
VCR if your TV has Audio/Video Input
jacks. In this case, you need to set the
TV to external Line Input Mode. Please
refer to your TV’s owner’s manual.
(Back of TV)
ANT
IN
OUT
3
VIDEO
IN
IN
OUT
IN
OUT
(Back of VCR)
Front & Rear Terminals
Connect
AUDIO OUT jack
Connect the audio cable here through to the audio
input jack of a camcorder, another VCR, a stereo
amplifier or an audio system.
RF Cable (supplied)
AUDIO IN jack
Connect the audio cable coming from the
audio output jack of a camcorder, another
VCR or an audio source here.
ANT
Hint for Cable Box or Satellite Box
AUDIO
To select channels of the cable box or
satellite box
1) Turn on the unit by pressing
RF cable
(supplied)
[STANDBY-ON], then press [VCR/TV].
(Back of TV)
RF Cables
The “POWER” and the “VCR/TV” indicator
(not supplied)
on the front panel will appear, then press
[CHANNEL
] to select channel 3 or 4
Select
this connection
when
want to view
(the same channel as the output channel of
(Back you
of VCR)
Connection
B
or record a scrambled channel.
With this conthe cable box or satellite box).
(Cable box or
Satellite
box)
nection,
changed
on the
• If you use the channel 4, you need to
Cable channels cannot be
Signal
unit.
You can view or record ONLY the chanchange the unit’s RF output to channel 4.
(Back of TV)
nels you have
on the RF
cable
Refer to “RF Output Channel”.
RF selected
Cable (supplied)
Cablebox or
the satellite box.
2) At the TV, select channel 3 or 4 (the same
• While you are recording, only the recorded
channel as you have selected at step 1).
channel can be viewed.
3) On the cable box or satellite box, select the
channel you want to view or record.
OUT
E
OUT
ANT
IN
OUT
E
IN
OUT
IN
OUT
OUT
IN
OUT
VIDEO
VIDEO OUT jack
Connect the video cable here through the video
input jack of a camcorder, another VCR or a TV.
STANDBY-ON
CHANNEL
VIDEO
AUDIO
MENU RECORD
VCR/TV
CST.IN
TIMER
STOP/EJECT
REW
PLAY
ANT OUT jack
Connect the supplied RF cable to the
antenna input jack on your TV.
VIDEO IN jack
Connect the video cable coming from the
video output jack of a camcorder, another
VCR or an audio-visual source (laser disc
player, video disc player, etc.) here.
F.FWD
IR
POWER
RECORD
• To use the input jacks on the back of this unit, press [0], [0], [1] on the remote control.
• To use the input jacks on the front of this unit, press [0], [0], [2] on the remote control.
Supplied Accessory
• Remote control
(NA374UD) with
two AA batteries
-CMWV405_HJ34RCD_EN.indd ANT IN jack
Connect your antenna or cable box here.
AUDIO
OUT
VIDEO
IN
ANT
AUDIO
IN
IN
(Back of VCR)
OUT
(not supplied)
VIDEO
IN
IN
ANT
IN
IN
VIDEO
Audio/Video Cables
ANT
(Cable box or
Satellite box)
ANT
AUDIO
(Back of TV)
Plug the AC power cords of the VCR and TV into the AC outlets.
Antenna or
Cable TV
signal
AUDIO
IN
• RF cable
• Owner’s manual
(WPZ0901TM002) (1VMN22462)
Installing the Batteries for
the Remote Control
Install two AA batteries
(supplied) matching
the polarity indicated
on the bottom of the
remote control.
Printed in China
1VMN22462 / HJ34RCD ★★★★★
EN
2006/0/23 6:20:25
2. Important Safeguards
WARNING:
TO REDUCE THE RISK OF FIRE OR ELECTRIC SHOCK,
DO NOT EXPOSE THIS APPLIANCE TO RAIN OR MOISTURE.
CAUTION
RISK OF ELECTRIC SHOCK
DO NOT OPEN
CAUTION:
TO REDUCE THE RISK OF ELECTRIC
SHOCK, DO NOT REMOVE COVER
(OR BACK). NO USER SERVICEABLE
PARTS INSIDE. REFER SERVICING
TO QUALIFIED SERVICE PERSONNEL.
The caution marking is located on the rear of the cabinet.
The lightning flash with arrowhead symbol, within an equilateral triangle, is intended to alert
the user to the presence of uninsulated “dangerous voltage” within the product’s enclosure
that may be of sufficient magnitude to constitute a risk of electric shock to persons.
The exclamation point within an equilateral triangle is intended to alert the user to the
presence of important operating and maintenance (servicing) instructions in the literature
accompanying the appliance.
1. R
ead Instructions- All the safety and operating
instructions should be read before the appliance
is operated.
2. Retain Instructions- The safety and operating
instructions should be retained for future reference.
3. Heed Warnings- All warnings on the appliance
and in the operating instructions should be
adhered to.
4. Follow Instructions- All operating and use
instructions should be followed.
5. Cleaning- Unplug this video product from the wall
outlet before cleaning. Do not use liquid cleaners
or aerosol cleaners. Use a damp cloth for cleaning.
EXCEPTION: A product that is meant for uninterrupted service and, that for some specific
reason, such as the possibility of the loss of an
authorization code for a CATV converter, is not
intended to be unplugged by the user for cleaning or any other purpose, may exclude the reference to unplugging the appliance in the cleaning description otherwise required in item 5.
6. Attachments- Do not use attachments not recommended by the video product manufacturer
as they may cause hazards.
7. Water and Moisture- Do not use this video
product near water, for example, near a bath tub,
wash bowl, kitchen sink, or laundry tub, in a wet
basement, or near a swimming pool, and the like.
8. Accessories- Do not place this video product
on an unstable cart, stand, tripod, bracket,
or table. The video product may fall, causing
serious injury to a child or adult, and serious
damage to the appliance. Use only with a cart,
stand, tripod, bracket, or table recommended
by the manufacturer, or sold with the video
product. Any mounting of the appliance should
CMWV405_HJ34RCD_EN.indd 2
12. P
ower Cord Protection- Power supply cords
should be routed so that they are not likely to
be walked on or pinched by items placed upon
or against them, paying particular attention to
cords at plugs, convenience receptacles, and
the point where they exit from the appliance.
13. Outdoor Antenna Grounding- If an outside
antenna or cable system is connected to the
video product, be sure the antenna or cable
system is grounded so as to provide some
protection against voltage surges and builtup static charges. Article 810 of the National
Electrical Code, ANSI/NFPA No. 70, provides
information with regard to proper grounding of
the mast and supporting structure, grounding
of the lead-in wire to an antenna discharge
unit, size of grounding conductors, location of
antenna-discharge unit, connection to grounding
electrodes, and requirements for the grounding
electrode. (Fig. A)
FIGURE A
follow the manufacturer's instructions and
should use a mounting accessory recommended by the manufacturer. An appliance and cart combination should
be moved with care. Quick stops,
excessive force, and uneven surfaces may cause the appliance
and cart combination to overturn.
9. Ventilation- Slots and openings
in the cabinet are provided for ventilation and to
ensure reliable operation of the video product
and to protect it from overheating, and these
openings must not be blocked or covered. The
openings should never be blocked by placing
the video product on a bed, sofa, rug, or other
similar surface. This video product should not
be placed in a built-in installation such as a
bookcase or rack unless proper ventilation is
provided or the manufacturer's instructions have
been adhered to .
10. Power Sources- This video product should be
operated only from the type of power source
indicated on the marking label. If you are not
sure of the type of power supply to your home,
consult your appliance dealer or local power
company. For products intended to operate from
battery power, or other sources, refer to the
operating instructions.
11. Grounding or Polarization- This video product
is equipped with a polarized alternating-current
line plug (a plug having one blade wider than
the other). This plug will fit into the power outlet
only one way. This is a safety feature. If you are
unable to insert the plug fully into the outlet, try
reversing the plug. If the plug should still fail to
fit, contact your electrician to replace your obsolete outlet. Do not defeat the safety purpose of
the polarized plug.
EXAMPLE OF ANTENNA GROUNDING
AS PER NATIONAL ELECTRICAL CODE
ANTENNA
LEAD WIRE
GROUND
CLAMP
ANTENNA
DISCHARGE UNIT
(NEC SECTION 810-20)
ELECTRIC
SERVICE
EQUIPMENT
POWER SERVICE GROUNDING
ELECTRODE SYSTEM
(NEC ART 250, PART H)
GROUNDING
CONDUCTORS
(NEC SECTION 810-21)
GROUND CLAMP
NEC – NATIONAL ELECTRICAL CODE
S2898A
14. L
ightning- For added protection for this video
product during a lightning storm, or when it is
left unattended and unused for long periods of
time, unplug it from the wall outlet and disconnect the antenna or cable system. This will
prevent damage to the video product due to
lightning and power-line surges.
15. Power Lines- An outside antenna system
should not be located in the vicinity of overhead
power lines or other electric light or power circuits, or where it can fall into such power lines
or circuits. When installing an outside antenna
system, extreme care should be taken to keep
from touching such power lines or circuits as
contact with them might be fatal.
16. Overloading- Do not overload wall outlets,
extension cords, or integral convenience
receptacles as this can result in a risk of fire or
electric shock.
--
17. O
bject and Liquid Entry- Never push objects
of any kind into this video product through any
openings as they may touch dangerous voltage
points or short-out parts that could result in a
fire or electric shock. Never spill liquid of any
kind on the video product.
18. Servicing- Do not attempt to service this video
product yourself as opening or removing covers
may expose you to dangerous voltage or other
hazards. Refer all servicing to qualified service
personnel.
19. Damage Requiring Service- Unplug this video
product from the wall outlet and refer servicing
to qualified service personnel under the following conditions:
a. When the power-supply cord or plug is damaged.
b. If liquid has been spilled, or objects have fallen
into the video product.
c. If the video product has been exposed to rain or
water.
d. If the video product does not operate normally
by following the operating instructions. Adjust
only those controls that are covered by the
operating instructions as an improper adjustment of other controls may result in damage
and will often require extensive work by a qualified technician to restore the video product to its
normal operation.
e. If the video product has been dropped or damaged in any way.
f. When the video product exhibits a distinct
change in performance-this indicates a need
for service.
20. Replacement Parts- When replacement parts
are required, be sure the service technician has
used replacement parts specified by the manufacturer or have the same characteristics as the
original part. Unauthorized substitutions may
result in fire, electric shock or other hazards.
21. Safety Check- Upon completion of any service
or repairs to this video product, ask the service
technician to perform safety checks to determine that the video product is in proper operating condition.
22. Heat- This video product should be situated
away from heat sources such as radiators, heat
registers, stoves, or other products (including
amplifiers) that produce heat.
EN
2006/0/23 6:20:25
3. Preparation for Use
Turn on the Unit for the First Time
1 Turn on the TV and set it
to channel 3.
• If channel 3 is already occupied
for broadcasting, see “RF Output
Channel” section on page 1.
2
STANDBY-ON
Remote Control
TV Screen
LANGUAGE SELECT
BENGLISH
PLAY
STOP
FRANCAIS
ESPAÑOL
[ON]
F.FWD
CH 01
F.FWD
AUTO SET UP
Do you connect the cable from the cable box
or the satellite box to the VCR’s ANT-IN jack?
Yes
Yes Press [MENU]
to exit.
• Refer to “Hint for Cable Box or
Satellite Box” section on page 1.
No
No Please wait for a few minutes.
After scanning...
• The tuner stops on the lowest memorized
channel.
• You can select only the channels memorized
in the unit by using [CHANNEL
].
• If "AUTO SET UP" appears on the TV
screen again, check the cable connections.
Then, press [F.FWD g] once again.
Hint
• Repeat these steps only if either there
was a power failure or if this unit has been
unplugged for more than 30 seconds.
CMWV405_HJ34RCD_EN.indd 3
You can select a channel by using
the Number buttons on the
remote control.
Notes for using the Number buttons:
• When selecting cable channels
which are higher than 99, enter
channel numbers as a three-digit
number (for example: 117, press
[1], [1], [7]).
• You must precede single-digit
channel numbers with a zero (for
example: 02, 03, 04 and so on).
To Preset the Channel Again
or
3
To Select a Channel
1) P
ress [MENU] until the main
menu appears.
2) S
elect "CHANNEL SET UP" by
pressing [PLAY B] or [STOP C].
Then, press [F.FWD g].
3) Select "AUTO SET UP" by
pressing [PLAY B] or [STOP C].
Then, press [F.FWD g]. After
scanning, the tuner stops on the
lowest memorized channel.
To Add/Delete Channels
Clock Set Up
1
1
MENU
PLAY
STOP
5
-MENU-
TIMER PROGRAMMING
AUTO REPEAT [OFF]
CHANNEL SET UP
BCLOCK SET
LANGUAGE SELECT
or
CLOCK SET
PLAY
STOP
• If the clock is not set,
the CLOCK SET screen
appears when you press
[MENU]. In this case, go
to step 2.
or
F.FWD
F.FWD
CHANNEL SET UP
PLAY
STOP
AUTO SET UP
2
BMANUAL SET UP
or
F.FWD
MONTH DAY
1 0 / – –
YEAR
––––
HOUR MINUTE
– – : – –
AM/PM
––
Select the current month.
F.FWD
F.FWD
6
CLOCK SET
PLAY
MANUAL SET UP
PLAY
CHANNEL 30
(CATV)
3
ADD
CLOCK SET
PLAY
STOP
or
or
Select the channel to be
added or deleted.
MONTH DAY
10 / 02 YEAR
––––
HOUR MINUTE
– – : – –
AM/PM
––
MANUAL SET UP
REW
F.FWD
CHANNEL 30
(CATV)
DELETE
or
Select the current minute.
F.FWD
7
CLOCK SET
PLAY
4
Select “AM” or “PM”.
CLOCK SET
PLAY
STOP
MONTH DAY
10 / 02
YEAR
2006
HOUR MINUTE
– – : – –
AM/PM
––
F.FWD
--
AM/PM
P M AM
BPM
CLOCK SET screen
Select the current year.
menu
HOUR MINUTE
0 5 : 4 0
8 To exit the
Select “ADD” or “DELETE”.
5 To exit the
or
MONTH DAY
YEAR
1 0 / 0 2 MON 2 0 0 6
F.FWD
or
C.RESET
EXIT
AM/PM
––
Select the current day.
F.FWD
4
MONTH DAY
YEAR
1 0 / 0 2 MON 2 0 0 6
HOUR MINUTE
0 5 : 4 0
or
STOP
STOP
AM/PM
––
Select the current hour.
CLOCK SET
PLAY
STOP
or
3
HOUR MINUTE
0 5 : – –
or
STOP
2
MONTH DAY
YEAR
1 0 / 0 2 MON 2 0 0 6
PLAY
STOP
Hint
• If you accidentally select Spanish
or French and need English: Press
[MENU] and choose SELEC. IDIOMA,
or SELECTION LANGUE. Press
[F.FWD g] and select ENGLISH.
Finally, press [C.RESET/EXIT].
MENU
TIMER PROGRAMMING
AUTO REPEAT [OFF]
BCHANNEL SET UP
CLOCK SET
LANGUAGE SELECT
To Change the On-Screen
Language
1) P
ress [MENU] until the main
menu appears.
2) Select "LANGUAGE SELECT" by
pressing [PLAY B] or [STOP C].
Then, press [F.FWD g].
3) Select "ENGLISH", "FRANCAIS"
or "ESPAÑOL" by pressing
[PLAY B] or [STOP C]. Then,
press [C.RESET/EXIT].
-MENU-
Hint
• To go back one step, press [REW h]
(during steps 2 to 7).
• Your clock setting will be lost if either there
is a power failure or if this unit has been
unplugged for more than 30 seconds.
EN
2006/0/23 6:20:29
4. Precautions
Precautions
Install Location
For safety and optimum performance of
this unit:
• Install the unit in a horizontal and
stable position. Do not place anything
directly on top of the unit. Do not place
the unit directly on top of the TV.
• Shield it from direct sunlight and keep
it away from sources of intense heat.
Avoid dusty or humid places. Avoid
places with insufficient ventilation for
proper heat dissipation. Do not block
the ventilation holes on the sides of the
unit. Avoid locations subject to strong
vibration or strong magnetic fields.
Troubleshooting Guide
Important Copyright Information
Unauthorized recording or use of broadcast television programming, video tape,
film or other copyrighted material may
violate applicable copyright laws. We
assume no responsibility for the unauthorized duplication, use, or other acts
which infringe upon the rights of copyright owners.
If this unit does not perform properly when operated as instructed in this Owner’s
Manual, check this unit consulting the following checklist.
PROBLEM
CORRECTIVE ACTION
No power.
• Make sure the power plug is connected to an AC outlet.
• Make sure the power is turned on.
Timer recording is impossible.
• Make sure the timer recording is set correctly.
• Make sure the power is off.
• Make sure the VCR clock is set correctly.
Cannot go into Recording mode.
•M
ake sure the tape has a record tab. If needed, cover the hole with
adhesive tape.
A Note about Recycling
Playback picture is partially noisy. • Adjust tracking control for a better picture by pressing
[CHANNEL
].
This product's packaging materials are
Cannot view a tape but the audio • H
ead cleaning may be necessary. Refer to “Auto Head Cleaning” on
recyclable and can be reused. Please
is OK.
page 8.
dispose of any materials in accordance
• Make sure the VCR is not in the Menu mode.
with your local recycling regulations.
No or poor playback picture.
• Change the RF output channel to CH4. Then select the same
Batteries should never be thrown away
channel on the TV.
Avoid the Hazards of Electrical Shock or incinerated but disposed of in accord• Fine tune your TV.
and Fire
ance with your local regulations concern- TV programs cannot be seen
• Re-check the ANT-IN and ANT-OUT connections. See page 1.
• Do not handle the power cord with wet ing chemical wastes.
normally.
• Press [VCR/TV] on the remote control so that the VCR/TV indicator
on the unit disappears.
hands.
No operation from the infrared
• Make sure the power plug is connected to an AC outlet.
Note to the Cable TV System Installer
• Do not pull on the power cord when
Remote Control.
• Check batteries in remote control.
disconnecting it from AC wall outlet.
This reminder is provided to call the
Video or color fades in and out when • You cannot copy a copyrighted video tape. You are experiencing
Grasp it by the plug.
Cable TV system installer’s attention to
making a copy of a video tape.
copy guard protection.
Article 820-40 of the NEC that provides
Moisture Condensation Warning
guidelines for proper grounding and
Specifications
Moisture condensation may occur inside in particular, specifies that the cable
Video Heads :
Four Heads
Power requirement : 120V, 60Hz
the unit when it is moved from a cold
ground should be connected to the
Operating temperature : 41°F~104°F
Power consumption : 14 Watts
place to a warm place, or after heating
grounding system of the building, as
(5°C~40°C)
Dimensions : W14-3/16" (360mm)
a cold room or under conditions of high close to the point of cable entry as posConverter output :
VHF Channel 3 or 4 H 3-5/8" (92mm)
humidity. Do not use the unit at least for sible.
D 8-9/16" (216mm)
2 hours until its inside is dry.
Weight :4.0 lbs. (1.8 Kg.)
CAUTION:
(approx.)
FCC Warning
TO PREVENT ELECTRIC SHOCK,
• Designs and specifications are subject to change without notice and legal obligation.
MATCH WIDE BLADE OF PLUG TO
This equipment may generate or use
• If there is a discrepancy between languages, the default language will be English.
WIDE
SLOT,
FULLY
INSERT.
radio frequency energy. Changes or
modifications to this equipment may
Make your contribution to the environment!!!
cause harmful interference unless the
• Used up batteries do not belong in the dust bin.
modifications are expressly approved in
the instruction manual. The user could
• You can dispose of them at a collection point for used up batteries or
lose the authority to operate this equipspecial waste. Contact your council for details.
ment if an unauthorized change or modification is made.
-EN
CMWV405_HJ34RCD_EN.indd 4
2006/0/23 6:20:29
5. Playback
7. Other Operations
Before:
Turn on the TV and set it to
channel 3.
• If channel 3 is already occupied for broadcasting, see “RF Output Channel” section.
2
1
Remote Control
4
VCR/TV
3
CST.IN
TIMER
2
3
4
5
6
7
8
9
CHANNEL
STANDBY-ON
SEARCH
CHANNEL
-MODE
VIDEO
AUDIO
MENU
0
SLOW
RECORD
SPEED
DISPLAY
REW
STOP
PLAY
EJECT
STOP
EJECT A
MENU RECORD
STOP/EJECT
REW
PLAY
F.FWD
IR
C.RESET
EXIT
POWER
VCR/TV
CST.IN
TIMER
RECORD
PAUSE
/STILL
3
4
F.FWD
2
3
Hint
RECORD
4
PLAY
STOP
1
TV Screen
PLAY B
POWER
VCR/TV
EJECT
PLAY
STOP
To cue or review picture during
playback (Picture Search)
STANDBY-ON
1
2
•W
hen a tape without record tab is inserted, the unit will start playback
automatically at step 1.
• Tracking will be automatically adjusted upon playback. To adjust the
tracking manually, press [CHANNEL
].
6. Recording & OTR (One Touch Recording)
Before:
Turn on the TV and set it to
channel 3.
1
2
Remote Control
TV Screen
with tab
1
2
3
4
5
6
7
8
9
0
POWER
3
RECORD
VCR/TV
CST.IN
TIMER
Tape Speed
RECORD
Select the channel to record.
Recording/Playback Time
Type of tape
SP mode
SLP mode
4
CH12
Select the desired tape
speed.
SP
SPEED
RECORD
CHANNEL
T60
1hour
3hour
T120
2hours
6hour
2
3
4
5
6
CHANNEL
7
8
9
SEARCH
VIDEO
4
3
5
Press [PAUSE/STILL]. Each time you
press the button, the picture will be forwarded by one frame.
• If the picture begins to vibrate vertically
during the still mode, stabilize the picture by pressing [CHANNEL
].
• If the picture is distorted or rolling vertically, adjust the vertical hold control on
your TV if equipped.
Counter Reset
Press [C.RESET/EXIT].
VCR/TV
CST.IN
TIMER
RECORD
Press [RECORD] repeatedly to select the
desired recording length.
REC
(Normal recording)
OTR(0:30)
OTR(8:00)
PLAY
-MODE
1
STANDBY-ON
CHANNEL
AUDIO
MENU
0
SLOW
C.RESET
EXIT
RECORD
SPEED
DISPLAY
PAUSE
/STILL
REW
STOP
PLAY
MENU RECORD
STOP/EJECT
REW
PLAY
STOP
POWER
VCR/TV
CST.IN
TIMER
RECORD
F.FWD
2
1
5
4 6
2
3
Record tab
AUDIO
Hint
•If you have connected this unit to a cable box or satellite box, refer to
“Hint for Cable Box or Satellite Box” section on page 1.
MENU RECORD
POWER
VCR/TV
CST.IN
TIMER
1
4
2 3
STANDBY-ON
CHANNEL SET UP
AUTO SET UP
4 1
To exit the menu
or
F.FWD
VCR/TV
EJECT
To decide
MENU
PLAY
RECORD
TIMER PROGRAMMING
AUTO REPEAT [OFF]
B CHANNEL SET UP
CLOCK SET
LANGUAGE SELECT
C.RESET
EXIT
REW
STOP/EJECT
IR
-MENU-
F.FWD
4
CHANNEL
To select an item
-CMWV405_HJ34RCD_EN.indd 5
STANDBY-ON
VIDEO
PLAY
STOP
STOPPLAY
or
To prevent accidental recording on a
recorded cassette, remove its record tab.
To record on it later, cover the hole with
adhesive tape.
-MENUB TIMER PROGRAMMING
AUTO REPEAT [OFF]
CHANNEL SET UP
CLOCK SET
LANGUAGE SELECT
B MANUAL SET UP
EJECT A
When a tape reaches its end during playback, fast-forward, or recording (except
timer recording and One Touch Recording),
the tape will automatically rewind to the
beginning. After rewinding finishes, the unit
will eject the tape and turn itself to off.
To call up the main menu
MENU
OTR(:00).....
EJECT
Auto Rewind
F.FWD
IR
OTR(7:30)
6
•D
uring the rec pause mode, five C
marks appear on the TV screen. Each C
mark represents one minute.
• Press it again to resume recording.
Hint
Accidental erasure prevention
POWER
STOP
1
T160
2-2/3hours
8hour
SPEED
REC
5
VCR/TV
EJECT
To temporarily stop recording
To freeze the picture on TV screen (Pause mode)
during playback (Still mode)
Press [PAUSE/STILL].
8. On-Screen Operations
STANDBY-ON
6
Press [SLOW] during playback or the still mode.
• If the noise bar appears on the TV
screen, you can reduce it by pressing
[CHANNEL
].
•S
till/Slow/Pause mode will be automatically cancelled after 5 minutes to prevent damage to
the tape and the video head.
• To return to playback from the Picture Search/Still/Slow mode, press [PLAY B].
2
• If channel 3 is already occupied for broadcasting, see “RF Output Channel” section.
Press [F.FWD g] or [REW h].
• Press it again and the VCR will now
search in super high speed (in the LP/
SLP modes only).
To play back in slow motion
2
1
2
3
4
5
6
CHANNEL
7
8
9
SEARCH
MENU
0
SLOW
C.RESET
EXIT
RECORD
SPEED
DISPLAY
PAUSE
/STILL
REW
STOP
PLAY
-MODE
F.FWD
4
3
EN
2006/0/23 6:20:3
9. Recording Features
Timer Recording
Hints for Timer Recording
•Insert a tape with its record tab into the unit.
1
MENU
-MENU-
5 Select the desired start
time (hour).
BTIMER PROGRAMMING
AUTO REPEAT [OFF]
CHANNEL SET UP
CLOCK SET
LANGUAGE SELECT
STOP
PLAY
STOP PLAY
or
F.FWD
F.FWD
Select the
minute.
9
ONE TIME PROGRAM
PLAY
STOP
ONE TIME PROGRAM
or
PROGRAM NUMBER 1
DATE1 0 / 2 3 MON
STARTTIME 0 7 : 3 0 – –
END TIME – – : – – – –
CHANNEL – –
REC SPEED – –
PROGRAM NUMBER 1
DATE1 0 / 2 3 MON
STARTTIME 0 7 : 3 0 PM
END TIME 0 8 : 3 0 PM
CHANNEL1 6
REC SPEED SP
BSP
SLP
Select the desired recording speed.
C.RESET
EXIT
STOP
PLAY
STOP PLAY
2
PLAY
STOP
or
PROGRAM NUMBER 1
DATE – – / – –
STARTTIME – – : – – – –
END TIME – – : – – – –
CHANNEL – –
REC SPEED – –
Select an empty program
number.
F.FWD
6
ONE TIME PROGRAM
PLAY
or
PLAY
STOP
or
PROGRAM NUMBER 1
B ONCE
DAILY
WEEKLY
PROGRAM NUMBER 1
DATE1 0 / 2 3 MON
STARTTIME 0 7 : 3 0 PM
END TIME – – : – – – –
CHANNEL – –
REC SPEED – –
AM
BPM
Select “AM” or “PM”.
F.FWD
Select “ONCE”, “DAILY”
(Mon-Fri), or “WEEKLY”.
F.FWD
7 Repeat the procedure in steps
5 and 6 to set the end time.
F.FWD
4 Select the desired month.
STOP
STOPPLAYPLAY
or
F.FWD
ONE TIME PROGRAM
PROGRAM NUMBER 1
DATE1 0 / 0 2 MON
STARTTIME – – : – – – –
END TIME – – : – – – –
CHANNEL – –
REC SPEED – –
Select the desired day.
STOP
STOPPLAYPLAY
or
• You can program one
year in advance.
F.FWD
8
ONE TIME PROGRAM
PLAY
STOP
or
PROGRAM NUMBER 1
DATE1 0 / 2 3 MON
STARTTIME 0 7 : 3 0 PM
END TIME 0 8 : 3 0 PM
CHANNEL1 6
REC SPEED – –
Select the desired channel.
•If you have connected the unit to a cable
box or satellite box as the Connection on
page 1, select the VCR to channel 3 or 4
(the RF output channel of the VCR). Then,
select the desired channel at the cable
box or satellite box. Leave the cable box
or satellite box on for timer recording.
F.FWD
Turn off the
VCR for
recording.
Press [STOP/EJECT P N] on the unit.
Copying a Video Tape
•T
IMER indicator on the VCR lights up.
Hint
(Back of Playing VCR)
•T
o go back one step, press
[REW h] (during steps 3 to 9).
To Check, Correct, or Cancel
a Timer Program
1) T
urn the power on by pressing
[STANDBY-ON].
2) Select main menu by pressing
[MENU].
3) Select "TIMER PROGRAMMING" by
pressing [PLAY B] or [STOP C].
Then, press [F.FWD g].
4) Select the program number
which you want to check by
pressing [PLAY B] or
[STOP C]. The details of the
program you selected will
appear on the TV screen.
• Go to the digit you want to
change by pressing
[F.FWD g] or [REW h].
Then, enter correct numbers by
pressing [PLAY B] or
[STOP C].
• You may cancel the entire
program by pressing [REW h]
while the program number flashes.
5) Press [C.RESET/EXIT] to exit.
6) Press [STANDBY-ON] to return
to timer stand-by mode.
-CMWV405_HJ34RCD_EN.indd 6
STANDBY-ON
To cancel a Timer Recording that is in progress
Warning: Unauthorized recordings of copyrighted video tapes
(Back of TV)
may be an infringement of copyright laws.
F.FWD
STOP
3
10
or
• If there is a power failure or the unit has been unplugged for more than 30 seconds, the clock setting and all timer settings will be lost.
• If the tape runs out before the end time, the unit will switch to the Stop mode
immediately, eject the tape and the power will be turned off. The TIMER indicator
will flash.
• If a tape is not in the unit or does not have the record tab, the TIMER indicator
flashes and timer recording cannot be performed. Please insert a recordable tape.
• When all the Timer Recording are completed, the TIMER indicator flashes.
To play or eject the recorded tape, press [STANDBY-ON] first, and then
press [PLAY B] or [EJECT A].
OUT
OUT
IN
IN
VIDEO
AUDIO
(Back of Recording VCR*)
1
Connect
ANT
IN
AUDIO
OUT IN
OUT
2
Connect
VIDEO
RF Cable
Audio/Video Cables
(not supplied)
(supplied)
*Front input jacks are also available
1)Insert a pre-recorded tape into the playing VCR.
2)Insert a tape with its record tab into the recording VCR.
3)Press [SPEED] on the remote control of the recording VCR to select
the desired recording speed (SP/SLP).
4)Select the “L1” or “L2” position on the recording VCR.
• To use the input jacks on the back of this unit, select "L1" position by
pressing [0], [0], [1] on the remote control or [CHANNEL
].
• To use the input jacks on the front of this unit, select "L2" position by
pressing [0], [0], [2] on the remote control or [CHANNEL
].
5)Press [RECORD] on the recording VCR.
6)Begin playback of the tape in the playing VCR.
7)To stop recording, press [STOP/EJECT P N] on the recording VCR,
then stop playback of the tape in the playing VCR.
Hint
• For best results during dubbing, use the VCR’s front panel controls whenever possible. The
remote control might affect the playing VCR’s operation.
• Always use video-quality shielded cables with RCA-type connectors. Standard audio cables are
not recommended.
• You can use a video disc player, satellite receiver, or other audio/video component with A/V outputs.
• “L1” or “L2” is found before the lowest memorized channel. (Example: CH02)
• "L2" input jacks are on the front of this unit.
EN
2006/0/23 6:20:33
10. Special Features
Time Search
Index Search
You can skip the program backward
and forward by the Index Mark.
• Insert a tape into this unit.
1
INDEX SEARCH
SEARCH
-MODE
1
––
TIME SEARCH
SEARCH
-MODE
Press once.
Auto Repeat
You can search backward and
forward a specific length of
time on a tape.
• Insert a tape into this unit.
–:––
This function will playback a
tape repeatedly from the beginning when the tape reaches to
the end.
• Insert a tape into this unit.
1
MENU
Press twice.
PLAY
STOP
or
2
INDEX SEARCH
PLAY
STOP
2 Select the desired length
03
of time for fast forwarding
or rewinding.
or
TIME SEARCH
CURRENT PROGRAM
Beginning
of tape
PLAY
STOP
01 ~ 20
End
of tape
2:50
2
F.FWD
02
01
01
02
or
03
To fast forward
3
F.FWD
REW
3
To rewind
To fast forward
REW
Hint
After searching,
PLAYB
Hint
AUTO REPEAT B
F.FWD
After searching,
4
-MENU-
0:01~ 9:59
(1 minute~9 hours
and 59 minutes)
INDEX MARK
To rewind
TIMER PROGRAMMING
BAUTO REPEAT [ON]
CHANNEL SET UP
CLOCK SET
LANGUAGE SELECT
Pro.1 Pro.2 Pro.3 Pro.4 Pro.5
3
-MENU-
TIMER PROGRAMMING
BAUTO REPEAT [OFF]
CHANNEL SET UP
CLOCK SET
LANGUAGE SELECT
4
PLAYB
• To cancel Auto Repeat, follow steps 1-2
above. Then, press [F.FWD g] so that
[OFF] appears beside AUTO REPEAT.
Press [C.RESET/EXIT] to exit.
• If menu remains on the TV screen at step
3), press [C.RESET/EXIT] to exit.
• The unit records an index mark at the
beginning of the recording when you make
a recording. There should be time gap
between index marks for the Index Search.
Hints for Index Search & Time Search
•T
hese functions are not available during recording.
• Press [STOP C] to stop the search.
• If the end of the tape is reached during a Search, the VCR will cancel the search
and rewind the tape.
CMWV405_HJ34RCD_EN.indd 7
--
EN
2006/0/23 6:20:34
11. Information
Maintenance
LIMITED WARRANTY
FUNAI CORP. will repair this product, free of charge in CANADA in the event of defect in materials or workmanship as
follows :
DURATION :
PARTS :
LABOR :
FUNAI CORP. will provide parts to replace defective parts without charge for one (1) year
from the date of original retail purchase. Certain parts are excluded from this warranty.
FUNAI CORP. will provide the labor without charge for a period of ninety (90) days from the
date of original retail purchase.
LIMITS AND EXCLUSIONS :
This warranty is extended only to the original retail purchaser. A purchase receipt or other
proof of original retail purchase will be required together with the product to obtain service under this warranty.
This warranty shall not be extended to any other person or transferee.
This warranty is void and of no effect if any serial numbers on the product are altered, replaced, defaced, missing
or if service was attempted by AN UNAUTHORIZED SERVICE CENTER. This limited warranty does not apply to any
product not purchased and used in CANADA.
This warranty only covers failures due to defects in material or workmanship which occurs during normal use. It
does not cover damage which occurs in shipment, or failures which are caused by repairs, alterations or product
not supplied by FUNAI CORP., or damage which results from accident, misuse, abuse, mishandling, misapplication,
alteration, faulty installation, improper maintenance, commercial use such as hotel, rental or office use of this product or damage which results from fire, flood, lightning or other acts of God.
THIS WARRANTY DOES NOT COVER PACKING MATERIALS, ANY ACCESSORIES (EXCEPT REMOTE CONTROL),
ANY COSMETIC PARTS, COMPLETE ASSEMBLY PARTS, DEMO OR FLOOR MODELS.
Servicing
Auto Head Cleaning
If this unit become inoperative, do not try to
• This unit automatically cleans video heads
correct the problem by yourself. There are no
as you insert or remove a cassette, so you
user-serviceable parts inside. Turn off, unplug
can see a clearer picture.
the power plug, and please call our help line
• Playback picture may become blurred or
mentioned on page 1 to locate an Authorized
interrupted while the TV program recepService Center.
tion is clear. Dirt accumulated on the video
heads after long periods of use, or the usage
Cabinet Cleaning
of rental or worn tapes can cause this prob• Wipe the front panel and other exterior surlem. If a streaky or snowy picture appears
faces of the VCR with a soft cloth immersed
during playback, the video heads in your
in lukewarm water and wrung dry.
VCR may need to be cleaned.
• Never use a solvent or alcohol. Do not spray 1. Please visit your local Audio/Video store
insecticide liquid near the VCR. Such chemiand purchase a good quality VHS Video
cals may cause damage and discoloration to
Head Cleaner.
the exposed surfaces.
2. If a Video Head Cleaner does not solve
the problem, please call our help line mentioned on page 1 to locate an Authorized
Service Center.
NOTES:
•R
emember to read the instructions included
with the video head cleaner before use.
• Clean video heads only when problems
occur.
FUNAI CORP. AND ITS REPRESENTATIVES OR AGENTS SHALL IN NO EVENT BE LIABLE FOR ANY GENERAL,
INDIRECT OR CONSEQUENTIAL DAMAGES ARISING OUT OF OR OCCASIONED BY THE USE OF OR THE INABILITY
TO USE THIS PRODUCT. THIS WARRANTY IS MADE IN LIEU OF ALL OTHER WARRANTIES, EXPRESS OR
IMPLIED, AND OF ALL OTHER LIABILITIES ON THE PART OF FUNAI, ALL OTHER WARRANTIES INCLUDING THE
WARRANTY OF MERCHANTABILITY AND FITNESS FOR A PARTICULAR PURPOSE, ARE HEREBY DISCLAIMED BY
FUNAI AND ITS REPRESENTATIVES IN CANADA.
ALL WARRANTY INSPECTIONS AND REPAIRS MUST BE PERFORMED BY AN AUTHORIZED SERVICE CENTER.
THIS WARRANTY IS ONLY VALID WHEN THE UNIT IS CARRIED-IN TO AN AUTHORIZED SERVICE CENTER.
THE PRODUCT MUST BE ACCOMPANIED BY A COPY OF THE ORIGINAL RETAIL PURCHASE RECEIPT. IF NO
PROOF OF PURCHASE IS ATTACHED, THE WARRANTY WILL NOT BE HONORED AND REPAIRS COSTS WILL BE
CHARGED.
ATTENTION :
FUNAI CORP. RESERVES THE RIGHT TO MODIFY ANY DESIGN OF THIS PRODUCT WITHOUT PRIOR
NOTICE.
To locate your nearest Authorized Service Center or for general service inquiries, please contact us at :
FUNAI CORPORATION
Customer Service
Tel: 1-800-605-8610
http://www.funai-corp.com
19900 Van Ness Avenue, Torrance, CA 90501
-CMWV405_HJ34RCD_EN.indd 8
EN
2006/0/23 6:20:34