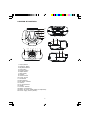
1
Portable CD / Radio Boombox Instruction Manual Model- MCD306 Thank you for yur purchase of this Magnasonic product. Please read this Instruction Manual carefully before using this Magnasonic product to ensure proper use. After reading this manual, please keep it in a safe place and refer to it when necessary. For additional information on this product or for help with set-up please call the Customer Help Line at 1-800-287-4871 Visit www.magnasonic.ca for more information about our great products IMPORTANT SAFETY INSTRUCTIONS WARNING: TO PREVENT FIRE OR SHOCK HAZARD, DO NOT USE THIS PLUG WITH AN EXTENSION CORD, RECEPTACLE OR OTHER OUTLET UNLESS THE BLADES CAN BE FULLY INSERTED TO PRESENT BLADE EXPOSURE. TO PREVENT FIRE OR SHOCK HAZARD. DO NOT EXPOSE THIS APPLIANCE TO RAIN OR MOISTURE. WARNING RISK OF ELECTRIC SHOCK DO NOT OPEN This lightning flash with arrowhead symbol, within an equilateral triangle, is intended to alert the user to the presence of uninsulated "dangerous voltage" within the product's enclosure that may be of sufficient magnitude to constitute a risk of electric shock persons. Warning: to reduce the risk of electric shock, do not remove cover (or back) no user-serviceable parts inside. Refer servicing to qualified service personnel. 1. 2. 3. 4. 5. 6. 7. The exclamation point within an equilateral triangle is intended to alert the user to the presence of important operating and maintenance (servicing) instructions in the literature accompanying the appliance. Read these instructions. Keep these instructions. Heed all warnings. Follow all instructions. Do not use this apparatus near water. Clean only with dry cloth. Do not block any ventilation openings. Install in accordance with the manufacturer's instructions. 8. Do not install near any heat sources such as radiators, heat registers, stoves, or other apparatus (including amplifiers) that produce heat. 9. Do not defeat the safety purpose of the polarized or grounding type plug. A polarized plug has two blades with one wider than the other. A grounding type plug has two blades and a third grounding prong. The wide blade or the third prong are provided for your safety. If the provided plug does not fir into your outlet, consult an electrician for replacement of the obsolete outlet. 10. Protect the power cord from being walked on or pinched particularly at the plugs, convenience receptacles, and at the point where they exit from the apparatus. 11. Only use attachments/accessories specified by the manufacturer. 12. Unplug the apparatus during lightening sorts or when unused for long periods of time. 13. Refer all servicing to qualified personnel. Servicing is required when the apparatus has been damaged in any way, such as power supply cord or plug is damaged, liquid has been spilled or objects have fallen into the apparatus, the apparatus has been exposed to rain or moisture, does not operate normally, or has been dropped. 14. This appliance shall not be exposed to dripping or splashing water and that no object filled with liquids such as vases shall be placed on apparatus. CAUTION: TO PREVENT ELECTRICAL SHOCK, MATCH WIDE BLADE PLUG TO WIDE SLOT AND FULLY INSERT. 1 PRECAUTIONS DEAR CONSUMER: PLEASE READ THE FOLLOWING INSTRUCTIONS TO BETTER UNDERSTAND THE FUNCTIONS OF THIS PRODUCT. AFTER READING THESE INSTRUCTIONS, PLEASE KEEP THEM FOR FUTURE REFERENCE. Please take good note of the following instructions: water. • The unit must be connected to the power voltage which is the same as the local • Avoid strong magnetic fields, e.g. near TVs area. If not, there is a danger of "burning" or Speakers for other units. the unit that causes a fire. • Avoid using strong chemical agents to clean. • Do not expose to the temperature higher than 35ºC. • Do not grease or oil components, running • Avoid installation near heaters or in areas mechanisms, etc. The CD player is designed to be maintenance free. subjected to direct sunlight. • Take the unit to approved service point for • Ensure good air circulation. • Protect the unit from dust, moisture and servicing. DRIPPING WARNING The product shall not be exposed to dripping or splashing and that no objects filled with liquids, such as vases, shall be placed on the product. VENTILATION WARNING The normal ventilation of the product shall not be impeded for intended use. LASER SAFETY This unit employs a laser. Only qualified service personnel should attempt repair. CAUTION CLASS 1 LASER PRODUCT Use of Controls or adjustments or performance of procedures other than those specified herein may result in hazardous radiation exposure. DANGER: INVISIBLE LASER RADIATION WHEN OPEN AND INTERLOCK FAILED OR DEFEATED. AVOID DIRECT EXPOSURE TO BEAM. CAUTION: HAZARDOUS LASER RADIATION WHEN OPEN AND INTERLOCK DEFEATED. CLASS 1 LASER PRODUCT LUOKAN 1 LASERLAITE KLASS 1 LASERAPPARAT CAUTION CLEANING: Always disconnect unit from power supply before attempting to clean it. Use soft cloth moistened with soapy water, wipe gently. Do not use solvents or abrasive materials. This Class B digital apparatus complies with Canadian ICES-003. 2 LOCATION OF CONTROLS 14 16 15 11 13 8 4 5 3 7 6 2 1 18 17 20 19 9 8 10 1. 2. 3. 4. 5. 6. 7. 8. 9. 10. 11. 12. 13. 14. 15. 16. 17. 18. 19. 20. Skip-up Button Skip-down Button Play/Pause Button Stop Button Program Button Repeat Button LED Display Speaker Volume Control Tuning Control Dial Pointer Band Selector FM Stereo Indicator Antenna CD Compartment Handle Function Selector Battery Compartment Built-in AC Cord (Inside Battery Compartment) Power Supply Switch (AC/DC) 3 12 POWER SUPPLY AND CONNECTION Battery Operation Set power supply switch to "DC" position. Remove battery compartment cover. Insert 8 "c" size batteries, noting the correct polarity as indicated inside the battery compartment. Replace the battery compartment cover. Note: Check your batteries regularly, old or discharged batteries should be replaced. If the unit is not going to be used for some time or is being run exclusively on AC power, remove the batteries to avoid leakage and damage. To remove batteries from compartment, open the cover and simply shake the unit gently or place it slightly downward. Alkaline batteries are recommended to operate this unit AC Operation Set power supply switch to "AC" position. Take the supplied AC Power Cord and connect the corresponding end to household mains outlet. Make sure the voltage is compatible. RADIO OPERATION Operation Set Function Selector switch to RADIO position. Select the desired radio frequency band using the Band Selector. Rotate Tuning Control to move the Dial Pointer to the station frequency you desire. Adjust Volume Control to the desired level. To turn off the radio, set Function Selector switch to OFF position. Antenna For FM stations, extend the Telescopic Antenna to full length, adjust the angle and direction for the best reception. Note that AM station signals are picked up through the built-in ferrite antenna. You may have to orientate the set to obtain the clearest reception. PLAYING A CD Getting Started 1. Set the Function Selector switch to CD position. Place a CD, with the label facing up, on the CD bracket. Close the CD mechanism door. 2. The display will show the total number of tracks on the disc. 3. Do not move or shake the player while it's playing a CD, otherwise it may not function properly. General Operation Play/Pause Button Press once to start disc playback. The indicator to the bottom right of the track number indicator will turn on. Press the Play key twice to pause playback temporarily. The indicator will start to flash. Press the Play key again to resume playback. Stop Button Press to stop playback. Total number of tracks will be displayed once again on the LED display. 4 Skip Up Button Press and release skip up key to go to next track. Press and hold skip up key to fast forward through the track being played. Alternatively, in Stop mode, press the Skip Up key repeatedly to choose the track you want to play and press the Play key once to start playback from the track you have chosen. Skip Down Button Press and release skip down key to go back to the beginning of the track being played. Press twice to go back to previous track. Press and hold skip down key to fast reverse through the current track being played. Repeat 1 Press Repeat key once, the current track will be repeated. The indicator between the two track number indicators will start to flash. Repeat All Press repeat key twice, all tracks will be repeated. The indicator between the two track number indicators will turn on. Press repeat key again to cancel the repeat mode and return to normal playback function. Programmed Playback In stop mode, press PROGRAM button, the track no. on display will flash. Use the SKIP UP/ SKIP DOWN button to choose a track you wish to program, then press PROGRAM button again to store the track you have selected into memory. Repeat the above steps to program additional tracks. Maximum 20 tracks can be programmed. Press play button to start programmed playback. The tracks will play in the order that you have selected. To clear the program memory, press STOP button or open the CD door. MAINTENANCE & CARE 1. Check your batteries regularly, old or discharged batteries should be replaced. If the unit is not going to be used for some time or is being run exclusively on alternative power, remove the batteries to avoid leakage and damage. 2. Electronic products of this kind should never be subjected to extreme temperatures or high humidity to ensure normal functioning and a long life-time. For instance, this set should not be placed in bathing areas, nor close to stoves and radiators. 3. If necessary, clean the unit with a piece of cloth dampened with water only. (Be sure the AC Power Cord is disconnected from the Power) Never use a polish nor a strong detergent as this will damage the finish of the cabinet. IMPORTANT Since CD circuitry may cause interference to order radio tuners nearby, switch this unit off when not in use or move it away from the affected radio tuner. Note: This digital apparatus does not exceed the Class B limits for radio noise emissions from digital apparatus as set out in the Radio Interference Regulations of Industry Canada. These limits are designed to provide reasonable protection against harmful interference in a residential installation. This equipment generates, uses and can radiate radio frequency energy and, if not installed and used in accordance with the instructions, may cause harmful interference to radio communications. However, there is no guarantee that interference will not occur in a particular installation. If this equipment does cause harmful interference to radio or television (which can be determined by turning the equipment off), the user is encouraged to try to correct the interference by one or more of the following measures: Reorient or relocate the receiving antenna. Increase the separation between the equipment and receiver. Connect the equipment into an outlet on a circuit different from that to which the receiver is connected. Consult the dealer or an experienced radio / TV technician for help. 5 MAGNASONIC HOME ENTERTAINMENT WARRANTY We appreciate your purchase of a MAGNASONIC Home Entertainment product. We take pride in the quality of our products and have manufactured your new Home Entertainment unit to exacting quality standards. We feel confident that in normal use, it will provide you with satisfactory performance. However, should you experience difficulty, you are protected under the provisions of this warranty. MAGNASONIC Home Entertainment products are warranted against manufacturing defects in materials and workmanship in normal use for the following period from the date of purchase by the original user, and is conditional upon the unit being installed and used as directed in the instruction manual. Product Parts and Labour Audio Products Remote Control Clock Radios 1 year 90 days 1 year MAGNASONIC’s obligation under this warranty shall of the labour connected therewith, or at our option evidence of a manufacturing defect within the warranty Replacement parts, furnished in connection with this portion of the original equipment warranty. be limited to the repair, including all necessary parts and the cost the exchange of any Home Entertainment product which shows period. warranty shall be warranted for a period equal to the unexpired CUSTOMER OBLIGATIONS This warranty applies to the product from the original date of purchase at retail. Therefore, the owner must provide a copy of the original, dated bill of sale. No warranty service will be performed without a bill of sale. Transportation to and from the service depot is the responsibility of the owner. WARRANTY EXCLUSIONS This warranty is extended to MAGNASONIC Home Entertainment products purchased and used in Canada. This warranty shall not apply to appearance or accessory items including but not limited to: antenna, cabinet, cabinet parts, knobs, batteries, connecting cables, cassette tapes, compact discs. This warranty shall, in addition, not apply to damages due to handling, transportation, unpacking, set-up, installation, customer adjustments that are covered in the instruction book, repair or replacement of parts supplied by other than the MAGNASONIC authorized service depot, any malfunction or failure caused by or resulting from abnormal environmental conditions, improper unauthorized service, improper maintenance, modifications or repair by the consumer, abuse, misuse, neglect, accident, fire, flood, or other Acts of God, and incorrect line voltage. This Home Entertainment product is only warranted to the original retail purchaser. This warranty becomes void in the event of commercial or rental use. This warranty becomes void in the event serial numbers are altered, defaced or removed. MAGNASONIC reserves the right to make changes in design or to make additions to or improvements upon this product without incurring any obligation to install the same on products previously manufactured. The foregoing is in lieu of all other warranties expressed or implied and MAGNASONIC neither assumes nor authorizes any person to assume for it any other obligation or liability in connection with the sale or service of this product. In no event shall MAGNASONIC or its MAGNASONIC dealers be liable for special or consequential damage arising from the use of this product, or for any delay in the performance of this warranty due to cause beyond our control. The purchaser may have other rights under existing provincial or federal laws, and where any terms of this warranty are prohibited by such laws, they are deemed null and void, but the remainder of the warranty shall remain in effect. HOW TO OBTAIN SERVICE Should this product require service, you may obtain specific information on how to obtain service by contacting the MAGNASONIC Dealer from whom this product was purchased, or by contacting us directly: SONIGEM SERVICE 300 Alden Road Markham, Ontario L3R 4C1 PHONE: (905) 940-5089 FAX: (905) 940-2303 1-800-287-4871 Lecteur CD avec radio AM/FM GUIDE D’UTILISATION MCD306 Merci d’avoir acheté cet appareil de marque Magnasonic. Veuillez lire attentivement le présent guide avant de faire fonctionner l’appareil pour la toute première fois afin de vous assurer de l’utiliser correctement. Une fois que vous aurez pris connaissance de ce guide, conservez-le dans un endroit sûr afin de pouvoir vous y référer au besoin. Pour obtenir de l’information additionnelle concernant cet appareil ou pour des conseils et de l’aide au sujet de l’installation et du raccordement, veuillez contacter notre service d’assistance à la clientèle au 1-800-287-4871. Visitez le site www.magnasonic.ca pour obtenir plus de renseignements sur nos formidables produits. IMPORTANTES CONSIGNES DE SÉCURITÉ AVERTISSEMENT: POUR PRÉVENIR LES CHOCS ÉLECTRIQUES, N’UTILISEZ PAS CETTE FICHE POLARISÉE AVEC UNE RALLONGE, UNE PRISE DE COURANT OU UNE AUTRE SORTIE DE COURANT, SAUF SI LES LAMES PEUVENT ÊTRE INSÉRÉES À FOND SANS EN LAISSER AUCUNE PARTIE À DÉCOUVERT. AFIN D’ÉVITER TOUT RISQUE D’INCENDIE OU D’ÉLECTROCUTION, N’EXPOSEZ PAS CET APPAREIL À LA PLUIE NI À L’HUMIDITÉ. ATTENTION RISQUE DE CHOC ÉLECTRIQUE NE PAS OUVRIR Le symbole représentant un éclair dans un triangle équilatéral a pour but d’avertir l’utilisateur du danger présenté par des pièces non isolées à l’intérieur de l’appareil et dont la tension est suffisante pour provoquer des décharges électriques dangereuses. 1. 2. 3. 4. 5. 6. 7. Attention: afin de réduire les risques de choc électrique, ne retirez pas le couvercle (ou le panneau arrière). Cet appareil ne contient aucune pièce pouvant être réparée par l’utilisateur. Confiez l’appareil à du personnel qualifié. Le point d’exclamation dans un triangle équilatéral a pour but d’avertir l’utilisateur que des instructions importantes relatives à l’utilisation et à l’entretien se trouvent dans le manuel accompagnant l’appareil. Lisez les instructions. Conservez les instructions. Tenez compte de ces mises en garde. Respectez les directives. N’utilisez pas cet appareil près de l’eau. Utilisez un chiffon propre et sec pour nettoyer cet appareil. N’obstruez pas les orifices d’aération de cet appareil. Installez-le en suivant les directives contenues dans le présent guide d’utilisation. 8. N’installez pas cet appareil à proximité de sources de chaleur, comme des radiateurs, bouches de chauffage, cuisinières ou autres appareils dégageant ou générant de la chaleur. 9. Cet appareil est doté d’une fiche polarisée de courant alternatif (une lame est plus large que l’autre) qui ne peut se brancher sur la prise que d’une seule façon. Ceci est un dispositif de sûreté, n’essayez pas de neutraliser l’objectif sécuritaire de la fiche polarisée S’il vous est impossible de la brancher sur la prise, essayez de l’inverser. Si c’est toujours impossible, demandez à un électricien de remplacer la prise désuète. 10. Le cordon d’alimentation doit être acheminé de façon à ne pas être écrasé ni coincé. Il faut aussi faire attention aux fiches, prises et points de sortie de l’appareil. 11. N’utilisez que les accessoires recommandés par le fabricant de cet appareil. 12. Débranchez l’appareil du réseau électrique lors d’orages électriques ou si vous ne prévoyez pas utiliser l’appareil pendant un certain temps. 13. Confiez la réparation de cet appareil à du personnel qualifié. Cet appareil doit être réparé s’il a subi quel que dommage que ce soit ; le cordon d’alimentation ou la fiche du cordon est endommagé, du liquide ou un objet a pénétré dans l’appareil, ce dernier a été exposé à la pluie ou à l’humidité, l’appareil ne semble pas fonctionner normalement ou il est tombé au sol. 14. Cet appareil ne doit pas être exposé à un liquide qui dégoutte ou éclabousse et aucun objet rempli de liquide - tel un vase à fleurs - ne doit être placé sur cet appareil. ATTENTION: POUR ÉVITER LES CHOCS ÉLECTRIQUES, INTRODUIRE LA LAME LA PLUS LARGE DE LA FICHE DANS LA BORNE CORRESPONDANTE DE LA PRISE ET POUSSER JUSQU’AU FOND. 1 PRÉCAUTIONS À PRENDRE AVERTISSEMENT: AFIN DE RÉDUIRE LES RISQUES D’INCENDIE OU D’ÉLECTROCUTION, N’EXPOSEZ CET APPAREIL NI À LA PLUIE NI À L’HUMIDITÉ. CHER CLIENT: VEUILLEZ LIRE ATTENTIVEMENT LES DIRECTIVES CONTENUES DANS LA PRÉSENT GUIDE AFIN DE BIEN COMPRENDRE LE FONCTIONNEMENT DES DIVERSES COMMANDES DE CET APPAREIL. APRÈS AVOIR LU CE DOCUMENT EN ENTIER, CONSERVEZ-LE AFIN DE POUVOIR VOUS Y RÉFÉRER AU BESOIN. Veuillez prendre note des consignes suivantes: • Cet appareil doit être branché sur une source de courant dont les paramètres lui conviennent. Si la tension du réseau électrique est supérieure, l’appareil risque d’être brûlé et provoquer un incendie. • N’exposez pas cet appareil à des températures supérieures à 35ºC. • Évitez d’installer ce lecteur CD à proximité d’appareils de chauffage ou dans des endroits où il serait exposé aux rayons directs du soleil. • Veillez à ce que l’aération de l’appareil soit suffisante. • Protégez l’appareil de la poussière, de l’humidité et l’eau. • Évitez de soumettre l’appareil à des champs magnétiques de forte magnitude, par exemple, près de téléviseur ou d’enceintes acoustiques. • Évitez d’utiliser des produits chimiques pour nettoyer l’appareil. • Aucun huile ne doit jamais être ajouté sur les composantes internes de l’appareil. Ce lecteur CD ne requiert aucun autre entretien qu’un nettoyage périodique. • Seuls les centres de service désignés sont autorisés à effectuer la réparation de l’appareil. PROTECTION CONTRE LES ÉCLABOUSURES Cet appareil ne doit pas être exposé à un liquide qui dégoutte ou éclabousse et aucun objet rempli de liquide - tel un vase à fleurs - ne doit être placé sur cet appareil. AVERTISSEMENT CONCERNANT L’AÉRATION Aucun objet ne doit obstruer les orifices assurant l’aération adéquate de l’appareil. PRÉCAUTION À PRENDRE AVEC LE LASER Ce lecteur de disques compacts est doté d’un faisceau laser qu’il emploie pour la lecture des disques. Seul un technicien qualifié peut réparer l’appareil étant donné le risque de blessure aux yeux par le laser. ATTENTION APPAREIL DOTÉ D’UNE COMPOSANTE LASER DE CLASSE 1 L’utilisation et l’ajustement des commandes de cet appareil, de même que la façon de le faire fonctionner, doivent être conformes aux instructions données dans le présent manuel. Toute dérogation pourrait entraîner une exposition dangereuse au rayon laser. CLASS 1 LASER PRODUCT LUOKAN 1 LASERLAITE KLASS 1 LASERAPPARAT ATTENTION NETTOYAGE: Débranchez toujours l’appareil du réseau électrique avant de le nettoyer. Pour procéder au nettoyage de l’appareil, utilisez un chiffon trempé dans de l’eau savonneuse, frottez avec précaution et asséchez la surface. N’utilisez jamais de solvants ni aucun autre nettoyant abrasif. 2 DANGER: CE SYMBOLE INDIQUE QUE L’APPAREIL EMET UN RAYONNEMENT LASER INVISIBLE ET DANGEREUX LORSQUE LA PORTE DU LECTEUR EST OUVERTE OU QUE LE VERROUILLAGE DE CELLE-CI EST ENDOMMAGÉ. ÉVITEZ TOUTE EXPOSITION AU FAISCEAU. ATTENTION: UN RAYONNEMENT LASER DANGEREUX PEUT ÉMANER DE L’APPAREIL LORSQUE LA PORTE DU LECTEUR EST OUVERTE OU LORSQUE LE DISPOSITIF DE VERROUILLAGE N’EST PAS CORRECTEMENT ENCLENCHÉ. DESCRIPTION DE L’APPAREIL ET DE SES COMMANDES 14 16 15 11 13 8 4 5 3 7 6 2 1 18 17 20 19 9 8 10 1. 2. 3. 4. 5. 6. 7. 8. 9. 10. 11. 12. 13. 14. 15. 16. 17. 18. 19. 20. Touche de saut piste suivante (SKIP UP) Touche de saut piste précédente (SKIP DOWN) Touche de lecture/pause (PLAY/PAUSE) Touche d’arrêt (STOP) Touche de programmation (PROGRAM) Touche de lecture répétée (REPEAT) Affichage DEL Haut-parleur Commande de volume Commande de syntonisation Curseur de l’échelle de syntonisation Sélecteur de bande Voyant de réception FM en stéréo Antenne télescopique de réception FM Plateau à disque du lecteur CD Poignée de transport Sélecteur de fonction Compartiment à piles Cordon d’alimentation CA (émanant du compartiment à piles) Sélecteur de tension (CA/CC) 3 12 SOURCE D’ALIMENTATION ET RACCORDEMENT Fonctionnement à partir de piles (CC) – Placez le sélecteur de tension à la position DC. – Ouvrez le compartiment à piles. – Placez huit (8) piles de format C dans le compartiment. Assurez-vous de placer les piles en respectant les polarités indiquées à l’intérieur du compartiment. – Remettez le couvercle du compartiment en place. Remarque: Vérifiez régulièrement l’état des piles. Les piles usagées ou épuisées doivent être remplacées. Si vous ne prévoyez pas utiliser l’appareil pendant un certain temps, ou l’alimenter exclusivement du réseau électrique de courant alternatif (CA), retirez les piles de l’appareil afin d’éviter qu’elles ne coulent et endommager ce dernier. Pour retirer les piles du compartiment, ouvrez celui-ci et secouez doucement l’appareil afin que les piles glissent hors du compartiment ou inclinez légèrement l’appareil. Nous vous recommandons fortement l’utilisation de piles alcalines avec cet appareil car elles durent plus longtemps. Fonctionnement à partir du courant alternatif (CA) – Placez le sélecteur de tension à la position CA. – Branchez le cordon d’alimentation CA de l’appareil sur une prise de courant domestique dont la tension convient à l’appareil. FONCTIONNEMENT DE LA RADIO Fonctionnement – Placez le sélecteur de fonction à la position RADIO. – Placez le sélecteur de bande à la position qui convient. – Tournez la commande rotative de syntonisation afin que le curseur se déplace sur l’échelle de syntonisation pour atteindre la fréquence de la station que vous souhaitez écouter. – Réglez la commande de volume au niveau désiré. Pour éteindre la radio, placez le sélecteur de fonction à la position OFF. Antenne La réception des stations diffusant sur la bande FM est assurée par l’antenne télescopique, allongez-la donc au maximum et orientez-la de manière à obtenir une réception de qualité optimale. La réception des stations diffusant sur la bande AM est assurée par l’antenne tige en ferrite incorporée au boîtier, faites pivoter l’appareil sur lui-même afin de déterminer la position procurant la meilleure réception. LECTURE DE DISQUES COMPACTS 1. Placez le sélecteur de fonction à la position CD. Déposez un disque compact sur le plateau à disque en veillant à ce que le côte portant l’étiquette soit sur le dessus. Fermez la porte du lecteur CD. 2. L’affichage indique le nombre total de pistes contenues sur le disque. 3. Ne secouez pas et ne déplacez pas l’appareil pendant que le lecteur CD effectue la lecture d’un disque sinon, l’appareil pourrait fonctionner incorrectement. 4 FONCTIONNEMENT GÉNÉRAL Touche de lecture/pause (PLAY/PAUSE) Appuyez une fois sur cette touche pour démarrer la lecture du disque. L’indicateur apparaîtra dans le coin inférieur droit de l’affichage. Appuyez deux fois sur la touche de lecture/pause (PLAY/PAUSE) pour interrompre momentanément la lecture du disque. L’indicateur se mettra à clignoter. Appuyez de nouveau sur la touche pour poursuivre la lecture. Touche d’arrêt (STOP) Appuyez sur cette touche pour arrêter la lecture. Le nombre total de pistes contenues sur le disque réapparaîtra à l’affichage DEL. Touche de saut piste suivante (SKIP UP) Appuyez sur cette touche et relâchez-la afin de faire passer le lecteur à la piste suivante. Appuyez sur cette touche et maintenez-la enfoncée pour que le lecteur entame un balayage rapide du disque, en marche avant. Appuyez à plusieurs reprises sur la touche de saut piste suivante (SKIP UP) pendant que le lecteur est en mode d’arrêt pour que ce dernier passe à chaque fois à la piste suivant celle où il se trouve. Une fois qu’il a atteint la piste désirée, appuyez sur la touche de lecture (PLAY) pour que l’appareil entamer la lecture de la piste en question. Touche de saut piste précédente (SKIP DOWN) Appuyez sur cette touche et relâchez-la afin de faire passer le lecteur au début de la piste en lecture. Appuyez deux fois sur la touche de saut piste précédente (SKIP DOWN) pour que l’appareil se positionne au début de la piste précédant celle où il se trouve. Appuyez sur cette touche et maintenez-la enfoncée pour que le lecteur entame un balayage rapide du disque, en marche arrière. Lecture répétée - une piste Appuyez une fois sur la touche de lecture répétée (REPEAT) et l’appareil entamera la lecture répétée de la piste où il se trouve. L’indicateur entre les deux chiffres composant le numéro de la piste clignotera à l’affichage. Lecture répétée - toutes les pistes Appuyez deux fois sur la touche de lecture répétée (REPEAT) et l’appareil entamera la lecture répétée de toutes les pistes contenues sur le disque. L’indicateur entre les deux chiffres composant le numéro de la piste s’allumera à l’affichage. Appuyez de nouveau sur la touche de lecture répétée (REPEAT) pour désactiver la fonction et poursuivre la lecture régulière du disque. Lecture programmée Lorsque l’appareil se trouve en mode d’arrêt, appuyez sur la touche de programmation (PROGRAM). Le numéro de la piste clignotera à l’affichage. Utilisez les touches de saut de piste suivante/précédente (SKIP UP/DOWN) pour sélectionner la première piste à programmer en mémoire. Lorsque le numéro de celle-ci apparaît à l’affichage, appuyez de nouveau sur la touche de programmation (PROGRAM) pour en confirmer la mise en memoire de la piste en question. Répétez cette procédure pour programmer en mémoire toutes les pistes de votre choix, jusqu’à concurrence de 20 pistes. Une fois terminé, appuyez sur touche de lecture (PLAY) afin d’entamer la lecture de pistes programmées en mémoire, dans l’ordre où vous les avez programmées. Pour effacer la programmation en mémoire, appuyez sur la touche d’arrêt/ouverture du plateau à disque (STOP/CD Open). 5 SOIN ET ENTRETIEN DE L’APPAREIL 1. Verifiez régulièrement l’état des piles. Les piles usagées ou épuisées doivent être remplacées. Si vous ne prévoyez pas utiliser l’appareil pendant un certain temps, ou l’alimenter exclusivement du réseau électrique de courant alternatif (CA), retirez les piles de l’appareil afin d’éviter qu’elles ne coulent et endommager ce dernier. 2. Les appareils électroniques comme celui-ci ne doivent jamais être soumis à des températures extrêmes ou un taux d’humidité elévé pour bien fonctionner pendant longtemps. Par exemple, cet appareil ne doit pas être utilisé dans une salle d’eau ou de bain ni à proximité d’une cuisinière ou appareil de chauffage. 3. Lorsque cela est nécessaire, nettoyez l’appareil à l’aide d’un chiffon humide. Assurez-vous auparavant de débrancher l’appareil du réseau électrique. N’utilisez jamais de poli ni de détergent fort pour nettoyer cet appareil car vous risquez ainsi d’endommage le fini du boîtier. IMPORTANT Le lecteur CD de cet appareil peut causer de l’interférence à d’autres récepteurs radio se trouvant à proximité. Si cela survient, éteignez l’appareil lorsque vous ne l’utilisez pas et/ou éloignez-le de l’appareil qui subit l’interférence. Remarque: Cet appareil a fait l’objet de tests qui ont déterminé qu’il est en conformité avec les limites imposées pour les appareils numériques de la classe B par les règlements d’Industrie Canada concernant l’interférence radio. Ces limites sont prescrites afin d’offrir une protection raisonnable contre toute interférence préjudiciable dans une installation résidentielle. Cet appareil produit, emploie et peut être la cause d’un rayonnement radioélectrique et, si l’installation et l’emploi ne sont pas conformes aux instructions, risque de présenter un brouillage nuisible aux radiocommunications. Toutefois, il est impossible de garantir qu’aucune interférence ne sera produite par une installation particulière. Si cet appareil est la source de brouillage nuisible à la réception des émissions radiophoniques ou télévisuelles, déterminé en allumant et en éteignant plusieurs fois de suite l’appareil, l’utilisateur pourra tenter de résoudre ce problème de brouillage par une des mesures suivantes: – Changer l’orientation ou l’installation de l’antenne de réception. – Eloigner davantage l’appareil du récepteur. – Brancher le cordon d’alimentation de l’appareil dans une prise ou sur un circuit séparé du récepteur. – Consulter le distributeur ou un technicien expérimenté en radio/TV pour assistance. 6