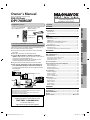
1
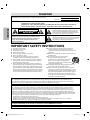
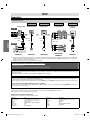
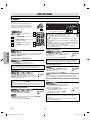
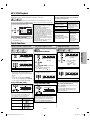
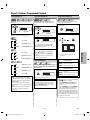
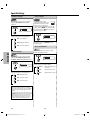
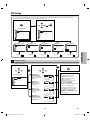
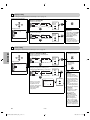
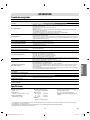
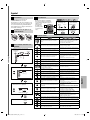
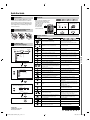
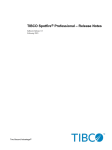
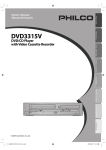
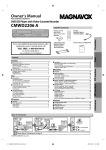
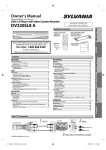
Owner’s Manual
Please read before using this unit.
DVD / CD Player
INSTRUCCIONES EN
ESPAÑOL INCLUIDAS.
DP170MGXF
Supplied Accessories
Contents
Connecting to RF Modulator (Not Supplied)
If your TV has antenna in jack only, it is still possible to
connect this unit to your TV by using an RF modulator. In
this case, follow the instructions below.
1) Disconnect the power cords of the devices from the
AC outlet.
2) Make the connection as illustrated below.
3) Set your RF modulator’s channel 3/4 switch to
either 3 or 4, whichever the TV channel is least used in
your area. If your RF modulator has a
modulator / antenna switch, set it according to the
manual supplied with the RF modulator.
4) Plug in the power cords of the devices to the AC outlet.
5) Turn on your TV and choose the same channel as
you set the RF modulator’s channel 3/4 switch to.
For more details, follow the manual supplied with the
RF modulator.
rear of this unit
RCA video cable
rear of TV
RCA audio cable
ANT. IN
rear of your RF
modulator
VHF / UHF
antenna
RF coaxial cable
or
cable TV
company
RF coaxial
cable
ANT. IN
3
4
CHANNEL
R
L
AUDIO IN
VIDEO IN
TO TV
Set channel 3 or 4
Note:
• RF modulator is not supplied with this unit. You need to
purchase it at your local store.
• The quality of picture may become poor if this unit is
connected to an RF modulator.
Connections .............................................................................. 6
Connection to a TV .................................................................................6
HDMI Audio ...............................................................................................7
HDMI Mode and Actual Output Signals .........................................7
Connection to an Audio System .......................................................8
Rear Terminals ..........................................................................................8
About the Remote Control ....................................................... 9
Remote Control .......................................................................................9
Installing the Batteries for the Remote Control ...........................9
PRECAUTIONS
SETUP
SETUP
Owner’s Manual
IMPORTANT SAFETY INSTRUCTIONS ....................................... 2
About the Discs ......................................................................... 5
Playable Discs ...........................................................................................5
Unplayable Discs .....................................................................................5
DVD FUNCTIONS
Playback .................................................................................. 10
MP3 / JPEG Playback ................................................................ 11
Search Functions ..................................................................... 11
Using Track / File / Folder Search.....................................................11
Using Title / Chapter Search ..............................................................11
Using Time Search .................................................................................11
On-Screen Display ................................................................... 12
Repeat / Random / Programmed Playback ............................ 13
Repeat Playback .....................................................................................13
Repeat A-B Playback .............................................................................13
Random Playback ..................................................................................13
Programmed Playback .........................................................................13
Special Settings ....................................................................... 14
Subtitle Language..................................................................................14
Audio Language .....................................................................................14
Camera Angles ........................................................................................14
Stereo Sound Mode ..............................................................................14
DVD Setting ............................................................................. 15
Language Setting...................................................................................15
Display Setting ........................................................................................16
Video Setting ...........................................................................................16
Audio Setting...........................................................................................17
Others Setting .........................................................................................18
DVD FUNCTIONS
owner’s manual
(1VMN27833)
PRECAUTIONS
INFORMATION
RCA audio / video cables
(WPZ0102TM018 /
WPZ0102LTE01)
Español
remote control (NB098UD)
AA (1.5 V DC) battery x 2
INFORMATION
Troubleshooting Guide ........................................................... 19
Specifications .......................................................................... 19
LIMITED WARRANTY................................................................ 20
Español .................................................................................... 23
Quick Use Guide.......................................................... Back Cover
If you need additional operating assistance after
reading this owner’s manual, please call
TOLL FREE : 1-800-605-8610
or visit our web site at
http://www.magnavox.com/support
© 2009 Funai Electric Co., Ltd.
E6MY0UD_DP170MGXF_EN_v3.indd 1
2009/08/10 11:41:30
PRECAUTIONS
The model and serial numbers of this unit may be found on the cabinet.
You should record and retain those numbers for future reference.
Model No.:
Serial No.:
WARNING:
TO REDUCE THE RISK OF FIRE OR ELECTRIC SHOCK, DO NOT EXPOSE THIS
APPARATUS TO RAIN OR MOISTURE.
APPARATUS SHALL NOT BE EXPOSED TO DRIPPING OR SPLASHING AND NO OBJECTS
FILLED WITH LIQUIDS, SUCH AS VASES, SHALL BE PLACED ON THE APPARATUS.
PRECAUTIONS
The lightning flash with arrowhead symbol, within an
equilateral triangle, is intended to alert the user to the
presence of uninsulated“dangerous voltage”within the
product’s enclosure that may be of sufficient magnitude
to constitute a risk of electric shock to persons.
CAUTION
RISK OF ELECTRIC SHOCK
DO NOT OPEN
CAUTION:
TO REDUCE THE RISK OF ELECTRIC SHOCK, DO NOT
REMOVE COVER (OR BACK). NO USER SERVICEABLE
PARTS INSIDE. REFER SERVICING TO QUALIFIED
SERVICE PERSONNEL.
The important note is located on the rear or bottom of the cabinet.
The exclamation point within an equilateral triangle is
intended to alert the user to the presence of important
operating and maintenance (servicing) instructions in
the literature accompanying the appliance.
IMPORTANT SAFETY INSTRUCTIONS
10. Protect the power cord from being walked on
or pinched particularly at plugs, convenience
receptacles, and the point where they exit from the
apparatus.
11. Only use attachments / accessories specified by the
manufacturer.
12. Use only with the cart, stand, tripod,
bracket, or table specified by the
manufacturer, or sold with the apparatus.
When a cart is used, use caution when
moving the cart / apparatus combination to
avoid injury from tip-over.
13. Unplug this apparatus during lightning storms or
when unused for long periods of time.
14. Refer all servicing to qualified service personnel.
Servicing is required when the apparatus has been
damaged in any way, such as power-supply cord or
plug is damaged, liquid has been spilled or objects
have fallen into the apparatus, the apparatus has
been exposed to rain or moisture, does not operate
normally, or has been dropped.
1.
2.
3.
4.
5.
6.
7.
Read these instructions.
Keep these instructions.
Heed all warnings.
Follow all instructions.
Do not use this apparatus near water.
Clean only with dry cloth.
Do not block any ventilation openings. Install in
accordance with the manufacture’s instructions.
8. Do not install near any heat sources such as radiators,
heat registers, stoves, or other apparatus (including
amplifiers) that produce heat.
9. Do not defeat the safety purpose of the polarized or
grounding-type plug. A polarized plug has two blades
with one wider than the other. A grounding type plug
has two blades and a third grounding prong. The wide
blade or the third prong are provided for your safety. If
the provided plug does not fit into your outlet, consult
an electrician for replacement of the obsolete outlet.
FCC WARNING
This equipment may generate or use radio frequency energy. Changes or modifications to this equipment may
cause harmful interference unless the modifications are expressly approved in the manual. The user could lose the
authority to operate this equipment if an unauthorized change or modification is made.
RADIO-TV INTERFERENCE
This equipment has been tested and found to comply with the limits for a Class B digital device, pursuant to Part
15 of the FCC Rules. These limits are designed to provide reasonable protection against harmful interference in a
residential installation. This equipment generates, uses, and can radiate radio frequency energy and, if not installed
and used in accordance with the instructions, may cause harmful interference to radio communications. However,
there is no guarantee that interference will not occur in a particular installation. If this equipment does cause harmful
interference to radio or television reception, which can be determined by turning the equipment off and on, the user
is encouraged to try to correct the interference by one or more of the following measures:
1) Reorient or relocate the receiving antenna.
2) Increase the separation between the equipment and receiver.
3) Connect the equipment into an outlet on a circuit different from that to which the receiver is connected.
4) Consult the dealer or an experienced radio / TV technician for help.
This Class B digital apparatus complies with Canadian ICES-003.
Cet appareil numérique de la classe B est conforme à la norme NMB-003 du Canada.
Disconnect the mains plug to shut off when find trouble or not in use. The mains plug shall remain readily operable.
EN
E6MY0UD_DP170MGXF_EN_v3.indd 2
–2–
2009/08/10 13:59:23
CAUTION: Danger of explosion if battery is incorrectly replaced. Replace only with the same or equivalent type.
WARNING: Batteries (Battery pack or battery installed) shall not be exposed to excessive heat such as sunshine, fire, or the like.
LASER SAFETY
This apparatus employs a laser. Only a qualified service person should remove the cover or attempt to service this
apparatus, due to possible eye injury.
CAUTION: Use of controls or adjustments or performance of procedures other than those specified herein may
result in hazardous radiation exposure.
CAUTION: Visible and invisible laser radiation when open and inter lock defeated. Do not stare into beam.
LOCATION: Inside, near the deck mechanism.
PRECAUTIONS
IMPORTANT COPYRIGHT INFORMATION
Unauthorized copying, broadcasting, public performance and lending of discs are prohibited. This product incorporates
copyright protection technology that is protected by U.S. patents and other intellectual property rights. Use of this
copyright protection technology must be authorized by Macrovision, and is intended for home and other limited
viewing uses only unless otherwise authorized by Macrovision. Reverse engineering or disassembly is prohibited.
Do not place the unit on the furniture that is capable of being tilted by a child and an adult leaning, pulling, standing
or climbing on it. A falling unit can cause serious injury or even death.
To Avoid the Hazards of Electrical Shock and Fire
• Do not handle the AC power cord with wet hands.
• Do not pull on the AC power cord when disconnecting it from an AC outlet. Grasp it by the plug.
• Do not put your fingers or objects into the unit.
Location and Handling
• Do not install the unit in direct sunlight, near strong magnetic fields, or in a place subject to dust or strong vibration.
• Avoid a place with drastic temperature changes.
• Install the unit in a horizontal and stable position. Do not place anything directly on top or bottom of the unit.
Depending on your external devices, noise or disturbance of the picture and / or sound may be generated if the unit is
placed too close to them. In this case, please ensure enough space between the external devices and the unit.
• Depending on the environment, the temperature of this unit may increase slightly. This is not a malfunction.
• Be sure to remove the disc and unplug the AC power cord from the outlet before carrying the unit.
Dew Condensation Warning
• Dew condensation may form inside the unit in the following conditions. If so, do not use this unit at least for a few
hours until its inside gets dry.
- The unit is moved from a cold place to a warm place.
- Under conditions of high humidity.
- After heating a cold room.
Note about Recycling
• This unit’s packaging materials are recyclable and can be reused. Please dispose of any materials in
accordance with your local recycling regulations.
• Batteries should never be thrown away or incinerated but disposed of in accordance with your local
regulations concerning chemical wastes.
Notice for Progressive Scan Output
• Consumers should note that not all high definition television sets are fully compatible with this product and may
cause artifacts to be displayed in the picture. In case of picture problems with 525(480) progressive scan output,
it is recommended that the user switch the connection to the ‘standard definition’ output. If there are questions
regarding your TV set compatibility with this 525p (480p) DVD player, please contact our customer service center.
–3–
E6MY0UD_DP170MGXF_EN_v3.indd 3
EN
2009/08/10 11:41:34
TRADEMARK INFORMATION
HDMI, the HDMI logo and
High-Definition Multimedia
Interface are trademarks or
registered trademarks of
HDMI Licensing LLC.
Manufactured under license from
Dolby Laboratories. Dolby and the
double-D symbol are trademarks of
Dolby Laboratories.
PRECAUTIONS
Products that have earned ENERGY STAR® are
designed to protect the environment through
superior energy efficiency.
is a trademark of DVD Format / Logo Licensing
Corporation.
SYMBOLS USED IN THIS MANUAL
The following symbols appear in some headings in this manual.
: Description refers to DVD-video.
: Description refers to audio CD.
MAINTENANCE
Servicing
• Please refer to relevant topics on the “Troubleshooting Guide”
on page 19 before returning the unit.
• If this unit becomes inoperative, do not try to correct the
problem by yourself. There are no user-serviceable parts inside.
Turn off, unplug the power plug, and please call our help line
mentioned on the front page to locate an authorized service
center.
Cleaning the Cabinet
• Wipe the front panel and other exterior surfaces of the unit
with a soft cloth.
• Never use a solvent, thinner, benzene or alcohol to clean the
unit. Do not spray insecticide liquid near the unit.
Such chemicals may discolor the surface or damage the unit.
Cleaning Discs
• When a disc becomes dirty, clean it with a cleaning cloth.
Wipe the disc from the center to out. Do not wipe in a circular
motion.
• Do not use solvents such as benzine, thinner, commercially
available cleaners, detergent, abrasive cleaning agents or
antistatic spray intended for analog records.
Cleaning the Disc Lens
• If this unit still does not perform properly although you refer
to the relevant sections and to “Troubleshooting Guide” in
this owner’s manual, the laser optical pickup unit may be
dirty. Consult your dealer or an authorized service center for
inspection and cleaning of the laser optical pickup unit.
: Description refers to DVD, CD-RW/-R with MP3 files.
Disc Handling
: Description refers to DVD, CD-RW/-R with JPEG
files.
• When you handle a disc, hold it by its edge and try not to
touch the surface of the disc.
• Always store the disc in its protective case when not in use.
© 2009 Funai Electric Co., Ltd.
All rights reserved. No part of this manual may be reproduced,
copied, transmitted, disseminated, transcribed, downloaded
or stored in any storage medium, in any form or for any
purpose without the express prior written consent of Funai.
Furthermore, any unauthorized commercial distribution of this
manual or any revision hereto is strictly prohibited.
Information in this document is subject to change without
notice. Funai reserves the right to change the content herein
without the obligation to notify any person or organization of
such changes.
with the
design is a registered trademark of
Funai Electric Co., Ltd and may not be used in any way without
the express written consent of Funai. All other trademarks
used herein remain the exclusive property of their respective
owners. Nothing contained in this manual should be construed
as granting, by implication or otherwise, any license or right
to use any of the trademarks displayed herein. Misuse of any
trademarks or any other content in this manual is strictly
prohibited. Funai shall aggressively enforce its intellectual
property rights to the fullest extent of the law.
EN
E6MY0UD_DP170MGXF_EN_v3.indd 4
–4–
2009/08/10 14:07:01
About the Discs
Playable Discs
Mark (logo)
DVD-video
*1, 2, 4, 6, 8
DVD+RW
DVD+R
*1, 4, 5, 6, 7, 8
Region code
or
Recorded
signals
Disc size
DVD-Video
digital video
(MPEG2)
digital video
(MPEG2)
or
MP3 / JPEG
Disc types
e.g.)
5 inches
(12 cm)
or
3 inches
(8 cm)
DVD
e.g.)
*4, 6, 8
MP3/JPEG
*4, 5, 6, 7, 8
e.g.)
title 2
folder 1
folder 2
file 2
file 3
file 4
file 1
file 2
digital audio
or
MP3 / JPEG
5 inches
(12 cm)
or
3 inches
(8 cm)
track 2
track 3
track 4
track 5
track 6
file 4
file 1
e.g.)
track 1
MP3/JPEG
e.g.)
file 1
Kodak
Picture CD
title 1
digital audio
audio CD
CD-RW
CD-R
title 2
chapter 1 chapter 2 chapter 3 chapter 4 chapter 1 chapter 2
file 1
audio CD
title 1
chapter 1 chapter 2 chapter 3 chapter 4 chapter 1 chapter 2
PRECAUTIONS
Type of
media
folder 1
file 2
file 3
folder 2
file 2
JPEG
*4, 5, 6, 7, 8
is a trademark of DVD Format / Logo Licensing Corporation.
is trademark of Eastman Kodak Company.
If you cannot play back a disc which bears one of the marks above, check the following notes.
*1: This unit conforms to the NTSC color system. Discs recorded in other color systems such as PAL cannot be played back.
*2: Certain DVD-video do not operate as described in this manual due to the intentions of the disc’s producers.
*3: Discs recorded in the VR (Video Recording) format cannot be played back.
*4: Scratched or stained discs may not be played back.
*5: Some discs cannot be played back because of incompatible recording conditions, characteristics of the recorder or special
properties of discs.
*6: You can play back discs which bear the marks above. If you use non-standardized discs, this unit may not play them back. Even
if they are played back, the sound or video quality will be compromised.
*7: If the recorded portion of the disc is too small (smaller than 2-3/16 inches (55mm) across), it may not be played back.
*8: Do not glue paper or put stickers on to the disc. These may damage the disc, and the unit may not read it correctly.
Unplayable Discs
NEVER play back the following discs as malfunction may result!
DVD-RAM / DVD-audio / CD-i / photo CD / DVD with region codes other than 1 or ALL / DTS-CD / DVD-ROM for personal computers
/ CD-ROM for personal computers / HD DVD / Blu-ray Disc
On the following disc, the sound MAY NOT be heard.
super audio CD
Any other discs without compatibility indications
Note:
• Only the sound recorded on the normal CD layer can be delivered. The sound recorded on the high density super audio CD layer
cannot be delivered.
–5–
E6MY0UD_DP170MGXF_EN_v3.indd 5
EN
2009/08/10 11:41:35
SETUP
Connections
Connection to a TV
Method 1
analog audio standard picture
Method 2
Method 3*1
Method 4*2
good picture
better picture
best audio /
picture
TV
AUDIO IN
VIDEO IN
COMPONENT
VIDEO IN
L
COMPONENT
VIDEO IN
S-VIDEO IN
HDMI IN
Y
Y
R
or
and
or
CB
or
CR
RCA audio
cable
RCA video
cable
S-video
cable
RCA component
video cable
PB
or
PR
HDMI
cable
SETUP
This unit
AUDIO OUT
VIDEO
OUT
S-VIDEO
OUT
VIDEO OUT
S-VIDEO OUT
COMPONENT
VIDEO OUT
HDMI OUT
*1 This unit is compatible with the progressive scan system. The feature provides you with the higher quality pictures than traditional
output system does. To utilize this feature, a component connection is required. Refer to “HDMI Video Resolution” or “ Progressive ”
setting on page 18 to set the video resolution.
2
* Analog audio connection is not required for this connection.
Supplied cables used in this connection are as follows:
• RCA audio cable (L/R) x 1
• RCA video cable x 1
Please purchase the rest of the necessary cables at your local store.
Note:
• Connect this unit directly to your TV. If RCA audio / video cables are connected to a VCR, pictures may be distorted due to the copy
protection system.
• Changing “ Progressive ” setting is not available while HDMI cable is connected.
If your TV is compatible with 525 (480) progressive scanning and you want to enjoy that high quality picture;
You must select the connection COMPONENT VIDEO OUT above and progressive scanning mode. To set the mode, set “Progressive”
to “On” in “Video” menu. Refer to pages 15-16 for more details.
• When “Progressive” is “On”, video signals from the unit’s VIDEO OUT and S-VIDEO OUT jacks will be distored or not be output at all.
If your TV is not compatible with progressive scanning;
Use this unit in interlace mode and set “Progressive” to “Off” in “Video” menu or by pressing and holding [PLAY B] on the front of
the unit for more than 5 seconds.
After connecting to your TV:
You will need to switch to video input on your TV. This is usually marked TV / VIDEO, INPUT or AUX.
Please refer to your TV’s owner’s manual for details.
Input modes for common TV brands:
Listed below are inputs for common brand name TV’s.
Admiral:
Curtis Mathis:
GE:
Hitachi:
JVC:
Kenwood:
LXI-Series:
Magnavox:
EN
E6MY0UD_DP170MGXF_EN_v3.indd 6
AUX
LINE1, LINE2, 00, 90, 91, 92, 93
INPUT, TV / VCR, 00, 90, 91, 92, 93
INPUT, AUX
VIDEO, VIDEO1, VIDEO2, VIDEO3
AUX
00
AUX CHANNEL
Panasonic:
RCA:
Samsung:
Sanyo:
Sharp:
Sony:
Toshiba:
Zenith:
TV / VIDEO
INPUT, TV / VCR, 00, 90, 91, 92, 93
TV / VIDEO
VIDEO
00
VIDEO1, VIDEO2, VIDEO3
TV / GAME
00
–6–
2009/08/10 11:41:37
HDMI Audio
Media
HDMI Audio Setting
Audio Recording Format
Bistream
LPCM
Dolby Digital
Dolby Digital
Multi PCM
LPCM
Multi PCM
Multi PCM
audio CD
2ch PCM
2ch PCM
MP3
2ch PCM
2ch PCM
DVD-Video
HDMI Mode and Actual Output Signals
Press [HDMI] to change the resolution of the video signal being output from the HDMI OUT. The video resolution
changes as follows every time [HDMI] is pressed. Or change the setting in the “Resolution” in the settings menu.
480p
720p
480p
1080i
480p
1080p
SETUP
480p
e.g.) when 480p is selected as an default.
Copyright protection system
To play back the digital video images of DVD-video via an HDMI connection, it is necessary that both the
player and the display device (or an AV receiver / amplifier) support a copyright protection system called HDCP
(highbandwidth digital content protection system). HDCP is copy protection technology that comprises data encryption
and authentication of the connected AV device. This unit supports HDCP. Please read the operating instructions of your
display device (or AV receiver / amplifier) for more information.
Note:
• When using HDCP-incompatible display device, the picture will not be viewed properly.
• The audio signals from the HDMI jack (including the sampling frequency, the number of channels and bit length)
may be limited by the device that is connected.
• Among the display device(s) that support HDMI, some do not support audio output (for example, projectors). In
connections with device such as this unit, audio signals are not output from the HDMI output jack.
• When this unit’s HDMI jack is connected to a DVI-D compatible display device(s) (HDCP compatible) with an HDMIDVI
converter cable, the signals are output in digital RGB.
• Pressing [HDMI] does not work when HDMI cable is not connected, or when no video signal is being output from
the HDMI OUT jack.
• Pressing [HDMI] does not work when a DVI compatible display devices is connected. Change the video resolution in
the “Resolution” in the settings menu.
• When you make a selection, the TV monitor temporarily goes blank and then comes back again. If it does not, press
[HDMI] repeatedly to change the resolution or press and hold [ PLAY B] on the front panel for 5 seconds to
change the setting back to its default.
–7–
E6MY0UD_DP170MGXF_EN_v3.indd 7
EN
2009/08/10 11:41:42
Connection to an Audio System
Analog Audio Connection
Digital Audio Connection
stereo system
Dolby Digital decoder,
MD deck or DAT deck
Audio
COAXIAL
digital audio
input jack
analog audio
input jacks
L
R
digital audio
coaxial cable
RCA audio cable
DIGITAL
AUDIO OUT
This unit
Setup > Audio>
Connection
L
SETUP
AUDIO OUT
Setting
Connecting to a Dolby Digital decoder
for Dolby Digital audio output.
Digital Out
Bitstream
R
AUDIO
OUT
Connecting to the other device
(an MD deck or DAT deck etc.)
without Dolby Digital decoder.
LPCM
* To complete these settings, refer to pages 15,17.
Note:
• The audio source on a disc in a Dolby Digital multi-channel
surround format cannot be recorded as digital sound by an
MD or DAT deck.
• By hooking this unit up to a Dolby Digital decoder, you can
enjoy high-quality Dolby Digital multi-channel surround
sound as heard in the movie theaters.
• Playing back a DVD using incorrect settings may generate
noise distortion and may also damage the speakers.
• “Digital Out” setting is not available while HDMI audio is
output.
Supplied cables used in this connection are as
follows:
• RCA audio cable (L/R) x 1
Please purchase the rest of the necessary cables at
your local store.
Rear Terminals
1
2 3
4
5
6
1 HDMI OUT jack
Use to connect a TV with an HDMI compatible port with an HDMI cable.
2 DIGITAL AUDIO OUT COAXIAL jack
Connect a digital audio coaxial cable here through the digital audio coaxial input jack of a decoder or audio receiver.
3 AUDIO OUT jacks
Connect an audio cable here through the audio input jacks of a television or other audio device.
4 COMPONENT VIDEO OUT jacks
Connect a component video cable here through the component video input jacks of a television.
5 S-VIDEO OUT jack
Connect an S-video cable here through the S-video input jack of a television.
6 VIDEO OUT jack
Connect a video cable here through the video input jack of a television.
EN
E6MY0UD_DP170MGXF_EN_v3.indd 8
–8–
2009/08/10 11:41:53
About the Remote Control
Media
Remote Control
Button
(Alphabetical order)
• To enter values in the input field.
• To select chapter or title directly.
• To enter values in the input field.
• To select track directly. (CD)
• To select folder / file directly.
(MP3 / JPEG)
• To move the cursor and determine
its position.
• To move the cursor and determine
its position.
• To rotate the JPEG.
• To repeat between your chosen
point of A and B.
• To repeat between your chosen
point of A and B. (CD / MP3)
• To select audio language on a disc.
• To cancel the point for A-B repeat.
• To clear the numbers entered
incorrectly.
Installing the Batteries for the
Remote Control
Install batteries (AA x2) matching
the polarity indicated inside battery
compartment of the remote control.
1
2
• To display the current disc mode.
• To select items or settings.
• To select items or settings.
• To set the HDMI output mode.
• To set the HDMI output mode.
• To search forward / backward through
a disc. (×2, ×4, ×8, ×16, ×32)
• To search forward / backward through
a disc. (×2, ×4, ×8, ×16, ×32)
• To begin slow forward/backward
playback in the pause mode.
• To call up the menu on a disc.
-----• To open or close the disc tray.
• To turn on the unit.
• To pause disc playback.
• To advance playback one frame at
a time.
• To start playback or resume
playback.
• To play back a chapter or title
repeatedly.
• To return to the previously
displayed menu screen.
• To search chapter, title or time.
• To call up the setup menu.
• Do not mix alkaline and manganese
batteries.
• Do not mix old and new batteries.
• Always remove batteries from remote
control if they are dead or if the
remote control is not to be used for
an extended period of time. This will
prevent battery acid from leaking into
the battery compartment.
• To open or close the disc tray.
• To turn on the unit.
• To pause disc playback.
• To start playback or resume
playback.
• To play back a track or disc
repeatedly. (CD)
• To play back a file, folder or disc
repeatedly. (MP3 / JPEG)
• To return to the previously
displayed menu screen.
• When file list is shown, press to
switch folder list. (MP3 / JPEG)
• To search tracks or files.
• To search time. (CD / MP3)
• To search folders. (MP3 / JPEG)
• To call up the setup menu.
• To turn the unit on or to turn the
unit into the standby mode. (To
completely turn off the unit, you
must unplug the AC power cord.)
• To stop playback.
• To stop playback.
• To select subtitle language on a disc.
------
• To call up the title menu on a disc.
------
• To magnify part of a picture.
(x2, x3, x4, x1/2, x1/3, x1/4)
–9–
E6MY0UD_DP170MGXF_EN_v3.indd 9
-----• To arrange the playing order or play
randomly.
• To skip tracks or files.
• When file list / folder list is shown,
press to switch between pages.
(MP3 / JPEG)
• To turn the unit on or to turn the
unit into the standby mode. (To
completely turn off the unit, you
must unplug the AC power cord.)
• To skip chapters or titles.
Note:
• To select “Stereo”, “L-ch” or “R-ch”.
(CD)
• To cancel the point for A-B repeat.
(CD / MP3)
• To remove status number in
program input.
• To clear the numbers entered
incorrectly.
• To display the current disc mode.
3
Keep in mind the following when using
the remote control:
• Make sure that there are no obstacles
between the remote control and the
remote sensor on the unit.
• The maximum operable ranges from the
unit are as follows.
- Line of sight:
approx. 23 feet (7m)
- Either side of the center:
approx. 16 feet (5m) within 30°
- Above: approx. 16 feet (5m) within 15°
- Below: approx. 10 feet (3m) within 30°
------
SETUP
• To select camera angles on a disc.
• To magnify part of a picture. (JPEG)
(x2, x3, x4, x1/2, x1/3, x1/4)
EN
2009/08/10 11:41:55
DVD FUNCTIONS
Please note : most instructions in this manual refer to remote control use.
Playback
Lights up when power is off.
Before:
Turn on the TV, amplifier and any other
device which are connected to this unit.
Make sure the TV and audio receiver (not
supplied) are set to the correct channel.
2
2
(
⇒on page 11
)
• When you play back a DVD or CD-RW/-R with
MP3 / JPEG files, details on page 11.
• A “ ” may appear at the top-right on the TV
screen when the operation is prohibited by the disc or this
unit.
• Some DVD may start playback from title 2 or 3 due to specific
programs.
• During the playback of a 2-layered disc, pictures may stop for
a moment. This happens while the 1st layer is being switched
to the 2nd layer. This is not a malfunction.
• You can change the on-screen language in “Player Menu”
setting. (Refer to page 15.)
2 Press [OPEN / CLOSE A] and insert a
disc with label facing up.
3
4
DVD FUNCTIONS
Disc Menu
Fast Forward / Reverse Search
Some discs contain menus which allow you to customize DVD
playback. Use [K / L / s / B] to select an item, then press
[ENTER] or [PLAY B].
Use [FWD g] or [REV h] repeatedly during
playback to select the required forward or
reverse speed.
To continue playback, press [PLAY B].
Calling Up a Menu Screen during Playback
Note:
FR x 2
Slow Forward / Reverse Search
Note:
• Menu operations may vary depending on the disc. Refer to
the manual accompanying the disc for more details.
Resume Playback
Press [FWD g] or [REV h] repeatedly
in the pause mode to select the required
forward / reverse speed.
To continue playback, press [PLAY B].
D
SF x1/32
Note:
R.Stop
Note:
• To cancel resume, press [STOP C] one more time in the stop
mode.
• The resume playback information stays on even when the
power is turned off, as long as the disc stays in the unit.
Paused and Step-by-Step Playback
Press [PAUSE F] during playback.
To continue playback, press [PLAY B].
E
• Fast forward or reverse search speed is different depending
on the disc. Approximate speed is x2, x4, x8, x16 and x32.
• Press [MENU] to call up the disc menu.
• Press [TOP MENU] to call up the title menu.
Press [STOP C] during playback. Resume icon
will appear at the top-left on the TV screen. Press
[PLAY B], playback will resume from the point at
which playback was stopped.
1
Note:
1 Press [STANDBY-ON] to turn on this
unit.
3 Press [PLAY B] to start playback.
4 Press [STOP C] to stop playback.
4 3
Lights up when discs playback.
2
1
Pause
• Slow forward / reverse speed is different depending on the
disc. Approximate speed is x1/32, x1/16, x1/8, x1/4 and x1/2.
Zoom
1) Press [ZOOM] repeatedly during playback
to select the required zoom factor: x2, x3,
x4, x1/2, x1/3, x1/4 or off.
2) Use [K / L / s / B] to slide the zoomed
picture across the TV screen.
3) To exit zoom function, press [ZOOM]
repeatedly to select off.
x2
Note:
The disc goes forward by one frame each time [PAUSE F]
is pressed in the pause mode.
To continue playback, press [PLAY B].
EN
E6MY0UD_DP170MGXF_EN_v3.indd 10
• Zooming function does not work while the disc menu is
displayed.
• Some part of the picture may not be zoomed depending on
the disc or playback status.
– 10 –
2009/08/10 11:42:45
MP3 / JPEG Playback
MP3 / JPEG is a method of compressing files. You can copy MP3 / JPEG files on DVD or
CD-RW/-R from the computer and play back the files on this unit.
This unit recommends the files recorded under
the following circumstances:
Insert an MP3 / JPEG format disc, then the file list will automatically appear on the TV
screen.For a disc with MP3 or JPEG files only, all repeat playback will start automatically.
1
Note:
Select the desired folder or file.
All
Audio
0001/0068
Picture
1. photo_01.jpg
2. photo_02.jpg
3. photo_03.Sjpg
4. photo_04.jpg
5. photo_05.jpg
6. photo_06.jpg
ENTER
Change
RERURN
Folder
MODE
Program
e.g.) JPEG
2
Press [ENTER] or [PLAY B].
Playback will start from the first file of
the folder or files.
Applicable MP3 file
Remarks
Sampling frequency:
44.1 kHz or 48 kHz
• Some selections may take a while to
be ecognized.
• Refer to “On-Screen Display” on
page 12 for more details.
• If you record data over 20 times, it
may not be played back correctly.
• For a disc with JPEG files only, the file
list will appear while in stop mode.
• A maximum of 498 folders or 4000
files may be recognized on one disc.
• Up to 8 hierarchies can be
recognized in one folder. File in the
9th or deeper hierarches cannot be
played back.
• To rotate the picture, press cursors
during playback JPEG files.
For MP3 file recorded
in VBR (variable bit
rate), the unit may
not display the actual
elapsed time.
Constant bit rate:
32 kbps ~ 320 kbps
Applicable JPEG file
Remarks
Normal playback
Upper limit: 6,300 x 5,100
Pixel lower limit: 32 x 32 pixel
File size: Max. 7 MB
A JPEG image
that extends
beyond the
screen is
reduced so
that it will be
displayed within
the screen.
Search Functions
Using [SEARCH MODE]
1
--/14
00:00:13
Off
Using Title / Chapter Search
Using Time Search
Using [SEARCH MODE]
1
- - /10
e.g.) CD
001/033
1
02/10
00:05:30
001/033
- -:- -:- -
DVD FUNCTIONS
Using Track / File / Folder Search
Off
Off
e.g.) DVD
or
ENTER
2
Enter the desired track / file / folder
number within 10 seconds.
02/14
3
00:01:04
e.g.) DVD
ENTER
Press cursor [B] to
highlight .
CD / MP3: once
DVD:
twice
Off
Press [SEARCH MODE] once for the
title search.
For the chapter search, press
cursor [B] to highlight
.
Press [ENTER].
• To play back the tracks, files or folders
whose track / file / folder number is
double-digit or larger, press the number
directly.
e.g.)
- for file 14, press [1], [4] and [ENTER].
- for file 114, press [1], [1], [4] and [ENTER].
- for file 1114, press [1], [1], [1] and [4].
Using [SKIP H , G]
1
Current Track / File / Folder
2
2
Enter the desired time within 10
seconds.
Enter the desired title or chapter
number within 10 seconds.
02/10
001/033
00:05:51
02/10
3 Press [ENTER].
Using [SKIP H , G]
1
Current Chapter
CH 1 CH 2 CH 3 CH 4
SKIP
SKIP
e.g.) Track
00:05:51
Off
Off
3
TR 1 TR 2 TR 3 TR 4
SKIP
SKIP
001/033
Press [ENTER].
Note:
• To play time 00:15:00, press [1], [5], [0],
[0] of [the Number buttons].
• Press [CLEAR] to erase the incorrect
input at step 2.
• For audio CD and MP3, time search
is not available for programmed or
random playback.
Note:
• For audio CDs, MP3 and JPEG files, track /
file / folder search are not available for
programmed or random playback.
Available Search Mode
Track Search
Displayed list
No list displayed
File Search
Folder Search
Note:
• Depending on the disc being played
back, this function can also be performed
by directly entering the desired chapter
number with [the Number buttons].
Refer to the manual accompanying the disc.
File list
Folder list
– 11 –
E6MY0UD_DP170MGXF_EN_v3.indd 11
EN
2009/08/10 11:42:51
On-Screen Display
You can check the information about the current disc by pressing
[DISPLAY].
T(Title):
current title number / total
titles
1
elapsed time of the current
time
02/10
001/033
00:05:51
You can check the information about the current disc by pressing
[DISPLAY].
T(Track):
current track number / total
track
current repeat mode
(Off / All / Track / A-B)
1
Off
02/14
00:00:13
Off
current repeat mode
(Off / Title / Chapter / A-B)
current play mode
(Program / Random)
elapsed time of the current
time
current chapter number /
total chapters
current audio
elapsed time of current
track
2
current subtitle
2
1/3 Dolby D 3/2.1CH ENG
Off
Track time:
00:00:21
00:03:19
remaining time of current
track
1/3
angle information
elapsed time of Disc
3
3
elapsed time of current
chapter
Chapter time:
00:01:03
Disc time:
00:00:25
00:40:15
remaining time of Disc
00:01:18
DVD FUNCTIONS
remaining time of current
chapter
4
elapsed time of current title
4
Title time:
00:01:11
02:09:06
remaining time of current
title
• Only in stop mode for JPEG.
playback media tab
Audio (MP3) / Picture (JPEG)
current repeat mode
(All / Folder / File / Off /
A-B (MP3))
displaying folder list:
current folder number /
total folders
displaying file list:
current file number / total
files in the current folder
5
Note:
• Some DVD will not allow you to set chapter playback correctly.
All 0001/0008 00:00:12/00:03:23
Audio
2.
3.
4.
5.
6.
Picture
1. folder1
folder2
folder3
folder4
folder5
folder6
Change
EN
E6MY0UD_DP170MGXF_EN_v3.indd 12
RERURN
Folder
MODE
Program
elapsed time of the
current file / total time of
current file (while MP3 file list
is displayed only)
thumbnail (while JPEG file
list is displayed only)
file list / folder list
operation guide
– 12 –
2009/08/10 11:43:04
Repeat / Random / Programmed Playback
Repeat Playback
Repeat A-B Playback
Repeat function is available only during
playback.
1
Repeat function is available only during
playback and set the repeat setting to
“Off”.
Programmed Playback
You may determine the order in which
tracks or files will play back.
1
1
Press [MODE] repeatedly to select
“Program”.
Chapter
Program
A-
e.g.) DVD
e.g.) CD
Each time you press [REPEAT], repeat
function changes as example below.
at your desired starting point (A)
2
Select a track or a file.
2
ENTER
A-B
Off
(repeat off)
Title
(current title repeat)
Chapter
(current chapter repeat)
at your desired ending point (B)
• Point B should be in the same title,
track or file as point A.
0005/0030
1. 01_**********.mp3
2. 02_**********.mp3
3. 03_**********.mp3
4. 04_**********.mp3
5. 05_**********.mp3
6. 06_**********.mp3
7. 07_**********.mp3
Note:
Off
(repeat off)
All
(entire disc repeat)
Track
(current track repeat)
CLEAR
• To exit the sequence, press [A-B] so
that “Off” appears.
• To cancel point A, press [CLEAR] at
step 1.
• This function does not work in the
other repeat modes.
Random Playback
All
(entire disc repeat)
Folder
(current folder repeat)
File
(current file repeat)
Off
(repeat off)
This function shuffles the playing order
of files or tracks instead of playback in
the sequence.
1
Note:
• Repeat setting (except “All”) will be
cleared when moving to another title,
chapter, track, file or folder (only for
DVD and CD).
• To clear the repeat setting for MP3
and JPEG files, set the repeat setting to
“Off”.
• This function is not available with
some discs or during repeat A-B
playback.
Press [MODE] repeatedly to select
“Random”.
Random
e.g.) CD
Random playback will start.
Note:
• During random playback, you cannot
go back to the previous track or file,
using [SKIP G] allows you to search
tracks or files randomly.
– 13 –
E6MY0UD_DP170MGXF_EN_v3.indd 13
Clear All
ENTER
1. 01_**********.mp3
2. 02_**********.mp3
3. 03_**********.mp3
4. 04_**********.mp3
5. 05_**********.mp3
6. 06_**********.mp3
Clear
PLAY
PLAY
e.g.) MP3
DVD FUNCTIONS
e.g.) DVD
• Up to 20 files or tracks can be
ordered.
When the highlight is in the
track / file list
[RETURN]: exit from the program menu.
[ENTER]: select a track / file.
[PLAY B]: start program playback.
When the highlight is in the
programmed list
[CLEAR]: erase all the track / file in the
program.
[ENTER]: erase the track / file you select.
[PLAY B]: start program playback.
Note:
• While a program is being played back,
[STOP C] works as follows;
- Press [STOP C] and [PLAY B] next,
so that the programmed playback
restarts.
- Press [STOP C] twice and [PLAY B]
next, so that playback restarts from
the first track in the original order.
However, your programmed playback
can be restarted when you follow the
above steps. (Your programs are still
stored until either the disc is removed
or power is turned off.)
EN
2009/08/10 11:43:10
Special Settings
Subtitle Language
This unit allows you to select a subtitle
language (if available) during DVD
playback.
1
Off
Camera Angles
Some DVD may contain
scenes which have been shot
simultaneously from various
angles. You can change the
camera angle if
appears on the TV
screen. If the “Angle Icon” setting is “Off”
in “Display” menu,
will not appear.
(Refer to pages 15-16.)
1
Each time you press [SUBTITLE], subtitle
language changes as example below.
Off
1/3
(no subtitles)
ENG (English subtitles)
Stereo Sound Mode
...
FRE (French subtitles)
Each time you press [ANGLE], camera
angle changes.
Audio Language
DVD FUNCTIONS
This unit allows you to select a sound
mode during CD playback.
1
This unit allows you to select an audio
language (if multiple languages are
available on disc) during DVD playback.
Stereo
1
1/4 Dolby D 3/2. 1ch ENG
Each time you press [AUDIO], audio
language changes as example below.
Each time you press [AUDIO], sound
mode changes as example below.
Stereo
(right and left channels
are active)
L-ch
(left channel is active)
R-ch
(right channel is active)
ENG (English audio)
SPA (Spanish audio)
...
FRE (French audio)
Note:
• Some discs will only allow you to change
the audio setting from the disc menu. Refer
to the manual accompanying the discs for
details.
• If your language is not shown after pressing
[AUDIO] several times, the disc may not have
that language. However, some discs allow
audio language setting on the disc menu.
(Operation varies depending on the disc, so
refer to the manual along with the disc.)
EN
E6MY0UD_DP170MGXF_EN_v3.indd 14
– 14 –
2009/08/10 11:43:20
DVD Setting
You can change the settings of the unit. You cannot change the setting during playback. Setting items are displayed in
gray when they are not available under the conditions at the time.
1
2
Press [SETUP].
Select the desired item.
ENTER
<SETUP MENU>
Language
Display
Player Menu
Language
Subtitle
Video
Disc Menu
Audio
Audio
Others
Others
Language
Display
Audio
Video
Disc Menu
Language menu
Player Menu
Subtitle
Player Menu
Subtitle
Display
Audio
Display menu
Language
Display
Angle Icon
Video menu
Language
Screen Saver
Display
Audio menu
TV Aspect
Language
Progressive
Display
Audio
Video
Disc Menu
Audio
Others menu
Dual mono
Language
Down Sampling
Display
Video
Video
Video
Audio
Audio
Audio
Auto Power Off
HDMI
Parental
DRC
Video
Reverberation
Sound Menu
Initialize
Audio
Digital Out
page 15 A
A
Others
page 16 B
Others
Others
page 16 C
page 17 D
DVD FUNCTIONS
Others
Others
page 18 E
Language Setting
Follow steps 1 to 2 above.
3
Select the desired item.
4
ENTER
Language menu
Note:
Player Menu:
Player Menu
Sets the language
for the on-screen
display.
Subtitle
Subtitle: ∗1 ∗2
Player Menu
Audio
Others
(Default: Off)
Display
Player Menu
Subtitle
Audio
Video
To exit the menu
ENTER
(Default: English)
Language
5
Select the desired language.
Audio
English
Français
Español
Disc Menu
Disc Menu
Sets the subtitle
language.
Subtitle
Audio
Disc Menu
Off
English
Français
Español
Other
Audio: ∗1 ∗2
(Default: Original)
Sets the audio
language.
Subtitle
Audio
Original
Disc Menu
English
Français
Español
∗1
• Language options are not
available with some discs.
• If “Others” is selected in the
“Audio”, “Subtitle” or
“Disc Menu” screen, select the
desired language using
[K / L]. Press [ENTER].
• Only the languages supported by
the disc can be selected.
∗2
• “Language” setting for “Audio”
and “Subtitle” are not available
with some discs. Then press
[AUDIO] and [SUBTITLE]. Details
are on page 14.
Other
Disc Menu: ∗1
(Default: English)
Audio
Disc Menu
Sets the language
in DVD menu.
Français
Español
Other
– 15 –
E6MY0UD_DP170MGXF_EN_v3.indd 15
English
EN
2009/08/10 11:43:28
B
Display Setting
You can change the display functions. Follow steps 1 to 2 on page 15.
3
Select the desired item.
4
5
Angle Icon: (Default: On)
See note on the right.
ENTER
Language
Display
Angle Icon
Angle Icon
On
Screen Saver
Screen Saver
Off
To exit the menu
Select the
desired
setting.
Video
Display menu
Language
Display
Note:
Angle Icon
Screen Saver
Video
Screen Saver: (Default: On)
See note on the right.
Audio
Language
Others
Display
Angle Icon
Angle Icon
Screen Saver
Screen Saver
Select the
desired
setting.
On
Off
Video
C
Angle Icon:
• Set to “On” to display
when multiple camera
angles are available
during DVD playback.
Screen Saver:
• Sets whether to
activate the screen
saver after 5 minutes of
no action on the unit.
Video Setting
You can change the video functions. Follow steps 1 to 2 on page 15.
DVD FUNCTIONS
3
Select the desired item.
ENTER
4
5
TV Aspect: (Default: 16:9 Wide)
Sets the aspect ratio of the playback
image to fit your TV.
Language
Display
TV Aspect
TV Aspect
Progressive
Progressive
To exit
“TV Aspect” menu
Select the
desired
setting.
16:9 Wide
4:3 Letter Box
4:3 Pan & Scan
Video menu
Video
To complete
“Progressive”
setting
Audio
Language
Display
TV Aspect
Progressive
Video
Audio
Others
Progressive: (Default: Off)
Changing ”Progressive” setting is not
available while HDMI cable is connected.
Language
Display
TV Aspect
Progressive
TV Aspect
Progressive
Select
“On”.
Note:
On
Off
Video
Audio
Select “Yes”.
Before proceeding…
If there is no picture
or you do not press
any buttons for 15
seconds, “Progressive”
will switch to “Off”
and it will exit the
setup menu.
EN
E6MY0UD_DP170MGXF_EN_v3.indd 16
Make sure your TV supports the selected item.
Connect with component video cable.
NOTE: If a blank screen appears, wait for 15 seconds
for auto-recovery.
Activate?
Progressive
Yes
On
Select: K / L
No
Set:ENTER
TV Aspect:
• Select “16:9 Wide”
if a wide-screen TV is
connected to this unit.
• Select “4:3 Letter Box”,
so that black bars may
appear on the top
and bottom of the TV
screen.
• Select “4:3 Pan & Scan”
for a full height picture
with both sides adjusted.
Progressive:
• You can set
“Progressive” to “Off”
in “Video” menu or
press and hold
[PLAY B] on the
front of the unit for
more than 5 seconds
during playback.
• When “Progressive”
is “On”, video signals
from the unit’s VIDEO
OUT and S-VIDEO OUT
jacks will be distorted
or not be output at all.
– 16 –
2009/08/10 11:43:35
D
Audio Setting
Choose the appropriate audio settings for your device. It only affects during the playback of DVD. Follow steps 1 to 2 on page 15.
Select the desired item.
4
Dual mono: (Default: Stereo)
This unit allows you to select a sound mode during CD playback.
ENTER
Language
Display
Video
Audio menu
Language
Display
Audio
Dual mono
Down Sampling
DRC
Dual mono
Stereo
Reverberation
Down Sampling
L-ch
Sound Menu
DRC
R-ch
Digital Out
Reverberation
General
VS
Audio
Note:
Reverberation:
d
Dual mono
Down Sampling
Reverberation
Sound Menu
Digital Out
Others
Down Sampling: (Default: On)
Set to “On” when outputting in 48kHz.
Set to “Off” when outputting the original sound.
Language Dual mono
Select the
Down Sampling
Display
desired
Dual mono
DRC
Video
setting.
Down Sampling
Reverberation
On
Audio
Sound Menu
DRC
Digital Out
Reverberation
General
Note:
Down Sampling:
• When playing back disc
with copyright protection,
the sound will be down
sampled at 48kHz, even if
you set to “Off”.
DRC:
• This function is available
only on the discs which
are recorded in the Dolby
Digital format.
• “On” “7/8-1/8” “Off”:
Compress the range
between soft and loud
sounds.
Digital Out:
• When HDMI cable is
connected, make sure
“HDMI Audio” setting is
set to “Off” to change the
“Digital Out” setting.
VS
Off
d
DRC (Dynamic Range Control): (Default: On)
Set to “On” to compress the range between soft and loud sounds.
Down Sampling
Display
Select the
DRC
desired
Video
Reverberation
setting.
Sound Menu
Audio
Digital Out
on
General
Reverberation: (Default: Normal)
You can set the reverberation effect.
p y
Video
Audio
Normal
Living Room
DRC
DRC
Reverberation
Reverberation
Sound Menu
Sound Menu
Digital Out
Digital Out
General
Hall
Arena
Off:
Select the
desired
setting.
Cave
Concert Hall
Bath Room
Cathedral
Sound Menu: (Default: Off)
You can enjoy stereophonic virtual world
your existing 2 channel stereo system.
Dual mono
Video
Audio
Reverberation
Sound Menu
Digital Out
Others
Off
Down Sampling
3D
DRC
Jazz
Reverberation
Rock
Sound Menu
Pop
Digital Out
Classic
Select the
desired
setting.
Digital Out: (Default: Bitstream)
Set to “Bitstream” when the unit is connected to a Dolby Digital
decoder.
• Bitstream: outputs a Dolby Digital signals.
• LPCM: convert the Dolby Digital into LPCM (2 channel).
Select the
Video
Sound Menu
desired
Reverberation
Digital Out
Sound Menu
setting.
Bitstream
Audio
Digital Out
Others
LPCM
– 17 –
E6MY0UD_DP170MGXF_EN_v3.indd 17
Normal:
no effects
(original sound)
Living Room:
sounds as if you
are in a living
room
Hall: sounds as if you
are in a hall
Arena: sounds as if you
are in an arena
Cave: sounds as if you
are in a cave
Concert Hall:
sounds as if you
are in a concert
hall
Bath Room:
sounds as if you
are in a bath room
Cathedral:
sounds as if you
are in a cathedral
Sound Menu:
Dual mono
Down Sampling
To exit the menu
Select the
desired
setting.
DRC
Video
5
no effects (original
sound)
3D: sound mode
suitable for setting
stereophonic
audio
Jazz: sound mode
suitable for jazz
music
Rock: sound mode
suitable for rock
music
Pop: sound mode
suitable for pop
music
Classic:
sound mode suitable
for classic music
DVD FUNCTIONS
3
• Sound Menu is
available under the
following condition:
- When the unit is
connected to a TV
using AUDIO OUT
jacks.
- When “HDMI Audio”
is set to “LPCM”.
- When “Digital Out” is
set to “LPCM”.
EN
2009/08/10 11:43:51
E
Others Setting
Follow steps 1 to 2 on page 15.
3
Select the desired item.
ENTER
5
4
Auto Power Off : (Default: On)
Set to “On” to turn this unit off automatically after 30 minutes of
no use.
Language
Auto Power Off
HDMI
Display
Auto Power Off
Parental
Others menu
Language
Display
Video
HDMI
Initialize
HDMI
Select the
desired
setting.
On
Off
Parental
Audio
Initialize
Auto Power Off
Note:
Others
Parental
Video
Initialize
Audio
Others
Note:
DVD FUNCTIONS
HDMI:
• You cannot select the
video resolutions which
are not supported by the
connected TV, except
when this unit’s HDMI
OUT jack is connected to
a DVI compatible display
devices with an HDMI-DVI
cable (default is 480p in
such case).
• Video and audio signals
may be distorted
temporarily when
switching to / from the
HDMI output mode.
Resolution:
• Auto:
HDMI video resolution will
be selected automatically
depending on the
connected HDMI device.
If you want to change the
resolution manually, press
[HDMI] repeatedly.
• When you make a
selection, the TV monitor
temporarily goes blank
and then comes back
again. If it does not, press
[HDMI] to change the
resolution or press and
hold [PLAY B] on the
front panel for 5 seconds
to change the setting back
to its default.
HDMI Audio:
• This feature is available
only when the display
device is connected by an
HDMI cable.
HDMI:
Resolution: (Default: Auto)
You can select the desired “Resolution” among the settings.
Auto Power Off
Select the
Auto
HDMI
Resolution desired
480p
Parental
HDMI Audio
setting.
720p
Initialize
To exit “Auto Power
Off”, “HDMI” or
“Parental” menu
Parental:
• If you forgert the
password, press [4],
[7], [3], [7] at step
3 above, then enter
your new password.
Initialize:
• When you do not
wish to initialize, press
[SETUP] to exit the
menu at step 4.
• The setting for “Parental” will not be reset.
HDMI Audio: (Default: Bitstream)
Sets the audio format for the sound output from the HDMI OUT.
Select the
Auto Power Off
desired
Bitstream
HDMI
Resolution setting.
LPCM
Parental
HDMI Audio
Off
Initialize
Parental:
Parental level allows you to set the rating levels of your DVD.
Playback will stop if the ratings exceed the levels you set.
*1 If you have set a password already, “Enter your PIN” will be
displayed and enter the current 4-digit password.
*2 If you have set a password already, enter your new PIN after
entering the current password.
Rating Level: (Default: 8[Adult])
Sets the rating level for the disc playback.
Auto Power Off
HDMI
Rating Level
Parental
New PIN Select the
desired
setting.
8[Adult]
Itinialize
Enter your new
4-digit password
(except for 4373).
*1 Enter New PIN
Enter your new 4-digit
password again.
Confirm PIN
----
----
New PIN:
You can change your password for parental controls.
Enter your new
Enter your new 4-digit
4-digit password.
password again.
*1,2
Enter New PIN
Confirm PIN
----
----
Initialize:
Reset to default setting.
Parental
Video
Audio
Others
EN
E6MY0UD_DP170MGXF_EN_v3.indd 18
Initialize
HDMI
Select “Yes”
Parental
Initialize
Yes
No
– 18 –
2009/08/10 11:44:07
INFORMATION
Troubleshooting Guide
Problem
Corrective action
No power
–Check if the AC power cord is properly connected.
–Unplug the outlet once, and wait for 5-10 seconds and then plug it in again.
–Check if the TV is switched on.
–Check the video connection.
–Check the audio / video cable connections to the TV.
(Refer to page 6.)
–When“Progressive” is “On”, video signals from the unit’s VIDEO OUT and S-VIDEO OUT jacks will be
distorted or not be output at all.
–Check whether the connected TV or other device supports HDCP.
(This unit will not output a video signal unless the other device supports HDCP.)
–Sometimes a small amount of picture distortion may appear.
This is not a malfunction.
–Connect the unit directly to the TV.
–Set “Progressive” correctly in “Video” menu. Turn it on only if your TV has progressive scan and you are
using the component video connections between the unit and the TV. Disable progressive scan for all
other connections. (Refer to page 6.)
–Connect this unit directly to the TV.
–Make sure the disc is compatible with the unit.
–Adjust the volume.
–Check that the speakers are connected correctly.
–Check the digital connections.
–Check if the audio format of the selected audio language matches your receiver capabilities.
–This unit does not support DTS audio.
This is not a malfunction.
No sound or picture
Distorted picture
Completely distorted picture or
black / white picture with DVD
No sound or distorted sound
No audio at digital output
No DTS audio is output.
Picture freezes momentarily during
playback.
–Check the disc for fingerprints / dirty and clean with a soft cloth wiping from center to edge.
Disc cannot be played back.
–Clean the disc.
–Ensure the disc is inserted in correct direction.
–Check if the disc is defective by trying another disc.
–Cancel the parental lock or change the control level.
–Insert a correct disc that plays back on this unit.
–Handle a disc with special care so that it does not have fingerprints, scratches, or dusts on its surface.
No return to start-up screen when
disc is removed.
–Reset the unit by switching off the unit, then on again.
The unit does not respond to
the remote control.
–Aim the remote control directly at the sensor on the front panel.
–Reduce the distance to the unit.
–Replace the batteries in the remote control.
–Re-insert the batteries with their polarities (+ / – signs) as indicated.
–Tune your radio to an empty AM station so that you hear a lot of noises. Then, turn up the volume. If
you hear some signal sound from the radio by pressing buttons on the remote control, the remote
control is working.
–Press and hold any button on remote control toward a digital camera. The remote control is working if
you confirm infrared light through the digital camera.
Buttons do not work or the unit stops
responding.
The unit does not respond to some
operating commands during playback.
The unit cannot read CD / DVD.
Angle does not switch.
Playback does not start
when the title is selected.
The password for rating level
has been forgotten.
–To completely reset the unit, unplug the AC cord from the AC outlet for 5-10 seconds.
–Operations may not be permitted by the disc. Refer to the instructions of the disc.
INFORMATION
If the unit does not perform properly when operated as instructed in this owner’s manual, refer to the following.
–Use a commonly available cleaning CD / DVD to clean the lens before sending the unit for repair.
–The angle cannot be switched for DVD which do not contain multiple angles. In some cases multiple
angles are only recorded for specific scenes.
–Check the “Parental” setting.
–Enter the default password “4737”, then your forgotten password will be cleared.
Specifications
Output signal format:
NTSC color
Power source:
120 V AC + / - 10%, 60 Hz + / - 0.5%
Power consumption:
8 W (standby : 0.8 W)
Operating temperature:
41°F (5 °C) to 104 °F (40 °C)
Dimensions:
W : 11 1/16”
H : 2 1/16”
D : 8 5/16”
(280mm)
(51mm)
(210mm)
• Designs and specifications are subject to
change without notice.
• If there is a discrepancy between
languages, the default language will be
English.
Weight:
Approx 2.76lbs. (1.25kg)
• Some functions are not available in specific modes, but this is not a malfunction. Read the description in this owner’s manual for
more details on correct operations.
• Playback from a desired track and random playback are not available during programmed playback.
• Some functions are prohibited on some discs.
– 19 –
E6MY0UD_DP170MGXF_EN_v3.indd 19
EN
2009/08/10 11:44:20
LIMITED WARRANTY
FUNAI CORP. will repair this product, free of charge in the
USA in the event of defect in materials or workmanship as
follows:
DURATION:
PARTS: FUNAI CORP. will provide parts to replace defective
parts without charge for one (1) year from the date
of original retail purchase. Certain parts are excluded
from this warranty.
LABOR: FUNAI CORP. will provide the labor without charge
for a period of ninety (90) days from the date of
original retail purchase.
LIMITS AND EXCLUSIONS:
This warranty is extended only to the original retail purchaser.
A purchase receipt or other proof of original retail purchase
will be required together with the product to obtain service
under this warranty.
This warranty shall not be extended to any other person or
transferee.
This warranty is void and of no effect if any serial numbers
on the product are altered, replaced, defaced, missing or if
service was attempted by an unauthorized service center.
This limited warranty does not apply to any product not
purchased and used in the United States.
This product is produced for home use and this warranty only
covers failures due to defects in material or workmanship
which occurs during normal use. It does not cover damage
which occurs in shipment, or failures which are caused by
repairs, alterations or product not supplied by FUNAI CORP.,
or damage which results from accident, misuse, abuse,
mishandling, misapplication, alteration, faulty installation,
improper maintenance, commercial use such as hotel, rental
or office use of this product or damage which results from
fire, flood, lightning or other acts of God.
THIS WARRANTY DOES NOT COVER PACKING MATERIALS,
ANY ACCESSORIES (EXCEPT REMOTE CONTROL), ANY
COSMETIC PARTS, COMPLETE ASSEMBLY PARTS, DEMO OR
FLOOR MODELS.FUNAI CORP. AND ITS REPRESENTATIVES OR
AGENTS SHALL IN NO EVENT BE LIABLE FOR ANY GENERAL,
INDIRECT OR CONSEQUENTIAL DAMAGES ARISING OUT
OF OR OCCASIONED BY THE USE OF OR THE INABILITY
TO USE THIS PRODUCT. THIS WARRANTY IS MADE IN
LIEU OF ALL OTHER WARRANTIES, EXPRESS OR IMPLIED,
AND OF ALL OTHER LIABILITIES ON THE PART OF FUNAI,
ALL OTHER WARRANTIES INCLUDING THE WARRANTY
OF MERCHANTABILITY, AND FITNESS FOR A PARTICULAR
PURPOSE, ARE HEREBY DISCLAIMED BY FUNAI AND ITS
REPRESENTATIVES IN THE UNITED STATES. ALL WARRANTY
INSPECTIONS AND REPAIRS MUST BE PERFORMED BY AN
AUTHORIZED SERVICE CENTER. THIS WARRANTY IS VALID
WHEN THE UNIT IS CARRIED-IN TO AN AUTHORIZED SERVICE
CENTER.
IMPORTANT:
THIS LIMITED WARRANTY GIVES YOU SPECIFIC LEGAL RIGHTS.
YOU MAY HAVE OTHER RIGHTS THAT VARY FROM STATE TO
STATE. IF, AT ANY TIME DURING THE WARRANTY PERIOD,
YOU ARE UNABLE TO OBTAIN SATISFACTION WITH THE
REPAIR OF THIS PRODUCT, PLEASE CONTACT FUNAI CORP.
ATTENTION:
FUNAI CORP. RESERVES THE RIGHT TO MODIFY ANY DESIGN
OF THIS PRODUCT WITHOUT PRIOR NOTICE.
WARRANTY STATEMENT REGARDING NON AUTHORIZED
REPAIRS:
To obtain warranty service, you must take the product, or
deliver the product freight prepaid, in either its original
packaging or packaging affording an equal degree of
protection, to any AUTHORIZED SERVICE CENTER. FUNAI
CORP. will not reimburse you for any service done by
unauthorized service providers without prior written
approval.
To locate your nearest AUTHORIZED SERVICE CENTER or
for general service inquiries, please contact us at:
FUNAI SERVICE CORPORATION
Customer Service
Tel :1-800-605-8610
http://www.magnavox.com/support
2200 Spiegel Drive, Groveport, OH 43125
INFORMATION
EN
E6MY0UD_DP170MGXF_EN_v3.indd 20
– 20 –
2009/08/10 11:44:21
INFORMATION
Memo
– 21 –
E6MY0UD_DP170MGXF_EN_v3.indd 21
EN
2009/08/10 11:44:22
corte aquí
Memo
INFORMATION
EN
E6MY0UD_DP170MGXF_EN_v3.indd 22
– 22 –
2009/08/10 11:44:22
Español
1
4
Conexiones
Si su televisor tiene entradas de
AUDIO / VIDEO vea la sección
“Connection to a TV” en la página 6 en el
manual de manejo. En caso contrario, vea
la sección “Connecting to RF Modulator
(Not Supplied)” en la página del frente en
el manual de manejo.
2
Instalación de las pilas en el
control remoto
1
2
3
Reproducción
Antes.
Encienda el televisor, amplificador y otros equipos conectados
a esta unidad. Asegúrese que el
televisor y el
sintonizador
1
de audio (no
provisto) están
en el canal correcto.
3
5
Botón
1
1
Para abrir o cerrar
la bandeja del
disco
STANDBY-ON
3
Ponga un disco
con la etiqueta
hacia arriba.
4
Para parar la
reproducción
OPEN/CLOSE
Para empezar la
reproducción
4
2
STOP
PLAY
Control remoto
Disco
(Orden alfabético)
Para cambiar el idioma en la
pantalla
1 Confirme que ha seleccionado
“Language”.
SETUP
STANDBY-ON
• Para mover el cursor y determinar la posición.
• Para mover el cursor y determinar la posición.
• Para girar la imagen JPEG.
• Para repetir entre su punto A y B seleccionado.
• Para repetir entre su punto A y B seleccionado.
(CD / MP3)
• Para seleccionar los ángulos de la cámara en
un disco.
------
• Para seleccionar idiomas de audio en un disco.
• Para seleccionar “Estéreo”, “L-ch” o “R-ch”. (CD)
• Para borrar el punto para la repetición A-B.
• Para borrar los números mal entrados.
• Para borrar el punto para la repetición A-B.
(CD / MP3)
• Para eliminar el Nº de estado en la entrada de
programa.
• Para borrar los números mal entrados.
Audio
• Para mostrar el modo de disco actual.
• Para mostrar el modo de disco actual.
Others
• Para seleccionar opciones o valores de
configuración.
• Para seleccionar opciones o valores de
configuración.
• Para establecer el modo de salida HDMI.
• Para establecer el modo de salida HDMI.
• Para buscar en avance/retroceso por un disco.
(×2, ×4, ×8, ×16, ×32)
• Para empezar la reproducción en avance lento
durante el modo de pausa.
• Para buscar en avance/retroceso por un disco.
(×2, ×4, ×8, ×16, ×32)
STOP
Language
corte aquí
• Para especificar valores en el campo de entrada.
• Para seleccionar directamente la canción. (CD)
• Para seleccionar la carpeta / archivo
directamente. (MP3 / JPEG)
Display
Player Menu
Subtitle
Audio
Video
Disc Menu
ENTER
2 Seleccione “Player Menu”.
• Para llamar el menú en un disco.
Language
Display
Player Menu
------
Subtitle
Audio
Video
Disc Menu
Audio
Others
• Para abrir o cerrar la bandeja del disco.
• Para encender la unidad.
• Para abrir o cerrar la bandeja del disco.
• Para encender la unidad.
• Para hacer una pausa en la reproducción.
• Para avanzar la reproducción un cuadro cada vez.
• Para hacer una pausa en la reproducción del
disco.
• Para iniciar o reanudar la reproducción.
ENTER
3 Seleccione el idioma deseado para las
indicaciones en la pantalla.
Player Menu
Subtitle
Audio
English
• Para reproducir repetidamente un capítulo o
título.
• Para volver al menú o pantalla anteriormente
visualizado.
• Para buscar un capítulo, título o tiempo.
Français
Español
Disc Menu
ENTER
4 Para salir del menú
• Para llamar el menú de ajustes de DVD.
• Para seleccionar el idioma de subtítulos de un disco.
• Para visualizar el menú de títulos de un disco.
• Para ampliar la imagen de vídeo en DVD.
(x2, x3, x4, x1/2, x1/3, x1/4)
– 23 –
E6MY0UD_DP170MGXF_EN_v3.indd 23
• Para iniciar o reanudar la reproducción.
• Para reproducir repetidamente una canción o
disco. (CD)
• Para reproducir un archivo, carpeta o disco
reiteradamente. (MP3 / JPEG)
• Para volver al menú o pantalla anteriormente
visualizado.
• Cuando aparezca la lista de archivos, presiónelo
para cambiar a la lista de carpetas. (MP3 / JPEG)
• Para buscar pistas o archivos.
• Para buscar el tiempo. (CD / MP3)
• Para buscar los grupos. (MP3 / JPEG)
• Para llamar el menú de ajustes de DVD.
• Para saltar pistas o archivos.
• Cuando aparezca la lista de archivos /
• Para saltar capítulos o titulo.
carpetas, presiónelo para cambiar de una
página a otra. (MP3 / JPEG)
• Para encender o para pasar la unidad al modo de • Para encender o para pasar la unidad al modo de
espera. (Para apagar completamente la unidad,
espera. (Para apagar completamente la unidad,
debe desconectar el cable de alimentacion de CA.) debe desconectar el cable de alimentacion de CA.)
• Para parar la reproducción.
SETUP
-----• Para disponer el orden de reproducción o la
reproducción aleatoria.
Español
3
• Para especificar valores en el campo de entrada.
• Para seleccionar directamente el capítulo o
título.
• Para parar la reproducción.
----------• Para ampliar la imagen de vídeo en DVD. (JPEG)
(x2, x3, x4, x1/2, x1/3, x1/4)
ES
2009/08/10 11:44:22
Quick Use Guide
1
4
Connections
If your TV has AUDIO / VIDEO input jacks,
see the section “Connection to a TV” on
page 6 of the owner’s manual. If not, see
the section “Connecting to RF Modulator
(Not Supplied)” on the front page of the
owner’s manual.
2
Installing the Batteries for
the Remote Control
1
2
Playback
Before:
Turn on the TV, amplifier and
any other device which are
connected to this unit. Make
sure the TV and
audio receiver
(not supplied)
1
are set to the
correct channel.
1
3
5
Button
To start playback
4
3
2
Insert a disc with
label facing up.
4
To stop playback
OPEN/CLOSE
STANDBY-ON
1
3
To open the disc
tray
STOP
PLAY
Remote Control
Media
(Alphabetical order)
3
To Change the
On-Screen Language
1 Confirm that “Language” is selected.
SETUP
STANDBY-ON
STOP
Language
Display
• To enter values in the input field.
• To select track directly. (CD)
• To select folder / file directly. (MP3 / JPEG)
• To move the cursor and determine its
position.
• To move the cursor and determine its position.
• To rotate the JPEG.
• To repeat between your chosen point of A
and B.
• To repeat between your chosen point of A
and B. (CD / MP3)
• To select camera angles on a disc.
Player Menu
• To select “Stereo”, “L-ch” or “R-ch”. (CD)
• To cancel the point for A-B repeat.
• To clear the numbers entered incorrectly.
• To cancel the point for A-B repeat.(CD / MP3)
• To remove status number in program input.
• To clear the numbers entered incorrectly.
• To display the current disc mode.
• To display the current disc mode.
• To select items or settings.
• To select items or settings.
• To set the HDMI output mode.
• To set the HDMI output mode.
• To search forward / backward through a disc.
(×2, ×4, ×8, ×16, ×32)
• To begin slow forward / backward playback in
the pause mode.
• To search forward / backward through a disc.
(×2, ×4, ×8, ×16, ×32)
Audio
Others
ENTER
2 Select “Player Menu”.
Language
Display
• To call up the menu on a disc.
Subtitle
Audio
Video
------
Player Menu
Disc Menu
Audio
Others
ENTER
3 Select the desired language for the
Player Menu
Subtitle
Audio
-----• To arrange the playing order or play
randomly.
• To open or close the disc tray.
• To turn on the unit.
• To open or close the disc tray.
• To turn on the unit.
• To pause disc playback.
• To advance playback one frame at a time.
• To pause disc playback.
• To start playback or resume playback.
• To start playback or resume playback.
• To play back a chapter or title repeatedly.
• To play back a track or disc repeatedly. (CD)
• To play back a file, folder or disc repeatedly.
(MP3 / JPEG)
• To return to the previously displayed menu
screen.
• To return to the previously displayed menu
screen.
• When file list is shown, press to switch folder
list. (MP3 / JPEG)
• To search chapter, title or time.
• To search tracks or files.
• To search time. (CD / MP3)
• To search folders. (MP3 / JPEG)
on-screen language.
English
cut here
Disc Menu
------
• To select audio language on a disc.
Subtitle
Audio
Video
• To enter values in the input field.
• To select chapter or title directly.
Français
Español
• To call up the setup menu.
• To call up the setup menu.
• To skip chapters or titles.
• To skip tracks or files.
• When file list / folder list is shown, press to
switch between pages. (MP3 / JPEG)
Disc Menu
ENTER
4 To exit the menu
• To turn the unit on or to turn the unit into the
• To turn the unit on or to turn the unit into the
standby mode. (To completely turn off the unit, standby mode. (To completely turn off the unit,
you must unplug the AC power cord.)
you must unplug the AC power cord.)
• To stop playback.
SETUP
• To stop playback.
• To select subtitle language on a disc.
------
• To call up the title menu on a disc.
------
• To magnify part of a picture.
(x2, x3, x4, x1/2, x1/3, x1/4)
• To magnify part of a picture. (JPEG)
(x2, x3, x4, x1/2, x1/3, x1/4)
E6MY0UD
1VMN27833 ★★★
Printed in China
E6MY0UD_DP170MGXF_EN_v3.indd 24
2009/08/10 11:44:35