1
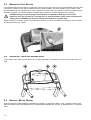
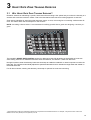
ST55 Treadmill
USER MANUAL
CORPORATE HEADQUARTERS
10601 West Belmont Avenue
Franklin Park, Illinois 60131 • U.S.A.
847.288.3300 • FAX: 847.288.3703
800.735.3867 (Toll-free within U.S.A., Canada)
www.lifefitness.com
INTERNATIONAL OFFICES
LIFE FITNESS ASIA PACIFIC LTD
Room 2610, Miramar Tower
132 Nathan Road
Tsimshatsui, Kowloon
HONG KONG
Telephone: (+852) 2891.6677
FAX: (+852) 2575.6001
LIFE FITNESS ATLANTIC BV
LIFE FITNESS BENELUX
Bijdorpplein 25 - 31
2992 LB Barendrecht
THE NETHERLANDS
Telephone: +31 (0) 180 64 66 66
FAX: +31 (0) 180 64 66 99
LIFE FITNESS DO BRAZIL
Av. Dr. Dib Sauaia Neto 1478
Alphaville, Barueri, SP
06465-140
BRAZIL
Telephone (+55) 11.4193.8282
FAX: (+55) 11.4193.8283
LIFE FITNESS VERTRIEBS GMBH
Dückegasse 7-9/3/36
1220 Vienna
AUSTRIA
Telephone: (+43) 1.61 57 198
FAX: (+43) 1.61 57 198.20
LIFE FITNESS IBERIA
Pol. Ind. Molí dels Frares. c/C, nº 12
08620 Sant Vicenç dels Horts (Barcelona)
SPAIN
Telephone: (+34) 93.672.4660
FAX: (+34) 93.672.4670
LIFE FITNESS EUROPE GMBH
Siemensstrasse 3
85716 Unterschleissheim
GERMANY
Telephone: (+49) 89.31 77 51.0
FAX: (+49) 89.31 77 51.99
LIFE FITNESS ITALIA S.R.L.
Via Vittorio Veneto, 57/A
39042 Bressanone (Bolzano)
ITALY
Telephone: (+39) 0472.835 470
FAX: (+39) 0472.833 150
LIFE FITNESS LATIN AMERICA
and CARIBBEAN
10601 West Belmont Avenue
Franklin Park, Illinois 60131
U.S.A.
Telephone: (+1) 847.288.3300
FAX:(+1) 847.288.3886
LIFE FITNESS UK LTD
Queen Adelaide
Ely, Cambs CB7 4UB
UNITED KINGDOM
Telephone: (+44) 1353.666017
FAX: (+44) 1353.666018
LIFE FITNESS JAPAN
Nippon Brunswick Bldg., #8F
5-27-7 Sendagaya
Shibuya-Ku, Tokyo
JAPAN 151-0051
Telephone: (+81) 3.3359.4309
FAX: (+81) 3.3359.4307
7421101
1/03
1
Before using this product, it is essential to read this
ENTIRE operation manual and ALL installation instructions.
This will help in setting up the equipment quickly
and in instructing others on how to use it correctly and safely.
Class HB (Home): Domestic use. Not designed for therapeutic purposes.
Complies with EN957-1 and EN957-6.
CAUTION: Any changes or modifications to this equipment could void the product warranty.
Any service, other than cleaning or user maintenance, must be performed by an authorized service representative.
There are no user-serviceable parts.
2
TABLE
OF
CONTENTS
Unpacking and Assembly . . . . . . . . . . . . . . . . . . . . . . . . . . . . . . . . . . . . . . . . . . . . . . . . . . . . . . . . . . . . . . . . . . .4
Operation . . . . . . . . . . . . . . . . . . . . . . . . . . . . . . . . . . . . . . . . . . . . . . . . . . . . . . . . . . . . . . . . . . . . . . . . . . . . . . .6
1. Getting Started . . . . . . . . . . . . . . . . . . . . . . . . . . . . . . . . . . . . . . . . . . . . . . . . . . . . . . . . . . . . . . . . . . . . . . . . .7
1.1
Important Safety Instructions . . . . . . . . . . . . . . . . . . . . . . . . . . . . . . . . . . . . . . . . . . . . . . . . . . . . . . . . . . .7
1.2
Set-up . . . . . . . . . . . . . . . . . . . . . . . . . . . . . . . . . . . . . . . . . . . . . . . . . . . . . . . . . . . . . . . . . . . . . . . . . . .8
Folding, Moving, and Positioning the Treadmill // Electrical Requirement // Grounding Instructions //
Starting Up the Treadmill // Getting On and Off the Treadmill // Keeping the Treadmill Deck Lubricated //
Centering the Treadmill Belt // Adjusting the Treadmill Belt Tension
2.
The Display Console . . . . . . . . . . . . . . . . . . . . . . . . . . . . . . . . . . . . . . . . . . . . . . . . . . . . . . . . . . . . . . . . .10
2.1
Display Console Overview . . . . . . . . . . . . . . . . . . . . . . . . . . . . . . . . . . . . . . . . . . . . . . . . . . . . . . . . . . . .10
2.2
Display Console Descriptions . . . . . . . . . . . . . . . . . . . . . . . . . . . . . . . . . . . . . . . . . . . . . . . . . . . . . . . . . .11
2.3
Emergency Stop System . . . . . . . . . . . . . . . . . . . . . . . . . . . . . . . . . . . . . . . . . . . . . . . . . . . . . . . . . . . . . .12
2.4
Accessory Trays and Reading Rack . . . . . . . . . . . . . . . . . . . . . . . . . . . . . . . . . . . . . . . . . . . . . . . . . . . . .12
2.5
English / Metric Display . . . . . . . . . . . . . . . . . . . . . . . . . . . . . . . . . . . . . . . . . . . . . . . . . . . . . . . . . . . . . . .12
3.
Heart Rate Zone Training Exercise . . . . . . . . . . . . . . . . . . . . . . . . . . . . . . . . . . . . . . . . . . . . . . . . . . . . . .13
3.1
Why Heart Rate Zone Training Exercise? . . . . . . . . . . . . . . . . . . . . . . . . . . . . . . . . . . . . . . . . . . . . . . . . .13
3.2
Heart Rate Monitoring . . . . . . . . . . . . . . . . . . . . . . . . . . . . . . . . . . . . . . . . . . . . . . . . . . . . . . . . . . . . . . . .14
4.
The Workouts . . . . . . . . . . . . . . . . . . . . . . . . . . . . . . . . . . . . . . . . . . . . . . . . . . . . . . . . . . . . . . . . . . . . . .15
4.1
Workout Overviews . . . . . . . . . . . . . . . . . . . . . . . . . . . . . . . . . . . . . . . . . . . . . . . . . . . . . . . . . . . . . . . . . .15
4.2
Using the Workouts . . . . . . . . . . . . . . . . . . . . . . . . . . . . . . . . . . . . . . . . . . . . . . . . . . . . . . . . . . . . . . . . .15
To Begin Any Workout Setup // Selecting Quick Start // Selecting a Workout // Entering Numeric
Values During a Workout Setup // Accepting or Changing the Target Heart Rate // Adjusting the
Elevation for a Workout-In-Progress // Adjusting the Speed for a Workout-In-Progress //
Pausing a Workout // Ending a Workout Early // Viewing Workout Statistics // Treadmill Workout
Setup Steps (chart)
4.3
Workout Descriptions . . . . . . . . . . . . . . . . . . . . . . . . . . . . . . . . . . . . . . . . . . . . . . . . . . . . . . . . . . . . . . . .18
Speed Interval // Aerobic // Weight Loss // Hill Climb // Heart Rate Control // Target Time // Target
Distance // Target Calories
4.4
Custom Workouts . . . . . . . . . . . . . . . . . . . . . . . . . . . . . . . . . . . . . . . . . . . . . . . . . . . . . . . . . . . . . . . . . .19
Setting Up and Using Custom Workouts for the First Time // Changing Existing Custom Workout
Settings
5.
Service and Technical Data . . . . . . . . . . . . . . . . . . . . . . . . . . . . . . . . . . . . . . . . . . . . . . . . . . . . . . . . . . . .21
5.1
Preventative Maintenance Tips
5.2
Troubleshooting the Telemetry Heart Rate Chest Strap . . . . . . . . . . . . . . . . . . . . . . . . . . . . . . . . . . . . . . .21
Heart Rate Reading Is Erratic Or Absent Entirely // Heart Rate Reading Is Erratic Or Extremely High
5.3
When and How to Obtain Product Service . . . . . . . . . . . . . . . . . . . . . . . . . . . . . . . . . . . . . . . . . . . . . . . . .21
Identifying Problems // Obtaining Service
5.4
Treadmill Specifications . . . . . . . . . . . . . . . . . . . . . . . . . . . . . . . . . . . . . . . . . . . . . . . . . . . . . . . . . . . . . .23
. . . . . . . . . . . . . . . . . . . . . . . . . . . . . . . . . . . . . . . . . . . . . . . . . . . . . . . .21
© 2003 Life Fitness, a division of Brunswick Corporation. All rights reserved. Life Fitness and Heart Rate Zone Training are registered trademarks of Brunswick Corporation. Any use of these trademarks, without the express written consent of Life Fitness or the
corresponding companies is forbidden.
3
UNPACKING
THE
TREADMILL
1. Carefully cut and remove the SHIPPING BANDS.
2. Carefully disengage the staples securing the TOP
TRAY.
3. Lift the TOP TRAY upward and off of the BOTTOM
TRAY.
4. Remove the TOP SPACERS, DISPLAY CONSOLE
BOX and UPRIGHTS.
5. Remove the remaining packaging from the deck of
the TREADMILL.
Caution: The TREADMILL should be assembled
before removing it from the BOTTOM SHIPPING
TRAY. Follow the ASSEMBLY INSTRUCTIONS
on the opposite page before proceeding.
6. From the rear of the TREADMILL, tilt the BASE
upward until it locks upright.
4
7. Tear the front end of the BOTTOM SHIPPING TRAY
at the corners and fold the flap downward.
8. Carefully roll the TREADMILL forward and off of the
BOTTOM SHIPPING TRAY.
9. Carefully roll the treadmill near the desired location
for use.
10. Unfold the treadmill: Stand directly behind the treadmill. Support the treadmill base with the right hand,
and pull and hold the release handle downward with
the left hand. The handle is located on the end of the
left main frame. Begin lowering the base a short distance. Let go of the release handle and, with both
hands, guide the treadmill deck down to unfold it.
Caution: As the treadmill comes closer to the
ground, it lowers at a faster rate and feels
heavier.
ASSEMBLING
THE
TREADMILL
Tools Required: Metric Wrench Set, Metric
Allen Wrench Set, Phillips Screwdriver
1. Locate the USER LEFT UPRIGHT (A) (upright with
pre-fed CONSOLE CABLE). With the HANDLEBAR
EXTENSION facing the rear of the unit, position the
USER LEFT UPRIGHT near the USER LEFT
UPRIGHT BRACKET (B). Connect the CONNECTORS (C) leading from the USER LEFT UPRIGHT
and USER LEFT UPRIGHT BRACKET. Slide the
USER LEFT UPRIGHT over the USER LEFT
UPRIGHT BRACKET until fully seated. Install one
5/8" BUTTON HEAD SCREW (1) and LOCK WASHER (2) each in the side and rear mounting holes of
the USER LEFT UPRIGHT. Finger-tighten the
SCREWS.
Caution: Do not pinch the cable when sliding the
USER LEFT UPRIGHT (A) over the USER LEFT
UPRIGHT BRACKET (B).
2. Locate the USER LEFT UPRIGHT BRACE (D).
Using four 5/8" BUTTON HEAD SCREWS (1) and
LOCK WASHERS (2), secure the USER LEFT
UPRIGHT BRACE to the front of the USER LEFT
UPRIGHT (A) and the FRAME (E). Finger-tighten
the SCREWS.
6. Locate the DISPLAY CONSOLE (K). Position the
DISPLAY CONSOLE near the top ends of the LEFT
and RIGHT UPRIGHTS (A) & (F). Connect the CONNECTOR (L) leading from the top of the USER LEFT
UPRIGHT to the CONNECTOR (L) leading from the
user left side of the DISPLAY CONSOLE. Slide the
DISPLAY CONSOLE onto the TOP UPRIGHT
EXTENSIONS. Secure the DISPLAY CONSOLE to
the uprights using two 5/8" BUTTON HEAD
SCREWS (1) and LOCK WASHERS (2) on either
side of the DISPLAY CONSOLE. Tighten the
SCREWS securely.
Caution: Do not pinch the cable when sliding the
DISPLAY CONSOLE (K) onto the LEFT and
RIGHT UPRIGHTS (A) & (F).
7. Tighten all SCREWS securely.
8. Position the TREADMILL into the desired location for
use.
9. Plug the TREADMILL into a proper electrical outlet
as instructed in SECTION 1.2 of this manual.
3. Locate the USER RIGHT UPRIGHT (F). With the
HANDLEBAR EXTENSION facing the rear of the
unit, position the USER RIGHT UPRIGHT near the
USER RIGHT UPRIGHT BRACKET (G). Slide the
USER RIGHT UPRIGHT over the USER RIGHT
UPRIGHT BRACKET until fully seated. Install one
5/8" BUTTON HEAD SCREW (1) and LOCK WASHER (2) each in the side and rear mounting holes of
the USER RIGHT UPRIGHT. Finger-tighten the
SCREWS.
4. Locate the USER RIGHT UPRIGHT BRACE (H).
Using four 5/8" BUTTON HEAD SCREWS (1) and
LOCK WASHERS (2), secure the USER RIGHT
UPRIGHT BRACE to the front of the USER RIGHT
UPRIGHT (F) and the FRAME (E). Finger-tighten the
SCREWS.
5. Locate the HANDRAIL (J). With the stepped extension end of the HANDRAIL facing right, position the
HANDRAIL between the LEFT and RIGHT
UPRIGHTS (A) & (F) at the HANDRAIL MOUNTING
HOLES. Secure the user left side of the HANDRAIL
to the LEFT UPRIGHT using the 2" BUTTON HEAD
SCREW (3) and one LOCK WASHER (2). Secure
the user right side of the HANDRAIL to the RIGHT
UPRIGHT using one 5/8" BUTTON HEAD SCREW
(1) and one LOCK WASHER (2).
5
This Operation Manual describes the functions of the following products:
Life Fitness Sport treadmill:
ST55
See Section 6, titled Specifications page in this manual
for product-specific features.
Statement of Purpose: The treadmill is an exercise machine that enables users to walk or run, in place, on a moving
surface.
Health-related injuries may result from incorrect or excessive use of exercise equipment. The manufacturer
STRONGLY recommends seeing a physician for a complete medical exam before undertaking an exercise
program, particularly if the user has a family history of high blood pressure or heart disease; or is over the
age of 45; or smokes, has high cholesterol, is obese, or has not exercised regularly in the past year. The
manufacturer also recommends consulting a fitness professional on the correct use of this product.
If, at any time while exercising, the user experiences faintness, dizziness, pain, or shortness of breath, he or
she must stop immediately.
6
1
GETTING STARTED
1.1
IMPORTANT SAFETY INSTRUCTIONS
SAFETY WARNING: The safety of the product can be maintained only if it is examined regularly for
damage and wear. See Preventative Maintenance section for details.
•
DANGER: To reduce the risk of electrical shock, always unplug this Life Fitness product before cleaning or
attempting any maintenance activity.
•
CAUTION: Risk of injury to persons - To avoid injury, stand on the siderails before starting the treadmill.
•
WARNING: To reduce the risk of burns, fire, electric shock or injury, it is imperative to connect each product to a
properly grounded electrical outlet.
•
To disconnect, turn power OFF at the ON/OFF switch, then remove plug from electrical outlet.
•
Never operate a Life Fitness product if it has a damaged power cord or electrical plug; or if it has been dropped,
damaged, or even partially immersed in water. Contact Life Fitness Customer Support Services.
•
Before using this product, it is essential to read this ENTIRE operation manual and ALL instructions. The treadmill is intended for use solely in the manner described in this manual.
•
Always follow the console instructions for proper operation.
•
Close supervision is necessary when used by or near children, invalids or disabled persons.
•
Never insert objects into any opening in the treadmill. If an object should drop inside, carefully retrieve it. If the
item is beyond reach, contact Customer Support Services for assistance. See Section 4 for details.
•
Use caution when unfolding the treadmill. As the treadmill base is unfolded, it will feel heavier and lower at an
increasing rate as it moves closer to the ground.
•
Never place liquids of any type directly on the unit, except in an accessory tray. Containers with lids are
recommended.
•
Do not use the treadmill outdoors, near swimming pools or in areas of high humidity.
•
When in use, keep all loose clothing, shoelaces, and towels away from the treadmill’s moving components. Keep
hands and feet away from all moving components.
•
Keep the area around the treadmill clear of any obstructions, including walls and furniture. An area of six feet by
four feet behind the treadmill is recommended.
•
Use the handrails whenever additional stability is required. In case of an emergency, such as tripping, the
handrails should be grabbed and the user should place his/her feet on the side platforms.
•
Wear shoes with rubber or high-traction soles. Do not use shoes with heels, leather soles, cleats or spikes. Do
not use the treadmill in bare feet.
•
Do not tip the treadmill on its side during operation.
•
To ensure proper functioning of this product, do not install attachments or accessories that are not provided or
recommended by the manufacturer.
•
Be sure that the Safety Key is properly located before use.
•
Use this product in a well-ventillated area.
•
Use this product on a solid, level surface.
•
Make sure that all components are fastened securely. These include the console, uprights, and handlebars.
•
Keep the power cable and plug away from heated surfaces.
•
Never place the power cord under carpeting or set any object on the power cord. Do not route the power cord
under the treadmill. Do not pull on the power cord.
•
Never walk or jog backwards on the treadmill.
SAVE THESE INSTRUCTIONS FOR FUTURE REFERENCE.
7
1.2
SETUP
Read the entire Operation Manual before setting up the the treadmill.
FOLDING, MOVING, AND POSITIONING
THE
TREADMILL
The treadmill can be folded easily by means of a “gas shock” mechanism. Folding the treadmill when it is not in use
frees up floor space and makes it easy to move the unit.
Folding the treadmill: When the treadmill is idle, set the incline grade to 0 percent, switch the unit off, and unplug it.
Then, with both hands, lift the back end of the treadmill upward until it clicks and locks into place.
Caution: The treadmill must be set to 0% before folding. Damage may occur and the treadmill may
not lock into a proper upright position.
Moving and positioning the treadmill: Once the treadmill is folded and locked, simply roll it to the desired location.
When positioning the treadmill for use, allow for a clearance area of six feet by four feet behind the treadmill to make
it easy to get on and off the treadmill and to adjust the tension of the belt. See the section titled Specifications for the
treadmill’s dimensions. Also, make sure to use the treadmill on a firm, level surface.
Note: Occasionally, after extended treadmill use, a fine black dust may accumulate on the floor beneath the unit. This
does not indicate that anything is wrong with the treadmill, and the dust can easily be
removed with a vacuum cleaner. To prevent the dust from accumulating on floor, place a mat beneath the unit.
Unfolding the treadmill: Stand directly behind the treadmill. Support the treadmill base
with the right hand, and pull and hold the release handle downward with the left hand.
The handle is located on the end of the left main frame. Begin lowering the base a
short distance. Let go of the release handle and, with both hands, guide the treadmill
deck down to unfold it.
Caution: As the treadmill comes closer to the ground, it lowers at a faster rate and feels heavier.
ELECTRICAL REQUIREMENT
Consult the chart below for electrical requirements outside the U.S. and Canada. The plug must be inserted into an
electrical outlet that has been properly installed and grounded in accordance with all local codes and ordinances.
GROUNDING INSTRUCTIONS
This product must be properly grounded. If the unit malfunctions or breaks down, proper grounding provides a path of
least resistance for the electric current, which reduces the risk of shock to anyone touching or using the equipment.
Each unit is equipped with an electrical cord, which includes an equipment grounding conductor and a grounding
plug. The plug must be inserted into an outlet that has been properly installed and grounded in accordance with all
local codes and ordinances. Use only the power cord provided with this treadmill.
DANGER: A risk of electrical shock may result from improper connection of the equipment-grounding conductor.
Check with a qualified electrician if in doubt as to proper grounding technique. DO NOT modify the plug provided with
the product. If it will not fit an electrical outlet, have a proper outlet installed by a qualified electrician.
STARTING UP THE TREADMILL
The On/Off switch for the treadmill is located next to the power supply cord at the front of the treadmill. To start up
the treadmill, simply flip the switch to the On position (|).
The treadmill will start up only when the safety key has been properly inserted into the key-holder in the console. For
more information, see section 2.3, titled Emergency Stop System.
8
GETTING ON AND OFF
THE
TREADMILL
With the treadmill belt idle, step on the side rails to straddle the belt. Set up a workout using the steps described in
Section 4.2, titled Using the Workouts. When the belt is in motion, hold the handrails and carefully step onto the belt.
Continue to use the handrails as necessary for stability. After completing a workout, wait until the belt is idle before
stepping off.
CAUTION: Always face forward during a workout.
KEEPING
THE
TREADMILL DECK LUBRICATED
The treadmill deck has been pre-lubricated at the factory. However, it may require periodic lubrication throughout its
usage life for optimal performance and reduced wear-and-tear on important components . With an average rate of
use, which is approximately three weekly 30-minute workout sessions, the treadmill lubrication level should be
checked every 9 - 12 months.
To check the lubrication level: When the treadmill is idle, reach underneath the belt, palm-side-down, as far toward
the center as possible. Then, place the hand on the deck. If it is moist then it does not require lubrication. If the deck
is dry, it requires lubrication.
To add lubricant: The Lube-N-Walk® Wax Kit is recommended for this treadmill. Follow the instructions included
with the kit to add lubricant. Use of other lubrication kits may void the warranty. Contact the product service center for
more information on the Lube-N-Walk Wax Kit. See Section 5.3 for contact information.
CENTERING
THE
TREADMILL BELT
With normal use, the treadmill belt periodically may tend to run off-center. To test and adjust the belt, run the treadmill
at 4 mph (6.5 kph) without a user on it. To perform any centering adjustment, use the Allen wrench that was shipped
with the unit, and turn the left and right roller bolts, as described below. The roller bolts are located in the back of the
frame side rail.
If the belt runs too far to the left: Turn the left roller bolt one quarter-turn clockwise to tighten it. Then, turn the right
roller bolt on quarter-turn counterclockwise to loosen it.
If the belt runs too far to the right: Turn the right roller bolt one quarter-turn clockwise to tighten it. Then, turn the
left roller bolt on quarter-turn counterclockwise to loosen it.
After performing any adjustment, continue to run the belt without a user on it for three minutes to confirm that it is
centered. Repeat adjustments as necessary.
CAUTION: Never turn the bolts more than one quarter-turn at any time. Also, over-tightening the belt
can shorten the belt’s life considerably.
ADJUSTING
THE
TREADMILL BELT TENSION
As the belt stretches over time with normal use, the user may begin to feel the belt slipping across the rollers. The
slipping sensation indicates that the belt requires tightening. When the belt is idle and not in use, turn each roller bolt
one quarter turn clockwise to tighten it. Make sure to turn each bolt an equal amount.
Afterward, walk on the belt while it is in motion to test the adjustment. Repeat the tightening if necessary, but do not
turn the bolts more than one quarter-turn at any time.
If this adjustment does not stop the belt from slipping, call Customer Service. See section 5.3, titled How to Obtain
Product Service.
9
2
THE DISPLAY CONSOLE
2.1
DISPLAY CONSOLE OVERVIEW
The computerized display console on the treadmill allows the user to tailor a workout to personal fitness abilities and
goals and to monitor progress. With this easy-to-use console the user can track fitness improvement from one workout to the next.
10
2.2
DISPLAY CONSOLE DESCRIPTIONS
The functions for the keys and display windows on the treadmill console are listed and described in this section. See
Section 4, titled The Workouts, for detailed information on using the console to set up workouts.
A
ELEVATION: During a workout-in-progress, press this key to change the current elevation. Then, press the
NUMERIC keys to select a new elevation.
B
SPEED: During a workout-in-progress, press this key to change the current speed. Then, press the NUMERIC
keys to select a new speed.
C
ENTER: During a workout setup, press this key to accept a displayed value, such as speed or elevation.
D
CLEAR: During a workout setup, press this key to clear incorrect data, such as speed or elevation. When setting
up a CUSTOM PROGRAM, use this key to clear previously saved settings as described in section 4.4, titled CUSTOM PROGRAMS.
E
WORKOUT/NUMERIC keys: During a workout setup, press one of these keys when prompted by the MESSAGE
CENTER to select a workout.
•
•
•
•
•
•
•
•
•
CUSTOM A: Press this key to select the CUSTOM A workout if it has been pre-programmed.
CUSTOM B: Press this key to select the CUSTOM B workout if it has been pre-programmed.
SPEED INTERVAL: Press this key to select the SPEED INTERVAL workout.
WEIGHT LOSS: Press this key to select the WEIGHT LOSS workout.
HILL CLIMB: Press this key to select the HILL CLIMB workout.
HR CONTROL: Press this key to select the HEART RATE CONTROL workout.
TARGET TIME: Press this key to select a workout that targets a specific time duration as a goal.
TARGET DISTANCE: Press this key to select a workout that targets a specific distance as a goal.
TARGET CALORIES: Press this key to select a workout that targets a specific number of caloires as a goal.
Additionally, each of these 10 keys is labled with a numeral, from “0” to “9”. During a workout setup, use these keys
to enter numeric values, such as age or workout duration, as prompted by the MESSAGE CENTER. During a
workout-in-progress, use these keys to easily enter a new numeric value after pressing the SPEED or ELEVATION key
to change the current speed or elevation. The up and down arrow keys may also be used to select workout values.
F
ELEVATION ARROW keys: Press these keys to change an elevation level while a workout is in progress.
G
SPEED ARROW keys: Press these keys to change an speed while a workout is in progress.
H
QUICK START/START: Press this key to begin a workout immediately, bypassing workout setup steps. This workout
runs at a preset duration, elevation, and speed. These settings do not change automatically, but may changed manually.
Also press this key after setting up a workout to begin the workout.
I
VIEW: During a workout-in-progress, press this key to scroll through workout statistics as displayed in the MESSAGE
CENTER.
J
COOL DOWN: Press this key during a workout in progress to enter a four minute cool down period. During the first two
minutes of the cool down period, the current speed and elevation will be reduced by half. During the last two minutes of
the cool down period, the reduced speed and elevation will be reduced by half again.
K
PAUSE/STOP: Press this key to pause a workout-in-progress. Press the key again to stop the workout.
L
ELEVATION window: This window displays the elevation of a workout-in-progress.
M MESSAGE CENTER: This window displays step-by-step instructions for setting up a workout. When a workout is in
progress, it displays statistics about the progress of the workout, as seen below:
•
•
•
•
•
N
Time: the time elapsed since the start of the workout.
Distance: the distance traveled since the beginning of the workout.
Calories: the number of calories burned since beginning the workout.
Pulse: the detected heart rate if the user is wearing telemetry heart rate chest strap.
Percentage of Maximum Heart Rate: the user’s heart rate expressed as a percent of the theoretical maximum heart rate† if the user is wearing a telemetry chest strap.
SPEED window: This window displays the current treadmill speed of a workout-in-progress.
O
STOP KEY: A magnetized key that cuts the main power in emergency situations.
†
Defined by the American College of Sports Medicine's "Guidelines for Exercise Testing and Prescription" as equal to 220 minus an individual’s age.
11
2.3
EMERGENCY STOP SYSTEM
The treadmill features an emergency system that cuts the main power of the unit to stop the treadmill if the user falls.
The system consists of a key that is inserted into a key-holder located in the lower-left side of the console. A cord
and clip attached to this magnetized key is then clipped to the user. If the key is pulled out of the key-holder during a
workout-in-progress, the treadmill stops immediately. Before starting a workout, attach the clip to clothing.
CAUTION: Pulling out the key brings the treadmill to an immediate, dead stop, which can be
dangerous. Only pull out the key in emergencies. To stop the treadmill under routine circumstances,
simply press the PAUSE/STOP key, which brings the treadmill to a gradual stop.
Replace the key to reset the system. The treadmill will start up only when the safety key has been properly inserted
into the keyholder in the console.
2.4
ACCESSORY TRAYS AND READING RACK
An accessory tray is built into each side of the console. Additionally, a reading rack is built in to the base of the console.
2.5
ENGLISH / METRIC DISPLAY
By factory default, workout statistics are displayed in English, as opposed to Metric, units. To switch to Metric units,
press and hold the UP speed ARROW key, the DOWN speed ARROW key, and the “0” NUMERIC key in respective
order.
12
3
HEART RATE ZONE TRAINING EXERCISE
3.1
WHY HEART RATE ZONE TRAINING EXERCISE?
Research shows that maintaining a specific heart rate while exercising is the optimal way to monitor the intensity of a
workout and to achieve maximum results. That is the idea behind heart rate zone training approach to exercise.
Zone training identifies an exerciser's ideal heart rate range, or zone, for burning fat or increasing cardiovascular fitness. The values within the zone depend on the workout.
NOTE: Consulting a fitness trainer is recommended for defining specific fitness goals and designing a workout program.
The treadmill’s HEART RATE CONTROL workout is designed to take full advantage of the benefits of heart rate
zone training exercise. For detailed information about this workout, see Section 4, titled The Workouts.
During this workout, wear the telemetry heart rate chest strap to enable the treadmill’s on-board computer to monitor the
heart rate. The computer automatically adjusts the speed and elevation level to maintain the target heart rate* based on
the actual heart rate.
For all other workouts, wearing the telemetry chest strap is optional for heart rate monitoring.
* Target Heart Rate (THR) zone is between 60 percent and 75 percent of the theoretical maximum. For example, a 40-year-old user's THR zone is
beween 108 and 135: (220-20)*.60=108; (220-20)*.75=135.
13
3.2
HEART RATE MONITORING
THE TELEMETRY HEART RATE CHEST STRAP
The treadmill is equipped with telemetry, a heart rate monitoring system in which electrodes, pressed against the
skin, transfer heart rate signals to the treadmill console. These electrodes are attached to a telemetry heart rate
chest strap that the user wears during the workout. The chest strap is included with the treadmill.
See the diagram below for correct positioning of the strap. The electrodes (A), which are the two grooved surfaces on
the underside of the strap, must remain wet to transmit accurately the electrical impulses of the heart back to the
receiver. Moisten the electrodes. Then, secure the strap as high under the chest muscles as possible. The strap
should be snug, but comfortable enough to allow for normal breathing.
The transmitter strap delivers an optimal heart rate reading when the electrodes are in direct contact with skin.
However, it also functions properly through a thin layer of wet clothing.
If it becomes necessary to re-moisten the chest strap electrodes, grasp the center of the strap, pull it away from the
chest to expose the two electrodes, and moisten them.
A
14
A
4
THE WORKOUTS
4.1
WORKOUT OVERVIEWS
This section lists the treadmill’s pre-programmed workouts. For more detailed information, see Section 4.2, titled
Using the Workouts.
SPEED INTERVAL alternates intervals of high and low speeds.
AEROBIC also alternates intervals of high and low speeds, but the low intervals are higher than those of SPEED
INTERVAL.
WEIGHT LOSS alternates uniformly high and low elevations.
HILL CLIMB also alternates high and low elevations, building gradually to a peak.
HEART RATE CONTROL alters speed and elevation to maintain the user’s entered target heart rate.*
TARGET TIME targets a specific time duration as a goal.
TARGET DISTANCE targets a specific distance as a goal.
TARGET CALORIES targets a specific number of caloires as a goal.
CUSTOM WORKOUTS (A and B): The user may pre-set up to two workouts with personal setup information, such as
age, time duration, and elevation, and then store the workouts in the console memory. For more information, see section
4.4, titled Custom Workouts.
4.2
USING
THE
WORKOUTS
Different workouts require different setup steps. See the chart titled Treadmill Workout Set-up Steps, which appears
later in this section, for a quick glance at the steps for setting up any workout. This section provides details on the
steps themselves.
TO BEGIN ANY WORKOUT SETUP
Switch on the treadmill. Then, make sure that the emergency stop key is properly inserted into the key-holder, and
clip the key cord to clothing.
SELECTING QUICK START
QUICK START is the fastest way to begin exercising, and it bypasses the steps involved in selecting a specific workout.
Once QUICK START is selected, a workout begins at the default elevation of 0 percent and the default speed of
.6 mph (1 kph) speed. These settings can be changed manually during the workout. The workout lasts for 30 minutes.
SELECTING A WORKOUT
At the MESSAGE CENTER prompt, press one of the numeric workout keys for the desired workout. The MESSAGE
CENTER displays a profile of the workout. Press the ENTER key to accept the workout, or simply press another WORKOUT key to select another workout.
For CUSTOM WORKOUTS, once a workout is configured and saved, no further setup steps are necessary. For more
information, see Section 4.4, titled Custom Workouts.
* Target Heart Rate (THR) zone is between 60 percent and 75 percent of the theoretical maximum. For example, a 40-year-old user's THR zone is beween
108 and 135: (220-20)*.60=108; (220-20)*.75=135.
15
ENTERING NUMERIC VALUES DURING A WORKOUT SETUP
After a workout is selected, the MESSAGE CENTER displays prompts to enter certain values, depending on the
workout type. At these prompts, simply use the the NUMERIC KEYS to enter the number, and press ENTER.
•
Age: The treadmill’s computer uses this value to calculate the user’s target heart rate.
•
Duration: The maximum possible workout duration is 99 minutes. The workout duration determines the duration of the individual intervals. Each workout consists of 15 intervals of equal length. The length of each interval in a 30-minute workout, for example, is two minutes.
•
Maximum speed: For SPEED INTERVAL and AEROBIC workouts, which alternate between slower and
faster intervals, the maximum speed chosen is the value for the faster intervals. The highest possible speed
is 10 mph
(16 kmh). The treadmill computer automatically selects the speed for the slower interval based on the
maximum speed.
•
Maximum elevation: For WEIGHT LOSS and HILL CLIMB workouts, which alternate between higher and
lower elevations, the maximum elevation chosen is the value for the the higher intervals. Elevation grades
range in .5 percent increments from 0 percent to 10 percent. The treadmill computer automatically selects the
elevation for the lower-elevation interval based on the maximum elevation.
•
Warm-up time: The HEART RATE CONTROL workout begins with a warm-up period. Choose a warm-up
period of 3 to 7 minutes.
•
Warm-up speed: During the warm-up period for a HEART RATE CONTROL workout, a user-selected, low
speed gradually elevates the heart rate. Using the numeric keys, select a speed from 1 to 5 mph (1 to 6 kph).
•
Target distance: The maximum possible distance is 30 miles (50 kilometers).
•
Target calories: A range of possible values from 20 to 999 calories.
ACCEPTING
OR
CHANGING
THE
TARGET HEART RATE*
During the setup for a HEART RATE CONTROL program, which requires the user to wear a telemetry heart rate
chest strap, the MESSAGE CENTER displays a target heart rate based on the user’s age. Either accept the displayed value (60% of theoretical max) by pressing ENTER, or change the value using the NUMERIC keys, and then
press ENTER. The target heart rate cannot be changed during a workout-in-progress.
NOTE: The computer does not accept an entered value that is above the user’s theoretical maximum heart rate†.
ADJUSTING
THE
ELEVATION
FOR A
WORKOUT-IN-PROGRESS
During a workout, change the elevation one of two ways:
•
Press the ELEVATION key and then entering a new value with the NUMERIC keys. Then press ENTER.
OR
•
Press the ELEVATION ARROW keys to increase or decrease the elevation.
ADJUSTING
THE
SPEED
FOR A
WORKOUT-IN-PROGRESS
During a workout, change the speed one of two ways:
•
Press the SPEED key and then entering a new value with the NUMERIC keys. Then press ENTER.
OR
•
Press the SPEED ARROW keys to increase or decrease the speed.
PAUSING A WORKOUT
To pause a workout in progress, press the PAUSE/STOP key. Press the START key to resume the workout.The maximum pause duration is three minutes. If a paused workout is not resumed within that time, the computer deletes the inprogress workout information and returns to a workout setup state.
†
Defined by the American College of Sports Medicine's "Guidelines for Exercise Testing and Prescription" as equal to 220 minus an individual’s age.
* Target Heart Rate (THR) zone is between 60 percent and 75 percent of the theoretical maximum. For example, a 40-year-old user's THR zone is
beween 108 and 135: (220-20)*.60=108; (220-20)*.75=135.
16
ENDING A WORKOUT EARLY
It is possible to end a workout immediately before the pre-set duration expires. To do so, press the STOP key twice. The
MESSAGE CENTER displays the completed time, total distance, and total calories burned. Press the STOP key again to
reset the console and set up a new workout.
It also is possible to initiate an early, but more gradual, end to a workout-in-progress by going into a cool-down mode.
This period of diminishing speed and elevation allows the user’s exertion level to decrease steadily. To initiate a cooldown before the pre-set duration expires, press COOL DOWN key. The workout immediately goes into a four-minute
cool-down mode. For the first two minutes, the speed and elevation decrease to 50 percent of the values of the workoutin-progress. For the final two minutes, the speed and elevation decrease another 50 percent. After the cool-down period,
the workout ends. The MESSAGE CENTER displays the completed time, total distance, and total calories burned. Press
the STOP key again to reset the console and set up a new workout.
Caution: The treadmill elevation must be set to 0% before folding the treadmill. Damage may occur
and the treadmill may not lock into a proper upright position.
VIEWING WORKOUT STATISTICS
When a workout is in progress, the ELEVATION window continuously displays the current elevation, and the SPEED
window continuously displays the current speed. The MESSAGE CENTER displays the user’s progress as points on a
track.
The MESSAGE CENTER also displays the time remaining in the duration. To scroll through other statsitics of the
workout-in-progress, press the VIEW key. Each time this key is pressed, the MESSAGE CENTER displays one of the following values:
•
Distance
•
Pulse (if the user is wearing the telemetry chest strap)
•
Calories burned
strap)
•
Percent of maximum heart rate (if the user is wearing the telemetry chest
At the end of the workout duration or manually-selected
cool-down, the MESSAGE CENTER displays the completed time, total distance, and total calories burned.
Note: By factory default, workout statistics are displayed in
English, as opposed to Metric, units. To switch to Metric
units, press and hold the UP speed ARROW key, the
DOWN speed ARROW key, and the “0” NUMERIC key in
respective order.
TREADMILL WORKOUT SETUP STEPS
QUICK START
Select QUICK START
Enter AGE
Begin workout
SPEED INTERVAL
Select SPEED INTERVAL
Enter age
Enter duration
Select maximum speed
Press START
Begin workout
AEROBIC
Select AEROBIC
Enter age
Enter duration
Select maximum speed
Press START
Begin workout
WEIGHT LOSS
Select WEIGHT LOSS
Enter age
Enter duration
Select maximum elevation
Press START
Begin workout
HILL CLIMB
Select HILL CLIMB
Enter age
Enter duration
Select maximum elevation
Press START
Begin workout
HEART RATE CONTROL*
Select HEART RATE
CONTROL
Enter AGE
Enter time
Enter WARM-UP TIME
Enter WARM-UP SPEED
Accept THR**
Press START
Begin workout
TARGET TIME
Select TARGET: TIME
Enter age
Enter duration
Press START
Begin workout
TARGET DISTANCE
Select TARGET: DISTANCE
Enter age
Enter distance
Press START
Begin workout
TARGET CALORIES
Select TARGET: CALORIES
Enter age
Enter calories
Press START
Begin workout
CUSTOM WORKOUTS
(These must be pre-set first;
see Section 4.2 for details)
Select CUSTOM WORKOUT A
or CUSTOM WORKOUT B
Enter AGE
Accept TIME
Press START
Begin workout
* This workout requires the user to wear the telemetry chest strap.
** Target Heart Rate (THR) zone is between 60 percent and 75 percent of
the theoretical maximum. For example, a 40-year-old user's THR zone is
beween 108 and 135: (220-20)*.60=108; (220-20)*.75=135.
17
4.3
WORKOUT DESCRIPTIONS
SPEED INTERVAL
This program alternates intervals of high and low speeds. As the profile diagram indicates, the speed gradually
increases in the early stage. The main section of the workout consists of high- and low-speed intervals. The contrast
between speeds is sharper than in the AEROBIC workout. In the final stage, the speed gradually declines.
AEROBIC
This program alternates intervals of high and low speeds. As the profile diagram indicates, the speed gradually
increases in the early stage. The main section of the workout consists of high- and low-speed intervals. The contrast
between speeds is more subtle than in the SPEED INTERVAL workout. In the final stage, the speed gradually
declines.
Weight loss profile
WEIGHT LOSS
This program alternates intervals of high and low elevations. Unlike the HILL CLIMB workout, the high intervals are
uniform in elevation, as are the low intervals.
18
HILL CLIMB
This program alternates intervals of high and low elevations. Unlike the FAT BURN workout, the high intervals build
to a peak and then gradually decline.
HEART RATE CONTROL
In this program the treadmill will activate according to your warm up speed for the duration that you have requested.
Treadmill will automatically adjust by speed or elevation to achieve and maintain your target heart rate. After the
warm up time, it will take about 3-5 minutes to reach your target heart rate. Your heart rate will be maintained at +/5 beats of your target heart rate.
When the monitor picks up your heart beat signal, the heart under the viewing display will light up and blink. When
you have reached your target heart rate, the HRC next to the heart will light up.
See section 4.2 for more information regarding accepting or changing the target heart rate.
TARGET TIME
This workout targets a specific time duration as a goal. By default, the elevation or speed for this workout do not
change automatically, but may be changed manually with the SPEED or ELEVATION ARROW keys. Once the duration target is acheived, the workout ends.
TARGET DISTANCE
This workout targets a specific distance as a goal. By default, the elevation or speed for this workout do not change
automatically, but may be changed manually with the SPEED or ELEVATION ARROW keys. Once the distance target
is acheived, the workout ends.
TARGET CALORIES
This workout targets a specific number of calories burned as a goal. By default, the elevation or speed for this workout do not change automatically, but may be changed manually with the SPEED or ELEVATION ARROW keys. Once
the calorie target is acheived, the workout ends.
4.4
CUSTOM WORKOUTS
The user may pre-set up to two workouts with personal setup information, such as workout type and age, and then store
the workouts in the console memory. Then, in future workouts, the user can select one of these CUSTOM WORKOUTS
and begin exercising immediately.
SETTING UP AND USING CUSTOM WORKOUTS
FOR THE
FIRST TIME
CUSTOM WORKOUTS must be set up before they can be used. The SPEED and INCLINE settings are saved
throughout the program. To set up a CUSTOM WORKOUT:
1.
2.
3.
4.
5.
With the treadmill powered up and the safety key engaged, press the CUSTOM A or CUSTOM B key.
Press ENTER.
Enter age when prompted by the MESSAGE CENTER.
Enter the duration when prompoted by the MESSAGE CENTER.
Press START.
The treadmill computer stores one change in speed or incline per minute. A total of 15 speed or incline changes may
be saved throughout the workout.
19
CHANGING EXISTING CUSTOM WORKOUT SETTINGS
Once a CUSTOM WORKOUT has been set up, it can be reset or changed as desired. To change existing settings for
one of the two CUSTOM WORKOUTS:
1. Change the workout duration during setup. Doing so prompts the computer to erase all the settings for the
workout.
2. Set up the workout as described above in Setting Up Custom Workouts for the First Time.
OR
1. With the treadmill powered up and the safety key engaged, press the CUSTOM A or CUSTOM B key.
2. Press the CLEAR key.
3. The MESSAGE CENTER displays the prompt, “CLEAR PROGRAM? YES”. Press CLEAR again.
4. Press ENTER. The computer memory is cleared of the workout information.
5. Set up a new workout as described above in Setting Up Custom Workouts for the First Time.
20
5
SERVICE AND TECHNICAL DATA
5.1
PREVENTATIVE MAINTENANCE TIPS
Use a vacuum cleaner or a slightly damp cloth to remove dust from the treadmill periodically.
WARNING: Do not use any solvents on the deck or running belt, as these can reduce lubrication.
NOTE: Safety of the equipment can be maintained only if the equipment is examined regularly for damage or wear.
Keep the equipment out of use until defective parts are repaired or replaced.
•
Check the operation of the Stop key once a week.
•
Also, fold up the treadmill and vacuum the floor beneath and around it periodically to prolong the life of the unit.
5.2
TROUBLESHOOTING
THE
TELEMETRY HEART RATE CHEST STRAP
HEART RATE READING IS ERRATIC OR ABSENT ENTIRELY
•
Repeat the electrode moistening procedure on the chest strap. See Section 3.2, titled Heart Rate Monitoring for
details. The electrodes must remain wet to pick up and transmit accurate heart rate readings.
•
Make sure the electrodes are flat against the skin.
•
Wash the belt transmitter regularly with mild soap and water.
•
Make sure the chest strap transmitter is within three feet (91 centimeters) of the console.
•
The chest strap is battery-operated and will stop functioning when the battery runs out. Contact Customer
Support Services for instructions on how to have the chest strap replaced. See Section 5.3, titled How to Obtain
Product Service.
HEART RATE READING IS ERRATIC OR EXTREMELY HIGH
If the chest strap is worn near sources of electromagnetic signals, these signals may be strong enough to elevate heart
rate readings. Possible sources include:
•
Television sets and/or antennas, cell phones, computers, cars, high voltage power lines and other motor driven
exercise equipment.
•
Another heart rate transmitter within three feet, or one meter, may also cause abnormal heart rate readings.
5.3
WHEN AND HOW
TO
OBTAIN PRODUCT SERVICE
IDENTIFYING PROBLEMS
In the event of an electrical failure, the treadmill shuts down immediately.
Generally speaking, if the console’s displays or programs do not function properly, try switching it off and on. Doing so
often clears problems by resetting the treadmill computer’s memory. If restarting the treadmill does not eliminate the
problem, call Customer Support.
•
No signal on the monitor LCD windows: It is often possible to correct this problem by restarting the treadmill.
If not, check the communication cable between the monitor and motor controller, and make sure that the cable
isn’t pinched or damaged.
•
Displayed “ERROR 1-SPEED SENSOR ERROR”: This indicates that the computer is not picking up the motor
speed signal. Note whether the belt moves at all when the START key is pressed. If so, note whether the motor
stops at low speeds, such as .6 mph to 1 mph (1.0kmh to 1.5 kmh) or high speeds, such as 6 mph to 8 mph
(10kmh to 12 kmh). These details are important in helping Customer Service diagnose and solve the problem.
•
Displayed “ERROR 2-OVER SPEED ERROR”: This problem actually is a safety function referred to as “run
away protection”. When the belt speed exceeds the computer’s speed detection range, the treadmill motor shuts
down, and the MESSAGE CENTER displays the Error 2 message. In this case, simply restart the treadmill. If the
MESSAGE CENTER displays this message before the unit is ever used, or if the MESSAGE CENTER displays
this message at speeds within the detection range, the mechanism is damaged.
21
•
Displayed “ERROR 3-SAFETY KEY TETHER ERROR”: This indicates that the Emergency Stop Key is not correctly inserted into the keyholder. Make sure that the key is properly inserted.
•
Displayed “ERROR 5-INCLINE ERROR”: This indicates that the incline motor, which creates workout elevations, is not functioning properly. It may be over-loaded or over-heated. To test this, wait until the motor cools
down, and try working out again. Other sources of the problem may be that the sensor connection cable is
defective, the sensor itself may be damaged, or the incline motor itself is damaged.
•
Displayed “ERROR 11-COMMUNICATION ERROR”: It is often possible to correct this problem by restarting the
treadmill. If not, check the communication cable between the monitor and motor controller, and make sure that
the cable isn’t pinched or damaged.
OBTAINING SERVICE
1. Verify the symptom and review the operating instructions. The problem may be unfamiliarity with the product and its
features and workouts.
2. Locate and write down the serial number of the unit, which is located at the front of the frame.
3. Contact Life Fitness Customer Support Services via the Web at: www.lifefitness.com, or call the nearest Life Fitness
Customer Support Services group:
For Product Service within
the United States and Canada:
Telephone: (+1) 847.451.0036
FAX: (+1) 847.288.3702
Toll-free telephone: 800.351.3737
For Product Service Internationally:
Life Fitness Europe GmbH
Telephone: (+49) 089.317.751.66
FAX: (+49) 089.317.751.38
Life Fitness Asia Pacific Ltd
Telephone: (+852) 2891.6677
FAX: (+852) 2575.6001
Life Fitness (UK) LTD
Telephone: (+44) 1353.665507
FAX: (+44) 1353.666018
Life Fitness Latin America
and Caribbean
Telephone: (+1) 847.288.3964
FAX: (+1) 847 288.3886
Life Fitness Atlantic BV
Life Fitness Benelux
Telephone: +31 (0) 180 64 66 66
FAX: +31 (0) 180 64 66 99
Life Fitness Italia S.R.L.
Telephone: (+39) 0472.835.470
FAX: (+39) 0472.833.150
Toll-free telephone: 800.438836
Life Fitness Vertriebs GmbH
Telephone: (+43) 1615.7198
FAX: (+43) 1615.7198.20
22
Life Fitness Brazil
Telephone: (+55) 11.7295.2217
FAX: (+55) 11.7295.2218
Life Fitness Japan
Telephone: (+81) 3.3359.4306
FAX: (+81) 3.3359.4307
Life Fitness Iberia
Telephone : (+34) 93 672 4660
FAX : (+34) 93 672 4670
5.4
TREADMILL SPECIFICATIONS
Designed use:
Maximum user weight:
Motor:
Power requirements:
Rollers:
Striding belt:
Cushioning system:
Deck type:
Front handrail:
Side handrails:
Stop systems:
CONSOLE:
Displays:
Consumer
300 pounds / 136 kilograms
2.0 hp continuous duty Leeson
All major power requirements available
2.6” / 6.7 cm crowned front
2.0” / 5 cm crowned back
19.5” x 54” / 49.5 cm x 136 cm; anti-static
Rubber isolation mounts
Deck hard-mounted to frame in back
1" / 25.4 mm non-reversible, one-sided laminate
Standard with black foam grip
Standard with black foam grips
Emergency Stop key and mechanical switch emergency stop system
Two LCD windows for Time and Elevation; LCD MESSAGE CENTER with Time, Distance,
Calories, Pulse, Percentage of Maximum Heart Rate
Summaries:
Total elapsed time of workout, total calories burned, total distance
WORKOUTS:
Quick Start, Speed Interval, Aerobic, Weight Loss, Hill Climb, Heart Rate Control, Target Time,
Target Distance, Target Calories, two Custom Workouts
Heart rate monitor:
Telemetry heart rate monitoring system
Telemetry heart rate monitoring chest strap included
Elevation range:
0 percent to 10 percent in .5 percent increments
Workout duration range:
0 to 99 minutes
Calorie range:
0 to 999 calories
Pulse range:
40 to 240 beats per minute
Distance range:
0 to 30 miles / 0 to 50 kilometers
Speed range
0.6 to 10 mph / 1 to 16 kmh
Accessory Tray:
Standard
Color:
Silver frame; Blue shrouds with gray accents
ASSEMBLED DIMENSIONS (UNFOLDED):
Length
76.4 inches / 194 centimeters
Width
32.7 inches / 83 centimeters
Height
56.7 inches / 144 centimeters
ASSEMBLED DIMENSIONS (FOLDED)
Length
39.5 inches / 100.3 centimeters
Width
32.7 inches / 83 centimeters
Height
68.1 inches / 173 centimeters
ASSEMBLED WEIGHT:
253 pounds / 115 kilograms
SHIPPING DIMENSIONS:
Length
80 inches / 203.2 centimeters
Width
36 inches / 91.4 centimeters
Height
11 inches / 28 centimeters
Weight
275 pounds / 125 kilograms
23