1
ʅ
aria 130 - DIGITAL KEY TELEPHONE SYSTEM USER GUIDE
aria 130
Dig it a l Ke y Te le p ho ne
Sy s te m
USER GUID E
Co n ta i ns : Q u ic k Re fe re n c e Gui d e s ,
Di g i tal Ke y s e t Fe a tu re s ,
Atte n d an t Op e ra ti on ,
Ho te l Op t io n Fe atu re s ,
Sin g l e Li n e Te l e p h on e (An alo g u e ) Op e rat io n .
0
ʅ
aria 130 - DIGITAL KEY TELEPHONE SYSTEM USER GUIDE
aria 130
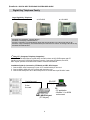
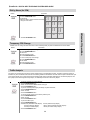
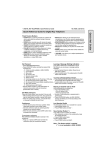
A single cabinet installation is shown, (a maximum of
2 cabinets are available for aria 130).
NB: Although every effort is made to keep this Guide up to date, Features and Functions are subject to change without notice. An inclusion of a
feature or function in this guide does not imply it is operational on your system. Some features require specific hardware or software installation.
Please check with your aria dealer for further details.
1
ʅ
aria 130 - DIGITAL KEY TELEPHONE SYSTEM USER GUIDE
Index
A
Access Authorization Code...............................…...18
Alarm Reset .....................................…..……………22
Answering a Call Wait with Voice Over .......…….....14
Answering an Intercom Call ....................….…….....13
Answering an Outside Call ..........................………..10
Auto Call Number Redial ..........................……….....11
B
Background Music ...................................………..…20
Blocking Outside Calls .............................……….....18
C
Call Back ................................................…………...14
Call Forward ...........................................…………...15
Call Park ..................................................……….....12
Call Transfer ..........................................……………10
Call Wait ..................................................……….....14
Changing Differential Ring …………………..………13
Changing Intercom Answer Mode .............………...13
CO Message Wait ……………………………………22
Conference .............................................…………..17
D
Directed Call Pick-up ................................………..14
DISA (Direct Inward System Access) ..........…..….22
Do Not Disturb .........................................……….. 15
E
Executive/Secretary Transfer ..................…………11
F
Flash .......................................................……….. 16
Flexible Key Programming.........................……….25
G
Group Call Pick-up .....................................…….. 17
L
Last Number Redial ................................………...10
LCD Language Change ……………………………22
M
Message Waiting ....................................………... 15
Mute .......................................................………... 14
P
Paging ....................................................………... 16
Placing a CO Call on Hold ........................………..17
Placing an Intercom Call .........................………...13
Placing an Intercom Group Call ................………..17
Placing an Intercom on Hold ......................……….13
Placing an Outside Call ...............................………10
Pre-selected Message ..............................………..20
Programming Your Name into Display ...........…....19
Q
Queuing ......................................................………11
R
Ring Volume Control ................................…….…. 17
Restoring Outside Calls ....................…….. ……...18
S
Save Number Redial ...........................……………10
Speakerphone ......................................…. ……....16
Speaker Volume Control .............................……...17
Speed Dial Numbers .............................…………..11
Station Programming Menu Table ………………...24
Step Call ..............................................…………...11
Storing Dial By Name ........................……………..12
T
Two-way Recording ................…...………………...22
U
Universal Night Answer ................…...………….13
User Custom Message Programming .......…..…20
Using Dial By Name ............................….…...…19
V
Voice Announcement …………………………….21
Voice Over ........................................………..…14
W
Wake-up Call .......................................……..… 19
Attendant Operation…………………………….26
Attendant Clock Set……………………………....26
Attendant DSS Operation ..................………..…30
Attendant Intrusion ................................……….27
Attendant LCD Language ..................….……....30
Attendant Programming Menu Table …….32 & 33
Changing Time/Date Format ..............……….…27
CO Outgoing Disable ............................………..27
Customized Message ...........................………. 28
Day/On-demand/Night/Weekend Mode Svc……28
Dial By Name .....................................………..…29
Erasing Station Message ...................…………. 30
External Page Port BGM Selection by ATD ……30
Intercom Box BGM Selection by Attendant .……30
Overriding a Key Telephone in DND …………....31
System Greetings ..................................…….….26
System Speed Dial .............................……….…27
Temporary COS Change ......................………. 29
To Erase SMDR Record ....................…………..28
To Print out Accumulated SMDR Records ....….28
Traffic Analysis ........................................…….. 29
Wake-up Call ........................................………. 26
Hotel Operation…………………………………..34
Authorization Code……………………………......36
Auto Internal Speed Directory ...........………..….41
Baby Listening ................................…………… .37
Bath Alarm ..................….………………….….... 39
Brief SMDR Print ………………………………….41
Call Charge Rate ..............…………………….…37
Change LCD Display Language ………………...38
Check-In ............................……………………....34
Check-In/Change a Guest Room Status .......….35
Check-Out ...…..….………………………………..37
Class Of Service .................................……….…35
Fee for Part Time ………....................…………. 40
Guest Alarm Call .………………………………….35
Hotel Programming Menu Table ...……………... 42
Intercom Enable/Disable …………………………36
Maid Status .............................……………….….39
Multiple Front Desk ……………………..………...41
New Cabina Call …………………………………..41
One-time CO Call Enable…………………………38
Pre-paid Call Charge ……………………………..36
Printing a Guest Room Status……………………38
Register Bar & Mini-Bar Charge ...................…..39
Register & Change a Guest Name ……………...35
Register Hotel Name. …………………….......…..34
Room Charge Display & Printing ……………..…37
Room Rate Assign ...................................………40
Room to Room Call Group ..................………….40
SLT Operation…………… See Contents pg 7
2
ʅ
aria 130 - DIGITAL KEY TELEPHONE SYSTEM USER GUIDE
Quick Reference Guide for aria
130 Digital Key Telephone
Fixed Feature Buttons
FLASH button may be used to terminate an outside call and
re-seize dial tone without having to hang up the handset.
MUTE button allows you to switch the built in microphone
on or off when using the speakerphone or the handset
microphone when using the handset.
MON button enables you to make a phone call with-out
lifting handset. It turns the telephone on and off when using
the speakerphone.
SPEED button provides you with access to speed dialing,
save number redial and last number redial.
TRANS (TRANSFER) button is used to transfer an outside call
HOLD button enables you to place an outside caller on hold.
from a station to another.
CALLBK (CALLBACK) button allows you to leave a callback
indication at a station that is busy, unattended, or in DND.
REDIAL allows you to make last number redial and auto
call number redial.
CONF button is used to establish conference calls.
VOLUME bar allows you to adjust speakerphone and
handset volume.
DND/FWD (Do Not Disturb/Forward) button allows you to
forward your calls to another destination, or make DND mode.
Call Forward
Placing an Outside Call on Hold
Press MON button.
Press DND/FWD button and dial the desired Call
Forward type.
- 0 : Follow me
- 1 : Unconditional
- 2 : Busy calls
- 3 : No answer calls
- 4 : Busy/no answer calls
- 5 : Station off-net, unconditional
- 6 : Station off-net, no answer
- 7 : Incoming outside line to off-net (Sys. ATD only))
- # : Cancel previous call forward
Dial the station number or press DSS button or
intercom group where calls are forwarded.
(Confirmation tone is heard.)
To make Call forward to VMIB, press # key after
dialing call forward type (1~4).
While connected to an outside line,
Press HOLD/SAVE button.
- Once for system hold
- Twice for exclusive hold
Reverse if hold preference is programmed to
system hold.
Press HOLD/SAVE button.
Last Number Redial
The last dialed number on an outside line is saved.
Press REDIAL button. Or,
Press SPEED button and dial ✱.
Each station with LCD has 10 last dialed number
directory. You may find a dialed number by pressing
VOLUME key. And press HOLD/SAVE button to dial
the number.
Call Wait (Camp-on)
Save Number Redial
If you dial a busy station, you may alert it to your call.
After receiving intercom busy tone, dial ✱ or the last
digit of called station number or press DSS button.
When the called party answers, consult with them
or hang up to transfer the call, if any.
If you wish to save a number you dialed,
After dialing the number of an outside party, keep
the handset off-hook.
Press SPEED button twice.
To dial a saved number,
Press SPEED button and dial #.
Conference
Call the desired party (internal or outside). When
called party answers, press CONF button.
Add next conference party by selecting another
outside line or intercom station.
When the party answers, press CONF button twice.
All parties are connected.
To terminate a conference,
The conference initiator should be actively in the
conference.
Hang up, or press CONF button to finish the
conference (only for conference initiator).
Call Transfer
While connected to an outside call,
Press TRANS/PGM button.
Dial station number or DSS button.
(You can select a screened or unscreened transfer.)
Screened Transfer
When that extension answers, announce the transfer
and hang up to complete call transfer.
Unscreened Transfer
When the called extension begins to signal, hang up
to complete call transfer.
Leaving a Message Waiting Indication
Storing Speed Dial Numbers
If you dial a station that is unattended or in Do
Not Disturb, you can leave a message waiting
indication.
Dial the desired intercom station. Busy tone or
DND tone is heard.
Press CALLBK button. The called party’s CALLBK
button LED will flash.
To answer a Message Waiting Indication,
Press flashing CALLBK button and the station that
left message will be signaled with tone ringing.
If called station does not answer, press the CALLBK
button once to leave a message.
Press TRANS/PGM button and then SPEED
button.
Dial the speed number bin.
- Station Speed Number bins are 000~099
- System Speed Number bin are 2000~3499
Dial the phone numbers to be stored.
Press HOLD/SAVE button to save the number.
3
ʅ
aria 130 - DIGITAL KEY TELEPHONE SYSTEM USER GUIDE
Quick Reference Guide for Digital Key Telephone
Flexible Buttons Programming
Storing Speed Dial Numbers (cont)
Press TRANS/PGM button.
Press a flexible button to be programmed.
See the below chart and dial the desired code.
Press HOLD/SAVE button.
To erase an exiting speed bin,
Press TRANS/PGM button and then SPEED button.
Dial speed number bin to be erased.
Press HOLD/SAVE button.
Dialing a Speed Number
Direct Station Select
Call Park
Call Pick Up
Call Pick Up – Directed
Speed Dial
Station Speed Dial
System Speed Dial
All Call Page
Universal Night Answer
Last Number Redial
Save Number Redial
Account Code
Call Wait (Camp-on)
Speakerphone/Headset
UCD Group (only) DND
Press SPEED button and dial the speed number bin.
When the called party answers, pick up the handset or
use speakerphone.
Voice Over
It is available when the station has been programmed with
voice over.
When a busy keyset engaged in an internal or external
call is called through camp-on by a caller, HOLD/SAVE
button of busy keyset is flashing.
After tone, the busy keyset will be connected to both
parties.
Queuing
You see that a particular line is busy and want to be
placed on a list waiting for the first line in the group or
station to become available.
Lift handset or press MON button.
Press the busy outside line button, specific line group
button or DSS button.
Pressing CALLBK button, your CALLBK button flashes
and confirmation tone is heard.
Hang up or press MON button.
700~827
601~610
✱1
✱ 4 2 (Station Number if reqd)
✱7
SPEED + bin no. (000~099)
SPEED + bin no. (2000~3499)
#6
2
SPEED + ✱
SPEED + #
TRANS/PGM + 8 0
TRANS/PGM + 8 5
TRANS/PGM + 7 5
TRANS/PGM + 8 7 + (UCD Gp#)
For LDK-2 & 8 button Keyphones
CONF Button
TRANS/PGM + 9 1
CALLBK Button
TRANS/PGM + 9 2
DND Button
TRANS/PGM + 9 3
FLASH Button
TRANS/PGM + 9 4
MUTE Button
TRANS/PGM + 9 5
MON Button
TRANS/PGM + 9 6
REDIAL Button
TRANS/PGM + 9 7
To answer a queue request,
When the busy outside line button, specific line
group button or DSS button returns to idle, you
hear ringing and the queued line button flashes.
Lift handset and dial outside line.
To erase a flexible button,
Press TRANS/PGM button.
Press the flexible button to be erased.
Press HOLD/SAVE button.
NOTES:
Attendant Clock Set
The attendant can set the Time/Date without entering
Admin. Programming.
Press TRANS/PGM button.
Dial 0 4 1
Enter Date (YYMMDDHH) and press HOLD/SAVE
button.
Enter Time (HHmm) and press HOLD/SAVE button.
If there is no need to change date or time, do not dial
current date/time and press HOLD/SAVE button.
Entering Account Code
To enter Acc Code prior to a call,
Press {Acc Code} flexible button.
Dial the account code (1-12 digits)
✱ to end digit entry
Access the Line
To enter Acc Code during a call,
Press {Acc Code} flex Key (conversation may continue),
OR Dial TRANS/PGM 5 5 0 (line is on hold)
Dial the account code (1-12 digits)
✱ to end digit entry
Recommence conversation
4
ʅ
aria 130 - DIGITAL KEY TELEPHONE SYSTEM USER GUIDE
CONTENTS
Index (Alphabetical Order – Digital, Attendant, Hotel User Guide Sections).........................................…… 2
Quick Reference Guide ……..............................................................................................................……. 3
Quick Reference Guide ……..............................................................................................................……. 4
Digital Key Telephone Family............................................................................................................……. 8
5
System Features
System Features
17
Placing an Intercom Group Call..........................................................................................................……...17
Placing a CO Call on Hold ...................................................................................................................….…17
Group Call Pick-up...............................................................................................................................….... 17
Conference ....................................................................................................................…………………... 17
Access Authorization Code...................................................................................................................... ... 18
Blocking Outside Calls .........................................................................................................................…… 18
Restoring Outside Calls .......................................................................................................................…... 18
Wake-up Call ..........................................................................................................................……………...19
Using Dial By Name ............................................................................................................................…….19
Programming Your Name into Display .................................................................................................…... 19
Pre-selected Message ..........................................................................................................................….. 20
User Custom Message Programming ...................................................................................................…...20
Background Music...................................................................................................………………………….20
Voice Announcement ...............................................................................................….……………………...21
CO Message Wait ………………………………………………………………………………………..………….22
DISA (Direct Inward System Access) ..................................................................................................…….22
LCD Language Change ...................................................................................................………………….. 22
Alarm Reset ...................................................................................................…………………………………22
Two-way Recording …………………………………………………………………………………………………22
Intercom Features
Intercom Features
13
Changing Intercom Answer Mode ........................................................................................................…... 13
Placing an Intercom Call ........................................................................................................................…..13
Answering an Intercom Call .................................................................................................................….. 13
Placing an Intercom on Hold...................................................................................................….………….. 13
Changing Differential Ring ..................................................................................................................…... 13
Voice Over...............................................................................................................………………………….14
Answering a Call Wait with Voice Over ..................................................................................................…..14
Directed Call Pick-up..............................................................................................................................…...14
Call Wait (Camp-on) .............................................................................................................................…... 14
Mute ...................................................................................................................................................……. 14
Call Back...............................................................................................................................................…... 14
Message Waiting....................................................................................................................……………….15
Do Not Disturb............................................................................................................………………………..15
Call Forward .....................................................................................................................………………….15
Paging ........................................................................................................…………………………………...16
Flash .......................................................................................................................………………………….16
Speakerphone .........................................................................................................................……………. 16
Speaker Volume Control.................................................................................................…………………….17
Ring Volume Control .............................................................................................................................….. 17
CO Line Features
CO Line Features
10
Placing an Outside Call .................................................................................................................………….10
Answering an Outside Call................................................................................................…………………...10
Call Transfer .................................................................................................................………………………10
Last Number Redial..................................................................................................................……………..10
Save Number Redial................................................................................................................…………….. 10
Auto Call Number Redial......................................................................................................................…….11
Queuing................................................................................................................…….......………………….11
Executive/Secretary Transfer ..........................................................................................................…........ 11
Step Call .......................................................................................................................................………… 11
Speed Dial Numbers ............................................................................................................................…...11
Storing Dial By Name ...........................................................................................................................…... 12
Call Park ..............................................................................................................................................…... 12
Universal Night Answer........................................................................................................……………….. 13
ʅ
aria 130 - DIGITAL KEY TELEPHONE SYSTEM USER GUIDE
CONTENTS
VMIB Quick Reference Guide
23
VMIB messaging for aria 30 Button Digital Phone...............................................................................…….23
VMIB messaging for aria 8 Button Digital Phone...............................................................................……...23
VMIB messaging for aria 2 Button Digital Phone and Analogue Phone................................................……23
VMIB Remote Access………………………………................................................................................…….24
VMIB Password Protected Mailbox……………….................................................................................…….24
Station Programming Menu
24
Flexible Button Programming.............................................................................................………………….25
Codes for Flexible Button Programming............................................................................…………………. 25
6
Hotel Operation
Hotel Operation
34
Introduction.....................................................................................................................…………………….34
Register Hotel Name.........................................................................................................................….…...34
Check-In...................................................................................................................………………………... 34
Check-In /Change a Guest's Room Status.....................................................………………………………...35
Register & Change a Guest Name (Room Status Type 1).....................................................……………….35
Class of Service (Room Status Type 2).....................................................……………………………………35
Guest Alarm Call (Room Status Type 3).....................................................………………………………….. 35
Intercom Enable/Disable (Room Status Type 4).....................................................…………………………..36
Room to Room Call Group (Room Status Type 5).....................................................………………………..36
Authorization Code (Room Status Type 6)........................................................................................……….36
Pre-paid Call Charge (Room Status Type 7)...........................................………………………………………36
Call Charge Rate (Room Status Type 8)..............................................................................................…....37
Baby Listening ..........................................................................................…………………………………….37
Check-Out ......................................................................………………………………………………………..37
Room Charge Display & Printing .................................................................................…………………….. 37
Printing a Guest's Room Status ........................................................................…………………………….. 38
Intercom Cal Enable/Disable ...................................................................................................................….38
One-Time CO Call Enable ......................................................................................………………………….38
Change LCD Display Language .....................................................................................…………………….38
Bath Alarm .....................................................................................…………………………………………….39
Maid Status …………………………………………………………………………………………………………..39
Attendant Operation
Attendant Operation
26
Wake-up Call.....................................................................................................................…………………. 26
Attendant Clock Set ..........................................................................................................................….…...26
System Greetings...........................................................................................…………………………………26
Changing Time/Date Format ..............................................................................................................…….. 27
System Speed Dial..............................................................................................................................….….27
Attendant Intrusion ................................................................................................................…... ………… 27
CO Outgoing Disable................................................................................................................…... ……….27
Day/On-demand/Night/Weekend Mode Service …………………..……………………………………………..28
To Print out Accumulated SMDR Records...........................................................................…………………28
To Erase SMDR Record.......................................................................................................................…… 28
Customized Message.........................................................................................................................…….. 28
Dial By Name (for ICM)……………………………………………………………………………………………...29
Temporary COS Change..................................................................................................................……….29
Traffic Analysis......................................................................................……………………………………….29
Erasing Station Message .......................................................................................................................…..30
Attendant LCD Language ....................................................................................................................…….30
Intercom Box BGM Selection by Attendant ..........................................................................................……30
External Page Port BGM Selection by Attendant ………………………………………………………………..30
Attendant DSS Operation ..............…......................................................................………………………….30
Make a Page .………………....................................................................................…………………………..31
Transferring an Outside Line to Another Station......................................................………………………….31
Intercom Group Call ……........................................................................................…………………………..31
Overriding a Key Telephone in Do Not Disturb ......................................................................................……31
Attendant Programming Menu Table
32 & 33
ʅ
aria 130 - DIGITAL KEY TELEPHONE SYSTEM USER GUIDE
CONTENTS
Hotel Analogue Single Line Telephone Operation
45
Baby Listening ....................................................................………………………………………..……….……45
Maid Status ……………………………………………………..……………………………………………………...45
New Cabina Call …………………………………………………………………………………………….…………45
DOCUMENT REVISION
Markw
22/09/03
Additions Pg 25,27, 43. Amendment Pg 22
7
Single Line Telephone (Analogue) Operation
Analogue Single Line Telephone Operation
43
Placing a Call (Outside call & internal) ...........……………….............................................…..….……………..43
Placing a call on Hold ........................................................................……………….......….…........…………..43
Call Pick Up ...............................................................................….……………….…………………..………….43
Call Wait (Camp On) ..............................................................................…………........………..……………...43
Call transfer (Screened and Unscreened) ………………………………………………………………..…………43
Last Number Redial ........................................................................................……………………...…………...43
Station Speed Dialing ..............................................................................….…………………. ………………...43
Conference Calling ..........................................…..............……………………………………..…….……………43
Message Waiting …..…………………………………………………………………………………………………..43
Call Forwarding your Station ...........................................................….………………………..……..…………..43
D N D (Do Not Disturb) .............................................................................….......……………….........………...44
Shuttle Call ……………………………………………………..……………….………………………………………44
Universal Night Answer ...........................................................................................………………...………….44
Paging ......................................................................……... …………….………………………………………...44
Meet Me Paging ........................................................................................……………….……………………...44
Flash To Line ...................................................................………………………………………..….…………….44
Queuing ........................................................................................………………………………………………..44
Call Park .................................................................................................………………………….………….…44
Pre-selected Messages ……………………….............................................................………………...………..44
Voice Announcements (Requires an Aria Voice Card)…………………………………………………………….44
Off Hook Alarm ……...........................................................................………………………….………………..44
Authorisation Code Programming.….........................................................…………………………..…………..45
Station Name Programming...................................................................…………………………….....………..45
Account Code Call ….......................................................………………………………………..………………..45
Hotel
Hotel Operation cont.
Register Bar & Mini-Bar Charge …………….…………………………………………………………………….....39
Room to Room Call Group…………………………………………………………..………………………………..40
Room Rate Assign……………………………………………………………………………………………………. 40
Fee for Part Time……………………………………………………………………………………………………... 40
Auto Internal Speed Directory ………………………………………………………………………………………..41
Multiple Front Desk ………………………………………………………………………………………………….. .41
New Cabina Call ……………………………………………………………………………………………………... 41
Brief SMDR Print ……………………………………………………………………………………………………... 41
Hotel Programming Menu Table
42
ʅ
aria 130 - DIGITAL KEY TELEPHONE SYSTEM USER GUIDE
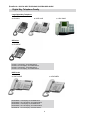
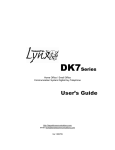
Digital Key Telephone Family
Large Digital Key Telephone
KD-33LD
KD/E-36LD
LDK-306LD
KD Series
KD-36EXE
KD-36D : LCD Display, 24 Flexible Buttons
KD-36N : No LCD Display, 24 Flexible Buttons
KD-24D : LCD Display, 12 Flexible Buttons
KD-24N : No LCD Display, 24 Flexible Buttons
KD/E Series
KD/E-36EXE
KD/E-36EXE : LCD Display, 24 Flexible Buttons
KD/E-36ENH : No LCD Display, 24 Flexible Buttons
KD/E-24EXE : LCD Display, 12 Flexible Buttons
KD/E-24ENH : No LCD Display, 24 Flexible Buttons
KD/E-8 BTN : No LCD Display, 8 Flexible Buttons
8
KD/E-8BTN
ʅ
aria 130 - DIGITAL KEY TELEPHONE SYSTEM USER GUIDE
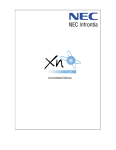
Digital Key Telephone Family
Large Digital Key Telephone
LKD-2N/S
LKD-8D/S
LKD-30DS
LKD-2N/S: No LCD Display, 2 Flexible Buttons
LKD-8D/S: LCD Display, 8 Flexible Buttons
LKD-30D: LCD Display, 30 Flexible Buttons (Dual LED with Flex. BTN 01~24 & Single LED with 25~30)
LKD-30LD: Large LCD Display, 30 Flexible Buttons (Dual LED with Flex. BTN 01~24 & Single LED with 25~30)
LKD-DSS: 48 Flexible Buttons
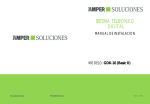
1st Party CTI (Computer Telephony Integration)
KE/C, KD/C, LDK-30DS Series keysets have normal functions as KD, KD/E keysets and CTI
function to connect PC (RS-232C Interface Function). Connecting CTI Module, the KE/C,
KD/C keyset operates to transmit/receive data to communicate with PC.
Installation Guide for Connection CTI Module to KE/C, KD/C keyset
1. Connect KE/C, KD/C keyset to KTU port of CTI module with 6-pin line cord.
2. Connect KSU to KSU port of CTI module with 4-pin line cord.
3. Connect the serial port of PC to the serial port of CTI module with 9-pin RS-232C cable.
2 wire line cord
RS-232C
(9 pin)
6 wire
line cord
KD/C,KD/EC Keyset
(CTI Keyset)
9
PC
- PC application
- Window 3.1 or 95/98
environment
ʅ
aria 130 - DIGITAL KEY TELEPHONE SYSTEM USER GUIDE
Placing an Outside Call
Button
Procedures
Lift handset or press MON button.
Press outside line button, pool button or dial CO line access code.
Dial desired party.
When called party answers, lift handset or use speakerphone.
Range
1
OR: 4 + 01~24
Or, 48 +
01~40
Button
Procedures
Range
Lift handset or press MON button to use speakerphone.
Press flashing CO line button or loop key. (NB: If the Preferred Line Answer feature is
ON for your station, you may answer just by lifting handset, or press MON.)
Call Transfer
Button
Range
Procedures
To transfer an outside call to the other extension,
Press TRANS/PGM button. (The outside call is put on hold.)
Dial station number or appropriate DSS button.
You can make a screened or unscreened transfer.
Screened
Transfer
When the called extension answers, notice the call transfer and hang up to complete call
transfer.
Unscreened
Transfer
While the station you called rings, hang up to complete call transfer.
700~827
To answer screened transfer,
When a station rings according to Intercom Answer Mode selection, answer the intercom
call.
The transferring party hangs up, the call will be connected.
Last Number Redial
Button
Range
Procedures
Each station with LCD has 10 individual last dialed number directory.
To use one of dialed numbers in the directory by scrolling,
Press REDIAL button. Or,
Press SPEED + ✱.
When the last dialed number is displayed. Press VOLUME (▲/▼) button to find a
phone number.
Press HOLD/SAVE button then, the number is dialed.
Save Number Redial
Button
Range
Procedures
If you want to save a number you dialed,
After dialing the number of an outside party, keep handset off-hook state.
Press SPEED button twice.
Hang up.
To dial a saved number,
Press SPEED + #.
10
CO Line Features
Answering an Outside Call
ʅ
aria 130 - DIGITAL KEY TELEPHONE SYSTEM USER GUIDE
Auto Call Number Redial
When the called party is busy or does not answer the call, the system can automatically redial
the number by pre-programmed time interval.
Button
Procedures
Range
Queuing
When a CO line is busy, you can request a call back when the CO line is available. As soon as it
becomes idle, you can be the first extension to get the CO line.
Button
Range
Procedures
Lift handset or press MON button.
Press busy outside line button or specific line group button.
Pressing CALLBK button, your CALLBK button is lighting and confirmation tone is heard.
Hang up or press MON button.
To answer a queue request,
When the busy CO line or specific line group returns to idle, you hear ring and the
queued line button is flashing.
Lift handset and dial a desired phone number.
Executive/Secretary Transfer
Button
Procedures
Range
When the Executive Station is busy or DND (Do Not Disturb), all calls will go to the
Secretary Station.
The Secretary Station may signal the Executive Station that is in DND by using Call Wait
feature. (Press ✱ key or dial the last digit of the number of Executive station or press the
DSS button to operate Call Wait feature.)
Step Call
When an extension is busy, you can make a call to a different station by dialing only the last digit
of new station number.
Button
Procedures
Range
Dialing an extension number, and the station is busy.
After hearing ICM busy tone, dial the last digit of the next extension number in the same
10’s group. (ex. If station “712” is busy, dial digit “4” to call station “714”.)
It can be used for CO line call by pressing SPEED button + last digit.
Speed Dial Numbers
Each extension can program up to 100 individual speed dial numbers in the station. The numbers
are entered and stored by the user and it can be recalled at any time.
Button
Procedures
To store station speed numbers,
Press TRANS/PGM button.
Press SPEED button.
Dial speed number bin.
Dial the phone numbers to be stored.
Press HOLD/SAVE button.
Enter name for Dial by Name. (optional)
Range
Station Speed bin
000~ 099
System Speed bins
2000~3499
11
CO Line Features
Press REDIAL button.
Hang up.
A busy or no answer number will be redialed automatically after pre-programmed
time interval while MUTE button is lighting.
When called party answers, lift handset to talk.
ʅ
aria 130 - DIGITAL KEY TELEPHONE SYSTEM USER GUIDE
Speed Dial Numbers (cont)
Button
Range
Procedures
Station Speed bin
000~ 099
System Speed bins
2000~3499
To use system speed numbers,
Lift handset or press MON button.
Press SPEED button.
Dial speed number bin.
To erase station speed numbers,
Press TRANS/PGM button.
Press SPEED button.
Dial speed number bin to be erased.
Press HOLD/SAVE button.
Storing Dial by Name
Users for digital display phone can enter the called party’s name so they can dial by name instead
of dialing the phone number.
Button
Range
Procedures
Press TRANS/PGM button.
Press SPEED button and speed number bin.
Dial the desired phone number.
Press HOLD/SAVE button.
Enter the name up to 16 letters using the code table:
Press HOLD/SAVE button.
Q - 11
Z - 12
. - 13
1 - 10
A - 21
B - 22
C - 23
2 - 20
D - 31
E - 32
F - 33
3 - 30
G - 41
H - 42
I - 43
4 - 40
J - 51
K - 52
L - 53
5 - 50
M - 61
N - 62
O - 63
6 - 60
P - 71
R - 72
S - 73
Q - 7*
7 - 70
T - 81
U - 82
V - 83
8 - 80
W - 91
X - 92
Y - 93
Z - 9#
9 - 90
*1 - Blank
*2 - :
*3 - ,
0-00
#
Call Park
A call can be parked in a parking location and the call will be retrieved by dialing the location number. (The call can be
picked up by other extension with making a page announcement to inform the parking location.)
Button
Procedures
While connected to an outside call,
Press TRANS/PGM button.
Dial parking location.
Range
601~610
12
CO Line Features
Or,
Press TRANS/PGM button.
Press SPEED button.
Dial speed number bin.
Press desired outside line or specific line group button.
Dial the phone number to be stored.
Press HOLD/SAVE button.
Enter name for Dial by Name. (optional)
Press HOLD/SAVE button.
To use station speed numbers,
Lift handset or press MON button.
Press SPEED button.
Dial speed number bin.
ʅ
aria 130 - DIGITAL KEY TELEPHONE SYSTEM USER GUIDE
Universal Night Answer
When CO lines are programmed for UNA and the system is placed into night mode, users can
answer incoming CO line calls employing dial code regardless of pick-up group.
Button
Range
Procedures
Lift handset or press MON button.
Press flashing CO line button. If a CO line button is not assigned, dial 2.
You will be connected to ringing outside line.
Button
Range
Procedures
Press TRANS/PGM button.
Dial 1 2
Dial 1 for Hands-free, 2 for Tone ring, or 3 for Privacy announce.
Press HOLD/SAVE button.
Placing an Intercom Call
Button
Range
Procedures
Answering an Intercom Call
Range
Procedures
With your intercom answer mode setting,
- in TN mode, intercom ring is heard. Lift handset to talk.
- in PV mode, 3 bursts of tone and one-way announcement is heard. Lift handset to talk.
- in HF mode, 3 bursts of tone and announcement is heard. Reply with Hands-free
mode or lift handset for privacy.
Placing an Intercom on Hold
Button
Range
Procedures
If your phone has ICM button, you may put an intercom call on hold by pressing
HOLD/SAVE button.
Or, while on an intercom call, press ICM button.
The ICM button flashes and intercom dial tone will be heard.
To retrieve intercom call on hold,
Press the flashing ICM button and lift handset.
Changing Differential Ring
Button
Procedures
Press TRANS/PGM button.
Dial 1 1
Select the ring type by dialing 1~4.
Press HOLD/SAVE button.
13
Range
Intercom Features
Dial intercom number or press programmed DSS button.
You will hear,
- Ring back tone in TN (Tone) mode. Wait for called station to answer the ringing.
- 3 bursts of tone in HF(Hands-free) or PV(Privacy) mode. Begin your announcement
after the tone.
Button
CO Line Features
Changing Intercom Answer Mode
ʅ
aria 130 - DIGITAL KEY TELEPHONE SYSTEM USER GUIDE
Voice Over
This feature provides voice announcement to a busy station without interrupting the existing conversation. The announcement
is received over the existing conversation so that only the busy station hears both incoming parties.
Button
Procedures
Range
When a busy keyset engaged in an internal or external call is called through camp-on by
a caller, HOLD/SAVE button of busy keyset is flashing. After tone, the busy keyset can be
connected to both parties.
Press HOLD/SAVE button in the busy keyset to converse with new call.
Press HOLD/SAVE button again to alternate the call.
Answering a Call Wait with Voice Over
Button
Procedures
You hear camp-on tone and HOLD/SAVE button is flashing.
Press HOLD/SAVE button to talk with the second caller. The first caller is placed on
hold. (MOH may be provided)
You will be connected to the first caller when the second caller hangs up.
Range
Directed Call Pick-up
Button
Range
Procedures
700~827
Call Wait (Camp-on)
If you dial a busy station, you may alert it of your call.
Button
Procedures
Range
After receiving intercom busy tone, dial “✱ ” or last digit of called station number, or press
DSS button.
Camp-on tone is heard in called station.
When called party answers, talk or hang up to transfer the call.
Mute
It provides privacy during speakerphone or handset operation by disabling the microphone.
Button
Procedures
Range
Press MUTE button to activate.
Press MUTE button again to deactivate.
Call Back
If you dial a station that is busy, you can leave a callback indication.
Button
Range
Procedures
After receiving intercom busy tone, press CALLBK button.
Hang up.
When the busy station hangs up, you will be signaled.
Answer the signal by lifting handset or by pressing MON button, the station you called
will be signaled.
14
Intercom Features
You hear intercom or transferred outside line ring at a station.
Lift handset or press MON button.
Dial ✱42 and the ringing station number.
You will be connected to the calling party.
ʅ
aria 130 - DIGITAL KEY TELEPHONE SYSTEM USER GUIDE
Message Waiting
When the called extension does not answer the call, you can leave a message wait to the station.
Button
Procedures
Range
If a called party does not answer, press CALLBK button.
Hang up.
At that time, the LED of CALLBK button in the called station is
flashing.
On LKD-2N/S, 8D/S,
If a called party does not answer, press TRANS/PGM button
and dial ✱ 6 6
To answer a message waiting,
Press flashing CALLBK button.
Station that left message will be signaled with tone ring.
On LKD-2N/S, 8D/S,
Dial ✱ 6 7 to answer a message waiting.
Do Not Disturb
Button
Range
Procedures
Intercom Features
If your phone has been programmed to have Do Not Disturb,
Press DND/FWD button while on-hook or your phone is ringing.
The LED is lighting and your phone is in DND.
To remove Do Not Disturb,
Press DND/FWD button while on-hook.
The LED is extinguished and DND at your phone is removed.
On LKD-2N/S, 8D/S,
Dial 5 5 3 instead of pressing DND/FWD button (Toggle setting).
Call Forward
A call can be forwarded to the other station, station group or VMIB depending on the call forward type. It should be
programmed in Admin. Programming to use some of the Call Forward types.
Button
Procedures
Lift handset or press MON button. (The MON button is illuminated.)
Press DND/FWD button.
Press the call forward type:
0 - Follow me
1 - Unconditional
2 - Busy calls
3 - No answer calls
4 - Busy / no answer calls
5 - Station off-net, Unconditional
6 - Station off-net, No Answer
7 - Incoming outside line to off-net (Attendant only)
Dial station number or press DSS button or intercom group.
Confirmation tone is heard and DND/FWD button is flashing.
Hang up.
To activate call forward to VMIB,
Lift handset or press MON button.
Press DND/FWD button.
Dial desired Call Forward code (1~4).
Dial VMIB selection code # to receive the call.
Hang up.
15
Range
Sta. No.
700~827
ICM. Group
620~634
ʅ
aria 130 - DIGITAL KEY TELEPHONE SYSTEM USER GUIDE
Call Forward (cont)
Button
Range
Procedures
- For Follow-me, programme the station that you will be forwarded to i.e. if your extension is
702 and you are forwarding to 704, then you will need to go to 704 to program the feature. Also,
this feature requires authorisation code and requires system programming.
- For Station Off-net, the number you are forwarding to should be saved as a speed dial
number first. (Please see Speed Dial Number.)
- For Incoming outside line to Off-net, it requires system programming.
To cancel call forwards,
Lift handset or press MON button.
Press DND/FWD button and dial #.
Hang up.
- To cancel Incoming Outside line to Off-net (at system attendant),
Press MON + DND/FWD + CO line code (CO group/CO line no. /CO BTN) + #
Sta. No.
700~827
ICM. Group
620~634
On LKD-2N/S, 8D/S,
Dial 5 5 4 instead of pressing DND/FWD button.
Paging
A station, which is allowed to access page facilities, can connect and transmit voice announcement to any or all of the
system external/internal page zones.
Button
Procedures
All Call
Internal Zone 2
Internal All Call
External Zone 2
External All Call
#
#
#
#
#
6
0 2 to …..
7
4 2
5
Internal Zone 1
Internal Zone 15
External Zone 1
External Zone 3
Meet Me Page
#
#
#
#
#
0
1
4
4
#
Range
1
5
1
3
Internal Zones:
01~15
To answer paging, (meet me page)
Go to the nearest key telephone.
Lift handset and dial # #
or HOLD/SAVE button, and you will be connected to the paging party.
Flash
May disconnect outside line and re-seize dial tone if programmed . It can be used to send a recall to line, when the system is
connected with a PBX or Enhanced Feature Analogue Line.
Range
Button
Procedures
While connected to an outside line, press FLASH button.
Speakerphone
Pressing an outside line button, a speed button, a station button or dialing a station number will automatically activate the
speakerphone. (LKD-2N/S has no microphone and doesn’t function as Hands-free unit.)
Button
Range
Procedures
To activate speakerphone,
Press MON button.
Dial outside line number or intercom number to talk.
16
Intercom Features
To make a page,
Lift handset.
Dial page zone. (See below chart.) And you will hear warning tone.
After the tone, speak your message.
Hang up.
ʅ
aria 130 - DIGITAL KEY TELEPHONE SYSTEM USER GUIDE
Speaker Volume Control
Button
Procedures
Range
In speakerphone mode, press VOLUME (▲/▼) button to control the speakerphone volume.
Ring Volume Control
Button
Procedures
Range
When bell rings, press VOLUME (▲/▼) button to control ring volume.
Placing an Intercom Group Call
Range
Procedures
Button
To make an intercom group call,
Lift handset or press MON button.
Dial the intercom group number.
ICM. Group No.
620~634
Placing a CO Call on Hold
Button
Range
Procedures
To retrieve the call,
Lift handset and press flashing outside line button.
Group Call Pick-up
Button
Range
Procedures
You should be in the same pick-up group as ringing phone.
You hear an unattended phone ringing.
Lift handset or press MON button.
Dial ✱ 1
Conference
Button
Procedures
To establish a conference,
Call desired party. (internal or outside)
Press CONF button. (CONF button is lighting and the called party is put on exclusive hold.)
Call the next party.
Press CONF button twice. (once if adding additional parties)
Conference is established.
To add another party in the conference,
Press CONF button.
Call the next party.
Press CONF button twice.
To exit a conference (unsupervised),
Press CONF button in the supervisor station and hang up. Other parties are still connected.
17
Range
Intercom
System
Features
Features
Press HOLD/SAVE button.
- Twice for exclusive hold
- Once for system hold
Reverse if hold preference is programmed to system hold.
Press HOLD/SAVE button
ʅ
aria 130 - DIGITAL KEY TELEPHONE SYSTEM USER GUIDE
Conference (Cont'd)
Procedures
Button
Range
Re-entering a conference,
Lift handset or press MON button.
Press CONF button.
To drop an outside party,
(You should be active in the conference.)
Press outside line of party you wish to drop.
Hang up or press MON button.
To terminate the conference,
Hang up or, press CONF button if unsupervised.
On LKD-2N/S, 8D/S,
Conference feature can be accomplished by programming
a flexible key as CONF button (TRANS + 91).
Access Authorization Code
To prevent unauthorized outside calling, DISA access or Trunk access on your station by others,
the system provides a means to lock/unlock a station by access authorization code.
Procedures
Button
Range
To register access authorization code,
Press TRANS/PGM button and dial 3 1
Dial your own 5 digits access authorization code.
Press HOLD/SAVE button.
Confirmation tone is heard.
To change access authorization code,
Press TRANS/PGM button and dial 3 2
Dial your current access authorization code. You will hear
confirmation tone.
Dial your new 5 digits access authorization code.
Press HOLD/SAVE button.
You will hear confirmation tone.
Blocking Outside Calls
Note : An access authorization code should be registered.
Button
Procedures
Range
Restoring Outside Calls
Button
Range
Procedures
Press TRANS/PGM button and dial 2 2).
Dial your current access authorization code. (Confirmation tone is heard.)
MUTE button will be extinguished.
18
System Features
Press TRANS/PGM button and dial 2 1
Press HOLD/SAVE button. (Confirmation tone is heard.)
MUTE button will flash until restored to normal.
ʅ
aria 130 - DIGITAL KEY TELEPHONE SYSTEM USER GUIDE
Wake-up Call
The system automatically sends ring signal to a station which registers a wake-up time. There are two kinds of wake-up call,
one is effective for one-day, the other is effective until canceled.
Button
Procedures
Range
To register wake-up time,
Press TRANS/PGM button.
Dial 4 1 and 4-digit wake-up time (HHMM) in 24-hour mode.(HH = 00~23, MM = 00~59)
Press HOLD/SAVE button for “one-day” or dial # and HOLD/SAVE button for “until
canceled”. (Confirmation tone is heard.)
To cancel wake-up call,
Press TRANS/PGM button and dial 4 2.
Press HOLD/SAVE button. (Confirmation tone is heard.)
Using Dial By Name
Each station and speed dial number can be assigned to a name. When names are programmed, you may select a speed dial
number by the stored name.
Range
Procedures
Button
Press SPEED button twice.
On the display, you will see the following.
DIAL BY NAME
ICM : 1 U_SPD : 2 S_SPD : 3
Select desired type.
1 : Intercom
2 : User (Station Speed Dial)
3 : System (System Speed Dial)
Confirmation tone is heard and you will see the following.
1 : XXXX XXXX XXXXXX
2 : YYYY YYYY YYYYYY
Using Dial By Name
Button
Procedures
Range
Programming Your Name into Display
You can program your name and people using display phones will see your name instead of your station number.
Range
Button
Procedures
Press TRANS/PGM button.
Dial 7 4.
Enter your name. (up to 7 letters using the code in “Storing Dial by name.)
Press HOLD/SAVE button.
19
System Features
Pressing VOLUME button, the cursor will be moved to the next name. When the cursor
points a name or a dial number to call, press HOLD/SAVE button. Then, the stored
number is dialed.
You may enter characters using the code in “Storing Dial by Name”. The LCD will display
the first two names which match your input. (You may delete the last letter of your input by
pressing CALLBK button. And then, the previous matched name is displayed.)
You can see the matched phone number by pressing FLASH button while the name is
displayed (toggle).
ʅ
aria 130 - DIGITAL KEY TELEPHONE SYSTEM USER GUIDE
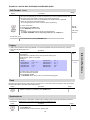
Pre-selected Message
You can select a pre-assigned message to be displayed on the LCD of the phone calling the station.
Button
Procedures
Range
Press TRANS/PGM button and dial 5 1
Dial the number of desired message. Date, Time or Station
Number if required.
Press HOLD/SAVE button. (DND/FWD button is flashing.)
0 1 LUNCH, RETURN HH:MM
0 2 ON VACATION / RETURN AT MM:DD
0 3 OUT OF OFFICE/ RERURN TIME HH:MM
0 4 OUT OF OFFICE/ RETURN AT MM:DD
0 5 OUT OF OFFICE/ RETURN UNKNOWN
0 6 CALL : XX.... (Telephone number: Max. 17 digits)
0 7 IN OFFICE/STA XXXX
0 8 IN A MEETING / RETURN TIME (HH:MM)
0 9 AT HOME
1 0 AT BRANCH OFFICE
# to cancel
1 1 ~ 2 0 are used for customized messages which are
programmed by attendant. (See “Creating Customized Message”)
To turn off message display,
Press flashing DND/FWD button.
User Custom Message Programming
You may program a custom message 00 to be displayed on the LCD of the phone calling your station.
Button
Procedures
Range
Press TRANS/PGM button and dial 5 2 at the station. (Confirmation tone is heard.)
Enter the message. (up to 24 letters using the code in “Storing Dial by Name”)
Press HOLD/SAVE button.
Background Music
A station can receive audio, generally music from an internal or external source while idle.
Button
Procedures
Press TRANS/PGM button.
Dial 7 3 and select BGM channel (00~11).
Press HOLD/SAVE button.
Range
00~11
System Features
20
ʅ
aria 130 - DIGITAL KEY TELEPHONE SYSTEM USER GUIDE
Voice Announcement
This feature provides the station an audible system prompt and you can record your greeting to provide the caller when the
call is not answered within the predefined time.
Button
Procedures
Range
Date & Time Prompt ;
Press TRANS/PGM button and dial 6 2.
You will hear the time prompt, “Date is December, 20th, Time is XX : XX PM.”
Station Number Prompt ;
Press TRANS/PGM button and dial 6 3.
You will hear the station number prompt, “This is station XXXX.”
Station Status Prompt ;
Press TRANS/PGM button and dial 6 4. (You will hear below list (a-j). c-i items will be omitted
if not active.)
a) Station number XXXX
b) Intercom Answer Mode
c) Listed message X
d) Wake-up time XX:XX AM or PM
e) Do not disturb
f) Forwarded to station XXXX
g) Forwarded to speed bin XXX
h) Queued CO XXX
i) Locked (temporary COS change) j) COS X
Record your greeting,
Press TRANS/PGM button and dial 6 1.
“Press # button to record” is heard and any current greeting will be played.
Press # button and record your greeting after hearing confirmation tone.
Press HOLD/SAVE button or MON button to finish recording, then confirmation tone is heard
Pressing SPEED button while playing, the greeting is deleted, confirmation tone is heard.
Delete your greeting,
Press TRANS/PGM button and dial 6 6.
Activate Call Forward to VMIB,
Lift handset or press MON button.
Press DND/FWD button.
Dial Call Forward type code (1~4).
Dial # key . (Confirmation tone is heard.)
Deactivate Call Forward to VMIB,
Lift handset or press MON button.
Press DND/FWD button.
Leave voice message wait,
After user greeting is played. “Record your message” prompt is heard.
After beep tone, record your message with normal voice.
Hang up.
Listen to the recorded message,
Press the flashing CALLBK button.
The recorded message is heard with the time and date.
Pressing HOLD/SAVE button, the current message is saved, the next message is heard.
Pressing CALLBK button, the current message is played again.
Pressing CONF button, the current message is deleted and the next message is heard.
(The operation of 2/8 BTN keyset is the same with other aria systems.)
To forward a recorded message,
While listening to the recorded message, dial recipient’s station number.
Activate VMIB Message Paging,
Dial the desired page zone (5XX) and lift handset.
The recorded VMIB message is paged.
Delete VMIB Paging Message,
Press TRANS/PGM button and dial 6 7.
The recorded message is deleted.
Or, press SPEED button while playing, then the message is deleted and confirmation tone
is heard.
21
System Features
Record VMIB Paging Message,
Press TRANS/PGM button and dial 6 5.
“Press # button to record” is heard and if there is a recorded paging message, it will be
played.
Press # button and record paging message after hearing confirmation tone.
Press HOLD/SAVE button or MON button to finish recording, confirmation tone is heard.
Pressing SPEED button while playing, the greeting is deleted, confirmation tone is heard.
ʅ
aria 130 - DIGITAL KEY TELEPHONE SYSTEM USER GUIDE
CO Message Wait (CLI Message Wait)
When a call is received with DISA/DID, the Calling Line Identification (CLI) of the incoming call is displayed on the LCD of
the station. If the DISA/DID external party hangs up the call before being answered, the CLI will be stored in the CO
message wait queue in the called party.
Button
Procedures
Range
To retrieve CLI Message,
Press CALLBK button.
The stored message will be shown on the LCD.
To delete the current CLI message and see the next one,
Press CONF button.
To make a callback,
Press HOLD/SAVE button.
The stored number is dialed as speed dialing.
To see the next/previous CLI message,
Press VOLUME button.
To delete all CLI messages,
Press SPEED button twice.
If DVU message is stored with CLI message, the CLI message will not be deleted by
pressing SPEED button.
DISA (Direct Inward System Access)
Outside caller can access a CO line which is programmed as DISA line.
Button
Procedures
Range
Dial the CO access code after hearing dial tone or voice guide from DVU.
Or, dial the CO access code after dialing the programmed authorization code (when
needed) for outgoing call.
LCD Language Change
Procedures
Button
Range
Press TRANS/PGM button and dial 7 1
The language in LCD is changed into default value.
If pressing TRANS/PGM + 7 1, the language in the LCD is changed to the nation’s
language.
Alarm Reset
Button
Procedures
Range
Two-way Recording
While a CO line call, you can record the conversation and it will be saved in its own mailbox.
Button
Procedures
To record the conversation,
Press the programmed {RECORD} button.( To program the {RECORD} button,
[TRANS/PGM] + Flex. BTN + [TRANS/PGM] +5 4 + [HOLD/SAVE] )
To finish the recording,
Press the programmed {RECORD} button again. Or, replace the handset.
22
Range
System Features
To terminate alarm signal while idle state,
Dial ✳ 5 6 5
Confirmation tone is heard and the alarm signal is terminated
at all assigned stations.
ʅ
aria 130 - DIGITAL KEY TELEPHONE SYSTEM USER GUIDE
Voice Mail (VMIB) Quick Reference Guide
To Forward calls to the Voice Mail (VMIB)
Press MON button.
Press DND/FWD button.
Dial one of the following forward types:
For Unconditional Forward dial……….. 1 #
For Forward on Busy dial ………………2 #
For Forward on No Answer dial ……….3 #
For Forward on Busy/ No Answer dial ..4 #
To Retrieve your Voice Mail (VMIB) Messages
Press the flashing CALL BK button. (LCD also
will also indicate a VMIB message waiting)
The Time and Date will play (if programmed)
The message will begin re playing.
Press CALL BK button to save the message
Press HLOD/SAVE button to replay the
message
Press CONF button to delete the message.
The VMIB will hang up when all messages
are deleted, or hang up the station.
To Remove the Call Forward to the Voice
Mail (VMIB)
Press MON button.
Press DND/FWD button. Dial #
Voice Mail (VMIB) for 8 Button Digital Key Telephones
To Record Out Going Greeting
Press TRANS/PGM button.
Dial 6 1
Follow the voice Prompts,
Press HOLD/SAVE when you have finished
recording your greeting.
To Forward calls to the Voice Mail (VMIB)
Press MON button (or lift the handset)
Dial one of the following forward types:
For Unconditional Forward dial… 5 5 4 1 #
For Forward on Busy dial ….……5 5 4 2 #
For Forward on No Answer dial ..5 5 4 3 #
For Forward on Busy/ No Answer dial .5 5 4 4 #
To Retrieve your Voice Mail (VMIB) Messages
The flashing CALL BK button and LCD will alert a
VMIB message
Dial ✳ 6 7
The Time and Date will play (if programmed)
The message will begin re playing.
Press # 3 to replay the message again.
Press # 2 to save the message.
Press # 1 to delete the message.
The VMIB will hang up when all messages are
deleted, or hang up the station.
To Remove the Call Forward to the Voice
Mail (VMIB)
Press MON button.
Dial 5 5 4 #
Voice Mail (VMIB) Guide for SLT & 2 Button Digital Key Telephones
SLT’s receiving VMIB message alert
Requires compatible phone.
To Record Out Going Greeting
Dial 5 6 3 6 1
Follow the voice Prompts,
Press HOLD/SAVE (or hook flash / recall for slt)
when you have finished recording your greeting.
To Forward calls to the Voice Mail (VMIB)
Press MON button (or lift the handset)
Dial one of the following forward types:
For Unconditional Forward dial……….. 5 5 4 1 #
For Forward on Busy dial ………………5 5 4 2 #
For Forward on No Answer dial ……….5 5 4 3 #
For Forward on Busy/ No Answer dial ..5 5 4 4 #
To Retrieve your Voice Mail (VMIB) Messages
The flashing MSG lamp or slt msg wait lamp will
alert a VMIB message.
Press MON button (or lift handset)
Dial ✳ 6 7
The Time and Date will play (if programmed)
The message will begin re playing.
Press # 3 to replay the message again.
Press # 2 to save the message.
Press # 1 to delete the message.
The VMIB will hang up when all messages are
deleted, or hang up the station.
To Remove the Call Forward to the Voice Mail (VMIB)
Press MON button (or lift handset)
Dial 5 5 4 #
Voice Mail (VMIB) - Password Protection
Accessing a Password Protected Mailbox
A station’s mailbox may be flagged by your installer as password protected. To access your mailbox, you will need to
key in your authorisation code (see above).
Changing your Authorisation Code
Use TRANS/PGM 3 2 (or 5 6 3 3 2 for SLT's & 2 button phone’s) to change your authorisation code (your station’s c
urrent code authorisation code is required for this feature.)
23
VMIB - Quick Ref. Guide
To Record Out Going Greeting
Press TRANS/PGM button.
Dial 6 1
Follow the voice Prompts,
Press HOLD/SAVE when you have finished
recording your greeting.
ʅ
aria 130 - DIGITAL KEY TELEPHONE SYSTEM USER GUIDE
Voice Mail (VMIB) - Remote Access Quick Reference Guide
Enter your Authorisation Code (of your Station)
Before you can remotely access your voice mail you will need to enter an ‘authorisation code’ this is done at your extension.
Press TRANS/PGM, Dial 3 1 (or Dial 5 6 3 3 1 for slt & 2 button phones)
Dial your 5 digit Authorisation code (unique to your station)
Press HOLD/SAVE button (or hook flash / recall at slt)
Dial 1 to retrieve your messages
Dial 2 to listen to the next message
Dial 4 to delete all messages
Dial # during greeting to change the greeting
Dial ✴ to exit voice mail remote control mode
Dial 1 to listen to the current message again
Dial 3 to delete the current message
Dial 2 to listen to or change your greeting
Dial 3 to remove the forward to your voice mail
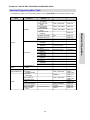
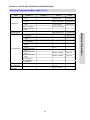
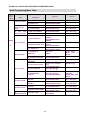
Station Programming Menu Table
The aria 300 system supports multiple hierarchical menus based on station programming. User can make station
programming by selecting desired menu. By pressing [TRANS/PGM ] button in a keyset with LCD, user can see the menu.
M a in M e n u
[1 ] R IN G
[2 ] C O S
[3 ] A U T H O R IZ AT IO N
[4 ] TIM E
[5 ] M E S S A G E
[6 ] A N N O U N C E M E N T
[7 ]
S U P P L E M E N TA R Y
Sub M enu
S u b M e n u -2
S e le c tio n
[1 ] T YP E
1 ,2 ,3 ,4
[2 ] A N SW E R M O D E
H (1 )/T (2 )/P (3 )
[1 ] C O S D O W N
IC M /C O S 7
[2 ] C O S R E S TO R E
ENTER AU TH O C O DE
[3 ] W AL K IN G C O S
ENTER AU TH O C O DE
R em a rk
DKTU
[1 ] A U T H R E G IS T E R
[2 ] A U T H C H A N G E
ONCE/
PERMERNANT
[1 ] S E T W A K E U P T IM E
[2 ] W AK E U P D IS A B L E
[1 ] S E T P R E S E L E C TE D
MSG
[2 ] S E T C U S TO M E R
MSG
[1 ] R E C O R D
U S E R G R E E TIN G
[2 ] L IS T E N
T IM E & D AT E
[3 ] L IS T E N
S TA N U M B E R
[4 ] L IS T E N
S TA S TAT U S
[5 ] R E C O R D
PA G E M S G
[6 ] E R A S E
U S E R G R E E TIN G
[7 ] E R A S E PA G E
MSG
[1 ] L C D D IS P L AY
LANG UAG E
[2 ] M P B V E R S IO N
D IS P L AY
[3 ] B G M
[4 ] R E G IS TE R S TA
NAME
[5 ] S P K /H E A D S E T
00 - 10
None
D O M E S T IC /
E N G L IS H
D KTU
2 /8 B T N /S LT
S P E A K E R /H E A D S E T
S P E A K E R /H E A D S E T /
B O TH
[6 ] H E A D S E T R IN G M O D E
[7 ] W T U S TA N U M R C V R
[8 ] S E R IA L N U M B E R
[0 ] ATT E N D A N T
[*] S Y S T E M
AT D O N LY
[# ] E N T E R A D M IN
A D M IN O N LY
24
VMIB - Quick Ref. Guide
Remote Accessing Your Mailbox
You can dial into your voice mail through DISA or using your DID number. When you hear your greeting press the ✴ button
you will be asked to enter your ‘authorisation code’ The system will respond with the number of messages in your voice mail,
if the correct code was entered.
ʅ
aria 130 - DIGITAL KEY TELEPHONE SYSTEM USER GUIDE
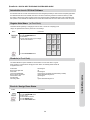
Flexible Button Programming
Button
Procedures
Range
To program flexible buttons,
Press TRANS/PGM button.
Press a flexible button to program.
See the below table and enter the desired code.
Press HOLD/SAVE button.
To erase a flexible button,
Press TRANS/PGM button.
Press the flexible button to be erased.
Press HOLD/SAVE button.
Code for Flexible Button Programming
Direct Station Select
station number
700 ~ 827
Call Park
parking location
601 ~ 610
Hunt Group
internal hunt group
620 ~ 634
Alarm Reset
Group Call Pick-up
Direct Call Pick Up
Universal Night Answer
Speed Dial
Station speed dial
System speed dial
✱565
✱1
✱ 4 2 <station #>
2
✱7
SPEED+000~099
SPEED+2000~3499
Outside Line Access
Group access
E.g. Group #1~24
Individual Line Access
E.g. Lines #1~40
1
4 + ...
4 0 1~4 2 4
4 8 + 01~40
4 8 0 0 1~4 8 4 00
Button Assignment for LKD-2/8 button
CONF button
CALLBK button
DND button
FLASH button
MUTE button
MON button
REDIAL button
TRANS + 9 1
TRANS + 9 2
TRANS + 9 3
TRANS + 9 4
TRANS + 9 5
TRANS + 9 6
TRANS + 9 7
Ring Type
Ring Answer Mode
COS Down
COS Restore
Walking COS
Auth. Code Register
Auth. Code Change
Set Wake-up Time
Wake-up Disable
Set Preselected MSG
Set Customer MSG
Record User Greeting
Listen Time & Date
Listen Station Number
Listen Station Status
Record Page MSG
Erase User Greeting
Erase Page MSG
LCD Display Language
MPB Version Display
Background Music
Register Station Name
Speakerphone/Headset
Headset Ring Mode
Account Code
ICM Hold
LOOP button
Camp-on
25
TRANS/PGM + 11
TRANS/PGM + 12
TRANS/PGM + 21
TRANS/PGM + 22
TRANS/PGM + 23
TRANS/PGM + 31
TRANS/PGM + 32
TRANS/PGM + 41
TRANS/PGM + 42
TRANS/PGM + 51
TRANS/PGM + 52
TRANS/PGM + 61
TRANS/PGM + 62
TRANS/PGM + 63
TRANS/PGM + 64
TRANS/PGM + 65
TRANS/PGM + 66
TRANS/PGM + 67
TRANS/PGM + 71
TRANS/PGM + 72
TRANS/PGM + 73
TRANS/PGM + 74
TRANS/PGM + 75
TRANS/PGM + 76
TRANS/PGM + 80
TRANS/PGM + 83
TRANS/PGM + 84
TRANS/PGM + 85
ʅ
aria 130 - DIGITAL KEY TELEPHONE SYSTEM USER GUIDE
Wake-up Call
Button
Procedures
To register wake-up call,
Press TRANS/PGM button.
Dial 0 4 2
Dial the station range. In case of one station, dial the station number twice.
After hearing confirmation tone, enter 4-digit wake-up time (HHmm) in 24-hour mode.
(HH= 00~23, mm= 00~59)
Press HOLD/SAVE button for one-day, or dial # and HOLD/SAVE button for until canceled.
Attendant Clock Set
This feature allows the attendant to set the Time/Date without entering Admin Programming.
Button
Procedure
Press TRANS/PGM button.
Dial 0 4 1
Enter Date as MMDDYY (6 digits) and press HOLD/SAVE button.
Enter Time as military format (4 digits) and press HOLD/SAVE button. If there is no need to
change date or time, press HOLD/SAVE button to go to the next step.
System Greetings
It provides announcements for Hunt service (UCD/Circular/Terminal) or DISA and only the system attendant can record
this message.
Button
Procedures
To record system greetings,
Press TRANS/PGM button.
Dial 0 6.
Dial the announcement number (001~100).
“Press # button to record” is heard. Then press # button to start recording.
Record your greeting and press HOLD/SAVE button to finish the recording.
To delete, press SPEED button while the message is played.
The System Prompt messages are 071~100 as default;
071: VMIB MOH
086: Reserved
072: Reserved
087: Reserved
073: Invalid Number Prompt
088: Remote VMIB Control Main Menu Prompt
074: Time out Prompt
089: Remote VMIB Sub-menu for digit 1 in Main Menu Prompt
075: Retry Prompt
076: Transfer to Attendant Prompt
090: Reserved
077: Reserved
091: Reserved
078: Leave Message Prompt
092: Reserved
079: Record Start Prompt
093: Remote VMIB Sub-menu for digit 2 in
080: Authorization Code Prompt
Main Menu Prompt
081: Busy Prompt
094: Remote VMIB Sub-menu for digit 3 in
082: Reserved
Main Menu Prompt
083: Station Off-net Forward Prompt
095: Remote VMIB Sub-menu for digit ✱ in
084: DND Prompt
Main Menu Prompt
085: No Answer Prompt
096: Leave Message after Tone Prompt (mailbox)
097~100: Reserved
26
Attendant Operation
To cancel wake-up call,
Press TRANS/PGM button.
Dial 0 4 3 (Confirmation tone is heard and MON button is lighting.)
Dial the station range to be canceled.
Press HOLD/SAVE button. (MON button will be extinguished.)
ʅ
aria 130 - DIGITAL KEY TELEPHONE SYSTEM USER GUIDE
Changing Time/Date Format
Button
Procedure
To change the date format on the LCD,
Press TRANS/PGM button.
Dial 0 4 4
The format toggles between DDMMYY and MMDDYY. (YY : year, MM : month, DD : date)
To change the time format on the LCD,
Press TRANS/PGM button.
Dial 0 4 5
The format toggles between 12-hour mode and 24-hour mode. (YY : year, MM : month, DD : date)
System Speed Dial
To store system speed numbers,
Press TRANS/PGM button.
Dial SPEED button.
Dial speed number bin.
Dial the phone numbers to be stored.
Dial HOLD/SAVE button.
Enter Speed Dial NAME (to 16 characters). HOLD/SAVE.
Or,
Press TRANS/PGM button.
Dial SPEED button.
Dial speed number bin.
Press desired outside line button.
Dial the phone numbers to be stored.
Dial HOLD/SAVE button.
Enter Speed Dial Name (to 16 characters). HOLD/SAVE.
System Speed
Dial Range:
2000~3499
To use system speed numbers,
Press SPEED button.
Dial speed number bin.
To edit a speed dial Name,
Press the MUTE key to edit the Name without changing the stored number.
Attendant Intrusion
Attendant may intrude into any station which is in conversation with a CO line.
Button
Procedure
To assign a flexible key as the Intrusion button
Press TRANS/PGM button.
Press the desired flexible key to be registered.
Press TRANS/PGM button.
Dial 8 6.
Press HOLD/SAVE button.
To activate attendant intrusion
Press DSS button corresponding to the busy station you wish to call. (Busy tone is heard.)
Press ATD INTRUSION button. (Intrusion warning tone is heard in the busy station, then a 3-way
conference is set up.)
CO Outgoing Disable
Button
Procedure
To disable outgoing calls a CO line,
Press TRANS/PGM button.
Dial 0 7 3
Press the desired outside line button. (Confirmation tone is heard.)
After hearing confirmation tone, selected outside line button is disabled.
Repeat the process to enable the CO line.
27
Attendant Operation
A group of speed dial numbers can be stored within the system for access by allowed stations. These numbers provide
speedy access to often used outgoing CO dialing numbers.
Button
Range
Procedure
ʅ
aria 130 - DIGITAL KEY TELEPHONE SYSTEM USER GUIDE
Day/On-demand/Night/Weekend Mode Service
The attendant station can be placed into night service mode allowing ring assignments and answering privileges to station
not having the privileges in the day mode. Or, can be placed into on-demand service mode allowing ring assignments and
answering privileges to station not having the privileges in the night mode.
The system can be placed in Day/On-demand/Night/Weekend/Auto mode operation manually by pressing [DND/FWD]
button at attendant station. In Auto ring mode, the ring mode will follow the Weekly Time Table (PGM 233).
Button
Procedures
To activate/deactivate Day/Night/On-demand/Weekend/Auto mode manually,
Pressing DND/FWD button, the ring mode is changed to
On-demand ➔ Night ➔ Weekend ➔ Auto ➔ Day mode in sequence.
On-demand mode is not activated automatically.
To Print out Accumulated SMDR Records
Station Message Detail Recording(SMDR) can provide details on both incoming and outgoing calls.
Button
Procedures
For station basis,
Dial TRANS/PGM + 0 1 1 1
Enter the desired station range.
Press HOLD/SAVE button. Accumulated SMDR records will be printed to SMDR port)
For account group basis,
Dial TRANS/PGM + 0 1 1 3
Enter the desired account group to be printed.
01~99
Press HOLD/SAVE button. (Accumulated SMDR records will be printed SMDR port)
To Erase SMDR Records
Button
Procedure
For station basis,
Dial TRANS/PGM + 0 1 1 2
Enter the desired station range. (SMDR records will be erased for all stations in the range.)
Press HOLD/SAVE button.
For call account group basis,
Dial TRANS/PGM + 0 1 1 4
Enter the desired account group. (SMDR records will be erased for all stations in the range.)
Press HOLD/SAVE button.
To display call charge,
Dial TRANS/PGM + 0 1 1 5
Enter the station number.
Press HOLD/SAVE button.
Customized Message
Button
Procedure
Press TRANS/PGM button.
Dial 0 5 3
Dial the number of the desired message (11~20).
Enter the desired message using the code in Dial by Name.
Press HOLD/SAVE button.
28
Attendant Operation
To activate Auto Ring Mode with Attendant PGM mode,
Press TRANS/PGM button.
Dial 0 7 4.
Dial 1 and press HOLD/SAVE button.
(The Weekly Time Table should be entered by Admin Programming.)
ʅ
aria 130 - DIGITAL KEY TELEPHONE SYSTEM USER GUIDE
Dial by Name (for ICM)
Button
Procedure
Press TRANS/PGM button.
Dial 0 7 2
Dial the station number and enter the name
using the code shown.
A
B
C
2
-
21
22
23
20
D
E
F
3
-
G - 41
H - 42
I - 43
4 - 40
J
K
L
5
-
51
52
53
50
M
N
O
6
- 61
- 62
- 63
- 60
P - 71
R - 72
S - 73
Q - 7*
7 - 70
T
U
V
8
-
81
82
83
80
W
X
Y
Z
9
- 91
- 92
- 93
- 9#
- 90
*1 - Blank
*2 - :
*3 - ,
0 -0 0
31
32
33
30
#
Temporary COS Change
A station user can change the class of service to lower class temporarily to prevent unauthorized use of the station.
Button
Procedures
To activate temporary COS change,
Press TRANS/PGM button.
Dial 0 2 1
Enter the station range.
Press HOLD/SAVE button.
To remove temporary COS change,
Press TRANS/PGM button.
Dial 0 2 2
Enter the station range.
Press HOLD/SAVE button.
Traffic Analysis
The system can monitor and print various system activate based on the attendant’s request. The traffic-monitoring program is
activated only when enabled and will continue accumulating statistics until disabled. The traffic data is output to the RS-232C port
upon manual request. The system will support the following traffic reports; Attendant Traffic Report, Call Summary Report, Call
Hourly Report, H/W Unit Usage Summary Report, CO Traffic Report and CO Traffic Hourly Report.
Button
Procedure
To print all summary at system attendant,
Press TRANS/PGM button.
Dial 0 1 2 1. & Select Measurement Time type.
Press HOLD/SAVE button.
To print all summary traffic report periodically at system attendant,
Press TRANS/PGM button.
Dial 0 1 2 2.
Press HOLD/SAVE button.
To cancel periodic printing of all summary traffic reports,
Press TRANS/PGM button.
Dial 0 1 2 3.
Press HOLD/SAVE button.
To print the traffic report,
Press TRANS/PGM button.
Dial 0 1 2 4 (Attendant Traffic Report) 0 1 2 5 (Call Summary Report)
0 1 2 6 (Call Hourly Report)
0 1 2 7 (H/W Unit Usage Summary Report)
0 1 2 8 (CO Traffic Report)
0 1 2 9 (CO Traffic Hourly Report)
Press HOLD/SAVE button.
29
Attendant Operation
Press HOLD/SAVE button.
Q - 11
Z - 12
. - 13
1 - 10
ʅ
aria 130 - DIGITAL KEY TELEPHONE SYSTEM USER GUIDE
Erasing Station Message
The attendant can cancel the features, DND CALL FORWARD and pre-selected message
activating at other station.
Button
Procedure
Press TRANS/PGM button.
Dial 0 7 1
Dial the desired station range to be canceled.
Press HOLD/SAVE button.
Attendant LCD Language
Procedure
To change the LCD language at attendant,
Press TRANS/PGM button.
Dial 0 7 ✱
Dial the station range to be changed.
Select the language type with the following codes.
Press HOLD/SAVE button.
aria 300
00
01
02
03
04
05
06
07
08
09
10
11
12
13
14
Language
English
Italian
Finnish
Dutch
Swedish
Danish
Norwegian
Hungarian
Germany
French
Portuguese
Spanish
Korean
Estonia
Russian
Intercom Box BGM Selection by Attendant
The attendant can select the music channel source to an ICM box.
Button
Procedure
To set ICM box music,
Press TRANS/PGM button.
Dial 0 7 5
Dial the music channel 01~11
Press HOLD/SAVE button.
External Page Port BGM Selection by Attendant
Button
Procedure
To set External Page Port music,
Press TRANS/PGM button.
Dial 0 7 6 (External Port 1), 0 7 7 (External Port 2), or 0 7 8 (External Port 3).
Dial the music channel 01~11.
Press HOLD/SAVE button.
Attendant DSS Operation /Placing an Intercom Call from the DSS
Button
Procedures
Lift handset or press MON button.
Press the desired DSS station button.
30
Attendant Operation
Button
ʅ
aria 130 - DIGITAL KEY TELEPHONE SYSTEM USER GUIDE
Making a Page
Button
Procedure
Lift handset or press MON button.
Press PAGE button.
Speak in normal voice tone to announce message.
Transferring an Outside Line to Another Station
Button
Procedure
While connecting an outside line, press the desired DSS station button.
You can wait to announce the transfer or hang up.
Button
Procedure
Lift handset or press MON button.
Press the programmed INTERCOM GROUP CALL button.
The call is connected to an idle station in the group.
Overriding a Key Telephone in Do Not Disturb
Button
Procedure
Press DSS button of the station to be overridden. (DND tone or busy tone is heard.)
Dial ✱ to override the station in DND or in busy.
31
Attendant Operation
Intercom Group Call
ʅ
aria 130 - DIGITAL KEY TELEPHONE SYSTEM USER GUIDE
Attendant Programming Menu Table
The attendant can program some features with this table by pressing TRANS/PGM button then [0] and appropriate codes.
Attendant Main
Menu
Attendant
Sub Menu - I
[1] SMDR
[6] ABORT PRINTING
[1]PRINT
[2] TRAFFIC
[2]COS
[3]AUTHORIZATION
Remark
STN# (+ END STN#)
MAIN ATD
STN# (+ END STN#)
MAIN ATD
GRP# (+ END GRP#)
MAIN ATD
GRP# (+ END GRP#)
MAIN ATD
MAIN ATD
None
MAIN ATD
[7] PRINT LOST CALL
MAIN ATD
[8] DELETE LOST CALL
[1] PRINT ALL
SUMMARY
[2] PRINT ALL
PERIODIC
[3] ABORT PERI ODIC
PRINT
[4] PRINT ATD
TRAFFIC
[5] PRINT CALL
SUMMARY
[6] PRINT CALL
HOURLY
MAIN ATD
Analysis Time Type
MAIN ATD
Analysis Time Type
, Print Time (Hour)
MAIN ATD
None
MAIN ATD
Analysis Time Type
MAIN ATD
None
MAIN ATD
None
MAIN ATD
[7] PRINT H/W USAGE
Analysis Time Type
MAIN ATD
[8] PRINT CO
SUMMARY
Analysis Time Type
MAIN ATD
[9] PRINT CO HOURLY
Enter CO Grp #
MAIN ATD
[1] SET ICM ONLY
MODE
[2] RESTORE COS
STN# (+ END STN#)
STN# (+ END STN#)
[1] CHANGE
AUTHORIZATION
[1] CHANGE
DATE/TIME
STN# (+ END STN#)
MAIN or
GROUP ATD
MM/DD/YY
MAIN ATD
[3] DISABLE WAKE
UP
[4] LCD DATE MODE
MMDDYY/DDMMYY
MAIN or
GROUP ATD
MAIN or
GROUP ATD
MAIN ATD
[5] LCD TIME MODE
12H/24H
MAIN ATD
[6] USE PX TIME
/DATE
ON/OFF
MAIN ATD
[2] SET WAKE UP
[4]TIME
Selection
STN# (+ END STN#)
STN# (+ END STN#)
32
Attendant Operation
Attendant
Sub Menu - II
[1] PRINT SMDR
(STA BASE)
[2] DELETE (STA
BASE)
[3] PRINT SMDR
(GRP BASE)
[4] DELETE (GRP
BASE)
[5] DI SPL AY CALL
CHARGE
ʅ
aria 130 - DIGITAL KEY TELEPHONE SYSTEM USER GUIDE
Attendant Programming Menu Table (Cont'd)
Attendant Main
Menu
[5] MESSAGE
Attendant
Sub Menu - I
[1] PRESELECT MSG
ACT
[2] PRESELECT MSG
DEACT
[3] CUSTOM MSG
REG
[4] ERASE VM MSG
Attendant
Sub Menu - II
Selection
STN# (+ END STN#)
+ MSG #(00-10)
STN# (+ END STN#)
MSG # (11-20)
+ MSG STREAM
STN# (+ END STN#)
Remark
MAIN or
GROUP ATD
MAIN or
GROUP ATD
MAIN or
GROUP ATD
[5] ATD DEL ALL CLI
MSG
[7]
SUPPLEMANTARY
[1] CANCEL
FEATURES
[2] REGISTER STA
NAME
[3] DISABLE
CO OUTGOING
[4] AUTO RING
MODE
[5] ICM BOX BGM
CH SEL
[6] EXT PORT#1 BGM
EN/DI
[7] EXT PORT#2 BGM
EN/DI
[8] EXT PORT#3 BGM
EN/DI
VMIB ANNC# (01-70)
SYSTEM ATD
STN# (+ END STN#)
MAIN or
GROUP ATD
STN# + NAME
MAIN ATD
PRESSING CO BTN
MAIN ATD
ATD/AUTO
BGM CHANNEL #
(01-1 2)
MAIN ATD
ENABLE / DISABLE
MAIN ATD
ENABLE / DISABLE
MAIN ATD
ENABLE / DISABLE
MAIN ATD
[9] PREPAID CALL
[✱] LCD DISPLAY
LANGUAGE
[✱] BOARD
SERVICE SWITCH
[#] W HTU
SUBSCRIBE
SLOT NUMBER
(01 – 27)
FLEX 1 – FLEX 9
33
Attendant Operation
[6] REC. VMIB
ANNOUNCEMENT
ʅ
aria 130 - DIGITAL KEY TELEPHONE SYSTEM USER GUIDE
Introduction to aria 130 Hotel Software
The aria hotel S/W has a number of features that have been designed specifically for hotel and other hospitality applications.
The additional features that are available, add value to the service offered to guests and increase the efficiency of staff.
This section is aimed at the system manager and anyone else that requires a detailed description of the hotel facilities and
their operation. These features are additional to the normal office features and refer to the other sections in this user guide.
Register Hotel Name (at Front Desk)
This feature allows registering or changing the name of hotel. In check-out or displaying room
charge, the registered hotel name is printed out in the headings.
Button
Procedures
To register hotel name,
Press TRANS/PGM button.
Dial # 9 1)
Enter the hotel name (up to 24 digits)
with the code as below.
Press HOLD/SAVE button.
Q - 11
Z - 12
. - 13
1 - 10
A - 21
B - 22
C - 23
2 - 20
D - 31
E - 32
F - 33
3 - 30
G - 41
H - 42
I - 43
4 - 40
J - 51
K - 52
L - 53
5 - 50
M - 61
N - 62
O - 63
6 - 60
P - 71
R - 72
S - 73
Q - 7*
7 - 70
T - 81
U - 82
V - 83
8 - 80
W - 91
X - 92
Y - 93
Z - 9#
9 - 90
*1 - Blank
*2 - :
*3 - ,
0-00
#
Check-In (at Front Desk)
This feature allows the System Attendant to view the status of a room and check-in a guest.
When checking in a guest without changing the Room Status, the following default values will
be applied to the room;
- Not assigned
- 22
- Not assigned
- Internal call is not allowed (programmable by Installer)
- System Attendant assigned no.
- Not assigned
-0
- System Attendant assigned no.
Check-In / Assign Room Status
Button
Procedures
To check in a guest with Standard Room Status,,
Press TRANS/PGM button.
Dial # 1 1
Dial the Room Number.
Press SPEED button.
Press HOLD/SAVE button.
34
Hotel Operation
Guest Name
Room Day & Night COS
Alarm Calls
Intercom Enable/Disable
Room to Room Call Groups
Authorization Codes
Pre-paid Calls
Call Charge Rate
ʅ
aria 130 - DIGITAL KEY TELEPHONE SYSTEM USER GUIDE
Check-In / Change a Guest's Room Status (at Front Desk)
To check in the guest and change the Room Status from the default values, you should enter the following information.
Button
Procedure
Press TRANS/PGM button.
Dial # 1 1
Dial Room Number.
Press SPEED button.
Dial Room Status Type (1~8).
1:
2:
3:
4:
5:
6:
7:
8:
Register/Change Guest Name (up to 12 digits)
Change Room Day and Night Class of Service
Register/Change Alarm Call (wake-up) Time
Set Intercom Enable/Disable
Set Room to Room Call Group
Register/Change Authorization Code
Register/Change Pre-paid Call Charge
Register/Change Call Charge Rate
Press SPEED button (for only Room Status Type 1).
Press HOLD/SAVE button.
Register & Change a Guest Name (at Front Desk) (Room Status Type 1)
This feature allows the System Attendant to register/change a guest's name which will be printed out on the guest's bill
when checking out.
Button
Procedures
To register/change a guest's name,
Press TRANS/PGM button.
Dial # 1 1
Dial Room Number and press SPEED button.
Dial 1 to register/change guest name.
Enter the guest's name with the character code.
Press SPEED button.
Press HOLD/SAVE button.
Class of Service (Outside Call Restriction) (at Front Desk) (Room Status Type 2)
To change the Class of Service,
Press TRANS/PGM button.
Dial # 1 1
Dial Room Number and press SPEED button.
Dial 2 to change the Class of Service.
Dial rooms Day and Night COS (11~77: 2 digits).
Press HOLD/SAVE button.
Guest Alarm Call (at Front Desk) (Room Status Type 3)
You can set an alarm call for a guest from the Front Desk extension. The alarm call will ring on the guest's phone and
when the call is answered they will receive the system music on hold. The alarm will ring for 30 seconds and if there is
no reply then it will wait for 90sec and try again. If there is no reply after the third attempt then a "WAKE UP FAIL' alarm
will ring on the attendant and the display will show the extension that the alarm call has failed on.
Button
Procedures
To set an alarm call from the attendant,
Press TRANS/PGM button.
Dial # 1 1
Dial Room Number and press SPEED button.
Enter Alarm Call time (HH:MM in 24-hour mode).
Press SPEED button (for one-time) or # button (for continuous).
Press HOLD/SAVE button.
35
Hotel Operation
When a guest is checked into a room, the system will automatically remove any call barring restrictions that are set when
the room is vacant. The Class of Service is entered into the Room Status information as 2-digit, the first digit represents
the COS for day mode and the second digit the COS when the system is in night mode.
Button
Procedures
ʅ
aria 130 - DIGITAL KEY TELEPHONE SYSTEM USER GUIDE
Intercom Enable/ Disable (at Front Desk) (Room Status Type 4)
It is possible to allow or restrict internal calls from a guest's extension.
Button
Procedures
To change the Intercom Restriction,
Press TRANS/PGM button.
Dial # 1 1
Dial Room Number and press SPEED button.
Dial 4, the status is changed (toggle setting).
Press HOLD/SAVE button. (NB Once Intercom Enable is set, it becomes the Default Setting.)
Room to Room Call Group (at Front Desk) (Room Status Type 5)
If a large party of guests are checking into the hotel as a group then it is possible to allow calls between these guests internally
but not allow them to call any other guests in the hotel.The system will provide up to 100 groups, each of which can have any
number of rooms included.
Button
Procedures
To register/change room to room call group,
Press TRANS/PGM button.
Dial # 1 1
Dial Room Number and press SPEED button.
Dial 5.
Enter Room to Room Call Group Number (00~99).
Press HOLD/SAVE button.
To remove, press SPEED button.
Authorization Code (at Front Desk) (Room Status Type 6)
The authorization codes can be used for 3 types of operation:
1. If restrictions have been set on the outside lines, then staff and guest will have to dial 1 followed by a valid authorization
code before they dial out.
2. If you have Direct Inward System Access(DISA) configured on the system then outside callers into the switch could be
allowed access to other outside lines for dialing out.
3. It is possible to restrict outside calls from Service Stations unless an authorization code has been entered. It will prevent
unauthorized calls being made from unattended Service Stations.
Button
Procedures
Pre-paid Call Charge (at Front Desk) (Room Status Type 7)
When the guest checks in, a pre-paid call charge can be registered against that room and the system will keep a check on
how much the guest has spent on outside calls. The pre-paid limit has been reached then a warning tone will be sent to the
guest and the call will be disconnected.
Button
Procedures
To enter a pre-paid call charge against a guest's room,
Press TRANS/PGM button.
Dial # 1 1
Dial Room Number and press SPEED button.
Dial 7.
Dial Pre-paid Call Charge (6 digits).
Press HOLD/SAVE button.
36
Hotel Operation
To register/change authorization code,
Press TRANS/PGM button.
Dial # 1 1
Dial Room Number or Staff Station Number.
Press SPEED button.
Dial 6.
Enter Authorization Code that you want to use (5 digits).
Press HOLD/SAVE button.
ʅ
aria 130 - DIGITAL KEY TELEPHONE SYSTEM USER GUIDE
Call Charge Rate (at Front Desk) (Room Status Type 8)
This feature allows system attendant to register Call Charge rate to rooms while check-in.
Button
Procedures
To assign Call Charge Rate,
Press TRANS/PGM button.
Dial # 1 1
Dial Room Number and press SPEED button.
Dial 8.
Dial Call Charge Rate (0~5).
Press HOLD/SAVE button.
Note: If call charge rate is not assigned, SMDR call charge is applied and after check-out, the assigned call
charge is expired and changed to default value.
Baby Listening
A guest can monitor his room at the other place in the hotel. Setting baby listening feature, you
can monitor the room but, the inside of the room cannot hear of you.
Button
Procedures
To set baby listening at a guest's room,
Off-hook and dial the guest's room number.
(To cancel, on-hook.)
To operate baby listening from another hotel phone,
Off-hook and dial the guest's room number twice.
Check Out (at Front Desk)
When the guests leave the hotel, it is an easy operation to check them out. The system will automatically calculate their bill
and print it out on the printer. Also, any room status settings that are applied to the room will be reset to the default values.
The system attendant can select the method of payment among registered ones according to the guest's payment methods.
Button
Procedures
To check out a guest,
Press TRANS/PGM button.
Dial # 1 2
Enter the room number.
(To check out a guest with method of payment, press SPEED button and dial bin no.(credit card no.))
Press HOLD/SAVE button.
If you wish to check out more than one guest, dial the next room number.
Press MON button or hang up.
When a guest checks out or asks for the status of their bill, then it is possible to either display the current bill on the LCD of
the phone or print it out.
Button
Procedures
To show the current total bill for the guest in the attendant display,
Press TRANS/PGM button.
Dial # 2 1
Dial Room Number.
The display will show the following information:
TOTAL ROOM CHARGE
115 (01)
60.00
Total room charge
To print out the total charges without any details, press HOLD/SAVE button.
To print out the total bill for a room, press # button and HOLD/SAVE button.
37
Hotel Operation
Room Charge Display & Printing (at Front Desk)
ʅ
aria 130 - DIGITAL KEY TELEPHONE SYSTEM USER GUIDE
Printing a Guest's Room Status (at Front Desk)
Button
Procedures
To print out the Room Status,
Press TRANS/PGM button.
Dial # 2 2
Dial the range of Room Numbers to be printed.
Press HOLD/SAVE button.
Intercom Call Enable/Disable (at Front Desk)
If you do not want guests to be able to dial each other unless they are transferred by the attendant then, it is possible to
block single or multiple rooms.
Button
Procedures
To enable intercom calls,
Press TRANS/PGM button.
Dial # 3 1
Dial the range of Room Number.
Press HOLD/SAVE button.
To disable intercom calls,
Press TRANS/PGM button.
Dial # 3 2
Dial the range of Room Number.
Press HOLD/SAVE button.
One-Time CO Call Enable (at Front Desk)
By guest's request, system attendant can enable one-time CO call to intercom only station. In this time, calling station's COS
is temporally changed to charged station's COS. The guest can make only one external call for request.
Button
Procedures
To enable one-time outside call,
Press TRANS/PGM button.
Dial # 4 3
Dial the room number that the call will be made from.
Dial the room number that the call will be charged to.
Press HOLD/SAVE button.
The default language is English and if the language is changed then, it will be reset to default when the guest checks out.
Button
Procedures
To set the LCD language type,
Press TRANS/PGM button.
Dial 7 1
Dial the range of room number to be changed.
Dial the language code (0~14)
Press HOLD/SAVE button.
Language Codes
00: English
01: Italian
03: Dutch
04: Swedish
06: Norwegian
07: Hebrew
09: French
10: Portuguese
12: Korean
13: Estonia
38
02: Finnish
05: Danish
08: Germany
11: Spanish
14: Russian
Hotel Operation
Change LCD Display Language
ʅ
aria 130 - DIGITAL KEY TELEPHONE SYSTEM USER GUIDE
Bath Alarm (at Front Desk)
The system has a facility which can be used to ensure that the front desk is notified when the guest is in trouble. If the handset
is left off-hook for a period of time then, an alarm will ring at reception and the Front Desk staff can take appropriate action.
Button
Procedures
To set bath alarm device from System Attendant,
Press TRANS/PGM button.
Dial # 7 1
Dial the station range to be set the bath alarm device.
Press HOLD/SAVE button.
To release bath alarm device from System Attendant,
Press TRANS/PGM button.
Dial # 7 2
Dial the station range to be set the bath alarm device.
Press HOLD/SAVE button.
Maid Status
Once a guest has checked out of a room, the maid status is automatically changed to 'Dirty'. Therefore, when the maid
has finished cleaning the room, he/she can change the maid status to 'Clean' from the guest's extension.
Button
Procedures
To register 'Clean' at a guest station by maid,
Press TRANS/PGM button.
Dial 7 ✱
To register 'Dirty' at a guest station by maid,
Press TRANS/PGM button.
Dial 7 #
To register 'Clean' by system attendant, (at Front Desk)
Press TRANS/PGM button.
Dial # 8 1
Enter the room range.
Press HOLD/SAVE button.
To register 'Dirty' by system attendant, (at Front Desk)
Press TRANS/PGM button.
Dial # 8 2
Enter the room range.
Press HOLD/SAVE button.
Guest may pay for charge at service station or mini-bar in time of check-out. Bar terminal operator registers guest's charge
using the following procedure. Mini-bar charge of each room is registered by only system attendant (Front Desk service station).
Button
Procedures
To register bar charge at Service Station or mini-bar charge at System Attendant,
Press TRANS/PGM button.
Dial # 6 4 (at Service Station dial 7 9)
Dial room number of guests to be charged.
Dial Product Code (2 digits).
Dial Product Cost (up to 6 digits).
Press SPEED button.
Dial HOLD/SAVE button.
39
Hotel Operation
Register Bar & Mini-Bar Charge (at Front Desk)
ʅ
aria 130 - DIGITAL KEY TELEPHONE SYSTEM USER GUIDE
Room to Room Call Group (at Front Desk)
If you wish to split the hotel rooms into groups for internal calls, this can be done from system attendant. Once the groups
have been set up then only guests in the same group can call each other internally.
Button
Procedures
To set Room to Room Call Group,
Press TRANS/PGM button.
Dial # 4 1
Dial Group Number (00~99).
Dial the room range.
Press HOLD/SAVE button.
To remove from group as above, dial 1 7 after TRANS/PGM button.
Room Rate Assign (at Front Desk)
This feature allows the system attendant to assign room rate among 20 different ones to individual rooms. This information
is included in the Total Room Charge Bill which is printed out on the SMDR and on check-out.
Button
Procedures
To assign room rate at the system attendant,
Press TRANS/PGM button.
Dial # 5 1
Enter the room rate bin no.
Enter room cost and name.
Dial HOLD/SAVE button.
Room Rate Assign (Cont’d)
This feature allows the system attendant to assign room rate among 20 different ones to individual rooms. This information is
included in the Total Room Charge Bill which is printed out on the SMDR and on check-out.
Button
Procedures
To assign a range of rooms the same room rate,,
Press TRANS/PGM button.
Dial # 5 2
Enter the room range.
Enter the room rate bin no.
Dial HOLD/SAVE button.
In case a guest checks in and checks out in the same day, part time fee may be charged according to the room type or hotel
policy. Each room type may have up to 6 fields for the different part time range and fee.
Button
Procedures
To register/change fee for part time table at system attendant,
Press TRANS/PGM button.
Dial # 6 3
Dial fee for part time (00~31).
Enter time range. (Press Flex. BTN 1 and dial the time with 4 digits.)
Enter change rate for the part time. (Press Flex. BTN 2 and dial fixed 3 digits from 000 to 100.)
Press HOLD/SAVE button.
To erase, press SPEED button instead of dialing.
40
Hotel Operation
Fee for Part Time (at Front Desk)
ʅ
aria 130 - DIGITAL KEY TELEPHONE SYSTEM USER GUIDE
Auto Internal Speed Directory (at Front Desk)
This feature will automatically build an internal directory of registered service stations and guests staying at the hotel from
the name information that is entered when they check-in. Once the name has been added to the list, it is possible to
choose a name from the list for dialing and transferring of calls.
Button
Procedures
To insert Internal Speed Directory at Front Desk,
Press TRANS/PGM button.
Dial 0 7 2
Enter the station number.
Enter the name.
Press HOLD/SAVE button.
To delete a name in the internal speed directory, press HOLD/SAVE button after entering station number.
Auto Internal Speed Directory (Cont’d)
This feature will automatically build an internal directory of registered service stations and guests staying at the hotel from the
name information that is entered when they check-in. Once the name has been added to the list, it is possible to choose a
name from the list for dialing and transferring of calls.
Button
Procedures
To dial by name with Internal Speed Directory,
Press SPEED button twice.
Dial 1 for internal speed dial directory.
Press VOLUME button or dial digits to find a name, then the LCD displays 2 names one on each LCD line.
Or, dialing a character, the first matched name is displayed.
Press HOLD/SAVE button for dial the name on line 1 or dial 2 and press HOLD/SAVE button on line 2.
Multiple Front Desk
Main Attendant can manipulate Hotel programming. If one multiple station enters hotel feature Programming, the others
cannot enter the programming mode. Only error tone is heard with ‘Invalid” message.
New Cabina Call
To activate, (It is available on a guest station or service station)
Press TRANS/PGM button.
Dial 0 1 1 1
Enter the password.
Press HOLD/SAVE button.
Access a CO line and dial tone will be heard.
Brief SMDR Print
The brief SMDR for room or service station can be printed by Front-desk station.
Button
Procedures
To print SMDR,
Press TRANS/PGM button.
Dial 2 6.
Enter the station range.
Press HOLD/SAVE button.
41
Hotel Operation
This feature allows to temporarily override toll restriction and makes a toll call from toll restricted phone. It is activated by
entering feature code and the password before accessing a CO line.
Button
Procedures
ʅ
aria 130 - DIGITAL KEY TELEPHONE SYSTEM USER GUIDE
Hotel Programming Menu Table
Front
Desk
Menu
Attendant Main
Menu
Attendant
Sub Menu - I
Selection
[1] CHECK IN
ENTER ROOM NUMBER
[2] CHECK OUT
ENTER ROOM MUNBER
Remark
[1]CHECK IN/OUT
[2]
CHARGE
PRINT/STATUS
PRINT
[1] CHARGE PRINT
ENTER ROOM NUMBER
[2] STATUS PRINT
ENTER ROOM RANGE
Press HOLD Key
[3]
ICM
CALL
ENABLE/DISABLE
[1] ICM CALL ENABLE
ENTER ROOM RANGE
Press HOLD Key
ENTER ROOM RANGE
Press HOLD Key
[2] ICM CALL DISABLE
[1] SET ROOM CALL
TRANS
[4] CALL BLOCK
[2] DISABLE ROOM CALL
#
[3] CABINA CALL
[5] ROOM RATE
[1] ROOM RATE
REGISTER
[2] ROOM RATE ASSIGN
[1] CALL RATE
REGISTER
[2] CALL RATE ASSIGN
[6] CALL RATE
[7] BATH ALARM
[8] MAID STATUS
[3] PART TIME FEE
RATE (00)
0000000
…………..
ROOM RATE SELECT
ENTER ROOM RANGE
CALL CHARGE RATE (0)
…… %
…………
SELECT CALL CHARGE
RATE
ENTER ROOM RANGE
PART TIME FEE (00)
…. - ….: …… %
[4] BAR/MINI-BAR
CHARGE
BAR COST CHARGE
ENTER ROOM NUMBER
[1] BATH ALARM
ENABLE
[2] BATH ALARM
DISABLE
[1] MAID STATUS
(CLAEN)
BATH-ARM ENABLE
ENTER ROOM RANGE
BATH-ARM DISABLE
ENTGER ROOM RANGE
SET ROOM CLEAN
ENTER ROOM RANGE
SET ROOM DIRTY
ENTER ROOM RANGE
[2] MAID STATUS (DIRTY)
[9]
MISCELLANEOUS
ROOMtoROOM CALL
ENABLE
ENTER ROOM GROUP
NUMBER
ROOMtoROOM CALL
DISABLE
ENTER ROOM RANGE
ONE TIME CO CALL ENABLE
ENTER ROOM NUMBER
[1] HOTEL NAME
ENTER NAME
42
[Flex 1] 00000
RATE
COST
DGTS)
ROOM xxx-yyy
…:
(7
ROOM xxx-yyy
.. :
BAR
COST
CHARGE
ENTER BAR CODE
(00-99)
ROOM xxx-yyy
Press HOLD Key
ROOM xxx-yyy
Press HOLD Key
ROOM xxx-yyy
Press HOLD Key
ROOM xxx-yyy
Press HOLD Key
ʅ
aria 130 - DIGITAL KEY TELEPHONE SYSTEM USER GUIDE
Analogue Single Line Telephone User Guide for aria Telephone Systems
Placing an Outside Call
Last Number Redial
Lift handset.
Dial 1.
Dial the desired number.
Lift handset.
Dial 5 5 2
Storing Station Speed Dial Numbers
Lift handset.
Dial 5 5 5
Dial station speed dial number. 000~099
Dial speed dial number you wish to store.
‘Flash’ the hook switch.
You will hear confirmation tone and hang up.
Placing an Intercom Call
Lift handset.
Dial intercom number.
Placing an Outside Call on Hold
Using Station Speed Dial Numbers
Lift handset.
Dial ✱ 7
Dial the desired station speed dial number, 000~099,
Retrieving a Held Outside (CO) Call
Lift handset.
Dial 4 # and CO line number. Eg 4#01~4#40
On SLT, you can dial 4 ✱ in case you don't remember the
held CO number.
Using System Speed Dial Numbers
Lift handset.
Dial ✱ 7
Dial the desired system speed dial number, 2000~3499,
Placing an Outside Call via CO Group Access
Lift handset.
Dial 4 and CO group number. Eg 401~424
Dial the desired number.
Establishing a Conference Call
The system allows you to set up a 3-way conference call.
Lift handset.
Call the desired party. (outside or internal)
‘Flash’ the hook switch.
Dial the internal extension number.
When the other party answers, ‘flash’ hook switch
twice in 2 seconds. (All three parties are now connected.)
Placing an Outside Call via CO Individual Access
Lift handset.
Dial 4 8 and CO line number. Eg 4801~4840
Dial the desired number.
Re-directing an Incoming Call (Call Pick-up)
Message Waiting
When you hear a phone ringing in your area,
Lift handset.
Dial ✱ 4 2
Dial the extension number of the ringing phone.
Lift handset.
Dial the desired extension number.
No reply from a key station or busy tone from an SLT station.
‘Flash’ the hook switch.
Dial ✱ 6 6 .
Hang up.
Group Call Pick-up
When hearing an unattended phone ringing in your area,
Lift handset.
Dial ✱ 1
You will be connected to an incoming extension or outside
line call. (NB: You must be in the same pick-up group. – check
with your installer.)
Call Forward
Lift handset.
Dial 5 5 4
Dial the desired call forward number.
1 - Unconditional,
2 - Busy calls
3 - No answer calls,
4 - Busy/no answer calls
5 - Station off-net, unconditional
6 - Station off-net, no answer
7 - Incoming outside line off-net (ATD only)
# - Cancel previous forward
Call Wait (Camp-on)
After receiving intercom busy tone, dial ✱.
Camp-on tone is heard in the called station.
The called station receives the ringing from camped on call
when hanging up from original call.
To make Call forward to VMIB, press # key after
dialing call forward type (1~4).
Dial the station / group number to forward calls to.
Station numbers: 700~827 / Group numbers: 620~624
Hang up.
To cancel Call Forward, lift handset and dial 5 4 4 and #.
Or, dial 5 5 9 To Clear All.
Answering a Waiting Call
You will receive warning tone in handset.
Hang up the present call to take a new one.
Making a Screened Transfer
While connected to an outside line, ‘flash’ the hook switch.
Dial the desired extension number and wait to be answered.
Announce the call.
Hang up to complete call transfer.
Making an Unscreened Transfer
While connected to an outside line, ‘flash’ the hook switch.
Dial the desired extension number
Hang up to complete call transfer.
43
For “Follow Me” Call Forward
Go to the forwarding station and lift handset.
Dial 5 5 4
Dial 0.
Dial the station number that calls are to be forwarded.
Dial the authorization code of forwarded extension.
(The authorization code should be registered
before "Follow Me" Call Forward can be set.)
Dial the extension number that will receive the call.
Hang up.
Single Line (Analogue)
Telephone
While connected to an extension call, briefly depress and
release the hook switch (‘flash’ the hook switch).
OR ‘Flash’ 5 6 0 for System Hold.
ʅ
aria 130 - DIGITAL KEY TELEPHONE SYSTEM USER GUIDE
Analogue Single Line Telephone User Guide for aria Telephone Systems
Do Not Disturb (DND)
Queuing
Lift handset.
Dial 5 5 3
Place the handset.
To cancel Do Not Disturb,
Lift handset.
Dial 5 5 3 or 5 5 9.
Hang up.
If you access a busy line, you may request the system
to place you on hold, until the next line becomes idle.
Lift handset.
‘Flash’ the hook switch.
Dial ✱ 6 6 .
You will hear confirmation tone when the call is
accepted.
Hang up.
Shuttle Call
Call Park
While connected to an outside call,
Lift handset.
‘Flash’ the hook switch.
Dial parking location. 601~610
Hang up.
To retrieve a parked call, dial parking location.
Preselected Messages
Universal Night Answer
When hearing an incoming signal on other phone or
night bell, when system is in night ringing mode
Lift handset.
Dial Universal Night Answer Access Code 2 .
You will be connected to an incoming call if it was programmed as
an Universal Night Answer line.
Paging
Lift handset.
Dial the desired page zone number.
Give your message.
Hang up to complete paging.
Page Zones
Call All zones: # 6
Call All Internal zones: # 7
Internal zone 1 : # 0 1
Internal zone 2 : # 0 2
:
:
Internal zone 15 : # 1 5 (to maximum zone)
External zone 1 : # 4 1
External zone 2 : # 4 2
External zone 3 : # 4 3
Call all external zones : # 5
Single Line (Analogue)
Telephone
An extension user engaged in an internal or external call, should
briefly press hook switch to hold a call (‘flash’ the hook switch).
The holding party hears music on hold. (If equipped)
Dial the second number of another internal or external call.
When the second call is connected, the extension user may
alternate the call between holding parties by ‘flashing’ the hook
switch.
Then, you may make a conference by ‘flashing’ the hook switch.
You can choose a preselected message to be displayed
on the LCD of the phone calling your station.
Lift handset.
Dial 5 6 3 (Program Code)
Dial 5 1
Dial the following number to leave your message.
(01~10)
Dial 01 + (Time) LUNCH, RETURN HH:MM
Dial 02 + (Date) ON VACATION, RETURN AT MM:DD
Dial 03 + (Time) OUT OF OFFICE RETURN TIME HH:MM
Dial 04 + (Date) OUT OF OFFICE RETURN MM:DD
Dial 05
OUT OF OFFICE RETURN UNKNOWN
Dial 06 + (External no.) CALL XX.... (17 digits)
Dial 07 + (Extension you can be called) IN OFFICE, STA XXXX
Dial 08 + (Time) IN A MEETING, RETURN TIME HH:MM
Dial 09
AT HOME
Dial 10
AT BRANCH OFFICE
‘Flash’ the hook switch.
Hang up.
To erase a pre-selected message, lift handset and
dial 5 6 3 + 5 1 + #
‘Flash’ the hook switch.
Hang up.
Handset Off-hook Alarm
Should the handset be left off the cradle unattended, for any
length of time, the user will receive a high pitched signal.
To cancel the signal, hang up.
Meet Me” Paging
When hearing a paging announcement,
Dial # #.
Returning Call to Host System (FLASH to Line)
If your aria system is connected to another system, you can use this
feature to transfer a call back to an extension on the other system.
(Your installer will tell you if you need this feature.)
While connected to an extension call, ‘flash’ the hook switch.
Dial 5 5 1
Hearing new dial tone from the other system, dial the extension
number on the required system.
When the station answers, (See Screened Transfer) speak or
hang up (See Unscreened Transfer) to transfer the call.
44
ʅ
aria 130 - DIGITAL KEY TELEPHONE SYSTEM USER GUIDE
Analogue Single Line Telephone User Guide for aria Telephone Systems
Voice Announcement
Programming Your Name
Date & Time Prompt;
Lift handset.
Dial 5 6 3.
After hearing confirmation tone, dial 6 2. You'll hear date
& time prompt, " Date is March, 20th and Time is 00:00."
Extension Number Prompt;
Lift handset.
Dial 5 6 3.
After hearing confirmation tone, dial 6 3. You'll hear extn
number prompt, "This extension is XXXX.”
Extension Status Prompt;
Lift handset.
Dial 5 6 3.
After hearing confirmation tone, dial 6 4.
You'll hear items listed below. (a~h)
a) Extension number
b) Intercom Answer Mode
c) Listed message X
d) Wake-up time XX:XX AM or PM
e) Do Not Disturb
f) Forwarded to extension XXXX
g) Forwarded to speed bin XXX
h) Queued CO XXX
i) Locked (Temporary Class of Service Charge)
j) COS X
Recording Your Message;
Lift handset.
Dial 5 6 3.
After hearing confirmation tone, dial 6 1.
Record your message.
Place the handset.
Deleting Your Message;
Lift handset.
Dial 5 6 3.
After hearing confirmation tone, dial 6 6.
Recording Paging Message;
Lift handset.
Dial 5 6 3.
After hearing confirmation tone, dial 6 5.
Record paging message.
Place the handset.
Deleting Your Message;
Lift handset.
Dial 5 6 3.
After hearing confirmation tone, dial 6 6.
Deleting Paging Message;
Lift handset.
Dial 5 6 3.
After hearing confirmation tone, dial 6 7.
To activate Call Forward to Internal Voice Mail,
Lift handset.
Dial 5 5 4.
Dial Call Forward type number (1~4)
Dial # .
Hang up.
To deactivate Call Forward to Internal Voice Mail,
Lift handset.
Dial 5 5 4.
Dial # .
Hang up.
Lift handset.
Dial 5 6 3
Dial 7 4
Enter your name using the same codes as keysets.
‘Flash’ hook switch. (Confirmation tone is heard.)
Hang up.
Entering an Account Code
To identify a call, system provides the user with an account
code field in the Call Logging printout by entering an account
code while on an outside call.
Following features are only available with
Hotel Software
Baby Listening
This feature allows a guest to monitor his room from any
other party of the hotel. You can hear the room which is set
baby listening but the room will not be disturbed.
To activate baby listening at guest’s room,
Lift the handset.
Dial the guest’s own room number.
(Confirmation tone is heard.)
To cancel baby listening at guest’s room,
Replace the handset.
To operate baby listening from any other phone in the
system,
Lift the handset.
Dial the guest’s own room number.
DND tone will be heard and dial the guest’s own room
number again.
After confirmation tone, baby listening is operated.
Maid Status
The Maid can update the maid status of any room.
To register “Cleaned” at a guest station,
Dial SLT PGM code 5 6 3
Dial code 7 ✱
(Confirmation tone is heard.)
To register “Dirty” at a guest station,
Dial SLT PGM code 5 6 3
Dial code 7 #
(Confirmation tone is heard.)
New Cabina Call
It allows to temporarily override toll restriction
and make a call.
Dial SLT PGM code 5 6 3
Dial code 0 1 1 1
Enter the password (5 digits).
‘Flash’ the hook switch. (Confirmation tone is heard.)
Accessing CO line, dial tone will be heard.
Programming Authorization Code
Lift handset.
Dial 5 6 3
Dial 3 1 for new code, 3 2 to change
Dial 5 digits as authorization code.
‘Flash’ the hook switch.
45
Single Line (Analogue)
Telephone
After dialing or during a conversation with an external party,
‘Flash’ the hook switch.
Dial 5 5 0 and your account code.
(An account code can be 1 - 12 digits.)
Dial ✱ (for end of Account Code)
Continue conversation and hang up to finish the call.