1
MFL62194603
8/10/09 2:50 PM
Page 1
i
t r
i
Life% Good
i OWNER'S
LCD TV
MANUAL
32LH250H
37LH250H
42LH250H
32LH255H
37LH255H
42LH255H
Please read this manual carefully
your set and retain it for future
The model and serial number of
on the back and one side of the
Record it below should
before operating
reference.
the TV is located
TV.
you ever need service.
M(
An extended owner's manual that contains information
on the advanced features of this LG TV is located on the
CD-ROM
provided
in an electronic
version.
To read these files, you will need to use personal computer
(PC) equipped
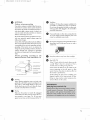
default" setting and this is the setting in which power
with a CD-ROM
drive.
1-800-243-0000
Issp_,
co_sHm_u_ ,
1-888-865-3026
usA,comm_<:i_I;s__
1-888-542-2623
CAnAOA
savings
will bequalifies
achieved.
This
product
for ENERGYSTAR in the "factory
Changing the factory default picture setting or enabling
other features will increase power consumption that
could exceed the limits necessary to quality for Energy
Star rating.
i
\j/
i
P/NO
: MFL62194603
(0908-REV02)
Printed in Korea
MFL62194603
8/10/09 2:50 PM
i
S]%
t r
Page 2
i
WARNING
/ CAUTION
WARNING / CAUTION
To prevent
this product
fire or shock hazards,
do not expose
to rain or moisture.
Class B digital device
USER SERVICEABLE PARTS INSIDE. REFER TO
QUALIFIED
This equipment has been tested and found to comply with the
SERVICE PERSONNEL.
limitsfor a ClassB digital device, pu_uant to Part 15 of the
FCCRules.These limits are designedto provide reasonable
protection against harmful interference in a residentialinstallation. This equipment generates,usesand can radiateradio frequency energy and, if not installed and used in accordance
with the instructions, may cause harmful interferenceto radio
communications. However,there is no guaranteethat interference will not occur in a particular installation. If this equipment
does cause harmful interference to radio or television reception, which can be determined by turning the equipment off
and on, the user is encouraged to tryto conect the interference by one or more of the following measures:
- Reorient or relocate the receiving antenna.
- Increasethe separation between the equipment and receiver.
-Connect the equipment to an outlet on a circuit different from that to which the receiver is connected.
-Consult the dealer or an experienced radio/TV technician for help.
This devicecomplieswith part 15 of the FCCRules.
Operation is subject to the following two conditions: (1) This
device may not cause (harmful) interference,and (2) this
device must accept any interferencereceived,includinginterferencethat may causeundesiredoperation (of the device).
Any chengesor modifications in constmct_
This reminder is provided to call the CATV system installer's
attention to Article 820-40 of the National Electric Code
of this de_ce vAlkh
are not exp_s_ approved by the party _sponsible for compliance could vokl the user'sauthorkqj k__
the equipment
(U.S.A.). The code provides guidelines for proper grounding
and, in particular, specifies that the cable ground shall be
connected to the grounding system of the building, as close
to the point of the cable entry as practical.
Do not attempt to modify this product in any waywithout written authorization from LGElectronics. Unauthorized modification could void the user'sauthority to operate this product
2
i
........................
4:,,,,,_-,,,I
.........................
\j/
i
MFL62194603
8/10/09 2:50 PM
i
S]%
t r
Page 3
i
SAFETY INSTRUCTIONS
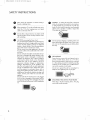
IMPORTANT SAFETY INSTRUCTIONS
O
Read these instructions.
Keep these instructions.
Heed all warnings.
Follow all instructions.
O
Protect
the power cord from being walked on
or pinched
particularly
receptacles,
and the point where they exit from
at plugs, convenience
the apparatus.
Do not use this apparatus
near water.
O
Only use at2achments/accessories
the manufacturer.
specified
by
Clean only with dry cloth.
-£zzzzzz3[==--_
O
Use only with the cart, stand, tripod,
or table specified
I
O
caution
amplifiers)that
I
O
produce heat.
@
Do not defeat the safety purpose of the polarized
or grounding-type
plug. A polarized plug has
two blades with one wider than the other. A
grounding
type plug has two blades and a third
grounding
prong, The wide blade or the third
prong are provided foryour
outlet,
consult
bracket,
or sold
When a cart is used, use
moving
the
cart/apparatus
to avoid injury from tip-over.
Unplug this apparatus during lighting storms
when unused for long periods of time.
OF
Refer all servicing to qualified service personnel.
Servicing is required when the apparatus has been
damaged in any way, such as power-supply cord or
plug is damaged, liquid has been spilled or objects
have fallen into the apparatus, the apparatus has
been exposed to rain or moisture, does not operate
safety. If the provided
plug does not fit into your
when
combination
Do not install near any heat sources such as
radiators, heat registers, stoves, or other apparatus
(including
O
I
by the manufacturer,
with the apparatus.
Do not block any ventilation openings. Install in
accordance with the manufacturer's instructions.
"_
normally, or has been dropped.
an
electrician for replacement of the obsolete outlet.
3
i
........................
4:,,,,,_-,,,I
.........................
\j/
i
MFL62194603
8/10/09 2:50 PM
i
Page 4
t r i
i
SAFETYINSTRUCTIONS
O
Never touch this apparatus or antenna during a
thunder or lighting storm.
shock, do not expose this product to rain, moisture
or other liquids. Do not touch the TV with wet
hands. Do not install this product near flammable
objects such as gasoline or candles or expose the
When mounting a TV on the wall, make sure not to
install the TV by the hanging power and signal
cables on the back of the TV.
O
WARNING - To reduce the risk of fire or electrical
TV to direct air conditioning.
Do not allow an impact shock or any objects to fall
into the product, and do not drop onto the screen
with something.
@
@
CAUTION concerning the Power Cord :
It is recommend that appliances be placed upon a
dedicated circuit; that is, a single outlet circuit which
powers
outlets
page of
Do not
Do not expose to dripping or splashing and do not
place objects filled with liquids, such as vases, cups,
etc. on or over the apparatus (e.g. on shelves above
the unit).
only that appliance and has no additional
or branch circuits. Check the specification
this owner's manual to be certain.
connect too many appliances to the same
AC power outlet as this could result in fire or electric shock.
Do not overload wall outlets. Overloaded wall outlets, loose or damaged wall outlets, extension cords,
frayed power cords, or damaged or cracked wire
insulation are dangerous. Any of these conditions
O
GROUNDING
Ensure that you connect the earth ground wire to
could result in electric shock or fire. Periodically
examine the cord of your appliance, and if its
appearance indicates damage or deterioration,
unplug it, discontinue use of the appliance, and
prevent possible electric shock. (i.e. a TV with a
three-prong grounded AC plug must be connected
have the cord replaced with an exact replacement
part by an authorized servicer. Protect the power
cord from physical or mechanical abuse, such as
cian install a separate circuit breaker.
to a three-prong grouned AC outlet) If grounding
methods are not possible, have a qualified electriDo not try to ground the unit by connecting it to
telephone wires, lightening rods, or gas pipes.
being twisted, kinked, pinched, closed in a door, or
walked upon. Pay particular attention to plugs, wall
outlets, and the point where the cord exits the
appliance.
%
Breaker
Do not make the TV with the power cord plugged
in. Do not use a damaged or loose power cord. Be
sure do grasp the plug when unplugging the power
@
cord. Do not pull on the power cord to unplug the
TV.
DISCONNECTING
DEVICE FROM MAINS
Mains plug is the disconnecting
must remain readily operable.
4
i
........................
4r-,,_--,I
.........................
\j/
i
device. The plug
MFL62194603
8/10/09 2:50 PM
i
ST'_
t r i
Page 5
i
@
O
ANTENNAS
Outdoor
antenna
Install your TV where there is proper ventilation. Do
grounding
not install in a confined space such as a bookcase.
Do not cover the product with cloth or other mate-
If an outdoor antenna is installed, follow the precautions below. An outdoor antenna system should not
rials (e.g.) plastic while plugged in. Do not install in
be located in the vicinity of overhead power lines or
excessively dusty places.
other electric light or power circuits, or where it can
@
come in contact with such power lines or circuits as
death or serious injury can occur.
If you smell smoke or other odors coming from the
TV or hear strange sounds, unplug the power cord
contact an authorized service center.
Be sure the antenna system is grounded so asto provide some protection
Ventilation
against voltage surges and
built-up static charges.
Do not press strongly upon the panel with a hand or
sharp object such as nail, pencil or pen, or make a
scratch on it.
Section 810 of the National Electrical Code (NEC) in
the U.S.A_provides information with respect to proper grounding of the mast and supporting structure,
grounding of the lead-in wire to an antenna discharge unit, sizeof grounding conductors, location of
antenna discharge unit, connection
to grounding
electrodes and requirements for the grounding electrode.
Antenna
National
grounding
Electrical
according
Code,
to
the
ANSl/NFPA
_}1
70
Keep the product
For
_°-
Antenna
Lead
LCD
away from direct sunlight.
TV
If the TV feels cold to the touch, there may be
a small "flicker" when it is turned on. This is
in Wire
normal, there is nothing
(NEC
Section
Grounding
(NEC
_
Ground
Power
Electrode
Ad
NEC:
National
Electrical
250,
Some minute dot defects may be visible on the
Conductors
Section
nlenna
810-21
Discharge
)
screen, appearing
Unit
Clamps
Service
Grounding
the monitor's
(NEC
Avoid touching
Doing
tortion
Cleaning
When cleaning, unplug the power cord and scrub
gently with a soft cloth to prevent scratching. Do not
spray water or other liquids directly on the TV as
electric shock may occur. Do not clean with chemicals such as alcohol, thinners or benzene.
0
Moving
Make sure the product
is turned
red, green, or blue
performance.
H)
Code
finger(s)
@
as tiny
spots. However, they have no adverse effect on
System
Pad
wrong with TV.
810-20)
off, unplugged
and all cables have been removed. It may take 2 or
more people to carry larger TVs. Do not press
against or put stress on the front panel of the TV.
i
........................
P,,,_-,,,I
.........................
\j/
i
the LCD screen or holding your
against
it for long periods
of time.
so may produce some temporary
effects on the screen.
dis-
MFL62194603
8/10/09 2:50 PM
i
Page 6
t r
i
WARNING / CAUTION ............................ 2
DVD Setup .....................................................
20
SAFETY INSTRUCTIONS
VCR Setup .....................................................
PC Setup ........................................................
21
22
Turning On TV ................................................
Channel Selection ...........................................
24
24
Contents
..........................3
..........................................................
Accessories
6
......................................................
Front Panel Information
7
......................................
Back Panel Information
8
......................................
9
Stand Instruction
.............................................
11
Remote Control
Functions ................................
12
Securing the TV to the wall to prevent falling
When the TV is used on a stand ..........................
14
Cable Management
15
Desktop
Attaching
.........................................
Pedestal Installation
............................
16
the TV to a Desk ..............................
16
VESA Wall Mounting
........................................
Antenna or Cable Connection
Volume Adjustment ......................................... 24
Channel Setup ................................................
25
On-Screen Menus Selection ............................. 26
8
Swivel Stand .....................................................
If you
want
"ACRORD"--_
Manual
19
on the CD-ROM,
folder on the CD-ROM
to install
those
double-click
Manual files are included
Load the supplied
CD-ROM
34
Troubleshooting ..............................................
Maintenance ...................................................
37
38
Product Specifications .....................................
Open Source Software Notice ..........................
39
39
ON THE CD-ROM
Reader must be installed
the installation
Open
the
"My
on your PC.
programs for them.
Computer"--*
Open
the
"LG"--*Open
the
language.
TO VIEW THE OWNER'S MANUAL
The Owner's
30
Music List .......................................................
Adobe Acrobat
contains
programs,
your
Photo List .......................................................
18
HOW TO USE THE OWNER'S MANUAL
The "ACRORD"
29
17
..........................
HD ReceiverSetup .........................................
To view the Owner's
Entry Modes ...................................................
ON THE CD-ROM
in the supplied
into the CD-ROM
After a while, the web page of the CD-ROM
CD-ROM.
drive of your PC.
will open automatically.
(for Window
only)
+
Z:. ......
@+'_'
71
+,,
1
You can find the desired contents
easily using the bookmark.
6
i
\j/
i
MFL62194603
8/10/09
2:50
PM
Page
7
/ih
[
PREPERATION
ACCESSORIES
Ensure that the following
accessories
are included
tact the dealer where you purchased
the product.
For further
information,
see the the Owner's
with your
Manual
product.
files supplied
If an accessory
is missing,
please con-
CD-ROM.
-O
The accssories
can be different
from the figures
shown here.
m
©
z
Owner's
Manual
Remote Control,
Batteries
CD Manual
Not included with all models
@w
* Wipe spots on the exterior
the polishing
®[
.
Power Cord
."
only with
cloth.
* Do not wipe roughly
when
When
using
cable)
PC
must
removing
Cloth
stain.
Excessive
Torx plus
Star head screw
Bracket and Bolt for
Power Cord
is not available
D-sub
15 pin Cable
standards
ferrite
Screw for stand fixing
Cable Holder
for all models.)
[
\jJ
i
user
interface
cores to maintain
compliance.
x2
Bolts for stand assembly
(This feature
with
signal
15 pin
the
may cause
scratch or discoloration.
x4
Protective
pressure
connection,
use shielded
cables
Polishing
the VGA (D-sub
Protection
Plug in type
holder
Cover
MFL62194603
8/10/09 2:50 PM
i
S]%
t r
Page 8
i
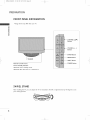
PREPARATION
FRONT PANELINFORMATION
m Image shown may differ from your TV.
"O
m
O
z
CHANNEL (A,'I!')
Buttons
VOLUME
Buttons
(+,-)
ENTER Button
--
MENU Button
--
INPUT
--
POWER Button
SPEAKER
Remote Control
Sensor,
Power/Standby
Indicator
Illuminates
red in standby
Illuminates
blue when the TV is switched
Button
mode.
on.
SWIVELSTAND
After installing
the TV, you can adjust the TV set manually to the left or right direction
your viewing position.
8
i
\j/
i
by 90 degrees to suit
MFL62194603
8/10/09 2:50 PM
Page 9
i
ST_
t r
i
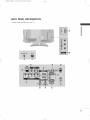
BACK PANELINFORMATION
m Image shown may differ from your TV.
-O
m
©
z
iiiiii+_++++++++++++++++++
iiiiiii_ii:ii:ii:ii:ii:ii:ii:ii:ii:ii:ii::i'!i!+?i_
_'
'_,ii_i!_!_!!i
_+iiiiiiiiiiiiiiiiiiiiiiiiii+_iii_i!i_ill
9
i
........................
4r,,,,_.,,,,,,j
.........................
\j/
i
MFL62194603
8/10/09 2:50 PM
i
S]%
t r
Page i0
i
O
@ GAME CONTROL
Control port
RJP(REMOTE JACK PACK PORT)
Connect to remote jack pack control output port.
i'-I-I
@
TV - LINK CFG
AV (Audio/Video)
IN
Analog composite connection.
definition video only (480i).
0
z
Supports
Used for FTG Configuration
standard
@
Used for PC/DTV audio input jack.
@
COMPONENT
Used for viewing photos and listening
@
IN
Analog Connection.
Supports
HDMI/DVI
@
@
@
@
IN
Supports
SPEAKER OUT
or HDMI
M.RI.
Control
Caution:
power.
to
speaker input.
device.
UPDATE
Enables/disables
mode.
software
downloads
and debug
Uses a D-sub
15 pin cable
RESET
Performs a hardware reset.
@ RGB IN (PC)
Analog PC Connection.
(VGA cable).
AUDIO
IN (RGB/DVI)
headphone
@ RS-232C
port.
Power Cord Socket
80
to external
REMOTE CONTROL OUT
IR output for controlling an auxiliary
1/8"
IN
over-the air signals to this jack.
For operation
HD video and Digital
Accepts DVI video using an adapter
DVI cable (not included)
Connect
to MP3s.
HD.
Digital Connection.
audio.
@
ANTENNA
Connect
Uses a red, green, and blue cable for video & a red
and white cable for audio.
@
USB IN
jack for analog PC audio input.
IN (SERVICE ONLY)
Used for software updates.
10
i
........................
p,+.,,,,,,j
.........................
\j/
i
with AC power.
Never attempt
to operate
the TV on DC
MFL62194603
8/10/09 2:50 PM
i
Page ii
t r i
i
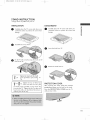
STAND INSTRUCTION
Image shown may differ from your TV.
INSTALLATION
DETACHMENT
-O
O
Carefully
place the TV screen side down
cushioned
surface
to protect
on a
Carefully place the TV screen side down on a
cushioned surface to protect the screen from
the screen from
m
_o
damage.
damage.
©
z
O
Assemble the TV as shown.
Fix the 4 bolts securely
back of the TV.
0
Loose the bolts from TV.
0
Detach the stand from TV.
using the holes in the
A
_x
4
of the
screws (provided as parts
Tighten the stand with the four/
x2
b
x2
Tighten
or
J
TV).
the two
screws and the
of these
two
Torx
four
plus
PROTECTION
After
star head screws (provided
as parts of the TV)
to secure the TV. Tighten the two Torx plus star
head screws with a star head driver bit (not provided as parts of the TV).
removing
protection
the
cover
COVER
stand,
install
the
included
over the hole for the stand.
Press the PROTECTION
COVER
into the TV
until you hear it click.
11
i
........................
4r,,,,_-,,,,,I
.........................
\j/
i
MFL62194603
8/10/09
2:50
PM
Page
12
/ih
J
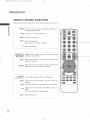
REMOTE CONTROL FUNCTIONS
When using the remote control,
aim it at the remote control
sensor on the TV.
"O
I'm
O
z
POWER Turns your TV or any other programmed equipment on
or off, depending on mode.
MARK Use to mark or unmark a photo/music.
RATIO Change the aspect ratio.
INPUT Rotates through inputs.
Also switches the TV on from standby.
CC Selecta closedcaption.
THUMBSTICK
(Up/Down/Left
Right/ENTER)
MENU
RETURN
VCR/DVD
control buttons
TIMER
Navigates
the on-screen
menus and adjusts the
system
set:Lings to your preference.
Displays the main menu or clears all on-screen
return to TV viewing.
displays and
Allows the user to move return one step in an interactive
application or other user interaction function.
Control
video casset:Le recorders
Select the amount
or DVD players.
of time before your TV turns off auto-
matically.
ALAM
SAP
Set the time that the TV will automatically
Analog
mode:
Selects
MTS sound
turn itself on.
(Mono,
SAP)
DTV mode: Changes the audio language.
EJECT
Eject the USB device.
12
i
S\
........................
4:,,,,,_-,,,I
.........................
\jJ
i
Stereo,
or a
MFL62194603
8/10/09
2:50
PM
Page
13
/ih
[
-D
I"11
NUMBER
button
--
(DASH)
LIST
FLASHBK
VOLUME UP
/DOWN
MUTE
CHANNEL
UP/DOWN
Used to enter a program number for multiple program channels such as 2-1,2-2,
etc.
©
z
Displays the channel table.
Tunes to the last channel viewed.
Increase/decrease
the sound level.
Switch the sound on or off.
Select available channels.
PAGE Move from one full set of screen information to the next one.
UP/DOWN
13
[
\jJ
i
MFL62194603
8/12/09 5:09 PM
Page 14
/ih
[
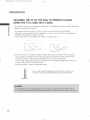
SECURING THE TV TO THE WALL TO PREVENTFALLING
WHEN THE TV IS USED ON A STAND
You should purchase necessary
;m
m
;m
O
z
components
to prevent the TV from tipping
over (when not using a wall mount).
Image shown may differ from your TV.
We recommend
Additionally,
potentially
Caution:
that you set up the TV close to a wall so it cannot fall over if pushed
we recommend
that the TV be attached
causing injury or damaging
* If your product
don't
(or TV brackets and bolts)
has the bolts in the eye-bolts
* Insert the eye-bolts
direction,
or TV brackets/bolts
climb on or hang from the TV.
to tighten
position
the product
to the wall as shown in the picture.
before inserting
the eye-bolts,
and tighten them securely in the upper
Secure the wall brackets with the bolts (sold separately)
mounted
backwards.
in a forward
the product.
Please make sure that children
_ Insert the eye-bolts
to a wall so it cannot be pulled
loosen the bolts.
holes.
to the wall. Match the height of the bracket that is
on the wall to the holes in the product.
Ensure the eye-bolts
or brackets are tightened
securely.
m Use a sturdy rope (sold separately)
the rope so it becomes horizontal
]4
[
........................
4:,,,-.,,,,,,;
.........................
\j/
i
to tie the product.
It is safer to tie
between the wall and the product.
MFL62194603
8/10/09 2:50 PM
i
ST_
t r
Page 15
i
CABLE MANAGEMENT
m Image shown may differ from your TV.
-O
O
m
Connect
the cables as necessary.
To connect
additional
equipment,
EXTERNAL
EQUIPMENT
O
see the
©
z
or the Plug in type Holder.
It will help prevent
being removed
PROTECTIVE
(This feature
all models.)
PLUG
@
_o
SETUP section.
Secure the power cable with the PROTECTIVE
BRACKET/Screw
ut the cables inside the CABLE MANAGEMENT
CLIP and snap it closed.
the power cable from
by accident.
BRACKET/Screw
is not
available
for
Or
IN TYPE HOLDER
Install the CABLE MANAGEMENT
CLIP as
shown.
If your TV has the CABLE HOLDER,
as shown and bundle the cables.
CABLE
MANAGEMENT
install it
CLIP
CABLE HOLDER
15
i
\j/
i
MFL62194603
8/10/09
2:50
PM
Page
16
/ih
[
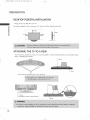
DESKTOP PEDESTALINSTALLATION
Image shown may differ from your TV.
For proper ventilation,
allow a clearance of 4 inches on all four sides from the wall.
m
4 inches
4 inches
O
z
4 inches
4 inches
ATTACHING THE TV TO A DESK
The TV must be attached
injury or damaging
to a desk so it cannot
be pulled in a forward/backward
direction,
potentially
the product.
Stand
Desk
g
4-Screws(not
provided
as parts of the product)
] -Screw
(provided
as parts of the product)
Desk
16
[
\jJ
i
causing
MFL62194603
8/10/09
2:50
PM
Page
17
/ih
[
VESA WALL MOUNTING
Install your wall mount on a solid wall perpendicular
contact
to the floor. When attaching
to other
building
materials, please
your nearest installer.
If installed
on a ceiling or slanted wall, it may fall and result in severe personal
We recommend
that you use an LG brand wall mount when mounting
LG recommends
that wall mounting
be performed
by a qualified
-D
injury.
m
the TV to a wall.
professional
installer.
©
z
200.
100
M4
4
;_
RW250
200.
200
M6
AW-47LGg0M
4
AW-47LGg0M
17
[
i
MFL62194603
8/10/09
2:50
PM
Page
18
/ih
[
PREPARATION
I To prevent damage do not connect to the power outlet until all connections
are made between the devices.
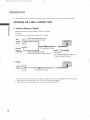
ANTENNA OR CABLE CONNECTION
m
1. Antenna
(Analog
or Digital)
Wall Antenna Socket or Outdoor
O
z
Antenna without
a Cable Box
Connection.
For optimum
picture quality, adjust the direction
if needed.
Multi-family
Dwellings/Apartments
(Connect to wall antenna socket)
Wall
Antenna
Socket
RF Coaxial
Outdoor
Wire
(7S ohm)
Antenna
Single-family
(VHF, UHF)
(Connect
Dwellings/Houses
Copper
to wall jack for outdoor
antenna)
Be careful not to bend the copper wire
when connecting the antenna.
2. Cable
Cable TV
Wall Jack
I To improve
the picture quality in a poor signal area, please purchase a signal amplifier
i
If the antenna
needs to be split for two TV's, install a 2-Way Signal Splitter.
i
If the antenna is not installed
properly,
contact
your dealer for assistance.
18
[
........................
4:,,,,,_.,,,,,I
.........................
\jJ
i
and install properly.
MFL62194603
8/10/09
2:50
PM
Page
19
/ih
[
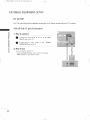
EXTERNAL EQUIPMENT SETUP
I To prevent the equipment damage, never plug in any power cords until you have finished connecting all equipment.
i Image shown may differ from your TV.
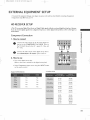
HD RECEIVERSETUP
+This TV can receive Digital
if you do receive digital
shown below.
Over-the-air
or Digital
signals from a digital
Cable signals without
set-top
box or other
an external
digital
external
digital set-top
box. However,
device, refer to the figure
as
m
x
--4
Component
m
Connection
z
>
1. How to connect
m
O
Connect
the video outputs
c
(Y, PB, PR) of the digital set-
top box to the COMPONENT
IN
VIDEO
jacks on
m
the TV. Match the jack colors (Y = green, PB = blue, and
z
PR = red).
m
--4
C
O
"D
Connect the audio output of the digital set-top box to
the COMPONENT
IN AUDIO
jacks on theTV.
2. How to use
Turn on the digital
set-top
box.
(Refer to the owner's manual for the digital set-top
i Select Component
input source usingthe
on the remote control.
Supported
INPUT
box.)
button
Y,
Resolutions
Yes
No
Yes
Yes
Yes
Yes
Yes
Yes
Yes
Yes
CB/PB,
CR/PR
15.73
15.73
59.94
60.00
31.47
31.50
59.94
60.00
44.96
59.94
45.00
60.00
33.72
59.94
33.75
60.00
6Z43
6Z50
2ZOO
26.97
33.75
33.71
59.94
60.00
24.00
23.976
30.00
29.97
19
[
S\
........................
4:,,,,,_.,,,,,I
.........................
\jJ
i
MFL62194603
8/10/09 2:50 PM
i
Y]%
t r
Page 20
i
EXTERNAL EQUIPMENT SETUP
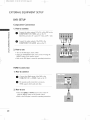
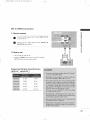
DVD SETUP
Component
Connection
1. How to connect
i-m
x
O
onnect the video outputs (Y, PB, PR) of the DVD to the
COMPONENT
IN VIDEO
jacks on theTV.
i-m
Match the jack colors (Y = green, PB = blue, and PR = red).
;o
z
>
c
O
Connect the audio outputs of the DVD to the
COMPONENT
IN AUDIO
jacks on theTV.
i-m
z
m
2. How to use
c
"O
I Turn on the DVD player, insert a DVD.
i Select the Component
input source on the TV using the
INPUT huron on the remote control.
i Refer to the DVD player's manual for operating
instructions.
HDMI Connection
1. How to connect
O
Connect the HDMI output of the DVD to the
HDMI/DVI
IN 1or HDMI 2 jack on the TV.
O
No separate audio connection
HDMI
supports
is necessary.
both audio and video.
2. How to use
I Select the HDMIIor
using the INPUT
HDMI2
huron
input source on the TV
on the remote control.
i Refer to the DVD player's manual for operating
instructions.
20
i
........................
4:,,,,,_.,,,,,I
.........................
\j/
i
MFL62194603
8/10/09
2:50
PM
Page
21
/ih
J
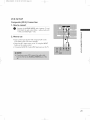
YCR SETUP
Composite
(RCA) Connection
1. How to connect
O
Connect the AUDIO/VIDEO
jacks between TV and
VCR. Match the jack colors (Video = yellow, Audio Left
= white, and Audio
Right = red)
m
x
.-t
m
_o
2. How to use
z
i Insert a video tape into the VCR and press PLAY on the
VCR. (Refer to the VCR owner's manual.)
c
i Select the AV1 input source on the TV using the INPUT
button on the remote control.
i
If connected to AV IN 2, select AV2
m
input source on the TV.
-o
m
z
m
-t
c
-0
21
i
........................
4:,,,,,_.,,,,,I
.........................
\iJ
i
MFL62194603
8/10/09 2:50 PM
i
S]%
t r
Page 22
i
EXTERNAL EQUIPMENT SETUP
PC SETUP
This TV provides
Plug and Play capability,
meaning
that
the PC adjusts automatically
VGA (D-Sub 15 pin) Connection
m
x
1. How to connect
m
z
>
the VGA output
jack on the TV.
O
Connect
IN(PC)
O
Connect
the
IN(RGB/DVI)
m
of the
PC to
the
RGB
c
PC audio output
jack on the TV.
to
the
AUDIO
m
z
m
c
2. How to use
I Turn on the PC and the TV.
i Select the RGB-PC input source on the TV using the
INPUT button on the remote control.
22
i
........................
4:,,,,,_.,,,,,I
.........................
\j/
i
to the TV's settings.
MFL62194603
8/10/09
2:50
PM
Page
23
/ih
J
DVI to HDMI Connection
m
1. How to connect
x
--I
m
z
O
onnect the DVI output of the PC to the HDMI/DVI
1 jack on the TV.
IN
m
O
Connect the PC audio output
(RGB/DVI)
jack on the TV.
,JO
c
to the
AUDIO
IN
m
z
-.I
m
.--I
c
2. How to use
I Turn on the PC and the TV.
i Select the HDMI1 input source on the TV using the
INPUT button on the remote control.
Supported
Display Specifications
(RGB-PC,
HDMJ-PC)
31.469
59.94
...........
sz8_?
...........................
6°:s!..............
48.363
60.00
4Z 776
59.87
4Z720
59.799
23
J
\jJ
i
MFL62194603
8/10/09
2:50
PM
Page
24
/ih
J
WATCHING TV
TURNING ON TV
O
O
O
First, connect
power cord correctly.
At this moment, the TV switches to standby
mode.
m In standby mode to turn TV on, press the
POWER button on the remote control.
_/I
button on the TV or press the
elect the viewing source by using the INPUTbutton
on the remote control.
When finished using the TV, press the POWER button on the remote control.
TV reverts to standby mode.
N
"IZ
C_
CHANNEL SELECTION
O
Press the CH(^
or v)
or NUMBER buttons
to select achannel
number.
VOLUME ADJUSTMENT
Adjust
the volume
to suit your
personal
preference.
O
Press the VOL (+ or -) button to adjust the volume.
O
If you want to switch the sound off, press the MUTE button.
O
You can cancel the Mute function
button.
by pressing the MUTE or VOL (+ or -)
24
i
........................
4:+,,_.,,,,,,j
.........................
\jJ
i
The
MFL62194603
8/10/09
2:50
PM
Page
25
/iA
J
CHANNEL SETUP
Auto
Scan (Auto
Automatically
channel list.
finds
Tuning)
all channels
available
through
Run Auto Tuning again after any Antenna/Cable
antenna
connection
or cable inputs,
and stores them
in memory
on the
changes.
-1Z
Select CHANNEL.
m The TV will ask for a password
Select Auto
control
Tuning.
has
been
if parental
activated
(LOCK
Menu). Use the password you set up in
the LOCK Menu to allow a channel
search.
Select Yes.
m When setting
the Auto tuning
tuning, the number
or Manual
of maximum channel
you can store is 740.
Run Auto
tuning.
It is subject to change depending
broadcasting
m Automatically
Return to the previous
through
menu.
finds all channels available
antenna
stores them
list.
on the
signal environment.
or
cable
in memory
inputs,
on the
and
channel
Return to TV viewing.
2S
i
\jJ
i
MFL62194603
8/10/09
2:50
PM
Page
26
/ih
[
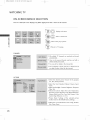
WATCHING TV
ON-SCREENMENUSSELECTION
Your TV's OSD (On Screen Display)
may differ
slightly
from what
is shown in this manual.
Display
each menu.
Select a menu item.
Enter to the pop up menu.
-1Z
Return to TV viewing.
CHANNEL
I All available TV channels are searched
and stored
........
aut m.at! a.......................................................................
.!X
I User can do manual channel
delete individual
selection
and add or
channels.
PICTURE
I Select the
desired
picture
format:
Set by program,
4:3, 16:9, Zoom, Just Scan.
i Select the Vivid, Standard,
Game.
Natural,
i Adjust the Backlight, Contrast,
Cinema, Sport,
Brightness, Sharpness,
Color, Tint.
i Advanced
Control:
Dynamic Contrast,
Adjust
the
Color
Temperature,
Dynamic Color, Noise Reduction,
Gamma, Black Level, Eye Care, Real Cinema, Color
Gamut,
i Picture
Edge Enhancer, or xvYcc.
Reset:
Settings
of
modes return to the default
i Adjust the screen Resolution,
Size, Phase, Reset.
26
[
........................
_:,,,,,_-,,,,,I
.........................
\jJ
i
the
factory
selected
picture
settings.
Auto config, Position,
MFL62194603
8/10/09 2:50 PM
i
YT'_
t r ?
Page 27
i
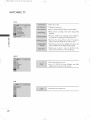
AUDIO
IAuto
Volume makes sure that the volume level remains
consistent
whether you are watching
a commercial or
a regular TV program.
,,,,By differentiating
the human sound range from oth-
ers, it improves the sound quality of voices.
,,,,Adjust the left/right
sound of speaker.
Spo_i anaGamel
....
_ Select
the
I
SRS TruSurround XT: Takes advantage
channel format
without
of any multi-
needing to add extra speak-
ers or equipment.
i Treble, Bass: Adjust
and room situations.
the sound
i Reset: Settings of the selected
to the default factory
[
T
ke
to suit your
Sound Mode
taste
Z
return
<
settings.
_ Turn the TV speaker On or off.
TIME
Auto:
The time
is set automatically
from a digital
channel signal.
Select your viewing area time zone.
Select
Auto,
not your
time.
Off,
viewing
On
depending
area observes
on whether
Daylight
or
Saving
Manual: Set the clock manually.
time.
IIIIIIII
Select the amount of time before your TV turns off
iiiiiiiiiiiiiiiiiiiiiiiiiiiiiiiiiiiiiiiiiii
¸i_ii!iiiiiiiiiiiiiiiiiiiiiiiiiiii_iiiiiiiiiiiiiiiiiiiiiiiiiiiiiiiiiiiiiiii_i___i_i
i7
ili!ii!ii!ii!i
i!ii!ii!ii!ii!ii! i! i
automatically:
Off, 10, 20, SO, 60, 90,
120, 180,
240.
OPTION
Select your desired
language for on screen menus
Select your desired
language for on screen menus
: English, Spanish, French.
Analog: CC1 ~ CC4,
Text1 ~ Text4.
Digital: CC1 ~ CC4, Text1 ~ Text4, Service1 ~ Service6
Digital Option:
Customize the DTV/CADTV
.......tlt_at .aPP_aL 9PII_QIU.[.s_eeo:
captions
....................................................
27
i
\j/
i
MFL62194603
8/10/09 2:50 PM
i
YT'_
t r
Page 28
i
WATCHING TV
LOCK
i Blocks movies according
to the
movie ratings limits
specified.
1,1
i Based on the ratings,
N
"-I-
blocks
certain
TV programs
that you and your family do not want to view.
X
i This function
c_
may become available in the future and
will be available only for digital channel signal.
<
[[[[[[[[[[[[[[[[[[[[[[[[[[
j
_j
_ Enables you to select a source to block from the
external source devices you have hooked up.
INPUT
IIIIIIII
Select desired
,,,,,,,i
Your
slightly
TV's
input sources.
OSD
(On
Screen
Display)
may differ
from that shown in this manual.
USB
D___
_"_*'_'
U_
"""Use Photo List or Music List.
___
______________________________________________________________________________________________________________________________
___________________________________________________________________________________________________________________________
..............
________________________________________________________________________________________________
___
28
i
........................
4:,,,,,_.,,,,,I
.........................
\j/
i
MFL62194603
8/10/09
2:50
PM
Page
29
/iA
[
Image shown may differ from your TV.
ENTRY MODES
When you connect
a USB device, this pop up menu is displayed
automatically.
When the Pop Up menu does not appear, you can select Photo List or Music List in the USB menu.
On a USB device, you can not add a new folder
1
Connect
the USB device to the USB
or delete an existing
folder.
IN
This TV Supports
jacks on the side of TV.
on JPG and MP3.
C
Select PHOTO
LIST
or MUSIC
LIST.
29
[
........................
4:,,,,,_.,,,,,I
.........................
\jJ
i
MFL62194603
8/10/09 2:50 PM
i
S]%
t r
Page 30
i
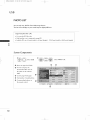
USB
PHOTO LIST
You can only view .JPG files from
The On-Screen
Display
on your
USB storage
devices.
model may be slightly
different.
C
Oo
Screen Components
Select USB.
@ Moves to upper
@ Preview:
Select Photo
List.
level folder
Display
thumbnail/folder
the
name of
the photo in the selected
folder
Current
page/Total
pages
Total number of marked photos
@ Corresponding
buttons
on
the remote control
I
/
3O
i
S\
........................
4:,,,,,_.,,,,,I
.........................
\j/
i
MFL62194603
8/10/09 2:50 PM
i
/]%
t T
Page 31
i
Photo Selection
_j_
Navigation
_
Popup
and Popup Menu
Menu
¢H
Page ¢hange
Mark
_a
C
Exit
When you select a file
(not folder),
this
PopUp
menu is displayed.
View: Display the selected item.
Mark
Use to mark or unmark a photo.
Mark All: Mark all photos on the screen.
Unmark
Delete
_
Navigation
_
Popup
Menu
¢H
Page ¢hange
_M_K_
Mark
c_
All: Deselect all marked photos.
or Delete
Marked:
Delete the selected
Exit
photo item.
Close:
Close the pop-up
menu.
Select the target folder or drive.
Select the desired photos.
Show the Popup menu.
Select the desired
Popup menu.
31
i
........................
4:,,,,,_.,,,,,I
.........................
\j/
i
MFL62194603
8/10/09 2:50 PM
i
ST'_
t r
Page 32
i
USB
Full Screen Menu
You can change the Photo List view so that
screen mode.
it fills the screen.
More
operations
are available
in full
C
_navigation
(_PopupMenu
CH
PageChange
iiiiMAR
Ma,k
_
Exit
iiii_R
_
Exit
$
_navigation
_)PopupMenu
CH
PageChange
Ma,k
The aspect
photo
Press the
screen.
Select the target
folder
or drive.
Select the desired photos.
Show the Popup menu.
Select View.
The selected photo is displayed in
full size.
32
i
\j/
i
ratio of a photo
displayed
may change
on the screen
RETURN
button
the size of the
in full size.
to move to the
previous
menu
MFL62194603
8/10/09 2:50 PM
Page 33
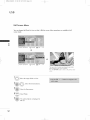
_!_i
Select the Slideshow, BGM, _(Rotate),
Delete, Option, or Hide.
C
_+ Slideshow:
Selected
photos
are displayed
during
the
slide show. If no photo is selected, all photos in the current folder are displayed
m Set the time interval
_+ BGM:
during
slide show.
of the slide show in Option.
Listen to music while viewing photos
in full size.
m Set the BGM device and album in Option.
_+
(Rotate):
Rotate photos.
m Rotates the photo
Delete:
Delete photos.
>+Option:
Album.
mUse
90 °, 180 °, 270 °, 360 ° clockwise.
Set values
^
v <
>
for
button
Slide
Speed
and ENTER
values. Then go to _
and
button
and press ENTER
Music
to set
to save
the settings.
mYou
cannot
change
Music
Album
while
BGM
is
playing.
_+ Hide
: Hide the menu on the full-sized
screen.
m To see the menu again on the full-sized
ENTER
button
screen, press
to display.
33
i
MFL62194603
8/10/09 2:50 PM
i
S]%
t r
Page 34
i
USB
MUSIC LIST
You can use the Music List menu to play MP3 files from a USB storage
This TV cannot
play back copy-protected
The On-Screen
Display
Supported
on your model
device.
files.
may be slightly
different.
music file: *.MP3
Bit rate range 32 Kbps - 320 Kbps
C
• Sampling rate (Sampling
Frequency)
MPEG1 layer 3:32
kHz, 44.1
MPEG2 layer 3:16
kHz, 22.05
MPEG2.5
layer 3:8
kHz, 48 kHz
kHz, 24 kHz
kHz, 11.025
kHz, 12 kHz
Screen Components
Select USB.
@ Moves to upper
@ Preview:
for the
Select Music
List.
level folder
If any album jacket
file exists,
this
jack-
et is displayed.
O
Current
page/Total
pages
O
Total number of marked
musics
@ Corresponding
buRons on
the remote control
I _>
Navigation
_)
Popup
Menu
34
i
........................
4:,,,,,_.,,,,,I
.........................
\j/
i
CH
Page Change
I_IA_KI_ Mark
d_
Exit
I
MFL62194603
8/10/09 2:50 PM
i
/]%
t r
Page 35
i
Music Selection and Popup Menu
Play
(During
stop): Play the selected file.
Once a song finishes
playing, the next selected
one will be played. When there
are no selected
files to play, the next one in the current
will be played. If you go to a different
press the ENTER
button,
folder
folder and
the current
song in
playback will stop.
Play
_:_Navigation
_PopupMenu
CH
PageChange
Marl;
#%
Marked:
file finishes
Exit
Play the selected
files. Once
playing, the next selected
a
C
one will
be played automatically.
$
Stop
Play
(During
playback):
Stop the play-
ing files.
Play with Photo:
Start playing the selected
files and then move to the Photo List.
Mark:
Mark
Unmark
_
Navigation
_)
Popup
Menu
CH
Use to mark or unmark a music.
All: Mark all files in the folder.
All:
Deselect all marked files.
Delete
files.
or Delete
Marked:
Close:
Close the pop-up
Delete the selected
Page Change
menu.
Select the target folder or drive.
Select the desired
musics.
Show the Popup menu.
Select the desired
Popup menu.
Return to TV viewing.
35
i
........................
4:,,,,,_.,,,,,I
.........................
\j/
i
MFL62194603
8/10/09
2:50
PM
Page
36
/ih
J
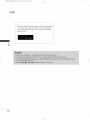
USB
I The play information
box (as shown below) will automatically
move across the screen when there is no user input to prevent a fixed image remaining
on the screen for a extended
period of time.
C
36
i
........................
4:,,,,,_.,,,,,I
.........................
\jJ
i
MFL62194603
8/10/09 2:50 PM
i
Y]%
t r ?
Page 37
i
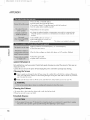
APPENDIX
TROUBLESHOOTING
IIIIIIII
Check to see if there is any object between the product
causing obstruction.
Ensure you are pointing
iiiiiiii
Ensure that the batteries
iiiiiiii
Ensure that the correct
are installed with correct
remote operating
,,,,Install new batteries.
and the remote control
the remote control
polarity
directly at the TV.
(+ to +, - to -).
mode is set: TV, VCR etc.
_This feature is not available for all models.
IIIIIIII
Is the sleep timer set?
IIIIIIII
Check the power control
i TV will be automatically
settings. Power interrupted.
turned
off, in case of no signal for 15 minutes.
>
"D
"D
z
E_
x
IIIIIIII
Check whether
iiiiiiii
Try another
the product
is turned
channel. The problem
iiiiiiii
Is the power cord inserted
into wall power outlet?
iiiiiiii
Check your antenna direction
i Test the wall power outlet,
where the product's
on.
may be with the broadcast.
and/or
location.
plug another
product's
power cord was plugged
power cord into the outlet
in.
IIIIIIII
This is normal, the image is muted during the product
contact
startup
your service center, if the picture has not appeared
process. Please
after five minutes.
iiiiiiii
Adjust Color in menu option.
iiiiiiii
Keep a sufficient
iiiiiiii
Try another
distance between the product
channel. The problem
iiiiiiii
Are the video cables installed
iiiiiiii
Activate
any function
and the VCR.
may be with the broadcast.
properly?
to restore the brightness
IIIIIIII
Station
or cable product
experiencing
iiiiiiii
Station
signal is weak, reorient
of the picture.
problems,
tune to another
station.
antenna to receive weaker station.
iiiiiiii
Check for sources of possible interference.
iiiiiiiiiiiiiiiiiiiiiiiiiiiiiiiiiiiiiiiiiiiiiiiiiiiiiiiii
!i !i
7 !! !! ! 7 i i7 !! !!i
i!ili_71iTiiT_ii77!ii!7_iTiiiiiiiiii
11111111
Check antenna (Change
the direction
iiiiiiii
Check HDMI cable over version
The HDMI cables don't
support
of the antenna).
1.3.
HDMI version 1.3, it cause flickers or no screen
display. In this case use the latest cables that support
HDMI version 1.3.
37
i
........................
4:,,,,,_.,,,,,I
.........................
\j/
i
MFL62194603
8/10/09 2:50 PM
i
Y]%
t r
Page 38
i
I Adjust
Balance in menu option.
_;_ changein amblen{ humicilty or {gmpgrature ma>;resuitin an uhusuai
nolse
...............
when the product is turned on or off and does not indicate a fault with the
product.
i Check HDMI cable over version
1.3.
i Check USB cable over version 2.0.
I Use normal MP3 file.
*This feature is not available for all models.
>
,,,,,,,,
Run the Auto configure
m
z
or adjust clock, phase, or H/V position.
(Option)
x
11111111
Check the signal cable.
i_i
Update video card drivers.
MAINTENANCE
Early malfunctions
enjoy your
Caution:
can be prevented.
Careful
and regular
cleaning
can extend the amount
of time you can
new TV.
Be sure to turn the power
off and unplug the power cord before
you begin any cleaning.
Cleaning the Screen
O
Here's a great way to keep the dust off your screen for a while. Wet a soft cloth in a mixture of lukewarm
water and a little fabric softener or dish washing detergent. Wring the cloth until it's almost dry, and then
use it to wipe the screen.
O
Make sure the excess water is offthe
Cleaning
screen, and then let it air-dry before you turn on your TV.
the Cabinet
I To remove dirt or dust, wipe the cabinet
i Please be sure not to use a wet cloth.
with a soft, dry, lint-free cloth.
Extended Absence
38
i
........................
4:,,,,,_.,,,,,I
.........................
\j/
i
MFL62194603
8/10/09 2:50 PM
i
Y]%
t r
Page 39
i
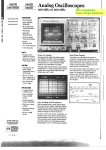
PRODUCT SPECIFICATIONS
2Z7 pounds/ 12.6 kg
25.1 pounds/ 11.4kg
33.0 pounds/ 15.0 kg
29.1 pounds/ 13.2 kg
41.0 pounds/ 18.6 kg
3Z0 pounds/ 16.8 kg
AC100-240V ~ 50/60Hz
NTSC-M, ATSC, 64 & 256 QAM
VHF 2-13, UHF 14-69, CATV 1-135, DTV 2-69, CADTV 1-135
75 ohm
32 ~ 104°F (0 ~ 40°C)
Lessthan 80%
>
-4 ~ 140°F (-20 ~ 60°C)
Less than 85%
I The specifications
shown
above
may be changed
without
prior
notice
for quality
-D
-D
z
E:I
x
improvement.
OPEN SOURCE SOFTWARE NOTICE
The following GPL executables and LGPL/MPL
libraries used in this product are subject to the
GPL2.0/LGPL2.1/MPL1.1
This software is based in part on the work of the
Independent JPEG Group copyright
© 1991 - 1998,
Thomas G. Lane.
You can obtain a copy of the GPL, LGPL, MPL licenses from
License Agreements:
GPL EXECUTABLES:
i Linux kernel 2.6
i busybox
I
]ZO
hit p://www.gn
2.0.html,
u.o rg/lice nses/old-
lice nses/gpl-
hit p://www.gn
2.1 .html
u.o rg/lice nses/old-
lice nses/Igpl-
http://www.mozilla.org/MPL/M
LGPL LIBRARIES:
PU 1.1 .html.
Also you can obtain the translation
licenses from
i uClibc
http://www.gn
u.o rg/lice nses/old-lice
of GPL, LGPL
nses/gpl-2
MPL LIBRARIES:
translations
i Nanox
http://www.gnu.org/licenses/old-licenses/Igpltranslations.html
LG Electronics offers to provide source code to you
on CD-ROM for a charge covering the cost of per-
This product
forming such distribution,
such as the cost of media,
shipping and handling upon e-mail request to LG
i libpng library : copyright
Pehrson
© 2004
Electronics
i Zlib compression
Copyright
at: [email protected]
This offer is valid for a period of three
from the date of the distribution
LG Electronics.
Jean-loup
(3) years
of this product
2.1 -
includes
library:
Glenn Randers© 1995-2002
Gailly and Mark Adler.
i Tinyxml library : copyright
Thomason
by
.O-
html,
(c) 2000-2006
Lee
You can obtain a copy of the GPL, LGPL and MPL
licenses on the CD-ROM provided with this product.
39
i
........................
4:,,,,,_-,,,I
.........................
\j/
i
MFL62194603
8/12/09
5:00
PM
Page
40
_!_J
Lifds Good
Congratdafions on your purchase! As you enjoy your new product, phase
keep these safety tips in mind:
THE ISSUE
® l'le home theater erltePair'r'neqt experience is a grow ng tlend and la/ger
fiat panel dispays are popubr purchases However, fiat panel dispays
are not aways supported on the prope" stands or instal ed according to the
manufacturer's recommenda_4ons
" Fat panel dismays that are inapprop_ ctey situa÷ed o:1 dressers, bookcases,
shebes, desks, speakers, chests or cars may fall eve _ and cause Iniury
THIS MAHUFACTURERCARES!
- The consume_ dectromcs indusky _scornrnr'ed to making home e*llertainment
enioyabb and safe
TUNE INTO SAFETY
• One size does NOT fit dl
Fdow _he manbfacturer's recommendations
for tile safe instal½tion and use ,of your fiat pand dispay
• Careful_ read and understand all enclosed ns'ructons for proper use d
f_is p_oduct
" Don1 alow chi dren _oclimb on or pay wf_h {umi'ure and iee_sion ses
• Don't pace fiat pane" dispays on furniture _hatcan easy be used as steps,
such as a chest of d_awers
• Remembe__Sla'ch dren can become excited whb
watch ng a plogram,
espec_aly on a "½rge_ than life" riot pane dmpay Care shadd be taken to
place aT install/he dispay where it canna ' be pdshed, pulled over,
or knocked down
" Care shoud be taken to route all cords and caUes connected to t_e fiat
panel @spay so lhat they cannot be puled or grabbed by curious chi dren
WALL MOUNTING: IF YOUDECIDE
TOWALLMOUNT
YOURFLATPANELDISPLAY,
ALWAYS:
•' Use a moun _lhat has been recommended by lhe dispay rnanufac%re _
and/or I's:ed by an independen: ½bo_a_ory (such as UL, CSA, ETL)
" Feow dl ir'st_uctionssupp ied by the disp½y and wall mount manufacturers
o If you have any doubts abaut yo,Jr abill 7 to safey install your Sat pond
dispay, contact your retai e_ about professional ms*elatien
" Make sore _ha' the wall where you are moun' ng lhe dispay is appropriate
Some wall mounts are not designed to be mounted to walB wt[_ steel
studs or old cinder block construction _ you a_e unsure, contact a
p_ofessanal ins:aller
• A min mum of two peo_e are required fo_ instalut:on
Flat panel dispbys
can be heavy
J