1
MarkVision™ Professional
11.0
User’s Guide
June 2005
Lexmark and Lexmark with diamond design are trademarks of Lexmark International, Inc.,
registered in the United States and/or other countries.
© 2005 Lexmark International, Inc.
740 West New Circle Road
Lexington, Kentucky 40550
www.lexmark.com
Edition: June 2005
The following paragraph does not apply to any country where such provisions are inconsistent with
local law: LEXMARK INTERNATIONAL, INC., PROVIDES THIS PUBLICATION "AS IS" WITHOUT
WARRANTY OF ANY KIND, EITHER EXPRESS OR IMPLIED, INCLUDING, BUT NOT LIMITED TO, THE
IMPLIED WARRANTIES OF MERCHANTABILITY OR FITNESS FOR A PARTICULAR PURPOSE. Some
states do not allow disclaimer of express or implied warranties in certain transactions; therefore, this statement
may not apply to you.
This publication could include technical inaccuracies or typographical errors. Changes are periodically made to
the information herein; these changes will be incorporated in later editions. Improvements or changes in the
products or the programs described may be made at any time.
References in this publication to products, programs, or services do not imply that the manufacturer intends to
make these available in all countries in which it operates. Any reference to a product, program, or service is not
intended to state or imply that only that product, program, or service may be used. Any functionally equivalent
product, program, or service that does not infringe any existing intellectual property right may be used instead.
Evaluation and verification of operation in conjunction with other products, programs, or services, except those
expressly designated by the manufacturer, are the user’s responsibility.
Lexmark, Lexmark with diamond design, MarkNet, MarkVision, and Optra are trademarks of Lexmark
International, Inc., registered in the United States and/or other countries. MarkTrack and OptraImage are
trademarks of Lexmark International, Inc.
PCL® is a registered trademark of the Hewlett-Packard Company.
PostScript® is a registered trademark of Adobe Systems Incorporated.
All other trademarks are the property of their respective owners.
© 1998, 2005 Lexmark International, Inc.
All rights reserved.
UNITED STATES GOVERNMENT RIGHTS
This software and any accompanying documentation provided under this agreement are commercial computer
software and documentation developed exclusively at private expense.
2
Licensing Notice
This product contains software developed and copyrighted by Lexmark.
In addition, the product software may contain:
• Software licensed under the provisions of the GNU General Public License version 2 and/or the GNU
Lesser General Public License version 2.1
• Software licensed under other licenses
Click the title of the document you want to review:
• Third-party licenses
The third-party software covered by these third-party licenses is free software; you can redistribute it and/or
modify it under the terms of the licenses referenced above. These licenses do not provide you any rights to
Lexmark copyrighted software.
Software source code
This product includes software, JmDNS 0.2, developed and distributed by Arthur van Hoff and Ric Blair and
distributed according to the GNU Lesser General Public License, v2.1
(http://www.gnu.org/copyleft/lesser.txt). The sourcecode is available locally at:
-- Windows: <install dir>\MarkVision Server\granite\src\jmdns_src.zip
-- Linux/Mac: /usr/mv_pro/src/jmdns_src.zip
-- Novell: SYS:\LEXMARK\MVPS\SRC\JMDNS_SRC.ZIP
3
Contents
Chapter 1: Introduction to MarkVision Professional .................. 7
Introduction..................................................................................................... 7
Terms used in this document ......................................................................... 8
What’s new in MarkVision Professional 11.0 ................................................. 8
MarkVision components ................................................................................. 9
System requirements ................................................................................... 11
Chapter 2: Using MarkVision Professional................................ 17
Installing MarkVision Professional................................................................ 17
Getting started.............................................................................................. 29
Basics........................................................................................................... 32
Chapter 3: Configuring MarkVision Professional ..................... 40
Adding and removing devices ...................................................................... 40
Creating folders ............................................................................................ 44
Using filters................................................................................................... 46
Creating user accounts and user groups ..................................................... 48
Assigning user privileges.............................................................................. 51
Chapter 4: MarkVision Professional Security ........................... 52
Adapter password conformance................................................................... 52
Confidential print job settings ....................................................................... 54
Secure communication................................................................................. 56
Secure viewing of encrypted hard disk drives .............................................. 60
User authentication ...................................................................................... 60
Chapter 5: Managing devices ..................................................... 64
Finding the devices you want ...................................................................... 64
Contents
4
Creating custom views ................................................................................. 65
Creating custom tables................................................................................. 65
Using device policies.................................................................................... 67
Scheduling tasks .......................................................................................... 68
Managing plug-ins ........................................................................................ 69
Generic file download................................................................................... 70
Resource Management ................................................................................ 71
Bookmark Management ............................................................................... 73
Wireless print server support........................................................................ 77
Destination management ............................................................................. 78
Changing printer settings ............................................................................. 80
Checking printer status................................................................................. 80
Organizing devices ...................................................................................... 81
Viewing a print server embedded Web page ............................................... 82
Viewing all printers ....................................................................................... 82
Creating maps .............................................................................................. 83
Monitoring printer supplies ........................................................................... 84
Moving the MarkVision Server ..................................................................... 84
Flashing print servers ................................................................................... 87
Formatting storage devices .......................................................................... 87
Print Permissions Technology...................................................................... 87
Queue management..................................................................................... 89
Chapter 6: MarkVision Messenger ............................................. 93
Installing MarkVision Messenger.................................................................. 93
How does MarkVision Messenger work? ..................................................... 93
How do I use MarkVision Messenger?......................................................... 99
Chapter 7: Troubleshooting ...................................................... 113
Problems with user accounts and account groups..................................... 113
Problems with network devices .................................................................. 115
Problems with MarkVision Messenger ....................................................... 117
Problems with actions ................................................................................ 119
Miscellaneous problems............................................................................. 122
Contents
5
Chapter 8: Frequently Asked Questions.................................. 124
How do I get to the server after installing? ................................................. 124
How do I discover printers?........................................................................ 125
Is IPX supported?....................................................................................... 126
Is there any way to speed up device discoveries? ..................................... 126
What are the differences between the Application and the Web Client? ... 127
What do the lines through some devices mean? ....................................... 127
Why are some devices displayed in red text? ............................................ 127
How do I create a filter and apply it to a folder? ......................................... 128
What is MarkVision Messenger?................................................................ 129
How do you create actions? ....................................................................... 130
Where is the README file? ....................................................................... 131
How do I change the MarkVision Web Server port? .................................. 132
Where can I find additional Tivoli support for MarkVision? ........................ 132
Are sensitive files displayed when viewing encrypted hard disk drives?.... 133
Contents
6
1
Introduction to MarkVision Professional
Introduction
MarkVisionTM Professional (MVP) is a Web-enabled device management utility designed for IT staff.
MarkVision works as a client-server application. The server component is responsible for discovering
and communicating with devices on the network and providing information about them to a client.
The client is then responsible for displaying information about the devices to a user and providing
them with an interface to manage those devices.
The ability to use MarkVision through a Web Client provides the convenience of accessing all of
MVP's management options from virtually any location. While MarkVision's built-in security
provisions help to prevent unauthorized access to devices on your network, an authorized user can
access an instance of the Web Client by connecting to the MarkVision Server through supported web
browsers. After logging on, all of the information being managed by MarkVision becomes instantly
available to authorized users anywhere with web access.
MarkVision's highly customizable format and various tasks also provide highly versatile options for
managing devices. You can configure MarkVision to display specific device information to see only
the information of interest to you. By using Quick Find or by creating Discovery Profiles, you can
quickly and efficiently locate specific devices on your network. Extensive Folders and Filters can then
be used to group devices based on one or multiple characteristics (such as color capability, input
capacity, and speed) or conditions (such as cover open, low toner, low paper, and paper jam).
The goal of MarkVision Professional is to provide the most comprehensive and efficient device
management capabilities available. Here are a few examples of what MarkVision can do:
MarkVision helps to:
•
•
Quickly troubleshoot printing issues on the network and fix them before they become critical
and disruptive.
Remotely perform printer and printer adapter maintenance and routine updates.
With MarkVision Professional, you can:
•
•
•
Diagnose and fix printing problems using Quick Find to locate a specific device on the
network.
Use extensive Filters to find and group devices based on one or more characteristics (such
as color capability, input capacity, speed, and multifunction capabilities) or conditions (such
as cover open, low toner, low paper, and paper jam).
Configure settings on multiple devices simultaneously with customizable device policies.
Introduction to MarkVision Professional
7
•
•
•
•
Display devices that meet predefined criteria (such as Toner Low) so you can fix problems
before they affect user productivity.
Schedule time-intensive activities, such as company-wide device discovery or updating print
server firmware when network use is at a minimum.
Prevent unauthorized access to devices on the network.
Download plug-ins for additional device support at runtime.
Note: This book is written for administrators. To complete these tasks successfully, you
should have a working knowledge of your network hardware and software.
Terms used in this document
MarkVision Professional (also referred to as MarkVision or MVP) refers to the components that make
up MarkVision Professional: the MarkVision Server, the MarkVision Web Client, and the Web site
files that enable remote installation of MarkVision Professional.
MarkVision Web Client refers to MarkVision Professional running through a browser.
MarkVision Server refers to a server that collects data from network-attached printers and provides
information to MarkVision Clients.
Note: Within this document, printers and print servers are in some instances referred to
as "devices."
What’s new in MarkVision Professional 11.0
MarkVision Professional 11.0 includes several new features and enhancements to provide even
greater control of your network devices.
•
Secure communication
MVP 11.0 provides the option to implement secure communication between the MarkVision
Server and devices that support the same security protocol, reducing the possibility of either
user information or device commands from being compromised when administrators work
with the devices over the network.
•
Bookmark Management
The Bookmark Management feature lets a user save links or “bookmarks” in printer
permanent memory. These bookmarks point to printable documents that are stored on
remote servers or on the Internet, and can then be accessed through the printer operator
panel of a supported device. MVP’s Bookmark Management feature also allows a user to
organize bookmarks into folders and to protect access to bookmarks with a secure PIN
access number.
•
Wireless device support
MVP 11.0 provides the capability to configure the wireless settings for the Lexmark™ N8050
wireless print server.
Terms used in this document
8
•
Confidential print job settings
New settings have been added to the General Settings (Printer) task for MVP 11.0 that help
protect confidential print jobs. The Confidential Print Job Expiration setting lets an
administrator set a specific time interval that a confidential print job will remain idle in a printer
queue before it is deleted. The Confidential Print Job Lockout setting lets an administrator set
the number of times that a PIN access number can be entered at the printer operator panel
when printing a confidential print job before the job is deleted.
•
Device policy options
Several new device policy options have been added to the Device Policies Create/Manage
task to provide enhanced configuration capabilities for new MVP features including
Confidential Print Job Expiration, Confidential Print Job Lockout, and wireless device support.
•
Expanded PIN access number range
The range of digits for PIN access numbers has been expanded from 1—6 to 0—9 for
supported tasks and devices.
•
More supported devices
MarkVision Professional 11.0 supports even more devices. For a complete list of supported
devices, see Supported devices.
MarkVision components
The MarkVision Client
The MarkVision Client is a Java program that provides the user with an interface for managing
devices. The client can exist in two forms: as a standalone Java application or as a browser-based
Java applet.
MarkVision Client Application
The standalone application can be installed locally on a user’s workstation. MarkVision Client files
are then copied onto the user’s computer during the installation process.
MarkVision Web Client
The browser-based client is a version of the client that can be accessed through a supported web
browser by using the URL http://<yourserver>/markvision. If the MarkVision Server is not the
default server on your machine, you can use the URL http://<yourserver>:9180/markvision.
In order to run the Web Client, you must first enable your web browser to support Sun’s Java
Runtime Environment (JRE) by installing the Java plug-in.
Note: In Windows environments, the plug-in is provided and the user will automatically
be prompted to install it the first time they run the MarkVision Web Client. For
information on the Java plug-in software and to download available versions of the
MarkVision components
9
plug-in for UNIX and other platforms, go to: http://java.sun.com/products/plugin/
index.html.
The MarkVision Client application and the Web Client are essentially the same program. All
information that is being managed by the MarkVision Server is available to users of either the
application or Web Client. The only differences are that the application does not require installation of
the Java plug-in and may require less startup time because some files are stored locally on the
user’s workstation. However, anyone who does not run MarkVision Professional on a regular basis,
or who is not currently working from their workstation, should use the Web Client version of MVP. In
this case, there is no need to install any MarkVision files in order to use the client.
MarkVision Messenger
MarkVision Messenger works with MarkVision Professional to provide technicians with e-mail
notification or command line execution when a network printer triggers a pre-defined event (such as
Paper Tray Missing, Toner Low, and many more). The heart of MarkVision Messenger is a “service”
that runs inside the MarkVision Server. To use this service, the user creates “actions” using a
browser-based interface. Users can access MarkVision Messenger either by launching it from the
Action menu in the MVP application, or by using the URL http://<yourserver>/messenger in your
browser. For more information, see the MarkVision Messenger section of this User’s Guide.
MarkVision Server
The MarkVision Server is the engine that powers MarkVision. The MarkVision Server is the single
point of contact between an instance of the MarkVision Client and all of the devices that MVP
manages. The first time a client requests information, the MarkVision Server gathers the new
information from the device and stores it in a cache. Each subsequent request for the same
information is then retrieved from the cache. This saves valuable network resources by eliminating
redundant network traffic from duplicate requests.
The MarkVision Server also eliminates the complexity of talking to a wide variety of network devices.
Client programs only need to send a single protocol to the server, which in turn knows how to
communicate with the devices.
In order for the system architecture to work, at least one MarkVision Server must exist on a network.
It is possible to install multiple instances of the MarkVision Server on a network, however, a client
can only connect with one server at a time.
MarkVision Web Server
MarkVision Professional provides a web server for the browser-based components of the product
(MVP Web Client and MarkVision Messenger) as part of the MarkVision Professional package. The
MVP Web Server is automatically installed along with the MarkVision Server.
During installation, you are given the option to make the MarkVision web server the default server on
the machine. This allows the browser-based application to access the server from the standard port
(80), which requires no additional numbering in the URL. If this option is not selected, the MVP Web
MarkVision components
10
Server accepts HTTP requests on a non-standard port (9180) that does not interfere with any other
existing web servers.
System requirements
The following are minimum requirements for installing and running MarkVision Professional. These
requirements are for both the server and the client, and should be in place before you install
MarkVision.
Client system:
•
Windows 98 SE/Me, Windows NT, Windows 2000, Windows XP, Windows 2003 Server, Mac
OS X 10.2.8 (or higher), or a supported UNIX Client system
•
30MB available hard disk space
•
Internet or TCP/IP connection
•
A supported web browser, such as Windows Internet Explorer 6.x or later, Netscape
Navigator 6.x or later, or the Mozilla version that shipped with your operating system.
•
Java 1.4 software update (see table for specific operating systems)
Server system:
•
Windows NT (Service Pack 4.0 or later), Windows 2000, Windows XP, Windows XP SP2,
Windows 2003 Server, Windows 2003 Server SP1, Mac OS X server 10.2.3 (or higher),
Novell 6 or 6.5, or a supported UNIX server system
•
70MB available hard disk space
•
Internet or TCP/IP connection
•
Java 1.4 software update (see table for specific operating systems)
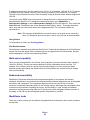
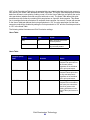
Minimum RAM and processor configurations for multiple devices
Total RAM on
Number of printers computer (MB)
Processor speed
of computer (MHz)
1 — 250
128
350
251 — 500
192
500
501 — 1000
256
500
1001 — 2500
512
500
Note: Managing more than 2500 printers requires additional servers.
System requirements
11
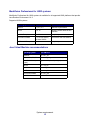
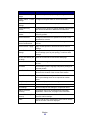
MarkVision Professional for UNIX systems
MarkVision Professional for UNIX systems is available for all supported UNIX platforms that provide
Java Runtime Environment 1.4.2.
Supported UNIX systems
Operating system
Version numbers
Hardware
IBM-AIX
5.1, 5.2, 5.3
IBM RISC System/6000
HP-UX
11.0, 11i
Hewlett-Packard 9000/700 and
9000/800
Red Hat Enterprise
3.0 WS
Intel (IA32)
Sun Solaris SPARC
8, 9, 10-Sun SPARC,
and Ultra SPARC
Sun SPARC and Ultra SPARC
SUSE LINUX Enterprise
9
Intel (IA32)
Java Virtual Machine recommendations
Operating system
Java VM level
Windows
Sun 1.4.1_07
IBM-AIX 5.1, 5.2, 5.3
IBM 1.4.2 (java_ca1420-20040626)
Mac OS X 10.2.8 (or
higher)
Apple 1.4.2 Update 2 (or higher)
HP-UX
HP 1.4.2_05
Red Hat Linux
Sun 1.4.2_06
SuSE Linux
Sun 1.4.2_06
Sun Solaris SPARC
Sun 1.4.2_06
Novell NetWare server
Novell JVM 1.4.1
System requirements
12
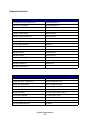
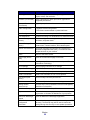
Supported devices
Print servers
Dell Wireless Printer Adapter 3300
MarkNet N2004fl-SC
Lexmark C750 Ethernet
MarkNet N2004fl-ST
Lexmark C910 Ethernet
MarkNet N2501e
Lexmark T520 Ethernet
MarkNet N4050e
Lexmark T522 Ethernet
MarkNet N8020
Lexmark T520 SBE Ethernet
MarkNet N8050
Lexmark T620 Ethernet
MarkNet Pro 1
Lexmark T622 Ethernet
MarkNet Pro 3
Lexmark W820 Ethernet
MarkNet S
Lexmark X820 Ethernet
MarkNet X2011
MarkNet™ N2000t
MarkNet X2012
MarkNet N2001e
MarkNet X2030
MarkNet N2002e
MarkNet X2031
MarkNet N2003fx-MTRJ
MarkNet XI
MarkNet N2003fx-SC
MarkNet XL
MarkNet N2003fx-ST
MarkNet XLe
MarkNet N2004fl-MTRJ
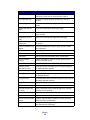
Printer table 1
Brother HL-1470N Series
Canon ImageRunner 400
Brother HL-1650 / 1670N Series
Canon ImageRunner 500
Brother HL-1870N Series
Canon ImageRunner 600
Brother HL-2460 Series
Canon ImageRunner 2800
Brother HL-5070N
Canon ImageRunner 5000i
Brother HL-6050D
Dell Color Laser Printer 3100cn
Brother MFC-8820DN
Dell Laser Printer 1700
Canon GP 200D
Dell Laser Printer 1700n
Canon ImageCLASS C2100
HP 2000 C
Canon ImageRunner 330
HP 2500 C
System requirements
13
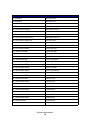
Printer table 2
HP 4345 MFP
IBM InfoPrint 20
HP 8550 MFP
IBM InfoPrint 21
HP 8550GN
IBM Infoprint 1145 MFP
HP Business InkJet 2250TN
IBM Infoprint 1145L MFP
HP Color LaserJet 3550N
IBM InfoPrint Color 8
HP Color LaserJet 3700DTN
IBM LaserPrinter 4039
HP Color LaserJet 4500
IBM Network Printer 12
HP Color LaserJet 4550 Series
IBM Network Printer 17
HP Color LaserJet 4650 DTN
Konica KL-3015
HP Color LaserJet 5550DTN
Kyocera FS-C5016N
HP Color LaserJet 8500
Kyocera FS-1700
HP Color LaserJet 9500n
Kyocera FS-1750
HP LaserJet 1320 NW
Kyocera FS-1800
HP LaserJet 2100 Series
Kyocera FS-3750
HP LaserJet 2200
Kyocera FS-3800
HP LaserJet 2420 DN
Kyocera FS-3820N
HP LaserJet 2430 TN
Kyocera FS-3830N
HP LaserJet 3300 MFP Series
Kyocera FS-7000
HP LaserJet 4000 Series
Kyocera FS-9000
HP LaserJet 4050 Series
Kyocera FS-9100DN
HP LaserJet 4100 MFP Series
Lexmark™ 4079 plus
HP LaserJet 4250 DTN
Lexmark C510
HP LaserJet 4350 DTN
Lexmark C750
HP LaserJet 5000 Series
Lexmark C752
HP LaserJet 5/5M
Lexmark C760
HP LaserJet 5si
Lexmark C762
HP LaserJet 8000 Series
Lexmark C910
HP LaserJet 8100 Series
Lexmark C912
HP LaserJet 8150 Series
Lexmark C920
HP LaserJet 9000 Series
Lexmark E230
HP LaserJet 9050N
Lexmark E232
HP Mopier 320
Lexmark E234
System requirements
14
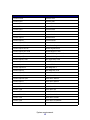
Printer table 3
Lexmark E234n
Lexmark T63X
Lexmark E320
Lexmark T640
Lexmark E321
Lexmark T642
Lexmark E322
Lexmark T644
Lexmark E323
Lexmark W812
Lexmark E330
Lexmark W820
Lexmark E332n
Lexmark W840
Lexmark Optra™
Lexmark X422
Lexmark Optra C
Lexmark X830e
Lexmark Optra C710
Lexmark X832e
Lexmark Optra Color 40
Minolta Color PageWorks
Lexmark Optra Color 45
Minolta PageWorks 20
Lexmark Optra Color 1200
Minolta Magicolor 7300
Lexmark Optra E
Minolta-QMS Magicolor 2200
Lexmark Optra Ep
Minolta-QMS Magicolor 3100
Lexmark Optra K 1220
NEC SuperScript 1800
Lexmark Optra M
Oki C5300
Lexmark Optra N
Okidata C7350n
Lexmark Optra Plus
QMS Magicolor 2
Lexmark Optra S
QMS Magicolor 6100
Lexmark Optra SC
Ricoh Aficio 180
Lexmark Optra Se
Ricoh Aficio 270
Lexmark Optra Se plus
Ricoh Aficio 350/355
Lexmark Optra T
Ricoh Aficio 450/455
Lexmark Optra W810
Ricoh Aficio 550
Lexmark T420
Ricoh Aficio 650
Lexmark T430
Ricoh Aficio 750
Lexmark T520
Ricoh Aficio 850
Lexmark T520 SBE
Ricoh Aficio 1045
Lexmark T522
Ricoh Aficio CL3000
Lexmark T620
Ricoh Aficio CL7000CMF
Lexmark T622
Ricoh AP3800C Series
System requirements
15
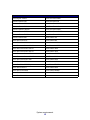
Printer table 4
Samsung ML-2152W
Xerox DocuPrint N2825
Tektronix Phaser 350
Xerox DocuPrint N32
Tektronix Phaser 550
Xerox DocuPrint N3225
Tektronix Phaser 560
Xerox DocuPrint N40
Tektronix Phaser 740/750
Xerox DocuPrint N4025
Tektronix Phaser 750DX
Xerox DocuPrint N4525DX
Tektronix Phaser 780GN
Xerox DocuPrint NC60
Tektronix Phaser 850
Xerox Phaser 790
Xerox DocuColor 4CP
Xerox Phaser 860
Xerox DocuColor 2006
Xerox Phaser 1235
Xerox Document Centre 220/230
Xerox Phaser 2135DT
Xerox Document Centre 240 ST
Xerox Phaser 3400
Xerox Document Centre 265 ST
Xerox Phaser 3450
Xerox Document Centre 332
Xerox Phaser 4500DX
Xerox Document Centre 340/440
Xerox Phaser 5400
Xerox Document Centre 440
Xerox Phaser 6200
Xerox DocuPrint 4512
Xerox Phaser 6250
Xerox DocuPrint C55/C55mp
Xerox Phaser 7700DN
Xerox DocuPrint N17
Xerox Phaser 8200
Xerox DocuPrint N2025
Xerox Phaser 8400DP
Xerox DocuPrint N2125
Xerox WorkCentre Pro 32C
Xerox DocuPrint N24
System requirements
16
2
Using MarkVision Professional
Installing MarkVision Professional
Before you install
Before you install the MarkVision Server:
1 Make sure you have 70MB of hard disk space available for a complete installation.
2 Decide where to install the MarkVision Server.
You must install at least one MarkVision Server on the network.
Note: You may install any of the other packages on the same workstation running the
MarkVision Server, although this is not necessary.
Where to install MarkVision components
If your devices are distributed across a local area network (LAN) or wide area network (WAN),
network traffic increases as users try to access them. With MarkVision, you can choose where to
install components, letting you reduce network traffic.
To minimize network traffic and improve performance, install the MarkVision Server on a host that
offers relatively high-speed access to users and to the devices you want to monitor.
Installable components
MarkVision supplies several installable components
•
MarkVision Application–Installs the primary client application that is used to manage your
devices. This application requires a MarkVision Server to be available on the network.
•
MarkVision Server–Installs the necessary files to set up the MarkVision Server.
•
MarkVision Messenger–Installs the MarkVision Messenger Web-based utility.
•
MarkVision Web Client–Installs a Web browser-based version of the MarkVision Client to
the MarkVision Server, allowing you to access MVP from a remote location using a browser.
Because the installation process is operating system-specific, there are different install
packages that can be used for this version of the client. These files include:
Using MarkVision Professional
17
•
•
•
Windows Web package
Mac OS X Web package
UNIX Web package (Java runtime environment is required)
When you are installing the MarkVision components, a dialog will appear that shows the hierarchy in
which the different components can be installed. You can install the MarkVision application and the
MarkVision Server separately; the application only requires that one instance of the MarkVision
Server be installed somewhere on the network, not necessarily on the same machine.
Note: For Windows based operating systems, you must also be sure to select the parent
branches in the hierarchy if you want to include any items located in a sub-branch.
Installation notes
In order to run the Web Client, you must first enable your web browser to support Sun’s Java
Runtime Environment (JRE) by installing the Java Plug-in. In Windows environments, the plug-in is
provided and the user is automatically prompted to install it the first time they run the MarkVision
Web Client.
Note: The MarkVision Client program does not require the installation of the browser
plug-in.
The MarkVision Web Server is automatically installed along with the MarkVision Server.
MarkVision Professional relies on technology that is specific to the web server that it provides, so it is
not possible to use other web servers to make MarkVision available. During installation, you are
given the choice to make the MarkVision web server the default server on the machine. This allows
the browser-based application to access the server from the standard port (80), which requires no
additional numbering in the URL. When this option is rejected, the MarkVision Web Server listens for
HTTP requests on a non-standard port (9180) that should not interfere with any other existing web
servers.
Note: If another web server is listening on port 80, the option to have the MVP Server
listen on the default web port (80) is not present.
As an administrator, if you already have a department or corporate web server on which you want to
publish the URL to access MarkVision Professional or Messenger, we recommend that you create a
URL on your current web server that automatically forwards the user’s browser to the URL used by
either tool.
Installing MarkVision Professional for Windows and Mac OS X systems
To install MarkVision Professional 11.0:
1 Go to www.lexmark.com.
2 Click Products and Supplies.
Installing MarkVision Professional
18
3 Click Software.
4 Click MarkVision Professional.
5 Download the MarkVision Professional 11.0 package.
6 Open the MarkVision Professional Installation package, and follow the instructions on the
screen.
For a successful installation
•
•
The operating system must be supported by MarkVision Professional.
You must use a supported web browser.
To uninstall MarkVision Professional
To remove MVP from a Windows system, select MarkVision Professional in the Add/Remove
Programs application, or go to Start Æ Programs Æ Lexmark Æ Lexmark Software Uninstall. For a
Mac OS X system, run the MarkVision Professional Uninstaller application located in Applications/
Utilities. This will shut down both servers that are running and then remove all aspects of MarkVision
Professional.
Windows default file locations
MarkVision Application
C:\Program Files\Lexmark\MarkVision Professional
MarkVision Server
C:\Program Files\Lexmark\MarkVision Server\Granite
Macintosh default file locations
MarkVision Application
/Applications/MarkVision Pro Client
MarkVision Server
/Applications/Utilities/MarkVision Pro Server Control
Installing MarkVision Professional for UNIX systems
MarkVision Professional supports multiple UNIX operating systems.
Installing MarkVision Professional
19
HP-UX
1 Download the MVP package file from the Lexmark Web site into the /tmp directory, and
extract the package file:
# /usr/contrib/bin/gunzip /tmp/markvision-pro-hpux11.pkg.gz
2 Start the System Administration Manager by typing /usr/sbin/sam &.
3 On the SAM areas screen, click Software Management.
4 Click Install Software to Local Host. The SD Install-Software Selection screen and Specify
Source dialog appear. If these dialogs do not appear, go to the Actions menu and click
Change Source to open the Specify Source dialog.
5 Make sure that the hostname of the computer that you are installing on appears in the Host
Name text box. If it does not, enter the hostname or select it from the list.
6 In the Source Depot Path field, enter the full path to the HP-UX package file:
/tmp/markvision-pro-hpux11.pkg
7 Make sure Change Software View is set to All Bundles. If it is not:
a
Click Change Software View.
b
On the Software View screen, click All Bundles, and then click OK.
8 On the Specify Source screen, click OK.
9 Select the bundles you want to install. There are two ways to mark the packages: for
installing all the MarkVision packages at once or installing individual packages.
To install all the MarkVision packages at once
a
Click the MarkVisionPro bundle.
b
Go to the Actions menu, select Mark for Install. This marks all the MarkVision
Professional packages for install.
c
Skip to step 10.
To install individual packages
a
Double-click the MarkVisionPro bundle. This displays the server and client packages.
b
Double-click each package bundle to view its contents.
c
For each package that you want to install, click the package, and then go to the Actions
menu and select Mark for Install. A “Yes” appears beside each package that you have
selected to install.
10 Go to the Actions menu and select Install (analysis).
11 Click OK. A confirmation message appears.
Installing MarkVision Professional
20
12 Click Yes to start the installation.
Note: If the HOME variable was not set for root when you started SAM, an error message
appears. Ignore the message and click OK.
13 During Installation, select Logfile to view the installation log.
Note: Make sure there are no errors or warnings during installation.
14 When installation is finished, select Done to return to the SD Install-Software Selection
screen.
15 Click File, and then click Exit to return to the Software Management screen.
16 Enter the following in the command line and answer any questions that may appear:
/opt/lexmark/setup.mvjserver
This file will set up the MarkVision Server users for use with the MarkVision Professional
server.
AIX
1 Download the MVP package file from the Lexmark Web site and place the package file in the
/tmp directory.
2 Type the following in the command line and press Enter:
smit install_latest
3 When prompted to enter the input device directory for software, enter:
/tmp/markvision-pro-aix.pkg
4 All packages are normally installed by default, though you can choose to install some
packages individually. To install only the packages you want:
a
Under the Software to Install option, select List.
b
Select the packages you want to install.
c
Select Do.
5 Specify any other install options, such as COMMIT.
6 Select Do to begin installing MarkVision Professional. A message is displayed when
installation is finished.
7 Enter the following in the command line and answer any questions that appear:
/usr/lpp/markvision_pro/setup.mvjserver
Installing MarkVision Professional
21
RedHat Linux; SuSE Linux
1 Download the MVP package file from the Lexmark Web site and place the package file in the
/tmp directory.
2 Unzip and untar the file:
$ tar zxvf /tmp/markvision-pro-linux-glibc2-x86.tar.gz
3 cd to the package directory:
$ cd /tmp/markvision-pro-linux-glibc2-x86
4 Install either all or individual MarkVision components:
•
To install all MarkVision components, issue the command:
rpm -ivh *.rpm
•
To install individual MarkVision Professional components, specify the file name of the
MarkVision Professional component that you want to install. For example, to install just
the MarkVision Professional Server, issue the command:
rpm -ivh markvision-pro-MVJserver-*.i386.rpm
or
rpm -ivh markvision-pro-MVJclient-*.i386.rpm
5 Type the following on the command line and answer any questions that appear:
/usr/local/lexmark/setup.mvjserver
Solaris SPARC systems
1 Download the MVP package file from the Lexmark Web site and place the package file in the
/tmp directory.
2 Start the package installation program:
pkgadd -d /tmp/markvision-pro-solaris2-sparc.pkg
3 When a list of available packages appears:
a
If you want to install all the packages, type all and then press Enter.
b
If you want to install individual packages, type each package number separated by a
comma and then press Enter. For example: 1,2,3.
4 Follow the prompts and answer any questions that appear on the screen:
a
To accept the defaults, press Enter.
b
To answer yes/no questions, type y, n, or ?, and then press Enter.
Installing MarkVision Professional
22
c
When a message appears telling you the installation was successful, type q to quit.
Note: You must install all the packages in the same location.
5 Type the following on the command line and answer any questions that appear:
/opt/lexmark/setup.mvjserver
Unix general file locations
MarkVision Application
/usr/mvp/bin (executable files)
/usr/mvp/etc (configurable files)
/usr/mvp/lib (archive/library (JAR) files)
MarkVision Server
/usr/mv_pro/bin (executable files)
/usr/mv_pro/etc (configurable files)
/usr/mv_pro/lib (archive/library (JAR) files)
Setting up the MarkVision Professional UNIX Server
Once the MarkVision Professional package is installed on a system, a setup script must run to
complete the installation process. This script is installed at:
<install-dir>/setup.mjserver
The MarkVision Server must be run as a standard system daemon. It collects information about
network attached devices, such as printers and print servers. For security reasons, this daemon
must be run as a normal user with no special privileges. Therefore, we recommend using an existing
user ID or to create a special user ID for this daemon to run as.
The default user ID is user nobody. Most modern UNIX systems ship with this ID pre-installed. If you
want to change it and use a different ID (for example markvision), create the user ID before running
the setup script.
The setup script checks if the MarkVision Server is currently running, and if so will exit, prompting the
user to stop the server using the appropriate command. If the server is not running, it prompts for the
user ID and verifies its validity. Once the user ID is verified, the MarkVision Server starts.
The following shell scripts are used during the MarkVision Server setup and startup process:
•
•
•
/usr/mv_pro/bin/findJava
/usr/mv_pro/bin/MvService
/usr/mv_pro/bin/MvWebService
Installing MarkVision Professional
23
FindJava
This script is used by multiple scripts to locate the appropriate version of Java Virtual Machine on the
system. This script attempts to find the path to the “java” binary in standard system locations. If the
JVM is not found in standard system locations, it tries to search the PATH environment variable for
the JVM. If the search for the appropriate JVM fails, it exits with an error message informing the user
that a suitable JVM was not found. It also indicates the appropriate JVM version(s) required to run
the MarkVision Server software.
If you believe a suitable JVM is on the system, make sure it is in your PATH and run the /usr/mv_pro/
bin/findJava script again. This creates a symbolic link from /usr/mvp_java to the Java home directory
(JAVAHOME).
For example, if the full path to the appropriate “java” binary is:
/usr/local/java/bin/java
The Java home directory is “/usr/local/java.”
Therefore, the link can be created as follows:
# /bin/ln -s /usr/local/java /usr/mvp_java
MvService
The /usr/mv_pro/bin/MvService command is used to start and stop the MarkVision Professional
Server as a UNIX daemon.
$ man MvService
MvWebService
The /usr/mv_pro/bin/MvWebService command is used to start and stop the MarkVision Web Server.
The MvWebService process is used to provide the following services over HTTP:
•
•
•
Serve the MarkVision Professional Web Client
Provide access to MarkVision Messenger
Provide browser-based access to MarkVision Professional documentation
To access the above features, point your browser to port 9180 of the machine where you installed
MarkVision Professional Server with the following URL:
http://<markvision-server-host>:9180/markvision
or
http://<markvision-server-host>:9180/messenger
To uninstall the MarkVision Professional UNIX Client
1 Run the uninstall script which removes the symbolic links to the mounted directory from /usr/
mvp.
./MVJclient.unlink
Installing MarkVision Professional
24
2 Unmount the MarkVision Professional directory. Refer to your operating system
documentation for unmounting instructions.
Removing MarkVision Professional packages
With root authority, you can remove MarkVision Professional using these utilities:
Operating system
Package removal tool
HP-UX
sam
IBM AIX
smit
RedHat; SuSE Linux
rpm -e
Sun Solaris SPARC
pkgrm
Depending on the utility on your system, either mark the packages for removal after you start the
program, or provide the names of the packages you want to remove in the command line. Refer to
your operating system documentation for more information.
Removing remaining directories
Package removal utilities usually do not remove directories shared by more than one package. The
following two software packages share the same directory structure (install-directory>markvision)
•
•
Enhanced Printer Drivers
MarkVision Professional
After removing all the previously mentioned MarkVision packages (if one or more were installed),
some directories may need to be removed manually.
To see if any directories remain after removing all the MVP packages, check the directory where you
installed MarkVision. By default, MVP installs in either /opt/lexmark/ or /usr/local/lexmark/.
Installing MarkVision Professional into CDE
You can integrate MVP into the Common Desktop Environment (CDE). Integrating installs CDE
icons, actions, and online Help.
To integrate MarkVision Professional into the CDE:
1 Make sure you have root user authority.
2 Type the following in the command line:
/usr/mv_pro/bin/mark2cde
On some CDE systems, the MarkVision Professional CDE icons may not appear after installing the
MarkVision Professional CDE snap-in. The icons appear after logging out and logging back in again.
If you encounter problems while running mark2cde manually, try running it again using the Korn shell
(ksh) rather than the Bourne shell (sh).
Installing MarkVision Professional
25
Removing the MarkVision Professional CDE:
When removing the MarkVision Professional Client package, you must manually remove the CDE
snap-in.
To uninstall the CDE snap-in, as root, type the following in the command line:
# /usr/mv_pro/bin/mark2cde -d
Installing MarkVision Professional into KDE
You can integrate MVP into the K Desktop Environment (KDE). Integrating installs KDE icons,
actions, and online Help.
To integrate MarkVision Professional into the KDE:
1 Make sure you have root user authority.
2 Type the following in the command line:
/usr/mv_pro/bin/mark2kde
You must restart KDE after installing the KDE snap-in to see the icons.
Removing the MarkVision Professional KDE:
When removing the MarkVision Professional Client package, you must manually remove the KDE
snap-in.
To uninstall the KDE snap-in, as root, type the following in the command line:
# /usr/mv_pro/bin/mark2kde
Installing MarkVision Professional into GNOME
You can integrate MVP into the GNU Network Object Model Environment (GNOME). Integrating
installs GNOME icons, actions, and online Help.
To integrate MarkVision Professional into the GNOME:
1 Make sure you have root user authority.
2 Type the following in the command line:
/usr/mv_pro/bin/mark2gnome
On some GNOME systems, the MarkVision Professional GNOME icons may not appear after
installing the MarkVision Professional GNOME snap-in. The icons appear after logging out and
logging back in again.
Removing the MarkVision Professional GNOME:
When removing the MarkVision Professional Client package, you must manually remove the
GNOME snap-in.
Installing MarkVision Professional
26
To uninstall the GNOME snap-in, as root, type the following in the command line:
# /usr/mv_pro/bin/mark2gnome
Finding space to install MarkVision Professional
Some operating systems require you to install MarkVision Professional in a particular directory. If the
file system containing that directory is full, you can create a symbolic link that points to a directory in
another file system. The symbolic link appears to be a real directory, but the files are actually
installed in the location the link points to.
For example, to appear to install MarkVision Professional in /disk2/lexmark, do the following:
1 Create a directory in the location where you want the packages to be installed. For example,
to install the /disk2 file system:
mkdir /disk2/lexmark
2 Create a symbolic link pointing to the directory you created. For example:
ln -s /disk2/lexmark /opt/lexmark
Installing MarkVision Professional for a Novell NetWare server
MarkVision Professional 11.0 supports the use of Novell NetWare 6 and 6.5 as a server platform.
The Novell server must have a Java 1.4.2 VM installed in order for the MarkVision Server to work
properly. The MVP Client system is currently not supported on Novell systems.
1 Login to your NetWare Server from a Windows system.
2 Run the installer and extract the installation files to a directory on a volume that you can
access from your system console.
3 If you have an existing version of MarkVision Professional installed, you will need to stop the
MVP Server processes before upgrading. To stop the MVP Server processes, enter the
following command at the server console:
SYS:\LEXMARK\MVPS\MVPWEB stop
4 At the server console, load NWCONFIG.
5 Choose Product Options.
6 Choose Install a product not listed.
7 Specify the path to the directory determined in step 1.
Press ESC to cancel the installation.
Press F3 to specify the directory path.
8 At the installation prompt, press Enter to continue the package installation.
Installing MarkVision Professional
27
To stop the MarkVision Server
To save the MarkVision Server settings during a Novell Server shutdown or reset, add the following
commands to the SYS:\SYSTEM\SHUTDOWN.NCF file.
At the server console, enter the following commands:
SYS:\LEXMARK\MVPS\MVPWEB stop
SYS:\LEXMARK\MVPS\MVPS stop
To start the MarkVision Server
Start the MarkVision Professional Server (MVPS) before starting the MarkVision Professional Web
Server (MVPWEB).
If you want MarkVision Professional to start at boot time, add the following commands to the bottom
of the SYS:\SYSTEM\AUTOEXEC.NCF
SYS:\LEXMARK\MVPS\MVPS start
SYS:\LEXMARK\MVPS\MVPWEB start
Uninstalling MarkVision Professional for a Novell NetWare Server
Note: The Uninstall process is currently a manual process.
1 Stop the MarkVision Professional Server processes.
2 At the server console, enter the following commands:
SYS:\LEXMARK\MVPS\MVPWEB stop
SYS:\LEXMARK\MVPS\MVPS stop
3 Delete the following directory:
SYS:\LEXMARK\MVPS
Note: If you want to save the MarkVision Server settings, do not remove the
SYS:\LEXMARK\MVPS directory.
Upgrading from previous versions of MarkVision
Prior versions of MarkVision for Windows are easily upgraded by running the installation program. All
prior folders, filters, devices, and so on are retained with the new version. If you are upgrading from
an earlier release of MarkVision Professional for UNIX systems, make sure you upgrade your
MarkVision Clients and server(s) together.
Note: When upgrading MarkVision Professional for Unix systems, you should remove the
currently installed package.
Installing MarkVision Professional
28
For versions earlier than MarkVision Professional 6.0, such as MarkVision for Intranets, or classic
MarkVision, we recommend that you uninstall the old version before attempting a new installation.
To export devices from classic MarkVision:
1 In Classic MarkVision, under the Configure - TCP/IP option, click the Manage Print Server
List button, and then click Export to File.
2 Enter the location where you want the file stored.
3 Once you have exported the file, you need to edit the file to accommodate the current MVP
format. Configure the file path to match the following naming convention:
IP <Ip address or hostname> <read community name> <write community name>
4 Install your new version of MVP 11.0, and then click Load in the Device Discovery task.
5 Select your updated file. Click OK. The list is imported for discovery.
Getting started
Once MarkVision has successfully installed, you are ready to access the the MarkVision Client.
Invoking the MarkVision Client
Select which version of the MarkVision Client you want to use. You can use either the MarkVision
Client Application or the MarkVision Web Client.
Opening the MarkVision Application
In the application form, the client is installed locally, so it can be launched just like any other program.
For example, in Windows environments, you can double-click the MarkVision Professional icon on
the desktop, or go to Start Æ Programs Æ Lexmark Æ MarkVision Professional.
Accessing the MarkVision Web Client
Since the MarkVision Web Client is browser-based, you will need to open your browser and point it to
the MarkVision URL:
http://<your server>/markvision
In this URL <your server> is the IP address or hostname of the machine that is running the
MarkVision Server.
Note: If during installation you did not make MarkVision Professional the default server
on your machine, you must use the non-standard port number (9180) in the URL:
http://<your server>:9180/markvision.
Getting started
29
Opening the MarkVision Application on a UNIX system
If you are using MarkVision Professional from a UNIX system, you can access MVP from either a
command line or the MarkVision Professional Web Client.
Using the MVP UNIX Client from the command line:
If it is supported by your workstation, you can use the X Window system. To use MarkVision with X,
you must set the display variable.
1 Set the DISPLAY environment variable.
•
Korn (ksh) and Bourne (sh) shell users type the following:
Display=hostname:0.0
export DISPLAY
Where hostname is the name of your workstation.
•
C shell users type the following:
setenv DISPLAY disphost:0.0
2 If you are running the MarkVision Professional UNIX Client on a different host computer than
your X server, make sure the remote host has permission to access your display. For
example, if the MVP UNIX Client is running on the host flora, type the following in the
command line:
xhost + flora
3 Type mvp in the command line, and then press Enter.
Using the MVP UNIX Client from a Web browser:
Once the MarkVision Web server is configured, a MarkVision Web Client starts when you connect to
/markvision on that server with your browser.
For example, to start a MarkVision Web Client on a Web server whose IP address is 190.168.112.21,
point your browser to the following URL:
http://190.168.112.21:9180/markvision
Starting MarkVision Professional
When you open MarkVision Professional for the first time, select the server you want to use. Enter
the computer/hostname or IP address of the machine running the MarkVision Server, or click
Browse to locate it, and then click Connect.
If you click Browse to locate a supported MarkVision Server, the display will list several server
details. This provides you the opportunity to select which instance of the MarkVision Server you want
to use based on each individual server’s current status. For example, If you have multiple instances
of the MarkVision Server on your network, and multiple clients are currently active, you can select
Getting started
30
the supported server that holds the least number of connections, allowing you faster access to MVP.
Clicking Hide Details will remove the server details from the display.
Once you have connected to a MarkVision Server, the setup wizard appears. Use the steps outlined
in the wizard to:
•
•
•
Configure MarkVision Professional to your specific needs.
Locate and organize devices across your network.
Establish a device management strategy that lets you quickly begin working with MarkVision.
Note: To prevent MarkVision Professional from opening the setup screen at startup,
check the Do not show me this setup window again box.
If you are new to MarkVision Professional, completing these steps in the setup wizard will help you to
get the most out of what MarkVision has to offer. Depending on your needs, some steps may not be
necessary.
1 Find your devices. Create device profiles and find printers and print servers on your
network.
2 Organize your devices. The setup wizard provides a default set of installation folders that
you can install on your system, or you can use the Folder Configuration task to organize your
devices into folders based on criteria you choose.
3 Customize your device information. The setup wizard provides default sets of custom
tables and views, or you can use the Custom Views and Custom Tables tasks to customize
the ways that you view your devices.
•
•
Creating custom tables. Use the Custom Tables task to create a table of specific device
information. A custom table can be exported as a comma separated variable (.csv) file,
which can be opened by spreadsheet or word processing software.
Creating custom views. Use the Custom Views task to create multiple views that let you
view only the printer attributes you want to see.
4 Secure access to available information. Use the User Accounts and Groups task to grant
or restrict access to tasks and devices.
Managing your devices with MarkVision Professional
After you have configured MarkVision, you can begin exploring the powerful management features
that MarkVision has to offer.
•
Using filters. Use the Filters task to create criteria filters that can be saved and applied to
folders.
•
Using device policies. Use the Device Policy tasks to uniformly configure many devices at
once.
•
Scheduling tasks. Use the Scheduling task to schedule certain tasks.
Getting started
31
•
Gathering information about printers. Use the Custom Tables task to view information
about your devices.
•
Managing plug-ins. Use the Software Update task to install and remove plug-ins for
additional device support.
The All Tasks list
There are many more device management tasks available in MarkVision Professional than those
listed above. For a complete listing, see the All Tasks list.
Basics
Home screen
After you log in to MarkVision Professional, the Home screen appears, which lists things you can
do with MarkVision Professional. These lists contain some of the most commonly used functions
available in MarkVision Professional. You can customize these lists by selecting Customize next to
the list's category name.
The MarkVision Professional toolbar is directly below the menus. The icons in this toolbar represent
frequent tasks. To add or remove tasks from the toolbar, select MarkVision Personal Settings from
the menus. With the Personal Settings task, you can also configure the level of message detail and
other miscellaneous options.
Note: Frequent tasks are also available when you right-click a device in a context menu.
Layout
The left pane of the MarkVision Professional window is typically used to select one or more devices.
You can find the devices you want by using the Quick Find feature or Folders. Task information for
the selected device(s) appears in the right pane.
Using Quick Find
To use the Quick Find feature, select the type of field that you want to search, enter or select the
appropriate value for that search field, and then click Find.
The search fields that you can select from are:
•
•
•
•
•
•
•
IP Address/Hostname
Device Name
Hardware Address
Model (Printer/Print Server)
Property Tag
Serial Number
Other
Basics
32
IP addresses should be in the dot notation form of X.X.X.X, for example, 192.168.12.34. To perform
a network discovery (search a subnet), use a zero(0) or asterisk (*) as a wildcard. For example,
192.168.0.0 would search the entire Class B network, finding all devices whose address begins with
192.168.
You can also enter SNMP community names to change the read or write access privileges
associated with Quick Find. To change the read/write privileges, go to MarkVision Æ
Administrative Settings or select Administrative Settings from the All Tasks list. Then, select the
Quick Find tab. The default value for the Read and Write fields is “public.” To change the default
value, enter the new community names in the appropriate field. The community names are
case-sensitive.
Note: This changes the MarkVision community name, not the print server community
name. To change the print server name, refer to your print server documentation.
Using Folders
For information on folders see Creating folders.
Find Results window
Devices that are selected using either the Quick Find or Folders tab are displayed in the Find Results
window. Devices that appear with a strikethrough are not supported for the selected task. Devices
that are displayed in red text are password protected.
Multi-select capability
When you are presented with a list of items, such as printers, you can multi-select them using the
Control or Shift key. This lets you edit an attribute for all the selected devices at one time. For
example, if the contact name for a group of printers has changed, you can multi-select those
particular printers and change the contact name for those printers only, without having to change
each one individually.
Enhanced accessibility
MarkVision Professional offers alternative keyboard navigation in accordance with industry
standards. MarkVision’s user interface and subsequent task oriented dialog boxes can be navigated
exclusively with a keyboard. The navigational features include using the Alt key to activate
mnemonic (underlined character) options in the Task bar menus, accelerator key combinations that
invoke menu items without navigating the menus, and the ability to “jump” through the different
elements of a dialog screen using either the F6 function key, which navigates between sections of
the dialog, or the Tab key which navigates specific components in a section.
MarkVision tasks
There are a variety of tasks you can perform using MarkVision Professional, and a variety of ways to
access them:
Basics
33
•
The All Tasks list on the MarkVision Professional Home screen
•
The menus (for example: MarkVision Æ Personal Settings)
•
The MarkVision Professional toolbar (also available by right-clicking a device)
•
The MarkVision Professional (MVP) Home screen
Note: Because of its customizable user environment, your version of MarkVision may
contain a different set of tasks than those listed below.
All Tasks list
The following table briefly describes the tasks available from the All Tasks list.
Task
Function
About
View the version information of MarkVision.
Add Devices
Search networks and add devices to MarkVision
Professional.
Administrative Settings
Change settings regarding how MarkVision Professional
obtains information from the server.
AppleTalk
View or modify the AppleTalk network settings.
Application Links
Configure external applications to launch from MarkVision.
Bookmark Management
Create, save, and edit printer bookmarks in a printer’s
permanent memory.
Change Password
Change the current user’s password.
Communication
Password
Syncronize the communication password of one or more
devices with a new or existing server, or remove the
communication password from a device.
Contact Name and
Location
View or modify the contact name or location for a specified
device.
Create Windows Print
Objects
Create a Windows print object (queue) on a remote host
computer.
Custom Media - Custom
Paper Name
View or modify custom paper names.
Custom Media - Custom
Paper Type
View or modify custom paper type settings.
Custom Media - Paper
Loading
View or modify custom paper loading settings.
Custom Media - Paper
Texture
View or modify custom paper texture settings.
Custom Media - Paper
Type Bin
View or modify custom paper bin settings.
Basics
34
Task
Function
Custom Media - Paper
Weight
View or modify custom paper weight settings.
Custom Tables - Create/ Configure and export tables of device information.
Manage
Custom Views - Create/
Manage
Create custom views with multiple pieces of information.
Device Discovery
Profiles
Create discovery profiles to search attached networks and
add discovered devices to MarkVision Professional.
Device Discovery
Results
Display device discovery results based on specific
discovery profiles.
Device Password
Change a selected device’s password or create a new
password for a device.
Device Policy - Check
Device Conformance
Determine if selected devices are conforming to device
policies.
Device Policies - Apply
Apply created policies to selected devices to enforce
settings.
Device Policies - Create/ Manage list of device policies to quickly set or change
Manage
device settings (such as print quality), or enforce those
settings.
Drivers and Utilities (On
the Web)
Open the Lexmark driver and utilities Web page.
E-mail Destinations
Create and manage e-mail destinations for selected
devices.
Emulators
View emulator (printer language interpreters) settings for
selected printers.
Enter Device Password
Enter a password to gain access to a password protected
device for the duration of the current client session.
Export Server Settings
Export MVP Server settings to a file that can be used to
back up an existing server or be imported to another
server.
Fax (Printer)
View or modify a printer's fax settings.
Fax Destinations
Create and manage fax destinations for selected devices.
Fax Settings
View or modify the fax settings for a specified device.
Feature Overview
(Printers)
View printer data, such as identification information,
capabilities, code levels, and page count information.
Feature Overview (Print
Servers)
View print server data, such as identification information,
protocol, and fax settings.
Filters
View or edit the list of saved filters, which can be used to
limit the number of devices displayed.
Basics
35
Task
Function
Finishing
View or modify a printer's finishing settings, such as
copies, collate, and resolution.
Firmware (On the Web)
Open a Web page to obtain print server upgrades for
supported print servers.
Firmware Download
(Print Server)
Upgrade your print server firmware.
Folder Configuration
- Organize devices using folders.
- Filter folder contents based on printer attributes.
Font Cartridges
View information about any installed font cartridges.
FTP Destinations
Create and manage FTP destinations for selected devices.
General Settings
(Printer)
View or modify printer settings, such as job timeout,
emulation, and power saver.
General Settings (Print
Server)
View or modify print server settings, such as job timeout,
contact name, contact locations, and network speed.
Generic File Download
Download miscellaneous files such as PostScript files,
universal configuration files (UCF), or font files to one or
multiple devices on your network.
Home
Return to the Home screen.
Home Page (On the
Web)
Open the Lexmark home page on the Web.
Hosts Table
A configuration of host computer names. A part of Print
Permissions Technology.
HTTP Settings
View or modify a device's HTTP settings.
Import Server Settings
Import MVP Server settings from a saved file to a server.
Inputs
View settings for paper trays and other printer inputs.
Install CA Certificate
Install a CA Certificate for one or more printers.
Job Timeout (Print
Server)
View or modify a device's job timeouts.
LexLink
View or modify the LexLink network settings.
Manage Global
Password List
View and edit a list of passwords for devices managed by
MarkVision Professional.
MarkVision Setup
Access the MarkVision Setup Wizard.
Map
Place device icons on a graphical representation of your
organization to illustrate the distribution of your printers.
MarkVision Messenger
Launch
Open the MarkVision Messenger application.
MFP - Backup
Configuration
Information
Create a backup copy of all configuration settings on MFP
device(s). The backup copy will be used to restore the
settings during disk recovery or code update operations.
Basics
36
Task
Function
MFP - Default Copy
Settings
View or modify Copy Settings for an MFP device.
MFP - Default Scan to
E-mail Settings
View or modify Scan to E-mail Settings for an MFP device.
MFP - Default Scan to
Network Settings
View or modify Scan to Network Settings for an MFP
device.
MFP - Features
View feature information for multifunction devices.
MFP - General Settings
View or modify General Settings for an MFP device.
MFP - LDAP Settings
View or modify LDAP Settings for an MFP device.
MFP - Manage Function
Access
View or modify Function Access for an MFP device.
MFP - OptraImage Job
Statistics Settings
View or modify OptraImage™ job statistics settings for an
MFP device.
MFP - Specify External
Destination File
View or modify OptraImage external destination settings
for an MFP device.
MFP Status
View the current status conditions of multifunction devices.
Names of Devices
View or modify a device's name.
NetWare
View or modify the NetWare network settings.
Network Time Protocol
Synchronize a print server's internal clock with the
MarkVision Server.
Operator Panel
Display a functional operator panel for a specified printer.
Operator Panel LCD
Display the LCD display from the operator panel for a
specified printer.
Operator Panel Lock/
Unlock
Remotely lock and unlock a printer operator panel.
Outputs
Summarizes device output options. Associated with the
Feature Overview tasks.
Output Bin Names
View or modify a printer's custom bin names.
Page Counts
View a printer's current page count information.
Paper Settings
View or modify a printer's paper settings.
PCL
View or modify a printer's PCL settings.
Personal Settings
Personalize MarkVision to fit the way you work.
Picture of Printer
Display a picture of a selected printer.
Ports
View or modify a device's ports.
PostScript
View or modify a printer's PostScript settings.
PPDS
View or modify a printer's PPDS settings.
Basics
37
Task
Function
Printer Lockdown
Force one or more supported devices to communicate
exclusively over a secure communication channel.
Profile Destinations
Create and manage profile destinations for selected
devices.
Property Tag
View or modify a property tag (user identification) for a
printer.
Publications (On the
Web)
Open the Lexmark publications Web page.
Refresh Devices
Refresh cached information for selected printer and/or print
server devices.
Registration (On the
Web)
Open the Lexmark printer registration Web page.
Remove Devices
(Advanced)
Lets administrators remove all or specified devices from
the system.
Remove Windows Print
Objects
Removes Windows print objects (queues) from remote
host computers.
Reset
Reset a specified printer or print server.
Resource Management
Download fonts and overlays to printers.
Scheduling
Specify times to automatically initiate certain tasks.
Service Location
Protocol
Enable or disable the Service Location Protocol (SLP)
function on a print server.
SNMP Traps
View or modify a device's SNMP Trap Destination.
Software Update
(Manage Plug-Ins)
Install and remove new MarkVision Professional plug-ins
for additional device support.
Status of Printer
View the current status conditions of selected printers.
Status Overview
View the LCD panel, picture of printer, and status of printer
for selected devices.
Storage Devices
View information about a printer's storage devices, such as
hard disks and flash memory.
Supplies (On the Web)
Open a Web page where printer supplies can be ordered.
TCP/IP
View or modify the TCP/IP network settings.
Technical Support (On
the Web)
Open a Web page where technical support for Lexmark
products can be obtained.
Toner/Ink Levels
Monitor toner or ink levels for a specified printer.
User's Guide
Opens the MarkVision Professional User's Guide.
User Accounts and User
Groups
Create or edit individual accounts or account groups to
restrict access to certain tasks.
User’s Table
Configure user printing privileges on devices that support
Print Permissions Technology.
Basics
38
Task
Function
Web Page (Print Server) Open a Web page displaying settings for a selected
device.
WLAN
Setup and configure wireless devices (Lexmark N8050).
Basics
39
3
Configuring MarkVision Professional
Adding and removing devices
MarkVision Professional lets you search your network for devices, such as printers and print servers.
You can then schedule and configure discoveries to suit your needs. Once devices are "discovered,"
their locations are stored on the MarkVision Server, and, by default, populate the All Devices folder.
To discover devices, you must first create a profile (or profiles) for the devices you want to discover. If
you have upgraded from MarkVision Professional 10.1 or earlier, any devices that have previously
been discovered and stored on the server are available in version 11.0 as a profile labeled Full
Discovery. If you have upgraded from MarkVision Professional 10.2, you will not need to create a
Full Discovery profile.
Device profiles define the range of devices that you want to discover, letting you select devices
specific to your current needs. You can create multiple device profiles, each with a different set of
devices. Each profile can then be saved and reused for future discoveries.
Creating discovery profiles
1 On the MarkVision Home screen, go to MarkVision Æ Device Discovery and select
Manage Discovery Profiles, or select Device Discovery Profiles from the All Tasks menu.
2 Click New.
3 Enter a name for the profile that you want to create. For example, enter My Network.
4 Enter any comments about the profile.
5 Click Add to add devices to the Include list. The Add Address dialog box appears.
6 Select the type of address, and enter the range from which the devices will be included.
Specify one or more of the following:
•
TCP/IP address, subnet, or hostname
IP addresses should be in the dot notation form of X.X.X.X, for example, 192.168.12.34.
To perform a network discovery (search a subnet), use a zero(0) or asterisk (*) as a
wildcard. For example, 192.168.0.0 would search the entire Class B network, finding all
devices whose address begins with 192.168.
•
You can also search for a device using its hostname.
Configuring MarkVision Professional
40
•
After you enter the address information, you can enter SNMP community names to
change the read or write access privileges. To change privileges from the default
value (public), enter the new community names in the appropriate field. The
community names are case-sensitive.
Note: This changes the MarkVision community name, not the print server community
name. To change the print server name, refer to your print server documentation.
•
TCP/IP address range
Enter the TCP/IP address range, beginning with the From: box and ending with the To:
box.
With this option, you can also enter SNMP community names to change the read or write
access privileges. To change privileges from the default value (public), enter the new
community names in the appropriate field. The community names are case-sensitive.
Note: This changes the MarkVision community name, not the print server community
name. To change the print server name, refer to your print server documentation.
•
IPX
Enter the network number on which your print server resides. It is an eight-digit
hexadecimal number; for example, 000C2194. If the print server resides on the same
network as your MarkVision Server, enter 00000000 (zeros) for the network number. If
you do not know the network number of your print server, you can find it on the print
server setup page, under the NetWare settings.
7 Click OK to return the Manage Discovery Profiles screen. The entered address or address
range is now listed under the Include tab.
8 Click Apply.
Note: If you want to discover a device or group of devices without creating a profile, see
Adding devices.
Discovering devices
1 Go to MarkVision Æ Device Discovery Æ Manage Discovery Profiles.
2 Select the profile from the Discovery Profiles window that encompasses the devices that
you want to discover.
3 Click Start.
4 MVP communicates with the devices included in the selected profile. To stop a discovery at
any time, click Stop Discovery.
Note: Performing a discovery with the Full Discovery profile, or any profile that includes
all of the devices on your network, requires a large amount of CPU usage. Running
Adding and removing devices
41
a full discovery can render the MarkVision Server virtually unusable while the
discovery is executing.
Including and excluding devices
The Include and Exclude tabs on the Manage Discovery Profiles screen display lists of devices that
are to be included or excluded from the profile’s current device list respectively. When creating a
profile, if there are certain devices that were listed in the device range that you entered that you do
not want to include in the profile, select the Exclude tab and add that device to the exclude list. You
can then use the Remove and Remove All buttons to remove devices from the include/exclude lists.
Examples:
•
If you are the network administrator and know the addresses of routers and computers on
your network and do not want to have extraneous traffic created by the discovery, add the
addresses of your routers and computers to the exclude list.
•
If you want to manage all printers on the 70 subnet except for the secretary's printer, add the
70 subnet in your include list, and then add your secretary's printer address in your exclude
list.
Advanced features
To configure advanced device discovery features, click the Advanced tab from the Device Discovery
main window. The following are features that may be customized for an advanced device discovery
profile:
•
Query each address: MarkVision Professional sends an individual query to each address
specified in the device discovery.
•
SLP Multicast: MarkVision Professional sends a single SLP (Service Location Protocol)
request over the network. An SLP Multicast only generates a brief spike in network traffic.
•
Also search for other vendors' devices: MarkVision Professional discovers non-Lexmark
devices on the network.
•
Maximum number of seconds to wait for a device to respond: This specifies the
maximum amount of time to wait for a device response during device discovery. Adjust this
value if devices are not responding or network traffic is heavy.
•
Maximum number of seconds to wait for responses to an SLP Multicast: This specifies
the maximum amount of time to wait for a print server response during an SLP Multicast.
Adjust this value if print servers are not responding or network traffic is heavy. Only supported
print servers are discovered during an SLP Multicast.
•
Number of retries to perform when a device does not respond: This specifies the number
of attempted retries before an address is ignored. Setting this value beyond 1 does not
normally provide greater accuracy. Setting this value to zero (0) disables retries, which may
substantially increase speed with little impact on accuracy.
Note: Each Discovery Profile can have its own advanced settings.
Adding and removing devices
42
Import / Export buttons
You can use the Import and Export buttons to import or export profiles for discovery. They are saved
in XML format.
Load / Save buttons
The Save button saves the information in the Devices to Include on the Server and Devices to
Exclude from the Server fields as a text file, which can later be retrieved using the Load button.
Scheduling
To schedule discoveries, select the Schedule task from the All Tasks menu.
You can schedule device discoveries to occur on a daily, weekly, or monthly basis. This ensures that
the list of devices MarkVision Professional manages is always current. If your device discoveries are
network-intensive, you can schedule them to occur at off hours, when network traffic is at a minimum.
Select the profile that you want to use for the discovery, then choose the initial day from the Start
time: box, and select the time at which the discovery is to occur. You can then decide to have the
discovery occur once, daily, weekly, or monthly. When all of your selections are made, click OK. For
more information on scheduling, see Scheduling tasks.
Naming devices
After you have found all of the devices that you want to manage with MarkVision Professional, you
can establish the name that MarkVision will use to identify the device.
MarkVision uses a specific algorithm to determine a device’s name. First, it looks to see if a name
has been assigned to it from the Names of Devices task. Then MarkVision looks for the following in
order: TCP/IP address, hostname, IPX address, Serial Number, and then Property Tag. The order of
this list can be changed using the Administrative Settings task.
From the All Tasks menu on the MarkVision Home screen, select Custom Names. With this task,
you can select the devices that you want, and enter any name you want for the device. For example,
name the device My Printer.
Note: You must have administrative access to name devices or to use the Administrative
Settings task.
Adding devices
In some situations you may want to discover some devices without creating a profile. In these
situations you can use the Add Devices task to discover individual or small groups of devices.
Adding and removing devices
43
To use the Add Devices task:
1 Select Add Devices from the All Tasks menu, or select MarkVision Æ Device Discovery Æ
Add Devices on the MVP Home screen.
2 Select a specific device or devices from the list of existing devices on the screen, or click Add
to enter a new device address, and then click OK.
3 Click Start to begin the discovery.
You can also select the Exclude tab to select devices from an existing profile that you do not want to
include in the discovery.
Select the Advanced tab to reset additional discovery settings.
Note: You can save any new groups of devices that you establish with the Add Devices
task as a new discovery profile by clicking Save as Profile.
Device discovery results
After you have performed a device discovery, you can view the discovery’s results. You can access
device discovery results under MarkVision Æ Device Discovery Æ Device Discovery Results.
The discovery results contain a series of log entries detailing the discovery.The Device discovery
dialog box also gives you the opportunity to export the device discovery results. To export the
results, click Export. Browse to the location that you want to save the results, and click Save.
Removing devices from the server
If there are any devices that you no longer want to associate with your network, you can remove
them from the server’s list of managed devices with the Remove Devices task. You can then change
the discovery profile to ensure that the devices are no longer discovered in subsequent discoveries.
The Remove Devices task is available by clicking the Remove Devices icon, located between the
navigation buttons and the frequent task icons on the MVP toolbar, in the MarkVision menu under
Device Discovery Æ Remove Devices (Advanced), or by selecting Remove Devices (Advanced)
under the All Tasks menu.
To remove devices from the MarkVision Server, browse the existing device folders or use the Quick
Find feature to locate the devices that you want to remove. When you have selected all of the
appropriate devices, click the Remove icon on the MarkVision taskbar. The selected devices are
removed from the MarkVision Server.
Creating folders
Folders are a way of grouping devices by particular conditions, such as low toner, or by particular
options, such as duplexing. By grouping devices in this manner, it is much easier to find the devices
you want.
Creating folders
44
MarkVision Professional is shipped with a pre-existing root folder, All Devices, which cannot be
deleted. All additional folders you create are listed below this root folder. However, you do not have to
create additional folders to use MarkVision.
To create folders:
1 Select Folder Configuration from the All Tasks menu, or click MarkVision Æ Folders.
2 Select the parent folder.
3 Click New from the Folder window.
4 Enter a name for the new folder.
5 Add devices to the folder. There are two methods to populate a folder with devices (printers or
print servers):
•
•
Manual selection
Filter
To add devices manually, select the Manual Selection tab, and then select the devices you
want.
To add devices through the use of filters, select the Filter tab, and configure your filter.
6 Click Apply.
Note: You can also create folders by right-clicking a parent folder, and then clicking New.
Manual selection is very useful when dealing with a small number of devices, or if there is a specific
device that you want to include in the folder. Filters are the most efficient method for managing a
large number of devices. A filter limits the number of devices visible in a folder to only those exhibiting
the characteristics you specify, letting you select a limited number of devices from the multitude that
are connected to your network. Select multiple filter characteristics for an increasingly narrow printer
selection. For example:
Jane is in charge of keeping the printers in her company up and running. She would like to
know which ones presently need human intervention or will need attention very soon. To
accomplish this, she creates a folder that populates by using filters. In the Device Type list
box, she selects Printers. She clicks Advanced, then selects Status: Message, Equal To,
Paper Jam. She clicks New to create another filter criterion, and then selects Status:
Message, Equal To, Toner Low. Once Jane applies the filter, the folder will only display
printers with paper jams or low toner.
Note: When organizing a large number of printers based on frequently changing criteria
(such as paper jams), we recommend that you use filters rather than folders to
observe the affected devices. The effort needed by the MarkVision Server to
continuously update and repopulate folders can dramatically slow your system. As
a result, populating folders based on static criteria saves network resources on
larger printer networks.
Creating folders
45
You can also use the Load and Save buttons to import or export a filter set. The Save button saves
the filter criteria you have selected as a file which can later be retrieved using the Load button. For
more information on creating filters, see Using filters.
Using filters
The Filters screen lets you create a filter set, which limits the number of devices visible in a list or
folder to only those exhibiting the characteristics you specify. Filters can have multiple criteria,
allowing for specific device selection. When you create a folder, you have the option to create a filter
for that particular folder, or load a previously saved filter and apply it to the folder. A folder with no
filter contains all the devices of its parent folder. There are two types of filters:
•
Basic: Choose one or more common device characteristics as filter criteria.
•
Advanced: Create multiple filter criteria, some of which require characteristics to be typed
into the Value list box. For example, if you have a brand XYZ printer model (that is not in the
list of available printer models) with Job Timeout set at 90 seconds, you could specify both:
Parameter
Operation
Value
Model:
Equal To
XYZ
Parameter
Operation
Value
Job Timeout:
Equal To
90
In the above example, both the "90" and "XYZ" would be manually typed into the Value list box.
You can also filter devices by conformance (or lack of conformance) with specific device policies. To
create a Device Policy Conformance filter, select the parameter Policy Conformance and select
either Is in conformance with or Is not in conformance with for the operation. The value will be
one of the device policies on the MarkVision Server (unless no policies have been created yet). For
example:
Parameter
Operation
Value
Policy
Is in conformance with Jane’s Printer Policy
Conformance
Note: Only printers that have all values specified in Jane’s Printer Policy are visible if this
filter is used.
Click New to add additional filter criteria; click the red X to remove filter criteria.
Using filters
46
When multiple conditions are selected
•
Clicking the All conditions must be met radio button means that every device must meet
every criterion displayed by the filter.
•
Clicking the At least one condition must be met radio button means that devices must meet
only one condition displayed by the filter.
Device Type
•
You can choose to have your filter include printers, print servers, or both. Specify this in the
Device Type list box.
Example 1: Basic filter
John is in charge of keeping the printers in his company up and running. He would like to know which
ones presently need human intervention or will need attention very soon. To accomplish this, he
creates a Basic filter.
1 Since John is only interested in printers, he selects Printer from the Device Type list box.
2 From the Select Filter Type list, he selects Status.
3 He then selects All Errors and All Warnings.
4 He then clicks Apply, and the filter is created.
5 To save the filter, he clicks Save Filter As.
Once John applies the filter to a folder, that folder only contains printers displaying an error or
warning state. He can then select another MarkVision task such as Status of Printer to view the new
folder he created, letting him see which printers are currently exhibiting errors or warnings.
Example 2: Advanced filter
Mary would like to create and save a filter that only displays monochrome printers with firmware code
level 1.10.17. To accomplish this, she creates an Advanced filter.
1 Since Mary is only interested in printers, she selects Printer from the Device Type list box.
2 She then selects the following:
Parameter
Operation
Value
Color
Equal To
Monochrome
Using filters
47
3 She clicks New to create another filter criterion, and then selects the following from the
Parameter and Operation list boxes. She must manually type in the firmware code (1.10.17).
Parameter
Operation
Value
Printer Firmware
Code
Equal To
1.10.17
4 Since Mary's printers need to meet both conditions, she clicks the All conditions must be
met radio button.
5 To save the filter, Mary clicks Save Filter As.
Once Mary applies the filter to a folder, that folder only contains monochrome printers with a
firmware code equal to 1.10.17.
Creating user accounts and user groups
The User Accounts and Groups task lets you create and manage user accounts and account groups
that define the user’s access to the devices that MarkVision manages.
Accounts are designed as a security measure. By having accounts, you limit user access to specific
tasks. Similarly, you can place several accounts into account groups. This lets you distribute a range
of privileges across a number of accounts.
To access the User Accounts and Groups task, go to MarkVision Æ User Accounts and Groups or
select User Accounts and Groups from the All Tasks menu on the MarkVision Home screen. When
adding accounts or account groups, a wizard dialog box appears to guide you through the process.
The MarkVision Setup Wizard helps you create some initial accounts. You do not have to add
accounts to use MarkVision, but we recommend that you at least create an administrator account to
ensure the security of your devices.
Only administrators or designated users can add or delete accounts. As people join or leave your
staff, you may need to create or update MarkVision user accounts. If you do not want a specific
account to have full administrative rights, you can either specify the appropriate privileges when the
account is created or assign the account to a group that contains rights to only the tasks you allow.
Create an administrator account
It is only possible to create an Administrator account if no other accounts have previously been
created. To complete the creation of an administrator account, you must also create at least one
other user account. For information on creating additional user accounts, see Create a new user
account.
1 In the Accounts section of the users table, click Add.
2 Enter the administrator account name and password.
Creating user accounts and user groups
48
3 Confirm the password that you entered. The indicator light to the right of the field turns green
and enables the OK button when the password confirmation is entered correctly.
4 Click OK.
Create a new user account
An administrator account must be created before a new user account can be completed.
1 In the Accounts section of the users table, click Add.
2 Enter the account name and password.
Note: If you are utilizing user authentication with LDAP, with the exception of an
administrator account, the account name should correspond to an existing account
listing on your LDAP server. Similarly, an account password is not needed as user
passwords will instead be verified with you company’s LDAP server. However, An
MVP administrator account will always need an authentic user ID and password
specific to MVP.
3 Confirm the password that you entered. The indicator light to the right of the field turns green
and enables the Next button when the password confirmation is entered correctly.
4 Click Next.
5 Select the privileges that will be available to the account from the Available Privileges window.
6 Click the (>) buttons to add or remove the selected privileges to and from the user account.
7 Click Next.
8 Select all the device folders that the user account will have access to.
9 Click Finish.
Create an account group
By putting user accounts into groups, you can ensure that your user accounts are configured
uniformly. If, for example, you wanted a group of users to only have access to certain tasks on certain
devices, you could create an account group to:
•
Specify the user accounts to be included in the group
•
Specify the tasks to be available to the group
•
Specify the devices to be available to the group
Creating user accounts and user groups
49
For example:
Group
Access rights
Devices
Help desk
Reset printers and print servers; Change printer and print
server settings
All devices
Executive
secretaries
Monitor toner and paper supplies
Respective department
printers only
Department B73 Change printer settings; View status; Discover printers
Department printers only
Note: If you assign task privileges for your users and then add the user accounts to a
group, your users will have access to tasks granted by both the account and the
group. For example, if a user account is not given access to the Device Discovery
task, and that user account is a member of an account group that grants access to
the Device Discovery task, that user account will have access to Device Discovery.
Create a user group
1 In the Groups section of the users table, click Add.
2 Enter the group name.
3 Select the user accounts that will be assigned to this group.
4 Click Next.
5 Select the privileges that will be available to the user group from the Available Privileges
window.
6 Click the (>) buttons to add or remove the selected privileges to and from the user group.
7 Click Next.
8 Select all the device folders that the user group will have access to.
9 Click Finish.
Edit or remove an existing user account or group
•
To edit a user account or group
1
Double-click the account or group that you want to edit, or select the desired account or
group, and then click Edit in the corresponding section of the table.
2
Select the appropriate step in the wizard, and adjust the account or group attributes
accordingly.
3
Click Finish.
Creating user accounts and user groups
50
•
To remove a user account or group
1
Select the account or group that you want to remove, and then click Remove.
2
If the Confirm Account and Group Deletion setting is enabled under Personal Settings
task, enter your user account and password into the confirmation prompt, and then click
OK. If a password is not required, click OK.
Note: Removing groups may affect a user’s access rights. You cannot recover a group
once it has been removed.
Assigning user privileges
MarkVision administrators can restrict the access of other MarkVision users so they can only perform
certain tasks on certain devices. To control user privileges, create accounts and account groups
(User Accounts and Groups task). When you set up a group, determine what tasks the group can
perform, or assign them individually when creating an account. You can also determine which
devices the users can view.
Administrator privileges
If you decide to create accounts in MarkVision, you are required to create an administrator account.
This administrator account is authorized to perform all MarkVision tasks on all devices.
Note: If no accounts (administrator or otherwise) are created, all MarkVision users have
authorization to perform all tasks.
Designated user privileges
For non-administrator accounts, user privileges and accessible devices are either defined by the
parameters specified when the user account was created, or the group assigned to the user.
Assigning user privileges
51
4
MarkVision Professional Security
Adapter password conformance
MarkVision Professional emphasizes the password protection of individual network devices. Access
to network devices that are password protected through MVP are tightly regulated, increasing
MarkVision’s security and providing MVP with another level of device management options.
There are three tasks at the center of adapter password conformance. The Enter Device Password
task provides password protected access to specific network devices, the Device Password task lets
you set or change device passwords on network devices, and the Manage Global Password List task
lets you manage a password list that provides access to numerous devices on a user by user basis.
Enter Device Password task
When a device in MVP is not supported by a specific task, it is displayed with a black line through the
device icon and IP address. Similarly, network devices that are password protected are displayed in
red. To gain access to these devices, a user must enter the device password. The Enter Device
Password task provides the opportunity to enter a device password to gain temporary access to a
network device for the duration of the current client session.
Using the Enter Device Password task
1 Go to MarkVision Æ Enter Device Password or select Enter Device Password from the All
Tasks list.
2 Select the device that you want to access.
3 Enter the device password.
4 Click Apply.
Device Password task
The Device Password task lets you set a new password on a network device or change an existing
device password. Once a password has been set on a device, the device’s display in the Find
Results window turns red to indicate that it is password protected.
MarkVision Professional Security
52
Using the Device Password task
1 Go to Settings Æ Security Æ Device Password or select Device Password from the All
Tasks list.
2 Select the device that you want to set a password for.
3 Edit the Old Password field accordingly:
a
If you want to change an existing device password, enter the device’s current password.
b
If you want to create a new device password, delete any text in the Old Password field
and proceed to the next step.
4 Enter the new password in the New Password field.
5 Confirm the device password. If the passwords match, the light next to the field turns green. If
the passwords do not match, the light turns red.
6 Click Apply.
To remove a password from a device
1 Go to Settings Æ Security Æ Device Password or select Device Password from the All
Tasks list.
2 Select the device that you want to remove the password from.
3 Enter the device’s current password.
4 Delete any text from the New Password and Confirm New Password fields so that both text
fields are blank.
5 Click Apply.
Manage Global Password List task
The Manage Global Password List task opens a list of the device passwords for your network
devices. When a user has access to the Manage Global Password List task, if a network device’s
password is included in the list, the user is provided access to any device that password applies to
on the network. Each entered password is displayed in uppercase in the device password list. For
security purposes, because this list displays important device passwords, we recommend that
access to this task be limited only to authorized personnel.
To add a device password
1 Go to MarkVision Æ Manage Global Password List or select Manage Global Password
List from the All Tasks list.
2 Click Add.
Adapter password conformance
53
3 Enter the new password.
4 Click OK.
To edit a device password
1 Go to MarkVision Æ Manage Global Password List or select Manage Global Password
List from the All Tasks list.
2 Select the password you want to edit.
3 Click Edit.
4 Enter a new password.
5 Confirm the changed password.
6 Click OK.
To delete a device password
1 Go to MarkVision Æ Manage Global Password List or select Manage Global Password
List from the All Tasks list.
2 Select the password you want to delete from the list.
3 Click Remove.
4 Click Yes.
Note: Click Remove All to delete all passwords from the list.
Confidential print job settings
For some supported printers, confidential print jobs can be associated with a PIN access number
that a user must enter at the printer operator panel before the document will be printed. This
prevents unauthorized users from gaining access to confidential materials in a shared-printer
environment. In order to help prevent user access to confidential materials from being compromised,
MVP 11.0 has implemented two controls that affect how confidential print jobs are handled by a
printer: Confidential Print Job Lockout and Confidential Print Job Expiration.
The Confidential Print Job Lockout feature limits the number of attempts that a user can make at
entering the PIN access number for a confidential print job before the document is deleted from the
printer queue. The Confidential Print Job Expiration feature lets an administrator determine the
specific amount of time that a confidential print job will remain idle in the printer queue before it is
deleted.
Confidential print job settings
54
Using Confidential Print Job Lockout
The Confidential Print Job Lockout feature is available under both the General Settings (Printer) task
and the Device Policy tasks.
To use Confidential Print Job Lockout with the General Settings (Printer) task:
1 From the MarkVision Professional Home screen, go to Settings Æ Printer Æ General
Settings or select General Settings (Printer) from the All Tasks list.
2 Select the device(s) that you want to enable Confidential Print Job Lockout for.
3 In the Confidential Print Job Lockout drop down list, select the number of attempts the
user will have to enter the correct PIN number before the print job is deleted. The default
setting for this feature is Off (unlimited attempts), and can be set within the range of 2 — 10
attempts.
4 Click Apply.
To use Confidential Print Job Lockout with the Device Policy tasks:
1 From the MarkVision Professional Home screen, go to Actions Æ Device Policies Æ
Create/Manage or select Device Policies — Create/Manage from the All Tasks list.
2 Click New.
3 Select For Any Printer, and then click Continue.
4 Expand the General Settings folder.
5 Click the Confidential Print Job Lockout check box.
6 Select the number of attempts the user will have to enter the correct PIN number before the
print job is deleted. The default setting for this feature is Off (unlimited attempts), and can be
set within the range of 2 — 10 attempts.
7 Click Apply.
Using Confidential Print Job Expiration
The Confidential Print Job Expiration feature is available under both the General Settings (Printer)
task and the Device Policy tasks.
To set Confidential Print Job Expiration with the General Settings (Printer) task:
1 From the MarkVision Professional Home screen, go to Settings Æ Printer Æ General
Settings or select General Settings (Printer) from the All Tasks list.
2 Select the device(s) that you want to enable Confidential Print Job Lockout for.
3 In the Confidential Print Job Expiration drop down list, select the period of time that the
confidential print job will remain in the printer queue before being deleted. The default setting
for this feature is Off (unlimited), and can be set to 1 hour, 4 hours, 1 day, or 1 week.
Confidential print job settings
55
4 Click Apply.
To set Confidential Print Job Expiration with the Device Policy tasks:
1 From the MarkVision Professional Home screen, go to Actions Æ Device Policies Æ
Create/Manage or select Device Policies – Create/Manage from the All Tasks list.
2 Click New.
3 Select For Any Printer, and then click Continue.
4 Expand the General Settings folder.
5 Click the Confidential Print Job Expiration check box.
6 Select the period of time that the confidential print job will remain in the printer queue before
being deleted. The default setting for this feature is Off (unlimited), and can be set to 1 hour,
4 hours, 1 day, or 1 week.
7 Click Apply.
Secure communication
MVP 11.0 provides the option of secure communication between the MarkVision server and network
devices that support the same security protocol. This allows system administrators to communicate
with, configure, control, and retrieve information from devices on the network while reducing the
threat of either user credentials or device commands being compromised.
Secure communication can be implemented by first establishing the communication security settings
for the MarkVision Server either through the initial MVP setup process, or by accessing MVP’s
administrative settings. Security may then be established for specific devices, provided the device is
capable of communicating securely.
Communication security for devices consists of setting a communication security password using the
Communication Password task, and “locking down” a device using the Printer Lockdown task. The
Communication Password task lets an administrator establish a communication security password
for a device by synchronizing it with the server’s communication password. Both the server and the
device must use the same communication security password in order for a secure communication
channel to be opened. Locking down a device forces the device to communicate only over a secure
channel when sending and receiving configuration information. It is possible to communicate
securely with a printer that is not locked down even if the communication password has not been set
for the device. It is also possible to set the communication password for a device without locking it
down. However, if a communication password is set for a device, it must match the server
communication password in order to establish a secure channel. In addition, it is not possible to lock
down a device without first setting the communication password, and a secure communication
channel must be open between the device and the server in order for the communication password
to be changed for a device.
Secure communication
56
The degree of security with which the devices and the server communicate over the network is then
determined by the security level that has been set on the MarkVision Server in conjunction with the
communication security that has been applied to the device.
Note: Secure communication is limited to configuration commands between the host
computer and the device, not for printing.
Setting server communication security
There are two elements of server communication security: establishing a communication security
password for the server and setting the server communication security level. The server
communication security password can be set in the MarkVision Setup wizard or through the
Administrative Settings task. The server communication security level is set exclusively through the
Administrative Settings task. The default server security level is Low.
Setting the server communication security password
If using the MarkVision Setup Wizard:
1 The MarkVision Setup Wizard appears when the application opens. If the setup wizard does
not appear, go to MarkVision Æ MarkVision Setup from the MarkVision Home Screen or
select MarkVision Setup from the All Tasks list.
2 Proceed through the MarkVision Setup Wizard to Step 6: Secure Communication.
Note: It is not necessary to complete each step of the setup wizard. To go directly to
secure communication setup, click Step 6 at the top of the wizard.
3 Enter a server communication password.
4 Confirm the password.
5 Click OK.
If using the Administrative Settings task:
1 Go to MarkVision Æ Administrative Settings or select Administrative Settings from the
All Tasks list.
2 Select the Communication Security tab at the top of the dialog.
3 Click the Communication Password button.
4 If the server has an existing password, enter the password in the Current Password field.
5 Enter the new password.
6 Confirm the new password.
7 Click OK.
Secure communication
57
Setting the server communication security level
1 Go to MarkVision Æ Administrative Settings or select Administrative Settings from the
All Task list.
2 Select the Communication Security tab at the top of the dialog.
3 Move the slide bar to indicate the desired communication security level for the server. Server
communication security consists of four security levels:
Server security
level
Effect
High
This setting allows only secure communication. Devices that are not capable of secure
communication will be discovered, but communication between the server and the device
will not be possible. Devices that are not capable of secure communication can be
identified by a red circle and slash over the device icon.
Medium
This setting allows both secure and insecure communication, but prefers secure
communication. Communication is secure if the device is capable of secure
communication whether it is locked down or not. Devices that are not locked down and/or
are incapable of secure communication will continue to communicate over insecure
channels.
Low (Default)
This setting allows both secure and insecure communication, but prefers insecure
communication. Communication is secure only if the device is capable and locked down.
All other communication is insecure.
Off
This setting allows only insecure communication. Devices that are locked down will not be
able to communicate with the server.
Note: The current MarkVision server security level is displayed in the bottom right corner
of the MarkVision Professional Home Screen.
4 Click Apply.
5 Click OK.
Selecting Server-to-Client security
The Communication Security tab in the Administrative Settings Dialog also provides an administrator
with the option to use a Secure Socket Layer (SSL) for communication between the MarkVision
Server and Client. For more information on SSL, see LDAP Server authentication or refer to your
LDAP Server documentation.
1 Go to MarkVision Æ Administrative Settings or select Administrative Settings from the
All Task list.
2 Select the Communication Security tab at the top of the dialog.
3 Click the Use SSL for Server-Client Communications check box to enable SSL
communication.
Secure communication
58
4 Click Apply.
5 Click OK.
Setting communication security for devices
The two tasks that control communication security for devices are the Communication Password
task and the Printer Lockdown task. The Communication Password task lets the user synchronize
the communication password of one or more devices with a new or existing server or lets the user
remove the communication password from one or more devices. In order for secure communication
to take place the server and device must use the same communication password. Synchronizing a
device password sets the communication password for the device to the same password that is used
by the server.
The Printer Lockdown task lets a user force one or more supported devices to communicate
exclusively over a secure channel.
Before either the Communication Password task or the Printer Lockdown task may be implemented,
a server communication security password must first be set. If a user attempts to access one of
these tasks before a server communication password has been set, the user will be prompted to set
a password before the task will open.
Using the Communication Password task
1 From the MarkVision Professional Home Screen, go to Settings Æ Security Æ
Communication Password or select Communication Password from the All Tasks list.
2 Select the devices that you want to establish a password for using either the Quick Find or
Folders tab in the Find Results window. You can use Ctrl + click to select multiple devices.
Note: Devices that are not capable of secure communication are displayed with a red
circle and slash over the device icon in the Find Results window.
To synchronize the device communication password with the MarkVision Server:
1
Click the Synchronize with Server button.
2
Click Yes.
To synchronize the device communication password with a new server password:
1
Click the Synchronize with Server button.
2
Click the I want to change the communication password of the server before
synchronizing check box.
3
Click Yes.
4
Enter the new server communication password.
5
Click OK.
Secure communication
59
To remove the device communication password:
1
Click Remove Password.
2
Make sure the device has not been locked down. For more information on printer
lockdown, see Using the Printer Lockdown task.
3
Click Yes.
Using the Printer Lockdown task
1 From the MarkVision Professional Home Screen, go to Settings Æ Security Æ Printer
Lockdown or select Printer Lockdown from the All Tasks list.
2 Select the devices that you want to establish a password for using either the Quick Find or
Folders tab in the Find Results window. You can use Ctrl + click to select multiple devices.
Note: Devices that are not capable of secure communication are displayed with a red
circle and slash over the device icon in the Find Results window.
3 Click the Lockdown check box to lock down the device. To remove lockdown from a device,
uncheck the check box.
Secure viewing of encrypted hard disk drives
Some supported devices contain encrypted hard disk drives to prevent information stored on the
devices from being compromised. MVP is capable of retrieving hard disk drive information without
interfering with the security of the device.
If the device has an encrypted hard disk drive and is communicating over a secure channel, an
administrator can use the Storage Devices task to view the drive. As a precaution, if the hard disk
drive is encrypted and the device is not communicating securely, the task will not display the hard
disk drive information. In addition, though MVP is able to view encrypted hard disk drives, MVP will
not allow a user to change the encryption for the device.
To access the Storage Devices task, go to Features Æ Storage Devices or select Storage Devices
from the All Tasks list.
User authentication
MarkVision Professional utilizes three security techniques to authenticate user access to MVP:
LDAP Server authentication, active session expiration, and account password expiration.
Secure viewing of encrypted hard disk drives
60
LDAP Server authentication
MVP Administrators can use their company’s LDAP server to authenticate user IDs and Passwords,
eliminating the need for MarkVision Client users to maintain separate login IDs and passwords for
use with MarkVision Professional.
If an administrator chooses to utilize LDAP authentication, when creating a new user account they
will only enter the user’s existing network login ID and leave the password field blank. Then, when a
user logs into MVP, they will enter the user ID and password that they use for their company’s local
network. The MarkVision Server then accesses the company’s LDAP server’s directory service and
authenticates the user’s login through either a simple bind protected by SSL, or a secure bind using
Kerberos.
Note: The only directory service that MarkVision Professional 11.0 currently supports is
Microsoft Active Directory.
When enabling LDAP server authentication, administrators have three modes of LDAP
authentication to choose from: Anonymous, simple (Default), and secure. The use of each of these
modes of authentication is determined by how the LDAP server is set up. To use simple LDAP
authentication, an MVP Server account will need to be set up on the LDAP server. Also, when using
simple LDAP authentication to utilize SSL, select the SSL check box and then select the appropriate
SSL certificate from the store to complete the setup.
If using secure (Kerberos) LDAP authentication, the need to set up an MVP Server account will be
determined by the current Kerberos configuration. For information on determining the need to set up
an MVP Server account for Kerberos, see your Kerberos documentation.
To enable LDAP Server authentication
LDAP Server authentication is only accessible through the Master Administrator account. If you are
upgrading from a previous version of MarkVision Professional, open the User Accounts and
Groups task under the MarkVision menu, or select User Accounts and Groups from the All Tasks
list. Select the administrator account and click Edit.
If MarkVision Professional is being installed for the first time, the option to set up LDAP Server
authentication will be available when creating the Master Administrator account.
Note: LDAP authentication works for all user accounts with the exception of the Master
Administrator account. As a result, the Master Administrator account will still need
to contain a password that is unique to MarkVision Professional. Make sure that
the administrator password is defined before proceeding with LDAP Server
authentication setup.
1 Once the Master Administrator account wizard has been accessed, enter a master
administrator account name and password, then click the Authenticate with an LDAP
Server check box.
2 Select the authentication mechanism to be used from the drop-down list. The options are
Anonymous, Simple, and Secure.
User authentication
61
3 Click Next.
4 Enter your LDAP Server information.
a
If Anonymous or Simple is selected as the authentication mechanism:
Enter the LDAP Server Address, Port Number, Search Base, and User Attributes in
the LDAP Settings area.
b
If Secure is selected as the authentication mechanism:
Enter the KDC IP HostName and Realm (Domain Name) of your LDAP Server in the
Kerberos Settings area.
5 Enter the MVP Server information. This step is needed only if your LDAP Server
configuration requires authentication by the MVP Server.
a
If Anonymous is selected as the authentication mechanism:
Proceed to step 7.
b
Simple is selected as the authentication mechanism:
In the MVP Server LDAP Account area, enter a Distinguished Name and Password
that was previously set up on the LDAP Server.
c
If Secure is selected as the authentication mechanism:
In the MVP Server Account area, enter a User Name and Password that was previously
set on the LDAP Server.
6 If Secure is selected as the authentication mechanism, click Finish. If Anonymous or Simple
is selected, proceed to step 7.
7 If Anonymous or Simple is selected as the authentication mechanism, and you want to use
SSL, click the Use SSL check box, enter the Certificate Store password, then click Next. If
you do not want to use SSL, click Finish.
8 Select the appropriate certificate for use with the SSL protocol. Without the proper certificate,
the SSL protocol will not work. The LDAP server should have a facility for issuing a certificate
request.
9 Click Import.
10 Click Finish.
Active session expiration
If active session expiration has been enabled, and if an MVP Client session remains idle for a
specified period of time, a dialog appears prompting the user to re-enter their password to regain
access to the application. Active session expiration helps to prevent unauthorized users from
accessing a MarkVision Client that has been left unattended.
User authentication
62
To use active session expiration
1 Go to MarkVision Æ Administrative Settings or select Administrative Settings from the
All Tasks list.
2 Under the Intervals section of the dialog, specify the active session expiration interval in
minutes (10 to 60 minutes). To remove active session expiration, delete the current number in
the box.
3 Click OK.
Account password expiration
To reduce the likelihood of a password being compromised, administrators can choose to set a
password expiration interval for user accounts. After a specified amount of time, a user account
password will become invalid, forcing users to regularly change their MVP passwords.
Account password expiration applies to all users with the exception of the administrator, unless
LDAP Server authentication has been enabled. If LDAP Server authentication is used, account
password expiration will not be enabled as password security will depend on your company’s
existing password security and network protocols.
Note: To eliminate the need for the administrator to change each user account password
for every expiration interval, all users should have access to the Change Password
task.
To set the account password expiration interval
1 Go to MarkVision Æ Administrative Settings or select Administrative Settings from the
All Tasks list.
2 Under the Intervals section of the dialog, specify the account password expiration interval in
days. To remove the password expiration interval, select Never.
3 Click OK.
To change your account password
1 Go to MarkVision Æ Change Password or select Change Password from the All Tasks list.
2 Enter your current password.
3 Enter your new password.
4 Confirm your new password. If the passwords match, the light next to the field turns green. If
they do not match, the light turns red.
5 Click OK.
User authentication
63
5
Managing devices
Finding the devices you want
There are numerous ways to find devices using MarkVision. You can search for one device using
specific criteria, or multiple devices using a variety of methods.
Note: MarkVision only recognizes devices that have been discovered using the Device
Discovery task (see Adding and removing devices), or Quick Find by Address.
Once MarkVision recognizes a device using one of those methods, that device can
later be found by its other attributes, such as its serial number or a property tag.
Here are some suggested methods for finding one or more printers in MarkVision:
•
If you know a specific setting for a printer, you can use this attribute to find it. For example,
you can find a printer using its IP address, name, serial number, or a property tag. First,
select a task to perform. Using the Quick Find tab, pick the attribute you want to use in your
search from the Select a field to search list. Type the attribute information in the appropriate
box, and then select Find.
You can substitute the asterisk (*) character as a wildcard for unknown information in your
search. It acts as a placeholder for any number of characters. For example, you could enter
192.168.12.* as your search criteria.
•
If you monitor only 10 printers in MarkVision, the easiest way to find the one you want is to
scan the tabs in the Feature Overview task for the feature you want. Select Feature
Overview (Printers) from the All Tasks list. Choose the Folders tab, and view the folder that
contains the printers you want to choose from. You can then scan the various features
columns. Click any column heading to sort the printers according to the criteria you want.
With only a few printers, you should easily find the printer you are looking for.
•
Let's say, however, that you have 800 printers distributed over a large network, and you need
to find all the color printers with duplex units. First, scan your folders to see if you already
have one for color or duplex printers. Otherwise:
1
Choose the Quick Find tab, and then select Other from the Select a field to search list.
2
Click Find Parameters....
3
Configure the filter to find only color printers with duplex units.
For more information on configuring filters, see Using filters.
Managing devices
64
4
Click OK, and then click Find. A list of any color duplex printers on your MarkVision
Server appears.
You can also create a folder that automatically populates itself with color printers that have duplex
units. For help creating such a folder, see Organizing devices.
Creating custom views
With the Custom Views task, you can create multiple views that let you view only the printer
attributes you would like to see.
To create a custom view
1 Select Custom Views - Create/Manage from the All Tasks menu.
2 Click New.
3 Give the custom view a name.
4 Choose the printer attributes you would like to add to this view by clicking the New
Component icon (next to the Name field).
5 As you select the attributes, blocks indicating the size of the data appear in the window
below. Arrange the blocks so that each one can be easily viewed.
6 Click Apply.
Once created, custom views are available from the All Tasks list. A custom view is listed by the name
you gave it in the steps above. You can also select your custom view by clicking View Æ Custom
Views Æ <custom view name> from the menu bar.
To edit a custom view
1 Select Custom Views - Create/Manage from the All Tasks menu.
2 Select the custom view to change.
3 Change the custom view as appropriate.
4 Click Apply.
Creating custom tables
Custom Tables provide an easy interface with which to view device information. After it has been
configured, a custom table can be exported as a comma-separated variable (.csv) file, which can be
opened by spreadsheet or word processing software.
Creating custom views
65
Creating a custom table
1 Select Custom Tables - Create/Manage from the All Tasks menu.
2 Click New. (To edit an existing custom table, click the table's name.)
3 Give your table a descriptive name.
4 From the Available Columns box, select the items to be included in the table. You can use the
Ctrl or Shift keys to select multiple items.
5 Click the arrow to move the selected items into the Columns In Use box. You can then
arrange the columns by using the up and down arrows. For example, if you wanted Duplex
Option to be the first column of the table, you would move it to the first position in the
Columns In Use box.
6 Choose how to sort the rows of your table. For example, if you choose Color from the Sort
Custom Table By list, and then click Ascending, your table lists color printers first.
7 If you want your Custom Table to be a Frequent Task, click the Frequent Task box in the
upper right corner. Your custom table is then available from the MarkVision Professional
toolbar or when you right-click a device.
8 Click Apply.
Your Custom Table is also available by selecting View Æ Custom Tables Æ <your custom table>.
Viewing a custom table
1 Select the devices you want to appear in the table.
2 Select your custom table from the All Tasks menu, or select View Æ Custom Tables Æ
<your custom table>. Your custom table appears.
3 To print your custom table, click Print. To export your custom table, click Export.
4 To edit a custom table while viewing it:
•
•
•
Reorganize columns by dragging them.
Click a column heading to sort by that column.
Right-click the table to save your changes or reset to the default column and sort
order.
Note: These changes do not change the table settings as defined in the Custom Tables
task; they are unique to each user account. To change the default column and sort
order, you must use the Custom Tables task.
Creating custom tables
66
Using device policies
A device policy contains saved printer or print server settings. When a policy is created, it can then
be applied to one or more devices. The device's settings are then reconfigured to match the settings
listed in the policy. Any setting that is not applicable to the device is not applied.
Reasons to create a device policy
•
To enforce a standard configuration across a set of devices. For example, Power Saver
should be set to Off for all printers, and Printer Timeout set to 20.
•
To use multiple configurations for a device. For example, one policy could set Toner Saver on
and low resolution for draft printing, while another policy could set Toner Saver off and high
resolution for final document printing.
Tasks associated with device policies
•
Device Policies - Create/Manage. Create, edit, or remove a policy.
•
Device Policies - Apply. Apply a policy to one or more specified devices.
•
Device Policies - Check Conformance. Determine if selected devices are conforming to
device policies.
•
Scheduling. Specify days and times to automatically apply a policy or perform a
conformance check.
Create a device policy
Let's say you want to duplicate the printer settings you have configured for one printer to several new
printers.
1 Select the Device Policies - Create/Manage task.
2 Click New and select the based on a specific device option.
3 Select the device whose settings you want to copy, and then click OK.
4 Give the new policy a meaningful name, such as "Company Printer Settings."
5 Click Apply.
Apply the device policy
Select the Device Policies - Apply task.
Select the printers you want to update with the new policy from the device list. If the printers you want
to update do not show up in the list, you can search for them. (See Finding the devices you want
for help.)
Using device policies
67
Select the device policy you created ("Company Printer Settings") from the Device Policies list and
click Apply Policy.
Check device policy conformance
The Device Policies - Check Conformance task displays a selected device’s current settings in
comparison to its applied device policy.
To access the task:
1 Select Device Policies - Check Conformance from the All Tasks list.
2 Select the device you want to check for policy conformance.
3 Compare the present device settings with the policy settings.
Scheduling device policies
You can set up a schedule telling MarkVision when to apply specific policies on one or more devices.
This might be useful for resetting defaults for your devices each day or checking a device's
conformance to a policy. For scheduling information, see Scheduling tasks.
Note: Not all devices support the device policy task. Unsupported tasks appear with a line
through the device name.
Scheduling tasks
The Scheduling feature lets you perform a task such as Device Discovery or Generic FIle Download
on a specific day at a specific time. Each task can have multiple schedules.
Tasks you can schedule using MarkVision
•
•
•
•
•
•
•
Generic File Download
Device Policies: Apply Policies
Device Policies: Check Conformance
Firmware Download
Device Discovery
Remove Devices
Resource Management
Scheduling tasks
68
To schedule a task
When you access the Scheduling task, the scheduling screen appears with a list and calendar
showing all presently scheduled events.
1 Select Scheduling from the All Tasks menu or click Actions Æ Scheduling.
2 Click Add.
3 Select the event you want to schedule and type a description of the event. Click Next.
4 Select the date and time you want the event to take place. You can schedule an event to
occur on a daily, weekly, or monthly basis. If your scheduled event is to occur on a weekly or
monthly basis, select the days on which you want it to occur.
5 Click Next.
6 Select the type of database (if applicable) and the database’s location (URL) where you want
to store the results of the scheduled event.
7 Enter your user name and password in the appropriate fields. Click Next.
8 Select discovered devices from the device folders window, or use the Quick Find feature to
locate new devices and place them in the selected devices window using the (>) buttons.
9 Once you have selected all of the devices that you want to associate with the event you are
scheduling, click Finish.
The scheduled event now appears in the calendar window of the Scheduling task.
Note: To schedule a device discovery, use the Device Discovery task.
Managing plug-ins
You can download and install new MarkVision plug-ins on your MarkVision Server for added device
support. The plug-ins you install will, in most cases, also contain downloadable client components.
Relevant client information then downloads to your workstation when you log into the MarkVision
Server.
To access the Software Update (Manage Plug-Ins) task, select MarkVision Æ Software Update
(Manage Plug-Ins) on the MVP Home screen, or select Software Update (Manage Plug-ins) from
the All Tasks list.
The Manage Plug-Ins screen lists all of the plug-ins that are currently installed. A list of all of the
currently installed plug-ins is also available on the About MarkVision Professional screen, which you
can access through the About task. If there are no plug-ins listed, you can download the current
updates from the Lexmark Web site at www.lexmark.com .
The manage plug-ins screen then provides two management options: Remove and Install New.
Managing plug-ins
69
•
Remove
The Remove option lets you uninstall a selected plug-in. First select the plug-in(s) that you
want to uninstall from the list. Click Remove. This removes the selected plug-in(s) from the
server and the client. The uninstall script on both the server and the client then determines if
a restart is needed.
•
Install New
When you click Install New, a dialog box appears that lets you select a plug-in from the
directory to be installed on the server. Once a plug-in file has been selected, a confirmation
screen appears containing more specific information about the plug-in(s) that you have
selected, and provides you with the option to proceed with installation.
•
•
•
If you select a plug-in of which an earlier version has already been installed, you have the
option to upgrade the existing plug-in.
If the selected plug-in has previously been installed, you will be informed that the plug-in
is already installed.
If the selected plug-in is down-level from the one that is currently installed, the current
plug-in will need to uninstalled before the down-level version can be installed.
The successful installation of a plug-in is then announced to all clients connected to the
server through the MVP message window located at the bottom of the MVP Home screen.
After a plug-in has been installed on the server, the MVP Client receives information on the plug-in
versions that have been installed and details on which plug-ins contain downloadable client
components. If new client components are available, the client determines if the server and itself are
compatible and then automatically downloads the client component of any plug-ins that it does not
already have.
Note: If the client and server are not compatible because the client contains a component
that the server does not have, a warning message is issued and any incompatible
client components are removed.
Generic file download
The Generic File Download task lets you download miscellaneous files from the MarkVision Server
to one or multiple devices on your network. As a result, various file types, including universal
configuration files (UCF), can be instantly distributed to any devices that MarkVision manages.
The Generic File Download task is available under the All Tasks menu, or by clicking Actions Æ
Generic File Download on the MarkVision Professional Home screen.
You can also schedule the download of files by using the Scheduling task.
Generic file download
70
Using the Generic File Download task
1 Select the file(s) that you want to download from the list of available files on the MarkVision
Server. If there is a file from another location that you want to include in the list, click Load to
browse for local files that you can load onto the server.
2 Click the (>) button to move the files to the file management table on the right side of the
screen.
Note: Clicking Remove removes the selected files from the list of available files,
subsequently removing the files from the server’s file store, as well as the file
management table.
3 In the file management table, select the file’s target location in the Target Directory column,
then specify the directory name in the Remote Directory column.
4 Click Next.
5 Select the device or devices to which you want to download the selected file(s).
Resource Management
Resource Management is a new task in MarkVision Professional 11.0 that lets you upload various
resource files such as fonts and overlays to the MarkVision Server. These files can then be
distributed to your Lexmark network devices that have hard disks and/or Flash SIMMs.
Unlike the Generic File Download task, which normally handles the distribution of miscellaneous files
to your network devices, Resource Management is capable of handling the more complex formatting
information involved in installing fonts and overlays.
The Resource Management task supports the following font and overlay types:
•
•
•
•
•
•
SFP - PCL Bitmap Font
TTF - True Type Font
PFB - Type 1 Font
Overlay PCLXL
Overlay PS
Overlay PCL5
Using the Resource Management task
Uploading resource files to the MarkVision Server
1 Go to Actions Æ Resource Management or select Resource Management from the All
Tasks list.
2 On the left side of the dialog under the Resources folder, select the folder of the font or
overlay type that you want to upload to the MarkVision Server.
Resource Management
71
3 Click Upload to browse for the font file(s) that you want to load on the server.
4 In the Upload Resources dialog, enter the file name in the file field or click Browse to locate
the file(s).
Note: To upload multiple files simultaneously, use the Browse feature and then
Ctrl + click the files you want to upload.
5 Enter a description of the file.
6 Click OK.
Removing resource files from the MarkVision Server
1 Go to Actions Æ Resource Management or select Resource Management from the All
Tasks list.
2 On the left side of the dialog, select the folder that contains the file(s) that you want to
remove.
3 Select the files that you want to remove from the Resource Management table. You can selct
multiple devices using Ctrl + click.
4 Click Remove. Click Remove All to remove all files listed in the table.
Downloading resource files to selected devices
1 Go to Actions Æ Resource Management or select Resource Management from the All
Tasks list.
2 On the left side of the dialog, select the folder that contains the file(s) that you want to
distribute to your devices.
3 Select the files that you want to distribute to your devices. You can select multiple files by
using Ctrl + click.
4 Click Send to Printer. The Resource Management Download Wizard opens.
5 To select devices that contain a hard disk, click Step 1 at the top of the wizard. To select
devices that contain Flash SIMM memory, click Step 2 of the wizard. For devices that contain
both types of memory, proceed through the wizard normally.
Note: Only printers that contain Flash SIMM memory or ones that are connected to a hard
disk may be selected to receive the file download.
6 Select the devices to which you want to download the files. You can select your devices using
the Quick Find feature, or by selecting devices from the existing device folders.
If the printers you want to download to are not present in the existing folders, you will need to
use a filter to display the supported devices. For more information on filters see Using filters.
Resource Management
72
7 Use the (>) button to transfer the printers to the Selected Printers window. Then click or
Ctrl + click the devices you want to download to.
8 Click Existing Files to display the files currently stored in the device’s memory. Select Font
or Overlay to show the different types of files. Clicking the Log button will display a dialog
containing a log of the resource downloads for the selected device.
9 Click Next to proceed to the next step in the wizard.
10 In the left side of the dialog, select the files that you want to download by clicking Select All
at the top of the field, or by clicking the individual check boxes next to each file.
11 In the right side of the dialog, click either the Hard Disks tab or Flash SIMMS tab to display
the devices of each type and select the printers to which you want to download the selected
files by clicking Select All or by clicking the individual check boxes next to each printer.
12 Click the (>) button to match the files with the devices. This button will only be enabled if at
least one check box is selected on each side of the dialog.
13 Click Finish to begin the download.
Bookmark Management
The Bookmark Management task lets the user create and save printer bookmarks in a printer’s
permanent memory. A printer bookmark is a link to a document that is stored on a Web server or the
Internet. When a bookmark is called from the BOOKMARKS menu on a supported printer’s operator
panel, the document the bookmark points to is printed. A supported printer in this case indicates a
printer that utilizes sufficient memory to store bookmarks, and includes the appropriate operator
panel and menu.
Existing bookmarks may also be loaded into the Bookmark Management task to be organized in
folders and then distributed to supported printers accross the network. Multiple bookmarks can then
be saved as a configuration file allowing the distribution of bookmark sets to devices with a single
action.
In addition, the Bookmark Management task also facilitates the following bookmark management
options:
•
•
•
Protecting an individual bookmark, folder, or bookmark set with a Personal Identification
Number (PIN)
Loading bookmarks from a printer using an IP address or host name
Setting or changing bookmark properties including: name, URL, and available print settings
such as duplex, orientation, and copies
Bookmark Management
73
Using the Bookmark Management task
Creating folders
The Bookmark Management task provides a default root folder called BOOKMARKS, to which
additional folders or bookmarks can be added.
To create a new folder:
1 Go to Actions Æ Bookmark Management or select Bookmark Management from the All
Tasks list.
2 Click the Create New Folder Icon at the top of the Bookmark Management window.
3 Enter a folder name up to 25 characters in length.
4 If you choose, you may also assign a PIN number to the folder. A user will be required to
enter the PIN when trying to view the contents of the folder or when trying to print the
contents of the folder from a printer operator panel. The PIN should be four digits long using
the numbers 0 — 9.
5 Click OK.
Creating a new bookmark
1 Go to Actions Æ Bookmark Management or select Bookmark Management from the All
Tasks list.
2 Select the folder location where you want to place the bookmark.
3 Click the Add Bookmarks icon located at the top of the Bookmark Management window.
The Bookmark Properties dialog opens.
4 Under the Bookmarks tab, enter the bookmark name and the URL location for the
corresponding document.
5 If you choose, you may also assign a PIN number to the bookmark. A user will be required to
enter the PIN in order to print the bookmark from a printer operator panel. The PIN should be
four digits long using the numbers 0 — 9.
6 Verify that the settings listed under the remaining dialog tabs are appropriate for the
document that will be printed when the bookmark is accessed. Most settings will be set to the
existing printer defaults.
7 Click OK to create the bookmark. Click Cancel to stop the creation of the bookmark.
Bookmark Management
74
Loading an existing bookmark
Bookmarks may be loaded from either an existing file or printer memory. Once the Load Bookmark
dialog has been opened, the option to either Browse for a specific file or select a specific printer is
provided.
1 Go to Actions Æ Bookmark Management or select Bookmark Management from the All
Tasks list.
2 Select the folder location where you want to place the bookmark.
3 Click Load. The Load Bookmark dialog opens.
4 If loading a bookmark from a file:
•
Select the From File radio button, then enter the file path in the space provided or click
Browse to find the appropriate file location.
If loading a bookmark from a printer:
•
Select the From Printer radio button, then select either the Quick Find or Folders tab to
locate the appropriate printer.
5 Click OK to create the bookmark. Click Cancel to stop the creation of the bookmark.
Saving a bookmark
Once a bookmark or set of bookmarks has been created or loaded, it can then be saved to either a
file that can be stored on a computer for future use, or on a printer hard disk drive.
1 Go to Actions Æ Bookmark Management or select Bookmark Management from the All
Tasks list.
2 Select the folder or bookmark that you want to save. Selecting a folder for this operation will
save all folder contents.
3 Click Save.
4 If saving the bookmark(s) to a file:
•
Select the To File radio button, then enter the file path in the space provided or click
Browse to find the appropriate file location.
If saving the bookmark(s) to a printer:
•
Select the To Printer radio button, then select either the Quick Find or Folders tab to
locate the appropriate printer. Use the (>) button to add the correct printer(s) to the
Selected Printers window.
5 Click OK.
Bookmark Management
75
Deleting a bookmark or folder
1 Go to Actions Æ Bookmark Management or select Bookmark Management from the All
Tasks list.
2 Load the folder or bookmark set that contains the bookmark(s) that you want to delete.
3 Select the folder or bookmark that you want to delete. Selecting a folder for this operation will
delete all folder contents.
4 Click the Delete Folder/Bookmark icon at the top of the Bookmark Management window.
The Confirm Removal dialog opens.
5 Click Yes to delete the selected items.
Note: The Bookmark Management task is only an interface through which bookmarks
may be manipulated for other devices and locations. As a result, deleting a folder
or bookmark through this process only removes the selected item(s) from the
interface, not from the saved location of the file.
Changing the properties of a folder or bookmark
The Change Properties feature of the Bookmark Management task lets a user edit various
characteristics of a selected bookmark or folder. In terms of folders, with the exception of the root
BOOKMARKS folder, the user can change a folder name or the folder PIN access number. Only the
PIN access number may be changed for the root folder.
For bookmarks, in addition to the bookmark name, URL, and PIN access number, the Page Layout,
Paper, and HTML/PDF tabs let the user change various print attributes of the document. Some of
these attributes include: number of copies to be printed, page orientation, duplexing, N-Up printing,
as well as output options and HTML and PDF settings.
1 Go to Actions Æ Bookmark Management or select Bookmark Management from the All
Tasks list.
2 Load the folder or bookmark set that contains the bookmark(s) that you want to edit the
properties for.
3 Select the folder or bookmark that you want to change settings for. If the correct bookmark is
not already present, you may need to reload it into the Bookmark Management task.
4 Click the Change Properties Folder/Bookmark icon at the top of the Bookmark Management
task window.
5 Edit the appropriate fields to reflect the desired change.
6 Click OK.
Note: The Bookmark Management task is only an interface through which bookmarks
may be manipulated for other devices and locations. As a result, any changes to
the properties of a folder or bookmark will not be permanent until the file is saved.
Bookmark Management
76
Wireless print server support
In addition to adding device support for several new wireless devices (for a complete list of the
printers and print servers that MVP supports, see Supported devices), MarkVision Professional
11.0 provides the ability to setup and configure the Lexmark N8050 wireless print server for use on
your network.
MarkVision Professional 11.0 includes a new WLAN task and a new WLAN device policy option to
manage the wireless settings for supported print servers attached to the network. The WLAN task
and device policy let an administrator enter or edit the wireless settings for a supported print server,
and then transfer the settings to the supported devices.
The WLAN task and device policy can support wireless configurations for both Ad Hoc and
Infrastructure Basic Service Set (BSS) modes, as well as WEP and WPA-PSK security modes.
In addition, for security modes that utilize CA certificates as part of an authentication mechanism, an
additional task called Install CA Certificate is available to install CA Certificates on devices.
Creating a WLAN device policy
1 Go to Actions Æ Device Policies Æ Create/Manage from the MarkVision Home screen, or
select Device Policies – Create/Manage from the All Tasks list.
2 Click New and select For Any Print Server, and then click Next.
3 Under Print Server Policy, expand the WLAN nodes.
4 Enter the SSID, BSS Type, Channel, and Wireless Security Mode for the device. For more
information on your wireless settings, see your wireless network documentation.
5 Enter the appropriate authentication or encryption information for the wireless security mode
that you selected by expanding the WEP or WPA nodes under WLAN.
6 Click Apply.
Using the WLAN task
1 Go to Settings Æ Network Æ Wireless Æ WLAN or select WLAN from the All Tasks list.
2 Select the device(s) that you want to configure wireless settings for.
Note: The WLAN task provides the ability to configure the wireless settings on multiple
devices simultaneously. As a result, if multiple devices are selected for use with this
task, make sure that only the values that are shared by all of the selected devices
are changed. Some settings are specific to one device and changing them can
disrupt wireless communication for that device.
3 Enter the SSID, BSS Type, Channel, and Wireless Security Mode for the device. For more
information on your wireless settings, see your wireless network documentation.
Wireless print server support
77
4 Enter the appropriate authentication or encryption information for the wireless security mode
that you selected.
Some wireless security modes require certificates to work properly. To install the appropriate
certificates, go to the print server embedded Web page or use the Install CA Certificate task.
For information on accessing the print server embedded web page, see your print server
documentation.
5 Click Apply.
Using the Install CA Certificate task
Some wireless security modes require Certificate Authority(CA) certificates for authentication
purposes. The Install CA Certificate task provides a means of installing a CA certificate on one or
more devices at a time. The CA certificate must be in a PEM encoded format.
1 Go to Settings Æ Network Æ Wireless Æ Install CA Certificate or select Install CA
Certificate from the All Tasks list.
2 Select the device(s) that you want to install a CA Certificate for.
3 Click Browse to locate the CA Certificate that you want to install.
4 Click Apply.
Note: If you select more than one device for this task, the selected CA Certificate is
applied to all selected devices and overwrites any existing certificates.
Destination management
MarkVision Professional’s destination management tasks provide the ability to more accurately
manage the destinations to which the devices on your network send information. MVP provides a
destination management task with which you can easily add or edit specific destinations for each
protocol that your network devices use to transmit information.
The destination management tasks are:
•
Fax destinations
•
E-mail destinations
•
FTP destinations
•
Profile destinations
Destination management
78
Using destination management tasks
1 Select one of the four destination management tasks from the All Tasks menu, or select
Settings Æ MFP Æ Destinations from the MVP home screen.
2 Using either Quick Find, or by choosing a specific device (or devices) from existing folders,
select the devices that have the destination types you want to manage. A table will appear in
the right side of the screen displaying the existing destinations. If the selected devices have
no current destinations, the table will be empty.
3 To add a new destination, click Add. Enter the appropriate information in the dialog box, and
then click OK.
Destination
Fields
Fax
Name, Fax number, Shortcut (If applicable)
E-mail
Name, E-mail address, Format, Content,
Color, Resolution, Shortcut (If applicable)
FTP
Name, Server, Login, Password, Password
confirmation, Path and filename, Format,
Content, Color, Resolution, Shortcut (If
applicable)
Profile
Name, Address, Port
4 Click Apply.
5 The listed destinations are added to the selected devices.
You can also cut, copy, or paste definitions by right-clicking destinations listed in the
destination management table.
Editing destinations
1 Select one of the four destination management tasks from the All Tasks menu, or select
Settings Æ Destinations from the MVP Home screen.
2 Using either Quick Find, or by choosing a specific device (or devices) from existing folders,
select the devices that have the destination types you want to manage. A table will appear in
the right side of the screen displaying the existing destinations. If the selected devices have
no current destinations, the table will be empty.
3 Select the destination you want to edit. Click Edit.
4 Enter the updated information in the dialog box, and then click OK.
5 Click Apply. The edited destinations are updated for the selected devices.
Destination management
79
Removing destinations
1 Select one of the four destination management tasks from the All Tasks menu, or select
Settings Æ Destinations from the MVP Home screen.
2 Using either Quick Find, or by choosing a specific device (or devices) from existing folders,
select the devices that have the destination types you want to manage. A table appears in the
right side of the screen displaying the existing destinations. If the selected devices have no
current destinations, the table will be empty.
3 Select the destination you want to edit. Click Remove. Clicking Remove All removes all
listed destinations.
Destinations in device policies
You can also set specific destinations for print servers through the Device Policies task. To set
destinations for print servers:
1 Open the Device Policies task and select the print server policy that you want to edit.
2 Expand the MFP folder view and open the Destinations folder.
3 Click the check box for the destination type that you want to edit, and then click Edit.
Note: When policies containing destinations are applied to devices that already contain
destinations, the device’s existing destinations are first deleted.
4 The Destinations Management dialog box opens beneath the selected destination. Edit the
destination list accordingly. Click Hide to close the Destination Management dialog.
Changing printer settings
The easiest method of changing printer settings is by selecting the item you want to change from the
Settings menu or the All Tasks list. Select one or more printers and change the settings
appropriately.
You can create a device policy to coordinate multiple settings and save them as a unit. A policy can
then be applied to one or more devices at a time, or saved for future use. See Using device policies
for more information.
Checking printer status
To check printer status, you can select one of the following options from the View menu:
•
Status of Printer
•
Toner / Ink Levels
Changing printer settings
80
•
MFP Status
•
Picture of Printer
•
Page Counts
•
Operator Panel LCD
•
Map
•
Custom Tables
•
Custom Views
Organizing devices
MarkVision lets you organize your devices using folders. When you create or edit folders, you can
specify certain criteria to limit which devices are in a folder. This works like a filter so that only the
devices you want to appear are in the folder.
For example, if you are responsible for maintaining toner cartridges for printers on the third floor of
your building, you might create a folder for your printers named "3rd floor." Create a subfolder named
"Low Toner," specifying that a filter should be placed in it. Click Advanced, then specify the filter
criteria by selecting Status: Message, Equal To, Toner Low. This causes the "Low Toner" folder to
display only those printers in need of service due to low toner cartridges.
All Devices
Subnets
157.175.84.0 (13)
157.175.85.0 (24)
157.175.86.0 (4)
157.175.87.0 (16)
Location (46)
Building (21)
Floor (8)
Printer Type(57)
Color (12)
Mono (45)
Duplex (25)
Department (37)
I/S (9)
Accounting (4)
Engineering (18)
Marketing (6)
In this example, one folder groups printers by subnet. Other folders group
printers by their location, printer type, or department. Using the built-in
filtering feature, the folders show you only the printers matching the criteria
you specify.
•
The same printer could appear in multiple folders,
depending on your needs.
•
The devices in a sub folder are dependent on the members
of the parent folder. In other words, if you create a sub folder
called Main under the Building folder, the sub folder can only
contain the devices that are also in the Building folder.
•
The numbers in parentheses indicate the number of devices
in that particular folder.
Organizing devices
81
Using filters to automatically populate folders
1 Select Folder Configuration from the All Tasks menu.
2 Click New to create a new folder, or select a specific folder to edit an existing one.
3 Enter the name of the new folder.
4 Select the properties to use in adding filters or devices to the folder.
5 You can specify a device name or names to further narrow down which devices to show in the
folder.
6 Click Apply to apply the specified criteria to the current folder.
For more information about finding specific printers within a folder, see Finding the devices you
want.
For more information about filters, see Using filters.
Viewing a print server embedded Web page
1 Select Web Page (Print Server) from the All Tasks menu, or click Actions Æ Web Page
(Print Server) from the menus.
2 Select the appropriate print server, and then click Launch.
3 Your browser opens with an information page for that print server. You see a real-time view of
the selected printer status.
Note: Not all print servers have Web pages.
Viewing all printers
MarkVision gives you several ways to see all the printers available to you at a glance.
Create folders and filters
Use the Folder Configuration task to create custom folders to organize your printers. If your printers
are on a small network, you may only need one folder. However, if your printers are distributed
across a large network, you can create multiple folders to organize them.
For example, if your printers are concentrated on a small network within a single building, you could
create folders for each floor or type of printer. For larger printer networks, you could create a folder
hierarchy that includes subfolders identifying printers listed by geographical location or by subnet.
Apply filter criteria to your folders to automatically populate folder contents or to find a specific
printer. For example, create a folder named "Color," and then select the appropriate filter criteria to
show only color printers. MarkVision applies the filter and adds only color printers to that folder. The
same printer can appear in more than one folder, depending on the filters you set. For example, a
color printer with a duplex unit would appear in both the "Color" folder and the "Duplex" folder. For
Viewing a print server embedded Web page
82
more information on creating folders and using filters, see Organizing devices and Finding the
devices you want.
Create a map view
You can use the Map task to create a graphical representation that illustrates the distribution of your
printers by placing a printer icon on a map background relative to your organization. The printer
status determines the border color of the icon that is displayed. A printer icon with a yellow border is
in a warning state; a printer icon with a red border is in an error state. For more information on using
the map feature, see Creating maps.
Creating maps
With MarkVision's Map task, you can create a graphical representation that illustrates the distribution
of your devices.
Creating a map
The type of map you create depends on the structure of your organization. If your organization has
one location with just a few printers, your map could be a simple line drawing or a scanned plan of
your building with icons marking the printer locations. If, however, you are responsible for many
printers in various geographies, you might create maps that correspond with the hierarchy of your
printer folders. For example, you could create a folder for the state where a group of printers are
located. Within that folder, you might create a sub folder for the city. Additional subfolders could
contain printers grouped by the building or floor number. Create a corresponding map for each folder.
Create maps using any graphics application that saves in JPEG or GIF format. You can create an
original image or develop your graphic using a scanned image like an area map or building plan.
Save the image in JPEG or GIF format. You can then select the graphic from the Map task in
MarkVision.
Using a map
1 Select Map from the All Tasks menu, or select a folder and click View Æ Map.
2 Select a folder.
3 Click the Map icon in the lower part of the window. Select the map you want to use, or click
Browse to find the graphic you want to use.
4 Arrange the device icons on the map image to represent its location in your organization, and
then click Apply.
Note: A yellow border around a device icon indicates that the device is in a warning state;
a red border indicates an error state.
Creating maps
83
Monitoring printer supplies
There are several methods you can use to monitor printer supplies.
If you are responsible for monitoring multiple printers:
•
Select Folder Configuration from the All Tasks menu and create a folder with a filter based
on the status criteria you are interested in. For example, you could create a folder named All
Status Errors and Warnings, and configure the filter to display only those devices containing
status errors or warnings. This folder's contents dynamically changes as devices meet or fail
to meet the filter criteria.
•
You can also perform a Quick Find to monitor printer supplies. Click the Quick Find tab, and
under the Select a Field to Search box, select Other. Click Find Parameters to configure the
parameters of your search. Click Find. The results of your search are displayed.
•
To see at a glance which printers are low on toner, select Status of Printer from the All Tasks
menu, open a folder, and select the printers you are interested in.
If you are responsible for monitoring only one printer:
•
Select Status of Printer from the All Tasks list. Choose the appropriate printer from either the
Quick Find or Folders tab.
Note: MarkVision's Map task displays an icon for each device. These icons give you an
indication of a device's status. A yellow border around a device icon indicates that
the device is in a warning state; a red border indicates an error state.
Moving the MarkVision Server
As newer hardware becomes available, it may become necessary to move the MarkVision
Professional Server to another machine, or import settings from one instance of the MarkVision
Server to another server. Since MarkVision Professional is extremely customizable, you may not
want to repeat the process of creating folders, filters, and rediscovering devices. As a result, MVP
provides the option of either moving an entire MarkVision Server or exporting specific settings for
folder configuration and MarkVision Messenger actions to a file to be imported on another server.
The following steps describe a method of creating a backup of MarkVision Professional's customized
data, and integrating that data onto a new machine.
1 Stop the MarkVision Server.
2 Back up the directory in which the customized data files are stored.
•
•
In Windows, the default directory is: C:\Program Files\Lexmark\MarkVision
Server\granite\data
For Mac and UNIX, the default directory is: /var/spool/markvision/data
3 Install the MarkVision Server on the new machine.
4 Stop the MarkVision Server.
Monitoring printer supplies
84
5 Replace the data files saved in step 2 into the same locations on the new machine.
6 Restart the MarkVision Server.
Note: The listed files do not contain settings for window and frame sizes or positional
information.
Starting and stopping the MarkVision Professional Server on a Windows system
For Windows 2000:
1 Go to Control Panel Æ Administrative Tools Æ Services and select the MarkVision
Server.
2 Click Start/Stop.
Note: You can use the same process to start or stop the MarkVision Web service.
For Windows NT:
1 Go to Control Panel Æ Services and select the MarkVision Server.
2 Click Start/Stop.
Note: You can use the same process to start or stop the MarkVision Web service.
For Windows XP and Windows 2003 Server:
1 Go to Control Panel Æ Performance and Maintenance Æ Administrative Tools Æ
Services and select the MarkVision Server.
2 Click Start/Stop.
Note: You can use the same process to start or stop the MarkVision Web service.
Starting and stopping the MarkVision Professional Server on a Macintosh system
To start the MarkVision Server, open a Terminal session and type:
/usr/mv_pro/bin/MvService start
To stop the MarkVision Server, open a Terminal session and type:
/usr/mv_pro/bin/MvService stop
Starting and stopping the MarkVision web service on a Macintosh system
To start the MarkVision Web service, type:
/usr/mv_pro/bin/MvWebService start
Moving the MarkVision Server
85
To stop the MarkVision Web service, type:
/usr/mv_pro/bin/MvWebService stop
Starting and stopping the MarkVision Professional Server on a UNIX system
To start the MarkVision Server, type:
/usr/mv_pro/bin/MvService start
To stop the MarkVision Server, type:
/usr/mv_pro/bin/MvService stop
Starting and stopping the MarkVision Web service on a UNIX system
To start the MarkVision Web service, type:
/usr/mv_pro/bin/MvWebService start
To stop the MarkVision Web service, type:
/usr/mv_pro/bin/MvWebService stop
Importing and exporting MVP Server settings
Only folder configurations and MarkVision Messenger actions are imported or exported.
Exporting MVP Server settings
1 Go to MarkVision Æ Export Server Settings or select Export Server Settings from the All
Tasks list.
2 Browse to the location where you want to save the server settings file.
3 Name the file.
4 Click Export.
Importing MVP Server settings
1 Go to MarkVision Æ Import Server Settings or select Import Server Settings from the All
Tasks list.
2 Browse to the server settings file you want to use.
3 Click Import.
Moving the MarkVision Server
86
Flashing print servers
Periodically, you may need to rewrite the flash memory inside one or more of your print servers. For
example, let's say Customer Support recommends you upgrade to a newer or different version of
firmware to solve a network printer problem.
You can also flash your print servers to take advantage of new functions available in the latest
version of firmware. Use MarkVision Professional to flash multiple print servers simultaneously.
Note: Not all print servers are supported.
All supported firmware (flash) files are available free of charge from the Lexmark Web site. You can
access the Web site by selecting Firmware (On the Web) from the All Tasks List, or by visiting
www.lexmark.com.
To flash Lexmark print servers
1 Download the latest flash files from the Lexmark Web site. Store these files in a safe place
(C:\temp, for example).
2 Select the Firmware Download (Print Server) task from the All Tasks list, or click
Actions Æ Firmware Download (Print Server) from the menus.
3 Select the print servers you want to update.
4 Click New File to find the downloaded files (C:\temp, for example).
5 Click Start.
Warning: If the print server is turned off or reset during flashing, it may be damaged. For this reason,
try to perform flash operations at night, on holidays, or other times when printer traffic is very light.
Accomplish this using the Scheduling task.
Formatting storage devices
You can use the Storage Devices task to format a device’s hard disk or flash memory. If you select
a device in the Storage Devices task, changing the Job Buffer amount causes the hard disk to
reformat, erasing all files. Likewise, clicking the Format button for either the hard disk or the flash
erases all files located in the device’s memory.
You can only copy or move files within a single device. For example, you can move a file from the
hard disk to the flash within a printer, but not to another printer.
Print Permissions Technology
Print Permissions Technology lets an administrator restrict color printing to specific users for
supported color printers on your network. By restricting the use of color printing, you can more
closely monitor and save valuable color printing resources.
Flashing print servers
87
MVP’s Print Permissions Technology is separated into two related tasks that control user access to
color printing, the Users Table task and the Hosts Table task. The Users Table displays and controls
basic user access to color printing. Adding a user’s ID to the Users Table lets you specify the user’s
color permission (whether that user may print with color or not). The Hosts Table takes color print
permissions a step further by controling print permissions on a specific host computer. This allows
you to override user level permissions on a specific host computer. As a result, if a user with access
to the Users Table task had set their color permissions to “On,” the color permission for their host
computer could still be disabled by setting the Color permission to “Off” and the Override permission
to “On” in the Hosts Table.
The following tables illustrate some Print Permission settings.
Users Table:
User ID
Color
Result
Mary
On
Mary can print color on all
selected printers.
Bob
Off
Bob cannot print color on
any selected printers.
Hosts Table:
Computer (Host)
Name
Color
Override
Result
MARYSPC
On
Off
A user logged into Mary’s
computer can print color on
all selected printers,
regardless of the individual
user’s print permissions.
BOBSPC
Off
On
A user logged into Bob’s
computer cannot print color
on any selected printers
regardless of the individual
user’s print permissions.
MARYSPC
Off
Off
A user logged into Mary’s
computer will not be able to
print color jobs unless their
User ID is granted color
printing permissions in the
User’s Table (as Override is
“Off”).
Print Permissions Technology
88
Using the Print Permissions Technology tasks
1 Go to Settings Æ Printer Æ Print Permissions Technology and select either Users Table
or Hosts Table.
2 Select the supported color devices that you want to use with the task from the Find Results
window. For information on locating devices, see Finding the devices you want.
3 Select your management option:
•
•
•
•
Click Add to enter a new user or host.
Click Edit to modify an existing user or host.
Click Remove to remove a selected user or host.
Click Remove All to remove all users or hosts from the table.
4 Enter or modify the appropriate fields in the table dialog box.
5 Click OK to implement the changes or Cancel to cancel the command.
6 Click Apply to save the changes or Undo to revert to the table’s previous state.
Queue management
Queue management provides the capability to create and remove Windows print objects (queues)
on host computers that utilize Windows-based platforms. Queue management utilizes two tasks to
manage print objects: the Create Windows Print Objects task and the Remove Windows Print
Objects task. The Create Windows Print Objects task can create Windows print queues on multiple
host computers simultaneously, eliminating the need to set up print queues separately on each
individual host computer. The Remove Windows Print Objects task similarly lets you remove print
queues from host devices.
Note: In order to create print objects on remote host computers (computers on which an
instance of the MarkVision Server is not running), the MarkVision Server must first
be configured to perform the necessary network operations. See Configuring the
MarkVision Server for instruction on implementing this configuration.
Configuring the MarkVision Server
To create print objects on remote host computers, the MarkVision Server service for Windows must
be configured to run in the context of a valid administrative user ID and Password. This allows the
MarkVision Server service to perform network operations such as listing the existing print objects
and drivers that reside on other computers.
For Windows operating systems only
1 Open the Windows Control Panel. For example, go to Start Æ Settings Æ Control Panel.
2 Double-click Administrative Tools.
Queue management
89
3 Double-click Services.
4 In Services, right-click MarkVision Server.
5 Select Properties.
6 Select the Log On tab.
7 Select the This account radio button.
8 Enter the user ID and password for an administrative account.
To create print queues
1 Go to Actions Æ Queue Management Æ Create Windows Print Objects, or select Create
Windows Print Objects from the All Tasks list.
2 In the queue management wizard, select the printers that you want to create queues for. You
can locate the printers under the Folders tab or by using Quick Find.
3 Click the (>) button to move the printers to the Selected Printers window.
4 Click Next.
5 In the Domains window, select the domain of the computers you want to create print queues
on.
6 In the Computers window, select the host computers that you want to create print queues
on. Use the (>) button to transfer the computers to the Selected Computers window.
Note: Each domain can potentially list several computers. To create printer queues on
host computers under different domains, repeat steps 5 and 6 selecting different
domains with each pass until all of the desired host computers are present in the
Selected Computers window.
7 Enter a network administrator user ID and password. To gain access to the host computers, a
high-level network administrator’s user ID and password is required for security purposes. If
you do not have administrative rights on the host computers you are trying to access, contact
an administrator with the appropriate privileges.
If you are using the Windows XP operating system, and the network administrator account
does not include a password, see For Windows XP administrator accounts without
passwords.
8 Select the type of print object that you want to create on the host computer. Select PCL,
PostScript, or both PCL and PostScript.
Note: MVP will attempt to locate and match the type of print object that is selected with
the appropriate device and drivers by name comparison. If the pre-selected drivers
are not your preference, you can change them in step 10.
Queue management
90
9 Click Next.
10 Verify that the print queue information is correct for each host computer in the queue creation
table. If the default settings are incorrect, select the table entry, and modify each of the fields
in the dialog below the table.
11 Click Select to open the Print Driver dialog.
12 Select the appropriate driver source radio button: Server (target computer) or MVP Server.
13 Select the driver from the list, then click OK.
If the driver is not included in the list:
a
Make sure the MVP Server radio button is selected as the driver source.
b
Click Add, browse to the driver, then click OK.
c
Select the driver from the list, then click OK.
14 To remove a print object from the list to be created, select the table entry that contains the
print object you want to remove, and click Remove.
15 Click Apply to save any changes, and then click Finish.
To remove print queues
1 Go to Actions Æ Queue Management Æ Remove Windows Print Objects, or select
Remove Windows Print Objects from the All Tasks list.
2 Select the domain of the host computer that you want to access.
3 Select the host computer that contains the queue you want to remove. Use the (>) button to
add the computer to the Selected Computers window.
4 Enter a network administrator user ID and password.
5 Click Next.
6 Select the print queue or queues that you want to remove from the list of print objects present
on the system.
7 Click Finish.
For Windows XP administrator accounts without passwords
In most cases, when selecting a server in either the Create Windows Print Objects task or the
Remove Windows Print Objects task, an administrator account user name and password for that
specific computer must be entered. If the administrative account that is used to complete this
Queue management
91
process does not include a password, or if use of an administrative account without a password is
preferred, the following proceedure must be completed on the target computer.
1 Open the Windows Control Panel. For example, go to Start Æ Settings Æ Control Panel.
2 Double-click Administrative Tools.
3 Double-click Local Security Policy.
4 Double-click Local Policies.
5 Double-click Security Options.
6 In the Policy column, double-click Accounts: Limit local account use of blank passwords
to console logon only, and change the value from Enabled to Disabled.
Queue management
92
6
MarkVision Messenger
MarkVision Messenger is a utility that lets you create Actions. An Action defines a command to
execute whenever an event occurs across a set of devices. Device Status Events are conditions
signaled by messages like Paper Tray Missing or Toner Low. Folder Events are signaled when
devices enter and/or exit a particular folder.
During the installation of MarkVision Professional, you are asked to select the components to install.
To install MarkVision Messenger, check MarkVision Messenger.
If the MarkVision Server is your default Web server, you can access MarkVision Messenger from any
browser by entering:
http://yourserver/messenger
Where your server is the TCP/IP hostname or address of the workstation on which you installed the
MarkVision Server. For example, if you installed the MarkVision Server and MarkVision Messenger
on a workstation with an address of nexus.dev.yourcompany.com, you would enter:
http://nexus.dev.yourcompany.com/messenger
Notes:
•
MarkVision Messenger requires at least one MarkVision Server to be running on your
network.
•
If MarkVision Professional is not your default Web server, you will need to add the 9180 port
number to the Messenger URL:
http://yourserver:9180/messenger
Installing MarkVision Messenger
MarkVision Messenger requires at least one MarkVision Server to be running on your network. If you
choose, you can run MarkVision Messenger multiple times on the same workstation. However, each
instance of the client must use a different configuration directory.
How does MarkVision Messenger work?
MarkVision Messenger communicates with the MarkVision Server to let you create and configure
automated responses to printer events. These responses are called Actions. When you create an
Action, you must specify three things:
MarkVision Messenger
93
•
The type of event your Action will monitor
•
The devices your Action will monitor
•
The type of command your Action will execute
With MarkVision Messenger, you can create Actions to automate many printer administration tasks.
For example, you can configure Actions to:
•
Keep a log of printer paper jams
•
E-mail someone when a specific device condition occurs
•
Order supplies for a specific device when messages, such as Toner Low, occur
Event Types
Your Action can be triggered by two types of events:
Device Status Alerts
A Device Status Alert is a notification that something has changed at a printer. For
example, when you pull a paper tray out of a printer, the printer tells MarkVision
Messenger that the tray is now missing. This is represented in MarkVision Messenger by
an event with name = "Paper Tray Missing" and state = "ACTIVE."
When the tray is put back into place, the printer tells MarkVision Messenger that the tray
is no longer missing. This is represented in MarkVision Messenger by an event with name
= "Paper Tray Missing" and state = "CLEARED."
You can configure your Action to respond to an event when its state is "ACTIVE," when its
state is "CLEARED," or both. If your Action responds to Device Status Alerts, you will be
prompted to choose the specific device status alerts that will trigger your action.
Printer Folder Alerts
A Folder Alert is generated when printers enter and/or exit a specified folder. For
example, you could create a folder in MarkVision Professional that contains printers with
a Toner Level less than 10%, and create an Action in MarkVision Messenger to notify you
when printers enter this folder. If your Action responds to Printer Folder Alerts, you will be
prompted to choose a folder.
Device Selection
When choosing the devices your Action will monitor, you have three choices:
All Devices on the MarkVision Server
If your Action will monitor all devices on the MarkVision Server, choose this option.
How does MarkVision Messenger work?
94
Devices in a Specified Folder
If your Action will monitor only a specific folder, choose this option. For example, if you
were in charge of devices on the third floor, and had configured a folder on the
MarkVision Server that included these devices, you could limit the number of devices
your Action monitors by choosing this folder.
Selected Devices
If your Action will monitor only specific devices, choose this option.
Command types
There are four types of commands that your Action can execute:
Send an SMTP e-mail
Your Action, when triggered, sends an e-mail to addresses you specify. These e-mails are highly
customizable from within MarkVision Messenger. For example, an Action, triggered by a Folder
Alerts event, could e-mail an administrator when monitored printers enter a "Low Toner" folder. This
e-mail message could be configured to list the model of printer, its IP address, and the time at which
it entered the "Low Toner" folder.
Execute a command line on the MarkVision Server
Your Action, when triggered, executes a command line. For example, if you wanted to keep a log of
offline devices, you could configure your Action to respond to the "Offline" Device Status Alert. Each
time a monitored device becomes offline, specified information is written to a text file. Like the
example above, the information MarkVision Messenger writes to this text file is highly customizable.
For example, you could specify that the text file list the device model, page count, and the time at
which it went offline.
Execute a command line on a remote host server
Your Action, when triggered, executes a command line on a remote host server. In order to execute
command lines on a remote host server, the rexec client must connect to a rexec server on the
remote host server.
Furthermore, you can specify whether to perform commands conditionally or repeatedly, and how to
execute them. You can have your Action execute its command:
•
Only after a specified delay period.
For example, if your Action sends an e-mail message when a printer goes offline, you can
delay the execution of the command for a specified amount of time. This way, if the printer
returns online during the delay period, the e-mail will not be sent. See Delaying Event
notifications for more information.
•
After additional conditions have been met.
For example, if your Action is triggered by a Paper Tray Missing event, but you only want to
execute the command when the event occurs for Tray 3, you could write a custom filter to
How does MarkVision Messenger work?
95
specify that your Action only respond when Tray 3 is removed from monitored printers. See
Custom filters for more information.
Send device status alerts to a Tivoli event server
MarkVision Messenger contains a custom event adapter that integrates with Tivoli's event
management console. This event adapter lets administrators use the Tivoli event console to monitor
printer events across a range of devices in real time. In order for Tivoli to display printer events, you
must first setup the Tivoli event adapter by creating an action in MarkVision Messenger.
What are Actions?
Actions are associations that let you execute event-driven commands. They can be set up to occur
automatically, as well as conditionally or repeatedly. You can specify which commands MarkVision
Messenger executes when device status events, such as Paper Tray Missing or Toner Low, occur,
or when devices enter and/or exit a specified folder on the MarkVision Server.
See How does MarkVision Messenger work? for more information about using Actions.
Simple Filters
By using the Simple Filter you can set your Action to execute its command when a device is added to
a folder, removed from a folder, or both. For example:
If you create a folder that contains printers whose page count is greater than 10,000,
once a printer's page count exceeds that amount, the printer is added to that folder.
If you create a folder that contains printers with a flash device installed, and someone
removes the flash from the printer, it is removed from that folder.
By using the with a delay of: option, you can delay the execution of your Action until a device has
been in or out of the folder for a specified amount of time.
Custom filters
Custom filters let you customize and define how your action executes. You can do this by either
uploading a previously defined script file or by writing a new one.
MarkVision Messenger provides a very simple scripting language to define filters. The following is a
complete list of the statements and conditions you can use to write a custom filter:
Statements:
•
While (Condition)
•
WaitUntil (Condition)
•
IfThen (Condition)
•
{ StatementList }
How does MarkVision Messenger work?
96
•
Distribute
Conditions:
•
And (Condition_1...Condition_n)
•
Or (Condition_1...Condition_n)
•
EventDataIs (key, value)
•
SourceDataIs (key, value)
•
TimeIsAfter
As an example, let's look at the script representation of the built-in Trigger on Active filter:
IfThen (EventDataIs("state", "ACTIVE"))
Distribute
The effect of the EventDataIs condition is to ask the event for the value of the event.state keyword.
This is the same keyword you can insert into command lines and e-mail messages. The first
statement, an IfThen, executes the next statement if the condition EventDataIs ("state",
"ACTIVE") is true. An EventDataIs condition is true if the value of the keyword (state) matches
the given value (ACTIVE). The next statement, Distribute, causes the command to execute.
Now, let's look at the script to write when the Trigger on Active filter is set with a delay of 30 seconds:
{
WaitUntil (TimeIsAfter(30))
IfThen(EventDataIs("state", "ACTIVE"))
Distribute
}
The braces ({}) are used to group statements into a list. They were not needed in the previous
example because the IfThen and following statements were treated like a single statement.
The WaitUntil statement causes the script to pause execution until the condition is true. The
TimeIsAfter condition checks for true only after the specified number of seconds has passed.
Once the 30 seconds has passed, if the event is still Active, the Distribute statement executes the
command.
The script representation of the built-in Trigger on Either Active or Clear filter is a single Distribute
statement. Let's say, for example, that you select Paper Tray Missing as the event, but you only want
to execute the command when the event occurs for Tray 3. Also, you want to wait 20 minutes before
executing the command, and execute the command again at the same 20-minute interval if the
condition remains Active. Let's look at the script to write for this filter:
While (And(EventDataIs("state", "ACTIVE"), EventDataIs("location", "Tray 3")))
{
WaitUntil(TimeIsAfter(1200))
How does MarkVision Messenger work?
97
IfThen(EventDataIs("state", "ACTIVE"))
Distribute
}
In this example, And was used to build a compound condition. The While loop is only entered or
repeated if the event is active for Tray 3. The code within the loop is the same as the code for the
Trigger on Active filter, except the TimeIsAfter condition is set to wait 1200 seconds (20 minutes).
Trigger on Either Active or Clear filters
Choose the Trigger on Either Active or Clear filter if you want to set your Action to execute each
time a condition becomes Active or Cleared.
For example, let's say you want to keep a log of all printer paper jams so you can determine the
average time it takes for a jam to be cleared. When a paper jam occurs, the printer generates an
event with a state of Active. This satisfies the condition of the filter and executes your Action.
When the paper jam is cleared, the printer generates another event with a state of Clear. This event
also satisfies the condition of the filter and executes your Action. You now have two lines in your log
file, one with the time at which the paper jam occurred and another with the time it was cleared.
Trigger on Active filters
Choose the Trigger on Active filter if you want to set your Action to execute its command only when
a condition becomes Active.
When you pull out a tray, the printer generates a Paper Tray Missing event with a state of Active.
This satisfies the condition of the filter and executes your Action, perhaps by sending an e-mail
notification.
When you push the tray back into place, the printer generates another Paper Tray Missing event, this
time with a state of Clear, which does not satisfy the condition of the filter. Therefore, your Action is
not executed and no one is notified when the event is cleared.
You can also choose to delay execution of your Action until the condition has been Active for a
specified amount of time. Let's say the e-mail recipient is receiving too many notifications and you
want to wait 20 minutes to see if the condition clears. By using the Delay Time option, you can create
a filter that won't send the e-mail notification unless the Paper Tray Missing condition has been
Active for 20 minutes.
Note: The Delay Time value is limited to 10 characters.
How does MarkVision Messenger work?
98
How do I use MarkVision Messenger?
Use MarkVision Messenger to create Actions that automatically perform printer administration tasks
in response to printer events.
Use the following examples for ideas about how you can use MarkVision Messenger to:
•
Keep a log of all printer paper jams
•
Delay event notifications
•
Monitor specific paper trays
•
E-mail or page someone when a specific event occurs
•
Order supplies
Step 1: Preview the steps
To create an Action:
1 From the MarkVision Messenger Home screen, click Create New.
2 Define your Action by completing the following steps in order:
a
Name and describe your Action.
b
Set user access.
c
Select the Event Type that will trigger your action.
d
Select the events or folder that will trigger your Action.
e
Select the devices to monitor for your Action.
f
Select the type of command to execute.
g
Compose the command, and any parameters, for the event(s).
h
Select or create a filter for the events.
i
Verify Action information.
Note: If you no longer want to preview your choices, select Do not display this screen
again.
Step 2: Name your Action
The name you choose associates the Action you create with the name that appears in the Action list
on the MarkVision Messenger Home screen.
How do I use MarkVision Messenger?
99
From the Description Information screen:
1 Enter a unique name for you Action in the Name: field.
2 Enter a more detailed description about your action and what it does in the Description: field.
3 Enter instructions associated with your Action in the Notes: field. For example, "Please clear
the paper jam."
4 Click
when you're ready to continue.
Notes:
The Name: field is limited to 80 characters.
The Description: field is limited to 255 characters.
The Notes: field is limited to 255 characters.
Step 3: Set user access
User access determines who can see, use, and change the Action you create.
From the Access screen:
1 Select Public to make your Action available to all users.
2 Select Private to make your Action available only to you.
3 Click
when you're ready to continue.
Notes:
•
This screen only appears if user accounts have been created in MarkVision Professional.
•
A private Action does not require a special access password from within MarkVision
Messenger. However, since it is associated with the username used to create it, the Action is
only accessible to that specific user.
Step 4: Select the Event Type
You must tell MarkVision Messenger which type of event your Action will monitor.
From the Event Type screen, you can:
•
Choose to monitor Printer Status Alerts.
•
Choose to monitor Printer Folder Alerts.
Click
when you're ready to continue.
For more on Event Types, see How does MarkVision Messenger work?
How do I use MarkVision Messenger?
100
Step 5: Select specific events or folder
Depending on the Event Type you have chosen, you must now tell MarkVision Messenger either the
Device Status Alerts your Action will monitor, or the folder whose events your Action will monitor.
If your Action is triggered by a Printer Folder Alert
1 Select a folder.
2 Click
when you're ready to continue.
If your Action is triggered by a Device Status Alert
From the Events screen you can:
•
Add an event to the Selected Events: list:
1
Choose whether to sort events by Type or Severity.
2
Select an event category.
3
Add events to the Selected Events: list by:
4
•
—
—
Selecting an event, and then clicking
.
Selecting [All events], for example [All Input Alerts], and then clicking
—
Clicking
Click
.
to add all category events.
when you're ready to continue.
Remove an event from the Selected Events: list
Select the event you want to remove, and then:
—
Click
—
Click
to delete the event from the list.
to delete all events from the list.
Notes:
•
•
Selecting [All events] adds all category events to the Selected Events: list, even ones added
to the server later.
You can select from one or more event categories, one or more events, or a combination of
the two.
Step 6: Select devices
You must choose which devices you want to monitor. For your convenience, MarkVision Messenger
provides you with a list of all available devices capable of producing the events you selected.
From the Event Sources screen, you can:
How do I use MarkVision Messenger?
101
•
Select All Devices on the MarkVision Server to monitor all devices, even ones added to the
server later.
•
Select Devices in a Specified Folder to monitor all devices in a specified folder, even ones
added to the folder later.
•
Select Selected Devices to specify which devices to monitor.
If you choose Selected Devices, you can:
•
Click the name of a specific device in the Selected Devices list to select it.
•
Click Select All to select all devices currently in the Selected Devices list.
•
Click Deselect All to remove all devices selections from the Selected Devices list.
Click
when you're ready to continue.
Notes:
•
If your Action is triggered by a Folder Event, you may be confused to be asked to choose a
folder for a second time. By choosing a folder on this screen, you can narrow the list of
printers you are interested in. In MarkVision Professional, printers can occupy more than one
folder at a time.
•
For example, if your Action is triggered when printers move into a folder named "Toner Level
< 10%," and you only want to monitor printers in the folder named "Building 7." select the
"Building 7" on this screen. MarkVision Messenger will execute your Action when a printer
from the "Building 7" folder enters the "Toner Level < 10%" folder.
Step 7: Select a command
You must tell MarkVision Messenger which type of command your Action will execute.
From the Command Type screen, you can:
•
Choose to execute a command line on the MarkVision Server.
Note: Because command lines are run on the MarkVision Server, you must be logged in
as the MarkVision administrator to select this option.
•
Choose to send an e-mail message.
•
Choose to execute a command line on a remote host.
Note: This option requires that a rexec server be present on the remote host.
•
Choose to setup a Tivoli event adapter.
Note: this option is only available if the Device Status Alert option is selected.
Click
when you're ready to continue.
How do I use MarkVision Messenger?
102
Step 8: Compose the command
Keywords represent information about your Action, a device, or an event. You can pass this
information to your command on the MarkVision Server or a remote host, or choose to embed it in an
e-mail message.
To send an e-mail message
1 Enter the recipient's e-mail address in the To: field. Make sure you separate multiple e-mail
addresses with a comma.
2 Enter optional e-mail addresses in the Cc: field. Make sure you separate multiple e-mail
addresses with a comma.
3 Enter the purpose of your e-mail in the Subject: field.
4 Enter your e-mail message in the Body: field.
5 Add keyword(s) to any text field by:
•
•
Selecting a keyword from the Keywords: list, and then clicking
Typing the keyword directly into the field.
6 Click
.
when you're ready to continue.
Note: If you have not set up your SMTP mail server, you will be prompted to enter your
mail server and mail path information.
To execute a command line on a remote host
1 Enter the remote host information in the Hostname:, Username:, and Password: fields.
2 Enter the name of an executable command in the Command Path: field.
3 Add keyword(s) to the Command Line Parameters: field by:
•
•
Selecting a keyword from the Keywords: list, and then clicking
Typing the keyword directly into the field.
4 Click
.
when you're ready to continue.
To execute a command line on the MarkVision Server
1 Enter the name of an executable command in the Command Path: field.
2 Add keyword(s) to the Command Line Parameters: field by:
•
•
Selecting a keyword from the Keywords: list, and then clicking
Typing the keyword directly into the field.
3 Click
when you're ready to continue.
How do I use MarkVision Messenger?
103
.
To setup a Tivoli event server
To execute this command, see Setting up the Tivoli event adapter.
Step 9: Select a filter
A filter lets you control commands that execute when events occur. Your filter options depend on the
Event Type.
If your Action is triggered by Device Status Alerts:
•
Choose Trigger on Active to set the command to execute only when a condition becomes
Active. You can also choose to delay execution of the command until the condition has been
active for a specified amount of time.
•
Choose Trigger on Either Active or Clear to set the command to execute each time a
condition becomes Active or Clear.
•
Choose Custom to customize and define when the command executes. You can do this by
either uploading an existing script file or writing a new one.
If your Action is triggered by Printer Folder Alerts:
•
Choose Simple Filter to set the Action to execute when a device is added to the folder,
removed from the folder, or both. You can also choose to delay execution of the command
until the condition has been active for a specified amount of time.
•
Choose Custom to customize and define when the command executes. You can do this by
either uploading an existing script file or writing a new one.
Click
when you're ready to continue.
Step 10: Customize a filter
If you choose Custom from the Filter Type screen, you can customize and define how your action
executes. Do this by either uploading a previously defined script file or by writing a new one.
•
•
To upload a previously defined script file:
1
From the Custom Filters screen, enter the name of the script file you want to upload, or
click Browse... to locate it.
2
Click Load. The script file appears in the text field.
3
Click
when you're ready to continue.
To write a new script file:
1
From the Custom Filters screen, type new script information into the text field.
2
Click
when you're ready to continue.
How do I use MarkVision Messenger?
104
Notes:
•
•
Click Tips for more information and sample scripts.
When you upload a script file, all information in the text field is erased. Make sure you upload
the script file first, and then make changes or enter additional information.
Step 11: Verify Action information
When you're finished, you should verify all Action information for technical accuracy. Carefully review
the detailed summary provided in the text field.
When you're ready to continue:
•
Click Yes to enable your Action.
•
Click No to disable your Action.
•
Click
to step back through the setup process and make changes.
•
Click
to create your Action and return to the MarkVision Messenger Home screen.
•
Click
to return to the MarkVision Messenger Home screen without creating an Action.
Note: You cannot alter information directly in the text field. If you want to make changes,
click
to step back through the setup process and make changes from the
appropriate screens.
Modifying an Action
1 From the MarkVision Messenger Home screen, find the Action you want to change.
2 Click Modify.
You are presented with the same series of choices you used to create an Action, but each choice
defaults to the current setting for the Action you selected. You may change any or all of your previous
settings.
Notes:
•
You cannot modify an Action that is enabled by another user.
•
You cannot modify an Action that another user has selected.
How do I use MarkVision Messenger?
105
Enabling an Action
1 From the MarkVision Messenger Home screen, select the Action you want to enable by
clicking the box to the left of the Action name.
2 Click Enable Selected. The status of the selected Action changes to Enabled.
Note: You cannot enable an Action that another user has selected.
Disabling an Action
1 From the MarkVision Messenger Home screen, select the Action you want to disable by
clicking the box to the left of the Action name.
2 Click Disable Selected. The status of the selected Action changes to Disabled.
Note: You cannot disable an Action that another user has selected.
Deleting an Action
1 From the MarkVision Messenger Home screen, select the Action you want to delete by
clicking the box to the left of the Action name.
2 Click Delete Selected. The selected Action is removed from the Actions list.
Notes:
•
You cannot delete an Action that is enabled by another user.
•
You cannot delete an Action that another user has selected.
Viewing Action information
To display a detailed summary of an Action:
1 From the MarkVision Messenger Home screen, click the name of the Action.
2 Click Done when you are ready to return.
Note: You can only view information for one Action at a time.
You cannot make changes to the Action from the screen. If you want to make changes:
1 From the MarkVision Messenger Home screen, find the Action you want to change.
2 Click Modify.
See Modifying an Action for more details.
How do I use MarkVision Messenger?
106
Setting or changing user data
User data identifies and provides more information about a specific device or set of devices. It is
associated with the action.sourcedata keyword string that can be inserted into the Command Line
Parameters: list. You can associate the same data with one or more devices.
To set or change user data:
1 From the MarkVision Messenger Home screen, click Set User Data. A list of all available
devices and current user data is displayed.
2 Enter your device information in the Data: field.
3 Select the devices you want to associate with this data. You can:
•
•
•
Click the box to the left of a device name to select it.
Click Select All to select all devices.
Click Deselect All to remove all device selections.
4 When you're finished:
•
•
Click Apply to save your changes and refresh the Set User Data screen.
Click Done to return to the MarkVision Messenger Home screen.
Notes:
•
User-defined data is user specific and cannot be viewed or altered by another user.
•
The Data: field is limited to 80 characters.
Generating reports
You can create Actions to generate event-specific reports.
For example, you're an account administrator and you want to set up an Action to generate a report
containing billing and delivery information for all supplies that have been ordered.
1 From the MarkVision Messenger Home screen, click Create New.
2 Enter your Action information in the setup screens that follow, and then click Next.
3 From the Events screen, select Supplies Alerts from the Categories: list.
4 Select the events you want to monitor and click the (>) button to add them to the Selected
Events: list.
5 Click Next when you are ready to continue.
6 Select the devices you want to monitor, and then click Next.
7 Enter your command information and keywords in the appropriate fields.
8 Click Next, and complete the remaining steps.
How do I use MarkVision Messenger?
107
Keeping a log of paper jams
You can create an Action to keep a log of specific device events.
For example, you may want to keep a log of paper jams to determine the average time it takes for
them to be cleared.
To set up an Action to log paper jams:
1 From the MarkVision Messenger Home screen, click Create New.
2 Enter your Action information in the setup screens that follow, and then click
.
3 From the Event Type screen, select Printer Device Status Alerts, and then click
.
4 From the Events screen, choose [Output Alerts] from the Categories: list.
5 Select Paper Jam as the event, and then click
6 Click
to add it to the Selected Events: list.
when you're ready to continue.
7 Select the devices you want to monitor, and then click
.
8 Select Execute a Command Line on the MarkVision Server, and then click
.
Note: Because command lines are run on the MarkVision Server, you must be logged in
as the MarkVision administrator to select this option.
9 Enter the name of an executable command in the Command Path: field.
Note: Make sure the command you enter can accept the keywords you insert and write
them to the end of a log file.
10 Select the keywords you want to appear in the log file, and then click
to add them to the
Command Line Parameters: field.
Note: Make sure you insert the keywords in the correct order.
11 Click
when you're ready to continue.
12 From the Select a filter screen, select Trigger on Either Active or Clear.
Note: This creates two lines in the log file: one that logs the time at which paper jams
occur, and another that logs the time they are cleared.
13 Click
, and then complete the remaining steps.
Delaying Event notifications
You can set up an Action to delay execution of its command until an Event has been active for a
specified amount of time.
How do I use MarkVision Messenger?
108
Let's say you created an Action to send an e-mail notification when a Load Paper or Envelope
condition occurs. But after a week, the e-mail recipient is receiving too many notifications, and often
when he goes to a device, someone else has already loaded more paper. By using the Delay Time
option, you can create a filter that will only send a notification if the Load Paper or Envelope condition
has been active for an amount of time that you specify.
Likewise, if your Action is triggered by a Folder Alert, you can delay its execution by using the With a
delay of: option.
If you want to create an Action that uses the Delay Time option:
1 From the MarkVision Messenger Home screen, click Create New.
2 Enter your Action information in the setup screens that follow, and then click
.
3 Enter the filter information:
If your Action is triggered by Device Status Alerts
•
From the Filter Type screen, choose Trigger on Active.
•
Under Delay Time, specify how long you want the Action to wait to execute its command. For
example, type in 20 and select Minute(s) from the drop-down list.
If your Action is triggered by Folder Alerts
From the Filter Type screen, select Simple Filter.
Under with a delay of:, specify how long you want the Action to wait to execute its command. For
example, type in 2, and then select Hour(s) from the drop-down list.
Click OK, and then complete the remaining steps.
Monitoring specific device paper trays
You can use a filter to narrow the Events that trigger your action.
Let's say you configured Tray 2 on all your devices for your company's letterhead and you only want
to monitor for Load Paper or Envelope events on Tray 2. For this example, the Trigger on Active
or the Trigger on Either Active or Clear filter is not sufficient.
To write a custom filter to monitor specific paper trays:
1 From the MarkVision Messenger Home screen, click Create New.
2 Enter your Action information in the setup screens that follow, and then click
.
3 From the Event Type screen, choose Printer Device Status Alerts, and then click
4 From the Filter Type screen, choose Custom, and then click
How do I use MarkVision Messenger?
109
.
.
5 In the text field, enter a script that only executes the command when the parameter is the
paper tray you want to monitor. For example:
IfThen (EventDataIs("location", "Tray2"))
Distribute
6 Click
, and then complete the remaining steps.
Sending an e-mail
You can create an Action to automatically send an e-mail to someone when a specific event occurs.
For example, your network administrator must be notified each time an Operator Intervention Alert
occurs, but he is rarely at his desk. If your administrator has an alphanumeric pager, you can set up
the Action to send an e-mail to his pager and promptly alert him when the event occurs.
To create an Action to send an e-mail:
1 From the MarkVision Messenger Home screen, click Create New.
2 Enter your Action information in the setup screens that follow, and then click
.
3 From the Event Type screen, choose Printer Device Status Alerts, and then click
.
4 From the Command Type screen, choose Send SMTP E-mail.
Note: If you have not set up your SMTP mail server, you are prompted to enter your mail
server and mail path information.
5 Enter the recipient's e-mail address in the To: field. Make sure you separate multiple e-mail
addresses with a comma.
6 Enter optional e-mail addresses in the Cc: field. Make sure you separate multiple e-mail
addresses with a comma.
7 Enter the purpose of your e-mail in the Subject: field.
8 Enter your e-mail message in the Body: field.
9 Add the appropriate keyword(s) to any text field.
10 Click
, and then complete the remaining steps.
Ordering supplies
If you have an automated ordering system on your network, you can set up an Action to
automatically order supplies for all devices attached to the server.
For example, you can configure an Action to automatically order toner when the first Supply Low
event occurs. You can also use the Delay Time option to tell your command to ignore Supply Low
and Supply Empty messages for 10 days after the first event. This lets your Action invoke the
How do I use MarkVision Messenger?
110
automated ordering system to order toner for the printer, and allows time for the new toner to arrive
and be installed before more Supply Low and Supply Empty messages are logged.
To create an Action to order supplies:
1 From the MarkVision Messenger Home screen, click Create New.
2 Enter your Action information in the setup screens that follow, and then click
.
3 From the Event Type screen, choose Printer Device Status Alerts, and then click
.
4 From the Events screen, choose Supplies Alerts from the Categories: list.
5 Select Supply Low and Supply Empty, and then click
to add them to the Selected
Events: list.
6 Click Next when you're ready to continue.
7 Select the devices you want to monitor, and then click
.
8 Select Execute a Command Line on the MarkVision Server, and then click
.
9 Enter the path to the automated ordering system program in the Command Path: field.
10 Select the keywords to pass to the automated ordering system, and then click
to add them
to the Command Line Parameters: field.
Note: Make sure you insert the keywords in the correct order.
11 Click
when you're ready to continue.
12 From the Filter Type screen, choose Trigger on Active.
13 Under the Delay Time option, enter 10, and then select Day(s) from the list box.
14 Click
, and then complete the remaining steps.
Setting up a SMTP mail server
MarkVision Messenger lets you set up and store your SMTP parameters to use for all your e-mail
messages.
To set up a SMTP mail server:
1 From the MarkVision Messenger Home screen, click SMTP Setup.
2 Enter your mail server information in the SMTP Mail Server: field.
3 Enter your e-mail information in the From: field.
4 Click Done to return to the MarkVision Messenger Home screen.
How do I use MarkVision Messenger?
111
Setting up the Tivoli event adapter
The Tivoli event adapter lets administrators monitor printer events accross a range of devices in real
time. In order to send device status alerts to Tivoli, you must create an action in MarkVision
Messenger.
1 Click Create New on the MarkVision Messenger Home screen.
2 Enter a name for the adapter, and if desired, input a description and any notes. Click
.
3 Select the type of alert that you want to send an event to the Tivoli event server, and then
click
.
Note: The Tivoli event adapter will be available in a subsequent section of the wizard only
if the type of events selected on this screen are Device Status Alerts.
4 Select the type of event that will trigger the action from the Event scroll box, and then use the
arrow buttons to move the event to the Selected Events box. Click
5 Choose the method of device selection. Click
.
.
6 Select Send Device Status Alerts to a Tivoli Event Server from the dialog box, and then
click
.
7 Enter your Tivoli configuration settings, and then click
.
8 Determine when the action should execute, and then click
.
A summary of the action that you have created is displayed. If you are satisfied with the action, click
Yes and then
to enable the Tivoli event adapter.
Note: After creating a Tivoli event adapter in MarkVision Messenger, you must then
configure the Tivoli server for Messenger alerts. Refer to your Tivoli documentation
for details on how to configure your Tivoli server.
How do I use MarkVision Messenger?
112
7
Troubleshooting
Problems with user accounts and account groups
Error reading account
When you log in, MarkVision validates your account by requiring a user name and password.
At login, if you see:
A message that indicates there was an error reading accounts
Possible causes
•
•
•
•
•
The user name or password you entered is invalid. See Error reading password.
You have logged in to the wrong MarkVision Server.
The MarkVision Server is not running.
The file containing your account information is corrupt.
There is a problem verifying the account information with the LDAP server (if LDAP
authentication has been enabled).
User actions
Contact your administrator.
Administrator actions
From the Services control panel, verify that the MarkVision Server is running on the Web
server.
If the service is not running:
1
Stop and restart the service.
2
Ask the user to attempt to log in again.
If the service is running:
1
Log in to MarkVision using the default administrator username and password.
2
Reconfigure or add the user's account (User Accounts and Groups task).
Troubleshooting
113
3
Ask the user to attempt to log in again.
If LDAP authentication is enabled, verify that all LDAP settings are correct both in MVP and
on the LDAP server. User account names should be consistent with the account listings in
your LDAP server’s directory service.
Error reading password
When you log in, MarkVision validates your account by requiring a user name and password.
At login, if you see:
A message that indicates there was an error reading the password.
Possible causes
•
•
•
•
The MarkVision Server is not running on the Web server.
The file containing your password is corrupt.
You have incorrectly typed in your password. Passwords are case sensitive.
If you are using LDAP authentication, your LDAP server settings may be configured
incorrectly.
User actions
•
•
Ask your administrator to reset your password.
If LDAP authentication is being used, ask your administrator to check the LDAP server
settings.
Administrator actions
From the Service control panel, verify that the MarkVision Server is running on the Web
server. If it is not running, stop and restart the service.
If the service is running, reset the user's password:
1
Click User Accounts and Groups from the All Tasks menu.
2
Select the appropriate account, and then click Edit.
3
Change the password information as necessary.
4
Ask the user to log in again.
If you are using LDAP authentication, make sure that LDAP authentication is configured
correctly both in MVP and your LDAP server.
Forgotten password
When you log in, MarkVision validates your account by requiring a user name and password.
Problems with user accounts and account groups
114
If you have forgotten your password
User actions
Ask your administrator to reset your password.
Administrator actions
Reset the user's password.
1
Click User Accounts and Groups from the All Tasks menu.
2
Select the appropriate account.
3
Change the password information as necessary.
Problems with network devices
MarkVision is unable to find a network device
1 Make sure the printer is turned on and is ready.
2 Make sure the LAN cable is plugged into both the print server and into the LAN, and is
working properly.
3 If you are using an INA:
•
•
Make sure the print server is properly installed and enabled. Print a setup page for the
printer. See your print server documentation for instructions. The print server should
appear in the list of attachments on the setup page.
Make sure TCP/IP on the print server is activated. The protocol must be active for the
print server and MarkVision to work. You can do this from the printer operator panel.
4 If you are using an ENA:
•
•
Check the print server lights. Refer to your print server documentation for instructions.
Print a setup page from the print server. Refer to your print server documentation for
instructions.
5 Make sure the SNMP community name you supplied to MarkVision is the same as the one
set in the print server.
6 PING the print server.
•
•
•
•
If PING works, check the IP address, netmask, and gateway to make sure they are
correct. Turn the printer off, and then PING again to check for duplicate IP addresses.
If PING does not work, check the setup page you printed to be sure IP is enabled.
If TCP/IP is enabled, check the IP address, netmask, and gateway to be sure they are
correct.
Make sure bridges and routers are functioning correctly.
Problems with network devices
115
•
Make sure all the physical connections among the print server, the printer, and the
network are working.
7 Turn the printer and the print server off, and then on again. Turn the printer on first so when
you turn on the print server, it can determine whether the printer is enabled for NPA.
“Device not responding” message appears
1 Make sure the printer is turned on and is ready.
2 Make sure the LAN cable is plugged into both the print server and into the LAN, and is
working properly.
3 If you are using an INA:
•
•
Make sure the print server is properly installed and enabled. Print a setup page for the
printer. Refer to your print server documentation for instructions. The print server should
appear in the list of attachments on the setup page.
Make sure TCP/IP is activated on the print server. The protocol must be active for the
print server and MarkVision to work. You can do this from the printer operator panel.
Refer to your print server documentation for instructions.
4 If you are using an ENA:
•
•
Check the print server lights. Refer to your print server documentation for instructions.
Print a setup page from the print server. Refer to your print server documentation for
instructions.
5 PING the print server.
•
•
•
•
•
If PING works, check the IP address, netmask, and gateway to make sure they are
correct. Turn the printer off, and then PING again to check for duplicate IP addresses.
If PING does not work, check the setup page you printed to be sure TCP/IP is enabled.
If TCP/IP is enabled, check the IP address, netmask, and gateway to be sure they are
correct.
Make sure bridges and routers are functioning correctly.
Make sure all the physical connections among the print server, the printer, and the
network are working.
6 Use MarkVision to see if the server can contact the printer.
7 Compare the IP address of the print server to the address stored for the network printer in the
name server or /hosts file. If the addresses do not match, edit the /hosts file or update the
name server to correct the address.
8 Print a setup page from the print server. If the page prints, the connection between the print
server and the printer is working correctly. If the page does not print, check all physical
connections.
Problems with network devices
116
Printer information appears incorrect
Occasionally, the printer may lose contact with MarkVision because something happens to the
printer. For example, if the printer is turned off, the information in MarkVision is not updated until the
printer is turned back on.
If MarkVision displays printer or print server information that appears to be incorrect, refresh the
printer and print server.
No printer icon(s) appear
When you log in to MarkVision and see:
A message that indicates there was an error reading printers.
Possible causes
•
•
The MarkVision Service is not running on the server.
The file that stores your printers has been corrupted.
User actions
Contact your administrator.
Administrator actions
From the Services control panel, verify that the MarkVision Server is running on the Web server. If it
is not running, stop and restart service. If the service is running, ask the user to repopulate the folder
with printers. Select the printer, and then click Edit. Use filters or manually select printers.
Printers are missing from folders (no login error messages).
Possible causes
The file that stores your printers has been deleted from the Web server.
User actions
Repopulate your folder with printers. Select the printer, and then click Edit user filters or manually
select printers.
Problems with MarkVision Messenger
Cannot access MarkVision Messenger
Possible causes:
•
The URL you entered is incorrect.
Problems with MarkVision Messenger
117
•
The MarkVision Web Server service is not running correctly.
•
The MarkVision Web Server is not your default Web server, and you have forgotten to add
port 9180 in your address.
User actions:
•
Verify that you entered the URL correctly.
•
Contact your administrator.
Administrator actions:
•
Verify that the user is using the correct URL address.
•
Restart the MarkVision Web Server service to verify that it is running correctly.
No e-mail notification
Possible causes:
•
The e-mail address you entered is incorrect.
•
The MarkVision Web Server service is not running correctly.
User actions:
•
Verify that the e-mail address in the To: field of the Compose SMTP E-mail screen is correct.
•
Verify that the SMTP mail server and mail path are correct.
•
Contact your administrator.
Administrator actions:
•
Review the system log.
•
Verify that the mail server is running.
•
Restart the MarkVision Web Server service to verify that it is running correctly.
MarkVision Messenger does not work properly while Apache is installed
MarkVision Messenger works on two ports by default: 8007 and 8009. If Apache is installed and
listens on either of these ports, Messenger will not function properly. When installing, first check for
port availability, and then assign the appropriate port to Messenger.
Problems with MarkVision Messenger
118
Problems with actions
Cannot create a new action
Possible cause:
The MarkVision Web Server service is not running correctly.
User action:
Contact your administrator.
Administrator action:
•
Verify that the MarkVision Web Server service is running correctly.
•
Restart the service.
•
Ask the user to log in again and attempt to create an action.
Cannot enable an action
Possible cause:
Another user has selected the action.
User action:
Try again later, or contact the user who has selected the action.
Cannot disable an action
Possible cause:
Another user has selected the action.
User action:
Try again later, or contact the user who has selected the action.
Cannot modify an action
Possible causes:
•
The action is enabled by another user.
•
Another user has selected the action.
Problems with actions
119
User action:
Try again later, or contact the user who has selected the action.
Cannot delete an action
Possible causes:
•
The action is enabled by another user.
•
Another user has selected the action.
User action:
Try again later, or contact the user who has selected the action.
Action did not work
Possible causes:
•
The command line contains an error.
•
The wrong device is selected.
•
The wrong event is selected.
•
The selected device is not operating.
•
The MarkVision Web Server service is not running correctly.
User actions:
•
Click the action name to review a detailed summary and verify its accuracy.
•
Contact your administrator.
Administrator actions:
•
Verify that the selected device is operating correctly.
•
Review the system log.
•
Restart the MarkVision Web Server service to verify that it is running correctly.
Action has unexpected results
Possible causes:
•
The command line contains an error.
•
The wrong event is selected.
•
The MarkVision Web Server service is not running correctly.
Problems with actions
120
User actions:
•
Click the action name to review a detailed summary and verify its accuracy.
•
Contact your administrator.
Administrator action:
•
Review the system log.
•
Restart the MarkVision Web Server service to verify that it is running correctly.
Action list is empty
Possible causes:
•
No actions are available.
•
All available actions are listed as private by other users.
•
The MarkVision Web Server service is not running correctly.
User action:
Contact your administrator.
Administrator action:
Restart the MarkVision Web Server service to verify that it is running correctly.
No private actions listed
Private actions are associated with individual usernames. Therefore, you can only see those
associated with your username.
Possible causes:
•
No private actions are associated with the username you used to log into MarkVision
Messenger.
•
The MarkVision Web Server service is not running correctly.
User actions:
•
Use a different username to log in and check for that user's private actions.
•
Contact your administrator.
Administrator action:
Restart the MarkVision Web Server service to verify that it is running correctly.
Problems with actions
121
Miscellaneous problems
The client and server cannot communicate
If there is a firewall installed on the network, and the MarkVision Client and the Server exist on
opposite sides of the firewall, the client will not be able to communicate with the server; MVP will stop
responding after the initial request. For the best results, only use an instance of the client that exists
inside the firewall.
No folder(s)
If MarkVision does not display your folders, and during login you see:
A message that indicates there was an error reading folders
Possible causes:
•
The MarkVision Server is not running on the web server.
•
The file that stores your folders has been corrupted.
User actions:
Contact your administrator.
Administrator actions:
•
From the services control panel, verify that the MarkVision Server is running on the web
server. If it is not running, stop and restart service. If the service is running, ask the user to
recreate their folders (Folder Configuration task - Add).
All folders are missing (no login error messages)
Possible causes:
The file that stores your folders has been corrupted.
User actions:
Recreate the folders (Folder Configuration task - Add).
Out of available memory
If the MarkVision Professional Web Client performs poorly, crashes, or gives you a memory error,
you may need to change your system Java plug-in settings. The Java plug-in uses 16MB of RAM
regardless of how much physical or virtual memory is available. You can improve performance by
increasing the memory available to MarkVision.
Miscellaneous problems
122
User actions
To change the Java plug-in settings:
1
In Windows, access the Java plug-in settings from the Control Panel.
2
In the Java Runtime Parameters box, type:
-ms16m -mx64m
Note: The entry "-ms16m" reserves 16MB memory when the application starts. The entry
"-mx64m" reserves a maximum of 64MB available RAM. If your system has more
memory, you can specify a larger amount.
For additional Java troubleshooting, refer to the MarkVision README file.
Cannot enter characters in printers in a different language
In some situations, a user may need to enter information in a printer in a different language than the
MVP client is currently using. MVP 11.0 has some limitations configuring or entering specific
characters for devices in a language that MVP does not support. In these situations, you must enter
the characters manually, without using MVP.
Some settings that have been configured in MarkVision Professional
revert to their previous state after the MarkVision Server is rebooted
MarkVision Professional saves configured system settings at a regular interval. As a result,
configurable settings, such as Administrative Settings, Device Policies, folders, filters, and User
Accounts and Groups, will not persist until the regular save interval has occurred. To ensure that
configured settings remain in place, wait at least 10 minutes after making any changes to the
settings before stopping the MarkVision Server.
Miscellaneous problems
123
8
Frequently Asked Questions
How do I get to the server after installing?
Accessing the MarkVision Professional Server with the MarkVision Application
In application form, the client is installed locally so it can be launched just like any other program
installed on the machine. For example, in Windows environments, you can double-click the
MarkVision Professional icon on the desktop. This version of the client does not use a Web
browser.
After starting the application:
•
Enter the hostname or IP address of the machine running the MarkVision Server, and then
click Connect. You can also click Browse to locate your server.
•
If user accounts are enabled, you are prompted to enter the name of a user account and its
password.
•
Click Login.
Accessing the MarkVision Professional Server with the MarkVision Web Client
Since the MarkVision Web Client is browser based, you need to open your browser and point it to the
MarkVision URL. If MarkVision Professional is your default Web server, the URL is:
http://<your server>/markvision
where <your server> is the IP address or hostname of the machine that is running the MarkVision
Server.
If MarkVision Professional is not your default Web server, the URL is:
http://<your server>:9180/markvision
Note that because this URL uses a non-standard port number, in most browsers, you need to type
the "http://" in the beginning of the URL.
Note: The "markvision" part of the URL is case-sensitive; it must be entered in all
lowercase letters.
The MarkVision Web Client launches a browser window from which MarkVision Professional runs as
a Java applet. If you have not already enabled your browser to support Sun's Java Runtime
Environment (JRE), you must do so at this time. In order to run the Web Client, you must first enable
your Web browser to support JRE by installing the Java plug-in. In Windows environments, the
Frequently Asked Questions
124
plug-in is provided and you are automatically prompted to install it the first time you run the
MarkVision Web Client.
How do I discover printers?
Device discovery in MarkVision Professional 11.0 is now managed through the use of discovery
profiles. During MVP Setup, a default device discovery profile is typically established. If you do not
currently have any discovery profiles created, see Creating discovery profiles. Once you have
some discovery profiles to work with, you can use the Manage Discovery Profiles task to discover
your devices.
Manage Discovery Profiles task
The Manage Discovery Profiles task can be selected from either the All Tasks list or by clicking
MarkVision Æ Device Discovery Æ Manage Discovery Profiles.
1 Go to MarkVision Æ Device Discovery Æ Manage Discovery Profiles.
2 Select the profile from the Discovery Profiles window that encompasses the devices that
you want to discover.
3 Click Start.
4 MVP communicates with the devices included in the selected profile. To stop a discovery at
any time, click Stop Discovery.
Note: Performing a discovery with the Full Discovery profile, or any profile that includes
all of the devices on your network, requires a large amount of CPU usage. Running
a full discovery can render the MarkVision Server virtually unusable while the
discovery is executing.
For a more in-depth look at discovering devices, see Adding and removing devices.
Quick Find task
The Quick Find task is capable of initially discovering devices and filtering a device search for
previously discovered devices.
While searching by TCP/IP address, multiple devices can be discovered using a wildcard variable
when typing in the criteria for the TCP/IP address. You can use a zero (0) or asterisk (*) as a wildcard
character when performing a Quick Find based on a network subnet. For example, in order to find all
the printers on the 122 subnet, the user would type in the address value 138.188.122.0. This would
find devices with IP addresses of 138.188.122.2, 138.188.122.3, 138.188.122.4, and so on.
Note: If you enter a TCP/IP address, MarkVision Professional first checks the list of
devices already discovered. If the address is not in the list, MarkVision Professional
initiates a device discovery to find it.
Note: IPX discoveries can only be performed using the Device Discovery task.
How do I discover printers?
125
Adding devices
In some situations you may want to discover some devices without creating a profile. In these
situations you can use the Add Devices task to discover individual or small groups of devices.
To use the Add Devices task:
1 Select Add Devices from the All Tasks menu, or select MarkVision Æ Device Discovery Æ
Add Devices on the MVP Home screen.
2 Select a specific device or devices from the list of existing devices on the screen, or click Add
to enter a new device address, and then click OK.
3 Click Start to begin the discovery.
You can also select the Exclude tab to select devices from an existing profile that you do not want to
include in the discovery.
Select the Advanced tab to reset additional discovery settings.
Note: You can save any new groups of devices that you establish with the Add Devices
task as a new discovery profile by clicking Save as Profile.
Is IPX supported?
IPX management support
IPX management support is only available for a MarkVision Server running on a Windows NT,
Windows 2000, Windows XP, or Windows 2003 Server workstation. UNIX Clients can connect to a
Windows-based MarkVision Server to manage printers with the IPX protocol.
IPX protocol support must be installed on the Windows NT, Windows 2000, Windows XP, or
Windows 2003 Server workstation. If IPX protocol support is not installed, the IPX option is disabled.
The NetWare protocol for the supported print server must be active to be discovered.
Note: Not all devices are available through IPX support.
IPX printer installation support
The easiest way to configure the print server for NetWare jobs in non-NDPS and non-NEPS
environments is to use the Network Printer Utility for NetWare (Interwin). The Network Printer Utility
(Interwin) automatically creates all the necessary NetWare objects (print queue objects, print server
objects, and printer objects).
Is there any way to speed up device discoveries?
The time MarkVision Professional takes to discover devices varies, depending on the scope of the
discovery. A device discovery spanning multiple subnets (133.122.0.0) requires more time than a
device discovery spanning a single subnet (133.122.123.0).
Is IPX supported?
126
From the Scheduling task, the MarkVision Server can be set to perform network discoveries once,
daily, weekly, or monthly. Device discoveries can be scheduled to occur at off times, when network
traffic is less busy, and routinely scheduled device discoveries ensure that the list of devices
MarkVision Professional manages is current.
For a more in depth look at discovering devices, see Adding and removing devices.
What are the differences between the Application and the Web
Client?
Differences between the MarkVision Application and the MarkVision Web Client
The MarkVision Application and Web Client are essentially the same program. All folders, filters,
devices, and so on that are managed by the MarkVision Server are available to users of either the
application or the client, provided that the user has been granted access.
The Web Client requires the installation of the Java browser plug-in. Since the Web Client runs
through a Web browser, you can use it to access the MarkVision Server from any computer on your
network.
What do the lines through some devices mean?
Because the nature of MarkVision Professional is such that all tasks are available all of the time, it is
possible to choose devices that do not support a given task. For example, not all printers can report
their toner/ink levels. When this occurs, the name of the device incapable of the selected task has a
line through it.
If a device that does not support the current task is selected, MarkVision Professional responds in
the following way:
•
For a single device selection, the message Device Incapable of Task is displayed.
•
When multiple devices are selected, and one or more of them do not support the current task,
either of the following occurs:
—
—
For read-only tasks (such as status and toner levels), MarkVision Professional displays
the Device Incapable of Task message in place of the task information for that
device. All supported devices have their appropriate information displayed.
For multi-device configuration tasks, MarkVision Professional warns you that some of the
devices will not be affected by the task because they do not support the function or
feature that is being configured.
Why are some devices displayed in red text?
Devices that are displayed in red text are password protected. In order to gain access to a password
protected device, you can use the Enter Device Password task to gain access to a protected device
What are the differences between the Application and the Web Client?
127
for the duration of the current Client session. The Enter Device Password task is located under
MarkVision Æ Enter Device Password or in the All Tasks list.
An administrator also has the option to add a device’s password to the Manage Global Password list.
If a user has access to the Manage Global Passwords list task, they will in turn have access to every
device that MarkVision manages that has a password included in the list.
Because the Manage Global Passwords list task provides access to valuable device passwords,
access to the task should be limited to administrative personnel.
How do I create a filter and apply it to a folder?
Filters provide an easy way to view devices of a certain type or status.
Create a filter
1 From the menu bar, select MarkVision Æ Filters. The Filter Creation window appears.
2 Click New.
3 Give your filter a meaningful name.
4 Under the Name dialog box, select either Basic or Advanced.
•
If you select Basic
Select the filter conditions. If you select more than one condition, you can specify whether
a device must meet any or all conditions in order to be included in the folder. If All is
selected, a device must meet all conditions. If Any is selected, a device must meet at least
one condition to be included in the folder.
•
If you select Advanced
You can create conditions by first selecting a parameter, then selecting a logical
operation, and then selecting or typing in a value.
For example, if you wanted to "filter out" all color printers, you would:
1
From the parameter box, select Color.
2
From the operation box, select Equal To.
3
From the value box, select Monochrome.
Likewise, if you wanted to "filter in" all printers with Job Timeouts greater than or equal to
90 seconds, you would:
1
From the parameter box, select Job Timeout.
2
From the operation box, select Greater Than Or Equal To.
3
From the value box, type in 90.
Note: Some values (such as the 90 seconds in the previous example) must be manually
typed.
How do I create a filter and apply it to a folder?
128
As in the Basic filter configuration, if All is selected, a device must meet all conditions. If Any is
selected, a device must meet at least one condition to be included in the folder. If only one condition
is specified, the Any and All radio buttons will be grayed out.
For a more in-depth look at filters, see Using filters.
Apply a filter to a folder
1 From the menu bar, click MarkVision Æ Folders. The folder configuration window appears.
2 Select the folder you want to configure. If you have already applied a filter to this folder, the
filter settings appear.
3 If you want to apply a previously created filter, click Load Filter..., and then choose the filter.
Note: Manual selection overrides filters. For example, if you apply the filter Color Equal
To Monochrome, and you have already manually selected various color printers,
those manually selected printers remain in the folder.
What is MarkVision Messenger?
MarkVision Messenger is a browser-based tool that helps to automate responses to printer problems
or events. MarkVision Messenger lets you create Actions to automate many printer administration
tasks. Using its intuitive wizard-based interface, you can configure Actions to:
•
•
E-mail someone when a specific device condition occurs, such as Toner Low.
Keep a log of paper jams.
To use MarkVision Messenger, click Actions Æ MarkVision Messenger Launch or, from a Web
browser, enter the URL:
http://<your server>/messenger
where <your server> is the IP address or hostname of the machine that is running the MarkVision
Server.
Note: If MarkVision Professional is not your default Web server, the MarkVision
Messenger address is:
http://<your server>:9180/messenger
The "messenger" part of the URL is case-sensitive; it must be entered in all lowercase letters.
What is MarkVision Messenger?
129
How do you create actions?
The following steps are an example of how to create an Action in MarkVision Messenger. This
sample Action sends an e-mail message to a fictional address, ([email protected]) whenever a printer
monitored by the MarkVision Server enters a Paper Jam state.
1 After logging in to MarkVision Messenger, click Create New.
•
•
•
Type in the name of the Action (required).
Type in a description of the Action (optional).
Type in notes about your Action (optional).
2 Click the Next arrow icon.
3 Choose whether to make your Action private (the Action is only available to you) or public
(the Action is available to all users), and then click the Next arrow icon.
4 Choose the event that will trigger the Action. For this example, select Paper Jam from the
Events list, and then click the
5 Click
to add Paper Jam to the Selected Events box.
.
6 Select your method of device selection. You can choose to:
•
•
•
Monitor All Devices on the MarkVision Server
Monitor Devices in a Specified Folder
Monitor Selected Devices
7 For this example, click Monitor All Devices on the MarkVision Server, and then click the
Next arrow icon.
8 Select the type of command your Action will execute. For our example, click Send SMTP
E-mail, and then click the Next arrow icon.
9 In the SMTP Mail Server box, enter your SMTP Mail Server (mailserver.mycompany.com, for
example). In the From: box, enter your e-mail address. Click
.
10 Compose your e-mail message.
•
•
•
•
In the To: box, type the fictional [email protected].
If you want to carbon copy (Cc) someone, type the appropriate address in the Cc: box.
For this example, type Paper Jam in the Subject: box.
In the Body: box, type: There is a paper jam at: source.ipAddress, model:
source.model, and then click
.
Note: Both source.ipAddress and source.model are Keywords. Select them from the
Keywords list and move them to the Body: box by clicking . The
source.ipAddress keyword contains the TCP/IP network address (if applicable) of
the print server to which the printer is attached. The source.model keyword
contains the model name of the printer. Many keywords are available in MarkVision
How do you create actions?
130
Messenger, and a description of each is in the Keyword Detail box, directly under
the Keywords list.
11 Select the type of filter for your action:
•
•
•
Trigger on Active sends an e-mail whenever a printer enters a Paper Jam state.
Trigger on Either Active or Clear sends an e-mail whenever a printer enters or exits a
Paper Jam state.
Custom lets you create your own filter script.
For this example, click Trigger on Active, and then click the Next arrow icon.
12 You will now see a summary of your action. Click Yes to enable the Action.
Results of this example
If a printer monitored by MarkVision Professional enters a Paper Jam state, an e-mail will be sent to
the fictional [email protected]. The subject will be "Paper Jam," and the body will be similar to:
There is a paper jam at: 123.123.123.123, model: generic printer.
In this example, 123.123.123.123 is the TCP/IP network address of the print server to which the
printer is attached, and generic printer is the model name of the printer.
Where is the README file?
If MarkVision Professional was installed in the default location, the README text file can be found in:
For Windows users:
•
Click Start Æ Programs Æ Lexmark Æ MarkVision Professional Æ MarkVision
Professional ReadMe
For UNIX users:
•
/usr/markvision/docs/readme
For both Windows and UNIX users:
•
You can link to the README file at:
http:/<your server>/markvision
where <your server> is the IP address or hostname of the machine that is running the
MarkVision Server.
Note: If MarkVision Professional is not your default Web server, you need to change the
URL to:
http://<your server>:9180/markvision
Where is the README file?
131
How do I change the MarkVision Web Server port?
The port upon which the MarkVision Web Server responds to web requests is also configurable. It
may become necessary to do this if you want to simplify the Web Client URL to make requests on
port 80, the standard port for web browsers, eliminating the need to specify 9180 in the MarkVision
URL.
For Windows-based machines, the MarkVision Web Server port may be changed by editing the
server.xml file, located in the following path:
C:\Program Files\MarkVision Server\mvp-tomcat\conf\server.xml
Within the server.xml file, locate the following tag section:
<!-- changed to 9180 for non-default web server -->
<http10connector
port=”9180”
secure=”false”
maxThreads=”100”
maxSpareThreads=”50”
minSpareThreads=”10” />
Copy the section and paste it below the original. Under this heading, change the port= value to 80
and save the changes. In order for the changes to become operational, you must stop and restart the
web server service. This will allow the MarkVision Web Server to accept requests from both ports.
Note: The MarkVision Web Server can only be set to listen to port 80 provided no other
web server is currently using the port. Do not remove the prior section containing
9180 as some functions of MarkVision may require this port.
To change the MarkVision Web Server port for UNIX or Macintosh operating systems, run the
setup.mvj server script, which is included in your operating system’s install package.
Where can I find additional Tivoli support for MarkVision?
If you use Tivoli with MarkVision Professional, the new Tivoli Plus module is available for download
at the following URL:
www.lexmark.com .
How do I change the MarkVision Web Server port?
132
Are sensitive files displayed when viewing encrypted hard disk
drives?
If you use the Storage Devices task to securely view an encrypted hard disk drive, the only
information that is available is file name, file type, file size, and the date that a file was saved on the
hard disk. The contents of any files saved on the hard disk will not be displayed.
Are sensitive files displayed when viewing encrypted hard disk drives?
133