1
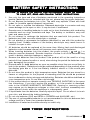
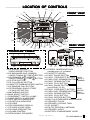
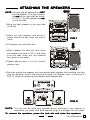
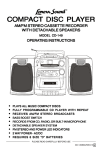
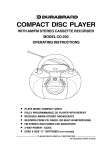
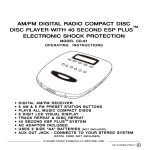
® COMP ACT DISC PLA YER COMPACT PLAYER DUAL CASSETTE AM/FM STEREO CD PLA YER PLAYER WITH DET ACHABLE SPEAKERS DETACHABLE MODEL CD-160 OPERA TING INSTRUCTIONS OPERATING CD TAPE RADIO PLA YS ALL MUSIC COMP ACT DISCS PLAYS COMPACT DIGIT AL TUNING WITH 20 RADIO PRESETS DIGITAL FULL Y PROGRAMMABLE CD PLA YER WITH REPEA T FULLY PLAYER REPEAT HIGH SPEED DUBBING FOR F AST T APE COPIES FAST TAPE RECEIVES AM/FM STEREO BROADCASTS BASS BOOST SWITCH RECORDS FROM CD, RADIO, CASSETTE OR BUIL T-IN BUILT MICROPHONE TAPE RELA Y PLA Y - FROM PLA YBACK T O RECORD DECK RELAY PLAY PLAYBACK TO DET ACHABLE SPEAKER SYSTEM DETACHABLE 2 W AY POWER - AC/DC WA REQUIRES 8 SIZE D BA TTERIES BATTERIES PLEASE READ CAREFULLY BEFORE USE CD-160S050699 V.2 E SAFETY INSTRUCTIONS CAUTION RISK OF ELECTRIC SHOCK DO NOT OPEN The lightning flash and arrow head within the triangle is a warning sign alerting you of dangerous voltage inside the product. CAUTION: TO REDUCE THE RISK OF ELECTRIC SHOCK, DO NOT REMOVE COVER (OR BACK). NO USER SERVICEABLE PARTS INSIDE. REFER SERVICING TO QUALIFIED SERVICE PERSONNEL. The exclamation point within the triangle is a warning sign alerting you of important instructions accompanying the product. WARNING: TO REDUCE THE RISK OF FIRE OR ELECTRIC SHOCK, DO NOT EXPOSE THIS APPLIANCE TO RAIN OR MOISTURE. THESE IMPORTANT SAFETY INSTRUCTIONS ARE INCLUDED, AS APPLICABLE TO THE APPLIANCE, CONVEYING TO THE USER THE INFORMATION ITEMIZED BELOW: 1. Read Instructions - All the safety and operating instructions should be read before the appliance is operated. 2. Retain Instructions - The safety and operating instructions should be retained for future reference. 3. Heed Warnings - All warnings on the appliance and in the operating instructions should be adhered to. 4. Follow Instructions - All operating and use instructions should be followed. 5. Water and Moisture - The appliance should not be used near water - for example near a bathtub, washbowl, kitchen sink, laundry tub, in a wet basement, or near a swimming pool, and the like. 6. Wall or Ceiling Mounting - The appliance should not be mounted to a wall or ceiling. 7. Ventilation - The appliance should be situated so that its location or position does not interfere with its proper ventilation. For example, the appliance should not be situated on a bed, sofa, rug, or similar surface that may block the ventilation openings; or, placed in a built-in installation, such as a bookcase or cabinet that impede the flow air through the ventilation openings. 8. Heat - The appliance should be situated away from heat sources such as radiators, heat registers, stoves, or other appliances (including amplifiers) that produce heat. 9. Power Sources - The appliance should be connected to a power supply only of the type described in the operating instructions or as marked on the appliance. 1 0 . Grounding or Polarization - Precautions should be taken so that the grounding or polarization means of an appliance is not defeated. 11. Power Cord Protection - Power supply cords should be routed so that they are not likely to be walked on or pinched by items placed upon or against them, paying particular attention to cords at plugs, convenient receptacles, and the point where they exit from the appliance. 1 2 . Cleaning - The appliance should be cleaned only as recommended by the manufacturer. 1 3 . Nonuse periods - The power cord of the appliance should be unplugged from the outlet when left unused for a long period of time. 1 CD-160S050699 V.2 E SAFETY INSTRUCTIONS 1 4 . Object and Liquid Entry - Care should be taken so that objects do not fall and liquids are not spilled into the enclosure through openings. 1 5 . Damage Requiring Service - The appliance should be serviced by qualified service personnel when: A. The power supply cord or the plug has been damaged; or B. Objects have fallen, or liquid has been spilled into the appliance; or C. The appliance has been exposed to rain; or D. The appliance does not appear to operate normally or exhibits a marked change in performance; or E. The appliance has been dropped, or the enclosure damaged. 1 6 . Servicing - The user should not attempt to service the appliance beyond that described in the operating instructions. All other servicing should be referred to qualified service personnel. 1 7 . Power lines - An outdoor antenna should be located away from power lines. 1 8 . Outdoor Antenna Grounding - If an outside antenna is connected to the receiver, be sure the antenna system is grounded so as to provide some protection against voltage surges and built up static charges. Section 810 of the National Electrical Code, ANSI/ NFPA 70 provides information with respect to proper grounding of the mast and supporting structure, grounding of the lead-in wire to an antenna discharge unit, size of grounding conductors, location of antenna-discharge unit, connection to grounding electrodes, and requirements for the grounding electrode. See Figure. EXAMPLE OF ANTENNA GROUNDING AS PER NEC - NATIONAL ELECTRICAL CODE ANTENNA LEAD IN WIRE GROUND CLAMP ANTENNA DISCHARGE UNIT (NEC SECTION 810-20) GROUNDING CONDUCTORS (NEC SECTION 810-21) ELECTRIC SERVICE EQUIPMENT GROUND CLAMPS POWER SERVICE GROUNDING ELECTRODE SYSTEM (NEC ART 250, PART H) It is the intent of Lenoxx that this product be used in full compliance with the copyright laws of the United States and that prior permission be obtained from copyright owners whenever copying tapes or CDs. Do not apply oil or petroleum products or solvents to any part of this set. CAUTION Use of controls or adjustments or performance of procedures other than those specified herein may result in hazardous radiation exposure. This compact disc player is classified as CLASS 1 LASER PRODUCT as stated on the back of the set. 2 CD-160S050699 V.2 E BA TTER Y SAFETY INSTRUCTIONS BATTER TTERY C A U T I O N : TO REDUCE THE RISK OF FIRE OR PERSONAL INJURY OR DAMAGE T O YOUR SET SET,, READ AND FOLLOW THESE INSTRUCTIONS. 1. Use only the type and size of batteries mentioned in the operating instructions booklet (batteries are not included with this set, please buy the proper batteries). 2. Do not dispose the batteries into a fire. The cells may explode. Check with local codes for possible special disposal instructions. 3. Do not open or mutilate the batteries. Released electrolyte is corrosive and may cause damage to the eyes or skin. It may be toxic if swallowed. 4. Exercise care in handling batteries in order not to short the battery with conducting materials such as rings, bracelets and keys. The battery or conductor may over heat and cause burns. 5. Do not attempt to recharge the batteries that are used with this product. The batteries may leak corrosive electrolyte or explode. 6. Do not attempt to rejuvenate the batteries identified for use with this product by heating them. Sudden release of the battery electrolyte may cause burns or irritation to eyes or skin. 7. All batteries should be replaced at the same time. Mixing fresh and discharged batteries could increase internal cell pressure and rupture the batteries. 8. When inserting batteries into this product, the proper polarity ( and ) or direction must be observed. Reverse insertion of some or all of the batteries may result in battery eletrolyte leakage or explosion. 9. Remove the batteries from this product if the product will not be used for a long period of time (several months or more) since during the period the batteries could leak, damaging the product. 10. Discard weak or dead batteries as soon as possible since they are more likely to leak in the product. Batteries should be replaced (depending on the product) when the display gets dim or if the Low Battery Indicator shows or if the sound gets distorted. 11. Do not store this product in high temperature areas. Batteries that are stored in a freezer or refrigerator for the purpose of extending shelf life should be protected from condensation during storage and defrosting. Batteries should be stabilized at room temperature prior to use after cold storage. 12. If this product does not operate normally, see TROUBLE SHOOTING in the opera tion instructions. If you cant resolve the problem, or if the product is damaged, refer to the LENOXX WARRANTY INFORMATION. Opening or removing covers may expose you to dangerous voltages or other risks. Incorrect reassembly can cause electric shock when the appliance is subsequently used. 13. If liquid leaks from the batteries, carefully wipe this liquid. Do not allow it to touch your skin, and discard the leaking batteries. 14. Do not mix batteries (OLD and NEW or CARBON and ALKALINE, etc.). 15. The use of rechargeable batteries is not recommended for this set because their voltage and life is lower than standard batteries. 16. Installation of batteries should be done by an adult only. SA VE THESE INSTRUCTIONS SAVE 3 CD-160S050699 V.2 E LOCA TION OF CONTROLS LOCATION 15 16 17 14 18 FRONT VIEW 13 12 19 11 CD TAPE RADIO 20 20 21 34 22 33 32 31 22 26 30 28 24 25 27 29 23 REAR VIEW CONTROL P ANEL PANEL 1 10 2 3 9 8 4 7 5 SPEAKER R L 35 6 1. CD REPEAT ALL/ONE / RADIO PRESETS BUTTON 2. CD BACKWARD SKIP (SEARCH) / RADIO TUNING / TIME BUTTON 3. CD FORWARD SKIP (SEARCH) / RADIO TUNING / TIME BUTTON 4. CD STOP BUTTON 5. CD PLAY/PAUSE BUTTON 6. CASSETTE DUBBING SPEED SWITCH 7. CD RANDOM PLAY BUTTON 8. CD PROGRAM / RADIO STORE / CLOCK SET BUTTON 9. AM/FM BAND SWITCH 10. BASS BOOST SWITCH 11. POWER/BATT. SWITCH & LAMP 12. RADIO SWITCH & INDICATOR 13. TAPE SWITCH & INDICATOR 14. CD SWITCH & INDICATOR 15. CD DOOR 16. CD/CLOCK/RADIO DISPLAY 17. CD DOOR CLOSE AREA 18. CD DOOR OPEN BUTTON 19. VOLUME CONTROL 20. DETACHABLE SPEAKERS 36 40 39 38 37 36 35 2 1 .STEREO HEADPHONE JACK (headphones not included) 2 2 .CASSETTE DOORS 2 3 .CASS. PAUSE BUTTON 2 4 .CASS. STOP/EJECT BUTTON CASS. 2 5 .CASS. FAST FORWARD BUTTON DECK A PLAYBACK 2 6 .CASS. REWIND BUTTON 2 7 .CASS. PLAY BUTTON 2 8 .CASS. PAUSE BUTTON (and RELAY PLAY) CASS. 2 9 .CASS. STOP/EJECT BUTTON DECK B 3 0 .CASS. FAST FORWARD BUTTON PLAY/ 3 1 .CASS. REWIND BUTTON RECORD 3 2 .CASS. PLAY BUTTON 3 3 .CASS. RECORD BUTTON 3 4 .BUILT-IN CONDENSER MICROPHONE 3 5 .SPEAKER PLUGS 3 6 .SPEAKER LOCKING TABS 3 7 .AC SOCKET 3 8 .FM TELESCOPING ANTENNA 3 9 .SPEAKER JACKS 4 0 .BATTERY COMPARTMENT DOOR 4 CD-160S050699 V.2 E INTRODUCTION Your new COMPACT DISC PLAYER WITH AM/FM STEREO DUAL CASSETTE RECORDER is a specially designed all solid state set which, with proper care, will give you years of trouble-free service. Please read these operating instructions carefully as they will help you obtain maximum performance from this set. Unpack the set carefully and place it on a level surface, away from sources of excessive heat, such as radiators. POWER SUPPL Y- 2 W AY SYSTEM SUPPLY WA This set is designed to be operated from two different power sources as listed below: A. DC OPERA TION OPERATION This set runs on 8 size D batteries. For best performance, always use heavy duty alkaline batteries. T O INST ALL BA TTERIES INSTALL BATTERIES 1.Remove the Battery Door by gently pushing tabs downward and outward. 2.Install 8 size D batteries. N O T E : The battery compartment has 2 levels, upper and lower. Be sure to install the batteries as per the sketch shown or inside the battery compartment. LOWER UPPER 3.Replace the Battery Door. N O T E : To use your set on battery power, you MUST remove the AC Power Cord from BOTH the wall outlet AND the back of the set. N O T E : The negative polarity (side) of battery touches the spring. BATTERY INDICATOR The Power Lamp also shows you if your batteries are fresh. When this lamp gets dim, it is time to replace the batteries. B. AC OPERA TION OPERATION Plug the AC Power Cord into the back of the set and insert the AC plug into 120 Volts AC 60Hz 15W standard household outlet. N O T E : This cord is polarized. This means either end of the cord will only fit ONE way into the socket or wall outlet. If it does not fit, do not force it, just reverse it and try again. N O T E : If the AC Power Cord is plugged into the back of the set, the set will not work on batteries. To operate the set on batteries, remove the AC plug from the back of the set. 5 POLARIZED AC PLUG CD-160S050699 V.2 E ATT ACHING THE SPEAKERS TTACHING NOTE: The right and left speakers are NOT interchangeable. The right speaker fits only on the right side (as shown in FIG. 1). The left speaker fits only on the left side. 1.Bring the right speaker to the right side of the set. CD TAPE RADIO 2. Raise the right speaker box about 5 inches above the set. Align the tracks (rails). FIG.1 3. Fit speaker over the side rails. 4. When speaker fits over the rails, lower the speaker as shown in FIG. 2, and make sure the tabs snap into the speaker box (locks in the back). CD TAPE RADIO 5. Repeat above steps 1 to 4 for the left speaker box. FIG.2 6.Carefully unwind the speaker wire from behind each speaker box and plug the right plug into Speaker Jack R also plug the left plug into Speaker Jack L (as shown in FIG. 3). Wrap the remaining wire behind each speaker box. SPEAKER R L FIG.3 N O T E : This set can be used with speaker boxes attached to the cabinet or separated, just make sure both speaker plugs are plugged into the jacks. To remove the speakers, press the lock tab and raise the speakers. 6 CD-160S050699 V.2 E NOTE The control panel has different color lettering to help you identify the multiButton functions: BLACK COLOR = CD BUTTONS RED COLOR = CLOCK SETTING BUTTONS BLUE COLOR = RADIO & PRESET BUTTONS CLOCK SETTING Connect the AC power cord or install 8 size D batteries, the LCD display will show: HOUR MINUTE The clock is adjusted with the Power Switch off. To set the time, do as follows: 1. Press the Clock Set Button, the hour digits will flash for 10 seconds. 2. Press the Time or Button to select the correct hour time. Observe the AM & PM indicators, advance the time 12 hours to change AM to PM. 3. Press the Clock Set (Program) Button to accept the hour time and switch to minute setting. 4. Press the Time or Button to select the correct minute time. 5. Press the Clock Set (Program) Button again to complete clock setting. 6. The numbers will not flash, but the colon : will flash, indicating that the clock is set. NOTE: If the Power Switch is ON and you want to set the time, press the Tape Switch first, and then follow the above steps to set the clock. BASS BOOST SWITCH This set has a Bass Boost Switch which allows you to hear more bass (low frequency) sounds. You may slide it ON or OFF to your taste (Bass means low frequency sounds like a bass drum). ON OFF BASS BOOST STEREO HEADPHONE JACK A Stereo Headphone Jack has been provided on the front of the set so that you can listen to the set without disturbing others. To use this jack, plug in low impedance stereo headphones (4 Ohm, not included) and adjust the Volume Control to your taste. Special internal switches will turn off the sets speakers when you plug in the stereo headphones. 7 CD-160S050699 V.2 E RADIO OPERA TION OPERATION T O PLA Y THE RADIO PLAY Make sure the speakers are connected (speaker wires plugged into the jacks in the back of the set). 1. Press the Power Switch ON (the Power Lamp will light). 2. Press the Radio Switch ON (the Radio Indicator will light). 3. Press the AM/FM Band Switch to select the desired wave band. 4. Tune to desired station by pressing the Tuning or Button. Each time the button is pressed, the frequency changes. 5. To search for a station quickly (automatic tuning), keep the Tuning or Button pressed until the station starts to change rapidly, then release the Button and it will stop at the next strong station. will 6. If you tune into a FM stereo station, show in the Display. 7. Adjust the Volume Control to your listening preference. 8. If you prefer more bass, slide the Bass Boost Switch to ON position. 9. To turn off the radio, press the Power Switch again, the Power Lamp will go off. PRESETTING ST ATIONS STA UP T O 1 0 A M A N D 1 0 F M S T ATIONS CAN BE ST ORED INT O THE PRESET TA INTO MEMORIES. (THEY WILL REMAIN IN MEMOR Y AS LONG AS THE BA TTERIES MEMORY BATTERIES ARE INST ALLED, OR AC POWER CORD IS CONNECTED.) INSTALLED, 1 . Press the Band Switch to select AM or FM band, and PRESET PROGRAM press the Tuning or Button to select a station. 2. Press the Radio Store (Program) Button, PROGRAM will flash in the Display. 3. While the PROGRAM is blinking, press the Radio Presets Button to choose a memory location (01-10). (Example: Push the Radio Presets Button 3 times for Preset Number 3; 4 times for Preset Number 4.) 4. Press the Radio Store (Program) Button again to confirm. The station now broadcasting is stored into that preset memory. NOTE NOTE: Steps 2-4 should be done quickly. 5. Repeat the above steps 1 to 4 to store other 9 stations into memory. 6. Each memory location (01-10) can store 2 stations, one for AM, the other for FM. N O T E : Before you disconnect the power (AC and Battery) of the set, make sure the Power Switch is OFF, then you have approximately 30 seconds to re-connect the power. Otherwise, the memories may be lost and need to be re-programmed. T O LISTEN T O PRESET MEMOR Y ST ATIONS (after you TO MEMORY STA programmed them) 1. 2. 3. 4. Press the Power Switch ON, the Power/Batt. Lamp will light. Press the Radio Switch, the Radio Indicator will light. Press the Band Switch to select the band you want (AM or FM). Press the Radio Presets Button to select the stations stored (01-10). You will receive the station you stored into that preset memory. Pressing the button several times will give you the different preset stations you stored into the preset memories 1 to 10 (Example: Pressing the button 3 times will give you Preset Number 3, press the button 4 times will give you Preset Number 4). Word PRESET and Preset Number will show in the Display. 5. To shut off the radio, press the Power Switch again, the Power/Batt. Lamp will go off. ANTENNAS The built-in AM Antenna and the FM Telescoping Antenna are directional. You may find that you can improve AM reception by rotating the set or bringing it closer to a window. The FM Band can be adjusted by FM Telescoping Antenna. Be sure to extend the FM Telescoping Antenna carefully to its full length for best reception. 8 CD-160S050699 V.2 E HANDLING A DISC CD OPERA TION OPERATION Although built to withstand a certain amount of the effects from dust, soil and scratches, discs should be treated with care normally accorded to conventional analog discs (records). Always protect a disc against scratches, soil and dust etc. We recommend that during non-use periods, the discs should be stored in their original cases. Since any dirt, scratches or warping of the disc can cause skipping or intermittent sound or noise, bear in mind the following points: When holding the discs, take care not to touch the playing surface. HANDLE DISC AS SHOWN Store the discs in their cases. Return them to their cases with the label surface facing up and push down lightly on the label surface. Do not place discs near a heating device or a place where the temperature is high or in dusty areas. Do not write on the label surface using a ballpoint pen and do no stick labels on the CD. Wipe away any fingerprints or dust on the playing surface of a disc using a soft cloth. Bear in mind the following points when cleaning your discs: - Always wipe from the inside toward the outside of the disc. - Never in a circular motion. - Do not use conventional record cleaners, anti-static agents, CLEAN FROM CENTER TO EDGE benzene, thinner or other solvents. PLA YING A CD (COMP ACT DISC) PLAYING (COMPACT This set is designed to play only compact discs bearing this identification logo must say DIGITAL AUDIO). (logo 1. 2. 3. 4. Press the Power Switch ON, the Power/Batt. Lamp will light. Press the CD Switch, the CD Indicator Lamp will light. Press the CD Door Open Button (near the door) to open the CD door. Insert a CD with the LABEL side facing UP UP,, close the CD Door gently by pushing it down. TRACK 5. The Display will show 6 zeros and then the total number of tracks (songs) and the total play time of the disc. (If the disc is upside down or damaged damaged, the Display will show 6 zeros , and then will be flashing). 6. To start the music, press the CD Play/Pause Button (wait a few seconds for music to start). The first track number will appear in the Display, and the disc will start playing. The played time shows in the Display also. 7. Adjust the Volume Control to your taste. For extra bass sound, slide the Bass Boost Switch ON. TRACK 8. To pause the music - if the phone rings or other reasons, press the CD Play/Pause Button, the elapsed play time will flash to remind you that you are in pause mode. 9. To resume the music from pause, press the CD Play/Pause Button again. The not flashing track number will be steady on (not flashing). 10.To stop playing music, press the CD Stop Button. 11. To shut the power off, press the Power Switch again, and the Power/Batt. Lamp will go off. INTRO 9 PROGRAM CD-160S050699 V.2 E CD OPERA TION OPERATION REMOVING A DISC 1. Make sure the CD is not playing before removing the disc. If it is, press the CD Stop Button. 2. Press the CD Door Open Button to open the CD Door. 3. Gently remove the disc. 4. Close the CD Door by gently pushing it down. 5. Replace the disc in its original case. N O T E : Never press the CD Door down during play, this may cause malfunction or damage to the disc. Always stop the CD player by pressing the CD Stop Button before you take the disc out of the compartment. N O T E : If you hit or move the set during play play,, the music will stop for a second or two and then start again. This is normal operation for all portable CD players. SKIPPING TRACKS (SEARCH) 1. This function enables you to find the beginning of any desired track during play. If the CD Forward Skip/Search ( ) Button is pressed once or repeatedly, the NEXT TRACK or one of the following tracks will be selected. The Display will show the track (song) number. 2. If the CD Backward Skip/Search ( ) Button is pressed twice or more in rapid succession, play will go BACK one track per press. 3. When the set is in the pause mode, it is also possible to select the beginning of a certain track by using the CD Forward Skip/Search ( ) Button and CD Backward Skip/Search ( ) Button to reach the desired track. After selection, press Play Button. 4. During play, press and HOLD the CD Forward Skip/Search ( ) Button to search forward at a high speed for a particular point of a song. Press and HOLD the CD Backward Skip/Search ( ) Button to search backward. Release the button to resume normal play at your desired point. REPEA T PLA Y - SINGLE SONG REPEAT PLAY To repeat the SAME song over and over again, do the following: 1. When the CD is playing, press the Repeat ALL/ONE Button twice. 2. The REPEAT icon will be flashing. The song currently REPEAT playing will play over and over, till you press Stop. TRACK 3. To stop the repeat function, press the Repeat ALL/ONE Button once. REPEA T PLA Y - ALL SONGS REPEAT PLAY To repeat play ALL SONGS on a disc and then play them again and again, do the following for non-stop music. 1. When the CD is playing, press the Repeat ALL/ONE Button once. REPEAT TRACK 2. The REPEAT icon will show steadily in the Display. All the songs on the CD will play in order and then start all over again. 3. To stop the repeat function, press the Repeat ALL/ONE Button twice. 10 CD-160S050699 V.2 E RANDOM PLA Y PLAY CD OPERA TION OPERATION 1. Press the Random Button either in stop mode or normal play mode, the set will play all of the songs in random order. The display will show RANDOM icon. N O T E : If the RANDOM icon flashes and then disappears from the Display, turn off the CD power and restart. 2. Press the Forward Skip/Search ( )Button to skip to the next random song. 3. To resume normal play, press the Random Button again. The RANDOM icon will go off. PROGRAMMED MEMOR Y PLA Y MEMORY PLAY Up to 20 tracks can be programmed for disc play in the order you like. Programming can only be done during STOP mode. PROGRAMMED (MEMOR Y) PLA YBACK (MEMORY) PLAYBACK PROGRAM TRACK 1. During STOP mode, press the Program Button. 2. The Display will show , and PROGRAM and TRACK will flash in the display. or 3. Press the Skip/Search Buttons either until the desired track shows on the Display. PROGRAM TRACK 4. Press the Program Button. The Display will show . 5. Repeat steps 3 and 4 until all the desired tracks are programmed. 6. When you finished programming, press the CD Play/Pause Button. PROGRAM TRACK 7. All songs will play in the order you programmed. 8. The Display will show the track number being played, and the PROGRAM will show (but not flashing) in the display during programmed play. 9. If in middle of play, you want to hear the next programmed song, press Forward Skip/Search . PROGRAM TRACK 10. When all the songs have finished playing, the set will stop. PROGRAM disappears from the display. 11. To turn off the power, remember to press the Power Switch again, the Power/Batt. Lamp will go off. N O T E : Programming can only be done when the CD is in the STOP mode. (CD is in the set, CD Switch is ON and Display shows the total number of tracks (songs) and the total play time of the CD.) EXAMPLE: T o program track To When CD has stopped, Press the Program Button, the Display. Press the Forward Skip/Search The Display will show and Press the Program Button, Press Play. Track 4 will play first. 4 to play first. will show and PROGRAM will flash in Button till track 4 appears. PROGRAM flashing. will show and PROGRAM will flash. N O T E : The programmed memory will be cleared if the CD power is turned off. 11 CD-160S050699 V.2 E CASSETTE OPERA TION OPERATION This set has 2 tape decks. Deck A is a playback only deck and Deck B is a record and playback deck. You may make recordings only on Deck B. All of the tape buttons (except the Cassette Pause Button and Cassette Stop/Eject Button) operate in the same fashion. To activate a feature, you press the button all the way down so that it stays in its depressed position when you release it. To deactivate the feature, press the Cassette Stop/Eject Button. F AST FOR W ARD AND REWIND FORW For fast forward or rewinding of the tape, press the Cassette Fast Forward Button or Cassette Rewind Button. PAUSE The Cassette Pause Button is used to edit commercials or in case recording is temporarily interrupted. Since the deck motor is still running while the Pause Button is depressed, this pause feature should be used for a short time only. AUT OMA TIC ST OP AUTOMA OMATIC STOP This set has a built-in automatic stop feature and the tape mechanism will stop playing or recording and shut itself off when it has reached the end of the tape. MANUAL STOP The tape player can be stopped manually by pressing the Cassette Stop/Eject Button. CASSETTES CASSETTE T APE SELECTION TAPE The quality and condition of the cassette tapes you use will have a direct effect on the performance of this set. Low quality tapes tend to be broken and stretched and a broken tape can easily become entangled in the drive mechanism, causing major damage. Stretched tapes will run at uneven speeds and will distort anything recorded on them. Use only well-known Use of C-120 (120 brands of tapes. minutes) cassette is not recommended. The extreme thinness of this tape may result in breakage or other failures. This set is not designed for CrO2, Fe-Cr or METAL tape use. Therefore, be sure to use name brand normal cassette tapes. You may use the above (special) tapes, but the best sound quality is from normal bias tapes. CASSETTE T APE FOR RECORDING TAPE Generally, a fresh blank tape is most desirable for use when recording. A tape with previously recorded information can also be used since this set erases the tape in the recording process, providing the Record Interlock defeat tabs are in place. For APE AGAINST more information on these tabs, see PROTECTING CASSETTE T TAPE ERASURE on page 17. 12 CD-160S050699 V.2 E IMPOR TANT NOTES CONCERNING CASSETTE T APES IMPORT TAPES 1. After a period of time, especially when inexpensive brands of tapes are used, the sound during playback may become muffled or, in extreme cases, almost inaudible. This is most frequently NOT A FAULT OF THE SET ITSELF but merely a deposit of oxide and other dirt on the tape heads. The easiest way to solve this problem is by using a head-cleaning cassette. Follow the instructions provided with the cleaner carefully. The tape head is a delicate precision component and serious damage will result if you attempt to scrape dirt away with a sharp tool. 2. Other common causes of trouble are: (a)Tapes jamming - leading to uneven speed during playback. (b)Tapes tangling - where the tape wraps itself around vital parts of the mechanism. To reduce the chances of these problems occurring, you should take the following precautions: (1)Check that there are no loose layers of tape visible through the cassette center window (see FIG. 1). Tighten these loose layers of tape using a pencil before inserting the cassette into the set (see FIG. 2). (2)If the cassette feels tight while performing the operation as shown in FIG. 2, the tape may be jamming due to ridges in the winding of the tape (visible through the center window). These may be removed in most cases by fast winding the cassette from one end to the other and back again, or the tape may be permanently damaged. Do not play damaged or worn out tapes, as this may cause your set to break. FIG. 1 FIG. 2 NOTES FOR STORING CASSETTE TA P E S 1. Do not put a tape near a magnetic field, such as a TV, or speaker. Magnetic fields may reduce the tape sensitivity or even erase the recording. 2. Do not store tape for any length of time in a hot, moist or dusty place. 13 CD-160S050699 V.2 E TO PLA Y A CASSETTE T APE PLAY TAPE OK FULL REEL NO EMPTY REEL 1. Open the Cassette Door by pressing the Cassette Stop/Eject Button (in some cases, you may have to press the Cassette Stop/Eject Button twice since this button has combined functions). 2. Insert the cassette tape, with the exposed tape facing downwards, into the tracks in the Cassette Door with the full reel on the left side, make sure the tape inside is not slack or loosely wound. If it is, insert a pencil into the reel and turn until the tape is wound up (see Page 13). 3. Close the Cassette Door. 4. Press the Power Switch, the Power/Batt. Lamp will light. 5. Press the Tape Switch, the Tape Indicator will light. 6. Press the Cassette Play Button. The cassette tape will play till it reaches the end and then stop. N O T E : If the Cassette Play Button does not stay down, your tape may have reached the end, reverse the tape or press Rewind. 7. Adjust the Volume Control and Bass Boost Switch to your listening preference. 8. To stop the tape manually, press the Cassette Stop/Eject Button. 9. To remove the tape, press the Cassette Stop/Eject Button again and the Cassette Door will open. 10.To listen to the other side of the tape, remove the cassette tape, reverse it and reinsert into cassette compartment, then press the Cassette Play Button. 11.To shut the power off, press the Power Switch again, the Power/Batt. Lamp will go off. RELA Y PLA Y RELAY PLAY To play tapes in Deck A and then Deck B, follow the steps below. 1. Press the Cassette Play Button on Deck A. 2. Press the Cassette Pause Button on Deck B. 3. Press the Cassette Play Button on Deck B, Deck A will play first and when it finishes, Deck B will start playing automatically. 4. When the tape finishes playing on Deck B, the set will stop. 14 CD-160S050699 V.2 E TO COPY CASSETTE T APES (T APE DUBBING) TAPES (TAPE To record from a pre-recorded cassette to a blank cassette tape, follow the steps below: 1. Press the Power Switch, the Power/Batt. Indicator will light. 2. Press the Tape Switch, and the Tape Indicator Lamp will light. 3. Place the pre-recorded cassette in Deck A (Playback Deck) with full reel on the left side. Push the Cassette Pause Button first, then the Cassette Play Button. The tape will not play because the Cassette Pause Button is pressed. 4. Place the blank cassette in Deck B with full reel on the left side. Push the Pause Button first, then the Record and Play Buttons together so that they both lock down. 5. Release BOTH Pause Buttons on Deck A and Deck B. Both cassettes will start and the music on the pre-recorded cassette in Deck A will be recorded directly onto the blank cassette in Deck B. If the Record Button cannot go down, see page 17. Do not force this button down. Or if button does not stay down, your tape may have reached the end of the tape, reverse it so that full reel is on the left side. 6. When the recording is completed on one side, if you want to record on the other side, turn both cassettes over to the other side and repeat above steps 2 to 4. 7. If the tapes have reached the end, the automatic stop feature will activate and stop the recording. Remove both tapes from the tape compartments. Y A CASSETTE T APE instructions on 8. To hear what you recorded, follow TO PLA PLAY TAPE page 13. Remember to rewind the tape to the beginning then press Play. HIGH SPEED DUBBING To make recordings faster, slide the Dubbing Speed Switch to HIGH speed position before starting recording. Remember to return the switch to NORMAL position for playback. AUT OMA TIC LEVEL CONTROL (ALC) AUTOMA OMATIC This set has the latest Automatic Level Control circuitry, therefore, it is not necessary to adjust the Volume Control when recording. This circuit automatically records at the correct level and prevents over loading. N O T E : While recording, you may adjust the Volume Control or Bass Boost Switch as you desire without affecting the recording operation. TO RECORD FROM THE BUIL T-IN AM/FM RADIO BUILT 1. Load the blank cassette tape into Deck B (recording deck) with full reel on the left side. 2. Locate the portion of the tape where you desire to start recording by using the Rewind (or Fast Forward) feature or start at the beginning of the tape. Y THE RADIO (see page 8). PLAY 3. Follow the instructions T O PLA 4. Make sure the Power Switch is ON. Press the Radio Switch and the Radio Indicator Lamp will light. 5. Tune into the station you want to record, press the Cassette Record Button and Cassette Play Button simultaneously. Both buttons should remain in their down positions when released. If the Record Button cannot go down, see page 17. Do not force this button down. Or if button does not stay down, your tape may have reached the end of the tape, reverse it so that full reel is on the left side. 6. You are now recording from the built-in radio and the recording process will automatically stop at the end of the tape. 7. To stop the recording manually, press the Cassette Stop/Eject Button. 8. To shut off the set, press the Power Switch. The Power/Batt. Indicator will go off. N O T E : When you want to play the cassette tape after recording, press the TAPE Switch and the Cassette Rewind Button, and then press the Cassette Play Button. Adjust the Volume Control and the Bass Boost Switch to your taste. 15 CD-160S050699 V.2 E TO RECORD FROM THE BUIL T-IN MICROPHONE BUILT 1. Load a blank cassette tape into the Cassette Deck B (Play/Record Deck) with full reel on left side. 2. Make sure the Power Switch is in ON position, and the Tape Switch Indicator Lamp is ON. 3. Press the Cassette Record Button and Cassette Play Button at the same time. Both buttons should remain in their depressed positions when released. If the Record Button cannot go down, see page 17. Do not force this button down. Or if button does not stay down, your tape may have reached the end of the tape, reverse it so that full reel is on the left side. 4. When you talk in front of the set, your voice will be recorded. You are now recording using the Built-in Condenser Microphone and the recording process will automatically stop at the end of the tape. 5. To stop the recording manually, press the Cassette Stop/Eject Button. 6. To hear what you recorded, press the Cassette Rewind Button and the Cassette Play Button. 7. To shut off the set, press the Power Switch. The Power/Batt. Lamp will go off. T O RECORD FROM A COMP ACT DISC COMPACT 1. Load a blank cassette tape into Deck B (Play/Record deck) with full reel on the left side. 2. Load a CD and close the CD Door. 3. Press the Power Switch and the CD Switch ON, the Power/Batt. Lamp and CD Indicator Lamp will light. 4. Press the Cassette Pause Button. 5. Press the Cassette Record and the Cassette Play Button for record stand-by. N O T E ::When pressing the Cassette Record Button, the Cassette Play Button will automatically go down (If the Record Button cannot go down, see page 17. Do not force this button down. Or if button does not stay down, your tape may have reached the end of the tape, reverse it so that full reel is on the left side. ). 6. Start the CD playing by pressing the CD Play/Pause Button. 7. Press (and release) the Cassette Pause Button when you wish to start recording. 8. You are now recording the CD music onto your cassette tape. 9. Press the Cassette Stop/Eject Button to stop recording. 10. The recording will stop when the tape has reached the end and the Cassette Record and Play Buttons will pop up. 11. To hear what you recorded, press the Tape Switch, then press Rewind and Play. 12. To shut off the set, press the Cassette Stop/Eject Button, and then press the Power Switch, the Power/Batt. Lamp will go off. T O ERASE A T APE TAPE Simply record any new song, the old song will be erased automatically. N O T E ::If you cannot press the Cassette Record Button down, see RECORD LEVER INTERLOCK information on Page 17, or your tape may have reached the end. Remove the tape and flip it over to the other side or press Rewind. CAUTION: The automatic stop mechanism may not operate during playback of tape when the set is using batteries and the batteries are weak. Disconnect the AC power cord plug from the AC outlet if the set is not going to be used for a long period of time (2 weeks or more). Also remove the batteries. Do not leave any tape buttons down when the set is not in use, or else the pinch roller could be damaged. Remember when inserting tapes, the full reel must be on the left side. If the Cassette Play Button pops up, your tape has reached the end, reverse the tape or press the Rewind Button. 16 CD-160S050699 V.2 E RECORD LEVER INTERLOCK PROTECTING CASSETTE T APE AGAINST ERASURE TAPE All cassette tapes are provided with tabs which, when in place, allow tape erasure to be performed. If the tabs are REMOVED then the tape CANNOT be erased or recorded on and the Cassette Record Button cannot be pressed. To protect the A (or 1 1) side for cassette tape, break off the A side tab with a screwdriver. Break the small tab to prevent erasing or recording SCREWDRIVER Follow same procedure for B (or 2 ) side. N O T E : Music tapes you buy from a store have these tabs removed to prevent accidental erasure. The tape can be re-recorded or erased, if required, by covering the tab holes with plastic tape. PLASTIC T APE TAPE N O T E : If the Record Button will not go down, the tabs above are probably missing - Also check if the tape has reached the end. 17 CD-160S050699 V.2 E CLEANING THE T APE HEADS TAPE We suggest using a special cleaning tape cassette (not included) (available in most music and Hi-Fi stores). But if you do not have one, you may follow the instructions below. COTT ON SW AB COTTON SWAB ERASE HEAD CAPST AN CAPSTAN RECORD / PLA YBACK HEAD PLAYBACK PINCH ROLLER When the heads, capstan and pinch roller become dirty, this may result in muffled, distorted or reduced sound during playback and may even result in tape jams. Remove the cassette tape and clean with a cotton swab moistened with commercially sold head/pinch roller cleaner or alcohol. Wait approximately 10 seconds for the alcohol or cleaning fluid to dry before using. HOW TO GET THE BEST OUT OF YOUR SET AM RECEPTION - You may find that you can improve the reception of your favorite station by rotating the set a small amount. FM RECEPTION - You may find that you can improve the reception of your favorite station by collapsing the telescoping antenna a small amount, rotating or extending it to its full length. RECORD BUTTON - If you find that you cannot press this button down, check the Record Lever Interlock defeat tabs on the cassette (see page 17), or the tape may have reached the end, rewind the tape or reverse it. TAPE HEADS - The tape heads should be cleaned periodically with a special cleaning tape (available in music and Hi-Fi stores) to remove the particles of brown oxide coating from the tapes that collected on these heads. These particles fill the gap in the heads and degrade performance. 18 CD-160S050699 V.2 E TROUBLE SHOOTING CHECK LIST & HELPFUL HINTS SHOULD YOUR SET HAVE A PROBLEM, CHECK THE FOLLOWING: CHECK THE FOLLOWING PROBLEM Does the AC outlet being used actually have AC power? Is the power cord plugged into the back of the set? Is the Power/Batt. Indicator Lamp ON? Set does not work on AC Are the batteries fresh and properly installed? Is power cord connected? Remove power cord from both AC Socket and outlet. Is the Power/Batt. Indicator Lamp ON? Set does not work on batteries Sound is distorted, the Power/Batt. Indicator is dim The batteries are weak or not installed correctly. Replace batteries and/or check the polarity. No sound Are the speakers plugged in? Check the back of the set and see page 6. Is the Volume Control at MIN? Is headphone plugged in? Is Play on? Are the batteries fresh? Rotate the unit to improve AM reception. To improve FM reception, extend the FM Telescoping Antenna to its full length. AM, FM (FM Stereo) reception weak Poor quality recording or playback of cassette tapes Clean the tape heads using a special cleaning tape cassette (not included) (available at most music and Hi-Fi stores). If you do not have a cleaning tape, please see page 18. The Cassette Record Button will not stay down Does the cassette tape you are using still have its tabs at the bottom? See details on Record Lever Interlock on page 17. The Cassette Play Button or the Cassette Record Button will not stay down The tape may have reached the end. Remove tape, flip it over to the other side and then reinsert and press Play, or rewind it. NORMAL BATTERY LIFE USING ALKALINE BATTERIES IS ABOUT 8 HOURS OF CASSETTE PLAYING TIME. 19 CD-160S050699 V.2 E CD TROUBLE SHOOTING GUIDE PROBLEM CD does not rotate CD does not play Disc skips parts of songs Speakers have no sound POSSIBLE CAUSE AND REMEDY Is AC Power Cord plugged into outlet? Does outlet have power? Check outlet with a lamp or other appliance. Make sure the CD Indicator is ON. If using the set on batteries - make sure you unplug the AC Cord from the back of set and outlet. - Also check if batteries are fresh. (The AC Socket in the back of set has a switch which shuts off battery power if cord is plugged into back of set). If the Display shows (flashing). This means the CD disc is upside down or missing. Open the door, remove the CD, flip it over and insert correctly. The printed side facing up. 1.Is the lens very dirty? (Gently clean the lens with a soft cloth or CD cleaner disc available at most Hi-Fi stores.) 2.Is the Power/Batt. Indicator Lamp ON? 3.Is the CD Indicator ON? 4.Is the played time flashing? (press the PlayButton) The played time will flash in pause and be steady on during play. The disc is defected. Try cleaning the disc with a clean rag or disc cleaner. If this does not help, the disc may be damaged. Is the lens very dirty? Gently clean the lens. 1. Are the speakers plugged in? Check the back of the set and see page 6. 2. Is Volume Control at MIN? Adjust the Volume Control. 3. Is headphone in jack? Remove headphones. 4. Make sure AC Power Cord is plugged in or unplugged from back of set if using batteries. 5. Make sure batteries are fresh. N O T E : The CD player and the cassette decks are fitted with self-lubricating bearings which must not be oiled or greased. T O CLEAN THE CD PLA YER PLAYER A chamois soft cloth very slightly moistened with water is sufficient for cleaning the housing of the set and the enclosures. N O T E : Your CD player may not play when bringing it from a cold place (outdoors) to a warm place (indoors). Because of large temperature differences, condensation may have formed on the lens of the laser. This will disappear after some time (when the mechanism warms up). 20 CD-160S050699 V.2 E SPECIFICA TIONS SPECIFICATIONS GENERAL DESCRIPTION Power source: AC 120V, 60Hz, 15 Watts DC 12V (8 size D batteries) (we recommend alkaline batteries for longer life) Speakers: Output Power: 4" 4 ohm 4 Watts / channel Dimensions: Width : 24" Depth : 8 3/4" Height : 11 1/4" Weight : 13 LB (without batteries) TAPE RECORDER SECTION Tape: Standard normal bias cassette tape Frequency response: 50 Hz - 10KHz RADIO SECTION Frequency range: CD SECTION FM: 87.5 - 108 MHz AM: 520 - 1710 KHz Plays disc type: Any normal music CD Laser wave length: 760 - 800 NM Tracking method: 3 - spot error detection 3.86mm lens LENOXX reserves the right to make design and specification changes for product improvement. PROTECT YOUR FINE FURNITURE! WE RECOMMEND A CLOTH OR OTHER PROTECTIVE MATERIAL BE PLACED UNDER THE SET WHEN PLACING IT ON SURFACE WITH A NATURAL OR LACQUER FINISH. 21 CD-160S050699 V.2 E © 1999 LENOXX ELECTRONICS CORP. 2 GERMAK DRIVE CARTERET, N.J. 07008 MADE & PRINTED IN CHINA http://www.lenoxx.com CD-160S050699 V.2 E