1
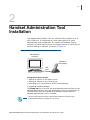
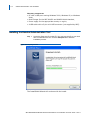
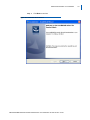
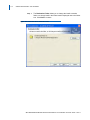
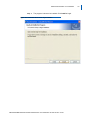
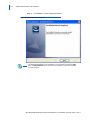
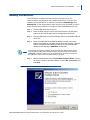
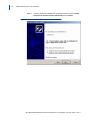
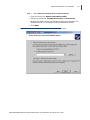
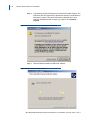
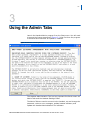
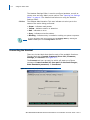
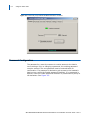
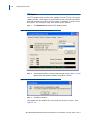
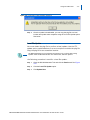
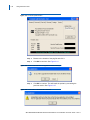
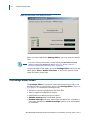
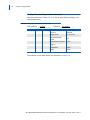
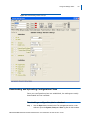
NEC MH150/MH160 Mobile
Handset Administration Tool
Installation
User Guide
NEC NEC Unified Solutions, Inc.
September 2008
NDA-30922, Issue 1
Liability Disclaimer
NEC Unified Solutions, Inc. reserves the right to change the
specifications, functions, or features, at any time, without notice.
NEC Unified Solutions, Inc. has prepared this document for the
exclusive use of its employees and customers. The information
contained herein is the property of NEC Unified Solutions, Inc. and
shall not be reproduced without prior written approval from
NEC Unified Solutions, Inc.
© 2008 NEC Unified Solutions, Inc.
MS-DOS® and Microsoft® Windows® are
registered trademarks of Microsoft Corporation.
All other brand or product names are or may be trademarks or
registered trademarks of, and are used to identify products or services
of, their respective owners.
i
Contents
About This Guide
1-1
Icons and conventions. . . . . . . . . . . . . . . . . . . . . . . . . . . . . . . . . . . . . . . . . . . . 1-1
Handset Administration Tool Installation
2-1
Installing the Handset Administration Tool . . . . . . . . . . . . . . . . . . . . . . . . . . . . 2-2
Installing the USB Driver . . . . . . . . . . . . . . . . . . . . . . . . . . . . . . . . . . . . . . . . . . 2-6
Using the Admin Tabs
3-1
Connecting the Handset . . . . . . . . . . . . . . . . . . . . . . . . . . . . . . . . . . . . . . . . . . 3-2
Password Configuration . . . . . . . . . . . . . . . . . . . . . . . . . . . . . . . . . . . . . . . . . . 3-4
Character table . . . . . . . . . . . . . . . . . . . . . . . . . . . . . . . . . . . . . . . . . . . . . . . . . 3-5
Error Information . . . . . . . . . . . . . . . . . . . . . . . . . . . . . . . . . . . . . . . . . . . . . . . . 3-6
Software Updates . . . . . . . . . . . . . . . . . . . . . . . . . . . . . . . . . . . . . . . . . . . . . . . 3-7
Version . . . . . . . . . . . . . . . . . . . . . . . . . . . . . . . . . . . . . . . . . . . . . . . . . . . . . . . 3-9
FTP Update. . . . . . . . . . . . . . . . . . . . . . . . . . . . . . . . . . . . . . . . . . . . . . . . . . . 3-10
Local File Update . . . . . . . . . . . . . . . . . . . . . . . . . . . . . . . . . . . . . . . . . . . . . . 3-11
Using the Settings Editor
4-1
Opening the Settings Editor . . . . . . . . . . . . . . . . . . . . . . . . . . . . . . . . . . . . . . . 4-1
The Settings Editor Screen . . . . . . . . . . . . . . . . . . . . . . . . . . . . . . . . . . . . . . . . 4-2
NEC MH150/MH160 Mobile Handset Administration Tool-Installation and User Guide - Issue 1
ii
Contents
The Settings Editor Toolbar . . . . . . . . . . . . . . . . . . . . . . . . . . . . . . . . . . . . . . . . 4-4
File management . . . . . . . . . . . . . . . . . . . . . . . . . . . . . . . . . . . . . . . . . . . . . . . 4-4
Copy settings . . . . . . . . . . . . . . . . . . . . . . . . . . . . . . . . . . . . . . . . . . . . . . . . . . 4-4
Upload/download and indicators. . . . . . . . . . . . . . . . . . . . . . . . . . . . . . . . . . . . 4-5
Tab Options . . . . . . . . . . . . . . . . . . . . . . . . . . . . . . . . . . . . . . . . . . . . . . . . . . . . 4-5
Creating a Configuration Plan . . . . . . . . . . . . . . . . . . . . . . . . . . . . . . . . . . . . . . 4-6
Organize the plan . . . . . . . . . . . . . . . . . . . . . . . . . . . . . . . . . . . . . . . . . . . . . . . 4-6
Create the options and save the settings . . . . . . . . . . . . . . . . . . . . . . . . . . . . . 4-7
Configuration planning worksheet (sample) . . . . . . . . . . . . . . . . . . . . . . . . . . . 4-8
Downloading and Uploading Configuration Plans . . . . . . . . . . . . . . . . . . . . . . . 4-9
Downloading a configuration plan to a handset . . . . . . . . . . . . . . . . . . . . . . . . 4-9
Uploading a configuration plan from a handset . . . . . . . . . . . . . . . . . . . . . . . 4-10
Regulatory Domain Mismatch . . . . . . . . . . . . . . . . . . . . . . . . . . . . . . . . . . . . 4-10
NEC MH150/MH160 Mobile Handset Administration Tool-Installation and User Guide - Issue 1
iii
Figures
Figure
2-1
2-2
2-3
2-4
2-5
2-6
2-7
2-8
2-9
2-10
2-11
3-1
3-2
3-3
3-4
3-5
3-6
3-7
3-8
3-9
3-10
3-11
3-12
3-13
3-14
3-15
4-1
4-2
4-3
4-4
Title
Page
Mobile Handset and PC connection using USB ports . . . . . . . . . . . . . . . 2-1
Preparing to Install. . . . . . . . . . . . . . . . . . . . . . . . . . . . . . . . . . . . . . . . . . 2-2
InstallShield Wizard welcome . . . . . . . . . . . . . . . . . . . . . . . . . . . . . . . . . 2-3
InstallShield Wizard: Destination folder . . . . . . . . . . . . . . . . . . . . . . . . . . 2-4
InstallShield Wizard completed . . . . . . . . . . . . . . . . . . . . . . . . . . . . . . . . 2-5
Found New Hardware Wizard: Welcome. . . . . . . . . . . . . . . . . . . . . . . . . 2-6
Found New Hardware Wizard: Install software for USB Device . . . . . . . 2-7
Found New Hardware Wizard: Choose search and installation options . 2-8
Warning: Software has not passed Microsoft testing. . . . . . . . . . . . . . . . 2-9
New software is being installed . . . . . . . . . . . . . . . . . . . . . . . . . . . . . . . . 2-9
Software installation completed . . . . . . . . . . . . . . . . . . . . . . . . . . . . . . . 2-10
End-User License Agreement . . . . . . . . . . . . . . . . . . . . . . . . . . . . . . . . . 3-1
Connect tab prompt:showing the next action or status.. . . . . . . . . . . . . . 3-2
Prompt to enter the password and remember password checkbox. . . . . 3-3
Connect tab prompt indicates the Mobile Handset is connected. . . . . . . 3-4
Password change tab window . . . . . . . . . . . . . . . . . . . . . . . . . . . . . . . . . 3-5
Error information tab screen . . . . . . . . . . . . . . . . . . . . . . . . . . . . . . . . . . 3-6
Firmware tab displays current file information . . . . . . . . . . . . . . . . . . . . . 3-7
Firmware update ready to begin . . . . . . . . . . . . . . . . . . . . . . . . . . . . . . . 3-8
Version tab displays current Handset information . . . . . . . . . . . . . . . . . . 3-9
Version tab displays the FTP update progress . . . . . . . . . . . . . . . . . . . 3-10
Mobile Handset update prompt . . . . . . . . . . . . . . . . . . . . . . . . . . . . . . . 3-10
Confirmation of new application installation. . . . . . . . . . . . . . . . . . . . . . 3-11
Local file update initiation . . . . . . . . . . . . . . . . . . . . . . . . . . . . . . . . . . . 3-12
Handset Administration Tool upgrade confirmation dialog box . . . . . . . 3-12
Confirmation of HandsetAdmin shutdown . . . . . . . . . . . . . . . . . . . . . . . 3-12
Settings Editor on the Settings tab window . . . . . . . . . . . . . . . . . . . . . . . 4-2
Handset Settings Editor Network Config screen . . . . . . . . . . . . . . . . . . . 4-3
Settings Editor toolbar . . . . . . . . . . . . . . . . . . . . . . . . . . . . . . . . . . . . . . . 4-4
Handset Settings Editor example . . . . . . . . . . . . . . . . . . . . . . . . . . . . . . 4-9
NEC MH150/MH160 Mobile Handset Administration Tool-Installation and User Guide - Issue 1
iv
Figures
NEC MH150/MH160 Mobile Handset Administration Tool-Installation and User Guide - Issue 1
v
Tables
Table
3-1
4-1
4-2
Title
Page
Handset character entry table . . . . . . . . . . . . . . . . . . . . . . . . . . . . . . . . . 3-5
Tab options on the Settings Editor window . . . . . . . . . . . . . . . . . . . . . . . 4-5
Configuration planning worksheet sample. . . . . . . . . . . . . . . . . . . . . . . . 4-8
NEC MH150/MH160 Mobile Handset Administration Tool-Installation and User Guide - Issue 1
vi
Tables
NEC MH150/MH160 Mobile Handset Administration Tool-Installation and User Guide - Issue 1
1-1
1
About This Guide
The Handset Administration Tool is a software utility developed by NEC
Unified Solutions, Inc. to automate the configuration of multiple NEC
MH150 and MH160 Mobile Handsets and perform various administration
tasks. This document explains how to use the Handset Administration
Tool to administer and configure the NEC MH150 and MH160 Mobile
Handset.
Please refer to the configuration and administration document that
pertains to the system in your facility for exact configuration options of
the handset. Specific configuration options are explained in detail in the
configuration and administration document for your system.
• NEC MH150/MH160 Mobile Handset Administration Guide
• NEC MH150/MH160 Deployment Best Practices Guide
REFERENCE
Customer support
hotline
• NEC WLAN Voice Gateway Administration Guide
For additional information or support on this NEC Unified Solutions, Inc.
product, contact your NEC representative.
Icons and conventions
This manual uses the following icons and conventions.
Caution! Follow these instructions carefully to avoid danger.
CAUTION
Note these instructions carefully.
NOTE
NEC MH150/MH160 Mobile Handset Administration Tool-Installation and User Guide - Issue 1
1-2
About This Guide
NEC MH150/MH160 Mobile Handset Administration Tool-Installation and User Guide - Issue 1
2-1
2
Handset Administration Tool
Installation
The Handset Administration Tool is a software utility installed on a PC
with a USB port. It is designed as a time-saving device for rapid
administration and configuration of a number of handsets. During
operation, the USB cable must be connected from the PC's USB port to
the Dual Charger's USB port, as shown in Figure 2-1.
Figure 2-1 Mobile Handset and PC connection using USB ports
Administrative
computer
Handset in
Dual Charger
USB
cable
Configuration options include:
• Setting all options on the Admin menu,
• Setting all options on the Config menu,
• Recording error information to assist troubleshooting,
• Upgrading handset software.
The Setup.exe file on the CD will download and install the files for the
Handset Administration Tool and download the files for the USB driver.
The USB driver must be installed as a separate process after the
Handset Administration Tool is installed.
The CD contains Setup.exe files for SRP and SIP. Please ensure that you have
downloaded the Setup.exe program for your protocol.
NOTE
NEC MH150/MH160 Mobile Handset Administration Tool-Installation and User Guide - Issue 1
2-2
Handset Administration Tool Installation
Necessary components:
• PC with a USB port running Windows 2000, Windows XP, or Windows
Vista,
• Dual Charger for the NEC MH150 and MH160 Mobile Handset,
• Power supply for the appropriate country or region,
• A USB cable with a 5-pin mini-USB connector (not supplied by NEC).
Installing the Handset Administration Tool
Step 1
Locate the Setup.exe file on the CD. You may copy this file to your local
drive or install from the CD. Click the Setup.exe file to start the
installation process.
Figure 2-2 Preparing to Install
The InstallShield Wizard will continue with the install.
NEC MH150/MH160 Mobile Handset Administration Tool-Installation and User Guide - Issue 1
Handset Administration Tool Installation
Step 2
Click Next to continue
Figure 2-3 InstallShield Wizard welcome
.
NEC MH150/MH160 Mobile Handset Administration Tool-Installation and User Guide - Issue 1
2-3
2-4
Handset Administration Tool Installation
Step 3
The Destination Folder allows you to change the install to another
folder or to simply install in the folder location displayed next to the folder
icon. Click Next to continue
Figure 2-4 InstallShield Wizard: Destination folder
.
NEC MH150/MH160 Mobile Handset Administration Tool-Installation and User Guide - Issue 1
Handset Administration Tool Installation
Step 4
The program is about to be installed. Click Install to begin.
Figure 2-5 InstallShield Wizard read to begin installation
NEC MH150/MH160 Mobile Handset Administration Tool-Installation and User Guide - Issue 1
2-5
2-6
Handset Administration Tool Installation
Step 5
Click Finish to exit the InstallShield Wizard.
Figure 2-6 InstallShield Wizard completed
NOTE
The Handset Administration Tool will appear in your Programs list under the Start
menu as HandsetAdmin and as an icon on your desktop. It may be launched like
any other program.
NEC MH150/MH160 Mobile Handset Administration Tool-Installation and User Guide - Issue 1
Handset Administration Tool Installation
2-7
Installing the USB Driver
The USB driver installation allows the Dual Charger to be the
communication link between the handset and the PC. The two files
needed for the USB driver to function are named slnkusb.sys and
slnkusb.inf. If the Destination Folder had not been changed in step-3,
these files will be located at C:\Program Files\HandsetAdmin\Driver\
NOTE
Step 1
Find the USB driver files on the PC.
Step 2
Place the Dual Charger on a flat, horizontal surface. Plug the power
supply into the Dual Charger and into an appropriate wall outlet.
Step 3
Plug the USB cable into the Dual Charger and into an available USB port
on the PC.
Step 4
Power off a NEC MH150 and MH160 Mobile Handset, remove the
Battery Pack (optional), and place the handset in the Charger. If properly
seated, the handset automatically powers up in USB mode and the
handset screen displays a USB Mode on indication.
If the handset is not properly seated in the Dual Charger, the USB connection will not
be made and the Battery Pack will begin charging, and the handset screen displays
a Charging… indication. If this occurs, reseat the handset, check the connections on
the USB cable, and/or remove the Battery Pack and try again.
Step 5
Microsoft Windows will start the Found New Hardware Wizard. There is
no need to connect to Windows Update, so select No, not this time and
click Next.
Figure 2-7 Found New Hardware Wizard: Welcome
NEC MH150/MH160 Mobile Handset Administration Tool-Installation and User Guide - Issue 1
2-8
Handset Administration Tool Installation
Step 6
The files need to be installed from a specific location, so select Install
from a list or specific location (Advanced) and click Next.
Figure 2-8 Found New Hardware Wizard: Install software for USB Device
.
NEC MH150/MH160 Mobile Handset Administration Tool-Installation and User Guide - Issue 1
Handset Administration Tool Installation
Step 7
2-9
Select Search for the best driver in these locations.
— Clear the check box Search removable media.
— Select the check box Include this location in the search.
— Browse the folder where the USB driver files were installed. The
default location is C:\Program Files\HandsetAdmin\Driver\
— Click Next
Figure 2-9 Found New Hardware Wizard: Choose search and installation options
.
NEC MH150/MH160 Mobile Handset Administration Tool-Installation and User Guide - Issue 1
2-10
Handset Administration Tool Installation
Step 8
The following warning message from the Microsoft Wizard displays. The
USB driver files are proprietary to SpectraLink and were not submitted to
Microsoft for testing. They were fully tested by SpectraLink to more
exacting standards and will not harm your system. Click Continue
Anyway
Figure 2-10 Warning: Software has not passed Microsoft testing
.
Step 9
Microsoft Wizard installs the USB driver software
Figure 2-11 New software is being installed
.
NEC MH150/MH160 Mobile Handset Administration Tool-Installation and User Guide - Issue 1
2-11
Handset Administration Tool Installation
Step 10 The final screen indicates that the USB driver has been successfully
installed. Click Finish to close the wizard and proceed with handset
configuration
Figure 2-12 Software installation completed
.
NEC MH150/MH160 Mobile Handset Administration Tool-Installation and User Guide - Issue 1
2-12
Handset Administration Tool Installation
NEC MH150/MH160 Mobile Handset Administration Tool-Installation and User Guide - Issue 1
3-1
3
Using the Admin Tabs
Launch the Handset Admin program from the Start menu. You will need
to accept the license agreement (Figure 3-1) the first time the program
is launched and whenever an update is installed.
Figure 3-1 End-User License Agreement
The Handset Administration Tool has two separate functional areas: the
Admin Tabs and the Handset Settings Editor.
The Admin Tabs are used to connect to the handset, set and change the
password, retrieve error messages, update handset software, and
update the Handset Administration Tool software.
NEC MH150/MH160 Mobile Handset Administration Tool-Installation and User Guide - Issue 1
3-2
Using the Admin Tabs
The Handset Settings Editor is used to configure handsets, as well as
create, save and copy Admin menu options. See “Opening the Settings
Editor” on page 4-1 for detailed instructions on using the Handset
Settings Editor.
Indicators
The Handset Administration Tool uses indicators to alert you to the
status of the action being performed.
• Green - indicates ready status.
• Yellow - indicates caution or attention.
• Red - indicates an error
• Gray - indicates not active status.
• Blinking - indicates entry is needed or waiting on system response.
If closed, the Admin Tabs may be opened from the Settings Editor by selecting the
Admin or View option on the Settings Editor menu bar.
NOTE
Connecting the Handset
There are six tab labels that describe each of the available functions.
The tab labels are: Connect, Password, Error info, Firmware,
Settings, and Version. See Figure 3-2.
The Connect tab has a prompt line which will state one of three
messages: Power handset off, then put it in the Dual Charger;
Enter handset's password; or Connected.
Figure 3-2 Connect tab prompt:showing the next action or status.
NEC MH150/MH160 Mobile Handset Administration Tool-Installation and User Guide - Issue 1
Using the Admin Tabs
3-3
The prompt line at the bottom of the window provides information about
what action should be taken or the status of the utility. See Figure 3-3.
Insert the handset into the Dual Charger and enter the password.
Figure 3-3 Prompt to enter the password and remember password checkbox.
When the handset is inserted for the first time, the password must be
entered. If you select the Remember password check box, the
password is retained as the default password for all handsets. Enter the
password and click Submit. The default password is 123456.
Unique passwords for each handset are not remembered.
NOTE
When connection is established between the program and the handset,
the Handset connected indicator turns green and Connected displays
on the prompt line. The handset is now ready for configuration. See
Figure 3-4.
NEC MH150/MH160 Mobile Handset Administration Tool-Installation and User Guide - Issue 1
3-4
Using the Admin Tabs
Figure 3-4 Connect tab prompt indicates the Mobile Handset is connected.
Password Configuration
The password is a security measure to restrict access to the Admin
menu settings. Prior to changing a password, the existing password
must be entered. The new password must be entered twice for
confirmation. If a password is desired to gain access to the handset's
Admin menu, select the Enable password checkbox. If no password is
desired, clear the Enable password checkbox. A password may be up to
18 characters. See Figure 3-5.
NEC MH150/MH160 Mobile Handset Administration Tool-Installation and User Guide - Issue 1
Using the Admin Tabs
3-5
Figure 3-5 Password change tab window
Character table
Table 3-1 illustrates how numbers and letters are entered on the
handset's keypad. The CAPS/caps softkey toggles to allow both upper
and lowercase letters. Only English characters are allowed.
Table 3-1 Handset character entry table
Key
caps
CAPS
1
1
1
2
2abc
2ABC
3
3def
3DEF
4
4ghi
4GHI
5
5jkl
5JKL
6
6mno
6MNO
7
7pqrs
7PQRS
8
8tuv
8TUV
9
9wxyz
9WXYZ
0
0
0
*
* - _.! $% & ' () +
,:; / \ = @ ~
#
# <space>
NEC MH150/MH160 Mobile Handset Administration Tool-Installation and User Guide - Issue 1
3-6
Using the Admin Tabs
Error Information
The Error info tab (Figure 3-6) provides a utility to assist the NEC
customer service team to troubleshoot handset errors. When directed
by customer service, this utility enables you to save any errors as a file,
which can then be sent to your NEC representative for handling.
Use the Browse button to establish the path and enter the filename.
Future saves will point to this same location as the default, so that the
same file may be overwritten if desired. A drop-down list box displays
the most recently used filenames.
The File time window displays the modification timestamp of the file in
the Save error info as file window.
Power off handset and place it in the Dual Charger.
Click the Get file button to save the file. The file will be copied from the
handset to the location.
The Read/Write indicators will reflect the action as it occurs.
A progress indicator above the prompt line displays the file transfer
progress.
Figure 3-6 Error information tab screen
NEC MH150/MH160 Mobile Handset Administration Tool-Installation and User Guide - Issue 1
Using the Admin Tabs
3-7
Software Updates
The Firmware tab allows you to copy software updates to the mobile
handset's memory after they are downloaded from a website.
To install manual updates
Step 1
NEC MH150 and MH160 Mobile Handset software updates can be
procured from NEC NTAC.
Step 2
Extract the bin files from the zip file to a folder set up for this purpose.
Each file must be individually downloaded into the handset.
This is not an efficient method of updating any quantity of handsets, but it works for
testing new code and in extremely small installations.
NOTE
CAUTION
Be aware that if there is a TFTP server broadcasting a different version of the
handset code, the handsets will continue to download code over the air and revert to
the different version. Remove handset code from the TFTP server or disable
broadcasting before relying on this update procedure.
Step 3
Use the Browse button to locate the software file. The drop-down list box
displays the most recently used filenames. The File time window
displays the modification timestamp of the file in the Firmware file
window.
Figure 3-7 Firmware tab displays current file information
Step 4
Check the file version and handset version for comparison. Once the
update is complete, the file version will have overwritten the handset
version and these two file versions will match.
NEC MH150/MH160 Mobile Handset Administration Tool-Installation and User Guide - Issue 1
3-8
Using the Admin Tabs
Step 5
Verify that the information in the File ver window is the correct file to be
downloaded and then click the Update button. This file copies from the
location to the handset. The Read/Write indicators reflect the action as it
occurs.
While a firmware update is in progress, you may open other tabs and the
handset indicators shown on those tables will inform you of the status of
the update.
Step 6
(Conditional) Should an Error indication occur, retry the update after
ensuring that the handset is properly seated and that the USB cable is in
good condition and connected securely. Contact Customer Service if an
error persists. See About This Guide for contact information.
Figure 3-8 Firmware update ready to begin
Note that the firmware file path, file time, file version and handset
version shown in the above example screen are for illustration only.
NEC MH150/MH160 Mobile Handset Administration Tool-Installation and User Guide - Issue 1
Using the Admin Tabs
3-9
Version
The Version tab (Figure 3-9) displays the serial number of the handset
and the current version of the Handset Administration Tool software.
Figure 3-9 Version tab displays current Handset information
Update Mode allows you to select where and how you want to check
for updates to the program. The program can be updated from either of
two locations—FTP Update or Local File Update.
Updates may be installed either automatically or manually. The
Automatic option sets the program to automatically check the FTP site
for updates every time the HAT program is launched. The Disable
option disables the automatic check and allows you to manually update
the program by clicking the Update Now button. Any computer that is
not connected to the internet should be set to Disable.
Depending on the Update Mode setting, the Update Now button can
be used to check the FTP site for an update or to browse to a local
location,
NEC MH150/MH160 Mobile Handset Administration Tool-Installation and User Guide - Issue 1
3-10
Using the Admin Tabs
FTP Update
The FTP Update option retrieves the update from an FTP site. During the
update process, the program is downloaded to the connected computer
and that computer's version of the program is updated. In order to use
this option, the computer must have access to the internet.
Step 1
Click Update Now to start the FTP update process.
Figure 3-10 Version tab displays the FTP update progress
Step 2
If the Automatic option is selected, the following prompt (Figure 3-11) will
appear before the update is installed. Click OK to continue.
Figure 3-11 Mobile Handset update prompt
Step 3
Click OK to continue.
The update will be installed by overwriting the previous version. See
Figure 3-12.
NEC MH150/MH160 Mobile Handset Administration Tool-Installation and User Guide - Issue 1
Using the Admin Tabs
3-11
Figure 3-12 Confirmation of new application installation
Step 4
Once the update is downloaded, you can copy the.pkg file to a local
location and update other computers using the Local File Update option.
See below.
Local File Update
You must obtain the.pkg file to perform a local update. Use the FTP
update option explained above or a service option to obtain the.pkg file.
Copy the.pkg file to an accessible location.
The MH Administration Tool must already be installed on any computer that is being
updated. Install the MH Administration Tool software first, and then update it.
NOTE
The following procedure is used for a local file update.
Step 1
Open the MH Administration Tool and click the Version tab. See Figure
3-13.
Step 2
Click the Local File Update option.
Step 3
Click Update Now.
NEC MH150/MH160 Mobile Handset Administration Tool-Installation and User Guide - Issue 1
3-12
Using the Admin Tabs
Figure 3-13 Local file update initiation
Step 4
Browse to the location of the.pkg file and click it.
Step 5
Click OK to continue. See Figure 3-14.
Figure 3-14 Handset Administration Tool upgrade confirmation dialog box
Step 6
Click OK to continue. This will install the update by overwriting the
previous version. See Figure 3-15.
Figure 3-15 Confirmation of HandsetAdmin shutdown
NEC MH150/MH160 Mobile Handset Administration Tool-Installation and User Guide - Issue 1
4-1
4
Using the Settings Editor
The handset has two menus with configurable options - the Admin menu
and the Config menu. The Admin menu contains administrative options
that can be password protected. The Config menu has options that
enable the end user to customize settings for user preferences. The
Settings tab allows you to configure both required and optional settings
in the Admin and Config menus. Specific configuration requirements are
detailed in the NEC MH150 and MH160 Mobile Handset Administration
Guide document.
Opening the Settings Editor
The Settings tab displays the serial number of the handset and the
software version being run.
To enter and modify menu settings you will need to open the Settings
Editor. See Figure 4-1. Click the Show Settings Editor button.
NEC MH150/MH160 Mobile Handset Administration Tool-Installation and User Guide - Issue 1
4-2
Using the Settings Editor
Figure 4-1 Settings Editor on the Settings tab window
When you have opened the Settings Editor, you may close the Admin
Tabs.
NOTE
If you plan on editing other handsets, consider selecting the Remember Password
checkbox located in the Connect tab. Refer to Figure 3-3, “Prompt to enter the
password and remember password checkbox.” on page 3-3.
To open the Admin Tabs again, go to the Settings Editor menu bar and
select either View > Admin Functions, or any of the options listed
under the Admin menu item.
The Settings Editor Screen
The Settings Editor is a powerful utility that allows you to edit or set
any Admin menu or config menu option. The Settings Editor (Figure 42 on page 4-3) includes the following areas:
• Toolbar to execute configurations and save files
• Tabs to organize configuration options
• Radio buttons to define the type of option
• Editable settings that list handset options
• Handset settings that have either been uploaded from a handset or
have been copied from Editable settings options to be downloaded
to a handset.
NEC MH150/MH160 Mobile Handset Administration Tool-Installation and User Guide - Issue 1
Using the Settings Editor
The Handset Settings Editor screen shot (Figure 4-2) is for example only and may
not match the options or settings for your system's protocol.
NOTE
Figure 4-2 Handset Settings Editor Network Config screen
Toolbar
Tabs
Radio
Buttons
Options that can
be edited
NEC MH150/MH160 Mobile Handset Administration Tool-Installation and User Guide - Issue 1
Options to/from
the handset
4-3
4-4
Using the Settings Editor
The Settings Editor Toolbar
The Settings Editor toolbar (Figure 4-3) allows you to manage
configuration files and download and upload configuration settings to
and from the handset in the charger.
Figure 4-3 Settings Editor toolbar
File management
The three filename windows, System, Group and User match the three
columns of radio buttons along the left side of the window. The Sys Grp
Usr radio buttons allow you to designate the option(s) for System,
Group or User files. The three windows in the File management section
allow you to name, open, or save setting types as separate files.
For example, system types relate to network options such as security
settings and regulatory domain. Group types relate to Push-to-talk
options. User types reference name, extension and profile options.
The file indicators beside the Save As buttons have three colors to
indicate the status of the file displayed in the window:
• Red: file does not exist. The filename in the window has not been
saved.
• Green: unsaved edits. Changes made in the Editable settings
field(s) which have not been saved to a file yet.
• Gray: file up-to-date. The settings have been saved.
By default, the files will be saved in the Application folder under the
folder where the program is stored. Use the File menu to set up your
own file structure, if desired.
Copy settings
The Copy settings arrows and checkboxes allow you to copy between
the Handset settings column and the Editable setting column. The
Sys Grp Usr checkboxes allow you to copy just the settings you
require.
NEC MH150/MH160 Mobile Handset Administration Tool-Installation and User Guide - Issue 1
Using the Settings Editor
4-5
Upload/download and indicators
When the Read Handset and Write Handset buttons are clicked, they
initiate the transfer of configuration data from or to the handset in the
charger. The handset indicators change color to indicate the state of the
transfer. See “Indicators” on page 3-2 for indicator color significance.
Tab Options
A tab system organizes the options. See .
Tabs on the Settings Editor window
Each tab contains options from the Admin menu and/or the Config menu
(see Table 4-1). Admin menu options are password protected and
usually set by the system administrator. Config menu options are
available to the end user but are also offered here for initial
configuration of key settings. Specific options vary by protocol.
Table 4-1 Tab options on the Settings Editor window
Tab
Contents-Admin Menu
Contents-Config Menu
Phone config
Extension # and User Name
Time Zone
Daylight Saving
Protected Speed dial
Speakerphone
Location Service
Keypad Autolock
Display Contrast
Hearing Aid
Startup Song
Predial
Active User Profile
Network config
IP Addresses
SSID
Security
Regulatory Domain
Diagnostics
N/A
Push-to-talk Admin
Enabled/Disabled
N/A
Priority Channel and Name
Allowed Channels
Name Channels
Push-to-talk User
N/A
PTT Audio Volume
PTT Tone Volume
Default Channel
Subscribed Channels
NEC MH150/MH160 Mobile Handset Administration Tool-Installation and User Guide - Issue 1
4-6
Using the Settings Editor
Tab
Profiles:
Silent
Vibrate
Loud
Soft
Custom
Contents-Admin Menu
N/A
Contents-Config Menu
Noise Mode
Ring in Speaker/
Headset
Warning Tones
Key Tones
Push-to-Talk
(Ring option)
Telephone Ring
Message Alert 1
Message Alert 2
NOTE
NOTE
(Ring option settings)
Ring Cadence
Ring tone
Ring volume
Vibrate Cadence
Ring Delay
For user convenience and efficiency, when the Write Handset button is clicked,
every option set under the Handset settings column in all nine tabs is written at the
same time. Each tab's options are NOT written separately. Be sure that you set all
options before copying the configuration to the handset.
Your handsets may have different options than those available in the Handset
Administration Tool. When a handset is placed in the cradle, it is checked for certain
features, such as the Regulatory Domain version. The HAT will turn controls on/off
based on the information that it gathers. If your handsets have options that are not
yet programmed into the HAT, those options will require manual setting if the factory
default is not desired.
Creating a Configuration Plan
Although not necessary for using the Handset Administration Tool, a
configuration plan can maximize its efficiency and save countless hours
of handset option management. An example of a configuration plan is
provided in Table 4-2, “Configuration planning worksheet sample,” on
page 4-8.
Organize the plan
Determine which options should be categorized as each type—system,
group or user. Generally, system options are listed on the Network tab,
group options are on the PTT tabs and user options are on the profile
tabs. The Phone Config tab contains a mix of user and system types.
NOTE
Do not create a plan that saves an option in two different categories. Option
categories should be established and should not overlap. Example: Speakerphone
and Push-to-talk settings are typically tagged as Grp options and saved as Group
files.
NEC MH150/MH160 Mobile Handset Administration Tool-Installation and User Guide - Issue 1
Using the Settings Editor
4-7
Create the options and save the settings
Once you have established which options will be categorized as System,
Group or User, enter the configuration information into the Editable
settings fields.
Start with the System options and enter all system-level field values,
such as IP addresses, security, and reg domain. Click the Sys radio
button on the left side of the window for each option. Save these
settings as a System file by entering a descriptive filename in the
System filename field and clicking Save As. See the example in
Table 4-2, “Configuration planning worksheet sample,” on page 4-8.
Note that when a setting is changed, the option label is highlighted in yellow until it is
saved.
NOTE
In the same way, create each Group plan by entering the values in the
fields designated as Group types. Click the Grp radio button on the left
side of the window for each option. Save each plan under a different
name in the Group filename field. You may have several groups—
possibly divided by sets of PTT users.
It is recommended that you establish one generic User file that has the
default (or desired) values for each User field. Click the Usr radio
button on the left side of the window for each option and save the
generic user file.
If desired, user settings can be saved for each user, if desired, as each
handset is configured. If you determine that each handset configuration
should be saved, it is easiest to do this during the configuration process.
See “Downloading a configuration plan to a handset” on page 4-9.
Alternately, you can upload options from a correctly-configured handset;
copy them to the Editable settings column, categorize them and save
them. See “Uploading a configuration plan from a handset” on page 410.
NEC MH150/MH160 Mobile Handset Administration Tool-Installation and User Guide - Issue 1
4-8
Using the Settings Editor
Configuration planning worksheet (sample)
Use the worksheet in Table 4-2, or a similar worksheet to design your
configuration plan.
Table 4-2 Configuration planning worksheet sample
Plan category __System______
Sys
Grp
Filename __System01____
Usr
Label
Editable Setting
Time Zone
-7 Mountain
Daylight Saving
DST Auto (USA)
Protected Speed Dial
Number
5555
Protected Speed Dial Name Security
Assign to
1
Speakerphone
Enabled
Predial
Enabled
The settings in the table above are executed in Figure 4-4.
NEC MH150/MH160 Mobile Handset Administration Tool-Installation and User Guide - Issue 1
Using the Settings Editor
4-9
Figure 4-4 Handset Settings Editor example
Downloading and Uploading Configuration Plans
Once your configuration plans are established, the settings are easily
downloaded into the handsets.
Downloading a configuration plan to a handset
Step 1
Use the Open button located in the File management section on the
toolbar to open the System, Group and User cfg files for this handset.
NEC MH150/MH160 Mobile Handset Administration Tool-Installation and User Guide - Issue 1
4-10
Using the Settings Editor
Step 2
In the Editable settings fields, enter the Extension and User name for
this handset. Note that the Extension field has a Next button that is
useful when configuring a quantity of handsets.
Step 3
Copy the settings to the Handset settings fields using the Copy
settings arrow.
Step 4
Click Write Handset.
You may want to save the configuration, load new files or edit settings for
the next handset (steps 1 and 2) during the download.
Step 5
(Conditional) If you wish to save the settings unique to this handset,
enter the identifying information into the filename fields, such as user
name or extension number and then click Save As.
Step 6
When the Handset indicator turns off, the download has finished and the
handset may be removed from the charger.
Uploading a configuration plan from a handset
Step 1
Click the Read Handset button to begin the upload.
Step 2
You may copy these settings over to the Editable settings fields using
the left Copy settings arrow to use them to create configuration plans as
described above or to save them by user or extension.
Regulatory Domain Mismatch
The options that are available on the Settings Editor may not match the
options currently enabled on the handset. This could happen if you
update the software in the handset without also updating the MH
Administration Tool. Or you could update the MH Administration Tool but
not the handset software. In either of these situations different options
may appear on the MH Administration Tool than are available in the
handset.
If the Regulatory Domains in the handset are not supported by the
currently installed version of the MH Administration Tool, a warning
message will appear:
Warning: Regulatory domain support is
down level with respect to this phone's
firmware version. Recommend upgrading
the application.
This message indicates that the MH Administration Tool software needs
to be updated. Please see “Software Updates” on page 3-7.
If it is necessary to down rev the handset and MH Administration Tool
code, this message could also appear. If so, reset the handset defaults
and proceed with configuration.
NEC MH150/MH160 Mobile Handset Administration Tool-Installation and User Guide - Issue 1
For additional information or support on this NEC Unified Solutions,
Inc. product, contact your NEC Unified Solutions, Inc. representative.
NEC NEC Unified Solutions, Inc.
NEC MH150/MH160 Mobile Handset Administration Tool-Installation and User Guide
NDA-30922, Issue 1