1
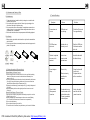
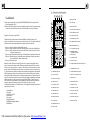
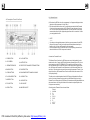
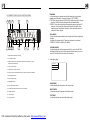
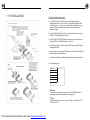
SD82
Instruction Manual
Fully Compatible to the Formats
of Files Such as DVD, VCD,
JPEG, MP4, MP3, MWA, CD.
2 IN 1 CAR AUDIO SYSTEM WITH
DVD.VCD.JPEG.MP4.MP3.WMA.CD DISC PLAYER
AND AM/FM STEREO DIGITAL TUNING RADIO
Remark: Any information subject to change without further notice
WWW. LANZAR. COM
Contents
1. Before Operation..........................................................................................2
1.1 Glossary........................................................................................ ....... 2
1.2 Precautions and Maintenance.................................................................2
1.3 Maintenance and Cleaning of Discs.........................................................3
1.4 Battery Information of Remote Control.....................................................3
1.5 Remote Control Description....................................................................4
1.6 Description of Face of Front Panel..........................................................5
1.7 Description of Unit Chassis Face.............................................................6
1.8 Description of Rear Cabinet Socket.................. .......................................6
1.9 Description of LCD on the Front Panel......................................................7
1.10 Description of Input/Output Wires............................................................8
1.11 Unit Installation......................................................................................9
2. Common Operation.....................................................................................10
3. Radio Operation..........................................................................................11
4. Basic Disc USB MMC/SD Operation..............................................................13
4.1 Begin Playback.....................................................................................13
4.2 Pause Playback....................................................................................14
4.3 Stop Playback ......................................................................................14
4.4 Select Chapter/Track with NEXT/PREV. or >>|/|<< Buttons.......................14
4.5 Select Chapter/Track with Number Buttons..............................................14
4.6 Select Chapter/Track with Root/PBC Menu..............................................15
4.7 Terminate Playback............................................................................... 16
5. Advanced Disc USB MMC/SD Operation.......................................................16
5.1 Playback with Speed.............................................................................16
5.2 Playback with Slow Speed.....................................................................16
5.3 Playback with Still Frame......................................................................16
5.4 Playback Repeatedly............................................................................17
5.4.1 One/All Repeat.................................................................................1 7
5.4.2 A-B Repeat.......................................................................................17
5.5 Playback in Scan Mode.........................................................................17
5.6 Playback a selected track/chapter or from a specified time.......................18
5.7 Playback in Random.............................................................................18
5.8 Program Playback................................................................................1 8
5.9 Playback in Different Angle...................................................................19
5.10 Playback in Zoom Mode......................................................................19
5.11 Change Caption Language..................................................................19
5.12 Change Audio Language.....................................................................20
5.13 Changing of Video Signal System.........................................................20
5.14 Look over Sequence Number or Playback Time of Title/Chapter/Track.....20
5.15 Playback the Picture CD in JPEG Format..............................................20
5.16 MP4 Operation....................................................................................21
5.17 ESP Function.................................................................................... .21
5.18 USB and MMC/SD Reader Operation....................................................21
5.19 System Setup Menu Operation.............................................................22
5.20 Parental Control................................................................................. 26
5.21 Region Code...................................................................................... 27
6. Trouble Shooting........................................................................................28
7. Specification..............................................................................................29
PDF created with FinePrint pdfFactory trial version http://www.pdffactory.com
7. Specification
1. Before Operation
General Specification
Power Requirement.............................................................DC 12V
Maximum Power Output...................4 x 80W(measured at DC 14.4 V)
Dimensions(w x h x d)............................................178 x 50 x 165mm
1.1 Glossary
DVD Deck Specification
Format....................................DVD/VCD/JPEG/MP4/MP3/MWA/CD
Video System............................................PAL/PAL 60/NTSC/AUTO
Audio System..............................................................24 bit/96KHz
Loading System.......................................................... Auto Loading
Mounting Angle.................................................................0 to +/-30
Video Specification
Video System...............................................................16:9 and 4:3
Video Output level.................................................1.0Vp-p 75 ohms
Horizontal Resolution................................................................500
Audio Specification
Maximum Output.......................................................1Vrms(+/-3dB)
Frequency Response.....................................................20 to 20KHz
S/N Ratio(A-vtd)......................................................................60dB
Separation..............................................................................50dB
Radio Specification
FM Section
Frequency range..............................................87.5MHz - 107.9MHz
Usable sensitivity......................................................................3uV
I.F Frequency....................................................................10.7MHz
AM Section
Frequency..........................................................530KHz - 1710KHz
PBC (playback control)
It is a kind of signal(menu) recorded in the disc with SVCD or VCD2.0
format used for the playback control. For the discs contained PBC, It
can playback interactive software with the menu displayed on TV. And
if the disc contain still images, it can playback high definition of still
image.
Title
Generally, the title is the important part of DVD disc. for example, the
theme part of movie is title 1, the part described how to make movie
is title 2, the cast is title 3, etc. Every title contain a serial number
that is easy to lookup.
Chapter
A title can be divided into several blocks, so that every block can be
operated as a unit, the unit is called chapter. The chapter contain a
unit at least.
Track
It is the biggest component of VCD. Generally, every song of karaoke
disc is a track.
1.2 Precautions and Maintenance
1. If the car interior is extremely hot, as after being parked in the sun, do
not use the player until the car has been driven for a while to cool off
the interior.
2. The protective case is to safely keep the front panel.
PROTECTIVE CASE
FRONT PANEL
Manufactured under license from Dolby Laboratories.
Dolby and the double-D symbol are trademarks of Dolby Laboratories.
PDF created with FinePrint pdfFactory trial version http://www.pdffactory.com
3. The unit is designed for negative terminal of the battery which is
connected to the vehicle metal. Please confirm it before installation.
4. Do not allow the speaker wires to be shorted together when the unit is
switched on. Otherwise it may overload or burn out the power amplifier.
5. Do not install the detachable panel before connecting the wire.
1.3 Maintenance and Cleaning of Discs
6. Trouble Shooting
Disc Maintenance
1. To keep the disc clean, handle the disc by its edge, do not touch the disc
surface of the play side.
2. Do not stick paper or tape on the disc. If there is glue (or analog) on the
disc surface, must wipe it up before using.
3. Do not expose the disc to direct sunlight, or nearby heat sources such as
caliduct, or leave it in a car parked in direct sunlight where there can be a
considerable rise in temperature.
4. Put the disc inside disc case to keep temperature after finishing playback.
Symptom
Cause
Solution
Power does not
turn on
IR Remote not
functioning.
Check the IR remote
For a good battery.
DVD Disc does
not insert.
Another disc is
Already in unit.
Eject first DVD disc
And insert another
into unit.
Disc Cleaning
1. Before playing, wipe the disc with a clean lint. wipe the disc outwards from
the disc center.
2. Do not use petrel, thinner, commercially cleaner or anti-static spray used to
plastic LP to wipe disc.
+ side up
B
A
Fig.1
Fig.2
Fig.3
1.4 Battery Information of Remote Control
Replace Battery in Remote Control :
1.Before using the remote control for the first time, pull the insulating
sheet out of the remote control as the direction indicated by the
arrow.(see fig.1)
2.Press the movable block hold as the direction indicated by the A arrow
(See fig.2), then pull the battery holder out of the remote control as
the direction indicated by the B arrow(see fig.2).
3.Replace the old battery by a new battery with (+) polarity side upward.
(See fig.3).
4.Insert the battery holder to the original position in remote control.
(See fig.3).
Note about the Battery of Remote Control :
1. Improper use of battery may cause overheating or explosion. so that
Result in injury or fire .
2.Battery leakage may cause damage to the remote control(Battery
Life: 6 months with normal use in normal room temperature).
3.Do not short the battery.
4.Do not throw the battery into the fire.
5.To avoid the risk of accident, keep the battery out of reach of children.
PDF created with FinePrint pdfFactory trial version http://www.pdffactory.com
The disc is ejected
as soon as it is
inserted.
Sound skips or
noisy.
The disc has
been inserted
Upside down.
Insert the disc with
the label side up.
Disc is dirty.
Clean the disc with
A soft cloth.
Replace the disc
with no scratches.
Disc is seriously
scratched or
warped.
Sound is bad
after power is
turned on.
Condensation may
have formed on the
Internal lens when
The car is parked in
a humid place.
Let dry for about
one hour with the
power turned on.
1.5 Remote Control Description
5.21 Region Code
3
31
39
POWER
LOC
SETUP
1
1. MODE BUTTON
Q: Not begin to playback but to display REGION ERROR after inserting disc into
disc compartment. Why ?
A: Because the DVD player and disc has respective region code. If the region codes
of them are not match with each other, the DVD player can not play the disc.
14
32
OSD
MODE
MUTE
MENU
EQ
8
+
13
5
STOP
PLAY
PAUSE
1
2
3
4
5
6
7
8
9
0
P/N
LOUD
STEP
SEARCH
33
30
SLOW_FWD
A/P
29
28
27
26
25
1. WarnerBros;
2. Colmbia;
3. 20thCenturyFOX;
4. Paramount;
5. Universal;
6. UA(UnitedArtist);
7. MGM(MetroDogwynMayer);
8. WaltDisney
RANDOM
INT
10
7. F.BWD/PREV. BUTTON
8. JOG DN/SEEK DN BUTTON
12
9. MENU/BAND BUTTON
TITLE
CLEAR
ZOOM
ANGLE
10. PLAY/PAUSE BUTTON
15
17
11. NUMBER/PRESET
MEMORY BUTTONS
12. P/N BUTTON
19
13. CLOCK BUTTON
20
14. MUTE BUTTON
18
SUBTITLE
A-B
REPEAT
16
ST
PROGRAM
AUDIO
24
21
23
22
15. STEREO/MONO and SEARCH BUTTON
16. A/P and STEP BU TTON
29. LOUDNESS BUTTON
17. PRO GRAM BUTTON
30. SLOW FO RWARD BUTTON
18. TITLE BUTTON
31. OSD and LOC/DX BUTTON
19. SUBTITLE BUTTON
32. EQ BUTTON
20. PBC BUTTON
33. RETURN BUTTON
21. CLEAR BUTTON
34. STOP BUTTON
22. ANGLE BUTTON
35. VOLUME- BUTTON
23. ZOO M BUTTON
36. JO G LEFT BUTTON
24. AUDIO BUTTON
37. ENTER BUTTON
25. REPEAT BUTTO N
38. VOLUME+ BUTTON
26. A-B BUTTON
39. SETUP BUTTON
27. RANDOM BUTTO N
28. INT BUTTO N
PDF created with FinePrint pdfFactory trial version http://www.pdffactory.com
6. JOG RIGHT BUTTON
11
PBC
Basically, when a DVD movie disc for the version of region 6 was decided not to
issue, we need to purchase another DVD player that can play the DVD movie disc
for the version of non-region 6. In order to view this disc, viewer who does not have
the non-region 6 DVD player facilities will have to spend extra sum of money to buy
it. The problems caused from the area code inconsistency between the disc and the
DVD player has pushed for the production of Unlock-Version DVD player facilities,
and some DVD disc sets allow user to modify the area codes for a limited number of
times. But note that only the discs produced by the 8 biggest filmmaking companies
of America restrict so, they are not one of original DVD format. That is to say, the
DVD movie discs not produced by the 8 biggest filmmaking companies of America
were not restricted by the rule of region code. Generally, they are called
FreeRegionCode discs or Full Region discs. The 8 biggest filmmaking companies of
America are as follows:
5. F.FWD/NEXT BUTTON
7
RETURN
Region 1: America, Canada, East-Pacific Inlands;
Region 2: Japan, West Europe, North Europe, Egypt, South Africa, Middle East;
Region 3: South-east Asian countries include Taiwan, Hong Kong, South Corea,
Thailand, indonesia, etc.;
Region 4: Australia, New Zealand, Central South America, South Pacific Inlands;
Region 5: Russia, Mongolia, Indian Peninsula, Middle Asia, East Europe, North
Corea, North Africa, North-west Asia etc.;
Region 6: China mainland.
4. JOG UP/SEEK UP BUTTON
CLK
35
34
3. POWER BUTTON
6
SEL
The Motion Picture Association of Amereca (MPAA) divided the world into 6
regions, and named every region a code, namely region code. The region codes and
the countries or areas represented by the region codes are as follows:
9
37
2
Appendix: The region code of DVD:
2. SEL BUTTON
BAND
ENTER
36
38
4
5.20 Parental Control
1.6 Description of Face of Front Panel
Q:After inserting DVD disc into disc compartment, it will appear a dialogue window
that ask me input a password of 4 digit. Why ?
A:This is because that the disc movie you are playing was rated with the Parental
Control, and the current rating level of DVD player is lower than one of current
disc. You must input right password and enter it to entry Parental Control setup
menu and then set a equal or higher rating level than one of current disc. So that
you can playback the disc.
! NOTE
* If you have not changed the password, the factory preset password for the DVD
player will be empty. So that you should input a desired password and input it
again to verify it to enter the Parental Control setup menu.
* For the rating level setup of Parental Control of the DVD player, please refer to
the relative content of LOCK setup menu for details.
1. OPEN BUTTON
10. CLOCK BUTTON
2. LCD SCREEN
11. MUTE BUTTON
3. IR REMOTE SENSOR
12. PRESET STATION AND RPT/RDM BUTTONS
4. BAND BUTTON
13. POWER BUTTON
5. UP/DN BUTTONS
14. SOUND MODE BUTTON AND VOL KNOB
6. PLAY/PAUSE BUTTON
15. LO/DX BUTTON
7. MODE BUTTON
16. LOUD BUTTON
8. P-EQ BUTTON
17. USB SOCKET
9. APS BUTTON
18. MMC/SD SOCKET
PDF created with FinePrint pdfFactory trial version http://www.pdffactory.com
Accessories: Parental Control
The Parental Control function of a DVD player can control the playback of movie
rated level in a disc. Can set the DVD player(include software player in PC) to be a
certain rating level with SETUP MENU on TV screen.If the rating level set in the
disc is higher than one set in the DVD player, the DVD player can not playback the
disc. Sometimes the Parental Control sequences in some discs are different from
each other. The rating level setup can be protected by the password. Therein, if you
select Unlock item, the Parental Control function will be invalid, the content of disc
will be played totally.
The disc movie can be designed as that the DVD player will playback the different
version of content of a same movie according to the different rating level set by
Parental Control. Depend on the DVD feature of seamless switching described above,
the scenes that are not fitting for children will be cleared or replaced by the other
fitting scene automatically.
All rating levels of Parental Control are as follows:
Unlock
1
Kid Safe
2
G
3
PG
4
PG 13
5
PG R
6
R
7
NC 17
8
Adult
1.7 Description of Unit Chassis Face
D. Preference Page
EJ
Audio
Subtitle
Disc Menu
Parental
Angle Mark
Default
1
AUDIO
This item is for selecting an audio language.
SUBTITLE
This item is for selecting a subtitle language or turn off the subtitle
language.
DISC MENU
This item is for selecting a disc menu language.
2
3
1.LED indicator: Flashing when detachable panel is removed.
2.RESET button: Press it to rehabilitate the distorted program
to zero.
3. EJECT button: press it to eject disc from disc compartment.
When the disc can not be eject out of the compartment,
press MODE button to change into RADIO mode and then
press EJECT button to eject the disc from compartment.
1.8 Description of Rear Cabinet Socket
1
PARENTAL
The item is for setting a new rating level of the Parental Control(See
page 26).
Note: if you want to set a new rating level of the Parental Control, must
input the password 137988.
Before the other persons see the Manual, you should get the
password in mind and cut out the PASSWORD in the Manual.
ANGLE MARK
This item is for turning on/off ANGLE MARK mode. When turning on the
ANGLE MARK mode, during playback of the DVD disc, if you press the
ANGLE button , you can view the picture in different angle.
DEFAULT
This item is for making all setup items change back to original status.
PDF created with FinePrint pdfFactory trial version http://www.pdffactory.com
3
5
2
4
1,2. Video Output (2 RCA jacks)
Use a video cable to connect the video output signal to the external
video monitors.
3. Power and Speakers Wires Socket
4. Antenna Socket
5. Fixing Screw Bolt
Use the clip end of a Ground Line provided by manufacturer to connect
the Fixing Screw Bolt, use another end of the Ground Line to connect
the negative pole of the power source. Otherwise, the video on screen
maybe flashes.
DOWNMIX
It is for selecting your desired sound effect when there is not central
speaker and sub-woofer. There are 2 modes: LT/RT, STEREO.
LT/RT: When playing a disc with PRO LOGIC Dolby stereo effect, choose
the item, so it will output audio signal with vivid theatre effect.
STEREO: If you choose the item, when outputting audio signal with 5.1
channels, it will output the left and right channels of signal ; when
outputting audio signal with 2 channels, it will output the common 2
channels of stereo signal.
1.9 DESCRIPTION OF LCD ON THE FRONT PANEL
9
2
4
5
6
DUAL MONO
It is for selecting a desired audio output mode for the left and right ways
of signal.
It is mainly for Karaoke of Ac3. There are 4 modes in all as follows:
STEREO, L-MONO, R-MONO, MIX- MONO.
3
8
12 13
1
14
7
11
10
DYNAMIC RANGE
It is for adjusting the linear compression ratio. If you set it to be FULL,
the Peak-to-Peak value of the audio signal is the minimum; if you set it
to be OFF, the Peak-to-Peak value is the maximum.
1. DVD/VCD/CD/MP3 disc indicators.
2. Loudness indicators .
3. Repeat playback indicators (single or all for DVD/VCD/CD disc, single,
folder and all for MP3 disc).
4. Title number indicator.
C. Video Setup Page
Sharpness
Brightness
Contrast
5. Chapter/Track number indicator.
6. Disc playing time indicator for DVD/VCD, track time indicator for CD/MP3.
7. Dolby digital indicator.
8. Disc rotation indicator.
9. RANDO M indicator.
10/14/15. SPECTRUM indicator.
11. CLASS, ROCK and POP equalizer curves indicators.
12. STEREO indicator.
13. Local indicator.
14. Playing indicator.
PDF created with FinePrint pdfFactory trial version http://www.pdffactory.com
SHARPNESS
It is for adjusting the sharpness of the video output.
BRIGHTNESS
It is for adjusting the brightness of the video output.
CONTRAST
It is for adjusting the contrast of the video output.
If your TV set has only NTSC or PAL Type, the screen will blink and become
colorless when a wrong TV Type is selected. In this case, press the N/P
button on the Remote Control to switch the right TV Type to match
the TV color system.
TV Display
The setup item is for matching the TV screen size.
4:3 PS: Choose the item when connecting a TV set with 4:3 screen. When
playing the pictures with 16:9 size, the left and right parts of the video
will be cut out, and display in full screen.
4:3 LB: Choose the item when connecting a TV set with 4:3 screen. When
playing the pictures with 16:9 size, the top and bottom parts of the TV
screen will be turned into a black square respectively.
16:9 WIDE: Choose the item when connecting a TV set with 16:9 wide
screen.
1.10 Description of Input/Output Wires
ANTENNA SOCKET
YELLOW
MEMORY B+
Fused
BLACK(GND)
RED
IGNITION SWITCH
MP3 MODE
The setup item can switch the MP3 playback mode between Auto and
Manual.
PBC
The setup item can switch the defaulted PBC mode between ON and OFF.
filter box
10A&3A
fuses
BLUE AUTO ANT
FRONT
LEFT
SP
WHITE
WHITE / BLACK
GREEN
WOOFER LINE OUT
YELLOW
RED R
RCA LINE OUT
GRAY
GRAY / BLACK
VIOLET
B. Speaker Setup Page
Downmix
Dual Mono
Dynamic
PDF created with FinePrint pdfFactory trial version http://www.pdffactory.com
RIGHT
SP
REAR
REAR
HDCD
The setup item is for the playback of the high definition CD. There are 3
modes: Off, 1X, 2X.
WHITE L
FRONT
GREEN / BLACK
VIOLET / BLACK
NOTES:
1. Only speakers with 4 ohms impedance may be used.
2. Ensure that the blue auto antenna cable does not make contact
with any ground connection.
1.11 INSTALLATION
5.19 System Setup Menu Operation
1. Press SETUP button on the IR remote control to display System
Settings Main Menu on the TV screen. The System Setting Main Menu
consist of 4 parts, i.e. 4 sub-menu. From left side to right side, they are
General Setup Page, Speaker Setup Page, Video Setup Page and
Preference Page.
INSTALLATION INSTRUCTIONS
IT I S AN ANTI-THEFT INSTALLATION WAY. THE CHASSIS WEAR A ME TAL
SLIDING HOUSING. PLEASE HAVE THE WIRI NG CO NNECTION OF THE
PO WER SUPPLY, SPEAKERS AND ANTENNA AS FO R THE REQ UIREMENT
OF THE MANUAL, TH EN INSTALL THE M ETAL SLIDING HO USING INT O THE
CA R ACCORDING TO THE DIAGRAM.
TO BO OST UP TH E CAPABILITY OF
ANTI-JAMM ING, PLEAS E FIX THE
META L STRAP ON THE META L
CONNECTE D TO THE B OTTO M
BRAC KET O F THE CAR .
METAL STRAP
SE LECT THE P ROPE R FIX ER
FO R FIX ING T HE SL IDING
METAL H OUSI NG.
2. Use LEFT/RIGHT button to select one of the above 4 parts. Then press
ENTER or PLAY/PAUSE button to enter it.
3. Use LEFT/RIGHT/UP/DOWN button to select a item you want set, then
press ENTER or PLAY/PAUSE button to conform it.
4. After finishing setting, continuously press LEFT button to exit to System
Settings Main Menu.
UNIT CHA SSIS
PLA STIC TRIM O UT
DASH BO ARD
FR ONT PANEL
SLID ING M ETAL HOUS ING
TO DRAW T HE CH ASSI S OUT OF THE
SLIDING M ETAL H OUSING, IN SERT
THE LEFT A ND RIGHT K EY PLATES
INTO THE R IGHT POSITION O F THE
2 SIDES OF THE CHASSIS.
*
During setting up, pressing SETUP button can exit from System Settings
Menu and resume normal playback.
The 4 parts of the System Settings Main Menu are described as follows:
NOTE
REMOVE THE DECK TRANSPO RT
SCREWS BEFORE OPERATIN G IT.
REMOVE THE SLIDIN G
METAL HOUSING
TO IN STAL L THE FRON T PANEL BA CK
TO T HE UN IT CH ASSIS , FIRS TLY M AKE
THE LEFT GUIDE BLOC K HO LE AND THE
LEFT CYLI NDER LINE UP AN D THE N
COM BINE THEM , THEN MAK E THE
RIGH T GUIDE BL OCK H OLE AND T HE
RIGH T CYL INDER LINE UP A ND THEN
COM BINE THEM , FINA LLY FL IP TH E
FRO NT PA NEL UP TO T HE PA NEL
HOU SING TILL IT CLIP INTO POSIT ION.
A. General Setup Page
OSD Lang
TV Type
TV Display
MP 3 M O D E
PB C
HD C D
PRES S RESET BUTTON TO R ESUM E
THE DISTO RTED PROG RAM WHEN
THE LCD DISPLAY IMPROPE RLY AND
SOM E BUT TONS ARE I NVALI D.
RESE T BUT TON
TO REMOVE THE FRONT PANEL
FROM THE UNIT CHASS IS,
FIRS TLY PUSH THE FRONT
PANEL HOLD RIGHTWARDS AND
THEN PULL TH E LEFT SIDE OF
THE FRONT PANEL OUTWARDS
TO INSE RT DI SC INTO CO MPARTMENT OR EJECT DISC OR
REMOVE THE FRONT PAN EL FR OM THE UNIT CHASSIS,
PRESS THE OPEN B UTTON TO FLIP DOWN THE FRONT PANE L.
PDF created with FinePrint pdfFactory trial version http://www.pdffactory.com
OSD Lang
This item is for selecting the language of the SYSTEM MENU and all
operating prompt interface displayed during playback.
TV Type
This product supports output of various TV Type, including PAL, AUTO,
NTSC and PAL 60.
2. Common Operation
3. During JPEG playback, press one of the >/< buttons to change the angle
of viewing picture that is displaying as follows:
>: 90 deg cw; <: 90deg ccw
During JPEG playback, press the STOP or MENU button to stop playing and
return to the root menu.
*
During JPEG playback, the following buttons are not available: SLOW-FWD,
SUBTITLE, TITLE, ANGLE, STEP, OSD, RETURN, RDM, PROGRAM, ZOOM,
AUDIO, CLEAR,PBC, INT and A-B.
*
In JPEG mode,the other operations are same as ones in MP3/WMA mode.
5 .16 MP4 Operation
1. The root menu is displayed on TV when beginning to switch on DISC mode,
then it will automatically play the first fi le.
During playback, press the STOP button to stop playing and return to the
root menu.
2. When displaying the root menu, press the direction buttons to select your
desired FOLDER or file, then press the OK or PLAY button to open the
FOLDER, or play the selected file.
When displaying the root menu, you can also use the number buttons to
select the serial number of the file and play the file.
*
The ANGLE, TITLE, PBC, MENU, RETURN, PROGRAM, CLEAR, RDM,
INT, SUBTITLE buttons are not valid.
*
The other functions are same as ones in VCD disc.
5 .17 ESP Function
There is ESP function for all formats of discs.
5 .18 USB and MMC/SD Reader Operation
Power on the DVD player, then insert the USB storage or MMC/SD Card,
and then the monitor will display the root menu of the USB storage or MMC
/SD Card.
All the operations are same as ones in the disc of the same format file.
PDF created with FinePrint pdfFactory trial version http://www.pdffactory.com
1. POWER BUTTON
Under power on mode, press POWER button shortly to turn off the unit but
the clock still display on LCD. Press power button again to turn on the unit.
Under power on mode, press POWER button long, it will display SEE-YOU
on LCD for a while and then fully turn off.
2. MODE BUTTON
Press the MODE button on the front panel or the remote control to select
DISC(after inserting a disc), RADIO, USB(after inserting a USB storage),
CARD(after inserting a SD/MMC card) mode.
3. AUDIO MODE AND LEVEL BUTTONS(KNOBS)
Press the SEL button on the front panel or the remote controller to select the
audio modes such as VOL, BAS, TRE, BAL and FAD, then press + or - button or
rotate the VOL knob to adjust the level of them.
If turn off the controlling power and then turn on it, the level of all audio modes
will be one of them before turning off the controlling power. If turn off ACC power
and then turn on it, the level of volume will be the defaulted one, and the other 4
audio modes will still be one of them before turning off the ACC power .
Press or hold the + or - button or rotate the VOL knob to directly adjust the
volume level.
Hold the SEL button to display the defaulted volume level, then press the + or button or rotate the VOL knob to set a new one.
4. MUTE BUTTON
Press the MUTE button on the front panel or the remote control to eliminate
the sound immediately and the audio mute indicator on the LCD will be flashed,
press it again to resume the normal playback.
5. CLOCK DISPLAY AND ADJUSTMENT BUTTONS
Press the CLK button on the front panel or the remote control to display
time on LCD.
Long press the CLK button to flash MINUTE, and then rotate the VOL knob on
the front panel or press or hold the + or - button on the remote control to
adjust MINUTE; then press the CLK button to flash HOUR, and then rotate the
VOL knob on the front panel or press or hold the + or - button to adjust HOUR.
Finally long press the CLK button to confirm it and exit.
6. EQ(P-EQ) BUTTON
Press the EQ button on the remote control or the P-EQ button on the front
panel to select the preset music equalizer curves: OFF, POP, ROCK, CLAS.
The sound effect will be changed.
7. OPEN BUTTON
Press the OPEN button on the front panel to flip down the front panel from the
unit, then you can insert the disc into the disc compartment or press the EJECT
button on the back of the front panel to eject the disc or remove the front panel.
8. IR REMOTE SENSOR
9. LOUDNESS BUTTON
Press LOUD button to enhance bass level immediately when bass is not enough.
5.12 Change Audio Language
3. Radio Operation
1. PRESET STATION [ 1-6 ] BUTTONS
A]. To memorize the current frequency, press any one of the six preset
buttons(1-6) on the front panel or on the remote control hold for more
than 2 seconds.
B]. To recall the preset memory, press one of the preset buttons [1-6].
2. AS/PS BUTTON
A)When shortly pressing the APS button on the front panel or the A/P button on
the remote control, the radio searches for each preset station stored in the
current band from the preset station 1. At the time, the name of the band, the
frequency of the preset station and the name of the number button, will display
on LCD, and it will display for 5 seconds for every preset station. after searching
the preset stations for a circle, it will stop searching and listen to the preset
station 1.
B)When long pressing the APS or A/P button (more than 1 second), the radio
searches from the current frequency and checks the signal strength level in the
current band until 1 cycle searching is finished. And then the 6 stations of the
strongest signal will preset to the corresponding memory banks of the number
buttons. When the AS operation is finished, the radio will listen to the preset
station 1. (For the 3 bands of the FM1/FM2/FM3, the AS operation will be finished
once a time. It can store 3x6 FM stations and 2x6 AM stations)
3. BAND BUTTON
In RADIO mode, press BAND button on the remote control or on the front
panel to select your desired radio band and word which band is selected will be
displayed on LCD.
4. TUNE/SEEK UP/DOWN BUTTONS
Press ^ or v button on the remote control or >>| or |<< button on the front
panel to manually tune up or down for your desired station. Press them hold for
more than 2 seconds to automatically tune up or down for the stronger station.
1. In the state of DVD disc playing, press the AUDIO button repeatedly
on the IR remote control to select the desired language type.
(depend on the disc used)
2. In the state of MP3/WMA disc playing, the AUDIO button on the IR
remote control is not available.
3. In the state of VCD/CD disc playing, press the AUDIO button repeatedly
to select LEFT MONO, RIGHT MONO, MIX-MONO and STEREO sound
mode, no language function.
5.13 Changing of Video Signal System
During playback of DVD/VCD disc, press the P/N button repeatedly to
change VIDEO SIGNAL SYSTEM mode as follows:
--> PAL --> PAL 60 --> NTSC-->AUTO -->
5.14 Look over Sequence Number or Playback Time of Title/Chapter/Track
1. In the state of DVD disc playing, press the OSD button repeatedly on the
remote control to display: Title Elapsed, Title Remain, Chapter Elapsed,
Chapter Remain and Display Off.
2. In the state of VCD disc playing, press the OSD button repeatedly on the
remote control to display: Single Elapsed , Single Remain , Total Elapsed,
Total Remain and Display Off.
3. In the state of CD disc playing, press the OSD button repeatedly on the
remote control to display: Single Elapsed, Single Remain, Total Elapsed,
Total Remain.
5. STEREO/MONO BUTTON
Press ST button on the remote control to select STEREO or MONO sound
mode for FM band.
4. In the state of MP3/WMA disc playing, press the OSD button repeatedly
on the remote control to display: Filelist Repeat Off, Filelist Repeat On.
6. LO/DX BUTTON
In RADIO mode, when the signal of the distance radio station are very weak
and the receiving effect is bad during tuning, check whether there is the word
LOC on LCD or not. If there is the word LOC on LCD, press this button to turn
off the LOC function, then tune again for the distance radio station; when the
signal of the local radio station are too strong to lead that the interference to
the receiving local radio station is very strong during tuning, press this button
to turn on the LOC function to display the word LOC on LCD, then tune again
for the local radio station.
5.15 Playback the Picture CD in JPEG Format
PDF created with FinePrint pdfFactory trial version http://www.pdffactory.com
1. The root menu is displayed on TV when beginning to switch on DISC mode.
2. When displaying the root menu, press the direction buttons to select your
desired JPEG picture file, then press the OK or PLAY button to display the
JPEG picture in full screen from the JPEG picture of the selected file.
When displaying the root menu, you can also use the number buttons to
select the serial number of the JPEG picture file and display the JPEG
picture in full screen from the JPEG picture of the selected file.
2 Use number button to input desired sequence number of title/chapter/
track with desired sequence.
3 Use direction button to move cursor onto START item, then press PLAY
/PAUSE button toplay the programmed tracks in programmed order.
4 To exit program playback, firstly press PROGRAM button to enter program
interface again. At the time, the cursor will stay on STOP item, pressing
ENTER button will move cursor onto EXIT item, then press ENTER or PLAY
/PAUSE button to exit program playback and resume normal playback.
* when you input a wrong figure, press CLEAR button to delete it.
* In the state of MP3/WMA disc playing, the PROGRAM button is invalid.
5.9 Playback in Different Angle
1. In the state of VCD/MP3/WMA/CD disc playing, the ANGLE button on the
IR remote control is not available.
2. In the state of DVD disc playing, press TITLE button on the IR remote
controller to display title menu and then root menu on TV screen, or
press MENU or RETURN button to directly display root menu, then
select ANGLE FUNCTION item and then press ENTER button on the
IR remote control to turn into ANGLE function playing mode, then
press the ANGLE button repeatedly on the IR remote control to view
in different angle.(This function is only for the DVD discs with ANGLE
function)
5.10 Playback in Zoom Mode
1. Under DVD/VCD/ Data CD mode, during playback, press ZOOM button
continuously to enlarge a certain area of the images on TV screen with
these multiples: X2, X3, X4, X1/2, X1/3,X1/4,ZOOM OFF.
2. Press UP/DOWN/LEFT/RIGHT buttons to select the area you want to
enlarge(only for DVD).
5.11 Change Caption Language
In the state of DVD disc playing, press SUBTITLE button repeatedly to
select the language of the caption or turn off the caption.(depend on the
disc used.)
In the state of VCD/CD/MP3/WMA disc playing, the SUBTITLE button
is not available.
PDF created with FinePrint pdfFactory trial version http://www.pdffactory.com
4. Basic Disc USB MMC/SD Operation
4.1 Begin playback
1. Press POWER button to turn on the DVD player.
After turning on the DVD player, please turn on TV set, and ensure that
the video output of TV is the video input from the DVD player connected
with TV set.
? Common Question
Q: There is not anything is displayed on TV screen when the DVD player
is turned on:
A: Ensure that the TV was set to right video input(not TV channel); for
example, if you make VIDEO1 INPUT of TV and DVD player connected
with each other, then you need set TV to VIDEO1.
2 . Press OPEN button to flip down the front panel.
3. Insert Disc Into Disc Compartment(Label surface up)
4. Push the front panel back to combine with the head unit properly for
the other operation.
use UP or DOWN button to select a desired item, then press ENTER
button to enter it. Use UP/DOWN/LEFT/RIGHT button to select the
item for inputting number for title/chapter/ track, then use the number
buttons to input the corresponding serial number, finally press the
ENTER button to play.
2. In the state of CD disc playing, press the INT button on the remote
controller to play the previous 10 seconds part of each track on disc.
Press PLAY/PAUSE or INT button to resume normal playback (depend
on the disc used).
3. In the state of MP3/WMA disc playing, INT button is not available.
5.6 Playback a selected track/chapter or from a specified time
1. In the state of DVD disc playing, press SEARCH button to enter title/
chapter SN. search mode or title/chapter time search mode.
2. In the state of VCD/CD disc playing, press SEARCH button to enter
disc time/track time search mode or track SN. Search mode .
3. In the state of MP3/WMA disc playing, press SEARCH button to enter
track SN. Search mode or track time search mode.
5.7 Playback in Random
! NOTE
1. For some discs that are seriously scratched or poor manufacturing or
recording quality, it may not play.
2. If the player can not read disc under normal condition, please try to
eject and reload the disc again.
3. Remark:
1) In addition to normal CD and DVD, this unit supports to play CD-R,
CD-R/W, DVD-R and DVD-R/W as well; however, depending on the
conditions of the recording equipment, recording program or the disc
itself, some CD-R, CD-R/W, DVD-R or DVD-R/W may not play.
2) When dealing with CD-R, CD-R/W, DVD-R or DVD-R/W recording,
too high recording speed may result in poor signal quality and therefore,
it is recommendable to select as lower as possible recording speed.
In the state of DVD/VCD/MP3/WMA/CD disc playing, press the RDM
button to switch between SHUFFLE ON/OFF.
5.8 Program Playback
It allows you to enter the order in which you want some chapters/tracks
in DVD/VCD/CD disc to play.
1 During playback, press PROGRAM button to enter a program interface
as follows:
for DVD disc
for VCD/CD disc
Program:TT(n)/CH(- -)
6
TT:
CH:
1
- -
6
- -
2 TT: CH:
7
TT:
CH:
2
- -
7
- -
3 TT: CH:
8
TT:
CH :
3
- -
8
- -
4 TT: CH:
9
TT:
CH :
4
- -
9
- -
10 TT:
CH :
5
- -
10
- -
5 TT: CH:
Exit
PDF created with FinePrint pdfFactory trial version http://www.pdffactory.com
Program: Track(01-n)
1 TT: CH:
START
STOP
Exit
START
STOP
5.4 Playback Repeatedly
4.2 Pause Playback
5.4.1 ONE/ALL Repeat
1. Under mode of DVD disc playback:
Press the REPEAT button on the IR remote control or the 2RPT button
on the front panel to select Repeat Chapter, Repeat Title, Repeat All
or Repeat Off.
2 . Under mode of VCD disc playback:
Press PBC button on the IR remote control to turn PBC function ON/
OFF(the defaulted mode is PBC OFF):
1) When it is in the state of PBC ON, during playing, the REPEAT button
on the IR remote control or 2RPT button on the front panel are not
available.
2) When it is in the state of PBC OFF, during playing, press the REPEAT
button on the IR remote control or 2RPT button on the front panel to
select Repeat Track, Repeat All or Repeat Off.
3. Under mode of MP3/WMA/CD disc playback:
Press the REPEAT button on the IR remote control or the 2RPT button
on the front panel to select Repeat Track, Repeat All or Repeat Off.
5.4.2 A-B Repeat
Press A-B button if you want to repeat a specific segment on a disc that
you define:
1. Press A-B button at a point (A) where you want it to be the start point of
the repeat segment. Press A-B button again at a point (B) where you want
it to be the terminal point of the repeat segment. Then it will play the segment repeatedly.
In the state of DVD/VCD/CD/MP3/WMA disc playing, press the PLAY
/PAUSE button on IR remote control or the front panel of DVD
player to pause the playback, press the PLAY/PAUSE button again
to resume normal playback.
4.3 Stop Playback
In the state of DVD/CD disc playing, press the STOP button once on IR
remote control to stop the playback, then press the PLAY/PAUSE
button to resume the normal playback; press the STOP button twice to
full stop the playback, then press the PLAY/PAUSE button to start
playback from the beginning of disc again .
In the state of MP3/WMA disc playing, press the STOP button on IR
remote control to stop the playback. Then press the PLAY/PAUSE
button to playback from beginning of the track was playing before
stopping .
In the state of VCD disc playing, press PBC button on the IR remote
controller to turn PBC function ON/OFF:
1)When it is in PBC on, during playback, press the STOP button once on
IR remote control to stop the playback, then press the PLAY/PAUSE
button to resume the normal playback; press the STOP button twice to
full stop the playback, then press the PLAY/PAUSE button to display
disc menu.
2)When it is in PBC off, during playback, press the STOP button once on
IR remote control to stop the playback, then press the PLAY/PAUSE
button to resume the normal playback; press the STOP button twice to
full stop the playback, then press the PLAY/PAUSE button to start
playback from the beginning of first track.
2. To cancel A-B repeat mode and resume normal playback, press A-B button
for the third time.
4.4 Select Chapter/Track with NEXT/PREV. or >>| / |<< Buttons
5.5 Playback in Scan Mode
1. In the state of DVD/VCD disc playing, press the INT button on the
remote control to display an optional interface on the monitor:
For DVD disc:
For VCD(PBC OFF) disc:
Select Digest Type
Title Digest
Chapter Digest
Title Interval
Chapter Interval
Select Digest Type
Track Digest
Disc Interval
Track Interval
PDF created with FinePrint pdfFactory trial version http://www.pdffactory.com
Press the NEXT/PREV. or the >>| / |<< button during playback to select the
next or last chapter/track to playback.
NOTE: PRESS THE NEXT//PREV. OR >>| / |<< BUTTON MULTIPLE TIMES
TO ADVANCE MULTIPLE CHAPTERS FORWARD OR BACKWARD.
4.5 Select Chapter/Track with Number Buttons
1. In the state of VCD disc playing, press PBC button on the IR remote
controller to turn PBC function ON/OFF:
1).When it is in the state of PBC ON and display the PBC menu on the TV
screen if the disc include PBC menu, press one(s) of NUMBER buttons
to select the track/chapter to playback; During playing, the NUMBER
buttons are not available.
2).When it is in the state of PBC OFF, press one(s) of the NUMBER buttons
to select the chapter/track to playback.
* To select one track of the 1st-9th tracks to play, should input 0 number
firstly, then input the serial number.
2. In the state of DVD disc playing, during playback, press one(s) of the
NUMBER buttons to select the chapter/track to playback.
* To select one track of the 1st-9th tracks to play, should input 0 number
firstly, then input the serial number.
3. In the state of CD/MP3/WMA disc playing, press the NUMBER buttons
to select the chapter/track to playback.
4.6 Select Chapter/Track with Root/PBC Menu (If the disc includes the
root/PBC menu)
1. In the state of DVD disc playing
1) press TITLE button on the IR remote control to play the title and then
root menu or press MENU button to directly display root menu on the TV
screen.
2)Press JOG button on the IR remote control to select your desired chapter
/track or other icon.
3) Press ENTER or PLAY/PAUSE button to play the selected chapter/track; or
to display the sub-menu on the TV screen, then press JOG button to select
your desired chapter/track or other icon, then press ENTER or PLAY/PAUSE
button to play the selected chapter/track.
2. In the state of CD disc playing
The TITLE, PBC, MENU, RETURN, JOG and ENTER buttons are disabled.
3.In the state of VCD disc playing, press PBC button to turn PBC on or off.
1) When starting to turn on PBC function, it will play from the beginning of disc
till it display PBC menu on TV screen if the disc include PBC menu. You also
can press RETURN button to display PBC menu.
Then press one(s) of the NUMBER buttons to select track/chapter to play.
2) When starting to turn off PBC function, it will also play from the beginning
of disc, but it can not show the PBC menu.
4.In the state of MP3/WMA disc playing:
During playing, the root menu is displayed on TV all the time(and the TITLE
or MENU button is not available), press the UP/DN button to select your
desired track, then press the ENTER button to play the selected track.
PDF created with FinePrint pdfFactory trial version http://www.pdffactory.com
4.7 Terminate Playback
1. Press OPEN button to flip down the front panel, then press EJECT button
to eject disc from disc compartment and then take away the disc.
2. press the POWER button on the IR remote control or the front panel of the
DVD player to turn off the DVD player.
NOTE:
1) In the state of DVD/VCD disc playing, if the POWER button or the ignition
is shut off and then turn on the power or the ignition, the DVD player will
resume play at the exact spot where playback was interrupted.
2) In the state of CD/MP3/WMA disc playing, if the POWER button or the
ignition is shut off and then turn on the power or the ignition, the DVD
player will playback from the beginning of the track played before power off.
5. Advanced Disc USB MMC/SD Operation
5.1 Playback with Speed
Press the F.FWE/NEXT or F.BWD/PREV. button long continuously on
the IR remote control or the >>| or |<< button long continuously on
the front panel during normal playback to fast play forwards or backwards at the speeds such as 2X, 4X, 8X,16X,32X.
During speed playback, press PLAY/PAUSE button to resume normal
playback.
5.2 Playback with Slow Speed
Press SLOW FWD button during playback to execute the Slow Forward
function. With each consecutive press the SLOW FWD button, the playback speed decreases. The speed levels in Slow Forward for each function mode as follows:
DVD/VCD:1/2X, 1/4X, 1/8X, 1/16X, normal.
CD/MP3/WMA: not available.
During slow playback, press PLAY/PAUSE button to resume normal
playback.
5.3 Playback with still frame
If the unit is currently running DVD/VCD/SVCD disc, press STEP button to
enable the unit to enter still frame mode. press STEP button consecutively
to display the still frame forward step by step. Press PLAY/PAUSE button
to resume normal playback.