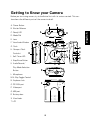
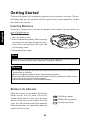
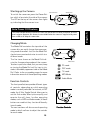
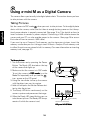
1
This equipment has been tested and found to comply with the limits for a Class B digital device, pursuant to part 15 of the FCC Rules. These limits are designed to provide
reasonable protection against harmful interference in commerical installation. This equipment generates, uses and can radiate radio frequency energy and if not installed and
used in accordance with the instructions, may cause harmful interference to radio
communications. However, there is no guarentee that interference will not occur in a
particular installation. If this equipment does cause harmful interferece to radio or television reception, detectable by turning the equipment in question off and on, the user is
encouraged to try to correct the intereference by one or more of the following measures:
Reorient or relocate the receiving antenna; Increase the distance between the equipment and the receiver; Connect the equipment to an outlet on a different circuit than
that which the receiver is connected to; Or consult the dealer or an experienced radio/
TV technician for help.
1
English
FCC Notice
CAUTION
English
Do not place this camera in a damp or dusty location.
This may cause a fire or electric shock.
Do not place this camera in a location affected by oil fumes or
steam, such as near a cooking stove or humidifier. This may cause
a fire or electric shock.
Do not leave this camera in places subject to extremely high
temperatures, such as in a sealed vehicle or in direct sunlight.
Exposure to high temperatures may adversely affect the camera
case and internal components and cause a fire.
Do not cover or wrap the camera or the AC power adapter with a
cloth or quilt. This may cause heat to build up and distort the
case or cause a fire. Always use the camera and its accessories
in well-ventilated locations.
Take care that the camera is not bumped when it is being moved.
This may cause the camera to malfunction.
While it is switched on do not move the camera after transferring
images to PC. (if you are using the AC power adapter, unplug the
adapter from the AC power outlet after you have switched off
the camera.) Ensure that any connector cords or cables to other
devices are disconnected before moving the camera. Failure to
do so may damage the cords or cables and cause a fire or electric
shock.
When handling the camera, always unplug it from the power
source (batteries or AC power adapter) for safety. (If you are not
going to use the AC power adapter, unplug the adapter from the
AC power outlet after you have disconnected the camera.) Failure
to do so could result in an electric shock.
2
When leaving the camera unused for long periods, such as
during a vacation, always unplug the camera from the power
source (batteries or AC power adapter ) for safety.
(If you are not going to use the AC power adapter, unplug the
adapter from the AC power outlet after you have disconnected
the camera.)
Failure to do so could result in a fire.
Contact your dealer or local authorized service facility to
request cleaning of the interior of the camera every two years.
Allowing dust to accumulate in the camera for long periods
without cleaning the camera interior may cause a fire or electric
shock.
Cleaning is best performed prior to seasonal periods of high
humidity.
Consult with your dealer or local authorized service facility for
information on the cost of cleaning your camera.
Do not use batteries other than those specified for use
with your camera.
The use of unsuitable batteries may result in the batteries
splitting or leaking and causing a fire, injury or corrosion of the
battery compartment.
When fitting a battery into the camera, check the polarity
markings on the battery ( + and )to ensure that you insert the
battery correctly.
Incorrect battery polarity may result in the batteries splitting
or leaking and causing a fire, injury or corrosion of the battery
compartment.
Remove the batteries if the camera will not be used for an
extended period of time. The batteries may leak and cause a
fire, injury or soiling of the battery compartment. If the
batteries leak, clean and wipe the battery compartment
carefully and install new batteries. Wash your hands carefully
if you touch the battery fluid.
3
English
CAUTION
WARNING
English
Unplug from
power socket.
Do not use this camera when it is emitting smoke, is unusually
hot to the touch, is emitting any unusual odor or noise, or is in
any other abnormal state. Use of the camera in any of these
situations may cause a fire or electric shock. Stop using the
camera immediately, turn the camera off, and then disconnect
the power source (batteries or AC power adapter). (If you are
using the AC power adapter, unplug the adapter from the AC
power outlet after you have disconnected the camera.) After
checking that smoke is no longer being emitted, contact your
dealer or your local authorized service facility and request
repairs. Never attempt to repair this camera yourself as this is
dangerous.
Do not use the camera if any water has entered the camera.
Switch the camera off, and then disconnect the power source
(batteries or AC power adapter). (If you are using the AC power
adapter, unplug the adapter from the AC power outlet after you
have disconnected the camera.) Then contact your dealer or
your local authorized service facility. Do not continue to use
the camera as this may cause a fire or electric shock.
Do not use the camera if any foreign objects have entered the
camera. Turn the camera off, and then disconnect the power
source (batteries or AC power adapter). (If you are using the
AC power adapter, unplug the adapter from the AC power outlet
after you have disconnected the camera.) Then contact your
dealer or your local authorized service facility. Do not continue
to use the camera as this may cause a fire or electric shock.
If the camera has been dropped or the camera case has been
damaged, switch the camera off, and then disconnect the power
source (batteries or AC power adapter). (If you are using the AC
power adapter, unplug the adapter from the AC power outlet
after you have disconnected the camera.) Then contact your
dealer or your local authorized service facility. Do not continue
to use the camera as this may cause a fire or electric shock.
4
WARNING
Take care that the camera is not exposed to moisture and that
water does not get into the camera. Take particular care when
it is raining or snowing or when you are using the camera at the
beach or near water.
Water in the camera may cause a fire or electric shock.
Do not insert or drop metallic or inflammable foreign objects
into the camera through access points such as the Compact
Flash card slot.
This may cause a fire or electric shock.
Do not attempt to modify this camera. This may cause a fire or
electric shock.
Do not disassemble
Do not remove the camera casing. This may cause an electric
shock. Internal inspection, maintenance and repairs should be
carried out by your dealer or local authorized service facility.
Do not use in wet areas.
Do not use this camera in the bathroom. This may cause a fire
or electric shock.
Do not touch
Do not touch the power plug during a thunderstorm if you are
using the AC power adapter.
This may cause an electric shock.
5
English
Do not place the camera in unstable locations such as on a
wobbly table or sloping surface where the camera may fall or
tip over and cause injury.
WARNING
English
Never use this camera, look through the viewfinder, or watch
the LCD (liquid crystal display)while you are operating a moving
car, motorcycle or bicycle.
This may cause a traffic accident.
Do not attempt to charge the alkaline battery.
This may cause the battery to split or leak, causing fire or injury.
Do not carry or store a battery with objects such as metal pens,
necklaces, coins or hairpins. This could short circuit the positive
+ and negative poles of the battery.
This may cause the battery to split or leak, resulting in fire or
injury.
Do not heat or attempt to disassemble a battery, and do not
place a battery in water or in a fire.
Any of these may cause the battery to split or leak, cause fire
or injury.
Do not subject a battery to strong impacts, such as hitting it
with a hammer, stepping on it or dropping it. Any of these may
cause the battery to split or leak, cause fire or injury.
Use only the specified batteries or AC power adapter specified
for use with this camera.
The use of other power sources may cause a fire.
6
Table of Contents
Introduction ............................................................................... 8
Overview ............................................................................................................................................ 8
What’s included in the package ....................................................................................... 8
System Requirements (Windows) ................................................................................ 8
Getting to Know your camera ........................................................................................... 9
Inserting Batteries ...................................................................................................................... 10
Using the Power Adapter (Optional Accessory) ............................................... 11
Attaching the Strap ................................................................................................................... 11
Using a Compact Flash Card (Optional Accessory) ........................................ 12
Operating the Camera ............................................................................................................. 12
Using e-mini M as a Digital Camera ............................... 14
Taking Pictures ................................................................................................................................ 14
Camera Funtion Controls ....................................................................................................... 15
Viewing Pictures ...................................................................... 16
Downloading Pictures into your PC ............................... 18
Using e-mini M as an MP3 Player .................................... 20
Where to get MP3 music files .........................................................................................
Transferring MP3 files into e-mini M ...........................................................................
MP3 Playback Controls ..........................................................................................................
Playing MP3 Music ......................................................................................................................
20
20
21
21
Using e-mini M as an Audio Recorder .......................... 22
Recording Controls ....................................................................................................................
Recording Audio ...........................................................................................................................
Playing Recorded Audio .........................................................................................................
Transferring Recorded Audio into your PC .............................................................
23
23
24
24
Erasing Contents from e-mini M ..................................... 25
Erasing a Single Picture, MP3 Song or Recorded Audio ............................. 25
Erasing All Pictures, MP3 Songs or Recorded Audio Tracks ................... 26
Using e-mini M as a PC Camera ........................................ 27
Appendix 1 : LCD Icons ......................................................... 27
Appendix 2 : Specifications .............................................. 28
English
Getting Started ........................................................................ 10
Introduction
English
Overview
Digital Camera, MP3 Player, Digital Audio Recorder, and PC Camera in One!
Thank you for purchasing the e-mini M, which is the most incredible camera ever
developed. This portable digital camera not only takes pictures, but also features a builtin MP3 player, audio recorder, and PC camera in the same camera unit.
The e-mini M is equipped with 2MB built-in memory. In addition, it provides a memory
card slot which can be inserted with a (Type I) Compact Flash Card. To download digital
pictures and audio from the camera into your PC, a USB cable connection is all that is
required. This single USB connection also allows you to transfer MP3 songs into the
camera. When you use it as a PC camera, you can videoconference over the Internet.
See and talk to people on the internet face-to-face.
What’s Included in the Package
e-mini M unit
USB cable
● Video cable
● Earphone
● 2 x AA alkaline batteries
Software CD-ROM
Quick start guide
● Owner’s Manual
● Pouch and Strap
●
●
●
●
CD-ROM content :
Disk 1 : MGI Photosuite SE, Multimedia Camera Manager, MP3 trial software
Disk 2 : MGI Video Wave SE+
Optional accessories :
Compact Flash Card
AC Adapter
System Requirements (Windows)
Personal computer with minimum Pentium 166 MHz with graphic card
Microsoft windows 98/98SE/2000/ME operating system
32 MB or more of RAM
80 MB of hard disk space available
Available USB, and CD-ROM drive
Color Display (800x600 24 bit or higher recommended)
8
Getting to Know your Camera
Before you start using camera, try to familiarize first with its various controls. This section shows the different parts of the camera in detail.
B
A. Power Button
C
B. Shutter Release
A
D
D. Mode Dial
English
C. Ready LED
E
E. Lens
F. Viewfinder Window
F
I
T
J
K
G
G. Flash
H. Compact Flash
Card slot
H
I. Self-Timer LED
J. Stop/Erase Button
K. Audio Record /
L M
Play Mode Selection
Button
R
L. Microphone
M. 4-Way Toggle Control
N. Earphone Jack
O. DC IN 5V port
S
P. Video port
Q. USB port
R. Battery door
S. Viewfinder
T. LCD
9
N
DCIN
5V
VIDEO
O
P
Q
Getting Started
The e-mini M comes with standard accessories such as batteries, and strap. This section shows how you can use them with the camera. Basic camera operations are also
described in this section.
English
Inserting Batteries
The battery compartment is located the bottom of the camera. You will need to use
two AA-size batteries.
To install the batteries:
1. Open the battery cover.
2. Insert the batteries properly. When inserting,
make sure that you follow the polarity directions which are indicated on the inner side
of the battery cover.
3. Close the battery cover.
Note
You do not need to use batteries when you connect a USB cable between the camera and
your PC. The camera receives power from the PC through the USB port.
Warning
If you won’t be using the camera for an extended period of time, remove the batteries to
prevent leaks or corrosion.
● Never use manganese batteries. Never mix old and new batteries.
● Low temperatures under 0 C may reduce the output efficiency of batteries, thereby shortening the time that the camera is able to operate.
● The recommended battery is AA-size alkaline battery.
●
Battery Life Indicator
When the camera has full power, the Battery
Power icon on the LCD panel will be fully
shaded. When power is low, only the lower
portion of the icon will be shaded. This indicates that the batteries need to be replaced.
When the batteries are completely dead, the
camera will not turn on.
10
Full Battery power
Medium Battery power
Low Battery Power
Using the Power Adapter (Optional Accessory)
If you prefer to operate the camera on AC
power, a Power Adapter (5v/2.4a) is available.
Simply connect the power adapter into the DC
IN port on the camera, and then plug the power
adapter into a wall socket.
English
Note
You do not need to use the power adapter when
you connect a USB cable between the camera
and your PC. The camera receives power from
the PC through the USB port.
Warning
Always be sure to use the power adapter from the manufacturer. Any other adapter may
cause damage to the camera, which is not covered under the warranty.
Grasp the power adapter, not the cord, when unplugging it from a wall socket.
● If the power cord gets damaged (exposed or severed wires, etc.), purchase a new power
adapter from your local dealer. Using a damaged cord may cause fire or electrical shock.
● Switch off and disconnect the AC adapter from the camera before unplugging it from the
wall socket.
●
●
Attaching the Strap
2
If you intend to take pictures outdoors, you may
find it convenient to carry the camera using the
strap provided.
To attach the strap to the camera:
1. Pass the small loop at the end of the strap
through the hole in the camera’s strap holder.
2.Insert the other end of the strap through the
loop and pull it tight until the strap is securely
attached to the camera.
11
1
English
Attaching the Earphone
You need to attach the earphone to the camera to listen to the MP3 songs or the recorded
audio. To attach the earphone to the pouch and
the camera:
1. Insert the end of earphone connector into
the hole at the side of the pouch.
2. Pull it down until the cord comes out to the
other hole of the pouch.
3. Plug the earphone connector into the Earphone Jack.
Using a Compact Flash Card (Optional Accessory)
The camera already comes with 2MB internal
memory for storing pictures, MP3 songs and
recorded audio. If this is not enough for you,
you can extend the camera’s storage capacity
by inserting a compact flash memory card.
To insert a Compact Flash memory card:
1. Open the card slot cover located at the side
of the camera.
2. Make sure the back side of the CF card toward the front of the camera and the end
with pin-connector toward the card slot.
3. Push the memory card all the way into the
card slot until you hear a clicking sound.
4. Close the card slot cover.
Note
To remove the Compact Flash memory card, push
the Eject button located next to the card slot.
Operating the Camera
Once there is power supplied to the camera
(through installed batteries, the optional power
adapter or through a USB cable connected between the camera and your PC), you can start
using the camera.
12
Starting up the Camera
Power Button
Ready LED
To switch the camera on, press the Power Button which is located at the side of the camera.
The LED on the top of the camera then lights
up, indicating that the camera is on.
The camera automatically switches off after no operations has been performed for more
than 2 minutes. However, this feature is not available when the camera is supplied with power
from a USB or AC Adapter connection.
Changing Mode
The Mode Dial located on the top side of the
camera lets you easily change from one operating mode to another. Just turn the Mode Dial
clockwise or counterclockwise to switch to a
different mode.
The five icons shown on the Mode Dial indicate the five operating modes of the camera.
To select a particular mode, that you want, keep
on turning the Mode Dial until its icon is situated at the middle, uppermost side of the Mode
Dial . Refer to the succeeding pages for more
information on each of these operating modes.
Mode Dial
PC mode
DSC mode
TV mode
MP3 Mode
Audio Mode
Function Controls
The front panel buttons provide different types
of controls, depending on which operating
mode is currently selected. For instance, in DSC
mode, the 4-Way Toggle Control allows you to
set the flash mode, select picture quality, and
operate the self-timer. In other operating
modes, such as MP3 and Audio modes, all these
buttons are used but they function differently
in each mode.
The next sections will discuss each operating
mode in detail and how to adjust the controls
for each mode.
13
Function Controls
English
Auto Power Off Feature
Using e-mini M as a Digital Camera
The camera allows you to easily take digital photo shots. This section shows you how
to take pictures with the camera.
English
Taking Pictures
Set the camera to DSC mode
when you want to take pictures. To take digital photo
shots with the camera, make sure that there is enough battery power or that the optional power adapter is properly connected. (See page 10 to 11 for details on how to
insert batteries or connect a power adapter.) Connecting a USB cable between the
camera and your PC can also provide power to the camera. (See page 18 to see an
illustration of how to connect a USB cable.)
If you want to use a Compact Flash memory card to store your pictures, insert the
memory card before you start taking pictures. Without a Compact Flash memory card
installed, the pictures are stored in built-in memory. (For more information on inserting
memory card, see page 12 ).
To take a picture:
1. Turn the camera on by pressing the Power
Button. The Ready LED located on the top
of the camera then lights up.
2. Make sure that the camera is in DSC mode.
To set the camera to DSC mode
mode, turn the
Mode Dial repeatedly until you see the
icon appear on the LCD panel.
3. Using the viewfinder to line up the camera
with the object you want to capture.
4. Hold still and press the Shutter Release button to take the picture.
5. The Ready LED blinks continuously as the
camera captures and processes the image.
6. When the Ready LED stops blinking, you can
take the next picture. (The Ready LED always
remains lit while the camera is on.)
1
4
2
Remaining
photo shots
Battery Power
Picture Quality
Self-timer
No Flash or Auto Flash
LCD panel in DSC Mode
14
Erasing Pictures
You cannot erase pictures from the camera memory while in DSC mode. To erase pictures, set
the camera to TV mode
mode. For more information, see page 25 .
Camera Function Controls
Press to set the
Flash mode
Press to select the type
of Picture Quality
No Flash
Normal Quality
Fine Quality
Auto Flash
Press to set the SelfTimer on or off
Self Timer On
Flash Mode
The camera has two different flash modes:
No Flash - The flash is disabled no matter what the ambient brightness of the
surroundings is.
Auto
- The camera automatically fires the flash when the lighting in the
surrounding is not bright enough.
Picture Quality
Two different elements determine the quality of the pictures that you take. The first is
resolution. The camera takes pictures at 640 X 480 resolution. The second element is
the amount of compression applied to captured images. This camera can capture images using two types of compression settings: Normal (high compression) and Fine (low
compression). The lower the compression, the higher the image quality, but the fewer
the number of pictures that can be taken. Higher compression gives acceptable image
guality for most purposes and allows more pictures to be taken.
Normal Quality - 32 pictures
Fine Quality
- 16 pictures
(The total number of images that can be stored may vary according to the free space
available, the picture quality setting used for each shot, and the complexity of the subjects.)
Self-Timer
The Self-Timer gives a 10-second delay between the time you press the Shutter Release button and the time the picture is taken. The 10-second delay is indicated by the
Self-Timer LED flashing once per second for seven seconds, then twice per second for
the last three seconds.
After a picture has been taken, the Self-Timer is cancelled automatically. It needs to be
activated each time you wish to use it to take a picture.
15
English
When you’re using e-mini M as a digital
camera, use the 4-Way Toggle Control located on front of the camera to select
the options you want to use when taking
your picture.
Viewing Pictures
Show off your pictures to an audience by connecting your camera to a TV. This section
shows you how to properly connect the camera to a TV and display your pictures on
TV.
English
Using the Camera in TV Mode
Set the camera to TV Mode
when you want to use a TV to view the pictures you
have taken or when you want to erase pictures from the camera memory.
TV Function Contorls
While in TV mode, use the 4-Way Toggle Controls located on the front of the camera to
set the TV standard, advance forward or backward when viewing pictures, and to erase
pictures.
Press to set the
Note
TV standard
NTSC
For details on erasing pictures, see page 25.
Standard
PAL
Standard
Viewing Pictures on your TV
Set the camera to TV Mode
when you
want to use a TV to view the pictures you have
taken.
Press to enable
Erase mode
Press to go
backward and view
Press to go forward
and view the next
the previous picture
picture
Connecting the Camera to your TV
Use the video cable that comes with the package to connect the camera to a TV.
1. Connect one end of the video cable to the
video port on the camera.
2. Connect the other end of the cable to the
video input socket of your TV (normally at
the back).
16
VIDEO
IN
TV
VIDEO PORT
Defining the TV Output
Before you can view pictures on your TV, you need to identify first what TV standard
your television uses. If you have an NTSC standard TV, set the camera to NTSC. If you
have a PAL standard TV, set the camera to PAL. (The figure on page 16 illustrates clearly
how to set the TV output for your camera.)
After properly connecting your camera to a TV,
you can start viewing your pictures.
1. Turn on your TV. Switch your TV to Video
mode. (Usually, your TV's remote control will
have a TV/Video switch button. Simply press
this button.
2. Set the camera to TV mode
mode.
3. Use the 4-Way Toggle Control in front of the
e-mini M to select the camera’s TV output.
Press TV to select NTSC or PAL, depending
on the TV system you are using.
4. Also use the 4-Way Toggle Control to select which picture to display on the TV
screen. Press Right (+) to display the next
picture, or press Left (-) to display the previous picture.
As you advance forward and backward
through your pictures, the LCD Panel shows
the current picture number you are viewing.
5. If you want to resume taking pictures, disconnect the camera from your TV. Then, set
the camera to DSC mode again.
2
3
Press to set the TV standard
PAL
NTSC
Standard
Standard
Press to
enable Erase
mode
4
Press to go
backward and view
the previous picture
Battery Power
4
Press to go forward
and view the next
picture
Picture Number
TV Standard (NTSC or PAL)
LCD Panel in TV Mode
Note
You can also view your pictures on your computer monitor by downloading them to your PC
For more information about downloading pictures into your PC, see page 18.
17
English
Viewing your Pictures
Downloading Pictures into your PC
Once your camera’s memory or the inserted Compact Flash Card is full, you can erase
the pictures and take more pictures. If you want to keep the pictures you have taken,
you should save them first by transferring them to your computer. This section shows
you how to download pictures into the computer.
English
Note
For details on how to erase pictures, see page 25.
Connecting the Camera to Your PC
Use the USB cable provided to connect the
camera to your PC.
1 Connect one end of the USB cable into the
USB port on your PC.
2 Connect the other end of the USB cable to
the USB port on the camera.
3 Turn on the camera.
Note
You do not need to use batteries or the power
adapter when you have connected a USB cable between the camera and your PC. The camera receives power from the PC through the USB port.
Camera driver and software installation
The following software applications and camera driver are included in the DSC Application Suite CD.
● MGI Photosuite III SE - allows you to enhance the pictures with fast, friendly, fun PC
photography software.
● MGI VideoWave SE+ - is powerful PC video software that allows even novice users to
create professional videos quickly and easily.
● Multimedia Camera Manager- provides you with an efficient way to manage and transfer
pictures, audio and MP3 files between the camera and computer.
● MP3 trial software - convert your music CD to MP3 file format and enjoy your favorite
songs anywhere.
18
In order to transfer files between e-mini M and PC, you need to install the Multimedia
Camera Manager which is included in the DSC Application Suite. It is provided with
auto-setup program. Once you insert Disk 1 into the CD-ROM drive, the DSC Application
Suite main menu will appear. Alternatively, you still can run “setup.exe” file in the root
directory of CD-ROM drive.
English
1 . Insert the Disk 1 into CD-ROM drive
2. Click on the checkbox to select the
software you would like to install.
3. Follow the on screen instructions to
complete driver and the application
software installation.
4. Restart the computer. After restarting the
computer, a DSC Application Suite shortcut
icon will appear on the desktop.
Note
The system requirements and operation of each
bundled software application may vary. For more
information, please refer to their respective software help menu.
Getting your Pictures
To get pictures from the camera and transfer
them to your PC:
1. Make sure that the camera is securely connected to your PC and the camera driver is
installed.
2. Set the camera to PC mode
mode.
3. Double-click the DSC Application Suite
Shortcut icon on the desktop.
4. Click the Multimedia Camera Manager button .
5. Drag or copy the image files from the folder
of Multimedia Camera Manager to the folder
on your hard disk to which you want to transfer them.
6. Once the copy process has been completed,
the images will have been successfully have
downloaded from the camera to your PC.
19
2
Using e-mini M as an MP3 Player
To use the e-mini M as an MP3 Player, you need to first transfer MP3 songs from your
PC into the camera. This section tells you where you can get MP3 files as well as how
to upload them into camera and then play them.
Where to Get MP3 Music Files
English
There are basically three ways of getting MP3 songs:
● From the Internet
Now, there are Web sites on the Internet which allow you to download MP3 songs.
There are also Web sites which sell popular music from well known artists in MP3 format.
Using your Web browser, you can search for such Web sites and then download MP3
files by purchasing them online.
● MP3 CDs
You can purchase MP3 music CDs. These CDs are capable of storing many more songs
than traditional music CDs because of MP3 compression.
● Record from your personal CD collection
Another way of getting MP3 files is by converting music tracks from traditional music
CDs into MP3 files in your PC. You need to use an MP3 encoding software in order to do
this. MP3 encoders are available on the Internet, and you can just download and use
them to transform your favorite CD collection into MP3 files.
With MP3 encoding software, you may also convert .WAV audio files into MP3 format.
For more information about the operation of MP3 software, please refer to its respective software help.
Copyright Protection
Music, especially from recorded artists, is protected by copyright. Distributing or sharing MP3
files without authorization is an infringement against international copyright laws.
Transferring MP3 Files into the e-mini M
To transfer MP3 music files into the e-mini M:
1. Please insert a Compact Flash Card which you can buy from the computer accessory
shop.
20
2. Make sure that the camera is securely connected to your PC using the USB cable
provided. (See page 18 for a clear illustration
on how to connect the USB cable.)
3. Set it to PC mode
.
4. Double-click the DSC Application Suite
shortcut icon on the desktop
5. Click the Multimedia Camera Manager button
6. Select the MP3 songs you want to transfer,
and then drag the MP3 files into the Multimedia Camera Manager folder
7. Once the copy process has been completed,
the MP3 songs will have been successfully
uploaded from your PC to the camera.
English
2
Note
You do not need to use batteries or the power adapter when you have connected a USB cable
between the camera and your PC. The camera receives power from the PC through the USB
port.
MP3 Playback Controls
Press to increase
the volume level
While in MP3 mode, use the Shutter Release
button and the 4-Way Toggle Control located
on the front of the camera to control the playback of MP3 songs.
Note
For details on erasing MP3 songs, see page 25.
Press to go
Press to go
backward and
select previous
forward and
select the next
MP3 songs
Press to decrease
the volume level
Playing MP3 Music
After you have finished transferring MP3 files,
you are ready to play the songs . Make sure that
your camera has enough battery power or that
the power adapter is connected.
21
MP3 song
English
To play MP3 songs:
1. Connect your earphone to the camera.
2. Set the camera to MP3 mode
.
3. Use the 4-Way Toggle Control on the front
of the camera to adjust the volume. Press the
Up Arrow ( ) to increase the volume level,
or press the Down Arrow ( ) to decrease
the volume level.
4. Use the 4-Way Toggle Control also to select
the MP3 song you want to play. Press Right
(+) to select the next song, or press Left (-)
to select the previous song.
5. To play the selected MP3 song, press the
Shutter Release button.
To pause or resume playback, press the Shutter Release button again.
6. To stop the playback, press the Erase/Stop
button located on the front panel.
5
2
MP3 Song Number/
the volume level
Battery Power
LCD Panel in MP3 Mode
Using e-mini M as an Audio Recorder
Another outstanding feature of the e-mini M is
its built-in audio recorder, which allows you to
record notes, interviews with other people,
lectures, or conferences. You can record and
then play back the audio in the camera, as well
as transferring the recorded content to your PC.
Press to increase
the volume level
Recording Controls
Press to toggle
Set the camera to Audio Mode (
) when
you want to use the audio recording feature.
Use the Shutter Release button and the 4-Way
Toggle control located on the front of the camera to start, pause and stop the recording, play
the recorded audio, or erase the audio.
22
between audio
recording and
playback
Press to
go backward
and select the
previous
recorded audio
Press to
decrease
Press to go
forward and select
the next
the volume
recorded audio
level
Note
For details on erasing recorded audio, see page
25 .
Recording Audio
1
7
2
4
Audio Recording
mode
Note
Audio Track
Number
If you keep on pressing the Shutter Release button in between recordings, audio will always be
recorded on the same track. Make sure you press
the Stop button when you want to end an audio
segment and do a new recording on the next
track.
23
Battery Power
LCD Panel in Audio Mode
English
3 5 6
1. Set the camera to Audio mode
.
2. Press the AUDIO REC/PLAY button to enter
Audio Record Mode, the RECORD will appear in the LCD panel
3. Press the Shutter Release button to start
recording.
4. If you are recording your own voice, speak
to the microphone on the front of the
camera. Or, if you are recording interviews,
meetings or lectures, place the camera in a
location where audio can be recorded. Make
sure that the microphone is facing the
speaker to get a clear recording.
5.To pause the recording, press the Shutter Release button.
6.To continue recording on the same track,
press the Shutter Release button again.
7.To stop recording, press the Erase/Stop button located on the front of the camera.
English
Playing Recorded Audio
To play the recorded audio:
1. Connect your earphone to the camera.
2. Make sure that the camera is set to Audio
mode
.
3. Press the AUDIO REC/PLAY button to enter
PLAY mode. PLAY will appear on the LCD
panel
4. Use the 4-Way Toggle Control on the front
of the camera to adjust the volume. Press the
Up Arrow ( ) to increase the volume level,
or press the Down Arrow ( ) to decrease
the volume level.
5. Use the 4-Way Toggle Control also to select
the audio track you want to play. Press Right
(+) to select the next track, or press Left (-)
to select the previous track.
6. To play the selected track, press the Shutter
Release button.
To pause or resume playback, press the Shutter Release button again.
7. To stop playback, press the Erase/Stop button located on the front panel.
Transferring Recorded Audio
into your PC
e-mini M records audio in .WAV format. After
recording, you can transfer the audio into your
computer.
To transfer recorded audio from the camera
into your PC:
1. Connect the Camera to your PC using the
USB cable provided. (See page 18 for a clear
illustration on how to connect the USB cable.)
2. Set the camera to PC mode
mode.
3. Double-click the DSC Application Suite short
cut button icon on the desktop
4. Click the Multimedia Camera Manager button
24
6
2
5
7
3
4
Audio Playback
mode
Audio Track
Number
Battery Power
LCD Panel in Audio Playback Mode
5. Select the audio track you want to transfer, and then drag the files from the folder of
Mutlimedia Camera Manager to the folder on your hard disk to which you want to
transfer them.
6. Once the copy process has been completed, the recorded audio will have successfully downloaded from the camera to your PC.
You do not need to use batteries or the power adapter when you have connected a USB cable
between the camera and your PC. The camera receives power from the PC through the USB
port.
Erasing Contents from the e-mini M
When both the camera’s internal memory and any additional Compact Flash Card are
full, it’s is time to erase some or all of their contents to free up storage space. Before
you erase anything, however, make sure that you first transfer the contents to your PC
if you still want to use them.
Erasing a Single Picture, MP3 Song or Recorded Audio
To erase a single picture, MP3 song or recorded audio:
1. Set the camera to the appropriate operating mode:
● To erase a picture, set to TV mode
.
● Erase an MP3 song, set to MP3 mode
.
● To erase a recorded audio, set to AUDIO
mode
.
2. Enter Erase mode by pressing the Erase/Stop
button located on the front of the camera.
3. Use the 4-Way Toggle Control on the front
of the camera to select the picture, MP3
song, or audio track number you want to
erase. Press Right (+) repeatedly to skip
forward, or press Left (-) repeatedly to go
backwards, until the number that you want
appears on the LCD panel.
4. Press the Shutter Release button to erase
the selected number.
5. Press the Erase/Stop button to exit Erase
mode.
25
2
3
4
3
English
Note
Erasing a Picture (TV mode)
Erasing an MP3 Song (MP3 mode)
Erasing a Recorded Audio
English
(AUDIO mode)
Erasing All Pictures, MP3 Songs or Recorded Audio Tracks
To erase all pictures, MP3 songs or recorded
audio tracks:
1. Set the camera to the appropriate operating
mode:
● To erase all pictures, set to TV mode
.
● To erase all MP3 songs, set to MP3 mode.
To erase all recorded audio tracks, set to
AUDIO mode
.
2. Enter Erase mode by pressing the Erase/Stop
button located on the front of the camera.
3. Keep pressing the Right (+) or Left (-) of the
4-Way Toggle Control until the message
ERASE ALL appears on the LCD panel.
4. Press the Shutter Release button to erase
all pictures, MP3 songs, or recorded audio
tracks, depending on which operation mode
you are currently in.
●
Erasing All Pictures (TV mode)
Erasing All MP3 Songs (MP3 mode)
2
3
3
4
Erasing All Recorded Audio Tracks
(AUDIO mode)
26
This camera features a USB device that complies with Windows 98 plug-and-play
specifications. You don’t need to turn off your PC, before making the connection. Just
plug camera’s USB cable connector into the USB port of your PC, then everything is
ready to go.
1 . Make sure the Multimedia Camera Manager is installed. (For details, see Camera driver
and software installation section on page 18)
2. Make sure the camera is connected to the PC by its USB cable. (For details, see
Connecting to the computer on page 18)
3. Set the camera to PC mode
4. Launch your own video conference software, such as Microsoft NetMeeting
Note
For more information about the video conference application software, please refer to its respective software help menu.
Appendix 1: LCD Icons
PC mode
Erase Icon
DSC Record mode
Volume Icon
TV mode
Pause Icon
MP3 Mode
Digital Icon
MP3 Play
Auto Flash
Audio Mode
No Flash
Audio Play
Normal Quality
Audio Record
Fine Quality
Full Battery power
TV (PAL)
Medium Battery power
TV (NTSC)
Low Battery Power
Self-Timer On
27
English
Using e-mini M as a PC Camera
English
Appendix 2: Camera Specifications
Image Sensor
CMOS Image Sensor
Image Size (HxV)
640x480 pixels
Resolution Mode
640x480 pixels
Internal Memory
2MB Flash Memory
External Memory
Compact Flash Card (Type 1)
Image Storage 2MB
Approximately up to 32 pictures (Normal)
External Connectors
AC adapter/ USB / Video Output (NTSC / PAL),
Earphone Output
Optical Viewfinder
Built-in
LCD Display
B/W LCD for text display
LED Indicator
Self-timer (red, on front) ; Ready (green, on top)
Lens
Fixed focus lens
Power supply
2 X AA-size Alkaline Batteries; AC Adapter 5V DC / 2.4 A ;
MP3
Playback MP3 File
Voice
Record/Playback WAV File
Flash Mode
Flash Modes Auto, Off
DC5V from USB port
Flash Range
0.5m - 1.5m
Self-timer
10 sec delay
Exposure
Auto
White Balance
Auto
Shutter
Electronic shutter (Auto)
Compression method
JPEG base
Auto Power OFF
120 sec after no operation
Weight
136 g (without Battery and CF card)
Dimensions
91 x 80 x 35 mm
For North American technical support, please call 888.7.KONICA, Mon-Fri 9am to 6pm Eastern
28