1
REFERENCE ALL WEATHER
OUTDOOR SPEAKER
OWNER'S MANUAL
OUTDOOR SPEAKERS
IMPORTANT SAFETY INSTRUCTIONS
1. READ these instructions.
2. KEEP these instructions.
3. HEED all warnings.
4. FOLLOW all instructions.
KLIPSCH REFERENCE ALL-WEATHER LOUDSPEAKERS
(AW-400, AW-500, AW-525, AW-650, AW-500-SM models)
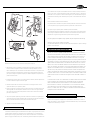
The Klipsch Reference All-Weather loudspeakers are two-way designs using a high
performance bass driver for the low frequencies. A Tractrix Horn with a 90˚ x 90˚ coverage
pattern attached to a 1” diameter compression driver for clean and efficient reproduction of
the high and midrange frequencies.
5. DO NOT use this apparatus near water.
6. CLEAN ONLY with dry cloth.
7. DO NOT block any ventilation openings. Install in accordance with the manufacturer's
instructions.
8. DO NOT install near any heat sources such as radiators, heat registers, stoves, or other
apparatus (including amplifiers) that produce heat.
9. DO NOT defeat the safety purpose of the polarized or grounding type plug. A polarized plug
has two blades with one wider than the other. A grounding type plug has two blades and a
third grounding prong. The wider blade or the third prong are provided for your safety. If
the provided plug does not fit into your outlet, consult an electrician for replacement of the
obsolete outlet.
(AW-800-SW)
The AW-800-SW is an innovative approach that delivers low frequency sound in outdoor
applications. This subwoofer has been designed to complement any of the Reference AllWeather two-way speakers and deliver strong bass response in a variety of applications. It
incorporates both a low-pass crossover as well as a high-pass crossover. This ensures a
seamless blend between the subwoofer and the models used for high-frequency reproduction and allows for simple wiring configurations.
Klipsch Reference All-Weather loudspeakers are constructed from UV-resistant, glass-reinforced polypropylene and are remarkably durable against the elements. They can be painted to match any trim or siding color.
10. PROTECT the power cord from being walked on or pinched, particularly at plugs,
convenience receptacles, and the point where they exit from the apparatus.
11. ONLY USE attachments/accessories specified by the manufacturer.
12. USE only with a cart, stand, tripod, bracket, or table specified by the manufacturer, or sold
with the apparatus. When a cart is used, use caution when moving the cart/apparatus
combination to avoid injury from tip-over.
13. UNPLUG this apparatus during lightning storms or when unused for long periods of time.
14. REFER all servicing to qualified service personnel. Servicing is required when the apparatus
has been damaged in any way, such as power-supply cord or plug is damaged, liquid has
been spilled or objects have fallen into the apparatus, the apparatus has been exposed to
rain or moisture, does not operate normally, or has been dropped.
This symbol indicates that there are important operating and maintenance instructions
in the literature accompanying this unit.
This symbol indicates that dangerous voltage constituting a risk of electric shock is
present within this unit.
WARNING: To reduce the risk of fire or electrical shock, do not expose this apparatus to rain or
moisture.
PLACEMENT
The Reference All-Weather models are perfect for patios, decks, swimming pools, porches
or any other place where exposure to the elements makes conventional loudspeaker usage
unsuitable.
(AW-400, AW-500, AW-525, AW-650, AW-500-SM models)
To achieve the best performance from your speakers, place the pair on the same wall
facing the listening area and space them six to fifteen feet apart. In the case of the
AW-500-SM, only one of these may be used in some installations. It is best to center the
speaker on the listening area in these cases. When two are used, follow the same placement guidelines for the other models. For a higher quality stereo image, angle down, or toe
in, the speakers toward the primary listening area. This is especially important in
installations that place the speakers well above ear level. Some additional bass will result if
you place the speakers in a corner or near a wall. This provides greater bass coupling due
to the additional reflected energy from the walls.
(AW-800-SW)
The AW-800-SW can be installed in a large variety of locations due to bass frequencies
being less directional than high frequencies. You will achieve better results if it is installed
in a corner or near a wall where additional energy can be reflected from the walls.
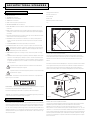
WALL MOUNTING
WARNING: Voltages in this equipment are hazardous to life. No user-serviceable parts inside.
Refer all servicing to qualified service personnel.
CAUTION: Changes or modifications not expressly approved by the manufacturer could void the
user’s authority to operate this device.
ABOUT YOUR KLIPSCH PURCHASE
Thank you for your purchase of Klipsch outdoor loudspeakers. After reading this manual and
connecting your system, you will hear the result of over 55 years of stringent engineering and
class-leading research and development. Like all Klipsch products, your outdoor loudspeakers
feature Klipsch Tractrix® Horn-loaded Technology—the guiding design for the first Klipschorn®
developed in 1946 and for every product that has followed. Horn-loading allows your speakers
to deliver high sensitivity, low distortion, flat frequency response and wide dispersion, which
translates to unequaled power, detail and dynamics, the hallmarks of “The Klipsch Sound.”
Please be sure to fill out the warranty card at the back of this manual or online at
www.klipsch.com so we are better able to serve you. Again, thank you for choosing Klipsch
and we hope that your speakers bring life to your music for many years.
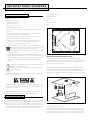
Included with your speakers are "C" style mounting brackets constructed of weatherresistant, powder-coated zinc. These brackets attach to the speaker with the supplied low
profile knobs that thread onto the top and bottom studs protruding from the cabinet. This
allows the speaker to be angled to the left or right when mounted vertically, or up and
down when mounted horizontally.
After determining the desired location and orientation of your speakers, remove the bracket
from the loudspeaker and use it as a template to mark the location of the mounting holes.
Check the alignment of the holes with a torpedo level before drilling the pilot hole. Use
#10-12 2.5” –3” long pan head screws to attach the bracket into a wall stud. Affix the
speaker to the bracket with the supplied knobs. Be sure to leave enough clearance
between the end of the bracket and any adjacent wall or ceiling for installation of
the knobs.
If a wall stud is not available, use the appropriate type of drywall or masonry anchor to
support the weight of the speaker, allowing for a generous safety margin. Please consult
your dealer, custom installer or building contractor in these situations.
You may also use an optional wall or ceiling mount that will fit the provided 3/8” – 16 inserts.
Please see your authorized Klipsch dealer to see which model is right for you.
CONNECTIONS
Note: Proper connection of your speakers to your amplifier or receiver is vital to obtaining good
sound quality. Please follow these directions carefully. Sloppy connections can cause amplifier
malfunction or damage. We recommend that you use 16-gauge or heavier stranded copper wire.
Use a lower gauge (heavier) wire for longer runs to reduce the amount of amplifier power lost due
to the wire’s resistance.
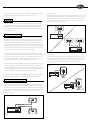
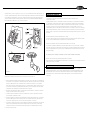
(AW-500-SM model)
The AW-500-SM can operate in two modes. When using one speaker, flip the switch to the
“Stereo” position and connect the “Front” or “Main” left and right channels of your system’s
power amplifier to both inputs (See Figure 2A). When using more than one AW-500-SM,
flip the switch to the “Mono” position and connect either output of your system’s power
amplifier to either input cup (See Figure 2B).
A
Figure 2
BUT FIRST: TYPES OF CONNECTORS
Bare wire. Pull the two conductors apart for about an inch and strip approximately 1/4-inch of
insulation from the end of each. (A wire stripper will simplify this, but you can use an ordinary
pocket knife to cut around and through the insulation down to the wire.) Twist the strands of wire
on each individual conductor tightly together. Loosen the nuts on a pair of binding posts until the
holes through the metal posts are exposed, then insert the bare wire through the holes. Screw the
nuts down finger-tight on the wire. Make sure that no strands of wire are touching from one binding post to the other or to any strands from the other conductor. Failure to observe this precaution
at either end of the connection can result in amplifier malfunction or damage.
Pins. Many pre-made speaker cables are terminated with metal pins. Loosen the nuts on a pair of
binding posts until the holes through the metal posts are exposed, then insert the pins through the
holes. Screw the nuts down finger-tight on the pins — do not overtighten. Make sure that there is
no metal-to-metal contact between the two pins or binding posts. Failure to observe this precaution at either end of the connection can result in amplifier malfunction or damage.
Spade lugs. Some speaker cables are terminated with U-shaped connectors called spade lugs. Loosen
the nuts on a pair of binding posts and slip the spade lugs around the metal posts. Screw the nuts
down finger-tight on the lugs and inspect to ensure they have remained firmly in place. Make sure that
there is no metal-to-metal contact between the two lugs or binding posts. Failure to observe this precaution at either end of the connection can result in amplifier malfunction or damage.
B
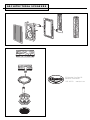
(AW-800-SW)
The AW-800-SW can operate in two modes. If the amplifier you are using is mono, flip the
switch to the left and connect the output of your system’s amplifier to either of the two
input connectors (See Figure 3A). For stereo use, flip the switch to the right and connect
the output of your system’s amplifier to both input connectors (See Figure 3B).
A
Figure 3
OTHER TYPES OF SPECIALTY CONNECTORS ARE AVAILABLE TO FACILITATE HOOKING UP YOUR SPEAKERS.
PLEASE CONSULT YOUR AUTHORIZED KLIPSCH DEALER FOR SUGGESTIONS AND FURTHER DETAILS.
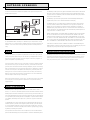
SPEAKERS TO AMPLIFIER: KEEPING IT STRAIGHT
(AW-400, AW-500, AW-525, AW-650 models)
One of the most important things about hooking up your speakers is keeping them in the same
polarity, or phase. If they are connected out of phase, bass and sound imaging will be degraded.
The easiest way to ensure that your speakers are wired in phase is to always connect the positive
and negative output terminals on your amplifier or receiver to the matching input terminals on your
speakers: positive (“+”, color-coded red) to positive and negative (“–”, color-coded black) to
negative. (See Figure 1.)
Figure 1
B
OUTDOOR SPEAKERS
You can then connect two all-weather series speaker to the right and left outputs of the
AW-800-SW (See Figure 4).
This Warranty is invalid if (a) the factory-applied serial number has been altered or removed from
this product or (b) this product was not purchased from a KLIPSCH authorized dealer. You may
call 1-800-KLIPSCH to confirm that you have an unaltered serial number and/or you purchased
from a KLIPSCH authorized dealer.
This Warranty is only valid for the original purchaser and will automatically terminate prior to
expiration if this product is sold or otherwise transferred to another party.
This Warranty does not cover cosmetic damage or damage due to misuse, abuse, negligence,
acts of God, accident, commercial use or modification of, or to any part of, the product. This
Warranty does not cover damage due to improper operation, maintenance or installation, or
attempted repair by anyone other than KLIPSCH or a KLIPSCH dealer which is authorized to do
KLIPSCH warranty work. Any unauthorized repairs will void this Warranty. This Warranty does not
cover product sold AS IS or WITH ALL FAULTS.
Figure 4
An optional Weatherization and Safety kit is available from your Klipsch dealer. You may
want to install this in instances where the speaker connections are directly exposed to the
elements. This kit also includes a security cable that provides a secondary measure of
safety.
PAINTING
The grille and cabinet of your speakers may be painted. For best results, lightly sand all
surfaces to be painted (cabinet and grille) with 300-400 grit sandpaper. Wash these surfaces with a moistened cloth dipped into a mild detergent to remove any fingerprints or
grease. Allow speaker to dry before painting.
Care must be taken to mask off the front of the speaker to protect the tweeter, woofer and
front panel form over spray. This will maintain the existing uniform dark color behind the
grille and protect the woofer and tweeter from being damaged by the paint. Affix masking
tape to the inboard wall of the grille groove and attach plastic or newspaper to the tape to
cover the entire front panel of the speaker. Also before painting, mask the speaker wire
binding posts on the rear of the cabinet to preserve their color-coding and conductivity.
Make sure that the black and red knobs are screwed down to cover the threaded metal
shafts and wrap the knobs securely in masking tape.
Remove the grille before painting. For best results, use several light coats of paint instead
of one heavy coat. This will help prevent the perforations in the grille from becoming
clogged with paint.
WARRANTY—U.S. AND CANADA ONLY
The Warranty below is valid only for sales to consumers in the United States or Canada.
KLIPSCH, L.L.C. ("KLIPSCH") warrants this product to be free from defects in materials and workmanship (subject to the terms set forth below) for a period of five (5) years from the date of purchase. During the Warranty period, KLIPSCH will repair or replace (at KLIPSCH’s option) this product or any defective parts (excluding electronics and amplifiers). For products that have electronics or amplifiers, the Warranty on those parts is for a period of two (2) years from the date of
purchase.
To obtain Warranty service, please contact the KLIPSCH authorized dealer from which you purchased this product. If your dealer is not equipped to perform the repair of your KLIPSCH product, it can be returned, freight paid, to KLIPSCH for repair. Please call KLIPSCH at 1-800-KLIPSCH for instructions. You will need to ship this product in either its original packaging or packaging affording an equal degree of protection.
Proof of purchase in the form of a bill of sale or receipted invoice, which is evidence that this
product is within the Warranty period, must be presented or included to obtain Warranty service.
REPAIRS OR REPLACEMENTS AS PROVIDED UNDER THIS WARRANTY ARE THE EXCLUSIVE REMEDY OF THE CONSUMER. KLIPSCH SHALL NOT BE LIABLE FOR ANY INCIDENTAL OR CONSEQUENTIAL DAMAGES FOR BREACH OF ANY EXPRESS OR IMPLIED WARRANTY ON THIS PRODUCT. EXCEPT TO THE EXTENT PROHIBITED BY LAW, THIS WARRANTY IS EXCLUSIVE AND IN LIEU
OF ALL OTHER EXPRESS AND IMPLIED WARRANTIES WHATSOEVER, INCLUDING BUT NOT LIMITED TO, THE WARRANTY OF MERCHANTABILITY AND FITNESS FOR A PRACTICAL PURPOSE.
Some states do not allow the exclusion or limitation of incidental or consequential damages or
implied warranties so the above exclusions may not apply to you. This Warranty gives you specific
legal rights, and you may have other rights, which vary from state to state.
WARRANTY OUTSIDE THE UNITED STATES AND CANADA
The Warranty on this product if it is sold to a consumer outside of the United States or Canada
shall comply with applicable law and shall be the sole responsibility of the distributor that supplied this product. To obtain any applicable warranty service, please contact the dealer from
which you purchased this product, or the distributor that supplied this product.
ARCHITECTURAL SPEAKERS
CONSIGNES DE SÉCURITÉ IMPORTANTES
Outillage minimum nécessaire
1. LIRE ces instructions.
Tournevis cruciforme n° 2
2. CONSERVER ces instructions.
Pince à dénuder
3. RESPECTER tous les avertissements.
Niveau à bulle
4. SUIVRE toutes les instructions.
Détecteur de poteaux d’ossature murale
5. NE PAS utiliser cet appareil à proximité de l’eau.
Scie
6. NETTOYER UNIQUEMENT avec un chiffon sec.
7. NE PAS OBSTRUER les orifices de ventilation. Installer conformément aux instructions du
constructeur.
8. NE PAS installer à proximité de sources de chaleur telles que les radiateurs, les grilles de
chauffage, les cuisinières et les autres appareils (notamment les amplificateurs) dégageant
de la chaleur.
9. Cet appareil doit être branché sur une prise de courant par une fiche conforme aux normes
locales de mise à la terre et de polarité électrique.
10. PROTÉGER le cordon d’alimentation en s’assurant qu’il ne risque pas d’être piétiné ou
écrasé, en particulier près des fiches, des blocs multiprises et de son point de sortie de
l’appareil.
11. UTILISER UNIQUEMENT les accessoires préconisés par le constructeur.
12. UTILISER exclusivement avec un chariot, un support, un trépied, une console ou un bâti
recommandé par le fabricant ou vendu avec l’appareil. Lorsqu’un chariot est utilisé,
faire preuve de prudence pour déplacer l’ensemble chariot/appareil afin d’éviter un
renversement pouvant causer des blessures.
13. DÉBRANCHER cet appareil en cas d’orage ou lorsqu’il reste inutilisé pendant une longue
durée.
14. CONFIER tout travail de dépannage à un réparateur professionnel compétent. Faire réparer
l’appareil en cas de dommages, par exemple si la fiche ou le cordon d’alimentation a été
endommagé, si un liquide a été renversé ou si un objet a pénétré à l’intérieur de l’appareil,
si l’appareil a été exposé à la pluie ou à l’humidité, s’il ne fonctionne pas normalement ou
s’il a subi une chute.
Ce symbole indique d’importantes instructions d’utilisation et d’entretien dans la
documentation accompagnant cet appareil.
Figure 1
Placement des enceintes murales encastrables
Conçues pour tout montage standard mural, au plafond ou en faux plafond, les enceintes
murales encastrables Klipsch ont été étudiées pour offrir des années de bon fonctionnement.
L’épaisseur de la cloison sèche ou autre surface de montage doit être d’au moins 10 millimètres.
Pour obtenir la meilleure restitution stéréophonique, il faut placer les enceintes contre un même
mur et à égale distance de la position d’écoute. Pour la diffusion de musique d’ambiance (ou
lorsque la position d’écoute peut varier de façon importante), les enceintes peuvent être
placées en tout endroit pratique, mais la restitution stéréophonique risque alors d’être perdue.
Ce symbole indique qu’une tension dangereuse présentant un risque d’électrocution
est présente dans l’appareil.
AVERTISSEMENT : Pour réduire les risques d’incendie et d’électrocution, ne pas exposer cet
appareil à la pluie ni à l’humidité.
AVERTISSEMENT : Les tensions présentes dans cet appareil peuvent être mortelles. Cet appareil
ne contient pas de pièces pouvant être remplacées par l’utilisateur.
Tout travail de dépannage doit être confié à un réparateur professionnel compétent.
ATTENTION : Les changements ou modifications non expressément approuvés par le fabricant
peuvent annuler le droit de l’utilisateur à utiliser cet appareil.
Figure 2
ABOUT YOUR KLIPSCH PURCHASE
Placement des enceintes de plafond encastrables
Ces nouvelles enceintes architecturales Klipsch ont été conçues pour offrir un son d’excellente
qualité tout en restant discrètes où qu’elles se soient. Pour un fonctionnement optimal dans le
cas d’un montage mural encastré, choisissez parmi les modèles dont la référence se termine
par « W ». Pour un montage au plafond de type encastré, choisissez parmi les modèles dont la
référence se termine par « C ». Les deux types conviennent pour les canaux avant, centraux ou
ambiophoniques ainsi que pour les applications de cinéma-maison ou dans le cadre d’un système acoustique réparti.
Conçues pour tout montage standard au plafond ou en faux plafond, les enceintes de plafond
encastrables Klipsch ont été étudiées pour offrir des années de bon fonctionnement.
L’épaisseur de la cloison sèche ou autre surface de montage doit être d’au moins 10 millimètres. Dans le cas d’une installation en faux plafond, les dalles standard de 2’ x 4’ (61 x 122
cm) et de 2’ x 2’ (60 x 60 cm) sont constituées de matériaux de faible densité pouvant se tasser dans le temps et émettre des vibrations sonores. Pour obtenir le meilleur fonctionnement des
enceintes de plafond encastrables, Klipsch recommande de remplacer le panneau de montage
d’origine par du contreplaqué ou un panneau de fibre de bois de densité moyenne d’une épaisseur de 12 à 19 mm.
cas d’installation dans une pièce acoustiquement lumineuse, comme par exemple une salle de
bains ou une cuisine, il peut être nécessaire de régler le commutateur d’aigus. Si l’enceinte est
placée dans un coin et produit un niveau excessif de graves, il peut être nécessaire de régler le
commutateur de médiums-graves. Vérifiez toujours la position du commutateur avant de fixer la
grille.
Pavillon orientable (modèles muraux encastrables)
Les gammes 3000 et 5000 offrent un pavillon orientable pouvant être tourné vers le bas. Avant
la mise en place de la grille, dirigez avec précaution le pavillon vers la zone d’écoute.
Haut-parleur d’aigus à pavillon pivotant (modèles de plafond encastrables)
Les modèles de plafond Klipsch Reference comportent un haut-parleur d’aigus pivotant permettant de diriger les fréquences élevées. Pour orienter le son directement vers la zone d’écoute, il
suffit de retirer la grille et de régler doucement le pavillon suivant l’angle voulu.
Lors du réglage du haut-parleur d’aigus pivotant, ne pas essayer de tourner sa tige.
Montage à capteur infrarouge (modèles encastrables)
Tous les modèles Reference d’enceintes murales encastrables comportent un capteur infrarouge
placé sur l’écran acoustique.
GARANTIE (ÉTATS-UNIS ET CANADA UNIQUEMENT)
Figure 3
Installation des enceintes (pour une construction neuve, passer à l’étape 3)
1. Découpez dans le mur ou le plafond une ouverture de la taille voulue à l’aide du gabarit
fourni. En l’absence de gabarit, utilisez les dimensions de découpe indiquées sur le site
Klipsch, www.klipsch.com. Ces dimensions sont des valeurs minimales. Si une précision suffisante de la découpe ne peut être obtenue, ajoutez 6 mm à chaque dimension. Veillez à ne
pas couper le câblage ou la tuyauterie déjà en place. Évitez de dégrader les coupe-feu entre
poteaux d’ossature murale.
2. Introduisez dans l’ouverture les fils de l’enceinte (calibre 18 minimum). Veillez à respecter tous
les codes du bâtiment en vigueur dans votre région.
3. Raccordez chaque câble à son enceinte en vous aidant du marquage de couleur ou des
repères de chaque fil pour respecter la polarité.
4. Insérez l’enceinte dans l’ouverture et fixez-la en serrant les deux vis cruciformes (figure 3). Le
verrouillage KWIC du cadre emprisonne ensemble le mur et le cadre. (Les supports Klipsch
pour construction neuve facilitent cette opération à condition de les utiliser avant la mise en
place de la cloison sèche.)
KLIPSCH, LLC (« KLIPSCH ») garantit ce produit contre tout vice de matériaux et de fabrication
(sous réserve des termes établis ci-dessous) pendant une période d’un (1) an à partir de la date
d’achat. Pendant la période de garantie, KLIPSCH réparera ou remplacera (selon son choix) ce
produit ou toute pièce défectueuse. Une preuve d’achat telle qu’une facture ou un reçu d’un
revendeur agréé Klipsch, attestant que le produit est toujours couvert par la garantie d’un an, doit
être présentée ou incluse pour pouvoir bénéficier de la garantie. Cette garantie ne couvre pas les
dégâts résultant d’une utilisation abusive, d’une utilisation à mauvais escient, d’un cas de force
majeure, d’un accident, d’une utilisation commerciale ou de la modification de ce produit ou de
l’un de ses composants. Cette garantie ne couvre pas les dégâts résultant d’une utilisation, d’un
entretien ou d’une installation incorrecte, ou d’une tentative de réparation par quiconque autre
que KLIPSCH ou par une personne non autorisée par KLIPSCH à effectuer une réparation sous
garantie. Toute réparation non autorisée annule la présente garantie. Cette garantie ne couvre pas
les produits vendus EN L’ÉTAT ou ceux SANS GARANTIE QU'ILS SONT EXEMPTS D'ERREUR. Cette
garantie est nulle si la date ou le numéro de série apposé en usine a été modifié ou retiré de ce
produit.
LE SEUL RECOURS DU CLIENT EST LA RÉPARATION OU LE REMPLACEMENT SELON LES TERMES
DE CETTE GARANTIE. KLIPSCH DÉCLINE TOUTE RESPONSABILITÉ POUR TOUT DOMMAGE
DIRECT OU INDIRECT RÉSULTANT DU NON RESPECT DE TOUTE GARANTIE EXPRESSE OU
IMPLICITE RELATIVE À CE PRODUIT. À L’EXCEPTION DES CAS OÙ LA LÉGISLATION L’INTERDIT,
CETTE GARANTIE EST EXCLUSIVE ET REMPLACE TOUTE AUTRE GARANTIE EXPRESSE OU
IMPLICITE, Y COMPRIS, MAIS SANS S’Y LIMITER, LES GARANTIES DE VALEUR MARCHANDE OU
D’ADÉQUATION À UN USAGE PARTICULIER.
GARANTIE À L'EXTÉRIEUR DES ÉTATS-UNIS ET DU CANADA
5. Vous pouvez à présent peindre les grilles avant de les fixer aux enceintes. Les grilles Klipsch
ont été conçues de façon à être compatibles avec la plupart des types de peintures. Veillez à
éviter l’accumulation excessive de peinture dans les ouvertures des grilles.
6. Appuyez sur la grille pour la mettre en place.
COMMANDES DE FONCTIONNEMENT
Commutateur de médiums-graves et d’atténuateur de haut-parleur d’aigus (gammes 3000 et 5000)
Certains modèles comportent un commutateur d’aigus (gamme 3000) ou un commutateur de
médiums-graves et d’aigus (gamme 5000), placé sur l’écran acoustique avant. Ce commutateur
permet un réglage de 0 dB (normal) ou de –3 dB dans les gammes de fréquences respectives. En
Si ce produit est vendu à l'extérieur des États-Unis et du Canada, la garantie doit être conforme aux lois en vigueur et n'engage que la responsabilité du distributeur qui a fourni ce
produit. Pour obtenir un service en garantie, contactez le détaillant chez qui vous avez acheté
ce produit ou le distributeur qui l'a fourni.
ARCHITECTURAL SPEAKERS
INSTRUCCIONES IMPORTANTES DE SEGURIDAD
Mínimo de herramientas requeridas
Atornillador Phillips N° 2
1. LEA estas instrucciones.
Pelacables
2. GUARDE estas instrucciones.
Nivel
3. RESPETE todas las advertencias.
Localizador de parales
4. SIGA todas las instrucciones.
Sierra
5. NO use este aparato cerca del agua.
6. LÍMPIELO SOLAMENTE con un paño seco.
7. NO bloquee las aberturas de ventilación. Instale el aparato de acuerdo con las instrucciones
del fabricante.
8. NO lo instale cerca de fuentes de calor tales como radiadores, rejillas de piso, estufas u
otros aparatos (incluso amplificadores) que generan calor.
9. Este equipo se debe enchufar en un tomacorriente con un enchufe que cumpla con las
normas locales de polaridad eléctrica y conexión a tierra.
10. EVITE que el cordón de alimentación sea pisado o aplastado, en particular cerca del
enchufe o del tomacorriente y en el punto en que el cordón sale del aparato.
11. USE SÓLO los accesorios especificados por el fabricante.
12. USE el aparato solamente con el carrito, pedestal, trípode, soporte o mesa especificado por
el fabricante o vendido con el aparato. Sea precavido cuando mueva el aparato en un
carrito, para evitar las lesiones que pueda producir un volcamiento.
13. DESENCHUFE el aparato durante tormentas eléctricas o cuando no lo vaya a usar durante
largos períodos de tiempo.
14. ENCARGUE todo servicio al personal de servicio calificado. Se requiere servicio cuando el
aparato ha sido dañado de alguna manera, tal como cuando se ha dañado el enchufe o el
cordón de alimentación, han caído líquidos u objetos dentro del aparato o el aparato se ha
dejado caer, ha dejado de funcionar normalmente o ha sido expuesto a la lluvia o a la
humedad.
Este símbolo indica que hay información importante sobre operación y mantenimiento
en los folletos que acompañan a esta unidad.
Este símbolo indica que en esta unidad hay voltajes peligrosos que constituyen un
riesgo de descarga eléctrica.
ADVERTENCIA. Para reducir el riesgo de incendio o de descarga eléctrica, no exponga este
aparato a la lluvia o a la humedad.
Figure 1
UBICACIÓN DE LOS ALTAVOCES EMPOTRADOS EN LA PARED
Los altavoces empotrados en la pared de Klipsch han sido diseñados para funcionar en
cualquier pared de pirca, cielo raso o cielo raso colgante normal y para rendir durante muchos
años. Los requisitos mínimos de construcción son pared de pirca u otra superficie de montaje
de por lo menos 3/8 de pulgada de grosor.
Para maximizar el rendimiento y asegurar el mejor efecto estéreo, los altavoces se deben colocar a la misma distancia del oyente y en una pared común. En ambientes de audición de fondo
(o cuando la posición del oyente puede variar mucho) la ubicación de los altavoces puede ser
donde sea más conveniente, aunque en tales casos se puede perder la formación de imágenes
estéreo.
ADVERTENCIA. Los voltajes que hay dentro de este equipo pueden poner en peligro su vida.
Dentro del dispositivo no hay piezas que el usuario pueda reparar. Encargue todo servicio al
personal de servicio calificado
PRECAUCIÓN. Los cambios o modificaciones no aprobados expresamente por el fabricante
pueden anular la autorización del usuario para hacer funcionar este dispositivo.
ABOUT YOUR KLIPSCH PURCHASE
Sus nuevos altavoces arquitectónicos Klipsch han sido diseñados para producir discretamente
un sonido magnífico dondequiera que los instale. Para lograr un rendimiento óptimo, use los
modelos que terminan en "W", lo cual indica instalaciones en la pared (wall, en inglés). Los
modelos que terminan en "C" deben ser utilizados en aplicaciones empotradas en el cielo raso.
Cualquiera de los dos tipos se puede usar como altavoz de canal frontal, central o surround en
aplicaciones de audio o cine en casa, o como parte de un sistema de sonido distribuido.
Figure 2
Ubicación de los altavoces en el cielo raso
Los altavoces empotrados en el cielo raso de Klipsch han sido diseñados para funcionar en
cualquier pared de pirca o cielo raso colgante y para rendir durante muchos años. Los requisitos mínimos de construcción son pared de pirca u otra superficie de montaje de por lo menos
3/8 de pulgada de grosor. En las instalaciones en cielo raso colgante, las planchas de cielo raso
normales son de 2 pies x 4 pies y de 2 pie x 2 pie, y son de materiales de baja densidad que, con
el tiempo, pueden abombarse o vibrar de manera audible. Para maximizar el rendimiento acústico
de los altavoces empotrados en el cielo raso, Klipsch recomienda que cambie los paneles originales con madera terciada (contraenchapada) o Plancha de Fibra de Densidad Media (Medium
Density Fiberboard, MDF) de 1/2 plg. a 3/4 plg de grosor.
CONTROLES DE OPERACIÓN
Conmutador de atenuador de tweeter y de nivel de frecuencias medias y bajas
(series 3000 y 5000)
Algunos modelos tienen un conmutador de tweeter (serie 3000) o un conmutador de tweeter y
un conmutador de frecuencias medias y bajas (serie 5000) en el bafle frontal. El conmutador
permite seleccionar 0 dB (normal) o -3 dB en la gama de frecuencias respectiva. Si los altavoces se van a instalar en una sala acústicamente brillante, tal como el baño o la cocina, es
recomendable ajustar el conmutador de nivel de tweeter. Si el altavoz se ubica en una esquina y
produce demasiados bajos, puede ser necesario ajustar el conmutador de nivel de frecuencias
medias y bajas. La posición del conmutador debe verificarse siempre antes de poner la rejilla en
el altavoz.
Trompeta pivotante (modelos empotrados en la pared)
Las series 3000 y 5000 tienen una trompeta pivotante que permite orientarla. Antes de instalar
la rejilla, oriente cuidadosamente la trompeta hacia el área de audición.
Tweeter con trompeta basculante (modelos empotrados en el cielo raso)
Los modelos de altavoces Reference de Klipsch empotrados en el cielo raso tienen un tweeter
basculante para dirigir las frecuencias altas. Para dirigir el sonido directamente hacia el área de
audición, simplemente quite la rejilla y ajuste cuidadosamente la trompeta hasta que quede en
el ángulo deseado.
No intente girar el vástago del tweeter cuando ajuste el tweeter basculante.
Montura de sensor infrarrojo (modelos empotrados en la pared)
Todos los modelos de altavoz Reference empotrados en la pared tienen un localizador de sensor
infrarrojo de 1/2 plg. en el bafle.
GARANTÍA FUERA DE LOS ESTADOS UNIDOS Y CANADÁ
Figure 3
Instalación de altavoces (para estructuras en construcción, vaya al paso 3)
1. Haga la abertura de tamaño correspondiente en la pared o en el cielo raso con la plantilla que
se suministra. Si no hay plantilla, las dimensiones de la abertura se pueden ver en el sitio web
de Klipsch, www.klipsch.com. Los tamaños que se indican son mínimos. Si no es posible
lograr cortes precisos, puede agregar 1/4 de plg. a cada dimensión. Tenga cuidado de no cortar los cables o tuberías que pueda haber detrás de la pirca o la plancha de cielo raso. Evite
comprometer los cortafuegos que pueda haber entre los parales.
2. Encamine cable de altavoz (calibre 18 como mínimo) hasta la abertura. Cumpla con todos los
códigos de construcción del área en que vive.
3. Conecte el cable al altavoz de acuerdo con la codificación de color o las marcas del cable
para mantener la polaridad correcta.
4. Inserte el altavoz en la abertura y fíjelo apretando los tornillos Phillips (Figura 3). La cerradura
de marco KWIC aprieta el marco contra la pared. (Los soportes Klipsch para estructuras en
construcción simplifican esto si se usan antes de la instalación de la pirca.)
5. A esta altura, usted puede pintar las rejillas antes de ponérselas a los altavoces. Las rejillas de
Klipsch han sido diseñados para aceptar la mayoría de los tipos de pintura. Se debe tener
cuidado para evitar una acumulación excesiva de pintura en las perforaciones de la rejilla.
6. Encaje la rejilla a presión.
Si este producto se vende a un consumidor fuera de los Estados Unidos o Canadá, la
garantía deberá cumplir con las leyes correspondientes y será responsabilidad exclusiva
del distribuidor que lo suministró. Para obtener cualquier servicio de garantía aplicable,
comuníquese con el minorista que le vendió este producto o con el distribuidor que lo
suministró.
ARCHITECTURAL SPEAKERS
3502 Woodview Trace, Suite 200
Indianapolis, Indiana 46268
1. 800 . KLIPSCH • www.klipsch.com