1
R-K701
KENWOOD CORPORATION
FRANÇAIS
INSTRUCTION MANUAL
ENGLISH
COMPACT HI-FI COMPONENT SYSTEM
DEUTSCH
NEDERLANDS
ITALIANO
ESPAÑOL
B60-5506-10 01 JA (E)
0408
Before applying power
Caution : Read this page carefully to ensure
safe operation.
ENGLISH
Units are designed for operation as follows.
U.S.A. and Canada ............................... AC 120 V only
Australia .............................................. AC 240 V only
Europe . ............................................... AC 230 V only
Other countries ................... AC 110-120 / 220-240 V
switchable
Safety precautions
WARNING : TO PREVENT FIRE OR ELECTRIC SHOCK, DO NOT
EXPOSE THIS APPLIANCE TO RAIN OR MOISTURE.
CAUTION: TO REDUCE THE RISK OF ELECTRIC SHOCK, DO NOT REMOVE COVER (OR BACK). NO USER-SERVICEABLE PARTS INSIDE.
REFER SERVICING TO QUALIFIED SERVICE PERSONNEL.
CAUTION
RISK OF ELECTRIC SHOCK
DO NOT OPEN
THE LIGHTNING FLASH WITH ARROWHEAD SYMBOL, WITHIN AN EQUILATERAL TRIANGLE, IS INTENDED TO ALERT THE USER TO THE PRESENCE OF UNINSULATED "DANGEROUS VOLTAGE" WITHIN
THE PRODUCT’S ENCLOSURE THAT MAY BE OF SUFFICIENT MAGNITUDE TO CONSTITUTE A RISK OF
ELECTRIC SHOCK TO PERSONS.
THE EXCLAMATION POINT WITHIN AN EQUILATERAL TRIANGLE IS INTENDED TO ALERT THE
USER TO THE PRESENCE OF IMPORTANT OPERATING AND MAINTENANCE (SERVICING) INSTRUCTIONS IN THE LITERATURE ACCOMPANYING THE APPLIANCE.
The marking of products using lasers
(For countries other than U.S.A., U.S.-Military and Canada)
CLASS 1
LASER PRODUCT
The marking of this product has been classified as Class 1. It means
that there is no danger of hazardous radiation outside the product.
Location: Back panel
2 EN
*5506/01-05/EN
2
04.12.17, 10:43 AM
Before applying power
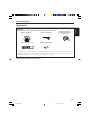
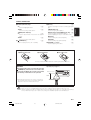
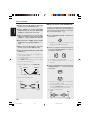
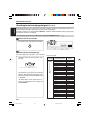
Accessories
Unpack the unit carefully and make sure that all the accessories are present.
AM loop antenna (1)
FM indoor antenna (1)
Remote control unit (1)
ENGLISH
Unpacking
Microphone for Room
Equalizer (1) (Cord length:
approx. 5 m)
Batteries (R03/AAA) (2)
If any accessories are missing, or if the unit is damaged or fails to operate, notify your dealer immediately. If the unit
was shipped to you directly, notify your shipper immediately. Kenwood recommends that you retain the original carton
and packing materials in case you need to move or ship the unit in the future.
Keep this manual handy for future reference.
3 EN
*5506/01-05/EN
3
04.12.16, 0:14 PM
Before applying power
ENGLISH
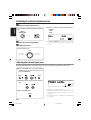
Special features
Room Equalizer feature
This model is equipped with Room Equalizer, which automatically creates your best listening environment
according to your room, speakers position, etc. In addition to technical knowledge, generally, a great deal of
time and work are spent finding the best listening position such as changing speakers or furniture position
while listening to the sound. This function enables you to simply create it in a short time without laborious
settings.
Digital Sound Equalizer feature
This model is equipped with Digital Sound Equalizer by Digital Sound Processing, which makes more detailed
sound adjustments possible.
Playback capability of CD-R and CD-RW discs
This model can playback music data recorded in CD-R (Compact Disc Recordable) and CD-RW (Compact Disc
Rewritable).
However, some CD-R and CD-RW discs may not be playable on the CD player depending on the recording
characteristics of the recording equipment (including the pick-up), properties of the CD-R or CD-RW in use, its
recording condition and so on. Also note that a CD-R or CD-RW disc which has not been finalized cannot be
played back.
Versatile timer features
÷ Timer playback :
Two timer programs (PROG 1, PROG 2) are available for timer playback (AI timer playback). (With the AI
timer playback, the playback volume increases gradually after the start of timer playback.)
÷ Sleep timer :
This timer turns the unit off automatically when the set time has elapsed. It is convenient for example,
falling asleep while listening to music in the night time, etc.
RDS (Radio Data System) tuner
This model is equipped with an RDS tuner that provides several convenient tuning functions: RDS Auto
Memory, to automatically preset up to 40 RDS stations broadcasting different programs; station name
display, to show you the name of the current broadcast station; and PTY search to let you tune stations by
program type.
PTY (Program Type) search
Tune the stations by specifying the type of program you want to hear.
4 EN
*5506/01-05/EN
4
04.12.16, 0:14 PM
Before applying power
Contents
carefully to ensure safe operation.
Before applying power .......................................2
Safety precautions ........................................................ 2
Accessories .................................................................... 3
Special features ............................................................ 4
Preparation section
System connections ..................................................6
Connection of the system accessories .............................. 6
Connection of other accessories
(Commercially available parts) .................................... 8
Controls and indicators.............................................9
Display ..................................................................................... 9
Main unit ............................................................................... 10
Operation of remote control unit ...................................... 12
Application section
Various CD playback features ............................... 33
Listening to the desired sequence
(program playback) ....................................................... 33
Repeated playback .............................................................. 35
Playing tracks in a random order (random playback) .. 36
Timer operation ........................................................37
Sleep timer (SLEEP) ............................................................. 37
Setting the timer program (PROG. TIMER) ...................... 38
Deactivating and activating the timer program ............. 41
Setting DIMMER functions ..................................... 42
Switching the level meter ...................................... 43
Knowledge section
Important Items .........................................................44
Reference .............................................................................. 44
Maintenance ........................................................................ 44
Basic section
Clock adjustment .....................................................14
Basic use method .....................................................15
In case of difficulty .................................................. 46
Specifications ...........................................................48
Using Room Equalizer function .................................. 17
Using Digital Sound Equalizer function .................... 19
Playback of CD ......................................................... 22
Receiving broadcast station .................................. 25
Collective presetting of stations (AUTO MEMORY) ...... 26
Tuning in to a non-preset radio station
(Auto tuning, Manual tuning) ...................................... 27
Presetting radio stations manually (Manual preset) .... 28
RDS (Radio Data System)........................................ 29
Searching for a desired program type (PTY search) ..... 30
Listening to external input sources ......................32
Adjusting the external input level .................................... 32
5 EN
*5506/01-05/EN
5
04.12.16, 0:14 PM
ENGLISH
Caution : Read the pages marked
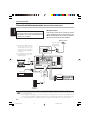
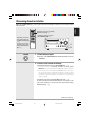
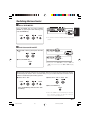
System connections
ENGLISH
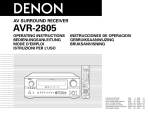
Connection of the system accessories
This figure shows the method of connection between the main unit and provided accessories.
CAUTION
Malfunction of microcomputer
Connect the components as shown in the diagram.
Only plug the AC power cord into an AC wall outlet
once connections are completed.
If operation is not possible or erroneous display appears even though all connections have been made
properly, reset the microcomputer by referring to "In
case of difficulty".
y
CAUTION
The magnet in the speaker may cause color irregularity to the TV or PC monitor. Place the speakers farther away from the TV set or PC monitor.
CAUTION
Be sure to adhere to the following, or proper ventilation will be blocked causing damage or fire hazard.
÷ Do not place any objects impairing heat radiation
onto the top of the unit.
÷ Leave some space around the unit (from the largest
outside dimension including projection) equal to or
greater than, shown below.
Top panel
: 50 cm
Back panel
: 10 cm
CAUTION
The power in this equipment will not be completely
cut off from the wall outlet when the power switch
is turned off.
Install the equipment so that the wall outlet is easily
accessible and, in case of emergency, immediately
unplug the power cord from the wall outlet.
Speaker (Right)
÷ Never short-circuit the "+" and "–" speaker cords. It may cause malfunction.
÷ If the "+" and "–" polarity are inverted, the sound will be unnatural with unclear positioning of musical instruments,
etc.
÷ Be sure to insert all connection cords securely. If their connections are imperfect, the sound may not be produced
or noise may interfere.
÷ Before plugging or unplugging a connection cord, be sure to unplug the power cord from the wall AC outlet. If
connection cords are plugged or unplugged with the power cord left plugged in, malfunction or damage may result.
6 EN
System connections
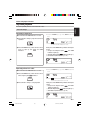
AM/FM radio stations cannot be received without the proper antenna connections. Connect the antennas properly according to the following instructions.
FM indoor antenna
The provided antenna is for temporary indoor use
only. For stable signal reception, we recommend
to use an outdoor antenna. Remove the indoor antenna if you connect to an outdoor antenna.
1 Connect the antenna to the antenna terminal.
2 Locate the position providing good reception
How to connect the antenna
2
1
3
condition.
3 Fix the antenna.
FM indoor antenna
AM loop antenna
Assemble
ANTENNA
AM
GND
FM
75Ω
Microphone for Room Equalizer
(not for recording)
ANTENNA PHONO
IN
AM
GND
TAPE
AUX
IN
REC OUT PLAY IN
FM
75Ω
L
ROOM EQ
MIC IN
R
+
L
R
SUB WOOFER
PRE OUT
–
SPEAKERS(6–16Ω)
AC POWER cord
To AC wall outlet
Speaker (Left)
+
L
R
Speaker cord
–
SPEAKERS(6–16Ω)
How to connect the speaker cords
1
2
3
4
7 EN
*5506/06-13/EN
7
04.12.15, 23:46
ENGLISH
AM loop antenna
The supplied antenna is for indoor use. Place it as
far as possible from the main unit, TV set, speaker
cords and POWER cord, and set it to a direction
which provides the best reception.
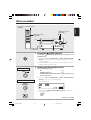
System connections
ENGLISH
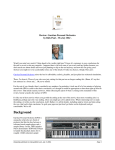
Connection of other accessories (Commercially available parts)
FM outdoor antenna
CAUTION
Lead the 75Ω coaxial cable connected to the FM
outdoor antenna into the room and connect it to the
FM 75Ω terminal. Please remove the indoor antenna
after an outdoor antenna has been installed.
Connect the components as shown in the diagram.
Only plug the power cord into an AC wall outlet once
connections are completed.
FM outdoor antenna
Antenna adaptor
(Commercially
available parts)
÷ Moving coil (MC) cartridge
record player cannot be used
directly from the unit. It can
only be used when equalizer
amplifier for MC cartridge is
connected.
÷ For record players with equalizer amplifier, connect it to the
AUX IN terminal.
ANTENNA
AM
GND
ANTENNA PHONO
IN
Earth
cord
AM
GND
FM
75Ω
TAPE
AUX
IN
REC OUT PLAY IN
FM
75Ω
L
ROOM EQ
MIC IN
R
+
SUB WOOFER
PRE OUT
L
R
Audio OUT
–
SPEAKERS(6–16Ω)
Record Player
with MM cartridge
Audio OUT
AC POWER cord
To AC wall outlet
SUB WOOFER
PRE OUT
Audio OUT
VCR
Audio IN
Cassette Tape Deck
Powered
Subwoofer
÷ In case an associated system component is connected, also read the instruction manual of the component.
÷ Be sure to insert all connection cords securely. If their connections are imperfect, the sound may not be produced
or noise may interfere.
÷ Before plugging or unplugging a connection cord, be sure to unplug the power cord from the wall AC outlet. If
connection cords are plugged or unplugged with the power cord left plugged in, malfunction or damage may result.
÷ The earth terminal with the H symbol is used for noise reduction of record player. It is not for safety earth.
8 EN
*5506/06-13/EN
8
04.12.15, 23:46
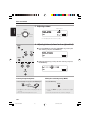
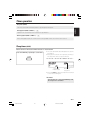
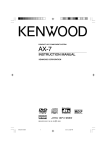
Controls and indicators
Display
1
3
2
4
5
1 2 3
MUTE
CD
!
EQ RDM
1
PGM
2
0
REPEAT
ONE FM
AM
A.P.S.
9
2 MUTE indicator
30 10 5
ªº
4 Sound preset memory number
3 1 0 (-dB)
7
7 Level meters
^
indicators
RDS PTY
TTL L
kHz
MHz R
8
1 Character information display
3 RDS-related indicators
TUNED ST. AUTO
RoomEQ
D-Bass
6
e
8 Tuner-related indicators
CD time display
Clock display
¡
5 RoomEQ indicator
&
6 D-Bass indicator
(
9 Timer-related indicators
‡
0 EQ indicator
)
! CD-related indicators
9 EN
*5506/06-13/EN
9
04.12.16, 3:06 PM
ENGLISH
The displays given in this manual are approximations only. They may differ from what actually appears on
the display.
Controls and indicators
ENGLISH
Main unit
1
3
2
4
0
8 9
6 7
5
SOUND SELECTOR ENTER
MODE
!
MUTE
VOLUME
SOUND CONTROL
STANDBY
/TIMER
D-BASS
REMOTE
ROOM EQ MODE
ROOM
EQ
TONE
PHONES
TIMER
COMPACT Hi-Fi COMPONENT SYSTEM
DISPLAY
CD
TUNER
INPUT
SELECTOR
R-K701
BAND
*
&
^
%$
1 STANDBY/TIMER indicator
#
@
6 0 (CD open/close) key
Lights up when the unit is set to the Standby mode.
Red
: Ordinary standby.
Green : Timer standby.
Off
: The unit is On.
Refer to "In case of difficulty" for blinking of the
y
indicator.
2
TUNING MODE
%
(POWER) key
Used for setting the unit to On or Standby.
3 CD tray
7 SOUND SELECTOR key
Each press of the key switches the display items.
"D-BASS"
(
"ROOM EQ MODE"
*
"BASS"
(
"TREBLE"
)
SOUND setting mode OFF
8 ENTER key
4 Display panel
5 Sound indicators
D-BASS indicator
(
Blinks during D-BASS setting; lights up when the setting is completed.
ROOM EQ MODE indicator
*
Blinks during ROOM EQ MODE setting; lights up
when the setting is completed.
TONE indicator
)
Blinks during TONE setting; lights up when the setting
is completed.
ROOM EQ indicator
&
Blinks during ROOM EQ setting; lights up when the
setting is completed.
When setting up in a mode : Used for confirming the
selection.
When receiving a broadcast station : Used for confirming the station to preset in memory.
10 EN
*5506/06-13/EN
™
Used for opening or closing the CD tray.
10
04.12.15, 23:46
Controls and indicators
9 MODE key
# Basic operation keys
^
§
w
e
e
$
°
¡
&
BALANCE
AUTO MEMORY
DIMMER SET
LEVEL METER
A.P.S. SET
TIME ADJUST
TIMER SET
SOUND PRESET
ROOM EQ
• Some of the items may not be displayed depending on
selected input source.
0 MUTE key
^
Used for muting the sound temporarily.
! VOLUME knob
^
Used for volume adjustment.
@ 4 / ¢ (multi control) keys
In the normal mode, these are used for
– skip CD tracks
£
– select a preset radio station
§
In the function menu mode (selected by pressing the
MODE key), press these keys to select the desired
menu item. To set or enter setting of the function
menu item, press the ENTER key.
MODE
ENTER
CD 6 key
™
Used for selecting the CD input and starting playback.
During CD playback, press to pause.
TUNER/BAND key
∞
Used for selecting the TUNER input.
This key is also used to select the received broadcast
band.
%¤
INPUT SELECTOR key
Used for selecting an input source (PHONO, TAPE,
AUX).
7 (STOP)/TUNING MODE key
£
CD :
Used for stopping a disc operation.
¶
TUNER :
Used for switching between the AUTO (auto
tuning, stereo reception) and MONO (manual
tuning, monaural reception) modes.
Standby mode:
$
Used for displaying the clock.
$ DISPLAY key (for CD/TUNER inputs only) ¢
Used for changing the CD-TEXT displays.
Used for displaying the day of week and the time.
% SOUND CONTROL knob
(
Used for adjusting the SOUND level.
^ TIMER key
q
Used for activating or deactivate timer function.
& PHONES jack
^
Connect headphones with a stereo mini-plug
(optionally available) to it.
* REMOTE sensor
#
This sensor receives signals from the remote control
unit.
• The function of these keys returns to the normal mode
when they have not been operated for 20 seconds.
Standby mode
While the standby indicator is lit, a small amount of power is supplied to the unit to back up the memory.
This is called Standby mode. Under the condition, the unit can be turned ON by the remote control unit.
11 EN
*5506/06-13/EN
11
04.12.15, 23:46
ENGLISH
Used for switching the function of the 4 / ¢ keys
to function menu mode. Press again to reset the function of the 4 / ¢ keys to normal mode.
Items of function menu mode :
INPUT LEVEL
¤
Controls and indicators
ENGLISH
Operation of remote control unit
The keys on the remote control unit with the same names as on the main unit have the same function as
the keys on the main unit.
2 RANDOM key (CD)
fl
Used for setting playback of tracks in a random order.
fi
REPEAT key (CD)
1
8
Used for setting repeated playback.
2
‹
P.MODE key (CD)
Used for switching to track mode, or program mode.
w
DIMMER key
Used for switching to the DIMMER mode.
3 Numeric keys
9
3
£•‹›
Press for selecting a CD track number or recall a preset station of the tuner.
4 Sound setting mode keys
Press for entering the sound setting mode with the
following keys.
4
0
5
FLAT key
¡
D-BASS key
(
ROOM EQ MODE key
*
(
TONE TURN OVER key
5 SOUND PRESET (@/#) keys
()¡
Used for recalling a preset sound or select a frequency
band of the equalizer.
6
()
SOUND CONTROL (%/fi) keys
7
Used for adjusting the sound control level.
)
MANUAL EQ key
Used for entering the manual EQ mode.
MODE key
Used for entering the function setting mode.
With same functions, in the case that names of the
keys and knobs between "on the main unit" and "on
the remote control unit" are different, in this manual,
names on the remote control unit are indicated in
parentheses [ ] ;
Name on the main unit [ Name on the remote control unit]
Example: The SOUND CONTROL knob [ the SOUND
CONTROL % / fi key ]
¤
AUX key
Used for pressing to switch to an external input source
connected to the AUX (analog auxiliary input) jack.
ENTER key
When setting up in a mode : Used for confirming the
selection.
When receiving a broadcast station : Used for confirming the station to preset in memory.
¤
PHONO key
1 ROOM EQ key
&
Used for setting the Room Equalizer.
q
TIMER key
Used for activating or deactivating timer function.
‡
SLEEP key
Used for setting the sleep timer.
Used for switching to an external input source connected to the PHONO jack.
6 Basic operation keys
CD 6 key
™
TUNER/ BAND key
∞
INPUT SELECT key
¤
Used for selecting an input source (PHONO, TAPE,
AUX).
AUTO/MONO/7 (STOP) key
12 EN
*5506/06-13/EN
12
04.12.15, 23:46
$£¶
Controls and indicators
7 P.CALL (4 / ¢) keys
9 PTY key
8
º
£
Used for entering PTY mode or searching a program
type.
§
TIME DISPLAY key
¢
Used for changing time displays.
TUNING (1 / ¡) keys
DISPLAY key (for CD/TUNER inputs only) ¢
CD :
£
Used for fast-forward or fast-reverse the played
music.
TUNER :
¶
Used for receiving a radio station.
Used for changing the CD-TEXT displays.
Used for displaying the day of week and the time.
%
(POWER) key
Used for setting the unit to On or Standby.
^
MUTE key
Used for muting the sound temporarily.
›
CLEAR key
Used for clearing a programed track(s).
0 VOLUME (%/fi) keys
^
Used for adjusting the volume.
Loading batteries
1 Remove the cover.
2 Insert batteries.
3 Close the cover.
÷ Insert two R03 ("AAA"-size) batteries following the polarity indications.
Operation
Operating range (approx.)
After plugging the power cord of this unit, press the
(POWER) key of the remote control unit to turn
the system ON. When the system is turned ON,
press the key of the function to be operated.
Remote sensor
COMPACT Hi-Fi COMPONENT SYSTEM
R-K701
6m
÷ When pressing more than one remote control keys
successively, press the keys securely by leaving an
interval of 1 second or more between keys.
30˚
30˚
÷ The provided batteries are intended for use in operation checking, and their service life may be short.
÷ When the remote controllable distance becomes short, replace both of the batteries with new ones.
÷ If direct sunlight or the light of a high-frequency fluorescent lamp (inverter type, etc.) is incident to the remote
sensor, malfunction may occur. In such a case, change the installation position to avoid malfunction.
13 EN
*5506/06-13/EN
13
04.12.15, 23:46
ENGLISH
CD :
Used for skipping CD tracks.
TUNER :
Used for receiving a radio station.
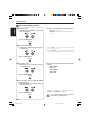
Clock adjustment
As the clock is not only used to show the time of the day but also used in timer operations, be sure to set
the clock adjustment in advance.
ENGLISH
Turn POWER ON.
1 Select "TIME ADJUST".
1 Press the MODE key and select "TIME
1 2 3 4 5
ADJUST" by pressing the 4 / ¢ key.
2 Press the ENTER key.
MODE
L
30 10 5
3 1 0 (-dB)
R
ENTER
÷ The time display starts to blink.
2
Adjust the day of week.
Example: Adjustment to Monday 8:07
1 Adjust the day of week by pressing the
4 / ¢ key.
2 Press the ENTER key.
1 2 3 4 5
L
30 10 5
3 1 0 (-dB)
R
ENTER
÷ After the day is input, the hour display starts to
blink.
3
Adjust the hour.
1 Adjust the hour by pressing the 4/¢ key.
Example: Adjustment to Monday 8:07
1 2 3 4 5
2 Press the ENTER key.
L
30 10 5
3 1 0 (-dB)
R
ENTER
÷ After the hour is input, the minute display starts to
blink.
4 Adjust the minute.
1 Adjust the minute by pressing the
Example: Adjustment to Monday 8:07
1 2 3 4 5
4 / ¢ key.
2 Press the ENTER key.
L
30 10 5
3 1 0 (-dB)
R
ENTER
÷ If you made a mistake, restart from the beginning.
÷ When the time of day has been set by pressing the
ENTER key, the display shows "COMPLETE".
÷ After a power failure or the AC power cord has been
unplugged, the time set will be cleared. You have to
set the time again when the unit is switched on.
÷ When the 7 (STOP) key is pressed while the power
is in the standby mode, the time of day will be displayed for 8 seconds.
14 EN
*5506/14-24/EN
14
04.12.15, 23:47
Basic use method
The unit is switched ON or
STANDBY
ENGLISH
Muting the sound
temporarily
4.
Muting the sound
temporarily
1.
3.
Listening through
headphones
1. Turning the
2.
(POWER) ON (OFF).
Pressing the
(POWER) key when the unit is ON, turns it off
(Standby mode).
÷ Pressing the CD 6, TUNER/BAND, or INPUT SELECTOR [INPUT
SELECT] key also turns power on and starts playback (reception) of the
corresponding input.
÷ When the CD input is selected while the corresponding disc have been
loaded, it automatically starts to play.
2. Selecting the desired input sources.
EX: CD
Select a desired input source.
CD
™
TUNER (Broadcasts)
∞
PHONO/TAPE/AUX (External input sources) [Adjusting the
CD
¤
external input level]
÷ Pressing the CD 6, TUNER/BAND, or INPUT SELECTOR [INPUT
SELECT] key selects the corresponding input.
EX: An external input source
When CD is selected
INPUT
SELECTOR
1 2 3 4 5
CD
L
30 10 5
3 1 0 (-dB)
R
÷ Each press of the INPUT SELECTOR [INPUT SELECT] key changes the
external input sources;
"PHONO"
"TAPE"
"AUX"
or
Continued to next page
15 EN
*5506/14-24/EN
15
04.12.15, 23:47
Basic use method
3. Adjusting volume.
ENGLISH
Volume level
VOLUME
L
CD
Decrease
volume
30 10 5
Increase
volume
3 1 0 (-dB)
R
÷ The display shows a reference value.
4. Adjusting balance (volume level on right and left).
MODE
1 Press the MODE key and select "BALANCE" by pressing the
4 / ¢ key, and press the ENTER key.
REPEAT
L
CD
30 10 5
3 1 0 (-dB)
R
ENTER
2 Adjust the balance by pressing the 4 / ¢ key, and press
the ENTER key.
L
CD
30 10 5
3 1 0 (-dB)
R
ENTER
Listening through headphones
Muting the sound temporarily (MUTE)
Insert the headphones plug into the PHONES jack.
Press the MUTE key.
MUTE
÷ Headphones with a stereo mini plug can be connected.
÷ The sound from all speakers is cut off.
÷ Press the MUTE key again to resume the original
volume.
÷ It is also canceled when the volume is changed.
16 EN
*5506/14-24/EN
16
04.12.15, 23:47
Basic use method
Using Room Equalizer function
ROOM EQ function automatically performs the
following adjustments with the provided microphone by measuring sound characteristics for the
best listening environment according to your room
conditions and speakers layout.
1. Sound delay from speakers
2. Volume level differences between left and
right speakers
3. Speaker frequency characteristics and room
sound characteristics
Measuring room sound characteristics
(ROOM EQ)
"R.EQ START": Measurement starts.
"R.EQ OFF":
Characteristics setting is
temporarily canceled.
"R.EQ CALL": Characteristics setting is
called up.
÷ It takes about 1 minute until the measurement is
completed.
÷ If the microphone is not connected or headphones
are connected, the measurement is impossible.
("CAN'T SETUP" is displayed.)
÷ Make sure that the microphone is removed from the
main unit right after the ROOM EQ measurement.
÷ Effective result may not be obtained depending on
the measurement surroundings.
÷ Displays during and after the measurement
The ROOM EQ indicator (LED) blinks during the
measurement. The ROOM EQ indicator (LED) and
the RoomEQ indicator on the display light up.
1 2 3 4 5
RoomEQ
1 Connect the microphone to the ROOM EQ
MIC IN jack on the back of the unit. 7
2 Place the microphone to the listening position (at a height of your ears).
3 Select "ROOM EQ" from the menu by pressing the 4 / ¢ key, and press the ENTER
key. Or press the ROOM EQ key on the remote control unit.
MODE
AUTO
L
30 10 5 3 1 0 (-dB)
R
÷ Image of the measurement
Place the microphone at a height of your ears.
Do not place any obstacles between the microphone
and speakers during the measurement.
ENTER
or
÷ Image of effect by Room Equalizer function
4 Select "R.EQ START" by pressing the 4 /
¢ key and press the ENTER key.
ENTER
17 EN
*5506/14-24/EN
17
04.12.15, 23:47
ENGLISH
A very loud test sound is produced
during the measurement. Please take
into consideration that it may disturb
your neighborhood, especially, when you
measure it at the night time.
Each press of the 4 / ¢ key changes the
items;
Basic use method
ENGLISH
To cancel the measurement
Turn the VOLUME knob on the main unit or
press the VOLUME % / fi key on the remote
control unit.
Changing measured Room Equalizer Characteristics according to situation (ROOM
EQ MODE)
1 Select "ROOM EQ MODE" by pressing the
SOUND SELECTOR key. Or, press the
ROOM EQ MODE key on the remote control
unit.
VOLUME
or
SOUND SELECTOR
or
÷ Another method of cancellation: Press the ROOM
EQ key on the remote control unit. When "R.EQ
CANCEL?" is displayed, press the ENTER key.
2 Select a mode by using the SOUND
CONTROL knob on the main unit or SOUND
CONTROL % / fi key on the remote control
unit.
The following mode items can be selected:
"NORMAL": This mode reproduces the
sound optimized based on the
measured results by ROOM
EQ. Usually, use this mode.
"WIDE":
Mode that you can enjoy
music at a relatively wide area
centering around the measured position. It is convenient, for example, when you
wish to listen to music walking around room at a home
party.
"NIGHT":
Mode that is convenient when
you wish to enjoy music with
low volume at midnight. It is
adjusted based on melodious
sounds such as vocal and will
relatively be clear sound with
low volume.
÷ The ROOM EQ MODE indicator blinks, and when it
is selected, the indicator lights up.
÷ If no operation continues for 20 seconds, it returns
to the original display.
18 EN
*5506/14-24/EN
18
04.12.15, 23:47
Basic use method
D-BASS Setting
1 Select "D-BASS" by pressing SOUND SELECTOR key on the main unit or the D-BASS
key on the remote control unit.
TONE / TURN OVER setting
In this unit, TREBLE and BASS sounds can be
adjusted to your preferences. (TONE)
In addition, frequency characteristics of the
TREBLE and BASS sounds can be adjusted
with the three types of Low, Mid and High.
(TURN OVER)
1 Select "BASS" by pressing the SOUND
SELECTOR key. Or press the TONE TURN
OVER key on the remote control unit.
SOUND SELECTOR
or
÷ The D-BASS indicator blinks.
SOUND SELECTOR
2 Adjust the level with the SOUND CONTROL
knob or the SOUND CONTROL % / fi key.
Turn the SOUND CONTROL knob.
2 Select a frequency type (Low: 100Hz, Mid:
150Hz, High: 200Hz) by pressing the SOUND
PRESET @ / # key on the remote control unit.
SOUND CONTROL
Increase
the level
Decrease
the level
or
÷ When the SOUND Setting mode is in OFF,
by simply turning the SOUND CONTROL knob,
it can enter the D-BASS setting mode.
or
Press the SOUND CONTROL % / fi key.
3 Adjust the level of BASS with the SOUND
CONTROL knob [SOUND CONTROL % / fi
key].
Turn the SOUND CONTROL knob.
SOUND CONTROL
Decrease
the level
Increase
the level
or
÷ The level can be adjusted at the range of 0 - 10.
÷ If no operation continues for 20 seconds, the
display returns to the original display.
÷ The D-BASS indicator lights up after the setting
(when the level is 1 or more).
Press the SOUND CONTROL % / fi key.
The D-Bass indicator lights up.
D-Bass
CD
REPEAT
FM
TUNED ST. AUTO
MD
MHz
D-Bass level is displayed.
Continued to next page
19 EN
*5506/14-24/EN
19
04.12.15, 23:47
ENGLISH
Using Digital Sound Equalizer
function
Basic use method
ENGLISH
4 Repeat the steps 2 and 3 to adjust the
levels for your favorite BASS sound.
5 Select "TREBLE" by pressing the SOUND
SELECTOR key. Or press the TONE TURN
OVER key on the remote control unit.
6 Select a frequency type (Low: 5kHz, Mid:
7kHz, High: 10kHz) by pressing the SOUND
PRESET @ / # key on the remote control unit.
7 Adjust the level of TREBLE with the SOUND
CONTROL knob [SOUND CONTROL % / fi
key].
8 Repeat the steps 6 and 7 to adjust the
levels for your favorite TREBLE sound.
9 Press the SOUND SELECTOR [ TONE TURN
OVER ] key.
÷ The level can be adjusted by one step (1dB) at the
range of -6(dB) to +6(dB).
÷ If no operation continues for 20 seconds, it returns
to the original display.
÷ The TONE indicator lights up after the setting
when the level is other than "0".
÷ Image of variable frequencies (TURN OVER)
LEVEL
Va ri a b l e
Fre q u e n c i e s
Va ri a b l e
F re q u e n c i e s
Making your favorite sounds (MANUAL EQ )
This unit is equipped with 7-band equalizer. It
enables you to make your favorite frequency
response curve with frequencies from super
bass to super high range. ¡
1 Press the MANUAL EQ key on the remote
control unit.
÷ Equalizer curve, level and frequency are
displayed and the EQ indicator blinks.
2 Select an equalizer band(frequency) by
pressing the SOUND PRESET @ / # key on
the remote control unit.
÷ The display of selected band blinks.
÷ The frequency bands from 1 to 7 can be
selected.
3 Adjust the equalizer level by pressing the
SOUND CONTROL % / fi key on the remote
control unit.
Low
Mid
High
BASS
TREBLE
Frequency
÷ Image of the level adjustment
LEVEL(dB)
Variable
levels
+6
0
-6
BASS
TREBLE
Frequency
÷ The level can be adjusted by one step (1dB) at
the range of -8(dB) to +8(dB).
÷ The manual EQ setting mode will be cancelled
when the MANUAL EQ key is pressed, or
no operation is continued for 20 seconds.
÷ Image of level adjustment
LEVEL(dB)
Variable
levels
+8
0
-8
Frequency
20 EN
*5506/14-24/EN
20
04.12.15, 23:47
Basic use method
Preset Call of sound pattern
Memorizing your favorite sound
MODE
Press the SOUND PRESET @ / # key on the
remote control unit.
ENTER
÷ The indicator "1", "2" and "3" on the display
blinks.
÷ "PRESET" and "1", "2", and "3" is displayed on
the character information display.
÷ The sound of three patterns from 1 to 3 can be
preset regardless of sound type.
÷ Information for Room EQ setting is memorized.
÷
÷
÷
÷
"SOUND PRESET" and "1" are displayed.
Factory default setting is "flat".
The display turns to the original display in 3 seconds.
The level can be set to "0" by pressing the FLAT key on
the remote control unit, or the SOUND SELECTOR
key on the main unit for 2 seconds.
1 2 3 4 5
2 Select one of preset numbers from "1" to
"3" and press the ENTER key.
D-Bass
CD
ENTER
Switched to the D-Bass display.
÷ The indicator of selected preset number lights
up on the display.
Sound equalization
Super bass range (band 1: 63Hz)
When this control is moved up, the sound from bass
instruments such as a bass guitar becomes deep an
stable. When the super bass sound is boomy, move
this control down.
Mid-high range (band 5: 2.5kHz)
This range is related to stimulus and metallic sound.
When this range is well compensated, vivid sound
can be obtained.
High range (band 6: 6.3kHz)
Bass range (band 2: 160Hz)
Usually, the listening room resonance frequency is
in this range. To eliminate bass resonance, move
this control down.
This frequency range is related to hardness of the
sound. When this control is moved up, strings or
brass instruments, such as flutes or piccolos, are
emphasized. When the control is moved down, the
sound will be more soothing.
Mid bass range (band 3: 400Hz)
This range is the basis of music, whether the sound
is rich or not, depends on this range. When the playback sound is not so good, moving this control up
slightly makes the sound sonorous.
Mid range (band 4: 1kHz)
Super high range (band 7: 16kHz)
This frequency range is related to the width and details of the music. When this control is moved up,
super high frequency instruments, such as triangles
or cymbals, are emphasized, resulting in wide
sound and echoes.
When this control is moved up or down, the baritone
or soprano voice is emphasized/de-emphasized. This
range is related to the "presence" of music.
21 EN
*5506/14-24/EN
21
04.12.15, 23:48
ENGLISH
1 Press the MODE key and select "SOUND
PRESET" from the menu, and press the ENTER key.
Playback of CD
ENGLISH
When a disc is placed into the CD player in advance, the unit will be switched on automatically by pressing
the CD 6 key, and playback will start.
To play back a
desired track
1.
To start playback/
To pause playback
To skip tracks
To stop
playback
Fast forward
and backward
To skip tracks
2.
To stop playback
1. Load a disc
1 Press the 0 key on the main unit to
The label side facing up.
open the CD tray.
2 Place a disc.
3 Press the 0 key on the main unit to
close the CD tray.
÷ Do not touch the played side of disc.
÷ Be sure to place a disc on the tray
horizontally. Placing it with an inclination will result in malfunction.
2. Start playback
÷ After a few seconds, playback starts from track No.1.
÷ A title is displayed for Discs with CD-TEXT.
CD
Track No. being played.
1 2 3 4 5
CD
L
30 10 5
3 1 0 (-dB)
R
This indicator lights up when
CD is loaded.
Elapsed time of track being played.
22 EN
*5506/14-24/EN
22
04.12.16, 4:31 PM
Playback of CD
To start playback/ To pause playback
Press the CD 6 key.
Fast forward and backward
Remote control unit only
ENGLISH
CD
Backward
search
÷ Each press of the key pauses and plays the CD alternately.
Forward
search
÷ Press and hold one of the keys during playback.
Normal playback resumes at the point where the
key is released.
To skip tracks
To stop playback
Press the 7 (STOP) key.
Press the 4 / ¢ key.
To skip
backward
TUNING MODE
To play back a desired track
Remote control unit only
Select the desired track No.
To skip
forward
÷ The track in the direction of the key pressed is
skipped, and the selected track will be played from
the beginning.
÷ When the 4 key is pressed once during playback,
the track being played will be played from the beginning.
÷ To skip further to a track located before the current
track, press the 4 key quickly.
÷ Tracks can be skipped by pressing the 4 / ¢
key even when the CD is in stop mode. In this case,
playback starts automatically from the point
reached by skipping.
To eject disc
Main unit only
Press the numeric keys as shown below.
To select track No. 23 : +10, +10, 3
To select track No. 30 : +10, +10, +10, 0
÷ The CD tray will open. (To close the CD tray, press
the key again.)
23 EN
*5506/14-24/EN
23
04.12.15, 23:48
Playback of CD
ENGLISH
Time display on CD player
Each press of the TIME DISPLAY key on the remote
control unit changes the display items.
2 Remaining time of track being played ("–" lights
up)
1 2 3 4 5
L
CD
3 1 0 (-dB)
30 10 5
R
÷ Only time information 1 and 2 can be displayed during single-track repeated playback or random playback.
÷ When the displayed time is 1000 minutes or more,
the display shows "– – – : – –".
3 Elapsed time of entire disc ("TTL" lights up)
1 2 3 4 5
TTL L
CD
3 1 0 (-dB)
30 10 5
R
4 Remaining time on entire disc ("TTL" & "–"
lights up)
1 Elapsed time of track being played
1 2 3 4 5
1 2 3 4 5
L
CD
30 10 5
3 1 0 (-dB)
TTL L
CD
3 1 0 (-dB)
30 10 5
R
R
Title Displays for Discs with CD-TEXT
Disc and music titles are automatically displayed when a Disc with CD-TEXT is played. Each press of
the DISPLAY key changes displays on the main unit.
1 Track number display
1 2 3 4 5
L
CD
3 1 0 (-dB)
30 10 5
R
DISPLAY
2 Title display
1 2 3 4 5
L
CD
30 10 5
3 1 0 (-dB)
R
3 Clock display
2 3 4 5
÷ Some discs with CD-TEXT may not display titles.
When discs with letters more than 1000 is played,
the display shows "CD TEXT FULL".
L
CD
30 10 5
3 1 0 (-dB)
R
÷ Refer to "Discs which can be played with this unit" for playable discs.
t
÷ CD-R/RW discs that are not finalized cannot be played with this unit.
÷ Data signals other than music, such as CD-R/RW data signal, cannot be played back with this unit.
÷ This unit may also be incapable of playing certain CD-R/RW discs depending on their properties, recording
conditions, etc.
24 EN
*5506/14-24/EN
24
04.12.15, 23:48
Receiving broadcast station
When the TUNER /BAND key is pressed, the unit will automatically be switched on and reception status
will be reached.
ENGLISH
Presetting radio stations manually
(Manual preset) (3) •
Collective presetting of stations
(AUTO MEMORY)(3) §
Tuning in to a non-preset
radio station (Auto tuning, Manual tuning) (2)
¶
Tuning in to a non-preset radio station (Auto
tuning, Manual tuning)
(3) ¶
TUNER
1.
3.
1. Select the tuner input.
Each press of the TUNER /BAND key switches the bands as follows.
FMjAM
BAND
2. Preset a radio station in memory.
Collective presetting of stations (AUTO MEMORY)
§
Follow the procedure in "Collective presetting of stations (AUTO
MEMORY)" to preset automatically the tunable radio stations in your area.
÷ Once the stations are stored with AUTO MEMORY (Auto memory function) you are not required to repeat this procedure the next time you listen
to radio. However when you shift to another location whereby the broadcast station frequencies are different, you will have to re-execute the presetting of stations.
Presetting radio stations manually (Manual preset) •
A station can also be tuned in even when it is not preset. For details, read "Tuning in to a non-preset radio station (Auto tuning,
Manual tuning)". ¶
Continued to next page
25 EN
*5506/25-31/EN
25
04.12.15, 23:49
Receiving broadcast station
3. Tuning (Preset Call)
ENGLISH
÷ If radio stations have already been stored with AUTO MEMORY (Auto
memory function) or manual presetting, select a station using the 4 /
¢ key. Each press of the key switches the preset stations in sequence.
1 2 3 4 5
TUNED ST. AUTO
FM
L
30 10 5
3 1 0 (-dB)
MHz R
The indicator TUNED lights up when a station is received.
The indicator ST. lights up during stereo reception.
When the ¢ key is pressed : P1=P2=P3 ... P38=P39=P40=P1...
When the 4 key is pressed : P40=P39=P38 ..... P3 =P2 =P1=P40.....
÷ When a key is held down, preset stations will be skipped at intervals of
about 0.5 seconds.
÷ To select a preset station from the remote, use the P.CALL 4 / ¢ key
or the Numeric keys on the remote control unit.
Collective presetting of stations (AUTO MEMORY)
Up to 40 stations can be memorized.
1 Press the MODE key.
1 2 3 4 5
MODE
L
30 10 5
3 1 0 (-dB)
R
2 Select "AUTO MEMORY" by pressing the
4 / ¢ key.
÷ For use of the RDS function, stations must be memorized by AUTO MEMORY.
÷ RDS stations are given priority during auto presetting.
If there is memory left after presetting, this unit continues presetting regular FM and AM stations.
÷ A broadcast station that cannot be preset with AUTO
MEMORY should be set with Manual preset.
3 Press the ENTER key.
ENTER
26 EN
*5506/25-31/EN
26
04.12.15, 23:49
Receiving broadcast station
Tuning in to a non-preset radio station (Auto tuning, Manual tuning)
1 Select the tuner input.
ENGLISH
Select the tuning mode according to the radio
wave receiving condition.
Auto tuning:
When the receiving condition
is good.
Manual tuning: When the receiving condition
is poor. (Weak radio waves)
÷ In MANUAL mode, FM stations are received in monaural.
2 Press the TUNING MODE [AUTO/MONO]
key to select a tuning type of Auto or
Manual.
or
Each press of the TUNING MODE key changes the
tuning types.
Auto tuning : "AUTO TUNE" is displayed.
The AUTO indicator lights up.
Stereo reception
Manual tuning : "MANUAL TUNE" is displayed.
The AUTO indicator goes off.
Monaural reception
÷ Normally, use the Auto tuning (stereo reception).
TUNING MODE
3 Tune in to a station by pressing the 4 /
¢ [1 / ¡] key.
Auto tuning :
The next station can be received automatically every
time the 4 / ¢ key is pressed.
Manual tuning :
To decrease
frequency
To increase
frequency
Press the 4 / ¢ key repeatedly until the desired
station is received. The desired station can also be received by holding the 4 / ¢ key down until its frequency is displayed.
or
To decrease
frequency
To increase
frequency
27 EN
*5506/25-31/EN
27
04.12.15, 23:49
Receiving broadcast station
ENGLISH
Presetting radio stations manually (Manual preset)
1 Perform the procedure in "Tuning in to a
non-preset radio station (Auto tuning,
Manual tuning)" to receive the station to be
preset.
¶
Up to 40 stations can be memorized.
÷ To memorize an RDS station, wait for the station
name to appear on the display before performing
step 2.
2 Press the ENTER key during reception.
1 2 3 4 5
ENTER
TUNED ST. AUTO
L
FM
30 10 5
3 1 0 (-dB)
MHz R
(Proceed to step 3 while "- - " is blinking.)
"MEMORY" lights (for approx. 20 sec.) .
3 Select one of the preset numbers from 1 to 40
with the 4 / ¢ key [ Numeric keys ].
1 2 3 4 5
TUNED ST. AUTO
FM
L
30 10 5
3 1 0 (-dB)
MHz R
÷ If several stations are preset under the same number, the previous memory is replaced with the latest
memory contents.
÷ Sequence for pressing the Numeric keys on the remote control unit
To input "12" ..... +10, 2
To input "20" ..... +10, +10, 0
or
Preset numbers can directly be input with the
Numeric keys on the remote control unit.
4 Press the ENTER key again.
ENTER
(Repeat steps 1, 2, 3 and 4 to preset other
stations.)
28 EN
*5506/25-31/EN
28
04.12.16, 1:03 PM
RDS (Radio Data System)
Before using RDS
For reception of RDS stations, the auto memory function must be used to preset the stations.
§
This unit is equipped with the following functions utilizing RDS data :
1 2 3 4 5
PS (Program Service Name) Display :
When an RDS broadcast is received, the station name
is automatically displayed.
TUNED ST. AUTO
FM
RDS
L
30 10 5
3 1 0 (-dB)
MHz R
PTY (Program Type) Search : º
The tuner automatically searches for a station which is
currently broadcasting a specified program type (genre).
The RDS indicator lights up when an RDS broadcast (signal) is received.
÷ Some functions may not be provided or be given different names depending on countries or areas.
Switching the displays
Each press of the DISPLAY key changes the display items;
Press the DISPLAY key.
PS (Program service name) \ Frequency \ Clock
÷ The RDS indicator lights up on the display, when a
preset RDS broadcast is selected.
DISPLAY
29 EN
*5506/25-31/EN
29
04.12.15, 23:49
ENGLISH
RDS is a system which transmits useful information (in the form of digital data) for FM broadcasts
along with the broadcast signal. Tuners and receivers designed for RDS reception can extract the information from the broadcast signal for use with
various functions such as automatic display of the
station name.
RDS (Radio Data System)
ENGLISH
Searching for a desired program type (PTY search)
By specifying the type of program (genre) you want to listen to, the tuner automatically searches for a
station which is currently broadcasting a program of the specified type.
However, if a station is not preset by AUTO MEMORY, "No Data" will flash instead of the program (genre)
type and PTY search is not available.
Set the reception band to FM. Preset RDS stations with the AUTO MEMORY function. §
1 Select the PTY search mode.
Press the PTY key on the remote control unit.
1 2 3 4 5
TUNED ST. AUTO
RDS PTY
FM
L
30 10 5 3 1 0 (-dB)
MHz R
When an RDS broadcast is received, the program type is
shown on the display. If no PTY data is available, or if the
station is not an RDS station, "None" is displayed.
2 Select the desired program type.
Use program type table on the right for your convenience.
Program type table
Select the desired program with the 4 /
¢ key.
4, ¢ keys
4
DOWN
Select it while the PTY indicator is lit.
The desired program type can be selected
with the 4 / ¢ key from 29 types. Press
the key and release it when the desired type
is displayed.
"No Data" blinks on the display if this operation is attempted before setting the
AUTO MEMORY.
UP
¢
Program Type Name
Pop Music
Rock Music
Easy Listening Music
Light Classical
Serious Classical
Other Music
News
Current Affairs
Information
Sport
Education
Drama
Culture
Science
Varied
Weather
Finance
Children's programs
Social Affairs
Religion
Phone In
Travel
Leisure
Jazz Music
Country Music
National Music
Oldies Music
Folk Music
Documentary
30 EN
*5506/25-31/EN
30
04.12.15, 23:49
Display
Pop M
Rock M
Easy M
Light M
Classics
Other M
News
Affairs
Info
Sport
Educate
Drama
Culture
Science
Varied
Weather
Finance
Children
Social
Religion
Phone In
Travel
Leisure
Jazz
Country
Nation M
Oldies
Folk M
Document
RDS (Radio Data System)
3 Start the search.
Press the PTY key on the remote control unit.
Display while searching for a Rock Music broadcast.
Blinks.
1 2 3 4 5
RDS PTY
L
30 10 5
3 1 0 (-dB)
R
÷ No sound is heard while the PTY indicator is blinking.
÷ If a program of the desired type cannot be found,
"No Program" blinks, then after several seconds the
display returns to the original display.
÷ If a program of the desired type is found, that program
is received and the program type name display
changes to the station name display.
÷ To cancel the search, press the PTY key again.
PS display when an RDS station is received.
Goes off.
PS name display.
1 2 3 4 5
TUNED ST. AUTO
FM
RDS
L
30 10 5
3 1 0 (-dB)
MHz R
To change to a different program type :
Repeat steps 1, 2 and 3.
31 EN
*5506/25-31/EN
31
04.12.15, 23:49
ENGLISH
Program type name display.
Listening to external input sources
ENGLISH
1 Select an external input source.
Press the INPUT SELECTOR [INPUT SELECT]
key.
INPUT
SELECTOR
Each press of the key switches the display items;
"PHONO”
"TAPE"
"AUX"
1 2 3 4 5
or
L
30 10 5
3 1 0 (-dB)
R
2 Play the connected equipment.
3 Adjust the volume.
÷ The AUX and PHONO keys on the remote control unit
can also be used for selecting the respective input
sources.
Turn the Volume knob.
VOLUME
Decrease
the volume
Increase
the volume
Adjusting the external input level
This adjusts the input level for the external equipment (cassette deck etc.) connected to the external input
terminal. Adjust the level for the external input sources to sound like an equivalent volume to CD.
1 Press the MODE key and select "INPUT
LEVEL" by pressing the 4 / ¢ key, and
press the ENTER key.
MODE
ENTER
2 Select input level by pressing the 4 / ¢
1 2 3 4 5
key.
L
30 10 5
3 1 0 (-dB)
R
Input level
÷ Adjustment is possible at the range of –3 to +5.
÷ Adjusting the input level also changes the recording
level from the input source connected to the external
input jacks.
÷ The adjustment mode is displayed for approximately
20 seconds.
3 Press the ENTER key.
ENTER
32 EN
*5506/32-36/EN
32
04.12.15, 23:50
Various CD playback features
Listening to the desired sequence (program playback)
Use the following procedure to program desired tracks in a desired order. (up to 32 tracks)
ENGLISH
Select the CD input.
1 Select PGM mode.
Press the P.MODE key on the remote control
unit.
Press the key in
the stop mode.
1 2 3 4 5
TTL L
CD
30 10 5
3 1 0 (-dB)
R
PGM
The indicator lights up.
2 Select track numbers in the order you want to play them.
1 Select the track number with the Numeric
1 2 3 4 5
keys on the remote control unit.
TTL L
CD
30 10 5
3 1 0 (-dB)
R
PGM
Press the Numeric keys as shown below;
To select track No. 23: +10, +10, 3
To select track No. 30: +10, +10, +10, 0
(Go to step 2 within 20 seconds.)
2 Press the ENTER key to confirm the
selection.
÷ Up to 32 tracks can be programmed. When "PGM
FULL" is displayed, no more tracks can be
programmed.
÷ If you made a mistake, press the CLEAR key and enter
the track No. again.
÷ When a track No. is entered, the track will be added to
the end of the existing program.
÷ When the total time of CD program is 1000 minutes or
more, the time display shows "- - - : - -".
(To select more than one track, repeat steps 1 and
2 for each track.)
3 Start playback.
÷ Tracks will be played in the order they were
programmed (following the program numbers).
÷ When the 4 key is pressed once during playback, the
track being played will be played from the beginning.
To skip further to a track proceeding the current track,
press the 4 key twice repeatedly.
÷ When the ¢ key is pressed during playback, play will
skip to the next track in the program.
Press the CD 6 key.
33 EN
*5506/32-36/EN
33
04.12.15, 23:50
Various CD playback features
ENGLISH
To add a track to an existing program
1 Select the track number to be added with
the Numeric keys on the remote control unt.
Press the key in
the stop mode.
Press the Numeric keys as shown below;
To select track No. 23: +10, +10, 3
To select track No. 30: +10, +10, +10, 0
÷ Up to 32 tracks can be programmed. When "PGM
FULL" is displayed, no more tracks can be
programmed.
÷ If you made a mistake, press the CLEAR key and enter
the track No. again.
÷ When a track No. is entered, the track will be added to
the end of the existing program.
2 Press the ENTER key.
To clear a programmed track
Press the CLEAR key on the remote control
unit.
1 2 3 4 5
TTL L
CD
Press the key in
the stop mode.
30 10 5
3 1 0 (-dB)
R
PGM
P-01 has been deleted
÷ Each time the key is pressed, the last track in the
program is cleared.
To get out of the PGM mode
1 2 3 4 5
Press the P.MODE key on the remote
control unit to turn off the PGM indicator.
L
CD
Press the key in
the stop mode.
30 10 5
3 1 0 (-dB)
R
Goes off
The program mode is canceled when the unit is turned off or the disc is ejected. The programmed information is
cleared entirely at this time.
34 EN
*5506/32-36/EN
34
04.12.15, 23:50
Various CD playback features
Repeated playback
You can repeatedly listen to a favorite track or disc.
ENGLISH
Select the CD input.
Repeating a single track
1 Confirm that the PGM indicator is not lit.
÷ Press the P.MODE key to go off the PGM indicator if it
is lit.
2 Press the CD 6 key to play the track to be
repeated.
1 2 3 4 5
L
CD
30 10 5
3 1 0 (-dB)
R
Confirm that this indicator is not lit.
3 Press the REPEAT key on the remote control
u n i t t o l i g h t u p t h e REPEAT a n d O N E
indicators.
Each press of the REPEAT key switches the repeat
mode;
1 Single track Repeat (The REPEAT and ONE
indicators light up. )
2 All tracks Repeat (The REPEAT indicator lights up. )
3 Cancellation (The indicators go off. )
1 2 3 4 5
CD
REPEAT
ONE
L
30 10 5
3 1 0 (-dB)
R
Repeating all tracks in a disc
1 Confirm that the PGM indicator is not lit.
÷ Press the P.MODE key to go off the PGM indicator if it
is lit.
2 Press the REPEAT key on the remote control
unit to light up the REPEAT indicator.
1 2 3 4 5
L
CD
30 10 5
3 1 0 (-dB)
R
Confirm that this indicator is not lit.
3 Press the CD 6 key to start playback.
Each press of the REPEAT key switches the repeat
mode;
1 Single track Repeat (The REPEAT and ONE
indicators light up. )
2 All tracks Repeat (The REPEAT indicator lights up. )
3 Cancellation (The indicators go off. )
1 2 3 4 5
REPEAT
L
CD
30 10 5
3 1 0 (-dB)
R
35 EN
*5506/32-36/EN
35
04.12.16, 2:47 PM
Various CD playback features
ENGLISH
Repeating selected tracks
1 Program the track sequence according to
steps 1 to 2 of "Listening to the desired
sequence (program playback)". ‹
2 Press the REPEAT key on the remote control
unit to light up the REPEAT .
Each press of the REPEAT key switches the repeat
mode;
1 All tracks Repeat (The REPEAT indicator lights up. )
2 Cancellation (The indicator goes off.)
1 2 3 4 5
REPEAT
TTL L
CD
30 10 5
3 1 0 (-dB)
R
PGM
÷ All selected tracks will be played back repeatedly.
To stop repeated playback
3 Press the CD 6 key to start playback.
Press the REPEAT key repeatedly until the repeat
mode is switched off.
÷ The REPEAT indicator goes off and playback
according to the current CD player mode.
Playing tracks in a random order (random playback)
As titles each time are selected randomly, music can be enjoyed without getting tired of it.
Select the CD input.
1 Confirm that the PGM indicator is not lit.
2 Press the RANDOM key on the remote
control unit.
÷ Press the P.MODE key to go off the PGM indicator if it
is lit.
Each press of the RANDOM key switches the
random mode;
1 Random Playback (The RDM indicator lights up.)
2 Normal Playback (The RDM indicator goes off.)
1 2 3 4 5
CD
L
RDM
30 10 5
3 1 0 (-dB)
R
÷ Playback stops after each track has been played once.
÷ The random playback can also be repeated by pressing
the REPEAT key on the remote control unit.
To select another track in the middle of playing one
Press the ¢ key.
To cancel random playback
Press the RANDOM key on the remote
control unit to go off the RDM indicator.
÷ Pressing the 4 key returns the playback position
to the beginning of the track being played.
÷ The RDM indicator goes off and the playback in order
of the tracks starts from the track being played.
36 EN
*5506/32-36/EN
36
04.12.16, 2:29 PM
Timer operation
Sleep timer (SLEEP)
The unit is turned OFF automatically after the specified period has elapsed.
ENGLISH
Timer playback (PROG. 1, PROG. 2) °
Playback of the selected input source starts at the specified time.
AI timer playback (PROG. 1, PROG. 2) °
When timer playback starts, the volume level increases gradually until the unit volume level is reached.
Sleep timer (SLEEP)
Set the number of minutes after which the unit is to be turned OFF.
Press the SLEEP key repeatedly to set the time.
÷ The unit is turned OFF automatically after the set time
has elapsed.
÷ Each press increases the timer period by 10 minutes.
The sleep timer can be set up to 90 minutes.
10 = 20 = 30 ..... 70 = 80 = 90 = Cancel = 10 = 20 .....
1 2 3 4 5
L
CD
30 10 5
3 1 0 (-dB)
R
Sleep timer
indicator lights
Duration for
sleep timer
÷ Press the SLEEP key while the sleep timer is activated
to check the remaining time.
To cancel
Turn the unit off, or press the SLEEP key until
the sleep timer is cancelled.
37 EN
*5506/37-43/EN
37
04.12.16, 0:23 PM
Timer operation
ENGLISH
Setting the timer program (PROG. TIMER)
In each of PROG. 1 and PROG. 2, the timer data including the operating period and played contents can be
programmed and set to be activated or deactivated.
Adjust the clock before setting the timer $
Connect the related equipment under reference to "System connections" 6~8
1 Make preparations for timer.
Listening to CD
Listening to external input sources
Listening to radio
Set a disc.
(Only normal playback is possible.)
Radio stations should be preset
beforehand. ∞
Set the timer for a component
connected to external input jacks.
÷ The programs of "PROG.1" and "PROG.2" can be set at the same time.
÷ For the simultaneous programs setting, keep the time intervals of 1 minute or more between timer programs, in order
to avoid time overlapping.
2 Set the timer setting program number.
1 Press the MODE key and select "TIMER
SET" by pressing the 4/¢ key, and press
the ENTER key.
MODE
ENTER
2 Select "PROG.1 SET" or "PROG.2 SET" by
pressing the 4 / ¢ key.
Each press of the 4 / ¢ key switches the display
items;
"PROG.1 SET"
"PROG.2 SET"
1 2 3 4 5
CD
1
L
30 10 5
3 1 0 (-dB)
R
3 Press the ENTER key.
÷ The previously set contents are displayed. (If you do
not want to change them, simply press the ENTER
key.)
÷ When a timer setting has already been made in the
selected timer, the setting will be overwritten by the
new setting.
ENTER
38 EN
*5506/37-43/EN
38
04.12.16, 0:23 PM
Timer operation
3 Select the program timer ON/OFF.
1 Select "PROG.1 ON" or "PROG.1 OFF" by
1 2 3 4 5
CD
L
1
30 10 5
3 1 0 (-dB)
R
÷ If "OFF" is selected, the key function return to ordinary
mode.
2 Press the ENTER key.
ENTER
4 Select an execution day of the programmed timer.
1 Select the day of week by pressing the 4 /
¢ key.
Advanced.
Returned.
2 Press the ENTER key.
Each press of the 4 / ¢ key changes the items;
"EVERYDAY"
"MONDAY"
"TUESDAY"
"WEDNESDAY"
"THURSDAY"
"FRIDAY"
"SATURDAY"
"SUNDAY"
"MON-FRI"
"TUE-SAT"
"SAT-SUN"
ENTER
1 2 3 4 5
CD
L
1
30 10 5
3 1 0 (-dB)
R
5 Set the ON time, and then the OFF time.
1 Adjust the time by pressing the 4 / ¢
1 2 3 4 5
key.
CD
L
1
30 10 5
3 1 0 (-dB)
R
The time is
advanced.
The time is
returned.
2 Press the ENTER key.
ENTER
÷ For each of the ON time and OFF time, enter the figure
of "hour" by performing steps 1 and 2, then enter the
figure of "minute" in the same manner.
÷ If you make a mistake, press the MODE key and restart
from step 2.
Continued to next page
39 EN
*5506/37-43/EN
39
04.12.16, 0:23 PM
ENGLISH
pressing the 4 / ¢ key.
Timer operation
ENGLISH
6 Set the desired Timer operation.
1 Select the mode.
(1) Select "PLAY" or "AI PLAY" by pressing
the 4 / ¢ key.
Each press of the 4 / ¢ key changes the items;
"PLAY"(Timer play back)
"AI PLAY" (Timer play with gradually increasing
volume)
(2) Press the ENTER key.
ENTER
2 Adjust the volume level.
(1) Adjust the volume level by pressing the
4 / ¢ key.
÷ When "PLAY" is selected, the timer playback will start
at the set volume level.
÷ When "AI PLAY" is selected, the timer playback will
start at volume 0 and increase to the set volume level.
(2) Press the ENTER key.
ENTER
3 Select input source.
(1) Select a source to be played by pressing
the 4 / ¢ key.
Each press of the 4 / ¢ key changes the items
as follows.
"PLAY TUNER"
"PLAY CD"
"PLAY PHONO"
"PLAY TAPE"
"PLAY AUX"
(2) Press the ENTER key.
ENTER
4 Select broadcast station (only when TUNER
is selected above).
(1) Select the preset station No. by pressing
the 4 / ¢ key.
÷ When the timer setting is completed by pressing the
ENTER key, "COMPLETE" is displayed.
(2) Press the ENTER key.
To modify the setting contents, restart the
timer setting from the beginning.
ENTER
40 EN
*5506/37-43/EN
40
04.12.16, 1:31 PM
Timer operation
7 Put the unit in standby mode.
(POWER) key.
Deactivating and activating the timer program
Once the timer setting procedure has been performed, the timer program can be deactivated or activated easily.
When the unit is in on, press the TIMER key.
TIMER
or
Each press of the TIMER key changes the items ;
1
2
1, 2
Activate PROG.1 timer.
Activate PROG.2 timer.
Activate both PROG.1 and PROG.2
timer.
Deactivate the timer. (Timer indicator is off.)
÷ The timer program contents remain even if the timer is
deactivated.
÷ After a power failure or the AC power cord has been
unplugged, the STANDBY/TIMER indicator blinks in
green. In this case, set the present time, and then go
through the timer setting procedure again.
41 EN
*5506/37-43/EN
41
04.12.16, 0:23 PM
ENGLISH
Press the
÷ When the unit enters the Standby mode, the
STANDBY/TIMER indicator lights in green.
÷ If there is a power failure or the AC power cord is
unplugged after the timer reservation has been
activated, the STANDBY/TIMER indicator blinks in
green. In this case, the clock setting should be
restarted from the beginning.
÷ Active timer program can be seen on the display by
pressing the 7(STOP) key.
Setting DIMMER functions
ENGLISH
Select DIMMER mode.
Press the DIMMER key on the remote control
unit to select DIMMER mode.
1 2 3 4 5
L
30 10 5
3 1 0 (-dB)
R
Each press of the DIMMER key changes items;
Procedure on the main unit
1 Press the MODE key and select "DIMMER
SET" by pressing the 4 / ¢ key, and
press the ENTER key.
MODE
“DIMMER OFF”: Normal brightness
“DIMMER 1”:
Brightness of the display is reduced.
“DIMMER 2”:
Brightness of the display is reduced.
Key illumination goes off.
The sound indicators go off.
“DIMMER 3”:
Key illumination goes off.
ENTER
2 Press the 4 / ¢ key to select DIMMER
mode and press the ENTER key.
ENTER
Each press of the 4 / ¢ key changes
functions in order of: “DIMMER 1” =
“DIMMER 2” = “DIMMER 3” = “DIMMER
OFF”.
42 EN
*5506/37-43/EN
42
04.12.16, 0:23 PM
Switching the level meter
1 Select "LEVEL METER".
2 3 4 5
TUNED ST. AUTO
L
30 10 5
3 1 0 (-dB)
R
MODE
ENTER
÷ The character information display and level meter start
to blink.
2 Switch between ON and OFF.
2 3 4 5
1 Select ON or OFF by pressing the 4 / ¢
key.
TUNED ST. AUTO
L
30 10 5
3 1 0 (-dB)
R
2 3 4 5
TUNED ST. AUTO
2 Press the ENTER key.
ENTER
÷ Each press of the 4 / ¢ key switches "ON" and
"OFF" of the level meter. The "ON" or "OFF" display
blinks.
AUTO POWER SAVE (A.P.S.) function
When the unit is ON and the unit is left for about 30 minutes with CD not operating, the unit is switched off (standby)
automatically by this function. This is convenient when you forgot to switch off the unit. This function can be
activated or deactivated by the following operation.
1 Select "A.P.S. SET".
2 Select "A.P.S. ON" or "A.P.S. OFF".
MODE
ENTER
3 Press the ENTER key.
(Press the ENTER key while the "A.P.S. SET"
is blinking.)
ENTER
÷ When the TUNER or an external input is selected,
A.P.S. function operates only when the volume is
set to zero or when MUTE is on.
43 EN
*5506/37-43/EN
43
04.12.16, 0:23 PM
ENGLISH
Press the MODE key and select "LEVEL
METER" by pressing the 4 / ¢ key, and
press the ENTER key.
Important items
ENGLISH
Reference
Caution on condensation
Memory backup function
Condensation (of dew) may occur inside the unit when there
is a great difference in temperature between this unit and
the outside.
This unit may not function properly if condensation occurs.
In this case, leave the unit for a few hours and restart the
operation after the condensation has dried up.
Be specially cautious against condensation in a following
circumstances:
When this unit is carried from one place to another across
a large difference in temperature, when the humidity in the
room where this unit is installed increases, etc.
Please note that the following items will be deleted
from the main unit’s memory if the AC power cord is
disconnected from the AC wall outlet for approximately
1 day.
• Power mode
• Input selector settings
• Volume level
• Sound preset settings
• PHONO, TAPE, AUX input level
• A.P.S. setting
• Sound mode settings
• Room Equalizer settings
• Manual Equalizer settings
• D-BASS settings
• Dimmer setting
• Broadcast band
• Frequency setting
• Preset stations
• Tuning mode
• Timer settings
Note related to transportation and movement
Before transporting or moving this unit, carry out the
following operations.
1 Remove the CD from the unit.
2 Press the CD 6 key.
3 Wait for some time and verify that the display
appears as above.
4 Wait a few seconds and turn the unit OFF.
Maintenance
Maintenance of the unit
In regard to contact cleaner
When the front panel or case becomes dirty, wipe with a
soft, dry cloth. Do not use thinner, benzine, alcohol, etc. for
these agents may cause discoloration.
Do not use contact cleaners because it could cause a malfunction. Be specially careful not to use contact cleaners
containing oil, for they may deform the plastic component.
44 EN
*5506/44-48/EN
44
04.12.16, 0:26 PM
Important items
Discs which can be played with this unit
Disc handling precautions
Handling
Label side
with the IEC standard, for example a disc carrying the
marking on the label surface.
Never play a cracked or warped disc
Playing side
Sticker
Do not attach paper or tape to either the
playing side or the label side of the disc.
During playback, the disc rotates at high speed in the
player. Therefore, to avoid danger, never use a cracked or
deformed disc or a disc repaired with tape or adhesive
agent. Please do not use discs which are not round because they may cause malfunction.
Sticky paste
Disc accessories
Cleaning
If there are fingerprint marks or foreign
matter found on the disc, lightly wipe the
disc with a soft cotton cloth (or similar)
from the center of the disc outwards in a
radial manner.
The disc accessories (stabilizer, protection sheet, protection ring, etc.) which are marketed for improving the sound
quality or protecting discs as well as the disc cleaner
should not be used with this system because they may
cause malfunction.
Storage
When a disc is not to be played for a long period of time,
remove it from the player and store it in its case.
45 EN
*5506/44-48/EN
45
04.12.16, 0:26 PM
ENGLISH
Hold the disc so that you do not touch the
playing surface.
CD (12 cm, 8 cm), CD-R, CD-RW, and the audio part of
CDV, CD-G, CD-EG and CD-EXTRA. Use discs that comply
In case of difficulty
ENGLISH
What seems to be a malfunction is not always so. Before calling for service, check the following table according to the symptom of your trouble.
Resetting the microcomputer
The microcomputer may fall into malfunction (impossibility to operate, erroneous display, etc.) when the AC
power cord is unplugged while unit is ON or due to an
external factor. In this case, execute the following procedure to reset the microcomputer and return it to normal condition.
÷ Please note that resetting the microcomputer clears
the contents stored in and it returns to condition
when it left the factory.
÷ CD tray will open if the microcomputer is reset with a
disc loaded. In this case, please press the CD open/
close key to close the tray after removing the disc.
Unplug the AC power cord from the AC wall outlet,
then while holding the (POWER) key down, plug
it in the AC wall outlet again.
After resetting the microcomputer, the display will show
as follows:
Amplifier section/Speaker section
Symptom
Remedy
Sound is not produced.
÷
÷
÷
÷
The STANDBY/TIMER indicator blinks in red
and no sound is output.
÷ A speaker cord is short-circuited. Turn the power off and reconnect the speaker cord.
The STANDBY/TIMER indicator blinks in
green.
÷ Adjust the present time again.
$
No sound from the headphones.
÷ Insert the headphones plug correctly.
÷ Adjust to a required volume.
÷ Switch MUTE OFF.
^
^
Connect properly referring to "System connections".
Adjust to a required volume.
Switch MUTE OFF.
Unplug the headphone plug.
6
^
^
^
Sound is not produced from the left or right
speaker.
÷ Connect cables properly referring to "System connections". 6
÷ Adjust balance.
^
A humming noise is generated when the PHONO
input selector is selected.
÷ Insert the audio cord plugs securely into the PHONO jacks. 8
÷ Connect the Earth cord to the GND terminal on the rear panel.
8
The clock display blinks without changing the
figures.
÷ Adjust the present time again.
Timer operation is not possible.
÷ Adjust the present time referring to "Clock adjustment". $
÷ Set the timer ON time and OFF time.
°
46 EN
*5506/44-48/EN
46
04.12.16, 0:26 PM
$
In case of difficulty
Tuner section
Symptom
Remedy
÷ Connect antennas.
÷ Select a band.
÷ Tune to the frequency of the desired station.
Noise interferes.
÷ Install the outdoor antenna in an apart position from the road.
÷ Switch the suspected electric appliance OFF.
÷ Install the TV or the system at an increased distance between
them.
A station has been preset but it cannot be received by pressing the P.CALL key.
÷ Preset stations with tunable frequencies.
÷ Preset stations again.
78
∞
∞
§
§
CD player section
Symptom
Remedy
A CD is placed in the player but it cannot be
played.
÷ Place the disc properly, with the label side facing upward.
÷ Clean the disc referring to "Disc handling precautions". t
÷ Refer to "Caution on condensation" and remove the condensation
by evaporation.
r
Sound is not produced.
÷ Press the CD 6 key.
÷ Clean the disc referring to "Disc handling precautions". t
÷ Discs which are recorded by data formats such as MP3 and
WMA cannot be played back.
Sound skips.
÷ Clean the disc referring to "Disc handling precautions". t
÷ Install the unit in a place not subject to vibrations.
Remote control unit
Symptom
Remedy
Remote control operation is not possible.
÷ Replace with new batteries.
÷ Operate the unit inside the remote controllable range.
#
#
Displayed messages
Meaning
Displayed Message
CAN’T SETUP
÷ The microphone for ROOM EQ is not connected or headphones are connected.
CD NO DISC
÷ A CD is not inserted in the unit.
CD TEXT FULL
÷ The disc has the text data of more than 1k byte.
CHECK DISC
÷ TOC of the disc cannot be read. Or the disc (CD-R) which is not finalized is inserted.
Check the disc.
PGM FULL
÷ An attempt is made to select a 33rd track during programing of CD.
‹
R.EQ ERROR1
÷ The measurement is impossible because measuring room is too noisy.
&
R.EQ ERROR2
÷ The measurement is impossible because no signal is input in the microphone. &
TRAY OPEN
÷ CD tray is opened.
&
¢
47 EN
*5506/44-48/EN
47
04.12.16, 0:26 PM
ENGLISH
Radio stations cannot be received.
ENGLISH
Specifications
[Amplifier section]
[Tuner section]
Effective output power during STEREO operation
(1 kHz, 10% T.H.D., at 6 Ω) ...... 30 W + 30 W (RMS)
Rated output power during STEREO operation
(63 Hz ~ 12.5 kHz, at 6 Ω) .......... 24 W + 24 W (DIN)
Total harmonic distortion
........................ 0.007 % (AUX IN, 1 kHz, 11 W, 6 Ω)
Tone Control Characteristics
BASS(TURN OVER 100 Hz) ....... ±3.1 dB (at 100 Hz)
(TURN OVER 150 Hz) ....... ±5.1 dB (at 100 Hz)
(TURN OVER 200 Hz) ....... ±5.7 dB (at 100 Hz)
TREBLE (TURN OVER 5 kHz) ... ±5.7 dB (at 10 kHz)
(TURN OVER 7 kHz) ... ±5.1 dB (at 10 kHz)
(TURN OVER 10 kHz) . ±3.1 dB (at 10 kHz)
Graphic Equalizer Characteristics
Adjustable Center Frequency
..................................... 63 Hz, 160 Hz, 400 Hz,1 kHz,
2.5 kHz, 6.3 kHz, 16 kHz
Variable Range ................................................ ±8 dB
D-Bass (+10) .............................. +16 dB(40 Hz, Vol. 60)
Input (Sensitivity / Impedance)
PHONO .............................................. 5.5 mV / 31 kΩ
LINE (AUX, TAPE) ........................... 400 mV / 30 kΩ
Output (Level / Impedance)
TAPE REC OUT ................................ 400 mV / 200 Ω
SUBWOOFER PRE OUT ........................... 2V / 620 Ω
FM tuner section
Tuning frequency range ......... 87.5 MHz ~ 108 MHz
MW (AM) tuner section
Tuning frequency range .......... 531 kHz ~ 1,602 kHz
[CD player section]
Laser ............................................. Semiconductor laser
Over sampling ....................................... 8 fs (352.8 kHz)
D/A Conversion ....................................................... 1 Bit
Frequency response
................................ 20 Hz ~ 20 kHz (TAPE REC OUT)
Signal to noise ratio
........................... More than 97 dB (TAPE REC OUT)
[General]
Power consumption .............................................. 70 W
Standby power consumption .............. less than 0.3 W
Dimensions ................................. W: 270 mm (10-5/8”)
..................................................... H: 126 mm (4-15/16”)
..................................................... D: 368 mm (14-1/2”)
Weight (net) ........................................... 5.6 kg (12.4 lb)
KENWOOD follows a policy of continuous
advancements in development. For this reason
specifications may be changed without notice.
÷ Sufficient performance may not be exhibited
at extremely cold locations (where water
freezes).
For your records
Record the serial number, found on the back of the unit, in
the spaces designated on the warranty card, and in the
space provided below. Refer to the model and serial
numbers whenever you call upon your dealer for information or service on this product.
Model
Serial Number
48 EN
*5506/44-48/EN
48
04.12.16, 4:27 PM