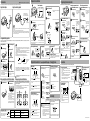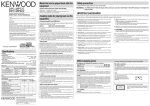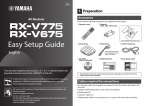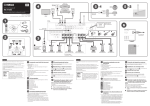
1
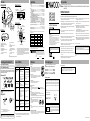
Part names Specifications Display (main unit) Unit (top/right side) System ............................................................................ Compact disc digital audio system Laser ....................................................................................................... Semiconductor laser Power supply Ó E LIN Ò PH ON Battery life (continuous repeat playback) D.A.S.C. mode indicator (DPC-X507/X602) Playing time display Ì T OU (Figures inside parentheses show the performance when the D.A.S.C. is ON.) Commercially-available alkaline batteries (LR6/AA) x 2 .................................... Approx. 12 (9.5) Hours Commercially-available alkaline batteries (LR6/AA) x 4 ..................................... Approx. 25 (20) Hours Rechargeable batteries (NB-88) x 2 ................................................................... Approx. 5.5 (4.5) Hours Alkaline batteries (LR6/AA) x 2 and rechargeable batteries (NB-88) x 2 ............ Approx. 18 (15) Hours Dimensions (W x H x D) (DPC-X301) ........................................ 132 mm x 32.5 mm x 153 mm (5 - 3/16" x 1 - 1/4" x 6") Dimensions (W x H x D) (DPC-X507/X602) .............................. 132 mm x 29.5 mm x 153 mm (5 - 3/16" x 1 - 3/16" x 6") Weight (net) (DPC-X301) ...................................................................................... 272 g (9.6 oz) Weight (net) (DPC-X507/X602) ............................................................................ 260 g (9.2 oz) Track number display -IN ES Remote control ME VOLU REMOTE Å ı Ç Î Battery duration indicator ‰ Ï PHONES Unit (left side) Ï LINE OUT PHONES (Headphones) jack B. BOOST (bass boost) key PHONES Track number display Ì VOLUME knob B.BOOS T Playing indicator ˜ Accessories C Å ı Ç Î ‰ Ï Stop/off key ¢ (Skip up/Fast forward) key REPEAT (Repeat play/Shuffle play) key 7 (Stop/off) key ‰8 (Play/pause) key VOLUME control knob ÷ PHONES/REMOTE jack (for *DPC-X507) ÷ PHONES jack (for DPC-X301/ *DPC-X507/ DPC-X602) Ì LINE OUT jack Ó ¬ Ô DC IN (External power) jack Display 4 (Skip down/Fast reverse) key P.MODE/B.B. (Program mode/Bass boost) key Ò OPEN knob (Slide to open top cover.) ˜ D.A.S.C. switch (for DPC-X507/DPC-X602) ˆ HOLD switch Sound skip guard function (D.A.S.C.) 1 1 1 Headphones 1 1 1 Remote control – *1 – Rechargeable batteries *2 2 – Play/pause key Car battery adaptor – – 1 ÷ Always ensure that the headphone plug is fully inserted before turning the power ON. ÷ If the headphone plug is inserted or removed while playback is in progress, the liquid crystal display may be inconsistent with the operation status of the unit. To correct this, turn the power OFF and then ON again. ÷ When the LCD remote control plug is connected, the remote control operation keys may not operate. To correct this, pull the LCD remote control's plug out of the unit, wait about 5 seconds, and then re-insert it. In case of difficulty No operation occurs when operation keys are pressed. Mechanism of D.A.S.C. Display Note Sound skips, or is interrupted. Reproduced sound Digital memory Depending on the extent of the impact, the data in the memory may be used up, so the playback skip protection may momentarily be ineffective. Setting the D.A.S.C. Lit ST Cause Remedy ÷ The HOLD switch of the main ÷ Set the switch to OFF. unit is set to ON. ÷ The batteries are exhausted. ÷ Replace the two alkaline batteries, or recharge the rechargeable batteries. ÷ The disc is placed upside down. ÷ Place the disc with the labeled side up. ÷ Condensation has occurred ÷ Leave the unit for about 1 hour inside the unit. before re-use. ÷ The AC adapter or car battery ÷ Connect it properly. adapter is disconnected. OFF HI D.A.S.C. M Remaining memory capacity indicator ÷ The D.A.S.C. is set to "OFF". (only for DPC-X507 and DPCX602) ÷ A strong vibration that exceeds the capacity of the D.A.S.C. has occurred. ÷ The disc is dirty. ÷ The lens is dirty. ÷ The headphone plug is dirty. ÷ The batteries are low. Noise interferes. ÷ The headphone plug is dirty. ÷ The batteries are low. Rechargeable batteries cannot be recharged. ÷ Commercially available rechargeable batteries are used. Lit ST or HI Set to ST or HI. ÷ Set the D.A.S.C. to on. (only for DPC-X507 and DPCX602) ÷ Place the unit in a place not subject to vibration. ÷ ÷ ÷ ÷ Clean it. Clean it. Clean it. Replace or recharge the batteries. ÷ Clean it. ÷ Replace or recharge the batteries. ÷ The headphones are conected ÷ Insert the plug securely into the incompletely. PHONES jack. ÷ Use the exclusive rechargeable batteries (NB-88 or NB-77). ST position: Data are held for about 10 sec. Playback with high sound quality is possible. HI position : Data are held for about 40 sec. Notes ÷ The reproduced sound is interrupted during switching. ÷ When the player is used in a place free of vibration, it is recommended to release the D.A.S.C. to extend the play time by reducing the battery power. – 1 *1 *1 *1 Before using the rechargeable batteries The rechargeable batteries comes non-charged condition. Read "Rechargeable battery operation" carefully and charge the batteries before use. Record the serial number, found on the back panel of the unit, in the spaces designated on the warranty card, and in the space provided below. Refer to the model and serial numbers whenever you call upon your dealer for information or service on this product. Model Serial Number Care of lens When the lens in the pick-up gets dirty, malfunctions including the impossibility of playback may occur. The lens should be cleaned using a commercially available camera lens blower, etc. Do not touch the lens to prevent damaging the mechanism. Also do not use a lens cleaner or disc cleaner product. Care of main unit When the unit gets dirty, clean with a soft, dry cloth. If the unit is stained seriously, a moistened cloth can be used. Do not use benzine or thinner for these will damage the unit. Cleaning the plug Wipe the headphone plug with a soft cloth to keep it clean. A dirty plug may cause noise or malfunction. Caution on disc used Usable discs This unit is capable of playing discs marked with . Other discs cannot be played. 8 cm single CDs can be played as they are; do not use a commercially-available single CD adapter. Handling Hold compact discs so that you do not touch the playing surface. Do not attach paper or tape to either the playing side or the label side of compact discs. Never play a cracked or warped disc. During playback, the disc rotates at high speed in the player. Therefore, to avoid danger, never use a cracked or deformed disc or a disc repaired with tape or adhesive agent. Cleaning If fingerprints or foreign matter become attached to the disc, lightly wipe the disc with a soft cotton cloth (or similar) from the center of the disc outwards in a radial manner. Storage When a disc is not to be played for a long period of time, remove it from the CD player and store it in its case. Precaution against condensation Note : This system uses a microcomputer so it may malfunction due to external noise or interference. In such a case, unplug the power cord and remove the batteries, then re-connect the power cord and insert the batteries again. Unpack the unit carefully and make sure that all accessories are put aside so they will not be lost. Examine the unit for any possibility of shipping damage. If your unit is damaged or fails to operate, notify your dealer immediately. If your unit was shipped to you directly, notify the shipping company without delay. Only the consignee (the person or company receiving the unit) can file a claim against the carrier for shipping damage. We recommend that you retain the original carton and packing materials for use should you transport or ship the unit in the future. Keep this manual handy for future reference. For your records Simple care Immediately after a room is heated or in a room with high humidity (or vapor), the unit may malfunction due to the condensation of dew or mist on the pick-up lens. In such a case, leave the unit for about an hour before trying to use it again. 14. Nonuse periods — The power cord of the unit should be unplugged from the outlet when left unused for a long period of time. 4. Drop — Do not drop the unit or apply strong shock to it. (Damage due to dropping the unit is not covered by the warranty.) 5. Ventilation — Avoid hindering the ventilation of the unit by covering it with a cloth, etc. Unpacking Note: The accessories marked by an asterrisk (*) are provided only for certain areas. The standard accessories vary depending on the model of the unit. The accessories which are not standard are optionally available. For details, please consult your dealer. Maintenance ÷ The headphones are connected ÷ Insert the plug securely into the No sound is heard incompletely. PHONES jack. from the headphones. ÷ The volume is set to the ÷ Adjust the volume on the unit. minimum position on the unit. Storage of digital data – AC plug adaptor 2. Power-cord protection — Power-supply cords should be routed so that they are not likely to be walked on or pinched by items placed upon or against them. Pay particular attention to cords at plugs, convenience receptacles, and the point where they exit from the unit. 6. Abnormal smell — If an abnormal smell or smoke is detected, immediately turn the power OFF and pull out the power cord. Contact your dealer or nearest service center. 7. Heat — Avoid placing the unit under direct sunlight or near a source of heat such as heating equipment. Particularly, never leave it in an automobile or on the dashboard. 8. Temperature — The unit may not function properly if used at extremely low, or freezing temperatures. The ideal ambient temperature is above +5°C (41°F). 9. Water and moisture — The unit should not be used near water — for example, near a bathtub, washbowl, kitchen sink, laundry tub, in a wet basement, or near a swimming pool, etc. 10. Dust and moisture — Avoid places where is dusty or where the humidity is high. 11. Vibrations — Avoid placing the unit on an unstable place such as a shelf or in a place subject to vibrations. B60-4271-08 00 (M/T/X)Å@ OC 12. Magnetic fields — Keep the unit away from sources of magnetic fields such as TV sets, speaker systems, radios, motorized toys or magnetized objects. 9809 15. Damage requiring service — The unit should be serviced by qualified service personnel when: A. The power-supply cord or the plug has been damaged. B. Objects have fallen, or liquid has been spilled into the unit. C. The unit has been exposed to rain. D. The unit does not appear to operate normally or exhibits a marked change in performance. E. The unit has been dropped, or the enclosure damaged. 16. Servicing — The user should not attempt to service the unit beyond that described in the operating instructions. All other servicing should be referred to qualified service personnel. 17. CAUTION — TO PREVENT ELECTRIC SHOCK DO NOT USE THE AC PLUG WITH AN EXTENSION CORD, RECEPTACLE OR OTHER OUTLET UNLESS THE BLADES CAN BE FULLY INSERTED TO PREVENT BLADE EXPOSURE. Notes on using through car stereo ÷ In case of abnormality such as smoke production, immediately unplug the car battery adaptor from the cigar lighter socket. ÷ Do not leave the products or batteries in the car, particularly above the dashboard, for this may lead to malfunction or damage due to solar heat. ÷ If the unit is connected to a car stereo using an audio cord, noise may sometimes interfere. In case of abnormality, immediately press the Å° key to turn the power OFF, and unplug the AC adaptor from the power outlet. Then please contact your nearest KENWOOD service center. Before applying power Caution: Read this page carefully to ensure safe operation. For rechargeable battery AC adaptors are designed for operation as follows. RC Symptom When the D.A.S.C. function is operating, about a 10 or 40-second portion of signals is always stored in memory. Consequently, when the unit receives an impact, playback will continue without interruption even if the signal from the light pickup is interrupted. Car cassette adaptor 13. Cleaning — Do not use volatile solvents such as alcohol, paint thinner, gasoline, or benzine, etc. to clean the cabinet. Use a clean dry cloth. RB D.A.S.C. (Digital Anti Shock Circuit) Note: This instruction manual is for common use with the 3 models above. DPC-X602 AC adaptor What seems to be a serious trouble may sometimes be due to a simple mistake. Before calling for service, check the items shown in the following table again. (If you request servicing due to the reasons shown in the table, the service may be charged in some cases.) (Only for DPC-X507 and DPC-X602) DPC-X507 keys Skip/Fast forward /Fast reverse keys *DPC-X507 only Note: Marked by an asterisk (*) are only for some areas. DPC-X301 1. Power sources — The unit should be connected to a power supply only of the type described in the operating instructions or as marked on the appliance. 3. Enclosure removal — Never remove the enclosure. If the internal parts are touched accidentally, a serious electric shock might occur. B.BOOST OFF @ @ ON ˆ INSTRUCTION MANUAL Note: , HOLD. PORTABLE COMPACT DISC PLAYER KENWOOD follows a policy of continuous advancements in development. For this reason specifications may be changed without notice. HOLD switch Please read all of the safety and operating instructions before operating this unit. For best results, follow all warnings placed on the unit and adhere to the operating and use instructions. These safety and operating instructions should be retained for future reference. U.S.A. and Canada ..................................................... AC 120 V only Europe and U.K. ........................................................ AC 230 V only Australia .................................................................... AC 240 V only *Other countries ...................... AC 110-120 / 220-240 V switchable C DC IMPORTANT SAFEGUARDS DPC-X301 DPC-X507 DPC-X602 External DC supply ........................................................................................... 4.5V to 6 V DC Rechargeable batteries (NB-88 or NB-130) x 2 or 4 ................................................. DC 2.4 V Commercially-available alkaline batteries (LR6/AA) x 2 or 4 ....................................... DC 3 V Playing indicator RBR Ô Frequency response .......................................................................... 20 Hz to 20 kHz, Å}3 dB PHONES outpuyt level (16Ω, 1 kHz ) ............................................................ 10 mW + 10 mW Line output/impedance ..................................................................................... 0.6 Vrms/1 kΩ Battery duration indicator REPEAT/SHUFFLE mode indicator Program mode indicator HI D.A.S.C . WARNING: TO PREVENT FIRE OR ELECTRIC SHOCK, DO NOT EXPOSE THIS APPLIANCE TO RAIN OR MOISTURE. Audio È OFF Caution: Read this page carefully to ensure safe operation. Format Bass boost indicator ST Safety precautions Ni-Cd ATTENTION Nickel-Cadmium batteries must be recycled or disposed of properly. State laws may vary regarding the handling and disposal of Nickel-Cadmium batteries. Please contact your Authorized KENWOOD Dealer for more information. *For other countries AC voltage selection This unit operates on 110-120 or 220-240 AC voltage. The AC voltage selector switch on the AC adaptor is set to the voltage that prevails in the area to which the unit is shipped. Before connecting the power cord to your AC outlet, make sure that the setting position of this switch matches your line voltage. If not, it must be set to your voltage in accordance to the following direction. Note: Our warranty does not cover damage caused by excessive line voltage due to improper setting of the AC voltage selector switch. AC voltage selector switch 110V120V 220V240V Move switch lever to match your line voltage with a small screwdriver or other pointed tool. The marking of products using lasers (Except for some areas). CLASS 1 LASER PRODUCT This label is attached to the bottom panel and says that the component uses laser beams that have been classified as Class 1. It means that the unit is utilizing laser beams that are of a weaker class. There is no danger of hazardous radiation outside the unit. DPC-X301/X507/X602(En-M/T/X) Power sources Caution: Read this page carefully to ensure safe operation. Playback from the first track This unit can be powered with three kinds of supplies including the batteries, household power line and car battery. Using the AC adaptor 3 Using the car battery adaptor Programming tracks in desired order Favorite tracks (max. 24 tracks) can be programmed. Connect headphones. Model with remote control. 2 Model without remote control. REMOTE PHONES 3 Car battery adaptor DC-C3A (Cars with DC 12V battery only) ÷ Refer to the "Accessories" table. ÷ Before any operation, be sure to set the HOLD switch to OFF. AC power outlet DC -IN TE MO RE 4 1 LINE OU -IN 2 1 N 5 4 DC-IN Start playback. ÷ The power comes ON and playback begins. T LINE OU DC LINE PH OU VOLUME DC-IN -IN Connect to cigar lighter socket T ES ON 1 ÷ Move the OPEN knob in the direction of the arrow. L ÷ When the unit is not used, unplug the car battery adapter. (Otherwise, the car battery may run out, with some car models.) ÷ The plug may not match the cigar lighter socket of some car models. ÷ If the unit cannot be operated with the car battery adapter connected, suspect the possibility of a blown fuse. The fuse can be replaced by turning the electrode on the tip of the adapter plug. When replacing the fuse, be sure to use a fuse with a rating of 1 A. 2 Loading the batteries Open the battery cover. 1 2 EN OP Insert 2 rechargeable batteries and close the cover. 2 Plug in the AC adaptor. 3 Press the Å°key twice quickly. Operation returns to power OFF status. Charging in progress Charging completed Adjust the volume To decrease volume ÷ Close securely by pushing the front center position of the top cover unit it clicks. To pause playback temporarily ÷ IWhen the key is pressed during playback, it pauses temporarily. Pressing the key again resumes playback. C Total number of tracks Total playing time Blinks Programmed order 2 and enter it. P.MODE/B.B. ÷ After stopping playback, press the Å° key again. C Auto power-OFF function If no operation key has been pressed for 2 minutes while the unit is in the stop mode, the power is turned OFF automatically to prevent battery power consumption. Playback from desired track Repeat playback/Shuffle playback Changing the tone The following program sequence will be displayed. Repeat steps 1 and 2 and enter the Track Nos. into the program in order. ÷ When 24 tracks have been programmed, "FULL" will be displayed. 3 Start playback. Track number Programmed order Enter the Track No. you want to change. To clear the programmed contents 1 Select a track... 1 Ensure that the player is in stop mode. 2 Press the 7 key . A 2 and enter it. P.MODE/B.B. C K N Program mode can be canceled even if the top cover is open. When the programmed contents are to be changed further, repeat steps 2 and 3 . D Blinks K N Track number Programmed order J K N To turn power OFF ÷ The total number of tracks and the total playing time of them will be displayed. D A ÷ The programmed track numbers will be displayed in sequence each time the key is pressed. P.MODE/B.B. K N 3 J E To stop playback Press the P.MODE/B.B. key. Connections Ensure that the power of all components is off before connecting the cords. ÷ Rechargeable batteries can be recharged for about 500 times. When the playable time per recharge reduces, please newly purchase the optional (NB-88 or NB-77) rechargeable batteries. key once to supply power, and then press the ÷ When charging is to be stopped, press the Å° key to switch off the power. C 4 Removing the AC adapter. Skipping tracks press key or To skip backward Open the batteries cover. Insert 2 alkaline batteries and close the cover. MAIN /CHARGE SUB OP EN 2 1 When operating the unit with 4 batteries This unit can be operated with 4 alkaline batteries, or with 2 rechargeable batteries and 2 alkaline batteries. When 4 batteries are used, the unit will operate for a longer time. ÷ When 4 batteries are used, make sure they are arranged so that batteries of the same type are in line horizontally (see illustration). ÷ Do not combine batteries that have different model numbers (NB-88, NB-77). ÷ Exchange the same type of batteries at the same time. MAIN /CHARGE SUB ÷ Insert 2 AA alkaline batteries into the side of the battery case where "MAIN/ CHARGE" is displayed. ÷ Make sure the positive (+) and negative (-) poles are properly aligned. ÷ Use commercially available AA (LR6) batteries. The unit may not operate normally if manganese batteries are used. ÷ Replace both batteries at the same time. Rechargeable battery Rechargeable battery Dry battery Dry battery Dry battery Dry battery Dry battery Rechargeable battery Rechargeable battery Dry battery Battery duration indicator The duration at which the battery indicator starts to blink is variable depending on the type of battery used. Refer to the table on the right. Battery indicator Battery Type B key is pressed, playback will skip to the start of the subsequent track. ÷ Each time the key is pressed, playback will skip to the next track. ÷ When the key is pressed, playback will skip to the start of the track being played back. ÷ Each time the key is pressed, playback will skip to the previous track. Hold the key pressed during playback. Fast reverse Dry battery Rechargeable battery Blinking Timing Treatment Rechargeable batteries When the batteries is nearly exhausted. In a while, the power will be turned off automatically. Then recharge the batteries. Alkaline batteries When the batteries are half exhausted. Playback is possible while the indicator is blinking. P.MODE/B.B. K N ÷ Each press of the key switches the mode as follows: ÷ When the Fast forward 1 One-track repeat The track being played or the selected track will be played repeatedly. 2 All-track repeat All tracks on the disc will be played repeatedly. 3 Shuffle play All tracks on the disc will be played in a random order. 4 Repeat OFF Return to normal playback is made. Dry battery Dry battery Rechargeable battery A Fast forward, fast reverse Dry battery Compensation of low frequencies The low frequencies sound, which is felt in headphone, can be boosted. To skip forward J Always pay attention to the following contents when the unit is to be used with four batteries. 2 key. REPEAT After the batteries have been charged, remove the AC adapter. When operating the unit with 2 alkaline batteries It is possible to listen to one track or all tracks of a CD repeatedly or to listen to the tracks in random sequence. (SHUFFLE play) J A ÷ Fast forward is engaged by pressing and holding down key while playback is in progress. ÷ Fast reverse is engaged by pressing and holding down key while playback is in progress. ÷ Playback will resume when either key is released. Notes After display for about 2 sec, return is made to the original display. ÷ If a key is pressed just before the end of a track and the track does not change, press the REPEAT key again when the track being played back is over. ÷ If Shuffle Play is selected while playback is in progress, Shuffle Play operation will commence when the track being played back is over. ÷ Up to 99 tracks can be played back in Shuffle Play operation. ÷ If Shuffle Play is selected when operation is in Stop status, Shuffle play operation will commence immediately. Listening through speakers Listening through car audio ÷ If sound is not produced, change the tape playing direction of the car stereo. (Sound is not produced if the car stereo is set to play tape side B) ÷ Audio reproduction may be impossible with the following type of car stereo. One-way models which have the play head on the left side. Models which function by detecting the tape tension. (With these car stereo models, the car cassette adaptor is ejected automatically when it is inserted.) Listening through an amplifier with CD input jack CASSETTE ACTIV SPEAKER SYSTEM Speakers with built-in amplifier Insert into cassette deck slot. VOLUME MIN MAX Car cassette adaptor CAC-3 Refer to the "Accessories" table. R ÷ Each press of the key switches the mode as follows: 1 Bass Boost ON Car cassette adaptor insertion methods Amplifer INPUT CD INPUT CD A MAIN /CHARGE SUB R L L ÷ Connect the cable to the amplifier's CD input jacks. ÷ This connection may be impossible with some amplifiers. Low frequencies are boosted. 2 Bass Boost OFF Normal tone reproduction. The BASS BOOST is not applied to the output from the LINE OUT jack. Hold facility The operation keys of the main unit are deactivated. This position prevents undesired operation when the unit is put in a bag, etc. Car stereo Car cassette adaptor A MAIN /CHARGE SUB ÷ Insert 2 rechargeable batteries into the side of the battery case where "MAIN/ CHARGE" is displayed. ÷ Make sure the positive (+) and negative (-) poles are properly aligned. 1 P.MODE/B.B. Select the desired track numbers in the order you want to play them. Blinks 1 Select a track... B Charging is possible only on the side marked MAIN/ CHARGE. C ÷ Insert with labeled side up. ÷ Secure the disc by pushing a position near the center hole unit it clicks. 2 ÷ Press the P.MODE/B.B. key repeatedly until the programmed order you want to change is displayed. 2 A 2 ÷ When using a rechargeable battery which is new or which has not been used for more than 2 months, the operating period may be shorter than nomal. This is due to the properties of the battery and not a malfunction. After recharging, use the battery on the unit unitl it is exhausted. The original performance of the battery perfomance can be recovered by repeating this cycle a few times. ÷ Recharging is not possible during playback. Be sure to switch the power OFF before starting recharging. ÷ Be sure to close the top cover of the unit before proceeding to recharging. ÷ Recharging completes in about 6 hours. Avoid recharging batteries over 6 hours. Lit Goes off Switch the power OFF. 1 Track number Elapsed time of track being played ÷ Stop status is engaged when the 7 key is pressed while playback is in progress. K N Blinks Insert disc and close the top cover. To increase volume Press the P.MODE/B.B. key for at least 1 second during Stop status. P.MODE/B.B. Call the programmed order to be changed. ÷Stop status is engaged when the 7 key is pressed while playback is in progress. A 1 Notes 2 Blinks 5 1 K N Press the P.MODE /B.B. key for at least 1 second during Stop status. K N VOLUME Charging the rechargeable batteries ES 1 D Rechargeable battery operation Always use the specially provided rechargeable battery (NB-88) or a separately sold rechargeable batteries NB-88 or NB-77. Never use the batteries other than the batteries authorized by Kenwood. ON To check the programmed contents ÷ Stop status is engaged when the Å° key is pressed while playback is in progress. P.MODE/B.B. T 3 2 P.MODE/B.B. OPEN AC power adaptor 1 Open the top cover. VOLUME Notes PH OU VOLUME 2 ES ON PH Press the P.MODE /B.B. key for at least 1 second during Stop status. -IN DC LINE T ES ON PH VOLUME 1 1 PHONES HOLD OFF @ @ ON DC 2 Set the HOLD switch to OFF. To change the programmed contents ÷ Insert the car cassette adaptor by setting the played edge and cord position as shown in the illustration. ÷ "B" indicates the reverse side of the car cassette adaptor. ÷ For details, please read the instructions for the car cassette adaptor. DC -IN T LINE OU ES ON PH VOLUME PHONES LINE OUT When the HOLD switch on the unit is switched ON, the unit's keys are protected. HOLD OFF @ @ ON N Be sure to OFF the switch before performing any operations. Operations cannot be performed if it is in the ON position. DPC-X301/X507/X602(En-M/T/X)