1
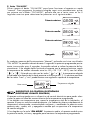
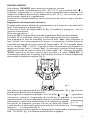
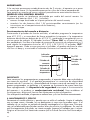
ELECTRIC OIL FILLED RADIATOR
INSTRUCTIONS FOR USE
SAVE THESE INSTRUCTIONS
RADIADORES ELÉCTRICOS DE ACEITE
INSTRUCCIONES PARA EL USO
REPASE Y GUARDE ESTAS INSTRUCCIONES
TYPE/MODELO: EW 7507 EK
Register this product on-line and receive a free trial issue of Cook's
Illustrated. Visit www.delonghiregistration.com
Visit www.delonghi.com for a list of service centers near you. (U.S.
Only).
Registre este producto en línea y reciba un ejemplar gratis de Cook's
Illustrated. Visite www.delonghiregistration.com.
Visite www.delonghi.com para ver la lista de centros de servicios
cercanos a usted. (Solamente en los Estados Unidos)
ELECTRONIC CHARACTERISTICS/ CARACTERISTICAS ELECTRICAS
120V˜60Hz
1500W
IMPORTANT SAFEGUARDS
When using electrical appliances, basic precautions should always be taken to avoid the risk of
fire, electric shock and personal injury, including the following:
1. Read these instructions thoroughly before using this heater.
2. If your radiator is equipped with a polythene tape, which serves as carry handle, remove it
prior to connecting the appliance to an outlet.
3. This heater becomes very hot when operating. To avoid burns, do not touch its hot surfaces
with your bare skin. Use the heater’s handle when moving it. Keep combustible materials,
such as furniture, pillows, bedding, papers, clothes and curtains at least 3 feet (90 cm) away
from the heater’s front and top, and also well away from its sides and rear.
4. Extreme caution should be taken when leaving and operating heater unattended near children.
5. Always unplug the heater when it is not in use.
6. Do not operate your heater when its cord or plug has been damaged or
after it has malfunctioned, has been dropped or damaged in any manner. If
you notice any leakage of oil, switch it off immediately and contact a service
center as indicated in these instructions. Return the heater to an authorized
service facility for inspection, electrical or mechanical adjustment, or repair.
7. Your heater should not be operated outdoors.
8. Your heater is not intended for use in bathrooms, laundry areas and similar indoor locations.
Never locate the heater where it might fall into a bathtub or other water containers.
9. Do not run the electric cord under carpeting. Do not cover cord with throw
rugs, runners, or the like. Run the cord away from traffic areas and where it
will not be tripped over.
10.To disconnect the heater, switch it OFF, then unplug its cord from the outlet.
11. Connect to properly polarized outlets only.
12. Do not insert or allow foreign objects to enter any ventilation or exhaust opening, as this might
cause an electric shock, fire, or damage the heater.
13. To prevent fire, do not block air intakes or exhaust in any manner. Do not place the heater on
soft surfaces, like a bed, where openings may be blocked.
14. Your heater’s internal parts may become hot or issue sparks during normal
operation. Therefore, you should not use it in areas where gasoline, paint, or
flammable liquids are used or stored.
15. Use this heater only as described in this manual. Any other use not recommended by the
manufacturer might cause fire, electric shock, or personal injury.
16. To prevent overload and blown fuses, be sure that no other appliances are plugged into the
same shared outlet, or a separate outlet on the same shared circuit.
17. The heater’s electric cord and plug may grow warmer during normal operation. However,
exceedingly hot or deformed plug or cord are not normal, and are often the result of a defective power outlet. You should replace such outlets prior to further use of the heater. Continuous
use of defective outlets might cause cord overheating and fire.
18. The use of extension cords is not recommended, as they are likely to
overheat and increase the risk of fire. However, where necessary, you may
use a No. 1 4 AWG or larger cord rated for 1875 watts or more; the extension cord should not be shared by any other appliance.
19. Make sure the heater is firmly plugged into the wall outlet. Please note that the quality of wall
outlets may deteriorate over time: Check the electric plug periodically for signs of overheating
or deformation, and in such cases, stop using that outlet and have it fixed.
20. Check that neither the heater nor the power cable has been damaged in any way during
transportation.
21. Make sure that no pieces of polystyrene or other packaging material have been left between
heating elements. If necessary, remove such pieces using a vacuum cleaner.
22.When switching the heater on for the first time, allow it to run at full power
for about two hours to get rid of a possibly unpleasant smell. Make sure
that the room where the heater is placed is well ventilated during this first
operation. Soft crackling sounds are normal during the heater’s first operation.
CAUTION: To prevent electric shock match wide blade of plug to wide slot, fully
insert.
SAVE THESE INSTRUCTIONS
2
HOW TO USE YOUR HEATER
ASSEBMLY - "EASY WHEEL" SYSTEM
Turn the radiator upside-down on a rug or a soft surface in order to prevent damaging the paint finish. Fully unfold the castors by turning them outwards (Fig. 1).
Turn the radiator back to its upright position.
fig. 1
1. LOCATION
Place heater on floor beneath coldest window in the room or any desired location.
Your heater will minimize the effect of cold drafts.
The heater must not be placed immediately below a power-outlet.
Do not use this radiator in rooms having a surface area of less than 43 square feet
(4 sq.m.).
2. POWER CONNECTION
The radiator must be connected to a properly polarized A/C 110/120 V household
outlet in perfect working condition.
Keep loose clothing or bedding, furniture and flammable material away from away
from the power outlet where the heater is plugged into.
Your product is equipped with a polarized alternating current line plug (a plug having one
blade wider than the other). This plug will fit into the power outlet only one way. This is a
safety feature. If you are unable to insert the plug fully into the outlet, try reversing the plug.
If the plug should still fail to fit, contact your electrician to replace your obsolete outlet.
Do not attempt to modify the plug to bypass this safety feature.
OPERATION AND USE
1) SETTING THE CLOCK
For the first time, set the clock to the correct time, proceeding as follows:
• Press the button “hour” until the display shows the correct hour setting.
• Press the button “min” until the display shows the correct minute setting.
When setting the clock time, the numbers will flash on the display.
The flashing numbers will continue for a few seconds until the adjustment has finished.
Once the numbers stop flashing the clock will start working.
To change the time, press and hold the hour or min button for at least 5 seconds or
until the numbers are flashing. Then proceed as above to modify both hours and
minutes.
AM
MAN
Set temperature
correct time
°F
0
3
2) MANUAL OPERATION
To operate the appliance in “manual” mode, press the “ON MODE” button.
To set the required power level: press the “ON MODE" button, and then press again one or
more times within 5 seconds to select the power level, as per the following sequence:
AM
MAN
Maximum power
°F
AM
MAN
Medium power
°F
AM
MAN
Minimum power
°F
AM
Off
MAN
°F
0
At any time during “Manual” operation, pressing the “ON MODE” button once will display
the previously set power level for 5 seconds; after this 5 second period, the display will
return to show the current operating power.
If Maximum power has been selected, adjust the “ +” or ” -” button to the desired comfort
temperature, from 42 to 95°F (5 to 35°C). By pushing once the “ +” or “ -” button the
desired temperature (shown on the right side of the display) will increase or decrease by1°F.
Press and hold the button to move through the temperature mode quickly.
AM
MAN
correct time
set temperature
°F
ELECTRONIC CLIMATE CONTROL
This heater has Electronic Climate Control which automatically monitors and selects
the ideal power setting to maintain your chosen temperature.
If the selected temperature is higher than the actual room temperature, the appliance
will start automatically and rapidly heat the room until it reaches the selected temperature. The unit will automatically maintain the temperature at a constant level, by
switching between maximum, medium, minimum power and OFF.
If medium power level has been selected using the “ON MODE” button, the
appliance will cycle between medium, minimum power and OFF to maintain a selected temperature.
ANTI-FREEZE SETTING
Press the “ON MODE” button and select the maximum power level. Set the temperature to 42°F with the “ -” button. When set in this way, the appliance will turn on
4
automatically only if the room temperature falls below 42°F, to prevent freezing conditions.
Note: This function is not guaranteed in the event of power failures, lasting more
than 2 minutes.
TIMER OPERATION
The timer allows you to set two programs in a 24-hour period.
To program the timer:
Press the Timer button A (see Figure 2), the following is displayed:
- The flashing message “--:--“;
- The message “ON” at the bottom left (ON time setting);
- The symbol “A” at the right indicating that the first program controlling is being set;
To set the “START” time press the “hour button” to set the hour and “min button” to set
the minutes, then confirm the “START” time by pressing the “Timer button A” again.
The words “OFF” and “00:00” appear on the display.
Set the time you want the appliance to go OFF using the “hour button” and “min button”, then confirm the OFF time by pressing the “Timer Function A” button again.
At this point, the word “AUTO” appears at the top of the display and the “TIMER
ON” indicator light comes on to indicate that the appliance is ready to operate
at the programmed time maintaining the preset comfort temperature (fig.2).
AUTO
:
¡F
EW 7507 EK
fig. 2
-
To set the program B press “Timer button B” and follow the same procedure as described
for the program A.
- Use the “ +” or “ -” buttons to set the desired comfort temperature,
AUTO
as described above.
- When set in this way the heater will automatically switch on at the set
time for the designated time period and automatically maintain the prefig. 3
set comfort temperature.
To cancel a preset program, press the timer button A or B once and then press the hour button until the display shows “--:--“ (fig. 3).
:
TIMER OVERRIDE
To operate the appliance without using the programs (timer), press the “ON MODE” button
(Fig.5). The yellow lamp will go off.
IMPORTANT:
If the heater looses its electricity supply for more than 2 minutes the appliance does not switch
on. The display shows the blinking numbers.
5
To switch it on, repeat the above described operations.
Remote Control
The appliance can be completely controlled with the remote control.
Two AAA 1.5V batteries are required (included):
• remove the cover located on the back side of the remote control;
• insert the two AAA 1.5V batteries positioning them correctly (see the instructions in
the batteries compartment);
• replace the cover.
Remote Control Operation
- When you press the the frost protection push button,
the
radiator will set the temperature to 42°F (5°C) and will switch on automatically only if
the room temperature falls below 42°F (5°C), thereby preventing freezing, at minimum energy consumption.
The “Timer ON” light on the control panel will flash.
- Press the increase/decrease temperature button (+/-) to adjust the temperature from
42°F (5°C) to 95°F (35°C).
- The “Off” button switches off the appliance.
Every time you press a button, the appliance will confirm the selection with a “beep”
and the pilot light on the remote control will illuminate.
Pilot light
OFF
Frost protection
Increase temperature
button
Decrease temperature
button
+
-
WARNINGS
You must leave the heater plugged into the outlet to keep the timer
memory programmed.
If the heater loses its power supply for more than 2 minutes, (e.g. switched off at the
outlet or in the event of a power failure), the heater’s programs will be lost, and the heater will not work until reset. A safety device switches the heater off in the event of everheating.
To restart the heater, call the nearest service center.
Note: when the safety device intervenes, the heater doesn’t heat but the display works.
4. MAINTENANCE AND SERVICE
Always remove the plug from the power outlet and allow the radiator to cool. Wipe
radiator with a soft damp cloth, do not use detergents and abrasives. Should the radiator
not be in use over a certain length of time, wind the cable round the holder and store it in
a dry place. This appliance has been built to give many years of trouble free service. In
case of malfunction or doubt, do not try to repair the heater by yourself: it may result in a
fire hazard or electric shock. Call the nearest Service Center (see attached list of Service
Centers) or call customer support at 1-800-322-3848.
6
This warranty applies to all products with De’Longhi or Kenwood brand
names.
Limited Warranty
What does the warranty cover?
We warrant each appliance to be free from defects in material and workmanship. Our obligation under
this warranty is limited to repair at our factory or authorized service center of any defective parts or part
thereof, other than parts damaged in transit. In the event of a products replacement or return, the unit
must be returned transportation prepaid. The repaired or new model will be returned at the company
expense.
This warranty shall apply only if the appliance is used in accordance with the factory directions, which
accompany it, and on an Alternating current ( AC ) circuit.
How long does the coverage last?
This warranty runs for one year ( 1 ) from the purchase date found on your receipt and applies only to
the original purchaser for use.
What is not covered by the warranty?
The warranty does not cover defects or damage of the appliance, which result from repairs or alterations to the appliance outside our factory or authorized service centers, nor shall it apply to any
appliance, which has been subject to abuse, misuse, negligence or accidents. Also, consequential and
incidental damage resulting from the use of this product or arising out of any breach of contract or
breach of this warranty are not recoverable under this warranty. Some states do not allow the exclusion
or limitation of incidental or consequential damage, so the above limitation may not apply to you.
How do you get service?
If repairs become necessary, see contact information below:
U.S. Residents:
Please contact our toll free hotline at 1-800-322-3848 or log onto our website at www.delonghi.com.
For all accessories, spare parts or replacement parts, please contact our parts division at 1-800-8656330.
Residents of Canada: Please contact our toll free hotline at 1-888-335-6644 or log onto our website at www.delonghi.com.
Residents of Mexico: Please refer to the Limited Warranty statement for Mexico.
Please refer to the back page of the manual for De’Longhi addresses.
The above warranty is in lieu of all other express warranties and representations. All implied warranties
are limited to the applicable warranty period set forth above. This limitation does not apply if you enter
into an extended warranty with De’Longhi. Some states do not allow limitations on how long an implied
warranty lasts, so the above exclusions may not apply to you. De’Longhi does not authorize any other
person or company to assume for it any liability in connection with the sale or use of its appliance.
How does state law apply?
This warranty gives you specific legal rights, and you may also have other rights, which vary from state
to state.
7
INSTRUCCIONES IMPORTANTES
Cuando use aparatos eléctricos, tome siempre las precauciones básicas para reducir el riesgo
de incendio, electrocución y lesiones a las personas, observando lo siguiente:
1. Lea todas las instrucciones antes de usar el calentador.
2. Si el radiador tiene una cinta de polietileno que se usa como manija para trasladarlo, quítela
antes de conectar el aparato a un tomacorriente.
3. Este calentador se calienta durante el uso. Para evitar quemaduras, procure no tocar superficies calientes con la piel sin protección. Use la manija para desplazar este calentador.
Mantenga el material combustible, tal como muebles, almohadas, ropa de cama, papeles,
prendas y cortinas, a una distancia de al menos 90 cm. de la parte frontal y superior del
aparato, así como de los costados y de la parte trasera del radiador.
4. Ponga extremo cuidado cuando use cualquier calentador cerca de niños o inválidos y cuando el calentador se deje funcionando sin vigilancia.
5. Siempre desconecte el calentador cuando no lo esté usando.
6. No haga funcionar ningún calentador con el cable o enchufe averiado o si éste funcionara mal, por haberse caído o averiado en algún modo. Si el calentador pierde
aceite, no lo use y póngase en contacto con el centro de servicio técnico indicado en
el folleto de instrucciones. Lleve el calentador a un centro de servicio de asistencia
autorizado para que lo examinen, para los ajustes eléctricos o mecánicos o para su
reparación.
7. No use el aparato a la intemperie.
8. EI calentador no se debe de usar en baños, lavaderos y otros locales similares. Nunca
coloque el calentador en donde se pueda caer en la bañera o en cualquier otro recipiente
con agua.
9. No pase el cable por debajo de la alfombra. No cubra el cable con tapetes, alfombras
o similares. Ponga el cable lejos de zonas transitadas y donde no pueda provocar
tropezones.
10. Para desconectar el calentador, apague los mandos y luego desenchúfelo.
11. Conecte el aparato solamente en tomacorrientes debidamente polarizados.
12. No introduzca ni permita que entre ningún objeto extraño en la ventilación o salida de aire,
porque esto puede causar una descarga eléctrica, incendio o avería del calentador.
13. Para evitar incendios, no cubra las entradas o salidas de aire de ninguna manera.
No use el calentador sobre superficies blandas, como una cama, en donde las aberturas se
podrían bloquear.
14. Un calentador tiene adentro partes calientes o que causan chispas. No lo use en
zonas donde se use o almacene gasolina, pintura o líquidos inflamables.
15. Use este calentador sólo como se indica en este folleto. Todo otro uso que no sea aquel
recomendado por el fabricante puede causar incendios, descarga eléctrica o lesiones a las
personas.
16. Para prevenir una sobrecarga de corriente y que se quemen los fusibles, verifique que no
haya otros aparatos conectados en el mismo tomacorriente o en otro tomacorriente conectado en el mismo circuito.
17. Es normal que el enchufe y el cable de alimentación del aparato se sientan calientes al
tacto. Sin embargo, si el enchufe o el cable están calientes o se deforman, puede ser debido a un tomacorriente gastado. Los tomacorrientes o enchufes gastados se deben sustituir
antes de seguir utilizando el radiador. Si se conecta un aparato en un tomacorriente deteriorado, el cable de alimentación podría llegar a provocar un incendio.
18. Este calentador no se debe usar con un cable de extensión, porque podría recalentarse y
provocar un riesgo di incendio. Sin embargo, si fuera necesario usar un cable de extensión,
este tiene que ser tamaño N° 14 AWG como mínimo y debe soportar un mínimo de 1875
vatios de potencia. Además, tiene que ser usado solo para alimentar este radiador.
19. CControle que el enchufe esté bien conectado y que el tomacorriente sea adecuado.
Recuerde que los tomacorrientes se deterioran con el tiempo y el uso continuo. Controle
periódicamente si el enchufe muestra signos de recalentamiento o deformación. En tal
caso, no utilice el tomacorriente y llame inmediatamente a un electricista.
20. Controle que el aparato y el cable de alimentación no hayan sufrido daños durante el transporte.
21. Controle que entre un elemento y otro del aparato no hayan quedado residuos de poliestireno u
otras materiales de embalaje. Podría ser necesario pasar el aspirador sobre el aparato.
22. Al encender el aparato por primera vez, déjelo funcionar durante alrededor de dos horas a
la potencia máxima, para eliminar el olor desagradable. Ventile muy bien el local donde se
encuentra el aparato durante tal operación. Es normal que el radiador produzca ligeros
crujidos cuando usted lo encienda por primera vez.
ATENCIÓN: para prevenir descargas eléctricas haga coindicir la espiga plana del enchufe con
la entrada ancha e introdúzcalo hasta el fondo.
CONSERVE ESTAS INSTRUCCIONES
8
COMO USAR SU CALENTADOR
MODELOS CON EL SISTEMA “EASY WHEEL”
Vuelque el radiador, apoyándolo sobre una alfombra o sobre otra superficie blanda para no
arruinar la pintura.
Gire hacia afuera los soportes de las ruedas hasta el fin de carrera (fig. 1).
Coloque el radiador en posición vertical.
fig. 1
1. UBICACIÓN
Ponga el calentador en el piso abajo de la ventana más fria del cuarto o en cualquier lugar en
donde usted guste. Su calentador reducirá el efecto de corrientes de aire frio. El aparato no debe
estar colocado immediatamente bajo una toma de corriente fija.
No utilizar este radiador en habitaciones que tengan una superficie menor de 4 m2.
2. CONEXION
EI calentador debe ser conectado apropiadamente a una toma de salida polarizada a 110/120 V
de A/C en perfectas condiciones de trabajo. Mantenga alejados vestidos o sabanas, meubles y
materiales inflamables de la toma de salida donde el calentador ha sido conectado.
Este aparato está equipado con una clavija polarizada de corriente alterna (una clavija que tiene una
patilla más larga que otra). Esta clavija no podrá ser insertada en el enchufe más que en una sola posición. Esto es una medida de seguridad. Si usted no puede insertar hasta el fondo la clavija en el enchufe,
pruede invirtiendo la clavija. Si la clavija continua sin adaptarse correctamente al enchufe, avise a un
electricista cualificado para reemplazar el enchufe anticuado. No considere vano el esfuerzo de mejoramiento de la seguridad que representa la clavija polarizada.
FUNCIONAMIENTO Y USO
1) REGULACIÓN RELOJ
Regule el temporizador en la hora exacta efectuando las siguientes operaciones:
- Pulse la tecla “hour” hasta ver la hora exacta en la pantalla, a continuación suelte
la tecla (fig. 4.
- Pulse la tecla “min” para programar los minutos exactos que aparecen en la pantalla, a continuación suelte la tecla.
Durante la regulación de la hora exacta, las indicaciones aparecen en la pantalla
intermitentemente.
Cuando finaliza la regulación, la intermitencia sigue durante unos segundos, luego
se fija en la hora exacta y el reloj empieza a funcionar.
Para poner en hora el reloj, pulse la tecla “hour” al menos durante 5 segundos para
dar el asenso a la modificación, después siga las indicaciones anteriormente descritas para corregir horas y minutos.
AM
MAN
Temperatura elegida
Hora exacta
°F
0
9
2) Botón “ON MODE”
Pulsar siempre el botón “ON MODE” para hacer funcionar el aparato en modo
“manual”. Para programar la potencia elegida seguir este procedimiento: pulsar
por primera vez el botón “ON MODE”, pulsarlo otra vez o varias veces en los 5
segundos sucesivos para seleccionar las potencias en el siguiente orden:
AM
MAN
Potencia máxima
°F
AM
MAN
Potencia media
Potencia mínima
°F
AM
MAN
°F
AM
Apagado
MAN
°F
0
En cualquier momento del funcionamiento “Manual”, pulsando una única vez el botón
“ON MODE” la pantalla indicará durante 5 segundos la potencia programada previamente; transcurridos estos 5 segundos, la pantalla volverá a indicar la potencia de funcionamiento. Si ha elegido hacer funcionar el aparato con la potencia máxima, regule
la temperatura de comfort deseada entre los 42 y 95 °F (5 - 35°C) com las teclas
“ +” o “ -”. Pulsando una sola vez las teclas “ +” o “ -” la temperatura elegida
(visualizada a la derecha de la hora) aumenta o disminuye de 1°F. Si mantiene presionadas las teclas “hour” y “min” puede efectuar una regulación rapida de la temperatura.
AM
Hota exacta
MAN
Temperatura elegida
°F
DISPOSITIVO DE CONTROL ELECTRÓNICO
(ELECTRONIC CLIMATE CONTROL)
El aparato está equipado con un dispositivo de control electrónico para poder seleccionar la potencia ideal de mantenimiento de la temperatura programada.
Si ha elegido una temperatura que supera la temperatura real de la habitación, el
aparato se pone en marcha automáticamente y la habitación alcanza rápidamente la
temperatura seleccionada, manteniéndola constante y modulando la potencia entre
potencia máx., media, mín y apagado a medida que se aproxima a la temperatura
de comfort elegida.
Si ha elegido con la tecla “ON MODE” la potencia media, el aparato modula entre
la potencia media, mínima y apagado para mantener la temperatura programada.
10
FUNCION ANTIHIELO
Pulse el botón “ON MODE” para seleccionar la potencia máxima.
Programe el mando termostato para el valor “ 42°F” (5°C) presionando la tecla “ -”.
El aparato, programado así, se pondrá en marcha automáticamente solamente si la
temperatura ambiente desciende por debajo de los 42°F (5°C) y con el mínimo consumo de energía impedirá el congelamiento.
Esta función no está garantizada en caso de interrupción de corriente aunque sólo dure
2 minutos.
Programación del temporizador electrónico
El temporizador permite efectuar dos programaciones a lo largo de un período de 24
horas. Para programar el temporizador:
Al presionar la tecla del Temporizador A, (fig. 2) accederá al programa y verá las
siguientes informaciones:
El mensaje intermitente “--.--“.
El mensaje “ON” en la parte inferior izquierda (programación de la hora de encendido).
El símbolo “A” en la derecha indica que se está programando el primer programa.
Para programar la hora de encendido, presione la tecla “hour” para programar la
hora y la tecla “min” para programar los minutos. A continuación, confirme la hora de
encendido presionando de nuevo la tecla del Temporizador “A”. En la pantalla aparecen los mensajes “OFF” y “00:00”. Programe la hora a la que quiere que el aparato se
apague con la tecla “hour” y la tecla “min”. A continuación, confirme la hora de apagado presionando de nuevo la tecla del Temporizador “A”. Entonces, la palabra
“AUTO” aparece en la parte superior de la pantalla y el piloto “TIMER ON” se
enciende para indicar que el aparato está listo para funcionar a la hora programada
manteniendo la temperatura elegida (fig. 2).
AUTO
:
¡F
EW 7507 EK
fig. 2
Para efectuar la programación B, presione la tecla Temporizador “B” y siga el mismo
procedimiento descrito para el programa A.
Para programar la temperatura deseada, utilice las teclas “ +” o “ -”, siguiendo las
indicaciones anteriores. Programado de esta forma, el radiador se encenderá
automáticamente a la hora programada durante el período de tiempo
AUTO
seleccionado y mantendrá automáticamente la temperatura elegida.
Para borrar un programa, presione una vez las teclas del Temporizador A o B y a continuación presione la tecla de la hora hasta que
fig. 3
aparezca “--.--“ en la pantalla (fig. 3).
Si desea hacer funcionar el aparato sin programación (temporizador excluido) pulse la
tecla “ON MODE” (fig. 2) la lámpara piloto amarillo se apagará.
:
11
IMPORTANTE:
Si la corriente permanece cortada durante más de 2 minutos, el aparato no se pone
en marcha de nuevo. En la pantalla aparecen las cifras de la hora parpadeando.
Para ponerlo en marcha de nuevo, repita el procedimiento anteriormente descrito.
MODELOS CON CONTROL REMOTO
El aparato puede ser totalmente controlado por medio del control remoto. Se
requieren dos baterias AAA 1.5V (incluidas):
• remover la tapa localizada en la parte posterior del control remoto;
• introducir las dos baterias AAA 1.5V posicionandolas correctamente (ver las
instrucciones en el compartimiento de las baterias);
• reponer la tapa.
Funcionamiento del mando a distancia
Presionando el pulsador de función antihielo, el radiador programa la temperatura
para 42°F (5°C) y se encenderá de forma automática únicamente si la temperatura
ambiente desciende por debajo de los 42°F (5°C), impidiendo la congelación con un
mínimo gasto de energía. El indicador luminoso “Timer ON” en el panel de mandos parpadeará. Presione el pulsador de aumento/disminución de temperatura (+/-)
para regular la temperatura entre los 42°F (5°C) y 95°F (35°C). El pulsador “OFF”
apaga el aparato. Cada vez que presione un pulsador, el aparato confirma la selección con un beep y se enciende el indicador luminoso en el mando a distancia.
Indicador
luminoso
Pulsador de
aumento
temperatura
Pulsador de
disminución
temperatura
On/Off
+
Pulsador de
función
antihielo
-
IMPORTANTE
Para conservar las programaciones programadas, el aparato debe estar enchufado a
una toma de corriente. Si el aparato permaneciese sin suministro de electricidad
durante más de 2 minutos (ej.: desenchufado de la toma o corte de corriente) los programas programados se perderían y el aparato no funcionaría de nuevo hasta que
fuese reprogramado. Un dispositivo de seguridad interrumpe el funcionamiento
del aparato si se produce un recalentamiento accidental. Para restablecer el
funcionamiento, dirigirse al Servicio Post-Venta para sustituir el dispositivo.
Con el dispositivo activado, el aparato no calienta mas y el visor fonctiona correctamente.
4. MANTENIMIENTO Y SERVICIO
Desconecte el cordón eléctrico y permita que se enfrie el radiador. Limpie el radiador
con un trapo suave y húmedo, no use detergentes ni cosas que lo puedan rayar. Si el
radiador no se usa por un período de tiempo manténgalo en un lugar seco. Este aparato se ha fabricado para brindar muchos años de servicio sin problemas. En caso de
mal funcionamiento ó de duda, no intente arreglar (reparar) el radiador por si mismo.
Dirigirse al Servicio Post-Venta más cercano (ver la lista de Servicios Post-Venta adjunto).
12
Esta garantía cubre todos los productos con las marcas De'Longhi o Kenwood.
GARANTIA
Garantizamos todo producto DE´LONGHI por defectos de fabricación, material y mano de obra. Nuestra obligación dentro de ésta garantía es proporcionar gratuitamente las refacciones y el servicio
durante un año a partir de la fecha de compra. Esta garantía se aplicará únicamente sí el producto se
utiliza de acuerdo con las instrucciones anexas del fabricante y con un circuito de corriente alterna
(ca). Esta garantía reemplaza a cualquier otra garantía y acuerdo, expreso o implícito y a todas las
demás obligaciones o responsabilidades de nuestra parte. No autorizamos a ninguna otra persona o
compañía a asumir nuestras responsabilidades relacionadas con la venta y el uso de nuestro producto.
Esta garantía no implica ninguna responsabilidad de parte nuestra en relación con la venta o el uso de nuestro producto.
Esta garantía no se hará válida en los siguientes casos:
a) Cuando el producto se hubiese utilizado en condiciones distintas a las normales
b) Cuando el producto no hubiese sido operado de acuerdo con el instructivo de uso que se le acompaña.
c) Cuando el producto hubiese sido alterado o reparado por personas no autorizadas por el fabricante
nacional, importador o comercializador responsable respectivo.
Para hacer efectiva la garantía o si se necesitan reparaciones o refacciones, componentes, combustibles y accesorios llame, con su garantía sellada por el establecimiento, al Centro Nacional de Servicio
para proporcionarle una cuenta de mensajería con la cual deberá remitir el producto y garantía. Los
gastos que se deriven del cumplimiento de la presente garantía deberán ser absorbidos por el Centro
Nacional de Servicio De´Longhi.
Obtención de servicios de garantía
Si las reparaciones son necesarias, vea la información de contacto que aparece a continuación:
Residentes de los Estados Unidos:
Por favor contactar a nuestra línea telefónica gratuita, al 1-800-322-3848 o ingrese a nuestro sitio en
el Internet www.delonghi.com.
Para todos los accesorios, piezas de repuesto o de reemplazo, por favor contactar a nuestra división de
piezas, al 1-800-865-6330.
Residentes de Canadá: Por favor contactar a nuestra línea telefónica gratuita, al 1-888-335-6644
o ingrese a nuestro sitio en el Internet www.delonghi.com <http://www.delonghi.com/>.
Residentes de México: Por favor contactar a nuestra línea telefónica gratuita, al 01-800-711-8805 (lada sin costo) / 56-62-53-68 y 69 (D.F.) o ingrese a nuestro sitio en el Internet www.delonghi.com <http://www.delonghi.com/>.
FIDUCIA ITALIANA S.A DE C.V
Pestalozzi #814
Col. Narvarte
Del. Benito Juarez
C.P. 03100
tels: 5543 1447
FECHA DE COMPRA
Esta garantía cubre todos los productos con las marcas De'Longhi o Kenwood.
Garantía limitada
(para los Estados Unidos solamente)
Alcance de la garantía
Cada artefacto tiene garantía por defectos de materiales y de fabricación. Bajo los términos de esta garantía
limitada, nuestra obligación se limita a la reparación de partes o componentes (a excepción de partes dañadas
durante el transporte) en nuestra fábrica o en un centro autorizado de servicio. Al devolver un producto para
cambio o reparación, todos los costos de envío deben ser pagados por el propietario del mismo. El producto
nuevo o reparado será devuelto con los gastos de envío pagados por la compañía.
Esta garantía es válida únicamente si el artefacto se utiliza de acuerdo con las instrucciones del fabricante (incluidas con el artefacto) y alimentada eléctricamente con corriente alterna (CA).
Duración de la garantía
Esta garantía es válida por un (1) año a partir de la fecha de compra que figura en el recibo o factura de
venta de la unidad, y sólo el comprador original tiene derecho a hacer uso de la garantía.
Exclusiones de la garantía
La garantía no cubre defectos ni daños que fueran consecuencia de reparaciones o modificaciones
efectuadas al artefacto por personal ajeno a nuestra fábrica o a centros autorizados de servicio, ni cubre
fallas o daños causados por maltrato, uso indebido, negligencia o accidentes. Esta garantía tampoco
reconocerá reclamos efectuados por perjuicios directos ni indirectos emergentes del uso del producto,
ni perjuicios o daños resultantes del uso del producto en incumplimiento de los términos y condiciones que hacen válida la garantía. En algunos estados no se permiten exclusiones ni limitaciones de los
perjuicios reconocidos por una garantía, por lo cual las limitaciones mencionadas podrían ser no válidas en su caso particular.
Obtención de servicios de garantía
Si las reparaciones son necesarias, vea la información de contacto que aparece a continuación:
Residentes de los Estados Unidos: Por favor contactar a nuestra línea telefónica gratuita, al 1-800-3223848 o ingrese a nuestro sitio en el Internet www.delonghi.com. Para todos los accesorios, piezas de
repuesto o de reemplazo, por favor contactar a nuestra división de piezas, al 1-800-865-6330.
Residentes de Canadá: Por favor contactar a nuestra línea telefónica gratuita, al 1-888-335-6644
o ingrese a nuestro sitio en el Internet www.delonghi.com <http://www.delonghi.com/>.
Residentes de México: Refiera por favor a la garantía limitada para México.
Por favor vea la página trasera donde encontrará las direcciones de De’Longhi.
La garantía explicada anteriormente se ofrece en reemplazo de cualquier otra garantía, sea expresa u
ofrecida de cualquier otra manera, y toda garantía implícita del producto estará limitada al período de
duración mencionado anteriormente. Esta limitación queda anulada y es reemplazada por otros términos si el usuario decide obtener una garantía prolongada de De’Longhi. En algunos estados no se permiten limitaciones del período de garantía implícita, por lo cual las limitaciones mencionadas anteriormente podrían no ser válidas en su caso particular. De’Longhi no autoriza a ninguna otra persona ni
compañía a ofrecer ningún tipo de garantía ni responsabilidad con respecto al uso o a los términos de
venta de sus artefactos.
Leyes estatales/provinciales
Esta garantía le confiere derechos establecidos por ley, pero usted también podría tener otros derechos
que varían de un estado a otro.
De’Longhi America, Inc.
Park 80 West, Plaza One
Saddle Brook, NJ 07663
1-800-322-3848
De’Longhi Canada, Inc.
6150 McLaughlin Road
Mississauga, Ontario
L5R 4E1 Canada
1-888-335-6644
Printed in China
FIDUCIA ITALIANA S.A DE C.V
Pestalozzi #814
Col. Narvarte
Del. Benito Juarez
C.P. 03100
tels: 5543 1447
lada sin costo: 01 800 711 8805
www.delonghi.com
5785013000/04.07