1
30" Radiant Self=Cleaning
Electric
Free-Standing
Range
_=e & Care
Estufa El_ctrica
Radiante de 30" Tipo "lndependiente"
con Autolimpieza
Models, Modelos
911.94752, 94754, 94759
Ill
I""
,,,,,,,,
P,.,
ZI
o
229c4020P292
(SRq 0484)
Sears, Roebuck and Co.,
Hoffman Estates, IL 60179 U.S.A.
www.sears.com
SELF-CLEANING
RADIANT
FREE-STANDING
RANGE
Tableof Contents
Oven Vent
18
Peeking
18
Preheating ..............................
I8
Oven Light ............................
18
Baking With Margarine
........ 18
Bakeware Placement
..........
19
Bakeware ......................
19
Element Cycling .................
19
Oven Racks ..........................
t9
Oven Control ........................
20
Broiling ................................. 21-22
..........................
.............................
Range Safety ........................ 3-8
Anti-Tip Bracket
3, 4
....................
Features of Your Range ............ 9
Removal of Packaging Tape .....9
Cooking Zones ........................... 10
Hot Cooktop indicator Lights
10
• Cooking Utensils and Woks 1.10
Home Canning Tips ..............
11
Checking Your Cookware ....... 11
Cookware Performance ........ 11
Radiant Coils .....................
11
Temperature
Limiter .........
1t
Control Settings ...........................12
Dual Cooking Zone .................. 12
Hour/Minute Arrow Pad .......... 13
Temp Recall
..............
13
Display ............................
13
Oven Light Switch ............
I3
Indicator Lights ...............
13
To Black Out The Display
t3
F-Codes ................................
13
PF Code ...........................
14
Automatic Oven Shutoff ......
14
To Set The Clock ..........
I5
To Set The Timer .................... 15
To Reset The Timer ...............
15
To Cancel The Timer ...........
15
Baking ..............................
16-17
Oven Cooking Tips .......... 18-20
Strong Smell or Odor ............. 18
Aluminum Foil ............................ I8
Self-Cleaning
Cycle ......
23-24
Glass-Ceramic
Cooktop
Cleaning ......................
25-27
Control Panel .......................
28
Broiler Pan and Grid ............
28
Walls of the Oven ................... 28
Drawer and Sides of Range . 28
Oven Door Glass ..................
28
Door Vent Trim ..................
28
Control Knobs .......................
29
Oven Light Bulb .................
29
Oven Racks ...............
30
Oven Door ...................
30-3t
Storage Drawer ..................
32
Before Calling for
Service
33-35
Temperature Adjustment...
20, 36
Warranty
38
Consumer Service Numbers
..76
............................
..............................
For your convenience
and future reference, please write down your model
and serial numbers in the space provided. They are located
on the front
frame behind the storage drawer.
MODEL
NUMBER:
SERIAL
© Sears, Roebuck and Co.
2
NUMBER:
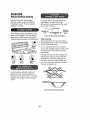
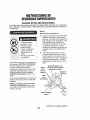
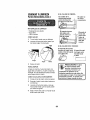
IMPORTANTSAFETYINSTRUCTIONS
SAVE
THESE
INSTRUCTIONS
Read all instructions
before using this appliance.
or electrical appliances,
basic safety precautions
including the following:
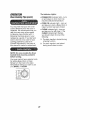
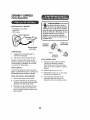
Step
1
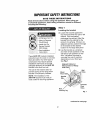
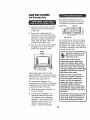
Locating
All Ranges
Can Tip
:t
Injury to Persons
Could Result
Install Anti-Tip
Device Packed
With Range
See installation
These ANTI-TIP bracket installation
instructions are for wood or concrete
floors and walls. Any other type of
construction
may require special
installation techniques
to provide
adequate fastening of the ANTI-TIP
bracket to the floor and wall
The use of this bracket
the
NOTE: The installation of the
ANTI-TIP bracket must meet all
bracket
A. Locate the bracket against the
rear wall and either the right or left
cabinet
If the countertop
overhangs the cabinet, offset the
bracket from the cabinet by the
amount of overhang, if there is no
adjacent cabinet, position the edge
of the bracket at the desired
location
of the range side panel.
B. Use the bracket as a template
and mark 2 hole positions on the
wall and 2 hole positions on the
floor, Use either the wood or
concrete floor set of positions,
depending
on your floor type.
See Fig. 1,
Adjacent Cabinet or
Final Location of Range
Side Panel
does not
prevent tipping of the range when
bracket is not properly installed
local codes for securing
:_
When using gas
should be followed,
_!I_":_'.i
Wood
Side
._ ":*'_[_;ii
,:;,_:_11:;i!,!.......
_
Wall
Holes
_ !i_!;:";
appliance,
/
Rear /
Leveling Leg
.: "ii:i
....
"
F o
Holes
Fig. 1
continued on next page
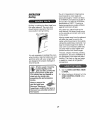
IMPORTANTSAFETY
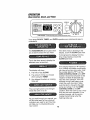
INSTRUCTIONS
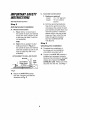
C.
Concrete
Construction:
Hardware
4 each
4 each
1.
Anti-Tip Bracket (contd.)
Step
2
=
Anti-tip bracket installation
A. Wood Construction:
AND
Step
Wall: Drill an angled 1/8"pilot
hole (as shown in Fig, 2) in
the center of each pre-marked
wall hole position (a nail or awl
may be used if a drill is not
available).
ATTACHMENT
Drill the recommended
size
hole for the anchors into the
concrete at the center of each
pre-marked concrete floor and
wall hole position Install the
sleeve anchor into the drilled
holes and then install the lag
bolts through the bracket
DO NOT OVERTIGHTEN
THE BOLTS,
Floor: Drill a 14_pilot hote in
the center of each pre-marked
wood floor hole position (a nail
or awl may be used if a drill is
not available),
.
3
Checking
A.
Wall
Plate
Fig. 2
Mount the ANTI-TIP
installation
Complete the installation of
the range per the installation
instructions provided with it,
securely
or
bracket
with the 4 screws provided
illustrated in Fig, 2
the
B. Check if the ANTI-TIP bracket is
installed and engaged properly
Remove the kick panel or storage
drawer and inspect the REAR
LEVELING LEG Make sure it fits
TO WALL AND FLOOR
Bracket
B.
required:
1/4"x t t/2"lag bolt
1/2"OD sleeve
anchor
as
4
into the slot See Fig, 1
IMPORTANTSAFETY
INSTRUCTIONS
KEEP THIS book for later use
NEVER USE your appliance for
warming or heating the room.
I
NEVER TRY to repair or replace
any part of the appliance unless
instructions are given in this manual
All other work should be done by a
qualified technician.
ALWAYS
NEVER HEAT unopened food
containers. Pressure buildup can
cause the container to burst and
cause injury.
NEVER LEAVE containers
drippings
the slot
NEVER TRY to clean a hot surface
Some cleaners produce noxious
fumes, and wet cloths or sponges
could cause steam burns,
o
NEVER WEAR loose-fitting
when using your appliance.
clothing
NEVER USE a towel or other bulky
cloth as a potholder. Make sure the
potholder is dry. Moist potholders and
wet cloths or sponges could cause
steam burns, DO NOT tet potholders
touch hot heating elements.
in use.
• TEACH CHILDREN not to play with
controls or any part of the appliance,
and not to sit, climb or stand on
the door, or any other part of the
appliance
- CAUTION:
in your oven
ALWAYS KEEP your appliance clear
of things that wili burn (gasoline and
other flammable vapors or liquids),
Important:
To ensure safety for
yourself, famNy, and home, please read
your Owner's Manual carefully. Keep it
handy for reference. Pay close attention
to Safety Sections. BE SURE your
appliance is installed and grounded
by a qualified technician.
• DO NOT leave children alone or
near an appliance
of fat or
ALWAYS KEEP the oven and surface
unit areas free from things that will
burn. Food, wooden utensils, and
grease buildup could catch fire.
Plastic utensils could melt and
canned foods could explode Your
appliance should never be used as a
storage area,
,,,_
unattended
wall
coverings, curtains, dishcloths,
towels, potholders, and other linens
a safe distance from the appliance
accidental
of the
--_
ARNING! tipping
To prevent
range from abnormal use,
including excessive loading of
the oven door, attach the range
to the wall or floor by installing
the Anti-Tip device supplied. If
the range is moved for cleaning,
servicing or any reason, be sure
the Anti-Tip device is re-engaged
properly when the range is slid
back in the opening. Failure to
do so could result in the range
tipping and may cause personal
injury. To inspect the Anti-Tip
device, remove the storage
drawer and look to see if the rear
leg leveler fully engages
in the bracket.
KEEP combustible
NEVER STORE items of
interest to children on the backguard
or in cabinets above the appliance
Children climbing on the appliance
could be seriousFy iniured
5
IMPORTANTSAFETY
INSTRUCTIONS
• NEVER LEAVE cooking zones
unattended
at high settings
Boifovers result in smoking or
greasy spitls which could catch fire
• DO NOT touch cooking zones,
surfaces near them, or interior oven
surfaces. These may be hot enough
to cause burns even though they are
dark in color. During and after use,
do not touch or let clothing or
flammable material contact the
zones or hot surfaces until they
have had time to cool Other
surfaces near the oven vent
openings, oven door and window,
and cooktop surfaces may also
be hot enough to cause burns
• NEVER cook on a broken cooktop;
cleaning solutions and spillage could
penetrate it and create the risk of
electrical shock or fire Contact a
qualified technician
• ALWAYS TURN utensil handles
inward and away from other cooking
zones to reduce the risk of burns,
ignition, unintended contact, and
spillage.
• WHEN PREPARING
flaming foods
under the vent hood, turn the fan on.
PLACE OVEN RACKS in the
desired position while the oven is
cool, If racks must be moved while
oven is hot, do not let potholder
contact the hot oven element
• ONLY certain kinds of glass or
ceramic cookware can be used for
cooktop cooking. Make sure the
cookware you choose to use is
designed for cooktop cooking
without breaking due to the sudden
temperature change.
. AFTER BROILING,
always take the
broiler pan and grid out of the oven
and clean them Leftover grease in
the broiler pan could catch fire the
next time you use your oven
° ALWAYS USE care when touching
cooking zones They will retain heat
after the range has been turned of[
. NEVER BLOCK
for repairs.
- ALWAYS USE care when opening
the oven door, Let hot air and steam
escape before moving foods,
the oven air vent
behind the right rear cooktop
cooking zone.
• NEVER USE aluminum
* COOKWARE
USED for cooktop
cooking should be flat on the bottom
and large enough to cover the
heating zone being used Undersized utensils expose the heating
zone and may result in direct
contact or ignition of clothing
The
proper size utensil wilt also improve
efficiency.
foil to line
the oven bottom Improper use of
foil could start a fire, or electrical
shock could result.
6
IMPORTANTSAFETY
INSTRUCTIONS
. CLEAN ONLY the parts listed in
this manual Follow all cleaning
instructions. Be sure to remove broiler
pan and grid before the self-clean
cycle,
• NEVER RUB, move, clean, or
damage the door gasket on
self-cleaning ranges. It is essential
for a good seal,
IMPORTANT:
READ AND UNDERSTAND
THIS INFORMATION
NOW!
Be sure everyone in your home
knows what to do in case of fire.
Never use water on a grease fire;
it will only spread the flames.
COOKTOP
Never
IMPORTANT
SAFETY
NOTICE!
The California
Safe Drinking
Water and Toxic Enforcement
Act
requires the governor of California
to publish a list of substances
known to the state to cause birth
defects or other reproductive
harm
and requires businesses to warn
their customers of potential
exposure to such substances.
The fiberglass insulation in a
self-cleaning
oven will give off a
very small amount of carbon
monoxide during the cleaning
cycle. Exposure can be minimized
by venting with an open door or
window or using a ventilation fan
or hood.
FIRE:
pick up a flaming
pan.°°
elements_
Smother the flame with a tightly
fitting lid, use baking soda, or
use a dry chemical, foam, or
haion-type extinguisher
2_
. IF THE SELF-CLEANING
mode
malfunctions, turn the oven off and
disconnect the power supply Have
it serviced by a qualified technician
GREASE
1. Turn off the surface
cookware, removable parts, or broiler
pan and grid in the self-clean cycle
protective coating of any kind should
be used in or around any part of
the oven,
of
some birds is extremely sensitive
to the fumes given off during
the self-cleaning
cycle of any
range. Move birds to another
well-ventilated
room.
• NEVER TRY to clean utensils,
• DO NOT USE oven cleaners No commercial oven cleaner or
The health
OVEN
FIRE:
Do not try to move the pan!
1. Close the oven door and turn
controls off,
.
If fire continues, carefully open the
door, throw baking soda on the
fire, or use a dry chemical, foam,
or halon-type extinguisher.
OPERATION
o DO NOT use a knife or any sharp
object on the cooktop seat around
the outer edge of the glass because
it will cut or damage it,
Protecting the Cooktop
surface controls are
CAUTION;
When the
turned off, the Hot
Surface Indicator light will
remain lit until the cooktop
surface has cooled to
approximately
150"F. The glass
ceramic surface will retain heat
after the indicator light goes out.
Use caution until the cooktop
surface has had time to cool.
[_
• DO NOT slide cookware
across
your cooktop
° DO NOT use a dishtowel or sponge
to clean or wipe your cooktop,
,, DO NOT use scouring powders
plastic, nylon, or metal cleaning
pads on your cooktop
or
• DO NOT apply your cooktop
cleaning creme to the cooktop
surface if the surface is hot
o READ the instruction
label on the
cooktop cleaning creme bottle
before attempting to clean the
surface of your cooktop.
. AFTER cleaning
surface, be sure
residue that may
creme with a dry
Sugar spills (such as jellies, fudge,
candy syrups) or melted plastic can
cause pitting of the cooktop surface
unless the spill is removed while it is
still hot Special care should be taken
when removing hot substances
the cooktop
to wipe off any
be left from the
paper towel
Follow these instructions carefully
remove soil while spill is hot.
• FOR MAJOR spills, turn the surface
control knob to OFF Use a dry
paper towel to wipe up spiel, then
use a razor scraper (held with a
potholder) at a 45 ° angle against
the surface of the cooktop to
scrape remaining spill from the
hot cooking zone
1. Turn off the cooking zone affected
by the spill Remove the utensils
2. Wearing an oven mitt, hold the
razor scraper at a 45 ° angle
against the cooktop and scrape
hot spill to a cool area outside the
cooking zone.
3. With the spill in a cool area, use a
dry paper towel to remove the
spillover. Any spill remaining
should be left until the surface of
the cooktop has cooled. Do not
continue to use the soiled cooking
zone until all of the spill has been
removed. Follow the steps under
Heavy Soil to continue the
cleaning process
NOTE: The razor scraper is not
supplied with your product.
• DO NOT cook directly
surface of the glass
on the
• DO NOT use the cooktop
cutting board
and
as a
8
OPERATION
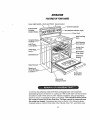
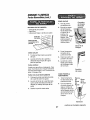
FEATURESOF YOURRANGE
Oven Light
Clock and Timer
Oven Control
4 Removable
Cooktop
Control Knobs
Surface Indicator Light
Oven Vent
Dual Cooking
Zone
Ceramic-Glass
Cooktop
Self-Cleaning
Interior
Self-Clean
Broiler Pan
md Grid
Oven Door
Latch
Removable
zn Rack
Broil Element
Self-Clean
Gasket
Bake Element
Model and
Serial Number
Location
Removable
Oven Door
\
Removable
Storage Drawer
To remove the adhesive residue left from packaging
tape, use household
dishwashing
liquid, mineral oil, or cooking oil With a soft cloth rub into the area
and allow to soak° Rinse and dry well. Repeat procedure
using an appliance
polish to ensure no damage is done to the range This should be done before
the range is turned on for the first time. The tape cannot be removed once
the range has heated. Packaging
tape may be found in the following areas:
Cooktop Surface, Control Panel Area, Door Handle, Door Trim, and Oven Area,
9
OPERATION
Radiant CooktopCooking
Before using your new radiant
cooktop, clean it with the Cooktop
Cleaning Creme e, This will leave a
protective coating
Use pans and woks that are flat on
the bottom, The size of the pan
should be the same size as the zone
used when cooking
__Bottom Of ,= l
Pan _-----
The cooking zones are shown by the
outline on the glass, The sign below
each control knob shows you which
radiant zone is turned on by that knob
_
j
t
_
Size of
Cooking
Zone
Pans should be fiat on bottom,
Wok Cooking
We recommend that you use only a
flat-bottomed
wok. They are available
at your local retail store,
Do not use woks that have support
rings. Use of these types of woks, with
or without the ring in place, can be
dangerous.
OO
®0
O®
Left
Rear
Left
Front
Right
Front
Placing the ring over the surface unit
will cause a buildup of heat that wilt
damage the porcelain cooktop. Do
not try to use such woks without the
ring You could be seriously burned if
the wok is tipped over
A Hot Cooktop Indicator Light will
glow when any radiant element is
turned on, and will remain on until the
surface has cooled to approximately
150°F
Use only fiat-bottomed
10
woks.
OPERATION
Radiant CooktopCooking
(cont.)
1. Be sure the canner
over the zones,
Stainless Steel: Highly recommended
for use with your new cooktOpr
Especially good with a clad bottom°
is centered
2.
Make sure the canner
bottom.
is fiat on the
3.
Use recipes and procedures
from
reputable sources, These are
available from manufacturers
such as BalPand
Kerr e, or the
Aluminum: Heavyweight
cookware recommended
Cast Iron: Cast-iron cookware that
is completely covered with porcelain
enamel is recommended,
Cast iron
that is not covered with porcelain
enamel may scratch the g!ass-ceramic
surface of the cooktop.
Copper Bottom: Has good
performance,
but it can leave a
residue on the cooktop surface if
allowed to boil dry,,
Department
of Agriculture
Extension Service
4.
aluminum
Use caution, while canning, to
prevent burns from steam or heat
Glass-Ceramic
or Stoneware:
Usable Check for rough edges or
burrs, which may scratch the cooktop
surface
If you don't know
i_,_,_,,_,i
f
if your cookware
11
i
is fiat on the
,I
.......
_,
bottom, try this
test. Turn your pan upside down on
the countertop,
and place the edge
of a ruler flat against the surface of
the pan Rotate the ruler in a full
circle, checking as you turn for any
space between the two surfaces,
The bottom of the pan and the edge
of the ruler should fit flush against
each other all the way across
When the knobs are turned on,
coils beneath the glass radiate heat
through the glass to the cooking
utensil. It will take a few moments for
the coils to heat; as they do, a red
glow can be seen below the surface
of the cooktop
Every radiant surface
temperature
Iimiter
unit has a
The temperature
limiter protects the
glass cooktop from getting too hot,
The temperature
limiter
units off for a time if:
may cycle the
* The pan boils dry
• The pan bottom
is not flat
o The pan is off center
- There is no pan on the unit
11
OPERATION
RadiantCooktopCooking
(cont.)
(For Models 95582, 95587, 95589 only)
The right front element
cooking zones:
HI
Used for quick starts, such as
bringing water to a boil,
MED
Used for slow boil and
sauteing
LO
Used for steaming foods or
keeping cooked foods at
serving temperature.
Push in to turn
the knob.
9" Zone k
ForLarge
\_
-'"\
has two
6" Zone
For Small
''tensils
"_'
O,e°,,,,
To use the large 9"
cooking zone, push
in the right portion of
the rocker switch
next to the control
II _.___--_
_'_
[LL2
6"
knob and push to turn the control
knob to the desired setting
,
Set on or
between marks
for desired heat,
To use the small 6" cooking zone,
push in the left portion of the rocker
switch and push to turn the control
knob to the desired setting
oF_
The surface unit indicator light will
glow when any cooking zone is
activated
12
9"
OPERATION
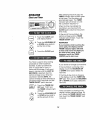
OvenControl, Clock, and Timer
OFF
#
PO 450 _'_
Your range CLOCK,
understand,,
TIMER,
and OVEN operations
The HOUR/MINUTE arrow pads allow
you to set the exact time you need
are simple and easy to
If the time of day is showing in the
display, touch the CLOCK pad once°
To bring back the display from the
time of day blackout, touch the
CLOCK pad twice,
Touch the down arrow to display
selected oven temperature
The display
the
If the display flashes an "F" followed
by a number and beeps continuously,
you have a function error code, Note
the number after the "F" Turn the
OVEN CONTROL KNOB to the OFF
will show:
1. The time of day CLOCK,
2. The amount of time you choose
when using the TIMER,
3. Any delayed
times set.
functions
position, Disconnect all power to the
range for at least 30 seconds and
retry the oven operation, If the "F"
displays during a self-clean cycle,
check the oven door latch, Make
sure the latch is moved to the right
as far as it will go, Turn the OVEN
CONTROL
KNOB to the OFF
position, Allow the oven to cool 1 hour
and retry the oven operation
If the
problem repeats, call for service.
Advise the technician what the
or cooking
The oven light switch turns the light
inside the oven on or off
flashing
As you read through your manual, you
will find what each of the individual
indicators are used for and how they
will help you in understanding
new control
your
13
code was
OPERATION
OvenControl, Clock, and Timer
(cont.)
When the power to your range is
turned on for the first time, or if you
experience a power failure, the
display will flash "PF"
By touching
the CLOCK pad, the display wilt flash
"12:007 Touch the CLOCK pad again
and follow the instructions to set the
clock, Any operation set before a
power failure wilt need to be reset
The oven wit! automatically
shut off
if it has been left on for more than
t2 hours
To deactivate
or reactivate
the
automatic shutoff, touch and hold
the MIN UP and DOWN arrow
pads for about 4 seconds
14
OPERATION
Clock and Timer
.....
l
•,,'A"+
gll
%tl;-
After releasing the arrow pad, the
TIMER indicator light will blink three
to five times. The countdown will
automatically
begin, The TIMER
indicator light will remain on until
the countdown reaches "0,"
When the timer has started
the
countdown,
you may touch the
CLOCK pad to return to the current
time of day.
At the end of the countdown,
the
control will beep and the TIMER
indicator light will flash Touch the
TIMER ON/OFF pad
1. Touch the CLOCK pad
until display flashesr
REMINDER!
(_
2. or
Touch
the arrow
HOUR/MIN
UP
DOWN
pads to
If you hesitate while touching the
arrow pads, the display and the
TIMER indicator lights will blink
3 times and return the display to
the time-of-day clock. If this
happens, touch the TIMER
ON/OFF pad to start over.
set the time of day
CL_}
3.
Touch the CLOCK
pad.
The Timer is used to time cooking
processes or other household
activities
It does not control the
oven tt can be set for up to ! 1
hours and 59 minutes, tt wilt count
down in minutes until the LAST 60
SECONDS is reached, then the
control wi!l beep once When the
countdown reaches ZERO, the
control will beep 3 times followed by
one beep every 6 seconds until the
TIMER ON/OFF pad is touched.
Touch the TIMER
If you decide
to change
your set time:
tf the countdown is showing in the
display, touch the HOUR]MIN
UP
or DOWN arrow pads Select the
new time.
If the time-of-day
clock is showing
in the display, touch the TIMER ON/
OFF pad. Then, touch the HOURJMIN
UP or DOWN arrow pads. Select the
new time
ON/
OFF pad. "0:00" and
the TIMER indicator light
will flash.,
If the countdown is showing in the
display, simply change the time, If it
isn't, touch the TIMER ONIOFF pad,
then touch the TIMER ONIOFF pad
to cancel,
Touch the HOUPjMIN
UP
or DOWN arrow pads to
set the amount of time
15
OPERATION
Baking
The oven win turn on immediately
and
cook for a selected length of time At
the end of the cooking time, the oven
will turn off automatically
1. Set the OVEN CONTROL KNOB
to the temperature you want to
use when baking The OVEN ON
indicator light will glow
1. Make sure the correct time of day
is showing in the display
2. Touch the COOK TIME
When the temperature
inside the
oven reaches your selected
temperature,
the preheat tone
will sound and the PREHEATED
indicator
ON/OFF
pad,
3. Touch the HOUR/MIN
UP and!or
DOWN arrow pads, to set how
long you want foods to cook,,
light will glow,
4. Turn the OVEN CONTROl.
KNOB
2. When baking is finished, turn the
OVEN CONTROL KNOB to the
OFF position,
to the baking temperature
want to use
BAKING
OVEN indicator lights will glow,
When the temperature
inside the
oven reaches the temperature you
have selected, the PREHEATED
indicator light will glow
SHELF
TYPE OF FOOD
Frozen pies
(on cookie sheet)
Angel food cake,
bundt or pound
cakes
Biscuits, muffins,
brownies, cookies,
cupcakes, layer
cakes, pies
Casseroles
Turkey or Roast
POSITION
you
The OVEN ON and AUTOMATIC
CHART
SHELF POSITION
4
3 or 4
5. When the set amount of cooktime
has reached zero, a tone will
sound and the AUTOMATIC
3 or 4
OVEN indicator light will blink until
the OVEN CONTROL
KNOB is
turned to the OFF position
3 or 4
1
16
OPERATION
Baking(cont.)
You can set the oven control to delay
start the oven, cook for a specific
length of time, and then turn off
automatically
1. Make sure the correct time of day
is showing in the display
2. Touch the COOK
ON/OFF
7. When the start time is reached,
the oven will automatically
turn on
and start cooking
When the
temperature
inside the oven
reaches the temperature you have
selected, the PREHEATED
indicator light will glow. The set
amount of cooktime will count
down to zero, a tone will sound,
and the AUTOMATIC OVEN
indicator light will blink until the
OVEN CONTROL KNOB is turned
to the OFF position..
TIME
NOTE: After touching the COOK
TIME or START TIME pads, if you
hesitate before touching the HOUR/
MIN pads, the display will blink 3
times and return to the time of day If
this happens, repeat the operation to
continue
pad.
3. Touch the HOUR/MIN
UP and/or
DOWN arrow pads, to set how
long you want foods to cook
4. Touch the START
ON/OFF
TIME
pad
5. Touch the HOUR/MIN UP and/
or DOWN arrow pads to set the
time of day you want the oven to
turn on.
6. Turn the OVEN
to the baking
want to use.
CONTROL
temperature
KNOB
you
The OVEN ON and AUTOMATIC
OVEN indicator lights will glow
17
OPERATION
Oven Cooking Tips
Opening the door often to check
foods will cause heat loss and poor
baking results
It is normal to have some odor when
using your oven for the first time To help
eliminate this odor, ventilate the room
by opening
hood,
a window
Preheating is bringing the oven
temperature
up to the temperature
you will be using during baking Let
the oven preheat when recipes call
for preheating.
or using a vent
IMPORTANT: Never cover the oven
bottom or oven rack with aluminum foil
Improper use can cause poor heat
flow, poor baking results, and may
damage the oven finish To prevent
staining from spillovers, you may place
a piece of aluminum foil or a cookie
sheet on the rack below the food which
may spill over
To prolong the tife of your oven light
bulb, follow this helpful tip: Always
turn the light off when the oven is not
in use or during a clean cycle. If your
oven iight is left on for an extended
period
of time, the oven will be warm when
the door is opened due to the heat
generated from the oven light bulb
Most recipes for baking have been
developed using high-fat products
such as butter or margarine (80% fat
by weight--the
federal requirement
for products labeled "margarine")
You will get poor results if cakes, pies,
pastries, cookies, or candies are
made with low-fat spreads
Low-fat
spreads contain less fat and more
water. The high moisture content of
these spreads affects the texture and
flavor of favorite baked recipes The
lower the fat content of a spread
product, the more noticeable these
differences
become.. To ensure best
results, use margarine, butter, or stick
spreads containing at least 70%
vegetable oil
The oven vent is located behind the
right rear cooking zone. This area could
become hot during oven use. It is
normal for steam to come out of the
vent and/or collect moisture underneath
when oven is in use The vent is
important for proper air circulation.
Never block this vent,
Oven Vent
Location
18
OPERATION
OvenCookingTips(cont.)
The Oven Temperature Sensor
continuously
senses and controls
the temperature
inside the oven. To
keep a constant set temperature,
the
elements will cycle (turn on and off
during cooking).
Baking results win be better if baking
pans are centered in the oven as
much as possible. If baking with
more than one pan, place the pans
so each has at least 1 to 11/2"of air
space around it_ If baking four cake
layers at the same time, place two
layers on rack 2 and two layers on
rack 4. Stagger pans on the rack so
one is not directly above the other
The oven racks are designed with
stops, a convenience as well as a safety
precaution The guides have a bump to
prevent the racks from tilting when they
are pulled out of the oven This design
allows the racks to be inserted in only
one way.
Bump in
J_
ookG ido
_L._J
_
L._
Your oven has six (6) rack positions
The top position is only a guide It
cannot be used as a rack position.
Guides
6
6
5.4
3
5
4
3
,,
SHINY PANS reflect
Always place oven racks in the
proper position while oven is cool.
heat and are
CAUTION: When you are using the rack
in the lowest position (1), you will need
to use caution when pulling the rack
out. We recommend that you pull the
rack out several inches and then, using
two pothoiders, pull the rack out by
holding the sides of it. The rack is low
and you could be burned if you place
your hand in the middle of the rack and
pull all the way ouL Be very careful not
to burn your hand on the door when
using a rack in the lowest position (1)
perfect for cakes and quick breads
that need a light brown crust.
GLASS, DARK NON-STICK,
OR
DARKENED-BY-AGE
BAKEWARE
absorbs heat and can be used for
yeast breads, pie crust, or foods
that need a brown crust. The oven
temperature
by 25°F.
Ill
_
FLAT COOKIE SHEETS, without
sides, allow air to circulate all around
the cookies for even browning.
L,
tll
should
be reduced
19
OPERATION
OvenCookingTips(cont.)
The Indicator
* PREHEATED
indicator light -turns
on and stays on when oven has
reached selected temperature.
- OVEN ON indicator iight - turns on
and stays on when a Bake, Broil, or
Clean function has been chosen
You may feel that your new oven
cooks differently
than the oven it
replaced
We recommend
that you
use your new oven a few weeks
to become more familiar with it,
• CLEAN indicator light - turns on
and stays on for self-clean
tf the
CLEAN indicator light flashes,
you should check for one of the
following:
following
the times given in your
recipes as a guide_ If you feel your
oven is too hot or too cool for your
cooking preference, see Do-ItYourself Adjustment
in the back of
this manual to make the adjustment,
NOTE:
On some models
1. The latch handle is locked during
a baking function,
2o The latch handle is not locked
during
the Oven
Control
Knob must be pushed
before turning.
Lights:
in
Your oven control has a selector knob
for setting Bake, Broil, or Clean
Simply turn the knob to the bake
temperature
setting you want to use
or to BROIL or CLEAN.
OFF
2O
a self-clean
function
OPERATION
The U S.. Department of Agriculture
recommends
to cook meat and
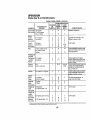
Broiling
poultry thoroughly--meat
to at least
an INTERNAL temperature
of 160 ° F
and poultry to at least an INTERNAL
temperature
of 180 ° F. Cooking to
these temperatures
usually protects
against food-borne
illness
Broiling is cooking by direct heat from
the upper element The oven door
should remain opened to the broil
stop position during broiling.
The closer you place foods to the
broil element, the faster foods brown
on the outside yet remain red to pink
in the center.
Moving meats away from the element
will allow the meat to cook to the
center while browning on the outsider
Using this positioning,
cook side t at
least 2 minutes longer than side 2 If
your oven is connected to 208 volts,
you may want to use a higher rack
position and/or broil foods longer.
It is not necessary
to preheat
The size, weight, thickness, starting
temperature,
and your preference
of
the doneness of the meat will affect
the oven
when broiling. Use the broiler pan and
grid that came with your range. Both
are designed for proper drainage of
fat and liquids.
II=I=HH=
r
II
broiling The chart on the next page
is based on meats at refrigerator
temperature
IIHIN
molded tightly to the
f foil is used, it must be
grid and slits cut into the
foil to match those of the grid.
This allows fats and liquids to
drain into the broiler pan,
preventing fire and excessive
smoke.
/'1
_
I.
Set the OVEN
to BROIL
CONTROL
2. When broiling is finished,
OVEN CONTROL
KNOB
OFF position
Always remove the _._.,
pan and grid from
the oven. Storing or
forgetting a soiled broiler pan in
the oven is a potential smoke or
fire hazard.
21
KNOB
turn the
to the
OPERATION
Broiling(cont.)
BROILING
-
(Hi Broil)
SECOND
SHELF FIRST SIDE SIDE TIME
POSITION TIME (MIN.)
(MIN.)
QUANTITY AND/OR
THICKNESS
FOOD
GUIDE
:
Ground
Beef ! lb (4 patties)
WellDone ½"to¾"thick
4Ibs (12patties)
,
J
1,
COMMENTS
,,,, .......
4
13
8
4
15
11
3A"
toI" thick
(1to1½tbs)
6
5
5
6
8
10
4
6
8
1½"thick
4
4
5
10
15
2O
8
10-I2
20
3
25
25
3
25
15
5
6
3
3-4
Spaceevenly
BeefSteaks
Rarer
Medium
WellDone
Rare
t
Medium
WellDone
Chicken
(2to2Y_
Ibs)
1 whole,cutup(21o2½tbs),
splitlengIhwise
Breast
Bakery
Products
2to4slices
Bread
(Toast)
orEnglish 2 (split)
Muffins
Steaks
lessthan_A"thickare
difficult
tocookrare
Slashfat
Brusheachsidewithmelted
butterBroilskin-side
down
first
SpaceevenlyPlaceEnglish
muffinscut.side-up
andbrush
withbutter,ifdesired.
,,
Lobsler
Tails
2to4
(6to8 oz each)
:ish
IIbtiIIets
Y,"
to½"thick
18-20
Donot
turnover
,-4
Salmon
Steaks
Fitlets
5
,,,
,,,,,,,,,
Cutthrough
backofshell
Spread
openBrushwith
meltedbutterbeforebroiling
andafterhalfofbroilingtime:
Handle
andturnverycarefully
Brushwilhlemonbutterbefore
andduringcooking,
if desired.
2 (1"thick)
2 (½"to-_"thick)
HamSlices ½"thick
(precooked) I" thick
5
5
I0
10
4
4
6
8
6
8
PorkChops
thick)
WetlDone 2(½"
2(t" thick)
aboutI lb.
4
4
10
15
10
15
SIashfat
LambChops
Medium
2(1"U_ck),
about
10to12oz
WeI_
Done
Medium
2 (t½"thick)about1tb
WellDone
5
5
5
5
7
10
9
14
4
9
Slashfat
TurncarafultyDonotlure
skin-side
down.
10
TheUS.Department
ofAgricdture
says"Rare
beefispopular,
butyoushouldknowthatcookingit toonty140=F
means
somefoodpoisoning
organisms
maysurvive"(Source:
SafeFoodBookYourKitchen
GuideUSDARevJunet985)
22
CAREANDCLEANING
Self-Cleaning Cycle
The gasket is designed to have a
5"-6 ° gap at the bottom of the door.
This allows for proper air circulation
Door Panel
1. Remove the broiler pan and grid,
utensils and any foil that may be
in the oven,
2,
If you oven is equipped with
nickel oven racks, they should be
removed, tf your oven is equipped
with gray porcelain-coated
oven
racks, they may stay in the oven
during the self-clean cycle,
3.
Gasket
t
Door Liner
It is normal for your oven door to give
the appearance of not having a good
seal against the range. This is due to
the gasket, The location of the gasket
on the door maintains a good seal and
prevents any heat loss.
Soil on the front frame and outside
the gasket on the door liner will
need to be cleaned by hand
Front
w,_ ............
41
Frame
_
Nickel oven racks may be
cleaned during the self-clean
cycle, but will lose their luster
and become hard to slide. If you
choose to leave them in during
the cycle, wiping them down with
vegetable oil after the cycle will
help them slide easier.
Door Gasket
Door Liner
Clean these areas with hot water.
soap-filled
pads, or cleansers such as
Soft Scrub e to remove any soil Rinse
well with clean water and dry
Gray porcelain-coated
oven
racks may safely be cleaned in
the oven during a self-clean
cycle. It will be necessary to
grease the edges of the oven
rack with a light coating of
vegetable oil after a clean cycle.
This will help maintain the ease
of sliding the racks in and out of
the oven.
Do not use oven cleaners - No
commercial
oven cleaner or protective
coating of any kind should be used in
or around any part of the oven
4,
u
Wipe up any heavy spillovers
the oven bottom.
left in the oven during a
tensils should never be
self-clean cycle.
on
Do not clean the gasket, The
fiberglass material of the oven
door gasket cannot withstand
abrasion. It is essential for the
For the first clean cycle, vent the
room with an opened window or
hood vent. This will reduce the
odor when heating
gasket to remain intact, If you
notice it becoming worn or
frayed, it should be replaced
23
new parts.
CAREAND CLEANING
Self-Cleaning Cycle (cont.)
1.
1.
lock handle
time of day
2. For best results, follow the steps
in PREPARING YOUR OVEN
For best results, follow the steps
in PREPARING YOUR OVEN.
2. Slide the self-clean
Make sure the correct
is displayed
3, Slide the self-clean
to
lock handle to
the right as far as it wilt go Do not
force the handle
the right as far as it will go, Do not
force the handle
4. Turn the OVEN CONTROL
KNOB
to CLEAN The CLEAN and OVEN
ON indicator
lights will glow
5. To delay the start of the clean
cycle touch the START TIME
ON/OFF pad
6. Touch the HOUR/MIN UP and/or
DOWN arrow pads to set the time
of day you want the oven to start
cleaning
3, Turn the OVEN CONTROL KNOB
to CLEAN The CLEAN and OVEN
ON indicator
lights will glow.
If the CLEAN indicator flashes, the
door is not closed completely
Simply push the handle to the lock
position
4. The clean cycle lasts 4 hours
and 20 minutes--this
includes
7. When the cycle is finished, the
OVEN ON and CLEAN indicator
lights will flash. Turn the OVEN
CONTROL KNOB to the OFF
position
a
cool-down time You may change
this to any time from 3 hours to
5 hours and 59 minutes by
touching the HOUR/MIN UP and/
or DOWN arrow pads
Turn the OVEN CONTROL
After the cycle, you may notice some
white ash in the oven Just wipe it up
with a damp cloth or sponge
the end of the cycle
to the OFF position
the door
KNOB to
the OFF position° Wait (approx 1 hour)
before attempting to open the door, The
indicator light will not blink if the cycle is
stopped_
When the door locks, CLEAN
and OVEN ON indicator lights
will glow, The oven temperature
must drop below the locking
temperature before the door can
be opened, The CLEAN and
OVEN ON indicators will blink at
5. Turn the OVEN CONTROL
and unlock the door
KNOB
tf white spots remain, scrub them with
a soap-filled pad, Be sure to rinse
thoroughly These are usually deposits
of salt that cannot be removed during
the cycle.
and unlock
If for any reason you are not satisfied
with the cleaning results, just repeat
the cycler
24
CAREAND CLEANING
Burned
Glass-CeramicCooktop
WARNING:
DAMAGE to your glass
surface may occur if you use scrub
pads other than BLUE Scotch-Brite e
Multi-Purpose
No Scratch scrub
sponges by 3M
Cleaning
On models with white or bisque
glass-ceramic,
it is ndrmal for the
surface to appear discolored when
cooking zones are hot This is
temporary and will disappear
as the glass cools Cleaning a
glass-ceramic
cooktop is different
from cleaning a standard porcelain
cooktop. To maintain and protect your
glass-ceramic
cooktop, follow these
basic steps
Use only Cooktop
on glass-ceramic.
Normal
daily
Cleaning
1. Allow the cooktop
3. Using the scrub sponge, rub the
residue area, applying pressure
as needed°
Creme e
4. If any residue remains, repeat the
steps listed above as needed.
5. For additional protection,
after all
residue has been removed, polish
the entire surface with Cooktop
Cleaning Creme e and a paper
towel
To maintain and protect your glassceramic cooktop follow these basic
steps
1. Before using the cooktop for the
first time, clean it with the Cooktop
Cleaning Creme e, This he_ps
protect the top and makes clean-up
easier,
Heavy, burned
on residue:
1. Allow the cooktop
to cool
2. Spread a few drops of Cooktop
Cleaning Creme _ to the entire
burned residue area
2. Daily use of the cooktop cleaning
creme will help keep the cooktop
looking new
3_
3. Shake the cleaning creme well
Apply a few drops of the creme
directly to the cooktop
Hold the razor scraper at
approximately a 45 ° angle against
the glass surface and scrape the
soil It w_ll be necessary to apply
pressure to the razor scraper in
order to remove the residue.
4. Use a paper towel or sponge to
clean the entire cooktop surface
Clean your cooktop
to cool
2. Spread a few drops of Cooktop
Cleaning Creme e to the entire
burned residue area
use cleaning:
NOTE: It is very important
DO NOT heat the cooktop
been cleaned thoroughly.
on residue:
that you
until it has
after each spill
NOTE: The razor scraper is not
supplied with your product
4. Keep a small amount of creme on
the residue as you scrape
25
CAREAND CLEANING
Glass.Ceramic
Cooktop
Cleaning(cont.)
5. After scraping with the razor
scraper, use the scrub sponge
remove any remaining residue
Cooktop
To clean the cooktop seat around the
edges of the glass, lay a wet cloth on
it for a few minutes, then wipe clean
with nonabrasive
cleaners
to
6. For additional protection, after all
residue has been removed, polish
the entire surface with Cooktop
Cleaning Creme e and a paper
towel.
Damage from sugary
melted plastic:
NOTE: Razor blade is packed
inverted for safety reasons Prior to
use, the blade must be rotated and
reinserted into slot.
i
,
1.Turn off all surface
2. Wearing
units
and
Remove
an oven mitt:
a. Use the razor scraper to move
the spill to a coo! area on the
cooktop
i , i,i iim,,mll
razor scraper will not
IMPORTANT: Using a
damage the surface if the
45 ° angle is maintained,
Do not
use a dull or nicked razor blade
b. Remove
towels
the spill with paper
3.Any remaining spillover should be
left until the surface of the cooktop
has cooled.
on your cooktop.
Store the razor
scraper out of reach of children.
J
4. Don't use the surface units again
until all of the residue has been
and scratches:
completely
1. Be careful not to slide pots and
pans across your cooktop It wilt
leave metal markings on the
cooktop surface
removed.
NOTE: If pitting or indentation in the
glass surface has already occurred,
the cooktop glass will have to be
replaced, In this case, service will be
These marks are removable using
the cleaning creme with a scrub
sponge and/or razor scraper
necessary
2. If pots with a thin overlay of
aluminum or copper are allowed
to boil dry, the overlay may leave
black discoloration
on the cooktop
This should
spills
hot pans
[_
Metal marks
seal:
be removed
immediately
before heating again
or the discoloration
may be
permanent
WARNING:
Carefully check the
bottom of pans for roughness
that would scratch the cooktop
26
CAREANDCLEANING
Glass-CeramicCooktop
Cleaning
As the Creme
cleans,
it leaves a
protective coating that helps prevent
buildup of mineral deposits (water
spots) and will make future cleaning
easier,, Dishwashing
detergent
removes the protective coating
and should not be used,
• Most cleaners contain ammonia,
chemicals,
and abrasives that
damage the surface of your
cooktop
Use only the Cooktop
Cleaning Creme e for proper
cleaning and protection of your
glass-ceramic
surface,
• If you slide aluminum or
copper-bottom
cookware across
the surface of the cooktop, they
may leave metal markings which
appear as scratches
Use the razor
scraper and cooktop creme to
remove these marks, Failure to
remove this residue immediately
may leave permanent
marks
• If pots with a thin overlay of
aluminum, copper, or enamel boil
dry, bonding with the glass-ceramic
surface of the cooktop may occur.
This black discoloration
should be
removed immediately
or it could
become permanent
• Use of glass cleaner may leave
an iridescent film on the cooktop
Cleaning Creme will remove
this film
• Water stains (mineral deposits) are
removable
using the creme or full
strength white vinegar,
- Do not use a dull or nicked razor
blade on your cooktopo
• Do not use abrasive cleaners or
abrasive scouring pads on your
cooktop
• Plastic mesh pads, such as Dobie e,
may be used
To order additional Cooktop Cleaning
Creme e, call your nearest Sears
Service Center or Retail Store and ask
for Stock No 40079,
CAREAND CLEANING
Cleaning
CLEANING
MATERIALS
• Dishwashing
• Warm water
CLEANING
MATERIALS
* Dishwashing
• Warm water
• Soft cloth
• Paper towels
detergent
TO CLEAN
Do not use oven cleaners, cleansing
powder or harsh abrasives
If
marinades, tomato sauce, basting
materials, etc should spill, wipe up as
much as possible
When surfaces
have cooled, thoroughly clean
painted areas
Do not use abrasive cleaners,
industrial cleaners, or bleach.
CLEANING
•
•
•
•
detergent
MATERIALS
Dishwashing
detergent
Warm water
Soap-filled steel-wool pad
Commercial
oven cleaner
TO CLEAN
For everyday cleaning, use glass
cleaner and a paper towel For
stubborn soil, use paste of baking
soda and water Rinse thoroughly
TO CLEAN
Allow the pan to soak Sprinkle the
grid with dishwashing
detergent and
cover with a damp cloth or paper
towel and let stand Scour as needed
Wash, rinse, and dry well. You may
also place both the pan and grid in
the dishwasher
CLEANING
MATERIALS
• Soft abrasive cleaner
- Sponge
scrubber
Do not use hard, abrasive
cleaners,
industrial
cleaners,
or bleach.
Clean only as touch-up between
clean cycles. Use dishwashing
liquid, warm water, or soap-filled
pad, Rinse well after cleaning
and dry,
NEVER USE OVEN CLEANERS
IN
OR AROUND ANY PART OF THE
OVEN.
When cleaning, be sure not to bend
or displace the temperature
sensor,
located on the back wall of the oven
28
CAREAND CLEANING
Removable Parts
r "¸
CLEANING
electrical
power to the
AUTION:
Disconnect
oven at the main circuit
breaker or fuse box before
_
MATERIALS
• Dishwashing
° Warm water
° Soft cloth
detergent
attempting to replace the oven
light bulb. Do not touch a hot
light bulb with wet hands or a
wet cloth. Wait until the bulb has
cooled and use a dry cloth.
Molded
._ -_
-"._
/
Rib
Clear
Groove in
L.
=4
Spring
Clip
Light Bulb
TO REMOVE
Bulb Cover
1. Be sure the control
knob
is in
the off position
2.
Pull straight
TO REPLACE
off the stem
,
Using a piece of string can make
removing the knob easier, Slip the
string under and around the knob,
pulling straight out
TO CLEAN
Wash the knob thoroughly with soapy
water, Dry completely with a soft
cloth, DO NOT let the knob soak.
1. Check the back of the knob, The
molded rib of the knob is designed to fit perfectly
knob stem
Hold your hand under the bulb
cover and firmly push back the
bail wire, until it clears and
releases the bulb cover.
2,
Unscrew
the light bulb,
3.
Replace the bulb with a 31/2"
40-watt appliance bulb,
4.
Place the bulb cover into the
grooves of the socket and pull
the bait wire forward until it rests
in the indentation on top of the
bulb cover
TO REPLACE
2,
•
onto the
Align the molded rib to the clear
groove in the knob stem.,
3. Push the knob back as far as it
wilt go
29
CAREAND CLEANING
RemovableParts(cont.)
TO REMOVE
1. Fully open the
Hinge Lock
(Unlocked
Position)
door
CLEANING
MATERIALS
• Dishwashing
detergent
. Warm water
° Scouring pad or soap-filled
RackGuide
Raised Back
Push the hinge
locks down
toward the
door frame, to
the unlocked
2_
pad
-.1_
"_
position,
This may
require a
flat-blade
screwdriver
IHI
fIf[
of the Rack __
Hinge Arm
TO REMOVE
.
1. Pull the racks out to the stop
position,,
2.
Firmly grasp both
sides of the door
at the top
Close door to
the door
removal position
4_
Pull up the front of the rack and
slide under the bump of the rack
guide
Lift door up until
5.
TO CLEAN
the hinge arm is
I
clear of the slot,
Removal Position
Clean with warm water and detergent
For hard-to-remove stains, gently
scrub with a scouring pad or a
soap-filled pad Rinse well
TO REPLACE
TO REPLACE
Firmly grasp both
sides of the door
I.
Place the raised back of the rack
onto the rack guides,
at the top,
2.
Lift the front of the rack until the
raised back slides under the bump
of the rack guides.
3.
Slide the rack all the way back
.
2_
Bottom
Edge of
Slot
Hinge
Arm
With the door at
the same angle
as the removal
position, seat
the indentation
of the hinge arm
into the bottom
edge of the hinge
slot
continued
3O
Indentation
on next page
CAREAND CLEANING
TO CLEAN
Removable Parts
• Because the area inside the gasket
is cleaned during the self-clean
cycle you do not need to clean this
by hand
Removable Oven Door (cont,)
3.
4.
Fulfy open the
door
Locked
Position
• The area outside the gasket and the
door liner can be cleaned with a
soap-filled
pad, hot water and
detergent, Rinse well with a vinegar
and water solution
Push the hinge
locks up against
the front frame of
the oven cavity,
to the locked
position
5_
Close the oven
door,
TO CLEAN
OUTSIDE
INSIDE OF DOOR
Sealed Hinge
Arm
OF DOOR
Use soap and water to thoroughly
clean the top, sides, and front of
the oven door. Rinse well. You may
also use a gtass cleaner to clean
the glass on the outside of the
door Do not let water drip into
the vent openings
Spillage of marinades, fruit juices,
tomato sauces, and basting
materials containing acids may
cause discoloration
and should
be wiped up immediately.
When
surface is cool, clean and rinse,
Do not use oven cleaners, cleaning
powders, or harsh abrasives on
the outside of the door.
tf any stain on the door vent trim is
persistent, use a soft abrasive
cleaner and a sponge scrubber
for best results
31
CAREAND CLEANING
RemovableParts(cont.)
CLEANING
IF DRAWER
detergent
Rear drawer
support
is resting
•
.
1. Pull the drawer
IF DRAWER
is on top of guide
rail on the high side
_
Guide
The drawer
_
be kept in this drawer. Do not
overload the storage drawer. If
the drawer is too heavy, it may
slip offthe base rail when
Wipe the inside and outside with
warm soapy water and a damp
cloth or sponge Do not use harsh
abrasives or scouring pads on the
drawer
_opened.
TO REPLACE
1. Place the drawer rail on the
guides,
back until it
stops,
and
push back untie the stops clear the
guides
Lower the front of the drawer
push back until it closes
CAUTION:
Drawer front
panel tipped
to one side
gives you space for
keeping cookware
and bakeware. Plastics and
flammable
materials should not
TO CLEAN
3. Lift the front of the drawer
IS CROOKED
Rear drawer support
3. Remove the drawer.
Push the drawer
away frorr
until the
Rail
Stop
i_
t L7.7 ..................
1!1t
out until it stops..
Lift the front of the drawer
Stop
_t
Drawer
front
an_
I_-P
uppeu
........... body
sido
stops clear the guides,
4.
Drawer
l'_ does not
close
completel_
on topofgu,de._a,I.,
TO REMOVE
2.
CLOSE
MATERIALS
o Dishwashing
* Damp cloth
* Warm water
2.
WON'T
Power cord may
be obstructing
drawer in this area
and
32
._
BEFORECALLINGFORSERVICE
To save you time and money, before making a service call, check the list
below for any problem you may feel you have with the performance
of your
range If the problem is something you cannot fix, use the Consumer Service
Numbers located at the back of this manual
When making any calls, have
the Model No., Serial No., Repair Parts List, Use and Care Manual, and the
Date of Purchase available.
PROBLEM
POSSIBLE
H
III
IIII
'
Cooktop, oven, and
oven control will not
work.
lul
nn, nil inu
Tiny scratches
or
abrasions on the
cooktop,
No power
SOLUTION
Check the circuit breaker
or fuse, Make sure the
power cord is plugged in
to range,
In'lull
i
a. Use of incorrect
cleaning materials
a. Use only Cooktop
Cleaning Cremee.
b. Coarse particles
(salt, etc,) between
cookware bottom
and cooking surface
b. Make sure the cooktop
surface and bottom of
cookware are clean
before using.
c. Cookware
bottoms,
c. Use only smoothbottomed cookware
with rough
Ii
n
i i i,,in
Metal markings
on the cooktop surface
(may appear as
scratches).
Sliding or scraping
metal utensils and
cookware across
cooktop surface,
Areas of
discoloration
on the cooktop
surface.
Mineral deposits
water or food,
lu ii_ln
in ,,
POSSIBLE
CAUSE
IIII I
......................
Use recommended
cleaning
to clean
surface.
procedure
the cooktop
=1111_1
from
Use recommended
cleaning procedure
to clean the cooktop
surface
== ' m ,=_H,=llt
Dark streaks
and
specks on the
cooktop surface.
a. Incorrect
materials
cleaning
b. Encrusted
boilovers
or grease
splatters
a. Use only the Cooktop
Cleaning Creme e on
the cooktop surface
b. Use razor scraper and
follow the directions in
the cleaning
this manual.
u
Cooktop cooking
zones work, but
oven will not
turn on.
Oven controls
incorrectly
section
iii n uIH in nn i,Jniunlj _ltlUluulln ittl i_lln
set
33
Check the baking and
broiling sections on
setting the oven control
correctly
of
BEFORECALLINGFORSERVICE
PROBLEM
ii
POSSIBLE
CAUSE
..................
Oven rack does not
slide easily,
Racks were left in
Wipe the racks down
with vegetable oil
the oven during a
self-clean cycle
iiii1,1111,1,1
Surface units will
not maintain a rolling
boil or cooking is not
fast enough.
Improper cookware
being used
..............................................
Use pans which are flat
and match the diameter of
the surface unit selected
i
i
,i
i
i i,iiiiiiii ,111,11
i
Oven temperature
seems inaccurate.
Oven control calibration
See the temperature
adjustment
instructions
following this section,
Oven will not
unlock.
Clean cycle
finished
Oven temperature
must
drop below the lock
temperature
before the
door will unlock
ii
is not
i
i
Oven light
not work°
does
a. Light switch
position
in off
b. Oven light bulb loose
or burned out,
i
i iii
iiiii
a. Check oven light switclon the control panel,
b. Check the oven
light bulb,
iiiii1,,111,1
Oven
smokes.
a. Dirty oven.
b. Improper
aluminum
use of
foil
c. Broiler pan containing
grease left in the oven
a. Check for heavy
spiltover
b. Use of foil not
recommended
c. Clean pan and grid
after each use
i
Oven emits
odor.
a. Oven insulation may
emit odor during the
first few usages
a. Put oven through
self-clean cycle to
speed up process of
odor "wearing out,"
b. Failure to wipe out
excess soil,
b, Wipe excess soil off
before using oven.
Oven door
Do not force the lock
Turn the control
accidentally
locked
while baking.
handle, Temperatures
above the locking
temperature
will prevent
the lock handle from
sliding to the unlock
position
the off position
Allow
the oven to cool until the
temperature
inside
drops below the lock
temperature
and the
handle slides easily
iii i,i,Jl,ii iiii
iiii
i1,11,11,11
i
Cleaning
results
were poor,
i
iiiiiipl
knob to
i
a. Over_ was heavily
soiled
a, Heavy spiflovers
should be cleaned
before the cycle is set
b. Clean cycle interrupted
b, Allow the oven to clean
its full cycle
34
BEFORECALLINGFORSERVICE
PROBLEM
,lli
POSSIBLE
POSSIBLE
CAUSE
Foods do not bake
properly°
a. Oven was not
preheated tong
enough.
a. Be sure to preheat,
when recipe calls for it.
bo Improper rack or pan
placement.
b. Maintain uniform air
space around pans and
utensils; see oven
cooking tips section
co Oven vent blocked
covered
c. Keep vent clear.
d. Improper
e.
go
or
use of foEi.
ii
Foods
ii,
iii1,1,.11
do not broil
d. Use of foif not
recommended on
racks or oven bottom
Improper temperature
setting for utensil
used
e.
Reduce temperature
25 degrees for glass or
dull/darkened
pans
Oven temperature
needs adjustment.
f.
Check oven
Range and oven rack
not level.
g, Check the installation
for leveling
h, Oven controls
improperly set,
i,,
SOLUTION
,ill inllqlr
temperature
adjustment section,
h, See the baking section,
=111
a.
properly.
improper
position
rack
ao Check broil pan
placement; see broiling
section°
b. Oven preheated,
b. Do not preheat when
broiling
c.
c.
lmproper
use of foil,
slit in the grid; this will
prevent grease
drainage,
d, Oven door closed
during broiling,
e_
f.
d.
Open door to broil stop
position; see broiling
section
e.
Use higher rack
position
f,
Check broiling chart in
broiling section
Low voltage (208).
Improper
broiling time
go Oven controls
improperly set
35
Do not let foil cover
g. See the baking
section
"DO-IT-YOURSELF"
TEMPERATURE
ADJUSTMENT
1. Press and hold, at the same
time, the HOUR UP and DOWN
arrow pads until the display
shows a
You may feel that your new oven
cooks differently than the oven it
replaced
We recommend
that you
use your new oven a few weeks to
become more familiar with it, following
the times given in your recipes as a
guide
two-digit
2.
number..
Press the HOUR UP arrow pad to
increase the temperature,
up to
+35°F hotter
or
If you think your new oven is too hot
(burning foods) or not hot enough
(foods are undercooked),
you can
adjust the temperature yourself,
The appearance
and texture of foods
is a better indicator of oven accuracy
than an oven thermometer
These
Press the HOUR
DOWN
arrow
pad to decrease the temperature,
down to -35°F cooler,
3. When this adjustment
has been
made, the display will return to
the time of day
thermometers
can vary by 20-40
degrees from the true temperature
of the oven. In addition, the oven
door must be opened to read these
thermometers
Opening the door will
change the temperature
of the oven
This adjustment witl remain in memory
until these steps are repeated and a
new temperature
is selected
it will
remain in memory even after a power
failure,
This adjustment will not affect the
Broil or Clean temperatures,,
To decide how much to change
the temperature,
set the oven
temperature
25 degrees higher
(if foods are undercooked)
or
25 degrees lower (if foods are
burning) than the temperature
in
your recipe, then bake, The results
of this "test" should give you an idea
of how much the temperature
should
be changed.
36
NOTES
37
RADIANTFREE-STANDING
RANGE
WARRANTY
fFULL ONE-YEARWARRANTY ONALL PARTS
if, within one year from the date of instalfation,any partfails to function properly due loa deled in
material or workmanship,Searswill repair or replace it, at our option, free ol charge
LIMITED WARRANTYONRADIANT GLASSAND RADIANTSURFACEUNITS FOR SECOND
THROUGHFIFTH YEAR:
For thestad of the second year, from thedate of installation, throughthe fifth year, fromthedate of
installation, Searswill repairor replace,at our option, theradiantglass or radiantsurfaceunits (you
will be responsiblelor any labor), il anyof theIollowing defectsoccur:
e Crackingof theradiant glass cooktop due to thermal shock
*
Discoloration of the radiant glass cooktop
o Wear-offof the pattern on the radiantglass cooktop
*
Crackingol the rubber sealbetweenthe radiantglass cooktop and the porcelain edge
,, Burnoutof any of the radiantsudace units
If this product is subjectedto other thanprivate family use, theabovewarrantiesare ellective for
only 90 days.,
WARRANTYSERVICEIS AVAILABLEBY CONTACTINGTHE NEARESTSEARSSERVICECENTERtN
THE UNITEDSTATES.
This warrantygives you specific legal rights, and you may also haveother rights which vary from
state to s_ate..
SearsRoebuckand Co Dept 817 WA Hoflman Estates,IL 60179
To further
add to the value
Buy a Sears Maintenance
of your Range,
Agreement,
r
1st Year
Years of Ownership Coverage
2nd Year
3rd Year
1oReplacement of Defective Parts other
than Radiant Glass and Radiant
Surface Units
W
MA
MA
2. Radiant Glass and Radiant Surface
Unit Parts
W
W
W
3. Labor
W
MA
MA
MA
MA
4. Annual Preventive Maintenance
Check at your request
MA
W - Warranty
MA _ Maintenance
Agreement
KenmoreAppliancesare designed,manulacturedand testedfor years of dependableoperation Yet,
any appliancemay require servicefrom time totime. The SearsMaintenanceAgreementoffersyou
an outstanding serviceprogramfor your product
The tableaboveshowsthe additional benefitsa SearsMaintenanceAgreementofferscompared to a
SearsWarranty
Contact your SearsSalesAssociateor local SearsServiceCenterto purchasea SearsMaintenance
Agreement
38
ESTUFAELECTRICARADIANTETIPO
"INDEPENDIENTE"CONAUTOLIMPIEZA
Indice
Ventilacion del homo ................
55
No mire .................................
55
Precelentamiento ....................... 55
Luz del homo ............................... 55
Horneado con margarina ............ 55
C6mo cotocar los utens[lios ...........56
Utensilios ........................................ 56
Ciclo de los etementos .............. 56
Parri]las del homo ........................ 56
Nuevo control ...................................57
Para asar ..........................................
58-59
Segufidaden el usode taestda . 40-45
Contra volcaduras ................... 40, 41
Caracter[sticas de su estufa ......... 46
CSmo sacar fa cinta de empaque. 46
Zonas para cocinar
47
Luces indicadoras de superficies
calientes ..................._....................... 47
Utensilios y woks para cocinar ..... 47
Consejos para hacer conservas . 48
Como revisar'ios utensilios .......... 48
Eficienca de los utensilios ........... 48
Espirales radiantes ...................... 48
Limitador de temperatura ........... 48
Posicion de los controles
49
Zona dobie para coclnar .........
49
Boron para subir o bajar
las horas ...........................................50
Vuelta a temperatura previa ....... 50
Dial ..........................................
50
lnterruptor de ta luz del homo ..... 50
Luces indicadoras ..................
50
CSmo poner el dial en blanco .... 50
CSdigo F
51
C6 di"go PF .................................
51
Apagado autom&tico det homo • 51
C6mo poner el reloj ..................
52
CSmo programar el cronSmetro . 52
CSmo reprogramar
el cronSmetro .......................................
52
Para cancelar el cron6metro ........ 52
COmo homear ........................ 53-54
Consejos para cocinar en
el homo ......................
55-57
Olor u olor fuerte .......................
55
Papel de aluminio .................
55
...........
.............
El ciclo de autolimpieza ......... 60-61
Limpieza de la cubierta de
vidrio-cer&mica ....................
62-64
Panel de control
65
Cacerota y parfilla para asar .... 65
Paredes del homo ..........................65
Cajon y lados de la estufa ............. 65
Vidrio de ta puerta del homo
..... 65
Moldura de la ventitaci6n
de la puerta
65
Perillas de control ........................... 66
Foco de la tuz del homo .................66
Parriltas removibles det homo ...... 67
Puerta removible del homo .... 67-68
Cajon de almacenamiento
removible ...................................... 69
....................
...........
..........
....................
...................................
Antes de Ilamar para
un servicio .................................. 70-72
Ajustes a la temperatura ..... 57, 73
Garantia ...........................
75
Nemeros para servicios del
consumidor
..........................
76
Para su conveniencia
y referencia futura, pot favor escriba e! numero de modelo
y de serie en el espacio que se provee, Est&n ubicados en el marco frontal detr_s
det cajbn.
NUMERO
NUMERO DE MODELO:
@ Sears, Roebuck and Co
39
DE SERIE:
INSTRUCCIONES
DE
SEGURIDADIMPORTANTES
GUARDE
ESTAS
INSTRUCCIONES
Lea todas las instrucciones antes de usar esta estufa.. Cuando use un aparato a
gas o el_ctrico, se debe seguir instrucciones de seguridad b_sicas, incluyendo
Io siguiente:
Paso 1
Ubicacibn de la abrazadera
A.
se pueden volcar
Personas podrian
resultar hefidas
Instale el dispositivo
contra volcaduras
empacado con la
estufa
Vea las instrucciones
de instalaciOn
i
:_
:_
:':
'_
Coloque la abrazadera contra la pared
trasera a la derecha o izquierda del
gabinete Si la superficie del gabinete
sale m&s afuera que et gabinete, corra
la abrazadera para compensar la
cantidad de la distancia Si no existe
un gabinete adyacente, ponga el
borde de la abrazadera en la posici6n
deseada sobre el panel lateral de la
estufa,
Bo Use la abrazadera como un molde
y marque las posiciones de 2 hoyos
sobre la pared y las posiciones de 2
hoyos sobre el piso, Use los juegos de
posiciones para madera o concreto
dependiendo del tipo de piso Vea la
Fig. 1
:,
Estas instrucciones para la instalaci6n de
la abrazadera CONTP..A VOLCADURAS
son para madera o pisos y paredes de
concreto Cualquier otto tipo de
construccion podria requerir tecnicas de
instafaci6n especiales para proveer un
anciado adecuado de la abrazadera
CONTR_ VOLCADURAS al piso o a la
pared,
Gabinete adyacente
o
ubicaci6n
final del panel
lateral de la estufa
Hoyos
para
piso de
madera
Hoyos en
la Pared
Lado
de la
abrazadera
El uso de esta abrazadera no evita que ta
estufa se de vuelta cuando no est& bien
instalada
NOTA: La instalacidn de la abrazadera
CONTRA VOLCADURAS debe cumplir
con todas las ordenanzas locales para
asegurar la estufa
Pata niveladora
trasera
para piso
de
concreto
Fig. 1
contim)a en la p_gina siguiente
40
INSTRUCCIONES
DE SEGURIDAD
IMPORTANTES
Dispositivo
de estabilidad
C.
Concreto ConstrucciSn:
1. Materiales requeridos:
4 de cada
Perno "Iag" de
uno
Y."x 1V_"
4 de cada
uno
(cont.)
,
Paso 2
Instalaci6n de la abrazadera contra
volcaduras
A.
Construccibn de madera:
1,
2.
Paso 3
Y
Revise la lnstalaci6n
INSTALACION SOBRE LA PARED Y PtSO
Fig. 2
B_
Haga el hoyo de] tamar_o
recomendado para las anclas
sobre el concreto en el centro de
cada hoyo premarcado sobre el
piso de concreto y sobre la pared
Instale la manga del ancla dentro
det hoyo y luego instale los pernos
a traves de la abrazadera NO
APRIETE LOS PERNOS
DEMASIADO
Piso: Haga un hoyo piloto de Ys"
en el centro de cada posici6n de
hoyo premarcada sobre el piso de
madera (un clavo o una lezna se
puede usar si no tiene un taladro),
Pared; Haga un hoyo piloto de _"
en _nguto (como se muestra en ta
Fig. 2) en el centro de cada
posici6n de hoyo premarcada en
la pared (un clavo o una lezna se
puede usar si no tiene un taladro),
Instate la abrazadera CONTRA
VOLCADURAS con los 4 tornillos
que se proveen como se ilustra en
la Fig. 2
41
Manga para
anclar O D de 1/2"
A.
Complete la instataci6n de la estufa
de acuerdo alas instrueciones de
instalaci6n que se proveen con ella
B.
Revise para asegurarse que la
abrazadera CONTRA VOLCADURAS
est(_ instalada y enganchada
correctamente, Saque el panel de
abajo o el caj6n e inspeccione la
PATA NIVELADORA TRASERA
Aseg_:_reseque est_ firmemente bien
colocada dentro de la ranura Vea la
Fig. !
INSTRUCCIONES
DESEGURIDAD
IMPORTANTES
• iPRECAUCION! NUNCA GUARDE cosas
de interes para los niSos sobre ef respaldo
de la estufa o en los gabinetes que
quedan por sobre la estufa Los niSos
que se suban sobre ]a estufa podrian
resultar gravemente hefidos
• GUARDE ESTE ]ibropara un uso futuro
• NUNCA USE su estufa para entibiar o
calentar una habitaci6n
_
DVERTENCIA:
• NUNCA TRATE de reparar o reemplazar
una parte de la estufa a menos que ]as
instrucciones se den en este manual
Todo otro trabajo deberia ser hecho pot
un t_cnico especializado
• SlEMPRE MANTENGA los revestimientos
combustibEes de Easparedes, cortinas y
otros paSos a una distanc[a prudente de
ia estufa
'
Para prevenir que la estufa se
vuelque accidentalmentedebido
a un uso anormal, incluyendo una carga
excesiva sobre la puerta, eng_nche la
estufa a ta pared o al suelo instalando el
dispositivocontra volcaduras que se
provee. Si la estufa se mueve para
Iimpiarla, para hacerle servicio o
cualquier raz_n, asegurese que el
dispositivocontra volcaduras sea
enganchado nuevamentecuando la
estufa se coloque de vuelta en |a
abertura. No hacerlo podria resultar en
que la estufa se vuelque y podria
causar heridas personales. Para
inspeccionarel dispositivo contra
volcaduras, saque el cajon de
almacenamientoy mire para asegurarse
que el nivelador de la pata trasero est_
bien enganchado en la ranura de la
abrazader&
i,......................
NUNCA CALIENTE contenedores de
alimentos cerrados El aumento de ia
presiSn podria causar que el contenedor
explote y cause heridas
NUNOA deje contenedores de grasa o
goteaduras sobre o cerca de la estufa.
w
SlEMPRE MANTENGA el _rea de La
estufa despejada de cosas que se podrian
quemar La acumulaciSn de comida y
grasa y los utensilios de madera se
podrian incendiar Los utensilios de
pt&stico se podr[an derretir y las comidas
en conservas podr_an explotar, Su homo
nunca se deber[a usar para almacenar
COSaS
.d
SIEMPRE MANTENGA [a estufa
despejada de cosas que se podrian
quemar (gasolina y otros vapores o
liquidos inf]amables)
IMPORTANTE: Para garantizar su
seguridad, la de su familia y Ia de su
hogar, pot favor lea su Manual det
Consumidor cuidadosamente
Mantenga[o a la mano para referencias
Ponga mucha atenciSn alas secciones de
seguridad ASEGURESE que su estufa
sea instalada pot un tecnico especializado
y que haga tierra adecuadamente
NUNCA TRATE de limpiar {as superficies
calientes A]gunos limpiadores producen
vapores nocivos y los paSos y las
esponjas mojadas podrian causar
quemaduras por vapor
• NO DEJE a los nifios sin vigiIancia cerca
de una estufa que se est_ usando
" NUNCA USE ropa suelta cuando use
la estufa
• ENSENE A LOS NINOS A no jugar con
los controles o cualquier parte de la
estufa y a no sentarse, subirse, o
pararse sobre la puerta
" NUNCA USE una toafla u otro paso
abultado como agarradera Asegurese
que la agarradera este seca Las
agarraderas humedas y las patios y
esponjas mojadas podrian causar
quemaduras pot vapor NO PERMITA
que las agarraderas toquen los elementos
para calentar
42
INSTRUCCIONES
DESEGURIDAD
IMPORTANTES
NUNCA DEJE las unidades de superficie
sin vigilancia a temperaturas altas, Los
derrames podrian resultar en humo o en
derrames de grasa que se podrian
incendiar,
NUNCA COClNE sobre una cubierta para
cocinar quebrada Las soluciones para ta
limpieza y los derrames podrian penetrarla
y crear un riesgo de corte de corriente o
de incendio Llame a un tecnico catificado
para las reparaciones
SIEMPRE COLOQUE las agarraderas
(mani!las) de las ollas hacia adentro y
lejos de las otras unidades de la superficie
para reducir el riesgo de quemaduras,
encendido, un contacto y derrame
accidental
CUANDO PREPARE comidas a ia llama
debajo de la campana de ventilaciSn,
encienda el ventilador
• NO TOQUE las superficies para calentar,
las superficies cerca de eflas o las
superficies interiores Estas podrian estar
suficientemente calientes para quemar
aunque se vean de color oscuro, Durante
y despues det uso, no toque o permita que
la ropa o materiates inflamabtes hagan
contacto con fas superficies calientes hasta
que hayan tenido tiempo de enfriarse. Las
otras superficies cerca de las ventanillas
de ventilacidn del homo, puertas, ventanas
y las superficies para cocinar tambien
podrian estar suficientemente calientes
para causar quemaduras
• SOLO C1ERTAS clases de utensilios de
vidrio o cer&mica se pueden usar para
cocinar en la cubierta Asegt_rese que los
utensitios que seleccione est&n diseSados
para cocinar sobre fa cubierta sin
quebrarse debido a los s0bitos cambios
de temperatura.
• SlEMPRE TENGA cuidado cuando toque
los elementos de la cubierta Retendr&n
calor despues de que la estufa se haya
apagado
• NUNCA OBSTRUYA la ventilaciSn del
homo detr&s de la zona para cocinar
posterior derecha
• LAS OLLAS QUE SE USEN para cocinar
en ta cubierta deberian ser de fondo piano
y Io suficientemente grandes para cubrir el
&tea que se est_ utilizando, Los utensilios
que son demasiado pequeSos exponen el
elemento calentador y podrta causar un
contacto directo o el incendio de ta ropa
El tamaSo correcto de los utensilios
tambi_,n mejorar_, la eficiencia
COLOQUE LAS PARRILLAS DEL
HORNO en la posiciSn deseada mientras
el homo est_ frlo Si las parrillas se deben
mover mientras et homo est& caliente, no
permita que la agarradera haga contacto
con el quemador caliente del homo
DESPUES DE ASAR A LA PARRILLA,
siempre saque la cacerola y la parrifla
para asar del homo y fimpielas, Los
sobrados de grasa en la cacerola para
asar podrian incendiarse la prSxima
vez que usted use et homo
SiEMPRE TENGA cuidado cuando abra
ta puerta del homo Deje que el aire
catiente y el vapor escapen antes de
mover los atimentos
NUNCA USE papel de aluminio
para cubrir el fondo del homo, El
uso incorrecto det papel de aluminio
podria empezar un incendio, o podria
resultar en un golpe de corriente
43
INSTRUCCIONES
DE SEGURIDAD
IMPORTANTES
IMPORTANTE:
La salud de algunos
p_jaros es extremadamente
sensitiva a
los vapores producidos por el ciclo de
autolimpieza de cualquier horno_ Ponga
los p_jaros en otra habitaci6n
que est6
bien ventilada.
;LEA Y COMPRENDA
ESTA INFORMACION
AHORA!
Aseg_rese que todos en su hogar sepan
qu_ hacer en caso de incendio. Nunca
use agua sobre un incendio de grasa,
esto solamente extender& las llamas,,
• LIMPIE SOLAMENTE fas partes que se
Iistan en este manual Siga todas [as
instrucciones para la limpieza Asegt_rese
de sacar la cacerola y la parritla para asar
antes del ciclo de autolimpieza
INCENDIO
CUBIERTA:
• NUNCA FRIEGUE, mueva, limpie, o daSe
el selfo de la puerta en las estufas con
autolimpieza Es esenciat para un buen
sellado,
Nunca
.
2.
. NUNCA TRATE de limpiar los utensilios,
oltas, partes removibles o la cacerola y la
pardlla para asar en el ciclo de
autolimpieza.
DE GRASA
levante
EN LA
una olla en llamas.,.
Apague los elementos de la superficie
Sofoque la llama con una tapa
apretada, soda para cocinar o con un
extintor quimico, a espuma o "haton"
FUEGO
EN EL HORNO:
iNo trate de mover la cacerola!
• NO USE limpiadores para hornos- No se
deberla usar ninguna clase de limpiador
para hornos o cremas protectoras dentro
o alrededor de cualquier parte del homo
1.
.
• SI LA FUNClON DE AUTOLIMPIEZA
fall& apague el homo y desconecte la
electricidad H_gale un servicio pot un
t_cnico calificado
;ADVERTENCIA
DE
SEGUR|DAD
IMPORTANTE!
California Safe Drinking Water and
Toxic Enforcement Act requiere que el
gobernador de California publique una
lista de substancias que el estado sepa
que producen defectos de nacimiento u
otros daSos reproductivos y requiere que
los hombres de negocios adviertan a sus
clientes del contacto potencial a tales
substancias_ El aislante de fibra de vidrio
en el horno con autotimpieza emitir_ una
muy peque5a cantidad de mon6xido de
carbono durante el ciclo de autolimpieza.
El contacto se puede minimizar ventilando
con una puerta o ventana abierta o
usando un ventilador o una campana
de ventilaci6n.
44
Cierre la puerta def homo y apague
los controls,
Si el incendio contin0a,
cuidadosamente abra la puerta y
arroje soda para cocinar sobre el
fuego, o use un extintor de quimico
seco, espuma o "halon"
OPERACION
CSmoProteger Su Nueva
Cuando
los contro|es de la
PRECAUCION:
superficie se apaguen, la luz
Indicadora de Calor de la Superficie
permanecer:_ encendida haste que la
superficie se haya enfriado hasta
aproximadamente
150 grados F.
La superficie de vidrio-cer_mica
retendrd cafor despu_s que |a luz
indicadora se haya apagado, Tenga
cuidado hasta que la superficie de
la cubierta haya |enido tiempo de
enfriarse.
_
CubiertaPara Cocinar
• NO ARRASTRE los utensilios sobre la
cubierta,
• NO USE una toalta o esponja para pfatos
pare Jimpiarla cubierta
L
.................
• NO USE poivos pare fregar, o lanitfas
de pl&stico o de metal sobre la cubierta,
', NO APLIQUE crema para limpiar sobre
ta cubierta si la superficie est& caliente,
Los derrames de azOcares (tales como
jaleas, chocolate, y jarabes) o el pl_stico
derretido puede causar hoyos en ta cubierta
a menos queet derrame se saque mientras
todavia est_ caiiente Se debe usar un
cuidado especial cuando se limpian
sustancias catientes
• LEA LAS instr,ucciones en la etiqueta
de fa botella de crema para limpiar ]a
cubierta antes de tratar de limpiar la
superficie de Jacubierta
• DESPUI_S de fimpiar fa supedicie de la
cubierta, aseg0rese de sacar rode el
residuo de ta creme que podrfa quedar
con una toat[a de papel seca,
Siga estas instrucciones cuidadosamente y
limpie fa suciedad mientras el derrame este
caliente
• PARA DERRAMES grandes, haga girar
la perilla de control de fa superficie ala
posici6n de APAGADO (OFF). Utilice una
toalla de pape] seca para limpiare!
derrame, tuego use un raspador a hoja
(sujetado con una agarradera) en un
&ngulo de 45 grados sobre la superficie
de la cubierta para rasper et resto del
derrame de la zone pare cocinar caliente
t.
Apague la zone para cocinar afectada
por el derrame Saque tos utensilios
2,
Usando un guante para homo, sujete el
raspador en un ,gegulo de 45 grados
sobre ta cubierta y raspe el derrame
caliente hacia un area fria fuera de fa
zone pare cocinar
3_
NOTA: Et raspador no es proporcionado
con su producto
• NO COCtNE directamente sobre la
superficie det viddo
• NO USE la superficie como tabla para
cortar
• NO USE un cuchilfo o un objeto afitado
sobre el selto de ta cubierta alrededor del
borde exterior del vidrio porque lo podria
cortar o dafiar
45
Con e! derrame en un area fria, use una
toalta de papel seca para limpiar la
suciedad Cualquier derrame que
permanezca se deberia dejar solo hasta
que la superficie de la cubierta se haya
enfriado, NQ contin0e utilizando la zona
para cocinar sucia hasta que todo el
derrame haya sido limpiado Siga los
pesos bajo Suciedad Pesada para
continuar el proceso de limpieza
OPERACION
CARACTERISTICASDE SU ESTUFA
Interruptor de la
luz del
Reloj y cron6metro
4 Perillas
removibles del
control de la
cubierta
Control del horno
Indicador
de luz de la
unidad de
superficie
Indicador de
luz de la
"_ad de superficie
Ventilaci6n del
"homo
Zona doble
para cocinar
Cubierta de
Interior del
homo con
autolimpieza
Manilla para
cerrar/abrir
Cacerola y
parrilla para
la parrilla
Seguro de la
puerta
Parritlas del
removibles
Elemento para
asar a la parrilla
Elemento
para hornear
Ubicaci6n de
n(Jmero de
\
modelo y serie
Puerta removible
Caj6n de
almacenamiento
removible
del homo
Sello de la puerta
del homo
Para sacar et residuo del adhesivo de la cinta de empaque, use un detergente liquido
normal para platos, aceite minera! o para cocinar, Con un paso suave frote e! area y
permita que se remoje Enjuague y seque bien Repita el procedimiento usando un
pulidor para estufas para asegurarse que el homo no se dane Esto deberia hacerse
antes que la estufa se encienda por primera vez, La cinta no se puede sacar una vez
que el homo ha sido calentado. La cinta de empaque se puede encontrar en tas
siguientes &teas: Superficie de la cubierta, Manilla de la puerta, Area deI panel de
control, Area del homo, y Moldura de la puerta
46
OPERACION
CSmoCocinarSobreUna
CubiertaRadiante
Use ollas y woks que tengan fondo plano.
El tamaSo de los utensilios deberian ser
del mismo tama5o que ia zona que se esta
usando para cocinar
Antes de usar su nueva cubierta para
cocinar radiante, limpiela con Cooktop
Cleaning Creme e Esto dejar_ una capa
protectora
'1
_ Tama_ode
_# la zona para
Fondo
___
i ' ,u,,,,,
de la olta
_
_, cocmar
I
Las ollas deberian tener fondo piano
Las zonas para cocinar se muestran con
un dibujo sobre el vidrio. La serial cerca
de cada perilla de control le muestra cu&l
zona radiante se enciende con esa perilla
Cbmo cocinar en un wok
Recomendamos que usted use s61o un
wok de fondo plano Se pueden encontrar
en su tienda local
bOO
erecha
trasera
O0
O0
,=,,.,ie,-da00
trasera
Izquierda
delantera
=_
No use woks que tengan anillos de
soporte, El uso de estos tipos de woks,
con o sin los anillos en su lugar, puede set
peligroso,
El colocar el anillo sobre la unidad de la
superficie causar& un aumento de calor
que daSar& la cubierta de porcelana, No
trate de usar tales woks sin los anillos
Usted se podria quemar seriamente si
el wok se da vuelta
O0
OO
Derecha
delantera
Una [uz indicadora de superficie
caliente se prendera cuando se
encienda cualquier elemento radiante,
y permanecer_, prendida hasta que la
superficie se haya enfriado a
aproximadamente 150°F
_//
Use sblamente woks de fondo piano.
47
OPERACION
CSmoCocinarSobreUna
CubiertaRadiante (cont,)
Acero inoxidable: Aftamente
recomendado para uso con su nueva
cubierta para cocinar, Especialmente
bueno con un fondo de tipo doble,
Aluminio: Se recomienda los utensilios de
aluminio pesado
1. Asegurese que ta olla est_ centrada
sobre et quemador
2.
Aseg_Jreseque la olla sea de fondo
piano
3.
Use recetas y procedimientos de
buenas fuentes Estas se encuentran
disponibles de fabricantes tales como
Ball® y Kerr_ y el Servicio de Extensi6n
del Departamento de Agricultura
4.
Hierro forjado: Las ollas de hierro forjado
que son comptetamente cubiertas con
porcelana son recomendadas Las oltas
de hierro forjado que no son cubiertas con
porcelana podrian rayar la superficie de
vidrio cer&mica de la cubierta
Fondo de cobre: Tiene buena eficiencia,
pero podria dejar un residuo sobre la
superficie de la cubierta
Tenga cuidado, cuando haga
conservas, para prevenir quemaduras a
causa de vapor o calor
Si usted no sabe
Vidrio cer_mica o piedra: Utilizable
Verifique la existencia de bordes rugosos
o asperezas ya que podrian rayar ta
superficie de la cubierta
_ _ ..... ,,, ,,, ,I
Cuando las perillas estan encendidas, los
espirales bajo el vidrio irradian calor a
traves del vidrio hacia el utensilio para
cocinar, Tomara ratios unos pocos
momentos para que los espirales se
catienten; a medida que 1ohacen se
puede ver una irradiaci6n roja sobre ia
superficie de la cubierta para cocinar
tienen
fondo
si sus utensflios
_
]
piano, haga esta
pruebar lnvierta
la olla sobre la cubierta, coloque una
regla sobre la superficie de la oila. Haga
girar ta regla en un circulo completo,
revisando mientras la da vuelta cualquier
espacio que podria existir entre tas dos
superficies. El fondo de ta o!ta y el filo de
la regla deberian coincidir uno sobre el
otro a traves de todo el largo,
Cada unidad de superficie radiante tiene
un timitador de temperatura
El limitador de temperatura protege la
cubierta de vidrio para que no se ponga
demasiado caliente
El limitador de temperatura puede causar
que fas unidades hagan un ciclo de
encendido y apagado por un tiempo si:
• La olla se seca
, El rondo de la olla no es piano
• La olla no esta centrada
• No hay una olla sobre la unidad
48
OPERACION
CSmoCocinarSobre Una
CubiertaRadiante (cont.)
(Por modelos 95582, 95587, 95589
solamente)
HI
Se usa para comienzos r&pidos,
ta) como para hervir agua
MED
Se usa para hervir y frelr.
LO
Se usa para comidas at vapor o
para mantener los alimentos a
temperaturas para ser servidos.
Et etemento frontal derecha tiene dos
zonas para cocinar:
Zona de 6" para
utensilios
Zona de 9" para
utensilios
grandes
1, Empuje parahacer
girar Ia perilia
.
Coloque entre las
maroas para et
Para usar la zona para
cocinar grande de 9",
empuje ta parte superior del
interruptor al lado de ta peritla
6"
9"
de control y empuje ta perilla de control
para hacerla girar a ta posicion deseada
[LLJ
Para usar la zona para cocinar pequeha de
6", empuje la parte inferior del interruptor y
empuje la perilla de control para haceda
girar a la po_ici6n deseada
_
OFF
La luz indicadora de superficie se
encendera carla vez que una zona
para cocinar es activada
49
OPERACION
ControlDel Homo, Reloj, y
CronSmetro
OFF
"_
ov_o, #'flail
<_I_'TL-...>
t_ "I"
;dll
OVENCLE.iit'tlNG
-
O_
z_cr_,_Tc,_Ior_0,_'r<
OTU_._OV_DBTO"CZ.r._',.
,/
Las operaciones del RELOJ, CRONOMETRO
y f&ciles de entender
y HORNO en su nueva estufa son simples
El bot6n con las ffechas para las HOP,AS/
MINUTOS le permite seleccionar la hora
exacta que necesita
El interruptor de la luz del homo enciende
o apaga la luz interior def homo.
A medida que usted lea su manual,
encontrar& et prop6sito de cada uno de
estos indicadores y c6mo le ayudar6n a
entender su nuevo control
Toque ta flecha hacia abajo para mostrar
la temperatura seleccionada del horno..
El dial mostrar_,:
I,
E1RELOJ para fa hora del dia.
2.
La cantidad de tiempo que ha
seleccionado cuando use el
CRONOMETRO
Si la hora del dia se muestra en e! dial,
empuje el bot6n del RELOJ dos veces
Para activar nuevamente el dial del Reloj,
empuje el bot6n del RELOJ dos veces.
3. Cuatquier funci6n demorada o tiempos
programados para cocinar,
50
OPERACION
ControlDel Homo, Reloj, y
CronSmetro(cont.)
Cuando la electricidad a la estufa se
prende pot primera vez, o si ocurre un
corte de corriente, el dial hat& pestar_ear
"PF". Si empuja el bot6n CLOCK
(RELOJ), el dial bar& pestafiear "12:00"
Toque el bot6n CLOCK (RELOJ)
nuevamente y siga 1as instrucciones para
programar el reloj. Cualquier operaci6n
programada antes del corte de corriente
tendr& que ser reprogramada
Si el control hace pestafiear una "F"
seguida de un nOmero y un tono continuo,
existe un error en el c6digo de la funciSn.
Tome nota def numero despues de la "F"
Ponga la PERILLA DEL CONTROL DEL,
HORNO en la posici6n de APAGADO
(OFF), Desconecte toda la electricidad
hacia la estufa pot Io menos 30 segundos
y trate nuevamente la funci6n del homa
Si la "F" aparece durante la funci6n de
autolimpieza, revise el cerrojo de la puerta
del homo AsegDrese que el cerrojo est&
empujado Io m&s posible hacia la
derecha, Haga girar la PERILLA DE
CONTROL DEL HORNO a la posici6n de
APAGADO. Permita que el homo se enffie
por una hora y pruebe la funci6n del
homo nuevamente Si et problema se
repite tlame para un servicio Dfgale al
t6cnico que codigo estaba pestaSeando
Como medida de precauci6n este homo
se apagar& autom&ticamente si se deja
prendido pot m&s de 12 horas
Para activar o deactivar el apagado
autom&tico, toque y sujete los botones
con las flechas para SUBIR y BAJAR
los MINUTOS por 4 segundos,
51
OPERACION
Relojy CronSmetro
|1t@[]
@@
Despu_s de soltar los botches de
MlN o HR, la luz indicadora del
CRONOMETRO pestaSear& de tres a
cinco veces La cuenta hacia arras
empezara autom_ticamente La luz
indicadora del CRONOMETRO
permanecer& encendida hasta que la
cuenta llegue a cero
®®ti F-rT/ft'l'
Oo
°
,
Cuando el cronOmetro empiece la cuenta,
usted podria apretar el botch del RELOJ
para volver a la hera presente del dia
Ai final de la cuenta e! control empezara
a sonar y la luz indicadora def
CRONOMETRO empezara a pesta_ear
Empuje el boton TIMER ON/OFF (BOTON
DEL CRONOMETRO)
Empuje et botOn para RELOJ
(CLOCK) hasta que empiece
a pestafiear.
@
Empuje los botones con las
flechas para SUB1R o
BAJAR las HORAS/
MINUTES para poner la hera
det dfa,,
Si usted vacila cuando est& empujando
los botones, las luces indicadoras
del dial y de! cron6metro pestafiear_n
3 veces y el dial votver_ a mostrar la
hera del dla. Si este sucede, empuje el
botbn TIMER ON/OFF para empezar
guevamente.
Toque el botch del RELOJ
(CLOCK).
El cron6metro se usa para medir el
tiempo de los procesos para cocinar u
otras actividades de ta cocina, No controla
el homo, Se puede programar hasta 11
horas y 59 minutes Contar& hacia atr&s
en minutes hasta que llegue a los
ULTtMOS 60 SEGUNDOS, entonces
el control dar_ unpito. Cuando la 60
SEGUNDOS, entonces et control dar_. un
pile Cuando la cuenta tlegue a CERO, el
control dar_, 3 pitos seguidos de unpito
cada 6 segundos hasta que el botch
CLEAR/OFF sea tocado
Si usted decide cambiar fa cantidad de
tiempo:
Si la cuenta se muestra en el dial, empuje
los botches con las flechas para SUBIR o
BAJAR las HORAS!MINUTOS
Seleccione [JRnuevo tiempo,,
Si e! re!oj de la hera del dia aparece en el
dial, empuje el botOn TIMER ON/OFF
Entonces empuje uno de los botones con
las flechas para SUBIR o BAJAR las
HORAS/MINU'[OS
Seleccione un nuevo
tiempo_
(CRONOMETRO).r
1.. OFF
Empuje
el bot6n TIMER ON/
Mostrar& "0:00" y la luz
indicadora del
CRON6METRO empezar& a
pestar_ear
Si la cuenta seve en el dial, simptemente
cambie el tiempo, Si no se ve, empuje el
botOn TIMER ON/OFF, tuego empuje el
bot6n TIMER ONIOFF para cancelar,
2. Toque los botches con tas
flechas para SUBIR O
BAJAR los MINUTES para
seleccionar la cantidad de
tiempo
52
OPERACION
ComoHornear
El homo se encender_, inmediatamente
y cocinara por la cantidad de tiempo
selecoionada. AI fin del tiempo para
cocinar, el homo se apagara
autom&ticamente.
1. Haga g#ar JaPERILLA DE CONTROL
DEL HORNO a la temperatura que
desea usar el hornear., La luz
indicadora "OVEN ON" (HORNO
ENCENDIDO) se encender&.
Cuando el homo haya alcanzado la
temperatura seleccionada el tono de
precalentamiento sonarQ y el indicador
de "PRECALENTADO"
(PREHEATED) se encendera,
2. Cuando termine de homear cofoque la
PERILLA DE CONTROl.. DEL HORNO
en la posici6n de APAGADO (OFF).
1, AsegQrese que el reloj este mostrando
la hora correcta de! dia
2. Empuje el boton COOK TIME ONIOFF
3. Empuje los botones con las flechas
para SUBIR y!o BAJAR las HORAS/
MINUTOS para programar la cantidad
de tiempo para cocinar
4. Haga girar la PERILLA DE CONTROL
DEL HORNO para seleccionar la
temperatura que desea usar
Las luces indicadoras de HORNO
ENCENDIDO y HORNO EN
AUTOMATICO se encender& Cuando
la temperatura dentro def homo Itegue
a la temperatura que usted ha
seteccionado la luz de
PRECALENTAMIENTO se encender&
TABLA PARA LA POSiCION DE
LAS PARRILLAS
PARA HORNEAR
TIPO DE COMIDA
Pasteles
congetados (sobre
bandejas para
gaIletas)
Queque "angSt"
food", o queques
Pancillos, panes
dulces, "muffins",
"brownies",
gatletas, quequitos,
tortas, pasteles
Cacerolas
Pavo o Asado
POS!C|ON DE PARRILLA
4
5. Cuando se termine de hornear, el
control sonar& y la luz indicadora de
HORNO AUTOM_.TICO pestaSearan
hasta que la PERILLA DE CONTROL
DEL HORNO se coroque en la posici6n
de APAGADO (OFF)
3o4
3o 4
3o4
1
.....
53
OPERACION
ComoHornear
(cont.)
7o Cuando se ltega a la hora de comienzo,
el homo se encender_ automaticamente
y empezar& a cocinar Cuando ta
temperatura dentro del homo IIegue a la
temperatura que usted ha seleccionado
la {uzde PRECALENTAMIENTO se
encender_ La cantidad de tiempo
programada para cocinar contar_ hasta
cero y sonar& un tono y tuz indicadora
AUTOMATIC OVEN pestaSeara,hasta
que [a PERtLLA DE CONTROL DEL
HORNO se coloque en posici6n de
APAGADO (OFF)
NOTA: Despu6s que empuje fos botones
COOK TIME o START TIME, si usted vacila
cuando est_ empujando los botones con
las flechas para HORAS O MINUTOS, el dial
pestahear_ 3 veces y volver& a la hora del
dia Si esto pasa, repita Ia operacion para
continuar
Usted puede programar el control del homo
para que el homo comience en forma
demorada Cocine pot una cantidad de
tiempo especifica, y entonces se apague
autom_ticamente
1. Asegurese que el reloj este mostrando la
hora correcta del dia
2. Empuje el bot6n COOK TIME ONIOFF
3. Empuje tos botones con las flechas para
SUBIR y[o BAJAR las HORAS/
MINUTOS para programar la cantidad
de tiempo para cocinar
4. Empuje el botSn START TIME ONIOFF
5. Empuje los botones con las flechas para
SUBIR y/o BAJAR las HORAS/
MINUTOS para programar la hora de! dia
en que desea que el homo se encienda
6. Haga girar la PERILLA DE CONTROL
DEL HORNO para seleccionar la
temperatura que desea usar
Las luces indicadoras DE HORNO
ENCENDIDO y HORNO EN
AUTOMATICO se encender&
54
OPERACION
ConsejosPara Cocinar
En E1Homo
Si abre la puerta para mirar los atimentos
causar& una p_rdida de calory malos
resultados cuando hornee
Es normal sentir un poeo de olor cuando use
su homo pot pfimera vez Para ayudar a
eliminar este olor, ventile la habitaci6n
abriendo una ventana o usando una
campana de ventilaci6n
El precalentamientoes subir fa temperatura
def homo a la temperaturaque va a usar
cuando homee. Permita que et homo se
precatiente bien cuando tas recetas requieren
precalentamiento
IMPORTANTE: Nunca cubra el rondo de]
homo o la parfilla del homo con papel de
aluminio. E!uso inadecuado puede causar una
mala circulaci6n det cal?r, pobres resultados at
hornear, y podria da_,aret acabado det homo
Para prevenir manchas a oausa de derrames,
usted pedria poner un pedazo de pape[ de
aluminio o una bande}a pata galletas debajo
de la comida que se podria subir
_" /.,-J
b .....
U
Para prolongar la vida det ioco de la tuz del
homo, siga estos consejos: Siempre apague ia
luz cuando el homo no est6 en uso 6 durante
un cicto de limpieza Si la luz del homo se deja
encendida por un largo periodo de tiempo, el
homo estar_ tfbiocuando abra la puerta
debido al calor generado por el foco de ia luz
del homo
L_.,_ "_
La mayoria de las recetas para homear han
sido desarrolladas utitizando productos con
un alto eontenido de manteca talescomo
mantequilla y margarina (80% de manteca
por peso--el requerimiento tederat para !os
productos marcados "margarina") Usted
obtendr& matosresultados si los queques,
pasteles, tortas, galfetas, o dufces son hechos
con mantequitiacon bajo contenido de
manteca Las mantequillas y margafinas con
bajo contenido de acei/e contienen menos
manteca y m_.sagua E! alto contenido de
agua de la mantequilla o margarina afecta la
textura y el sabor de sus recetas para flomear
favoritas Mientras m&s bajo sea el contenido
de manteca de ta manlequilla o margarina.
m_s se notar_n estas diferencias Para
asegurar*losmejores resultados, use
margarina, mantequilla u otras barras de
estos productos que contengan pot lo
menos 70% de aceite vegetal
,,,,,,,,,_
La ventilaci6n del homo est& ubicada debajo
def elementoposterior derecho Esta &tease
podria calentar mucho durante el uso del homo
Es normal que salga vapor de la ventilaci6n y/o
que se acumule humedad debajo cuando el
homo est_ en uso. La ventilaci6n es importante
para la circulaci6n adecuada del aire Nunca
obstruya la ventilaci6n.
Ubicaci6n de
ventilacibn
del homo
55
OPERACION
Consejos Para Cocinar
EnEl Homo(cont.)
El Sensor de Temperatura del Homo mide
y controla continuamente la temperature
dentro del homo Pare mantener una
temperatura programada constante, tos
elementos har_.n un ciclo de encendido (se
prenden y se apagan durante la cocci6n)
Los resultades del homeado ser_ meier si
tas cacerolas para hornear est_n centredas
en el homo lo m&s posible Si est_
horneando con m_s de un utensilio,
cof6quetos de manera que cada uno tenga
per Io menos de l" a 1_4"de espacio de aire
a su alrededor Si est& homeando cuatro
queques al mismo tiempo, coloque dos
queques en la parrilla 2 y dos queques en
fa pardlla 4 Coloque los utensilios de
manera q_.Jeninguno quede directamente
encima de otro
Las parrillas del homo estan disefiadas con
topes, una conveniencia y tambien una
precaucidn de seguridad Las guias tienen
una tope para prevenir que las parrillas se
den vuelta Este dise,fio permite que las
parriltas puedan ser insertadas de s6!o una
manera
Tope en las gulas
para
las parrillas
Su homo tiene six (6) posiciones La
posicidn de m_s arriba es solamente una
guia No puede ser usada come posici6n
para una parrilla
Gules
1
_
'
'
{
J
';I
5
,1'
I_
4
i ,t
5
4
.
!°,,
g
3
BANDEJAS BAJAS PARA GALLETAS, sin
lades permiten que e! aire circule alrededor
de tas gaHetas para que se doren en forma
pareja
1
Siempre coloque las parrillas del homo
en la posici6n correcta cuando el horno
est_ frio.
LOS UTENSILtOS BRILLANTES refteian
e! cafory son perfectos para queques y
paneciIlos rapidos que deben quedar
levemente dorados.
PRECAUCION: Cuando usted est_ usando
ta parrilla en la posici6n m_s baja (I),
necesitar_ tener cuidado cuando saquela
parrilla Recomendamos qua tire la parriIla
varias pulgadas hacia afuera y entonces.
usando dos agarraderas, tire la parriHahacia
afuera sujet_ndola de los lades La parrilla
est& baja y usted se podrla quemar si coioca
la mane en el medio de la parril]a y la saca
comptetamente hacia afuera Tenga cuidado
de no quemarse la mane en la puerta
cuando use una parrilla en la posicbn mas
baja (t)
LOS UTENSILIOS DE VlDRIO,
CONTRAPEGADURAS O OSCURECIDOS
PeR LA EDAD, absorben calor y pueden
set usados para panes con tevadura,
cortezas para pasteles o alimentos que
necesitan tener una corteza de color care.
La temperatura del homo cuando use estos
utensilios debefla ser reducida en 25" F
56
OPERACION
Luces indicadoras:
ConsejosPara Cocinar
,, Luz indicadora de,
PRECALENTAMIENTO - se prende y
permanece encendida cuando el homo
haya alcanzado la temperatura
seleccionada
En El Homo(cont.)
• Luz de HORNO ENOENDIDO (OVEN
ON) - se prende y permanece
encendida cuando la funci6n de
homear, asar, o timpiar ha sido
seleccionada.
Usted podria pensar que su homo nuevo
cocina diferentemente al homo que
reemplazo Le recomendamos que use
su homo nuevo por varias semanas para
que se famitiarice m&s con _1,siguiendo
los tiempos que se dan en la receta como
una gut& Si cree que su homo est&
funcionando demasiado caliente o frio
para su preferencia, vea Ajustes-H&galos
Usted Mismo en Ia parte de atr&s de este
manual para hacer los ajustes
• La luz del LIMPIAR (CLEAN) - se
prende y permanece encendida para la
autotimpieza, Si la luz de[ LIMPIAR
pestaRea, revise uno de Io siguiente:
1. La manilla de! cerrojo est& cerrada
durante la funci6n de hornear
2.
NOTA: En algunos modelos, la perilla
de control del horno deberia ser
empujado hacer girar.
Et control de su homo tiene una peri!la
para seleccionar Homear, Asar o Limpiar,
Simplemente haga girar la perifla a la
posicion de temperatura que usted desea
para ASAR o LIMPtAR
OFF
57
La manilla del cerrojo no estb cerrada
durante la funci6n de autolimpieza
OPERACION
El Departamento de Agricultura de los
Estados Unidos recomienda cocinar la
came y las ayes completamente--la came
a un calor INTERNO de por Io menos
160° F y las ayes a un calor tNTERNO de
por Io menos 180° F, El cocinar a estas
temperaturas generalmente protege
contra enfermedades causadas por los
alimentos
CSmoAsarA La Parrilla
Asar es cocinar al calor directo det
elemento superior. La puerta def homo
deberia permanecer abierta en la posici6n
de tope para asar cuando ase a ta parrilla
Mientras m_s cerca cotoque los alimentos
del elemento para asar, m&s rapido se
dorar&n por afuera, pero quedando rojo
o rosado en el centro
Cotocando las carnes lejos del elemento
permitir& que las carnes se cocinen en
el centro mientras se doran por afuera
Usando estas posiciones, cocine et lado
1 por lo menos 2 minutos m,&sque e!
lado 2 Si su homo est., conectado a 208
voltios, usted podria usar una posiciOn de
parritla m_s alta y/o cocinar los alimentos
pot mas tiempo,,
El tama5o, peso, grosor, temperatura
initial y su preferencia personal afectar,_ el
asado a la pard!la Esta tabla est& basada
en carnes a la temperatura del
refrigerador
No es necesario precalentar el homo
cuando ase a la parrilla Use ta cacerola
y fa parrilla para asar que viene con su
estufa Ambas est&n diseSadas para
drenar adecuadamente la grasa y los
liquidos
Ponga la PERILLA DE CONTROL
DEL HORNO en BROIL
debe ser moldeado
Si usa papel ade
firmemente
la aluminio,
parrilla y
debe hacer cortes en el
papel que est6n alineados con las
ranuras de la parrilla. Esto permite
que la grasa y los liquidos caigan a
la cacerola, evitando que se
produzca un incendio y humo
excesivo.
2. Cuando termine de asar, ponga la
PERILLA DE CONTROL DEL
HORNO en la posici6n de APAGADO
(OFF)
Siempre saque la cacerola y la
parri!la del homo. Guardar y oMdar
una cacerola para asar
sucia en el homo es un
peligro para producir
un incendio o humo.
,
,.-_
.,,..._
_o_"
,, _ =,.,."<'_--L_:_'"
58
OPERACION
CSmoAsarA LaParrilla (cont.)
GUIA PARA ASAR (Hi Broil)
CANTIDAD Y/O
GROSOR
ALIMENTO
Camemolida1ib(4tetras)
Biencocinada½"a 3A"degrueso
4 Ibs (12tetras)
Bistecs
C_udos
t
¾"a 1"grueso
Medianos
1a 1½lbs}
Biencocidos
P'R"i'MERtSEGUNDO
POSlCION LADe I LADe
DE
TIEMPOI TIEMPO
COMENTARIOS
PARRILLA
(MIN.)I fMIN,)
4
Sep_re!os
parejamente
I3 i" ;
15
I
11
6
5
5
8
6
Cludos
t
1½"
grueso
Medianos (2a 2½lbs)
Biencocidos
4
4
5
10
15
20
8
10-12
20
Polio
3
25
25
3
25
15
5
6
3
3-4
1 entero,codado
(2 a 2½
:lbs),codea Iolargo
Pechuga
°!'
'
Losbistecsdemenosde=A"son
dificilesdecocinarcrudos
Cartela grasa
I
Pongamantequifla
derretida
encada
ladeconunabrochaAsecontapie]
haeiaabajoprime_o.
Productos
de
panaderia
Pan(tostade)
2 a 4 tajadas
o pancit!os 2 (corlados)
ingleses
2a4
Colasde
langostas (6 a 8oz cadauna)
Pescado
Saim6n
Bistecs
Filetes
1
Separe
parejamente
Ponga
los
pancillos
ingleses
ladee×tedor
hacia
arribayaplique
mantequilla
conuna
brocha,
s!desea,
18-20 I No[asd_ Codea tray,sdelapartetrasera
deta
vuetla concha,
AbraPongamantequilla
de_etida
conunabrocha
antesde
asary a media
asar.
I
5
1 lb Fileles_A"a ½"gfueso
5
T6melos
yd_fosvueltaconcuidado
Ponga
mantequiUa
delim6nantesy
du_n!e.e!,.cocinado,
siclesea..........
D_vueltacuidadosamente
No
pongala pielhaciaabajo
I
2(1"grueso)
2 (_"a _" grueso)
'/z"grueso
I" grueso
(precocinadas)
Chutetas
de 2 ('h"gr_eso)
cerda
2 (I" grueso)
aproxt lb.
Biencocidas
Tajadas
de
]am6n
Chuletasde
cordero
Medianas 2 (I"grueso),
aprox
10a12oz.
Biencocidas
Medianas 2 (1½"grueso)
aprox.IIb.
Biencocidas
5
5
t0
10
5
4
4
6
B
6
8
4
4
t0
15
10
15
Cartela grasa
5
5
5
5
7
10
9
14
4
g
6
10
Codela g_'asa
i
59
CUIDADOYLIMPIEZA
El Ciclo De Autolimpieza
El sello de la puerta est& diseSado para
que tenga un espacio de 5"-6 ° en et fondo
del homo Esto permite la circulaci6n
adecuada deI aire
Saque ta cacerola y Ia parriIla para
asar, utensitios y cualquier paper
de aluminio que podria quedar en
el horno.
Panel de la puerta
2o Si su homo estA equipado con parrillas
de niquel, las mismas deben ser
removidas Si su homo est_ equipado
con parrillas cubiertas de porcelana
gris, las mismas deben ser removidas
durante e! ciclo de limpieza autom_tica.
3.
Selio
Revestimiento de la puerta
Es normal que su homo de la apariencia
de no tener un buen selio sobre el homo
Esto se debe al sello, La ubicacion del
sello sobre la puerta mantiene ta puerta
sellada y previene cualquier perdida de
calor.
La suciedad sobre el marco frontal
y afuera del selto del revestimiento
de la puerta necesitar_ ser timpiada
a mat3o
Marco frontal
t
Los utensilios nunca se
deberian dejar dentro del
homo durante un ciclo de
autolimpieza.
Las parrillas de niquel del homo se
podrian limpiar durante el ciclo de
autolimpieza, pero perderdn su brillo
y se pondr&n:dificiles de deslizar. Si
decide dejarlas dentro durante el
ciclo de limpieza, p,_seles aceite
vegetal para que se deslicen m_s
fdcilmente.
Sello
Revestimiento
de la puerta
Limpie estas &reas con agua caliente,
ianiHas con jab6n o timpiadores como Soft
Scrub e para sacar cuafquier suciedad
Enjuague bien con agua limpia y seque
Las parrillas cubiertas de porcelana
gris pueden ser limpiadas con
seguridad en el interior del horno
durante el cicto de limpieza
autom_tica. Ser_ necesario para
engrasar los extremos de la parrilla
del homo con una capa ligera de
aceite vegetal despu6s de un ciclo
de limpieza. Esto ayudar_ a que se
haga f_cil deslizar los estantes o
rejillas en el homo.
No use limpiadores de homos - Ning0n
limpiador de hornos para usos comerciales
o revestimiento de protecci6n debe set
usado en el interior o alrededor del homo.
.
Limpie cualquier derrame pesado del
rondo del homo.
5o No timpie el sello El material de fibra
de vidrio de ta puerta del homo no
soporta Ia abrasi6n Es esencial que
el sello permanezca intacto Si usted
nota que se est& gastando o trizando,
deber[a set reemplazado.
Durante el primer ciclo de limpieza,
ventile la habitacibn con una
ventana abierta o una campana de
ventilacibn. Esto evitar& el olor
fuerte producido pot el
calentamiento de tas partes nuevas.
6O
iiiiii iiii
i
i
i_I
CUIDADOYLIMPIEZA
E1Ciclo De Autolimpieza
(cont.)
1. Aseg_rese que se yea la hora correcta
del dia
2.
Para mejor resultado, siga los pasos
para PREPARAR SU HORNO
3,
Si la manifla no se ve, levante ia cubierta
superior y tire ta mani!la Io m,_safuera
posible
4. De vuelta fa PERILLA DE CONTROL a
"CLEAN" (LIMPIEZA) Las luces
indicadoras del LIMPIEZA (CLEAN) y
de HORNO ENCENDtDO (OVEN ON) se
encender_n
1. Para mejor resuitado, siga los pasos
para PREPARAR SU HORNO.
2. Si la mani{Ia no se ve, levante ta cubierta
superior y tire Ia manitia Io m_s afuera
posible
&
Para poner eJciclo de limpieza empuie
el botCn START TIME ONIOFF
&
,
Empuje {os botches con las fiechas para
SUBIR y/o BAJAR las NORAS/
MINUTOS para programar la hora del
dla en que desea que el ciclo comience
7. Cuando el ciclo de limpieza termine, las
luces indicadoras "OVEN ON" y
"CLEAN" pestaSearan Cobque ta
PERILLA DE CONTROL DEL HORNO
en la posiciCn de APAGADO "OFF"
De vuelta ta PER1LLA DE CONTROL a
"CLEAN" (LiMPIEZA) Las luces
indicadoras del LIMPIEZA (CLEAN) y
de HORNO ENCENDIDO (OVEN ON)
se encender_n
Si CLEAN pestaSea en el dial, la puerta
no est& enganchada campletamente.
Simplemente empuje la manilla a la
posiciCn de cierre
,
El cicto de limpieza dura 4 horas y
20 minutos, esto incluye un perbdo
de enfriamiento Su usted cambia a
cuaiquier tiempo de 3 horas a 5 horas
y 59 minutos empuje los botches con
/as flechas para SUBIR o BAJAR las
HORASlMINUTOS
Haga girar la PERILLA DE CONTROL DEf.
HORNO a ta posiciCn de APAGADO Espere
(aprox 1 hora) antes de tratar de abrir la
puerta La luz indicadora no pestaSear_ si el
ciclo se detiene
Cuando la puerta se cierra con
cerrojo, las luces indicadoras CLEAN
(LIMPIEZA) y OVEN ON (HORNO
ENCENDIDO) se encender_n La
temperatura del homo debe bajar a
menos de Jatemperatura de cierre
antes que la puerta se pueda abrir.
Los indicadores de CLEAN y
OVEN ON pestafiear_n al fin del ciclo
.
Despues del cicto usted podria notar un
poco de cenizas btancas en el homo
Simplemente limpielas con un pa5o o
esponja h0meda,
Si algunas manchas bfancas persisten,
frieguelas con una Ianilla con jab6n
Aseg_Jresede enjuagar bien Es{as son
generalmente dep6sitos de sal que no se
pueden sacar durante e{ ciclo
Haga girar la PERILLA DE CONTROL
DEL HORNO a la posiciSn de
APAGADO y s_quele e! cerrojo a la
puerta
Si per alguna razCn usted no queda
satisfecho con los resultados de la
limpieza, simplemente repita el ciclo.
61
CUIDADOYLIMPIEZA
Residuos
CSmoLimpiarLa Cubierta
ADVERTENClA: Puede causar DAIRIOS
a La superficie de su cubierta si utiliza
esponjillas diferentes alas esponjillas
AZULES anti-rayas Scotch-Brite e
Multipurpose No Scratch de 3M
De Vidrio-Cer6mica
En modelos con vidrio cer&mico blanco o
blanco arena, es normal que la superficie
se vea descolorida cuando las zonas para
cocinar est&n calientes. Esto es
moment&neo y desaparecer& cuando et
viddo se enfrie La limpieza de la cubierta
de viddo cerAmico es diferente a la
limpieza de la cubierta de porcelana
comun Para mantener y proteger la
cubierta de vidrio ceramica siga estos
pasos b_sicos
1o Deje que la cubierta se enfrie
2o Esparza unas cuantas gotas de la crema
limpiadora en toda el &rea de residuos
quemados.
3. Utilice la esponjifta, _
frote el &rea de los
_
residuos, apficando
,... _
presi6n segun sea
,__
necesano
4.
$61o ulilice la crema para limpieza de
superficies de cubieria de vidrio cer&mico
(Cooktop Cleaning Creme _)
Limpieza
quemados:
//
_
S
Si algun residuo permanece, repita los
pasos anteriores seg0n sea necesario
5. Para protecciOn adicional, despues de
que todos los residuos se hayan retirado,
brilte toda la superficie con la crema de
limpieza y una toalta de papel,
del uso diario normal:
Residuos
Para mantener y proteger la superficie de
su cubierta de vidrio cer&mico siga estos
pasos b&sicos
fuertemente
quemados:
1. Deje que ta cubierta se enfrie
2. Esparza unas cuantas gotas de la crema
limpiadora en toda el area de residuos
quemados
1_Antes de usar la superficie de tacubierta
pot primera vez, limpiela con la crema
Cooktop Cleaning Creme ® Esto ayuda
a proteger la superficie y hace que la
limpieza sea m&s f_cil,
3. Sostenga el raspador de cuchitla a un
_.ngulo aproximado de 45 ° contra la
supefficie de vidrio y raspe ta quemadura
Sen&necesario aplicar presbn al raspador
para remover los residuos
2. El uso diado de la crema le ayudar_, a
mantener ia apariencia de la cubierta
siempre como nueva
3. Agite muy bien ta crema de limpieza
Aplique unas gotas de la crema
directamente en la superficie de
la cubierta
4. Use una toa!la de papel o una esponja
para limpiar ta superficie completa de
ta cubierta.
NOTA." Et raspador no es proporcionado
con su producto
NOTA: Es muy importante que NO
encienda ta cubierta hasta que este
completamente limpia
4. Mantenga una pequeSa cantidad
de crema sobre el residuo a medida
que raspe
Limpie la superficie de la cubierta cada
vez que algo se derrame
5. Despues de utilizar el raspador de
cuchilla, utilice la esponjilla para retirar
cualquier residuo que quede
62
CUIDADOY LIMPIEZA
Setlante
C mo LimpiarLa Cubierta
Para limpiar el se!lante de ta superficie de
la cubierta alrededor de los bordes del
vidrio, ponga un pa5o humedo sobre Csta
pot unos pocos minutos, luego limpiela
con limpiadores no abrasivos,,
De Vidrio-Cer#mica (cont.)
6. Para protecci6n adicional, despues
de que todos los residuos se hayan
removido, brille toda la superficie con
fa crema limpiadora y papel toalla
NOTA: La hoja de ta cuchilla viene
empacada de forma invertida por razones
de seguridad.. Antes de su uso, se debe
rotar la cuchilla y reinsertarla dentro de
la ranura.
DaSos de derramamientos
y pl_stico
met_licas
de dulce
derretido:
1. Apague todas las unidades de ta
superficie_ Retire ]as sartenes calientes,
de un raspador no da_ar_
IMPORTANTE:
El uso
la superficie si se mantiene
un _ngulo de 45 grados. No
use una hoja de cuchilla sin filo o
desportillada en la superficie de la
cubierta. Mantenga el raspador de
cuchi|la fuera del alcance de los ni_os.
{_
Marcas
de ta cubierta:
2o Con un guante para homo
a. Utilice el raspador de cuchitla para
mover Io derramado a una zona fria
de la cubierta
b. Retire Io derramado con una toalla
de papel
y rayas:
3. Cualquier derrame restante se debe
dejar hasta que la superficie de la
estufa se haya enfriado
4, No vuelva a usar las unidades de la
superficie nuevamente hasta que todo
residuo se haya retirado por completo
1. Tenga cuidado de no deslizar olias y
sartenes en la superficie de la estufa
Esto dejar_ marcas met&licas en fa
supedicie de ]a cubierta.
Estas marcas pueden retirarse usando
crema ]impiadora con una esponja y/o
un raspador de cuchilla
NOTA: Si ya ha ocurrido una picadura o
hendidura en ta superficie de vidrio, el
vidrio de la cubierta tendra que ser
reemp/azado En este caso, un servicio
set& necesario.,
2. Si las oltas cubiertas por una capa
delgada de aluminio o cobre se dejan
hervir en seco, la capa puede dejar una
mancha negra en Ia cubierta
Esto se debe retirar de inmediato
antes de calentar la estufa de nuevo
o de Io contrario la mancha puede
ser permanente
ADVERTENCIA: Cuidadosamente
revise fa base de los sartenes en busca
de rugosidades que puedan rayar ]a
superficie de ia cubiert&
63
CUIDADOYLIMPIEZA
. Si las ollas con un enchapado de
aluminio delgado, de cobre o de esmalte
hierven cuando estan secas, se poddan
fundir con la superficie de la cubierta
Esta descoloracion negra deberia ser
sacada inmediatamente o podda set
permanente
CSmo Limpiar La Cubierta
De Vidrio-Cer mica (cont.)
. El uso de limpiadores de vidrio podrian
dejar una capa irridescente sobre la
cubierta, La crema para limpiar sacara
esta capa
A medida que la crema limpia, deja una
capa protectora que ayuda a prevenir la
acumulaci6n de dep6sitos minerales
(manchas de agua) y facilita la limpieza
futura El detergente para lavar platos
elimina la capa protectora y no se deberia
utilizar
- Las manchas de agua (dep6sitos
minerales) son removibles usando
crema y vinagre blanco a toda fuerza
o No use un raspador con una hoja
gastada o melfada sobre la cubierta
• No use limpiadores abrasivos o lanillas
abrasivas sobre la cubierta
• La mayoda de los limpiadores contienen
amonia, quimicos y abrasivos que dafian
la superficie de su cubierta, Use
solamente Cooktop Cleaning Creme e
para una limpieza adecuada y para la
protecci6n de la superficie de vidrio
cen_mica.,
- Se puede usar laniltas de plastico tat
como Dobie e,
Para ordenar Cooktop Cleaning Creme e
adicional, Ilame a su Centro de Servlcio o
tienda Sears m_s cercana, pida el Stock
No 40079
• Si usted arrastra el fondo de las ollas de
aluminio o cobre sobre ta superficie de
la cubierta, podria dejar marcas de
metal en forma de rayaduras Use el
raspador y la crema para la supefficie
para sacar estas marcas Si no saca
este residuo inmediatamente, podda
producir marcas permanentes
64
CUIDADO Y LIMPIEZA
C moLimpiar
MATERIALES DE LIMPIEZA
MATERIAt.ES
. Detergente liquido para platos
• Agua tibia
. Toallas de papef
DE LIMPIEZA
o Detergente liquido para platos
• Agua tibia
• PaSo suave
COMO LIMPIAR
No use limpiadores para hornos, polvos
para limpiar, o abrasivos fuertes, Si
safsas para sasonar, salsa de tomates,
materiales para batidos, etc, se
derraman, timpietos Io m&s posible
Cuando las superficies se enfden limpie
bien las superficies pintadas,
No use limpiadores abrasivos,
limpiadores industriales, o
blanquedores (cloro).
MATERIALES DE LIMP1EZA
• Detergente }iquido para platos
o Agua tibia
- Lanillas de acero con jab6n
• Limpiador comerciat para hornos
PAPA LIMPIAR
Para }impieza diaria, use un limpiador
para vidrios y una toalla de papel Para
suciedad pesada, use una pasta de soda
para hornear y agua Enjuague bien,
COMO L.IMPIAR
Permita que la cacerola se remoje Ponga
detergente para platos sobre la parrilla y
cubra con un paso o una toalla h0meda
pot un rato, Friegue a medida que sea
necesario Lave, enjuague, y seque bien
Usted tambi_n podda porter la cacerola y
la parrilla en la lavadora de platos.
MATERIALES DE LIMPIEZA
• Limpiador abrasivo suave
. Esponia-fregador
No use limpiadores abrasivos fuertes,
limpiadores industriales, o cloro.
Limpie solamente para retocarlas entre
ciclos de iimpieza Use detergentes
liquidos para platos, agua tibia, o laniltas
con jab6n. Enjuague bien despues de
Iimpiar y seque.
NUNCA USE LIMPIADORES PARA
HORNOS DENTRO O ALREDEDOR DE
CUALQUIER PARTE DEL HORNO.
Cuando limpie, asegurese de no doblar
o mover el sensor de la temperatura
ubicado en la pared trasera del homo,
65
CUIDADOYLIMPIEZA
Partes Removibles
el
poder el_ctrico Desconecte
hacia el
PRECAUClON:
homo en la caja del circuito
principal o en la caja de los fusibles
antes de tratar de reemplazar el foco
de la luz del horno_ No toque un foco
de la luz caliente con las manos
mojadas o con un pato h_'Jmedoo
Espere a que el foco se enfrie y use
un patio seco.
MATERIALES de LIMPIEZA
• Detergente para platos
• Agua tibia
• Pa5o suave
Cane! moldeado
Alambre
sujetador
_,
Collar con
electricidad
Ranura plana
en la carla
COMOSACAR
1o Aseg0rese que la perilta este en
posici6n de apagado
2. Tire derecho hacia afuera det tal!o
Cubierta
de vidrio
PARA REEMPLAZAR
Usando un pedazo de cuerda podria
facifitar el sacado de fa perilla, Ponga la
cuerda debajo y alrededor de la perilla,
y tire derecho hacia afuera
PARA
Coloque la mano bajo fa cubierta
y empuje el alambre sujetador
firmemente hacia atr&s, hasta que
pase pot encima y suelte la cubierta
del foco
LIMPIAR
Lave bien la perilla con agua con jab6n
Seque completamente con un paso suave,
NO permita que la perilla se remoje,
PARA COLOCARLA
,-_
NUEVAMENTE
2.
Desatornille el foco de ta iuz,
3.
Reemplace el foco con un foco para
hornos de 40 watts de 3V2"
4, Tire el alambre sujetador hacia
adelante hasta que caiga en la
indencion sobre la cubierta del foco
1, Mire la parte trasera de la perilta
2. El canat moldeado de fa perilla est_
diser_ado para quedar perfectamente
ajustado en el taflo de la perilla,
3. Coloque el canal moldeado en linea
con la ranura plana en el tallo de la
perilla Empuje la perilfa hasta Io m_s
atr,is posibie
66
CUIDADO Y LIMPIEZA
PartesRemovibles(cont.)
COMO SACAR
Cerradura
de bisagra
(Posicibn
abierta)
1, Abrala puerta
completamente
MATERIALES
2. Empuje los topes
de ?asbisagras
hacia abajo hacia
el marco de la
puerta, a la
posici6n de Salga
abierto, Esto
podria requerir un
destornillador de
cabeza plana,
DE LIMPIEZA
• Detergente para ptatos
• Agua tibia
• Lanas para fregar o lanilla con jab6n
Tope en
l_
las guias t%
Parte trasera
__
_
Brazo de la
Bisagra
3. Tome firmemente
los lados de la
puerta de arriba
COMO SACAR
1. Tire las parrillas hasta la posici6n
de tope
4. Cierre la puerta a la
posici6n de saque,
2. Levante el frente de la parrilla y
desiicela bajo el tope de la guia
para las parrillas
5,
PARA LIMPIAR
Levante la puerta
hasta que el brazo
de ta bisagra satga
de ta ranura,
Limpie con agua tibia y detergente. Para
sacar manchas duras, friegue tevemente
con lana para fregar o con una tanilia con
jab6n. Enjuague bien
Posici6n
de saque
COMO PONERLA
NUEVAMENTE
PARA COLOCAR NUEVAMENTE
1. Coloque la parte levantada de atr_s
de fa parrilla sobre las guias.
1. Tome firmemente
los dos lados de la
puerta de arriba
2, Levante el frente de la parrilla hasta
que la parte levantada de atr_s se
deslice pot debajo del tope de las
guias
3,
2.
Deslice la parrilla hasta atras
Con la puerta en
el mismo _nguto de
saque, coloque la
indencidn del brazo
de la bisagra dentro
del borde del rondo
de la ranura de la
bisagra
Ranura
del
Brazo
Borde de la
del
Bisagra
Fondo
(
Indenci6n
contint_a en la p&gina siguiente
67
CUIDADOYLIMPIEZA
COMO LIMPIAR ADENTRO DE LA
PUERTA
Partes Removibles (cont.)
Puerta
removible
del homo
Abra compretamente
fa puerta.
3.
• Debido a que el &rea dentro de] sello se
limpia durante el ciclo de autolimpieza,
usted no necesita limpiar esto a mano,
(conto)
Posici6n de
Cierre
o Et &rea afuera de] sello y el revestimiento
de la puerta se pueden limpiar con una
lanifla con jabon, agua caliente y
detergente Enjuague bien con una
soJuci6n de vinagre y agua
Empuje los topes de
las bisagras hacia
arriba contra el
marco frontal de la
cavidad del homo, a
la posici6n de cierre
4_
o
Cierre la puerta del
homo
COMO LIMPIAR
LA PUERTA
Brazo de
Bisagra Sellada
AFUERA
DE
• Use jab_n y agua para timpiar bien la
superficie, [ados, y frente de la puerta
de1 homo Enjuague bien, Usted tambien
podria usar un limpiador de vidrio para
fimpiar el vidrio exterior de la puerta No
permita que el agua gotee dentro de las
aberturas de la ventilaci6n.
• Los derrames de salsas para aliSar,
jugos de fruta, salsas de tomate, y
materiates para sasonar que contengan
_cidos podrian causar una
descoloraci6n y se deberian timpiar
inmediatamente Cuando la superficie se
enfrie, fimpie y enjuague
• No use limpiadores para homos, polvos
para fimpiar, o abrasivos duros en la
parte exterior de la puerta
• Si cualquier mancha sobre la moldura
de la ventiEaci0n de ta puerta persiste,
use un limpiador abrasivo suave y un
fregador de esponja para mejores
resultados,
68
CUIDADO Y LIMPIEZA
PartesRemovibles(cont.)
Sl EL CAJON NO ClERRA
El cordbn de la
electricidad
podria
estar obstruyendo
el caj6n en esta &rea
El caj6n no
se cierra
I_ completame
MATERIALES DE LIMPIEZA
• Detergente para platos
- Agua tibia
• PaSo hC_medo
El soporte trasero
del cajbn
est_
.
.
,
El panel de
frente del
pueszo soDre el
--- I_ ca'6n est_
rieldelaguia
_ ,._
_
Ill
,,.,=ra ae
/_
......................Hi llnea con e
COMO SACAR
1, Tire el caj6n hasta que se detenga,
2.
I
Z--7 ..................
11/I a.odel
Levante el frente del caj6n hasta que
los topes salgan de tas guias,
Riel
Sl EL CAJON
ESTA TORCIDO
El soporte de la parte
trasera del caj6n est& El panel frontal
sobre el riel de la gula del caj6n est_
en el lado alto
torcido hacia
:E
i el lado
Tope
Tope
Guia
,
,
,
,
,
,,
3o Saque el cajon
le ofrece espacio para
RECAUClON:
El caj6n
guardar utensilios para
cocinar y hornear, Los
materiales de pl&stico no se
deberian guardar en este caj6n. No
sobrecargue el caj6n. Si el cajbn est&
demasiado pesado, se podr{a salir
de! riel de la base cuando Io abra,
PARA LIMPIAR
_
Limpie por dentro y fuera del caj6n con
agua tibia con jab6n y un patio o esponja
h0meda No use abrasivos fuertes o lanas
para fregar sobre el caj6n
COMO
COLOCARLO
NUEVAMENTE
1. Ponga el riel del cajon sobre las guias
2.
Empuje el cajOn hacia atr&s hasta que
se detenga
3.
Levante el frente del caj6n y empuje
hacia atr_s hasta que los topes pasen
pot sobre las guias,
_,
4. Baje el frente del cajOn y empuje hacia
atr_s hasta que cierre.
69
ii
=€
ANTESDELLAMARPARAUNSERVICIO
Para ahorrar liempo y dinero, antes de llamar para un servicio, revise Jalista de m&s abajo
para cualquier problema que usted crea que tiene con el funcionamiento de su estufa Si
el problema es algo que usted no puede reparar, use los N0meros de Servicio para el
Consumidor que se encuentran al final de este manual Cuando haga un Ilamado, tenga
dlsponible el n_mero de modelo, nt3mero de serie, llsta de partes para reparaciones,
manual de uso y cuidado y la fecha de compra_
PROBLEMA
POSIBLE CAUSA
i
POSIBLE SOLUCION
,i
ii
i
II
i i i i i iiiiii ii iiiiii ii !!!1 ,l[j
I
Los controles de la
cubierta, horno y control
dei homo no funclonan.
No pasa electricidad a
la estufa
PequeSas rayaduras o
abrastones sobre la
cubierta.
a. Uso de materiales de
a. Use solamente Cooktop
timpieza incorrectos
CIeaning Creme e
b. Particulas _speras (sat,
b. Aseg,3rese que la
etc.,) entre el rondo de las
superficie de la cubierta y
otlas y Ia superficie para
el rondo de tas ollas esten
cocinar
limpias antes de usarlas
c_ Utensilios con fondos
c. Use s61o ollas de fondo
_speros.
suave
Marcas de metal en la
superficle de la cubierta
(pueden verse como
rayaduras).
Arrastrar o raspar los
utensilios sobre la
superficie de la cubierta,
Revise el circuito principal o
los fusibIes Asegtbrese que el
cord6n esta enchufado
i i
ii,,ll
illll
,,,,,,,,,,,,,,,,,,,,,,,
,,,,
I
iii1,,i,,,,iii,
,,,
_
................
Use el procedimiento
recomendado para limpiar la
superficie de la cubierta.
i'll_l,_lllUl,, I,I I
Areas de descotoract6n
sobre la superflcie
de la cublerta.
Dep6sitos de minerales
de agua o alimentos
Bandas y manchas
oscuras sobre la
superficle de la
cubierta,
a Derrames o
salpicaduras de
grasa incrustadas
a. Use un raspador a hoja y
siga fas direcciones en la
secci0n para fa lirnpieza
de este manual
b. Uso de materiafes
de limpieza
incorrectos,
b. Use sofamente Cooktop
Cleaning Creme e sobre la
superlicie de ta cubierta.
,,u,
=llmlullllllllluu
Las zonas para coctnar
de la cubterta funcionan,
pero el homo no
enciende.
u,= i i i
ii
Use procedimientos de
limpieza recomendados para
limpiar la superficie de la
cubierta,
i
=,illl i
ullll
illl ill
Controles del homo
puestos
incorrectamente
7O
uiHlll
=
,
Revise la secci6n de c6mo
cocinar en el homo y c6mo
colocar el control del homo
correctamente
ilu,ii,
La parrtlta del horno no se Las parriilas fueron dejadas
desliza con faciltdad,
en el interior del homo
durante el proceso de
limpieza autom&tica
i
i
ill,
,ll, i,i
P_,sele un trapo
parciaimente empapado con
aceite vegetal para limpiarlo
ANTESDELLAMARPARA
UNSERVICIO
jjlllllll
i
i
III
ii ,i
i1
iiii
ii1[i
La luz del homo no
funciona.
I
ijl
i i j,lll
iljll
IJJ
iii
c. Se dej6 la cacerota
para asar con grasa
dentro del horno.
H III1!
I!
a. El aislante del homo
podria emitir un olor
durante los primeros
El homo emite un oloro
USOS,
b. Falfa de limpiar el exceso
de suciedad
i,iii
i ,111111,11111,
Puerta del homo se cierra
accidentalmente con
cerrojo mientras se horneao
,_1 i iiiiiii
i
,
, i
c, Limpie la cacerola y ta
parritla despues de cada usc
i iiiiii,111111111_1
I
ao Ponga el homo en un ciclo
de autofimpieza para
acelerar el proceso de
eiiminar el olor
b, Limpie el exceso de
suciedad antes de usar
et homo.
IIIIIIHII
No fuerce la manilla del
cerrojo.
Las temperaturas m&s altas
que las temperaturas de
cerrado evitar&n que la
manitla del cerrojo se deslice
a fa posici6n de abierto.
a. Homo demasiado
sucio.
a. Los derrames pesados se
deberian limpiar antes de
programar un ciclo de
limpieza
b. Ciclo de limpieza
interrumpido
b. Permita que el homo se
limpie por un ciclo completo
i
..........................
de
jljlJlljllll,
Yea que no hayan
derrames grandes
b. No se recomienda el uso
del papel de aluminio
ao
b, Mal uso de papel de
aluminio
w
II1!
a. Revise la posici6n del
interruptor
b. Revise o reemplace el
foco de la luz
'llllf
a, Homo sucio.
i=1
La temperatura del homo debe
caer a menos de la temperatura
de enganche antes que se
pueda abrir la puerta
i ,i ,i,,,i,
a. El interruptor de la
luz est& apagado.
b, El foco de la luz
del homo est&
suelto o quemado.
E! horno humea_
Malos resultados
limpieza°
iii,111
Yea tas instrucciones para
ajustar ta temperatura que
siguen esta secci6n_.
i,,i i,ii1,111,1111,1111,11,
i_11
El cicto de timpieza no
ha terminado.
i
iii
Use olfas de rondo piano
y que coincidan con el
di_,metro de la unidad de
superficie seleccionada
i i i ,,i ,i,,i,iiiiii
iiiiii
La puerta del horno no
se desengancha.
i
i
iii,
Calibraci6n del control
del homo.
La temperatura del homo
no parece estar exacta.
iii
, i ii11/11111
Se estan usando ollas
inadecuadas
Las unidades de la superficie
no mantendr_n un hervor
fuerte o las comidas no se
cocinan Io suficientemente
r_pido.
ii
POSIBLE SOLUCION
POSIBLE CAUSA
PROBLEMA
j!!l
71
i
[[
IIII1!
I
ANTESDELLAMARPARA
UNSERVICiO
PROBLEMA
Los alimentos no
se hornean
adecuadamente°
POStBLE CAUSA
POSIBLE SOLUCION
a. El homo no se
precalent6 to suficiente
a. Asegurese de precalentar
cuando la receta Io requiera
b. Posici6n incorrecta de
la parrilla o la cacerola
b_ Mantenga un espacio de
aire uniforme alrededor de
las ollas y utensilios. Vea
la secci6n para consejos
para cocinar en el homo
c.
co Mantenga la ventilaciOn
despejada
del homo
o
d. Uso incorrecto de!
papel de aluminio
do No cubra tas parriltas
cuando homee
e. Temperatura incorrecta
para el utensitio usado
g. La estufa o ta parrifla
del homo no est&n
niveiadas,
e. Reduzca la temperatura
en 25 grados para
utensilios de vidrio,
oscuros u opacos
Revise la secci6n de
ajustes a la temperatura
que sigue esta secci6n
g. Vea las instrucciones
de instalacion para la
nivelaci6n
h. Controles del homo mal
puestos
h. Yea la seccion para
homear
a. Posici6n incorrecta de
la parrilla
a. Revise la posici6n de las
cacerotas; yea ia seccion
para asar a la parrilta.
b. El homo se precalento
b. No precaliente cuando
ase a la parritla
c. Mal uso de papel de
aluminio.
c. Lea fa secciOn para asar
a la parrilla
d. Abra la puerta a la
posici6n de tope para
asar; vea la secci6n de
c6mo asar a ta parrilla,
f.
Los alimentos no se
asan adecuadamente a
la parrilla.
La ventilaci6n
est& obstruida
cubierta
La temperatura del
homo necesita ajuste
d. La puerta del homo se
cerr6 durante el asado
a la parrilla
e. Voltaje bajo (208
Voltios)
e. Use posiciOn de parrilla
mas alta yio ase pot mas
tiempo
f.
f.
Cantidadde tiempo
incorrecta para asar,
g. Controles del homo
real puestos
72
Vea la tabla para asar en
la secci6n de cSmo asar a
la parrilta
g. Vea la secci6n para asar
AJUSTESDE
TEMPERATURA
"HAGALOSUSTEDMISMO"
1. Empuje y sujete, a la misma vez, los
botones con las flechas para SUBIR
y BAJAR LA HORA hasta que el dial
mueste un n0mero de dos digitos.
Usted podria pensar que su nuevo homo
cocina diferentemente al homo que
reemplaz6 Recomendamos que use su
homo nuevo unas pocas semanas para
que se familiarice con el, siguiendo los
tiempos que se dan en las recetas como
una gura.
2.
Empuje el boton con la flecha para
SUBIR LA HORA para aumentar la
temperatura en 35 ° F
Empuje el boton con la flecha para
BAJAR LA HORA para disminuir la
temperatura en 35 ° F
Si cree que su nuevo homo est&
funcionando demasiado catiente (quema
la comida) o no calienta Io suficiente
(ta comida no queda bien cocida) usted
mismo puede ajustar la temperatura La
apariencia y la textura de los atimentos
son mejores indicadores de fa exactitud
de un homo que un term6metro. Estos
term6metros pueden variar en 20-40
grados de la verdadera temperatura de!
homo, Adem_s, la puerta se tiene que
abrir para leer estos term6metros° Abrir la
puerta cambiara la temperatura del homo
Para decidir en cu&nto cambiar fa
temperatura, suba la temperatura del
homo en 25 grados (si los alimentos no
quedan bien cocidos) o baje la
temperatura en 25 grados (si la comida
se quema) de ta temperalura de la receta,
tuego homee. Los resultados de esta
"prueba" le deberian dar una idea de
cu&nto se deberia cambiar la temperatura.
3_
Cuando este ajuste haya sido hecho
el dial volver_, a la hora del dia
Este ajuste permanecer& en la memoria
hasta que estos pasos sean repetidos y
una nueva temperatura sea seleccionada
Permanecer& en la memoria incluso
despues de un corte de corriente.
Estos ajustes no afectar&n las
temperaturas para Asar y Limpiar
73
NOTAS
74
GARANTIADELAESTUFA
RADIANTETIPO "FREE-STANDING"
UN ANO COMPLETODE GARANTIAPARA TODASLAS PARTES
St, dentro de un ano de la fechade instalaci6n,cualquier parle deja de funcionar adecuadamente
debido a un defedo en el material o la obra de mano, Searsta reparar_o reemplazar&a nuestra
opci6n, s,in coslo.
GARANTIALIMITADA DEL VIDRIO RADIANTEY DE LAS UNIDADES RADIANTESDE LA
SUPERFICIE DESDEEL SEGUNDOAL QUINTO ANO:
AI principio det segundoafio, desdela lechade instalaci6n,a trav_sdel quinto a_o, desde la fecha
de instalaci6n, Searsrepara_ o reemplazar&a nuestraopci(_n,el vidrio radianteo las unidades
radiantesde la supedicie (usted ser_responsablepot cuatquier labor),si ocurre cualquierade los
delectossiguientes:
e
Trizaduradet vidrio radiantedebido a un go]petermal
.
Descoloraci6ndel vidrio radiantede la cubieda
o
Desgastedef diseno sobre el vidrio radiantede la cubierta
,,
Trizaduradel Sel[ode gomaentreel vidrio radiantede la cubierta y el borde de porcelana
o
Quemadode cualquiera de las unidadesradianiesde la supedicie
Si esleproducto es sometidoa un uso que no sea el tamiliarprivado, ]as garantfasde arriba son
eledivas por solamente90 dias,
EL SERVlCIODE GARANTIAESTADISPONIBLEPONIENDOSEENCONTACTOCONEL CENTRO
DESERVIClOSEARSMAS CERCANOENLOS ESTADOSUNIDOS
Estagarantiale brinda derechos legalesespecificos,y usted podria tener otros derechosque varian
de estadoa estado
SearsRoebuckand Co, Dept,817 WA Hoffman Estates,iL 60179
Para ampliar
el valor de su estufa,
compre
un contrato
de mantenimiento
A_os de cobertura
de propiedad
let afio
Sears
2do afio
3er a_o
1, Reemplazo de las partes defectuo sas
que no sean el vidrio radiante o las
unidades radiantes de ]as superficies
G
CM
CM
2. Partes del vidrio radiante y de las
unidades radiantes de [a superficie
G
G
G
G
CM
CM
CM
CM
CM
3. Labor
4. Revisi6n de mantenimiento preventivo
____anual a solicitud de usted
___,_
G - Garantia
CM - Cont_to
de Mantenimiento
Los aparatoselectrodomdslicosKenmoreest_n dise_ados,labricadosy probadospot anosde
operaci6nconfiable. Sin embargo,cualquierapara|oeiecirodom_stico podria requerir un servicio
cadacierto |tempo El Contratode MantenimientoSearsle ofreceun excelenleprogramade servicio
parasu producto,
La taNa de arriba muestra los beneficiosadicionatesque un Contratode ManlenimientoSears
ofrece comparadoa una GarantiaSears
P6ngaseen contacto con su Servicio de Ventasde Searso con un Centro de Servicio Searspara
comprar un Contratode ManienimientoSears.
7"5
For repair of major brand appliances in your own home°..
no matter who made it, no matter who sold it!
1-800-4-MY-HOME
_
(1-800.469-4663)
Anytime,dayornlght
(U SA and Canada)
h _- :,
www, sears,com
i'i _,
www.sears.ca
:i,
! ?:_:" _:i _
For repair of carry-in products like vacuums, lawn equipment and
electronics, call for the nearest Sears Parts and Repair Center.
1-800-488-1222
Anytime, day or night (U SA. only)
wwwosears corn
¢
For the replacement parts, accessories and owner's manuals
that you needto do-it-yourself,callSears PartsDirectS_'!
1-800-366-PART
6am - 11 pro, 7daysaweek
(U SA. only)
(1-800-366-7278)
www.sears.com/partsdirect
To purchase or inquire about a Sears Service Agreement
or Sears Maintenance Agreement:
1-800-827-6655
1
: [
7•¸,
7am-5p
(us A )
1-800-361-6665
rn, CST, Mono-Sat.
9am
-8pro
EST, M-F,
(Canada)
4 prn Sal
i _51
'
Para pedirsewiclo de mparaci6na
demicilio,y paraordenarplazas:
1-888-SU-HOGARm
AU Canada poursewice en francis:
t.800-LE.FOYER _._c
(1-800-53_937)
w,Nw sea_s,ca
(1-888-784-6427)
© Sears,Roebuckand Co.
® Registered Trademark / zu Trademark I s_,_
Service Mark of Sears, Roebuck and Co
® Marca Reglstrada t "m Maroa de F_brica / su Marca de Servicio de Sears, Roebuck and Co
uc Marque de commerce 1_e Marque d_pos_e de Sears. Roebuok and Co
76
,
_: