1
TM
Dual Fuel Range
Estufa de dual fuel
?:
Models/Modelos 790.75503
318200755(0601)Rev.E
Sears Roebuck and Co., Hoffman Estates, IL 60179 U.S.A.
www.sears.com
Liquefied Petroleum (Propane) Gas Conversion ............ 14
Surface Cooking ........................................................
14-16
Before Setting Oven Controls ........................................ 17
Air Circulation in the Oven ............................................
17
Setting Oven Controls ...............................................
18-26
Oven Cleaning ...........................................................
27-30
General Cleaning .......................................................
31-35
Changing Oven Light .....................................................
36
Adjusting Oven Temperature ......................................... 36
Avoid Service Checklist .............................................
37-38
EspaSol ...........................................................................
39
Sears Service ....................................................
Back Cover
Prod uct Record
In this space below, record the date of purchase, model and serial number of your product. You will find the model and serial
number printed on an identification plate. The identification plate is located on the front frame of the range and is visible
when the oven door is open or on the inside of the drawer along the side of the frame.
Model No. 790.
Date of purchase
Serial No.
Save these instructions and your sales receipt for future reference.
Kenmore
Elite Appliance
Warranty
One Year Limited Warranty
When installed, operated and maintained according to all instructions supplied with the product, if this appliance fails due to a
defect in material or workmanship within one year from the date of purchase, call 1-800-4-MY-HOME ® to arrange for free repair. If
this appliance is used for other than private family purposes, this warranty applies for only 90 days from the date of purchase.
This warranty covers only defects in material and workmanship.
Sears will NOT pay for:
1. Expendable items that can wear out from normal use, including but not limited to filters, belts, light bulbs, and bags.
2. A service technician to instruct the user in correct product installation, operation or maintenance.
3. A service technician to clean or maintain this product.
4. Damage to or failure of this product if it is not installed, operated or maintained according to all instructions supplied with the
product.
5. Damage to or failure of this product resulting from accident, abuse, misuse or use for other than its intended purpose.
6. Damage to or failure of this product caused by the use of detergents, cleaners, chemicals or utensils other than those
recommended in all instructions supplied with the product.
7. Damage to or failure of parts or systems resulting from unauthorized modifications made to this product.
FIVE-YEAR LIMITE D WARRANTY
For the second through the fifth year from the date of purchase, when installed and operated according to the Installation
Instructions and Use & Care Guide, Sears will supply the following
range parts free of charge if they fail for the reasons
listed below. Customer must pay labor cost of installation.
•
Cooktop glass if it fails due to thermal shock.
•
Cooktop elements if they are defective.
What Sears will not cover:
•
Failure of the product if it is abused, misused, or used for other than the intended purpose.
•
Damage to the cooktop glass caused by the use of cleaners or utensils other than the recommended cleaning cream and tools.
•
Damage to the cooktop glass caused by hardened spills of sugary materials (including starches from vegetables or pastas) or
melted plastic that are not cleaned according to the directions in the Use & Care Guide.
•
Repairs to parts or systems resulting from unauthorized modifications made to the appliance.
Disclaimer of implied warranties; limitation of remedies
Customer's sole and exclusive remedy under this limited warranty shall be product repair as provided herein. Implied
warranties, including warranties of merchantability or fitness for a particular purpose, are limited to one year or the shortest
period allowed by law. Sears shall not be liable for incidental or consequential damages. Some states and provinces do not
allow the exclusion or limitation of incidental or consequential damages, or limitations on the duration of implied warranties of
merchantability or fitness, so these exclusions or limitation may not apply to you.
This warranty applies only while this appliance is used in the United States and Canada.
This warranty gives you specific legal rights, and you may also have other rights which vary from state to state.
Sears, Roebuck and Co., Dept. 817WA, Hoffman
Estates, IL 60179
Sears Canada Inc., Toronto, Ontario, Canada M5B 2B8
2
Printed in United States
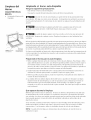
iMPORTANT SAFETY iNSTRUCTiONS
Read all instructions before using this appliance.
Save these instructions for future reference.
This manual contains many important safety messages. Always read and obey all safety messages.
The safety alert symbol _
calls your attention to safety messages that inform you of hazards that can kill or hurt you or
others, or cause damage to the product.
Indicates an imminently hazardous situation which, if not avoided may result in death or serious injury.
Indicates an imminently hazardous situation which, if not avoided may result in minor or moderate injury, or
product-damage-only.
All safety messages will identify the hazard, tell you how to reduce the chance of injury, and tell you what can happen if the
instructions are not followed.
if the information
exactly,
personal
a fire or explosion
injury
in this manual
may result
causing
is not followed
property
damage,
or death.
•
•
All ranges can tip.
injury to persons could
result.
FOR YOUR SAFETY:
--•
•
•
•
--
Do not store or use gasoline
or other flammable
vapors
and liquids in the vicinity
of this or any other appliance.
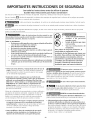
WHATTO
DOIFYOU
SMELLGAS:
Do not try to light any appliance.
Do not touch any eJectricaJ switch; do not use any phone
in your building.
immediately
call your gas supplier
from a neighbor's
phone.
Follow the gas supplier's
instructions.
if you cannot reach your gas supplier,
call the fire
department.
installation
and service must be performed
by a qualified
instaJJer, servicer or the gas suppJier.
Remove all tape and packaging before using the
range. Destroy the carton and plastic bags after
unpacking the range. Never allow children to play with
packaging material.
Proper Installation-Be sure your appliance is properly
installed and grounded by a qualified technician in
accordance with the National Fuel Gas Code ANSI
Z223.1 latest edition, and National Electrical Code
ANSI/NFPA No. 70--latest edition, and local code
requirements. Install only per installation instructions
provided in the literature package for this range.
•
••
packed with range.
Install
anti-tip device
See Installation
Instructions.
To reduce the risk of tipping, the range
must be secured by properly installed
anti-tip bracket(s) provided with the
range. To check if the bracket(s) is (are)
installed properly, remove the lower
panel or storage drawer and verify that
the anti-tip bracket(s) is (are) engaged.
Refer to the Installation Instructions for
proper anti-tip bracket(s) installation.
User servicing--Do not repair or replace any part of the
appliance unless specifically recommended in the
manuals. All other servicing should be done only by a
qualified technician, this may reduce the risk of personal
injury and damage to the range.
tet
Z
Never modify or alter the construction
of a range by
removing
leveling
legs, panels, wire covers, anti-tip
brackets/screws,
or any other part of the product.
Stepping, leaning or sitting on the doors
or drawer of this range can result in serious injuries
and also cause damage to the range. Do not allow
children to climb or play around the range. The weight of a
child on an open door may cause the range to tip, resulting in
serious burns or other injury.
Do not use the oven
Ask your dealer to recommend a qualified technician and an
authorized repair service. Know how to disconnect the power
to the range at the circuit breaker or fuse box and gas supply
at the main shutoff valve in case of an emergency. Remove
the drawer to accessthe valve.
Z
for storage.
Do not store items of interest to children
in the cabinets above a range or on backguard of a
range. Children climbing on the range to reach items could
be seriously injured.
NEVER use this appliance as a space heater
to heat or warm the room. Doing so may result in carbon
monoxide poisoning.
iMPORTANT SAFETY INSTRUCTIONS
• Storage in or on Appliance--Flammable
materials
should not be stored in an oven, near surface burners
or in the drawer (if equipped). This includes paper, plastic
and cloth items, such as cookbooks, plasticware and towels,
as well asflammable liquids. Do not store explosives, such as
aerosol cans, on or near the appliance. Flammable materials
may explode and result in fire or property damage.
Do not leave children alone--Children
should not be
left alone or unattended in the area where appliance
is in use, They should never be allowed to sit or stand on
any part of the appliance.
DO NOTTOUCH SURFACE BURNERS, AREAS NEAR
THESE BURNERS, OVEN HEATING ELEMENTS OR
INTERIOR SURFACES OF THE OVEN. Both surface
burners and oven heating elements may be hot even
though they are dark in color. Areas near surface burners
may become hot enough to cause burns. During and after
use, do not touch, or let clothing or other flammable
materials touch these areas until they have had sufficient
time to cool. Among these areas are the cooktop, surfaces
facing the cooktop, the oven vent openings and surfaces
near these openings, oven door and window.
Wear proper apparel--Loose-fitting
or hanging
garments should never be worn while using the
appliance. Do not let clothing or other flammable
materials contact hot surfaces.
• Do not use water or flour on grease fires--Smother
the fire with a pan lid, or use baking soda, a dry
chemical or foam-type extinguisher.
• When heating fat or grease, watch it closely, Fat or
grease may catch fire if allowed to become too hot.
In case of fire or gas leak,
off the main
gas shutoff
be sure to turn
valve.
Use only dry potholders--Moist
or damp potholders
on hot surfaces may result in burns from steam. Do
not let potholders touch hot heating elements. Do not use
a towel or other bulky cloth instead of a potholder.
• Do not heat unopened food containers--Build-up of
pressure may cause container to burst and result in
injury.
* Remove the oven doors from any unused range if it
is to be stored or discarded.
IMPORTANT--Do
not attempt
to operate the oven
during a power
failure. If the power fails, always turn
the ovens off. If the ovens are not turns off and the power
resumes, the oven may begin to operate again. Food left
unattended could catch fire or spoil.
Use proper pan size--Adjust flame size
so it does not extend beyond the edge of the utensil.
The use of undersize utensils will exposed a portion of the
burner flame to direct contact and may result in ignition of
clothing. Proper relationship of utensil to flame will also
improve efficiency.
Do not use stove top grills on the burner
grates of sealed gas burners. If you use a stove top grill on a
sealed gas burner, it will cause incomplete combustion and
can result in exposure to carbon monoxide levels above
allowable current standards. This can be hazardous to your
health.
Electronic controllers can be damaged by
cold temperatures. When you use your appliance for the
first time, or if it has not been used for a long period of
time, make sure that it has been exposed to a
temperature above 0°C/32°F for at least 3 hours before
connecting it to the power supply.
IMPORTANT
INSTRUCTIONS
FOR USING
YOUR
COOKTOP
• Know which knob controls each surface heating unit.
Always turn the knob to the LITEposition when igniting
the burners. Visually check that burner has lit. Then adjust
the flame so it does not extend beyond the edge of the
utensil.
Use proper pan size. This appliance is equipped with one
or more surface burners of different sizes. Select utensils
having flat bottoms large enough to cover the surface
burner. The use of undersized utensils will expose a portion
of the surface burner to direct contact and may result in
ignition of clothing. Proper relationship of utensil to the
surface burner will also improve efficiency.
Utensil handles should be turned inward and not
extend over adjacent surface burners--To reduce the
risk of burns, ignition of flammable materials, and spillage
due to unintentional contact with the utensil. The handle
of the utensil should be positioned so that it is turned
inward, and does not extend over adjacent surface
burners.
Never leave surface burners unattended at high heat
settings--Boilovers
cause smoking and greasy spillovers
that may ignite, or a pan that has boiled dry may melt.
Protective
liners--Do
not use aluminum foil to line oven
bottom or any other part of the appliance. Only use
aluminum foil as recommended for baking if used as a
cover placed on the food. Any other use of protective
liners or aluminum foil may result in a risk of electric shock
or fire or short circuit.
iMPORTANT SAFETY iNSTRUCTiONS
Glazed cooking utensils--Only
certain types of glass,
glass/ceramic, ceramic, earthenware, or other glazed
utensils are suitable for rangetop service without breaking
due to the sudden change in temperature. Check the
manufacturer's recommendations for rangetop use.
Do not use decorative
• Do not use the broiler pan without its grid. Tile
broiler pan and its grid allow dripping fat to drain and be
kept away from the high heat of the broiler.
Do not cover the broiler grid with aluminum
Exposed fat and grease could ignite.
surface burner covers. If a
Do not touch a hot light bulb with a damp cloth,
Doing so could cause the bulb to break. Disconnect the
appliance or turn off the power to the appliance before
removing and replacing light bulb.
burner is accidentally turned on, the decorative cover will
become hot and possibly melt. Burns will occur if the hot
covers are touched. Damage may also be done to the
cooktop or burners because the covers may cause
overheating. Air will be blocked from the burner and
cause combustion problems.
IMPORTANT INSTRUCTIONS
YOUR RANGE
FOR GLASS COOKTOPS ONLY
food under the hood, turn the fan on. Refer to the hood
man ufacturer's instructions for cleaning.
• Clean cooktop glass with caution--If
a wet sponge or
cloth is used to wipe spills on a hot cooking area, be
careful to avoid a steam burn. Some cleaners can produce
harmful fumes if applied to a hot surface.
IMPORTANT
OVEN
the cooktop
SELF CLEANING
FOR USING YOUR
OVENS
In the self-Cleaning cycle only clean the parts listed
in this Use and Care Guide. Before self cleaning the
oven, remove the broiler pan and any utensils or foods
from the oven.
• Use care when opening oven door--Stand to the side of
the range when opening the door of a hot oven. Let hot
air or steam escape before you remove or replace food in
the oven.
• Do not use oven
cleaners--No
commercial
oven
cleaner or ovens liner protective coating of any kind
should be used in or around any part of the oven.
• Keep ovens vents unobstructed.
Each vent has its own
vent located on the top, near each side and towards the
back of the cooktop. Touching the surfaces in this area
when the oven is operating may cause severe burns. Also,
do not place plastic or heat-sensitive items on or near an
oven vent. These items could melt or ignite.
• Do not clean door gasket--The
door gasket is essential
for a good seal. Care should be taken not to rub, damage
or move the gasket.
• Remove
oven
racks. Oven racks color will change
in the oven during
a self-cleaning
if left
cycle.
• Placement
of ovens racks. Always place oven racks in
desired location while ovens are cool. If rack must be
moved while oven is hot use extreme
caution.
The health of some birds is extremely
sensitive to the fumes given off during the self-cleaning
cycle of any range. Move birds to another well ventilated
room.
Use
potholders and grasp the rack with both hands to
reposition.
Do not let potholders contact the hot heating
elements in the ovens. Remove all utensils from the rack
before moving.
IMPORTANT
The California
Safe Drinking
to the state to cause cancer,
to such substances.
Water
birth
and Toxic
defects
Enforcement
or other
SAFETY NOTICE
Act requires
reproductive
'_:;
• Kitchen cleaners and aerosols--Always follow the
,[[:
manufacturer's recommended directions for use. Be
_,;
aware that excess residue from cleaners and aerosols may
ignite causing damage and injury.
glass with sharp
INSTRUCTIONS
FOR CLEANING
• Clean the range regularly to keep all parts free of
grease that could catch fire. Exhaust fan ventilation
hoods and grease filters should be kept clean. Do not
allow grease to accumulate on hood or filter. Greasy
deposits in the fan could catch fire. When you are flaming
• Do not clean or operate a broken cooktop--lf
cooktop
should break, cleaning solutions and spillovers may
penetrate the broken cooktop and create a risk of electric
shock. Contact a qualified technician immediately.
• Avoid scratching
objects.
foil.
harm,
the Governor
and requires
of California
businesses
to publish
to warn
SAVE THESE INSTRUCTION
a list of substances
customers
of potential
known
exposure
PROTECTION AGREEMENTS
In the U.S.A.
Master
Protection
Agreements
Congratulations on making a smart purchase. Your new
Kenmore ® product is designed and manufactured for years
of dependable operation. But like all products, it may
require preventive maintenance or repair from time to time.
That's when having a Master Protection Agreement can
save you money and aggravation.
Purchase a Master Protection Agreement now and protect
yourself from unexpected hassle and expense.
The Master Protection Agreement also helps extend the life
of your new product. Here's what's included in the
Agreement:
[_
Expert service by our 12,000 professional repair
specialists
1_ Unlimited service and no charge for parts and labor
I_
I_
[_
on all covered repairs
"No-lemon"guaranteereplacement
of your covered product if four or more product failures
occur within twelve months
Product replacement if your covered product can't be
fixed
Annual Preventive Maintenance Check at you r
request- no extra charge
1_" Fast help by phone- phone support from a Sears
technician on products requiring in-home repair, plus
I_
convenient repair scheduling
Power surge protection against electrical damage
I_
due to power fluctuations
Rental reimbursement
if repair of your covered
In Canada
Maintenance Agreements
Your purchase has added value because you can depend
on Sears HomeCentral®for service. With over 2400 Service
Technicians and more than a million parts and accessories,
we have the tools, parts, knowledge and skills to ensure
our pledge: We Service What We Sell.
Your Kenmore ®product is designed, manufactured
and tested to provide years of dependable operation. But
like all products, it may require service from time to time.
The Sears Maintenance Agreement offers you an
outstanding service program, affordably priced.
The Sears Maintenance
Agreement:
Is your way to buy tomorrow's service at today's price
Eliminates repair bills resulting from normal wear and tear
Provides phone support from a Searstechnician on
products requiring in-home repair
Even if you don't need repairs, provides an annual
Preventive Maintenance Check, at your request, to
ensure that your product is in proper run ning condition.
Some
limitations
apply,
Sears Canada Maintenance
call 1-800-361-6665
For more
information
about
Agreements,
product takes longer than promised
Once you purchase the Agreement, a simple phone call is
all that it takes for you to schedule service. You can call
anytime day or night, or schedule a service appointment
online.
Sears has over 12,000 professional repair specialists, who
have access to over 4.5 million quality parts and
accessories. That's the kind of professionalism you can
count on to help prolong the life of your new purchase for
years to come. Purchase your Master Protection Agreement
today!
Some limitations and exclusions apply,
For prices and additional information
call
1-800-827-6655.
Sears Installation
Service
For Searsprofessional installation of home
appliances, garage door openers, water heaters,
and other major home items, in the U.S.A. call
1-800-4-MY-HOME ®
REV. 030509
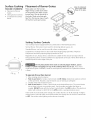
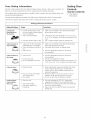
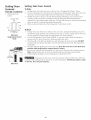
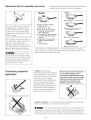
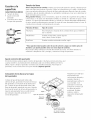
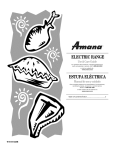
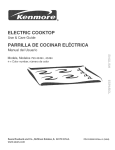
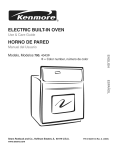
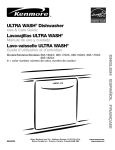
For best result and energy conservation, choose cooking utensils that have these
characteristics:
Selecting Surface
Cooking Utensils
*GOOD
POOR
_w
e Curved and warped pan
bottoms.
W
• Flatbottom and straightsides.
Pans should have flat bottoms.
Check for
flatness by rotating a ruler across the
bottom. There should be no gap between
the pan and ruler.
Note: Always use a utensil for its
intended purpose. Follow manufacturer's
instructions. Some utensils were not made
to be used in the oven or on the cooktop.
o Tight fitting lids.
oWeight of handledoesnot tilt pan.
Panis well balanced.
•
Pan overhangs unit by more than
one inch or 2.5 cm.
• Pansizesmatchthe amountof
food to be prepared.
• Madeof a materialthat conducts
heatwell.
® Heavy handle tilts pan.
ifi" ii
• Easyto clean.
Do not use griddle over
more than one burner because it could
damage your cooktop. It can also result in
exposure to carbon monoxide levelsabove
allowable current standards and be
hazardous to your health.
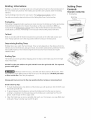
DO NOT use a wok if it is equipped
with a metal ring that extends
beyond the burner unit. Because this
ring traps heat, the surface unit and
cooktop surface could be damaged.
Wire trivets:
Z
• Flame extends
beyond
unit
* Specialty pans such as lobster pots, griddles and pressure cookers may be
used but must conform to the above recommended
cookware
requirements.
Woks with flat bottoms suitable
for use on your cooktop are
available in most cookshop or
hardware stores. Roundbottomed woks (with a support
ring that does not extend
beyond the burner unit) may
also be used. The metal ring
was designed to support the
wok safely when it is filled with
large amounts of liquids (soup
making) or fat (frying).
Do not use wire trivets. Cookware bottoms must be in direct
contact with the grates.
DO NOT use two burner units to heat one large pan such as a
roaster or griddle, or allow cooking utensils to boil dry. The bottom surface of
the pan in either of these situations could cause discoloring or crazing of the
appliance cooking surface, and damage to the grates and burner units.
Specialty
Pans & Trivets
Canning Tips &
Information
1.
2.
Canning
can generate large
amounts of steam. Use
extreme caution to
prevent burns. Always
raise the lid to vent steam
away from you.
3.
4.
5.
I.
2.
3.
Use tested recipes and follow instructions carefully. Check with your local Cooperative
Agricultural Extension Service or a manufacturer of glass jars for the latest canning
information.
Use flat-bottomed canners only. Heat is spread more evenly when the bottom surface is
flat.
Center canner on the burner grate.
Start with hot water and a high heat setting to reduce the time it takes to bring the water
to a boil; then reduce the heat setting as low as possible to maintain a constant boil.
It is best to can small amounts and light loads.
Prevent damage to cooktop and burner grates:
Do not use water bath or pressure canners that extend more than one inch beyond the
edge of the burner grate.
Do not leave water bath or pressure canners on high heat for an extended amount of time.
Alternate surface units between each batch to allow the units and surrounding surfaces to
cool down. Tryto avoid canning on the same burner unit all day.
Safe canning requires that harmful micro-organisms are destroyed and the jars
are sealed completely. When canning in a water bath canner, a gentle but steady boil must be
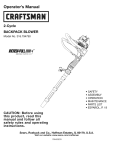
maintained continuously for the required time.
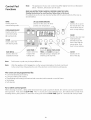
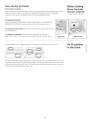
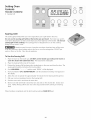
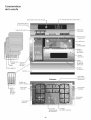
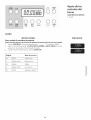
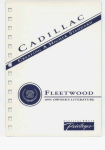
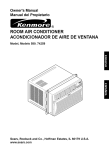
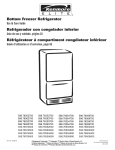
Range features
Electronic Oven Controls
Side Oven Thermostat
Main Oven
Light Switch
Element
Wok Stand
Convection
Element Cover
Ligths (2)
Oven
J
ustable :'1
Oven Rack :'4:_
Door
Handle
Oven Door
Grid
Drawer
Handle
Broil Pan
o
Q
Q
•
o
o
e
o
Simmer
Burner
Cooktop
_
JJJ_
_}i
-- Side Oven
Broil pan &
Grid
Cast Iron
Grates
Standard
Burner
Standard
Burner
Power
Burner
Power
Burner
Surface
Burner
Controls
Ceramic Glass
Cooktop
;,'
f
....
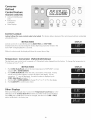
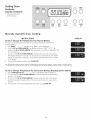
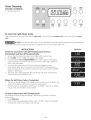
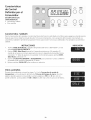
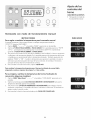
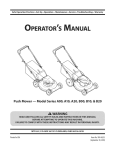
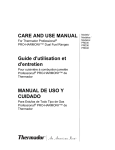
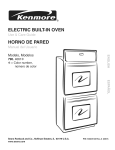
Note:
Control Pad
Functions
The appearance of your oven control may differ slightly from the one illustrated
below. However, all functions are the same.
READ ALL INSTRUCTIONS CAREFULLYBEFOREUSING THE OVEN.
Detailed instructions for each function follow later in this book.
For satisfactory use of your oven, become familiar with the various functions of the oven as
described below.
BAKE
Used to enter the
UP and DOWN ARROWS
Used to set the clock, the timer
and the oven tern
normal baking mode
CONV. BAKE/ROAST
Used to enter the
convection baking
TIMER
Used to set or cancel
the minute timer. The
minute timer does'nt
start or stop cooking.
TIMER
O_OFF
A
or roasting mode
J
CLEAN
Used to select the
self-cleaning mode
BAKE
TIME
STOP
\ CLOCK "_-_/ \
TIME
CLEAR
OFF
\_
CLEAR
Used to clear any oven
mode previously
entered except the
time of day and the
minute timer. Push
clear to stop cooking.
STOP TiM E _
BAKETIME
Used to enter the
VARI BROIL
Used to select the
variable broil mode
length of the
baking time.
Used with BAKE, OVEN COOK
TIME, and CLEAN to program _
delayed baking or delayed selfcleaning cycle stop time.
Note:
Push buttons or pads may be shaped differently.
Note:
After the appliance is first plugged in, or after a power interruption, the clock must be set
to the correct time of day before the rest of the electronic control functions will operate.
The oven can be programmed
•
•
•
•
•
CLOCK
Used to set the
time of the day.
for:
Conventional baking and roasting
Convection baking and roasting
Timed baking and roasting (conventional and convection) with automatic on and off times.
Vari broiling
Self-cleaning
For a silent control
panel:
When choosing a function, a beep will be heard each time a pad is pushed. If desired, the controls can be programmed for
silent operation. Push and hold STOPTIME After 7 seconds, the control will beep once. This will block the controls from
sounding when a pad is pushed. To return the sound, push and hold STOPTIME again for 7 seconds until a beep is heard.
10
Setting
the
Clock
FEATURE OVERVIEW
•
Clock
Minute Timer
Clock
When tile range is first plugged in, or when tile power supply to tile appliance has been interrupted, tile display will flash.
DISPLAY
INSTRUCTIONS
To Set the Clock: (example
1:30)
I. Push CLOCK. The word "TIME" will appear in the display. The
timer allows you 5 seconds to go to step 2.
2. Push and hold the UP or DOWN ARROW to set the time of clay to
1:30. The word "TIME" will disappear after 6 seconds and the clock will
start. You may also push CLEAR OFF; the word "TIME" will
disappear and the clock will start.
Minute
:',p_
Timer
Note: The minute timer does not start or stop cooking and is not active during self-clean. It serves as an extra timer in the
kitchen that will beep when the set time has run out. The minute timer can be used independently during any of the bake or
broil functions. The timer can be set for any amount of time from 5 seconds to 9 hours and 55 minutes.
To Set the Minute
1.
2.
3.
INSTRUCTION
Timer
DISPLAY
Push TIMER ON/OFF, ":00" andtheword
"TIMER" will be displayed.
Push and hold the UP ARROW until the desired time appears in the
display. As soon as the UP ARROW is released, the time will begin to
count clown in the display.
When the set time has run out, the timer will beep 3 times and will
continue to beep once every 10 seconds for 5 minutes or until TIMER
ON/OFF is pushed.
When settingtheminutetimer
for:
The time will
appear
display and increase in:
5 seconds to I minute 59 seconds
5 second increments
2 minutes to 9 minutes. 59 seconds
10 second increments
10 minutes to 59 minutes 59 seconds
I minute increments
I hourto 9 hours 55 minutes
5 minute increments
To Change the Minute
in the
Timer:
Push and hold tile UP or DOWN ARROW to increase or decrease tile time.
To Cancel the Minute
Timer
before
the set time has run out:
Push and hold tile DOWN ARROW until ":00" appears in the display or push TIMER ON/OFF.
11
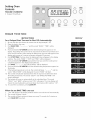
Consumer
Defined
Control
A
TIMER
O_/OFF
Feature
FEATURE OVERVIEW
•
Lockout (Child Resistant
Lock)
Temperature
Conversion
Other Displays
Control
BAKE
TIME
STOP
TIME
CLOCK
\
V
//
CLEAR
OFF
Lockout
Lockout allows the oven controls only to be locked. This feature allows cleaning of the control panel without accidentally
activating the oven.
INSTRUCTIONS
DISPLAY
Lockout can be set or cancelled by pushing BAKE TiME and STOP TIME
simultaneously for a second. During this mode, depressing any button results in the
word "OFF" being displayed for 2 seconds.
While in Lockout mode, the display will show the current time of day.
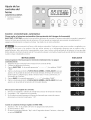
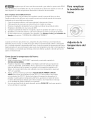
Temperature
Conversion
(Fahrenheit/Celsius)
Tile electronic oven control is set to operate in °F (Fahrenheit) when shipped from tile factory. To change tile temperature to
°C (Celsius) or from °C to °F:
INSTRUCTIONS
1.
2.
3.
4.
DISPLAY
Push CONV. Bake/Roast and set the oven temperature to 500°F/260°C or more
using the UP or DOWN ARROW.
Push CONV, Bake/Roast within the next 2 seconds for 3-4 seconds. A beep
sounds and a number appears in red to the right of the display. For the
conversion, "1 " must be displayed. If another number is displayed, push
CONV, Bake/Roast and select "1 ".
Push the UP or DOWN ARROW to change °F to °C or °C to °F in the display.
Push CLEAR OFF to confirm your choice.
Other
Displays
When proceeding through steps 1 and 2 in tile Temperature Conversion or in tile
elimination of the 12-hour Shut-off time limit, two other words can be displayed.
One is ESCwith a red 0 which cannot be changed; the other one is USE or SALE
with a red 2 which is for factory use.
12
Consumer
_\
TIMER
Defined
Control
Feature
FEATURE OVERVIEW
*
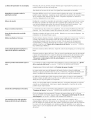
Sabbath
Sabbath Feature
Other Displays
Feature
For energy conservation, the Electronic Oven Control has been set at the factory to allow you to program the oven a
maximum of 12 hours in advance (except during timed bake). The Sabbath Feature allows you to program the oven more
than 12 hours in advance. To set the sabbath feature:
INSTRUCTIONS
1.
2.
3.
4.
DISPLAY
Push CONV. Bake/Roast and set the oven temperature to 500°F/260°C or
more using the UP ARROW.
Push CONV. Bake/Roast within the next 2 seconds for 3-4 seconds. A beep
sounds and a number appears in red to the right of the display. For the
conversion, "3" must be displayed. If another number is displayed, push
CONV, Bake/Roast and select "3 ".
Push the UP or DOWN ARROW to change from 12 hour to 9999 in the
display, for no 12 hour shut-off.
Push CLEAR OFF to confirm your choice.
Other
Displays
When proceeding through steps 1 and 2 in the Temperature Conversion or in
the elimination of the 12-hour Shut-off time limit, two other words can be
displayed. One is ESCwith a red 0 which cannot be changed; the other one is
USE or SALE with a red 2 which is for factory use.
13
;=
Liquefied
Petroleum
(Propane) Gas
Conversion
This appliance can be used with Natural Gas or Propane Gas. It is shipped from
the factory for use with natural gas.
If you wish to convert your range for use with LP/Propane gas, follow instructions
and use the fixed orifices you will find in the bag marked "FOR LP/PROPANEGAS
CONVERSION".
The conversion must be performed by a qualified installer, LP supplier or service
technician in accordance with the installation instructions furnished with this range
and all codes and requirements of all local codes and requirements. Failure to
follow instructions could result in serious injury or property damage. The qualified
agency performing this work assumes responsibility for the conversion.
Personal injury or death from electrical shock may occur if the
range is not installed by a qualified installer or electrician.
Any additions, changes or conversions required in order for this
appliance to satisfactorily meet the application needs must be made by an
authorized SearsService Center, Distributor or Qualified Agency.
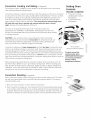
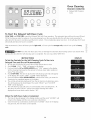
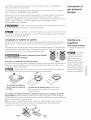
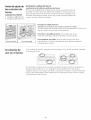
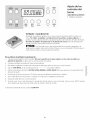
Using the Wok
Surface
Cooking
FEATURE OVERVIEW
Using the Wok Stand
Stand
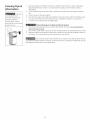
The Wok Stand provided with your range is designed to allow only round-bottomed
up to 14 inches in diameter (35.5 cm).
woks
The Wok Stand must be used on either of the front burners, although it is recommended that
you use the larger burner for best performance.
If properly positioned, the Wok Stand cannot be slid off the grate.
Always use
potholders to remove the
wok stand from the grate.
Allow the wok stand to cool
before removing. Do not
set hot wok stand on
surfaces that cannot
withstand high heat such as
cou ntertops.
Do not use the rear burner next to the Wok
when this one is on use.
To properly
position
the Wok Stand:
With the grate in position over the burner, set the Wok Stand on top of the grate. Turn the
Wok Stand, as shown, until the grate fingers fit into the slots on the bottom of the stand.
Be sure the grate stand is positioned correctly and stably before use to prevent
hot spills and possible burns.
Flat-bottomed
used on your
Wok Stand.
woks may also be
cooktop without
the
The WOK STAND fits
over grate fingers.
Round-bottomed
woks (with a support ring that does not extend beyond the burner
unit) may also be used without the Wok Stand. The metal ring was designed to support the
wok safely when it is filled with large amounts of liquids (soup making) or fat (frying).
DO NOT use a wok if it is equipped with a metal ring that extends beyond the burner unit.
Because this ring traps heat, the surface unit and cooktop surface could be damaged.
)
Wron(
Right
14
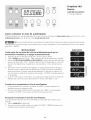
Flame Size
For most cooking, start on the highest control setting and then turn to a lower one to
complete the process. Use the table below as a guide for determining proper flame size for
various types of cooking. The size and type of utensil used and the amount of food being
cooked will influence the setting needed for cooking.
Fordeep fat frying, use a thermometer and adjust the surface control knob accordingly. If
the fat is too cool, the food will absorb the fat and be greasy. If the fat is too hot, the food
will brown so quickly that the center will be undercooked. Do not attempt to deep fat fry too
much food at once as the food will neither brown nor cook properly.
*Flame Size
FEATURE OVERVIEW
•
•
Flame Size
Proper Burner
Adjustment
• Placement of Burner
Bases and Caps
w
Type of Cooking
High Flame
Start most foods; bring water to a boil; pan broiling
Medium Flame
Maintain a slow boil; thicken sauces, gravies; steam
Low Flame
Keep foods cooking; poach; stew
*These settings are based on using medium-weight
Settings may vary when using other types of pans.
Surface
Cooking
aluminum
pans with lids.
Never extend the flame beyond the outer edge of the utensil. A higher flame simply wastes
heat and energy, and increases your risk of being burned by the flame.
Proper
Burner
Adjustments
The color of the flame is the key to proper burner adjustment. A good flame is clear, blue and
hardly visible in a well-lighted room. Each cone of flame should be steady and sharply defined.
Adjust or clean burner if flame is yellow-orange. To adjust the flame see the Installation
Instructions and to clean burner, see instructions under General Cleaning.
Placement
of Burner
Bases and Caps
Makesure eachburner
cap
is properly aligned and
level.
Place the burner base over each gas opening,
matching the burner base size with the gas
opening size. Place the burner cap on each
burner base, again matching the cap size to
the burner base size. The cap for the each
Burner has a inner locating ring which locates
the burner cap in the center of the burner.
Turn the burner on to
determine if it will light. If
the burner does not light,
contact a Sears Service
Center. Do not service the
sealed burner yourself.
located properly in slot
of eache Burner Head
15
Surface
Cooking
FEATURE OVERVIEW
•
Placement of Burner
Grates
•
•
Setting Surface Controls
To Operate the Surface
Burner
Placement
of Burner
Grates
Align the Alignment
Fork on the Center
Finger of the grate,
Place grate over the burners.
Align the tips under each center
of the grate to the holes on the
burner caps. The tip should fit in
the holes. Make sure that each
tips fit in the burner caps of each
of the front and rear burners.
Burner
Grate
Setting
Surface
Controls
Your cooktop may be equipped with any combination of the following burners:
Simmer Burner; this burner is best used for simmering delicate sauces, etc.
Standard Burner; can be used for most all surface cooking needs.
Large Burner; the larger burner is best used when bringing large quantities of liquid to
temperature and when preparing larger quantities of food.
LO
Regardless of size, always select a utensil that is suitable for the amount and type of food
being prepared. Select a burner and flame size appropriate to the pan. Never allow flames to
extend beyond the outer edge of the pan.
2
3
5
.........
L/7}? I_
Do not place plastic items such as salt and pepper shakers, spoon
holders or plastic wrappings on top of the cooktop when it is in use. These items
could melt or ignite. Potholders, towels or wood spoons could catch fire if placed too close to
a flame.
J
6
To operate
I.
2.
3.
4.
the surface
burner:
Place cooking utensil on burner.
Push in and turn the Surface Control knob to LITE Note: All electronic ignitors will click
at the same time. However, only the burner you are turning on will ignite.
Visually check that the burner has lit.
Push in and turn the Surface Control Knob to the desired flame size. The control knobs
do not have to be set at a particular mark. Use the guides and adjust the flame as
needed. DO NOT cook with the Surface Control knob in the LITE position. (The electronic
ignitor will continue to click if left in the LITE position, causing premature wear.)
In the event of an electrical power outage, the surface burners can be lit manually. To light a
surface burner, hold a lit match to the burner head, then slowly turn the Surface Control knob
to LITE Use caution when lighting surface burners manually.
16
Oven Vent(s)
and Racks
Before Setting
Oven Controls
Ovens Vents Locations
Each oven has its own vent located on the top, near each side and towards the back of the
cooktop. When an oven is on, warm air is released through the vent; this ventilation is
necessary for proper air circulation in the oven and good baking results.
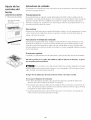
Arranging
FEATURE OVERVIEW
•
Oven vent(s) and racks
Oven Racks
ALWAYS ARRANGE OVEN RACKS WHEN THE OVEN IS COOL (PRIORTO
OPERATING THE OVEN). Always use oven mitts when using the oven.
To remove an oven rack, pull the rack forward until it stops. Lift up front of
rack and slide out.
To replace an oven rack, fit the rack onto the guides on the oven
walls. Tilt the front of the rack upward and slide the rack back into place.
Side Oven
If using multiple pans, stagger as shown. If using one pan, place in center of oven.
Main Oven
Air Circulation
in the Oven
Z
:d>
For best air circulation and baking results, center pans as much as possible. Allow 2-4" (5-10
cm) around the utensil(s) for proper air circulation and be sure pans do not touch each other
or the door, sides and back of oven. The hot air must circulate around the pans in the oven
for even heat to reach all parts of the oven.
17
Setting
Oven
Controls
FEATURE OVERVIEW
Manually Operated
Oven Cooking
Manually
Operated
Oven
Cooking:
DISPLAY
INSTRUCTIONS
To Set or Change the Temperature
for Normal Baking
The oven can be programmed to bake at any temperature from 170% (77°C)
to 550% (288°C).
I. Push BAKE. '....
and the word "BAKE" will be displayed.
2. Push the UP or DOWN ARROW. The display will show "350°F ''(177°C). By
holding the UP or DOWN ARROW, the temperature can then be adjusted in 5%
(3°C) increments.
3. As soon as the UP or DOWN ARROW is released, the oven will start heating.
The display will show the actual oven temperature as it increases to the desired
setting. If preheating is necessary, wait until the selected temperature is shown
in the display.
4. To cancel the baking function, push CLEAR OFF.
To change
the temperature
after
normal
To Set or Change Temperature
I.
2.
3.
4.
baking/roasting
for Convection
has begun,
repeat
Baking/Roasting
Push CONV Bake/Roast. '....
and "CONV BAKE" will be displayed.
Push and hold the UP or DOWN ARROW until the desired baking temperature
appears in the display.
As soon as the UP or DOWN ARROW is released, the oven will start heating
and the fan inside the oven will turn. The fan shuts off when the oven door is
opened.
To cancel the convection baking/roasting function, push CLEAR OFF.
18
steps 1 and 2 above.
(some
models)
Setting
_\
TIMER
Oven
Controls
FEATURE OVERVIEW
•
Timed
Timed Bake
Bake:
The BAKE TIME and STOPTIME pads control the Bake Time operation. The automatic timer will turn the oven on and off at
the times you select in advance. The oven can be programmed to start immediately and shut off automatically or to start
baking at a later time with an automatic shut off.
Use caution when using tile automatic timer. Use tile automatic timer when cooking cured or frozen meats
and most fruits and vegetables. Foods that can easily spoil such as milk, eggs, fish, meat or poultry should be chilled in the
refrigerator first. Even when chilled, they should not stand in the oven for more than I hour before cooking begins, and
should be removed promptly when cooking is completed.
DISPLAY
INSTRUCTIONS
Start Heating Immediately
and Shut Off Automatically:
Be sure that the clock shows the correct time of day (example 1:30).
Place the food in the oven.
Push BAKE TIME. "
:
" and the words "BAKE", "TIME" will be
displayed.
4. Push and hold the UP ARROW until the desired baking time appears in the
display. The baking time can be set for any amount of time from 5 minutes to 11
hours and Bg minutes. When setting the baking time, the time will appear in the
display and increase in 5 minute increments (example 55 minutes).
B. Push BAKE. '....
and the word "BAKE" will be displayed.
6. Push and hold the UP or DOWN ARROW until the desired baking temperature
appears in the display.
To
I.
2.
3.
Once the controls
are set:
1. The oven will come on and start heating to the selected baking temperature.
2. The word "ON" will be displayed.
3. The main display will show the oven baking time and count down by minutes
until it reaches ":00".
When
the set BAKE TIME runs out:
1. ":00" will be displayed and the oven will shut off automatically.
2. The control will beep 3 times.
3. The control will then continue to beep once every I0 seconds for B minutes or
until CLEAR OFF is pushed.
19
:'i
:'_
'[::
Setting
Oven
Controls
FEATURE OVERVIEW
Delayed Timed Bake
Delayed
Timed
Bake:
DISPLAY
INSTRUCTIONS
a Delayed Start Time and to Shut Off AutomaticalJy:
Be sure that the clock shows the correct time of day (example 1:30).
Place the food in the oven.
Push BAKE TIME. "
:
" and the words "BAKE", "TIME" will be
displayed.
4. Push and hold the UP ARROW until the desired baking time appears in the
display. The baking time can be set for any amount of time from 5 minutes to 11
hours and 59 minutes. When setting the baking time, the time will appear in the
display and increase in 5 minute increments (example 55 minutes).
5. Push STOP TIME, The time when the baking will stop will appear in the display
window. The words "BAKE"," STOP'and "TIME" will be displayed.
6. Push and hold the UP ARROW pad until the time you want the cooking to be
completed appears in the display (example 4:00).
7. Push BAKE, '....
and "DELAY BAKE" will be displayed.
8. Push and hold the UP ARROW until the desired baking temperature appears inn
the display.
9. If the baking temperature is not set, the control will beep. '....
and the
words "DELAY BAKE" will be displayed; the word "BAKE" will flash.
10. The control will calculate backward from the set stop time to determine when
the baking should start. The words "DELAY" and "BAKE STOPTIME" will
remain displayed.
11. The baking will come on automatically at the calculated time. The words
"DELAY" and "BAKE" will go out and "ON" will appear. The main display will
shown the oven baking time and count down by minutes until it reatches ":00".
12. To cancel the countdown, press CLEAR OFF.
For
I.
2.
3.
When the set BAKE TIME runs out:
I.
2.
3.
":00" will appear in the display window and the oven will shut off automatically.
The control will beep 3 times.
The control will then continue to beep once every I0 seconds for B minutes or
until CLEAR OFF is pushed.
20
Oven
Baking
Setting
informations
Oven
Controls
For best results, preheat the oven before baking cookies, breads, cakes, pies or pastries, etc.
There is no need to preheat the oven for roasting meat or baking casseroles.
FEATURE OVERVIEW
The cooking times and temperatures needed to bake a product may vary slightly from your
previously owned appliance.
Oven Baking
Informations
See step-by-step baking instructions for right oven in the Electronic Oven Control section.
See left oven step-by-step instructions in the "Setting Left Oven Control" section.
Baking problems
Baking Problems
Causes
Cookies
biscuits
o
the
too
dark
on
o
o
Dark pan absorbs heat too fast.
Use a medium-weight
o
Cakes put into the oven before
preheating time is completed.
Oven rack position too high or
low.
Oven too hot.
Allow oven to preheat to the selected temperature
before placing food in the oven.
Use proper rack position for baking needs.
or bottom,
.
Cakes
the
not done
in
Corrections
Cookies and biscuits put into
the oven before the pre-heating
time is completed.
Oven rack overcrowded.
bottom.
Cakes
top
and
burn on
and solutions
o
Oven too
hot.
o
•
Incorrect pan size.
Pan not centered
in the oven.
Allow
before
o
oven to preheat
placing
food
to the selected
Choose pan sizes that will permit 5.1 cm to 10.2 cm
(2" to 4") of air space on all sides when placed in the
oven.
aluminum
o
Set oven temperature
recommended.
25°F/12°C
level.
,
Range not level.
o
Pan too close to oven wall or
o
rack overcrowded.
Foods not done
when
time
o
Pan warped.
o
Oven too cool.
o
cooking
Oven overcrowded.
is up,
o
Oven door opened
frequently.
lower
Use pan size suggested
in recipe.
Use proper rack position and place
cm to 10.2 cm (2" to 4")
not
baking
sheet.
Set oven temperature 25°F/12°C lower than
recommended.
center.
Cakes
temperature
in oven.
o
too
o
is 5.1
of space on all sides of pan.
Place marked glass measuring cup filled with water
on the center of the oven rack. If water level is
uneven, refer to the installation instructions for
leveling the appliance.
Be sure to allow 5.1 cmtol0.2cm(2"
to4")of
clearance on all sides of each pan in the oven.
Do not use pans that are dented or warped.
Set oven temperature 25°F/12°C higher than
suggested and bake for the recommended time.
Be sure to remove all pans from the oven except the
ones to be used for baking.
Open oven door only after shortest recommended
baking time.
21
Z
**IiH_
than
pan so there
ifi'_ii
Setting
Oven
Controls
FEATURE OVERVIEW
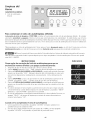
Broil
Broil
DISPLAY
INSTRUCTIONS
Close the oven door to the broil stop position
when
broiling.
I. Push VARI BROIL, "
" and the word "BROIL" will be displayed.
2. Push and hold the UP or DOWN ARROW until the desired broil
setting level appears in the display.
3. When broiling isfinished, push CLEAR OFF.
Variable
Setting
LO
(LOW)
2
(Medium
3-4
(Medium)
5
(Medium
Hi
(High)
Doneness
Well done
Low)
Medium
well
Medium
Hi)
Medium
rare
Rare
22
Broiling
Informations
Broiling is a method of cooking tender cuts of meat by direct heat from the broil elernent of
the oven. Meats are placed on the broiling rack and the rack is placed under the broiling
element.
Setting Oven
Controls
FEATURE OVERVIEW
"
See the broiling instructions for main oven in the Settinq Oven Controls section.
Broiling Tips
Broil Stop
Position
See side oven step-by-step instructions in the Setting Side Oven Control section.
Preheating
Preheating is suggested when searing rare steaks (remove the broiler pan before preheating;
food will stick if placed on hot metal.) To preheat, set the oven control(s) to BROILas
instructed in the Setting Oven Controls section. Wait for the element to become red-hot,
usually about 2 minutes. Preheating is not necessary when broiling meats well-done.
To Broil
Broil on one side until the food is browned; turn and cook on the other side; season and
serve. Always pull rack out to the stop position before turning or removing food.
Main Oven
Determining
Broiling
Times
if'_ii
Broiling times vary; watch the food closely. Time not only depends on the distance from the
element, but on the thickness and age of meat, fat content and aloneness preferred. The first
side usually requires a few minutes longer than the second. Frozen meats also require
additional time.
Broiling
Tips
The broiler pan and its grid allow dripping grease to drain and be kept away from the high
heat of the broiler.
DO NOT use the pan without
grease could ignite.
its grid. DO NOT cover the grid with foil. The exposed
Should an oven fire occur, close the oven door and turn off the oven. If the
fire continues, throw baking soda on the fire or use a fire extinguisher. DO NOT put water
or flour on the fire. Flour may be explosive.
Always
pull oven rack out to the stop position
before turning
or removing
food.
Broiler Clean-Up Tips:
• To make cleaning easier, line bottom of the broiler pan with aluminum foil. DO NOT cover
the broiler grid with foil.
• To prevent grease from baking on, remove the broiler pan from the oven as soon as
cooking is completed. Use hot pads because the broiler pan is extremely hot. Pour off
grease. Soak the pan in HOT, soapy water.
• Clean the broiler pan as soon as possible after each use. If necessary, use soap-filled steel
wool pads. Heavy scouring may scratch the grid.
23
Z
Setting
Oven
Controls
FEATURE OVERVIEW
,, Searing Grill
Searing Grill
The searing grill provided with your new range allows you to grill food in the oven.
Do not use the searing grill without the broiler pan and insert. The broiler pan and its
insert allow dripping fat to drain and be kept away from high heat of the broiler. Do not use
searing grill on the cooktop. The searing grill is not designed for use on the cooktop.
Doing so may result in a fire.
Should an oven fire occur, leave the oven door closed and turn off the oven.
If the fire continues, throw baking soda on the fire or use a fire extinguisher. DO NOT put
water or flour on the fire. Flour may be explosive.
To Use the Searing
GriJJ
1.
Place the insert on the broiler pan. DO NOT use the broiler pan without
cover the insert with aluminium foil. The exposed fat could ignite.
the insert or
2.
Place the Searing Grill on top of the insert.
3.
Preheat the Searing Grill by placing the stacked parts in the oven and close the door. The
searing grill should be hot before the food is added.
4.
Push VARI BROIL "
5.
Push and hold the UP or DOWN ARROW until the desired broil setting level appears in
the display.
6.
Allow the oven to operate for approximately 10 minutes for the Searing Grill to get hot.
7.
8.
Pull oven rack out and place food on the Searing Grill.
Push the oven rack in and close the oven door.
9.
Broil on one side until food is browned; turn and cook on the second side. Season and
serve. NOTE: Always pull the rack out to the stop position before turning or removing
food.
" and the word "BROIL" will be displayed.
When broiling is completed, end the broil cycle by pushing CLEAR OFF pad.
24
Convection
Cooking
and Baking (If Equipped)
The convection option, available on some models, is an alternative to the conventional
oven cooking methods of baking/roasting.
Setting
Oven
Controls
FEATURE OVERVIEW
Convection cooking is a method of cooking in which the heated air of the oven is circulated
by a fan at the rear of the oven cavity, providing better heat distribution. This fan is covered
by a baffle to circulate the air uniformly, providing even heat distribution for faster and
more even cooking, baking and browning. The heated air penetrates food from every
angle, sealing in natural moisture and flavors. The convection fan automatically turns
off when the oven door is opened and resumes when the door is closed
again. However, the heating element will stay on.
Convection Cooking
and Baking Informations
(If equipped)
Convection Roating
(If equipped)
The oven can be programmed to bake in the convection mode at any
temperature from 170°F/80°C to 550°F/288°C. Preheating the oven for 10-I 2
minutes is recommended when using convection but not necessarywhen roasting
or cooking casseroles.
CAUTION: In the convection mode, using cooking times from conventional
cooking recipes may cause food to be overcooked. For satisfactory results, use
only tested recipes with times adjusted for convection cooking. Obtaining and
using a convection oven cookbook is highly recommended.
Convection cooking uses a lower temperature and takes less time to achieve the same
results as conventional cooking. In convection mode, the actual temperature in your oven
automatically adjusts to be 25%/I 2°C lower than the temperature displayed on the oven
control panel. Because of this automatic adjustment you can enter the cooking temperature
from your existing conventional cooking recipe, but do not set the cooking time to be the
same. Even at the lower cooking temperature, convection cooking times will be as much as
30% lessthan conventional cooking times.
When programming cooking times for convection cooking, enter a time that is 20 to 30
percent less than called for in your conventional cooking recipe. After the cooking cycle
ends, decide if the food is done to satisfaction, slightly overdone or slightly underdone (if
underdone, cook a short time longer to satisfaction). Make a note of the time and results,
and with your next use of the recipe adjust cooking time accordingly.
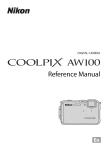
Convection
Roasting
(if equipped)
ifi" ii
Air circulation
during convection cooking.
To select convection
cooking mode, press
CONV BAKE ROAST button
on control panel before
setting cooking
temperature and time.
Roasting
When convection roasting, use the broiler pan and grid, and the roasting rack. The broiler
pan will catch grease spills and the grid will help prevent grease spatters. The roasting
rack will hold the meat.
Rack_
Grids,,
,s: _
1. Place oven rack on bottom or next to bottom rack position.
2. Place the grid in the broiler pan. The roasting rack fits on the grid allowing the heated
air to circulate under the food for even cooking and helps to increase browning on the
underside. Make sure the roasting rack is securely seated on the grid in the broiler pan.
DO NOT use broiler pan without the grid. DO NOT cover the grid with aluminum foil.
25
Broiler_
Pan,/
Z
Setting
Setting
Oven
Controls
To Bake
FEATURE OVERVIEW
I.
2.
Setting Side Oven
Control
SIDE OVEN
3.
TEMP
OFF
BROIL
4.
Side Oven
Control
Arrange oven racks while the oven is still cool. See "Arranging Oven Racks" above.
Turn the Temperature Control Knob to the desired oven temperature. When the oven is first
turned on, the oven indicator light below the Temperature Control Knob will glow.
Preheat the oven for 10 to 12 minutes before baking. Preheating is not necessary when
roasting, cooking casseroles or broiling most foods. When the desired temperature is
reached, the oven indicator light will go out. The light will then go on and off as the element
cycles on and off to maintain the desired temperature.
When cooking isfinished, turn the Temperature Control Knob to OFF.
500
150
..........
450
To Broil
I.
Side Oven
Temperature
Control
Knob
2.
3.
4.
5.
6.
BroilStop
Door Position
Arrange oven rack while oven is still cool. For rare meats, position the broiler pan closer to
the element (upper position). For well-done foods such as chicken, lobster tails or thick cuts
of meat, position the pan further from the element (to a lower position).
Turn the Temperature Control Knob to BROIL.To sear rare steaks, allow the element to
become red-hot--about 2 minutes--before placing food in oven.
Place the grid on the left oven broiler pan, and then place the meat on the grid. DO NOT
use the broiler pan without the grid or cover the grid with aluminum foil. The exposed fat
could ignite.
Place the side oven broiler pan on the oven rack. Close the oven door to the Broil Stop
position while broiling (door opened about 2 inches).
Broil on one side until food is browned; turn and cook on the other side. Season and serve.
Note: Always pull the rack out to the stop position before turning or removing food.
When broiling is finished, turn the Temperature Control Knob to OFF.
Should an oven fire occur, close the oven door and turn off the oven. If the fire
continues, throw baking soda on the fire or use a fire extinguisher. DO NOT put water or flour
on the fire. Flour may be explosive.
Side Oven
26
Self-Clean
Oven
Cycle (Main Oven)
Oven Cleaning
FEATURE OVERVIEW
Adhere
to the Following
Precautions:
Allow the oven to cool before cleaning.
Wear rubber gloves when cleaning any exterior parts of the oven manually.
During the self-clean cycle, the outside of the wall can become very hot to
touch. DO NOT leave small children unattended near the appliance. A ventilation system
starts automatically; it is normal for the hot air to be evacuated through the front of the
appliance.
Self-Clean Oven Cycle
(Main Oven)
Adhere to the Following
Precautions
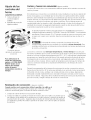
Preparing for the SelfCleaning Cycle
What to Expect During
Cleaning
Before cleaning any part of the oven, be sure the electronic oven control is
turned off or else push CANCEL pad. Wait until the oven is cool.
The health of some birds is extremely sensitive to the fumes given off during
the self-cleaning cycle of any range. Move birds to another well ventilated room.
DO NOT use commercial oven cleaners or oven
the self-cleaning oven. DO NOT clean the oven
essential for a good seal. Care should be taken
NOT use aluminum foil to line the oven bottom.
melt and damage the oven surface.
protective coatings in or around any part of
door gasket. The gasket on the oven door is
not to rub, damage or move the gasket. DO
This may affect cooking, or the foil could
/_
for the Self-Cleaning
Cycle
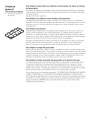
I. Remove excess spillovers in the oven cavity before starting the self-clean cycle. To clean,
use hot soapy water and a cloth. Large spillovers can cause heavy smoke or fire when
subjected to high temperatures. DO NOT allow food spills with a high sugar or acid content
(such as tomatoes, sauerkraut, fruit juices or pie filling) to remain on the surface as they
may cause a dull spot even after cleaning.
2. Clean all soil from the oven frame and the inner door (see illustration to right). These areas
heat sufficiently during self-cleaning cycle to burn soil on. Clean with soap and water. Do
not clean door seal because doing so can permanently damage it.
3. Remove the broiler pan and insert all utensils and any foil. These items do not withstand
high cleaning temperatures.
4. Oven racks may be left in the oven or may be removed. If they go through the clean cycle,
their color will turn slightly dull. After the cycle is completed and the oven has cooled, rub
the sides or the racks with wax paper or a cloth containing a small amount of baby oil or
salad oil. This will make the racks glide easier.
What
to Expect
During
:"i
DO
hand clean seal
hand clean door
A self-cleaning oven cleans itself with high temperatures (well above cooking temperatures)
which eliminate soil completely or reduce it to a fine powdered ash you can wash away with
damp cloth.
Preparing
_T
Cleaning
While the oven self-cleans, it heats to temperatures much higher than those used in normal
cooking. Sounds of metal expansion and contraction are normal. Odor is also normal as the
food soil is being removed. Smoke may appear through the oven vent, located on both sides
of the cooking surface.
If heavy spillovers are not wiped up before cleaning, they may flame and cause more smoke
and odor than usual. This is normal and safe and should not cause alarm. If available, use an
exhaust fan during the self-cleaning cycle.
NOTE: When the oven reaches its self-clean temperature, the smoke level will be reduced to
vapor.
27
'_;[
Oven Cleaning
FEATURE
•
OVERVIEW
Self-Cleaning Cycle
To start
the
Self-Clean
Cycle
*We recommend a 2 hour self-clean cycle for light soils, a 3 hour cycle for average soils, and a 4 hour cycle for heavy
soils.
DO NOT force the oven door open. This can damage the automatic door locking system. Use caution when
opening the door after the self-cleaning cycle is completed. The oven may still be VERY HOT.
INSTRUCTIONS
To Set the
Controls
for the
DISPLAY
Self-Cleaning
Cycle To Start
Immediately
1.
2.
3.
4.
5.
and Shut Off Automatically:
Be sure the clock shows the correct time of day and the door is close.
Push CLEAN. "CLN", "TIME" will appear in the display.
Push and hold the UP or DOWN ARROW until "3:00" appears in the display.
Set the cleaning time based on the amount of soil you have: light, medium or
heavy. *See note above.
As soon as the controls are set, the motor driven lock begins to close
automatically. After about 15 seconds, the word "DOOR" is displayed and 3
beeps are heard. From this moment, the lock is closed and the word "LOCKED"
appears in the display.
The word "ON" will be displayed; the main display will shown cleaning time
and count down until it reaches ":00".
When
1.
2.
the Self-Clean
Cycle is Completed
The time of day will appear in the display window and the word "LOCKED" will
remain in the display until the oven cavity has cooled down.
Once the oven has cooled down and the word "LOCKED" shown in the display
has gone out, the oven door can be opened.
To Stop or Interrupt
a Self-Cleaning
Cycle
If it becomes necessary to stop or interrupt a self-cleaning cycle due to excessive
smoke or fire:
1. Push CLEAR OFF.
2. Once the oven has cooled down and the word "LOCKED" shown in the display
has gone out, then the oven door can be opened.
28
Oven Cleaning
_\
TIMER
FEATURE OVERVIEW
Delayed Self-Cleaning
Cycle
To Start the Delayed
Self-Clean
Cycle
COOK TIME and STOP TIME control the Delayed Time Self-Clean operation. The automatic timer will turn the oven ON and
OFF at the time you select on advance. If you are planning to use the oven direclty after the self-clean cycle remember to
allow time for the oven to cool down and the lock to unlock. This normally takes about one hour. So to self-clean for 3 hours
will actually take about 4 hours to complete.
:
*We recommend a 2 hour self-clean cycle for light soils, a 3 hour cycle for average soils, and a 4 hour cycle for heavy
soils.
DO NOT force tile oven door open. This can damage tile automatic door locking system. Use caution when
opening the door after the self-cleaning cycle is completed. The oven may still be VERY HOT.
DISPLAY
INSTRUCTIONS
To Set the
Controls
for
the
Self-Cleaning
Cycle To Start
at a
Delayed
Time and Shut off Automatically:
1. Be sure the clock shows the correct time of day and the door is close.
2. Push CLEAN. "CLN", "TIME" will appear in the display.
3. Push and hold the UP or DOWN ARROW until "3:00" appears in the display.
Set the cleaning time based on the amount of soil you have: light, medium or
heavy. *See note above.
4. Push STOP TIME. The time of day that the self-cleaning cycle ends will appear
in the display. The words "STOP","CLEAN" will be displayed.
5. Push and hold the UP or DOWN ARROW until the time of day youwantthe
cleaning to be completed appears in the display.
6. The control will calculate backwards from the set stop time to determine when
the self-cleaning cycle should begin. The words "DELAY" and "CLN STOP
TIME" will be displayed.
7. The self-cleaning cycle will come on automatically at the calculated time. At
that time, the word "DELAY" will go out and the cleaning time will be
displayed and count down until it reaches ":00".
When the Self-Clean
I.
2.
Cycle is Completed
The time of day will appear in the display window and the word "LOCKED" will
remain in the display until the oven cavity has cooled down.
Once the oven has cooled down and the word "LOCKED" shown in the display
has gone out, the oven door can be opened.
29
i
:._;
Oven Cleaning
Porcelain
FEATURE OVERVIEW
Porcelain Enamel Oven
Porcelain has a smooth finish and is a type of glass fused to metal. Oven cleaners can be used
on all interior oven surfaces.
Cleaning (Side Oven, If
equipped)
• General Cleaning
To Remove Heavy Soil
Adhere to the Following
PrecautionsWhen Using
Oven Cleaners
• To Clean the Oven
Bottom
General Cleaning
Remove soils using hot, soapy water. Do not allow food spills with a high sugar or acid content
(such as milk, tomatoes, saukerkraut, fruit juices or pie filling) to remain on the surface as they
may cause a dull spot even after cleaning.
Adhere to the
following cleaning
precautions:
• AIIowthe oven to cool
before cleaning.
Wear rubber gloves
when cleaning the
appliance manually.
Remove spJllovers and
heavy soils as soon as
possible_ Regular
cleanings will reduce
the number of future
major
cieanings.
Ammonia
must be rinsed before
operating the oven.
Provide adequate
ventilation.
Enamel Oven Cleaning
(SideOven,
If
equipped)
To Remove Heavy Soil
1. Allow a dish of ammonia to sit in the oven overnight or for several hours with the oven
door closed. Clean softened spots using hot, soapy water. Rinse well with water and a
clean cloth.
2. If soil remains, use a soap-filled scouring pad or a nonabrasive cleaner. If necessary, use an
oven cleaner following manufacturer's instructions. DO NOT mix ammonia with other
cleaners.
Adhere to the following precautions when using oven cleaners:
1. DO NOT spray on the electrical controls or switches because it could cause a short circuit
and result in sparking or fire.
2. DO NOT allowa film from the cleaner to build up on the temperature sensing bulb located
at the top left rear corner of the oven; it could cause the oven to heat improperly. Carefully
wipe the bulb clean after each oven cleaning, being careful not to move the bulb. A
change in its position could affect how the oven bakes. Avoid bending the bulb and
capillary tube.
3. DO NOT spray any cleaner on the oven door trim or gasket, handles or any exterior
surfaces of the range, wood or painted surfaces. The cleaner can damage these surfaces.
To Clean the Oven
Bottom
Clean using hot, soapy water, a mild abrasive cleanser, a soap-filled abrasive pad or oven
cleaner following oven cleaner manufacturer's instructions.
DO NOT line the oven walls, bottom, racks or any other part of the appliance
with aluminum foil. Doing so will destroy heat distribution, produce poor baking results and
cause permanent damage to the oven interior (aluminum foil will melt to the interior surface of
the oven).
30
Cooktop
Cleaning
and Maintenance
Consistent and proper cleaning is essential to maintaining your ceramic glass cooktop
Prior to using your cooktop for the first time, apply the recommended CookTop® Cleaning
Creme to the ceramic surface (on the web visit www, sears,com for replacement cooktop
cleaner, item number 40079). Buff with a non-abrasive cloth or no-scratch cleaning pad. This
will make cleaning easier when soiled from cooking. The special cooktop cleaning cream
leaves a protective finish on the glass to help prevent scratches and abrasions.
General
Cleaning
FEATURE
•
OVERVIEW
Cooktop Cleaning and
maintenance
Sliding aluminum or copper clad bottom pans on the cooktop can cause metal markings
on the cooktop surface. These marks should be removed immediately after the cooktop
has cooled using the cooktop cleaning cream. Metal marks can become permanent if not
removed prior to future use.
Cookware (cast iron, metal, ceramic or glass) with rough bottoms can mark or scratch the
cooktop surface. Do not slide anything metal or glass across the cooktop. Do not use
your cooktop as a cutting board or work surface in the kitchen. Do not cook foods
directly on the cooktop surface without a pan. Do not drop heavy or hard objects on the
glass cooktop, because they may cause it to crack.
Cleaning Recommendations
for the Ceramic Glass Cooktop
For light to moderate soil:
Apply a few drops of CookTop® Cleaning Creme directly to the cooktop. Use a paper towel or
use a non-abrasive plastic type no-scratch cleaning pad to clean the entire cooktop surface.
Make sure the cooktop is cleaned thoroughly, leaving no residue.
For heavy, burned on soil:
Apply a few drops of CookTop® Cleaning Creme directly to the soiled area. Rub the soiled
area using a non-abrasive plastic type no-scratch cleaning pad, applying pressure as needed.
Do not use the pad you use to clean the cooktop for any other purpose.
If soils remain, carefully scrape soils with a metal razor blade scraper, holding scraper at a 30
degree angle to the surface. Remove loosened soils with cooktop cleaning cream and buff
surface clean.
IMPORTANT NOTE: Damage to the ceramic glass cooktop may occur if you use an abrasive
type scratch pad. Only use cleaning products that have been specifically designed for ceramic
glass cooktop.
Plastic or foods with a high sugar content:
These types of soils need be removed immediately if spilled or melted
onto the ceramic cooktop surface. Permanent damage (such as pitting of
the cooktop surface) may occur if not removed immediately,
After
turning the surface elements OFF,use a razor blade scraper or a metal
spatula with a mitt and scrape the soil from the hot surface (as illustrated).
Allow the cooktop to cool, and use the same method for heavy or burned
on soils.
31
if"ii
Z
Y
Before
cleaning the cooktop, be
sure the controls are turned
to OFF and the cooktop is
COOL,
DO NOT
use a cooktop cleaner on a
hot cooktop. The fumes
can be hazardous to your
health, and can chemically
damage the ceramic-glass
surface.
General
Cooktop
•
and Maintenance
Do not use the following
Cleaning
FEATURE
Cleaning
(continued)
on the ceramic glass cooktop:
• Do not use abrasive cleaners and scouring pads, such
as metal and some nylon pads. They may scratch the
cooktop, making it more difficult to clean.
OVERVIEW
Cooktop Cleaning and
Maintenance
• Do not use harsh cleaners, such as chlorine bleach,
ammonia or oven cleaners, as they may etch or
discolor the cooktop.
THIS COOKTOP IS NOT
REMOVABLE. Do not
• Do not use dirty sponges, cloths or paper towels, as
they can leave soil or lint on the cooktop which can
burn and cause discoloration.
attempt to remove or lift
the cooktop.
Use and Care of Glass Surface
Fine "Brown lines"
(tiny scratclqesor
abrasions which
have collected soil).
i
Coarse particles (salt,
sand, sugar or grit)
between bottom of
cookware and cooktop
that are not removed
before cooking. Using
incorrect cleaning materials.
Clean cooktop
after every use.
Metal marking
(mark or black
marks),
Sliding or scraping metal
utensils or oven shelves
across cooktop,
Do not slide
cookware across
cooktop,
Apply cleaner cream
with dampened paper
towel to cooled
surface
Brown streaks and
specks,
Cleaning with a sponge or
dishcloth that has been
used for other kitchen
tasks,
Use cleaner
cream with
clean, damp
paper towel,
Use a small amount
of cleaner cream with
clean, damp paper
towel.
Daily use of
cleaner cream.
Tiny scratches are not
removable. They can
be minimized by
continual use of
cleaner cream. Such
scratches do not
affect cooking.
Spedal Cleaning Instructions for Mineral Deposits and Discolorations
Problem: A gray brown stain cannot be removed when using cleaner cream.
Cause:
Prevention:
Condensation, when cooking, often collects and drips from cookware. The minerals
found in water may cause a gray or brown film to develop on cooktop. This film isvery
thin and appears to be under cooktop.
Daily and proper use of cleaner cream.
Removal:
•
•
•
•
Wet surface with water and sprinkle on cleaner cream.
Scrub with clean, damp paper towel until stain disappears.
Clean remaining paste away with damp paper towel.
Apply dab of cleaner cream and polish with a clean paper towel.
Do not use cleaners on a heated surface. Fumes could be hazardous. Wait for area
to cool before cleaning. Do not use cleaner cream to clean porcelain, paint or aluminium because
it could damage the surface.
32
To Clean the Burner
Burner Bases.
Grates,
Contoured
Burner
Pans, Burner
Caps, and
The burner grates, contoured burner pans, burner cap, and burner base should be routinely
cleaned. Keeping the burner ports clean will prevent improper ignition and an uneven flame.
Follow instructions below.
To Clean the Contoured
Burner
General
Cleaning
FEATURE
•
OVERVIEW
Cooktop Cleaning
Pans
The square burner pans are attached to the cooktop and are not removable. The burner pan
forms a recessed well area located around each burner unit. If a spill occurs in one of the four
well areas, blot up spill with an absorbent cloth. Rinse with a clean, damp cloth and wipe dry.
To Clean the Grates
The burner grates and wok stand are dishwasher safe. Any remaining soil may be removed
by gently scouring with a soapy scouring pad. Rinse with a 1:1 solution of clean water and
ammonia. If necessary, cover difficult spots with an ammonia-soaked paper towel for 30 to 40
minutes. Rinse with clean water and a damp cloth, then scrub with a soap-filled scouring pad.
Rinse and wipe dry with a clean cloth. Remove all cleaners thoroughly or the grate porcelain
may become damaged during future heating. DO NOT use spray oven cleaners.
To Clean the Burner
Caps
Use a soap-filled scouring pad or a mild abrasive cleanser to clean burner caps. If necessary,
cover stubborn spots with an ammonia-soaked paper towel for 30 minutes. Rub gently with a
soap-filled scouring pad and rinse with a mixture of clean water and vinegar. Wipe dry.
Remove all cleaners thoroughly or the burner cap porcelain may become damaged during
future heating.
To Clean the Burner
Bases and Gas Openings
The ports (or slots) around the burner base must be routinely cleaned. Use a small-gauge wire
or needle to clean small slots or holes. Use care to prevent damage to the electrode. If a
cleaning cloth should catch the electrode, it could break or damage the electrode. If the
electrode is damaged or broken, the surface burner will not light because it will not spark.
Manual lighting with a match is still possible.
For proper flow of gas and ignition of the burner--DO NOT ALLOW SPILLS,FOOD, CLEANING
AGENTS OR ANY OTHER MATERIAL TO ENTERTHE GAS OPENING. Gas must flow freely
through the small hole in the brass orifice for the burners to light properly. If the gas opening
orifice becomes soiled or clogged, use a small-gauge wire or needle to clean. ALWAYS keep
the burner cap assembly and ring in place whenever a surface burner is in use.
After cleaning make sure each burner cap is properly aligned and level. Turn the burner on to
determine if it will light. If the burner does not light after cleaning, contact a Sears Service
Center. Do not service the sealed burner yourself.
33
Z
General
CJeaning Various
Cleaning
Before cleaning any part of the range, be sure all controls are turned OFF and the range is
cool. Remove spillovers and heavy soiling as soon as possible. Regular cleaning will reduce the
effort required for major cleaning later.
Surfaces
Parts of Your Range
How to Clean
Vinyl and
Aluminum
Use hot, soapy water and a cloth. Dry with a clean cloth.
(Trim Pieces)
Control Panel f_ ............
Before cleaning the controlpanel, turn all controls to OFFand remove the control knobs.
To remove, pull each knob straight off the shaft. Clean using hot, soapy water and a
dishcloth. Be sure to squeeze excesswater from the cloth before wiping the panel;
especially when wiping around the controls. Excesswater in or around the controls may
cause damage to the appliance. To replace knobs after cleaning, line up the flat sides of
both the knob and the shaft; then push the knob into place.
Stainless Steel
Cleaners made especially for stainless steel as Stainless Steel Magic, or other similar
cleaners are recommended. Always follow the manufacturer's instructions. Be sure to
rinse the cleaners as bluish stains may occur during heating and cannot be removed.
Control panel,
Oven door and
Drawer front panel
Oven Racks
Remove racks. See "To remove and to replace an Oven Rack" under Setting Oven
Controls. Use a mild, abrasive cleaner, following manufacturer's instructions. Rinse with
clean water and dry. After cleaning the racks, rub the sides of the racks with wax paper
or a cloth containing a small amount of baby oil or salad oil (this will make the racks glide
easier into the rack positions).
Searing Grill (If equipped)
For general cleaning, put in hot soapy water for approximately 10 minutes. Use a soft
cloth to remove difficult soils. Rinse with a damp cloth and dry. DO NOT use abrasive
cleaners or pads; they can scratch.
Cooktop, under Cooktop,
Broiler Pan and Insert,
Door Liner, Small Oven
Gentle scouring with a soapy scouring pad will remove most spots. Rinse with a 1:1
solution of clear water and ammonia. If necessary, cover difficult spots with an ammoniasoaked paper towel for 30 to 40 minutes. Rinse with clean water and a damp cloth and
then scrub with a soap-filled scouring pad. Rinse and wipe dry with a clean cloth. Remove
all cleaners or the porcelain may become damaged during future heating. DO NOT use
spray oven cleaners on the cooktop.
Oven Door
To clean oven dooB wash with hot, soapy water and a clean cloth. DO NOT immerse the
door in water.
DO HAND
CLEAN FRAME
___
_kj_3
--
DO NOT \'_1_'_1
_
HAND
_"_y
CLEAN GASKET
DO NOT clean the oven door gasket. The oven door gasket is made of a woven material
which is essential for a good seal. Care should be taken not to rub, damage or remove
the gasket.
F/
34
To Remove
1.
2.
3.
4.
and Replace
Right Oven
General
Door
Open the door to the fully opened position.
Pull up the lock located on both hinge supports and engage it in the hinge levers. You may
have to apply a little downward pressure on the door to pull the locks fully over the hooks.
Grabthedoorbythesides,
pull the bottom of the door up and toward you to disengage
the hinge supports. Keep pulling the bottom of the door toward you while rotating the top
of the door toward the range to completely disengage the hinge levers.
To replace the door, reverse the door removal steps. Make sure the hinge supports are fully
engaged before unlocking the hinge levers.
Cleaning
FEATURE
•
OVERVIEW
To Remove and Replace
Oven Door
To Remove and Replace
Storage Drawer
The door is heavy. After removing door, lay it flat on the floor with its inside
facing down.
e lever
Z
Lock engaged
for door removal
in
normal position
To Remove
and Replace
Storage
Hinge Slot
Door removed
from range
Pull up with
Drawer
To Remove Storage Drawer:
I. Open the drawer to the fully opened position.
2. Locate the glide lever on each side of drawer; pull up on the left glide lever
and push down on the right glide lever (see figure 1).
3. Pull the drawer away from the range.
Left Glide
To Replace Storage Drawer:
1.
2.
3.
4.
Pull the bearing glides to the front of the range (see figure 2).
Align the drawer glides with the slots on the bearing glides.
Push the drawer into the range until the glides levers "click" (approx. 2 in.).
Pull the drawer open again to seat it into position.
If you do not hear the glide levers "click" or if the drawer does not
feel seated, remove it and repeat steps 1 through 3. Doing so will
minimize damage to the bearing glides. Do not try to force the drawer into
place.
Push down
'with finger
Fig. I
Fig. 2
35
finger
Changing
Light
Oven
Be sure the oven is unplugged and all parts are COOL before replacing the
oven light bulb. Do not turn the oven light on during a self-cleaning cycle. High temperature
will reduce lamp life.
To Change
the Oven Light
The oven light automatically turns on when the door is opened (some models). To turn the
oven light on and off when the door is closed, use the OVEN LIGHT switch located on the
control panel.
I. Turn electrical power off at the main source or unplug the oven.
2. Wear a leather-faced glove for protection against possible broken glass.
3. Presswire holder to one side to release the glass shield.
4. Replace bulb with a new 40 watt appliance bulb.
5. Replace glass shield in socket and snap wire holder into place.
6. Turn power back on at the main source (or plug the appliance back in).
7. The clock will then need to be reset. To reset, see Setting the Clock and Minute Timer in
the ELECTRONICOVEN CONTROL section of this manual.
Adjusting
Oven
Temperature
NOTE: The adjustments
made will not change the
self-cleaning temperature.
When first using the oven, be sure to follow recipe times and temperatures. If you think the oven
is too hot or too cool, the temperature can be adjusted. Before adjusting the oven temperature,
test a recipe by using a temperature set higher or lower than the recommended temperature.
The baking results should help you to decide how much of an adjustment is needed.
To Adjust
I.
2.
3.
4.
5.
the Oven Temperature:
Push BAKE.
Set the temperature to 550°F/288°C by pushing the UP ARROW.
Within 2 seconds, push and hold BAKE for approximately 5
seconds until the special 2 digit display appears. Release BAKE.
The display now indicates the difference in degrees between the
original factory temperature setting and the current temperatu re
setting. If the oven control has the original calibration, the display
will read "00".
The temperature can now be adjusted up or down 35%/21°C, in
5°F/3°C increments, by pushing the UP or DOWN ARROW.
Adjust until the desired amount of degrees offset appears in the
display. When adjusting for a cooler temperature, a minus sign (-)
will appear before the number in the display.
When you have made the desired adjustment, push CLEAR OFF
to go back to the time of day display.
36
Youmaysavethecostandinconvenience
of anunnecessar
service
callbyfirstreviewing
this Avoid
Checklist
ofcommonly
encountered
problem
situations.
Service
Checklist
Youwill becharged
fora service
callwhiletheappliance
isinwarrantyifthe problemisnot
caused
bydefective
productworkmanship
or materials.
Your new appliance is a carefully engineered product. Many times, what appears to be a
reason to call service requires nothing more than a simple adjustment you can easily make in
your own home.
OCCURRENCE
POSSIBLE CAUSE/SOLUTION
Range
Poor installation.
To level range, refer to Leveling Guide, page 8 in the Installation
Instructions.
When range is level, cooktop may appear out of alignment
if countertop
not level.
is not meveE
is
Weak, unstable floor. Be sure floor is level and can adequately support range. Contact a
carpenter to correct sagging or sloping floor.
Kitchen
cabinet
are square
Cannot move appliance
easily.
must be accessibme for service.
Appmiance
Cabinets
problem.
misalignment
may make range
and have sufficient
room
not square or are built
for range
in too tight.
appear
to be unlevel.
Be sure cabinets
clearance.
Contact
a cabinet
maker
to correct
the
:i
Contact
builder
Carpeting
or installer
interferes
with
to make appliance
range.
Provide
accessible.
sufficient
'_:_
space so range
can be lifted
over
carpet.
Entire
range
or oven
does
not operate.
Make
sure cord/plug
Service wiring
servicer.
is tightly
into outlet.
is not complete,
Contact
your
dealer,
installing
agent
or authorized
Power outage. Check house lights to be sure. Call your local electric company for
service.
*Oven
or Fg.
Oven
work.
control
and/or
Surface
unit
beeps
and displays
cooktop
lights
does
heat.
not
F1, F3
does not
Electronic control has detected a fault condition.
Push CLEAR to clear the display and
stop beeping. Program oven again. If fault recurs, record fault number. Push CLEAR and
contact an authorized
servicer.
Replace
or tighten
burners
do not
light.
See "Changing
No power
to the appliance.
Operate"
in this Avoid
Incorrect
used.
Surface
bulb.
control
Check
Oven Light"
steps under
in this
Guide
for instructions.
"Entire
Range or Oven
Does Not
control
is on for the surface
Service Checklist.
setting.
Make sure the correct
unit to be
Surface control knob has not been completely turned to LITE. Push in and turn the
surface control knob to LITE (until burner ignites) and then turn the surface control
knob to the desired flame size.
Burner
ports
Burner
Pans, Burner Cap and Burner
off,
are clogged.
use small-gauge
wire
Clean
burners.
See "To Clean Burner
Base"
under
or needle to clean
General
Grates,
Cleaning.
Contoured
With
the burner
ports or slots.
Gas supply is turned off. Turn gas supply on.
Surface burner flame burns half way
around.
Burner ports or slots are clogged. With the burner off, clean by using a small-gauge wire
or needle to lean ports or slots.
Moisture
until
flame
is present
after cleaning,
is full.
Dry the burners
Cleaning.
37
Lightly
fan the flame
thoroughly
following
and allow
instructions
the burner
under
to operate
General
Surface burner flame is orange.
Dust particles in main line. Allow the burner to operate a few minutes until flame turns
blue.
Salt air in coastal areas. A slightly orange flame is unavoidable.
Scratches or abrasions
surface.
on cooktop
Coarse particles such as salt or sand between cooktop and utensil can cause scratches.
Be sure cooktop surface and bottoms of utensils are clean before usage. Small
scratches do not affect cooking and will become lessvisible with time.
Cleaning
Metalmarks.
Brown
streaks
baking
Flames
vent.
inside
not recommended
the Cooktop
Cookware
with
rough
Glass"
for ceramic-glass
section
bottom
has been
under
used.
general
cooktop
have been used.
See
cleaning.
Use smooth,
flat-bottomed
cookware.
Sliding or scraping of metal utensils on cooktop surface. Do not slide metal utensils on
cooktop surface. Use a ceramic-glass cooktop cleaning cream to remove the marks. See
"To Clean the Cooktop Glass" section under General Cleaning.
Boilover are cooked onto surface. Use razor blade scraper to remove soil. See "To
Clean the Cooktop Glass" section under General Cleaning.
or specks.
Areas of discoloration
sheen.
Poor
materials
"To Clean
with metallic
Many factors affect baking results. Make sure the proper rack position is used. Center
food in the oven and space pans to allow air to circulate. Allow the oven to preheat to
the set temperature before placing food in the oven. Try adjusting the recipes'
recommended temperature or baking time. If you feel the oven is too hot or cool, see
"Adjusting
Oven Temperature"
in the ELECTRONICOVEN CONTROL section.
results.
oven
Mineral deposits from water and food. Remove using a ceramic-glass cooktop cleaning
cream. Use cookware with clean, dry bottoms.
or smoking
from
Excessive spillovers in oven. Set self-clean cycle for a longer cleaning time.
Excessive spillovers in oven. This is normal, especially for pie spillovers or large amounts
of grease on the oven bottom. Wipe up excessive spillovers before starting the selfclean cycle. If flames or excessive smoke are present, stop the self-clean cycle and follow
the steps under "Stopping or Interrupting
the Self-Cleaning Cycle" in the
ELECTRONICOVEN CONTROL section.
Oven
smokes
excessively
during
broiling.
Control(s)
not set properly. Follow instructions
ELECTRONIC OVEN CONTROL section.
under
"Setting
Oven
Controls"
in the
Make sure oven door is opened to the Broil Stop Position.
Meat too close to the element. Reposition the rack to provide proper clearance between
the meat and the element. Preheat broil element. Preheat broil element for searing.
Grid on broiler pan wrong side up and grease not draining. Always place grid on the
broiler pan with ribs up and slots down to allow grease to drip into pan.
Grease has built up on oven surfaces. Regular cleaning is necessary when broiling
frequently. Old grease or food spatters cause excessive smoking.
Self-cleaning
cycle
does
not work.
Control(s) not set properly. Follow instructions under "Oven
ELECTRONICOVEN CONTROL section.
Cleaning"
in the
Self-cleaning cycle was interrupted. Stop time must be 3 to 4 hours past the start time.
Follow steps under "Stopping or Interrupting
the Self-Cleaning Cycle" in the
ELECTRONICOVEN CONTROL section.
Soil not completely
cleaning cycle.
removed after self-
Failure to clean
bottom,
front
top
areas are not in the self-cleaning
or oven, frame
or door area outside
area, but get hot enough
oven seal. These
to burn on residue.
Clean
these areas before the self-cleaning
cycle is started. Burned-on
residue can be cleaned
with a stiff nylon brush and water or nylon scrubber. Be careful not to damage the oven
seal.
38
Tabla de materias
Registro del producto ....................................................
39
Garantia de la estufa ......................................................
39
IMPORTANTES INSTRUCCIONES DE SEGURIDAD ........ 40-42
Selecci6n de los utensilios de cocina ............................ 43
Cacerolas y soportes especiales .....................................
43
Consejos e informaci6n para hacer conservas .............. 44
Caracteristicas de la estufa ............................................
45
Funciones del panel de control ..................................... 46
Reglaje del reloj .............................................................
47
Caracteristicas de control
definidas por el consumidor ..................................... 48-49
Registro
Conversi6n al gas propano/licuado
............................... 50
Cocci6n de superficie ................................................
50-52
Antes de ajuste de los controles de homo ................... 53
CirculaciOn de aire en el homo ...................................... 53
Ajuste de los controles del homo ............................ 54-62
Limpieza del homo ...................................................
63-66
Limpieza general .......................................................
67-71
Para remplazar la bombilla del homo ........................... 72
Adjuste de la temperatura del homo ............................ 72
Lista de verificaci6n ..................................................
73-74
Nota ................................................................................
75
Servicio Sears ...........................................
Cubierta trasera
del producto
En 6ste espacio, inscriba la fecha de cornpra, modelo y n0mero de serie de su producto. Ud. encontrara el modelo y el
n0mero de serie en una placa de identificaciOn. La placa esta Iocalisada al la parte anterior de la estufa yes visible cuando la
puerta del homo esta abierta o en el interior de la gaveta en la parte lateral de la estufa.
Model No 790.
Fecha de compra
No de serie
Guarde estas instrucciones y su boleta de pago para consultaciOn futura.
Garantia
de electrodomOsticos
Kenmore
Elite
Garantia limitada de un aSo
Si este producto falla debido a un defecto de material o mano de obra durante el primer a_o a partir de la fecha de compra
cuando se instala, utiliza y mantiene de acuerdo con todas las instrucciones proporcionadas con el producto, Ilame al 1-888SU-HOGAR sMpara hacerlo reparar de manera gratuita. Si este electrodomOstico se usa para fines que no sean privados de
familia, esta garantia es valida 0nicamente por 90 dias a partir de la fecha de compra.
Esta garantia cubre _nicamente los defectos de material y mano de obra. Sears NO pagar_ Io siguiente:
1. Artk:ulos desechables que se desgasten por uso normal, incluyendo sin limitarse a los filtros, correas, bombillas y bolsas.
2. TOcnicos de servicio que instruyan al usuario en la manera adecuada de instalar, utilizar o mantener el producto.
3. TOcnicos de servicio que limpien o realicen mantenimiento al producto.
4. Da_os o fallas de este producto si el mismo no fue instalado, utilizado o mantenido de acuerdo con todas las instrucciones
proporcionadas con el producto.
5. Da_os o fallas de este producto por accidente, abuso o real uso del producto o uso para fines para los cuales no fue dise_ado.
6. Da_os o fallas de este producto por el uso de detergentes, limpiadores, quimicos o utensilios que no sean los
recomendados en todas las instrucciones proporcionadas con el producto.
7. Da_os o fallas de piezas o sistemas por modificaciones al producto que no hayan sido autorizadas.
GARANTJA LIMITADA DE ClNCO AI_IOS
Desde el segundo y hasta el quinto a_o a partir de la fecha de compra, cuando se instala y opera de acuerdo con las Instrucciones i:'_'
de instalaciOny con la Guia de uso y cuidado, Sears proporcionar& las siguientes piezas de la estufa sin costo alguno si
fallan por las razones que se indican a continuaciOn. El cliente debera pagar los costos de mano de obra de la instalaciOn.
•
Vidrio de la cubierta si falla debido a choque t_rmico.
•
Elementos superiores si estan defectuosos.
Lo que Sears no cubre:
•
Fallas del producto por abuso, real uso o uso para propOsitos para los cuales este electrodomOstico no fue dise_ado.
•
Da_os al vidrio de la cubierta causados por el uso de limpiadores o utensilios que no sean las cremas de limpieza y los
accesorios recomendados.
Da_os al vidrio de la cubierta causados por derrames endurecidos de materiales azucarados (incluyendo el almidOn de las
verduras o pasta) o de plastico derretido que no se limpien de acuerdo con las instrucciones de la Guia de uso y cuidado.
Reparaciones alas piezas o sistemas que resulten de modificaciones al electrodom_stico que no hayan sido autorizadas.
Renuncia de responsabilidades de garantias implicitas; limitaci6n de acciones legales
La 0nica y exclusiva opciOn del cliente bajo esta garantia limitada es la reparaciOndel producto seg0n se indica. Lasgarantias
implicitas, incluyendo las garantias de comercializaciOn o aptitud del producto para un propOsito especifico, estan limitadas a un
a_o o al periodo minimo permitido por ley. Sears no sera responsable por da_os consecuentes o incidentales. Algunos estados y
provincias no permiten la exclusion o limitaciOn de da_os incidentales o consecuentes o las limitaciones de duraciOn de las
garantias implicitas de comercializaciOn o aptitud, por Io que estas exclusiones o limitaciones pueden no aplicarse en su caso.
Esta garantia se aplica 0nicamente mientras este electrodom_stico est_ en uso dentro de los Estados Unidos o Canada.
Esta garantia le otorga derechos legales especificos. Usted puede tener ademas otros derechos que varian de un estado a otro.
Sears, Roebuck and Co., Dept. 817WA, Hoffman
Estates, IL 60179
Sears Canada Inc., Toronto, Ontario, Canada M5B 2B8
39
Impreso en los Estados Unidos
IMPORTANTES INSTRUCCIONES DE
Lea todas
las instrucciones
Guarde
Este manual
contiene
Este es el simbolo
herir o matar
importantes
_
Indica
Simpre
Le advierte
de utilizar
para futura
lea y obedezca
sobre
mensajes
el aparato
consultaci6n
todo
mensaje
de seguridad
de seguridad.
que le informan
de los peligros
que pueden
dano al producto.
una situacion
una situacion
antes
instrucdones
de seguridad.
de seguridad.
o ocasionar
Indica
_llr_
mensajes
de alerta
a Ud y a otros,
estas
EGURIDAD
muy peligrosa,
de peligro
inminente,
la cual de no ser evitada
la cual de no ser evitada
puede
puede
ocasionar
ocasionar
graves heridas
heridas
y hasta la muerte.
leves o dar3os al producto
solamente.
Todos
los mensajes
ocurrir
si no sige las instrucciones.
de seguridad
identificaran
Si todas
el peligro,
las instrucciones
le diran
de _ste
observadas
a la letra, se puede ocurrir incendios
causar daEos rnateriales,
lesiones o la rnuerte.
como
manual
o explosiones
reducir
el riesgo de heridad
que pueden
No alrnacene
--
cerca de _ste o cuamquier otro artefacto.
QUE HACER Sl HAY FUGAS DE GAS/E:
o utilke
gasolina
•
No intente
•
No toque
t_l_fonico
•
Llarne inrnediatarnente
•
de encender
ningun
calificado,
toda
estufa.
no utilice
ningun
de gas desde
y el servicio
deben
ser realizados
t_cnico
certificado
haber
el cart6n
desenvuelto
con el material
y ernpaquetado
antes
y las bolsas de plastico
la estufa.
No permita
de gas Ilarne
de
al
pot un instalador
o por el abastecedor
de usar
despues
edici6n
la
puerta
heridas
juegen
puerta
Electrical
o en la gaveta
y tarnbi&n
de instalacion
provistas
quemaduras
en el paquete
u otro tipo
fusibles,
y el suministro
caso de emergencia.
• Servicio
a la estufa
al cortaciruitos
No repare
que
o rernplace
se Io recorniende
a la valvula.
ninguna
pieza
en la
puede
ocasionar
No permita
graves
que los ninos
de heridas.
• Almacenarniento
sobre
rnateriales
inflarnables
de
los rnanuales
recipientes
ni sobre
Esto incluye
o de dar3os al aparato.
objetos
para alrnacenarniento.
de inter&s
para los ni_os
la constituci6n
use este electrodom_stico
del aparato.
de una estufa
ocasionar
la patas niveladoras,
ni el alarnbrado,
ni las
de anti-inclinaci6n
u otra parte del aparato.
4O
el papel,
ni en las gavetas
el plastico
y la ropa como:
o toallas,
explosivos
Los materiles
fuego
o dentro
del aparatoLos
no deberian
ser alrnacenados
la unidad,
de plastico
No almacene
rnoviendo
fijaciones
o sentarse
como calefactor
de _rea para calentar la habitaci6n.
Esto
podria causar envenenamiento
por monc_xiclo de carbono.
en
personales
o altere
estufa
NUNCA
especfficarnente.
Culaquier
typo de servicio debe ser hecho por
un tecnico calificado.
Esto reducira el riesgo de heridas
rnodifique
de
y
un homo,
• Nunca
instrucciones
pisar
al aparato.
No alarnacene
o la caja de
de cierre principal
Retire el cajon para acceder
a rnenos
viene
en los arrnarios
que est_n sobre la cocina. El nino que trata de
subir sobre la estufa para alcanzarlos
podria lastimarse.
de gas a la valvula
al usuario-
su aparato
las
No use el homo
de literatura
Solicite de su distribuidor
de recomendarle
a un tecnico calificado
una agencia de reparaci6n autorizada.
Asegurese de saber como
el corriente
de esta
da_os
Code
que viene con esta estufa.
desconectar
que
o se suban sobre la estufa. El peso de un niho sobre la
abierta puede hacer que esta se incline, causando graves
ANSI/NFPA
No. 70 - ultirna
edici6n
y requirirnientos
de
codigos
locales. Instale solamente
en conformidad
con las
instrucciones
Vea
El apoyarse,
que los nir3os juegen
y con el National
fijaci6n
de
de empaquetado.
- ultirna
inclinarse.
personas
Para reducir el riesgo de inclinad6n, la
estufa debe set asequrada con la
instalaci6n de las fUaciones que vienen con
la estufa. Para verificar si las fijaciones han
sido instaladas correctamente, retire el
panel inferior o gaveta de almacenaminto
y verifique que las fijaciones esten bien
clocadas. Consulte las instrucciones de
instalaci6n para una buena instalaci6n.
aparato
el tel_fono
Instalaci6n
correcta - Asegurese
que su artefacto
est_
correctarnente
instalado
y puesto
a tierra por un electricista
calificado,
en conforrnidad
con el National
Fuel Gas Code
ANSI Z223.1
le
puede
alas
con
la estufa.
pueden
ocurrir.
de gas.
el abastecedor
por un servicio
cinta adhesiva
Destruya
Io que puede
instalaci6n.
del abastecedor
contactar
estufa
Instale
inflarnables
de gas.
• Retire
Heridas
artefacto
el abastecedor
no puede
y liquidos
de bornberos.
La instalaci6n
Toda
•
•
el_ctrico;
Siga las instrucciones
departarnento
--
u otrosvapores
ningun
interruptor
en su edificio.
En caso que
•
•
--
le diran
no son
PARA SU SEGURIDAD:
un vecino.
y ademas
o dar3os
como
asi como
pueden
a la propiedad.
libros
liquidos
latas de aerosol
inflamables
ni en
(si equipada).
de cocina,
inflamables.
sobre
explotar
o dentro
y
RTANTES INSTRUCCIONES DE EGURIDAD
• No deje a los ni_os
solos o sin atencion
les permita
solos- Los ni_os no deben ser dejados
donde el aparato
est_ funcionando.
sentarse
o pararse
sobre
niguna
parte
No use parrillas
No
sobre las depresiones
del aparato.
una parrilla
de homo
AREAS
sellado,
va a occurir
CERCA DE ESTOS QUEMADORES,
ELEMENTOS
CAUENTES
DEL HORNO O LA SUPERFICIE AL INTERIOR DEL HORNO. La
generar
niveles
NO TOQUE
A LA SUPERFICIE
DE LOS QUEMADORES,
estandares
superior
calientes
toque
de los quemadores
pueden
para causar quemaduras.
estar suficientemente
Durante
y no deje ropa o otro material
y despues
inflamable
de monOxido
permitidos.
plancha
de cocinar,
superficie
ventana.
las aberturas
de ventilacion
cerca de estas aberturas,
• Use una vestimenta
la puerta
por la primera
tiempo
apropiada-
del homo
del homo
agua
o harina
para apagar
un fuego-
,, Cuando
caliente
ocasionar
substancias
un fuego
grasosas,
si es calentado
tenga
En caso de incendio
asegurese
de cerrar
• Utilice
secos-
de cierre
unicamente
los soportes
Los soportes
que
ocasionar
quemaduras
soportes
utilice
la v_lvula
u
oAseg0rese
a causa
est_n en contacto
una toalla
humedos
del vapor.
o un papel para remplazar
,, No caliente
recipientes
de comida
presion
al interior de estos puede
ocasionar
heridas.
el
interior
que est&n
No trate
de electricidad.
apaga
el homo
puede
seguir
quemarse
de utilizar
calientes,
que los
mango
No
y que la electricidad
funcionando.
Nunca
La
del utensilio
Io normal
quemador
utensilio
de cocina.
de modo
de caldera
El uso de utensilio
directamente
una parte
a la llama
mejorar_i
No utilice
WOK
durante
otras
del utensilio
halla
de cocina.
deben
ser colocados
unidades
hacia el
de superficie-
deie
debe ser colocado
unidades
Para
hacia el interior
y no
de superficie.
los quemadoreas
tiempo
puede
con alta
temperatura
sin
derretirse.
protectores-
utilizaciOn
puede
un cortocircuito.
Si no
el homo
puede
la utilizaciOn
del
adecuada
que no sobrepase
de tamano
Utensilios
tambien
el quemador
-
cocinar.
ocasionar
de cocina
No utilice
pelicula
de aluminium
un incendio,
envidriados-
una electrocuci0n
SOlo algunos
o
tipos de
No use cubiertas
Si un quemador
de
del fabricante
sobre el
de cocinar.
decorativas
se enciende
de superficie
accidentalmente,
de quemador.
la cubierta
decorativa
va a calentarse y posiblemente
fundirse. Se puede
occurir quemaduras
si toque alas cubiertas calientes. Esto
la eficacia.
detr&s
las recomendaciones
que
del
El tamaho
Verifique
uso con las planchas
el borde
menor
de la llama
y puede causar a la ropa de encenderse.
apropiado
de
(Lite) para
utensilios de vidrio, de vidrio/ceramica,
de cer_imica pueden
resistir la temperatura
del quemador de su plancha de
de la llama
expondr_i
cada unidad
de ENCENDIDO
a la base del homo u otra parte del aparato. SOlo utilizela
para cubrir la comida cuando este cociendola.
Cualquier
otra
un corte
que deja sin cuidado
de los utensilios
Delineadores
o deteriorarse.
el tamano
enciende
cuidadoLos derrames ocasionan
humo y derrames grasosos
que pueden encenderse,
o una sarten que ha calentado
pot
si esta
su estufa.
es restablecida,
La comida
Use un tamano
Gradue
inutilizada
durante
apaga
bot6n
la posici6n
del utensilio
y no sobre
sobre otras
al soporte.
el homo
Si no hay electricidad,
a
reducir el riesgo de quemaduras,
el encendido
de materiales
inflamables
y los derrames ocasionados
de casualidad.
El
puden
mucho
IMPORTANTE-
el borde
Los mangos
No permita
estufa
pot mucho
expuestas
Utilice una sart_n de tamaho apropiado. Este aparato est.1
equipado con quemadores de diferentes tamahos. Elija
utensilios con las bases aplanadas y Io suficientemente
grandes para cubrir todo el area del quemador. Utilizar
utensilios m_qspequer3os puede exponer parte del quemador
y ocasionar quemaduras de las prendas que Ileva puesta.
Puede
que est&n cerradoshacerlos
explotar
y
,, Retire la puerta del horno de toda
va ser almacenada
o destruida.
Use siempre
sobrepase
de gas,
o mojados
con las superficies
utilizada
sido
ser
su estufa
prender los quemadores.
Aseg0rese de que el quemador
encendido.
Entonces ajuste la llama de manera que no
principal.
para recipientes
est&n
de saber cual
superficie.
tiempo.
o fugas
no haya
pueden
utilice
un
cuidado.
por mucho
el&ctricos
Cuando
a los
para la salud.
INSTRUCCIONES IMPORTANTES PARA
UTILIZAR SU PLANCHA DE COClNAR
Apague
c_ustica,
superiores
y la
y la
No use ropa que es suelta
fuego con la tapa de una sart&n o use soda
quimico
seco o un extinguidor
en aerosol.
que
a gas
y puede
ser perjudicial
vez, o si no ha sido
asegurese
a gas - Si use
temperaturas
m_s altas que 0°C/32°F por m&s de 3 horas
antes de conectar
su estufa al suministro
em&ctrico.
holgada
cuando
utilice el aparato.
No ponga la ropa u otros
materiales
inflamables
en contacto con las areas calientes.
• No utilice
de carbono
con frias temperaturas.
en
contacto
con estos _ireas antes de dejarles enfriarse.
Entre estos
_ireas son la plancha de cocinar y la superficie en frente de la
incompleta,
Esto puede
superiores
sellados
un quemador
Los controles
da5ados
uso, no
entrar
sobre
una combustion
superficie de los quemadores
y los elementos
del homo pueden
estar calientes aun cuando estan de color moreno. Areas cerca de
la superficie
de horno
de los quemadores
del
puede
porque
WOK.
tambien
dar_ar la plancha
las cubiertas
aire va a bloquear
combustion.
41
pueden
de cocinar
o los quemadores
causar sobrecalentamiento.
desde el quemador
y causar problemas
El
de
'i:i:
i:'_
IMPORTANTES INSTRUCCIONES DE
PARA PLANCHAS
• No limpie
plancha
o utilice
DE COC[NAR SOLAMENTE
una plancha
de cocinar
se rompe,
de cocinar
los productos
que est_
rota-
de limpieza
Si la
o los
• Mmpie
el vidrio
utiliza
de la plancha
una esponja
superficie
mojada
caliente,
de cocinar
para limpiar
tenga
cuidado
con cuidado-
derrames
desconecte
IMPORTANTES
• Limpie
con el vapor.
de [a plancha
de cocinar
grasa deben
con objetos
encenderse
la cubierta,
muy filados.
UTILIZAR
IMPORTANTES
PARA
SU HORNO.
• Tenga cuidado
cuando
lado de la estufa cuando
Permita
que el humo
colocar
comida
abra la puerta
abra la puerta
y el vapor
del homo.
Parese al
de un homo caliente.
se escapen
en el horno/gaveta
antes de retirar
estar limpios.
plancha
o de
homo
est_ encendido
coloque
objetos
conducto
puede
de pl_stico
de ventilaciOn.
• Colocacion
del homo
gaveta
esten frios.
estas areas cuando
ocasionar
del homo.
Siempre
deseada
coloque
de estufa
instrucciones
del fabricante
tenga
bastante
cuidado.
Utilice
• No utilice
utensilio
la cubeta
parrillera
sin su accesorio.
permiten
el accesorio
La grasa que queda
ocasionando
dahos y heridas.
o la
de la parrilla
podria
con pelicula
reproductor
pueden
Siempre
y aerosoles
siga las
en cuenta
pueden
que
encenderse
de auto-limpieza
en la lista
del "Manual
unicamente
las partes
del usuario".
parrillera
Antes
de
y cualquier
otro
limpiadores
de homo-
Ningun
limpiador
de ninguna
de homo
clase debe set
unos
manos
sellado.
hasta
Tenga
cuidado
de no frotar,
Las
para un buen
dar_ar o desplazar
las
empaquetaduras.
• Retire
las rejillas
cambiara
limpieza.
del horno-
El color de las rejillas
del homo
si se les deja en el homo
durante
el ciclo
de auto-
La salud de algunos
pajaros
esta muy sensitiva
La cubeta
• F_
que proveen
Desplace
del ciclo de auto-
los p_jaros
limpieza
en otra habitaci6n
a
de cualquier
bien ventilada.
de aluminio.
encenderse.
La Ley del Estado de California sobre Seguridad
exige que el Gobernador
de California publique
al sistema
grasosos
No limpie
las empaquetaduras
del homoempaquetaduras
del horno son importantes
el
que la grasa gotee y este lejos
AVISO
o dano
en el ciclo
los humos
fuera
de
que la grasa se acumule
para su uso.Tenga
de los limpiadores
cocina.
• No cubra
las
Cuando caliente comida bajo
Consulte las instrucciones
del
y aerosoles-
comercial o de capa protectora
utilizada en en homo.
de la rejilla antes de moverla.
parrillera y su accesorio
del calor de la parrilla.
todas
No
recolocarla.
No permita que estos soportes est_n en contacto
con los elementos calientes del homo o de la gaveta de entibiar.
Retire todo
LIMPIAR
las
cuando
y coja la rejilla con ambas
mantener
Los depositos
los residuos
• No utilice
el homo
Si la rejilla debe ser desplazada
para recipientes
el
o encenderse.
cuando
o en el filtro.
auto-limpiar
el homo, retire la cubeta
utensilio o comida del homo.
al calor cerca del
derretirse
PARA
para la limpieza.
que est_n
graves quemaduras.
o sensibles
en la posici6n
este funcionando
soportes
Tocar
Estos pueden
de las rejillas
rejillas
homo
a la derecha.
la
electrico.
HORNO CON AUTO-LIMPIEZA
de entibiar.
el conducto
de ventilacion
del homo sin
La rejilla del homo esta ubicada detras de la
de cocinar
para
No permita
Limpiadores
• Limpie
• Mantenga
obstruccion.
regularmente
y causar un incendio.
encienda el ventilador.
fabricante
INSTRUCCIONES
INSTRUCCIONES
la estufa
en la cubierta
el vidrio
o corte el suministro
partes sin grasa que puede encenderse
y causar un
incendio.
La cubierta del escape de ventilacion
y los filtros
Algunos
productos
de limpieza puden producir
peligrosas
emanaciones
si se les usa sobre areas muy calientes.
o Evite de raspar
el aparato
con una tela mojada.
de retirar o remplazar
SU COClNA.
Si
en una
de no quemarse
• No toque la bombiiia
de luz caliente
Esto puede romper la bombilla.
Antes
bombilla
derrames pueden penetrar en ella y producir
un riesgo de
electrocucion.
Llame a un tecnico calificado
inmediatamente.
EGURIDAD
y exige
IMPORTANTE
SOBRE
SEGURIDAD
y Contaminaci6n
del Agua Potable (California Safe Drinking Water and Toxic Enforcement Act)
una lista de las sustancias que seg0n el Estado de California causan cancer, defectos congenitos
que los negocios
adviertan
a sus clientes
de la exposici6n
potencial
GUARDE ESTAS INSTRUCCI
42
a tales sustancias.
ES
ACUERDOS DE PROTECCION
En los EU.
Acuerdos
Maestro
En Canada
de Protecd6n
Acuerdos
Felicitaciones por haber hecho una compra inteligente. Su
nuevo producto Kenmore ®es disehado y manufacturado para
muchos ahos de servicio confiable. Pero como todo producto,
podria requerir mantenimiento preventivo o reparaciOn entre
tiempo. Ahies cuando el tener un Acuerdo Maestro de
Protecci6n le podria ahorrar dinero y molestias.
Su compra tiene valor mayor porque puedes depender de
Sears HomeCentral ® para servicio. Con sobre 2,400 T@cnicos
de Servicios y mas de un mill6n de piezas y accesorios,
tenemos las herramientas, piezas, conocimiento y destrezas
para asegurar nuestro compromiso: Le damos servicio a Io que
vendemos.
Compre ya un Acuerdo Maestro de Protecci6n y pret6jase de
gastos y frustradones inesperadas.
El Acuerdo Maestro de ProtecciOn tambi_n ayuda a extender
lavidadesunuevoproducto.
Estoesloqueseincluyeenel
Acuerdo.
I_" Servicio Profesional por nuestros 12,000 especialistas
profesionales en reparaciOn.
I_ Servido ilimitado sin cargo por piezas y servicio en
toda reparaci6n cubierta
I_" Garantia de"No-lim6n"reemplaza su producto
cubierto si ocurren cuatro o mas desperfectos dentro de
doce meses.
I_ Reemplazo de Producto si el producto cubierto no
puede set reparado.
1_ Verificaci6n de Mantenimiento
Preventivo Anual a su
petici6n sin cargos adicionales.
Pronta ayuda por tel_fono - apoyo por tel_fono por un
t_cnico de Searsen los productos que requieran
reparaci6n en casa, mas la conveniencia de hater cita
para reparaciOn.
I_" Protecci6n contra picos de energia o dahos el_ctricos
causados por fluctuaciones en energia.
I_" Reembolso de alquiler si la reparaciOn de su producto
cubierto toma mas tiempo de Io prometido.
I_
Su producto Kenmore®es disehado y puesto a prueba para
proveer muchos ahos de operaci6n confiable. Pero como todo
producto, podria requerir servicio entre tiempo. El Acuerdo de
Mantenimiento Sears le ofrece un programa de servicio
incomparable a un precio m6dico.
El Acuerdo de Mantenirniento
Sears:
Es su manera de comprar servicio para el mahana a precio
de hoy
Elimina facturas pot reparaci6n como resultado de uso y
desgaste normal
Provee apoyo via tel_fono de un t@cnico de Sears en
productos que requieran reparaci6n en casa
• Aunque no necesite reparaci6n, provee Verificaci6n de
Mantenimiento Preventivo anual, a su petici6n, para
asegurar que su producto esta en condiciones apropiadas.
Algunas limitaciones podrian aplicar. Para m_s
informaci6n sobre el Acuerdo de Mantenimiento
Sears Canada,
Ilame al 1-800-361-6665.
Una vez compres el Acuerdo, una simple Ilamada telefOnica
es todo Io que necesitas para hacer cita para su servicio.
Puedes Ilamar a cualquier hora, dia o noche o concertar una
cita para servicio via computadora.
Sears tiene sobre 12,000 especialistas profesionales de
reparaci6n, con acceso a sobre 4.5 millones de piezas y
accesorios de calidad. Esa es la clase de profesionalismo con
la que puedes contar para ayudar a prolongar la vida de su
nueva compra pot muchos ahos. iCompre su Acuerdo
Maestro de Protecci6n hoy!
Algunas limitaciones
precios e informaci6n
de Mantenimiento
y exclusiones podrJan aplicar. Para
adicional, flame al 1-800-827-6655.
Servicio de InstaJaci6n Sears
Para instalad6n profesional de Sears en enseres del hogar,
abridores de puertas de garaje, calentadores de agua y otros
articulos mayores del hogar, en EU. Ilame al
1-888-SU-HOGAR®.
43
de
Selecci6ne del los utensilios
de cocina
Paramejoresresultadosyconservaci6ndelaenergia,selecci6ne
utensilios de cocina con las caracteristicas siguientes:
POBRE
® Debajo de sart_n tot
Los sart_nes deben de tener las partes
de debajo planas. AsegOrese que la
parte esta plana girando una regla de
un lado a otro de la parte de debajo.
No debe tener ningOn boquete entre el
sart_n y la regla.
Nota: Siempre use utensilios segOn sus
usos propuestos. Siga las instrucciones
que sean recomendados por el
fabricante. Algunos utensilios no han
sido diseAados para ser utilizados en el
homo o sobre la plancha de cocinar.
No use encimeras sobre
• Parte de debajo
lados rectos.
cados y alabeados
plana y
o Tapa bien cerrada.
e Peso de la asa no incline a
la sart6n. El sart_n est_
bien balazando.
• El tamaffo del sarten iguale
a la cantidad de comida a
cocinar.
• Fabricado con materiales
buenos conductores
de
• calor.
Facil a limpiar.
•
Sart6n sobr epasela unidad de mils
queuna pulgada o 2,5 cm (I ").
® Peso de la asa incline a[ sart_n.
e Llama sobr epase la unidad.
Los sartenes con cualidad distintiva, como marmitas para cocer a langostas,
placas y cocedores a presidn pueden estar utilizados, pero deben cumplir con los
requerimientos recomendidos mas arriba.
mas de un quemador. Pueden daAar a
su plancha de cocinar y generar niveles
de mon6xido de carbono superiores a
los estandares permitidos, que serian
perjudiciales para la salud.
Cacerolas y soportes
especiales
!
Los Woks con fondos pianos
adecuados para usarse en la cubierta
estan disponibles en la mayoria de las
tiendas de articulos de cocina yen las
ferreterias. Loswoks con fondo
redondeado (con un anillo de soporte
que no se extienda mas alia del
quemador) pueden usarse tambi6n.
El anillo de metal esta diseriado para
sujetar el wok cuando esta Ileno de
grandes cantidades de liquido (para
hacer sopa) o grasa (para freir).
NO use un wok que est_ equipado
con un anillo met_lico que se
extienda m_s all_ del elemento de
superficie. Debido a que este anillo
aprisiona el calor, el elemento de
superficie y la superficie de la
cubierta pueden verse daffados.
Soportesmetalicos:
no use soportes metNicos. Elfondo de lascacerolas debe
estar en contacto directo con los elementos de superficie.
NO use dos quemadores para calentar una cacerola grande como
una rustidera o una plancha, ni deje que los utensilios hiervan hasta quedarse sin
liquido. El fondo de la cacerola en cualquiera de estos casos puede decolorar o
cuartear la superficie de cocinar de la unidad, y daAar las rejillas y los quemadores.
44
1. Userecetas
probadas
ysigalasinstrucciones
conatenciOn.
PidaalCooperative
Agricultural
Extension
Service
(Servicio
deExtensiOn
AgrariaCooperativa)
localoa unfabricante
de
envases
paraconservas,
queledenlainformaciOn
masreciente
sobrepreparaciOn
de
conservas.
2. Usesolamente
cacerolas
confondopianoparahaterconservas.
Elcalorsereparte
mas
uniformemente
cuando
elfondoespiano.
3. Centrelacacerola
parahacerconservas
sobreelelemento
desuperficie.
4. Comience
conaguacaliente
y unagraduaci6n
decalorelevado
parareducireltiempo
necesario
parahaterhervirelagua;luegoreduzca
lagraduation
decalorIomasbajaposible
paramantener
unhervorconstante.
5. Esmejorhacerconservas
concantidades
pequehas
ylivianas.
r,t_j_
I.
2.
3.
r_
Evite los dafios en la cubierta:
No usecacerolas para hacerconservasal baho Maria oa presiOn queseextiendan mas de
2,5 cm (1 ") mas alia del horde del elemento de superficie.
No deje las cacerolas para hacer conservas al baho Maria o a presiOn al calor elevado
durante una gran cantidad de tiempo.
Alterne los elementos de superficie entre cada tanda para dejar que los elementos y las
superficies colindantes se enfrien. Trate de evitar el uso del mismo elemento durante todo el
dia para hacer conservas.
La preparaciOn segura de conservas requiere que los micro-organismos
perjudiciales sean destruidos y lostarros estOn completamente sellados. Cuando utilice una
cacerola para hacer conservas al baho Maria, debe mantener un hervor suave pero constante
du rante el tiempo requerido.
45
Consejos e
information
para hacer
conservas
La
preparaciOn de conservas
puede generar grandes
cantidades de vapo[ Tenga
muchisimo cuidado para
evitar quemarse. Levante
siempre la tapadera
alejada de usted para dejar
que el vapor salga.
Caracteristicas
de la estufa
horn o electr6n ico
Termostato de horno de lado Interruptor de luz
de horno princip
Soporte de sart6n
de asado
de
convection
del horno
Homo
autolimpiable
illas
ajustables
de puerta
de frente
de puerta
del horno
grillar
ilia
Pieza adjunta
de gaveta
Quemador
I_uaracooer a
ego lento
Cubierta
illas de
--Rejilla y
pleza
adjunta
de horno
de lado
Quemador
estandar
Quemador
estandar
Quemador
potente
Quemador
potente
Controles
del quemador
de superficie
46
- Cubierta
en vidrio ceramico
Nota:
Laminuteria
basica
tieneunaconfiguraciOn
exteriordedistintas
apariencias
en
diferentes
modelos
deel6ctrodom_sticos.
Estonocambiasumanera
defuncionar.
Funciones del
panel de control
(LEAESTA
INSTRUCCIONES
CONCUIDADO
ANTES
DEUSAR
ELHORNO)
Parausosatisfactorio
desuhomoaprenda
autilizarlasdiversas
funciones
quesedescriben
a
continuaciOn.
Lasinstrucciones detalladas para cada fund6n han sido incluidas m_s adelante en
este manual.
CONW BAKE/ROAST
(HORNEO/ROTIZADO
DE CONVECCION)
Sirve para poner el
modo de borneo o de
rostizar de convecciOn
CLEAN (LIMPIEZA)
Se usa para seleccionar el
modo de autolimpieza --
BAKE (HORNEAR)
Se usa para seleccionar el
modo de horneado normal
FLECHA HAClA ARRIBA Y ABAJO
Se usa para seleccionar la temperatura,
contador de tiempo y las horas
iiiiiiiiiiiiiiiiiiiiiiiiiii
BAKE
TIME
STOP
TIME\
\
CLEAR
OEE
"_
_dejar
VARI BROIL
(ASAR A LA PARILLA)
Se usa para seleccionar
el modo variable de asar
asar a la parilla
Nota:
Nota:
tiempo de horneado
STOP TIME (TIEMPO DE PARADA)
Se usa con BAKE, OVEN COOK
TIME y CLEAN para programar un
horneado diferido o un tiempo de
parada diferido del ciclo de
autolimpieza.
CLEAR (CANCELAR)
Se usa para cancelar
cualquier modo del
homo previamante
seleccionado excepto la
horadeldiay el
contador de tiempo.
Oprima CLEAR para
de cocinar.
_CLOCK (RELOJ)
Se usa para poner
la hora del dia
Los controles que se muestran aqui pueden no ser id6nticos a los controles de su horo; son s61orepresentativos.
El control electrOnico no puede funcionar si la minuteria no ha sido arreglada a la exacta hora del dia; despu6s que
el el6ctrodomestico ha sido conectado por la primera vez; o despu6s una interrupciOn del suministro el6ctrico.
Se puede
•
•
•
•
•
BAKE TIME (TIEMPO
DE HORNEADO) Se
usa para seleccionar
la duraci6n del
TIMER (CONTADOR DE
TIEMPO) Se usa para
programar o cancelar el
contador de tiempo. El
contador de tiempo no
comienza ni detiene la
programar
el homo
para:
mornearnormalmente
Precalentamiento
Hornear con sincronizaciOn automatica de las funciones de encendido y apagado
Asado
Autolimpieza
SilenciamJento
del panel de control:
Cuando se selecciona una funciOn, se escuchara un "hip" cada vez que se oprima un control. Si se desea, se pueden
programar los controles para que funcionen de manera silenciosa. Oprima y mantenga oprimido STOP TIME, Despu_s de 7
segundos, el control emitira un "hip". De esta manera, se impedira que los controles suenen cuando se oprima un control. Si
se quiere que los controles suenen nuevamente, basta con oprimir y mantener oprimido STOP TIME nuevamente durante 7
segundos hasta que se escuche un "hip ".
47
Reglaje del
reloj
CARACTERISTICAS BREVES
•
•
Reloj
Minutero
Reloj
Cuando se enchufe la estufa por primera vez, o cuando se interrumpa su suministro el@trico, la pantalla se pondre_a parpadear.
INSTRUCCIONES
INDICADOR
Reglaje del reloj: (example 1:30)
I, Oprima CLOCK, Aparecera la palabra "TIME" en la pantalla,
2. Oprima y mantenga oprimido la FLECHA HAClAARRIBA o ABAJO hasta que aparezca
lahoradeldiacorrectaenlapantalla.
Despu@sde6segundos, desapareceralapalabra
"TIME" y el reloj comenzare_a funcionar. Otambi@n, usted puede anular la funci6n del
minutero pulsando CLEAR OFF y desaparecera la palabra "TIME" de la pantalla y el
reloj comenzara a funcionar.
Minutero
Nota: El minutero no inicia ni termina la cocci6n por si mismo ni estara activo durante la autolimpieza, sirve como minutero
adicional an la cocina para anunciar que se ha cumplido el lapso de ttiempo seleccionado. El minutero se puede utilizar de
manera independiente durante cualquiera de las funciones de hornear o asar al horno. Se puede reglar el minutero para que
marque cualquier cantidad de tiempo, desde 5 segundos hasta 9 horas con 55 minutos.
INSTRUCCIONES
INDICADOR
Reglaje
I,
2.
3.
del minutero
Oprima TIMER ONIOFF. En la pantalla apareceran ":00" y la palabra "TIMER".
Oprima y mantenga oprimido la FLECHA HACIA ARRIBA hasta que aparezca la hora
del die_deseaa en la pantalla. Tan pronto como suelte la FLECHA HACIA ARRIBA, los
minutos y la hora comenzaran a correr en forma regresiva en la pantalla. La palabra
"TIMER" sequire_en la plantalla.
Cuando haya transcurrido el lapso de tiempo ajustado, el minutero emitira tres" hips".
Enseguida, continuara emitiendo "hips" una vez cada I 0 segundos, por espacio de 5
minutos (o hasta que se oprima TIMER ON/OFF).
Cuando se quiere
marque de:
que el minutero
El lapso de tiempo
aumentar& en:
seleccionado
5 segundos a 1 minuto 59 segundos
incrementos de 5 segundos
2 minutos a 9 minutos 59 segundos
incrementos de I 0 segundos
10 minutos a 59 minutos 59 segundos
incrementos de 1 minuto
1 hora a 9 horas 55 minutos
incrementos de 5 minutos
Para cambiar el minutero mientras se est& usando:
Oprima y mantenga oprimido la FLECHA HACIA ARRIBA o HACIA ABAJO para aumentar o
disminuir la cantidad de tiempo.
Para cancelar el minutero antes de que termine de correr el tiempo asignado:
Oprima y mantenga oprimido la FLECHA HAClA ABAJO hasta que aparezca ":00" en la
pantalla. O tambi#n, usted puede anular la funci6n del minutero pulsando TIMER ON/OFF.
48
Caracteristicas
_\
TIMER
de Control
Definidas por el
Consumidor
DESCRIPCION DE LAS
CARACTERISTICAS
•
Sistema
e
protegido
contra los Nir_os)
Conversion
de la
de Cierre (Cierre
Temperatura
Celsius)
Controle
(Farenheit/
El Cierre
El cierre permite que los controles del homo sean trabados solamente.
de control sin accidentalmente activar el horno.
Esta caracteristica permite la limpieza del panel
INSTRUCCIONES
INDICADOR
El sistema de cierre puede ser programado o cancelado con s61opulsar COOK TIME/BAKE
TIME y STOP TIME al mismo tiempo. Durante _sta funci6n, si suelta cualquiera de los
botones, la palabra OFF(APAGADO) aparecera durante 2 segundos.
Mientras que el sistema de cierre esta en marcha, la pantalla muestra la hora actual.
Conversion
de la temperatura
(Fahrenheit/Celsius)
El control electr6nico del horno esta programado para funcionar en °F (Fahrenheit) desde que ha sido enviado de fabrica.
Para cambiar la temperatura a °C (Celsius) o de °C para °F:
INSTRUCCIONES
I.
2.
3.
4.
INDICADOR
Oprima CONV. Bake/Roast y programe la temperatura del homo a 500°F/260°C o mas
utilizando la FLECHA HAClA ARRIBA o HAClA ABAJO.
Oprima CONV. Bake/Roast, en los 2 segundos que siguen, por 3 a 4 segundos. Un
sonido se escucha y un nOmero aparece en rojo a la derecha de la pantalla. Para la
conversi6n, el "I " debe aparecer. Si otro nOmero aparece, oprima CONV. Bake/Roast
y seleccione "I ".
Oprima la FLECHA HAClA ARRIBA o HAClA ABAJO para cambiar °F a °C o °C a °F
en la pantalla.
Oprima CLEAR para confirmar su selecci6n.
Durante el procedimiento
a trav6s las etapas 1 y 2 en la Conversi6n
de escala de
temperatura
o en la eliminaci6n del limite de 12 horas del tiempo de cierre, dos otras
palabras pueden aparecer en la pantalla, la pimera palabra es ESC con O rojo; esto no
puede cambiarse. La otra palabra es USE o SALE con 2 en rojo y esto es para uso de
fabrica.
49
CaracterJstJcas
de Control
Definidas pot el
Consumidor
DESCRIPCION DE LAS
CARACTERISTJCAS
=
Caracteristica
Sabbath
Otras pantallas
CaracterJstica
Sabbath
Para la conservaci6n de la energia, el control electrOnico del homo ha sido fijado en la fabrica para apagarse automaticamente
despues que el homo halla funcionado durante 12 horas sin interrupciOn, con la excepci6n del horneado cronometrado. La
caracteristica Sabbath le permite de programar el homo para mas de 12 horas por adelantado. Para arreglar la caracterastica
sabbath:
INSTRUCCIONES
INDICADOR
1.
Oprima CONV, Bake/Roast y arregle la temperatura del homo a 500 ° F/260 ° C o mas
usando LA FLECHAASCENDENTE.
2. Oprima CONV, Bake/Roast durante los 2 segundos prOximos por 3-4 segundos. El
sonido de un beep y un nOmero apareceran en rojo a la izquierda de la pantalla. Para la
conversi6n "3" debe de aparecer en la pantalla. Si otro nOmero aparece, oprima CONV.
Bake/Roast y seleccione "3".
3. Oprima la FLECHAASCENDENTE o DESCENDENTE para cambiar de 12 horas a 9999 en
la pantalla, para cancelar el apagado de 12 horas.
4. Oprima cancelar (CLEAR OFF) para confirmar su selecciOn.
Otras
pantallas
Durante el procedimiento a trav6s las etapas 1 y 2 en la Conversi6n de escala de
temperatura o en la eliminaci6n del limite de 12 horas del tiempo de cierre, dos otras
palabras pueden aparecer en la pantalla, la pimera palabra es ESCcon O rojo; esto no
puede cambiarse. La otra palabra es USE o SALE con 2 en rojo y esto es para uso de fabrica.
50
Estaestufahasidodisefladaparautilizargasnaturalogaspropano.
Hasidofijadaenla
fabricaparautilizarse
congasnatural.
Sideseahacerlaconversion
parautilizarelgaspropano,uselasinstrucciones
enelpaquete
escrito"PARALACONVERSION
ENGASPROPANO".
Conversi6n al
gas propanol
licuado
Parahacerlaconversion
delgasnaturalalgaspropano,
esnecesario
utilizarelservicio
deun
t_cnicocalificado,
inacuerdo
conlasinstrucciones
delfabricante
y todosloscOdigos
y
reglamentos
reguladores.
Sitodaslasinstrucciones
nosonobservadas,
sepuedeocurrirseveros
lesiones
o dahosmateriales.
Laagencia
calificada
quehaceeltrabajoasumala
responsabilidad
paralaconversion.
Sepuedeoccurirseveros
choques
el_ctricos
o dahosa laplancha
decocinar
sinoestainstalada
potuninstalador
o el_ctricista
calificado.
Todos los cambios o conversiones requisitos para que este aparato funciona
correctamente deben de ser realizados por un centro de sercivio autorizado Sears, un distribuidor
autorizado o una agencia calificada.
UTILIZANDO
EL SOPORTE
Coccion a la
DE SARTI_N
El soporte de sarten provisto con su estufa ha sido disehado para la utilizaciOn de sartenes con
debajo redondo. Puede soportar sartenes de un maximo de 14 pulgadas de diametro (35.5
superficie
cm).
CARACTERISTICASBREVES
El soporte de sart_n puede utilizarse sobre cualquier quemador de adelante. Sin embargo para
mejores resultados es preferible utilizar el mas grande quemador. Si el soporte de sart_n esta
correctamente en su sitio, es impossible deslizarle de la rejilla.
•
Utilizandoelsoportede
sart_n
Use slempre
No utilice el quemador
durante
la utilizad6n
detr_s del WOK
del WOK.
Para ubicar correctamente el soporte de sart_n:
Una vez la rejilla en su lugar sobre el quemador, coloque el soporte de sart_n por encima de la
rejilla. Gire al soporte de sartOn, como se muestra, hasta que las varillas de la rejilla sean en
las aberturas del fondo del soporte.
Aseg0rese que el soporte de sart_n esta correctamente ubicado y solidamente
en su sitio antes de usarlo, para evitar derramas calientes y quemaduras.
EL SOPORTE DE SARTEN se
ajusta sobre las varillas de
la rejilla,
Los sa'rtenes con debajo piano pueden tambi_n
estar utilizados sobre su plancha de cocinar sin el
soporte de sart_n.
Los sartenes con debajo redondo (con anillo de soporte que no sobrepase la unidad
de quemador) pueden tambi_n estar utilizados sin el soporte de sartOn. El anillo mOtalico ha
sido disehado para soportar seguramente el sart_n cuando esta Ilenado con mucha canditad de
liquido (cocciOn de sopa) o grasa (frituras).
NO use un sart_n en la plancha de cocinar si viene con el anillo metalico que sobrepase la
unidad del quemador. Este anillo act0a como una trampa de calor que puede dahar la
superficie de la unidad y de la plancha de cocinar.
Malo
Bien
51
cogeollas para retirar el
soporte de sart_n de la
rejilla, Permita que se
caliente el soporte de
sart_n antes de removerlo.
No deje un soporte de
sartOn caliente sobre una
superficie que no puede
tolerar calor elevado, por
ejemplo los mostradores.
Coccion
Tamaffo
a la
superficie
CARACTERISTICAS BREVES
• Tamaflo de llama
• Ajuste correcto del
quemador
• ColocaciOn de las basa y
las tapas del quemador
de llama
Para la mayoria de las comidas, empieze con el mas alto ajuste de control, y despues gire al
ajuste mas bajo para terminar el proceso. Utilice las informaciones en la tabla a continuaciOn
coma una guia para determinar el tamaho de llama adecuada para diferentes tipos de comidas.
El tamaho y tipo de utensilio utilizado y la cantidad de comida para cocer van a determinar el
ajuste necesario para la cocciOn.
Para grandes frituras, use un termOmetro y ajuste el control de la superficie de la perilla en
consecuencia. Si la grasa esta demasiada enfriada, la comida va a absorber la grasa y estar
aceitosa. Si la grasa esta demasiada caliente, la comida va a dorarse demasiada rapidamente y
el centro estara insuficientemente cocinada. No trate de hacer demasiada frituras a la vez, la
comida estara ni dorada ni suficientemente cocinada.
*Tama_o de llama
w
Tipo de cocci6n
Alta llama
Para emmpezar la mayoria de las comidas; Ilevar agua a ebulliciOn;
asar a cacerola
Media llama
Guardar a fuego lento; espesar jugo de
carne, salsas; cocinar al vapor
Baja llama
Guardar comidas cociniendas; escalfar; ragOs
* Estos ajustes est_n basados
aluminio. Los ajustes pueden
Nunca deje la llama sobrepasar
solamente a despilfarrar calor y
Ajuste
correcto
sobre el uso de sartenes y tapas con medio-peso de
variar con otros tipos de sartenes,
el horde del utensilio de cocina. Una llama elevada va
energia, y aumentar el riesgo de quemarse.
del quemador
El color de la llama seflale el ajuste correcto del quemador. Una llama correcta esta clara, azul
y apenas visible en una habitaciOn bien alumbrada.Cada cono de llama deberia ser firme y
afilado. Ajuste o limpie al quemador si la llama esta amarilla-anaranjada. Para limpiar el
quemador, vea las instrucciones en la parte titulada Limpieza general,
ColocaciOn de las basas y las tapas
del quemador
Coloque la tapa del quemador sobre cada
abertura de gas, apareando el tamaho de la basa
del quemador con el tamaflo de la abertura del
....
Extremidad
delrejilla
gas. Coloque la tapa del quemador sobre cada
_-bo. ......
l_
de la tapa al tamaho de la basa del quemador. La
tapa
quemador
tiene un
anillo
basa de
de cada
quemador,
apareando
otra
vezinterior
el tamaflo
que coloque
centro
del quemador.
la tapa del quemador en el
.... _
i
Tapa del quemador
Basa
Oasquill%
del _Agujero
quemador
gas
......
J
" El electrodo se debe
situar correctamente
en ranura de cada
cabeza de la hornilla.
52
Aseg0rese que cada tapa
de quemador esta
correctamente alineada y
nivelada. Abierte el
quemador para verificar si
va a encender. Si el
quemador no enciende,
pongase en contacto con
un centro de servicio
autorizado. No debe
realizar a usted la
reparaci6n del quemador
sellado.
Colocadon
Cocci6n de
de las rejilJas deJ quemador
Coloque la rejilla sobre las quemador. Alinee las extremidades bajo cada centro de la rejilla
con los agujeros en los casquillos de la quemador. La extremidad debe caber en los agujeros.
Cerci6rese de que cada extremidad cabida en los casquillos de la hornilla de cada uno de las
hornillas
delanteras
y posteriores.
Alinee la bifurcation
de la
alinead6n
en el dedo de
centro de la rejilla.
Programacion
de los controles
superficie
CARACTERISTICASBREVES
Colocaci6n de las rejillas
del quemador
ProgramaciOn de los
controles de superficie
de superficie
Su plancha de cocinar puede set equipada con cualquier cornbinaci6n de los quemadores a
continuaci6n:
Quemador para hervir, la utilizaci6n de este quemador es mejor para hervir salsas delicadas,
etc.
Quemador estandar, el quemador estandar puede estar utilizado para la mayoria de cocciones
sobre la superficie de la plancha de cocinar.
Quemador grande, la utilizaciOn del mas gande quemador es mejor para Ilevar grande cantidad
de liquidos a temperatura, y para preparar grandes cantidades de cocina.
Poco importa la cantidad, selecci6ne siempre a un utensilio apropiado a la cantidad y tipo de
comida que usted esta preparando. SelecciOne un quemador y un tamaho de llama apropiado
a la caldera. No permite nunca que las llamas sobrepasen el horde de la caldera.
Su plancha de cocinar viene tambien equipada con valvulas rotativas de 270. Estos valvulas
proveen mejor control de la llama del quemador. Cada quemador seenciende automaticamente
desde un dispositivo de encendido cada vez que el botOn de control esta girando a la posiciOn
LITE (encendido).
No ponga articolos
de pl_stico, como agitadores
de sal o de pimienta,
soportes de cucharas o cubiertas de pl_stico sobre la plancha de codnar. Podrian
fundirse o encenderse. Cogeollas secos, toallas o cucharas de madera pueden encenderse
si estan muy cerca de la llama.
Para hacer fundonar
el quemador
de superficie:
1.
2.
Coloque el utensilio de cocina sobre el quemador.
Presi6ne y gire el bOton de control de superficie hasta LITE(Encendido). Nota: Todos
los dispositivos el_ctricos van a emitir golpecidos secos como un clic al mismo tiempo.
Sin enmbargo, solamente el quemador que esta girando va a encenderse.
3. Aseg0rese que el quemador halla encendido.
4. Presi6ne y gire el botOn de control al tamaho de la llama deseada. No es necesano
ajustar los controles en una marca determinada. Use las marcas como una guia y ajuste
la llama seg0n se desea. No debe cocinar con el bOton de control de superficie en la
posici6n LITE(El dispositivo de encendido el_ctrico continuara con el golpecito de un clic
si esta dejado en la posiciOn de LITE(encendido) y va a causar un deterioro prematuro).
Los quemadores de superficie pueden encenderse manualmente durante una interrupciOn
del suministro el_ctrico. Para encender un quemador, mantenga un fOsforo encendido en el
extremo del quemador, luego gire suavemente la perilla hasta LITE(encendido). Tenet
cuidado al encender los quemadores en forma manual.
53
LO
/
Antes de ajuste de
VentiJad6n
los controles
Localizaci6n de la rejilla de ventiJaci6n del homo
El homo esta ventilado detras de la plancha de cocinar. Cuando el homo esta
encendido, aire tibio sale por las rejillas. Este ventilado es necesario para una
buena circulaci6n de aire en el homo y para obtener buenos resultados con el
horneado. NO obstruya las rejillas. Si hate esto, puede ocasionar problemas de
cocci6n, un fuego o dahos a su aparato.
de
horno
CARATERISTICAS BREVES
Ventilaci6n y rejillasde homo
Parafijar lasrejillasdel homo
y rejilJas deJ homo
Para fijar las rejillas del homo
SIEMPREFIJELAS REJILLASDEL HORNO CUANDO EL HORNO
SEENFRIE(ANTESDE PONEREL HORNO EN FUNCIONAMIENTO). Siempre use
guantes cuando el homo esta en funcionamiento.
Para retirar una rejilla del homo, tire la rejilla hacia afuera
hasta que se detenga. Levante hacia arriba y tire hacia afuera.
Horno de lado
CirculaciOn de
aire en el horno
Homo principal
Para remplazar una rejilla, ponga la rejilla sobre los rieles de la
pared del horno. Incline la parte delantera de la rejilla hacia adelante
y deslizela hasta el fondo.
Si usa multiples recipientes, coloquelos como en la figura. Si usa un sOlo recipiente, colOquelo
en el centro del horno.
Para una mejor circulaciOn de aire y mejores resultados al hornear, centre los recipientes Io
masque pueda. Permita de 2" a 4" pulgadas (5-I Ocm) alrededor de los recipientes y
asegOrese que estos no se toquen uno al otro, a la puerta, a los lados o a la parte trasera del
horno. El aire caliente debe circular alrededor de los recipientes para que el calor se reparta
uniformemente en todo el homo.
54
Ajuste de los
_\
TIMER
controles
del
homo
CARATERISTICAS BREVES
,, Horneandocom rnodode
funcionamiento manual
Horneando
con modo
de funcionamiento
manual:
INDICADOR
INSTRUCCIONES
Para reglar o cambiar
la temperatura
para horneado
normal
Se puede programar el horno para hornear a cualquier temperatura desde los
170°E/77°C hasta los 550°E/288°C,
1, OprimaBAKE, '....
ylapalabra"BAKE"
apareceranenlaplantalla,
2. Oprima la FLECHA HACIA ARRIBA o HACIA ABAJO, En la pantalla aparecera "350%/
177°C ". La temperatura se puede ajustar en incrementos deS°E/l°C manteniendo
oprimido la FLECHA HACIA ARRIBA o HACIA ABAJO,
3. Tan pronto corno suelte la FLECHA HACIA ARRIBA o HACIA ABAJO, el horno cornenzara
a calentarse a la temperatura elegida. En la pantalla aparecera la temperatura del homo
a medida que va aumentando hasta la temperatura deseada. Tambi6n apareceran las
palabras "BAKE" y "ON". Cuando la temperatura que aparece la pantalla es la que se
seleccion6 para hornear, quiere decir que el homo esta listo. Se necesitan 10 minutos
para que el homo alcance la temperatura correcta.
4. Para cancelar la funciOn de hornear, oprima CLEAR OFF,
Para cambiar la temperatura despu_s que el horneo/rostizado
empezado, vuelva a empezar las etapas 1 y 2 m_s arriba.
Para arreglar y cambiar la temperatura
convection
(algunos modelos)
1.
2.
3.
4.
de normal halla
de horno/rostizado
de
Oprima CONV. Bake/Roast .....
y la palabra "CONV BAKE" aparecera en la
pantalla.
Oprima y mantenga pulsado LA FLECHAASCENDENTE O DESCENDANTE hasta que la
temperatura deseada aparece en la pantalla.
Tan pronto como LA FLECHA ASENDENTE O DESCENDANTE est_ relejada, el homo
empezara a calentarse y el ventilador del homo comenzara a funcionar. El ventilador se
apaga cuando la puerta se abre.
Para cancelar la funci6n horneo/rostizado pulse CLEAR OFF (CANCELAR).
55
0
Ajuste de los
controles
homo
del
CARATERISTICAS BREVES
Cocci6ncronometrada
automatica
Cocd6n
cronometrada
Como reglar
el mJnutero
automatica:
autom_tico
(sincronizaci6n
del tiempo
de horneado)
BAKE TIME y STOP TIME controlan la sincronizaciOn del tiempo de norneado. El minutero automatico encendera y apagara el
homo alas horas que usted seleccione de antemano. El homo puede ser programado para empazar inmediatamente y
apagarse automaticamente o empezar a hornear mas tarde con un cierre automatico.
Obre con precauci6n al hacer us del minutero automatico. Uselo para cocinar carnes curadas o congeladas y con
la mayoria de las frutas y las verduras. Hay que enfriar primero en el refrigerador alimentos que se pueden echar a
perderfacilmente, tales como leche, huevos,pescado, came o aves. Incluso se lesha enfriado de tal manera, no hay que dejar
dichos alimentos en el homo durante mas de 1 hora antes de empezar a cocinarlos y luego hay de sacarlosdel homo prontamente
cuando se haya completado la cocci6n.
INSTRUCCIONES
C6mo programar
autom_ticamente:
INDICADOR
el homo para que se encienda inmediatamente
y se apague
1.
2.
3.
AsegQrese de que el reloj del homo marque la hora correcta del dia.
Coloquelos alimentos en el horno.
Oprima BAKE TIME. En la pantalla apareceran "
:y las palabras "BAKE",
"TIME".
4.
Oprima y mantenga oprimido la FLECHA HACIA ARRIBA o HACIA ABAJO hasta que
aparezca en la pantalla la duraci6n de horneado deseada. El tiempo de horneado se
puede reglar en cualquier lapso, desde 5 minutos hasta 11 horas y 59 minutos, en
incrementos de 5 minutos.
5.
6.
Oprima BAKE, En la pantalla aparaceran .....
y la palabra "BAKE".
Oprima y mantenga oprimido la FLECHA HACIA ARRIBA o HACIA ABAJO hasta que
aparezca en la pantalla la temperatura de horneado deseada.
Una vez que se hart reglado los controles:
1. El homo se encendera y calentara la comida hasta alcanzar la temperatura deseada.
2. Las palabras "ON" apareceran en la pantalla.
3. En el indicator principal aparecera el tiempo de horneado que contara de manera
decremiente en minutos hasta Ilegar a ":00".
Cuando se completa el tiempo reglado en BAKE TIME:
I. Aparecera ":00" en la pantalla y el homo se apagara automaticamente.
2. El control emitira 3 "hips".
3. El control continuara emitiendo "hips" cada 10 segundos durante 5 minutos, o hasta que
se oprima CLEAR OFF.
56
Ajuste de los
_\
TIMER
controles
del
homo
CARATERISTICAS BREVES
, Encendido a retardo
Encendido
a retardo
INDICADOR
INSTRUCCIONES
C6mo
programar
el horno
para que
se endenda
a una hora
preseleccionada
I.
2.
3.
4.
y se apague
autom_ticamente:
AsegOrese de que el reloj del homo marque la hora correcta del dia.
Coloquelos alimentos en el horno.
Oprima BAKE TIME. En la pantalla apareceran "
:y las palabras "BAKE",
"TIME".
Oprima y mantenga oprimido la FLECHA HACIA ARRIBA o HACIA ABAJO hasta que
aparezca en la pantalla la duraciOn de horneado deseada. El tiempo de horneado se
puede reglar en cualquier lapso, desde 5 minutos hasta 11 horas y 59 minutos, en
incrementos de 5 minutos.
5.
Oprima STOP TIME. En la pantalla aparecera la hora en que el hora en que el horneado
se apagara.Tambi6n apareceran las palabras "BAKE", "STOP" y "TIME".
6. Oprima y mantenga pulsado LA FLECHAASCENDENTE hasta que el tiempo de fin de
cocciOn deseada aparece en la pantalla.
7. Oprima BAKE, En la pantalla apareceran .....
y la palabra "DELAY BAKE".
8. Oprima y mantenga pulsado LA FLECHA ASCENDENTE hasta que la temperatura de
hornear deseada aparece en la pantalla.
9. Si no regla la temperatura de horneado, el control harla "hip". En la pantalla aparaceran
°" y la palabra "DELAY BAKE".
10. El control va a calcular hacia atras del tiempo de termino seleccionado para determinar
cuando empezar a hornear. Las palabras "DELAY" (RETARDO)y "BAKE STOPTIME"
(TIEMPO DETERMINODEHORNEAR) apareceranen la pantalla.
1I. El modo de hornear empezara automaticamente al tiempo seleccionado. Entonces la
palabra "DELAY" (A RETARDO)y "BAKE" desaparecera y "ON" (ENCENDIDO)
aparacera. En el indicator principal aparecera el tiempo de horneado que contara de
manera decremiente en minutos hasta Ilegar a ":00 ".
12. Para cancelar el calcul hacia atras oprima CLEAR OFF (CANCELAR).
Cuando
I.
2.
3.
el tiempo
de horneo
arreglado
est_ terminado
"00" aparecera en la pantalla y el homo se apagara automaticamente.
El control emitira el sonido del beep 3 veces.
El control continuara entonces a emitir el sonido del beep una vez cada 10 segundos
para 5 minutos o hasta que CLEAR OFF (CANCELAR) esta pulsado.
57
Ajuste de los
instrucdones
controles
homo
Para mejores resultados, caliente el homo antes de hornear galletas, panes, tortas, pasteles o
dukes, etc. No necesita precalentar el homo para rostizar la came o para cooer caserolas.
del
Los tiempos de cocido y las temperaturas que se necesitan para hornear un producto pueden
CARATERJSTJCASBREVES
+ Instruccionesdehorneado
variar lijeramente de sus aparatos antiguos.
Problemas
Problemas
de horneo
y
se
+
pot
horneados
han sido puestas
est_n
Muchas
horno.
en
galletas en la rejilla del
+
Permita que el homo precaliente antes de colocar la
comida.
+
Elija sartenes
de espacio
+
El recipiente
oscuro absorbe
calor muy r_qpido.
+
Los pasteles han sido puestas
el homo
muy negros pot
encima o debajo.
Los pasteles
est_n bien
Las galletas
el homo antes que halla
precalentado
completamente.
+
Los pasteles
tabla de soluciones
Correcci6n
Causas
Las galletas
queman
endma
de horneado
el
Utilice
en
+
Permita que el homo precaliente antes de colocar la
comida.
est.1 muy baja
+
+
Posicione bien la rejilla del horno.
Ajuste ia temperatura
a 25°F/12°C
recomendado.
completamente.
+
El homo
no
•
+
El horno muy caliente.
Recipiente de talla incorrecta.
•
en el
+
Recipiente
del horno.
+
•
Ajuste la temperatura a 25°F/12°C menos que Io
recomendado.
Use la talla del recipiente recomendada en la receta.
Posicione bien la rejilla del homo y coloque el
recipiente de tal manera que halla 5.1cm a 10.2 cm
(2 "'4") de espacio por todos lados.
+
La estufa est,1 desnivelada.
+
Coloque
muy caliente.
no esta en el centro
no est_
+
•
La rejilla est.1 desnivelada,
•
No use recipientes
edentados.
®
El horno
est.1 muy frio.
+
Ajuste la temperatura
recomendado.
•
El horno
est.1 muy Ileno.
•
Asegurese
va usar.
+
El horno
se abre
+
Abra el homo solo despues
m_qs corto halla terminado.
el
de coccion
se termin_
El recipiente est_q muy cerca a la
pared del homo o la rejilla muy
Ilena+
constantemente.
para nivelar el aparato.
Aseguresequehalla
5+lcma
espacio
58
menos que io
un vaso con agua en el centro
nivel del agua est,1 desigual,
•
tiempo
lijera.
La rejilla del homo
o muy alta.
Los pasteles
no
est_n nivelados.
lista cuando
de aluminio
+
centro.
La comida
una pelicula
5.1cm a 10.2 cm (2"-4")
lados.
+
antes que halla
precalentado
que permitan
por todos
por todos
consulte
del homo.
Si el
las instrucciones
10.2 cm (2"'4")
de
lados.
que est_in desnivelados
a 25°F/12°C
de retirar todas
o
masque
Io
las rejilllas excepto
que el tiempo
las que
de cocci6n
Ajuste de los
_\
TIMER
controles
del
homo
CARATERISTICAS BREVES
Asado
Asado
INDICADOR
INSTRUCCIONES
Asar usando
la resistenda
superior
Deje la puerta abierta a la posici6n de parada del asado meintras se hate el asado.
I. Optima VARI BROIL, En la pantalla apareceran
°" y la palabra "BROIL".
2. Oprima y mantenga oprimido la FLECHA HACIA ARRIBA o HACIA ABAJO hasta que
aparezca en la pantalla el nivel deseado de asado.
3. Cuando haya terminado de asar, oprima CLEAR OFF.
Reglaje
Nivel de cocd6n
LO
(BAJO)
Muy hecho
2
(Medio hecho)
Medio hecho
3-4
(Medio)
Medio
5
(Medio ALTO)
Poco hecho
HI
(ALTO)
Muy poco hecho
59
Ajuste de los
instrucciones de rostizado
controles
homo
El rostizado es un m6todo para cocer cortes finos de carne aplicando el calor directo debajo del
elemento rostizador del homo.
del
CARATERISTICAS BREVES
• Instruccionesde rostizado
Posici6n de parada
del asado
Precalentamiento
El precalentamiento es sugerido cuando grille pedazos de biftec (retire la parilla antes de
precalentar. La comida puede adherirse si es colocada en el metal caliente). Para precalentar,
ajuste los controles del horno en BROIL como indica en la pagina 59. Espere hasta que el
elemento se ponga rojo, usualmente esto toma hasta 2 minutos. El precalentamiento no es
necesario para bien rostizar las carnes.
Para rostizar
Rostize por un lado hasta que la comida halla dorado; volteee y cosa la segunda parte. Sazone
y sirva. Siempre tire la rejilla hacia afuera a la position "parada" hasta el horde antes de
voltear o de retirar la comida.
Para calcuJar el tiempo
Horno derecho
de rostizado
El tiempo de rostizado puede variar, verifque constantemente la cornida. El tiempo no solo
depende de la distancia a la cual se encuentra del elemento pero tambi6n del grosor y del
torte de la came, del contenido en grasa y de cuan cocida desee su carne. El primer lado
necesita siempre unos minutos masque el otro lado. Lascarnes congeladas tambi6n necesitan
mucho mas tiempo.
Trucos para rostizar
La parrilla y su rejilla permiten que la grasa gotee y est6 lejos del calor intenso del rostizador.
NO USE la parriiia sin su rejiiia. NO CUBRA la rejiiia de peiicula de aiuminio.
que se queda puede encenderse.
La grasa
Si un incendio ocurre, deje la puerta del horno cerrada y apaguelo.Si el fuego
persiste, aplique soda caustica sobre el fuego o use un extinguidor. NO eche agua ni harina
sobre el fuego. La harina puede encenderse.
Siempre
tire la rejiiia
hasta
el borde
antes
de voltear
o de retirar
comida.
Trucos para la limpieza del rostizador:
• Para hacer la limpieza mas facil, cubra la parte de abajo de la parrilla de pelicula de
aluminio. NO cubra la rejilla de la parrilla con aluminio.
• Para eviatar que la grasa se grille, retire la parrilla del homo tan pronto como termine de
coser. Use guantes porque la parrilla esta sumamente caliente. Deseche la grasa. Remoje
el recipiente en agua caliente jabonosa.
• Limpie Ila parrilla tan pronto como termine de usarla. Si es necesario, use esponjas de
metal. Si frota muy fuerte puede dahar la rejilla.
60
Ajuste de los
controles
del
homo
CARATERISTICAS BREVES
Grilladorincandecente
Grillador
incandecente
El grillador incandecente provisto con su nueva estufa le permite de grillar cornida en el
homo. No utilice el grillador incandecente sin la parrilla y su pieza adjunta. La
parrilla y su pieza adjunta permiten a la grasa de gotear y de estar lejos del calor del asador.
No utilice el grillador incandecente en la plancha de cocinar. No esta disehado para
hacerlo. Si Io hace, esto puede ocasionar un incendio
Si un incendio ocurre, deje la puerta del horno cerrada y apaguelo.Si el
fuego persiste, aplique soda caustica sobre el fuego o use un extinguidor. NO eche agua ni
harina sobre el fuego. La harina puede ser explosiva.
Para utilizar
el grillado
incandecente.
I.
Coloque la pieza adjunta sobre la parrilla. NO use la parrilla sin la pieza adjunta
pelicula de aluminio. La grasa que se acumula puede encenderse.
o sino cubra la rejilla
con
2.
Coloque el grillador incandecente sobre la pieza adjunta.
3.
Precaliente el grillador incandecente colocando las diferentes partes en el homo y cierre la puerta.
4.
Oprima VARI BROIL, En la pantalla apareceran
5.
Oprima y mantenga oprimido la FLECHA HACIA ARRIBA o HACIA ABAJO hasta que aparezca en la pantalla el nivel
deseado de asado.
6.
Permita que el homo funcione por I0 rninutos para que el grillador incandecente se caliente.
7.
Tire la rejilla del homo hacia afuera y coloque la comida sobre el grillador incandecente.
8.
Empuje la rejilla del homo y cierre la puerta.
9.
Procedaaasar deun ladohastaquelacomidaest6dorada;volteeycosaelotrolado.
tire la rejilla hacia afuera hasta el borde antes de voltear o retirar la comida.
°" y la palabra "BROIL".
Cuando haya terminado de asar, oprima CLEAR OFF.
61
Sazoneysirva.
NOTA:Siempre
Ajuste de los
Cocinar y honear con convecci6n (algunos
modelos)
controles
homo
La opciOn de convecciOn es una caracteristica adicional aparte de los m_todos comunes de
cocinar y hornear.
del
CARATERISTJCASBREVES
Cocinary honear con
convection (algunos
modelos)
Rostizadosde convecci6n
(algunosmodelos
El cocimiento por convecci6n es un m_todo de cocinar mediante el cual el aire caliente del
homo circula gracias a un ventilador que se encuentra en la parte posterior de la cavidad
del homo. Este ventilador esta cubierto por un distribuidor que hate que el aire circule de
manera uniforme, Io cual proporciona la distribuciOn igual del calor; de esta manera cocina,
se hornea y se dora de una manera mas rapida y uniforme. El aire caliente penetra la
comida desde todos los angulos y sella la humedad natural y el sabor de los alimentos. El
ventilador de convexiOn se apaga automaticamente cuando se abre la puerta del homo y
se enciende nuevamente cuando se cierra nuevamente.
Se puede programar el homo para que hornee en la modalidad de convecci6n a
cualquier temperatura desde los 170%/80°C hasta los 550°F/288°C. Se recomienda
precalentar el homo durante 10 a 12 minutos cuando se cuece por convecci6n, mas
no para asar ni para cocer cacerolas. Siga las recomendaciones que se dan en la
receta.
F_
En el modo de cocinar a convecci6n, los tiempos de cocci6n
convencionales pueden dar por resultado a la comida de codnar demasiada. Para
resultados satisfactorios use solamente recetas probadas con tiempos ajustados para
la cocciOn a convecciOn.
Circulaci6n
del alre
durante el cocimiento
convecciOn
por
Para seleccionar eJ
modo de conveccion,
optima
el CONV BAKE
ROAST boton en eJ
tablero deJ mando
antes de poner
temperatura
coccion y
tiempo.
Rostizados
La cocci6n a convecci6n usa m_s bajas temperaturas y menos tiempo de cocci6n para
los mismos resultados que la cocci6n convencional. En el modo a convecci6n la temperatura
actual en su homo se ajusta automaticamente de 25 ° F/12 ° C mas baja que la temperatura
que aparece en el panel de control del horno. Este arreglo automatico le permite de entrar
la temperatura de su receta de cocina convencional, pero no puede ajustar el tiempo de
cocinadelamisma
manera, lnclusocuandolatemperaturaestamasbaja,
los tiempos de
cocinar a convecciOn estaran de un maximo de 30%inferiores a los tiempos de cocciOn
convencional.
Durante la programaciOn de los tiempos de cocina para la cocci6n a convecciOn, entre un
tiempo de cocciOn de 20 a 30 % menos que indicado en su receta de cocina convencional.
AI final del ciclo de cocina, verifique si la comida esta lista como se desea, ligeramente
demasiada cocinada o ligeramente poco cocinada (siesta poco cocinada, cocine un poco
mas como se desea). Haga nota de los resultatos de tiempo de cocina para la proxima vez
que use la receta y arregle el tiempo de cocina en consecuencia.
de conveccion
Rejilla de
rostiza
(algunos
modelos)
Cuando rostize con la convecci6n, utilice la parrJlla y la rejilla y, el
estante de rostizar. La parrilla cogera la grasa que se derrame y la rejilla
evitara las manchasde grasa. El estante de rostizar sostendr la came.
Rejil
I_
:
I. Coloque el estante del homo en la posici6n de abajo.
2. Coloque la rejilla en la parrilla. El estante de rostizar cabe en la rejilla y asi permite que el
aire caliente circule debajo de la comida para un cocido uniforme y aumenta el dorado de
la parte inferior de la carne. AsegOrese que el estante de rostizar halla sido bien ajustado
a la rejilla de la parrilla. NO utilice la parrilla sin la rejilla o sino cubra la rejilla con pelicula
de aluminio.
Parilla
62
Ajuste del control
Ajuste
de homo de lado
controles
Para hornear
I.
Coloque las rejillas del homo mientras que el homo esta todavia frio. vea
"Colocando las rejillas del homo" en la secd6n Antes de ajustar los controles del
horno.
2,
Gire la perilla de conrol de la temperatura hasta la temperatura del homo deseada.
Cuando el homo es encendido, la luz indicadora debajo de la Perilla de control del homo
se encendera.
3.
Precaliente el homo por 10-12 minutos antes de hornear. El precalentamiento no es
necesario para hornear, preparar caserolas o para rostizar la mayoria de las comidas.
Cuando alcance la temperatura que desea, la luz indicadora del homo se apagara. La luz
luego se encendera y se apagara al mismo ritmo que los ciclos del elemento para
mantener la misma temperatura.
Cuando termine de cooer, gire la perilla de control de la temperatura a OFF (apagado)
4.
de los
del
homo
CARATERISTICAS BREVES
•
Ajuste del control de horno
de lado
SIDE OVEN
TEMP
OFF
BROIL
500
150
450
4OO
25(
Para rostizar
1.
2.
3.
4.
5.
6.
Coloque las rejillas del homo mientras que el homo esta todavia frio. Para carnes raras,
coloque la parilla cerca del elemento (posici6n superior). Para las comidas bien cocidas
como el polio, las colas langostas o gruesos pedazos de came, coloque la parilla lejos
del elemento (a una posici6n mas baja).
Gire la parilla del control de la temperatura a BROIL(rostizar). Para archirarrar raros
biftecs, deje que el elemento se ponga de un rojo incandecente-unos 2 minutos- antes
de colocar la comida en el homo.
Coloque la rejilla en la parrila izquierda del homo y luego coloque la came sobre la
rejilla. NO USE la parilla sin la rejilla o cura la rejilla con una pelicula de aluminio. La
grasa que quada al descubierto puede encenderse.
Coloque la parilla izquierda sobre el carril del homo. Cierre la puerta del homo a la
posici6n de pare del rostizado para rostizar (abierto a unas 2 pulgadas).
Rostice de un lado hasta que la cornida este dorada, volteela y cosa del otro lado.
Sazone y sirva. Nota: Siempre tire el carril hasta la posiciOn de pare antes de voltear o
de retirar la comida.
Cuando el rostizado halla terminado, gire la perilla del control de la temperatura a la
posiciOn OFE
Si un incendio ocurre, deje la puerta del horno cerrada y apaguelo.Si el
fuego persiste, aplique soda caustica sobre el fuego o use un extinguidor. NO eche agua
ni harina sobre el fuego. La harina puede set explosiva.
63
Control de la temperature
Homo de lado
posiciOn de
parada del
asado
Homo de lado
Limpieza del
Limpiando
Horno
Tenga las siguientes
CARACTERISTICAS
BREVES
•
Limpiando el horno autolimpiable
el horno auto-limpiable
precauciones:
Deje enfriar el horno antes de limpiarlo.
Use guantes cuando limpie toda parte externa del horno manualmente.
Durante el ciclo de auto-limpieza, la parte exterior de la pared puede estar
muy caliente. NO deje a los nihos cerca del parato. Un dispositivo de ventilaci0n se pone en
marcha automaticamente. Esnormal que el aire caliente se salga por la parte delantera del
aparato.
Antes de limpiar cualquier parte del horno, asegOrese que el horno est6
apagadoosinopulseelbot0n
CANCELAR. Esperehastaqueelhornoseenfrie.
Illr_
La salud de algunos pajaros esta muy sensitiva a los humos que proveen del
ciclo de auto- limpieza de cualquier cocina. Desplace los pajaros en otra habitaciOn bien
ventilada.
NO use ning0 n tipo de limpiador comercial o de capas protectoras para hornos, dentro o en alguna
parte del homo auto-limpiable. NO limpie la empaquetadura de la puerta del horno. Esta es muy
importante para que la puerta cierre adecuadamente. Tenga cuidado de no frotar, dahar o mover
la empaquetadura. NO use pelicula de aluminio para cubrir la base del homo. Esto puede afectar
la cocci0n o la pelicula podria derretirse y dahar la superficie del horno.
manualmente
empaquetadura
Un homo auto-limpiable se limpia solo a altas temperaturas (mas altas que las temperaturas de
cocciOn normales), Io cual elimina las manchas y las convierte en polvo que Ud. puede limpiar
con un paho mojado.
Preparando
el homo
para la auto=limpieza.
1. Retire cualquier derrame antes de comenzar el ciclo de auto-limpieza. Para limpiar, utilice
agua caliente jabonosa y un paho. Los derrames grandes pueden ocasionar mucho vapor o
un incendio al hacer contacto con altas temperaturas. NO permita que los derrames de
az0car o de acidos (como tomates, jugos de frutas o los rellenos de pasteles) se queden en
la superficie puesto que dejan una mancha aunque se halla limpiado.
2. Limpie todo polvo del horde del homo o de la puerta (vea la ilustraciOn). Estas areas se
calientan Io suficiente para producir un polvillo. Limpie con agua yjabOn.
3. Retire la parrilla y la pieza adjunta, todos los recipientes y toda pelicula. Estos objetos no
resisten las altas temperaturas.
4. Las rejillas del homo deben dejarse dentro del homo o pueden ser retiradas.Si se dejan
durante el ciclo de auto-limpieza, su color se opacara un poco. Despu_s que el ciclo se
halla terminado y que el hornohalla enfriado, frote los lados o las rejillas con papel
encerado o un paho con aceite de bebe o para ensalada. Esto hara que la rejilla se deslize
mas facilmente.
Que esperar
durante
la limpieza
Mientras que el homo esta en operaciOn, el homo se calienta a temperaturas mas altas que
las temperaturas de cocciOn normales. Los sonidos de contracciOn y de expansion del metal
son normales. Los olores son tambiOn normales puesto que las manchas estan siendo retiradas.
Humo puede aparecer a travOs del orificio de ventilaci0n ubicado en ambos lados de la
plancha de cocinar.
Si las manchas causadas por derrames mayores no estan frotadas antes de la limpieza, estos
pueden encenderse y producir mas vapor y olor que Io normal. Esto es normal y no debe
causar panico. Si es necesario, utilice un ventilador durante el ciclo de auto.limpieza.
NOTA: Cuando el homo Ilega a su temperatura de auto-limpieza, el nivel de humo se
cambiara en vapor.
64
_\
TIMER
Limpieza del
Horno
CARATERISTICAS BREVES
•
Como comenzar
Ci¢lode autolimpieza
el cido de autolimpieza
* Recommendamos un ciclo de autolimpieza de 2 hora si el horno solamente esta ligeramente
medianamente sudo y uno de 4horas si esta excesivamente sucio.
sucio, uno de 3 horas si esta
NO fuerce la puerta del horno para abrirla. Esto podria dahar el sistema de trabaz6n automatica de la puerta.
Obre de manera precavida al abrir la puerta despu_s que se haya completado el ciclo de autolimpieza. El horno a0n podria
estar MUY CALIENTE.
INDICADOR
INSTRUCCIONES
Como
reglar
los controles
del cido
de autolimpieza
para que se
encienda
de immediato
y se apage automaticamente:
I. AsegQrese de que el reloj de la estufa est_ a la hora correcta del dia.
2. Oprima CLEAN. Aparecera "CLN", "TIME" (duraci6n del ciclo de limpieza) en la pantalla.
3. Oprima la FLECHA HACIAARRIBA o HACIAABAJO y mant_n galo oprimido hasta que
aparezcaenlapantalla"3:00".
MarqueladuraciOndelciclobasandoseencuansucio
esta su homo ligeramente, medianamente, excessivamente. Vet las indicaciones de
arriba.
4. Tan pronto como los controles est_n reglados, se cerrara automaticamente el seguro
activado a motor y aparecera la luz indicadora de "DOOR" (puerta) en la pantalla y 3
beeps se escuharan. (El seguro tarda aproximadamente 15 segunos en trabarse). De
este momento en adelante, la cerradura esta cerrada y "LOCKED" (cerrada) aparecera
en la pantalla.
5. La luz de "ON" (homo) seencendera. En el indicator principal aparecera el tiempo de
limpieza que contera de manera decremiente en minutos hasta Ilegar a ":00".
Cuando
I.
2.
se ha completado
el ciclo de autolimpieza
La hora aparecera en la plantilla y la palabra "LOCKED" (terraria) quedara en la
pantalla hasta que la cavidad se enfrie.
Una vez que se haya enfriado el homo pot espacio de 1 HORA y se haya apagado
la palabra "LOCKED" en la pantalla, se podra abrir la puerta del homo.
Para parar o interumpir
el cido de auto=limpieza.
Si es necesario de interumpir el ciclo de auto-limpieza a causa del vapor excesivo o pot
incendio:
1. Optima CLEAR OFF (CANCELAR).
2. Una vez que el homo halla enfriado y la palabra "LOCKED" (CERRADO) aparece en la
pantalla, la puerta del homo puede abrirse.
65
Limpieza
del
Homo
CARATERISTICAS BREVES
•
Ciclo de Autolimpieza
Diferido
Para comenzar
el ciclo de autolimpieza
diferido
La duraci6n de ciclo de limpieza y STOP TIME controlan el funcionamiento del ciclo de autolimpieza diferido. El contador
automatico encender,_ y apagar,_ el homo a la hora que usted seleccione con anterioridad. Si usted intenta usar el homo
directamente despu_s del ciclo de autolimpieza recuerde que debe dejar que el homo se enfrie y que la puerta del homo se abra.
Estonormalmentedemoraaproximadamenteunahora.
Porlotantoparaunciclodeautolimpiezade3
horasen realidadson
necesarias 4 horas para completarlo.
*Recomendamos un ciclo de autolimpieza de 2 horas para un horno levemente sucio, un ciclo de 3 horas para un horno
medianamente sucio y un ciclo de 4 horas para un horno bastante sucio (para garantizar resultados satisfactorios).
NO fuerce la puerta del horno para abrirla. Esto podria dahar el sistema de trabazOn automatica de la puerta.
Obre de manera precavida al abrir la puerta despu_s que se haya completado el ciclo de autolimpieza. El horno a0n podria
estar MUY CALIENTE.
INSTRUCCIONES
Como
reglar
los controles
del ciclo
INDICADOR
de autolimpieza
para
que se
endenda
de manera
diferida y se apague automaticamente:
1. AsegOrese de que el reloj de la estufa est_ a la hora correcta del dia.
2. Oprima CLEAN. Aparecera "CLN", "TIME" (duraci6n del ciclo de limpieza) en la pantalla.
3. Oprima la FLECHA HACIAARRIBA o HAClAABAJO y manten galo oprimido hasta que
aparezcaenlapantalla"3:00".
MarqueladuraciOndelciclobasandoseencuansucio
esta su homo ligeramente, medianamente, excessivamente. Ver las indicaciones de
arriba.
4. Oprima STOPTIME. La hora a la que termine el ciclo de autolimpieza aparecera en la
pantalla. Las palabras "STOP", "CLEAN" (hora de cese del ciclo de limpieza).
5. Oprima la FLECHA HAClA ARRIBA o HAClA ABA,IO y mant_ngalo oprimido hasta que
aparezca en la pantalla la hora del dia en que usted desea que se complete el ciclo de
limpieza.
6. El control calculara en forma regresiv a partir de la hora de cese que se haya marcado,
a fin de determinar cuando debera empezar el ciclo de limpieza. Las palabras "DELAY"
(diferido) y "CLN STOP TIME" apareceran en la pantalla.
7. El ciclo de autolimpieza se encendera automaticamente a la hora indicada. Enronces, se
apagara "DELAY" y el tiempo de limpieza que contera de manera decremiente en
minutos hasta Ilegar a ":00".
Cuando
1.
2.
se ha completado
el dclo de autolimpieza
La hora aparecera en la plantilla y la palabra "LOCKED" (cerrada) quedara en la
pantalla hasta que la cavidad se enfrie.
Una vez que se haya enfriado el homo por espacio de I HORA y se haya apagado
la palabra "LOCKED" en la pantalla, se podra abrir la puerta del homo.
66
Limpieza
del homo de esmalte
de porcelana
(siequipado)
La porcelana tiene un terminado muy delicado yes un tipo de vidrio mezclado con metal. Los
limpiadores de homo puden ser utilizados en todas las partes interiores del homo.
Limpieza
del
Homo
CARACTERISTICAS
Limpieza general.
Retire las manchas usando agua caliente y jabonosa. No permita que derrames de comidas
con alto contenido en az0car o en acido (como leche, tomates, chucruta, jugos de fruta o
rellenos de pastel) queden en la superficie pues estos pueden causar manchas oscuras a0n
despu_s de la limpieza.
BREVES
Limpieza del homo
(Homo de lado)
Para retirar y
remplazar la puerta
del homo
Para retirar manchas dificiles.
I.
2.
Deje un plato con amoniaco dentro del homo toda la noche o por unas horas con la puerta
del homo cerrada. Limpie manchas mas faciles con agua caliente y jabonosa. Enjuague
bien con agua y un paho limpio.
Si las manchas perduran, utilice una esponja o un limpiador no abrasivo. Si es necesario,
use un limpiador de homo de acuerdo a las instrucciones del fabricante. NO mezcle el
amoniaco con otros productos de limpieza.
Tenga en cuenta las siguientes Jnstrucciones cuando utilice los limpiadores de homo.
1. NO pulverise sobre los controles el_ctricos o interruptores porque esto podria causar un
corto-circuito y producir chispas o un fuego.
2. NO permita que una pelicula de limpiador se forme sobre la bombilla sensor de
temperatura, esto puede hater que el homo se caliente de manera inapropiada. (La
bombilla se encuentra en la parte trasera del horno). Limpie cuidadosamente todo residuo
sobre la bombila despu_s de cada limpieza, asegurandose de no mover la bombilla). Si
mueve la bombilla, el horneado podria estar afectado. Evite de doblar la bombilla o el
capilar.
3. NO pulverise ning0n tipo de limpiador en el horde de la puerta o en la empaquetadura, en
los tiradores o en cualquier otra area externa de la cocina, en la madera o areas pintadas.
El limpiador puede dahar estas areas.
Para limpiar la base del homo.
Limpie con agua caliente y jabonosa, u n limpiador poco abrasivo, un paho abrasivo jabonoso o
limpiador de homo de acuerdo a las instrucciones del fabricante.
NO forre las paredes del horno, la base, los carriles u cualquiera otra parte del
aparato con pelicula de aluminio. El hater esto puede destruir la distribuciOn de calor, producir
pobres resultados al hornear y causar un daho permanente al interior del homo (la pelicula de
aluminio se derretira al contacto con las areas internas del homo).
67
Siga las siguientes
precautiones
•
de limpieza
Permita que el homo
enfrie antes de limpiarlo.
Use guantes
de caucho
cuando limpie el aparato
manualmente.
RETIRE LOS DERRAMES
LAS MANCHAS
MAS PRONTO
POSIBLE.
LA UMPIEZA
REGULAR
DISMINUlRA
NECESlDAD
UMPIEZAS
ADELANTE
Y
DIFJCILESLO
LA
DE
A FONDO M_.S
DESPUI_S.
El amoniaco
debe set retirado
antes de
empezar a utilizar el homo.
Trate ventilar
adecuadamente.
Limpieza
Limpieza
general
Es esencial limpiar regularmente y en forma correcta la cubierta de vidrio ceramico.
Antes de usar su cubierta por primera vez, aplique en la superficie de vidrio la crema de
limpieza para cubiertas recomendada (P/N 40079). Pula con un pa_o no abrasivo o una
esponja de limpieza antirayaduras. Esto facilitar_, la limpieza cuando se ensucie al cocinar.
Esta crema especial de limpieza deja una pelicula protectora sobre el vidrio que evita las
rayaduras y abrasiones.
CARACTERISTICAS BREVES
•
Limpieza y
Mantenimiento de la
plancha de cocinar
y Mantenimiento
de la Cubierta
Si se deslizan sobre la cubierta utensilios con fondo de
aluminio o de cobre se pueden causar marcas de metal
en la superficie de la cubierta. Estas marcas deben set
quitadas inmediatamente despues de que la cubierta
se haya enfriado us_.ndo la crema de limpieza para
cubiertas. Las marcas de metal pueden ser
permanentes si no se sacan antes del pr6ximo use de la
estufa.
_lr_
Antes de
limpiar la cubierta,
asegOrese de que los
controles est#n en la
posici6n 'OFF' y que la
cubierta este FRIA.
_NO
use limpiadores para la
cubierta cuando est6
caliente. Los vapores
pueden ser perjudiciales
para su salud y pueden
dahar quimicamente la
superficie de vidrio
ceramico.
Los utensilios de cocina (de hierro fundido, metal,
cer_.mica o vidrio) con fondos _.speros pueden marcar o
rayar la superficie de la cubierta. No deslice nada que
sea de metal o de vidrio a traves de la cubierta. No
use la cubierta come una tabla de cortar o come
superficie de trabajo en la cocina. No cocine alimentos
directamente sobre la cubierta sin usar un utensilio. No
deje caer objetos duros o pesados sobre la cubierta de vidrio, pues pueden quebrarla.
Recomendaciones de Limpieza para Cubiertas de Vidrio Ceramico:
Para suciedad leve y moderada
Para aplicarla crema de limpieza sobre la superficie de la cubierta. Use una toalla de papel o una
esponja de limpieza antirayaduras de pl_.stico no abrasiva para limpiar la superficie completa
de la cubierta. AsegOrese de que la cubierta sea enjuagada minuciosamente, sin dejar ningOn
residue de detergente o de limpiador.
Para suciedad dura y quemada
Para aplicar la crema de limpieza sobre la superficie de la cubierta. Frote el _.rea manchada
usando una esponja de limpieza antirayadu ras de plastico no abrasiva y aplique presi6n cuando
sea necesario.
Si permanece suciedad, raspe cuidadosamente la suciedad con un raspador con hoja de afeitar,
sosteniendo el raspador en un _.ngulo de 30 g rados en relaci6n con la cubierta. Reti re la suciedad
suelta con crema de limpieza y frote la superficie hasta que quede limpia.
NOTA IMPORTANTE: Si utiliza una esponja de limpieza abrasiva,
la cubierta de vidrio ceramico puede sufrir daSos. S61o use
productos de limpieza que hayan side diseSados especificamente
para cubiertas de vidrio cer_.mico.
Pl&stico o alimentos con un alto contenido de az_car
Estos tipos de suciedad necesitan ser quitados inmediatamente
despu6s de que se derraman o derriten sobre la superficie de vidrio
cer&mico. Puede ocurrir daSo permanente (tal come picadura de la
superficie de la cubierta) si no se quitan inmediatamente. Despu6sde
apagar los elementos superiores, use un raspador con hoja de afeitar
o una esp_.tula de metal con un guante y raspe la suciedad de la
superficie caliente (come se muestra en la ilustraci6n). Espere que la
cubierta se enfrie y use el mismo metodo que para la suciedad dura y
quemada.
jf_H
68
Mmpieza
y MantenJmiento
No use los siguientes
cer4mico:
productos
de la Cubierta
en la cubierta
(continuacion)
Limpieza
de vidrio
general
• No use limpiadores abrasivos ni esponjas de restregar,
taJes como esponjas de metal y algunas esponjas de
niJ6n. Elias pueden rayar Jacubierta, hadendo m_s dificiJ
su limpieza.
• No use hmpiadores abrasivos, tales como blanqueador de
cloro, amoniaco o JimpJadores de hornos, pues pueden
rayar o descolorar Ja cubierta.
= No use esponjas, pa_os o toalJas de papel sucias, pues
pueden dejar suciedad o pelusas en Ja cubierta que
pueden quemarse y causar descoJorad6n.
Uso y cuidado
de la surperficie
Problema
Finas"lineas
marrones"
(pequeflas marcas o
abraciones que han
acumuladotierra)
i
CARATERISTJCASBREVES
Limpieza de la plancha
de cocinar
de vidrio.
Causa
Para prevenir
Para retirar
Particulas dificiles (sal,
Lirnpie la planclna
arena o azOcar) entre los
recipientes de cocina y la
plancha de cocinar.
UtilizaciOn de materiales
de limpieza inapropiados.
de
Pequehas marcas no
se pueden quitar. Se
pueden
disimular
usando la crema de
limpieza. Este tipo de
marcas no altera el
cocinado.
cocinar
despu_s del uso.
iii
Utilizaci6n diaria
de la crema
limpiadora.
Mar cas
.......................................
.................................................
No ciesiize.............................................................
Apiique crema de...............................
(marcas negras)
utensilios de metal o las
utensilios de
limpieza con una
repisas del horno sobre la
cocina sobre la
toalla de papel
plancha de cocinar,
plancha de
remojada para
cocinar,
enfriar la superficie.
Rayasomanchas
marrones
Limpiarconunaesponjao
trapo de cocina que han
tenido otro uso en la
cocina,
Utilicelacrema
de limpieza con
una toalla de
papel limpia y
remojada,
Utiliceunapequefla
cantidad de crema
de limpieza con una
toalla limpia y
remojada.
Instrucciones de limpieza especialemente para los depositos minerales y las descoloraciones
ProbJema: Una mancha marr6n gris que no puede ser retirada con la crema de limpieza.
Causa: La condensaci6n que se acumula y gotea de los utensilios de cocina. Los minerales
contenidos en el agua y las comidas pueden ocasionar la aparici6n de una pelicula gris o marr6n
sobre la plancha de cocinar.
Para prevenir:Uso
diario y apropiado de la crema de limpieza.
Para retirar:
Remoje la superficie con agua y aplique la crema de limpieza.
Frote con una toalla de papel limpia y remojada hasta que la mancha desaparezca.
Aplique un poco de crema de limpieza y lustre con una toalla de papel.
No utilice los limpiadores en una superficie caliente. Las hemanaciones pueden ser
peligrosas. Paciente hasta que el area est_ mas aereada antes de limpiar.
No utilice la crema de limpieza para limpiar porcelana, pintura o aluminium.
69
Limpieza
general
CARACTERISTICASBREVES
,,
Limpieza de la plancha
de cocinar
Para limpiar las parrillas,
del quemador.
las calderas
contorneadas,
las tapas
y la basas
Las parrillas, las calderas contorneadas, la tapa y la basa del quemador deben ser limpiadas
continuamente. Manteniendo los orificios del quemador previene un encendido inadecuado y
una llama desigual.
Siga las instrucciones siguientes.
Para
limpiar
las calderas
contorneadas
del quemador.
Las calderas del quemador estan unidas a la plancha de cocinar y son fijas. La caldera del
quemador forma una depresi6n alrededor de cada quemador. Si un derrame ocurre en una de
estas areas, secar con un paho absorbente. Enjuage con un paho remojado, limpio y seque
completamente.
Para limpiar
las parrillas.
AsegOrese que los quemadores y las parrillas est6n enfriados antes de colocar su rnano, un
soporte, pahos de lirnpieza u otro material sobre ellos. Las calderas de fierro pueden ser
lavadas en una lavadora de vajilla o en agua caliente jabonosa. Enjuage a fondo y seque las
parrillas con un paho. No las coloque sobre la plancha de cocinar mientras que est6n mojadas.
AsegOrese que las parrillas esten en buena posici6n sobre los quemadores.
Para retirar comida quemada, coloque las parrillas en un recipiente con tapa o en una bolsa
plastic& Ahada I/4 de taza de amoniaco y remoje por 30 minutos. Lave, enjuage bien y
seque. Un limpiador con poder abrasivo puede ser utilizado para las manchas dificiles.
Para IJmpiar la tapa del quemador
Retire la tapa del quemador. Utilice un tampon refregado con jab6n o un abrasivo ligero para
limpiar las tapas del quemador. Si es necesario, recubra las manchas dificiles con una toalla de
papel remojada con amoniaco por 30 minutos. Frote delicadamente con un tampon refregado
en jabOn y enjuage con una mezcla de agua y vinagre. Seque completamente. Retire todo
limpiador o la porcelana podfia ser dahada cuando vuelva a ser calentada.
Para
limpiar
la base
amovible
del quemador
y la apertura
de gas.
Los orificios alrededor de la base del quemador deben ser limpiados continuamente.
Utilice
una esponja de alambres o una aguja para limpiar pequeflas ranuras o agujeros. Tenga
cuidado de no daflar el electrodo. Si un patio de limpieza Ilega a tocar el electrodo, _ste se
puede romper o dahar. Si el electrodo es dahado o roto, el quemador no podra ser encendido
porque no habra ¢hispa. El encendido manual con un ¢erillo puede ser posible.
Para un flujo de gas y un encendido adecuados- NO PERMITA QUE DERRAMESDE LIQUIDOS,
COMIDA, LIMPIADORES0 CUALQUIER OTRO MATERIAL ENTRENEN LA APERTURA DEL
GAS. El gas debe pasar libremente a trav_s del pequeflo orificio de los quemadores para poder
encenderlos. Si el orificio del gas se obstruye, utilice una pequefla esponja de lambres o una
aguja para limpiarlo. SIEMPREtenga la tapa del quemador en su lugar cuando utilice
cualquiera de los quemadores.
70
Mmpieza
de diferentes
partes de su estufa
Antes de limpiar cualquier parte de la estufa, aseg0rese que todos los controles estan
apagados y que la estufa esta fria. Retire los derrames y las manchas dificiles tan pronto como
pueda. La limpieza constante disminuira el esfuerzo de una limpieza a fondo.
Superficies
Piezas de aluminio
vinilico
Limpieza
general
Como limpiarlas
Use agua jabonosa y caliente con un patio. Seque con un paho limpio.
&
Antes de limpiar el panel de control, apague todos los controles y retire las perillas de
control. Para retirarlas, tire la perilla de su eje. Limpie con agua caliente yjabonosa con
un patio de vajilla. AsegOrese de escurrir toda el agua del patio antes de frotar el panel,
sobre todo alrededor de los controles. Demasiada agua alrededor de los controles puede
dahar el el_ctrodomestico.Para volver a colocar las perillas despu_s de la limpieza, trate
de alinear los lados pianos de la perilla y del eje, luego empuje la perilla hasta su lugar.
Acero inoxidable (algunos
modelos) Puerta del homo y
panel frontal de la gaveta
Los limpiadores hechos exclusivamente para acero inoxidable como Stainless Steel Magic
u otros son recomendados. Siempre siga las instrucciones del fabricante. AsegLirese de
remojar los limpiadores puesto que hay manchas debidas al calor que no pueden ser
retiradas.
Rejillas del homo
Retire las rejillas del horno. Vea "Retirando y volviendo a colocar las rejillas del homo" en
Antes de ajustar los controles del homo. Use limpiadores abrasivos suaves seg0n las
instrucciones del fabricante. Enjuage con un patio mojado y deje secar. Despu6s de
limpiar las rejillas, frote los lados de las rejillas con papel encerado o un paho con un
poco de aceite de bebe o para ensaladas ( esto hace que las rejillas se deslizen mejor
sobre los estantes).
Grilla incandecente
Para limpieza general, ponga en agua caliente yjabonosa por unos 10 minutos. Use un
paho suave para retirar las manchas dificiles. Enjuage con un paho remojado y seco. NO
use limpiadores abrasivos o esponjas de metal. Estos pueden raspar la estufa.
(algunos modelos)
Plancha de cocinar en esmalte
de porcelana, Debajo de
plancha de cocinar, Parilla y
Pieza adjunta, Borde de la
puerta, Pequeflo homo
Puerta del homo
Rasque delicadamente con una esponja retirara la mayoria de las manchas. Enjuage con
una mezcla de agua y amoniaco (1:1). Si es necesario, cubra las manchas con una toalla
remojada de amoniaco por unos 30-40 minutos. Enjuage con agua y un paho mojado y
luego frote con una esponja jabonosa. Enjuage y seque con un paho limpio. Retire todo
limpiador o sino la porcelana puede daflarse cuando vuelva a calentar la estufa en el futuro.
NO use los limpiadores con vaporisador sobre la plancha de cocinar.
Para limpiar la puerta del homo, use agua jabonosa caliente y un paho limpio. No
sumerja la puerta en el agua.
No limpie la empaquetadura
de la puerta del homo. La empaquetadura del homo
esta fabricada con un material trenzado importante para un buen sellado. Tenga cuidado
de no frotar, dahar o desplazar la empaquetadura.
anuelmeRte
Limpie la puerta
manuelmente
{_
_
/
No limpie manualmente
la empaquetadura
71
Limpieza
Para retirar
general
1.
2.
CARACTERISTICAS
BREVES
Para retirar y remplazar le
puerta del homo
Para retirar y remplazar la
gaveta de entibiar
3.
4.
y remplazar
la puerta
del homo
Abra la puerta del homo completamente.
Tire hacia arriba del tope situado en cada soporte de la bisagra y enganchelo en el gancho
delaspalancasdelabisagra.
EsposiblequetengaquehacerunpocodepresiOnhacia
abajo sobre la puerta, para sacar los topes totalmente fuera de los ganchos.
Agarre la puerta por ambos lados, tire la parte de abajo de la puerta hacia arriba y hacia
usted, para desenganchar los soportes de las bisagras. ContinL_e a tirar la parte de abajo
de la puerta hacia usted, girando la parte superior de la puerta hacia la cocina para
desenganchar completamente las palancas de la bisagra.
Vuelva a empezar las etapas precedentes.en el sentido inversor para reponer la puerta.
La puerta esta pesada. Para seguro, temporal almacenamiento, ponga la puerta
sobre una superficie plana con la parte interior de la puerta sobre la superficie.
Palanca de
bisag_
" ""
normal
bisagra
o
Cierre en posici6n enganchada
_ara sacar la puerta
Agujero para la bisagra
puerta quitada del homo
Tire con el dedo
[
Para retirar
y remplazar
la gaveta
de entibiar
Para retirar la gaveta de entibiar:
1. Abra la gaveta completamente.
2. Coloque la palanca del deslizamiento en cada lado de la gaveta; tire hacia
arriba sobre la palanca del deslizamiento izquierdo y empuje hacia abajo sobre
la palanca del deslizamiento derecho (ver figura I).
3. Tire la gaveta hacia afuera de la estufa.
izquierdo
Empuje hacia
abajo con el dedo
Fig. 1
Deslizamiento
derecho
Para remplazar la gaveta de almacenamiento:
1. Tire los deslizamientos del cojinete hacia la parte delantera de la estufa (ver
figura 2).
2. Alinee los deslizamientos de la gaveta con las ranuras sobre los deslizamientos
del cojinete.
3. Deslice la gaveta en la estufa hasta que escuchara el sonido de un "click de las
palancas de los deslizamientos (aproximadamente 2 pulgadas). Vuelva a tirar la
gaveta para abrirla y apoyarla en su sitio.
4
Si no escucha al "click" de la palanca de los deslizamientos o si la gaveta
no se apoya firmemente, remuevala y vuelva a empezar las etapas I a 3.
De esta manera reducira al minino los dahos a los deslizamientos del cojinete.
No use fuerza para colocar la gaveta en su sitio.
del cojinete
Fig. 2
72
AsegOrese
queelhornoest6desconenctado
yquetodaslaspartesestenFRIAS Para remplazar
antesderemplazar
labombilladelaluz.Noencienda
laluzdelhornoduranteunciclode
la bombilla del
auto-limpieza.
Lasaltastemperaturas
disminuiran
laduraciOn
delabombilla.
homo
Pararemplazarla bombilladelhomo
Enalgunos
modelos,
unaluzinternaseencendera
cuandolapuertadelhomoseabre.
Puedeencender
laluzdelhomoa0ncuandolapuertaestacerrada
usandoelinterruptor
Iocalizado
enelcontroldelhomoelecr6nico.
1. Corteelsuministro
el6ctrico
alafuenteprincipalo desconecte
elhomo.
2. Utiliceguantes
decueroparasuprotecci6n
porsielvidrioserompe.
3. Presione
elsujetador
delalambrehaciaunladoparaliberarlapantalla
devidrio.
4. Remplace
labombillaconunanuevade40W.
5. Coloquelapantalla
devidrioenelsoquetey ajusteelsujetador
delcableensulugar.
6. Restablesca
elsuministro
el6ctricoa lafuenteprincipal(ovuelvaa conectar
elaparato).
7. Elrelojtendraqueserre-ajustado.
Paraajustarlo,
veaAjustareJreJojy eJcontadorde
tiempoenlasecci6n"CONTROL
DELHORNO
ELECTRONICO".
Cuando use el homo por primera vez, asegOrese de acatar el tiempo y las temperaturas
indicadas para las recetas. Si usted piensa que elhorno esta demasiado caliente o demasiado
frio, se puede reajustar la temperatura del horno. Antes de reajustar la temperatura del homo,
haga la prueba con una receta para la que usara una temperatura mas alta o mas baja que la
recomendada. Los resultados que obtenga al hornear deberan ayudarle a decidir que tipo de
ajuste se necesita hater.
Como ajustar
I.
2.
3.
4.
5.
la temperatura
del homo:
Oprima BAKE.
Regle la temperatura a 550°F/288°C oprimiendo y mantenido oprimido la
FLECHA HACIA ARRIBA.
Pasados 2 segundos, Oprima BAKE y mant_galo oprimido hasta que aparezcan
2 cifras en lapantalla. Suelte BAKE. Ahora, aparecera en la pantalla la cifra que
indica la differencia de los grados con respecto a la temperatura reglada en la
fabrica. Si el control del homo esta calibrado a la misma temperatura, aparecera
"00" en la pantalla.
Ahora, oprima y mantenga oprimido la FLECHA HACIA ARRIBA O HACIA
ABAJO para ajustar la temperatura hasta 35%/17°C hacia arriba o hacia abajo,
en incrementos de 5°F/3°C. Ajuste hasta Iograr la temperatura deseada en la
pantalla. Cuando ajuste la temperatura del homo, aparecera un signo de menos
(-) antes del nOmeropara indicar que el homo estara a una temperatura mas baja
en la candidad de grados indicados en la pantalla.
Una vez que haya hecho el ajuste deseado, oprima CLEAR OFF hasta que aparezca
la hora del dia en la pantalla.
73
Adjuste de la
temperature
del
horno
Usted puede evitarse el incoveniente y los gastos de una Ilamada innecesaria al servicio
revisando esta lista de verficaciOn. Esta lista muestra los problemas mas frecuentes que no son
la causa de un fabricado defectuoso de las piezas.
Lista de
verificadbn
para
evitar Ilamadas
Usted sera facturado por la Ilamada de servicio, durante el tiempo que cubre la garantia, si el
problema no es la causa del fabricado defectuoso de una pieza.
Su nuevo aparato ha sido disefldo cuidadosamente. Muchas veces, Io que parece necesitar
una Ilamada al Centro de servicio se puede arreglar con algunos ajustes que Ud.mismo puede
hacer en su domicilio o son caracteristicas normales de funcionamiento de su aparato en
ciertas condiciones.
SITUACION
POSIBLE
La estufa
Instalci6n inadecuada. Coloque la rejilla en el centro del horno. Coloque un nivel sobre
la rejilla. Ajuste las patas niveladoras en la base de la estufa hasta que la rejilla se nivele.
Cuando la estufa est,1 nivelada, la plancha de cocinar puede aparecer desnivelada si la
plancha de cocinar no est,1 nivelada.
est_ desnivelada.
CAUSA/SOLUCION
Piso no solido, inestable. Aseg0rese que el piso est.1 nivelado y que puede soportar la
cocina. Llame su carpintero para corregir un piso inclinado.
El desnivel del armario de la estufa puede hater aparecer la estufa desnivelada.
Asegurese que los armarios est_in cuadrados y tienen suficiente espacio para la cocina.
No puede mover el aparato
fadlmente.
El
aparato
no puede ser accesible facilmente,
Los armarios
para corregir
Consulte
no son cuadrados
el problema.
un carpintero
o son fabricados
para hacer el aparato
muy angostos.
Consulte
un carpintero
m_qs accesible.
Las alfombras interfieren con la cocina. Deje suficentemente de espacio para que la
estufa pueda set levantada sobre la alformbra.
La estufa completa
funcionan.
o el horno no
Asegurese que el cable este bien ajustado en el enchufe.
El alambrado no ha sido terminado.
instalaci6n o servicio autorizado.
Consulte con su agente de servicio, agente de
Corte de electricidad.
Verifique las luces de la casa para asegurarse.
de electricidad
local para el servicio.
*El control
del homo suena yen
pantalla
aparece
F1,F3 o F9.
la
El control electr6nico
ha detectado
una anomalia.
Pulse CLEAR para borrar la pantalla y
parar el sonido. Reprograme
el homo. Si la anomalia se repite, tome nota del n0mero
de anomalia.
La luz del homo
La unidad
no funciona.
de superficie
no calienta.
o ajuste
usuario
para las instrucciones.
la bombilla.
No hay suministro
electrico
no funcionan"
Programado
encendido
no encienden.
Pulse CLEAR y consulte
Coloque
homo
Los quemadores
Llame a su copar3ia
Vea
un servicio autorizado.
"Cambio
al aparato.
Verifique
que se encuentra
de los controles
para que pueda
de la luz del homo"
en el Manual
del
las etapas en "La estufa completa
o el
en esta lista.
inadecuado.
usar la unidad
AsegOrese
que el control
adecuado
este
de superficie.
La perilla de superficie no ha sido completamente encendida hacia LITE. Presione y gire
la perilla de superficie hasta LITE (hasta que el quemador se encienda) y luego gire hasta
obtener la talla de la llama que desea.
Los orificios del quemador est_in obstruidos. Limpie los quemadores. Vea "Para limpiar
las depresiones, la tapa, la caldera y la base del quemador" en Limpieza General. Con el
quemador apagado, limpie los orificios con una esponja de alambras o una aguja.
El suministro de gas est,1 cerrado. Abierte al suministro de gas.
El quemador
tiene
la mitad
de la llama.
Los orificios del quemador est_in obstruidos. Con el quemador apagado, limpie los
orificios utilizando una esponja de alambres o una aguja.
La humedad esta presente despues de la limpieza. Sople la llama lentamente y permita
que el quemador funcione hasta que la llama est@completa. Seque los quemadores a
fondo de acuerdo alas instrucciones de la secci6n "Limpieza General"
74
La llama
del quemador
es anaranjada.
Particulas de polvo en la linea principal. Permita
minutos hasta que la llama se ponga azul.
Aire salado en las zonas de la costa.
Raspaduras
o rasgu_os
plancha decodnar,
Marcas
la
o manchas
resultados
Llamas desde
maronnes.
con brillo
al hornear.
el interior
de la rejilla
pot unos
es inevitable.
Deslizando o rosando los utensilios de metal sobre la superficie de la plancha de cocinar.
Ne deslize los utensilios de metal sobre de la superficie de la plancha de cocinar.
Use
una crema de limpieza para retirar las marcas de la plancha de estufa cer_imica. Vea
"Para limpiar el vidrio de la plancha de cocinar"
en Limpieza General.
Areas de descoloracion
met_lico,
Malos
Una ligera llama anaranjada
funcione
Particulas difficiles como la sal o la arena entre la plancha de cocinar y los utensilios
pueden causar raspaduras.
Aseg0rese que la superficie de la plancha de cocinary la base
de los utensilios esten limpias antes de usarla. Pequer_as raspaduras no afectan la
cocciOn y desparecer_qn con el tiempo.
de metal.
Rayas
vapor
sobre
que el quemador
Los derrames han sido cocidos en la surperficie.
Use una lama de afeitar para retirar
manchas.
Vea "Para limpiar el vidrio de la plancha de cocinar" en Limpieza General.
las
Depositos minerales del agua o de la comida.
recipientes con las bases limpias y secas.
Use
Retirelos
con una crema de limpieza.
Muchos factores afectan el horneo. Asegurese que la rejilla est,1 en buen lugar. Centre la
comida y deje espacio para permitir al aire de circular. Precaliente el homo a la
temperatura
deseada antes de colocar la comida. Trate de ajustar las temperaturas
recomendadas
y el tiempo de horneo de sus recetas. Si cree que el homo est,1 muy
caliente o muy frio, vea "Ajuste
de la temperatura
del homo"
en secciOn "CONTROL
DEL HORNO ELECTRONICO".
del homo
o
Derrames excesivos dentro del homo. Ajuste el ciclo de auto limpieza pot un tiempo m_is
largo.
de ventilaci6n.
Derrames excesivos dentro del horno. Esto es normal, especialmente
para los de pasteles
o grasas en la base del homo. Limpie los derrames excesivos antes de comenzar la autolimpieza. Si observa llamas o vapor, pare el ciclo de auto.limpieza
y siga las etapas en
"Para parar o interrumpir
el ciclo de auto-limpieza"
en seccion "CONTROL DEL
HORNO ELECTRONICO".
El horno
asar.
produce
demasiado
vapor
al
Los controles no estan programados
adecuadamente.
de los controles
del homo"
en seccion "CONTROL
AsegOrese que el horno
est,1 abierto
a la Posicion
Siga las instrucciones
en "Ajuste
DEL HORNO ELECTRONICO".
de parar
el asado.
Las carnes est_in muy cerca del elemento del asador.Vuelva
a colocar la rejilla para
obtener un espacio suficiente entre las carnes y el elemento.
Precaliente el elemento
asador. Precaliente el elemento del asador para cocinar con la grilla incandecente.
del
La rejilla en la parrilla tiene el lado incorrecto hacia arriba y la grasa no est,1 goteando.
Siempre coloque la rejilla sobre la parrilla con las varillas hacia arriba y las ranuras hacia
abajo para que la grasa gotee en el recipiente.
Grasa se ha acumulado
sobre la superficie del horno. La limpieza frecuente es necesaria
cuando asa constantemente.
Grasa que se queda inpregnada
o manchas de comida
pueden causar vapor excesivo.
El ciclo de auto-limpieza
no funciona.
Los controles no estan programados
adecuadamente.
Siga las instrucciones
"Limpieza
del homo"
en seccion "CONTROL DEL HORNO ELECTRONICO".
en
El ciclo de limpieza fue interrumpido.
El tiempo de termino debe ser de 3 a 4 horas
despues de haber comenzado.
Siga las etapas en "Para parar o interrumpir
el ciclo
auto-limpieza"
en secciOn "CONTROL DEL HORNO ELECTRONICO".
Las manchas
despues
no han sido
del dclo
retiradas
de auto-limpieza.
de
No ha limpiado la base, la parte superior, el cadre o la puerta al exterior de la
empaquetadura del homo. Estas areas no son limpiadas por el ciclo de auto-limpieza,
pero se calientan Io suficiente para crear residuos. Limpie estas partes antes de comenzar
un nuevo ciclo de auto-limpieza. Los residuos pueden ser limpiados con un pano de
nylon y agua o con una esponja de nylon. Tenga cuidado de no dar_ar la empaquetadura
del horno.
75
Your Home
For repair-in
your home-of
all major brand appliances
lawn and garden equipment, or heating and cooling systems,
no matter who made it, no matter who sold it!
For,the replacement parts, accessories and
owner s manuals that you need to do-it-yourself.
For Sears professional installation of home appliances
and items like garage door openers and water heaters.
1-800-4-MY-HOME
®
(1-800=469-4663)
Call a nytim e, day o rn ig h t (U. S.A. an d Can ad a)
www.sears.com
www.sears.ca
Our Home
For repair of carry-in items like vacuums, lawn equipment,
and electronics, call or go on-line for the location of your nearest
Sears Parts & Repair Center.
1-800-488-1222
Call anytime,
day or night (U.S.A. only)
www.sears.com
SesLrS
® Registered
Trademark
® Marca Registrada /
MC Marque
de commerce
TM
/
TM
Trademark
/
SM
Marca de Fabrica /
/ MD Marque
d6pos6e
Service
SM
Mark of Sears
Mama de Servicio
de Sears
Brands,
Brands,
de Sears
LLC
LLC
Brands,
LLC
O Sears
Brands,
LLC