1
Front=Loading Automatic Washer
Models 4900*
_[_i_i_
¸ _Ji_,
¸¸
Designed
Efficiency
to use only HE High
Detergent
Code n ° : DC68-02902A-01
Sears Canada Inc., Toronto, Ontario,
Canada M5B 2C3
www.sears.ca
TABLE OF CONTENTS
TABLE OF CONTENTS
PROTECTION
...............................
AGREEMENTS
2
..........................
2
In Canada .........................................
KENMORE
ELITE_WASHER
PEDESTAL
OPTION WARRANTY
WASHER
SAFETY
iNSTALLATiON
2
WARRANTY
................
.......................
3
3
...................................
REQUIREMENTS
PROTECTION AGREEMENTS
4
.......................
5
Tools and Parts ....................................
5
Options
..........................................
5
Location
Requirements
6
Drain System
Electrical
..............................
......................................
Requirements
iNSTALLATiON
7
..............................
iNSTRUCTiONS
9
The Sears Protection
9
9
[]
Is your way to buy tomorrow's
[]
Eliminates repair bills resulting from normal wear and tear
[]
Provides phone support from a Sears technician
requiring in-home repair
[]
Even if you don't need repairs, provides an annual Preventive
Maintenance Check, at your request, to ensure that your
product is in proper running condition.
Route the Drain Hose ...............................
10
Secure the Drain Hose ..............................
11
Level the washer
11
FEATURES
WASHER
..................................
Installation
...............................
AND BENEFITS
11
..........................
12
USE .....................................
13
Starting Your Washer ...............................
13
Using the Proper Detergent
13
..........................
Using the Dispenser ................................
Pausing or Restarting
Changing
Status Lights
14
..............................
Cycles, Options and Modifiers
16
...............
.....................................
16
16
Cycles ..........................................
Normal Sounds ...................................
17
19
Options
19
LAUNDRY
.........................................
TiPS ....................................
21
Loading .........................................
Stain Removal Guide ...............................
WASHER
Vacation, Storage, and Moving Care ...................
...............................
Washer and Components
...........................
Washer Operation .................................
Clothes Care .....................................
SERVICE
21
22
CARE ....................................
Cleaning Your Washer ..............................
Water Inlet Hoses .........................
TROUBLESHOOTING
NUMBER
.......................
Your KENMORE ELITE ® product is designed, manufactured
and tested to provide years of dependable operation. But like
all products, it may require service from time to time. The Sears
Maintenance Agreement offers you an outstanding service
program, affordably priced.
8
........................
Remove Transport System ............................
Connect the Inlet Hoses .............................
Complete
Protection Agreements
Your purchase has added value because you can depend
on Sears HomeCentral ® for service. With over 2,400 Service
Technicians and more than a million parts and accessories, we
have the tools, parts, knowledge and skills to back our pledge:
We Service What We Sell.
22
i ........
22
24
24
25
25
26
27
BACK COVER
Agreement
service at today's
price
on products
KENMORE ELITE WASHER
WARRANTY
PEDESTAL OPTION
WARRANTY
TwoyearsFurlWarrantyon Washer& TenyearsParts
Warrantyon DirectDriveMotor
Furl One-Year Warranty on Mechanical Parts
For two years from the date of purchase, when installed and
operated according to the Use & Care Guide, this washer will be
repaired free of charge if defective in material or workmanship.
If the direct drive motor is defective in material or workmanship
within the third through tenth year from purchase date, call 1800-4-MY-HOME
to receive a free replacement motor. After the
second year from purchase date, you will be responsible for the
labor cost of motor installation.
Service must be provided by a Sears Service Department
Canada or an authorized agent.
in
Warranty Restric_on
For one year from the date of purchase, supplier will repair or
replace any of its mechanical parts if defective in material or
workmanship. This Pedestal must be installed with this washer
according to the instructions provided in the Pedestal installation
instructions.
Warranty RestricSon
if the pedestal is subject to other than private family use and or
if the pedestal is used with any other product than those listed in
the installation instructions, the above warranty coverage is null
and void.
Product Record
[]
if this washer is used for other than private family purposes,
this warranty applies for only 90 days from the date of
purchase.
[]
Use of any laundry detergent not specifically designated
High Efficiency (HE) washers wiil void this warranty.
for
Warranty Service
in the space below, record your complete model number, serial
number, and purchase date. Model plate for the pedestal is
located on the rear of the upper right hand corner.
Have this information available to help you quickly obtain
assistance or service when you contact Sears concerning
pedestal.
your
Model number
Warranty service is available by calling 1-800-4-MY-HOME®.
This warranty applies only while this washer is used in Canada.
This warranty gives you specific legal rights, and you may also
have other rights, which vary, from province to province.
For Sears warranty information or to contact a Sears Service
Center, please reference the service numbers located on the
back page of this manual.
Serial number
Purchase
date
Save these instructions
reference.
and your sales receipt
for future
Sears Canada Inc.
Toronto, Ontario, Canada IVl5B2C3
Product Record
In the space below, record your complete model number, serial
number, and purchase date. Model plate is located on the upper
left-hand corner of the door opening and on the rear right side of
the unit.
Have this information available to help you quickly obtain
assistance or service when you contact Sears concerning
appliance.
your
IVlodel number
Serial number
Purchase
date
inlet Hose replacement
date
inlet Hose replacement
date
inlet Hose replacement
date
Replace inlet hoses after 5 years of use to reduce the risk of
hose failure.
Save these
reference.
instructions
and your sales receipt
for future
3
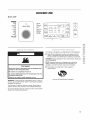
WASHER SAFETY
Your safety and the safety of others are very important.
We have provided
messages.
many important safety messages
in this manual and on your appliance.
Always read and obey all safety
This is the safety alert symbol.
This symbol alerts you to potential
All safety messages
®
hazards that can kill or hurt you and others.
will follow the safety alert symbol and either the word "WARNING"
or "CAUTION."
These words mean:
All safety messages will tell you what the potential
happen if the instructions are not followed.
Hazards or unsafe practices
injury or death.
that may result in severe personal
Hazards or unsafe practices
injury or property damage.
that may result
in minor personal
hazard is, tell you how to reduce the chance of injury, and tell you what can
iMPORTANT SAFETY iNSTRUCTiONS
WARNING:
To reduce the risk of fire, electric shock, or injury to persons when using the washer, follow basic precautions,
including the following:
[]
Read all instructions before using the appliance.
[]
Unplug the power cord before servicing
[]
With any equipment using electricity and moving parts,
potential hazards exist. To safely operate this appliance,
become familiar with its operation and be careful when
using it.
[]
Do not reach into the appliance
[]
Do not let children play on or in your washer. The washer
door isn't easily opened from the inside, and a child could
be seriously injured if trapped inside.
[]
Do not tamper with the controls.
[]
Do not repair, replace, or service any part of your washer
yourself unless you fully understand the recommended
user-repair instructions and have the skills to carry them
out. Work done by an unauthorized person may void your
warranty.
[]
Store laundry detergents and other laundry
cool, dry place out of children's reach.
[]
Do not wash or dry items that are soiled with vegetable
or cooking oil. These items may contain some oil after
laundering. Due to the remaining oil, the fabric may smoke
or catch fire by itself.
[]
Do not use chlorine bleach, ammonia, or acids (such as
vinegar or rust remover) in the same wash. Hazardous
fumes can form.
[]
Do not machine wash fiberglass materials. Small particles
can stick to fabrics washed in subsequent loads and cause
skin irritation.
[]
Before disposing of your washer, remove the door so that
children or small animals cannot get trapped inside.
[]
Do not sit on the top of your Washer.
[]
Inlet hoses are subject to damage and deterioration over
time. Check the hoses periodically for bulges, kinks, cuts,
wear or leaks, and replace them every five years.
[]
Ensure pockets are free from small irregularly shaped hard
objects or foreign materials, such as coins, knives, pins, etc.
These objects could damage your washer.
[]
Do not wash clothing with large buckles,
heavy metal.
[]
Install and store your washer inside, away from exposure
weather.
to
[]
Install and level your washer on a floor that can support
weight.
[]
Your washer must be properly grounded.
an ungrounded outlet.
[]
To reduce the risk of fire or explosion:
[]
Do not wash items that have been washed, soaked, or
treated with gasoline, dry cleaning solvents, or other
flammable or explosive substances. They give off vapors
that could ignite or explode. Rinse by hand any material that
has been exposed to cleaning solvent or other flammable
liquids or solids before putting in your washer. Be sure
that all traces of such liquids, solids, and fumes have
been removed. Dangerous substances include acetone,
denatured alcohol, gasoline, kerosene, certain liquid
household cleaners and spot removers, turpentine, waxes,
and wax removers.
[]
[]
its
Never plug it into
Do not put gasoline, dry cleaning solvents, or other
flammable or explosive substances into the washer.
Under certain conditions, hydrogen gas may be produced
in a hot water system-such
as your hot water heater-- that
has not been used for two weeks or more. HYDROGEN
GAS IS EXPLOSIVE. If your hot water system has not been
used for two weeks or more, turn on all hot water faucets
in your home, and let the water flow for several minutes
before using your washer. This will release any hydrogen gas
build-up. Since hydrogen gas is flammable, do not smoke
or light an open flame during this time.
SAVE THESE iNSTRUCTiONS
your washer.
when the tumbler
is moving.
supplies in a
buttons,
or other
iNSTALLATiON REQUIREMENTS
.....
_!_i;OOiiii
S _i!!_!i!ii_ili_i:i;:ii
iii::::_;ii!!_!i!i!i!;ili::S
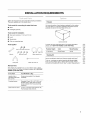
Gather the required tools and parts before starting
The parts supplied are in the washer drum.
Tools needed
[]
Pliers
[]
Flashlight
for connecting
installation.
Pedestal
You have the option of purchasing a pedestal for this washer.
You may select a 14"(35.5cm) pedestal. Remember that the
pedestal will add to the total height of the unit.
the water inlet hoses
(optional)
Tools needed
for installation
[]
Open end wrenches
[]
Level
[]
Wood block
[]
Ruler or measuring
17 mm and 13 mm
tape
Optional pedesta[
To order, call your local Sears store. For further information,
please call 1-800-4-MY-HOME@
(1-800-469-4993).
Parts supplied
Pedestal
_
(use for the upper bolt hole)
Wrench
Bolt hole covers
Height
14" (35.5cm)
Water supply hose
Stacking
i
Color
Model Number
Royal Grape
19103
Kit
....................................................................................................................................................................................................................................
Are you on planing to stack your Kenmore washer and dryer?
Hose guide
To do so, purchase an optional stacking kit (Model:18888)
from your local Sears store or Sears Service Center. Follow
instructions included with the kit. See "Location Requirements."
Plastic Zip Hose Tie
Alternate Parts
Parts listed are available from your local Sears store or Sears
Service Center. For further information, please call 1-800-4-MYHOME@ (1-800-469-4663).
if You Have
You Will Need to Buy
Laundry tub or
standpipe taller than
96" (2.4 m)
Sump pump system (if not already
available)
Overhead
Standard 20 gal. (76 L), 30" (76.2 cm)
tall drain tub or utility sink and sump
pump (available from local plumbing
suppliers)
sewer
Drain hose too short
3.3 ft (1.0 m) drain hose extension
Part Number DC82-O1012A
kit,
5
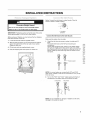
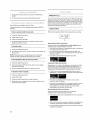
Recommended installationspacing for custom
undercounter
Selecting the proper location for your washer improves
performance and minimizes noise and possible washer "walk."
Your washer can be installed under a custom counter, or in a
basement, laundry room, closet, or recessed area. See "Drain
System."
Companion
considered.
installation
The dimensions
shown are for the recommended
Custom undercounter
appliance location requirements should also be
Proper installation is your responsibility.
spacing.
installation
- Washer
only
J
LT-"I%;:a=)
39"
(_.lca=)
You will need
[]
A water heater set to deliver 120°F (49°C) water to the
washer.
[]
A grounded electrical outlet located within 6 ft (1.8 m) of
where the power cord is attached to the back of the washer.
See "Electrical Requirements."
[]
Hot and cold water faucets located within 4 ft (1.2 m) of the
hot and cold water fill valves, and water pressure of 20-100
psi (137.9-689.6 kPa).
[]
[]
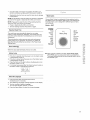
Recommended
installation
installation, win or without
The dimensions
Recessed
spacing for recessed
a padestai
shown are for the recommended
area or closet
or closet
spacing.
installation
A level floor with a maximum slope of 1" (2.5 cm) under entire
washer. Installing the washer on soft floor surfaces, such as
carpets or surfaces with foam backing, is not recommended.
(7.6 ca=)
-f
(510ca=2)
A sturdy and solid floor to support the washer with a total
weight (water and load) of 400 Ibs (180 kg).
Do not operate your washer in temperatures below 32°F (0°C).
Some water can remain in the washer and can cause damage in
low temperatures.
InstallaSon clearances
[]
24 In3* -=_
I 1"N- 51_,,
-_ 4,,I_.
Additional spacing should be considered for ease of
installation and servicing. The door opens more than 90 ° and
it is not reversible.
[]
Additional clearances
floor moldings.
[]
Additional spacing of 1" (2.5 cm) on all sides of the washer is
recommended to reduce noise transfer.
[]
_fS"
(7.6ca=)
The location must be large enough to allow the washer door
to be fully opened.
(2.5ca=)
[]
_=
(1_ ca=_)
Companion
appliance
(51.1ca=) (10.2ca=)
A
B
A. Side view - closet or confined area
B. Closet door with vents
might be required for wall, door, and
* Min. top and bottom
Recessed
air openings
or closet
installation
for closet door.
- Washer
on pedestal
m
spacing should also be considered.
f
38" a=in.
Washer Dimensions
(97 ca=)
(131.4ca=)
(2.5ca=)
_(68.5
ca=)
_
(2.5ca=)
(2.5ca=)
(51.1ca=)
A
B
A. Recessed area
B. Side view - closet
Door is not reversible
or confined
area
Recommended
instaJJatJon spacing for recessed
installation, with stacked washer and dryer
The dimensions
shown are for the recommended
or closet
spacing.
4_ in,_*
._L
(310ca?)
The washer can be installed using the standpipe drain system
(floor or wall), the laundry tub drain system, or the floor drain
system. Select the drain hose installation method you need. See
"Tools and Parts."
Standpipe drain system =wail or floor (views A & B)
cm)
The standpipe drain requires a minimum diameter standpipe of
2" (5 cm). The minimum carry-away capacity can be no less than
17 gal. (64 L) per minute.
The top of the standpipe must be at least 30" (76.2 cm) high and
no higher than 96" (2.4 m) from the bottom of the washer.
o
_
24 in? _
--_
_-
1
1"(2.9cm)
(155 cm_)
3011
inin.
(7&2cm)
]
-i
T
]
l
i
A
B
78"
P------i
I
(19_m)
Laundry tub drain system (view A)
l
i
The laundry tub needs a minimum 20 gal. (76 L) capacity. The
top of the laundry tub must be at least 30" (76.2 cm) above the
floor.
i
i
I
I
_1/4,,".-_
(13.3 cm)
_I
1""
Floor drain system
(2._ cm)
* Min. top and bottom air openings
The floor drain system requires a siphon break that may be
purchased separately, See "Tools and Parts,"
for closet door.
** External exhaust elbow requires additional
space.
*** Wall, door and floor molding may require additional
Recommended
installation
spacing
spacing.
for cabinet installation
[]
The dimensions
[]
For cabinet installation, with a door, the minimum
openings in the top are required.
shown are for the recommended
(view 13)
The siphon break must be a minimum of 28" (71 cm) from the
bottom of the washer, Additional hoses might be needed,
_J
L,
spacing.
ventilation
7" (17.8 cm)
A
4 ''-_
(10.2 cm)
31.9"
(31.1 cm)
B
I,,
(2.5cm)(2.5cm)
(68.6cm)
(2.5cm)
7
[]
Do not ground to a gas pipe.
[]
Check with a qualified electrician
washer is properly grounded.
[]
Do not have a fuse in the neutral or ground circuit.
GROUNDING
Electrical
Shock Hazard
Plug into a grounded 3 prong outlet.
Do not remove ground prong.
Do not use an adapter.
Do not use an extension
Failure to follow
fire, or electrical
[]
cord.
these instructions
shock.
if you are not sure the
INSTRUCTIONS
For a grounded, cord-connected
washer:
This washer must be grounded. In the event of a malfunction
or breakdown, grounding will reduce the risk of electrical
shock by providing a path of least resistance for electric
current. This washer is equipped with a cord having an
equipment-grounding
conductor and a grounding plug.
The plug must be plugged into an appropriate outlet that is
properly installed and grounded in accordance with all local
codes and ordinances.
WARNING:
can result in death,
A 120 volt, 60 Hz., AC only, 15 amp, fused electrical
supply is required. A time-delay fuse or circuit breaker is
recommended.
It is recommended that a separate circuit
serving only this appliance be provided.
[]
This washer is equipped
prong grounding plug.
[]
To minimize possible shock hazard, the cord must be
plugged into a mating, 3 prong, grounding-type
outlet,
grounded in accordance with local codes and ordinances.
If a mating outlet is not available, it is the personal
responsibility and obligation of the customer to have the
properly grounded outlet installed by a qualified electrician.
[]
If codes permit and a separate ground wire is used, it is
recommended that a qualified electrician determine that the
ground path is adequate.
with a power supply cord having a 3
Improper connection of the equipmentgrounding conductor can result in a risk of electric shock.
Check with a qualified electrician or serviceman if you are
in doubt as to whether the appliance is properly grounded.
Do not modify the plug provided with the appliance - if it will
not fit the outlet, have a proper outlet installed by a qualified
electrician.
For a permanently connected
washer:
This washer must be connected to a grounded metal,
permanent wiring system, or an equipment grounding
conductor must be run with the circuit conductors and
connected to the equipment-grounding
terminal or lead on
the appliance.
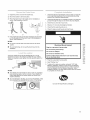
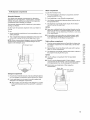
iNSTALLATiON iNSTRUCTiONS
Before Connect the inlet hoses to water faucets,
ensure a washer is inside coupling.
A
Connect
1.
Loosen all the bolts with the supplied wrench.
2.
Slide the bolt and spacer up and remove the bolt with the
spacer through the hole in the rear wall of your washer.
Repeat for each bolt.
.3. Fill the holes with the supplied
4.
plastic covers.
Keep the shipping bolts and spacers for future use.
B
A. Coupling
B. Washer
IMPORTANT: Position the washer so that the rear of the unit is
within approximately
3 ft (90 cm) of its final location.
Before using your Washer, you must remove the four shipping
bolts from the back of the unit.
Check to
the inlet hoses to the water
faucets
Make sure the washer drum is empty.
1.
Check the inlet hose to ensure a washer is inside each fill
hose.
Thread the inlet hoses to the HOT and COLD faucet
connections.
On the other end of the hose, check for one rubber washer
per hose and install each fill hose to the water valve. Make
sure the hose with the Hot printed line is attached to the HOT
faucet. Tighten by hand until snug, then two-thirds of a turn
with pliers.
Cold
Hot
_
Rubber washer
NOTE: For correct water use, connect both HOT and COLD
water valves. If either or both are not connected, an "nF" (no fill)
error can occur.
2. Turn on the "HOT" and "COLD "water supply and check all
connections at the water valve and the faucet for leaks.
Cold printed
Hot printed
NOTE: Do not overtighten or use tape or sealants on the valve.
Damage to the valves can result.
9
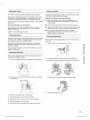
Clear water lines
[]
Run water through both faucets and inlet hoses, into a
laundry tub, drainpipe or bucket, to get rid of particles in the
water lines that might clog the inlet valve screens.
Proper routing of the drain hose protects your floors from
damage due to water leakage. Read and follow these
instructions.
[]
Check the temperature of the water to make sure that the hot
water hose is connected to the hot water faucet and that the
cold water hose is connected to the cold water faucet.
Remove drain hose fTom the washer
Gently pull the corrugated drain hose from the shipping clips.
Laundry
tub drain or standpipe
drain
Connect the drain hose form to the corrugated
Connect
drain hose.
the inlet hoses to the washer
A
A.
B
Snap either end of the drain hose form to the drain
hose at the point where the corrugation begins.
B. Bend drain hose over drain hose form and snap into
place.
To keep drain water from going back into the washer:
1,
Attach the hot water hose to the washer's hot (H) water inlet
valve. Screw on coupling by hand until it is seated on the
washer.
2,
Attach the cold water hose to the washer's cold (C) water
faucet. Screw on coupling by hand until it is seated on the
washer.
3,
Using pliers, tighten the couplings
thirds turn.
4.
with an additional
Damage to the coupling
Turn on the water faucets completely
twocan
and check for leaks.
NOTE: Replace inlet hoses after 5 years of use to reduce the
risk of hose failure. Record hose installation or replacement
dates on the hoses for future reference.
Periodically inspect and replace hoses if bulges, kinks, cuts,
wear, or leaks are found.
10
Do not straighten the drain hose, and do not force excess
drain hose into standpipe. Hose should be secure, but loose
enough to provide a gap for air.
[]
Do not lay excess hose on the bottom
of the laundry tub.
Floor drain
H. Hot water inlet
C. Cold water inlet
NOTE: Do not overtighten.
result.
[]
You may need additional
Parts."
parts. See Floor drain under "Tools and
Part no. for hose extension
DC97-15273A
1.
Drape the power cord over the washer top.
2.
Move the washer to its final location.
3.
Place the drain hose in the laundry tub or standpipe
shown. See illustrations A and B.
A
4.
B
as
1.
Check the electrical requirements. Be sure that you have the
correct electrical supply and the recommended grounding
method. See "Electrical Requirements."
2.
Check that all parts are now installed. If there is an extra part,
go back through the steps to see which step was skipped.
3.
Check that you have all of your tools.
4.
Dispose of or recycle all packaging
5.
Check that the water faucets are on.
6.
Check for leaks around faucets and inlet hoses.
materials.
C
If the washer faucets and the drain standpipe are recessed,
put the hooked end of the drain hose in the standpipe as
shown. See illustration C.
NOTES:
[]
Do not force excess drain hose back into the rear of the
washer.
[]
To avoid siphoning,
standpipe.
Electrical
do not seal the drain hose into the
Shock Hazard
Plug into a grounded 3 prong outlet.
Do not remove ground prong.
Do not use an adapter.
Do not use an extension cord.
Level your washer by turning the leveling legs in or out as
necessary by hand or the wrench included with your washer.
When your washer is level, tighten the nuts using the wrench or
(-) driver.
NOTES
[]
Your Washer must be leveled on all four sides. A carpenter's
level should be used on all four corners of your Washer. It's
a good idea after the first dozen washes to recheck your
washer's levelness.
[]
To avoid damage to the legs, do not move the Washer unless
the Lockingnuts are fastened to the bottom of the Washer.
Failure to follow these instructions
fire, or electrical shock.
7.
Plug into a grounded
can result
in death,
3 prong outlet.
8.
Read "Washer Use."
9.
To test and to clean your washer, using only "HE" High
Efficiency detergent, measure 1/2the amount of detergent
recommended by the manufacture for a medium size load.
Pour the detergent into the detergent dispenser. Select
NORMAL/CASUAL,
and then select START. Allow the washer
to complete one whole cycle.
Use only HE High Efficiency
detergent.
11
FEATURES AND BENEFITS
Your new front-loading
high efficiency washer, was designed to
conserve resources and lower your water and energy bills. The
washer is designed to determine and then provide the amount
of water needed for the best performance. The time of operation
may be greater for this new system than for a conventional
washer.
Spin Speeds
This washer automatically selects the spin speed based on the
cycle selected. This factory setting can be changed, however.
This washer offers up to three different spin speed choices.
Detergent Advantage System Dispenser
Electronic
Controls
Flexible electronic controls
beginner or an expert.
are easy to use whether
you are a
Auto Water Level
Adjusting to the size of the load, this feature allows the washer
to use the minimal amount of water needed to clean and rinse
the clothes. With a low water level, you can obtain the same
results with smaller amounts of additives. Because only the
required amount of water is used, the washer saves energy, too.
You can obtain the same washing results for small and large load
size.
The three compartments
in the dispenser allow loading of all
laundry additives before the washer is started. The additives
will be dispensed into the wash at the optimal time for high
performance cleaning. The bleach release system is included
in the detergent advantage system. The detergent is added at
the beginning of the cycle, and the bleach is added after the
enzymes have had a chance to do their cleaning. The Detergent
Advantage System Dispenser tray is easily removed for cleaning.
Extra Large Capacity
Even bulky garments and blankets get super clean. The large
capacity leaves enough room for a more thorough, cleaner wash.
Suspension
System
To reduce washer "walk"
washer combines:
and "off-balance"
[]
2 Springs to isolate vibration
[]
4 Shock absorbers
movement
Stainless
conditions,
your new
at the washer base to minimize
Steel Drum
The stainless steel drum eliminates corrosion and enables higher
spin speeds for more water extraction, reducing drying time.
Direct
Drive inverter Motor
The power to handle anything! Our direct-drive inverter motor
delivers power right to the washer tub from a variable speed,
reversible motor. A beltless direct-drive motor generates a higher
spin speed of 1,200 RPM for more effective, quiet operation.
The washer also has fewer moving parts.
12
Use only HE High Efficiency
detergent.
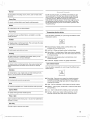
WASHER USE
Models : 4900*
Normal
00:35
NormaJ
Heavy Duty
Glallde
Delicates
Hand
Wash
Lavage _ ]a main
Hea W Duty
Relldemerlt
Whites
Lavage
extra
HotlCold
Wool
Bhncs
Laine
Extra Rinse
PermPress
Express
Wash
Sanitize
Rinse+Spin
PermPress
Rin_age
_xtraWarmlWarm
Lavag÷ rapide
St_lilisatiorl
Rin_age et essorage
Towels
D61[_ts
SpinOnly
SePtettes
Power
Mise en Marche
c_
Warm / Cold
Extended
Spin
9r_1_
_ra_
@
My Cyc
Mon cyc
Extra Wash
Cold I Cold
High
L _,_Steam
Medium
Heavy
Low
Normal
No Spin
Pre Wa_
Pr_lava!
On
Light
Off
Start/Pause
D6rnarrerlPause
C:
Delay St_
_part diff_
Es_orag_seLilement
Bedding
EC0CleanDrul
Litelie
Steam
Vapeur!
DEEP
SIEAM
9
Vapeurs Pr0fondes
.
-_-
J
Your Washer is designed
[]
©
to use high efficiency
High efficiency detergents contain suds suppressors that
reduce or eliminate suds. When fewer suds are produced,
the load tumbles more efficiently and cleaning is maximized.
WARNING: Regular detergent
only HE detergents.
[]
Never place items in the washer that are dampened
gasoline or other flammable
fluids.
remove
is NOT recommended.
ii%il;iiiiiiiii
Please use
_ ...........
NOTE: Reducing the amount of detergent may reduce the
quality of cleaning. It is important to pre-treat stains, sort
carefully by color and soil level, and avoid overloading.
Fire Hazard
No washer can completely
(HE) detergents.
with
Brand names are trademarks
manufacturers.
of their respective
oil.
Do not dry anything that has ever had any type of oil on it
(including cooking oils}.
Doing so can result in death,
explosion,
or fire.
Use only HE High Efficiency
detergent.
WARNING: To reduce the risk of fire, electric shock, or injury to
persons, read the IMPORTANT SAFETY INSTRUCTIONS before
operating this appliance.
The following is a guide to using your washer. Please refer to
specific sections of this manual for more detailed information.
Do not store laundry products on the top surface
Vibration is normal during operation.
of this washer.
13
First Wash Cycle Without
Laundry
Before washing clothes for the first time, choose the Normal/
Casual cycle and run it without clothes. Use only HE High
Efficiency detergent. Use 1/2the manufacturer's
recommended
amount for a medium sized load. This initial cycle serves to
ensure the interior is clean before washing clothes.
For All Wash Cycles
It is normal for small amounts of water to remain in the
dispensers when the wash cycle is complete.
1.
Load your Washer.
2.
Close the door.
3=
Add detergent
15-16).
4.
Select the appropriate
pages 17-20).
cycle and options for the load (see
5.
Press the Start/Pause
Button.
6=
The Wash Indicator
Do not put laundry additives directly into the wash tub. Always
use the proper dispensers when adding laundry additives.
and additives
to the dispenser
(see pages
Choosing
light will illuminate.
7. The estimated cycle time will appear in the display.
The time may fluctuate to better indicate the time remaining
in the cycle.
NOTE: The actual time required for a cycle may differ from
the estimated time in the display depending on the water
pressure, water temperature, detergent, and laundry.
8=
Your new washer has a dispenser drawer with three separate
compartments
for your laundry additives--one
is for detergent,
one is for liquid chlorine bleach, and one is for liquid fabric
softener. Laundry additives are diluted and dispensed
automatically at the proper time during the wash cycle, making it
unnecessary for you to return to the washer during the cycle to
add them.
the Right Detergent
Use only High Efficiency detergents. The package for this type
of detergent will be marked "HE" or "High Efficiency." This wash
system, along with less water, will create too much sudsing
with a regular non-HE detergent. Using regular detergent will
likely result in washer errors, longer cycle times and reduced
rinsing performance.
It may also result in component failures
and noticeable mold or mildew. HE detergents are made to
produce the right amount of suds for the best performance.
Follow the manufacturer's instructions to determine the amount
of detergent to use.
Before your washer starts to fill, it will make a series of
clicking noises to check the door lock and do a quick drain.
NOTE:
[]
When the cycle is complete, the Door Lock light will go out
and "End" will appear in the display.
[]
DO NOT attempt to open the door until the Door Lock light
is off. To add a forgotten item, see "Adding items" section
(page 17).
[]
When your Washer is restarted after a pause, expect a delay
of up to 15 seconds before the cycle continues.
[]
Pressing Power cancels
[]
The Wash, Rinse and Spin indicator lights will illuminate
during those portions of the cycle.
WARNING:
is running.
14
the cycle and stops your washer.
Do not place anything on top of your washer while it
Use only HE High Efficiency
detergent.
P
To fill dispenser compartments
1. Add chlorine bleach to the bleach compartment.
exceed the MAX FILL line.
Your Washer has separate compartments
for dispensing
detergent and color-safe bleach, chlorine bleach, and fabric
softener. All laundry additives are added to their respective
compartments
before starting your Washer.
MUST ALWAYS be in place before
DO NOT open the automatic
running.
dispenser
when your Washer is
2. Avoid splashing
3.
Never exceed the manufacturer's
adding detergent.
recommendations
=J Detergent
the compartment.
dispenses
bleach into the tub at
bleach
[]
Never pour undiluted liquid chlorine bleach directly onto the
load or into the tub. It is a powerful chemical and can cause
fabric damage, such as weakening of the fibers or color loss,
if not used properly.
[]
If you prefer to use color-safe, non-chlorine
bleach, add it
to the appropriate detergent compartment.
DO NOT pour
color-safe bleach into the Bleach compartment.
when
remove the Detergent
detergent will not
Your Washer automatically
the appropriate time.
DO NOT
NOTES
2. This Compartment
holds liquid detergent for the main wash
cycle, which is added to the load at beginning of cycle.
NOTE: When using powdered detergent,
Liquid from the compartment.
Powdered
dispense with Detergent Liquid.
or over-filling
4. The dispenser automatically dilutes liquid chlorine
before it reaches the wash load.
To use:
1.
compaKe'nent
(Liquid chlorine bleach only)
AutomaSc dispenser
The automatic dispenser
starting your Washer.
Bleach
Fabric softener
comparlrnent
1.
Pour the recommended
amount of liquid fabric softener into
the softener compartment.
For smaller loads, use less than
one capful.
2.
Fabric softener should be diluted
MAX FILL in the compartment.
Liquid
with water until it reaches
3. The dispenser automatically releases liquid fabric softener
the proper time during the rinse cycle.
at
NOTES
Detergent
Use the softener compartment
softeners.
ONLY for liquid fabric
[]
DO NOT use the dispensing ball in Fabric softener
Compartment
with this Washer. It will not add fabric softener
at the appropriate time. Use the detergent Compartment.
[]
Brand names are trademarks
manufacturers.
of their respective
comperlrnent
1.
Pour the recommended amount of laundry detergent directly
into the detergent compartment
before starting your Washer.
2.
If color-safe bleach is to be used, it should be added with
detergent to the detergent compartment.
[]
[]
When adding color-safe bleach with detergent, it is best if
both laundry products are in the same form - granular or
liquid.
_ ...............
z
15
iis_8_!i,l,z_Siiii_S!!!!;ii:ii
0_,_¸
i_:::::iii@Si4il;_%_q::iii}_ii_ii_,!!!!iil}ili
1. To pause the washer at any time, press the Start/Pause
button.
2. To continue the cycle, press the Start/Pause
button.
Not all Options are available with all Cycles.
Cycles and Options can be changed
selected.
anytime before START is
Locking conb'ols
To stop a cycle and select a new cycle
1.
Press the Start/Pause
This function
2.
Select desired
Select the desired OPTIONS.
4.
Press the Start/Pause button to restart the washer at the
beginning of the new cycle..
@
Activating
If the Child Lock function is activated,
the "Child Lock [@]" lamp is lit.
button.
2. The washer powers down, the door unlocks,
be removed.
after _e cycle
1.
Press the Start/Pause
2.
Select the desired OPTIONS.
the machine will beep.
,3. Press the Start/Pause
To drain _e washer
1.
Press the Start/Pause
2.
Select SPIN ONLY.
,3. Press the Start/Pause
the door is locked and
If the Start/Pause button is pressed after the Child Lock
function is activated, none of the buttons will work except for
the Power button.
and clothes can
NOTE: if the water level or the temperature is too high, the
washer will drain automatically before the door unlocks.
Options
the Child Lock function
Press and hold both the Soil Level and Cycle Signal buttons
simultaneously
for approximately 3 seconds.
Press the Start/Pause
4.
children from playing with your washer.
cycle.
To cancel a cycle
To change
prevents
button.
3.
1.
You can add or take out laundry items even after the wash has
started, as long as the "Garment+" light is on. Pushing the Start/
Pause button unlocks the door, unless the water is too hot or if
there is too much water in your Washer. If you are able to unlock
the door and wish to continue the wash cycle, close the door
and press the Start/Pause button.
If a button is pressed when the buttons are locked.
has started
button.
Pausing the Child Lock function
If the option is not available,
button to continue the cycle.
When the door is locked or the buttons are locked by the Child
Lock function, you can pause the Child Lock operation for 1
minute by pressing and holding both the Soil Level and Cycle
Signal buttons simultaneously
for approximately 3 seconds.
If Child Lock mode is paused temporarily, the door lock is
released for 1 minute for user convenience. During this period.
manually
button.
button to begin the drain.
When the spin is complete,
removed from the washer.
the door unlocks.
Items can be
o
If the door is opened after the minute is over, an alarm
sounds for up to 2 minutes.
If the door is closed within the 2 minutes, the door is locked
and the Child Lock function is reactivated. If the door is
closed after the 2 minutes, the door will not be locked
automatically and no alarm will be heard.
Deactivating
the Child Lock function
Press and hold both the Spin and Soil Level buttons
simultaneously
for approximately 6 seconds.
If the Child Lock function is deactivated,
the door is unlocked.
Child Lock is a function to prevent children or the infant from
accidently operating the washer and injuring themselves.
If a child enters the washing
trapped and suffocate.
16
machine, the child may become
Once the Child Lock function is activated, the Child Lock
function continuous working even if the power is turned off.
Opening the door by force can result in injury due to damage
to the product.
NOTE: To add laundry when the Child Lock function is activated,
you have to first pause or deactivate the Child Lock function.
NOTE: If you want to open the door of the washing
when the Child Lock function is activated:
Pause or deactivate
Turn the washing
machine
the Child Lock function.
machine
Wash Cycles
Choose Wash Cycles by rotating the Cycles selector knob to
the desired cycle. The indicator light for the cycle selected will
illuminate. Each cycle is designed for different types of fabric
and soil levels.
Models : 4900*
off and then on again.
...............................................................................................................................................................................................................i
Expected
Cycle Time
Norma_
The cycle times vary automatically based on your water
pressure, water temperature, detergent, and clothes load. The
cycle time will be extended if oversudsing occurs or the load is
unbalanced.
Delicates
00:35
N0mlal
beiicats
HandWash
HeavyDuty
Heavy Duty
Grande Rendement
Whites
Lavage _ la main
Wool
BlaNc5
Laine
PermPress
ExpressWash
Perm Press
Lavage rapide
Sanitize
The suds reduction routine removes extra suds and assures
proper rinsing of your garments. The options you select will
also affect the cycle times that are shown in the Preset Cycle
Settings table.
Rinse+Spin
5terilisation
Rin£age et essorage
Towels
SpinOnly
5e_iettes
Lorage
seulement
Bedding
Litede
DEEP
STEAM
_
Val_r_ Prof0r_des
Door Locked
(_)
,,
When the status light illuminates,
j
the door is locked.
interior Lamp
[]
1.
If the door is opened when the power is on, the Interior Lamp
is automatically turned on.
2.
If the door is closed when the power is on, the Interior Lamp
is automatically turned off.
3.
Press the Temp and the Spin buttons
the Interior Lamp on or off.
4.
If 4 minutes have passed after the Interior Lamp is turned on,
the Interior Lamp is automatically turned off.
simultaneously
Each cycle has a preset cycle time, WASH/RINSE TEMP,
SPIN SPEED and may have preset Options and Modifiers.
The preset settings provide the recommended fabric care for
the selected cycle.
to turn
Select the Language
...................................................................................................................................................................................................................................................................................................................................................................................................
i
'i
1.
Press the Extra Wash and Extra Rinse buttons
simultaneously for 3 seconds.
2. The "Select the Language"
message appears
on the display.
3. Turn the Jog Dial to select a language.
You can select English, Spanish, or French.
4.
Press the Signal button to select the chosen language.
17
I
I
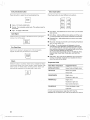
Preset Cycle Set, rigs
(0: factory setting, _: selectable)
Extra
Extra
.....
Extra
Sp n My
cyc e
Pre
Wash
De ay Start
Steam
Ch d Lock
Normal
®
®
®
®
®
®
®
®
00:58
Heavy Duty
®
®
®
®
•
®
®
®
01:35
Whites
®
•
®
®
®
®
®
®
01:11
Perm Press
®
®
®
®
®
®
®
®
00:47
Sanitize
®
®
®
®
®
®
®
®
01:55
Towels
®
•
®
®
®
®
®
®
01:11
Bedding
®
•
®
®
®
®
®
®
01:13
Deep Steam
®
®
®
®
®
®
•
®
01:45
Delicates
®
®
®
®
00:41
Hand Wash
®
_
®
®
00:41
®
®
®
00:57
®
®
®
00:38
®
®
®
00:20
®
®
®
00:11
®
®
01:32
Wool
Express
Wash
®
Rinse + Spin
®
Spin Only
Eco Clean drum
®
EH/C: Extra Hot/
Cold
EH" Extra High
H: Hea W
H: High
N: Normal
H/C: Hot/Cold
IVl: Medium
L: Light
W/W: Warm/Warm
L: Low
W/C: Warm/Cold
NS: No Spin
O/C: Cold/Cold
18
(Best 2)Keim_ore 592-49003-02902A-01
EN.i_dd
18
2011-03-23
_,,_Aft 9:39:51
I
I
I
Normal
For most fabrics
garments.
: :::::' :: :::::::::::::::::::::::
including cottons,
linens, and normally
soiled
Heavy Duty
For sturdy, colorfast
fabrics and heavily soiled garments.
As with any new product, you will hear sounds that you are
not accustomed to. You may hear various sounds when the
door is locked or unlocked, and during the washing, rinsing,
or spinning process. Between changes in wash actions,
there will be momentary pauses. You will hear water spraying
and splashing during the wash and rinse cycles. These new
sounds and pauses are part of normal washer operation. See
"Troubleshooting."
Whites
For white fabrics with or without
bleach.
Perm Press
Temperature
For wash-and-wear,
soiled garments.
synthetic
fabrics,
and lightly to normally
selec_on
button
Press the button repeatedly
temperature options.
to cycle through
the different water
Sanitize
For heavily soiled, colorfast garments.
to 150°F(65.6°C) to eliminate bacteria.
This cycle heats the water
Towels
For bath towels, washcloths
and mats.
[]
Extra Hot/Cold - Heavily soiled, colorfast
available with the Sanitize cycle.
[]
Hot/Cold
[]
Warm/Warm - Colorfast items. When warm rinse is selected,
only the final rinse will be warm. The other rinses will be cold
to conserve energy.
[]
Warm/Cold
wrinkle-free
[]
Cold/Cold
Bedding
For bulky items such as blankets and sheets. When you are
washing comforters, use liquid detergent.
Deep Steam
For heavily soiled, colorfast garments, this cycle provides high
washing temperature and steam and is efficient in cleaning
stains.
items. Only
- Whites and heavily soiled, colorfast
- Moderately
items.
soiled, colorfast
- Brightly colored,
Spin selec_on
items.
items; most
very lightly soiled items.
button
Press the button repeatedly
speed options.
to cycle through
the different spin
Delicates
For sheer fabrics, bras, lingerie silk, and other handwash-only
fabrics. For best results, use liquid detergent.
Hand Wash
For handwashable,
[]
Extra High - Removes more water from loads during spin.
To minimize wrinkling of wrinkle-free and no-iron fabrics,
DO NOT use the Extra High spin option for these loads, nor
overload your washer.
[]
High - Use for underwear,
[]
Medium - Use for jeans, wrinkle-free
and synthetics.
or wash-and-wear
[]
Low - Use for delicate items needing
a slow spin speed.
[]
No Spin - Drains your washer without spinning. Use for
extremely delicate items that cannot tolerate any spin.
special care garments.
Wool
For machine-washable
wool. Loads should be under 8 pounds.
Express Wash
For lightly soiled garments
needed quickly.
t-shirts,
jeans and sturdy cottons.
items
Rinse + Spin
Use for loads that need rinsing only or to add rinse-added
softener to a load.
fabric
SpinOnly
Provides a spin to remove more water.
19
(Best 2)Keim_ore 592-49003-02902A-01
EN.i_dd
19
2011-03-23
/,_1i
9:39:51
I
I
I
Soil Level selection
button
Press the button to select the soil level/washing
Select Cycle Op8on
time.
Press these buttons to select different cycle options.
Extra Wash - Add additional
stain removal.
time to the wash cycle for better
Extra Rinse - Add an additional rinse at the end of the cycle
to more thoroughly remove laundry additives and perfumes.
Extended Spin - Add additional
from loads.
My Cycle - Choose your favorite
spin, soil level, option, etc.
Eco Clean
time to remove more water
cycle including
temperature,
Pre Wash - To use this feature add detergent to the pre
wash section of the detergent compartment.
When turned
on, the washer fills with cold water and detergent, tumbles,
then drains and advances to the selected wash cycle. Some
cycles cannot be selected with this option.
You cannot select the prewash option in the Delicate, Wool,
Express Wash, Hand Wash, Rinse+Spin, and Spin Only
cycles.
Drum
Use for drum cleaning. It cleanses drum of dirt and bacteria.
Regular use (after every 40 washes) is recommended.
[]
Delay Start - Any cycle can be delayed for up to 24 hours in
one-hour increments. Displayed hour indicates the time at
which the wash will be started.
Steam
Temperature
Press this button to use steam. Steam Care is available with HeaW
Duty, Normal, Whites, Perm Press, Sanitize, Towels, Bedding, Deep
Steam cycles. For heavily soiled, colorfast garments. Steam care
improves stain treatment and use less water of each cycle.
Guide
Wash Water Temperature
Suggested
Fabrics
EXTRA HOT/COLD
Heaw Soils and Bright colors.
HOT/COLD
Whites and pastels
Heaw Soils
WARM/WARM
Bright colors
Moderate
WARM/COLD
to light soils
Bright colors
Moderate
to light soils
Most wrinkle-free
COLD/COLD
items
Colors that bleed or fade
Light soils
In wash water temperatures colder than 60°F (15.6°C),
detergents do not dissolve well. Soils may be difficult to remove.
20
(Best 2)Keim_ore 592-49003-02902A-01
EN.i_dd
20
2011-03-23
i,_ft
9:39:52
I
I
I
LAUNDRY TiPS
Preparingclothesfor washing
Sorling
Follow these recommendations
your garments.
[]
Separate heavily soiled items from lightly soiled ones, even
if they would normally be washed together. Separate lintgivers (towels, chenille) from lint-takers (corduroy, synthetics,
permanent press). When possible, turn lint-givers inside-out.
[]
Separate dark colors from light colors, colorfast
noncolorfast items.
items from
[]
Sort by fabric and construction
delicate items).
knits,
[]
to help you prolong the life of
Use only High Efficiency detergents. The package for this
type of detergent will be marked "HE" or "High Efficiency."
This wash system, along with less water, will create too
much sudsing with a regular non-HE detergent. Using regular
detergent will likely result in washer errors, longer cycle
times and reduced rinsing performance. It may also result
in component failures and noticeable mold or mildew. HE
detergents are made to produce the right amount of suds for
the best performance. Follow the manufacturer's
instructions
to determine the amount of detergent to use.
(sturdy cottons,
Unloading
[]
Remove clothes from washer after the cycle is completed.
Metal objects such as zippers, snaps, and buckles
left in the washer basket for a long time.
[]
Use only HE High Efficiency
[]
[]
When unloading garments, occasionally check under the
rubber rim at the front of the tub for small items.
detergent.
Close zippers, snaps, and hooks to avoid snagging other
items. Remove pins, buckles, and other hard objects to avoid
scratching the washer interior. Remove non-washable trim
and ornaments.
Heavy Work Clothes
Empty pockets
2 pair pants
3 pair jeans
1 coverall
and turn them inside-out.
Loading suggestions
[]
Turn down cuffs; brush away lint and dirt.
3 shirts
[]
Turn synthetic
Mixed Load
[]
Tie strings and sashes so they will not tangle.
[]
Mend tears, loose hems, and seams.
[]
Treat spots and stains.
[]
Stained or wet garments
results.
[]
Mix large and small items, avoid washing
load evenly.
[]
may rust if
knits inside-out
to avoid pilling.
2 double sheets or
1 king size sheet(s)
should be washed promptly
for best
single items, and
Wash small items, such as infant socks, in a mesh garment
bags. To create a balanced load it is recommend that more
than one garment bag be used, and that each garment bag
be filled with equal amounts of material.
NOTE: If you are washing only small items, it is recommend
that more than one mesh garment bag be used, and that
each garment bag be filled with equal amounts of material.
(maximum
size loads}
6 pair shorts
2 shirts
4 pillowcases
2 blouses
6 T-shirts
6 handkerchiefs
Towels
8 bath towels
10 washcloths
8 hand towels
1 bath mat
Delieates
3 camisoles
2 bras
4 slips
2 nighties
4 panties
EXPRESS WASH cycle
2 dress shirt
(2-3 garments)
1 pair dress pants
21
(Best 2)Kmmlore 592-49003-02902A-01
EN.i_ldd 21
2011-03-23
/,_1i
9:39:53
I
I
I
Stain
Chlorine or Color=
Save Bleach
v'
Wash Cycle
Chlorine or Color=
Save Bleach
Whites
Wash Cycle
Whites
Ink
Grass
v'
Cold or Warm
Whites
Normal
Tomato Products
Blood
v'
Warm
Warm
Whites
Whites
Coffee/Chocolate
Mud
Heaw
%
Duty
Heaw
Cosmetics
Duty
Deodorants
Heaw
Duty
Warm
_
Ring around
Collar
Dirty Motor Oil
_
Normal
the
WASHER CARE
If stained areas are found, wipe down these areas of the seal/
bellow, using the procedure that follows.
a}
Inspect the gray colored seal/bellow between the door
opening and the basket for stained areas. Pull back the
seal/bellow to inspect all areas under the seal/bellow and to
check for foreign objects.
2,
Mix a dilute solution, using 3Acup (177 mL) of liquid
chlorine bleach, and 1 gal. (3.8 L) of warm tap water.
b} Wipe the seal/bellow
damp cloth.
c)
area with the dilute solution,
using a
Let stand 5 minutes.
d} Wipe down area thoroughly with a dry cloth and let the
washer interior air dry with door open.
iMPORTANT:
[]
Wear rubber gloves when cleaning for prolonged
[]
Refer to the bleach manufacturer's
instructions
periods.
for proper
use.
A. Seal/Bellow
22
(Best
2)Keimlore
592-49003-02902A-01
EN.indd
22
2011-03-23
$,_d19:39:56
I
I
I
Cleaning
the exterior
Storing your washer
Turn off the water faucets after finishing the day's washing.
This will shut off the water supply to your Washer and prevent
the unlikely possibility of damage from escaping water. Leave
the door open to allow the inside of your Washer to dry out.
Use a soft cloth to wipe up all detergent,
they occur.
Clean the following
Washers can be damaged if water is not removed from hoses
and internal components
before storage.
Prepare your Washer for storage as follows:
[]
Select the Express Wash cycle and add bleach to the
automatic dispenser. Run your Washer through the cycle
without a load.
[]
Turn the water faucets off and disconnect
[]
Unplug your Washer from the electrical outlet and leave your
Washer door open to let air circulate inside the tumbler.
[]
If your Washer has been stored in below-freezing
temperatures,
allow time for any leftover water in your
Washer to thaw out before use.
bleach or other spills as
as recommended:
Control Panel - Clean with a soft, damp cloth. Do not use
abrasive powders or cleaning pads. Do not spray cleaners
directly on the panel.
Cabinet - Clean with soap and water.
Cleaning
the inlet hoses.
the interior
Cleaning the debris filter
Clean the interior of your Washer periodically to remove any dirt,
soil, odor, mold, mildew, or bacteriN residue that may remain in
your Washer as a result of washing clothes.
Failure to follow these instructions may result in unpleasant
conditions, including odors and/or permanent stains on your
Washer or laundry.
Hard water deposits may be removed,
labeled "Washer safe".
Cleaning
We recommend
drain well.
cleaning the debris filter when water does not
1.
Open the filter cover by using a key or coin.
2.
Unscrew the drain cap by turning it counterclockwise.
3.
Hold the cap on the end of the drain tube and slowly pull it
if needed. Use a cleaner
the dispensers
The automatic dispenser may need to be cleaned periodically
due to laundry additive buildup.
1.
Pull out the detergent
liquid from detergent
compartment.
Step
1
Step2
iiiiiiiiii_iiiiiiiiii
2.
Remove the siphon cap from the fabric softener
compartments.
and bleach
out about 6inches (15cm) and drain off all the water.
4.
Remove the debris filter cap.
,3. Wash all of the parts under running water.
4,
Clean the dispenser
recess with a soft brush.
5.
Reinsert the siphon cap and push it firmly into place.
6.
Push the dispenser
7.
Run a Rinse+Spin
back into place.
cycle without any load in your washer.
23
(Best
2)Keim_ore
592-49003-02902A-01
EN.indd
23
2011-03-23
i,_ft
9:39:57
I
I
I
5.
Wash any dirt or other material from the debris filter. Make
sure the drain pump propeller behind the debris filter is not
blocked.
6.
Replace the debris filter cap.
7.
Replace the filter cover.
8.
Close up the opening
To use washer
again:
1.
Flush water pipes.
2.
Reconnect
3.
Turn on both water faucets.
water inlet hoses to faucets.
of drain tube with cap.
Electrical
Shock Hazard
Plug into a grounded 3 prong outlet.
Do not remove
ground prong.
Do not use an adapter.
Do not use an extension
cord.
Failure to follow these instructions
fire, or electrical shock.
9.
Don't insert the drain tube in the hole.
Replace inlet hoses after five years of use to reduce the risk
of hose failure. Periodically inspect and replace inlet hoses if
bulges, kinks, cuts, wear or leaks are found.
When replacing your inlet hoses, record the date of replacement.
Install and store your washer where it will not freeze. Because
some water may stay in the hoses, freezing can damage
your washer. If storing or moving your washer during freezing
weather, winterize it.
4.
Plug in washer or reconnect
5.
Run the washer through the Normal/Casual cycle. Use only
HE High Efficiency detergent. Use 1Athe manufacturer's
recommended
amount for a medium sized load.
To t_ansport
2.
Unplug the power cord.
3.
Disconnect the drain hose from the drain system and attach
to rear panel clips.
4.
Shut off both water faucets.
5.
Disconnect the water inlet hoses from faucets, then drain the
hoses and clip them to the rear panel of the washer.
6.
IMPORTANT: Call service. Reinsert the shipping bolts to
minimize internal washer damage that may occur during
transportation.
Upon completion of moving, please do not
forget to remove shipping bolts prior to installation, and keep
time, you should:
Unplug washer or disconnect
Turn off the water supply to the washer. This helps avoid
accidental flooding (due to a water pressure surge) while you
are away.
[]
Slightly open door to provide ventilation.
To winterize
power,
washer:
1.
Put 1 qt (1 L) of R.V.-type antifreeze
2.
Run washer on a Drain & Spin cycle.
8.
Unplug washer or disconnect
4.
Shut off both water faucets.
5.
Disconnect
in the drum.
power.
the washer:
If washer will be moved during freezing weather, put in 1 qt (1
L) of R.V.-type antifreeze in the drum. Run washer on a Drain
& Spin cycle.
Operate your washer only when you are at home. If you will be
on vacation or not using your washer for an extended period of
[]
power.
1.
Non=use or vacation care:
[]
can result in death,
them for future use. Unit must be transported
in the upright
position. To avoid suspension and structural damage, your
machine must be properly set up for relocation by a certified
technician.
......................................................................................................................................................
Reinstalling
the washer
1.
Follow the "Installation
connect the washer.
Instructions"
to locate, level and
2,
Run the washer through the Normal/Casual cycle to clean
the washer and remove the antifreeze, if used. Use only
HE High Efficiency detergent. Use 1Athe manufacturer's
recommended
amount for a medium sized load.
water inlet hoses from faucets and drain.
24
(Best 2)Keim_ore 592-49003-02902A-01
EN.i_dd
24
2011-03-23
/,_1i
9:39:58
I
I
I
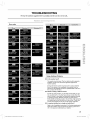
TROUBLESHOOTING
First try the solutions suggested
here to possibly avoid the cost of a service caR...
[Error!]
iiiiiiiiiiiiiiiiiiiiiiiiiiiiiiiiiiiiiii
_;;_i_i_i_i_i_i_i_i_i_i_i_i_i_i_i_i_i_i_i_i_i_i_i_i_i_i_i_i_i_i_i_i_i_i
¸i:iiii!ii!ililili!iiii_!i!i!i!i!i!i!i!i!i!i!i!i!i!i!i!i_!ii!iiii!i!i!g_i_ii_
¸3iiiiiiiiiiiiiiiiiiiiiiiiiiiiiiiiiiiiiiiiiiiiiiii
¸
[Error!]
[Error!]
_a
[Error!]
Noisy, vibrating,
H! [s the washer
off-balance
level?
The washer must be level. The four feet should be properly
installed, and the nuts should be tightened against the
washer cabinet.
All four feet of the washer must be in firm contact with the
floor. If the washer is on a pedestal, the washer must be
secured to the pedestal and all four pedestal feet must be in
firm contact with the floor.
[]
Washer
making a different
noise?
As with any new product, you will hear sounds that you are
not accustomed to. You may hear various sounds when the
door is locked or unlocked, and during the washing, rinsing,
or spinning process. Between changes in wash actions,
there will be momentary pauses. You will hear water spraying
and splashing during the wash and rinse cycles. These new
sounds and pauses are part of normal washer operation.
[]
is washer installed on a sturdy and solid floor?
Refer to the "installation Instructions" for flooring requirements.
Noise and vibration may be reduced by placing a piece of %"
(19.1 mm) plywood underneath your washer.
25
(Best 2)Kmmtore 592-49003-02902A-01
EN.indd
25
2011-03-23
_,P_a_ft 9:39:59
[
I
I
The plywood may extend underneath
to keep them at equal heights.
[]
[]
Washer odor
is the washer gurgling or humming?
[]
See "Cleaning
Your Washer"
As water is drained from the washer, you may hear air being
pulled through the pump. This happens during the end of
draining. It is normal.,,
[]
Are you using
HE detergent?
Are you washing items with metal snaps, buckles
zippers?
[]
You may hear metal items touching
normal.
[]
both washer and dryer
P
unlock
System."
Was the door opened
during
"Add
Did all of the water drain out of the washer during
spin?
the
Select DRAIN & SPIN to remove any water remaining in the
washer. The washer door will unlock at the end of the drain.
a garment"?
Water can drip off the inside of the door when opened after
the start of a cycle.
is HE detergent
Did you leave the door open after use?
Door won't
[]
[]
can cause a film residue which can
of the machine
Leaking
[]
Care."
This washer has a tight seal to avoid water leaks. To avoid
odors leave the door open to allow the washer to dry
between uses.
the washer drum. This is
Were the 4 shipping bolts in the back
removed?
See "Remove Transport
or
Use of non-HE detergent
result in odor.
in "Washer
[]
is the door locked and is the "Add a garment"
Press the Start/Pause
being used?
light on?
button. The door will unlock.
The non-High Efficiency detergents can cause over sudsing
which can leak from the rear of the washer.
[]
Are the fir hoses tight?
[]
Are the fir hose gaskets
Check both ends of each hose. See "Connect
Hoses" in the installation instructions.
[]
[]
P
properly seated?
the Inlet
is the drain hose properly installed?
[]
Make sure the door is firmly closed.
The drain hose should be secured to the drainpipe or laundry
tub. See "Secure Drain Hose" in the installation instructions.
[]
Make sure your Washer is plugged
[]
Make sure the water source faucets are open.
[]
Make sure to press the Start/Pause
Washer.
[]
Make sure the Child Lock is not activated;
[]
Before your Washer starts to fill, it will make a series of
clicking noises to check the door lock and do a quick drain.
[]
Check the fuse or reset the circuit breaker
is the sink or drain clogged?
Sink and drainpipe must be able to carry away 17 gal. (64 L)
of water per minute. If clogged or slow, water can back up
out of drainpipe or sink. Check household plumbing (laundry
tubs, faucets, drainpipe, water pipes) for leaks.
Dispenser
[]
[]
operation
Did you follow the manufacturer's
directions when adding
detergent and fabric softener to the dispensers?
see page 14.
water..
Turn both faucets
[]
Make sure the door is tightly closed.
Did you put powdered or liquid color-safe
bleach into the
liquid chlorine bleach dispenser
{on some models)?
[]
Straighten
[]
Disconnect hoses and clean screens.
be clogged.
[]
Open and close the door, then press the Start/Pause
Is the fabric
softener
dispenser
Are the laundry products
compartment?
See "Washer Care" for
in the correct
is there water in the dispenser
on fully.
the water inlet hoses.
Hose filter screens may
Button.
clogged?
Has detergent remains in the automatic
the wash cycle is complete.
dispenser
after
dispenser
Add the correct amounts of detergent, fabric softener or
liquid chlorine bleach to the correct compartments.
Add
powdered or liquid color-safe bleach to the Main Wash
compartment.
Be sure to match powdered color-safe bleach
with powdered detergent or match liquid color-safe bleach
with liquid detergent.
[]
Button to start your
[]
Clean the fabric softener dispenser.
details.
[]
Has no water or not enough
in.
Measure detergent and fabric softener. Slowly pour into the
dispensers. Wipe up all spills. Dilute fabric softener in the
fabric softener dispenser.
Add powdered or liquid color-safe bleach to the Main Wash
compartment.
Do not use the chlorine bleach dispenser for
color-safe bleach.
[]
Wiiinot start..
[]
Make sure your Washer is running with sufficient
pressure.
water
[]
Make sure the Detergent Selector dial is in the upper position
when using granular detergent.
Vibrates or is too noisy.
at the end of the cycle?
A small amount of water will remain in the dispenser
compartment. This is normal.
[]
Make sure your Washer is set on a level surface. If the
surface is not level, adjust your Washer feet to level the
appliance.
26
(Best 2)Kmm_ore 592-49003-02902A-01
EN.i_dd
26
2011-03-23
i,_ft
9:40:00
]
I
I
[]
Make sure that the shipping
[]
Make sure your Washer is not touching
bolts are removed.
[]
Make sure the laundry load is balanced.
become
unbalanced
and not spin out completely.
any other object.
Leaks water.
Stops.
[]
Plug the power cord into a live electricN
[]
Check the fuse or reset the circuit breaker.
outlet.
[]
Close the door and press the Start/Pause Button to start
your Washer.
For your safety, your Washer will not tumble or spin unless
the door is closed.
[]
Before your Washer starts to fill, it will make a series of
clicking noises to check the door lock and do a quick drain.
[]
There may be a pause or soak period in the cycle. Wait
briefly and it may start.
[]
Check the screens on the inlet hoses at the faucets for
obstructions.
Clean the screens periodicNly.
Fills with the wrong
temperature
[]
Make sure the door is firmly closed.
[]
Make sure all hose connections
[]
Make sure the end of the drain hose is correctly
secured to the drainage system.
[]
Avoid overloading.
[]
Use high efficiency
inserted and
detergent
to prevent over-sudsing.
[]
Use high efficiency detergent
to prevent over-sudsing.
[]
Reduce the detergent
soiled loads.
[]
Non-HE detergent
Has excessive
suds.
amount for soft water, small or lightly
is NOT recommended.
water.
Load too wet
[]
Turn both faucets
on fully.
[]
Make sure the temperature
[]
Make sure the hoses are connected
Flush water lines.
selection
is correct.
to the correct faucets.
[]
Disconnect the hoses and clean the screens. The hose filter
screens may be clogged.
[]
As your Washer is filling, the water temperature may change
as the automatic temperature control feature checks
incoming water temperature. This is normal.
[]
While your Washer is filling, you may notice just hot and/or
just cold water going through the dispenser when cold or
warm wash temperatures
are selected. This is a normal
function of the automatic temperature control feature as your
Washer determines the temperature of the water.
Door locked or will not open.
[]
Press the Start/Pause
[]
Your Washer door will remain locked during the heating
portion of the Sanitize Cycle
[]
It may take a few moments
disengage.
[]
Did you wash a single item or bulky items or have you
overloaded
the washer?
Did you use HE detergent?
Suds during rinse and spin cycles can reduce spin speed.
Use HE detergent. Residue, lint, stains on load; gray whites,
dingy colors
Did you add detergent
to the dispenser?
For best results, add detergent to the detergent
compartment.
Do not add detergent to the washer drum.
Button to stop your Washer.
for the door lock mechanism
for the load being washed?
A single item, bulky items, or overloading may cause
imbalance. Add items or try to evenly distribute your wet
laundry in the drum, and start a Drain & Spin cycle. If the
laundry is still wet, take half of the load out of the washer and
try again.
[]
[]
Did you use the right cycle
Select a cycle with a higher spin speed.
[]
Does not drain and/or
are tight.
[]
Sort lint givers (towels, chenille) from lint takers (corduroy,
synthetics). Dye transfer can occur when mixing whites and
colors in a load. Sort dark clothes from whites and lights.
to
[]
spin.
[]
Check the fuse or reset the circuit breaker.
[]
Straighten the drain hoses. Eliminate kinked hoses. If there is
a drain restriction, call for service.
[]
Close the door and press the Start/Pause Button. For your
safety, your Washer will not tumble or spin unless the door is
closed.
Did you sort properly?
Did you overload the washer?
Do not overload the washer. The washer can be fully loaded,
but not tightly packed. The wash load must be balanced. Lint
can be trapped in the load if overloaded.
[]
Checkthe
following:
Was paper or tissue left in pockets?
Load is too wet at the end of the cycle.
[]
Use the High or Extra High spin speed.
[]
Use high efficiency
[]
Load is too small. Very small loads (one or two items) may
detergent
to reduce over-sudsing.
27
(Best
2)Ke_mtore
592-49003-02902A-01
EN.indd
27
2011-03-23
i,_ft
9:40:00
I
I
I
[]
Did you use enough HE detergent?
Follow manufacturer's recommendations
for the type of
load you are washing. For best performance, use only High
Efficiency detergent. Use enough detergent to remove soil
and hold (t (n suspension.
[]
Do you have hard water?
Use more detergent
for washing
heavy soils in cold or hard
water.
[]
is your water colder than 60°F (15.6°C)?
Wash water colder than 60°F (15.6°C) may not completely
dissolve the detergent. Use hot or warm washes if safe for
the fabric load. Make sure your hot water system (s adequate
to provide a hot water wash.
[]
Are you using
a low speed wash cycle?
Powdered detergents may not dissolve well (n a slow-speed
cycle. For best results, use liquid detergent for slow-speed
cycles such as Dellcates.
[]
Did you unload the washer promptly?.
[]
To avoid dye transfer,
unload the washer as soon as (t stops.
Did you use a fabric
softener
Dispensing
dispensing
balls will not operate
correctly
ball?
with this washer.
Add liquid fabric softener to the fabric softener compartment,
[]
Did you use powdered
Consider
[]
detergent
in a low-speed
cycle?
using liquid detergent.
Did you use Express Wash on a large load?
For best results, use Express Wash for small, lightly soiled
loads.
Load is wrinkled,
[]
twisted,
tangled
Did you unload the washer promptly?.
Unload the washer as soon as it stops.
[]
Did you use the right cycle for the load being washed?
Use the Delicates cycle or another cycle with a low spin
speed to reduce wrinkling.
[]
Did you overload the washer?
The wash load must be balanced and not overloaded.
should tumble freely during washing.
[]
Loads
Was the wash water warm enough to relax wrinkles?
If safe for load, use warm or hot wash water.
[]
Are the hot and cold water hoses
reversed?
Check to be sure the hot and cold water hoses are
connected to the right faucets. A hot rinse followed by spin
will cause wrinkling. See "Connect the Inlet Hoses" in the
Installation Instructions.
28
(Best 2)Kmmlore 592-49003-02902A-01
EN.i_ldd 28
2011-03-23
L,_,_ft 9:40:00
I
I
I
29
I
(Best 2)Kmmlore 592-49003-02902A-01
EN.i_ldd 29
2011-03-23
L_,i9:40:00
]
I
I
Seairs
®Registered
© 2009 Bears
I
Brands
(Best 2)Keimlore 592-49003-02902A-01
LLC
EN.i_ldd 30
Trademark
/
IM
under
Trademark
licensee
/
SM
3/10
Service
Mark of Sears Brands
by Sears Canada.
LLC,
Printed
in Korea
2011-03-23
i,_ft
9:40:00
]