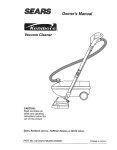
1
O
V
Model
1t6.29429
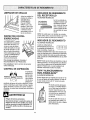
CAUTION:
Read and follow all
safety and operating
instructions before first
use of this product.
Sears, Roebuck and Co., Hoffman Estates, IL 60179 U.S.A.
www.sears.com
Part No, COIZAVKOOU00-8
!74797
Printed in U.S.A.
Before Using Your New Vacuum ........
2
Kenmore Vacuum Cleaner Warranty .... 2
Important Safety Instructions .........
Parts and Features ..................
3
4-5
Assembly
........................
6-7
Use ................................
How to Start ............................
Vacuuming Tips ......................
Suggested Pits Height Settings ............
Attachments .......................
Attachment Use Chart ...............
Performance Features
8
8
9
9
10
10
11
How Your Vacuum Works
12
.........
Canister Care .....................
Bag Changing ...................
Motor Safety Filter Cleaning .........
Cleaning Exterior and Attachments
.....
t2
12
13
13
Power-Mate TM Care ........................
14
Light Bulb Changing ................
14
Belt Changing and Brush Cleaning , _ _ 14-15
Brush Servicing .......................
16
Brush Assembly ...................
16
Troubleshooting
.....................
Requesting Assistance Or Service
17
18
Please read this guide. It will help you assemble and operate your new Kenmore vacuum in
the safest and most effective way..
For more information about the care and operation, call your nearest Sears store. You will
need the complete model and serial numbers when requesting information. Your vacuum's
model and serial numbers are located on the Model and Serial Number Plate.
Use the space below to record the model number and serial number of your new Kenmore
vacuum.
Model No..
Serial No.
Date of Purchase
Keep this book and your sales check (receipt) in a safe place for future reference.
LIMITED ONE YEARWARRANTY
ON KENMORE
VACUUM CLEANER
This warranty is for one year from the date of purchase, and includes only private household
vacuum cleaner use. During the warranty year, when this vacuum cleaner is operated and
maintained according to the owner's manual instructions, Sears will repair any defects in
material or workmanship free of charge.
This warranty excludes vacuum bags, belts, light bulbs, and filters, which are expendable
and become worn during normal use.
parts
For warranty service, return this vacuum cleaner to the nearest Sears Service Center in
the United States.
This warranty applies only while this product is in use in the United States This warranty gives
you specific legal rights, and you may also have other rights which vary from state to state.
Sears, Roebuck and Co., D!817 WA, Hoffman Estates,
IL 60179
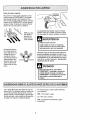
WARNING
Your safety is important to us. To reduce the risk of fire, electrical shock, injury to
persons or damage when using your vacuum cleaner, follow basic safety precautions including the following:
Read this manual before assembling or
using your vacuum cleaner,
Use your cleaner only as described in this
manual. Use only with Sears recommended
attachments°
To reduce the risk of electrical shock - Do
not use outdoors or on wet surfaces.
Disconnect electrical supply before servicing or cleaning out brush area. Failure to do
so could result in electrical shock or brush
suddenly starting_
Always turn cleaner off before connecting or
disconnecting the hose or POWER-MATE _.
Always
turn cleaner off before unplugging.
Do not unplug by pulling on cord_ To unplug,
grasp the plug, not the cord
Hold plug when rewinding onto cord reel..
Do not allow plug to whip when rewinding.
Do not use with damaged cord or plug. If
cIeaner is not working as it should, has been
dropped, damaged, left outdoors, or dropped
into water, return it to a Sears Service
Center/DepartmenL
Do not
handle,
around
cleaner
heated
pull or carry by cord, use cord as a
close door on cord, or pull cord
sharp edges or corners. Do not run
over cord. Keep cord away from
surfaces°
Do not leave cleaner when plugged in_
Unplug from outlet when not in use and
before servicing.
Do not allow to be used as a toy° Close
attention is neces§ary when used by or near
children.
Do not handle plug or cleaner with wet
hands.
Do not operate the cleaner with a punctured
hose_, The hose contains electrical wires
Replace if cut or worn. Avoid picking up
sharp objects_
Do not put any objects into openings_
Do not use with any opening blocked; keep
free of dust, tint, hair and anything that may
reduce air flow.
Keep hair, loose cIothing, fingers, and all
parts of body away from openings and moving parts.
Do not use cleaner without dust bag andlor
filters in place°
Always change the dust bag after vacuuming carpet cleaners or freshener, powders
and fine dust° These products clog the bag,
reduce airflow and can cause the bag to
burst. Failure to change bag could cause
permanent damage to the cleaner.
Do not use the cleaner to pick up sharp hard
objects, small toys, pins, paper clips, etc_
They may damage the cleaner or dust bag.
Do not pick up anything that is burning or
smoking, such as cigarettes, matches, or hot
ashes
Do not use cleaner to pick up flammable or
combustible liquids (gasoline, cleaning fluids,
perfumes, etc.), or use in areas where they
may be present. The fumes from these substances can create a fire hazard or explosiono
Use extra care when cleaning on stairs. Do
not put on chairs, tables, etc, Keep on floor.
You are responsible for making sure that
your vacuum cleaner is not used by anyone
unable to operate it properly,.
SAVE THESE INSTRUCTIONS
Proper assembly and safe use of your vacuum cleaner are your responsibilities. Your cleaner
is intended onty for household use. Read this Owner's Manual carefully for important use and
safety information. This guide contains safety statements under warning and caution symbols_
Please pay special attention to these boxes and follow any instructions given° WARNING
statements alert you to such dangers as fire, electrical shock, burns and personal injury. CAU.
TION statements alert you to such dangers as personal injury andlor property damage_
NI'NIIIIIINII
NIHHI'1,I '
I
.....................
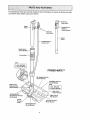
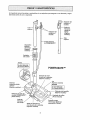
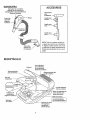
It is important to know your vacuum cleaner's parts and features to assure its proper and safe
use. Review these before using your cleaner.
,._- Cord and
Plug Holder
Upper
Cord and
Cord Holder
-
Upper
Wand
POWER,,MATE TM
Power Cord
Wan d Swivel
(Some Models
o
o
Cord Holder
Belt
#40110
IIn Canada
UoSo#20-5285
POWER-MATETM
Pile Height Indicator
(Some Models)
Headlight and Lens
(Some Models)
Bulb
Wand Quick
Release Pedal
(Some Models)
In U.S_ #20.5240
In Canada #596181
Light Cover
(Some Models)
POWER.MATE TM
Mo det/Serial Numbers
Edge Cleaner
(Not Shown)
Overload
(OnB°tt°m)Handle/l
ReleaseJ
Pedal
Protector
(Reset Button)
Pile Height Pedal
(Some Models)
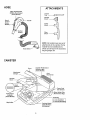
HOSE
ATTACHMENTS
3-Way On/Off Switch
Off/Bare Floor/Carpet
(Some Models)
Crevice
Tool
Dusting
Brush
Handle
._
----.-.--_
Control
(Some
Brush
Fabric _.........__
Models)
.---__
_
/
Floor
Brush
-------_
NOTE: All models have one set of
attachments in the canisten Some
models have an additional set,
which can be kept in the accessory
bag for garage use,
Hose Swivel
CANISTER
Cover
Canister
Performan
ce
Indicator
Light
(Some Models)
Attachment
Cord
Rewind Bar
Storage
Canister
Hood
(Not Shown)
Motor Safety Filter
(Behind Dust Bag)
Performance
Indicator
(Some Models)
Bag HoldeJ
Dust Bag
In U,S_ #20.50558
In Canada #20-50555
--
Canister Model/
Serial Numbers
(On Bottom)
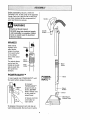
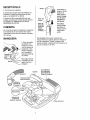
Before assembling vacuum, check the
PACKING LIST on the cover of the separate
Repair Parts List. Use this list to verify that
you have received all the components of
your new Kenmore vacuum.
Electrical Shock Hazard
Handle
DO NOT plug into electrical supply
until assembly is complete. Failure
to do so could result in electrical
shock or injury.
ii
IIIl_llnl,
II
Button
_
___
I i,
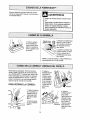
WANDS
Slide wands
together until
wand button
Button
snaps into place.
Turn wand button
to the slotted
area of the wand
swivel.
The swivel allows
you to turn the
handle to the left
side to reach farther under low
furniture°
6
i
Wand
Swivel -Wand
Swivel
Cord
Holder /
POWER-MATE TM
POWERMATE TM
1. Insert wands into POWER*MATE _ until
the wand buttons snaps into place.
Wand
2. Connect
POWER-MATE _
Raised
Area
plug and cord as
shown° DO NOT
force. Raised area
Wand
Button
Swivel
of plug must be
toward hand.
Wand Quick
Release Pedal
3. Secure cord into
cord ho_der on
wand swivel,
To remove; Disconnect cord and step on
wand release pedal, then pull up on wands.
6
CANISTER
2. Insert
handle into
wand until
lock button
Hat
1o Open the canister hood°
2. Check to see that the dust bag is properly installed, See BAG CHANGING for
instructions,
3. Check to see that the motor safety filter is
properly installed. See MOTOR SAFETY
FILTER CLEANING for instructions.
snaps in
place° Be
sure hose
is not
twisted.
Handle
Button
To remove:
press handle release
button and
Handle
Quick
Release
HOOD
(Some
It is normal for the canister hood to come off
when opened further than needed. Line up
the hinges, insert them, and close the hood
to replace it,
HOSE
pull up on
handle°
To store: Disconnect
1o Line up the
hose latch tab
and notch in
canister hood
and insert hose
into canister until
hose from wands and
canister to prevent stress on hose during
storage, Store hose in a loosely coiled
position so the hose covering is not
stressed.
it snaps in place,.
To remove: lift
hose latch tab
upward and pull
up on hose.
Notch
Cover
Canister
Performance
indicator Light
(Some Models)
HOOE
Attachment
Storage
Performance
Indicator
(Some Models)
Dust Bag
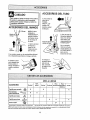
HOW TO START
E
Pile Height
Indicator
WARNING
Personal Injury and Product Damage
Hazard
• DO NOT plug in if switch is in ON
position. Personal injury or
damage could result.
Handle Release
Pedal
o The cord moves rapidly when
rewinding. Keep children away
and provide a clear path when
rewinding the cord to prevent
personal injury.
Pite Height
Pedal
3, Lower wand from upright position by
pressing on the handle release pedal.
, DO NOT use outlets above
counters. Damage to items in
surrounding area could occur.
i
Cord
Rewin d
Bar
i,
1, Pull cord out of
canister to desired
length° The cord
will not rewind until
the cord rewind
4, Select a pile height setting by pressing
the small pedal on the rear of the POWERMATE _, The pile height setting shows on
the indicator, See SUGGESTED PILE
HEIGHT SETTINGS.
bar is pushe&
Attention:
Refer to your carpet manufacturers cleaning recommendations.
Some
more delicate carpets may require that they
be vacuumed with the POWER-MATE T_ agitator turned off, to prevent carpet damage.
NOTE: To reduce the risk of electric shock,
this vacuum cleaner has a polarized plug,
one blade is wider than the other,, This plug
will fit in a polarized outlet only one way. If
the plug does not fit fully in the outlet,
reverse the plug., If it still does not fit, contact a qualified electrician to install the proper outlet. Do not change the plug in any
way.,
Select a switch
position on the
handle,
2, Plug the polarized power cord into a 120
Volt outlet located near the floor,
To rewind: Unplug the cleaner, Hold the
plug while rewinding to prevent damage or
injury from the moving cord, Push cord
rewind bar,
OFF
FLOOR - turns on the canister motor only,
CARPET - turns on both the canister and
the POWER-MATE _ motors,
8
Suction
Control
Forbestcleaningaction,thePOWERMATETM should be pushed straight away
from you and pulled straight back., At the
end of each pull stroke, the direction of the
POWER-MATE TM should be changed to
point into the next section to be cleaned,
This pattern shoutd be continued across the
rug with slow, gliding motions,
NOTE: Fast,
jerky strokes do
not provide
complete cleaningo
Carpeted stairs need to be vacuumed regutarlyo For best cleaning results, fully close
the suction control
Personal Injury Hazard
The hose swivel
allows the hose to
turn without moving
the canister, This is
helpful for cleaning
in small areas..
Check hose for
twisting before
pulling canister,
Use care if canister is placed on
stairs, if it falls, personal injury, or
property damage could result.
For best cleaning results, keep the airflow
passage open, Check each assembly area
in HOW YOUR VACUUM WORKS occasionally for clogs,
checking.
Unplug
from outlet before
To prevent tip over, never leave
POWER-MATE TM on or in the upright
position.Turning
the handle to one
side will make the POWER-MATE TM
more stable and less likely to tip
over.
For best deep down cleaning, use the XLO
setting_ However, you may need to raise the
height to make some jobs easier, such as
scatter rugs and some deep pile carpets,
and to prevent the vacuum cleaner from
shutting off, Suggested settings are:
HI - Shag, deep pile, or scatter rugs
MED - Medium to deep pileo
LO - Low to medium pite_
XLO - Most carpets and bare floors_
E
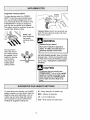
ATTACHMENTS
CAUTION
_
ON WANDS
=11
DO NOT attach or remove handle
wands while cleaner is ON. This
t. To remove
wands from
POWERMATE TM, lock
wands in
or
could cause sparking and damage
the electrical contacts.
ii
ii1,1,1111,,i
I
i
ATTACHMENTS ON HANDLE
NOTE: if the
POWER_
MATE TM is
attached, turn
cleaner off
before removing
handle from
wands,
Handle
Button
straight-up
position.
--_
2. Press wand
release pedal
with foot and
pull the wands
straight up out of
POWER-MATE TM.
Wand Quick
Release
1. Press lock
Pedal
The POWER-
button, then pull
to remove handle from wand.
I
MATE TM plug and
cord do not have to
be removed to use
attachments on the
wands.
If your model has the optional feature of a
handle release, press it in similarly°
2. Slide attach-
3. Put attachments on
wands as
needed, See
chart below_
ments firmly on
handle as needed_ See chart
below,.
.....
,,,
,
,.............
CLEANING
ATTACHMENT
Between
Furniture*
DUSTING
BRUSH
1_
Cushions*
X
Bare
Drapes*
Stairs
X
Walls
I
X
,
,
,
,
X
FLOOR BRUSH
x
TM
_'"
Carpeted
;Ioors/Rug._
X
...........
FABRIC BRUSH
Floors
X
X
CREVICE TOOL _
POWER-MATE
AREA
x
X**
,,
X
X
, ,,,,,,,,,, ,
*Always clean attachments
before using on fabrics
** 3-wa' ' OnlOff switch should be in FLOOR position
NOTE; When separating wands, depress tock button complelely before pulling wands apart, tf wand lock button is difficult to depress, push the two wands more tightly logether to line up the lock button with the hole. Depress lock butlon
and then pull wands apart
10
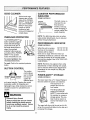
EDGE CLEANER
CANISTER PERFORMANCE
INDICATOR
Active brush edge
cleaners are on both
sides of the POWERMATE TM,Guide either
side of the POWERMATE 7Malong baseboards or next to
furniture to help
remove dirt trapped at
carpet edges°
SOME
blocked, dust bag
needs changing or
canister safety filter
needs cleaning°
NOTE: The light may also come on when
using certain attachments, due to reduced
airflow through attachmenL
The POWER-MATE _ has
stops, the overload
protector button pops up
and shuts off the POWERMATE TM.The canister
motor will continue to run.
i
r,
I
PERFORMANCE
SOME
the lines in the indicator
windows will be clear if
there are no clogs. When the lines turn
completely red there is a need to check the
dust bag for being fuli of the other areas
that may be clogged. See HOW YOUR VACUUM WORKS.
To reset: Push in the overload protector
button.
NOTE: Red lines may appear when using
attachments or when cleaning new carpet,
due to reduced airflow by the attachments
themselves or new carpet fuzz filling the
bag quickly.
CONTROL
The suction
control allows
Suction
Suction
POWER-MATE TMSTORAGE
you to change
the vacuum
suction for
SOME
MODELS
The lower wand has a "U" shaped flange in
the area where the power cord attaches_
The base has a %1"
different fabric
and carpet weights.. Opening the control
decreases suction for draperies and
lightweight rugs, while closing the control
increases suction for upholsteries and
carpets.
•
INDICATOR
MODELS
Who ,hooo,,,s,
/000
0no,
0)0
To correct problem: See
TROUBLESHOOTING.
SUCTION
The light comes on
whenever the airflow becomes
Canister
Performance
Indicator
Light
OVERLOAD PROTECTOR
buiIt-in protection against
motor and belt damage
should the brush jam, If
the brush slows down or
MODELS
shaped slot near the
front caster1.
The flange
wands and
MATE _ to
the canister
WARNING .........
allows the
POWERbe stored with
to conserve
storage space_ The canister must be stored on
end for this feature to be
used°
Personal Injury Hazard
Always unplug the vacuum cleaner
before cleaning the brush area as
brush may suddenly restart. Failure
to do so can result in personal
injury.
The wand will slip out of the slot as it is lifted up for use and will slide into the slot as it
is lowered for storage,
tl
The vacuum cleaner creates suction that
picks up dirt° Rapidly moving air carries the
HOSE
dirt
to the
sages.
The dust
dustbag
bagthrough
lets the the
air airflow paspass through, while it traps the /-_"_
The
allowshose
the swivel
hose to
turn without moving
dirt°
/.._-"-_--------_
For best cleaning results,
_
the
airflow
passage
keep
.,_/,_/
open. Check the
////
areas occasionally for
.z_iz
_/_'/
_
]_!_
the canister, This is
)))
I//
//!/
small areas.. Check
hose for twisting before pullingstarred
canister.
!{(
Unplug from
outlet before
\'._
\',,_"..__,
chec_
___
"_'_t helpful for cleaning in
c,o0 , j
_/_
,/_4f
SWIVEL
"--___
BAG CHANGING
Red Bag
For best cleaning results, the dust bag
should be changed often° The performance
indicator will come on when the bag needs
to be changed or the airflow is blocked°
NOTE: See PARTS AND FEATURES for
Bag #.
t
6, Raise red bag
mount,
7. Install bag into slots
per illustrations
pushing down until the
cardboard tab locks
into position and the
holes align. Tuck the
back end of the bag
down,
1. Unplug cord from
wall outlet.
2. Pull hood release
out and up, then lift
canister hood.
8. Close and latch canister hood,
3. Disengage
cardboard tab from red
9. Plug cord into wall outlet.
\
bag mount by pressing
away and lifting up.
CAUTION
4_ Pull bag out of the
red bag mount
NEVER REUSE A DUST BAG. Very
fine materials, such as carpet freshener, face powder, fine dust, plaster,
soot, new carpet lint, etc. can clog
the bag and cause it to burst before
it is full. Change bag more often
when vacuuming
these materials.
5. Check and clean motor safety filter. The
red bag mount will flip forward after
removing bag, This wil! prevent the lid from
closing until a new bag is insta!le&
i
12
There are two motor safety filters: 1. a dark foam filter incorporated in the red frame and
2. a white electrostatic filter that is laid on the back side of the dark foam filter
These filters should be checked with each bag change. The dark foam filter can be washed,
per the instructions below and the white filter must be replaced when dirty
3, Peel the white
filter off the dark
foam filter as
WARNING
Electrical Shock Hazard
shown Lay a new
white filter on the
dark filter by aligning the notches in
the filter with the
Do not operate the cleaner without
the motor safety filter. Be sure the
filter is dry and properly installed to
prevent motor failure and/or
electrical shock.
White
Electrostaticr_ .i
Filter
'.
_
Dark Foam
Filter
tegs of the frame.
The new filter can be purchased under
part number 4369971 at your local Sears
Service Unit, 20-86885 at most Sears
Retail stores, or ordered by calling the
Toll Free Number 1-800-366-7278 for
English speaking operator or 1-800-659.
7084 for Spanish speaking operator°
from wall outlet
and
I. Unplug
removecord
2, Pull out safety filters as
shown
DARK FOAM FILTER
This filter and the frame can be washed in
warm soapy water, rinsed and air dried. DO
NOT clean in a dishwasher or clothes
washer
f
4. Snap filter
back into canister.
or install while damp.
WHITE ELECTROSTATIC FILTER
5. Insert bag
This filter must be replaced when dirty. It
should be replaced regularly depending on
use conditions. The filter CANNOT be
washed as it wilt lose its dust trapping
ability.
1. Unplug cord from wall outlet. DO NOT
drip water on cleaner.
DO NOT USE ATTACHMENTS 1FTHEY ARE
WET_
2. Clean exterior using a clean, soft cloth
that has been dipped in a solution of mild
liquid detergent and water, then wrung dry.
Wipe dry after cleaning.
CAUTION
I
3. To reduce static electricity and dust buildup, wipe outer surface of cleaner and
attachments.
ttachments
used in dirty areas,
such as under a refrigerator,
should
not be used on other surfaces until
they are washed.They
could leave
marks.
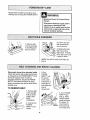
13
cleaningandservicingthe POWER-MATE
TM
WARNING
Electrical
Hazard
Shock Or Personal Injury
Disconnect electrical supply before
servicing or cleaning the unit,
Failure to do so could result in electrical shock or personal injury from
cleaner suddenly starting,
TM
•!iiiii!!ii!ii!i!i
!!iil
Push In
And Turn
1, Remove light
cover by pressing
in and lifting both
sides as shown_
2, Push in and turn
bulb counterclockwise to remove_
3. Replace the bulb,
Bulb must not be
higher than 15 Watts
Close light cover until
it snaps in place.
NOTE: See PARTS AND FEATURES for
Bulb #
Disconnect cleaner from electrical outlet.
Check and remove hair, string and lint buildo
up frequently in the POWER-MATE TM brush
and brush support areas, tf build-up
becomes excessive, disconnect POWERMATE TM from wand and follow the steps
below_ Instructions can also be found under
the light cover,
3. Turn
POWERMATE TM over.
To remove
cover, insert
screwdriver at
cover tabs on
both sides and
twist to
release tabs.
TO REMOVE BELT:
4, Turn POWER-
cover and light
bulb as shown
under LIGHT
BULB
CHANGING.
1. Remove light
--'-I
TM
MATE TM right
side uF Press
handle release
pedal and lower
the swivel Tilt
cover forward
from back until
front snaps free,
2. Unscrew the
POWERMATE TM cover
screws.
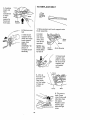
14
TO REPLACE
5. Carefully
insert and
twist
screwdriver
at each
brush
support to
free brush
from base.
BELT:
Base
Brush
Support
i
i
1. Slide washers and brush supports onto
brush assembly
6. Remove worn
belt.
7. Slide brush
new belt
over
motor
2. Install
drive, then
supports off to
check and clean
brush support
areas. See
BRUSH
ASSEMBLY for
Motor
Drive
over brush
sprocket.
NOTE: See
PARTS AND
FEATURES
for Bett #
picture of
complete brush
assembly
Brush
Support
Brush Sprocket
3. Snap brush
supports into
place on base.
Be sure brush
supports are
not upsidedown.
4. Line up
front of cover
and base.
Rest cover
on front edge
of base as
shown.
L_
Cover
Base
5. Tilt cover to
back° Press
cover firmly until
side tabs snap
into place.
Replace cover
screws, light
bulb and light
COVeL
15
TO REPLACE
1. Remove POWER-MATE TM cover, belt and
brush assembly° See "To remove belt" in
BELT CHANGING AND BRUSH
CLEANING..
Electrical Shock Or Personal Injury
Hazard
Disconnect electrical supply before
servicing or cteaning the unit.
Failure to do so could result in elec-
2. Remove brush supports, washers,
screws, end brush, brush sprocket pieces
from ends of brush assembly.
trical shock or personal injury from
cleaner suddenly starting.
U'll
III
'1
IIII
BRUSH DOWEL:
3o Reassemble
screw holes in
brush, be sure
brush lines up
I'1
TO CHECK BRUSHES:
brush assembly. To line up
dowel, sprocket and end
the brush portion of end
with brushes on brush dowel
whenb ushes
4. Replace belt, brush assembly, POWER*
MATE TM cover, light bulb and light cover. See
"To replace belt" in BELT CHANGING AND
BRUSH CLEANING..
are worn to the
level of the base
support bars,
replacedowel
brush
the
Base Support
Bars
Brush
Sprocket
Flange
Brush
Sprocket
End
Brush
Brush
Support
Screw
Washer
Brush
Support
Brushes
Brush
Dowel
Screw
16
Washer
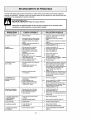
Review this chart to find do-it-yourself
solutions for minor performance
problems. Any service needed, other than those described in this owner's manual, should be performed by
an authorized service representative.
...........
Failure to do so co, ul,,?' resu, l,l,,in electrical
Cleaner won't start-
I. Unplugged at wall outlet,
2. Tripped cimuil breaker/blown fuse
at household service panel
3+ Loose hose electrical connections
4,, Tripped overload protector in
POWER-MATE TM.
Poor job of dirt
pick-up.
Cleanerstarts but
cuts off°
1+ Full or clogged dust bag.
2. Clogged airflow passages
3+ Dirty motor safetyfilter
4_ Wrong pile height setting
5. Open auction
control
6. Hole in hose
7, Worn POWER-MATE
TM brushes
8. Worn or broken belt
9. Dirty brush or brush supports
10, Canister hood open
'L Hose or hood electrical connections
Tripped overload proteclor in
POWER.MATEm,,
Tripped overloadprotector
in canister
POWER-MATE
TM will not
run when attached.
1. POWER-MATE
TM
sho?,k ?,,[,,,,perso?,,?I injury_
1. Plug in firmly, push ONtOFF switch to ON
2. Reset circuit breaker or replace fuse
3. Reconnecthose ends, (page 7)
4. Clean brush and brush supports,
then reset, (pages 14, 15)
1. Change bag, (page 12)
2o Clear airflow passages, (page 12)
3. Clean filter, (page 13).
4. Adjust setting, (page 9),
5+ Adjust control,
(page 11)
6. Replace hose
7. Change brushes, (page 16},
8 & 9+ See BELT CHANGING AND BRUSH
CLEANING, (pages 14, 15)+
10. Close and latch hood_
1. Check connections,
reconnect hose
ends,(page 7).
2+ Removeany items thatmay be caught
orjammed, thenreset. If cleanerstarts
and stops again+cleanbrush and brush
supports, then reset,(pages"_4,_,5)
3. Change dust bag, clearairflow blockage,
(page 12). Wait 20 minutesfor motor
to cool andautomatically reset.
connections
unplugged.
2. Worn or broken belt.
Plug in firmly, (page 6).
2&3o
See BELT CHANGING AND BRUSH
3, Dirty brush or brush supports
4. Tripped ovedoad protecior in
POWER-MATE _'-
CLEANING, (pages 14, 15).
4+ Check brush area for excessive lint
Performance indicator,
some models,is red,
Io
2_
3.
4,
1+ Change bag, (page t2)
2. Change tiller, (page 13)
3. Clear clog from airflow passage, (page 12)
4+ This is normal Light should go off
when loo_is removed
Cleanerpicks up moveable
rugs ,or- POWER-MATE
TM
)ushee too hard,
t. Wrong pile height setting
2. Suction too strong
1. Adjust setting, (page 9)
2+ Open suctioncontrol,(page 11)
Light won'twork.
1. Burned outlight bulb
1+ Change light bulb, (page 14)
Cord wor_'trewind+
1, Dirty power cOrdr
2o Cordjammed.
1. Clean the powercord
2, Pull oulcordand rewind
Cleanerleaves marks
on carpet
I+ Wrong vacuumingpattern
1_ SeeVACUUMING"rIPS,(page 9)..
Furlor clogged dust bag
Dirty filter
Cloggedairflow passage.
Certain attachmenttools
17
build-up or jamming CIean brush and
brush supports, then reset, (pages 14, 15)
:ili _,_4i_!
i:ii_!:ii_::!i_
!iii!_!_i:ili:;!i!!
_'
:_'_
!ii!_,i!_ _i_
For
repair of major brand appliances in your own home...
no matter who made it, no matter who sold it!
1-800-4-MY-HOME
®
Anytime, day or night
(1-800-469-4663)
(US,A. and Canada)
www.sears.com
wwwosearsoca
For repair of carry-in products like vacuums, lawn equipment, and
electronics, call for the nearest Sears Parts and Repair Center.
1-800-488-1222
Anytime, day or night (US.A only)
www,sears.com
For the replacement parts, accessories and owner's manuals
that you need to do-it-yourself, call Sears PartsDirect_M!
1-800-366-PART
6 aom.- 11 p.m, 7 days a week
(U.SA only)
(1-800-366-7278)
www.sears_com!partsdirect
"i¸¸_!_:i
To pumhase
or inquire about a Sears Service Agreement
or Sears Maintenance Agreement:
1-800-827-6655
.::
1-800-361-6665
(U,S Ao )
(Canada)
::
=: :::=
7!:'i
};: i!:i
i;; ii?i
7 a.mo- 5 pmo, CST, Mon.- SaL
9 a.m.- 8 pro. EST, M - F, 4 pore.Sat.
Au Canada pour service en frangais:
1-800-LE-FOYER _c
Pare pedir servicio de reparaci6n a
domicilio, y para ordenar piezas:
t-888.-SU-HOGAR sM
(1-800-533-6937)
www,sears,ca
(1-888-784-6427)
i_¸ !
i
© Sears, Roebuck and Co,
® Registered
Trademark
® Marea Registrada
I TMTrademark
/ SMService Mark of Sears, Roebuck and Co
/ Tt_ Marca de F_brica / s_ Marca de Servicio
MCMarque de commerce
f _o Marque
d_pos_e
de Sears, Roebuck
18
de Sears, Roebuck
and Co
and Co
p,
M
A
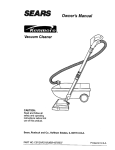
Modelo
116.29429
CUIDADO:
Lea y sigue todas las
instrucciones de operaci6n
y seguridad antes del uso de
este producto,
Sears, Roebuck and Co., Hoffman Estates, IL 60179 U.S.A.
www.sears,com
Pieza NOCOIZAVKOOUOO-8174797
Impreso en EUA
Antes de usar su aspiradora nueva ....
Garantia de la aspiradora de Kenmore
tnstrucciones importantes de
seguridad
.........................
Piezas y caracteristicas ..........
Armada ....................
3
4-5
6-7
Use ............................................
Para comenzar ......................
8
8
Sugerencias para aspirar ..............
Sugerencias sabre e! ajuste de nivel de
pelo de la alfombra .....................
Accesorios ........................
Use de los accesorios ......................
Caracteristicasde rendimiento ...........
Funcionamiento
de su aspiradora
2
,2
......
9
9
10
10
11
Cuidado del receptbculo
....
Cambio de la botsa ................
Limpieza detf_ltrode seguridad deI motor
Limpieza del exterior y de los accesorios
Cuidado de la Power.Mate TM
Cambio de la bombilla .............
Cambio de ia correa y limpieza
del cepifIo .....................
Cuidado del cepi!lo .......................
Ensambie del cepi]to .............
Reconocimiento de problemas
Informaci6n de assistancia
o servicio ...........................
12
12
13
• 13
.....
14
14
14-15
16
16
..........
17
t8
12
Per favor lea esta guia que le ayudara a assemblary operar su aspkadora nuevade Kenmore en una manera
m,_ssegura y effectiva
Para mas informaci6nacerca del cuidado y operaci6n de esta aspirador, Ilame a su tiendaSears mas cercana_
Cuando prequnte per informaci6nusted necisitar_ el n_mero compietode serie y modelo de la aspiradoraqua
est_ Iocado en ia placa de los n_meros de modeto y serie..
Use et espaciode abajo para registrarel nt_merode modeFoy serie para su nuevaaspiradora de Kenmore.
N_mero de Medelo
Numero de Serie
Fecha de Compra_
Matenga este libra y su recibo en u lugarseguro para refarenciasfuturas
GARANTJALIMITADADE UN ANO DE LA ASPIRADORAKENMORE
Esta garantia es per un afro desde la fecha de compra, e incluye solamente el usa de la aspiradora en hogares
privados.Durante el aSo de garantia, cuando la aspiradora es operada y mantenida de acuerdo a! manualde
instruccionesdel dueSo,Sears reparar_ cualquier defecto en materialeso fabricaci6n libre de cargo.
Esta garantia excluyelas balsas de colecoi6n,correas, lamparilPas,y filtros, las cuales son partes gastablesque
se deterioran con el use normal.
Para el servictode garantia, retorne esta aspiradora al Centre de Servicio Sears m_s cercanoen los
Estados Unidos.
Esta garantfa se aplica soiamente mientras este producto estb en use en los Estados Unidos Esta garantia te
da a usted derechos {egalesespecificos, y usted puede tenettambi6n otros derechos los cuales varian de
estado a estado.
Sears, Roebuck and Co,, D/817 WA, Hoffman Estates, IL 60179
ADVERTENClA
Su segurldad es muy importantepara nosotros.Para reducir el riesgo de incendio,choque
el_ctrico, lest6n corporal o daSos al utilizar su asptradora, actue de acuerdo con precauciones
b_stcas de seguridad, entre ellas:
Lea este manual antes de armar o utilizar su aspiradora.
No toque la aspiradora ni el enchufe con las
manos mojadas.
Use su aspiradora L_nicamente
en la forma descrita
en este manual. Use On[camentecon accesorios
recomendadospot Sears.
No use la aspiradora si la manguera est_ rota. La
mangueracontiene alambres et6ctricos. C&mbiela
si est& rota o desgastad& Evite aspirar objetos
agudos
No coloqueobjetos en 1asaberturas.
Para reducir el riesgo de choque el_ctrico, no use
su aspiradoraal aire libra ni sobre superficies
mojadas.
Deseonecte e! cordSnel_ctrico antes de
componer o limpiarel &rea del cepitlo.De to
contrario,el cepilto podria arrancar de form
imprevistao podria producirse un choque electrico
Siempre debe apagar la aspiradoraantes de
conectar o desconectar ta manguerade la
POWER-MATE_
Siempre debe apagar su aspiradoraantes de desconectarla
No desconectela aspiradora tirandodel cord6n
el6ctrico.Para desconectarta,hale el enchufe, no
el cord6n
Sujete el enchufa con la mano al enroliar el cord6n
el_ctrico Para desconectada,hale en enchufe, no
el cord6n.
No use la aspiradorasi el cord6n o el enchufe est;_
daSado Si la aspiradora no est_ funcionando adecuadamenteo si se ha dejado caer, est_ daSada,
se ha dejado expuesta a la intemperie o se ha
dejado caer en agua, devu_tvalaa un CentrotDepartamento
de servicio de Sears
No utifice la aspiradorasi alguna abertura esta bloqueada; mant_ngala libra de polvo, pelusa, cabeIlos y cualquiera cosa qua podria disminuir el flujo
de aire.
Mantengael cabello, ropa suelta, dedos y todas
tas partes del cuerpo alejados de las aberturas y
plazas mec_nicas..
No use la aspiradora sin tener instaladala bolsa
para polvo y/o los filtros.
Cambie siempre la boisa para polvo despu_s de
aspirar limpiadoresde alfombraso desodorantes,
talcos y pofvos t_nos.Estos productos atascan fa
bolsa, reducen et flujo de aire y pueden causar qua
6sta se romp& Si no cambia la bolsa podrtaocasionar daSo permanente a la aspiradora.
No use la aspiradorapara levantar objelos agudos,
juguetespequefos,alfileres, sujetapapeles,etc,
Poddan daSar ]a aspiradora o la bofsa para polvo
No levante ninguna cosa qua se est_ quemando o
emitiendo hume, como cigarrillos,cerillos o cenizas calientes.
No hale ni transporte la aspiradora por el cordSn;
no use el cord6n como mango; no cierre puertas
sobre e! cord6n; no hale el cord6n sobre rebordes
agudos ni esquinas No pase la aspiradorasobre
el cord6n, Mantenga el cord6n alejado de superficies calienles.
No usela aspiradorapara aspirar liquidos inflamables o combustibles (gasolina, liquidospara limpieza, perfumes, etc.) n{ la use en lugares donde
_stos podrian estar presentes. Los vapores de
estas sustancias pueden crear un peligro de incendio o exptosi6no
No abandone la aspiradoracuando est6 conectada Descon6ctelacuando no ta est_ usando y
antes de darle servicio.
Tenga cuidado especial al utilizar la aspiradora
en escalones. No ta coloque sobre silias, mesas,
etc Mant_ngalaen et piso
No permitaque sea utilizada como juguete Se
requiere tener mayor cuidado cuando sea utilizada
en la proximidadde niSoso por niSos
Usted es responsable de asegurar qua su aspiradora no sea utilizada por ninguna persona que no
pueda manejada correctamente.
GUARDE ESTAS INSTRUCCIONES
El armado y uso seguro de su aspiradora son su responsabifidad Esta aspiradora ha sido diseSada
exclusivamentepara uso dom6stico.La aspiradoradeber& almacenarseen un lugar seco yen el interior
Lea este Manualdel propietario detenidamente,pues contiene informaciSnimportantesobre seguridad y
uso. Esta qu[a contiene informaci6nsobre seguridad debajo de simbolos de advertiencia cu]dado. Pot
favor ponga atenci6n especial a estas instrucciones
dadasoAdvertencia: Este informaci6nle alertar&con
el poligrode fuego, choques electricos,quemadas y lesiones Cuidado: Este informaci6nle alerlara a
peligroscomo lesionesy daSosde propledad.
I
i!!tl
III
I
iiii
i,i
i
Es importante conocer las piezas y caractedsticas de su aspiradora para asegurar su uso adecuado y seguro,
E×aminelasantes de usar su aspiradora
Sujetador de!
cord6n y el
enchufe
--
Bot6n de
liberaci6n
supedor
r_pida de/
mango
(Algunos
modelos)
Sujetador del
eord6n y el
enehufe
Tubo
superior
Cord6n eldctrico
de POWER-MATE
TM
Dispositivo
giratorio
del mango
(Algunos
modelos)
Suje_dor
deleord6n
Co_ea
Canada#40110
I En
En EUA
#20-5285
i
POWER-MATETM
Indicador
de nivel
de pelo de/a alfombra
(Algunos modetos)
Luz
Pedal de
liberaci_n
del tubo
r_pida
(Algunos
modelos)
Bombitla
//[
En EUA #20-5240
(Algunos
modelos)
En Canad_ #59618_
Cubierta
Ndmeros de serie del
modeto POWER-MATE
(Parte inferior)
Pedal de
libe_c_n
delmango
(Algunos
de la bombilla
modelos)
Limpiador
de orillas
(No se muestra)
TM
/
Pedal de selecci_n de
nlvel de pelo de la alfombra
(Algunos
modelos)
4
1
Protector contra
sobrecargas
(Bot6n de
restauraci6n
"Reset")
MANGUERA
ACCESORiOS
Interruptor de encendido/
apagado de tres posiciones
(Apagado/Piso expuesto/Alfombra)
(Atgunos modeios)
Herramienta
para
hendiduras -.-_i _,_
Cepiflo para
velocidad
i
(AIgunos
J
,_
sacudir ------_
telasCepilt°
para
_
pisos -Cepillo para
Dispositivo
giratorio de
la manguera
__
NOTA: Todos los modelos cuentan con
un juegode accesorios en el recept&cuto Atgunos modelos cuentan con un juego adicionarque puedealmacenarseen
la botsa para accesorios de uso e en el
garaje,
RECEPTACULO
Cubierta
Luz indicadora
de rendimiento
del recept_culo
(Algunos modelos)
Almacenamiento
para accesorios
Almacenamiento
eord&n el_ctrlco
del
Tapa det
recept_culo
Cord6n el_ctrico
(No se muestra)
Fi/tro de segur/dad
del
motor (Detr_s de la
bolsa para polvo)
lndicador de
ren dimiento
(Algunos
modelos)
Bolsa para polvo
Sujetador
de la bolsa
N_meros de serie t
det mode!o de
recept_culo
(Parte inferior)
En EUA #20_50558
I
En Canada #20-50555
J
Antes de armar ia aspiradora, chequee la LISTA
DE EMBALAJE en {a cubierta separada de ]a Lista
de Partes para Reparaci6n Use esta fista para veto
ficar qua ha recibidotodas las componentes de su
nueva aspiradora Kenmore
Mang
ADVERTENCIA
Petigrode choque el_ctrico
No conecte fa aspiradora hasta que termine
de armarlaoDe Io contrario podria causar
un choque el6ctricoo lesi6n corporal
Bot6n
det
TUBOS
Una los tubos
desliz_ndolos
hasta que el bot6n
quede fijo en posiciSn,Gire el botSn
del tubo hacia la
zona ranurada del
dispositivo giratorio
del tubo,
El dispositivo giratorb le permite
girar el mango
hacia la izquierda
para limpiar major
debajo de los muebias bajos
,,o,,o__,i,,
giratorto
Disposltlve
del
mango -- _.:/__
Sujetador
del cord6n j
POWER-MATETM
1oIntroduzca los tubas en la POWER_MATETM
hasta que el bot6n del tubo quede fijo en posici6n
elevada
2oConecte el enchufe
y cord6n de la
POWER-MATETM
como se muestra. NO
LO fuerce, El &tea elevada del enchufe tiene
qua estar hacia la
POWERMATE
TM
Dispositivo
mane.
gtratorio
hacla dentro_
3. Assgure el cord6n
dentro del sujetador
del cord6n en el giratorio de la mango
Pedal de
liberacl6n
.
Para retirar: Desconectee! cordbn y pise el pedal
de liberaci6n r&pidadel tuboy tire del tubos hacia
arriba
r_pida del tubot
RECEPTACULO
2. Introduzca et
mango en el tuba
hasta qua el
bot6n quede en
posici6n,Aseg_rese de qua la
manguera no
est@torcida.
1oAbra la tapa del recept_cula
2_Examine la bofsa para poEvoeste instaladocorrectamante,Consulte las instrucc[onesde insta*
lacibn en ta CAMBIO DE LA BALSA
3, Examine el filtro de seguridad del motor este
instalado correctamante.Consutte las instrucciones
de instaiaci_nen LiMPIEZA DEL FILTRODE
SEGURIDAD DEL MOTOR
Bot6n del
Bot6n de
liberaci6n
r_pida det
mango
CUBIERTA
para liberar el
mango y tire del
mango hacia
arriba,
(Algunos
modelos)
Es normal qua la tapa def recept_culose desprenda
al set abierta m_s de 1onecesario_Para colocar
nuevamentela tapa, atinee las bisagras,ins_rtelas y
cierre Ia tapa
MANGUERA
PestaSade
sujecl6n
dela
Para retirar:
optima el bot6n
Para Guardar:Paraprevenir la precibnde la
mangua mientrasse guarda, dasunala manguadel
tuba de la aspiradora, Guarde la maguaen una
posicibn enroliada y flojamente de ta! maneraqua ia
tapa de la mangua no se estire
1oAlinee la pestaSa
de sujeci6n de fa
manguera y la ranura de la cubierta del
recept_culoe introduzca la manguera
en el recept&culo
basraque quede fija
en posici6n_
Para retirar: levante
el pestillo de la manguera y tire de la
manguera
manguerz
Cubierta
Luz indicadora
de rendimiento
del receptdculo
(Algunos modelos)
AlmacenamientoL_
para accesorios
"_
Indicador
de
rendimiento
(Algunos modelos)
Balsa
para polvo
PARA COMENZAR
Indieador de nlvel
de polo de la alfombra
Peligrode lesi6n personal y dar_oal
producto
, NO enchufe la aspiradora si el
interruptor est_ en la posici6n ON,
Podria causar lesi6n personalo dafio
al producto,
. El cord6n el_ctrico se mueve
r_pidamente durante el enrol?amientoo
Mantenga alejados a los nifios y
asegure espacio libre suficiente para
evitar lesiones personalesal enrotlar
el cord6n,
Pedal de
selecci6n
Pedal de liberaci6n
del mango
de nivet de pelo
de la alfombra
3_Baje el tubo desde la posiciSnvertical pisando et
pedal de liberaci6ndel mango
, NO use clavijas ubicadas arriba de
mostradores. Podria causar dafio a
los objetos cercanos.
1.Tfre del cord6n
para sacado del
recept&culobasra
tenorla Iongilud
deseadaoEl cord6n
no se enroliar_ hasta que optima la barra para enrotiarlo,
NOTA: Para reducir el riesgo de choqueer_ctrico,
esta aspiradora cuenta con una clavija potarizada,
uno de los contactos es m_s ancho que el otro, La
davija s6ro puedeintroducirsede una maneraen e!
enchufe,Si la clavija no cabe bienen el enchufe,
invi_rtala,SiaSn no cabe, Ilame a un electricista
para que instaleun enchufe corredo. No altere la
clavija de ninguna manera.
4. SeleccFoneuna altura de pe]o de la alfombra
usando el pedarpequeSoubicado en la parte poslerior de la POWER-MATETM El nivel de polo la
alfembra se muestra en el indicador. ConsulteSUGERENCIAS SOBRE EL AJUSTE DE NIVEL DE
PELO DE LA ALFOMBRA
Atenci6n: Refi,._rasea tas recomendacionesdel fabricante para limpiarsu alfombra Algunas alfombras
mrs delicadas pueden requerir el uso de la aspiradora con el agitador POWER-MATETM desconectado para prevenirque la affombrasea da_,ada,
2. Conecte el cord6n eI_ctricopolarizadoen un
enchufe de 120 vo[tios que se encuentre cerca del
piso
Seleccione una posi_
ci6n del interruptor en
el mango.
Para enrollar:desconecte la aspiradora,Sujete el
enchufemientras enrollael cord6n para impedir
daSoo fesiSncorporal por el movimientodot cord6n
Empujela barra para enrollar el cord6n el_ctrico.
OFF
FLOOR - s61oenciende el motor del recept_culo,
CARPET - enctende los motores del recept_cu!o y
de fa POWER-MATETM
Esti|o de limpieza sugerido,
Control de
Para obtener ]a major acciSnde fimpiezase recto
mienda empujar la POWER-MATETM en direcciSn
directamente opuesla a usted y jalarla en linea
recta AI final de cada pasada de regreso, cambie la
direcci6n de la POWER-MATETM hacla la siguiente
secciSn a limpia[ ContinUeasi a tray,s de toda fa
alfombra de una manera lenta y deslizante
\\
NOTA:las pasadas r&pidasy
jalonadas no
Iogranuna limpieza compteta.
Los escalones alfombrados requieren fimpieza
peri6dica. Cierre par completo et control de aspiraciSn para lagrar los mejores resultadosde limpieza.
ADVERTENCIA
Peligro de lesibn personal
El dispositivo giratofio
de la manguera permite que 6sta gire sin necesidad de mover el
recept&culo,Esto es
muy t_tilpara limpiar en
&teas pequeSas.Aseg_rese de qua la manguera no est_ torc_da
antes de jalar el recept&culo,
Tango cuidado si coloca e! recept_culo
sabre escalones. Si se cae, podria causar
lesi6n personal o daSo a ta propiedad,
Mantenga el paso de aire abierto para Iograr los
mejores resuffados de limpieza° Examine de vez
en cuando cada una de las _reas de uniSnen FUNCIONAMIENTODE SU ASPIRADORA para asegurarse de qua no ast_n bloqueadas. Desconectela
aspiradora antes de revisar.
CUIDADO
Para evitar volcaduras, nunca deje la
POWER-MATETM encendida o en posici6n
vertical Girando el mango a un lado, la
POWER-MATETM se hallar_ en una posici6n
m_s establa y ser_ m&s dific|l que se
vuelque,
Use el ajuste XLO (bajo) para obtener la major ]impieza a fondo_Par otra parte, quiz&s se requiera elevat el nive] para facilitar algunas tareas,coma par
ejemplo cuando se tratade tapetes y algunas alfombras de pelo largo,y para impedirque la aspiradora
se apague Se sugieren Ios siguientes ajustes:
HI - Pelo muy largo y suelto, tapetes,alfombras
muy acojinadas
MED - Pe]o mediano a largo,
LO - Pelo corto a mediano..
XLO - La mayoria de las alfombrasy pisos
descubiertos,.
CUIDADO
_
INI,II
ACCESORIOS DEL TUBe
iiii
i
t
NO instale ni retire el mango ni los tubas
cuando la aspiradora est_ encendidao
Esto podria causer chispas y daSar los
contactos el_ctricos.
,i,ii i
ACCESORIOS DEL MANGO
_"*-- Mango
Bot6n
del
mango
-+'U
iI
""
Tuba
superior
T
NOTA:Si tiene
instaladala
POWER-MATETM,
apague la aspiradora antesde quitar el mango de
los tubas
_i
!, Oprima el botSn
de bIoqueo y
tuego tire del
_r
mango
tartodelpare
tubaqui-
t It
1, Para retirar los
tubasde la
POWERMATE_, coT6queIos en la
posici6nvertical
de bloqueo,
Pedal de Iiberaci6n
r&pida del tuba
2. Pise el pedal de
liberaciSnr_pida del
tuba y tire del tuba
hacia arriba pare
desprenderlo de la
POWER-MATET_
m
No es necesario
retirar el enchufey
cord6n el6ctrico de
la POWER-MATE_,_
pare user los
accesorios del tuba
Si su modelo cuenta con la caractertstica adicional
de un dispositivo pare liberar el mango, opt|male
3, Coloque el
accesorio deseado sabre el
tuba.,Consults
el cuadro a continuaci6n,
2. Deslice el accesoda deseadocon
firmeza sabre el
mango. Consults el
cuadro a continuaci6n.
_,REA"A"'LIMPIAR
ACCESORIO
Entre
...............
Pisos
Pisos
Meubles* cojines* Coriinas* Escalones
descubiertos
alfombredos_Parades
Atfombras
Cepillo para sacudir
X
Herramienta
pare hendtduras
X
Cepillo para telas
X
X
X
X
X
Cepitlopare pisos
X
X
X**
° S{empre iimpie los accesorios antes de user sabre tales
X
X
" E! intemJpter de 3 pesidone_ debe estar en la posicibn FLOOR (piso descubiedo)
NOTA:Cuandoseparelos tubas, oprimBcompletsmenla
et bolbn de bloque_antesde sapararfaspar complelc,S{ sele dificultaoprimtreI botbn,
juntam_s los Iubos parealinaar elboIbnconel eriI_cioOprima el botbny daspu_ssepareIostubes
!0_
INDICADOR DE RENDIMIENTO
_3
/
DEL RECEPT.&,CULO
Active los cepillos limpiadores de orillas a
cada lado de fa
POWER-MATETM
Pase la POWERMATETM junto alas
parades o juntoa los
muebles para ayudar
a eliminar la tierra
acumufada en las orities de la atfombra
ALGUNOS MODELOS
La luz se enciende en
cualquier momentoqua
se bloquee el flujo de
aire, cuando la bolsa se
llene o cuando sea necesado cambiar el filtro
de seguridad del receptaculo.
Luz indicadora
de rendtmlenlo
del recept_culo
NOTA: Es posible qua la tuz tambi6nse encienda
ouando utilice ciertos accesorios debido a qua el flujo de aire se reduce al pasar por el accesorio,
PROTECTOR CONTRA
SOBRECARGAS
INDICADOR DE RENDIMIENTO
La POWER-MATE_' cuenta
con protecci6n incorporada
contra dafio del motor y la
correa en case de atascamiento del cepillo. Si et cepilio pierde vetocidad o se darlene,el bot6n del protector
contra sobrecargas se activa
y apaga fa POWER-MATETM
El motor del recept&culo
continuar_,funcionando.
ALGUNOS MODELOS
Cuando la unidad est'_en
, oo,onom,oo,o,o,,,oo
oo
o
la ventanilla del indicador no
est_n encendidas Cuando se
muestrancompletamente rojas ser& necesario examinar la boise para polvo y determine si est& tlena y
examinecualquiar otra _rea qua podria estaratascadaoConsulte la FUNCIONAMIENTODE SU ASPI*
RADORAo
Para corregir el pmblema: Consufle el
RECONOCIMIENTODE PROBLEMAS,
NOTA: Puede qua tea lineas se muestren en rojoa!
utilizer accesorios o si est&aspirando una alfombra
nueva Esto se debe a qua losaccesorios mismos
reducen el ftujo de aire, o a que la pelusa de la
alfombra nueva liana la bolsa muy r_pido,
Para restablecer: Oprima el bot6n del protector
contra sobrecarga,
CONTROL DE ASPIRACION
TAPAY ALMACENAMIENTO
PARA POWER-MATETM
El control de
aspiraci6nIe
permite cambier la potem
aspfraci6n
aspiraciSn
cia de aspiraci6nde la aspiradora dependiendo del grosor de la tefa o alfombra.La aspiraci6n se disminuye, pare limpiar cortinas y tapetes
tigeros,abriendo el control; pare aspirar muebles y
alfombras, el control debe cerrarse pare aumentar le
aspJracibn.
ALGUNOS MODELOS
El tuboinferior tieneun reborde en forma de °U"en
la zone de fijacibn del cord6nel6ctrico,La base tiene una ranura en forma de "U" cerca de la parte
frontal del recept_culo
El reborde permite almacenar
los tubos y la POWER=MATE
TM
con el lubo pare economizer el
espacio requerido pare su almacenamiento,Para user esta
caracteristica es necesario almacenar el recept_culoen forme vedical,
E1tubo se sale de la ranura aI
set levantado pare usarlo y se
desliza dentro de 6sta al bajarlo
pare almacenadoo
Peligrode lesiones personales
Desconectesiempre la aspiradora antes de
I|mpiar las _,reas de los cepiltos pues _stos
podrian arrancar de manera imprevista_ El
ho hacerlo,podria resultar en lestonespersonales,
11
Laaspiradora
creasucci6n
o aspiraci6n
quelevanta
latierra,
Latierraesimpulsada
a trav6s de las vias
DISPOSITIVO
GIRATORIO DE
LA MANGUERA
de fluio aire hasta la bolsa per una r&pida corrienle
de aire La bofsa para polvo permits el
flujo de aire, pero atrapa la tierra
Para Iograr los mejores resuEtados
de limpieza, mantenga abiertas las
vfas de airs Examine peri6dica ,,_
mente las &reas indicadas con //'_
asteriscos para asegurarse ,/_#/"
de que no est6nbloquea /,_Y
das Desconecte del
.,,_oY
El dispositivo giratorio de
l
/
6sta gire sin necesrdadde
mover et recept6cu!o,Esto
a manguera
permlte
queen
es
muy 0til para
limpiar
_reas pequefias,Aseg0rese de que la manguera no
est6 retorcida antesde jalar el recept_culo,
revts_
Bolsa del
montaje rojo
CAMBIO DE LA BOLSA
La bolsa debe cambiarse seguido para lograr los
mejores resuflados de limpieza_El indicador de rendimiento se encender,_cuando sea necesario cambiar la bo}sa o si se bloquean las v}as de fiujo de
aire. NOTA:Consutte la PIEZAS Y
CARACTERISTICASpard determinar el Nc' de _a
bolsa°
t
,.=_
6. Levanteel montaje
rojo_
7. tnstate la bolsa en las
_anurascome se muestra
en las ilustraciones,
empujandohacia abajo basra
que la pestafia de cart6n
quede bloqueada en posicibny tosorificios est6n
aiineadosDebtsel extreme posterior de 19bolsa
hacia abajo
1. Desconecte et cord6n
el6ctrlco de la clavija de
la pared.
2. Tire del pestilIo de la
tapa hacia fuera y hacia
arriba; tuego levante la
tapa del recept&culo
BeBaje ta cubierta del recept_culoy cierre el pestilto
9. Conecte et cord6n el6ctrico en la cfavija de la
pared,
3. Oestrabela pesta6a de
cart6n del montaje rojo de
la bolsa empujandehacia
afuera y
tirandohacia arfiba
!
CUIDADO
IH'
H'HIIH'II
NUNCA REUTILICE UNA BOLSA PARA
POLVOoLos materlales muy fines, tales
come desodorantes para alfombras,talco
facial, polvo fine, yeso, hollin, pelusa de
alfombras nuevas,etc. pueden afascar la
bolsa y causar que se rompaantes de que
est6 Ilena. Cambie ta bolsa m_s seguido
cuando aspire este tipo de materiales.
4oSaque la boisa del montaje rojo
5oExamine y timpie elfiltro de seguridad del motor.
El montaie rojo de ta bo_sase inclinar_hacia adelante despu6s de que retire la bolsa. Esto impedir_que
la tapase cierre antes de instalar una bolsa nueva.
iiiii i i
12
if1
,
IIIHJ
jlllllll i
_1111
Existen
dos_tresdeseguridad
paraelmotor:
1.unfiltrooscuro de hule espuma incorppradoen el marco rojo y
2. un filtro e[ectrost_ticoblanco tendido sobre el lade posterior del filtroescuro
Esios filtros deben verificarse cada vez que se cambie la bolsa, El filtro oscuro de hule espuma se puede lavar
de acuerdo con las instruccionessuministradasa continuaci6n, pete el fittro blanco se tlene que cambiar cuando
est6 sucio
3oDespegue el filtro
blanco del filtro
oscuro de hufe
espuma come se
muestra. Cologue un
filtro blanco nuevo
sobre el filtro oxcuro,
alineando las
muescas del filtrocon
las patas del marco
Peltgro de cheque el6ctrico
No opere la aspiradora sin el filtro de seguridad del motor. Asegfirese de que el flltro
est6 seco e instalado adecuadarnente para
irnpedir que el motor falle y/o que se produzca un cheque el_ctricoo
i
1. Desconecteel
cordSnel6ctrico de
la clavija de Ia pared
y retire la bolsa
Filtro
electr°s_c_
_
Filtro oscuro
de hule
espuma
Los filtros pueden adquirirse per No. pieza
4369971 en cualquier Unidad de Servicil de
Sears, 20-66885 en la rnayoria de las teindas
Sears, o per tel_fono, gratis, al 1-800-366-7278
(operadora en ingles) o 1-800=659-7084(operadora en espa_ol)_
2_Retire el filtro de
segurJdadcorno se
muestra en la ilustraci6n,
FILTRO OSCURO DE HULE
ESPUMA
kV
Este filtro y el marco pueden lavarse en agua
jabonosa tibia;tuego se deben eniuagar y secar.
NO limpiar en tavadera de plates ni io instale
cuando est_ hfirnedo,
4. Reinstale el filtro
en el recept_culo_
5. lnstale la bolsa
FILTRO BLANCO
ELECTROSTATICO
Este fittro se tiene que cambJarcuando est6 sucio
Debe carnbiarse peri6dicamentesegOnlas eondiciones de use El filtro NO se puede lavar pues
perdieria su capacidad para atrapar potvo.
NO USE LOS ACCESORIOSSI ESTAN Me JADes.
1. Desconecteel cordon electrico de la clavija de la
pared NO choree agua sobre la aspiradora.
2, Limpie el exterior con un traposuave y limpio, que
ha side exprimidodespu6s de remojar en una soluciSnde agua y detergente tlquido ligero Seque el
exterior con un trapo seco despu_s de limpiar
Los accesorios que se utilicenen ,_reas
suctas, debajo del refrigerador,no deben
usarse en otras superficies sunantes ser
lavados, Podrian dejar rnarcas,
3. Limpie ta superficieexterior del recept&cu]oy de
los accesoriospara reducir la electficidad est_ticay
la acumulaci6nde polvo
13
Siempre
deber&n
seguirsetodaslasprecaucionesdeseguridad
al iimpiary darservicioa
ADVERTENCIA
la POWER-MATE_,L
Peligrode cheque el_ctrico o lesibn corporal
Desconecte la unidadantes de limpiarla o
darte servicio. De Io contrario podria producirse un cheque el_ctrico o causar
lesibn corporal si la aspiradora arranca de
manera imprevista.
Empuje ha¢ia
adentro y gire
1, Retire ta cubierta
de la bombilla ejerciendo presi6n hacia
adentro y tevantando
ambos costados come
se muestra,
2. Empuje la bombilla hacia
adentro y girela en direcciSnopuestaal sentido de
las manecillas del reloi
para retirafla
3. Cambie la bombilia t_sta
no debe exceder 15 varies,
Cierre la cubierta de ta
bombilla hasta que quede
bien cerrada
NOTA: Consulte ]a P1EZASY CARACTERDSTICAS
para determinar el N° de la bombilta
3. Voltee ta
POWER-MATETM
Para quitar la
cubierta, inserte
eldestorniilador
en tas pestaSas
de la cubierta de
ambos costados
y gire]o para liberar las pestaSas,
Desconecte la aspiradora. Examine [recuentemente el cepi_loy las &reasde soporte del mismo
de ta POWER-MATETM y elimine rode cabello, hilo y
pelusa acumulada.Si la acumuJaci6nes excesiva,
separe la POWER-MATETM del tubey realice los
pasos a centinuaci6n,Las instrucciones
tambi_n
aparecenbajo la cubierta de la bembilla
PARA RETIRAR LA CORREA:
Pesla_a
1, Retire ]a cubierta
de la bombilla y la
bombilla come se
indica bajo CAM.
BIO DE LA BOMBILLA.
2, Retire los tornillos de la POWERMATETu
/1
t4
4. Voltee la
POWER-MATETM
hacia arriba,,
Optima la guia de
liberaci6n y baje
el dispositivo giratorio, Incline la
cubierta de atr_s
hacia adelante
hasta que se desprenda.
PARA CAMBIAR LA CORREA:
5, Inserte el
destorniHador
cuidadosamenle
en cada soporte
del cepilFoy
gtrelo para retirar
et cepillo de la
base.
Soporte
del cepillo
ii
I. Reinstale las arandelas y los soportes del cepiiJo
en el ensambfe,
6, Retire la banda
desgastada
7, Retire los
soportes del cepiliD;examine y lirapie las &teas de
soporte dei cepillo
En la ENSAMBLE
DEL CEPILLO se
proporcionauna
ilustraci6nde lode
el ensamble deK
cepillo
2. Instate una
correa nueva
sobre el
imputsordel
motor y tuego
sobre la rueda
dentada de}
cep[lto,
tmpu/sor
_
/
Soporte
(]el cepitlo
motor
_ Cepilto
Rueda dentada
cel ceplllo
NOTA:Consulte la PfEZAS Y CARACTERISTICAS
para determinar el N°, de correa.
3. Instate lossoportes
del cepiliosobre ta
base Aseg_rese de
que los soportes no
est6n invertides,
4, Alinee ta
parle frontal de
fa cubierta con
la base,.
CoIoque ta
cubierta sobre
el borde
delantero de la
base come se
muestra.
Cubierta
Base
5ofncline lacubierta
hacia arras Ejerza
presi6n firme sobre
la cubierta basraque
Ias pestaSaslaterales queden f_jas
en posici6n,Instale
los tornilrosde ta
cubierta, la bombiFla
y la cubierta de la
bombflla
15
PARA CAMBIAR MAZO DEL
CEPILLO:
ADVERTENCIA
1. Retire la cubierta,correa y ensambJedel cepillo
de la POWER-MATETM Consulte"Para retirar la correa" bajo CAMBIO DE LA CORREAY LIMPIEZA
DEL CEPtLLQ.
Petigro de choque et_ctrico o lesi6n corporal
Desconecte la unidad antes de limpiarla o
dafle servicio, De Io contrario podrta producirse un choque el_ctrico o causar
lesi6n corpora] si la aspiradora arranca de
manera imprevista,
2. Retire la soporte del cepillo, arandelas, torni!los,
tope del cepillo, ruede dentadadel cepillos la topes
de _asensamble del cepillo
3. Arme el ensambredel cepillo. Para alinear los orificios de rostornillosdel mazo, la rueda dentada y el
tope del cepillo, asegOresede que la perle de la
cepitlo de1tope det cepilloest_ atineada con ias
cepiilos del mazo del cepii!o.
PARA EXAMINAR EL CEPILLOS:
4. Cambie la correa, el ensambie del cepillo, la cubierla de la POWER-MATETM, Ia bombitla y la cubierta de la bombilla. Consuite"Para cambiar la
correa" baio CAMBIO DE LA CORREAY LIMPIEZA
DEL CEPILLO.
estSn desgastados
Cambie
dei
hasta el mazo
hive1de
las
barras
de
cepitto
cuando
soporte de ra base
Barra de soporte
de la base
Washer
Arandeta
Agitator Brush Sprocket Flange
Brida de la rueda detada
del cepillo
Agitator Brush Sprocket
Rueda detada det cepitlo
Brush
Tope det cepillo
/€
Agitator
Brush
Support
Soperte
Screw
delc
Tornillo
Agitator Brush
Support
Soporte
del cepillo
Brushes
Cepi/Ios
Agitator Brush Dowel
Barra del batidor
/
Screw
Torniflo Washer
Arandela
16
Consulte
este cuadro para encontrarsofuciones que ustedmismo puede reafizar cuando tenga probremas
menores de rendimiento. Cualquier servicio que necesite aparte de otros descritos en este manual tienen que
set hechos per un represetantede servicio autorizado.
I
iiii
I
I
_1,11
ADVERTENClA
"1 "-''=-'=
ii
, i
,
i................................................................
r'e,gro
docheque
e, ctr co
Desconecte la aspiradora antes de darle servlcio o limp|aria° De 1o contrario podria
producirseun cheque el_ctrico o causar lesibn corporal.
La asptredora
no arranca
1, Est_ descone[_tada
I,
Conectebien. optima selectorde encendidol
apagedoala psslci6nON
2. Reslablezcael corlacireuitos
o eatableel
fusible
3, Vuelvaa conectarlos extremesde ta manguera.
(p_gina5)
4, Utopia el cepHFo
y los aoportesde _.ste Luegs
reetablezca,(p_glnas 14_15)
2, Cortacircuitos be!ado e fusible quemado
an el tab!ere de aervldo de |a reaideoda
3. Conexiones eric!rices de la manguera
euelias
4. Protector contra sobreeargas botado en
la POWER-MATE TM
No aspire
satisfacteriamente
14
2,
3
4,
5.
6.
7_
8
9
10,
La aspkadora errancy,
pare aeapaga
1,.
2.
3.
4.
Botsa pare potvo _lena o a|ascada
VIes de fiujo de sire ataacadas
FiHro de seguHdad del motor sucio
Ajuste incon'eoto de hive] de polede
la alfombra
Control de aspiraciSn ablerto.
Manguera rote,
Cepillos de ta POWER-MATE TM desgastodos
Cortes desgestada o role
Cepit_o o soportes de _ste eucios
Tspa del recept_cuto abiert_
S,
6.
7.
8,&g,
CambieIs boise,(p_gina 12},
Limpieleavlasde fiujode eke,(p_gina 12)
Utopia et 51!re,(p;_gina13).
Ajusteel hive1,(p_gina9)
Ajuste e! controi, (p_g|ne 11).
Camble _a manguera,
Carnbte _eecepH!os, (p_gina 16}.
Consulle CAMB!o DE LA CORREA Y LIMPIEZA
DEL CEP!LLO. (p_ginas 14, 15)
10. Cierre bien !a tape
i
1
Conexionea elSe!rices de la manguera s
de la lapa
2, Protecto_' conlre sobrecargas de la
POWER-MATE TM betide
Examine }as conexiones el_ctr[cas, vuelva a con-
ectar los exb'emos de lamanguera, (p_gina 7).
2, Retire cualqoier objeto atorado o aleseado,
luego res!ablezca S| la _pkadors arrenca pore
se vuelve a apagar, timpte st cop|lie y toe
soportes de _ste, luego reslablezca,
(p_,gir_es14, 15).
3, Cambie Is boise pare polvo, deebloquee lea vies
de flujo de airs (p_gina 12), Espere 20 minutes
pare qua el motor se en[_Ie y se re_tablozca
autom_i!icamen!e
3, Protector
desebrecarga
betide
enelrecept_cuto
La POWER-MATE TM no
fLIncione cuando eat_
|nsiatada_
I
Indfcador de r_nd!mtento
deroje, algunosmedalos,
t.
2
3
4,
La esptradors levanta !spates
-o- es dificfl empujar
a POWER-MATE TM,
1
Ajua!e incorrecto de nivel de pelode
la atfombra
2_ AspS'acOrndemaslado paten!e,
'f, Ajuste el nive_, (p_gina 9).
La luz no funclona_
1. BomblHa fundida,
I.
E_cerdSn no se onrolte.
1. Cordbn e]_ctfico eucio
2. Cordbn a!aeeade.
t. LImpie e! cord6n et_ctflco.
2. Tire del cord6n ydespu6s enrbllelo,
La asplradora deja marcas
en la alfombra,
1. Es_Io de llmp{eza tncorrecta
1o Consulto SUGERENCIAS
(p_glna 9).
Conexionesde |aPOWER-MATE
desconectadas
2. C_ee desgastada o rots
3. Cepillo o soportes de _ste sucios
4, Protector can|re sebrecargas de le
POWER-MATE TM boiado
8o_eepare polvo Hens o atoscada
Filirodesegur|daddelmotorsucio
Vies de flu_ode sire ataecadas
Clertos accesorioe
17
1,
_=
2,&3
Conecte blen.(p_gina 6)
Cone_lteCAMBIODE LA CORREAY LIMPIEZA
DEL CEPILLO,{p,'_gtoas
14, 15)
4_ Examine et Areade!cop|liepare determinersl
hay aoumulactan
exceslvae bloqueode pelusa
Lfmpte_f ceptlloy sua sopor_es,luego
res!ab_e_ca,(p_gtnas14, 15)
1.
2
3.
4,
Gamble !a boise. (p_gIna 12)
Limpiealfifiro,(p_gina13)
Desbloquee los vies de fl_jo de site (p_g!na 12)
Este es norms! Ls toz debe apagarse al quilar
ta herramienta
2o Abra el con!mf de esplradSn. (p,'_gIna 1 I}
Gamble _abomb{lla, (p_gina I4},
PARA ASPIRAR,
Get'it fixed, at your home or curse
For repair of major brand appliances in your own home...
no matter who made it, no matter who sold it!
1-800-4-MY-HOME
®
Anytime, day or night
(1-800-469-4663)
(U.S,A. and Canada)
www.sears.com
www.sears.ca
For repair of carry-in products like vacuums, lawn equipment, and
electronics, call for the nearest Sears Parts and Repair Center.
1-800-488-1222
Anytime, day or night (US.Ao only)
www.sears.com
For the replacement parts, accessories and owner's manuals
that you need to do-it-yourself, call Sears PartsDirectSMt
1-800-366-PART
6 a°m,- 11 p.m, 7 days a week
(US,A. on|y)
(1-800-366-7278)
v_,t,sears.com]pa rtsdirect
To purchase
or inquire about a Sears Service Agreement
or Sears Maintenance Agreement:
1-800-827-6655
(U.S.A)
1-800-361-6665
7 a,m. - 5 pm., CST, Mono- Sat.
(Cadada)
9 am. - B p.moEST, M - F, 4 p m Sat.
Para pedir servicio de reparacl6n a
domicilio, y para ordenar piezas:
1-888.SU-HOGAR sM
Au Canada pour service en fran_ais:
1-800-LE-FOYER _c
(1-800-533-6937
www.sears ca
(t -888-784-6427)
• ili!ii ii'!iilL
© Sears, Roebuck and Co,
® Regislered Trademark I
Trademark I
Service Mark ol Sears, Roebuck and Co
® Marca Registrada / "rMMarca de F_,brica / sM Marca de Servfcio de Sears, Roebuck and Co
Mc Marque de commerce
/ Mo Marque
d_pos_e
de Sears, Roebuck
18
and Co