1
Owner's Manual
Manual Del Propietario
VacuumCleaner
Aspiradora
Model, Modelo
116.31912
116,31913
CAUTION:
Read and follow all
safety and operating
instructions before first
use of this product.
Y
CUIDADO:
Lea y sigue todas las
instrucciones
de operacion
y seguridad antes del uso de
este producto.
Sears, Roebuck and Co., Hoffman Estates, IL 60179 U.S.A.
www.sears.com
Printed in Mexico
Part No. CQ1 ZCHA1 QUQ(D-KCQ1ZCHAZQUQ
Imprime aux Mexique
iiiiiiiiii
iili
iiiii;iiiiiil;i;iii
ili;i i!!!!i!iiiiiiiiiiiiiiiiiiiii!!
i i;i
i_i_i_i_i__iiii!;;;;!_____;_________!!__!!!_!__________i_;__i;!_iii_i!i_!!!!!!i!i!i!i!!ii_!!!_!_!_!_!_!_i_!i!__;_i!ii__
;ilililili;
iiiiililiiiiiii;!iii!i
;!iii;;iii!!i
ii!ii_!i!i!i!iiiiiiiiiiiiiii_iliiiiii_iii_i_iii_ii_iiiili;
! !!!!!!i!!!!!iil;;iiiiii!;!;!i!i!i!i!i!i!iiii!i!i!i!iii!i!iill
i!iiiiiiii;;;;iiiiii!!! ii1
Before Using Your New Vacuum ........
2
Kenmore Vacuum Cleaner Warranty .... 2
ImportantSafety Instructions ...........
3
UprightVacuum Cleaner Parts and
Features ............................
4
Assembly Instructions ...............
5-6
Operating Instructions .................
Vacuuming Tips ....................
Performance/Safety Features .......
Vacuum Cleaner Care ...............
Vacuum Storage ...................
Cleaning Exterior and Attachments
Dust Bag Changing .................
Filter Changing ....................
Light Bulb Changing .................
Agitator Cleaning ...................
Clog Removal .....................
6
7
7
Releasing the Handle .................
ON/OFF Switch .....................
Pile Height Selection and Setting ........
Agitator On/Off Selector ..............
Attachments .....................
Attachment Use Chart ...............
7
8
8-10
11
11
12-13
14
14
14
15
16
17
17
18
.....
Troubleshooting .....................
Requesting Assistance Or Service .....
19
20
Nr
Please read this guide• It will help you assemble
the safest and most effective way.
and operate your new Kenmore vacuum in
For more information about vacuum cleaner care and operation, call your nearest Sears store.
You will need the complete model and serial numbers when requesting information. Your vacuum's model and serial numbers are located on the Model and Serial Number Plate.
Use the space below to record the model number and serial number of your new Kenmore
vacuum.
Model No.
..............................................................
Serial No.
Date of Purchase
Keep this book and your sales check (receipt) in a safe place for future reference.
lililiiiiii!i!iiiiiiiiiiiii!iiiiiiiiii
iiiiiiii!!!!!iii_iiii!i!i!i!i!ililililiiiiiiii!iiiiiiiiiiii!iiiiiii!iiii!ililililliiiiiiii
i ii!ii
!_!_!i!i!_i_i_i_i_i_ii_ii_!ii_i_i_i_!_i_ii!i!_!iii!ii_i_i_i_i_i_i_i_i_i_i_i_i_i_i_i_iiiii_i_iiiiii
iii!iii!i!i!i!i!i!l_llii_iiiiiiiii_,_i_i_i_i_i_!i!i
LIMITED ONE YEAR WARRANTY
ON KENMORE
VACUUM
CLEANER
This warranty is for one year from the date of purchase, and includes only private household
vacuum cleaner use. During the warranty year, when this vacuum cleaner is operated and
maintained according to the owner's manual instructions, Sears will repair any defects in
material or workmanship free of charge.
This warranty excludes vacuum bags, belts, light bulbs, and filters, which are expendable
and become worn during normal use.
parts
For warranty service, return this vacuum cleaner to the nearest Sears Service Center in the
UnitedStates.
This warranty applies only while this product is in use in the United States• This warranty gives
you specific legal rights, and you may also have other rights which vary from state to state.
Sears, Roebuck and Co., D/817 WA, Hoffman
Estates, IL 60179
2
Your safety is importantto us. To reduce the risk of fire, electrical shock, injuryto persons or damage when using your vacuum cleaner, follow basic safety precautions
Including the following:
Read this manual before assembling
using your vacuum cleaner.
or
Use your cleaner only as described in
this manual. Use only with Sears recommended attachments.
TO reduce the risk of electrical shock Do not use outdoors or on wet surfaces,
Disconnect electrical supply before any
servicing or cleaning. Failure to do so
could result in electrical shock or personal injury.
Always turn cleaner oft before unplugging.
Do not unplug by pulling on cord. To
unplug, grasp the plug, not the cord.
Do not use with damaged
cleaner is not working as
been dropped, damaged,
dropped into water, return
Service Center.
cord or plug. If
it should, has
left outdoors, or
it to a Sears
Do not pull or carry by cord, use cord as
a handle, close door on cord, or pull cord
around sharp edges or corners. Do not
run cleaner over cord. Keep cord away
from heated surfaces.
Do not leave cleaner when plugged in.
Unplug from outlet when not in use and
before servicing.
Do not allow to be used as a toy. Close
attention is necessary when used by or
near children.
Do not handle plug or cleaner with wet
hands.
Do not put any objects into openings,
SAVE THESE
Do not use with any opening blocked;
keep free of dust, lint, hair and anything
that may reduce air flow.
Keep hair, loose clothing, fingers, and all
parts of body away from openings and
moving parts.
Do not use cleaner without dust bag
and/or filters in place.
Always change the dust bag after vacuuming carpet cleaners or freshener, powders and fine dust. These products clog
the bag, reduce airflow and can cause
the bag to burst. Failure to change bag
could cause permanent damage to the
cleaner.
Do not use the cleaner to pick up sharp
hard objects, small toys, pins, paper
clips, etc. They may damage the cleaner
or dust bag.
Do not pick up anything that is burning or
smoking, such as cigarettes, matches, or
hot ashes.
Do not use cleaner to pick up flammable
or combustible liquids (gasoline, cleaning
fluids, perfumes, etc.), or use in areas
where they may be present. The fumes
from these substances can create a fire
hazard or explosion.
Use extra care when cleaning on stairs.
Do not put on chairs, tables, etc. Keep
on floor.
You are responsible for making sure that
your vacuum cleaner is not used by anyone unable to operate it properly.
NSTRUCTIONS
Proper assembly and safe use of your vacuum cleaner are your responsibilities. Your
cleaner is intended only for household use. Read this Owner's Manual carefully for
important use and safety information. This guide contains safety statements under
warning and caution symbols. Please pay special attention to these boxes and follow
any instructions given. WARNING statements alert you to such dangers as fire, electrical shock, burns and personal injury. CAUTION statements alert you to such dangers
as personal injury and/or property damage.
1
_ii_.i.!.!.i_._i_i_iTi.i...i_i_i_i_i_i_i_i_i_._i_i_i_Ti_i.i_iiT.!_%_i_i_i_i_i_i_._i_i_i.._._.i_iTi.i_i_i.i._._._...i
.......................
.'"i .................
ii''_'_'''°"
....................
i.............................
iiiiili..........
iii!i!_i_!_i_!iiiiiiiiT!!!_i_i_!!i_i_iiiiiii_i'
'-!i!!!_iiiiiii
_
::_::::::::_:
_:_::%_:;:;:::::::::;:::::::::_::::_:::::::::
::::;:::_::::::::::;:::::::::::::::::_:::..,.,,:, :,.,.::,......_.:.:.:,:.:¢,_:.:_::: :; :>_.:.:,>:+:<:_ .:,,__..:.:,:., :..:_.__.:._._.::.:.:+:+ _:_:+::;;_::::::_::::;:::::::::::::::::::::::::::::::::::::::::_::::::::::::::::_::::::::::_;
_i_ii:_i:ii_i
_: _::_:::_:::::" :::_:""" _::_:_i:iiiii_ "
|::::::::::_:::::;::::::::::::::::::
:::::::::
:
'
"
:::::::::::::;;:::;::::;:::::::::::;:::::::::_:_:_:::::::::::::::::::::::::;::::_
_ :_ ::;
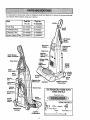
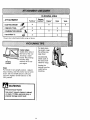
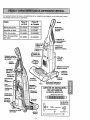
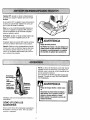
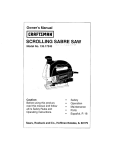
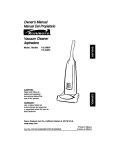
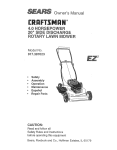
It is important to know your vacuum cleaner's
use. Review these before using your cleaner.
Item
:
:::
::::_
"
;:: :::::::;:_:::
:_::::_:::_:_:_'_:_::,
.....................
_ii!::!ii_::::_:_:_:_::_::::!:
::_
I
:::::::::::::::::::_::::::::::::;:::::::::::::::;:;:::::::::::::::::;;::::::::::::;;:::::_::::::::;:;:::::::::::::_::::_:::::::::
parts and features to assure its proper and safe
Part No.
In U.S.
Part No.
In Canada
Dust Bag
20-50690
20-50690C
Headlight Bulb
20-5248
20-5248C
Exhaust Filter
20-86889
20-86889C
Motor Safety Filter
20-86884
20-86884C
Switch
(Soma
Models)
Bag Cover
Performance
Indicator
(Some
Models)
Bag
Exhaust
Filter Cover
Quick Release
Exhaust Filter
Agitator
On/Off
Selector
Lower
Carry
Crevice
Tool --
Release
Pedal
Base
i _J _lReady-to-Use
Agitator Overload
Reset Button
Headlight
Telescoping
Wan1
I
Swivel
Hose
Dusting
EXTENSION HOSE KITS
SOME MODELS
Comb_aUon
B_sh
Extension
Motor
Protector
Handle
Release
!((II[{U({{lU(IHIII
_F
SOME MODELS
(_--
ModeVSerlel
Numbe_
Adaptor
loot BrUSwhan
d
Agitator
(Underneath)
Hose
Handl!Mate"
U
Jr.
E
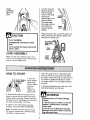
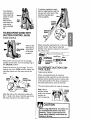
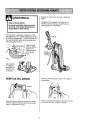
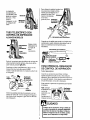
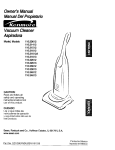
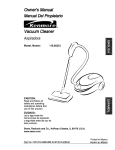
Position the handle as shown in the illustration below.
WARNING
Slide the handle into the opening at the top
of the vacuum.
Electrical Shock Hazard
Do not plug into the electrical supply
until the assembly is complete, Failure
to do so could result in electrical shock
or injury.
Before assembling vacuum, check the
PACKING LIST on the cover of the separate
Repair Parts List. Use this list to verify that
you have received all the components of
your new Kenmore vacuum.
e
_
tape located
below the dust
cover/filter cover
Remove
the
on
the motor
case•
_._._
Handle
Screw
Hole
Attach stretch hose
end to nozzle as
shown.
HANDLE ASSEMBLY
Insert the screw so it passes through the
handle into the vacuum.
Screw
Remove the screw located just below the
top edge of the back of the vacuum•
Begin to tighten the screw with your fingers•
It may be necessary to adjust the handle
slightly.
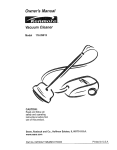
Lock the cord into
Using a
screwdriver,
tighten the
place by forcing it
into the locking
notch on the body
of the quick
release upper cord
hook as shown.
screw.
This helps keep
the power cord out
from under the
vacuum cleaner
Power
agitator.
Wrap the power cord around the upper and
lower cord hooks and lock the power cord
plug onto the power cord.
Do not overtighten.
Overtighteningcould stdp the screw
holes.
Upper Cord
Do not operate the cleaner without the
screw in place.
Power
CORD ASSEMBLY
Lower
Make sure the quick release upper cord
hook is in the upright position. Remove the
wire tie from the power cord.
Cord
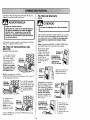
HOW TO START
Rel_s=
Upper Cord
Hook
other. This plug will fit in a polarized outlet
only one way. If the plug does not fit fully in
the outlet, reverse the plug. If it still does not
fit, contact a qualified technician to install
1. Turn the
quick release
the proper outlet. Do not change the plug in
any way.
upper cord
hook to either
side and
down to
release the
4. Plug the polarized power cord into a 120
Volt outlet located near the floor.
l
power cord.
2. Release the power cord plug from the
power cord and pull the cord off the quick
release upper cord hook. Check to be sure
the power cord is still locked into the lock in
the quick release upper cord hook.
WARNING
Personal Injury and Product Damage
Hazard
, DO NOT plug in if switch is in the ON
_osition. Personal injury or damage
;'ould result.
3. Check to see if the cleaner has bag
installed. See DUST BAG CHANGING.
• DO NOT use outlets above counters.
Damage from cord to items in surrounding area could occur.
Note: To reduce the risk of electric shock,
this vacuum cleaner has a polarized plug,
one blade is wider than the
6
iiiiiiiiiiiiiiiiiiiii!iiiiiiiii!i!iiiiiiiii
i iiiiiiiiii
ii Eiiii!i!i
N i iiiiiiiiiiiiiiiiiiiiiiiiiiiiiiiii!iiiiiiiiiiiiiiiiii
i i!!!!
!ii! iii!ii!!i!!!i!!!!!!!i!iiiiiiiiiiiiii!!i
iiiiiiiiiiil
iiiiiiiiiiii!!!!!!!!!ili!
iiiiii!i!i!iiiiii!iiii
_l_i_:_l_;_i_;_ii_!;_i_;_i_i_i!ii_i_i_;_i_ii_i_i_
i !!!1
iiiii!iii!!!i iiiii!!iiiiiiiiii
i !! !!iiii!!ii
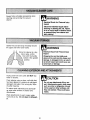
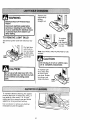
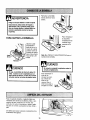
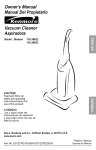
Release the handle by pressing down on
the handle release pedal with your foot and
pulling back and down on the handle with
your hand.
Note: The agitator will not rotate if the vacuum cleaner is in the upright position.
Handle
Ro_eue
Pedal
_i_i___Ez_i_iiiii_iiiiiiiiiiiiiiiiiiii!iii
HANDLE MOUNTED
SOME
MODELS
To start the vacuum cleaner, slide the
On/Off switch from the OFF position to the
ON position. To stop the vacuum cleaner,
slide the On/Off switch to the OFF position.
Note: This switch operates the suction
motor only. For the agitator to rotate, the
agitator On/Off selector must be in the ON
position and the handle must be released
from the upright position.
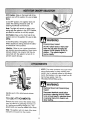
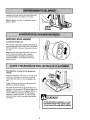
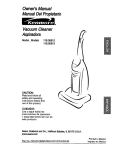
To select a pile height setting:
Turn off cleaner. Select a pile height setting
by tilting the cleaner back until front wheels
are lifted slightly off the floor.
Slide the adjustment
ling.
Height
Adjustment
Lever
lever to the correct set-
There are four (4) pile height settings on the
vacuum. Use the LOW setting for most carpets and bare floor cleaning (with agitator
OFF), and the HIGH setting for very long
pile carpets like shag carpet, scatter rugs,
etc. Use the other settings as needed for
carpet heights in-between.
CAUTION
Do not allow vacuum cleaner to remain
in one spot for any length of time when
the agitator is turning. Damage to carpet may occur.
i!ii!iiiliiiiiii
ii!!iliiiiiii
iiiiiiiiiiiiiiii
Eiiiiiiiiiiii!!!i!!i!iiiiiiiiiiii!i!i!i!il
lii iiiiiii! !iiil _!i!_ii!_!_ii!iiii_i_i!ii!@!i!_!_!_i_i_i_iiii_il!_ii!i!i!iiii!i_i_ii_iii_i!!%_!_i!_!_iiii
i iil i iii_iiiiii_!iii_;_;_!_!i_i!i!i!_!i!i!!!!_!_!_!_i_iiiiiiii_!_!_!_!!!!!_i!!!!_iiii_i!i_@_!_!_i_!_!_ii!i!_!_!i!i!i!i!!iiiii
i {{iiiiiii}iii!iiiii!Siiiii}iiiiiilJ
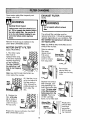
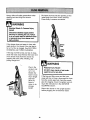
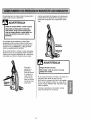
OFF Position: Step on the back half of the
pedal to turn off the agitator for use on bare
floors.
In the OFF position, the agitator does not
rotate. This setting should be used for
cleaning hardwood and tile floors.
Note: The light will remain on when vacuuming with the agitator in the OFF Position,
provided the vacuum is not fully upright.
ON Position: Step on the front half of the
pedal to turn on the agitator for use on carpeting,
In the ON position, the agitator will turn.
When carpets are being cleaned the selector should be in this position.
Attention: Refer to your carpet manufacturers cleaning recommendations.
Some more
delicate carpets may require that they be
vacuumed with the agitator turned off, to
prevent carpet damage.
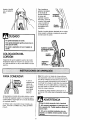
Cl_vlce
Tool
Dusting
- Stretch
Hose
Combination
Brus
Hose
Collar
!
r,f WARNING
Personal Injury Hazard
DO NOT place hands or feet underneath the unit when changing the
Agitator On/Off Selector to the On
position. The agitator begins to
revolve rapidly.
NOTE: The motor protector may open when
using attachments or when cleaning new
carpet, due to reduced airflow by the attachments themselves or by new carpet fuzz filling the bag quickly. See the
TROUBLESHOOTING
section.
rf, WARNING
Electrical Shock And Personal Injury
Hazard
Identify each ofthe
above.
attachments
shown
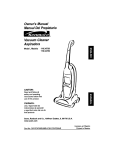
TO USE ATTACHMENTS:
Remove the lower end of the stretch hose
from the cleaner by grasping the hose collar, twisting and pulling straight out. The
attachments can now be added to the hose.
Note: The agitator will not rotate if the hose
has been removed from the nozzle.
Disconnect electrical supply before
servicing or cleaning the unit. Failure
to do so could result in electricalshock
or personal injuryfrom cleaner suddenly starting.
To achieve maximum reach
with the attachments, add the
crevice tool to the end of the
The attached
hose swivels to
make cleaning
easier in every
direction.
Remove the
hose from the
wand by inserting and
twisting slightly.
Hose-
Hose
Clip
Suction
Control
hose clip by
pulling straight
out.
TELESCOPING WAND WITH
SUCTION CONTROL SLIDE
SOME
MODELS
Wand,
Crevlcl
Tool
"Raised
Crev/ae
I Tool
,Telescoping
Wand
Remove the
telescoping
wand from
its storage
position.
When using the dusting brush or the combination brush, they may be attached
directly to the wand or placed on the end of
the crevice tool.
Dustlng Brush
Remove the crevice tool from its storage
position in the wand. Turn the locking ring to
the UNLOCK position.
Extend the wand to its full length. Turn the
locking ring to the LOCK position. Attach the
extension wand onto the open end of the
hose.
Lower_
SucUoo
Wand----'_
Control Slide
(Some Models)
Combination
Wand
_A_
I1_
Brush (Some
\ \
!
Models)
_._
Brush
TO OPERATE SUCTION CONTROL SLIDE
Telescoping
Wand
When using attachments for cleaning
draperies, small rugs with low pile and other
delicate items, twist the suction control slide
to the open position. This lever is located on
the telescoping wand, close to the hose.
This will reduce suction for ease of cleaning.
I
_.\L,°cklngRIngl
_lnlock
"_
Upper
Wand
Align the tabs on the extension wand with
the "J" slots in the hose. Push the wand into
the hose and twist to the right to lock.
Note: Return
suction control
slide to the closed
position for
normal cleaning.
Suction
Control
Slide
CAUTION
When using attachments, be careful not
to overextend the stretch hose when
reaching. Trying to reach beyond the
hose stretch capability could cause the
cleaner to tip over.
TO STORE A'I-FACHMENTS
EXTENSION HOSE
SOME
Remove dusting brush or combination
brush. Snap into appropriate storage location.
MODELS
Some models include an extra hose which
connects to the stretch hose on the vacuum
for a longer cleaning reach.
Remove crevice tool from the wand by twisting. Lay aside.
Unit Hose
,_k
Extension Hose
Remove the extension wand from the hose.
Twist the wand to the left and pull from the
hose end.
Insert the two tabs on the end of the
extension hose into the two "J" shaped slots
on the unit hose and twist to connect.
Wand
All attachments and the telescoping wand
can be attached to the open end of the
hose.
Locking
FLOOR BRUSH AND WAND:
Rlng E_
SOME
Upper
Wand
MODELS
Some models have an extra brush and wand
for cleaning bare floors. Twist one end of the
adaptor into the floor brush and the other
end into the straight wand. Connect the
straight wand to the telescopic wand and
then to the vacuum hose or extension hose.
Unlock the wand by turning the wand locking ring to the UNLOCK position.
Slide the lower wand into the upper wand.
Turn the wand locking ring to the LOCK
position.
Place the crevice tool down into the compressed wand. Snap, into the appropriate
storage ]ocation.
UI
w..dJ
Reinsert the hose fully into the opening on
the lower body from which it was removed.
Press firmly to assure connection.
WARNING
Personal
When using the regular hose or with
the extension hose attached, the
cleaner should be on a solid surface
on the same level or below the level of
the user's feet. DO NOT use the hoses
when the cleaner is above the level of
the user's feet.
Injury Hazard
The agitator may begin rotating when
the hose is inserted. Ensure that the
agitator is clear of all hands, feet,
objects, etc.
t,3 CAUTION
DO NOT pull the vacuum
cleaner
around the room by the hose.
damage could result.
Property
10
CLEANING AREA
Between
Furniture*Cushions*
ATTACHMENT
DUSTING
BRUSH
CREVICE
TOOL
Drapes*
X
<_
X
X
X
BRUSH
Handi-Mate ®Jr.
_lb
_
"Always clean attachments before using on fabrics.
For best clean-
t{j
_._
Pivoting
Brushes
X
X
X
Guide either side or
the airflow pas-
the
front ofa the
nozzle
along
baseCarpet
edges
board. The pivoting
brushes help
remove dirt at carpet edges.
sage clear.
ing
results, keep
Occasionally,
check each of
the areas indicated for clogs.
Unplug the
cleaner from the
outlet before
Stairs
Put handle in full upright position. Agitator
stops rotating. Use the crevice tool or fabric
brush. Set the On/Off switch to ON and
move the Agitator On/Off selector to the
OFF position.
checking.
Personal Injury Hazard
Use care if vacuum cleaner is placed
on stairs. If it falls, personal injury or
property damage could result.
11
Walls
X
X
X
X
COMBINATION
Stairs
........................
,,
......
i ....................
.............
......................
.........
.....................
,..........• .... I
MOTOR PROTECTION
SYSTEM
AGITATOR OVERLOAD
PROTECTOR
The agitator has
built-in protection
against motor
damage should the
agitator jam. If the
agitator slows down
or stops, the agitator
overload protector
shuts off the agitator.
The suction motor
wil) continue to run.
Motor Prot_.-'tor
This vacuum has a motor protector by-pass
valve which automatically opens to provide
cooling air to the suction motor when a clog
prevents the normal flow of air to the motor.
If the by-pass valve opens to prevent motor
overheating and possible damage to the
vacuum, you will notice a change of sound
as air rushes through the valve opening,
To correct problem: See the TROUBLESHOOTING chart.
Agitator Overload
Reset Button
NOTE: The motor
protector may open
when using
attachments or when
To correct problem: Turn off and unplug
vacuum, remove obstruction, then press
reset butlon.
c_eaning new carpet,
due to reduced airflow
by the attachments
themselves or by new
carpet fuzz filling the
bag quickly. See the
TROUBLESHOOTING
section.
\.
To reset: Push in the agitator overload
protector button.
Motor
Protector
PERFORMANCE INDICATOR
SOME
MODELS
When the unit is running with normal air
flow, the light on the performance indicator is
off. The light comes on whenever the airflow
becomes blocked. If that occurs, check the
Note: Do not block motor protector.
Thermal Protector
This vacuum has a thermal protector which
automatically trips to protect the vacuum
from overheating. If a clog prevents the
normal flow of air to the motor, the thermal
protector turns the motor off automatically to
allow the motor to cool in order to prevent
possible damage to the vacuum. During this
time the headlight remains on.
disposable dust bag, motor safety filter and
other possible c_og _ocations shown in
CLOG REMOVAL.
To correct
problem: See
the
TROUBLESHOOTING
chart.
To correct problem: If this occurs, turn the
vacuum off and unplug the power cord from
the outlet to allow the vacuum to cool and
NOTE: The
the thermal protector to reset. Check for
and remove clogs, if necessary, Also check
and replace any clogged filters. Wait
approximately thirty (30) minutes and plug
the vacuum in and turn back on to see if the
motor protector has reset. The motor
protector will not reset if the vacuum is not
turned off even if the vacuum has cooled
down.
light may also
come
on
when using
attachments,
due to
reduced
airflow
through the
attachment.
12
DIRT SENSOR
SOME
WARNING
MODELS
The electronic dirt sensor is a feature which
will detect particles as they pass through the
vacuum cleaner.
Electrical Shock And Personal Injury
Hazard
Disconnectelectrical supplybefore
servicing or cleaning the unit. Failure
to do so could result in electdcal shock
or personal injuryfrom cleaner suddenly starting.
The dirt sensor indicators and sensor
sensitivity switch are located on the front of
the switch cover.
A red light indicates dirt is being picked up
by the cleaner. A green light indicates most
of the dirt has been picked up by the
cleaner.
TO CLEAN DIRT SENSOR OPTICS
The dirt sensor optics consist of two optic
cells located inside the bag holder.
Occasionally, it may become necessary to
clean the two optic cells to assure
maximum performance.
It is
recommended the optic cells be cleaned:
OPERATION
As you vacuum, the red indicator light will
come on and stay on as long as the sensor
detects a high concentration of particles
passing through the cleaner.
• When the red light stays on
continuously.
• When the green light stays on
continuously.
• When dirt or dust adheres to the
The green light indicates that most of the
cleaning is complete.
The sensor switch allows you to select the
sensitivity of the dirt sensor. The switch can
be set to HI (+) or LO (-) sensitivity.
optic cells.
• Whenever the dust bag is changed.
Set the sensor switch to the HI (+) position
when:
To clean the sensor, wipe the optic cells with
a soft, dry cloth. Never use cleaners or
liquids as they can help speed the recoating
of the optic cells and make it necessary to
clean them much sooner than normal. The
• Cleaning bare floors.
• Cleaning carpet with low pile height.
Set the sensor switch to the LO (-) position
when:
dirt sensor area can be reached by
removing the dust cover and the dust bag.
• Cleaning heavily soiled areas.
• Cleaning carpet with deep pile.
• Cleaning new carpets.
Even with the sensor switch in the LO (-)
position, the dirt sensor will detect carpet
fuzz, especially on new carpet, which may
cause the red light to remain on longer than
expected.
Optic
Cells
Switch
Cover
13
Holder
.......................
1_/:
: :::
::::::
I::::::::::::::
:::::
, ..,_;
:::::::::::.:
::::::::::::::::::::::::::::::
Always follow all safety precautions
cleaning and servicing the vacuum
cleaner.
_
:
_:::
:::::
::::
::::::
:::::_:_
::::r::
when
_:::;:::
!
:_::::_
:::::::
: :::::::::::
:::::::::::::::::I::::
::::::::: : ::
:r;::: ............
:-:;,:: ...............
::::r::::r:::::::
;:::::::::::
::: ...............
:::::
::::::::::::::::::1
WARNING
ElectricalShock And Personal Injury
Hazard
Dis(_nect electrical supplybefore
servicingor cleaning the unit. Failure
to do so could result in electricalshock
or personal injuryfrom cleaner suddenly starting.
Gather the cord and wrap it loosely around
the upper and lower cord hooks.
WARNING
dcal Shock And Personal Injury
Hazard
Store the cleaner in a dry,
indoor
area,
on the
Wrapping the cord too tightlyputs
stress on the cord and can cause cord
damage. A damaged cord is an electrical shock hazard and could cause personal injury or damage.
floor with the handle
locked in the upright
position.
Unplug cord from wall outlet. DO NOT drip
water on cleaner.
CAUTION
Clean exterior using a clean, soft cloth that
has been dipped in a solution of mild liquid
detergent and water, then wrung dry. Wipe
dry after cleaning.
Do not use attachments ifthey are
wet. Attachments used In dirty areas,
such as under a refrigerator, should
not be used on other sudaces until
they are washed. They could leave
marks.
To reduce static electricity and dust buildup, wipe outer surface of cleaner and
attachments.
Wash attachments in warm soapy water,
rinse and air dry. Do not clean in dishwasher.
14
: |
I
ii: i:::i_':
i ii!i ii i i _"
i_i
ii_'
ii_:'_'
i:':'_"
i i :'iii
i i i i i i i iiiii iiiiiiiiiiii i
iiii:ii:i_i
'iii
'i'i'i'i'i'i'ii''i'i'i'i'i_ii''i'i'i:i
'ii:i:1%:i:iii_i:i:i:i_ii_C_C_i_i:i:i:i_i_1%%,,
ii:_
:,::
_%:
11:1%
_:::
i_'ii:_
'_'_
_'_:
;'i'_'
_'_i
_"
_'
:_'
i_'
;;'_':_'_'_'
_'
_'_:
_'
:'_'_:_:%::::i:i:i:i:i:i:i_i_i_ii
TO REMOVE DUST BAG
TO REPLACE DUST BAG
WARNING
Unfold the new
Dust
dust bag. Fold
the safety seal
tab on the new
Bag
dust bag away
from the opening that fits on
the bag holder.
Seal Tab
t,
//
/
Pull out on the
NOTE; See PARTS AND FEATURES for
bag cover release
located near the
top of the bag
cover.
bag number.
Bag
//_I1
Insert the dust bag
onto the bag holder
completely by holding the bag collar.
oo- H
Place the dust bag
collar into position.
Pull the bag
cover forward
and lift up.
Remove and lay
aside.
Bag
Grasp the dust bag
collar and pull gently,
carefully removing
the dust bag.
ht'_JJ
_"
Tuck the bag
behind each of the
four bag retention
corner flaps shown
here. Be sure the
bottom and sides
_ J_
of the dust bag are
completely within
bag cavity prior to
replacing the bag
cover.
Dust
dustThrow
bag.
away the used
_.
F'_
a,,#
RetenUon
corner
as'
Do not reuse.
- B,_l.lold_r
Check the bag
holder and the
Position the bag
cover so its positioning tabs fit
into the body
positioning tab
slots.
Slots
Cavity motor safety filter. If either is
blocked, check
- Motor
Safety
TROUBLEFilter
SHOOTING.
Close the bag
cover.
_,f,_CAUTION
You will hear a
NEVER REUSE A DUST BAG. Very
fine materials, such as carpet freshener, face powder, fine dust, plaster,
soot, etc. can clog the bag and cause
it to burst before it is full. Change bag
more often when vacuuming these
materials.
distinct snap
when cover is
securely closed.
Bag
Check to see that the dust bag is fully
enclosed in the bag cover.
15
iiiiii}:il
:_i_iii_}
__:_ iiiiiiii
iiiiiiii!iiiiiiiiiiiiiiiiii:_iiii:_iiiiiii!iii!iiiiill
:i_i_::_:::::iiii:
iii2iiiii;iiiiiiiiii!!i!ilzlii
iiiiii
iiii!i!i!iiiiiiiiiiiiiiii!iiii!iiiiiiiiiiiiiiiiiiiiii
iiiiiiiiiii
i!!i!iil: iiiii_iii
ii_B_j_iiill iiill
iiiiiiiiiiiiiiiiiiiiiiiiiiiiiiiiiiiiiii!ililililiiii!!
iiiii!iiiiiiiiiiiiii
i]
Check motor safety filter frequently
change when dirty.
EXHAUST FILTER
and
HEPA
Er_.._WARNING
E
'W.,_
WARNING
Electrical Shock Hazard
Do not operate without exhaust
filter.
Unplug power cord from electricaloutlet. Do not operate the cleaner without
the motor safety filter. Be sure the filter is dry and properlyinstalled to prevent motor failure and/or electrical
shock.
Remove the dust bag as outlined
DUST BAG CHANGING section.
The exhaust filter cartridge must be
replaced when dirty, It should be replaced
regularly depending on use conditions. The
filter CANNOT be washed as it will lose its
dust trapping ability.
in the
Note: See PARTS AND FEATURES
exhaust filter number.
MOTOR SAFETY FILTER
Slide the exhaust
filter cover
release down.
Pull out on
exhaust filter
cover to remove
from bag cover.
ELECTROSTATIC
1, This white & grey
filter must be
replaced when dirty.
It should be replaced
regularly depending
on use conditions.
The filter CANNOT
be washed as it will \
lose its dust trapping
ability.
Motor
safety
FI_
for the
_ohvaUStReFl#te._re
___p.
_
Exhaust
_l_ll_
Bag
Remove the
exhaust filter car-
\
Note: See PARTS AND FEATURES
Exhaust
for
tridge from the bag
cover.
motor safety filter number.
2. If the filter, located in the bottom of
Motor
Safety
Replace the exhaust
filter cartridge, carefully positioning it so
that it fits into the bag
cover. The grey edge
of the filter should be
the bag cavity, is
dirty, remove it by
pulling forward out
from under the
ribs.
Motor
safety
Rite,
Exhaust Filter
_
Cover Release "-_1_
the bag cavity.
Exhau,,
Replace the bag as outlined
BAG CHANGING section.
Exhaust
el_pr--
facing away from the
operator, Push only
...(_--_--_r_
on filter cartridge
frame, not on filter itself.
3. Replace the
filter, white side
up, by sliding it
back into place
under the ribs in
Bag
Covert-
_
J/
Replace the
exhaust filter
cover and
secure the
latch by pushing it upward.
in the DUST
16
Remove the
light bulb by
pulling
straight out.
WARNING
ElectricalShock Or Personal Injury
Hazard
To Release
Disconnect electdcal supply before
servicingor cleaning the unit. Failure
to do so could result in electrical shock
or personal injuryfrom cleaner suddenly starting.
TO REMOVE LIGHT BULB
Disconnect
let.
power cord from electrical
To replace
the light
bulb carefully insert fully
into slot.
out-
Pry light lens
out at slot in
rear as shown
on both sides.
Rotate lens up
and lift off.
Light
Note: See PARTS AND FEATURES
number.
for bulb
Slots
ot plug inor turnon until
the vacuuDCAUTION
°
s completely reassembled.
CAUTION
To replace light
lens, place tabs
at front of lens
into slots. Rotate
lens down and
Do not use a bulb rated over 9W (13V).
During extended use, heat from the bulb
could overheat surroundingplastic
snap into place.
To maintain efficient cleaning, the agitator
must be kept free of carpet pile, string, or
hair build-up. After every 7 to 10 uses,
unplug and turn vacuum over and check
agitator for string and hair build-up.
Use a scissors to remove any build-up
entangled around the agitator.
17
I
I
|::::::::::::::::::::::::_:::::::_::::::::::::::::::::::::::_::::::::::::::::::::::::::::::::::::::
:::::
Always follow all safety precautions
cleaning and servicing the vacuum
cleaner.
E
:::::::::_:::_:::.;_.:_
when
:•_:_
_::::
:::::::;:::;:::::::;::::::::_::::_:::::::::::::::;::::;:;:::::;;;:::;_:;::::::::
::::::::;;;;:::::::!:i:i:_:_:_:_;_:_:_:_:!:_!!!!_
Re-insert the hose into the opening on the
lower body from which it was removed.
Press firmly to assure connection.
WARNING
ElectricalShock Or Personal Injury
Hazard
Disconnectelectrical supply before
servicing or cleaning the unit. Failure
to do so could result in electrical shock
or personal injury from cleaner suddenly starting.
If the cleaner does not seem to have ade-
"Stretch
Hose
quate suction, first check if the dust bag is
full or if a filter is clogged. See DUST BAG
CHANGING and FILTER CHANGING.
Hose
Collar
If the bag and filter areas are free of clogs,
check the hose area. Remove the lower end
of the stretch hose from the cleaner by
grasping the hose collar, twisting, and
pulling straight out.
!
Plug in the
vacuum and
turn it on.
Stretch the
hose to max-
Stretch
Hose In.
and Out
WARNING
Personal Injury Hazard
DO NOT place hands or feet underneath the unit at any time.
the bag and filter areas and the hose
areas are free of clogs, disconnect the hose
from the nozzle pipe and check the nozzle
pipe for clogging. Clean the agitator according to the instructions in the AGITATOR
CLEANING section.
imum length
and then
allow the
hose to
return to its
storage
length.
Return the cleaner to the upright position
before plugging into an electrical outlet.
18
:::::::::::::::::::::::%::::::::::::::;:::::::::::::::::::::
.;;.v///;;;.-/;;;%u•:iiii::::::.:::iii_i!
::;::::;::
:::::
:
:::
.:::
:::::
,
_
- -.:. Hii::iiii i_iii_i_!
.:_._j;...;._j:!!!!ii!,__,
:.:•j:;;;;::
• :.....%// ...........
iiiiiiiiiiiiiiiiiii_
_ iiiiiiiiiiiiiiiiiiii ',••v
!!i!!i!iiiiiiiiii
"
_
.
•
:..v._..._... j. ..--
,,i ".
"
-...-.v•......._._
;_ :
:;::::::::::::::_ _::: i::::i:::.::::::::::::::::_:::::::::::::::::_:::::::
::::::;:;_::::::::::::::::::::
_.:.;._._•::: ;,/_•••,...v;;.%:_/:.:.;._j ..'/'•.'.'/.%'.'.'/•..;;;.V.•!_.II..._•%y/••••!II.'/L%-V;;.I
.._ _'
iiiiiiiiii
_ ii ii _
i iii_iiiiiii_
_ i
i _ii_i!i
iiii
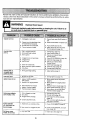
Review this chart to find do-it-yourself solutions for minor performance problems. Any service
needed, other than those described in this owner's manual, should be performed by an authorized service representative.
_n_
Cleaner won'trun.
_heun'mF_ilumtodo
f. Unplugged at wall outlet.
2. Tripped circuit breaker/blown fuse
at household service panel.
3. On/Oft switch not turned ON.
4. Thermal protector tripped.
Poor job of dirt
pick-up.
1.
Full or clogged
dust bag.
2. Wrong pile height setting.
3. Worn agitator•
4. Clogged nozzle or bag holder.
5. Clogged hose.
6. Hole in hose.
7, Hose not inserted fully,
8, Motor protectionsystem activated.
9, Dirty filters.
Cleaner picks up
moveable rugsor
pushes too hard.
Wrong pile height setting.
1. Plug in firmly, push On/Off switch to
ON.
2.. Reset circuit breaker or replace fuse•
:3. Push On/Oft switch to ON.
4. Allow vacuum to cool, then reset
Thermal protector (page 12).
1. Change bag, (page 15).
2. Adjust setting, (page 7).
3. Take to your nearest Sears
Service Center.
4. Check CLOG REMOVAL. (page 18).
5. Check for clogs, (page 18).
6. Take to your nearest Sears
Service Center.
7, Insert hose fully, (page 10).
B. Check for clogs. (page 18).
9. Change filters. (page 16).
1. Adjust setting, (page 7).
Ught won'twork.
1. Burned out light bulb•
1. Change light bulb, (page 17).
Agitator does not turn.
1. Agitator On/Off selector in
1. Move selector to the ON position,
(page 8).
2. Move handle from upright position
(page 7).
3. Reattach hose to nozzle (page 10).
4. Reset Agitator Ovedoad (page 12).
5. Allow vacuum to cool, then reset
Thermal protector (page 12).
OFF position.
2. Handte in foil upright position.
3, Hose removed from nozzle.
4. Agitator Overload tripped.
5. Thermal protector tripped.
Performanceindicator,
some models, |s red.
1. Full or clogged dust bag.
2. Dirty lilters.
3. Clogged airflow passage,
4. Certain attachment
tools.
1. Change bag, (page 15).
2. Change tilters, (page 16).
3. Clear clog from airflow passage,
(page 18).
4. This is normal. Light should go oft
when tool is removed.
Air flow restricted
with attachmentuse.
1. Attachment
Sm_ndchar_jes.
2. New carpet luzz dogged air path.
2. Check CLOG REMOVAL and clean
hose, (page 18).
Dirt Sensor, some
models, will notwork.
1. Dirty optic cells•
1. Clean optic cells. (page 13),
use restricts air flow.
19
f.
Check ATTACHMENTS,
(page 8)
I
20
E_!IIEE_I_EE_EE_SEEI_i!_!_!_!_!_!_!I!!!!i!!!i!!!!I!!!i!I_iiI!!!!E!!i
_!!!!!!!!!!!!.
i_ _:: _"_i _ "___":
_" _" _" :i
'_
•
"::_iEE E_E_i_lii_i_:_E
i_!i!
iiiE_i_!_i_i_i_i_!_!_!E_iii_
i i:_i_!_i_i_i_ii!
I...................................................
!!!..................................
i..i.i.!!i!!!!
!iiiii.i.i.!
!!.i.i.i:.!.i.i.i.i.i%i.liiii
iii!iii!i.i
iiii.i.i.':.i.!.!.i
i".iiiiii_iiiiiiiiiilliilii %iiii-i_!!iiiiiiiiiii_'ii!ii
iii!i_iiiiiilj.iiiiiiiiii
iiiiiiiiiii!iiiiiii!iiiiiiiii.liiiiiiii
I
Antes de usarsu aspiradoranueva .......
Garantiade la aspiradorade Kenmore.....
Instruccionesimportantes de
seguridad .............................
Piezas y caracterfsticasde aspiradora
ve_
................................
Instrucciones de ensamblamiento .......
t
1
2
3
4-5
Instrucciones de operaci_n...............
5
Desprendimiento del mango..............
6
Interrupterde encendido/apagado.........
6
Ajuste y seleeci6n de nivelde pelo de la
alfombra ............................
6
Agitador encendido/apagado Selector ......
7
Accesorios .........................
7-9
Cuadre de use de los accesorios .........
10
Sugerencias para aspirar ...............
10
Carecteriisticas de
rendimiento/seguridad ...............
11-12
Cuidado de la aspiradora ...............
13
Almacenamiento de la aspiradora ........
13
Limpieza del exterior y de los accesorios ... 13
Cambio de la bolsa para polvo ...........
14
Cambio des filtros ....................
15
Cambio de la bombilla .................
16
Limpieza del agitador ..................
C6mo eliminar los residues de basura
en los conductos .....................
16
17
Reconocimientode pmblemas ...........
18
Informaci6n de essistancia
o servicio .....................
(backpage)
!!iiiiiii!i!ii!iiiiiiii
iiiii ii iiiiii ii , ,iiiiJiiiiiiiJi,iiiii iiiiiii
Per favor lea esta guia que le ayudara a assemblar y operar su aspiradora nueva de Kenmore en una manera
ma.ssegura y etfectiva.
Para mas informaciSnacefca del cuidado y operaci6n de esta aspirador, Ilame a su tienda Sears mas cercana.
Cuando prequnte per informaciSn usted necisitar_ el nL_merocomplete de serie y modelo de la aspiradora que
esta Iocado en la placa de los nQmerosde modelo y serie.
Use el espacio de abajo para registrar el nQmerode modelo y serie para su nueva aspiradora de Kenmore,
N_mero de Modelo
Nt_merode Serie
Fecha de Compra
Matenga este libro y su recibo en u lugar seguro para referencias futures.
GARANT{ALIMITADA DE UN A_IO DE LA ASPIRADORAKENMORE
Esta garantia es per un aSo desde la fecha de compra, e incluye solamente el use de la aspiradora en
hogares privados. Durante el a5o de garantia, cuando la aspiradora es operada y mantenida de acuerdo al
manual de instrucciones del dueSo,Sears reparar_ cualquier defecto en materiales o fabricacion libre de cargo.
Esta garantia excluye las bolsas de celecci6n, correas, lamparillas, y filtros, las cuales son partes gastables que
se deterioran con el use normal.
Para el serviciode garantia,retome esta aspiradoraal Centro de Servicio Sears m&scercanoen los Estados
UnJdos.
Esta garantia se aplica solamente mientras este producto est& en use en los Estados Unidos. Esta garant[a le
da a usted dereehos legales especificos, y usted puede tener tambi_n otros derechos los cuales varian de
estado a estado.
Sears, Roebuckand Co., D/817 WA, HoffmanEstates,IL 60179
Su segufldedes muyimportantepara nosotros.Pare reducirel desgode incendio,chequeel6ctrico,
lesi6n corporalo dafiosal utilizarsu aspiradora,acttie de acuerdocon precaucionesbdsicasde
seguridad,entre elias:
Lea este manual antes de armar o utilizarsu
aspiradora.
Use su aspiradora _nicamente en la lorma
descdta en este manual. Use dnicamente con
accesorios recomendados per Sears.
Para reducir el riesgo de cheque el6ctrico, no use
su aspiradora al aire libre ni sobre superficies
mojadas.
Desconecte la fuente de electricdad antes de dar
servicio o limpiar. De Io contrario pedria causar
un cheque electrico o lesi6n corporal.
Siempre debe apagar su aspiradora antes de
desconectarla.
No utiiice la aspiradora si alguna abertura est_
bloqueada; mant_ngala libre de polvo, pelusa,
cabellos y cualquiera cosaque podrfa disminuir
el flujo de aire.
Ma,ntengael cabello,ropa suelta, dedos y todas
ias partesdel cuerpo alejados de ias aberturas y
piezas mec_nicas.
NOuse la aspiradora sin tenor instalada la bolsa
para polvo y/o los filtros.
Getablesiempre la bolsa para polvo despues de
aspirar limpiadores de alfombras o desodorantes.
talcos y pelves fines. Estes productos atascan la
bolsa, reducen el flujo de aire y pueden causar
que esta se rompa. Si no cambia la bolsa podrfa
ocasionar dafio permanente a la aspiradora.
No desconecte la aspiradora tirandodel cord6n
electrico. Para desconectada, hale el enchufe, no
el cordon.
No use la aspiradora si el cord6n e el enchufe
esta dafiado. Si la aspiradora no est,.
funcionando adecuadamente o si se ha dejado
caer, est_ dafiada, s_.ha dejado expuesta a la
intemperieo se ha dejado caer en agua, devu6F
vala a un Centre de servicio de Sears.
NOuse la aspiradora para levantar obietos agudos, juguetes pequefios, alfileres, sujetapapeles>
etc. Podrfan dafiar la aspiradorao la bolsa para
polvo.
No levante ninguna cosa que se este quemando
o emitiendo humo, come cigarrillos, cerilles o
cenizas calientes.
No hale ni transporte la aspiradera per el cord6n;
no use el cord6n come mango; no cierre puertas
sobre el cord6n; no hale el cord6n sobre rebordes agudos ni esquinas. No pase la aspiradora
sobre el cord6n. Mantenga el cordon alejado de
superficies calientes.
No abandone la aspiradora cuando este conectada. Desconectela cuando no la est_ usando y
antes de darle servicio.
No use la aspiradora para aspirar liquidos
inflamables o combustibles (gasolina, liquidos
para limpieza, perfumes,etc.) ni la use en
lugares donde estos podrfan estar presentes. Los
vapores de estas sustancias pueden crear un
peligro de incendio o explosi6n.
Tonga cuidadoespecialal utilizar la aspiradora
en escalones. No la coloque sobre sillas, mesas,
etc. Mantengala en el piso.
No permita que sea utilizada come juguete. Se
requteretenor mayor cuidado cuando sea
utilizada en la proximidad de nifios o per nifios.
No toquela aspiradora ni el enchufe con las
manes mojadas.
No coloque objetos en las aberturas.
Usted es responsable de asegurar que su aspiradora no sea utilizada per ninguna persona que no
pueda manejarla correctamente.
GUARDE ESTAS INSTRUCClONES
El armado y use seguro de su aspiradora son su responsabi]idad. Esta aspiradora ha side disefiada
exclusivamente para use domestico. La aspiradora deber_ almacenarse en un lugar seco yen el interior. Lea este Manual del propietario detenidamente, pues contiene informacion importante sobre seguridad y use. Esta quia contiene informaci6nsobre seguridad debaio de simbolos de advertiencia
cuidado. Per favor ponga atenci6n especial a estas instruccienes dadas. Adverfencia: Este informaci6n
le alertara con el poligro de fuego, cheques electricos, quemadas y lesiones. Cuidado: Esle
informaci6nle alertara a peligros come lesiones y daflos de propiedad.
2
Esimportante
concer
laspiezas
y caracteristicas
desuaspiradora
paraasegurar
suusoadecuado
y seguro.
Examfnelas
antesdeusarsuaspiradora.
Objeto
Pieza No
en EUA
Pieza N°
en Canadd
Bolsa para polvo
20-50690
20-50690C
Bombilla de farol
20-5248
20-5248C
Filtro de escape
20-86889
20-86889C
Filtro de seguridad
del motor
20-86884
20-86884C
-Mango
" lnterroptor
de encendldo/
apagado
Indlcadorde
polvo (algunos
modeles)
$eguro de la
cublerta de
la
Indlcador de
rendlmlento
(algunos modelos)
SujeMdor superior
de Ilberacl6n r_plda
del cord6n
escape
(dentro)
Cord6n
- Agltador encendldo/
apagado selector
del cord6n
llbaraci6n
del mango
Mango para
_ase de
boqullla
Herramlentas
para
@
Bot6n
Sobrecarga del agltador
Tubo
Manguara
Ceplllo para
Cepillo para
comblnacl6n.
Pedal de
Ilberacl6n
IIII
=
JUEGOS DE MAN_UERA
DE EXTENSION
ALGUNOS MODELOS
Manguera
_e extenslb_)
lUI([(UI[I[(II[IllU({[[I,i
Protector
de motor
ALGUNOS
-.(_j
NtJmeros d_
del modelo
_.j-e---
Agltador
(Abajo)
MODELOS
Adaptador
Cepil/o paraTPuibsoos
-_
Handi-Mate
'_ Jr,
Coloque el mango como se ve en la diagrama
abojo.
AI mantener le manquera de manera que no
interfera, mueva el mango a la abertura en la
parle superior de la aspiradora.
Peligrode choqueel(_ctrico
No conectela aspiradorahastaque termine
de armm'la. De Io contrariopodrfacausar un
choqueel_ctdcoo lesi6ncorporal.
Antes de armar la aspiradora, chequee la LISTA
DE EMBALAJE en la cubierta separada de la Lista
de Partes para Reparacidn. Use esta lista para verificar que ha recibido todas las componentes de su
nueva aspiradora Kenmore.
Retrar la banda
adhesiva ubicada
debajo de la
...polvo
]a caja del
motor.
fornillo
en
Fije el cabo de
la manguera
expansible a la
boquilla como
se muestra.
MONTAJE DEL MANGO
Inserte el tornillo para que pase por el mango de
la aspiradora.
Tornillo
Empiece a apretar el tornillocon los dedos. Quiza
sea necesario ajustar un poco el mango.
Quite el tornillo del mango Iocalizado justodebajo
del borclesuperior de la parte posterior de la asp(
radora,ver ilustracion de arriba.
4
Apriete
eltornillo
conundestornillador.
Fije el cord6nen
posici6n, forzandolo
en la ranura de
bloqueo ubicada en
el cuerpo del
sujetador superior
cle}cord6n, como se
muestra. Esto ayuda
a que el cord6n no
se enrede debajo
del agitador de la
aspiradora.
Co,,_6n
Enrolle el cord6n electrico alrededor de los sujetadores superior y inferior y presione la ranura del
enchufe sobre el cord6n.
No aprietedemasiadoel tomillo.
Si Io aprietademasiadop_r/a arruinar los odflciospare el tomillo.
No opere la aspiradora sin tener instaladoel
tomUlo.
COLOCACI6N DEL
CORDON
Sujetadorsuperior
de Ilberacl6n r_pida
del cord6n
Cord6n
Aseg_rese de que el sujetador superior del cord6n
de liberaci6n r_,pidase encuentre en posici6n vertical. Quite el alambre con el que esta atado el cord6n
electrico.
PARA COMENZAR
de/
cord6n
1. Gire el
sujetador del
cord6n de
lado a lado y
hacia abajo
pare liberar
el cord6n
el_ctrico.
2, Desprenda el enchufe del cordon eiectrico y quite
el cord6n del sujetador superior. Compruebe que el
cord6n el_ctrico sigue fijadoen la ranura de bloqueo
del sujetador superior.
3. Verifique que la aspiradora tenga instalada una
boise. Consulte la CAMBIO DE LA BOLSA PARA
POLVO.
Note:Para re_ucir el riesgo de choque electrico,
esta aspiradora cuenta con una clavija polarizada,
uno de los contactos es m_.sancho que el otro. La
clavija s61opuede introducirse de una manera en
el enchufe. Si la clavija no cabe bien en el enchul
inviertala. Si alan no cabe, Ilame a un electricista
para que instale un enchufe correcto. No altere la
claviia de ninguna manera.
4. Conecte el cord6n electricopolarizado en un
enchufe de 120 voltioe que se encuentre cerca del
piso.
ADVERTENCIA
Peligrode lesi6npersonaly daSoaJproducto
• NO conectela esplradorasi el interruptorest_
en la posici_ ON, Podrfa resultaren lesi(_npersonalo daSo.
• NO uselos enchufesIocalizadossobrelos
muebles.Los objetoscercanospodrfanresultar
da,'_ados.
Desprenda el mango pisando el pedal de liberaci6n
, tiranda del mango hacia abajo con la mano.
Nora: El agitador no girara si la aspiradora esta en
posici6n vertical,
Pedal,
Ilberacl6n
del mango
Para arrancar la aspiradora, deslice el interruptor de
encendido/apagado de la posici6n OFF a la posici6n
ON. Para detenerla, coloque el interruptor en la posici6n OFE
Nota: Este interruptor opera solamente el motor de
succi6n. Para qua el agitador gire, el selector
encendido/apagado del agitador debe estar en
posici6n encendido y el asa debe sacarse de la
posici6n vertical.
iiiiili!i
i_i_iiiiliiiiiiiiiiiiiiiii_!_!_!i!
ilili
iii_iiiiiiiiii_i_ii_i
iiii!iiiiii!i
iiiiiiiiiiiiiii!i
iiii!ililiiii!i
iiiiiiiiii!i!i!iii!i!i!iliiii!i!iiiii!i!i!ili
iiii!iiiiii
iiiiii_i_i_iii_i
iiiiii!i_i!iiiiil
iiiiiiiii!ii_ii
i!ii_iiiiliiiiiiiiiii
iiii
i_ii!iiiii!_!il
!iliiiii!iiiiiiiiiiiiiiiili!ili!iiiiiiiiiiiiiiii!i!i!i
i!i!i!ililiiii!iiii_ii!ilililiiiiiiiiii
iiiii!i!i!i!iliiiiiii
iiiiiiiiiilililililil
iiiiiiiiiiiiiii!i!i!i!i]
Para seleccJonarun ajuste de nivel de pelo de la
alfombra:
Palanca
para aJustar
la altura
\
Apague la aspiradora. Seleccione un nivel de ajuste
inctinando la aspiradora hacia arras hast que tas
fuedas delanteras esten un poso despegadas del
piso.
Deslice la palanca de ajuste de nivel de pelo de la
alfombra a la posici6n deseada.
Hay cuatro (4) posiciones de ajuste de altura en la
aspiradora. Use la posici6n LOW para la mayoria de
allombras y suelos lisos (con el agitador OFF), y la
posicion HIGH para alfombras de fibras largas o
abundosas, tapetes pequefios, etc. Use las otras
posiciones seg6n resulte conveniente para alturas
intermedias.
E
CUIDADO
No deje permanecerla aspiradoraen un solo
lugar duranteningOntiempocuandoel agitadorastd rotando.Se puededafiar la alfombra.
6
Poeici6n
OFF: Apriete con el pie la mitad posterior
del pedal para apagar el agitador para usa en suelos lisos.
En la posici6n OFF el agitador no gira. Esta posici6n
se debe usar pars limpiar readers firms coma parquet o pisos de Iosetas o cer_,mica.
Nots: La luz se mantendr_,encendida mientras se
aspira con el agitador en posici6n OFF, siempre y
cuando la aspiradora no se encuentre completamente en posici6n vertical.
En PosickSn:
Apriete con el pie la mitad anterior del
pedal pars encender el agitador para usa en
tapiz6n.
!
El agitador girar_ en posici6n ON. Cuando se limpia
alfombras el selector debe estar en esta pesici6n.
rV. ADVERTENCIA
Peligrode lesi6n personal
Atenci6n: Refi_rase alas recomendaciones del fabricante para limpiar su alfombra. Algunas alfombras
m_.sdelicadas pueden requerir el usa de la aspiradars con el agitador desconectado pars prevenir
que la alfombra sea dafiada.
NO PONGA las manesni los pies debajode la
unidadcuandose est6 cambJandoel Selector
de agitador encendido/apagadoa la posici6n
de encendido.El agitadorgire rapidarnente.
NOTA:La v&lvula de desviaci6n puede estar abierta
mientras se usan los accesorios o pars limpiar una
alfombra nueva a causa de un flujo reducido de sire
par los accesorios mismos o
per la pelusa de la alfombra que liens la balsa rapidamente. Consulte el cuadro RECONOCIMIENTO
DE PROBLEMAS.
Herramlenta
para hendidura=
Tuba
"_'_
telesc6plco......_
Ceplllo
_.
para sacudlr I
Ceplllo para
I
ADVERTENClA
"Manguera
expansible
, Collar de
Peligrode chequeel6ctricoo lesi6n corporal
Desconectela unldadantesde limptarla o
darleservtdo.De Io contrariopodrfaprodudrse un chequeel_ctricoo causar
lesi6ncorporalsi la aspiradoraarranca de
maneraimprevista.
comblnaci6n _
Identifique cada uno de los accesorios mostrados a
continuaci6n.
C6MO UTILIZAR LOS
ACCESORIOS
Saca la parts inferior de la manguera expansible de
la aspiradera y tirando par atras. Ahora se puede
conectar la manguera.
7
Para obtener la m&xima Iongitud con I_"_
los accesorios, instalela herra,,,IL, _| I_]
mienta para hendiduras
en e[
Jl_/_
_'
extremo del tubo Para
Jiii_i
_l
•
, "
Manguera-_hacerlo, ,ntroduzcala
en el tubo y
_111L_I II
girelaunpoco. Des/Izador ,Jr I _L"J_Q71_III
/
Lamanguera
incorporada
gila
parafacilitar
lalimpiezaencualquier
direcci6n.
Para
quitar
la
manguera,
tirede Manguera
"Jk' \ lll
doconS'old._ _
I Ill II
la manguera del
collar.
TUBOTELESC6PICO CON
CONTROLDE ASPIRACI6N
ALGUNOS MODELOS
y-,.--
Herramlontm para hendlduras
Cuando use el cepillopara sacudir o el cepillo para
combinaci6n, puede instalarlos directamente en el
tubo o en extreme de la herramienta para
hendiduras.
Saque el tube
telesc6pico de
su lugar de
alma
cenamiento.
Herramienta para hendldunls
Ceplllo para sacudlr
Tubo
unosmode_s)
Retire la herramienta para hendiduras de su lugar de
almacenamientodentro det tubo. Gire el aro de blo-
(Algunosmodelos)L_
queo hasta la posici6n L_N.LOCK.
PARA OPERAR EL DESLIZADOR
DE CONTROL DE ASPIRACI6N
Despliegue el tubo completamente. Gire el aro de
bLoqueodeI tubo basra la posicidn LOCK.
Instale el tubo de extension en el extremo abierto de
la manguera.
Tubo
Inferior
Cepillo
Tubo telesc6pico
Cuando use accesorios paralimpiar cortinas,
tapetes pequeSosde pelocorto ¥ otros articulos
delicados, gire el deslizador de control de aspiracion
a la posici6n abierta. Este selector se encuentra en
el tubo telesc6pico, cerca de la manguera.
DesUzador
de control
Esto reducirAla potenciade aspiraci6n para facilitar
la limpieza.
Nora: Coloque
el deslizador de
control de
aspiracion a la
pesici6n
cerrada para la
limpieza normal.
Tubo
superior
Alinee las pestahas del tubo de extension con las
ranutas en forma de "J" de la manguera. Empuje eI
tubo dentro de la manguera y gire hacia la derecha
para bloquearlo.
Cuando use los accesofios, tenga ctJk_ado
de
no estirardemasiadola mengueraexpansible
para tratar de alcanzar mztslejos.81 tratade
estirarla mangueram_ de Io debido,podrfa
causarque la aspiradora se venga abajo.
8
ALMACENAJE DE LOS
ACCESORIOS:
ALGUNOS MODELOS
Retire el cepillo para sacudir o el cepillo para
combinaci6n. Col6quelos firmemente en su lugar de
almaoenamiento correspondiente.
Unos modelos incluyen una manguera auxiliar que
conecta con la manguera de estirar en la aspiradora
para una extensi6n mas larga para limpiar.
Retire la herramienta para hendiduras del tube
gir&ndola.P6ngala a un lade.
MANGUERA DE EXTENSION
Manguera de la unldad Manguerade extensl6n
Retire el tube de extensi6n de la manguera. Gire el
tube hacia la izquierda y tire del extreme de la
manguera.
inferior
Abrlr
Cerrar
bloqueo
, del tubo
Inserte las dos leng0etasen el extreme de la
manguera de extensi6n en las dos ranuras formadas
come la letra J en la aspiradora y gire para conectar.
Se puede ¢onectar todas las herramientasy el tube
telesc6pico con el extreme abierto de la manguera.
CEPILLO PARA PISOS Y TUBe:
Tubo
superior
Desbloquee el tube girando el are de bloqueo hasta
la posici6n UNLOCK.
ALGUNOS MODELOS
Unos modeios tienen un cepillo y un tube auxiliares
para limpiar los suelos sin alfombras. Gire el extreme
del adaptador hacia el cepillo de suelo y el otto
extreme hacia el tube recto.Conecte el tube recto
con el tube telesc6pico y luego con la manguera en
la aspiradora o con la manguera de extensi6n.
Deslice el tube inferiordentro del tube superior, Gire
el are de bloqueo del tube a la posicion LOCK.
Introduzca la herramientapara hendiduras dentro
del tube ¢omprimido.Instale bien en su posicion de
almacenamiento.
Aseg0rese de que la unidad est_ apagada. Inserte
nuevamentela manguera completamente dentro de
ta abertura ubicada en la parle inferior de la
aspiradora, de donde la sac6 inicialmente.
I
ADVERTENCIA
Peligrode lesi6n personal
El agitadorpuedeempezara girarcuandose
Insertala manguera.Asegdresede que el agitadorest_ librede manos,pies, objetos,etc.
E
CUIDADO
NO tire de la aspiradora per la mangueraen
la habltaci6n. Podrian ocurrir datios a sus pertenenclas.
Cepillopara plsos ._p,-_
(]}
I
Tubo _jA. Adaptado-_-----JrO_(_
CUIDADO
Cuandouse la mangueraen forms normal
o con la manguerade extensi6ninstalada,
la aspiradora debe mantenersesobreuna
superficiefirme al mismonivelo a un nivel
inferiorque los pies del usuario.NO use las
manguerascuandola aspiradora est6 a un
nivelm&salto que los pies del usuario.
AREA A LIMPIAR
ACCESORIO
Muebles.
CEPILLO PAPA
SACUDIR
HERRAMIENTA
HENDIDURAS
_
Handi-Mate ®Jr.
_
X
&
X
_
Cortinas*
Escalones
Paredes
X
X
PARA
CEPILLO PA.RA
COMBINACION
Entre
coijines*
x
X
X
x
X
x
X
• Siemprelimpielos accesor_osantes de usarsobre telas.
iii i i i i iii iiii i i i i i iiiiiiii iiiiiiiiii!i!iiiiiiiiiiiiiii
iiiiiiE l
_
Cepillos
plvotes
Para obtener los
mejores resultados
de limpieza, mantenga desbloqueados los conductos
de llujo de aire.
Gufe uno de los costados
o la parte anterior de la
dllasde
boquilla
a alfombras
Io largo del
borde de la pared. Los
cepillos pivotes ayudan a
limpiar el polvo de los
\ .bordes de las alfombras.
Examine de vez en
cuando cada una
de las zones que
se indica podrian
causar bloqueo.
Esc_ones
Desconecte la
aspiradora del enchufe antes de examinarla
Coloque el mango en la posicion vertical. El agitador pare de girar. Use la herramienta para hendiduras o el cepillo pare telas. Ponga el interruptor
encendido/apagado en la posici6n ON y mueva el
selector encendido/apagado del agitador a la posici6n OFE
! , ADVERTENCIA
Peligrode lesi6npersonal
Act_e con precaucibn si coloca la aspimdora
sobreescalones, Si se cae, podn'a causer
lesi6n personal o dafio ala propiedad.
10
SISTEMA DE PROTECTION
DE MOTOR
PROTECTOR DE SOBRECARGA
DEL AGITADOR
Protector de motor
Esta aspiradora tiene una v_.lvulade desviaci6n que
sirve come protectorde motor que se abre
automaticamente para proveer un flujo de aire al
motor cuando un zueco impida que circule el aire al
motor. Si se abre la v_lvula bypass para impedirque
se recalente el motor y que no haga daSo ala
aspiradora, se notaria un cambio de sonidomientras
el aire per la abertura d la v&lvula.
Pare corregir el problema:Consulte el cuadro
RECONOCIMIENTODE PROBLEMAS.
NOTA: La valvula de
desviaci6n puede ester
abierta mientras se usan
los accesories opara
limpiar una alfombra
nueva a cause de un flujo
reducido de aire per los
accesorios mismos o per
ta pelusa de la alfombra
que Itenela boise
rapidamente. Consulte el
cuadro
RECONOCIMIENTO DE
PROBLEMAS.
Bot6n para Reajustar la
Sobrecargadel agltedor
El agitador tiene una
protecci6n
incorporada contra
daSo del motor en
case de que el
agitador se tranque.
Si el agitador se
pone lento o se
detiene, el protector
de sobrecarga del
agitader apaga el
agitador. El motor de
succi6n continuara
funcionando.
Parecorregirel problerea:Apague y desenchufela
aspiradora, saquela obstrucci6n, y luego apriete el
bot6n de reajuste.
Pare reajustaEEmpuje el bot6n de protecci6nde
sobrecarga del agitador,
INDICADOR DE RENDIMIENTO
ALGUNOS MODELOS
_e
motor
Cuando la unidad este luncionando con el flujo
normal de aire, el indicador de rendimiento est_
apagado. Se enciende la luz cuando el flujo de aire
est_ obstrufdo. Si esto pase, revise la bolsa
disponsible para polvo, el filtro de la seguridad del
motor y otres colocaciones posibles para los
residues de basura, Vease COMe ELIMINAR LOS
RESIDUES DE BASURA EN LOS CONDUCTOS.
Note: No ebstruye el protector de motor.
ProtectorTermal
Esta aspiradora tiene un protector termal que se
ajusta autom;_ticamentepara proteger ala
aspiradora de] sobrecalentamiento. Si una
obstrucci6n impide el flujo normal de aire al motor, el
protector termal apaga el motor autom;_ticamente
pare permitirque el motor se enfrie a fin de evitar
posibles daSos ala aspiradora. Durante este tiempo
la luz delantera se mantiene prendida,
Parecorregirel
problema:Vease
el diagrama
RECONOCIMIENTO DE
PROBLEMAS.
Pare corregir el preblema:Si esto ocurre, apague la
aspiradora y desenchufe el cord6ndel tomacorriente
para permitir que la aspiradora se enfrie y que el
protector termal se reajuste. Busquey saquelas
obstrucciones, si es necesado. Examine tambi_n y
reereplace cualquierfirm obstruido. Espere
aproximadamente
treinta (30) reinutos y enchufela
espiradora y volt6ela pare vet sl el protectordel
motorse ha reajustado. El protector del motorno se
reaJustar_sl no se ha apagado la aspiradora aun
cuando la aspiradora se haya enfriado.
NOTA: Es
posibleque la
luz encienda al
usar los
accesorios
porque el flujo
de aire es
reducido per los
accesorios.
11
!
INDICADORDE POLVO
ALGUNOS MODELOS
El indicadorde polvoy el indicador de sensibilidad
estan Iocalizados en la parte delantera de la cubierta del indicador.
ADVERTENCIA
Pellgrode chequeeI_TIco 0 lesi6ncorporal
Desconectela unidadantes de limpiarla o
(Jadeservicio.De Io contrariopodrfaproducirse un cheque_
o causar les_6ncorporalsi la aspiradora arrancade manera
imprevista.
Et indioador electrico de polvo ee una caracteristica
que averigua el polvo mientras que pasa per la aspiradora.
Laluz roja indicaque la aspiradora aspira et polvo.
La luz verde indica que la mayorfa del polvoya es
aspirada per la aspiradora.
PARA LIMPIAR !_ASCELDAS OPTICAS
OPERACI6N
Los 6pticos del indicadorde polvo consiste en dos
celdas 6pticas Iocalizadas dentro del compartimiento para la bolsa. De vez en cuando es necesafio
limpiar las dos celdas 6pticas para que funcionen a
su capacidadm&xima. Se recomienda limpiar las
oeldas 6pticas:
N pasar la aspiradora, _aLuzroja det indicador de
polvo enciende y sigue encendida mientras que el
indicador averigua una concentraci6n alta de polvo
pasando per la aspiradora,
La luz verde indicaque ta mayoria de la limpieza
est_ completa.
. Cuando se enciende continuamente la luz
roia.
• Cuando se enciende continuamente la ]uz
verde.
• Cuando se adhieren la _ie_rao el polve en _as
celdas opticas.
• Cuando se cambia la bolsa para polvo.
El indicador de polvo le permite que seleccione la
sensibilidad. Se puede p0ner el indicador para la
sensibilidad en _aposici6nalta (+) o baia (-).
Ponga el indicadorde polvo en la posici6n
alia (+) ouando:
Para limpiar el indicador, limpielo con un trapo
suave y seco. Nunca use los detergentes o Ifquidos
porque eLIospueden ensuciado m_,sr&pido las celdas 6pticas y ser_ necesario limpiaflas m,is pronto
que normal. Se alcanza el cornpartimiento para el
indicader de polvo per quitar la cubierta de polvo _/
la bolsa para polvo.
• Aspira sobre los suelos sin alfombras.
• Aspira sobre una alfombra con el pelo bajo.
Ponga el indicador de polvo en la posici6n
bala (-) cuando:
• Aspira sobre areas muy sucias,
• Aspira sobre una alfombra con el pelo alto.
• Aspira sobre una aliombra nueva.
Con el indicadorde polvo en la posici6n"ON", el
indicador de polvoaveriguara la pelusa de la
alfombra, especialmente en una alfombra nueva que
puede causar que la luz roja encienda m_.stiempo
que normal.
Celdas
de la bolsa
jY "
Indlcador de
sen$1bllldad
I
Cublerta
controle=
I
de los
12
Iiiiliiiiiii
illii iiiiiii!iiii
iiiiiii;;iiiiiiiiiiiiiiiiiiiiiiiiiiiil;ii!!iiiiiiiiiii;i
! iiiiiiiii!iiiiiilliii!iiiiiiiiiiiiiiTiiiiiiiiiii!ii_ii_iiiiiiiiiiiiiiiiii!iii!
i!iiiiiiiliiiiliiiiiiiliiiiili
iiiiiiiiiliiiiliii_ii!i!i_:_i_i
!ii!! !
E
Siga siempre todas las instrucciones de seguridad
al Impiar y dade servicio a su aspiradora.
't,,_ADVERTENCIA
Peigro de choqueel6ctricoo lesi6n corporal
Desconecte la unldad antes de limplarla o
darteservlcio. De lo contrsriopodrfaproduclrseun choqueel6ctrlcoo ¢._us_rlesi6ncorporalsi la aspiradom arrancade manara
Impmvlsta,
J!:!ii]i,
ill:
iiii
ii:iii]i
]iiiiii
::!:iiill
iiliiiiiiiiiiii
iiiiiiii
iiiiiiiiiiiiiiiiiiiiiiii
_i_i_!i_i!i_i_ii_i_!_i_i
i iiiiii!iiii!i!
!iiiiiiiilii
iiiii!iiiiii!i!i!i_i
iiii!iiiiii!iiiiiiiiiiiiiiiiii
!iiiii!ii!iii!!!
!!iii
iiiiliiililliiiii!i!i!i!iiiii!i!i!iiiiiiiii!i!iiiiiiiii!i!i
!ilili
iiiiiil
! 't.._ADVERTENCIA
Recoja el cord6n y enrr61leloen los sujetadores superior e interior, sin que quede muy apretado.
Peligro de choqueel_tdco o lesi6ncorporal
Guarde la aspiradora bajo techo
en un lugar seco, con el
mango en posici6n vertical.
Si enrollael cord6nmuyapretado puedetensado muchoy causarleda,5os.De daf_arse,el
cord6npodrfacausardescargaselL=ctricas
y lesioneso
da_os personales.
!'t.,t,_CUIDADO
Desconeete el cord6n el_ctrico de la clavija de la
pared. NO chorseagua sobre la aspiradora.
Limpie el exterior con un trapo suave y limpio, que
ha sido exprimido despu#s de remojar en una soluci6n de agua y detergente Ifquido ligero. Seque el
exterior con un trapo seco despu_s de limpiar,
NOuse los accesorios si sstanmoJados.
Los accesodos qua se utillcen en _reas
sucias,debajo del refdgerador, no deben
usarse en otras superficiessin antesser
lavados. Podrlan dejar marces.
Limpie la superficie exterior del receptaculo y de los
accesorios para reducir la electricidad est_tica y la
acumulaci6n de polvo.
Lave los accesorios en agua tibiajabonosa,
enjuague y deje secar al aire. No los lave en lavadora de plates.
13
iiiiii!i!iiiii!i!i
PAPAQUITAR LA BOLSA PARA
POLVO
E
PARA CAMBIAR LA BOLSA
Desdoble la bolsa
para polvo nueva.
Doble la lengeeta
de seguridad de la
nueva bolsa para
polvo en direcci6n
contraria a la abertura que va en el
sujetador de la
bolsa.
ADVERTENCIA
Siempredesconecteel cord6n_lectdco antes
de repamralguna parte de la aspiradora.
Tire hacia adelante de la liberaciSnsituada
cerca de la parte
superior de la
cubierta de bolsa.
i iii!iii!i!iiMi!i!i
!!!i!iiiiiiiiiiiiiiiiii!!!i!ii!i!!!iiill
iiiiiii!
]
i
Llberacl6n de_
Bolsa para
polvo
LengOeta de
segurldad
NOTA:Consulte las PII_ZASY CARACTERISTICAS
para determinar el N_.de la bolsa para polvo.
Inserte la bolsa para polvo
completamente sobre el sujetador de la bolsa sujetando la
bolsa per el collar.
Coloque el collar de la bolsa
en posicion.
Tire de la cubierta
de la bolsa hacia
el frente. Retirela
y dejela a un lade.
Cublerta
de la
Asegt_reseque la
LengOstas
bolsa se queda
deretenc/6n
detras de las
dela bo/r,a,
leng_etas de
retenci6n de cada
lado demostradas
aqui. Asegflrese de
que ta parte inferior
de la bolsa para
polvo este
completamente
dentro de la cavidad para ]a bolsa antes de instalar
la cubierta de la bolsa.
Tome el collar de la
H
bolsa para po]vo y tire \ . _,_
con cuidado para retirar
r_
la bolsa para polvo.
_" ._
Tire la bolsa usada a la _'_/_"
basura. NO la vuelva a
usar,
D.
Revise el sujetador
de la bolsa y el filtro
de seguridad de]
para motor.
- 8ujetadorde
I= belea
le bolsa
- F/Ibode
segurldad
delmotor
!
Ranuras
Si estuvieran
bloqueados,
consulte la tabla de
diagnostico de
problemas.
Cierre la cubierta de
la bolsa.
CUIDADO
I Coloque
bierta de ]a
laeubolsa
de manera que
]as pestafias entre en las ranura
de posici6n de]
cuerpo.
_,-
A] escuchar un
NUNCA REUTILICEUNA BOLSA PARA
POLVO. Los materlalesmuy fines,tales come
desodorantespara alfombras,talco facial,
polvofine, yeso, hollin, pelusade alfombras
nuevas,etc., puedenatascarla bolsay causar
que se rompaantes de que est_ Ilena. Cambie
la bolsam_s seguidocuandoaspire este tipo
de materiates.
chasquido
caracteristico ser_,in- Ceub/e
dicaciondequelacu-bolu'--_'Ji/_l_
bierta
ha oerrado
bien.
/ \\
AseglJresede que la botsa para polvo est_ Instatade
per completeen lacubiertade bolsa.
14
Examine
elfiltrodeseguridad
delmotordevezen
cuando
y cambio
cuando
est_sucio.
!
FILTRODE ESCAPE
HEPA
ADVERTENCIA
cUIDADO
Peligrode choqueel_'trico
Desenchufeel cord6nde la corrienteel_'trica.
No operela aspiradorasin el filtro de seguridad del motor. Aseg6uresede que el filtro
est6 seco • instaladeadecuadamentepare
impedirque el motorfalle y/o que se produzca
un choqueel_-'trico,
re la aspimdomsin el filtrode escape. J
Este cartucho del filtro escape se tiene que cambiar
est_ sucio. Debe cambiarse peri6dicamente segL_n
las condicienes de uso. El filtrono se puede laver
pues prded._su capacidadpare atraparaltrapar
polvo.
Para quitar la boise, siga las instrucciones en CAMBIO DE LA BOLSA PARA POLVO.
Note: Consulte ]as PIEZAS Y CARACTER[STICAS
para determiner el N°. de la filtro de escape.
FILTRO DE SEGURIDAD DEL
MOTOR
Mueva hacia abajo
[a liberaci6n del
cubierta del filtro de
escape. Tire hacia
adelante del cubierta del filtro de
escape para quitar
[a cubierta de la
boise.
ELECTROST,_TICO
1. Este filtro se tiene
que cambiar cuando
este sucio. Debe
cambiarse periSdicamente seg_n las
condiciones de use.
El flltrono se puede
lavar pues prderfasu
capacidadpara atrapar altraparpolvo.
Filtro de
segurldad
Cublerta del
Cublerta
de le
J
_l t_l_
_
Quite el cartucho del
filtro escape de la
cubierta de boise.
Filb'o de
2. Si el filtro, Iocalizado al rondo de la cavidad pare la bolsa, est_
sucie, saquele tirando
de 61hacia adelante
por debajo de las estries.
Reemplazca el cartucho
de] filtre escape, coloeandolo con cuidado para
que quepa en la cubierta
de la bolsa. El flloplomo
del filtro debe ester
opuestodel operado.
EmpujeL_nicamenteel
cartucho de filtro, no el
filtro mismo.
3. Vuelva a colocar el filtro
desliz_ndolo de
nuevo en su lugar
debajo de las
estrias en la cavidad pare la boise.
la bolsa -_.._
Llberacl6n de
II
I. cublerta de,
fllb'o de .cape "-_ll _
flltro de escape -T
NOTA: Consulte las PIEZAS Y
CARACTERiSTICAS para determinar el N°. de la illtro de seguridad del motor.
Filtm de
segurldad
Cublerta de
F//b-ode
LIberacl6n de
la cublerta del
flltro de escape --
segurldad
Cublertadel
Vease CAMBIO DE LA BOLSA PARA POLVO pare
cambiar la boise.
15
i
Cublerta
dela
FII_
de
Reemplazca el
cubiefta del filtro
de escape y
empuje hacia
abajo la liberaci6n pare asegurado,
Remueva la bombilla
tirando derecho hacia
afuera.
rt.. ADVERTENCIA
Pare retirat
Peligrode choqueek_'tricoo lesi6n corporal
Desconectela unidedantesde limpiadao
derle serviclo.De Io contrarlopodrfaproducirse un choqueel6ctrico o causar lesi6ncorporalsi la aspiradoraarranca de manera
imprevista.
Pare reemplazar
la ampolleta
cuidadosamente
PARA QUITAR LA BOMBILLA
Para remplacar
ins6rtela segu-
Observe cuidadosamente el
lente de luz en la
ranura de la parte
posterior como se
muestra en ambos
lades. Gire el lente
hacia arriba y levantelo.
/4
_
•_ _
=,,
ramenta en la
lente,
Note; Mire PIEZAS Y CARACTERISTICASpara el
numero de la bombilla.
CUIDADO
CUIDADO
onecte o encendela aspiradora antes de
rla completamente.
No use una bombilla de m&sde 9 vatios(13
volts), Cuando se use la aspiradorapot un
largoperiodode tiempo,el calorde la bombilla puedecalentarles partesde plasticocerca.
Para reemplazar e]
lente de luz
coloque las presillas al lrente del
lente en las
ranuras, Gire el
lente hacia abajo y
encajelo en el sitio,
Para un aspirado eficiente,el agitador deber ser
mantenido libre de fibras de alfombra, hilos, o acumulaci6n de pelo, Luego de 7 a 10 usos, desenchufe y de vuelta la aspiradora y revise el agitador para ver si tiene acumulacion de hilos, tibras o
pelo.
Use tijeras para sacar cualquier acumulaci6n atorada alrededor del agitador.
16
Lente
de Luz"
Proceda
siempre
conprecauciones
deseguridad
al
limpiar
ydarservicie
laaspiradora.
Inserte nuevamente la manguera en la abertura de
la parte inferior de donde la retir6. Empuje con firmeza para asegurarse de que quede bien conectada,
!. ADVERTENCIA
Peligro de choqueel_rico o lesi6ncorporal
Desconectela unidad antesde limpiada o
dadeservicio.De Io contrariopodrfaproducirseun choqueel_'trico o causar lesi6n corporalsi la aspiradoraarranca de mar=era
Imprevista.
Si considera que la aspiradora no aspira bien
asegurese primero de qua la bolsa no este Ilenay
de que el filtro no este atascado. Consu]te las instrucciones sobfe CAMBIO DE LA BOLSA PARA
POLVOy LIMPIEZA DES FILTROS.
Manguera
expansible
Collar de la
manguera
Si las zonasdel filtro y la bolsa no esta.natascadas,
examine la zona de la manguera. Retire el extreme
inferior de la manguera expansible de la aspiradora
tomandola ;,orel collar y tirando de hacia arriba.
ADVERTENClA
Ex'Uanda y
af/oJe la
manguera
Enchufe la
aspiradora y
enciendala.
Estire al maximo
la manguera y
luego permita
que se encoja
hasta su tamaho
normal de alma*
cenamiento.
Si las &teas de la bolsa y del filtro y las &reas de la
manguera est_.nlibres de obstrucciones,
desconecte la manguera del tubo de la boquilla y
revise si hay residuos de polvo en la tubo de la
boquilla.Vease LIMP]EZA DEL AGITADORpara
limpie el agitador.
Coloque la aspiradora en la posicionvertical
antes de conectarla en el enchufe.
17
Consulte
estecuadro
paraencontrar
solucionesque usted mismo puede realizar cuando tonga problemas
menores de rendimiento. Cualquier servicio que necesite aparte de otros descritos en este manual tienen que
set hechos per un represetante de servicio autorizado,
iiiili;ililililili R iii!ililiiiiiiiiiiiiiiililililiiii
iiiiiii!ii
I AU ili i iiiii
_]_]:_:_:_:_:[_::::_:_:_:_:_:_:_:_:_:_:_:_:_:_:_::_:_:_:::_:_:_V_
_:;I_;::_ ii_i_i_ii
_i_
_i_
La asplrsdora no
funciona.
_____i____i___:_:_:_:_:_:_:]:[:_:_:_;_:_:[:_:_;:::i:i:;_::_:i;i:::;_::::::i:i::::
1. Esta desco_ectada
Z
Codacircuilos
he,ado o lusible
quemado en eEtable_o de servido
de _a residencia.
3.
4.
NO _plra
sa_sfacto_mente,
_nletruptor de encendido!apagado
no estb e_ la posiclSa ON
Protector formal activado
1. Conecte bien, optima setector de
encendkJoiapagado a la position ON
2. Restablezca el ¢ortacircuilos o
cambie el fusible.
&
Coloque el interruplor de encendlde!
apagade en la posicide ON.
4, Deje que la aspiradora se enlrie, luego
reajuste el protector termal, (pagina 12)
1. Boisa para pone tlena o atascade
1. Cambie la bolsa, {p&gina 101.
2.
Ajuste incorrecto de ravel de pebde
la albmbla
2. Aiuste ef nive_, ip&gina 7)
3.
Agi(ador desgastade
3. Acuda el Cenlfo de Servicio de Sears
m_s cercano
4.
8oq_lilta, o suietade [ de la bofsa, atascada.
4,
5,
Manguera alascade.
&
Manguera rota
5. Limpiar tube para el mug_e, (pagina 18)
6. Aeuda el Centre de Servicio de Sears
m&s cercano
Revise COM0 ELIMINAR LOS RESIDUES
DE 8ASURA EN LOS CONDUCTOS,
(pa.gina 18)
7.
La manguera no esta bien bsertada
8. Ac_ivaci6t_ det sistema de protection
de[ motor.
7.
8.
9. Filtros de segurdad
9. Cambie el liltros, (p&gina t6)
La aspiradora levents
tapetes o es dif{cul empujar.
1. Ajuste incorrecto de nivel de pelo
de la allornbra
1. Ajusle e_nivel, (pagina 7)
La luz no funoiona.
1. Bonlbilla fundida
1. Cambie la bombilla. (pagina 11)
1, Selector encendide/apagade del agitadof
en posicion OFF
2. Ponga el asa completarnenle en
position vertical
& Separe ta manguera de la boquilla
1. Ponga el selector en posicibn ON,
(pagina 8)
El ensamble de_ agltadot
no glta
de la ;'nanguera
El Indtcador de rendlmlento,
a_guno_
modelos, est_ rojo.
Restricck_ndet flu}o
de el u8o de ]os accesorio&
Cambb de sonido.
Mueva el asa desde la posicbn
(p&gina 7)
verlicai,
3. Vuelva a ensamblar la manguera a la
boquilla de la manguera, (pagina 10).
4. Sobrecarga del agitader activacta.
4.
5. Deie queta aspiradera se enfrie,
luego reajuste el protector termal
5. SeJe_tor encendideiapagado del agitader
en poslciSn OFF, (l_gina 12}
1. Bolsa para poivo Ilena o atascada.
2.
Filt{os de seguridad
Reajuste la sobrecarga del agilador,
(pagina 12)
1. Cambie {a bolsa. (pagina 10).
2. Cambie el tiltros, (p#{gJnat6)
3. Conducto de tlujo de aire atascado
&
Retire e{ material btoquear_te del
conducto de aire. (pagina 17)
4.
4.
Esto es normal La luz debe apagatse al
quitar la herram_enta
Ciedos
;_ccesorlos
1. Ei use de io_accesorios limita el
llujo de aire
2. La pelusa de una allombla nueva
obstruye el paso de air&
fndbadet de pobo, algunos
modelos, no funolona.
2.
Insede bbn ta manguera, (p&gina I0}.
Determine si existen b_oqueos,
(pagina 18)
1. Celd_$
ophca£
1. Revise use
DE LOS
ACCESORIOS, (p_gina 8)
2. Revise COMe ELIMINAR LOS RESIDUES DE BASURA EN LOS CONDUCTOS y limpie {a manguera, (p_gina 18)
_.£t&n sucJa£
1. Limpie las ce_das operas, (pagina 13)
18
@
19
Your Home
For repair - in your home - of all major brand appliances,
lawn and garden equipment,
or heating and cooling systems,
no matter who made it, no matter who sold it!
For the replacement
owner's manuals
parts, accessories
and
that you need to do-it-yourself.
For Sears professional installation of home appliances
and items like garage door openers and water heaters.
1-800-4-MY-HOME
(1-800-469-4663)
®
/
Anytime, day or night
(U.S.A. and Canada)
www.sears,com
www.sears.ca
Our Home
For re_air of carry-in products like vacuums, lawn equipment,
_.nd electronics, call or go on-line for the nearest
Sears Parts and Repair Center.
1-800-488-1222
Anytime, day or night (U.S.A. only)
www.sears.com
To purchase a protection agreement (U.S,A.)
or maintenance agreement (Canada) on a product serviced by Sears:
1-800-827-6655
(U.S.A.)
Para pedir serv_o=ode reparaci6n
a domicilio, y para oroenar piezas:
1..888-SU-HOGAR sM
(1-888-784-6427)
1-800-361-6665
(Canada)
Au Canada pour service en francais:
1-800-LE-FOYER
Mc
(1-800-533-6937)
www.sears.ca
8E/
© Sears, Roebuck and Co.
® Registered Trademark / rM Trademark / sM Service Mark of Sears, Roebuck and Co.
® Marca Registrada / T_,IMarca de F&brica / sM Marca de Servicio de Sears, Roebuck and Co.
_c Marque
de commerce
/ MOMarque
di3pos6e de Sears. Roebuck
and Co.