1
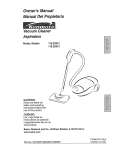
Owner's Manual
Vacuum Cleaner
Model
116.29912
CAUTION:
Read and follow all
safety and operating
instructions before first
use of this product.
Sears, Roebuck and Co., Hoffman Estates, IL 60179 U.S.A.
www.sears.com
Part No, CO1ZAUY10U00_8174834
Printed in U,SA
HowYour Vacuum Works ............
Canister Care ......................
Before Using Your New Vacuum .......
2
Kenmore Vacuum Cleaner Warranty .... 2
Important Safety instructions ..........
Parts and Features ..................
3
4-5
Assembly
6-7
Instructions
.............
14
I4
Bag Changing
Cleaning Exterior and Atlachments .....
Motor Safety Filter Changing ...........
Exhaust Filter Changing ...............
................
Use .................................
8
How to Start .......................
8
Vacuuming Tips .....................
9
Suggested Pile Height Settings .........
9
Dirt Sensor ....................
10
Attachments ......................
11
Attachment Use Chart ..................
12
Performance Features ............
12-13
Power-Mate ® Care
14
15
i5
16
.......
..................
16
Belt Changing and Agitator Cleaning o, 17-18
Light Bulb Changing ....................
18
Agitator Servicing ...................
19
Agitator Assembly ................
19
Troubleshooting
..........................
Requesting Assistance
Or Service
Please read this guide° It will help you assemble
the safest and most effective way.
20
... 21
and operate your new Kenmore vacuum in
For more information about vacuum cleaner care and operation, call your nearest Sears store.
You will need the complete model and serial numbers when requesting information. Your vacuum's model and serial numbers are located on the Model and Serial Number Plate°
Use the space below to record the model number and serial number of your new Kenmore
vacuum.
Model Noo
Serial No.
Date of Purchase
Keep this book and your sales check (receipt) in a safe place for future reference.
LIMITED
ONEYEARWARRANTY
ON KENMOREVACUUM
CLEANER
This warranty is for one year from the date of purchase, and includes only private household
vacuum cleaner use. During the warranty year, when this vacuum cleaner is operated and
maintained according to the owner's manual instructions, Sears will repair any defects in
material or workmanship free of charge°
This warranty excludes vacuum bags, belts, light bulbs, and filters, which are expendable
and become worn during normal use°
For warranty service,
the United States,
return
this vacuum
cleaner to the nearest
Sears Service
parts
Center in
This warranty applies only while this product is in use in the United States. This warranty gives
you specific tegal rights, and you may also have other rights which vary from state to state
Sears, Roebuck and Co,, DI817 WA, Heffman
Estates, IL 60179
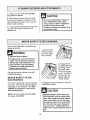
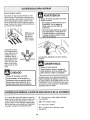
WARNING
Your safety is important to us.To reduce the risk of fire, electrical shock, injury to
persons or damage when using your vacuum cleaner, follow basic safety precautions including the following:
Read this manual before assembling or
using your vacuum cleaner.
Do not operate the cleaner with a punctured
hose. The hose contains electrical wires.
Replace if cut or worn, Avoid picking up
sharp objects
Use your cleaner only as described in this
manual Use only with Sears recommended
attachments_
Do not use with any opening blocked; keep
free of dust, tint, hair and anything that may
reduce air flow.
To reduce the risk of electrical shock - Do
not use outdoors or on wet surfaces.
Keep hair, loose clothing, fingers, and all
parts of body away from openings and moving parts
Disconnect electrical supply before servicing or ctean[ng out brush area. Failure to do
so could result in electrical shock or brush
suddenly starting.
Do not use cleaner without dust bag and/or
filters in place.
Always turn cleaner off before connecting or
disconnecting the hose or Power-Mate _
Always
Always change the dust bag after vacuuming carpet cleaners or freshener, powders
and fine dust. These products clog the bag,
reduce airflow and can cause the bag to
burst. Failure to change bag could cause
permanent damage to the cleaner.
turn cleaner off before unplugging
Do not unplug by pulling on cord. To unplug,
grasp the plug, not the cord.
Hold plug when rewinding onto cord reel.
Do not a{Iow plug to whip when rewinding.
Do not use the cleaner to pick up sharp hard
objects, small toys, pins, paper clips, etc.
They may damage the cleaner or dust bag.
Do not use with damaged cord or plug If
cleaner is not working as it should, has been
dropped, damaged, left outdoors, or dropped
into water, return it to a Sears Service
Center_
Do not
handle,
around
cleaner
heated
Do not pick up anything that is burning or
smoking, such as cigarettes, matches, or hot
ashes.
pull or carry by cord, use cord as a
close door on cord, or pull cord
sharp edges or corners. Do not run
over cord Keep cord away from
surfaces
Do not use cleaner to pick up flammable or
combustible liquids (gasoline, cleaning fluids,
perfumes, etc.), or use in areas where they
may be present. The fumes from these substances can create a fire hazard or explosion,
Do not leave cleaner when plugged in.
Unplug from outlet when not in use and
before servicing.
Use extra care when cleaning on stairs. Do
not put on chairs, tables, etc Keep on floor.
Do not allow to be used as a toy. Close
attention is necessary when used by or near
children.
You are responsible for making sure that
your vacuum cleaner is not used by anyone
unable to operate it properly,
Do not handle plug or cleaner with wet
hands.
Do not operate without exhaust
exhaust filter cover installed.
Do not put any objects into openings.
filter or
SAVE THESE iNSTRUCTiONS
Proper assembly and safe use of your vacuum cleaner are your responsibilities. Your cleaner
is intended only for household use_ Read this Owner's Manual carefully for important use and
safety information. This guide contains safety statements under warning and caution symbols
Please pay special attention to Lhese boxes and follow any instructions given WARNING
statements alert you to such dangers as fire, electrical shock, burns and personal injury CAUTION statements alert you to such dangers as personal injury and/or property damage
3
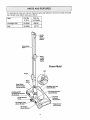
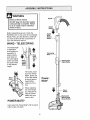
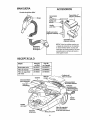
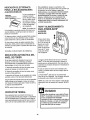
it is importantto knowyourvacuumcleaner'sparts andfeaturesto ensureits properandsafe
use.Reviewthesebeforeusingyourcleaner°
Item
Part No,
In U.S.
Part No.
In Canada
Headlight Bulb
20-5240
596181
Belt
20-5285
40110
*---
Handle
Quick
Release
Button
Telescoping
Wand
Wand
Length
Adjust
Button
Power-Mates
Belt
Flange "_
Wand
Swivel
Wand Quick
"_
Release Pedal
_
t_ndtens
(SomeModels)__
Model/Serlal Numbers
_'_
k_
OnBottom) " 'RXA
Handle Release
(Some Models)
_
HOSE
ATTACHMENTS
Electronic Touch Control
Power.Mate Jr, ®
(Some Models)
Crevice
Tool
Dustlng
Brush
Fabric
Brush
Handle
Floor
Brush
HandI-Mate Jr, ®
(Some Models)
NOTE: All models have one set of
attachments in the canister. Some
models have an additional set, which
Hose Swivel
can be kept in the accessory bag for
garage use or other dirty areas.
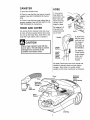
CANISTER
Item
Part No.
In U.S,
Part No.
In Canada
Dust Bag
Exhaust Filter
20-50557
20-50557C
20-86882
20_86882C
Motor Safety Filter
20-86883
20-86883C
Cover
Exhaust
Filter Cover
Exhaust
Attachment
Rewind Bar
Canister
Bag/Hose Check
(Some Models)
Cord
Hood
Motor Safety Filter
(Behind Dust Bag)
Bag
Dust Bag
E
WARNING
Electrical Shock Hazard
DO NOT plug into electrical supply
until assembly is complete, Failure
to do so could result in electrical
Handle
shock or injury.
.........................
i
Before assembling vacuum, check the
PACKING LIST on the cover of the separate
Repair Parts List. Use this Fist to verify that
you have received all the components of
your new Kenmore vacuum.
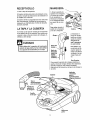
WAND -TELESCOPING
The wand length
is adjustable
and requires no
assembly. To
adjust, simpfy
push down on
the wand adjust
button and slide
the upper wand
to the desired
t
B
Telescoping
Wand --
Wand
Length
AdJust
Button
Hand
Above
This
Tab
Wand Length
Adjust Button
m
m
height.
The swivel, located on the PowerWand
Swivel
\
Mate ®, allows you
to turn the handle
to the left side to
reach farther
under low furniture
PowerMates
When adjusting
the wand length
you may have to
hold the PowerMate ®with your
hand or foot.
POWER-MATEs
Insert wand into Power-Mate e until the wand
button snaps into place.
_. Wand Quick
Release Pedal
(Some Models)
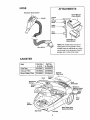
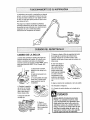
CANISTER
HOSE
1o Open the canister hood.
2. Check to see that the dust bag is properly
instalted. See BAG CHANGING for instructions,
3. Check to see that the motor safety filter is
properly installed See MOTOR SAFETY FILTER CLEANING for instructions.
HOOD AND COVER
It is normal for the canister hood and cover
to come off when opened further than needed, Line up the hinge slots, insert them, and
close the hood and/or cover to replace it.
1. Line up the
hose latch tab
and notch in canister hood and
insert hose into
canister until it
snaps in place_
Hose
Latch
Tab
To remove: Lift
hose latch tab
upward and pull
up on hose.
Notch__
2. Insert handle into wand
until lock but-
CAUTION
Never open canister hood with the
cover open. This will help to prevent
damage from occurring
to the
canister hood and!or cover.
ton snaps in
place Be
sure hose is
not twisted.
Handle
Button
==
'='
Handle
Quick
Release
_
_
(Some
_
r-]
v
To remove:
Press handle
quick release
button and
To store: Disconnect hose from wands and
canister to prevent stress on hose during
storage. Store hose in a loosely coiled
position so the hose covering is not stressed.
Electronic
Bag/Hose
Chock
Cover
Storage
Hose
Latch
Tab
Hood
Release
Dust Bag
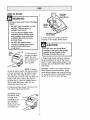
HOW TO START
Pile Height
Indicator
Personal Injury and Product Damage
Hazard
Handle
o DO NOT plug in if switch is in ON
position, Personal injury or
damage could result,
• The cord moves rapidly when
rewinding, Keep children away
and provide a clear path when
rewinding the cord to prevent
personal injury.
• DO NOT use outlets above
counters° Damage from cord to
items in surrounding area
could occur_
Cord
Rewlnd
1. Pull cord out of
canister to desired
length,, The cord
will not rewind until
the cord rewind
bar is pushed.
NOTE: To reduce
the risk of electric shock, this vacuum cleaner has a polarized plug, one blade is wider
than the other. This plug will fit in a polarized outlet only one way. If the plug does not
fit fully in the outlet, reverse the plugo If it
still does not fit, contact a qualified electrician to install the proper outlet, Do not
change the plug in any way.
2_ Plug the polarized power cord into a 120
Volt outlet located near the floor.
To rewind: Unplug
the cleaner, Hold
the plug while
rewinding to prevent damage or
injury from the
moving cord. Push
cord rewind barr
Pile Height Pedal
(Some Models)
3. Lower wand from upright position by
pressing on the handle release pedal
E
•
CAUTION
...........
DO NOT leave the Power-Mate ®
running in one spot in the upright
position for any length of time.
Damage to carpet may occur,
4. Select a pile height setting by pressing
the small pedal on the rear of the PowerMate®° The pile height setting shows on the
indicator. See SUGGESTED PILE HEIGHT
SETTINGS.
Attention:
Refer to your carpet manufacturers cleaning recommendations.
Some
more delicate carpets may require that they
be vacuumed with the Power-Mate s agitator
turned off, to prevent carpet damage.
ELECTRONIC
TOUCH CONTROL
CARPET High - turns on both the canister
and the Power-Mate _ motors for HIGH
power and cleaning of most carpets,
5, Select an
Electronic Touch
In order to get MEDIUM or LOW power level
for carpet cleaning, you must press CARPET High button first, then press the
desired lower power level
BARE FLOOR High - turns on the canister
motor only for HIGH power and cleaning of
bare floors.
Control position
on the handle
depending on
the type of vacuuming you will
be doing
Power Level MEDIUM - reduces the power
of the canister motor only to the MEDIUM
level for attachment cleaning of upholstery.
P_gE_ LEVEL
Power Level LOW - reduces the power of
the canister motor only to the LOW level for
attachment cleaning of curtains, blinds, etc_
OFF - turns off canister and Power-Mate _
motors.
NOTE -When the BARE FLOOR
ton is pressed, the headlight and
(some models) DO NOT function
electricity flows to the Power-Mate
High butdirt sensor
since no
_,
Suggested
sweeping
pattern.
For best cleaning action, the Power-Mate _
should be pushed straight away from you
and pulled straight back. At the end of each
pull stroke, the direction of the Power-Mate _
should be changed to point into the next
section to be cleaned. This pattern should
be continued across the rug with slow, gliding motions.
E
•
WARNING
Personal
Hazard
Injury
and Product
Damage
DO NOT run over power cord with
Power.Mate e. Personal injury
or damage could result.
DO NO']" pull plug from wall by the
power cord. If there is damage to
the cord or plug, personal injury
or property damage could result.
NOTE: Fast,
jerky strokes do
not provide
complete cleaning.
The hose swivel
allows the hose to
turn without moving
the canister,, This is
Carpeted
ularly.
helpful for cleaning
in small areas.
Check hose for
twisting before
pulling canister.
stairs need to be vacuumed
reg-
WARNING
Personal Injury Hazard
CAUTION
Use care if canister is placed on
stairs. If it falls, personal injury or
property damage could result.
Product Damage Hazard
Use care if the Power-Mate ®and
wand is left in the upright position as
it may tip over easily. Property
damage can occur if tipped.
I
!lUl!l"j'll
,
ii
i1,1 .,,i
For best cleaning results, keep the airflow
passage open,, Check each assembly area
in HOW YOUR VACUUM WORKS occasion-
, , i
ally for clog&
checking.
Unplug
from outlet
before
HI - Shag, deep pile, or scatter rugs.
For best deep down cleaning, use the XLO
setting However, you may need to raise the
height to make some jobs easier, such as
scatter rugs and some deep pile carpets,
and to prevent the vacuum cleaner from
shutting off Suggested settings are:
MED - Medium to deep pile.
LO - Low to medium pile,
XLO - Most carpets and bare floors.
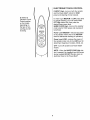
10
Thedirtsensorlightsystemis mountedon
the Power-Mate
®nozzlenearthe resetbutton,It consistsof a seriesof threeredlights
andonegreenlight.
Thelightsgive
youan indicationof the
amountofdirt
particlesthat
arepassing
Dirt Sensor
(Some Models)
1. Remove the
wands by pressing the quick
release pedal and
lifting up on the
wands
thru the sensor
on its way to
the dust bag
Cross Section View
INITIAL START UP
Ap_prox,
3 _ Inches
or gOmm
__L__.
When the Power-Mate _ is first started, the following light sequences occurs in a two second time frame:
I. All three reds come on.
Sensor
Elements
2.Two reds are on.
3. One red is on
4. One green is on and will remain on until
the Power-Mate ® nozzle is placed in use.
NOTE: If the nozzle is on a surface that has
2, As indicated by the illustration, the two dirt
sensor elements are located on the inside of
the swivel, approximately 3½ inches/90 mm
down, (note the arrows). Each element
should be cleaned periodically+ To reach the
sensor elements, use a smalt brush such as
a bottle brush+l Brush each sensor element
several times to remove dust and dirt.
dirt on it, dirt wilt be picked up by the vacuum
and one or more red lights might stay on.
IN OPERATION
When the Power-Mate _ is being moved back
and forth on the floor, the lights will change
from one configuration to another as more
dirt or less dirt is being vacuumed+ As long as
one or more red tights are on, dirt is passing
through the wand to indicate that the surface
still needs cleaning
NOTE: Looking down inside the swivel you
will see a ring. The sensor elements are
located just slightly below this ring.
When the green light stays on as the PowerMate '_ is moved back and forth over an area,
the sensor is not seeing enough dirt to warrant further cleaning of that area.
3. Reinstall the wands after cleaning the sensots,
NOTE: Dirt sensor lights DO NOT function in
the FLOOR setting
CAUTION
CLEANING LENS
Never use water or any cleaning
solution when cleaning the lenses.
The residue of the water or cleaners
Although the dirt sensor feature in your
Kenmore Power-Mate ® is designed for years
of trouble free use, the passage of dirt
through the air passage system can coat the
fens causing the green light to come on and
stay on - never switching to red+ When this
happens the lens must be cleaned_
will accelerate the recoating of the
lenses and make cleaning necessary
sooner,
11
!
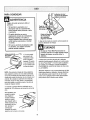
ATTACHMENTS ON WANDS
•
SOME
cAUTION
DO NOT attach or remove handle or
wands while cleaner is ON. This
1. To remove
wands from
Power-Mate s,
lock wands in
straight-up
position,
could cause sparking and damage
the electrical contacts,
iiii
ON HANDLE
ATTACHMENTS
NOTE: if the
Power-Mate s is
,'_- Handle
Lock
Button --_i
'='
MODELS
attached, turn
cleaner off
before removing handle from
wands,
_
1. Press lock
button, then
pull to remove
handle from
wand,
='= _
Wand
Release
Quick
Pedal
Ifyour model
has the optional feature of a handle release,
press it in similarly,
2. Press wand quick
release pedal with foot
and pull the wands
straight up out of
Power-Mate_.,
The Power-Mate e plug
and cord do not have
to be removed to use
attachments on the
wands,
3. Put attach-ments
wands as
needed, See
ATTACHMENT
USE.
2. Slide attachments firmly on
handle as needed, See
ATTACHMENT
USE.
12
--,
on
CLEANING
Between
Furniture* Cushions*
ATTACHMENT
Dusting Brush
X
Crevice Tool
x
Fabric Brush
X
Drapes*
AREA
Stairs
Bare
Floors
Carpeted
Floors/Rugs
Walls
x
x
x
X
Floor Brush
X
X
X
(Some Models)
X**
Power'Mate_
Handi':"MateJr?
......
{Some Models)**"
Power-Mate Jr?
(Some
X
X
X
X
X
Modefs)**"
*Alwaysclean attachments before using on fabrics
** 3-way OntOff switch shouid be in FLOOR position
*** Handi-Mate Jr ®and Power-Mate Jr ®attachment instructions are includedwith the products
NOTE: When separating wands, depress lock button completely before pullingwands
apart. If
wand lock button is difficult to depress push the two wands more tightly together to line up
the lock button with the hole. Depress lock button and then pu wands apart,
EDGE CLEANER
SUCTION
CONTROL
The suction
control allows
Active brush edge
cleaners are on both
sides of the PowerMate_, Guide either
side of the Power-
you to change
the vacuum
suction for
different fabric
Mate _ along base=
boards or next to
furniture to help
remove dirt trapped at
carpet edges.
Suction
Suction
and carpet
weights. Opening the control decreases
suction for draperies and lightweight rugs,
while closing the control increases suction
for upholsteries and carpets.
OVERLOAD PROTECTOR
The Power-Mate ®has
Overload Protector
built-in protection
Reset Button
against motor and belt
damage should the
agitator jamo If the
agitator slows down or
stops, the overload
protector shuts off the
Power-Mate s, The
canister motor will continue to run,
WARNING
Personal
Injury Hazard
Always unplug the vacuum cleaner
before cleaning the agitator area as
brush may suddenly restart.
Failure
to do so can result in personal
injury.
To correct problem: Turn off vacuum,
remove obstruction, then press reset button,
To reset: Push in the overload protector
button
13
ELECTRONIC BAG/HOSE
CHECK INDICATOR
SOME
MODELS
Electronic
Bag/Hose
Check_
The light comes
on whenever the
airflow becomes
blocked, dust bag
needs changing
or canister safety
filter needs clean-
To reset: Turn off and unplug the vacuum
from the outlet to allow the vacuum to coot.
Check for and remove any clogs, Also
check and replace any clogged filters.Wait
approximately
50 minutes and plug the
vacuum in and turn back on to see if the
thermal protector has reset. In some
cases, the unit may suddenly restart.
NOT leave unattended.
DO
POWER-MATE d STORAGE
ing.
SOME
NOTE: The light may come on when using
certain attachments, due to reduced airflow
through attachment.
MODELS
The lower wand
has a "U" shaped
flange in the
area where the
In some cases, when vacuuming loose
fibers, like new carpet lint, the bag may be
full and the light may not come on.
power cord
attaches. The
base has a "U"
In some cases, when vacuuming fine materials such as powder, soot, plaster dust, carpet
freshener, the bag may not appear full but
the light does come on.
shaped slot near
the front caster.
The slot allows
the wands and
Power-Mate _ to
be stored with the canister to conserve
Refer to TROUBLESHOOTING
AUTO POWER DOWN MODE
If vacuuming is continued after the light
comes on, the canister motor will automatically change speed to MEDIUM and/or LOW
to protect the motor from excessive heal
stor-
age space. The canister must be stored on
end for this feature to be used.
The wand will s_ip out of the slot as it is lifted
up for use and will slide into the slot as it is
lowered for storage.
1, Auto power down mode occurs when there
is a blocked airflow passage.
The Power-Mate e must be in the fiat position
as shown in the illustration. Use the handle
2. Auto power down mode occurs when the
bag is full.
release pedal to place it in this position.
Removal of blockage andtor bag replacement
will allow you to return to the seiected power
level.
NOTE: You may save space by lowering the
telescoping wand as shown in the ASSEMBLY section.
Further vacuuming after the light stays on
may cause the canister motor to shut off.
Wait up to 50 minutes for motor to cool and
automatically reset°
!
NOTE: Check bag often.
THERMAL PROTECTOR
CAUTION
To prevent tip
over, never leave
®
Power-Mate
on or m the upright
position with the wand fully
extended. Moving the wand to a
lower position and turning the
handle to one side will make the
Power-Mate d more stable and less
This vacuum has a thermal protector which
automatically trips to protect the vacuum from
overheating
The thermal protector turns the
motor off automatically to allow the motor to
cool in order to prevent possible damage to
the vacuum.
likely
14
to tip over.
The vacuum cleaner creates suction that
picks up dirL Rapidly moving air carries the
dirt to the dust bag through the airflow passages. The dust bag lets the air pass
through, while it traps the dirt.
/)
iSF
",4
1
For best cleaning results, keep the airflow
///
passage open° Check the starred areas
/_#,,/
occasionally for clogs. Unplug from outlet ,Z_7
before checking
,,_7
Motor
Safety
Filter
\
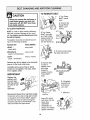
BAG CHANGING
Exhaust
Filter
7. The red bag mount will flip forward after
removing bag. This will prevent the lid from
closing unlit a new bag is installed.
For best cleaning results, the dust bag
should be changed often, The electronic/
mechanica! baglhose check indicator wi!l
come on when the bag needs to be changed
or the airflow is blocked, NOTE: See PARTS
AND FEATURES for Bag Number.
8. Rotate red bag
mount down and
install bag into
slots per
instructions
1. Unplug cord from
wall outleL
pushing down until
the cardboard tab
locks into position
and the holes
2, Remove hose
from canister.
align. Tuck the bag
securely into the bag cavity so that none of it
is able to be pinched by the hood.
3. Pull hood release
out and up, then tiff
canister hood.
9. Close and latch canister hood°
4. Disengage
cardboard tab from
10. Reinstall hose.
!
red bag mount by
pulling away and
lifting up
& Pull bag out of
the red bag mount.
NEVER REUSE A DUST BAG, Very
fine materials, such as carpet freshener, face powder, fine dust, plaster,
soot, new carpet lint, etc. can clog
the bag and cause it to burst before
it is full and may cause damage to
vacuum motor. Change bag more
often when vacuuming
these materials.
6. Check and
Safe
Fllter ,.I--/ // // // ///,
cAUTIoN
replace, if
necessary, the
motor safety
filter
_ed Bag
Mount
15
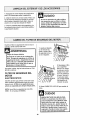
1, Unplug cord from wall outleL DO NOT
drip water on cleaner.
2, Clean exterior using a clean, soft cloth
that has been dipped in a solution of mild
liquid detergent and water, then wrung dry,
Wipe dry after cleaning.
E
Shock
#
I
11111, _1 ii1,111,1=,,i,1,,i'
, i
1. Lift the rubber
retainer and pull
out motor safety
filter as shown.
fA\" f
i/M,,
Unplug power cord from electrical
outlet. Do not operate the cleaner
without the motor safety filter. Be
sure the filter is dry and properly
installed to prevent motor failure
and/or electrical shock.
2. Replace the filter, white side out,
by sliding it back
into place under
the ribs in the bag
cavity. Tuck filter in
so that it fits com-
Remove the bag as outlined in the BAG
CHANGING section°
pletely under the
rubber retainer,
FILTER
3. Replace the bag as outlined
CHANGING section.
This white and grey filter must be replaced
when dirty It should be replaced regularly
depending on use conditions, The filter
CANNOT be washed as it will lose its
dust trapping
I
and
Hazard
MOTOR SAFETY
ELECTROSTATIC
N
surfaces until they are washed,They
could leave marks.
!.13 ......
Electrical
........ "'
Do not use attachments
if they are
wet. Attachments
used in dirty
areas, such as under a refrigerator,
should not be used on other
3o To reduce static electricity and dust buildup, wipe outer surface of cleaner and
attachments.
Check motor safety filter occasionally
change when dirty.
CAUTIO
!
ability.
NOTE: Use motor safety filter #20-86883,,
In Canada, #20-86883C.
in the BAG
,i CAUTION
NEVER REUSE A DUST BAG. Very
fine materials, such as carpet freshener, face powder, fine dust, plaster,
soot, new carpet lint, etc. can clog
the bag and cause it to burst before
it is full and may cause damage to
vacuum motor, Change bag more
often when vacuuming these materials.
16
2. Slightly push
the exhaust filter
WARNING .......
Exhaust
cartridge to the
side, as shown in
the illustration,
and pull up to
remove.
Fire and/or Electrical Shock Hazard
Do not operate with a clogged
exhaust filter or without the exhaust
filter or exhaust filter cover installed.
i
ii
iiii
EXHAUST FILTER
HEPA
3. Replace the
exhaust filter car-
The exhaust filter cartridge must be
replaced when dirty. Replace the filter when
the entire surface area is covered evenly.
The filter CANNOT be washed as it will
lose its dust trapping ability.
tridge, carefully
positioning it so
that the side
shown in the
illustration goes
down under the
NOTE: Use exhaust filter #20-86882.
Canada, #20-86882C_
ribs. Then push
the other side
1. Pull up on
the exhaust filter cover to
remove from
the motor cover
Exhaust
Filter
_
_
=./"
In
._,,,_\\
q=,,|
Exhaust
Filter.
down until it snaps into place,. Place the new
filter into the motor cover with the grey
I
J
edge down.
4. Replace the
exhaust filter
Exhaust_"_-._
and lay aside°
cover by engaging the two tabs
on the rear and
Filter Cove__
pushing down in
front until it
To.
!
Always follow alt safety precautions when
cleaning and servicing the Power-Mate ® .
snaps closed_
WARNING
Electrical
Hazard
,,
Shock Or Personal
Injury
Disconnect electrical supply before
servicing
or cleaning the unit.
Failure to do so could result in electrical shock or personal injury
cleaner suddenly starting.
,
17
,' 'IHHI
from
,i i,i1,,,
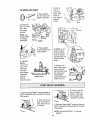
TO REMOVE BELT
•
CAUTION
When you remove the end caps, a
small metal washer on each end
may come off, DO NOT lose these
two metal washers.
u
TO CLEAN AGITATOR
i
NOTE: In order to keep cleaning efficiency
high and to prevent damage to your vacuum, the agitator must be cleaned every time
the belt is chanqedd.
Use
2. Unscrew the
two (2) PowerMate _ cover
screws.
3, Turn PowerMate ® right side
up Press handle
release pedal and
lower the swivel,
The agitator must also be cleaned according to the following schedule:
Vacuum
1. Turn PowerMate e upside
down,
Lift rear latches up
Clean Agitator
HEAVY (used daily)
every week
MODERATE (used 2-3 timeslweek)
every month
LIGHT -
every 2 months
4. To remove cover, grasp
the sides and pull out.
(used 1 timelweek)
Remove any dirt or debris in the belt path
area or in the brush roller area.
5. Depress tabs
on rear of
Carefully remove any string or debris
located on the agitator, end caps, washers or agitator shaft.
agitator cover
and rotate
forward to
release from the
Power-Mate _
base.
iMPORTANT
washers
the end
See the
ed view
Replace
rect
Tabs
Agitator
Covet
and
caps.
explodfor corthe
6o Lift agitator
assembly out
and remove
worn belt.
assembly.
7. Slide end
Disconnect cleaner from electrical outlet.
Check and remove hair, string and lint buildup frequently in the Power-Mate e agitator
and end cap areas_ If build-up becomes
excessive, disconnect Power-Mate ® from
wand and follow the steps below.
End Cap
caps off to check
and clean end cap
areas° See
AGITATOR
ASSEMBLY for
picture of complete
agitator assembly
18
End Cap
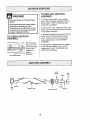
TO REPLACE BELT
1, Slide washers
and end caps onto
agitator assembly,
5, Line up
front of
cover and
base_ Rest
cover on
front edge of
base as
shown,
2. Install new
belt over motor
drive, then
over brush
sprocket.
NOTE: Use
belt #20-5201.
In Canada,
#20-4097&
i
Cover
'
Base
:::::3
Top View
io
Brush
Motor
Drive
_o
End Cap
rim
3, Place agitator
assembly back into
Power-Mate ® ,
4. Reinstall
agitator
cover by lining up the
front tabs
and slots
and rotating
downward
until the
latches
6. NOTE: On dirt
sensor models
be sure that the
board is upright
and the wires are
>
tucked back as
shown.
k4
7, Rotate cover
back, Press cover
firmly until side
and rear tabs snap
into placer Turn
Power-Mate ®
Agitator Cover
upside down and
replace two (2)
snap into place.
:[
PUSdhTnurn
I
1. Remove Power-Mate e cover as shown in
BELT CHANGING
ING section.
AND AGITATOR CLEAN-
3. Push in and turn
bulb clockwise, to
replace° Bulb must
not be higher than
15 Watts (130 Volts),
2. Push in and turn
bulb counterclockwise, then pull out
to remove.
4. Reinstall Power-Mate e cover as shown in
BELT CHANGING AND AGITATOR CLEANING section,
NOTE: Use bulb #20-5240.
#596!81.
19
tn Canada,
WARNING
,,
Electrical
Hazard
i
TO REPLACE AGITATOR
ASSEMBLY
ii,
1, Remove Power-Mate ® cover, agitator
cover, belt and agitator assembly. See "To
Remove Belt" in BELT CHANGING AND
AGITATOR CLEANING.
Shock Or Personal Injury
Disconnect electrical supply before
servicing or cleaning the unit°
Failure to do so could result in electrical shock or personal injury from
cleaner suddenly starting.
2. Remove end caps, washers, screws, end
brush, and brush sprocket pieces from ends
of old agitator assembly
3, Reassemble agitator assembly. To line up
screw holes in dowel, sprocket and end
brush, be sure all of the brush sprocket
pieces align properly. See AGITATOR
ASSEMBLY,
TO CHECK AGITATOR
ASSEMBLY
__
When brushes
4. Reinstall belt, agitator assembly, agitator
cover and Power-Mate ® cover. See "To
level of the base
replace belt" in BELT CHANGING
AGITATOR CLEANING.
support bars,
repface the
are
worn to the
agitator
assembly.
___._
AND
Base Support Bars
End
Brush
End
Screw
End
Cap
Screw
Agitator Unit
Brush Sprocket
20
Washer
Review this table to find do-it-yourself
solutions for minor performance
problems. Any service needed, other than those described in this owner's manual, should be performed by
an authorized
Sears Service Center.
,u .........
i iiiii
Disconnect electrical
supply
WARNING
Electrical
Failure to do so could result
i
Cleanerwon't start
Poor Job of dirt
pick-up
Cleanerstarts but
cuts off.
Ii
before Hazard
servicing
Shock
in electrical
i,i1,1,,,i
i iii
Fullor cloggedduel bag
Cloggedairflow passages
Dirtytigers
Wrongptle height setting
Open suction conh-o[
Hole In hose
WornPower*Mate_ agitator
Wornor broken belt
Dirty agitatoror end caps
Canisler hood open.
the unit.
shock or personal
injury.
I!'llllp
1, Plug tn firmly,pushON/OFFsw_lchto ON
2. Reset circuit breakerer replace fuse
3. Reconneclhose ends, (page7).
1,
2
3
4.
5,
6.
7,
8 & g.
Changebag, (page 14)
Clear airflowpassages,(page 14)
Change filters.(page 15-16)
Adjust setting,(page 9).
Adjust conlreL(page 12)
Repiacehose
Change agitator. (page 19),
See BELTCHANGINGAND AGITATOR
CLEANING,(pagest7-18)
10. Close andlalch hoed.
Hoseor hood electricalconnections
2, Trippedoverload pro_ector
in
Power-Mated
3 Trippedoverload protector
in canister
Power*Mate
= wgl not
run when attached,
or cleaning
ir i
ii1,111,111
1_ Unpluggedat wall outlet.
2, Trippedcircuitbreaker/blownfuse
at household service
panel
3. Loosehose electrical connections.
1,
2
3
4.
5.
6_
7.
8.
9
10.
iiiii1,,i
I,
Power-Mete= conneclione
unplugged
2, Worn or brokenbail
3 Dirtyegltafer or end cape
4. Trippedoverload protector in
Power.Male=
1- Check connections,
reconnecthess ends, (page 7)
2_ Removeany items that may be caught
er tammed,then reset If ciesner starts
end stops again, clean agitatorand endcaps,
Ihen reset.(pages 12. 17-18),
3. Turnoff and unplugthevacuumtrameuUetand
waitappreximalefy
50 minutesand ptugthevacuum in, turnback on to see if the protectorhas
reseL(page 13) Changedust bag, clear airflow
blockage,(page 12)
1, Plug in firmly,(page6)
5. Switchnet in CARPETpasiliono
See BELTCHANGINGAND AGITATOR
CLEANING,(pages 17-18}
4, Check agitatorarea forexcessivelint
build-upor jammingClean agitatm"end
end caps,thenreseL(pages12. 17-1B)
5. Moveswitch te CARPETposition. (page8).
Constantgreen tight on
in dirt sensor,
"t Dirt passageIs c!ogged
2 Lenses aredirty
1 Checkfor clogsIn air passages,(page 14)
2, Clean tenses,(page 10)
Any.some. or all red lights
in dirt sensor burn and never
turn green.
1
1, Checkfor clogstn air passages.(page t4)
No green or red dirt
sensor Ilghts.
1 Swilch not In CARPETposition
2, No powerIo sensor board_
1- Move switchIo CARPETpesilion. (page 8)
2. Taketo your neareslSears ServiceCenter.
Electronic/Mechanical
BaglHoseCheck Indicator
eettvelea
1
2.
3
4
1,
2,
3
4
Cleaner picks up moveable
rugs .or- Power-Mate _
1. Wrong pile height selling
2 Suclientee strong
!_ Adjust selling,(page9)
2 Open suction eonlreL(page 11)
Light won't work,
1, Burned out I_ghl bulb,
1. Changelight bulb, (page 18).
Cord won't rewind,
I
2
Dirty power cord
Cord jammed
1. Clean the powercord
2 Pull out cordand rewind
Cleanerleaves markson carpet
1
Wrong vacuuming pattern
1. SeeVACUUMINGTIPS, (page 9)
2&3,
Dirt passageIs clogged
Ful! or cloggeddust bag
D_rtyfilters
Blockedairflowpassage
Certainattachmenttools
Change beg.(page 14).
Change filters,(page 15-16)
Clearblockage from airflow passage (page 14)
This is normal Light should ge off
when tool is removed.
pushes too hard,
21
For repair of major brand appliances in your own home ...
no matter who made it, no matter who sold it!
1-800-4-MY-H
OM E ®
Anytime, day or night
(1-800-469-4663)
(U.S A and Canada)
www.sears.com
www.sears,ca
For repair of carry-in products like vacuums, lawn equipment, and
electronics, call for the nearest Sears Parts and Repair Center.
1-800-488-1222
Anytime, day or night (USA. only)
www.sears,com
For the replacement parts, accessories and owner's manuals
that you need to do-it-yourself, call Sears PartsDirectSM!
1-800-366-PART
6 a.m. - 11 pro., 7 days a week
(U S.A. only)
(1-800-366-7278)
wwwosears.comipartsdirect
To purchase
or inquire about a Sears Service
or Sears Maintenance Agreement:
1-800-827-6655
(USoA,)
1-800-361-6665
7 a m. - 5 p.m_,CST, Mort - Sat.
Agreement
(Canada)
9 a mo- 8 p.m EST, M - F, 4 pm SaL
Para pedir servic_o de reparaci6n a
domidiio, y para ordenar piezas:
1-888*SU-HOGAR su
Au Canada pour service en fran£:ais:
'I-800-LE-FOYER Mc
(1-800-533-6937)
(1-888-784-6427)
WWW sears.ca
HomeCentral®J
@ Sears, Roebuck and Co
® Registered Trademark t "rMTrademark / sMService Mar!{ of Sears, Roebuck and Co
® Marca Registrada/TM Marea de F_brfca / su Marca de Servicio _e Sears, Roebuck and Co
_c Marque de commerce / _ Marque depos_e de Sears, Roebuck and Co,
22
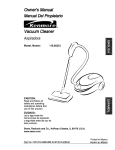
Manual Del Propietario
Aspiradora
Modelo
1!6.29912
CUIDADO:
Lea y sigue todas las
instrucciones de operaci6n
y seguridad antes det uso de
este producto,
Sears, Roebuck and Coo,Hoffman Estates, IL 60179 U.S.A.
www.sears.com
Pieza NOCO1ZAUY10UOO-8174834
Impreso en EUA
Antes de usar su aspiradora nueva ....
Garantia de la aspiradora de Kenmore
lnstrucciones importantes de
seguridad ........................
Piezas y caracteristicas ...........
instrucciones
de
ensamblamiento
...............
Use .................................
Para comenzar
Sugerencias pare aspirar ............
Sugerencias sobre et ajuste de nivel de
peio de la alfombra ...........
Indicadorde potvo ..................
Accesorios
.................
Uso de los accesorios
...........
Caractertsticas de rendimiento .....
.................
2
2
3
4-5
6-7
8
8
9
9
10
11
12
12-13
Funcionamiento
de su aspiradora
......
t4
Cuidado del recept&culo
14
Cambio de la bolsa ..................
14
Limpieza det exterior y de los accesorios . . 15
Cambio del filtro de seguridad del motor o. 15
Cambio del fittro de escape .............
16
..........
Cuidado de la Power-Mate '_ ............
Cambio de la correa y timpieza
del agitador ..............
Cambio de ta bombitla
..................
16
t7-18
18
Cuidado del agitador
...........
Ensamble del agitador .................
Reconocimiento de problemas
lnformaci6n de assistancia
o servicio
....
.........
..................
19
19
20
21
Pot favor lea esta guia que te ayudara a assemblar y operar su aspiradora nueva de Kenmore en una manera
m&s segura y effectiva,
Para mas informaci6nacerca del euidado y operaci6n de esta aspirador, ltame a su tienda Sears mas cercana,
Cuando prequnte pot informaci6n usted necisitar_ el numero completo de serie y modelo de ta aspiradora que
est& Iocado en la placa de los nt_merosde modelo y seri&
Use el espacio de abajo para registrar el nt_merode modelo y serie para su nueva aspiradora de Kenmore,
Nt]mero de Modelo
Nt]mero de Serie
Fecha de Compra
Matenga este libro y su recibo en u tugar seguro para referencias futuras.
GARANTiA LIMITADA DE UN ANO DE LA ASPIRADORA KENMORE
Esta garantia es por un aSo desde la fecha de compra, e incluyesolamente el uso de la aspiradora en hogares
privados. Durante el aSo de garantla, cuando la aspiradora es operada y mantenida de acuerdo al manual de
instrucciones del dueSo,Sears repararA cualquier defecto en materiates o fabricaciOnlibre de cargo,
Esta garantla excluye las bolsas de colecci6n, correas, lamparillas, y filtros, las cuates son partes gastables que
se deterioran con el uso normal.
Para el servicio de garantia,retorne esta aspiradora al Centro de Servicio Sears robs cercano en los
Estados Unidos.
Esta garantia se aplica solamente mientras este producto est_ en uso en los Estados Unidos. Esta garantla le
da a usted derechos legales especfficos, y usted puede tenet tambi6n otros derechos los cuales vat[an de
estado a estado
Sears, Roebuck and Co, D1817WA, Hoffman Estates, IL 60179
i
,ll
ii
illl,lll,,i,,,,i
' ......................
,,,
ADVERTENCIA
Su seguridad es muy irnportante pare nosotros. Pare reducir el riesgo de Incendio, cheque
el_ctrico, lesi6n corporal o defies al utilizer su asptradora, act_e de acuerdo con precauciones
b_sicas de segurldad, entre elias:
No use la aspiradorasi fa mangueraest_ rata La
Lea este manualantes de armar o utilizer su aspiredora.
mangueracontiene alambres el_ctricos C_rnbielasi
est_ rata o desgastada.Evite aspirar objetos
Use su aspiradoraunicarnenteen la forma descrita
agudos.
en este manual Use _nicamentecon accesorios
recornendadospar Sears
No coloqueabjetos en las aberturas.
Para reducirel flesga de cheque et_ctrico,no use
No utilice la aspiradorasi alguna abertura est_ blosu aspiradoraal aire libra ni sabresuperficies rnoiaqueada;mant_ngalalibra de polvo, pelusa,cabellos
des
y cualquieracase qua podria disrninuiretflujo de
aire.
Desconecte el cord6nel_ctrico antesde cornponer
o lirnpiar el _rea de] cepillo.De Io contrafio, ei cepillo
Mantengael cabel]o,rope suelta,dodos y tadas las
_oddaarrencar de form irnprevistao podria
partes del cuerpo alejadosde fas aberturasy plazas
producirseun chequeef6ctrica,
mec_nicas.
Siernpre debe apagarla aspiradoraantes de
No use ta aspiradorasin tenor instalada la balsa
canectaro desconectarla rnanguerade la Powerpare polvoylo tos filtros
Mate®
Siernpredebe apagar su aspiradoraantes de desconectarla
No desconectela aspiradoratirandadel cord6n
e!_ctrico Paredesconectaria,kale el enchufe,no el
cord6n.
Sujete el enchufecon fa mane al enrollar et cord6n
el_ctrico.Paradesconectafla,hale en enchufe,no et
cord6n.
No use ]a aspiradorasi el cord6na el enchufeest_
dafiado Si la aspiradorano est&funcionando adecuadarnenteo si se ha dejado caer, est_ dafiada, se
ha dejado expuestaa la internperieo se ha dejado
caer en ague, devu_tvalaa un Centre de serviciode
Sears
No hale ni transportela aspiradorapar el card6n;no
use el cord6ncoma mango; no cierre puertas sabre
el card6n;no hateef cord6n sabre rebordesagudos
ni esquinas.No peso la aspiradorasoloreel cerd6n.
Mantengael eord6natejadode supedTciescalientes
No abandonela aspiradoracuando est_ conectada
Descan_ctelacuandono la est_ usandoy antes de
darle servicio.
No permita que seautitizadacoma juguete Se
requiere tenormayorcuidadocuando sea utilizada
en Ia proximtdad
de ntfieso par nifios.
No toque ta aspiradorani el enchufe con las manes
moiadas.
Cambie siempre la balsa parepolvo despu_s de
aspirerlirnpiadoresde alfornbraso desodorantes,
talcosy potvosfines. Estos productosatascan la
balsa, reducenel flujo de aire y puedencauser que
_sta se rompa.Si no cambia la balsa podrla ocasionar dafio permanentea la aspiradora.
No use la aspiradorapare levantarobjetos agudos,
]ugueles pequeSos,alfileres,sujetapapeles,etc
Podrfandafter la aspiradoraola balsa pare polva
No levanteninguna case qua se estOquernandoo
emitiendo humo, cornocigarriltos,ceritloso cenizas
calientes
No use la aspiradorapare aspirartiquidos inflamebiaso combustibles(gasoline, liquidos pare timplaza, perfumes,etc.) nila use en lugares donde
6stos podrianester presentes Los vapores de estas
sustanciaspueden crearun peligro de incendio o
explosi6n,
Tonga cuidadoespecialal utilizer la aspiradoraen
escalones No la coloquesabre silias, mesas, elc.
Mant_ngalaen el piso
Usted es responsablede asegurarqua su aspiredora no sea utilizadapar ninguna persona qua no
pueda manejarlacorrectarnente_
No opere sin el filtro de escape nila cubierla det filtro de escapeinstalados
GUARDE ESTAS INSTRUCClONES
El armada y usa seguro de su aspiradora son su responsabilidad. Esta aspiradora ha side disefiada
exclusivamentepare usa darn6stico.La aspiradora deber_ almacenarseen un Iugar seco yen el interio_
Lea este Manual det propietario detenidamente, pues contiene inDrrnaci6n importante sabre seguridad y
usa. Esta quia contiene inforrnaci6nsabre seguridad debaio de simbolos de advertiencia cuidado. Par
favor ponga atenci6n especial a estas instrucciones dadas Advertencta: Este inforrnaci6nle atertar_ con
et poligro de fuego, cheques electricos, quemadas y lesiones. Cuidado: Este inforrnaci6nfe alertara a
petigroscoma lesiones y da_5osde propiedad,
i, '1'
i
,i
,i I' '
i,
iiii
.........
'
I
'i,_',_
Es importante conocer _aspiezas y caractedsticas de su aspiradora para asegurar su usa adecuado y seguro
Examinelas antes de usar su aspiradora,
Objeto
Plaza N°.
en EUA
Pieza N°.
en Canad_
Bombilta de farol
20-5240
596181
Correa
20-5201
40110
Power-Mate
(Algunos modelos)
Nt_meros de serle del
modelo POWER.MATE _
(Parte Inferior)
Pedal de liberacl6n
Pedal de seleccl6n de nlvet
de pale de la alfombra
(Atgunos modelos,
Indlcador de polvo
(Algunos modelos)
de pelo do la alfombra
(Algunos modelos)
Protector contra
sobrecargas
Bot6n de
restauracl6n "Reset"
Limplador de oflllas
(No se muestra)
MANGUERA
ACCESORIOS
Control electr6nlco digital
Power.Mate Jr.®
(Algunos modelos)
Herram/enta
para
hendlduras-----_.
Caplllo para
sacudlr
Ceplllo
___
para telas -----_
_
r13
Ceplllo para plsos
_11
'Algunos modelos)--_-
_
HandI.Mate Jr.=
(Algunos modelos)
NOTA:Todos Ios modelos cuentan con
un juego de accesorios en el recept_cuIo,,Unos modelos tienenun juego adicional qua se puede guardar en la bolsa
accesaria para el uso para la basura u
otros lugares sucios,
Dlsposltlvo
glratorlo de
la manguera
RECEPTACULO
ObJeto
Pieza N".
en EUA
Part NOo
en Canad&
Bolsa para poivo
20-50557
20-50557C
FUtro de escape
20-86882
20-86882C
Filtro de seguridad
del motor
20-86883
20-86883C
F/ttro de
Cublerta
ftltro de escape
A/macenamlento
para accesorlos
cord6n el_ctrlco
Tapa del
recept_culo
electr6nlco para
la bolsa/manguera
_Algunos modelos)
el6ctrlco
Pest/llo
de
Sujetador
de la bolsa
Ftltro de segurldad
del motor (Detr_s
de la bolsa para polvo)
Bolsa para polvo
!
•ADVERTENCIA
'
'i
Peligro de choque et_ctrtco
No conecte la aspiradora hasta que termine
de armarla, De 1ocontrario podrfa causar
un choque eldctricoo lesi6n corporal°
Bot6n
del
Antes de armar la aspiradora, chequee la LISTA
DE EMBALAJE en la cubierta separada de la Lista
de Partes para ReparaciSn_ Use esta lista para verificar que ha recibido todas las componentes de su
nueva aspiradora Kenmore
Bot6n de'2
_
Itberaol6n
r_plda
dei mango--_
TUBO TELESCOPICO
La extension
del tubo es
ajustable y no
requeire el
montaje Para
ajustar,
empuje hacia
abajo en el
bot6n del
tubo y mueva
el tubo supe_
rior a la posici6n dedeada
H
Control de
extensl6n
adjustable
del tubo
Dlsposltlve
glratorlo
del mango
la mano
arrlba
esta
lenggeta
Tubo
telesc6plco --
Control de extensi6n
aJustable del tubo
m
La parte giratofia,
situada en el
Power-mates, le
permite mover el
mango a la izquierda para pasar la
aspiradora a una
extensiSn m&s
larga debajo de los
muebles bajoSr
Cuando ajuste la
longitud de la vara
hay que tener el
Power-Mateeconla
PowerMates
m
m
.,----_J
Bot6n del
tubo
mano o el pie.
POWER-MATEs
Intreduzca los tubes en ta Power-Mateshasta que e[
bot6n del tubo quede fijoen posici6n
llberacl6n
rdplda del tubo
(Aigunos
modelos)
RECEPT. CULO
MANGUERA
1. Abra la tapa del recept&cuEo
1, Alinee la pesta_a de
sujeci6n de la manguera
y [a ranura de la cubierta dei recept&culo e
introduzca la manguera
en el recept_cuto hasta
que quede fija en posisuJecl6n
ci6n
2. Examine ta bolsa para polvo este instalado correctamante. Consulte ias instrucciones de instalaci6n en
la CAMBIO DE LA BOLSA
3. Examine el filtro de seguridad de] motor este instalado correctamante Consulte las instrucciones de
instalaci6n en LtMPIEZA DEL FILTRO DE SEGURfDAD DEL MOTOR.
LA TAPAY LA CUBIERTA
Es normal que la tapa del recept&culose desprenda
al ser abierta m&s de Io necesario.Para colocar nuevamente la tapa, alinee las ranuras de ia bisagra, insertelas y cierre la tapa.
!
•
CUIDADO
'"
i
i
hasta que el bot6n
quede en posici6n.
Aseg_rese de
que Is manguera
2.
el
nolntroduzca
est_en
torcida°
mango
el tubo
BmOiildl o l_
Nunca debe abrir la capucha del contenedor
estando la tapa abierta. Asi se evitar& da_3os
a la capucha del contenedor ylo a la tapao
i,u,
de la
manguera
Para retirar: Eevanteel
pestillo de ta manguera
y tire de ta manguera
i
Bot i_ _e_t
Ilberacl6n
r_plda del
mango
(Algunos
modelos)
==
=,=
_: '_
ma el bot6n de libPara retirar: oprimango para liberar
el mango y tire del
mango hacia arfiha,
eraci6n r_pida del
T
Para Guardar:
Para prevenirta preci6nde la mangua m]entras se
guarda, desuna la mangua deetubo de la aspiradora,
Guarde la magua en una posicibn enro!lada y
flojamentede tal manera queta tapa de la mangua no
se estire,
Indlcador
electr6nlco
para la
bolsa/manguera
(Algunos modelos)
Cublerta
Tapa y
afJa de
sujecl6n de
la rnanguera
Pestlllo
dela
Bolsa para
polvo
PARA COMENZAR
Indlcador de nlvel
de pelo de la alfombra
(Algunos modelos)
! , ADVERTENOIA
Peligro de lesi6n personal y dafio al
producto
• NO enchufe la aspiradora si el
interrupter est_ en la posici6n ON.
Podria causar lesl6n personal o dafio
al producto,
. El cord6n el_ctrico se mueve
r_ptdamente durante el enrollamlento
Mantenga alejados a los nifios y
asegure espacto libre suflciente para
evitar lesiones personales al enrollar
el cordbn.
• NO use los enchufes Iocalizados sobre
los muebles, Los objetos cercanos
podrian resultar dafiados,
L
Almacenamtentoj,._.--'=J
del cord6n ,_..,_
el_ctrlco_
.,,L_
t, Tire det cord6n
para sacarlo del
receptaculo hasta
tener la tongitud
deseada, E! cord6n
no se enrollarAhasta qua oprima la barra para enrollado
NOTA: Para reducir el riesgo de cheque el_ctrico.
esta aspiradora cuenta con una clavija polarizada,
uno de los contactos es m_s ancho qua el otro La
clavija s61opuede introducirse de una manera en el
enchufe Si la ctavija no cabe bien en el enchufe,
invi6rtala, Si a0n no cabe, Itamea un e]ectricista
para qua instaleun enchufe correcto No altere la
ctavija de ninguna manera
2o Conecte el cord6n el_ctrico polarizado en un
enchufe de 120 voltios qua se encuentre cerca def
piso
Para enmllar: desconecte ta aspiradora Sujete el
enchufe mientras
enrolla el cord6n
para impedir daSo o
tesi6n corporal per el
movimiento del cord6n, Oprima et
control para
rebobinar el cord6n
e!6ctrico con la mane o con el pie
Pedal de
de nlvel de pelo
de la alfombra
(Algunosmodalos)
3, Baje el tube desde la posici6n vertical pisando el
pedal de liberaci6n del mango
!
CUlDADO
NO deje la Power-Mateefuncionando en
posicl6n vertical en un lugar durante ning,3n
espacio de tiempo: se puede dafiar la
alfombra,
4, Seleccione una attura de pale de la alfombra
usando el pedal pequefio ubicado en la parte posterior de la Power-Mate'_ El nivel de pale la alfombra
se muestra en el indicador, Consulte SUGERENCIAS SOBRE EL AJUSTE DE NIVEL DE PELO DE
LA ALFOMBRA
AtenciOn: Refi6rase alas recomendaciones del fabricante para limpiar su alfombra Atgunas alfombras
m_s delicadas pueden requedr el use de la aspiradora con el agitador Power-mate_ desconectado
para prevenir qua la alfombra sea dafiada
i
CONTROL ELECTRONICO
DIGITAL
ALFOMBRA ALTO - enciende los motores del
contenedor y de la Power-Mate'_para obtener alto
poder de limpieza para la mayoria de alfombras
Para obtener nivel de poder MEDIO o BAJO para
limpieza de alfombras, apriete el bot6n de ALFOMBRA ALTO primero, y en seguida apriete et nivel
deseado de poder
m_s bajo,
5,Seleccione
una
posici6n
deControl
Electr6ntco
Digital
enelmango
de
acuerdo
altipode
asp]redo
quedesee
realizar,
PlSO RASO ALTO - enciendeel motor de! contenedor 0nicamente para poder ALTOy limpieza de
pisos rasos (sin alfombras),
POWERLEVEL
Ntvel de poder MEDIO - reduce la fuerza del motor
del contenedor s61oal nivel MEDIO para limpieza,
con accesorios, de tapicerla,
Nivet de poder BAJO - reduce la fuerza def motor
del contenedor exclusivamente al nive/BAJO para
limpieza con accesorios de cortinas, persianas, etc
APAGADO - apaga los motores del contenedor y de
la Power-Matee
NOTA - Cuando el boron de PISO RASO Alto est_
apretado, el faro] y el indicador de potvo (unos rood-
Estilode limpleza sugertdo°
ADVERTENCIA
Pare obtener la meier acct6n de limpiezase recomienda empujar la Power-Mate_ en direcci6n directamente opuesta a usted y jalarla en Ifnea recta AI
final de cada pasada de regreso, cambie la direcci6n de la Power-Matee hacia la siguiente secci6n a
limpiar ContinOeasi a tray,s de toda la alfombra de
una manera lenta y deslizante.
Risque de tesi6ns corporelles et de dommages au produit
, No atropelle el cord6n et_ctrico con la
Power.Matee. Hay un peligro de
lesi6n corporal o unos da_os de
poseslones°
• No tire del cord6n el_ctdco de la pared
pare desenchufario, Si hay danes en
el cord6n et_ctrico o el enchufe, hay
un peligro de lesi6n corporal o unos
daSos de poseslones,
NOTA: las pasadas r_,pidasy
jalonadasno
Iogran una liraplaza complete.
i
El dispositivo giratorio
de la manguera permi_
te qua _sta gire sin necesidad de mover el
recept&cuto.Esto es
muy util pare limpiar en
_reas pequeSas.AsegL_resede que la manguera no ast_ torcida
antes de jalar el recept_culo
E
CUIDADO
i
ii1,111,
.....
Los escalones alfombrados requieren limpieza
peri6dica
ADVERTENClA
Peligro de lesi6n personal
Tenga cuidado si coloca el recept&culo
sobre escalonesoSi se cae, podria causer
lesibn personal o daSo ala propiedad,
............
Risque de dommages au produit
Mantenga el paso de aire abierto para lograr los
mejores resultados de limpleza. Examine de vez
en cuando cada una de las &teas de uni6n en FUNCIONAMIENTO DE SU ASPIRADORA pare asegurarse de qua no est6n bloqueadas Desconecte la
aspiradora antes de revisar.
Tenga cuidado si el Power-Mate®y la
manguera se dejan en postct6n vertical
pues peuden caerse f_cilmente. Si se
voltean peude haber dafio de propiedad.
im
i
"'
"
""'"
'
HI -Pelo muy largo y suelto, tapetes, alfombras
muy acojinedas
Use el ajuste XLO (bajo) pare obtener la major limpieza a fondo Per otra parte, quiz&s se requiem elevar el nivel para facilitar algunas taraas, come per
ejemplo cuando setrata de tapetes y aigunas alfombras de pelo largo, y pare impedirqua ta aspiradera
se apague Se sugieren los siguientes ajustes:
MED - Pale mediano a largo.
LO -Pelo corto a mediano
XLO - La mayoria de tas alfombras y pisos
descubiertos
10
El sistema indicador del detector de tierra est_ montado en la boquiila de la Power-Mate_, cerca def
bot_n de restablecimiento Consiste en una serie de
tres indicadores fuminosos rojos y uno verde,
(Algunosmodelos)
ARRANQUE
1. Retire los tubas
oprimiendoel pedaI
de liberaci_n r&pida
y levantando los
tubes.
Las luces indican
la cantidad de
particulas de tierra que est&n
pasando a trav_s
de! detector al ser
transportadas
hacia la botsa
para polvo
Carte transversal
INiCIAL
A {jDrOX_
3 _ pulgadas
o 90 mm
La primera yes qua arranca la Power-Matee ocurre
siguiente en un peHodode 2 segundos:
Aniflo
1, Los tres indicadoresrajas se encienden.
Elementos
del detector
2. Dos indicadores quedan encendidos.
3. Un indicadorqueda encendtdo
4. El indicadorverd est,_encendido y permanece
encendido basra el momenta en que comience a
usar la Power-Matee
NOTA:Si ta boquilla est& sobre una superficie que
tiene terra, esta ser_ aspiradora per la aspiradora y
posibtemente se queden encendidos algunes de los
indicadores rojos
2, Coma se ve en el diagrama los dos indicadores
de pelvo est&ncofecados dentrode la articulaci_n
giratoria, aproximadamente 3 ½ pulgadas o 90 mm
abajo, Observe las flechas)Para tlegar a los elemantas del detector, use un cepiUopegueSo,come
par ejemplo para botetlas Cepille cada detector
varies veces para eliminar la tierra y el polvo.
EN OPERAClON
Cuando desliza la Power-Matee par e_piso, los indicadores cambian de una a otra configuraci6n segfm
si ta aspiradora recoge mucha o poca tierr& Si uno
o varies indicadoresrajas permanecen encendidos,
significa qua ta aspiradora sigue levantado tierra,
_sta sigue pasando a trav6s del tuba, y que necesita continuar aspirando ta superficie.
NOTA: Si mira hacia dentro del dispositivo giratorio
podr& vet un ani!lo. E1elemento detector est& justamonte debajo de dicho anilIo.
3. Vue!va a instalar los tubes despu_s de limpiar los
detectores.
Cuando se queda encendido eLindicadorverde
mientras desiiza ia Power-Mate®sabre una zona
determinada, significa qua el detector no est,,
detectando tierra y que Ia zona ya est& lipia.
!
NOTA: Las tuces del detector de tierra no funcionan
cuando se selecciona el ajuste para pisos descu*
biertos FLOOR.
•
CUIDADO
No utilice nunca agua ni soluci6n Iimpiadora para limpiear las lentes. El residuo del
agua o del limpiador causar_ que las lentes
se cubran de tierra m&srapldo, requiriendo
ltmpteza con mayou frecuencia.
LIMPIEZA DE LA LENTE
Aunque la funci6n de detecci6n de tierra de la
Power-Matee de Kenmore est& dise#,adapara
brindar touches aSos de funcionamiento interrumpido, el paso de tierra a tray,s det sistema de las vtas
de aire puede causar una escama en la lento,
haciendo que se encienday continQeencendido el
indicadorverde, sin cambiar nunca a rojo_Cuando
esta suceda, tiene que timpiar Ia lente
11
ACCESORIOS DEL TUBe
CUIDADO
ALGUNOS
NO instale ni retire el mango ni los tubes
cuando la aspiradora est_ encendida.
Esto podria causar chispas y da5ar los
contactos el_ctrlcos.
...............
MODELOS
1, Pare retirar los
tubes de la
ii1,,11,i
ACCESORIOS DEL MANGO
NOTA: Si tiene
instaladaLa
Power-Mate'_,
apague la aspiradora antes de quitar el mango de
_ostubes,
Bot6n
de cierre -_
=,m,
Tube
col6quelos en la
posici6n vertical
P°wer_Mate_'
de bloqueo.
u
,_
2, Pise e! pedal
de
Pedal de
fiberacf6n
i r&pfdadel
tube
1, Oprima el bot6n
de bloqueo y
luegotire del
liberaci6n r_pida del
tube y tire del tube
hacia arriba para
desprenderlo de la
Power-Mate®
No es necesario
retirar e! enchufe y
cord6n el6ctrico de
la Power-Mate'_
para user tes
accesofios del tube
mango
tarlo
clefpare
tubequi-
Si su mode!o tiene la caracteristica opcionat de la
liberaci6n del mango r&plda, ins6rtalade un mode
semejante.
2, Des_iceel accesorie deseado con
firmeza sobre el
mango Consuite la
use DE LOS
ACCESORfOS
t
3. Celoque el
accesorio deseado sobre el
tube Consulte
la use DE LOS
ACCESORtOS
,_'
12
AREA A LIMPIAR
ACCESORIO
Meubles=
@
Ceplllo para sacudir
Entre
coJines'
Pisos
I Corttnas'
x
Herramienta
para hendiduras
X
Cepitlo para telas
x
Alfombras
| ....
X
X
X
X
X
Cepillo para pisos
X
X
t
,,
X
X**
Power.Mate®
Handi-Mate Jr2 ......
(Algunosmodelos)""
I Power.Mate
Jr.'_
(Ngunos mode]as}**"
....x
Q x
* Slempre ltmpfelos _,ccesodosantes de usar sabratelas
**" La Handt-Mate Jr"
Ptsos
Esca|ones descubie_os
_lfombrados/IParades
X
X
"' El tnterruplorde 3 posicionesdebe astoren la posidSn FLOOR(piso descubierto),
y la Power.Mate Jr =tncluyen sus propias tns_rucdones para use de accesorios
NOTA: Cuando separe los tubes optima comp!etamenteel bot6n de bloqueo antes de separaflos per complete, Si sele dificulta oprimir el bot_n, juntom_s los tu_es para alinear el bot6n con el orificio uprima el bot6n y
despu6s separe los tubes
CONTROL DE ASPIRAClON
LIMPIADOR DE ORILLAS
Et control de
aspiraci6n le
permite cambiar la poten-
Active los cepillos limpiadares de eritlas a cada
lade de la Power-Mate_o
Paso la Power-Mate'_junto
a tas paredes o junto a Ios
muebles para ayudar a eliminor la tierra acumulada
en los oriUasde la alfombra
cia de aspiraasplracl(_n
asplracl6n
ci6n de la as_
piradora dependiendo del
grosor de la tela o alfembra,La aspiraci6n se disminuye,para limpiar cortinas y tapetesligeros,abriendo el control; papaaspirar muebles y alfombras, e]
control debe cerrarse para aumentar la aspiraci6n_
PROTECTOR CONTRA
SOBRECARGAS
La Power-Mateecuenta
con proteccibn incorporada contra dafio del
motor y la correa en
case de atascamJento
del agitador, Si e{ agitador funciona m_s
despacio o para, e[ pro*
rector de sobrecarga
para la Power-Mate_
El motor del recept&cuio
continuar_ funcionando
E
Protector contra
sobrecargasBof6n de
restauracl6n"Reset"
•
i
ADVERTENClA
Peligm de lesiones personales
Desconecte siempre ta aspiradora antes de
limpiar las areas de la agitador pues _stos
podrJanarrancar de manera imprevista. El
he hacerlo, podria resultar en lesiones personales.
i
Para resolver el problema: Apague [a aspiradora,
quite e[ residua y apriete el bot6n para encender de
nueVO,r
Para restablecer: Optima e] bct6n del protector
contra sobrecarga,
13
i,i,
i,iiii
i,
INDICADOR ELECTRONICO
PARA LA BOLSA/MANGUERA
ALGUNOS
MODELOS
Indlcador
electr6nlco para la
bolsa/_
La luz se enciende en
cuafquier memento
que se bloquee el flujo
de aire, cuando la bolsa se 13eneo cuando
sea necesario cambiar
el fittro de seguridad
del recept_culo.
NOTA: Es posibie que
la luz tambien se encienda cuando utilice ciertos accesorios debido a que el flujo de aire se reduce al
pasar per el accesodo
En algunos cases, cuando se aspira fibras sueltas,
come los hitos de una alfombra nueva, la bolsa
puede estar Ilena y Ia luz puede no encenderse.
En otros casos, cuando se aspira materiates finos
como talco, holltn, polvo de yeso o desodorante de
alfombras, fa bolsa puede no parecer tLenapero la luz
se enciende,
Consulte
el solucionador
de problemas.
Para restablecer: Apague la aspiradora y desenchufe el cord6n del tomacorriente para permitir que
la aspiradora se enfrfe Busque y saque las
obstrucclones, si es necesarioo Examine tambl_n
y reemplace cualquier filtro obstruido. Espere
aproximadamente 50 minutes y enchufe la aspiradora y volt_ela para ver st el protector del
motor se ha reajustado. En algunos cases, la
unldad puede velvet a arrancar s6bitamente, NO
LA DEJE desatendida.
TAPAY ALMACENAMIENTO
PARA POWER-MATE°
ALGUNOS
MODELOS
El tubo inferior tiene
un reborde en forma
de "U" en la zona de
fijaci6n del cordon
et_ctrico, La base
tiene una ranura en
forma de "U" cerca
de la parte frontal
del recept&culo
REDUCCION AUTOMATICA DEL
NIVEL DE PODER
Si se sigue aspirando despu6s de que la luz
aparece, el motor del contenedor cambiar_
autom_ticamente a velocidad MEDIA y/o BAJA
para proteger al motor del cater excesivo
1_Reducci6n autom_tica del hive] de poder ocurre
cuando se btoquea un conducte de aire
La raqura permite almacenar los tubes y la PowerMate"_ con el tube para economizar el espacio requerido para su afmacenamiento Para usar esta caractedstica es necesado almacenar el recept&culoen
forma vertical.
El tube se sale de la ranura al ser levantado para
usarlo y se desliza dentro de _sta al bajaric para almacenarlo
2. Reducci6n autom_tica del nivel de poder ocurre
cuando la botsa est& lien&.
La remociOndel bloqueo yfo el reemplazo de la bolsa
permitir_ volver al nivel de poder seleccionado
La Power-Mate® debe estar en la posici6n liana
come seve an el diagrama. Use el mango del pedal
de liberaci6n para moverla a esta posici6n
Seguir aspirando despu6s que la luz se ha encendido
puede causar que se apague el motor del contenetier Espere 50 minutes para que el motor se enfrie y
se reajuste autom_ticamente
NOTA: Se puede usar menos espaciosi baja el tube
telesc6pico come se muestra en la secci6n MONTAJE.
NOTA: revise la bolsa a menudo.
CUIDADO
PROTECTOR TERMAL
Para _vitar volcaduras, nunca deje la PowerMate encendlda o en poslcl6n vertical con
e! tube completamente extendido.
Ajustando el tube a una poslcl6n m_s baja_/
girando el mango a un lade, la Power-Mate_
se hallar_ en una postci6n m&s estable y
ser& m_s dificil que se vuelque.
Esta aspiradora tiene un protector termal que se
ajusta autom_ticamente para proteger a ta aspiradora
del sobrecalentamiento E! protector termal apaga el
motor autom&ticamentepara permitir que el motor se
enfrie a fin de evitar posibles da_os a la aspiradora
14
La aspiradora crea sucd6n o aspiraci6n que levanta
la tierra La tierraes impulsada a trav6s de tas vies
de flujo aire hasta ]a bolsa per una r_pNa carriente
de aire, La bolsa pare polva permite et flujo de aire,
pero atrapa [a tierra
/?
Para lograr los mejores resultados de ]impieza,
..///""mantenga abiertas ies vfas de aire Examine peri6/_/,/dicamente las _reas indicadas con astefiscos pare ///
asegurarse de que no est6n bloqueadas
.Z/_J
_
Y
Desconecte del recept_culo_
Ftltro de
segurldad
del motor Filtro de
_
escape
7. Examiney limpie el filtrode segufidad del motor
El montaje rojo de la botsa se incUnar_hacia
adelante despu6s de que retire la boise. Esto
impedir&que la tapa se cierre antes de instalar una
bolsa nueva.
CAMBIO DE LA BOLSA
La bofsa debe cambiarse seguido pare Iograrlos
mejores resuRadosde [impieza.E[ indicador electr6nico I mec_nico de la botsa o de manguera
enciende cuando se necesita cambiar NOTA: Use la
boise para potvo #20-50557_En el Canada, #20_
50557C,
8. Gire hacia abajo el
saporte para la boise
roja y pare inserter ]a
boise en las ranuras
empuje hacia abajo
hasta que tas lengeetas
de cart6n encierren
seguramente an lee
posiciones apropiadas
corn se ve en el diagra-
1. Desconecte el cord6n
e]6ctrico de la clavija de Ia
pared,
2, Quite la manguera de fa
aspiradora
3, Tire del pestillo de ta tapa
hacia fuera y hacia arriba;
luego levante la tapa del
recept&culo,
me.
9. Baje la cubierta del recept_culo y cierre el pestilto,
10. Reinstale la manguera •
4. Destrabe la pestana
de cart6n de] montaje
rojo de la bolsa empujando hacia afuera y
tirando hac[a arriba.
1t. Conecte el cerd6n electrice en la clavija de Ia
pared.
E3
5. Saque la bolsa dei
montaje rojo
FIItro de
montage
roJo
CUIDADO
NUNCA REUTILICE UNA BOLSA PARA
POLVO.los materiales muy finos, tales
como desodorantes para atfombras, talco
facial, polvo flno, yeso, hollin, pelusa de
alfombras nuevas, etc., pueden atascar la
bolsa y causar que se rompa antes de que
est_ ltena y puede da,3ar el motor de la
asptradorao Cambie la bolsa m_s seguido
cuando aspire este tipo de materiales.
6. Revise y
cambie, cuando
sea necesafio, el
filtro de seguridad
dot motor,
15
i
i , ,, ,m,
1.Desconecte
elcord6n
el_ctrico
delaclavija
deEa
paredNOchoreeaguasobrela aspiradora,
2. Limpie el exLeriorcon un trapo suave y limpio, que
ha sido exprimido despu_s de remoiar en una soluci6n de ague y detergente Itquido Iigero, Seque el
exterior con un trapo seco despu6s de timpia_
!
•
CUIDADO............
'..............
No use los accesorJos sl est_n mojados.
Los accesorios que se utilicen en areas
sucias, debajo del refrigerador, no deben
usarse en otras superficies sin antes set
lavados, Podrian dejar marcas.
3, Limpie la superficie exterior del recept_cuto y de
Losaccesorios para reducir la electricidad est&tica y
la acumulaci6n de polvo
i
illll,
Examine eLfiltro de seguridad dot motor de vez en
cuando y cambio cuandoest6 sucio
1, Levante el dispositivo de retenci6n de
goma y saque el filtro
de seguridad como se
ve en el diagrama
ADVERTENCIA
Pellgro de choque el_ctrico
Desenchufe el cord6n de la corriente el_ctrtca. No opere la asptradora sin el filtro de
seguridad del motor. AsegSurese de que et
filtro est_ seco e instalado adecuadamente
pare impedtr que el motor falle ylo que se
produzca un choque el_ctdcoo
Dispositivode
retenct6n de goma
"IFI,
III
Para quitar la boise, siga 1asinstruccionesen CAMBIO DE LA BOLSA,
FILTRO DE SEGURIDAD DEL
MOTOR
ELECTROSTh,
TICO
Dlsposittvo de
retencl6n de goma
Este filtro se tiene que cambiar cuando est_ sucio
Debe cambiarse peri6dicamente seg[_ntas condiciones de uso El filtro no se puede lavar pues
prderia su capacidad pare atrapar altrapar polvo.
2. Reemplace el filtro
con la superficie
bfanca en su campo
de vista por correrlo
debajo de las costillas en la cavidad de
]a boise Mete el filtro pare que quepa
por completo debajo
del dispositivo de
relenci6n de goma
3. V_ase CAMBIO DE LA BOLSA pare cambiar la
bofsa,
NOTA: Use el filtro de seguridad del motor #2086883 En e; Canada, #20-86883C
E
CUIDADO ..................
NUNCA REUTILtCE UNA BOLSA PARA
POLVO_Los materiales muy finos, tales
como desodorantes para alfombras, talco
faciat, polvo flno, yeso, hollin, pelusa de
alfombras nuevas, etc,, pueden atascar la
bolsa y causar que se rompa antes de que
est_ Ilena y puede daSar el motor de la
aspiradora, Cambie la bolsa m_s seguido
......
cuando aspire este tipo de materiales_..................
16
!
ADVERTENCIA
,,
2, Empuje el cartucho del filtro filtro
escape con cuidado
hacia a un lade
,11,,1111
Peligro de cheque el_ctrico
No opere con un filtro de escape bloqueado
o sin el filtro de escape o la cubierta de+filtro de escape instalados.
Flltro de
come se ve en el
diagrama y tire
hacia arriba para
sacarlo
i,
FILTRO DE ESCAPE
HEPA
Este cartucho del fittro escape tiene que cambiar
est_ suc{o+Cambie el filtro cuando el _rea superticiat est0 cubierta per complete El filtro no se
puede lavar pues prderia su capacidad para atrapar altrapar polvo.
3, Cambie el cartucho
del filtro escape,
ceLoc_ndolocon cuidado para que el lade
mostrado an el diagra+
ma corra debajo de las
costillas, Luego, empuje hacia abajo el otro
tado hasta que encierre
seguramenteoColoque
el nuevo filtro en ta
cubierta del motor con
el file plomo hacia
abajo.
Ftltro de
NOTA: Use el filtre de escape #20-86882 En el
Canad&.#20-86882C
1+Tire hacia
arriba la
cubierta del illfro de escape
para sacarla
de la cubierta
del motor y
col6quela a un
lade,
del filtro
4. Reemplace la
cubierta def filtro
de escape per
mover tas dos
lengiJetas
detraseras y
empujar hacia
abajo en Ia parte
trasera hasta que
encierre seguramenL
Cublerta'_-..
del flltro
clones de segurldad al Iimplar y dar servtclo a
la Power-Matee _
Peligrode cheque el0ctrico o lesi6n corporal
Desconecte la unidad antes de limpiada o
darle serviciooDe Io contrario podria producirse un cheque el_ctrico o causar
lesi6n corporal si fa asplradora arranca de
manera imprevtsta+
i
17
i
i
i,iii1,1111 i,i
!
m
PARA RETIRAR LA CORREA
. cu,DAD ...... ...............
1, Co_oquela PowerMate con la parte
inferior hacia arriba
Puede que at retirar los soportes del
cepllio se desprenda una pequefia
arandela de metal de cada extremo,
NO pierda estas arandelas.
2. Quite los dos (2)
tornillos en la cub_rta
de la Power-Mate
,1,1,,
I
NOTA: Para mantener una alta eficiencia de
limpieza y evitar el daf_o ala aspiradora, _hay
que limp!at el agitador cada vez uq.u.A
se cambla
la correa.
3, Co_oquela PowerMate en la posiciSn
vertical. Apriete el
pedal del mango de liberaci6n y beje la articulaciSn giratoria. Levante
los pestillos traseros
Tambi6n hay que limpiar el agttador seg_n el
stguiente horario:
El uso de la
LImDie el
a_gitador
Frecuente (usada dirariamente)
Moderado (usada 2 o 3 veces
por semana)
cada semana
cada mes
4. Para quitar la cubierta,
agarre los lados y tire afuera.
cada 2 meses
Ligero (usada I vez por semana)
Retire todo tndicio de basura o sucledad de la
zona de la correa y del rodil!o del cepillo,
Con cuidado quite tas tapas y quite el hllo o los
restos ubicados en el agitador, en los soportes
del cepillo, en las arandelas o en el eJe del agitatoro
5, Apdete las
leng0etas en la
parte trasera de
fa cubierta del
agitador y gire
hacia adetante
para liberar de
IMPORTANTE
Cambie tas arandeles y luego las
soporte&
Vea la perspectiva
desptezada para
segulr el orden correcto de colocaclOn de las plezas,
la base de 1_
Power-Mate
LengfJetas
del agltador
& Levante la
unidad del agitadory quite la cortea gastada.
Desconecte la asplradora, Examine frecuentemente el cepilto y_as _reas de soporte det mismo
de la Power-Mate y elimine todo cabello, hilo y
Tapa del extremo
7, Retire los tapas del
extremos; examine y
limpie las _reas de
tapa de! extremo En
la ENSEMBLE DEL
AGITADORse proporciona una ilustraci6n
de todoel ensemble
del agitador
pelusa acumulada, Si _a acumulaci6n es excesiva,
separe la Power-Mate del tubo y realice los pasos
a continuaci6n
18
Tape del
extremo
5, Alinee la parte
frontal de la
cubierta con la
base, Coioque
la cubierta sobre
el borde
delantero de la
base come se
muestra
PARA RETIRAR LA CORREA
@
_
2. lnstale
una correa
nueva sobre
el impulsor
del motor y
luego sobre
la rueda dentada del
cepitlo
y los topos dei extreme en
el
1. ensamble
Reinstale las arandelas
'_
Tapa del
extremo
_
\
Cubierta
Base
Rueda del motor
\ dot cepillo
Agitador
NOTA: Use correa #20-5201. En e! Canad&, #2040979
3. Cotoque otra vez
la unTdaddel agitador e_ fa PowerMate
4. Reinstale
la cubierta
deJagitador,
aHneelos
teng0etas
delanteras y
las ranuras y
gire hacia
abajo basra
que Eospestillos encierren
seguramente
7. Rote la cubierta
hacia atr&soApriete
con poca fuerza hasta
que las lengOetas laterates y traseras
encierren seguramonte Coloque la
POWER-MATE® con
la parte inferior hacia
arriba y inserte los dos
(2) tornillosen la cubierta
Cublerta dal agltador
EmpuJehacla _
adentroyglre |
1, Quite Ia cubierta de la Power-Mate® come se
describe en la secci6n CAMBIO DE LA CORREAY
LIMPIEZA DEL AGITADOR.
Empujehacla
adentroy glre
_"-_
2oEmpuje hacia adentro y gire la bombilla en
el sentido sontrario al
de las agujas del reloj,
iuegotire hacia afuera
para sacar
.._
"
3. Empuje hacia adentro
y gire en el sentido condel reloj para reemplacor, La bombilla no debe
ser m&s
delos
15 vatios
trario
al de
agujas
(130 voltiosl).
4. Reinstale la cubierta de la Power-Mate® come se
describe en Ia secci6n CAMBtO DE LA CORREAY
LIMPIEZA DEL AGITADOR
NOTA: Use la bombitla #20-5240, En el Canad&
#596181,
19
PARA CAMBIAR
DEL AGITADOR
ADVERTENClA ........
t. Quite la cubierta de LaPower-Mate
®, la cubierta
del agitador, Lacorrea y la unidad del agitado_
Vease "Para cambiar Ia correa" en ta secciSn de
CAMBIO DE LA CORREAY LIMPIEZA DEL
AGITADOR.
Peligre de cheque el_ctrico o lesi6n corporal
Desconecte la unidad antes de limpiarla o
darle servicio. De Io contrario podria producirse un cheque elbctrico o causar
lesibn corporal si la aspiradora arranca de
manera imprevista_
................
LA UNIDAD
2. Quite las tapasdel extreme, las arandelas, los
tornilfos, el cepilfo del extreme y 1ascoronas
dentadas para el cepillo de los extremes de la
unidad del agitador vieja
i
3. Ensamble otra vez _aunidad de] agitador Para
aiinear los huecos para tornillos en ]a clavija, la
corona dentada y e! cepil[o de extreme, aseg_rese
de que todas las coronas dentadas afinee
correctamente
PARA REVISAR LA UNIDAD DEL
AGITADOR
Cuando est6n gastadoslos cepillos al
nive! de las barras
de soporte en la
base, cambie la
unidad de1agitatier
4. Reinstale la correa, la unidaddet agitador, la
cubierta del agitador y ]a cubierta de Power-Mate®
V_ase "Para cambiar la correa" en la secci6n
CAMBIO DE LA CORREAY LIMPIEZA DEL
AGfTADOR
Barra de soporte
de la base
:::
:;:;::
:
:;;
:
:;:
;::::: ; ;::
:
'
:
Tapa del
Arandela
Tapa del
extreme
ceplllo
Unldad del agltador
Rueda dentada
del ceplllo
2O
Tapa del
Tornlllo extreme
Tornlllo
Arandela
ConsuIte este cuadro pare encontrarsaluciones que usted raisins puede realizar cuando tonga problemas
menores de rendh[ento CualquJerservicio qua necesite aparte de aires descritos en este manual tienen que
ser hechos per un centre de servicJoautorizado de Sears
u
,i
ADVERTENClA
Peligro de cheque el_ctrico
Desconectela aspiradora antes de darle servicio o timpiarlaoDe Io contrails podria
produclrse un cheque el_ctrico o causer lesi6n corporal.
i HIll,
, ,,,,_,,,,,,,,
H
...............
La aspiradera no arranca
EsI0 desconeC:ada
1
CertedrcoItoe botado o fusibb quomado
en el labIero de servido de la msideneia
Conaxtoneset_ctticas de }`1mar,gttera
sueltas.
2
Boise pare polvo Itena o a|aecada
Vfas de fiu}ode Bile at_,scadas
Fillros sucJes
Ajuste tncorraclode hive!de pc]ode
la atrembra
5 ConL_oIde aspirad6n abierto,
6, M_nguera rata,
7 Agltadorde la Power-Mate_ desgastadee
B, Correa desgastada o m_
9 Agllador o _pas dotextreme de _ste suctos
10, Tape del recep10cule abieda.
L
2
3
4
1
2
3
No `1spire
eatisf`1eteriamenta
L`1aapfr`1dora erranca,
pore so apag`1
2
La Power-Matee no fundon`1
cu_ndo est5 [nsta|ada,
3
1
2
3.
4
i
Console bien. opdma selector de encendidol
apagado ala posfcieeON
Restablezca
elcortacircoitoso cornbie et
lusibla
Vuelvaa coneclarlee exL_mos de ]a mar,gears,
(p0gina 7),
Camb_ela boise, (p_gtna t4)
........
Utopia lee v{as de flujode airs, (p_gina i4)
Cambia et l]ltros, (p0g[ns t5.16)
Ajuete et r,lvel,(p_g_na9}
AJusteel control,(p_gina t2)
8 Cembie la menguera
7, Camb{e Is agttader, {p_gtna19).
B&9
Ceneotle CAMelS DE LA CORREAY LIMP1EZA
DEL AGtTADOR, (p_ginas 17-18)
10, Ctsrm bien ta tape.
5_
1, Examine t_scor,exlones el_cLdcas,vueiva ,1 tory
eciar Ins extremes de la manguera, (p0gina 7)
2 Retire cualqoieroh}aleatorado o atascado.
luego raeteblezca SI laasp{radarsarmnco pore
se vuelvea apegar, limpie el agitadory los
_pas delextremesde _ste, tuego rasl,_blezca,
(p_g_as I2. 17-18)
3 Apague la aspir_doray desenchufee! eolian
det Iomaconier,te y espera aproximadamenlo50
minutes y enehufe la aspt_dera y velt,_atapare
ver si el proteclcr dal motorse ha _aluelado,
(p_gfna 12). Cambte la balsa pare polvo,desb!oqoee
;as via de daisde airs, (p0gina 12)
Conexiones ei_ctricosdo le manguera o
de ta tapa
Pralector centre sobre_rgas de ]a
Power-Mate a botado
3
Pralectnr de sobre_rga betide
or, elrecept_culo
1.
2
3.
4.
Conexionesde ta POWeFMale_ desconectadas.
Corraa deegasteda o rote
Agitador o tapes del extremes de _s_esucios
Protector con_m eobrac_gas de Ia
Power-Male e botado
t,
2& 3
4
5, El Interrupter no est_ en ta posiei6n CARPET
5
lndtceder verde eneendido
cenlInuamente on el detecter
de Uerra.
t,
1
AIgunes otodee los Indleadnres
ra_osdal detector de tisrr_
encendtdoe y nunea eamb]an a
verde.
No so enclanden los lndlcadores
verde o rojo de detecci_n de tto_
I
Hay un obje_e atrapadequa ea_ vibrando
en el araOde ta lenle
1
Et hlenupIor no est_ en _apostd6n CARPET
Conecta bien, (p0gina 8).
Consui[e CAbBie DE LA CQRREA Y LIMPIEZA
eEL AGITADOR, (p_gieas 17-IB}
Examine ei _rea deI agitadet paredeterminers_h_,y
acumalacibn excesivao bisques de petusa LImpie
at agi_ador y los _pas del extremes, luego
restablezca,
(p_gir_s 12. 17-1B)
Pong_ et inlerruptorata posiciOnCARPET,
(p_Oln.
,e!:.....
De,ermine si est_n bloqueadaa las v_asde aim,
(p,_gina 14)
2. Lhpie las leales, (p_gtna 10).
La via do paso de tietrao IBboise
de pelvo est_ blequeade
2. Lante socia.
,,,
i.
,,
"[)etermine si est_n blequaadas las vies de aim,
(p_gina14)
,,,.
t
2. No hay aunistro de energ[a a_tabiam detector,
Per,gaelInlerrupt;u;";'la
posid6nCARPET,'
(p_gina 8).
2. Acoda at CenLrode Servicto de Sears rnOs careens.
El tndieador electronics/
mee_nlco de la balsa y de la
m_ngoe_ fanclen_
1.
2
3
4
Boise pare pelvo liens o atas_da
Fillies susie
Vies de {lujo do aim atasc_das
Cisr_osaecesor_os
i.
2
3
4.
Cambte ta bo}sa, (p0gina 14),
Cambia el tilLros,(p_g[na 15-16)
Oesblequea lee vlas de tlujo de Bite, (p_gina 14}
EsIo as r,orm_l El Indic_dor
debeset normalcobra
ta herramienta es_ quilada,
Le aep_radora Iovanta tapstes -o-c- as dlflcI| empujar a
Power.Matee,
l.
2
Ajuste incorreclo de r,ive_de pelode la airembra
AspiratiOn dem_siado poleete
t
2
Alusta el nivei, (p0gina 9),
Abra el coniml de aspiracibn, (p_gina li}
'_ '"i'i'"
Bombiila _undide,'
El cordon no so enrolls,
La aspir_dora
on ta alfombra,
deJa marcae
1, Cambie la hornbills, (p_gtna 18),
1 Limpiee! ¢ord6neI_cldco.
2. Tire delcordon y despu_s enrbIlalo.
i Cord6n el6ctrir._,sudo
2. Co_n atescado.
i
EstI1o
do IImpieze
Incorrecta
......
21
I
Con'sutie SuGERENc'i,a,S PARA ASPtRARI
(p_gina 9}
i_ ,i!:ii i!_i!::_ii:i II :!! _i_ii'_i_!ili_
ii_
i!!iUii2 _:ii i i:i=! i:i!i "¸¸¸
.....=.... ::'
For repair of major brand appliances in your own home
no matter who made it, no matter who sold it!
: )
1-800-4-MY-HOME
® An m°,
dayoro ght
.......
(1-800-469-4663)
......
(U.S.A and Canada)
,,,,.,,.,oa,,.oomwww.,oa,,.oo
For repair of carry-in products like vacuums,
electronics,
call for the nearest Sears Parts
1-800-488-1222
lawn equipment, and
and Repair Center.
Anytime, day or night (U.SA,, only)
www,sears.com
For the replacement
parts, accessories
and owner's manuals
that you need to do-it-yourself, call Sears PartsDirectS_!
1-800-366-PART
6 amo-
(1-800-366-7278)
11 p.m,., 7 days a week
(U.S.A. only)
wwwosears.com/partsdirect
To purchase
or inquire about a Sears Service Agreement
or Sears Maintenance Agreement:
1-800-827-6655
(US.A)
1-800-361-6665
(Canada)
::_:_I!IL! i;
7 a.m. - 5 p.m. CST, Mon. - Sat,
9 a.m.- 8 p.m. EST, M - F,4 p.m,, Sat°
Au Canada pour service en frangais:
1.800-LE.FOYER _c
Pars pedir servicio de reparaci6n a
domicilio, y pars ordenar piezas:
1-888-SU-HOGAR
sM
(!_800_533_6937)
(1-888-784-6427)
w_v,sears ca
HomeCentral j
© Sears, Roebuck and Co.
® Registered Trademark t -mTrademark t s_ Service Mark ot Sears, Roebuck and Co
® Marca Registrada / TMMarca de F&brica t s_ Marca de Servtcio de Sears, Roebuck and Co
8c Marque de commerce / no Marque d6pos_e de Sears, Roebuck and Co
22
'
_
......,