1
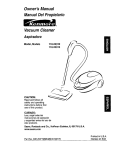
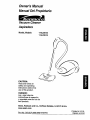
Owner's Manual
Manual Del Propietario
Vacuum Cleaner
Aspiradora
Model, Modelo
116.23512
116.23513
CAUTION:
Read and follow all
safety and operating
instructionsbefore first
use of this product.
CUIDADO:
Lea y siga todas las
instruccionesde operaci6n
y seguridadantes del use de
este producto.
Sears, Roebuck and Co., Hoffman Estates, IL 60179 U.S.A.
w_wv.sears.com
Part No. Ca1ZCFUQOU_O-8192794
Printed in U.S.A.
Impreso en EUA
Before Using Your New Vacuum .......
Kenmore Vacuum Cleaner Warranty
Important Safety Instructions
Parts and Features .................
Assembly
Instructions
.........
.............
Canister Care ......................
2
Bag Changing .....................
Cleaning Exterior and Attachments .....
Motor Safety Filter Changing ..........
Exhaust Filter Changing ..............
... 2
3
4-5
6-7
Power-Mate"
Use
................................
How to Start ........................
Vacuuming Tips .....................
Suggested Pile Height Settings .........
Dirt Sensor .......................
Attachments .......................
Attachment Use Chart ...............
Performance Features .............
How Your Vacuum Works ............
14
8
Care
..................
14
15
15
16
16
Belt Changing and Agitator Cleaning .. 17-18
Light Bulb Changing .................
18
Agitator Servicing ...................
19
8
9
9
10
11
12
12-13
14
Troubleshooting ....................
Requesting Assistance
Or Service ..................
Please read this guide. It will help you assemble
the safest and most effective way.
20
BackCover
and operate your new Kenmore vacuum in
For more information about vacuum cleaner care and operation, call your nearest Sears store.
You will need the complete model and serial numbers when requesting information. Your vacuum's model and serial numbers are located on the Model and Serial Number Plate.
Use the space below to record the model number and serial number of your new Kenmore
vacuum.
Model No.
Serial No.
Date of Purchase
Keep this book and your sales check (receipt) in a safe place for future reference.
LIMITED ONE YEAR WARRANTY ON KENMORE VACUUM CLEANER
This warranty is for one year from the date of purchase, and includesonly private household
vacuum cleaner use. Duringthe warranty year, when this vacuum cleaner is operated and
maintainedaccordingto the owner's manual instructions,Sears will repair any defectsin
materialor workmanshipfree of charge.
This warranty excludes vacuum bags, belts, light bulbs, and filters, which are expendable parts
and become worn during normal use.
For warranty service, return this vacuum cleaner to the nearest Sears Service Center in
the United States.
This warranty applies only while this product is in use in the United States. This warranty gives
you specific legal rights, and you may also have other rights which vary from state to state.
Sears, Roebuck and Co., D/817 WA, Hoffman
Estates, IL 60179
2
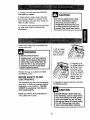
Yoursafety is importantto us.Toreduce the risk of fire, electrical shock, injury
to persons or damagewhen using your vacuumcleaner,follow basic safetyprecautions including the following:
Read this manual before assembling or
using your vacuum cleaner.
Use your cleaner only as described in this
manual, Use only with Sears recommended
attachments.
To reduce the risk of electrical shock - Do
not use outdoors or on wet surfaces.
Disconnect electricalsupplybeforeservicingor cleaningout agitatorarea. Failureto
do so could resultin electricalshockor
brush suddenlystarting.
Always turn cleaneroff beforeconnectin_
or disconnectingthe hose or Power-Mate.
Always turn cleaner off before unplugging.
Do not unplug by pulling on cord. To
unplug, grasp the plug, not the cord.
Hold plug when rewinding onto cord reel.
Do not allow plug to whip when rewinding.
Do not use with damaged cord or plug. If
cleaner is not working as it should, has
been dropped, damaged, left outdoors, or
dropped into water, return it to a Sears
Service Center,
Do not pull or carry by cord, use cord as a
handle, close door on cord, or pull cord
aroundsharpedges or corners. Do not run
cleanerover cord.Keep cord awayfrom
heated surfaces.
Do not leavecleanerwhen plugged in.
Unplugfrom outlet when not in use and
beforeservicing.
Do not allowto be used as a toy. Close
attentionis necessarywhen used by or
near children.
tured hose. The hose contains electrical
wires. Replace if cut or worn. Avoid picking
up sharp objects.
Do not use with any opening blocked; keep
free of dust, lint, hair and anything that may
reduce air flow.
Keep hair, loose clothing, fingers, and all
parts of body away from openings and moving parts.
Do not use cleaner without dust bag and/or
filters in place.
Always change the dust bag after vacuuming carpet cleaners or freshener, powders
and fine dust. These products clog the bag,
reduce airflow and can cause the bag to
burst. Failure to change bag could cause
permanent damage to the Kleaner.
Do not use the cleaner to pick up sharp
hard objects, small toys, pins, paper clips,
etc. They may damage the cleaner or dust
bag.
Do not pick up anything that is burning or
smoking, such as cigarettes, matches, or
hot ashes.
Do not use cleaner to pick up flammable or
combustible liquids (gasoline, cleaning fluids, perfumes, etc.), or use in areas where
they may be present. The fumes from these
substances can create a fire hazard or
explosion.
Use extra care when cleaning on stairs. Do
not put on chairs, tables, etc. Keep on floor.
Do not handleplug or cleanerwith wet
hands.
You are responsible for making sure that
your vacuum cleaner is not used by anyone
unable to operate it properly.
Do not putany objectsintoopenings.
Do not operatethe cleanerwith a punc-
Do not operate without exhaust filter or
exhaust filter cover installed.
SAVE THESE INSTRUCTIONS
Proper assemblyand safe use of your vacuumcleanerare your responsibilities. Yourcleaner
is intended only for household use. Read this Owner's Manual carefully for importantuse and
safety information. This guide contains safety statements under warning and caution symbols.
Please pay special attention to these boxes and follow any instructions given. WARNING
statements alert you to such hazards as fire, electrical shock, burns and personal injury. CAU.
TION statements alert you to such hazards as personal iniurY and/or property dama,fle.
/
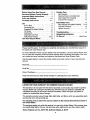
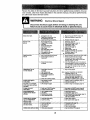
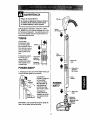
It is important to know your vacuum cleaner's
use. Review these before using your cleaner.
parts and features to ensure its proper and safe
Item
Part No.
In U.S.
Part No.
In Canada
Headlight Bulb
20-5240
596181
Belt
20-5201
20-40979
_-- Cord and
Plug Holder
Cord and
Cord
Holder_
--
Handle Quick
Release
(Some Models)
Upper
Wand
Wand
Swivel
(Some
Models)
1
Power-Mate Jr.. °
Caddy
(Some Models)
Power Cord
--Upper
Power-Mate®
Belt
Flang,
Wand Quick
Release Pedal
(Some Models)
Power.Mate°
Model/SerialNumbers
(On Bottom)
Handle Release
Protector
Reset Button
Pile Height Pedal
Dirt Sensor
Wand
Cleaner
(Not Shown)
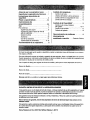
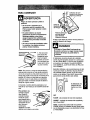
HOSE
ATTACHMENTS
3-Way On/Off Switch
Off/Floor/Carpet
(Some Models)
Power-Mate Jr..=
(Some Models)
Crevice
Tool
Dusting
Brush
Handle
Fabric
Brush
Floor
Brush
HanOi-Mate Jr.. ®
(Some Models)
NOTE: All models have one set of
attachments in the canister. Some
models have an additional set, which
can be kept in the accessory bag for
garage use or other dirty areas.
Hose Swivel
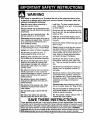
CANISTER
Item
Part No.
Part No.
In U.S.
In Canada
Dust Bag
20-50558
20-50555
Exhaust Filter
20-86880
20-86880C
Motor Safety Filter
20-86883
20-86883C
Cover
Exhaust
Filter Cover
Exhaust
Filter
Attachment
,Cord
rBar
Canister
Bag/Hose Check
Performance
Indicator
Cord
(Some Models)
Motor Safety Filter
(Behind Dust Bag)
Bag Holder
Dust Bag
5
Handle __
Handle
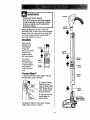
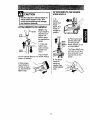
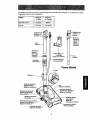
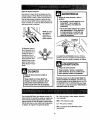
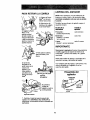
Before assemblingvacuum, check the
PACKING LIST on the cover of the separate
Repair Parts List. Use this list to verify that
you have received all the componentsof
your new Kenmore vacuum.
Bu.°n u
"9"
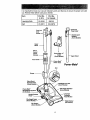
WANDS
Slide wands
together until
wand button
snaps into
place. Turn wand
button to the
slotted area of
the wand swivel.
Upper
Wand
I
i
The swivel
allows you to
turn the handle
to the left side to
reach farther
under low furniture.
wo°,, IIIII
Cord
Swivel -Holder
/
Power-Mate®
1. Insert wands into Power-Mate e until the
Wand
Button
Wand
Swivel
Lower
Wand
wand buttons snap into place.
Area
2. Connect PowerMate• plug and
cord as shown. DO
NOT force. Raised
area of plug must
be toward hand.
3. Secure cord into
cord holder on
wand swivel.
To remove: Step on wand quick release
pedal, then pull up on wands.
Wand
Button
}ulek
Release Pedal
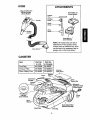
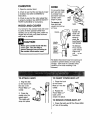
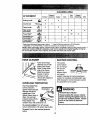
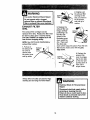
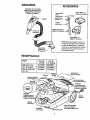
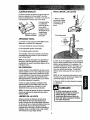
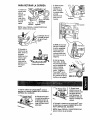
CANISTER
1, Open the canister
HOSE
hood.
2. Check to see that the dust bag is properly installed. See BAG CHANGING for
instructions.
3. Check to see that the motor safety filter
is properly installed. See MOTOR SAFETY
FILTER CLEANING for instructions.
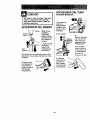
HOOD AND COVER
it is normal for the canister hood and cover
1. Line up the hose
latch tab and notch
in canister hood
and insert hose into
canister until it
snaps in place.
Hose
Latch
Tab
To remove: Lift
hose latch tab
upward and pull up
on hose.
Notch
to come off when opened further than
needed. Line up the hinge slots, insert the
hinges into the slots, and close the hood
and cover to reinstall.
handle into
wand until
lock button
CAUTION
snaps in
2. insert
H
place. Be
sure hose is
not twisted.
Handle
Hi
Never open canister hood with the
cover open. This will help to
prevent damage from occurring to
the canister hood and/or cover.
To remove:
Handle
Quick
Release
(Some
Press handle
quick release
button and
pull
up on
handle.
To store: Disconnect
hose from wands and
canister to prevent stress on hose during
storage. Store hose in a loosely coiled
position so the hose covering is not
stressed.
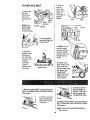
TO ATrACH CADDY
TO INSERT
1. Align the tab
on the wand with
the slot in the
Power-Mate Jr.®
caddy.
1. Place the front
of the PowerMate Jr.®into the
caddy.
Tab
POWER-MATE
JR °
2. Rotate the
Power-Mate Jr. ®
back until it
2. Press the
caddy onto the
upper wand.
The caddy will
snap into place
snaps into place.
TO REMOVE
POWER-MATE
JR. ®
1. Press the latch and lift the Power-Mate
Jr.®out of the caddy.
7
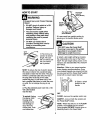
HOW TO START
Pile Height
Indicator
WARNING
_ersonal
Hazard
Injury and Product
Damage
Handle
Release
• DO NOT plug in if switch is in ON
position. Personal injury or
damage could result,
• The cord moves rapidly when
rewinding, Keep children away
and provide a clear path when
rewinding the cord to prevent
personal injury.
• DO NOT use outlets above
counters. Damage from cord to
items in surrounding area
coulldoccur.
CR:rwdind
1. Pull cord out of
canister to desired
length. The cord
will not rewind until
the cord rewind
bar is pushed.
NOTE: To reduce the risk of electric shock,
this vacuum cleaner has a polarized plug;
one blade is wider than the other.This plug
will fit in a polarized outlet only one way. If
the plug does not fit fully in the outlet,
reverse the plug. If it still does not fit, contact a qualified electricianto install the proper outlet. Do not change the plug in any
Pile Height Pedal
(Some Models)
3. Lower wand from upright position by
pressing on the handle release pedal.
!
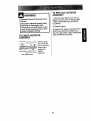
CAUTION
DO NOT leave the Power-Mate ®
running in one spot in the upright
position for any length of time.
Damage to carpet may occur.
4. Select a pile height setting by pressing
the small pedal on the rear of the PowerMate ®. The pile height setting shows on the
indicator. See SUGGESTED PILE HEIGHT
SETTINGS.
Attention: Refer to your carpet manufacturers cleaning recommendations.Some
more delicate carpets may require that they
be vacuumed with the Power-Mate" agitator
turned off, to preventcarpet damage.
5. Select a switch
way.
©
2. Plug the polarized power cord into a 120
Volt outlet located
near the floor,
position on the
handle.
©
OFF
To rewind: Unplug
the cleaner. Hold
the plug while
rewindingto prevent damage or
injury from the
movingcord. Push
cord rewind bar.
FLOOR - turns on the canister motor only.
CARPET - turns on both the canister and
the Power-Mate e motors.
NOTE - When this switch is in the FLOOR
position, the headlight and dirt sensor
(some models) DO NOT function since no
electricity flows to the Power-Mate ®.
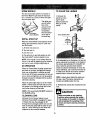
Suggested
sweeping
pattern.
For best cleaning action, the Power-Mate ®
should be pushed straight away from you
and pulled straight back. At the end of each
pull stroke, the direction of the Power-Mate ®
should be changed to point into the next
section to be cleaned. This pattern should
be continued across the rug with slow, gliding motions.
Personal
Injury
Damage Hazard
and
Product
• DO NOT run over power cord
with Power-Mate °. Personal
injury or damage could result.
• DO NOT pull plug from wall by
the power cord. If there is
damage to the cord or plug,
personal injury or property
damage could result.
NOTE: Fast,
jerky strokes do
not provide
complete cleaning.
Carpeted stairs need to be vacuumed
regularly.For best cleaning results,fully
close the suctioncontrol.
H
Suction
Control
The hose swivel
allows the hose to
turn without moving
the canister. This is
helpful for cleaning
in small areas.
Check hose for
twisting before
pulling canister.
WARNING
Personal Injury Hazard
Use care if canister is placed on
stairs. If it falls, personal injury or
property damage could result.
Product Damage Hazard
Use care if the Power-Mate ®and
wand is left in the upright position as
it may tip over easily. Property
damage can occur if tipped.
For best cleaning results, keep the airflow
passage open. Check each assembly area
in HOW YOUR VACUUM WORKS occasionally for clogs. Unplug from outlet before
checking.
For best deep down cleaning, use the XLO
setting, However, you may need to raise the
height to make some jobs easier, such as
scatter rugs and some deep pile carpets,
and to preventthe vacuum cleaner from
shutting off. Suggested settingsare:
HI - Shag, deep pile, or scatter rugs.
MED - Medium to deep pile.
LO - Low to medium pile,
XLO - Most carpets and bare floors.
9
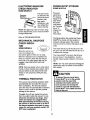
SOME MODELS
TO CLEAN THE LENSES
The dirt sensor light system is mounted on
the Power-Mate ® nozzle near the reset but-
1. Remove the
ton. It consists of a series of three red lights
and one green light.
The lights give
you an indication of the
amount of dirt
wands by pressing the quick
release pedal and
lifting up on the
wands.
particles that
are passing
Dirt Sensor
(Some Models)
thru the sensor
on its way to
the dust bag.
Cross Section View
INITIAL START UP
Ap_prox.
3 '/, inches
or 90 mm
When the Power-Mate ®is first started, the following light sequences occurs in a two second time frame:
1. All three reds come on.
Elements
2. Two reds are on.
3. One red is on.
4. One green is on and will remain on until
the Power-Mate" nozzle is placed in use,
NOTE: If the nozzle is on a surface that has
2. As indicatedby the illustration, the two dirt
sensor elements are located on the insideof
the swivel, approximately 31/2inches/90 mm
down, (note the arrows). Each element
should be cleaned periodically. To reach the
sensor elements, use a small brush such as
a bottle brush. Brush each sensor element
several times to remove dust and dirt.
dirt on it, dirt will be picked up by the vacuum
and one or more red lights might stay on.
IN OPERATION
When the Power-Matee is being moved back
and forth on the floor, the lights willchange
from one configuration to another as more
dirt or less dirt is being vacuumed. As longas
one or more red lights are on, dirt is passing
through the wand to indicate that the surface
still needs cleaning.
NOTE: Looking down inside the swivel you
will see a ring. The sensor elements are
located just slightly below this ring.
When the green light stays on as the PowerMate e is moved back and forth over an area,
the sensor is not seeing enough dirt to warrant further cleaning of that area.
3. Reinstall the wandsafter cleaning the sensors.
NOTE: Dirt sensor lights DO NOT function in
the FLOOR setting.
CLEANING
LENS
Never use water or any cleaning
solution when cleaning the lenses,
1"he residue of the water or cleaners
Although the dirt sensor feature in your
Kenmore Power-Mate ® is designed for years
of trouble free use, the passage of dirt
through the air passage system can coat the
lens causing the green light to come on and
stay on - never switching to red. When this
happens the lens must be cleaned.
will accelerate the reeoating of the
lenses and make cleaning necessary
sooner.
10
ATTACHMENTS ON WANDS
!•
SOME
CAUTION
DO NOT attach or remove handle or
wands while cleaner is ON. This
1.To
remove
wands from
Power-
could cause sparking and damage
the electrical contacts.
ATrACHMENTS ON HANDLE
Mate e, lock
wands in
NOTE: If the
Power-Mate ® is
attached, turn
cleaner off
before remov-
Lock
straight-up
position.
2. Press wand quick
release pedal with
Quick
foot and pull the
Release wands straight up out
ing handle from
wands.
m
Upper
Wand
_=_
_
1. Press lock
button, then
pull to remove
handle
wand.
MODELS
Pedal
of Power-Mate".
The Power-Mate ® plug
and cord do not have
to be removed to use
attachments on the
wands.
from
If your model
has the optional feature of a handle release,
press it in similarly.
3. Put attachments on
wands as
needed. See
ATTACHMENT
USE.
2. Slide attachments firmly on
handle as needed. See ATTACHMENT USE.
11
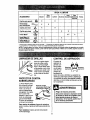
CLEANING AREA
Between
Furniture* Cushions*
ATTACHMENT
Dusting brush
X
Crevice tool
X
Fabric brush
X
Bare
Drapes*
Stairs
Floors
Carpeted
Floors/Rugs Walls
x
X
X
x
Floor brush
x
x
x
(Some Models)
Power-Mate*
X**
Handi-Mate Jr.°
X
x
X
x
(Some Models)***
Power-Mate Jr.•
X
(Some Models)***
*Always clean attachments beforeusingon fabrics. ** 3-way Orv'Off switchshourdbe in FLOOR position.
*** Handi-MateJr.." and Power-MateJr.° attachment instructionsare includedwith the products.
NOTE: When separating wands, depress lock button completely before pullingwands apart. If
wand lock button is difficult to depress push the two wands more tightly together to line up
the ock button with the h, e. Depress ock button and then pu wands apart.
EDGE CLEANER
SUCTION CONTROL
Active brush edge
cleaners are on both
sides of the PowerMate®. Guide either
side of the PowerMate* along baseboards or next to
furniture to help
remove dirt trapped at
carpet edges.
The suction
control allows
you to change
the vacuum
suction for
different fabric
Suction
Suction
and carpet
weights. Opening the control decreases
suction for draperies and lightweight rugs,
while closing the control increases suction
for upholsteries and carpets.
OVERLOAD PROTECTOR
The Power-Mate* has
OvedoadProtector
built-inprotection
ResetBu_on
againstmotor and belt
damage should the
agitatorjam. If the
agitatorslows down or
stops, the overload
protectorshuts off the
Power-Mate".The
canistermotor willcontinue to run.
Personal
Injury Hazard
Always unplug the vacuum cleaner
before cleaning the agitator area as
brush may suddenly restart. Failure
to do so can result in personal
injury.
To correct problem: Turn off vacuum,
remove obstruction, then press reset button.
To reset: Push in the overload protector
button.
12
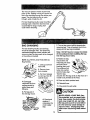
POWER-MATE ®STORAGE
ELECTRONIC BAG/HOSE
CHECK INDICATOR
SOME
MODELS
SOME MODELS
Electronic
Bag/Hose
Check_
The lower
wand has a
The light comes
on whenever the
airflow becomes
blocked, dust
bag needs
changing or canister safety filter
needs cleaning.
"U" shaped
flange in the
area where
the power
cord attaches. The base
has a "U"
NOTE: The light may come on when using
certain attachments, due to reduced airflow
through attachment.
shaped slot
near the
front caster.
Refer to TROUBLESHOOTING.
The flange allows the wands and PowerMate®to be stored with the canister to
MECHANICAL BAG/HOSE
CHECK INDICATOR
conserve storage space. The canister
must be stored on end for this feature to be
used.
SOME MODELS
The wand will slip out of the slot as it is lifted up for use and will slide into the slot as it
is lowered for storage.
When the unit is running, the indicator window will be green if there are no clogs.
When the indicator turns completely red
there is a need to check the dust bag for
being full or the other areas that may be
clogged. See HOWYOUR VACUUM
WORKS.
The Power-Mate ® must be in the flat position as shown in the illuskation. Use the
handle release pedal to place it in this position.
NOTE: You may save space by lowering the
telescoping wand as shown in the ASSEMBLY section.
NOTE: Red may appear when using attachments or when cleaning new carpet, due to
reduced airflow by the attachments themselves or new carpet fuzz filling the bag
quickly.
To prevent tip over, never leave
Power-Mate" on or in the upright
position with the wand fully
extended. Moving the wand to a
lower position and turning the
handle to one side will make the
Power-Mate ® more stable and less
THERMAL PROTECTOR
This vacuum has a thermal protector which
automatically trips to protect the vacuum
from overheating. The thermal protector
turns the motor off automatically to allow the
motor to cool in order to prevent possible
damage to the vacuum.
likely to tip over.
To reset: Turn off and unplug the vacuum
from the outlet to allow the vacuum to cool.
Check for and remove any clogs. Also
check and replace any clogged filters.
Wait approximately 50 minutes and plug
the vacuum in and turn back on to see if
the thermal protector has reset. In some
cases, the unit may suddenly restart. DO
NOT leave unattended.
13
The vacuum cleaner creates suction that
picks up dirt. Rapidly moving air carries the
dirt to the dust bag through the airflow passages. The dust bag lets the air pass
through, while it traps the dirt.
For best cleaning results, keep the airflow
passage open. Check the starred areas
occasionally for clogs. Unplug from
outlet before checking.
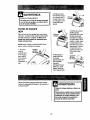
BAG CHANGING
7. The red bag mount willflip forward after
removing bag. This willpreventthe lid from
closinguntila new bag is installed.
For best cleaning results, the dust bag
should be changed often. The electronic/
mechanical bag/hose check indicator will
come on when the bag needs to be changed
or the airflow is blocked.
Note:
DO NOT bend or crease the middle
of the cardboard when installing the bag
into the bag mount slots.
8. Rotate red bag
mount down and
NOTE: See PARTS AND FEATURES for
Bag Number.
install bag into slots
per instructions
pushing down until
the cardboard tab
1. Unplug cord from
wall outlet.
2. Remove hose
from canister.
locks into position
and the holes align.
3. Pull hood release
Tuck the bag
securely into the bag cavity so that none of it
is able to be pinched by the hood.
out and up, then lift
canister hood.
9. Close and latch canister hood,
4. Disengage
cardboard tab from
red bag mount by
pulling away and
lifting up.
10. Reinstall hose.
11. Plug cord into wall outlet.
5. Pull bag out of
the red bag mount.
NEVER REUSE A DUST BAG.Very
fine materials, such as carpet freshener, face powder, fine dust, plaster,
soot, new carpet lint, etc. can clog
the bag and cause it to burst before
it is full and may cause damage to
vacuum motor. Change bag more
often when vacuuming these materials.
6. Check and
replace, if
necessary, the
motor safety
filter.
Red Bag
Mount
14
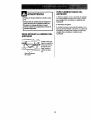
1. Unplug cord from wall outlet. DO NOT
drip water on cleaner.
2. Clean exterior using a clean, soft cloth
that has been dipped in a solution of mild
liquid detergent and water, then wrung dry.
Wipe dry after cleaning.
Do not use attachments if they
are wet. Attachments used in
dirty areas, such as under a
refrigerator, should not be used
on other surfaces until they are
washed. They could leave marks.
3. To reduce static electricity and dust buildup, wipe outer surface of cleaner and
attachments.
Check motor safety filter occasionally
change when dirty.
and
1. Lift the rubber
retainer and pull
out motor safety
filter as shown.
Electrical Shock Hazard
Unplug power cord from electrical
outlet. Do not operate the cleaner
without the motor safety filter. Be
sure the filter is dry and properly
installed to prevent motor failure
and/or electrical shock.
2. Replace the filter, white side out,
by sliding it back
into place under
the ribs in the bag
cavity. Tuck filter in
so that it fits completely under the
rubber retainer.
Remove the bag as outlined in the BAG
CHANGING section.
MOTOR SAFETY FILTER
ELECTROSTATIC
3. Replace the bag as outlined in the BAG
CHANGING section.
This white and grey filter must be replaced
when dirty. It should be replaced regularly
depending on use conditions. The filter
CANNOT be washed as it will lose its
dust trapping
ability.
NOTE: See PARTS AND FEATURES for
motor safety filter number.
NEVER REUSE A DUST BAG.Very
fine materials, such as carpet freshener, face powder, fine dust, plaster,
soot, new carpet lint, etc. can clog
the bag and cause it to burst before
it is full. Change bag more often
when vacuuming these materials.
15
2. Slightly push
the exhaust filter
WARNING
Exhaust
cartridge to the
side, as shown in
the illustration,
Fire and/or Electrical Shock Hazard
Do not operate with a clogged
exhaust filter or without the exhaust
filter or exhaust filter cover installed.
EXHAUST
HEPA
and pull up to
remove.
FILTER
3. Replace the
exhaust filter cartridge, carefully
positioning it SO
that the side
shown in the
The exhaust filter cartridge must be
replaced when dirty. Replace the filter when
the entire surface area is covered evenly.
The filter CANNOT be washed as it will
lose its dust trapping
illustration goes
down under the
ability.
NOTE: See PARTS AND FEATURES for
exhaust filter number.
1. Pull Up on
the exhaust illter cover to
&ha.st
Filter
_
Am f)
Cover_ _._.tr,"
ribs. Then push
the other side
down until it snaps into place. Place the new
filter into the motor cover with the grey
edge down.
I
/
Exhaust
Filter..
/I
4. Replace the
exhaust filter
the motor cover
remove
from
_
and
lay aside.
Exhaust
Filter
cover by engaging the two tabs
on the rear and
pushing down in
front until it
snaps closed.
Always follow all safety precautions when
cleaning and servicing the Power-Mate ®.
IWARNING
Electrical Shock Or Personal Injury
Hazard
Disconnect electrical supply before
servicing or cleaning the unit,
Failure to do so could result in electrical shock or personal injury from
cleaner suddenly starting.
16
TO CLEAN AGITATOR:
TO REMOVE BELT
NOTE: In order to keep cleaning efficiency
high and to prevent damage to your vacuum, the agitator must be cleaned every time
the belt is changed.
1. Turn PowerMate ® upside
down.
2. Unscrew the
The agitator must also be cleaned according to the following schedule:
two (2) PowerMate ® cover
Vacuum Use
Clean Aaitator
3. Turn PowerMate ® right
side up. Press
handle release
pedal and
lower the
swivel. Lift rear
HEAVY
every week
latches up.
IMPORTANT
screws.
-
(used daily)
MODERATE
-
every month
(used 2-3 times/week)
LIGHT -
every 2 months
(used 1 time/week)
Disconnect cleaner from electrical outlet.
Check and remove hair, string and lint buildup frequently in the Power-Mate ® agitator
and end cap areas.
4. To remove cover,
grasp the sides and
pull out.
Remove any dirt or debris in the belt path
area or in the brush roller area.
Carefully remove any string or debris
located on the agitator, or end caps.
5. Depress tabs
on rear of
agitator cover
and rotate
forward to
release from the
Power-Mate ®
base.
Tabs
Agitator Assembly
Brush Unit
Agitator
Cover
End Cap
6. Lift agitator
assembly out
and remove
worn belt.
1
L_Belt Pulley
End Cap
7. Check and clean end cap areas. See
AGITATOR ASSEMBLY for picture of
complete agitator assembly.
17
TO REPLACE BELT
4. Line up
front of
cover and
base. Rest
cover on
1. Install new
belt over
front edge of
base as
shown.
motor drive,
then over
brush sprocket.
\
Cover
Motor
Brush Drive
Sprocket
NOTE: See
PARTS AND
FEATURES
for belt number,
End Cap
Base
Agitator
[
Top View
2. Place agitator
assembly back into
Power-Mate ®.
5. NOTE: On dirt
sensor models
be sure that the
3. Reinstall
agitator cover
by lining up
the front tabs
and slots and
board is upright
and the wires are
tucked back as
shown.
rotating
downward
until the
latches snap
into place.
6. Rotate cover
back. Press cover
firmly until side
and rear tabs snap
into place. Turn
Power-Mate ®
upside down and
replace two (2)
cover screws.
Agitator Cover
Push In
And Turn
1. Remove Power-Mate ® cover as shown in
BELT CHANGING AND AGITATOR CLEANING section.
In
3. Push in and turn
bulb clockwise,to
replace. Bulb must
not be higher than
15 Watts(130 Volts).
2. Push in and turn
bulb counterclock-
And Turn
-_Push
\
_
wise, then pull out
to remove.
4, Reinstall Power-Mate ® cover as shown in
BELT CHANGING AND AGITATOR CLEANING section.
NOTE: See PARTS AND FEATURES for
bulb number.
18
TO REPLACE AGITATOR
ASSEMBLY
Electrical ShockOr PersonalInjury
Hazard
Disconnectelectricalsupply before
servicing or cleaning the unit.
Failure to do so could result in elec-
1. Remove Power-Mate ®cover, belt and
agitator assembly. See "To Remove Belt"
in BELT CHANGING AND AGITATOR
CLEANING.
trical shock or personal injury from
cleaner suddenly starting.
3. Replace belt, agitator assembly, PowerMate®cover, light bulb and light cover.
See "To replace belt" in BELT CHANGING
AND AGITATOR CLEANING.
•
2. Reptace Agitator
Illi
TO CHECK AGITATOR
ASSEMBLY
When brushes
level of the base
__K
--
support bars,
replace the
are
w°rn to the
agitator
assembly.
Base Support Bars
19
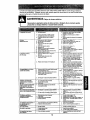
U
Review this table to find do-it-yourself
solutions for minor performance
problems. Any service needed, other than those described in this owner's manual, should be performed by
an authorized Sears Service Center.
Cleanerwon't start.
Poorjob of dirt
pi_-up.
Cleanerstarts but
cuts off.
1. Unpluggedat waftoutlet.
2. Tdppedcircuitbreaker_own fuse
at householdser.Hcepanel.
3. Loosehoseelectricalconnedlens.
1.
2.
3.
4.
5.
6.
7.
8.
9.
10.
Full
ordoggeddustbag.
Cloggedaidlow passages.
Dirty
filters.
WrOngpilehaigi_lsetting.
Opensuctioncontrol
Hale inhose.
Worn Power-Mate"sgitator.
Wornor brokenbell.
Dirtyagitatoror endcaps.
Canisferhoodopen.
1. Plug in ltrm4y,push ON/OFF switchfo ON.
2. Reset circuit breaker or replace fuse,
3, Reconnect hose ends, (page 7).
1. Change bag, (page 14).
2. Clear airltow passages. (page 14),
3. Change fibars, (page 15-16).
4. Adjust seHing, (page 9).
5. Adjust control, (page 12).
6. Replace hose.
7. Change agitator, (page 19),
$ & 9. See BELT CHANGING AND AGITATOR
GLEANING,
1. Hose or hood etsctrP.al connections.
2. Tdppad o_edoad protector in
1. Checkconnections,
reconneclhose ends,(page 7)
2. Removeany items Ihal may be caught
Power-Mate e.
or jammed,then reset. If cleanerstarts
andstepsagain,cleanagitatorand end caps,
then reseL(pages12, 17-18)
Turnoff and unplugthe vacuumfromoulleland
waitapproximately
50 rni_tes and plugthe vacuum in, turnbackon tosee if the protectorhas
resel, (page 13).Changedust bag,dear airflow
blockage,(page 14).
3. Tripped thermal protactor
in canister.
POWER-MATE
e wfllnot
tun when attached.
(pages 17-18).
10. Close and latch hood.
1. Power-Male
e connections
1. Plugin firmly,(page6).
unp_ugg_.
2, Wornor brokenpelt.
3. Dirtyagitatoror end caps.
4. Tdppedovedeadprotectorin
PowerJ,Aate"
5, Switchnot in CARPETposition.
2 & 3. See BELTCHANGINGAND AGITATOR
CLEANING,(pages 17-18),
4. Check agitatorareafor excessivelint
I_ild.-up orjamming.Clean agitatorand
endcaps,Ihanreset,(pages12, 17-18).
5, Move switchtoCARPETposition,(page8),
Constantgreen lighton
In dirt sensor.
1. Dirtpassage
tsdngged,
2. Lensesaredirly,
1. Checkforclogsin air passages,(page 14).
2. Clean lenses. (page10).
Any,some, or all red lights
in dirt sensorburn and never
tum green.
1. Dirt passageisdogged.
1. Check for clogsin airpassages,(page 14).
Nogreen or red dirt
sensor lights.
1. Switchnutin CARPETpeellton.
2. No powerIo censor board.
1. Move swit_ to CARPETposition,(page8).
2. Take toyonrnearestSears ServiceCenten
rlec_onlc/Mechanlcal
Ba_Hose Check Indicator
activates.
1.
2,
3.
4.
1.
2.
3.
4.
Cleanerpicks up moveabte
rugs-or- POWER.MATE*
pusheston hard.
1. Wrongpileheightselt_ng,
2. Sucltontoo strong.
1. Adjustsetting,(pageg)
2. Opensuctioncontrol,(page12).
Ught won't work.
1, Burnedoutltght bulb.
1. Changetight bulb, (page18).
Cordwon't rewind.
1. Dirtypoweros_l.
2. Cordjarnmed.
1. Cleanthe pewit cord.
2. Pullout cordand rewind.
Cleanerleavesmarkson carpel
1. Wrongvacuum!rig
pahern.
1. Sea VACUUMINGTIPS, (page9).
Fullor doggeddustbag.
Dirtyfilters.
BiodmdaJrflcwpassage.
Cer_Jnattadlmonttools.
2O
Chengehag, (page 14).
Changefilters,(page15-16).
Clear blockagefromelrllow passage,(page 14).
Thisisnormal.Lightshouldgooff
whan tonl
isremaved,
Antesde usarsu aspiradoranueva .....
1
Garantia de la aspiradora de Kenmore
Instrucciones importantes de
seguridad ............................
.. 1
Piezas y caracterfsUcas ...............
Instrucciones
de
ensamblamiento
...............
Uso ..............................
Para eomenzar ..........................
Sugerencias para aspirar ...............
Sugerencias sobre el ajuste de nivel de
pelo de la alfombra ....................
Detector de tierra ......................
Accesorios ..........................
Uso de los accesorios .................
Caracterfsticas de rendimiento ........
3-4
Funcionamiento
de su aspiradora ......
2
5-6
7
7
8
8
9
10
11
11-12
Cuidado del receptdculo ..............
Cambio de la bolsa ...................
Limpiezadel exteriory de los accesorios...
Cambiodel filtro de seguridaddel motor ...
Cambio del filtm de escape .............
13
13
14
14
15
Cuidado de la Power-Mate*
15
............
Cambio de la correa y limpieza
del agitador .......................
Cambio de la bombilla .................
Cuidado del agitador ..................
16-17
17
18
Reconocimiento de problemas .........
19
Informaci6n de
assistancia o servicio ..... Posterior
Cubierta
13
Por favor lea esta guia que le ayudara a assemblar y operarsu aspiradoranuevade Kenmore en una manera
m&s segura y effectiva.
Para mas informaci6n acerca del cuidado y operaci6nde esta aspirador, Ilame a su tien_iaSears mas cercana.
Cuando prequnte pot informaci6n usted necisitard el nlJmerocompleto de serie y modelo de la aspiradora que
esta.Iocado en la placa de los nl_merosde modelo y serie.
Use el espacio de abajo para registrar el n_mero de modelo y serie para su nueva aspiradorade Kenmore.
Numero de Modelo
N_mero de Serie.
Fecha de Compra
Matengaeste libro y su reciboen u lugar seguropara mferencias futuras.
GARANT|A LIMITADA DE UN ANO DE LA ASPIRADORA KENMORE
Esta garantfa es por un a._odesde la fecha de compra, e incluyesolamenteel use de la aspiradoraen hogares
privados. Durante el aSo de garantia, cuando la aspiradora es operada y mantenida de acuerdoal manual de
instrucciones del dueSo, Sears reparar_ cualquier defectoen materiales o fabricaciSnlibre de cargo.
Esta garantfa excluye las bolsas de colacci6n,correas,lamparillas, y filtros, las cuales son partes gastables que
se deterioran con el uso normal.
Para el servlcio de garanfia, retorne esta aspiradora al Centro de Servlclo Sears mds cercano en los
Estados Unidos.
Estagarantia se aplicasolamentemientras este producto est_ en uso en los EstadosUnidos.Esta garantia le
da a ustedderechoslegalesespecfficos,y ustedpuedetenet tambi_notrosderechoslos cualesvariande
estadoa estado.
Sears, Roebuck and Co., D/817 WA, Hoffman Estates, IL 60179
Suaeguridad
esmuyimportante
paranosotros.
Para reducir el rlesgo de Incendio, choque
eldctrico, lesibn corporal o dafios al uUlizar su aspiradora, actde de acuerdo con precauciones
bdsicas de seguridad, entre elias:
Lea estemanualantesde armaro utilizarsuaspiradora.
No use la aspiradorasi la mangueraesta rota.La
mangueracontienealambresel6ctrices.Cambielasi
esta rotao desgastada.Eviteaspirar objetos
agudes.
Use suaspiraderaOnicamanteen la forma descrita
an estamanual.Use _nicamenteconacoesories
recomendados
porSears.
Para reducirel riesgodechoqueel_ctrico,no use
suaspiradoraalaire librani sobrasuperficiesmojadas.
No coloqueobjatosen lasaberturas.
No utilicela aspiradorasialgunaaberturaesta bloquaada;mantdngalalibrade polvo,pelusa,cabellos
y cualquieracosa que podrfadisminuir
el flujode
aire.
Desconecteel cordenel_ctricoantesde componer
o limpiar el &readel cepino.De Io contrario,el cepillo
)odriaarrancardeform imprevistao podria
)roducirseunchoquealectrico.
Mantenga el cabello,rope suelta,dedos y todaslas
partesdel cuerpoalejadosde lasaberturasy piezas
mec_nicas.
Siempredebeapagarla aspiradoraantesde
conectaro desconectar
la manguerade la PowerMate®.
No use [a aspiradorasin tenerinstalada la bolsa
para polvo y/o los filtros.
Cambie siemprela bolsaparapolvodespuds de
espirar limpiaderas
de alfombraso desodomntes,
talcosy polvosficos. Estesproductes
atascanla
bolsa,reducenel flujo de aire y pueden causarque
_sta se rompa. Si nocambiala bolsapodrfaocesionar daSopermanentea la aspiradera.
Siempre debe apagarsu aspiradoraantes de desconectarla.
No desconectela aspiradoratirandodel cord6n
el_ctrico. Paradesconectarla,hale el enchufe,no el
,'ord6n.
Sujeteel enchufeconla mano al enrollarel cord6n
eldctrico.Paradesconectarla,haleen enchufe,no el
cord6n.
No usela espiraderaparalevantarobjetosagudes,
juguetespoqueSes,alfileras,sujetapapeles,
etc.
PodrfandaSarlaespiraderao la bolsaparapelvo.
No usela aspiradorasi el cord6no el enchufeesta
daSado.Si la aspiradorano estafuncionandoadecuadamenteo sise ha dejadecaer,estddaSada,se
ha dejadoexpuestaa la intemperieo se ha dejado
caeren agua,devublvala
a un Centrade serviciode
Sears.
No levantaninguna cosaque se estequemandoo
emitiendohumo,comocigarrillos,
ceriUoso cenizas
calientes.
No hale ni transportela espiradoraporel cord6n;no
use el cord6ncomo mango;no cierrepuertassobra
el corden; no haleel cordensobrerebordesagudes
ni esquinas.No paselaaspiradorasobreel cord6n.
Mantengael cord6n alejadode superficies
calientes.
No abandenelaaspiradoracuandoest6conectada.
Descondctela
cuandono la est6usandoy antesde
darleservicio.
No usela aspiradorapara aspirarliquidesinflamableso combustibles(gesolina,liquides para limpieza, perfumes,etc.)ni la useen lugaresdonde
6stospodrianestarpresentes.Losvaporesde estas
sustancies
puedencrearun peligro de incendioo
explosibn.
Tengaculdadoespecialal utilizarla aspiradoraen
escalones.No la coloquesobresillas,mesas, etc.
Mant_ngalaen el piso.
No permitaque sea utilizadacomo juguete.Se
requieratenermayorcuidadocuandosea utilizada
en laproximidad
de nihoso pot niSos.
Usted es responsable
de aesgurarque su aspiradoranosea utilizadapot ningunapersonaque no
puedamanejarlacorrectamente.
No toquelaaspiraderani el enchufecon lasmanes
rnojadas.
No operesinel filtra de escapeni la cubiertadel illtro de escapeinstalades.
GUARDE ESTAS INSTRUCCIONES
El armado y uso seguro de su aspiradorason su rasponsabilidad.
Esta aspiradoraha side diseSada
exclusivamente
para usodom_stico.La aspiradora deharaalmacenarseen un lugarsecoyen el interior.
Lea este Manualdel propietariodetenidamente,puescontieneinformaci6nirnportantesobreseguridady
uso.Esta quiacontieneinformacionsobreseguridaddebajode simbolosde advertiencia cuidado.Por
favorpongaatenci6nespeciala estasinstrucoionesdadas. Advertenela:Este informaci6nle alertard con
el poligrode fuego, choqueselectricos,quemadas y lesiones.Culdado: Este informaci6nle alertaraa
31i_roscome lesiones;/dafios de propiedad.
2
Es importante conocer las piezas y caracter{sticas
Exam{nelas antes de usar su aspiradora.
de su aspiradora para asegurar su uso adecuado y seguro.
Objeto
Pieza N9.
en EUA
Pieza Ng.
en Canad_
Bombillade farol
20-5240
596181
Correa
20-5201
20-40979
Sujetador del
cord6n y el
enchufe
_'__=_(
Sujetador del
cord6n y el
_
Jl
enchufe
I
I
Tubo
superior --
Dispositivo
giratorio
del mango
(Algunos
Power-Mate Jr.."
(Alg uYnbsand:_aelos)
modelos) _-------._
Sujetador
I_,:,_n
Ill
[_Tub°.r
I I
Cord6n el6ctrico
I
de Power-Mate"
U
I
supe.o
Power-Mate )
Correa
del cord6n "'''"__i
Reborde __
Pedal de liberaci6n
rdpida del tubo
(Algunos modelos)
de pelo de la alfombra
(Algunos modelos)
N_meros de serie del
modelo Power-Mate"
(Parte inferior)
Pedal de liberaci6n
Protector contra
sobrecargas
Bot6n de
restauraci6n "Reset"
Pedal de seleccibn de nivel
de pelo de la affombra
(Algunos modelos)
Limpiador de orillas
(No se muestra)
Indicador de polvo
(Algunos modelos_
3
MANGUERA
ACCESORIOS
Interruptor de encendido/
apagado de tres poslciones
(Apagado/PIso/Alfombra)
(Algunos modelos)
Mango
Power-Mate Jr.."
(Algunos modelos)
Herramienta
para
hendiduras _
Cepillo para
_
sacudir _
_L _
Cepiflo
Cepillo para pisos
.aratelas
(Algunos modelos)--_
___
_
HandI-Mate Jr.."
(Algunos modelos)
NOTA:Todoslos modelos cuentan con
unjuego de accesorios en el recept_,cuIo.Unosmodelos tienenun luego adicionalque se puedeguardaren la bolsa
accesariapara el uso para la basurau
otroslugaressucios.
Dispositivo
giratorio de
la manguera
RECEPTACULO
Objeto
Pleza N=.
en EUA
Part N'.
en Canada
Bolsa para polvo
20-50558
20-50555
Filtro de escape
20-86880
20-86880C
Filtro de seguridad
del motor
20°86883
20-86883C
Filtro de
Cubierta
filtro de escape
Almacenamiento
para accesorios
Tapa del
electr6nico para
fa bolsa/manguera
mecdnlco para la
bolsa/ manguera
el_ctrico
Pestillo
SuJetador
de la bolsa
Filtro de segurldad
del motor (Detrds
de ta bo/sa para polvo)
Bolsa para polvo
4
ADVERTENCIA
Peligm de choque eldctrico
No conecte la aspiradora hasta que termine
de armada. De Io contrado podrfa causar
un choque el_ctdco o lesi6n corporal,
Antes de armar la aspiradora, chequeela LISTA
DE EMBALAJE en la cubiertaseparada de la Lista
de Partes para Reparaci6n. Use esta lista para verificar que ha recibido todas las componentes de su
nueva aspiradora Kenmore.
TUBOS
Una los tubos
deslizandolos hasta
que el bot6n quede
fijo en posici6n. Gire el
bot6n del tubo hacia la
zona ranurada del dispositivo giratorio del
tubo.
El dispositivo giratorio
le permitegirar el
mango hacia la
izquierda para limpiar
mejor debajo de los
muebles bajos.
Dispositive
giratofio
del mango -Sujetador
del cord6n /
POWER-MATE®
1. Introduzca los tubosen la Power-Mate° hasta que
el bot6n del tuboquede fijo en posici6n.
•Area
elevada
hacla dentro
_
2. Conecteel
enchufey cord6nde
la Power-Mate
•
como se muestra,
NO LO fueme. El
area elevadadel
enchufe tiene que
estarhacia la mano.
3. Assegurael
cordbndentrodel
sujetadordel cord6n
en el giratoriode la
mango.
liberecl6n
r_plda del tubo
(Algunos
modelos)
Para retirar: Pise el pedal de liberaci6n rapidadel
tuboy tim del tuboshacia arriba.arriba.
5
RECEPTACULO
1. Abra la tapa del receptdculo.
2. Examinela bolsa para poIvoeste instaladocorrectamante.Consulte lasinstruccionesde instalaciSnen
la CAMBIO DE LA BOLSA.
3. Examinee[ filtro de seguridaddel motoreste instaladocorrectamante.Consultelas instrucciones
de
instalaciSnen LIMPIEZA DEL FILTRO DE SEGURIDAD DEL MOTOR.
LA TAPAY LA CUBIERTA
Es normal que la tapa del recept_,cufo
se desprenda
al serabierta m_.sde Io necesario.Paracolocarnuevamentela tapa, alineelas ranurasde la bisagra,ins_rtelasy cierrela tapa.
!•
MANGUERA
1. Alinee la pestaSade
sujecibnde la manguera
y la ranurade la cubierta del recept._culo
e
introduzcala manguera
en el receptaculohasta
que quede fija en posicibn.
Para retlrar: Levanteel
_estillo de la manguera
y tire de la manguera,
sujeci6n
de la
manguera
Ranura
2. Introduzcael
mango en el tubo
hastaque el bot6n
quede en posicibn.
Asegdrese de que la
manguere no est6
torcida.
CUIDADO
Nunca debe abrir la capucha del contenedor
estando la tapa abierta. Asf ee evitar_tdaSos
a la capucha del contenedor y/o a la tapa.
Bot6n del
"
Bot6n de
liberaci6n
rdpida del
mango
(Algunos
Pars retirar: Optima
el botSnde liberac_6n
rapidadel mango
para liberar el mango
y tire del mango hacia
arriba.
Para Guardar: Paraprevenirla precibnde la mangua
mientrasse guarda,desunala mangua del tubode la
aspiradora.Guardela maguaen una posicibn
enrolladay flojamente de tat maneraque la tapade la
manguano se estire.
PARA ACOPLAR LA BANDEJA
1. Alinee la
pestaSa de la
varilla con la
ranura de la
bandeja PowerMate Jr.®.
2. Presione la
bandeja en la
varilla superior.
PARA INTRODUCIR POWER-MATE
JR. °
1. Coloque la
parte frontal del
Power-Mate Jr. ®
Disposltivode
retenci6n
en la bandeja.
2. Gire el PowerMate. ® hacia
atrds hasta que
encaje en su sitio.
PARA
SACAR
EL POWER-MATE
JR, =
1, Presione el dispositivode retencibn y saque
el Power-Mate Jr.® de la bandeja.
PARA COMENZAR
Indicador de nivel
de polo de la alfombra
Peligro de lesibn personal y da_o al
producto
Pedal de
liberaci6n
• NO enchufe la aspiradora si el
interruptor esta en la poslci6n ON.
Podrfa causar lesibn personal o daSo
al producto.
• El cord6n electrico se mueve
rdpidamente dursnte el enrollamlento.
Mantenga alejados a los niSos y
asegure espacio Iibre suflclente para
evitar lesiones personales al enrollar
el cordon.
Pedal de selecclOn
de nivel de polo
de la alfombra
(Algunos modelos)
3. Baje el tubo desde la posici6n vertical pisando el
pedal de liberaci6n del mango.
• NO use los enchufes Iocaltzados sobre
los muebles. Los objetos cercanos
podrian resultar da6ados.
Almacenamiento
del cord6n
CUIDADO
1. Tire del cord6n
para sacarlo del
receptaculohasta
tenorla longitud
deseada,Elcord6n
no se enrollardhasta que optimala barra para enrollarlo.
4. Seleccione una alturade pelo de la alfombra
usando el pedal peque,5oubicado en la parte posteriorde la Power-Mate",El nivelde pelo la alfombra
se muestra en el indicador.ConsulteSUGERENCIAS SOBRE EL AJUSTE DE NIVEL DE PELO DE
LA ALFOMBRA.
Atenci6n: Refi6rase alas recomandaciones
del fabricantepara Iimpiarsu alfombra.Algunasalfombras
m._sdelicadaspuedenrequerirel use de la aspiredoracon el agitedorPower-Mate° desconectado
para prevenir que la alfombrasea daSada.
NOTA: Para reducir el riesgo de choqueel_ctrico,
esta aspiradora cuenta con una clavija polarizada,
uno de los contactos es mas ancho que el otro. La
clavija s61opuede introducirsede una manera en el
enchufe. Si la clavija no cabe bien en el enchufe,
invidrta[a. Si a0n no cabe, Ilame a un electricista
para que instale un enchufe correcto. No attere la
clavija de ninguna manera.
,_OfF
_ARPL_
5. Seleccioneuna
posici6n del interruptoren el mango.
2. Conecteel cord6n eldctrico polarizadoen un
enchufe de 120 voltiosque se encuentre cerca del
piso.
Para enrollar: desconecte la aspiradora.Sujete el
enchufemientras
enrollael cord6n
para impedirdaSoo
lesi6ncorporalpot el
movimiento del cordbn. Oprima el
control para
rebobinar el cord6n
el_ctrico con la mano o con el pie.
I
OFF
FLOOR - s61oenciende el motordel receptdculo.
CARPET - enciendelos motoresdel receptdculoy
de la Power-Mate'.
NOTA - Cuando este controlest._en la posici6n
FLOOR, el farol y el indicadordo polvo (unos medelos) no funcionan porqueno la electricidadno fluye
al Power-Mate'.
7
!
Estilo de limpieza sugerido.
Para obtener la mejor acci6n de limpieza se recomienda empujar la Power-Mate®en direcci6n directamente opuesta a usted y jalarla en linea recta.Ai
final de cada pasada de regreso, cambie la direcci6n de la Power-Mate* hacia la siguiente secci6n a
limpiar. Contin6e asi a traves de toda la alfombra de
una manera lenta y deslizante.
ADVERTENCIA
Peligro de lesion personal y dafio el
producto
• No atropelle el cord6n electrico con la
Power-Mate°. Hay un peligro de
lesi6n corporal o unos dafios de
posesiones.
• No tire del cord6n el_ctrico de la pared
para desenchufado. Si hay danos en
el cord6n el_ctrico o el enchufe, hay
un peligro de leal6n corporal o unos
da_os de posesiones.
NOTA: las pasadas rdpidasy
jalonadas no
Iogran una limpieza completa.
Control de
El dispositivo giratorio
de la manguera permite que _sta gire sin necesidadde moverel
recept&culo.
Estoes
muy 5til para limpiaren
&reaspequeSas.Aseg_rese de que la manguera no est_ torcida
antesde jalar el receptdculo.
Los escalones alfombrados requierenlimpieza
peri_lica. Cierre por completoel control de aspiraci6n para Iograrlos mejoresresuftadosde Umpieza.
!ADVERTENCIA
Peligro de lesi6n personal
Tenga cuidado si coloca el receptitculo
sobre escalones. Si se cae, podrfa causar
lesi6n personal o dafio a la propiedad.
Peligrode lesi6n personal y dafio al
producto
Mantenga el paso de aire abiertopara Iogrer los
mejores resultados de limpieza. Examinede vez
en cuandocada una de las ._reasde uni6nen FUNCIONAMIENTO DE SU ASPIRADORApara asegurarse de que no eatenbloqueadas.Desconectela
aspiredore antes de revisar.
Tenga cuidado si el Power-Mate° y la
manguere se dejan en posicl6n vertical
pues peuden caerse fdcllmente, Si se
voltean peude haber dafio de propledad.
Use el ajuste XLO (bajo) para obtenerla mejorUmpieza a rondo.Por otra parte, quizds se requiem elevat el nivel para facilitar algunas tareas, como pot
ejemplo cuando se trata de tapetes y algunas alfombras de pelo largo, y para impedir que la aspiradora
se apague. Se sugieren los siguientes ajustes:
HI - Pelo muy largo y suelto, tapetes, alfombras
muy acojinadas.
MED - Pelo mediano a largo.
LO - Pelo corto a mediano.
XLO - La mayoria de tas alfombrasy pisos
descubiertos.
8
ALGUNOS MODELOS
PARA LIMPIAR LAS LENTES
El sistema indicador del detector de tierra est._mentado en la boquilla de la Power-Mate®,cerca del
boron de restablecimiento. Consiste en una serie de
tres indicadoras luminosos rojos y uno verde.
_vo
(Algunosmodetos)
1. Retire los tubos
oprimiendo el pedal
de liberaci6n r_,pida
y levantando los
tubos.
Las lutes indican
la cantidad de
parficulas de tierra que est._n
pasando a tray,s
del detector al ser
transportadas
hacia la bolsa
para polvo.
Corte transversal
ARRANQUEINICIAL
3 _ pulgadas
o 90 mm
La primera yes que arranca la Power-Mate®ocurre
siguiente en un perlodo de 2 segundos:
Anillo
1. Los tres indicadores rojos se encienden.
Elementos
del detector
2. Dos indicadores quedan encendidos.
3. Un indicador queda encendido.
4. El indicador verde est_ encendido y permanece
encendido hasta el momento en que comience a
usar la Power-Mate®
NOTA:Si la boquilla est_ sobre una superficie que
tiene terra, _sta ser_ aspirada per la aspiradora y
posiblemente se queden encendidos algunos de los
indieadores rojos.
2. Como se ve en el diagramalos dos indicadores
de polvo estdn colocadosdentro de la articulaci6n
giratoria,aproximadamente3 V2pulgadaso 90
mm abajo, Observelas flechas). Para Ilegara los
elementosdel detector,use un cepillopegueSo,
comopor ejemplopara botellas. Cepillecada
detectorvarias veces para eliminarla tierra y el
polvo.
EN OPERACION
Cuando desliza la Power-Mate®per el piso,los indicadores cambian de una a otra configuracibn seg5n
si la aspiradora recoge mucha o poca tierra. Si uno
o varies indicadores rojos permanecen encendidos,
significa que la aspiradora sigue levantado tierra,
6s!a sigue pasando a traves del tubo, y que necesita continuar aspirando la superficie.
NOTA:Si mira hacia dentro del dispositivo giratorio podrdver un anillo.El elementodetectoresta
justamentedebajode dichoanillo.
3. Vuelvaa instalarlos tubesdespuesde limpiar
los detectores.
Cuando se queda encendido el indicador verde
mientras desliza la Power-Mate®eobreuna zona
determinada, significa que el detector no estd
detectando tierra y que la zona ya estd lipia.
NOTA: Las lucesdel detector de tierrano funcionan
cuandose seleccionael ajuste para pisosdescubiertosFLOOR.
No utillce nunca agua nl soluci6n
limpiadora para limplar las lentes. El
residuo del agua o del Iimplador
causar=tque lae lentes se cubran de
tlerra rods r_ipido,requlriendo limpieza
LIMPIEZA DE LA LENTE
Aunquela funci6nde deteccibn de tierrade la
Power-Mate®de Kenmoreest._diseSadapara
brindarmuchosafios de funcionamiento interrumpido, el paso de tierraa trav_sdel sistemade las v_as
de aire puedecausar una escama en la lente,
haciendoque se encienday contin,',eencendidoel
indicadorverde,sin cambiar nuncaa rojo.Cuando
esta suceda,tiene que limpiarla lent®.
I con mayor frecuencia.
9
ll
ACCESORIOS DEL TUBO
!
CUIDADO
ALGUNOS MODELOS
NO instale ni retire el mango nl los tubos
cuando la aspiradora estd encendida.
Esto podria causar chlspas y da_ar los
contactos el_ctdcos.
1. Para retirarlos
tubosde la
POWER-MATE
_,
colbquelosen la
posici6n vertical
de bloqueo.
ACCESORIOSDEL MANGO
NOTA: Si tiene
instaladala
Power-Mate
®,
apague la aspiradoraantes de quitar el mangode
los tubos.
Bot6n de
cierre
Tubo
_
I
2. Pise el pedal
de
Pedalde
liberaciSn
rdpldadel
tubo
1. Oprima el bot6n
de bloqueoy
luegotire del
mangopara quitarlodel tubo.
liberaci6n rdpidadel
tuboy tire del tubo
hacia arribapara
desprenderlode la
POWER.MATE_.
No es necesario
retirar el enchufey
cord6nelectricode
la POWER-MATE_
para usarlos
accesoriosdel tubo.
Si su modelo tiene la caractedstica opcional de la
liberaci6n del mango rdpida,insdrtala de un modo
semejante.
3. Coloqueel
acoesoriodeseado sobreel
tubo.Consulte
la USO DE LOS
ACCESORIOS.
2. Deslicoel accesoriodeseadocon
firmeza sobreel
mango.Consulte la
USO DE LOS
ACCESORIOS
10
AREA A LIMPIAR
ACCESORIO
Meubles*
Entre
Plso_
Pl$os
descubledos
ilfombradoe_ Faredes
coJlnes* Cortinas* Escalones
Alfombras
Cepillo para sacudir
I_
X
X
Herramienta
para hendiduras
Cepillo para telas
X
x
X
,_
X
X
X
Cepillo para pisos
X**
Power-Mate®
Handi-Mate Jr.°
(Algunosmodelos)*-
Power-MateJr.e
X
_
x
X
X
X
x
x
(Algunos modelo$)*• Siempre limpie los accesorios antes de usar sobre lelas. °* El interfuptor de 3 posloiones debe estar en la posicibn FLOOR (piso descubiedo)
"*" La Handi-Mate Jr," y la Power-Mate Jr2 incluy_n sus propias instrucclones para uso de accesodes.
NOTA: Cuand.osepare los tubos optimacomp!etamenteel bot,o.'n
de bk_lueoantes,desepararlospor completo. bi se le diTicultaoprimirel bot6n juntem_s los tubespara alinear el bot6ncon el oriricio,uprima el bot6ny
despuds separe os tubos.
LIMPIADOR DE ORILLAS
CONTROL DE ASPIRACION
El control de
aspiraci6nle
permite cambiar la poten-
Active los cepillos limpiadores de oriltasa cada
ladode la Power-Mate®.
Pose la Power-Mate®junto
alas paredeso juntoa los
muebies para ayudara eliminar la tierraacumulada
en las orillasde la alfombra.
cia de aspirasspiracl6n
aspiraci_)n
ci6nde la aspiradoradependiendodel
grosorde la tela o alfombra.La aspiraci6nse
disminwe, para limpiarcortinasy tapetesligei
ros,abriendoel control;para aspirarmueblesy
alfombras, el control debe cerrarsepara aumentar la aspiraci6n.
PROTECTOR CONTRA
SOBRECARGAS
La Power-Mate®cuenta
con proteecion incorporada contra daho del
motor y la correa en
caso de atascamiento
del agitador. Si el agitador funciona m._s
despacio o para, el protector de sobrecarga
para la Power-Mate®.
El motor del recept_culo
continuar& funcionando.
ProtectOr contra
sobrecargas Bot6n de
restauracidn "Reset"
ADVERTENCIA
Peligro de lesiones personales
Desconecte slempre la aspiradora antes
de limplar las _imas de la agltador pues
dstos poddan arrancar de manera
Imprevista. El ho hacerlo, podrfa resultar en lesiones personales.
Para resolver el problema: Apaguela aspiradora,
quiteel residuey aprieteel bot6npara encenderde
Ruevo,
Para restablecer: Oprimael bot6ndel protector
contrasobrecarga.
11
/
INDICADOR ELECTRONICO
PARA LA BOLSA/MANGUERA
TAPAY ALMACENAMIENTO
PARA POWER-MATE®
ALGUNOS MODELOS
ALGUNOS MODELOS
Indicador
electrOnico
para la
bolsa /_
La luz se enciende
en cualquier memento que se bloquee el
flujo de aire, cuando
la bolsa se Ilene o
cuando sea necesariocambiar el filtro de
seguridad del recept_culo.
El tube inferior tiene un reborde en
forma de "U" en la
zona de fijaci6n del
cord6n electrico. La
base tiene una ranura en forma de
"U" cerca de la parte frontal de) receptaculo.
NOTA: Es posibleque la luz tambi_n se encienda
cuando utiliceciertos accesorios debido a que el flujo de aire se reduce al pasar per el accesorio.
Consulte el solucionador
de problemas.
INDICADOR DE MECANICO
PARA LA BOLSA/MANGUERA
La ra,_urapermitealmacenarlos tubosy la PowerMate`= conel tubopara economizar el espacio requerido para su almacenamiento. Para usar esta caracter_sticaes necesario almacenar el receptaculo
en forma vertical.
ALGUNOS MODELOS
Cuando la aspiradora funciona, la ventana del indicador esta en rojoes necesario revisar si la bolsa de
polvoest_ Uenao haya
msiduos en otroslugares.
Vdase FUNCIONAMIENTODE SU ASPIRADORA.
El tubo se sale de la ranura al ser levantado para
usarlo y se desliza dentro de esta al bajaflo para almacenaflo.
La Power-Mate® debe estar en la posici6nliana
comose ve en el diagrama. Use el mango del
pedal de liberaci6n para moverla a esta posici6n.
NOTA: Es posible que la luz rojaenciendaal usar
las herramientas o al usar la aspiradora en la alfombra nueva porqueel fluio de aire es reducido porlas
mismas herramientas o la pelusa de una alfombra
nueva que ITenala bolsa r_oidamente.
NOTA: Se puede usarmenos espacio si baja el
tubo telesc6pico como se muestra en la secci6n
MONTAJE.
!r1. l CUIDADO
PROTECTOR TERMAL
Esta aspiradoratiene un protectortermal que se
ajusta automdticamente
para proteger a la
aspiradora del sobrecalentamiento. El protector
termal apaga el motor automdticamente para
permitir que el motor se enfrfe a fin de evitar
posibles dafios a la aspiradora.
Para evitar volcaduras, nunca deje la PowerMate_ encendida o en posicion vertical con
el tubo completamente extendido.
Ajustando el tubo a una posici6n m=isbaja_y
girando el mango a un lado, la Power-Mate
se hallar_ en una posici6n mdsestable y
serd rods dificil que se vuelque.
Para restabiecer: Apague la aspiradoray desenchufe el cord6ndel tomacorrientepara permitir
que la aspiradorase enfr{e.Busque y saque las
obstrucciones, si es necesario. Examine tambl6n
y reemplace cualquler filtro obstruido. Espere
aproxlmadamente 50 mlnutos y enchufe la asplradora y volt(,ela para ver sl el protector del
motor se ha reajustado. En algunos easos, la
unldad puede volver a arrancar sdbltamente, NO
LA DEJE desatendida.
12
La aspiradora crea succi6n o aspiraci6n que levanta
la tierra. La tierra es impulsada a trav_s de las vias
de flujoaire hasta la bolsa per una rapida corriente
de aire. La bolsa para polvo permite el flujo de aire,
////_.,._
/,) ,,_-_
_,r//
pero atrapa la tierra.
///
Para Iograr los mejores resultados de limpieza,
JjpJ
mantenga abiertae las vias de aire. Examine peri6-/#Y
dicamente las &teas indicadas con asteriscos pa_7
asegurarse de que no est_n bloqueadas.
//_7
/
!
I!
tl
Desconecte.del recept_culo__de
revisarlo.
"£
v
CAMBIO DE LA BOLSA
7. Examine y limpie el filtrode seguridad del motor.
El montaje rojo de la bolsa se inclinar_,hacia
adelante despues de que retire la bolsa. Esto
impedir&que la tapa se cierre antes de instalar una
bolsa nueva.
La bolsa debe cambiarse seguido para Iograr los
mejores resultadosde limpieza. El indicador electr6nico/ mecanicode la bolsao de manguera
enciendecuandose necesitacambiar
NOTA: V_ase PIEZAS y CARACTER[STICAS
para el nL_merode la bolsa.
NOTA: NO doble ni pliegt_teel centro del
cart6n al instalar la boisa en las ranuras del
montaje de la bolsa.
1. Desconecte el cord6n
el_ctrico de la clavija de la
pared.
2. Quite la manguera de la
aspiradora.
8. Gire hacia abajo el
soporte para la bolsa
roja y para insertar la
bolsa en las ranuras
empuje hacia abajo
hasta que las leng_3etas
de cart6n encierren
3. Tire del pestillode la tapa
hacia fuera y hacia arriba;
luego levante la tapa del
recept_culo.
seguramente en las
posiciones apropiadascomo se ve en el diagrama.
4. Oestrabela pestaha
de cart6n del montaje
rojo de la bolsa empujando hacia afuera y
tirando hacia arriba.
9. Baje la cubierta del recept&culoy cierre el
pestillo.
10. Reinstale la manguera.
5. Saque la bolsadel
montaje rojo.
11. Conecte el cord6n eldctrico en la clavija de la
pared.
Filtro de
del
rojo
6. Revise y
cambie,cuando
sea necesario,el
filtro de seguridad
del motor.
NUNCA REUTILICE UNA BOLSA PARA
POLVO. Los materiales muy finos, tales
como desodorantes para alfombras, talco
facial, polvo fino, yeso, hollfn, pelusa de
alfombras nuevas, etc., pueden atascar la
bolsa y causar que se rompa antes de que
est6 Ilena y puede da6ar el motor de la
aspiradora. Cambie la bolsa mztsseguido
cuando aspire este tipo de materiales.
13
1.Desconecte
el cord6nel_ctrico de la clavijade la
pared. NO choree agua sobre la asplradora.
CUIDADO
2. Limpie el exterior con un trapo suave y limpio, que
ha sido exprimido despu_s de remojar en una soluci6n de agua y detergente fiquidoligero. Seque el
exterior con un trapo seco despu_s de limpiar.
No use los accesorlos sl estdn mojados.
Los accesorios que se utilicen en dreas
sucias, debajo del refrigerador,no deben
usarse en otras superficies sin antes ser
lavados. Podrfandejer mamas.
3. Limpie la superficie exterior del receptaculo y de
los accesorios para reducir la electricidad est_tica y
la acumulaci6n de polvo.
Examine el filtro de seguridad del motor de vez en
cuando y cambio cuando este sucio.
1. Levante el dispositivo de retenci6nde
goma y saque el filtro
de seguridad como se
ve en el diagrama.
Peligro de choque el_,ctrico
Desenchufe el cord6n de la corrlente eldctrica. No opere la aspiradora sin el filtro de
seguridad del motor. Asegdurese de que el
filtro estd seco • instalado adecuadamente
para impedir que el motor felle y/o que se
produzca un choque el_ctrico.
Para quitarla bolsa,siga las instrucoiones en CAMBIO DE LA BOLSA.
FILTRO DE SEGURIDAD DEL
MOTOR
ELECTROSTATICO
Dispositivo de
retencibn de goma
Este filtro se tiene que cambiarcuandoest_ sucio.
Debe cambiarseperiddicamenteseg_n las condicionesde uso, El filtro no se puede laver pues
perderfa su capacldad para atrapar altrapar
polvo.
Dispositivo de
retencl6n de goma
2. Reemplace el filtro
con la superficie
blanca en su campo
de vistaporcorrerlo
debajode lascostillas en la cavidadde
la bolsa. Meta el illtro para que quepa
pot completo debajo
del dispositivo de
retenci6n de goma.
3. V6ase CAMBIO DE LA BOLSA para cambiarla
bolsa.
NOTA:V_ase PIEZAS y CARACTER[STICAS
pare el n_mem del filtro de segufidad del motor,
NUNCA REUTILICE UNA BOLSA PARA
POLVO. Los materiales muy finos, tales
como desodorantes pare alfombras, talco
facial, polvo fino, yeso, hollfn, pelusa de
alfombras nuevas, etc., pueden atascar la
boise y causar que se rompa antes de que
estd Ilena. Cambie la boise mds seguido
cuando aspire este tipo de matedales.
14
!
2. Empuje el cartucho del filtro escape
con cuidadohacia a
un lado comose ve
en el diagramay tire
hacia arribapara
sacarlo.
ADVERTENCIA
Peligro de choque el6ctrico
No opere con un filtro de escape bloqueado
o sin el filtro de escape o la cubierta del illtro de escape instalados.
Fil_ode
FILTRO DE ESCAPE
HEPA
Rl_ode
Este cartucho del fiitro escape tiene que cambiar
este sucio. Cambie el filtro cuandoel drea superficial est_ cubierta por completo. El flltro no se
puede lavar pues perderia su capacidad para
atrapar altrapar polvo.
NOTA:Vease PIEZAS y CARACTERfSTICAS
para el nL_merodel liltro de escape.
1. Tire hacia
arribala
cubierta del illtro de escape
para sacafla
de la cubierta
del motor y
col6quela a un
lado
Cubierta
del filtro
de
t
Siempre deberdn seguirse todas las precauclones de seg_ridad al limpiar y dar servicio
la Power-Mate _
4. Reemplace la
cubiertadel fUtro
de escape
posicionanadolas
dos leng,,etas
traseras y
empujaando hacia
abajo en la parte
trasera hasta que
cierre seguramente.
3. Cambie el cartucho
del filtro escape,
coloc_ndolo con cuidado para que el lado
mostrado en el diagrama corradebajo de las
costillas. Luego, empuje hacia abajo el otro
lado hasta que encierre
seguramente.Coloque
el nuevofiltro en la
cubierta del motor con
el filo plomo hacia
abajo.
._ubierta_
I filtro
al B
_llraglrode choque el6ctrico o lesi6n carDesconecte la unidad antes de limplarla
o darle aervlcio. De Io contrario podria
producirse un choque eldctrlco o causar lesi6n corporal sl la asplradora
arranca de manera Imprevista.
15
PARA RETIRAR LA CORREA
1. Co_oquela PowerMate'_ con la parte
inferior hacia arriba.
2. Quite los dos (2)
tornillosen la cub_rta
de la Power-Mate'_.
3. Co_oquela PowerMate'_ en la
posici6nvertical.
Apriete el pedal del
mango de liberaci6n
y baje la articulaci6n
giratoria. Levante los
pestillos traseros
LIMPIEZA DEL AGITADOR
NOTA: Para mantener una alta eficiencia de
limpieza y evitar el dafio a la aspiradora, hay
que limoiar el aeitador coda vez oue se cambia
la correa.
Tambi_n hay que limpiar el agitador seg_n el
siguiente horario:
EI_LU_S_O_d_e,J
Frecuente o
(usada dirariamente)
cada semana
Moderado (usada 2 o 3 veces
per semana)
cada mes
cada 2 meses
Ligero (usada 1 vez per semana)
IMPORTANTE
Desconecte la aspiradora. Examinefrecuentemente
el cepillo y I_s dreasde soporte del mismo de la
Power-Mate
_ y eliminetodocabeUo,hiloy pelusa
acumulada.
4. Paraquitar la cubierta,
agarre los lades y tire
afuera.
Retire todo indicio de basura o suciedad de la
zona de la correa y del rodillo del cepillo.
5. Apriete los
leng0etas en la
parte traserade la
cubierta del
agitador y gire
hacia edelante
para liberar de la
base de la PowerMate®.
Con cuidado quite las tapas y quite el hilo o los
restos ubicadoe en el agitador, o en los
soporfes del cepillo.
Ensamble del
agitador
del agitador
Unidaddel
agitador
r Tspa
do/
6. Levante la
unidaddel
agitador y quite la
correagastada.
|
_- Polea para
correa
Tapa del extreme
7. Examine y limpie las dreas de soportedel
agitador.En la ENSAMBLE DEL AGITADOR se
proporcionauna ilustraci6nde todoel ensambledel
AGITADOR.
16
PARA RETIRAR LA CORREA
1. Instaleuna
correa nueva
sobreel
impulsor de[
motor y
luego sobre
la rueda dentada del
cepillo.
Tapa del
extremo
4. Alinee la parte
frontal de la
cubierta con la
base. Coloque
la cubierta sobre
el borde
detantero de la
base como se
muestra.
Impulsor
Rueda del motor
dentadada
del cepillo
Agitador
\
Cubierta
Base
[ Vista superior
NOTA: V_ase PIEZAS y CARACTERfSTICAS
para el n_mero de la correa.
2. Coloque otra vez
la unidad del agitador e._la PowerMate`=`'
3. Reinstale la
cubierta del agitador, alinee las
fengeetas
delanteras y las
ranuras y gire
hacia abajo
hasta que los
pest_llosencierren seguramente.
5. NOTA: En los modelos con el indicador
de polvo, aseg_rese
de que la plancha
estdverticaly los
cordonesest_nmetidos como se ve en el
diagrama.
Vista lateral
6. Rote la cubierta
hacia atr_,s. Apriete
con poca fuerza hasta
que las lengSetas laterales y traseras
encierren segura-
Cubierta del agitador
mente. Col_que la
Power-Mate con la
parte inferior hacia arribay inserte los dos (2)
tornillosen la cubierta.
Empujehacia
adentroy glre
1. Quite la cubiertade la Power-Mate
® como se
describe en la seccibn CAMBIO DE LA CORREA Y
LIMPIEZA DEL AGITADOR.
Empujehacia
adentroy gire
2. Empujehacia adentroy gire la bombillaen
el sentidosontrarioal
de las agujasdel reloj,
luegotire hacia afuera
para sacar.
3. Empujehacia
adentroy gire en el
sentidocontrarioal de
las agujasdel reloj
para reemplacer. La
bombilla no debe ser
m_.sde 15 vatios( 130
voltios,').
4. Reinstalela cubiertade la Power-Mate
® corno
se describe en la secci6nCAMBIO DE LA CORREAY MMPIEZA DEL AGITADOR.
NOTA: Vdase PIEZAS y CARACTERfSTICAS
para el ndmero de la bombilla.
17
=
PARACAMBIAR MAZO DEL
AGITADOR
1. Retire la cubierta, correa y ensamble del agitador
de la Power-Mate®Consufte "Para retirar la correa"
bajo CAMBIO DE LA CORREAY LIMPIEZA DEL
AGITADOR.
Peligro
dechoqueel_ctdcoo lesi6ncorporal
Desconecte
la unidadantesdeIlmplarla
o
darleserviclo.DeIocontrariopodrfa pro-
2. Reemplace el agitador.
duclrse un choque eldctrico o causar
lesi6n corporal si la asplradora arrsnca de
manera imprevista,
3. Cambie la correa, el ensamble del agitador, la cubierta de la Power-Mate®,ta bombilla y la cubierta de
la bombilla. Consulte °Para cambiar la correa" bajo
CAMBIO DE LA CORREAY LIMPIEZA DEL
AGITADOR.
PARA REVISAR LA UNIDAD DEL
AGITADOR
tadoslos cepillos al
nivelde las barras
de soporte en ta
base, cambie la
Cuando est_n gasunidad del agitadot.
_j_
Barra de soporte
de la base
18
i
•
Consulte este tabla para encontrar soluciones que usted mismo puede realizarcuando tenga problemas
menores de rendimiento. Cualquier servicio que necesite aparte de otros descfitos en este manual tienen
que ser hechos por un Centro de servicio de Sears.
La aspiradora no arranca,
NO aspira
=atisfactorlamente.
1. Est_ desconeclade.
2. Cortacirceltosbotadeo lusibie quemado
en el taelero de serviciode la resider_a.
3. Conexionesel_tricas de la manguera
sueltas.
1. Conectebien, optimaselector de encendidof
apagade a la posici6n ON.
2. Restablezcael cortacircuitoso cambie el
lusil_e.
3. Vuelva a cone_ar Io_ extmrno_de la manguera,
(p_gina 6).
1.
2.
3.
4.
1.
2,
3.
4.
5.
6.
7.
8.
9.
10.
La asplradora arranca,
peru se apaga.
Bolsa para polvoIlena o atascade.
Vias de flujode aire atascadas.
Fillrossucios.
A_usleincorreclode niseide pelode
la allo_.
Controlde aspiracideabierto.
Manguera rota.
Ag_der de la Power-Mate° desgastados.
Correa desgaslada o rota.
Ag_ladoro tapasdel extmmode _ste sucios.
Tapa del recepldculoabierta.
t.
Conexioneseldctricasde la manguerao
de la tapa
2. Protsctorcontra sobmcargasde la
Pov_r.Matee botade
3. Protectorterrr_f botado en el recept_u]o.
La POWER-MATEe no funoiona
cuando e_t_ instalada.
1.
2,
3.
4.
Conexione_de la Power-Mate_ desconectadas.
Correa desgastadao rota.
Agitade_o tapas dd extromosde _,ste suclos.
Protectorcontra sobrecaz_gas
de _a
Power-Malee botado.
5. Ei interruptorno est_ en la posici_n CARPE'E
Cambie la bolsa, (pdgina 13),
Limpielasvlasdefluiodeaim,(pdgina13
Cambie el filtros.(pdglna14-t 5).
Ajuste el nive_,(p_girm8).
)
Ajuste el contrel, (p_gina 11).
6. Cambie ta rna_3uera.
7. Cambie _aagi_der, (pdgi_ 18).
8.&9.
ConsulteCAMBIO DE LA CORREA Y LIMPIEZA
DEL AGITADOR, Lo_ginas 16-17).
10. Cierre bien la tapa
5,
1. Examine las cor_exiones
eldctricas,vuelvaa conectar losextremosde la manguera, (pdgir_ 6).
2.
Retire cualquiero_etoLel
atorade o atascado,
luego restablezca._. la aspiradoraatran_z pero
se vuelvea apagar, limpie el agitader y los
lapas del exlrernosde _ste, luego reslab_ezca,
(p_ginas 11, 16-17).
3.
Apague la aspiradoray desenchufe el cordbn
del tornacorrientey espem aproximadarnente50
relnutosy er'_chule
la aspiladom y voltdela para
ve_ si el proteclor del motorse ha reajustade,
(p_gina 12). Carnb_e_abo4saparapoivo,desblo
que las via de IlujOde aim, (pdgina 13).
1. Conecte bien, (_gina 5)
2 & 3. ConsulteCAMBIO DE LA CORREA y LIMPIEZA
DEL AGITADOR, (l_ginas 16-17).
4. Examineel drea del agitade_para determinar si
hay acumu_aci6nexcesivao bioqueode pelusa.
Limpie el agitado( y los tapas del extremos, luogo
reelablezca, (l_ginas 11, 16-17}.
5. Ponga el interruptora [a posicibnCARPET,
Lo_tgina7).
Indicador vexde encendido
continuamente en el detector
de tie*re.
1. La v_ade paso de tierta o la bolsa
de polo est_ i:4oqueade.
2. Lente sucia,
las v(as de aim,
1. Determine si eel&ntY_oqueades
(p_gina 13).
2. Limpie las lentes, (pdgina9).
Algunos o todos los Indlcadore$
rojo= del detector de tierra
_ndidos
y nunca P.,_rr_n a
verdi,
1. Hay un dojelo_trapade que estd vibrando
en el are4 de la lente.
1. Determinesi est_neloqueades las vfas de aim.
(p_gir_ 14),
Noseenciendenlozlndlcadore=
verde o roJode detecck_n de tk.n
I.
1. PongaelinlerrupteuralaposlddnCARPET,
(p_gina 7).
2. AcodaaiCentrodeServlciodeSearsrmtScer
carlO.
Ellnterruptorr_es_entapos_cid_CARPET.
2. No hay sunistrode energla el tablero detector.
EIIndlcador_l¢o/
me¢_nlcodelabo_saydela
manguerafunolona
1,
2.
3.
4.
Bo_saparapoh_ollenaostascada.
Rllmssuci_
Viasdeflujodeaimatascadas.
Ciertosaccesorios.
Laa_lradorllevantatapetel--o-j
-o-esdlficilempujar=
POWIER-MATEe,
1. Ajuslei_correclodeni'_eldepelodetaalfombra.
2. Aspira,cibndemasiadepotente.
1. Ajusleelnivel.(p_girk_8).
2. Abraelcoolreldeaspimci_n,(pdgina11).
Lalcznofun¢lona.
1. Bombillafundida.
1. Cambielabombilk%(pdginat7).
Elco_d_nnoseenmlla.
1. Co_ddeel_tdcosudo.
2. Corddeatascade.
|. Limpmelco_ddeekictdeo.
2. TiredelcordOnydespu_senz_lelo.
Laup_redoradeJamaxca_
on I= Ilfombra.
1. Estilodelirnpiozaincolmc4a.
1. COP,
SUltOSUGERENCIASPARAASpIRAR,
(pdgina8).
19
1.
2.
3.
4.
CambielaboL_a,(p_gina13),
CarnbieelfUttos,(p_na14.15).
Desbloqueelasvlasdeflujodea[m,(p_gina13).
Eslo es normal El ind_ader dede ser normal
cuando
la herramientaest4 quitada.
Your Home
For repair - in your home - of all major brand appliances,
lawn and garden equipment, or heating and cooling systems,
no matter who made it, no matter who sold it!
For the replacement parts, accessories and
owner's manuals that you need to do-it-yourself.
For Sears professional Installation of home appliances
and items like garage door openers and water heaters.
1-800-4-MY-HOME
(1-800-469-4663)
_
Anytime,dayornight
(U.S.A. and Canada)
www._ars.com
wwwJNwJ'8._
Our Home
For repair of carry-in products like vacuums, lawn equipment,
and electronics, call or go on-line for the nearest
Sears Parts and Repair Center.
1-800-488-1222
Anytime, day or night (U.S.A. only)
ww,N,tearll;,com
To pumhase a protecl_n agreement (U.S.A.)
or maintenance agreement (Canada) on a product serviced by Sears:
1-800-827-6655
Para
(u.sA)
serv dereparac
a domicilio,y paraordenarpiezas:
1.888.SU.HOGAR s"
(1-_8-784.6427)
1-800-361-6665
(Canada)
Au Canada pourserviceen frar_:
1.800-LE.FOYER uc
(l.e00-_3a_/)
VA,,'w.sears .ca
8EAR8
OSa_ Roabu_
andC_
® Registered Trademark/'ra Trademark / _ Service Mad( of Sears, Roebuck and Co.
"rMMarcadeFdbdca/
®MarcaReg_al
Msrca de Sen/iclo de Seam, Roebuck and Co.
MCMan:lUede commerce / uo Marque d6posde de Sears, Roebuck and Co.