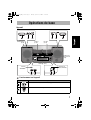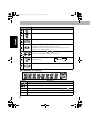
1
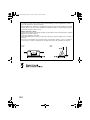
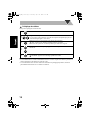
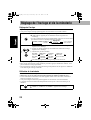
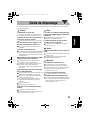
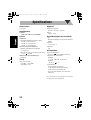
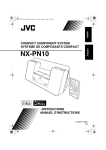
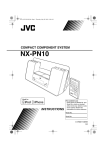
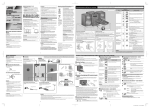
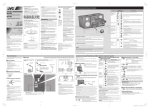
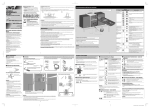
cover_NX-PN10[C].fm
Page 1
Wednesday, May 19, 2010
9:34 AM
COMPACT COMPONENT SYSTEM
SYSTEME DE COMPOSANTS COMPACT
NX-PN10
INSTRUCTIONS
MANUEL D’INSTRUCTIONS
LVT2011-002B
[C]
safety_NX-PN10[C].fm Page 1 Monday, April 27, 2009 4:22 PM
Warnings, Cautions and Others
Mises en garde, précautions et indications diverses
CAUTION
The
button in any position does not
disconnect the mains line.
Disconnect the mains plug to shut the power off
completely (the STANDBY lamp goes off).
The MAINS plug or an appliance coupler is used
as the disconnect device, the disconnect device
shall remain readily operable.
• When the system is on standby, the STANDBY
lamp lights red.
• When the system is turned on, the STANDBY
lamp goes off.
The power can be remote controlled.
ATTENTION
La touche
, dans n’importe quelle position, ne
déconnecte pas le système du secteur.
Déconnectez la fiche de secteur pour mettre
l’appareil complètement hors tension (le témoin
STANDBY s’éteint).
La fiche secteur ou un coupleur est utilisé comme
dispositif de déconnexion de l’appareil, et
l’appareil déconnecté doit être prêt à être utilisé.
• Quand le système est en attente, le témoin
STANDBY est allumé en rouge.
• Quand le système est sous tension, le témoin
STANDBY s’éteint.
L’alimentation peut être télécommandée.
CAUTION
To reduce the risk of electrical shocks, fire, etc.:
1. Do not remove screws, covers or cabinet.
2. Do not expose this appliance to rain or
moisture.
ATTENTION
Afin d’éviter tout risque d’électrocution,
d’incendie, etc.:
1. Ne pas enlever les vis ni les panneaux et ne
pas ouvrir le coffret de l’appareil.
2. Ne pas exposer l’appareil à la pluie ni à
l’humidité.
G-1
For U.S.A.
This equipment has been tested and found to
comply with the limits for a Class B digital
device, pursuant to part 15 of the FCC Rules.
These limits are designed to provide
reasonable protection against harmful
interference in a residential installation.
This equipment generates, uses and can
radiate radio frequency energy and, if not
installed and used in accordance with the
instructions, may cause harmful interference to
radio communications. However, there is no
guarantee that interference will not occur in a
particular installation. If this equipment does
cause harmful interference to radio or
television reception, which can be determined
by turning the equipment off and on, the user is
encouraged to try to correct the interference by
one or more of the following measures:
Reorient or relocate the receiving antenna.
Increase the separation between the
equipment and receiver.
Connect the equipment into an outlet on a
circuit different from that to which the receiver
is connected.
Consult the dealer or an experienced radio/TV
technician for help.
CAUTION
Changes or modifications not approved by JVC
could void the user’s authority to operate the
equipment.
safety_NX-PN10[C].fm Page 2 Monday, April 27, 2009 4:22 PM
For Canada/pour le Canada
THIS DIGITAL APPARATUS DOES NOT
EXCEED THE CLASS B LIMITS FOR RADIO
NOISE EMISSIONS FROM DIGITAL
APPARATUS AS SET OUT IN THE
INTERFERENCE-CAUSING
EQUIPMENT STANDARD ENTITLED
“DIGITAL APPARATUS,” ICES-003 OF THE
DEPARTMENT OF COMMUNICATIONS.
CET APPAREIL NUMERIQUE RESPECTE
LES LIMITES DE BRUITS
RADIOELECTRIQUES APPLICABLES AUX
APPAREILS NUMIRIQUES DE CLASSE B
PRESCRITES DANS LA NORME SUR LE
MATERIEL BROUILLEUR; “APPAREILS
NUMERIQUES”, NMB-003 EDICTEE PAR LE
MINISTRE DES COMMUNICATIONS.
CAUTION
Battery shall not be exposed to excessive heat
such as sunshine, fire or the like.
ATTENTION
Les piles ne doivent en aucun cas être
exposées à une chaleur excessive (lumière du
soleil, feu, etc.).
CAUTION
• Do not block the ventilation openings or
holes.
(If the ventilation openings or holes are
blocked by a newspaper or cloth, etc., the
heat may not be able to get out.)
• Do not place any naked flame sources, such
as lighted candles, on the apparatus.
• When discarding batteries, environmental
problems must be considered and local rules
or laws governing the disposal of these
batteries must be followed strictly.
• Do not expose this apparatus to rain,
moisture, dripping or splashing and that no
objects filled with liquids, such as vases, shall
be placed on the apparatus.
ATTENTION
• Ne bloquez pas les orifices ou les trous de
ventilation.
(Si les orifices ou les trous de ventilation sont
bloqués par un journal un tissu, etc., la
chaleur peut ne pas être évacuée
correctement de l’appareil.)
• Ne placez aucune source de flamme nue,
telle qu’une bougie, sur l’appareil.
• Lors de la mise au rebut des piles, veuillez
prendre en considération les problèmes de
l’environnement et suivre strictement les
règles et les lois locales sur la mise au rebut
des piles.
• N’exposez pas cet appareil à la pluie, à
l’humidité, à un égouttement ou à des
éclaboussures et ne placez pas des objets
remplis de liquide, tels qu’un vase, sur
l’appareil.
G-2
safety_NX-PN10[C].fm Page 3 Monday, April 27, 2009 4:22 PM
Caution: Proper Ventilation
To avoid risk of electric shock and fire, and to prevent damage, locate the apparatus as follows:
1. Front: No obstructions and open spacing.
2. Sides/Top/Back: No obstructions should be placed in the areas shown by the dimensions below.
3. Bottom: Place on the level surface. Maintain an adequate air path for ventilation by placing on a
stand with a height of 10 cm or more.
Attention: Aération correcte
Pour prévenir tout risque de décharge électrique ou d’incendie et éviter toute détérioration, installez
l’appareil de la manière suivante:
1. Avant: Bien dégagé de tout objet.
2. Côtés/dessus/dessous: Assurez-vous que rien ne bloque les espaces indiqués sur le schéma cidessous.
3. Dessous: Posez l’appareil sur une surface plane et horizontale. Veillez à ce que sa ventilation
correcte puisse se faire en le plaçant sur un support d’au moins dix centimètres de hauteur.
Front
Face
G-3
Side
Côté
NX-PN10[C].BOOK Page 1 Friday, May 21, 2010 11:24 AM
Contents
Introduction................................................. 2
Precautions ................................................................ 2
Getting Started............................................ 3
Connections................................................................ 4
Canceling the Display Demonstration (Demo) .......... 6
Turning on the Power Automatically
(Motion Sensor) .................................................. 6
Basic Operations ......................................... 7
Main Unit ................................................................... 7
Remote Control .......................................................... 9
Playing Back from iPod Devices.............. 12
Connecting iPod ....................................................... 13
Operations ................................................................14
Listening to FM Broadcasts ..................... 17
Basic Operations ......................................................17
Playing Back from Other Equipment ..... 19
Connecting Other Equipment................................... 19
Operations ................................................................19
Setting the Clock and Timer .................... 20
Setting the Clock ......................................................20
Using Timer ............................................................. 20
Troubleshooting ........................................ 23
Specifications............................................. 24
1
NX-PN10[C].BOOK Page 2 Friday, May 21, 2010 11:24 AM
Introduction
Thank you for purchasing a JVC product.
Please read all instructions carefully before operation, to ensure your complete understanding and
to obtain the best possible performance from the unit.
Precautions
Installation
• Install in a place which is level, dry and neither too hot nor too cold—between 5°C and 35°C.
• Install the unit in a location with adequate ventilation to prevent internal heat buildup inside the
unit.
DO NOT install the unit in a location near heat sources, or in a place subject to direct
sunlight, excessive dust or vibration.
• Leave sufficient distance between the unit and the TV.
• Keep the unit away from the TV to avoid interference with TV.
Power Sources
• When unplugging the unit from the wall outlet, always pull on the plug, not the AC power cord.
DO NOT handle the AC power cord with wet hands.
Internal Heat
For safety, observe the following carefully:
• Make sure there is good ventilation around the unit. Poor ventilation could overheat
and damage the unit.
• DO NOT block the ventilation openings or holes. If they are blocked by a newspaper
or cloth, etc., the heat may not be able to get out.
Others
• Should any metallic object or liquid fall into the unit, unplug the AC power cord and consult your
dealer before operating any further.
DO NOT disassemble the unit since there are no user serviceable parts inside.
• If you are not going to operate the unit for an extended period of time, unplug the AC power cord
from the wall outlet.
If anything goes wrong, unplug the AC power cord and consult your dealer.
2
NX-PN10[C].BOOK Page 3 Friday, May 21, 2010 11:24 AM
Getting Started
• In this manual, operations using the remote
control are mainly explained; however, you
can use the buttons and controls on the unit
if they have the same (or similar) name and
marks.
• In this manual, “iPod” means both iPod and
iPhone devices. When iPhone device is
especially mentioned, “iPhone” is used in
this case.
Replacing the battery in the remote control
Insert the battery into the remote control by
matching the polarity (+ and –) correctly.
• If the range or effectiveness of the remote
control decreases, replace the battery.
Rear side
Lithium coin battery
(product number:
CR2025)
Supplied Accessories
After unpacking, check to be sure that you have
all the following items. The number in
parentheses indicates the quantity of each piece
supplied.
• Remote control (1)
• Lithium coin battery CR2025 (1) (The battery
has been installed when shipped from the
factory.)
• FM antenna (1)
• AC power cord (1)
• AC adaptor (1)
If anything is missing, consult your dealer
immediately.
CAUTION:
To avoid risk of fire and to prevent damage.
• Do not use AC adaptors except the supplied
AC adaptor.
• Do not use the supplied AC adaptor for other
equipment.
Prepare the Remote Control
When you use the remote control for the first
time, pull out the insulation sheet.
Front side
WARNINGS:
• Store the battery in a place where children
cannot reach. If a child accidentally swallows
the battery, consult a doctor immediately.
• Do not recharge, short, disassemble or heat
the battery or dispose of it in a fire. Doing any
of these things may cause the battery to give
off heat, crack, or start a fire.
• Do not leave the battery with other metallic
materials. Doing this may cause the battery to
give off heat, crack, or start a fire.
• When throwing away or saving the battery,
wrap it in tape and insulate; otherwise, the
battery may start to give off heat, crack, or
start a fire.
• Do not poke the battery with tweezers or
similar tools. Doing this may cause the battery
to give off heat, crack, or start a fire.
• Dispose of battery in the proper manner,
according to federal, state, and local
regulations.
CAUTION:
Danger of explosion if battery is incorrectly
replaced.
Replace only with the same or equivalent
type.
Insulation sheet
3
NX-PN10[C].BOOK Page 4 Friday, May 21, 2010 11:24 AM
Connections
Do not connect the AC power cord until all other connections have been made.
Connecting the Antenna
FM antenna (supplied):
Extend it so that you can
obtain the best reception.
Rear side
For better FM reception
Disconnect the supplied FM antenna and
connect to an outdoor FM antenna using a 75 Ω
wire with coaxial type connector.
Outdoor FM antenna
(not supplied)
FM 75Ω COAXIAL
terminal
(on the rear panel)
NOTES:
• Make sure the FM antenna does not touch any other terminals, connecting cords or the AC power
cord. Also, keep the antenna away from metallic parts of the unit, connecting cords and the AC
power cord. This could cause poor reception.
AM band is not received with this unit.
4
NX-PN10[C].BOOK Page 5 Friday, May 21, 2010 11:24 AM
Connecting the Video Cord to View a Video/Picture from iPod
When viewing a video/picture from iPod on your TV, use a composite video cord (not supplied) to
connect the VIDEO OUT jack on the unit and the composite video input on your TV.
• After you have connected the unit, change the video input mode on your TV. For details, also refer
to the instruction manual for your TV.
Video cord (not supplied)
To video input
Rear side
Connecting the Power Cord
AC adaptor
(supplied)
Rear side
AC power cord
(supplied)
To a wall outlet
Plug in the AC power cord
only after all connections
are complete.
5
NX-PN10[C].BOOK Page 6 Friday, May 21, 2010 11:24 AM
Canceling the Display Demonstration (Demo)
When you connect the AC power cord for the first time, the display demonstration starts
automatically.
• When you operate the unit, the display demonstration stops temporarily. If no operation is done
for about 2 minutes, the unit starts the display demonstration again.
Button
Operation
On the unit
Hold down until “DEMO OFF” appears on the display.
• To activate again, hold down DEMO until “DEMO ON” appears on the display.
• When ECO mode is activated (P.10), the display demonstration does not function.
Turning on the Power Automatically (Motion Sensor)
When you move your hand or an object closer to Motion sensor (P.7), the unit turns on
automatically.
• iPod starts playback or an FM broadcast is received if you selected either of them last time.
• Motion Sensor works even if ECO mode is activated.
Button
Operation
On the unit
Press to activate Motion Sensor. “
M.S ON” appears on the display.
• When you select Clock as the display information or the unit is on standby,
“
” is shown on the display (see page 10).
• To deactivate, press MOTION SENSOR. “M.S OFF” appears on the display.
NOTE:
• If the AC power cord is unplugged, Motion Sensor does not work.
• Deactivate Motion Sensor in the following cases to prevent the unit from turning on automatically:
– when you do not use the unit for a long time
– when you use Timer
6
NX-PN10[C].BOOK Page 7 Friday, May 21, 2010 11:24 AM
Basic Operations
Main Unit
Illumination panel
(P.10)
Dock A
(P.13)
Dock B
(P.13)
Motion
sensor
(P.6)
Display (P.8)
Remote
control
sensor
STANDBY
lamp
Operating on the Main Unit
Buttons
Operations
Turns on or off (standby) the power.
Activates or deactivates Motion Sensor (P.6).
7
NX-PN10[C].BOOK Page 8 Friday, May 21, 2010 11:24 AM
Buttons
Operations
Activates or deactivates the display demonstration (P.6).
Adds the powerfulness to the sound (P.11).
Stops the timer sound and restarts it 5 minutes later (P.22).
• iPod (P.14):
Press: Reverse skip/forward skip.
Hold down: Reverse search/forward search.
• FM (P.17): Tunes in to a station.
• Changes the source to iPod /iPod
(P.14).
• Starts playback and pauses for iPod (P.14).
Changes the source to FM (P.17) or
AUDIO IN (P.19).
FM
AUDIO IN
Adjusts the volume level (VOL MIN/VOL 0 to VOL MAX/VOL 30).
Display Information
Symbols
Description
iPod
A
Lights up when iPod is connected to dock A.
iPod
B
Lights up when iPod is connected to dock B.
SHUFFLE
Lights up when Shuffle Play applies to both iPod
S.TURBO
Lights up when Sound Turbo is activated (P.11).
MHz
Lights up when FM frequency is indicated.
8
and iPod
(P.15).
NX-PN10[C].BOOK Page 9 Friday, May 21, 2010 11:24 AM
Symbols
Description
ST
Lights up when FM stereo broadcast is received.
MONO
Lights up when FM monaural reception mode is activated.
TUNED
Lights up when an FM station of sufficient signal strength is tuned in.
FM
Lights up when FM is selected as the source.
1/2/3
SLEEP
• Lights up when Timer is set (P.21).
•
1/2/3 icon flashes while Timer is working.
Lights up when Sleep Timer is activated (P.11).
Remote Control
P.10
P.11
P.20, P.22
P.14, P.20, P.22
P.15, P.17
P.14, P.17, P.18,
P.20 – 22
P.14, P.17, P.18
, P.17 – 19
, P.14
P.15, P.18 – 21
P.11
P.15
, P.11
P.11
Operating on the Remote Control
Basic operations
Buttons
Main operations
Turns on or off (standby) the power.
9
NX-PN10[C].BOOK Page 10 Friday, May 21, 2010 11:24 AM
Buttons
Main operations
Changes the display information.
• For iPod A/iPod B/AUDIO IN:
• When the unit is turned off:
Source name
Clock
Day of the week
Clock
Day of the week
• For FM:
Frequency
Clock
Day of the week
Changes the source to FM (P.17) or AUDIO IN (P.19).
• Changes the source to iPod /iPod
(P.14).
• Starts playback and pauses for iPod (P.14).
Adjusts the volume level (VOL MIN/VOL 0 to VOL MAX/VOL 30).
Drops the volume in a moment.
• To restore the volume, press again or adjust the volume level.
To dim the display and illumination panel—DIMMER
You can change the brightness of the display and illumination panel.
Press repeatedly.
DIM 1
DIM 2
DIM OFF
(Canceled)
DIM 1: Dims the display and illumination panel.
DIM 2: Dims the display much more than “DIM 1” and turns off the illumination panel.
• Dimmer is canceled when you turn off the unit.
To activate ECO mode
Activating ECO mode allows you to reduce power consumption by turning off the display while on
standby.
Press while the unit is on standby. “ECO ON” appears on the display for a while.
• The clock is not shown on the display when the unit is on standby.
• To cancel the mode, press ECO/DIMMER again. “ECO OFF” appears for a while then the clock
is shown on the display.
• The battery of iPod is not charged in ECO mode.
10
NX-PN10[C].BOOK Page 11 Friday, May 21, 2010 11:24 AM
To turn off the unit after a certain period of time—Sleep Timer
Press repeatedly to specify the time (in minutes) as follows:
10
30
20
OFF
(Canceled)
180
60
150
90
120
• To check the time remaining before the shut-off time, press SLEEP once. If you press the button
repeatedly, you can change the shut-off time.
To emphasize the sound—Sound Turbo
You can add the powerfulness to the sound.
Press to activate Sound Turbo.
“S-TURBO” appears for a while and S.TURBO lights up on the display.
• To cancel, press SOUND TURBO again. “OFF” appears on the display.
To adjust the tone
You can adjust the bass and treble levels.
Select the item you want to adjust.
1
BASS
TREBLE
Canceled
Adjust the bass or treble level (–5 to +5).
2
11
NX-PN10[C].BOOK Page 12 Friday, May 21, 2010 11:24 AM
Playing Back from iPod Devices
You can connect 2 iPod devices to the unit and enjoy sound and video from them.
Compatible iPod Models:
iPod model
Audio
Video
iPod nano 1GB/2GB/4GB
√
—
iPod nano (2nd Generation) 2GB/4GB/8GB
√
—
iPod nano (3rd Generation) 4GB/8GB
√
√
iPod nano (4th Generation) 8GB/16GB
√
√
iPod mini 4GB
√
—
iPod mini (2nd Generation) 4GB/ 6GB
√
—
iPod (4th Generation) 20GB/40GB
√
—
iPod photo (4th Generation) 20GB/30GB/40GB/60GB
√
√*1
iPod video (5th Generation) 30GB/60GB/80GB
√
√
iPod classic 80GB/120GB/160GB
√
√
iPod touch 8GB/16GB/32GB
√
√*2
iPod touch (2nd Generation) 8GB/16GB/32GB
√
√
iPhone 4GB/8GB/16GB
√
√
iPhone (3G) 4GB/8GB/16GB
√
√
*1
*2
Only for still picture.
To view a video/picture from iPod touch on your TV, update iPod touch software to the latest
version. (Additional charges may apply.)
If iPod does not play correctly, update iPod software to the latest version.
• For details about updating iPod, check on the Apple web site <http://www.apple.com>.
• JVC does not assure the compatibility of iPod released after April 2009 with this unit.
• “Made for iPod” and “Made for iPhone” mean that an electronic accessory has been
designed to connect specifically to iPod or iPhone, respectively, and has been certified by
the developer to meet Apple performance standards. Apple is not responsible for the
operation of this device or its compliance with safety and regulatory standards.
• iPhone, iPod, iPod classic, iPod nano, and iPod touch are trademarks of Apple Inc.,
registered in the U.S. and other countries.
12
NX-PN10[C].BOOK Page 13 Friday, May 21, 2010 11:24 AM
Connecting iPod
Connect iPod to dock A or B on the unit.
You can have 2 iPod devices connected at the same time.
• Make sure the unit is on standby when you connect iPod.
Dock adapter (supplied with iPod
or sold separately)
Dock A
Dock B
To detach the dock adapter from the dock:
Pull up the dock adapter with your fingernail or a sharp-pointed tool using the slot.
• Be careful not to injure your fingertips or damage the terminal of the dock.
slot
NOTES:
• Be careful not to damage the terminal on the dock when connecting/disconnecting iPod.
• Close the cover of the dock when you do not connect iPod to the unit.
About the battery charge of iPod
The battery of iPod is always charged through the unit except when the unit is in ECO mode (see
page 10).
• When 2 iPod devices are connected, both batteries are charged at the same time.
• For details of the battery charging, see the instruction manual for iPod.
13
NX-PN10[C].BOOK Page 14 Friday, May 21, 2010 11:24 AM
Operations
For details, also refer to the instruction manual for iPod.
NOTES:
• Before viewing a video/picture from iPod on your TV, make the appropriate video setting on
iPod. For details of the setting, see the instruction manual for iPod.
• For iPhone and iPod touch
Operate iPhone or iPod touch itself in the following cases:
– when operating the home button
– when selecting application icons on the home screen
– when dragging the slider
Buttons
On the unit
—
—
*1
*2
Operations
Control of
iPod
Press:
– Selects iPod /iPod
as the source and starts
playback.
– Starts playback/pauses.
Hold down*1: Puts iPod in sleep mode.
38, 3, or
8
On the
remote
Press: Forward skip
Hold down: Forward search
x
Press: Reverse skip/Return to the beginning of the
current track.
Hold down: Reverse search
4
Goes back to the previous menu/screen.
Selects an item on the menu/screen.
– Press: Selects an item.
– Hold down: Scrolls through a list. To stop
scrolling, press either one of the buttons.
• For iPhone and iPod touch: The buttons work
after starting “Music” or “Videos” by tapping
the corresponding application icon on the home
screen of iPhone and iPod touch.
• For iPod devices other than above: The buttons
work in the same way as operating the click
wheel of iPod counterclockwise/clockwise.
Not available for iPhone and iPod touch.
Not equipped with iPhone and iPod touch.
14
MENU*2
Click
wheel*2
NX-PN10[C].BOOK Page 15 Friday, May 21, 2010 11:24 AM
Buttons
On the unit
Operations
On the
remote
Confirms an item on the menu/screen.
—
*
Control of
iPod
Center
button*
—
Press: Applies Shuffle Play to iPod or iPod
selected as the source.
Select the desired shuffle mode.
“SHUFFLE” appears for a while.
• The shuffle icon lights up on the display of iPod.
• To cancel, press again until the shuffle icon
disappears.
Hold down: Applies Shuffle Play to both iPod
and iPod if connected.
Select the desired shuffle mode.
“SHUFFLE” appears for a while and
SHUFFLE lights up on the display.
• The shuffle icon lights up on the display of both
iPod devices.
• To cancel, press again until the shuffle icon
disappears.
—
—
Applies Repeat Play to iPod selected as the
source.
Select the desired repeat mode.
“REPEAT” appears on the display for a while.
• The repeat icon lights up on the display/screen
of iPod.
• To cancel, press again until the repeat icon
disappears.
—
Not equipped with iPhone and iPod touch.
15
NX-PN10[C].BOOK Page 16 Friday, May 21, 2010 11:24 AM
NOTES:
• JVC is not responsible for any loss of or damage to iPod that might result from the use of
this product.
• Do not touch or hit the terminals of the dock and of iPod. It might cause damage to these terminals.
• When you connect iPod to the dock, make sure the terminal on the dock is fully inserted into iPod.
• Always set the volume to the minimum level when connecting or disconnecting iPod.
• Do not carry the unit with iPod connected. You might drop it down or it might cause damage to
the connector part.
• Sound distortion may occur when playing back audio sources with a high recording level. When
distortion occurs, it is recommended to turn off the equalizer of iPod. For information on operating
iPod, see the instruction manual for iPod.
• Turn off the unit when disconnecting iPod.
• Remove iPod from the dock when you do not use it.
• When you cannot operate iPod connected through the unit or using the remote control, operate
iPod itself.
• After connecting iPod, wait until the unit is ready for operation (about 3 seconds).
16
NX-PN10[C].BOOK Page 17 Friday, May 21, 2010 11:24 AM
Listening to FM Broadcasts
Basic Operations
Buttons
Operations
On the unit
On the remote
Selects FM as the source.
FM
AUDIO IN
When an FM program is broadcasted in stereo, ST (stereo)
lights up on the display (only when the reception is good).
Press: Changes the frequency.
Hold down and release: The unit starts searching for stations
and stops when a station of sufficient signal strength is found.
• To stop searching, press again.
—
—
Tunes in to a preset station: Press repeatedly to select a preset
station number. (For presetting stations, see page 18.)
Changes the FM reception mode: When an FM stereo
broadcast is hard to receive or noisy, press to improve
reception. MONO (monaural) lights up on the display.
Reception will improve though the stereo effect is lost.
• To restore the stereo effect, press again.
AM band is not received with this unit.
17
NX-PN10[C].BOOK Page 18 Friday, May 21, 2010 11:24 AM
Presetting Stations
You can preset 30 FM stations.
1
Select FM as the source.
2
Tune in to the station you want to preset.
• You can also store the monaural reception mode for FM preset stations if
selected.
3
Activate the preset number entry mode.
“SET” flashes on the display for a few seconds.
• Complete the following operations while the indication is flashing.
Select a preset number for the station you want to store.
4
5
Store the station.
“STORED” appears on the display for a while.
NOTES:
• When you unplug the AC power cord or if a power failure occurs, the preset stations will be erased
in a few days.
• If you store a new station onto an occupied preset number, the station previously stored on that
number will be erased.
18
NX-PN10[C].BOOK Page 19 Friday, May 21, 2010 11:24 AM
Playing Back from Other Equipment
Connecting Other Equipment
By using a stereo mini plug cord (not supplied), you can connect other equipment with analog audio
output jacks, such as a portable audio player, etc.
To headphones or
audio out
Stereo mini plug cord
(not supplied)
Portable
audio player
Rear side
• Refer to the instruction manual supplied with the equipment.
NOTE:
Make sure the unit is on standby when connecting or disconnecting other equipment.
Operations
To Listen to Other Equipment
1
Select AUDIO IN as the source.
2
Start playing the equipment.
FM
AUDIO IN
To Adjust the Sound Input Level from the Equipment
You can adjust the sound input level from the connected equipment if the incoming signal is too
weak or too strong.
1
Select AUDIO IN as the source.
Hold down to adjust the sound input level.
2
LEVEL 1
LEVEL 2
LEVEL 3
LEVEL 1: Ordinary input level.
LEVEL 2: Increases the input level.
LEVEL 3: Increases the input level more than “LEVEL 2.”
19
NX-PN10[C].BOOK Page 20 Friday, May 21, 2010 11:24 AM
Setting the Clock and Timer
Setting the Clock
Set the built-in clock before using Timer.
• You can set the clock when the unit is turned on or on standby.
1
Activate the clock setting mode.
“ADJCLOCK” appears then the hour digit of the time indication flashes on
the display.
• If you have already set the clock before, press the button twice to activate the
clock setting mode.
TIMER 1/TIMER 2/TIMER 3*
Canceled
2
Clock setting
*
See “Using
Timer”.
1 Set the hour while the hour digits of the time indication flashes on the
display.
2 Set the minute while the minute digits of the time indication flashes on the
display.
3 Select the day of the week.
SUN DAY
(Sunday)
THU DAY
(Thursday)
MON DAY
(Monday)
FRI DAY
(Friday)
TUE DAY
(Tuesday)
SAT DAY
(Saturday)
WED DAY
(Wednesday)
Back to the beginning
“CLOCK OK” appears and the built-in clock starts working.
• To exit from the clock setting, press CLOCK/TIMER as required.
• To correct a misentry during the process, press MENU/CANCEL. You can return to the previous
step.
• If a power failure occurs, the clock loses the setting and is reset to “AM12:00.” You need to adjust
the clock again.
Using Timer
Using Timer, you can wake up with music, etc.
• Deactivate Motion Sensor when you use Timer (P.6) .
• When using iPod or other equipment as the playback source, connect it to the unit beforehand.
(P.13, P.19)
• You can set Timer when the unit is turned on or on standby.
• The unit is turned off automatically 2 hours after it is turned on by Timer.
1
20
Activate the timer setting mode.
“TIMER 1,” “TIMER 2” or “TIMER 3” appears on the display.
NX-PN10[C].BOOK Page 21 Friday, May 21, 2010 11:24 AM
Select Timer you want to set.
TIMER 1
2
TIMER 2
TIMER 3
Select Timer type.
WEEKLY
3
ONCE
WEEKLY: See step 4 below.
ONCE: Timer works once on a selected day of the week.
Select the desired day of the week.
• When “WEEKLY” is selected in step 3:
SUN DAY
THU DAY
MON-SAT
4
MON DAY
FRI DAY
EVERYDAY
WED DAY
TUE DAY
SAT DAY
MON-FRI
Back to the beginning
SUN DAY to SAT DAY: Timer works every week on the selected day.
MON-FRI: Timer works from Monday to Friday every week.
MON-SAT: Timer works from Monday to Saturday every week.
EVERYDAY: Timer works everyday.
• When “ONCE” is selected in step 3:
5
6
SUN DAY
MON DAY
TUE DAY
WED DAY
THU DAY
FRI DAY
SAT DAY
Back to the beginning
1 Adjust the hour then the minute for the on-time.
2 Select the playback source—“iPod A,” “iPod B,” “FM” or “AUDIO IN.”
• When “FM” is selected, select the preset number of the station you want to
listen to.
When you select “FM – – ” the preset station you last tuned in is set. (See
“Listening to FM Broadcasts” on page 17.)
3 Select the volume level.
“SET OK” appears followed by the setting information, then the
icon
and the timer number indicator (1/2/3) light up on the display.
Turn off the unit (on standby).
• To exit from Timer setting, press CLOCK/TIMER as required.
• To correct a misentry during the process, press MENU/CANCEL. You can return to the previous
step.
21
NX-PN10[C].BOOK Page 22 Friday, May 21, 2010 11:24 AM
To Cancel Timer
Select Timer you want to cancel.
TIMER 1
1
2
TIMER 2
TIMER 3
“CANCEL” flashes on the display.
The
icon and the timer number indicator (1/2/3) disappear.
NOTE:
The settings you have made are memorized though you cancel Timer.
To Turn off the Timer Sound briefly—Snooze
Using Snooze, you can have the timer sound stop and restart it 5 minutes later.
1
Set Timer following the steps 1 to 6 on pages 20 and 21.
2
When the timer sound starts, press SNOOZE. The unit turns off for 5 minutes
to stop the timer sound. Timer remains activated.
• “SNOOZE” flashes on the display while the unit turns off.
5 minutes later, the unit turns on and the timer sound restarts automatically.
• To stop the timer sound again, press SNOOZE.
• After stopping the timer sound 10 times by pressing SNOOZE, Snooze is
canceled.
• When the timer sound starts:
– If you do not press SNOOZE within 3 minutes after the timer sound starts, Snooze does not work.
– When you turn off the unit by pressing
, Snooze does not work.
22
NX-PN10[C].BOOK Page 23 Friday, May 21, 2010 11:24 AM
Troubleshooting
If you have a problem with your unit, check this list for a possible solution before calling for service.
General
iPod Operations
Power does not come on.
iPod doesn’t play though iPod /iPod
The power plug is not inserted securely. Plug lights up on the display.
it in securely (P.5).
The battery is empty. Leave it connected for
more than 10 minutes.
Power turns on even though you turned
off.
Motion Sensor is activated (P.6).
Adjustments or settings are suddenly
canceled before you finish.
There is a time limit. Repeat the procedure
again.
The battery of iPod cannot be charged
through the unit.
The unit is in ECO mode. Cancel the mode
(P.10, P.13).
Radio Operations
Hard to listen to broadcasts because of
Operations are disabled.
noise.
The built-in microprocessor may
The FM antenna connection is incorrect or
malfunction due to external electrical
loose (P.4).
interference. Unplug the AC power cord and
The FM antenna is not properly extended
then plug it back in.
and positioned (P.4).
Cannot view a video/picture from iPod
Timer Operations
on the TV.
Connect a composite video cord securely to Timer does not work.
your TV (P.5).
Timer starts working only when the unit is
Change the video input mode on your TV.
turned off (standby).
For details, refer to the instruction manual
A power failure may have occurred. Set the
for your TV.
clock first, then Timer again (P.20, P.21).
Unable to operate the unit from the
Timer sound starts working again.
remote control.
Snooze is activated (P.22).
The path between the remote control and the
Snooze does not work.
remote sensor on the unit is blocked.
If you do not press SNOOZE within 3
Point it at the remote sensor on the front
minutes after the timer sound starts, Snooze
panel.
does not work (P.22).
Signals cannot reach the remote sensor.
Move closer to the unit.
The batteries are exhausted.
Pull out the insulation sheet (P.3).
The unit is suddenly turned off.
The unit is turned off automatically 2 hours
after it is turned on by Timer (P.20).
23
NX-PN10[C].BOOK Page 24 Friday, May 21, 2010 11:24 AM
Specifications
Accessories
Main Unit
See page 3.
Output Power
10 W (5W+5W) at 8 Ω (10%THD)
Dimensions (W/H/D):
326 mm × 135 mm × 130 mm
Mass:
Approx. 1.6 kg
Terminals
Speaker Specifications
Amplifier
AUDIO IN
Input Sensitivity/Impedance (1 kHz):
LEVEL 1: 500 mV/47 kΩ
LEVEL 2: 315 mV/47 kΩ
LEVEL 3: 125 mV/47 kΩ
Dock A and B for iPod/iPhone
Compatible iPod/iPhone models:
See page 12.
Output power (each iPod dock):
DC 5 V
500 mA
VIDEO OUT (For iPod/iPhone)
Composite
Tuner
FM tuning range:
87.5 MHz – 108.0 MHz
(100 kHz channel space)
Type:
Full range bass-reflex type
Speakers:
7 cm cone × 2
Impedance:
8Ω
Power Specifications
Power Source:
DC 10.7 V
3 A (EXTERNAL DC IN)
AC Adaptor (AA-R1001)
INPUT:
AC 110 – 240 V , 50/60 Hz 1A
OUTPUT:
DC10.7 V
3A
Power Consumption:
18 W (power on mode)
1.5 W or less (in Standby mode)
0.8 W or less (in ECO mode)
10 W (in Standby mode, with two iPod devices
connected.)
Design and specifications are subject to change
without notice.
24
NX-PN10_FR_5.book Page 1 Monday, April 27, 2009
3:12 PM
Table des matières
Introduction................................................. 2
Précautions ................................................................ 2
Pour commencer ......................................... 3
Connexions................................................................. 4
Annulation de la démonstration des affichages
(Demo) ............................................................... 6
Mise sous tension automatique de l’appareil
(Capteur de mouvement).................................... 6
Opérations de base...................................... 7
Appareil...................................................................... 7
Télécommande ........................................................... 9
Lecture à partir d’un iPod ....................... 12
Connexion de iPod ................................................... 13
Opérations ................................................................ 14
Écoute d’émissions FM............................. 17
Opérations de base ................................................... 17
Lecture à partir d’un autre appareil....... 19
Connexion d’un autre appareil ................................. 19
Opérations ................................................................ 19
Réglage de l’horloge et de la minuterie... 20
Réglage de l’horloge ................................................ 20
Utilisation de la minuterie ........................................ 20
Guide de dépannage.................................. 23
Spécifications ............................................. 24
1
NX-PN10[J].fm Page 2 Tuesday, April 28, 2009
10:20 AM
Introduction
Merci pour avoir acheté un produit JVC.
Veuillez lire attentivement toutes les instructions avant d’utiliser l’appareil afin de bien comprendre
son fonctionnement et d’obtenir les meilleures performances possibles.
Précautions
Installation
• Installez la chaîne dans un endroit plat, sec, et ni trop chaud, ni trop froid—entre 5°C et 35°C.
• Installez l’appareil dans un endroit avec une bonne ventilation pour éviter tout échauffement
intérieur de l’appareil.
N’INSTALLEZ PAS l’appareil dans en endroit proche d’une source de chaleur ou
sujet à la lumière directe du soleil, à un poussière excessive ou à des vibrations.
• Laissez suffisamment d’espace entre l’appareil et le téléviseur.
• Éloignez l’appareil du téléviseur pour éviter toute interférence avec ce dernier.
Sources d’alimentations
• Pour débrancher l’appareil de la prise murale, tirez toujours sur la fiche et non pas sur le cordon
d’alimentation secteur.
NE MANIPULEZ PAS le cordon d’alimentation secteur avec les mains mouillées.
Échauffement intérieur
Pour votre sécurité, respectez les points suivants attentivement:
• Assurez-vous qu’il y a une ventilation suffisante autour de l’appareil. Une mauvaise
ventilation peut entraîner un échauffement et endommager l’appareil.
• NE BLOQUEZ PAS les ouvertures ni les trous de ventilation. En cas de blocage ou
d’obstruction par un journal, un vêtement, etc., l’air chaud pourrait ne pas être
évacué correctement.
Autres
• Si un objet métallique ou un liquide tombait à l’intérieur de l’appareil, débranchez le cordon
d’alimentation secteur et consultez votre revendeur avant d’utiliser l’appareil à nouveau.
NE DÉMONTEZ PAS l’appareil. Il n’y a aucune pièce réparable par l’utilisateur à
l’intérieur.
• Si vous n’avez pas l’intention d’utiliser l’appareil pendant une période prolongée, débranchez le
cordon d’alimentation secteur de la prise murale.
En cas d’anomalie, débranchez le cordon d’alimentation secteur et consultez votre revendeur.
2
NX-PN10[J].fm Page 3 Tuesday, April 28, 2009 10:20 AM
Pour commencer
• Dans ce manuel, nous expliquons
principalement les opérations à l’aide de la
télécommande; cependant, vous pouvez
utiliser les touches et les commandes de
l’appareil si elles portent le même nom (ou
un nom similaire) et la même marque.
• Dans ce manuel, “iPod” est utilisé à la fois
pour iPod et pour iPhone. Quand un appareil
iPhone est spécialement mentionné,
“iPhone” est utilisé à la place.
Mise en place de la pile dans de la
télécommande
Insérez la pile dans la télécommande en
respectant les polarités (+ et –).
• Si la plage de fonctionnement de la
télécommande diminue, remplacez la pile.
Arrière
Pile bouton au lithium
(numéro du produit:
CR2025)
Accessoires fournis
Après le déballage, vérifiez que tous les
éléments suivants sont présents. Le nombre
entre parenthèse indique la quantité de chaque
pièce fournie.
• Télécommande (1)
• Pile bouton au lithium CR2025 (1) (La pile a
été installée à l’expédition de l’usine.)
• Antenne FM (1)
• Cordon d’alimentation secteur (1)
• Adaptateur CA (1)
Si quelque chose manquait, consulter
immédiatement votre revendeur.
ATTENTION:
Pour éviter tout risque d’incendie et pour
prévenir tout dommage.
• Utilisez uniquement l’adaptateur CA fourni
avec l’appareil.
• N’utilisez pas l’adaptateur CA d’un autre
appareil.
Préparation de la télécommande
Quand vous utilisez la télécommande pour la
première fois, retirez la feuille isolante.
AVERTISSEMENTS:
• Rangez la pile dans un endroit hors d’atteinte
des enfants. Si un enfant avale accidentellement
la pile, consultez immédiatement un médecin.
• Ne rechargez pas, ne court-circuitez pas, ne
chauffer pas la pile ni ne la jeter dans un feu.
Cela pourrait entraîner une surchauffe de la
pile, une fissure ou un incendie.
• Ne laissez pas la pile avec d’autres objets
métalliques. Cela pourrait entraîner une
surchauffe de la pile, une fissure ou un incendie.
• Pour mettre au rebut la pile ou la conserver,
entourer-la de ruban isolant; sinon, la pile peut
chauffer se fissurer ou entraîner un incendie.
• Ne piquez pas la pile avec des ciseaux ou
d’autres objets similaires. Cela pourrait
entraîner une surchauffe de la pile, une fissure
ou un incendie.
• Mettez de la pile au rebut correctement en
respectant la régulation fédérale, régionale ou
locale.
ATTENTION:
Danger d’explosion si la pile est remplacée de
façon incorrecte.
Remplacez-la uniquement avec le même type
de pile ou un type équivalent.
Avant
Feuille isolante
3
NX-PN10_FR_5.book Page 4 Monday, April 27, 2009
3:12 PM
Connexions
Ne branchez pas le cordon d’alimentation secteur avant d’avoir effectué toutes les autres
connexions.
Connexion de l’antenne
Antenne FM (fournie):
Étendez-la de façon à
obtenir la meilleure
réception possible.
Arrière
Pour une meilleure réception FM
Déconnectez l’antenne FM fournie et connectez
l’appareil à une antenne FM extérieure en
utilisant un connecteur de type coaxial 75 Ω.
Antenne FM extérieure
(non fournie)
Prise FM 75Ω COAXIAL
(sur le panneau arrière)
REMARQUES:
• Assurez-vous que l’antenne ne touche aucunes autres prises, cordons de connexion ou cordon
d’alimentation secteur. De plus, gardez l’antenne à l’écart des parties métalliques de l’appareil, des
cordons de connexion et du cordon d’alimentation secteur. Cela pourrait entraîner une mauvaise
réception.
La bande AM ne peut pas être reçue avec cet appareil.
4
NX-PN10[J].fm Page 5 Tuesday, April 28, 2009
1:45 PM
Connexion de cordon vidéo pour voir une séquence vidéo/image de l’iPod
Pour afficher une séquence vidéo ou d’une image à partir de votre iPod sur votre téléviseur, utilisez
un cordon vidéo composite (non fourni) et connectez-le à la prise VIDEO OUT sur l’appareil et à
l’entrée vidéo composite du téléviseur.
• Après avoir connecté l’appareil, changez le mode d’entrée vidéo de votre téléviseur. Pour plus
d’information, référez-vous aussi au mode d’emploi fourni pour votre téléviseur.
Cordon vidéo (non fourni)
À l’entrée vidéo
Arrière
Connexion du cordon d’alimentation
Cordon
Adaptateur CA d’alimentation
secteur (fourni)
(fourni)
Arrière
À une prise murale
Branchez le cordon d’alimentation
secteur uniquement après que toutes
les connexions sont terminées.
5
NX-PN10_FR_5.book Page 6 Monday, April 27, 2009
3:12 PM
Annulation de la démonstration des affichages (Demo)
Quand vous connectez le cordon d’alimentation pour la première fois, la démonstration des
affichages démarre automatiquement.
• Quand vous utilisez l’appareil, la démonstration des affichages s’arrête temporairement. Si aucune
opération n’est réalisée pendant environ 2 minutes, l’appareil démarre de nouveau la
démonstration des affichages.
Touche
Fonctionnement
Sur l’appareil
Maintenez pressée la touche jusqu’à ce que “DEMO OFF” apparaisse sur
l’affichage.
• Pour la mettre de nouveau en service, maintenez pressée DEMO jusqu’à ce que “DEMO ON”
apparaisse sur l’affichage.
• Quand le mode ECO est en service (P.10), la démonstration des affichages ne fonctionne pas.
Mise sous tension automatique de l’appareil (Capteur de mouvement)
Quand vous approchez votre main ou un objet du capteur de mouvement (P.7), l’appareil se met
automatiquement sous tension.
• L’iPod démarre la lecture ou une émission FM est reçue si vous aviez choisi une de ces sources la
dernière fois.
• Le capteur de mouvement fonctionne même si le mode ECO est en service.
Touche
Fonctionnement
Sur l’appareil
Appuyez sur cette touche pour mettre en service le capteur de mouvement.
“
M.S ON” apparaît sur l’affichage.
• Quand vous choisissez l’horloge comme information sur l’affichage ou que
l’appareil est en mode d’attente, “
” apparaît sur l’affichage (voir page 10).
• Pour mettre hors service, appuyez sur MOTION SENSOR. “M.S OFF” apparaît sur l’affichage.
REMARQUE:
• Si le cordon d’alimentation secteur est débranché, le capteur de mouvement ne fonctionne pas.
• Mettez le capteur de mouvement hors service dans les cas suivants pour éviter que l’appareil ne se
mette sous tension automatiquement:
– quand vous n’avez pas l’intention d’utiliser l’appareil pendant longtemps
– quand vous utilisez la minuterie
6
NX-PN10_FR_5.book Page 7 Monday, April 27, 2009
3:12 PM
Opérations de base
Appareil
Panneau
d’illumination
(P.10)
Dock A
(P.13)
Dock B
(P.13)
Capteur de
mouvement
(P.6)
Affichage (P.8)
Capteur de
télécommande
Témoin
STANDBY
Fonctionnement sur l’appareil
Touches
Opérations
Met en marche/arrête (met en veille) l’appareil.
Met en ou hors service le capteur de mouvement (P.6).
7
NX-PN10_FR_5.book Page 8 Monday, April 27, 2009
Touches
3:12 PM
Opérations
Met en ou hors service la démonstration des affichages (P.6).
Ajoute de la puissance au son (P.11).
Arrête le son de la minuterie et le redémarre 5 minutes plus tard (P.22).
• iPod (P.14):
Appuyez sur: Saut vers l’arrière/saut vers l’avant.
Maintenez pressée la touche: Recherche vers l’arrière/vers l’avant.
• FM (P.17): Accorde une station.
• Change la source sur iPod /iPod
(P.14).
• Démarre et interrompt la lecture pour iPod (P.14).
Change la source sur FM (P.17) ou
AUDIO IN (P.19).
FM
AUDIO IN
Adjuste le niveau de volume (VOL MIN/VOL 0 à VOL MAX/VOL 30).
Informations sur l’affichage
Symboles
Description
iPod
A
S’allume quand un iPod est connecté au dock A.
iPod
B
S’allume quand un iPod est connecté au dock B.
SHUFFLE
S’allume quand la lecture aléatoire est appliquée à la fois à iPod
S.TURBO
S’allume quand la fonction Sound Turbo est en service (P.11).
MHz
S'allume quand la fréquence FM est indiquée.
8
et iPod
(P.15).
NX-PN10_FR_5.book Page 9 Monday, April 27, 2009
Symboles
3:12 PM
Description
ST
S’allume quand une émission FM stéréo est reçue.
MONO
S’allume quand le mode de réception FM monophonique est en service.
TUNED
S’allume lors de la réception d’une station FM dont le signal est suffisamment fort.
FM
S’allume quand FM est choisi comme source.
1/2/3
SLEEP
• S’allume lorsque la minuterie est réglée (P.21).
•
L’icône 1/2/3 clignote pendant le fonctionnement de la minuterie.
S’allume lorsque la minuterie d’arrêt est en service (P.11).
Télécommande
P.10
P.11
P.20, P.22
P.14, P.20, P.22
P.15, P.17
P.14, P.17, P.18,
P.20 – 22
P.14, P.17, P.18
, P.17 – 19
, P.14
P.15, P.18 – 21
P.11
P.15
, P.11
P.11
Commande à partir de la télécommande
Opérations de base
Touches
Opérations principales
Met en marche/arrête (met en veille) l’appareil.
9
NX-PN10_FR_5.book Page 10 Monday, April 27, 2009
Touches
3:12 PM
Opérations principales
Change les informations de l’affichage.
• Pour iPod A/iPod B/AUDIO IN:
Nom de la source
Horloge
Jour de la semaine
• Quand l’appareil est mis hors
tension:
Horloge
Jour de la semaine
• Pour FM:
Fréquence
Horloge
Jour de la semaine
Change la source sur FM (P.17) ou AUDIO IN (P.19).
• Change la source sur iPod /iPod
(P.14).
• Démarre et interrompt la lecture pour iPod (P.14).
Adjuste le niveau de volume (VOL MIN/VOL 0 à VOL MAX/VOL 30).
Permet de baisser le volume instantanément.
• Pour rétablir le volume, appuyez de nouveau sur la touche ou ajuster le
niveau de volume.
Pour assombrir l’affichage et le panneau d’illumination—DIMMER
Vous pouvez changer la luminosité de l’affichage et du panneau d’illumination.
Appuyez répétitivement.
DIM 1
DIM 2
DIM OFF
(Annulée)
DIM 1: Assombrit l’affichage et le panneau d’illumination.
DIM 2: Assombrit l’affichage encore plus que “DIM 1” et met hors service le panneau
d’illumination.
• L’assombrissement de l’affichage est annulé quand vous mettez l’appareil hors tension.
Pour mettre en service le mode ECO
Mettre en service mode ECO vous permet de réduire la consommation d’électricité en mettant hors
service l’affichage quand l’appareil est en attente.
Appuyez sur la touche quand l’appareil est en mode d’attente. “ECO ON” apparaît sur
l’affichage pendant un instant.
• L’horloge n’apparaît pas sur l’affichage quand l’appareil est en mode d’attente.
• Pour annuler le mode, appuyez de nouveau sur ECO/DIMMER. “ECO OFF” apparaît pendant un
certain temps puis l’horloge est affichée sur l’affichage.
• La batterie de l’iPod n’est pas chargée en mode ECO.
10
NX-PN10[J].fm Page 11
Tuesday, April 28, 2009
10:20 AM
Pour mettre l’appareil hors tension après une certaine période de temps—Minuterie
d’arrêt
Appuyez répétitivement sur la touche pour spécifier la durée (en minutes) de la façon
suivante:
10
30
20
OFF
(Annulée)
180
60
150
90
120
• Pour vérifier le temps qui reste avant que l’appareil s’éteigne automatiquement, appuyez une fois
sur SLEEP. Si vous appuyez répétitivement sur la touche, vous pouvez changer l’heure de mise
hors tension.
Pour accentuer le son—Sound Turbo
Vous pouvez ajouter de la puissance au son.
Appuyez sur cette touche pour mettre en service la fonction Sound Turbo.
“S-TURBO” apparaît un instant et S.TURBO s’allume sur l’affichage.
• Pour annuler cette fonction, appuyez de nouveau sur SOUND TURBO. “OFF” apparaît sur
l’affichage.
Pour ajuster la tonalité
Vous pouvez ajuster le niveau des graves et des aigus.
Choisissez l’élément que vous souhaitez ajuster.
1
BASS
TREBLE
Annulée
Ajustez le niveau des graves ou des aigus (–5 à +5).
2
11
NX-PN10_FR_R1.book
Page 12
Thursday, May 20, 2010
2:05 PM
Lecture à partir d’un iPod
Vous pouvez connecter 2 iPod à l’appareil et écouter leur son et voir leurs images.
Modèles d’iPod compatibles:
Modèle de iPod
Audio
Vidéo
iPod nano 1Go/2Go/4Go
√
—
iPod nano (2ème génération) 2Go/4Go/8Go
√
—
iPod nano (3ème génération) 4Go/8Go
√
√
iPod nano (4ème génération) 8Go/16Go
√
√
iPod mini 4Go
√
—
iPod mini (2ème génération) 4Go/6Go
√
—
iPod (4ème génération) 20Go/40Go
√
—
iPod photo (4ème génération) 20Go/30Go/40Go/60Go
√
√*1
iPod video (5ème génération) 30Go/60Go/80Go
√
√
iPod classic 80Go/120Go/160Go
√
√
iPod touch 8Go/16Go/32Go
√
√*2
iPod touch (2ème génération) 8Go/16Go/32Go
√
√
iPhone 4Go/8Go/16Go
√
√
iPhone (3G) 4Go/8Go/16Go
√
√
*1
*2
Uniquement pour les images fixes.
Pour voir une séquence vidéo/image à partir d'un iPod touche sur votre téléviseur, faites la mise
à jour du logiciel de votre iPod touche à la dernière version. (Des frais supplémentaires peuvent
vous être facturés.)
Si la lecture sur iPod ne se fait pas correctement, mettez à jour le logiciel de iPod à la dernière
version.
• Pour en savoir plus sur la mise à jour de l’iPod, consultez le site Web de Apple
<http://www.apple.com>.
• JVC n’assure pas la compatibilité de cet appareil avec les iPod mis en vente après avril 2009.
• “Made for iPod” et “Made for iPhone” signifient qu’un accessoire électronique a été conçu
pour être connecté spécifiquement à un iPod ou un iPhone, respectivement, et qu’il a été
certifié par les concepteur de respecter les standards de performance d’Apple. Apple ne
peut être tenu responsable pour le fonctionnement de cet appareil ou sa compatibilité avec
les standards de sécurité et réglementaires.
• iPhone, iPod, iPod classic, iPod nano et iPod touch sont des marques de commerce
d’Apple Inc., enregistrées aux États-Unis et dans les autres pays.
12
NX-PN10_FR_5.book Page 13 Monday, April 27, 2009
3:12 PM
Connexion de iPod
Connectez l’iPod au dock A ou B de l’appareil.
Vous pouvez connecter 2 iPod en même temps à l’appareil.
• Assurez-vous que l’appareil est en mode d’attente quand vous connectez un iPod.
Adaptateur de dock (fourni avec
iPod ou vendu séparément)
Dock A
Dock B
Pour détacher l’adaptateur de dock du dock:
Tirez sur l’adaptateur de dock avec le bout de votre doigt ou un outil pointu que vous insérez dans
la fente.
• Faites attention de ne pas blesser les bouts de vos doigts ou d’endommager la prise du dock.
Fente
REMARQUES:
• Faites attention ne pas endommager la prise sur le dock lors de la connexion/déconnexion du iPod.
• Fermez le couvercle du dock quand aucun iPod n’est connecté à l’appareil.
À propos de la charge de la batterie du iPod
La batterie du iPod est toujours chargée à travers l’appareil sauf quand l’appareil est en mode ECO
(voir page 10).
• Quand 2 iPod sont connectés, les deux batteries sont chargées en même temps.
• Pour en savoir plus sur la charge de la batterie, référez-vous au manuel d’instruction de iPod.
13
NX-PN10_FR_5.book Page 14 Monday, April 27, 2009
3:12 PM
Opérations
Pour plus d’information, référez-vous aussi au mode d’emploi fourni pour votre iPod.
REMARQUES:
• Avant de regarder une séquence vidéo/image à partir de iPod sur votre téléviseur, faites réglages
vidéo appropriés sur le iPod. Pour en savoir plus sur les réglages, référez-vous au manuel
d’instruction de iPod.
• Pour iPhone et iPod touch
Utilisez l’iPhone ou l’iPod touch directement dans les cas suivants:
– quand vous souhaitez utiliser la touche Home
– lors de la sélection d’icônes d’application sur l’écran Home
– pour faire défiler le curseur
Touches
Sur l’appareil
Opérations
Sur la
télécommande
Appuyez sur:
– Choisissez iPod /iPod
comme source et
démarrez la lecture.
– Lance la lecture / pause.
Maintenez pressée la touche*1: Met l’iPod en
mode de veille.
—
—
*1
*2
38, 3 ou
8
Appuyez sur: Saut vers l’avant
Maintenez pressée la touche: Recherche vers l’avant
x
Appuyez sur: Permet de faire un saut vers l’arrière/
Retourner au début de la plage en cours de lecture.
Maintenez pressée la touche: Recherche vers l’arrière
4
Retourne au menu précrédent ou au écran précrédent.
Choisit un élément sur le menu ou sur l’écran.
– Appuyez sur: Choisit un élément.
– Maintenez pressée la touche: Fait défiler une
liste. Pour arrêter le défilement, appuyez sur
n’importe quelle touche.
• Pour iPhone et iPod touch: Les touches fonctionnent
après avoir démarré “Music” ou “Videos” en
touchant l’icône de l’application correspondante sur
l’écran Home de l’iPhone et de l’iPod touch.
• Pour les iPod autres que ces cités ci-dessus: Les
touches fonctionnent de la même façon que quand
vous tournez la molette cliquable du iPod dans le sens
des aiguilles d’une montre ou dans le sens contraire.
Non disponible pour le iPhone et iPod touch.
Non disponible sur le iPhone et iPod touch.
14
Commande
du iPod
MENU*2
Molette
cliquable*2
NX-PN10_FR_5.book Page 15 Monday, April 27, 2009
3:12 PM
Touches
Sur l’appareil
Opérations
Sur la
télécommande
Valide un élément sur le menu ou sur l’écran.
—
*
Commande
du iPod
Bouton
central*
—
Appuyez sur: Applique la lecture aléatoire à
l,iPod ou à l’iPod choisi comme source.
Choisissez le mode de lecture aléatoire souhaité.
“SHUFFLE” apparaît sur l’affichage pendant
un instant.
• L’icône de lecture aléatoire s’allume sur
l’affichage de l’iPod.
• Pour annuler, appuyez de nouveau sur la touche
jusqu’à ce que l’icône de lecture aléatoire
disparaisse.
Maintenez pressée la touche: Applique la lecture
aléatoire à la fois à l’iPod
et àss l’iPod
s’il
est connecté.
Choisissez le mode de lecture aléatoire souhaité.
“SHUFFLE” apparaît un instant et SHUFFLE
s’allume sur l’affichage.
• L’icône de lecture aléatoire s’allume sur
l’affichage des deux périphériques iPod.
• Pour annuler, appuyez de nouveau sur la touche
jusqu’à ce que l’icône de lecture aléatoire
disparaisse.
—
—
Applique la lecture répétée à l’iPod choisi comme
source.
Choisissez le mode de répétition souhaité.
“REPEAT” apparaît sur l’affichage pendant un
instant.
• L’icône de lecture répétée s’allume sur
l’affichage/écran du iPod.
• Pour annuler, appuyez de nouveau sur la touche
jusqu’à ce que l’icône de lecture répétée
disparaisse.
—
Non disponible sur le iPhone et iPod touch.
15
NX-PN10_FR_5.book Page 16 Monday, April 27, 2009
3:12 PM
REMARQUES:
• JVC ne peut être tenu responsable pour toute perte ou dommage à iPod résultant de
l’utilisation de ce produit.
• Ne touchez pas ni ne frappez les prises du dock et du iPod. Cela pourrait endommager ces bornes.
• Quand vous connectez iPod sur le dock, assurez-vous que la prise sur le dock est complément
inséré sur le iPod.
• Réglez toujours le volume au minimum lorsque vous connectez ou déconnectez iPod.
• Ne transportez pas l’appareil avec iPod connecté. Vous pourriez le faire tomber ou causer des
dommages à la section du connecteur.
• Une déformation du son peut se produire lors de la lecture des sources audio avec des signaux
enregistrés à des niveaux élevés. Quand une déformation se produit, il est recommande de mettre
hors service l’égaliseur de iPod. Pour les informations sur l’utilisation de iPod, référez-vous au
manuel d’instruction de iPod.
• Mettez l’appareil hors tension avant de déconnecter le iPod.
• Lorsque vous ne l'utilisez pas, retirez l’iPod du dock.
• Quand vous ne pouvez pas commander l’iPod connecté via cet appareil ou en utilisant la
télécommande, commandez l’iPod directement.
• Après avoir connecté un iPod, attendez jusqu’à ce que l’appareil soit prêt (environ 3 secondes).
16
NX-PN10_FR_5.book Page 17 Monday, April 27, 2009
3:12 PM
Écoute d’émissions FM
Opérations de base
Touches
Sur l’appareil
Opérations
Sur la
télécommande
Choisit FM comme source.
FM
AUDIO IN
Quand un programme FM est diffusé en stéréo, l’indicateur
ST (stéréo) s’allume sur l’affichage (uniquement quand la
réception est bonne).
Appuyez sur: Change la fréquence.
Maintenez la touche pressée puis relâchez-la: L’appareil
recherche une station et s’arrête quand une station de signal
suffisamment fort est trouvée.
• Pour arrêter la recherche, appuyez à nouveau sur la touche.
—
—
Accorde une station préréglée: Appuyez répétitivement sur la
touche pour choisir un numéro de station préréglé. (Pour les
stations préréglées, voir page 18.)
Change le mode de réception FM: Quand une émission FM
stéréo est difficile à recevoir ou parasitée, appuyez sur la
touche pour améliorer la réception. MONO (monophonique)
s’allume sur l’affichage. La réception est améliorée mais
l’effet stéréo est perdu.
• Pour rétablir l’effet stéréo, appuyez de nouveau sur la
touche.
La bande AM ne peut pas être reçue avec cet appareil.
17
NX-PN10_FR_5.book Page 18 Monday, April 27, 2009
3:12 PM
Préréglage des stations
Vous pouvez préréglez 30 stations FM.
1
Choisissez FM comme source.
2
Réglez la station que vous souhaitez mémoriser.
• Vous pouvez aussi mémoriser le mode de réception monophonique pour les
stations FM préréglée s’il est choisi.
3
Mettez en service le mode d’entrée de numéro de préréglage.
“SET” clignote sur l’affichage pendant quelques secondes.
• Terminez les opérations suivantes pendant que l’indication clignote.
4
5
Choisissez un numéro de préréglage pour la station que vous souhaitez
mémoriser.
Mémorisez la station.
“STORED” apparaît sur l’affichage pendant un instant.
REMARQUES:
• Si vous débranchez le cordon d’alimentation secteur ou si une coupure de courant se produit, les
stations préréglées sont effacées en quelques jours.
• Si vous mémorisez une nouvelle station sur un numéro de préréglage déjà utilisé, la station
précédemment mémorisée sur ce numéro est effacée.
18
NX-PN10_FR_5.book Page 19 Monday, April 27, 2009
3:12 PM
Lecture à partir d’un autre appareil
Connexion d’un autre appareil
En utilisant un cordon à mini-fiche stéréo (non fourni), vous pouvez connecter un autre appareil
muni de prises de sortie audio analogique tel qu’un lecture audio portable, etc.
Au casque d’écoute
ou à la sortie audio
Lecture
audio portable
Cordon à mini-fiche
stéréo (non fourni)
Arrière
• Référez-vous aux manuels d’instruction fournis avec l’appareil.
REMARQUE:
Assurez-vous que l’appareil est en mode d’attente quand vous connectez ou déconnectez un autre
appareil.
Opérations
Pour écouter un autre appareil
1
Choisissez AUDIO IN comme
source.
2
Démarrez la lecture de l’appareil.
FM
AUDIO IN
Pour régler le niveau d’entrée du son à partir d’un autre matériel
Si le signal entrant est trop faible ou trop fort, vous pouvez régler le niveau d’entrée du son à partir
de l’appareil connecté.
1
Choisissez AUDIO IN comme source.
Maintenez la touche pressée pour ajuster le
niveau d’entrée du son.
2
LEVEL 1
LEVEL 2
LEVEL 3
LEVEL 1: Niveau d’entrée normal.
LEVEL 2: Augmente le niveau d’entrée.
LEVEL 3: Augmente le niveau d’entrée encore plus que “LEVEL 2”.
19
NX-PN10_FR_5.book Page 20 Monday, April 27, 2009
3:12 PM
Réglage de l’horloge et de la minuterie
Réglage de l’horloge
Réglez l’horloge intégrée avant d’utiliser la minuterie.
• Vous pouvez régler l’horloge quand l’appareil est sous tension ou en mode d’attente.
1
Mettez en service le mode de réglage de l’horloge.
“ADJCLOCK” apparaît puis les chiffres de l’heure clignotent sur
l’affichage.
• Si vous avez déjà ajusté l’horloge précédemment, appuyez 2 fois sur la touche
pour mettre en service le mode de réglage de l’horloge.
TIMER 1/TIMER 2/TIMER 3*
Annulée
2
Réglage de
l’horloge
*
Voir “Utilisation
de la minuterie”.
1 Ajustez les heures pendant que les chiffres des heures de l’horloge
clignotent sur l’affichage.
2 Ajustez les minutes pendant que les chiffres des minutes de l’horloge
clignotent sur l’affichage.
3 Choisissez le jour de la semaine.
SUN DAY
(Dimanche)
THU DAY
(Jeudi)
MON DAY
(Lundi)
FRI DAY
(Vendredi)
TUE DAY
(Mardi)
SAT DAY
(Samedi)
WED DAY
(Mercredi)
Retour au début
“CLOCK OK” apparaît et l’horloge intégrée entre en service.
• Pour quitter le réglage de l’horloge, appuyez sur CLOCK/TIMER autant de fois que nécessaire.
• Pour corriger une mauvaise entrée pendant la procédure, appuyez sur MENU/CANCEL. Vous
pouvez retourner à l’étape précédente.
• En cas de panne de courant, les réglages de l'horloge sont perdus et elle est réglée sur “AM12:00”.
Vous devez régler l’horloge à nouveau.
Utilisation de la minuterie
En utilisant la minuterie, vous pouvez vous réveiller au son de la musique, etc.
• Mettez hors service le capteur de mouvement quand vous utilisez la minuterie (P.6) .
• Lors de l’utilisation d’un iPod ou d’un autre appareil comme source de lecture, connectez-le
d’abord à l’appareil. (P.13, P.19)
• Vous pouvez régler la minuterie quand l’appareil est sous tension ou en mode d’attente.
• L’appareil est mis hors tension automatiquement 2 heures après sa mise sous tension par la
minuterie.
1
20
Mettez en service le mode de réglage de la minuterie.
“TIMER 1”, “TIMER 2” ou “TIMER 3” apparaît sur l’affichage.
NX-PN10_FR_5.book Page 21 Monday, April 27, 2009
3:12 PM
Choisissez la minuterie que vous souhaitez régler.
2
TIMER 1
TIMER 2
TIMER 3
Choisissez le type de minuterie.
WEEKLY
3
ONCE
WEEKLY: Voir l’étape 4 ci-dessous.
ONCE: La minuterie fonctionne une fois le jour choisi de la semaine.
Choisissez le jour de la semaine souhaité.
• Quand “WEEKLY” est choisi à l’étape 3:
SUN DAY
THU DAY
MON-SAT
4
MON DAY
FRI DAY
EVERYDAY
WED DAY
TUE DAY
MON-FRI
SAT DAY
Retour au début
SUN DAY à SAT DAY: La minuterie fonctionne chaque semaine le jour choisi.
MON-FRI: La minuterie fonction du lundi au vendredi, chaque semaine.
MON-SAT: La minuterie fonction du lundi au samedi, chaque semaine.
EVERYDAY: La minuterie fonctionne tous les jours.
• Quand “ONCE” est choisi à l’étape 3:
5
6
SUN DAY
MON DAY
TUE DAY
WED DAY
THU DAY
FRI DAY
SAT DAY
Retour au début
1 Ajustez les heures puis les minutes de l’heure de mise en service.
2 Choisissez la source de lecture—“iPod A”, “iPod B”, “FM” ou “AUDIO IN”.
• Quand “FM” est choisi, choisissez le numéro de préréglage de la station
que vous souhaitez écouter.
Quand vous choisissez “FM – – ” la dernière station préreeglée accordée
est réglée. (Voir “Écoute d’émissions FM” à la page 17.)
3 Choisissez le niveau de volume.
“SET OK” apparaît suivi par les informations sur le réglage, puis l’icône
et l’indicateur du numéro de la minuterie (1/2/3) s’allume sur
l’affichage.
Mettez l’appareil hors tension (en attente).
• Pour quitter le réglage de la minuterie, appuyez sur CLOCK/TIMER autant de fois que nécessaire.
• Pour corriger une mauvaise entrée pendant la procédure, appuyez sur MENU/CANCEL. Vous
pouvez retourner à l’étape précédente.
21
NX-PN10_FR_5.book Page 22 Monday, April 27, 2009
3:12 PM
Pour annuler la minuterie
Choisissez la minuterie que vous souhaitez annuler.
1
2
TIMER 1
TIMER 2
TIMER 3
“CANCEL” clignote sur l’affichage.
L’icône
et l’indicateur du numéro de la minuterie (1/2/3) disparaît.
REMARQUE:
Les réglages que vous avez réalisés sont mémorisés bien que vous ayez annulez la minuterie.
Pour interrompre brièvement le son de la minuterie—Rappel d’alarme
En utilisant le rappel d’alarme, vous pouvez interrompre le son de la minuterie et le reprendre 5
minutes plus tard.
1
Réglez la minuterie en suivant les étapes 1 à 6 des pages 20 et 21.
2
Quand le son de la minuterie démarre, appuyez sur SNOOZE. L’appareil se met
hors tension pendant 5 minutes pour arrêter le son de la minuterie. La minuterie
reste en service.
• “SNOOZE” clignote sur l’affichage pendant que l’appareil est hors tension.
5 minutes plus tard, l’appareil se met sous tension et le son de la minuterie
reprend automatiquement.
• Pour arrêter de nouveau le son de la minuterie, appuyez sur SNOOZE.
• Après avoir arrêté le son de la minuterie 10 fois en appuyant sur SNOOZE, le
rappel d'alarme est annulé.
• Quand le son de la minuterie démarre:
– Si vous n’appuyez pas sur SNOOZE pendant les 3 minutes qui suivent le démarrage du son de
la minuterie le rappel d’alarme ne fonctionne pas.
– Si vous mettez l’appareil hors tension en appuyant sur
, le rappel d’alarme ne fonctionne pas.
22
NX-PN10_FR_5.book Page 23 Monday, April 27, 2009
3:12 PM
Guide de dépannage
Si vous des problèmes avec votre appareil, cherchez d’abord une solution dans cette liste avant
d’appeler un réparateur.
Général
iPod
L’alimentation n’arrive pas.
La fiche d’alimentation n’est pas insérée
correctement. Insérez-la solidement (P.5).
La lecture sur le iPod ne fonctionne pas
bien que iPod /iPod soit allumé sur
l’affichage.
La batterie est déchargée. Laissez-le
L’appareil ser met sous tension même si
connecté 10 minutes de plus.
vous l’avez mis hors tension.
Le capteur de mouvement est en service (P.6). La batterie du iPod ne peut pas être
chargée à travers l’appareil.
Les ajustements ou les réglages sont
L’appareil est en mode ECO. Annulez le
annulés soudainement avant la fin.
mode (P.10, P.13).
Il y a un temps limite. Recommencez la
procédure.
Radio
La chaîne ne fonctionne pas.
Trop de bruit pendant les émissions de
Le microprocesseur intégré fonctionne mal à
cause d’interférences électriques extérieures. radio.
La connexion de l’antenne FM est incorrecte
Débranchez le cordon d’alimentation secteur
ou lâche (P.4).
et rebranchez-le.
L’antenne FM n’est pas correctement
Impossible de voir une séquence vidéo/
étendue et positionnée (P.4).
image de l’iPod sur le téléviseur.
Connectez un cordon vidéo composite
Minuterie
solidement à votre téléviseur (P.5).
La
minuterie
ne fonctionne pas.
Changez le mode d’entrée vidéo de votre
La
minuterie
ne se met en marche que
téléviseur. Pour plus d’information,
lorsque
la
chaîne
est arrêtée (en attente).
référezvous au mode d’emploi fourni pour
Il se peut qu’il y ait eu une panne de courant.
votre iPod.
Réglez tout d’abord l’horloge, puis la
L’appareil ne peut pas être commandé
minuterie (P.20, P.21).
avec la télécommande.
Le son de la minuterie redémarre.
Il y a un obstacle entre la télécommande et le
Le rappel d’alarme est en service (P.22).
capteur de télécommande de l’appareil.
Dirigez-la vers le capteur de commande à
Le rappel d’alarme ne fonctionne pas.
distance du panneau avant.
Si vous n’appuyez pas sur SNOOZE pendant
Les signaux ne peuvent pas atteindre le
les 3 minutes qui suivent le démarrage du son
capteur de télécommande. Plus près de
de la minuterie le rappel d’alarme ne
l’appareil.
fonctionne pas (P.22).
Les piles sont usées.
Retirez la feuille isolante (P.3).
L’appareil se met soudainement hors
tension.
L’appareil est mis hors tension
automatiquement 2 heures après sa mise sous
tension par la minuterie (P.20).
23
NX-PN10[J].fm Page 24
Tuesday, April 28, 2009
10:19 AM
Spécifications
Accessoires
Appareil
Voir page 3.
Dimensions (L/H/P):
326 mm × 135 mm × 130 mm
Masse:
Approx. 1,6 kg
Amplificateur
Puissance
10 W (5W+5W) à 8 Ω (10%DHT)
Prises
AUDIO IN
Sensibilité/Impédance d’entrée (1 kHz):
LEVEL 1: 500 mV/47 kΩ
LEVEL 2: 315 mV/47 kΩ
LEVEL 3: 125 mV/47 kΩ
Dock A et B pour iPod/iPhone
Modèles d’iPod/iPhone compatibles:
Voir page 12.
Puissance de sortie (pour chaque dock iPod):
CC 5 V
500 mA
VIDEO OUT (Pour iPod/iPhone)
Composite
Tuner
Plage d’accord FM:
87,5 MHz – 108,0 MHz
(100 kHz par voie)
Caractéristiques des enceintes
Type:
Enceinte acoustique à évent accordé de haute
fidélité
Enceintes:
7 cm en cône × 2
Impédance:
8Ω
Alimentation
Source d’alimentation:
DC 10,7 V
3 A (EXTERNAL DC IN)
Adaptateur CA (AA-R1001)
ENTRÉE:
CA 110 – 240 V , 50/60 Hz 1A
SORTIE:
DC10,7 V
3A
Consommation:
18 W (appareil sous tension)
1,5 W ou moins (en mode d’attente)
0,8 W ou moins (en mode ECO)
10 W (en mode d'attente, avec deux iPod
connectés.)
La conception et les spécifications sont sujettes
à changement sans notification.
24
cover_NX-PN10[C].fm
Page 2
Wednesday, May 19, 2010
9:34 AM
NX-PN10 COMPACT COMPONENT SYSTEM
EN, FR
© 2009 Victor Company of Japan, Limited
0509YAMMDWBET