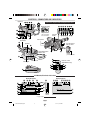
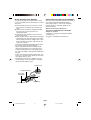
1
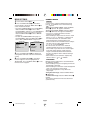
INSTRUCTIONS
ENGLISH
LYT0902-002B
COMPACT VHS CAMCORDER
GR-SXM745
GR-SXM540
For Customer Use:
Enter below the Model No. and Serial No. which is
located on the bottom of the camcorder. Retain this
information for future reference.
Model No.
U
Printed in Malaysia
1201MKV UN PJ
Serial No.
* *
COPYRIGHT© 2001 VICTOR COMPANY OF JAPAN, LTD
Dear Customer,
Thank you for purchasing the JVC Compact VHS camcorder. Before use, please read
“PRECAUTIONS” ( pg. 3, 4) to ensure safe use of this product.
AUTOMATIC DEMONSTRATION
Automatic Demonstration takes place when “DEMO MODE” is set to “ON”
(factory-preset).
• Available when the Power Switch @ is set to “ ” or “ ”.
• Performing any operation during the demonstration stops the demonstration temporarily. If no operation
is performed for more than 1 minute after that, the demonstration will resume.
• “DEMO MODE” remains “ON” even if the camcorder power is turned off.
• To cancel Automatic Demonstration, set the Power Switch @ to “ ” and press the MENU Wheel 1 in
while the demo is in progress. This takes you directly to the demo mode’s Setting Menu (so you will not
have to go through the main Menu Screen). Rotate the MENU Wheel 1 to select “OFF” and press it.
NOTES:
• When a tape whose Erase Protection tab is in the position that allows recording is loaded in the
camcorder, demonstration is not available.
• If you do not detach the Lens Cap, you cannot see the actual changes of the Automatic Demonstration
activated on the LCD monitor or viewfinder.
1
GR-SXM745/540U_EN
1
02.7.19, 9:24 AM
PROVIDED ACCESSORIES
• AC Adapter
• Cassette Adapter
C-P7U
AP-V12U, AP-V11U or AP-V10U
• Remote Control Unit
RM-V715U
(GR-SXM745 only)
• CD-ROM
• Battery Pack
BN-V11U
• AAA (R03) Battery x 2
(for Remote Control Unit,
GR-SXM745 only)
• Lens Cap
• Shoulder Strap
• AA (R6) Battery
(for Cassette Adapter)
• PC Connection Cable
NOTE:
In order to maintain optimum performance of the camcorder, provided cables may be equipped with
one or more core filter. If a cable has only one core filter, the end that is closest to the filter should be
connected to the camcorder.
2
GR-SXM745/540U_EN
2
02.7.19, 9:24 AM
PRECAUTIONS
SAFETY PRECAUTIONS
CAUTIONS
CAUTION
• This camcorder is designed to be used with
NTSC-type color television signals. It cannot be
used for playback with a television of a different
standard. However, live recording and LCD
monitor/viewfinder playback are possible
anywhere.
• Use the JVC BN-V11U/V12U/V20U/V400U
battery packs and, to recharge them or to supply
power to the camcorder from an AC outlet, use
the provided multi-voltage AC Adapter.
(An appropriate conversion adapter may be
necessary to accommodate different designs of
AC outlets in different countries.)
RISK OF ELECTRIC SHOCK
DO NOT OPEN
CAUTION:
TO REDUCE THE RISK OF ELECTRIC SHOCK,
DO NOT REMOVE COVER (OR BACK).
NO USER-SERVICEABLE PARTS INSIDE.
REFER SERVICING TO QUALIFIED SERVICE PERSONNEL.
The lightning flash with arrowhead symbol, within an
equilateral triangle, is intended to alert the user to the
presence of uninsulated "dangerous voltage" within the
product's enclosure that may be of sufficient magnitude
to constitute a risk of electric shock to persons.
The exclamation point within an equilateral triangle is
intended to alert the user to the presence of important
operating and maintenance (servicing) instructions in
the literature accompanying the appliance.
NOTES:
• The rating plate (serial number plate) and safety
caution are on the bottom and/or the back of the
main unit.
• The rating information and safety caution of the
AC Adapter are on its upper and lower sides.
WARNING:
TO REDUCE THE RISK OF FIRE
OR ELECTRIC SHOCK, DO NOT
EXPOSE THIS APPARATUS TO
RAIN OR MOISTURE.
ATTENTION:
The product that you have purchased is powered
by a rechargeable battery. The battery is recyclable. At the end of its useful life, under various state
and local laws, it may be illegal to dispose of this
battery into the municipal waste stream. Check
with your local solid waste officials for details in
your area for recycling options or proper disposal.
This product has a fluorescent lamp that
contains a small amount of mercury. Disposal of
these materials may be regulated in your
community due to environmental considerations.
For disposal or recycling information please
contact your local authorities, or the Electronics
Industries Alliance:
<http://www.eiae.org>
Cassettes marked
and
can be used used with this camcorder.
3
GR-SXM745/540U_EN
3
02.7.19, 9:24 AM
The EPA certified RBRC® Battery Recycling Seal on the nickel-cadmium (Ni-Cd) battery indicates JVC
is voluntarily participating in an industry program to collect and recycle these batteries at the end of
their useful life, when taken out of service in the United States. The RBRC® program provides a
convenient alternative to placing used Ni-Cd batteries into the trash or the municipal waste stream,
which may be illegal in your area. Please call 1-800-8-BATTERY™ for information on Ni-Cd battery
recycling and disposal bans/restrictions in your area. JVC’s involvement in this program is part of our
commitment to preserving our environment and conserving our natural resources.
When the equipment is installed in a cabinet or on a shelf, make sure that it has sufficient space on all
sides to allow for ventilation (10 cm (3-15/16") or more on both sides, on top and at the rear).
Do not block the ventilation holes.
(If the ventilation holes are blocked by a newspaper, or cloth etc. the heat may not be able to get out.)
No naked flame sources, such as lighted candles, should be placed on the apparatus.
When discarding batteries, environmental problems must be considered and the local rules or laws
governing the disposal of these batteries must be followed strictly.
The apparatus shall not be exposed to dripping or splashing.
Do not use this equipment in a bathroom or places with water.
Also do not place any containers filled with water or liquids (such as cosmetics or medicines, flower
vases, potted plants, cups etc.) on top of this unit.
(If water or liquid is allowed to enter this equipment, fire or electric shock may be caused.)
IMPORTANT SAFETY INSTRUCTIONS
(1) Read these instructions.
(6) Clean only with dry cloth.
(10) Use only with the cart, stand,
tripod, bracket, or table
specified by the manufacturer, or sold with the
apparatus. When a cart is
used, use caution when
moving the cart/apparatus combination to
avoid injury from tip-over.
(7) Do not block any ventilation openings. Install
in accordance with the
manufacturer’s instructions.
(11) Unplug this apparatus during lightning
storms or when unused for long periods of
time.
(8) Do not install near any heat sources such as
radiators, heat registers, stoves, or other
apparatus (including amplifiers) that produce
heat.
(12) Refer all servicing to qualified service
personnel. Servicing is required when the
apparatus has been damaged in any way,
such as power-supply cord or plug is
damaged, liquid has been spilled or objects
have fallen into the apparatus, the
apparatus has been exposed to rain or
moisture, does not operate normally, or has
been dropped.
(2) Keep these instructions.
(3) Heed all warnings.
(4) Follow all instructions.
(5) Do not use this apparatus near water.
(9) Only use attachments/accessories specified
by the manufacturer.
4
GR-SXM745/540U_EN
4
02.7.19, 9:24 AM
INDEX
A
P
AC Adapter ................................................................. pg. 6
Animation Recording .......................................... pg. 21, 24
Audio Dubbing ......................................................... pg. 24
Auto Date Record .................................................... pg. 19
Auto Focus ............................................................... pg. 18
Auto Shut Off ........................................................... pg. 11
Picture Stabilizer ...................................................... pg. 12
Playback .................................................................. pg. 11
Playback Special Effects .......................................... pg. 14
Playback Zoom ........................................................ pg. 24
Program AE with Special Effects ............................. pg. 23
Provided Accessories ................................................ pg. 2
B
Q
Battery Pack ......................................................... pg. 6, 26
Blue Filter Effect ...................................................... pg. 23
Brighten The Image ................................................. pg. 18
Brighten The LCD Monitor ....................................... pg. 11
Quick Review ........................................................... pg. 13
R
Recording, Advanced Features .......................... pg. 22, 23
Recording, Start/Stop ............................................... pg. 11
Recording Format (S-VHS/S-VHS ET) .................... pg. 20
Recording Mode ....................................................... pg. 20
Record-Standby ....................................................... pg. 11
Red Filter Effect ....................................................... pg. 23
Remote Control ........................................................ pg. 24
Retake ...................................................................... pg. 13
Rewind The Tape ..................................................... pg. 11
C
Cassette Adapter ..................................................... pg. 16
Charge Marker ........................................................... pg. 6
Charging The Battery Pack ........................................ pg. 6
Classic Film Effect .................................................... pg. 23
Clean The Camcorder .............................................. pg. 27
Connection To a VCR/TV ......................................... pg. 15
Connection To A PC ................................................. pg. 16
Counter Memory ...................................................... pg. 14
S
Self-Recording ......................................................... pg. 11
Sepia Mode .............................................................. pg. 23
Shoulder Strap Attachment ........................................ pg. 8
Snapshot .................................................................. pg. 12
Snapshot During Playback ....................................... pg. 12
Solarization Effect .................................................... pg. 23
Specifications ........................................................... pg. 28
Sports Mode ............................................................. pg. 23
Still Playback ............................................................ pg. 11
Stretch Effect ........................................................... pg. 23
Strobe Effect ............................................................ pg. 23
Super LoLux (S.LX) ................................................. pg. 19
Super VHS Expansion Technology .......................... pg. 20
D
Darken The Image ................................................... pg. 18
Darken The LCD Monitor ......................................... pg. 11
Date/Time Display .................................................... pg. 19
Date/Time Settings ..................................................... pg. 7
Demonstration Mode ............................................ pg. 1, 21
Digital Effects ........................................................... pg. 23
Digital Zoom ............................................................. pg. 20
Diopter Adjustment ..................................................... pg. 8
E
Electronic Fog Filter Mode ....................................... pg. 23
Erase Protection ........................................................ pg. 8
Exposure Control ..................................................... pg. 18
T
High Speed Shutter Mode ........................................ pg. 23
Tape Counter ........................................................... pg. 14
Tape Dubbing ........................................................... pg. 15
Tape Length Setting ................................................. pg. 21
Tele Macro ............................................................... pg. 21
Time Base Corrector ............................................... pg. 14
Time-Lapse Shooting ......................................... pg. 21, 24
Tracking ................................................................... pg. 14
Tripod Mounting ......................................................... pg. 8
Twilight Mode ........................................................... pg. 23
I
U
Insert Editing ............................................................ pg. 24
Instant Titles ............................................................. pg. 19
Unload A Tape ............................................................ pg. 8
F
Fade-In/Out .............................................................. pg. 22
Fast-Forward Tape ................................................... pg. 11
G
Grip Adjustment ......................................................... pg. 8
H
V
L
LCD Monitor/Viewfinder, Indications .............. pg. 9, 10, 17
Load A Tape ............................................................... pg. 8
Video Echo Effect ..................................................... pg. 23
Video Light ............................................................... pg. 13
Viewfinder Adjustment ............................................... pg. 8
M
W
Manual Focus .......................................................... pg. 18
Menu Screen .................................................... pg. 18 – 21
Monotone Effect ....................................................... pg. 23
Mosaic Effect ........................................................... pg. 23
White Balance Adjustment ....................................... pg. 19
Wide Mode ............................................................... pg. 20
Wipe-In/Out .............................................................. pg. 22
N
Zooming ................................................................... pg. 13
Z
ND Effect Mode ........................................................ pg. 23
Nega/Posi Mode ...................................................... pg. 23
Night-Alive ................................................................ pg. 22
5
GR-SXM745/540U_EN
5
02.7.19, 9:24 AM
GETTING STARTED
USING THE BATTERY PACK
Perform step 1) of “CHARGING THE BATTERY
PACK”.
Hook on.
Approximate recording time (unit: min.)
Battery pack
Push in.
BATTERY RELEASE Switch
Viewfinder on
LCD monitor on
BN-V11U
95
(50)
80
(45)
BN-V12U
(optional)
95
(50)
80
(45)
BN-V20U
(optional)
150
(85)
135
(75)
BN-V400U
(optional)
360
(205)
315
(190)
Battery pack
( ): when the video light is on
Power Switch
USING AC POWER
Connect the AC Adapter to the camcorder ( step
2) and 3) of “CHARGING THE BATTERY PACK”).
• The provided AC Adapter features automatic
voltage selection in the AC range from 110 V to
240 V.
To DC IN
connector
AC Adapter
To AC outlet
ATTENTION
CHARGING THE BATTERY PACK
Before detaching the power source,
make sure that the camcorder’s power is turned
off. Failure to do so can result in a camcorder
malfunction.
1) Hook the end of the battery pack to the
camcorder and push the battery in until it locks
in place.
• If the battery pack is attached in the wrong
position, a malfunction may occur.
2) Set the Power Switch @ to “OFF”. Connect the
AC Adapter to the DC IN connector 9.
3) Plug the AC Adapter into an AC outlet. The
CHARGE lamp * blinks to indicate charging
has started.
4) When the CHARGE lamp * stops blinking but
stays lit, charging is finished. Unplug the AC
Adapter from the AC outlet. Disconnect the AC
Adapter from the camcorder.
REFRESH:
Be sure to fully discharge a battery pack before
recharging or storing it for a long period of time,
otherwise the battery performance will be reduced.
1) Perform steps 1) through 3) of “CHARGING
THE BATTERY PACK”.
2) Press REFRESH r for over 2 seconds. The
REFRESH lamp ( blinks to indicate
discharging has started.
3) When discharging is finished, charging
automatically starts and the CHARGE lamp *
blinks.
To Detach The Battery Pack . . .
... slide BATTERY RELEASE 8 and pull out the
battery pack.
Battery pack
Charge marker helps you remember
whether the battery pack has been
charged or not. Two colors are provided
(red and black)—you choose which one
means charged and which means
discharged.
Charging time
BN-V11U
approx. 1 hr. 30 min.
BN-V12U (optional)
approx. 1 hr. 30 min.
BN-V20U (optional)
approx. 2 hrs. 20 min.
BN-V400U (optional)
approx. 4 hrs. 30 min.
Charging times are for a fully discharged battery pack.
6
GR-SXM745/540U_EN
6
02.7.19, 9:24 AM
Date/Time Settings
• During charging or discharging, the camcorder
cannot be operated.
• Charging and discharging is not possible if the
wrong type of battery is used.
• When charging the battery pack for the first time
or after a long storage period, the CHARGE lamp
* may not light. Remove the battery pack from
the camcorder, then try charging again.
• If a fully-charged battery’s operation time remains
extremely short, the battery is worn out. Please
purchase a new one.
• Perform charging where the temperature is
between 10°C and 35°C (50°F and 95°F). 20°C to
25°C (68°F to 77°F) is the ideal temperature range
for charging. If the environment is too cold,
charging may be incomplete.
• Charging time varies according to the ambient
temperature and the status of the battery pack.
• Since the AC Adapter processes electricity
internally, it becomes warm during use. Be sure to
use it only in well-ventilated areas.
• The following operation stops charging or
discharging:
”, “ ” or “ ”.
• Set the Power Switch @ to “
• Disconnect the AC Adapter from the camcorder.
• Unplug the AC Adapter from the AC outlet.
• Detach the battery from the camcorder.
• Using the optional AA-V15 AC Power Adapter/
Charger, you can charge the BN-V11U/V12U/
V20U/V400U battery pack without the camcorder.
However, it cannot be used as an AC adapter.
• To avoid interference with reception, do not use
the AC Adapter near a radio.
• Recording time is reduced significantly when
Zoom or Record-Standby mode is engaged
repeatedly or the LCD monitor is used repeatedly.
• Before extended use, it is recommended that you
prepare enough battery packs to cover 3 times the
planned shooting time.
1) Set the Power Switch @ to “ ”.
2) Press the MENU Wheel 1 in. The Menu
Screen appears.
3) Rotate the MENU Wheel 1 to select
“4TO SYSTEM MENU” and press it to display
SYSTEM MENU. Rotate the MENU Wheel 1 to
select “4NEXT” and press it to display the next
page.
4) Rotate the MENU Wheel 1 to select “DATE/
TIME” and press it. The DATE/TIME Menu
appears.
5) To set “YEAR”, “MONTH”, “DAY” or “TIME”
(hour/minute), rotate the MENU Wheel 1 to
select the desired item, and press it. When the
setting begins blinking, rotate the MENU Wheel
1 until the correct setting appears and then
press it. The setting stops blinking.
6) When none of these settings (“YEAR”,
“MONTH”, “DAY”, “TIME”) blinks, rotate the
MENU Wheel 1 to select “EXIT”, and press it.
The Menu Screen reappears with the highlight
bar on “4RETURN”.
7) Press the MENU Wheel 1 in to close the Menu
Screen.
• To display the date and time in the camcorder’s
display and on a connected TV, see DATE/TIME
DISP. ( pg. 19) in CAMERA MENU.
• The date/time cannot be stored in memory if the
built-in clock battery runs out. Consult an
authorized JVC dealer for replacement, or set the
date/time as necessary before you start shooting.
1
@
DATE / T I ME
Y E AR
MON T H
DA Y
T I ME
2002
JUN
28
PM 8 : 2 0
EX I T
7
GR-SXM745/540U_EN
7
02.7.19, 9:24 AM
12-hour indication
with AM or PM
Grip Adjustment
Tripod Mounting
1) Separate the Velcro strip.
2) Pass your right hand through the loop and grasp
the grip.
3) Adjust so that your thumb and fingers can easily
operate the Recording Start/Stop Button ! and
Power Zoom Lever 3. Refasten the Velcro strip.
Align the screw and camera direction stud on the
tripod with the tripod mounting socket W. Then
tighten the screw.
CAUTION
When using a tripod, be
sure to open and extend
its legs fully to stabilize
the camcorder. To
prevent damage to the
unit caused by falling
over, do not use a
small-sized tripod.
3
!
Viewfinder Adjustment
1) Set the Power Switch @ to “ ” or “
Loading/Unloading A Cassette
1) Open the LCD monitor fully. Slide EJECT t
until the cassette holder opens. Do not use force
to open.
2) Insert or remove a cassette. When inserting,
q
make sure the label is facing outward.
appears when a cassette is loaded.
3) Press the Close button i to close the cassette
holder until it locks into place. Close the LCD
monitor.
• Closing the LCD monitor while the cassette holder is
still open may cause damage to the LCD monitor.
• Make sure the erase protection tab is in the position
that allows recording. If not, slide the tab. Some
cassettes have removable tabs. If the tab has been
removed, cover the hole with adhesive tape.
• The cassette holder cannot be opened while the
camcorder is in the record mode or detached from
the power source.
”.
2) Turn the Diopter Adjustment Control o until the
indications in the viewfinder are clearly focused.
180°
PAUSE
Cassette holder
Shoulder Strap Attachment
Thread the strap through the eyelet y, then fold it
t
back and thread it through the buckle. Repeat the
procedure to attach the other end of the strap to
the other eyelet y, making sure the strap is not
twisted. Adjust the length.
Gear
i
y
Turn to take
up slack.
Erase Protection tab
8
GR-SXM745/540U_EN
8
02.7.19, 9:24 AM
CONTROLS, CONNECTORS AND INDICATORS
Eyepiece
1 2 34
Refer to this diagram while reading the instructions.
During shooting
# $ % ^ &* (
5
6
7
Keep the lens
cap attached to
the camcorder.
Cassette
holder
) q w e rt
8
9 0!
@
LCD monitor
Viewfinder
o
90°
180°
Speaker
y
u
p
Transmitted beam
effetive area
180°
Turn the gear to
take up slack.
y
i
Erase
protection tab
5 m (16 ft)
30°
Q
30°
E
Microphone
Remote control
(GR-SXM745 only)
R
Video light
T
Y
U
I
O
W
P
a
s
d
f
LCD Monitor/Viewfinder Indications
During Recording
1
7
8
9
0
!
@
#
$
%
2 3
During Playback
5
4
1 2 0M I N
S–ET
REC S P
444 1 N I GH T 1 0 x
6
S – VHS REC
MWB
P AU S E
5M I N
1 / 2S
BR I GH T – – – – – – – –6– – – +
CONGRA T U L A T I ON S
D E C 2 5 . 0 1 AM 1 1 : 4 5 : 1 8
&
^
*
1X
(
)
pg. 25 for
r tyui
SP 4
S–ET
–1 : 23 : 45
T BC
MONO T ON E
AT
T40
+0 2
q we
M– 0 : 1 2 : 3 4
VO L UME
– – – – – –6– – – – – +
Warning Indications .
9
GR-SXM745/540U_EN
9
02.7.19, 9:24 AM
o
p
1 • MENU Wheel [–, +] ..................................... pg. 18
2
3
4
5
6
7
8
9
0
!
@
#
$
%
^
&
*
(
)
q
w
e
r
t
y
u
i
o
p
Q
W
E
R
T
Y
U
I
• BRIGHT Wheel [–, +] .................................. pg. 11
• TRACKING Wheel [–, +] ............................. pg. 14
Snapshot Button [SNAPSHOT] ..................... pg. 12
• Power Zoom Lever [T/W] ............................ pg. 13
• Speaker Volume Control [VOL.] .................. pg. 11
• Picture Stabilizer Button
[P.STABILIZER] ........................................... pg. 12
• Time Base Corrector Button [TBC] .............. pg. 14
S-Video Output Connectors [S] ..................... pg. 15
Audio Output Connector [A] .......................... pg. 15
Video Output Connector [V] .......................... pg. 15
Battery Release Switch
[BATTERY RELEASE] .................................... pg. 6
DC IN Connector ............................................. pg. 6
Digital Connector [DIGITAL]
Recording Start/Stop Button ......................... pg. 11
Power Switch [
, OFF,
,
] .............. pg. 11
Video Light Switch
[LIGHT OFF/AUTO/ON] ................................ pg. 13
Stop Button [STOP] ....................................... pg. 11
• Retake Rewind Button [RETAKE R] ............ pg. 13
• Quick Review Button [
R] ...................... pg. 13
• Rewind Button [R] ....................................... pg. 11
Play/Pause Button ......................................... pg. 11
• Retake Forward Button [RETAKE F] ........... pg. 13
• Fast-Forward Button [F] .............................. pg. 11
CHARGE Lamp ............................................... pg. 6
POWER/REFRESH Lamp .............................. pg. 6
• Fade/Wipe Button [FADE/WIPE] ................. pg. 22
• Counter Reset/Memory Button
[COUNTER R/M] ......................................... pg. 14
Program AE Button [P.AE] ............................. pg. 23
Digital Effect Button [DIGIFECT] ................... pg. 23
NIGHT-ALIVE Button .................................... pg. 22
REFRESH Button ............................................ pg. 6
EJECT Switch ................................................. pg. 8
Shoulder Strap Eyelets ................................... pg. 8
Battery Pack Mount ......................................... pg. 6
Close Button .................................................... pg. 8
Diopter Adjustment Control ............................. pg. 8
• Camera Sensor
Be careful not to cover this area; a sensor
necessary for shooting is built-in here.
• Remote Sensor* ...................................... pg. 9, 17
Grip Strap ........................................................ pg. 8
Tripod Mounting Socket .................................. pg. 8
Infrared Beam Transmitting Window ......... pg. 9, 17
ZOOM (T/W) Buttons .............................. pg. 13, 24
PLAY Button .................................................. pg. 11
REW Button (Functions the same as %)
STOP Button (Functions the same as $)
INSERT Button .............................................. pg. 24
O • REC TIME Button ........................................ pg. 24
• ANIM. Button ............................................... pg. 24
P START/STOP Button (Functions the same as !)
a FF Button (Functions the same as &)
s PAUSE Button ............................................... pg. 11
d A.DUB Button ................................................ pg. 24
f • INT.TIME Button .......................................... pg. 24
• SELF TIMER Button (non-functional)
1 Tape Remaining Time ................................... pg. 21
2 Recording Mode Indicator ............................. pg. 20
3 • Digital Effect Indicator ................................. pg. 23
4
5
6
7
8
9
0
!
@
#
$
%
^
&
*
(
)
q
w
e
r
t
y
u
i
o
p
• Program AE Indicator .................................. pg. 23
• Night-Alive Indicator .................................... pg. 22
• Fade/Wipe-Standby Indicator ...................... pg. 22
Recording Format Indicator (S/S-ET) ............ pg. 20
Tape Length Indicator .................................... pg. 21
Zoom Indicator Bar ........................................ pg. 13
Zoom Level Indicator
Approximate Zoom Ratio
Recording Indicator ....................................... pg. 11
Digital Effect Indicator ................................... pg. 23
• Program AE Indicator .................................. pg. 23
• Night-Alive Indicator .................................... pg. 22
Fade/Wipe-Standby Indicator ........................ pg. 22
Picture Stabilizer Indicator ............................ pg. 12
Interval Time/Recording Time Indicator ........... pg. 21
Bright Level Indicator .................................... pg. 11
Instant Title Display ....................................... pg. 19
Date/Time Display ......................................... pg. 19
Focus Indicator .............................................. pg. 18
Exposure Control Level Counter ................... pg. 18
White Balance Mode Indicator ...................... pg. 19
S-VHS/S-VHS ET Recording
Indicator ........................................................ pg. 20
Record-Standby Mode Indicator ................... pg. 11
•
: Cassette Indicator ................................. pg. 8
• w: Insert Editing Indicator* .......................... pg. 24
TBC Indicator ................................................ pg. 14
Playback Special Effect Indicator .................. pg. 14
Recording Format Indicator (S/S-ET) ............ pg. 20
Tape Counter* ......................................... pg. 14, 24
Recording Mode Indicator (SP/EP) ............... pg. 20
Tape Running Indicator
4 : Playback
3 : Fast-Forward/Shuttle Search
2 : Rewind/Shuttle Search
6 : Pause
e4 : Audio Dubbing*
Tracking Indicator .......................................... pg. 14
Tape Counter* ............................................... pg. 24
• BRIGHT: Bright Level Indicator ................... pg. 11
• VOLUME: Speaker Volume Indicator ........... pg. 11
* GR-SXM745 only.
10
GR-SXM745/540U_EN
10
02.7.19, 9:24 AM
RECORDING
PLAYBACK
Set REC MODE, S-VHS (S-VHS ET), TAPE
LENGTH and DATE/TIME in SYSTEM MENU.
( pg. 18 – 21, “MENU SETTINGS”)
1 Load a tape ( pg. 8, “Loading/Unloading A
Cassette”).
2 Set the Power Switch @ to “ ”. To start
playback, press 4/6 ^ or T.
To stop playback temporarily (Still Playback), press
4/6 ^ or s. To stop playback, press 5 $. Press
2 % to rewind, or 3 & to fast-forward the tape.
High-speed picture search (Shuttle Search) is
possible by pressing 2 % or 3 & during
playback (holding 2 % or 3 & down during
playback continues search until released). To
resume normal playback, press 4/6 ^ or T.
1 Remove the lens cap. Set the Power Switch @
to “ ” or “ ”.
Shooting while using the viewfinder: Make sure
the LCD monitor is closed and locked.
Shooting while using the LCD monitor: Make
sure the LCD monitor is fully open.
The camcorder enters the Record-Standby mode
and “PAUSE” ) is displayed.
• The viewfinder and LCD monitor cannot be used
simultaneously on this camcorder. Therefore,
when opening the LCD monitor and tilting it
upward to 180°, you cannot view any image in the
viewfinder, however you can shoot yourself while
viewing your own image in the LCD monitor.
2 Press the Recording Start/Stop Button !.
7
appears while recording is in progress.
• To stop recording, press the Recording Start/Stop
Button !. The camcorder re-enters the RecordStandby mode.
To Adjust The Brightness Of The LCD Monitor,
rotate the BRIGHT Wheel 1 until the bright level
indiator # on the display moves and the
appropriate brightness is reached.
• Tapes recorded on S-VHS or S-VHS ET
( pg. 18, 20) cannot be played back correctly
on a normal VHS VCR.
To playback on a regular VHS VCR, use a VHS
tape and select S-VHS ET (OFF) in SYSTEM
MENU ( pg. 18, 20).
For VIDEO RECORDING/VIDEO PLAYBACK
• The camcorder shuts off automatically after about
5 minutes in the Record-Standby or Stop mode.
To turn on again, set the Power Switch @ to
”.
“OFF”, then to “ ”, “ ” or “
• When the Power Switch @ is set to “ ”, “ ” or
” and the LCD monitor* is opened at an
“
angle of 60 degrees or more, the LCD monitor
switches on and the viewfinder switches off
automatically to save power.
• The playback picture can be viewed in the
viewfinder (with the LCD monitor shut), on the
LCD monitor or on a connected TV ( pg. 15,
“Connections To A TV/VCR”).
• To remove the indications, pg. 21, DISPLAY or
OSD OUTPUT in SYSTEM MENU.
• To control the speaker volume, slide VOL. 3
towards “+” to turn up, or towards “–” to turn
down. While shooting, sound is not heard from
the speaker.
• If TBC ( pg. 14) is engaged during Still
Playback, noise bars will not appear.
11
GR-SXM745/540U_EN
11
02.7.19, 9:24 AM
BASIC FEATURES
Picture Stabilizer
Snapshot
You can record still images that look like photographs onto a tape.
1) Perform step 1 of “RECORDING” ( pg. 11).
2) Press SNAPSHOT 2.
• There is a momentary camera shutter-type
blackout together with the sound effect of a
shutter closing.
• Snapshot is also available during playback.
However, the shutter sound is not heard.
To compensate for unstable images caused by
camera-shake, particularly at high magnification.
! appears.
1) Press P. STABILIZER 4.
2) To switch off the Picture Stabilizer, press
! disappears.
P. STABILIZER 4.
• Accurate stabilization may not be possible in
certain conditions including excessive hand
shake.
! appears blinking if the Stabilizer cannot be
•
used.
• This function cannot be activated during the
“Night-Alive”, “CLASSIC FILM”, “STROBE” and
“VIDEO ECHO” modes ( pg. 23, “Digital
Effects”).
12
GR-SXM745/540U_EN
12
02.7.19, 9:24 AM
Zooming
DANGER
To produce the zoom in/out effect. Digital circuitry
extends the maximum magnification offered by
optical zoom. This system is called Digital Zoom.
• Slide the Power Zoom Lever 3 towards “T” to
zoom in, or “W” to zoom out.
• The further you slide the Power Zoom Lever 3,
the quicker the zoom action.
• Focusing may become unstable during Zooming.
In this case, set the zoom while in Record–
Standby, lock the focus by using the manual focus
( pg. 18, FOCUS in CAMERA MENU), then
zoom in or out in Record mode.
• The zoom level indicator 6- moves during
zoom. Once the zoom level indiator 6reaches the top, all magnification from that point
is through digital processing.
• When using Digital Zoom, the quality of image
may suffer. To deactivate Digital Zoom, set
“D.ZOOM” ( pg. 20) to “OFF” in SYSTEM
MENU.
• Digital zoom cannot be used when the “VIDEO
ECHO” mode ( pg. 23, “Digital Effects”) is
activated.
Video Light
To brighten the scene when natural lighting is too
dim.
Set LIGHT OFF/AUTO/ON # as required:
OFF : Turns off the light.
AUTO: Automatically turns on the light when the
camcorder senses insufficient lighting on
the subject.
ON : Always keeps the light on as long as the
camcorder is turned on.
• It is recommended to set M.W.B. ( pg. 19) to
in CAMERA MENU when you use the video
light.
) does not blink
• Even if the battery indicator (
if the battery pack’s charge is low, the camcorder
may turn off automatically when you turn on the
video light, or when you start recording with the
video light turned on.
• When LIGHT OFF/AUTO/ON # is set to “AUTO”:
• Depending on the lighting conditions, the video
light may keep turning on and off. Set LIGHT
OFF/AUTO/ON # to ON or OFF as required.
• While the “Sports” or “High Speed Shutter” mode
is engaged, the light is likely to stay on. While
the “Twilight” mode is engaged, the light will not
activate. ( pg. 23, “Program AE with Special
Effects”)
• The video light can become
extremely hot.
Do not touch it either while in
operation or soon after turning it off,
otherwise serious injury may result.
• Do not place the camcorder into the carrying case
immediately after using the video light, since it
remains extremely hot for some time.
• When operating, keep a distance of about 30 cm
(11-13/16”) between the video light and people or
objects.
• Do not use near flammable or explosive
materials.
• It is recommended that you consult your nearest
JVC dealer for replacing the video light.
Quick Review
To check the end of the last recording.
1) Make sure the camcorder is in the Record–
Standby mode.
2) Press 2 % and release quickly.
Tape is rewound for approx. 2 seconds and
played back automatically, then pauses in
Record–Standby mode for the next shot.
• Distortion may occur at the start of playback. This
is normal.
Retake
To re-record certain segments.
1) Make sure the camcorder is in the Record–
Standby mode.
2) Press and hold either RETAKE % or & to reach
the start point for new recording. Pressing 3
& forwards the tape and pressing 2 %
reverses it.
3) Press the Recording Start/Stop Button ! to
start recording.
• Noise bars appear and pictures may become
monochrome or darken during Retake. This is
normal.
13
GR-SXM745/540U_EN
13
02.7.19, 9:24 AM
Tracking
Counter Memory
Eliminates noise bars that appear on-screen during
playback. To activate Manual Tracking:
1) Press the TRACKING Wheel 1 for approx.
2 seconds. “MT” i appears.
2) Rotate the TRACKING Wheel 1 so that the
noise bars disappear.
• To return to Auto Tracking, press the TRACKING
Wheel 1 for approx. 2 seconds or set the Power
” again. “AT” i
Switch @ to “OFF” and then “
blinks. When Auto Tracking finishes, the indication
disappears.
• When noise bars appear during playback, the
camcorder enters the Auto Tracking mode and
“AT” i appears.
• Manual Tracking may not work with tapes
recorded on other VCRs or camcorders.
Makes it easier to locate a specific tape segment.
1) Press COUNTER R/M ) and hold for more than
1 second. The counter t resets to “0:00:00”.
2) Press COUNTER R/M ) for less than 1 second.
“M” appears.
3) After recording or playback, press 5 $, then
2 %. The tape automatically stops at or close
to 0:00:00.
4) Press 4/6 ^ to start playback.
• The counter memory functions in the FastForward and Rewind modes.
• To disable the counter memory function, press
COUNTER R/M ) for less than 1 second so that
“M” disappears.
TBC (Time Base Corrector)
Removes jitter from fluctuating video signals to
deliver a stable picture even with old tapes.
To activate/release the TBC mode, press TBC 4
during playback for more than 1 second. When the
TBC mode is activated, “TBC” w is displayed.
• The “TBC” indicator w turns green (gray with a
camcorder equipped with a black/white
viewfinder) while TBC is working, and white while
TBC is not operative.
• TBC does not work during Still Playback and
Shuttle Search ( pg. 11).
• It may take a few seconds before TBC actually
starts working.
• The picture may be distorted if the TBC mode is
activated or deactivated at the edit-in/-out points
or when normal playback resumes after Still
Playback or Shuttle Search ( pg. 11).
• If the playback picture is distorted when TBC is
set to on, turn off TBC.
Playback Special Effects
Allows you to add creative effects to the playback
image. ( pg. 23, “Digital Effects”)
1) Activate “TBC” and Auto “Tracking”.
2) Press DIGIFECT w repeatedly until the desired
mode e appears.
• To cancel the effect, select “OFF”.
• NEGA POSI, MOSAIC and STRETCH are not
available.
• Playback Special Effects do not work during
Shuttle Search ( pg. 11).
• The selected effect mode cannot be changed
during Still Playback ( pg. 11).
14
GR-SXM745/540U_EN
14
02.7.19, 9:24 AM
Connections To A TV/VCR
Tape Dubbing
1) Make sure all units are turned off.
2) Connect the camcorder to a TV or VCR using
optional video and audio cables. If using both
TV and VCR, connect the VCR output to the TV
input.
3) Turn on all units. Set the VCR to its AUX input
mode, and set the TV to its VIDEO mode.
• Use the AC Adapter as the power supply.
• The S-Video cable connection can improve the
dubbed picture quality. The S-Video cable is
optional. Be sure to use the following cable:
YTU94146A S-Video cable.
Consult the JVC Service Center described on
the sheet included in the package for details
on its availability. Make sure to connect the
end with a core filter to the camcorder. The
core filter reduces interference.
• Be sure to adjust the TV sound volume to its
minimum level to avoid a sudden burst of sound
when the camcorder is turned on.
• If you have a TV or speakers that are not
specially shielded, do not place the speakers
adjacent to the TV as interference will occur in the
camcorder playback picture.
1) Connect the camcorder and the VCR
( “Connections To A TV/VCR”). Set the Power
”, turn on the VCR’s power,
Switch @ to “
and insert the appropriate cassettes in the
camcorder and the VCR. Engage the VCR’s
AUX and Record-Pause modes.
2) Press 4/6 ^ to find a spot just before the editin point. Once it is reached, press 4/6 ^ again.
3) Press 4/6 ^ and engage the VCR’s Record
mode.
4) Engage the VCR’s Record-Pause mode and
press 4/6 ^.
• Repeat steps 2) through 4) for additional editing,
then stop the VCR and camcorder when finished.
White to
Audio
Output 6
To S-Video
Output 5
Yellow to
Video Output 7
Connector cover
A/V cable
S-Video cable
(optional)
TV
To S-Video
Input
To TV or VCR
White to
Audio Input
VCR
Yellow to
Video Input
15
GR-SXM745/540U_EN
15
02.7.19, 9:25 AM
Using The Cassette Adapter
Connection To A Personal Computer
Use this to play back an S-VHS-C/VHS-C video
cassette recorded with this camcorder on a S-VHS/
VHS VCR.
You can transfer image data from the camcorder to
a PC using Digital Photo Navigator. When
connecting to your PC, refer to the instruction
manuals of the PC and Setup Guide for the
provided software.
1) Slide the battery cover up to remove it, install
one “AA (R6)” size battery, then reattach the
cover.
2) Slide the latch to open the compartment door,
then insert the cassette and close the
compartment door.
3) Load the cassette adapter into the VCR and
play the tape back.
4) Slide the latch and the compartment door opens
automatically. This may take around 10 seconds.
Do not attempt to force the adapter open. Then,
insert your finger in the hole, and push up and
remove the cassette.
• During tape loading and unloading, do not touch
the reels for safety and tape protection.
• Tapes recorded in S-VHS or S-VHS ET mode
cannot be played back on a regular VHS VCR.
Playback is possible with a VCR equipped with
the S-VHS or SQPB (S-VHS QUASI PLAYBACK)
function.
• During special-effect playback (slow motion, still
frame, etc.), the picture may vibrate or noise bars
may appear on the screen.
• To record on a VCR using a compact cassette
and the adapter, cover the adapter’s recording
safety hole with adhesive tape.
When connecting to a Macintosh . . .
The optional KEYSPAN USA-19 USB PDA
Adapter is required.
• Macintosh is a registered trademark of Apple
Computer, Inc.
• Keyspan is a trademark of InnoSys Inc.
Sliding Latch
Compartment Door
Recording
Safety Hole
Hole
Reels
Battery Cover
16
GR-SXM745/540U_EN
16
02.7.19, 9:25 AM
INSTRUCTIONS
Eyepiece
1 2 34
Refer to this diagram while reading the instructions.
During shooting
# $ % ^ &* (
5
6
7
Keep the lens
cap attached to
the camcorder.
Cassette
holder
) q w e rt
8
9 0!
@
LCD monitor
Viewfinder
o
90°
180°
Speaker
y
u
p
Transmitted beam
effetive area
180°
Turn the gear to
take up slack.
y
i
Erase
protection tab
5 m (16 ft)
30°
Q
30°
E
Microphone
R
Video light
Remote control
(GR-SXM745 only)
T
Y
U
I
O
W
P
a
s
d
f
LCD Monitor/Viewfinder Indications
During Recording
1
7
8
9
0
!
@
#
$
%
2 3
During Playback
5
4
1 2 0M I N
S–ET
REC S P
444 1 N I GH T 1 0 x
6
S – VHS REC
P AU S E
&
MWB
5M I N
1 / 2S
BR I GH T – – – – – – – –6– – – +
CONGRA T U L A T I ON S
D E C 2 5 . 0 1 AM 1 1 : 4 5 : 1 8
^
*
1X
(
)
pg. 25 for
r tyui
SP 4
S–ET
–1 : 23 : 45
T BC
MONO T ON E
AT
T40
+0 2
q we
M– 0 : 1 2 : 3 4
VO L UME
– – – – – –6– – – – – +
Warning Indications .
17
GR-SXM745/540U_EN
17
02.7.19, 9:25 AM
o
p
MENU SETTINGS
CAMERA MENU
1 Set the Power Switch @ to “ ”.
2 Press the MENU Wheel 1 in. The Menu
Screen appears. Rotate the MENU Wheel 1 to
select the desired function.
• To go from CAMERA MENU to SYSTEM MENU,
rotate the MENU Wheel 1 to select “4TO
SYSTEM MENU” and press it. SYSTEM MENU is
composed of 2 pages. To go to the next page,
rotate the MENU Wheel 1 to select “4NEXT”
and press it.
• To return to CAMERA MENU from page 2 of
SYSTEM MENU, rotate the MENU Wheel 1 to
select “4TO CAMERA MENU” and press it.
CAME RA ME NU
T O S Y S T EM ME NU
F OCU S
E X POS UR E
M .W. B .
S . LX
T I TLE
DA T E / T I ME D I S P .
R E T URN
AU T O
AU T O
AU T O
MA X
S Y S T EM MENU
NE X T
SP
R E C MOD E
D . Z OOM
50x
W I DE
OF F
S – VHS
ON
T A P E L E NG T H
T30
D I S P L AY
FUL L
OS D OU T P U T
ON
R E T URN
3 Press the MENU Wheel 1 in to display the
Setting Menu and rotate it to select the desired
setting.
4 Press the MENU Wheel 1 in. The Menu
Screen reappears with the highlight bar on
“4RETURN”. Press the MENU Wheel 1 in. The
normal screen reappears.
FOCUS
If correct focus cannot be obtained with AUTO
FOCUS, set to MANU to use manual focusing.
” appears.
“
To focus on a farther subject, rotate the MENU
Wheel 1 upward. “1” appears and blinks.
To focus on a nearer subject, rotate the MENU
Wheel 1 downward. “4” appears and blinking.
• If the lens is smeared or blurred, accurate
focusing is not possible.
• When shooting a subject close to the lens, zoom
out first ( pg. 13, “Zooming”). If zoomed in in
the auto focus mode, the camcorder could
automatically zoom out depending on the
distance between the camcorder and the subject.
This does not occur with “TELE MACRO”
( pg. 21) in SYSTEM MENU.
• Be sure to focus the lens in the maximum
telephoto position when you use the Manual
Focus mode. If you focus in on a certain subject
in the wide-angle position, sharply focused
images cannot be obtained when zoomed in
because the depth-of-field is reduced at longer
focal lengths.
• When the focus level cannot be adjusted any
farther or closer, “ ” or “ ” will blink.
EXPOSURE
Manual exposure adjustment is recommended in
the following situations:
• When shooting using reverse lighting or when the
background is too bright.
• When shooting on a reflective natural background
such as at the beach or when skiing.
• When the background is overly dark or the
subject light.
To brighten the image, rotate the MENU Wheel
1 downward.
To darken the image, rotate the MENU Wheel 1
upward.
The exposure control level increases/decreases
(maximum ±06).
18
GR-SXM745/540U_EN
18
02.7.19, 9:25 AM
M.W.B.
TITLE
If the white balance is correct, all other colors will
be accurately reproduced.
AUTO
: White balance is adjusted
automatically.
FINE
: Outdoors on a sunny day.
CLOUD
: Outdoors on a cloudy day.
HALOGEN : A video light or similar type of
lighting is used.
MWB: White balance is set manually. Hold a sheet
of plain white paper in front of the subject. Adjust
zoom or position yourself so that the white paper
fills the screen. If it is difficult to focus on the white
paper, adjust focus manually ( FOCUS in
CAMERA MENU). Press the MENU Wheel 1 in
until “MWB” begins blinking. When the setting is
completed, “MWB” stops blinking.
• Once you adjust white balance manually, the
setting is retained even if the power is turned off
or the battery removed.
• White balance cannot be used when the “SEPIA”
or “MONOTONE” mode ( pg. 23, “Digital
Effects”) is activated.
Allows you to superimpose one of eight preset
titles in 2 different languages. Change the
language in TITLE LANG. ( pg. 21) in SYSTEM
MENU.
• $ shows the selected title which remains until
OFF is selected.
DATE/TIME DISP.
Makes the date/time appear in the camcorder or on
a connected monitor (set DATE/TIME in SYSTEM
MENU first pg. 7).
• The selected display will be recorded. If you do
not want to record the display, select OFF before
shooting.
• In the AUTO DATE mode, the camcorder records
the date for about 5 seconds when recording is
initiated after the date is changed, a cassette is
loaded, or AUTO DATE is selected. The date is
replaced after 5 seconds with “AUTO DATE” but
this is not recorded.
S.LX
MAX: To record a subject in a darkly lit
environment, when it is more convenient to shoot
the subject with a brighter image even if the picture
becomes slightly coarse.
NORMAL: To record a subject in a dimly lit
environment, when it is more convenient to shoot
with a less coarse picture although the subject
becomes slightly dark. This setting is suitable for
measuring sensitivity conforming to EIA-639 (EIA*
Standard for Low Light Sensitivity Measurement).
* EIA : Electronic Industries Alliance
OFF: Allows you to shoot dark scenes with no
picture brightness adjustment.
19
GR-SXM745/540U_EN
19
02.7.19, 9:25 AM
SYSTEM MENU
This Menu Screen cannot be accessed while
recording.
REC MODE
Allows you to set the recording mode. “EP”
(Extended Play) is more economical, providing
three times the recording time.
• If the recording mode is switched during
recording, the playback picture will be blurred at
the switching point.
D. ZOOM
Zooming is possible from 16X (the optical zoom
limit), to a maximum of 50X or 600X digital
magnification.
When set to “OFF” only optical zoom (maximum
16x magnification) can function.
WIDE
When set to “ON” black bars will be recorded at the
top and bottom of the screen to produce a cinemalike “wide-screen” effect. Not effective with
“Snapshot” ( pg. 12).
S-VHS (S-VHS ET)
ON: With an S-VHS cassette, “S” appears and
the camcorder records in S-VHS.
With a VHS cassette, “S-ET” appears and the
camcorder records with S-VHS picture quality,
which is called Super VHS ET (Expansion
Technology). S-VHS REC appears during
recording.
OFF: Records in VHS on a VHS or S-VHS
cassette.
• JVC EHG (Extra High Grade) tapes are
recommended for superior results.
Use S-VHS tape for storing recordings for an
extended period or for recording important
scenes, as it enables higher-quality recording and
playback.
• With some tapes, better picture quality may not
be obtained even with S-VHS ET recording. It is
recommended that you do test record beforehand
to make sure whether better results can be
obtained.
• If the S-VHS ET mode or recording format is
switched during recording, the playback picture
will be blurred at the switching point.
• It is recommended that tapes recorded on this
camcorder be played back on this camcorder.
• Tapes recorded in S-VHS or S-VHS ET mode can
be played back not only on this camcorder but
also on a Super VHS VCR or a VCR equipped
with the SQPB (S-VHS QUASI PLAYBACK)
function.
— When tapes recorded in S-VHS or S-VHS ET
mode are played back on a VCR equipped with
the SQPB (S-VHS QUASI PLAYBACK)
function, S-VHS picture quality is not available.
— Tapes recorded in S-VHS ET mode cannot be
played back on some VCRs, including some
JVC VCRs.
• Tapes recorded in S-VHS or S-VHS ET mode
cannot be played back correctly on a normal VHS
VCR.
• S-VHS ET does not work with S-VHS tapes.
• To avoid on-screen noise, do not perform Still
Playback or Shuttle Search repeatedly.
• If the picture contains a lot of jitter or noise, use a
cleaning cassette.
20
GR-SXM745/540U_EN
20
02.7.19, 9:25 AM
TAPE LENGTH
TELE MACRO
Allows you to set the tape length depending on the
tape used: T20=20 minutes, T30=30 minutes,
T35=35 minutes, T40=40 minutes.
• Tape remaining time 1 is correct only if the
correct tape length has been selected.
When set to “ON”, you can shoot a subject as large
as possible at a distance of approx. 60 cm
(23-5/8").
Depending on the zoom position, the lens may go
out of focus.
DISPLAY
TITLE LANG.
FULL: Makes all of the indications appear on the
LCD monitor/viewfinder during playback or
recording.
SIMPLE: Makes the following indications
disappear from the LCD monitor/viewfinder during
, tape remaining time,
recording or playback:
, tape length ( pg. 9, 17).
OSD OUTPUT
ON: On-screen indications are displayed.
OFF: On-screen indications are turned off except
Date/Time, Instant Title and Warning Indication.
REC TIME
You can shoot a series of pictures, each slightly
different, of the same object for a brief selected
period of time (Animation). REC MODE should be
set to “SP”.
Select the desired recording time and press the
Recording Start/Stop Button ! after focusing on
the subject.
• The remote control can also be used for this
setting.* ( pg. 24, “Animation And Time-Lapse”)
• Fade- or wipe-in/out cannot be performed.
• This function is canceled when the power is shut
off or when the cassette is ejected.
Allows you to select the language (ENGLISH,
FRENCH, SPANISH or PORTUGUESE) of TITLE
in CAMERA MENU. After selection, the TITLE
setting menu ( p. 19) appears automatically.
DATE/TIME
Allows you to set the current date and time.
( pg. 7)
DEMO MODE
Demonstrates certain functions automatically.
Available when the Power Switch @ is set to “ ”
or “ ” and “DEMO MODE” is set to “ON” (factorypreset). Performing any operation during the
demonstration stops the demonstration
temporarily. Set to OFF to stop completely.
• When a tape whose erase protection tab is in the
position that allows recording is loaded in the
camcorder, demonstration is not available.
• If you do not detach the Lens Cap, you cannot
see the actual changes of the Automatic
Demonstration activated on the LCD monitor or
viewfinder.
* GR-SXM745 only.
INT. TIME
You can record sequentially at preset time spans.
Leaving the camcorder aimed at a specific subject,
you can record subtle changes over an extended
period of time (Time-Lapse). REC MODE should
be set to “SP”.
(Please note that it is necessary to set the REC
TIME (Animation) in the SYSTEM MENU before
performing the INT. TIME (Time-Lapse) function.)
Select the desired interval time and press the
Recording Start/Stop Button !.
• The remote control can also be used for this
setting.* ( pg. 24, “Animation And Time-Lapse”)
• Fade- or wipe-in/out cannot be performed.
• This function is canceled when the power is shut
off or when the cassette is ejected.
* GR-SXM745 only.
21
GR-SXM745/540U_EN
21
02.7.19, 9:25 AM
ADVANCED FEATURES
Fade/Wipe Effects
Night-Alive
Fade- or wipe-in works at recording start, and fadeor wipe-out works at recording end.
Makes dark subjects or areas even brighter than
they would be under good natural lighting.
1) Set the Power Switch @ to “ ”.
2) Press FADE/WIPE ) repeatedly until the
desired mode appears.
3) Press the Recording Start/Stop Button ! to
activate fade-in/out or wipe-in/out.
• Pressing and holding the Recording Start/Stop
Button ! allows you to vary the length for the
image during fade in/out or wipe in/out.
• To cancel a fade or wipe, press FADE/WIPE )
repeatedly until “OFF” appears.
1) Set the Power Switch @ to “ ” or “ ”.
2) Press NIGHT-ALIVE e repeatedly until the
desired mode appears.
A NIGHT AUTO: The shutter speed is automatically adjusted (maximum 1/6 sec.).
1 NIGHT 10X (only when the Power Switch @
is set to “ ”): The shutter speed is set to 1/6th of
a second to provide 10 times the sensitivity.
2 NIGHT 60X (only when the Power Switch @
is set to “ ”): The shutter speed is set to 1 second
to provide 60 times the sensitivity.
• To cancel the effect, press NIGHT-ALIVE e
repeatedly until “OFF” appears.
• During Night-Alive, the following cannot be
activated: “Picture Stabilizer”, “Program AE With
Special Effects”, “Digital Effects” and “S.LX” in
CAMERA MENU ( pg. 19).
• Night-Alive does not work when LIGHT OFF/
AUTO/ON # is set to “AUTO” or “ON” ( pg. 13,
“Video Light”).
• During Night-Alive, it may be difficult to bring the
camcorder into focus. To prevent this, use of a
tripod is recommended.
FADER: Fades in/out to a black screen.
MOSAIC (Fader): Gradually turns/returns the
picture into/from a mosaic pattern.
SHUTTER (Wipe): A black screen moves in
from the top and bottom, closing over the image
like a shutter, or a new image pushes open the
black screen vertically from the center.
SLIDE (Wipe): A black screen moves in from
the left to gradually cover the image, or a new
image moves in from right to left.
DOOR (Wipe): Wipes in as the two halves of
a black screen open to the left and right, revealing
the scene, or wipes out and the black screen
reappears from left and right to cover the scene.
CORNER (Wipe): Wipes in on a black screen
from the upper right to the lower left corner,
revealing the scene, or wipes out from lower left to
upper right, leaving a black screen.
WINDOW (Wipe): Wipes in on a black screen
from the center of the screen towards the corners,
revealing the scene, or wipe out from the corners
to the center, leaving a black screen.
22
GR-SXM745/540U_EN
22
02.7.19, 9:25 AM
Program AE With Special Effects
1) Set the Power Switch @ to “ ”.
2) Press P.AE q repeatedly until the desired mode
appears.
• To cancel the effect, press P.AE q repeatedly
until “OFF” appears.
• Only one mode can be engaged at a time.
• In the “High Speed Shutter” or “Sports” modes,
picture color may be adversely affected if the
subject is lit by alternating discharge-type light
sources such as flourescent or mercury-vapor
lights.
• This function cannot be activated during NightAlive ( pg. 22).
SPORTS: High shutter speed clearly captures
fast-moving action.
ND : ND EFFECT: A black mist darkens the
picture, as when an ND filter is used. Helps to
counter the effects of glare on the subject.
FG : FOG: Makes the picture look misty white, as
when an external fog filter is attached to the lens.
Softens the image and gives it a “fantasy” look.
This mode cannot be used when the “VIDEO
ECHO” mode ( “Digital Effects”) is activated.
TWILIGHT: Dusk, twilight scenery, fireworks,
etc., look more natural and dramatic. In this mode,
S.LX and AUTO FOCUS in CAMERA MENU
( pg. 18, 19) may not work.
S1/2000 (1/2000 sec. High Speed Shutter):
Captures faster action than Sports mode. The
screen becomes slightly dark. Use in well-lit
situations.
Digital Effects
1) Set the Power Switch @ to “ ”.
2) Press DIGIFECT w repeatedly until the desired
mode appears.
• To cancel the effect, press DIGIFECT w
repeatedly until “OFF” appears.
• This function cannot be activated during NightAlive ( pg. 22).
• Picture Stabilizer cannot be activated during the
“CLASSIC FILM”, “STROBE” and “VIDEO ECHO”
mode.
SEPIA: Recorded scenes have a brownish tint
like old photos. Combine this with WIDE in
SYSTEM MENU for a classic look.
MONOTONE: Like black and white films, your
footage is shot in B/W. Combine this with WIDE in
SYSTEM MENU for a classic look.
B. FILTER: Recorded scenes have a bluish
tint.
R. FILTER: Recorded scenes have a reddish
tint.
SOLARI: The picture is recorded with an effect
similar to a painting.
NEGA POSI: The colors of a picture are
reversed.
MOSAIC: Turns recorded scenes into a mosaic
pattern.
STRETCH: Doubles the width of the picture
horizontally.
CLASSIC FILM: Makes your footage look like
a classic movie by shooting in black and white,
with a strobing effect, and black bars added at the
top and bottom.
STROBE: Your recording looks like a series of
consecutive snapshots.
VIDEO ECHO: Adds a “ghost” to the subject,
giving your recording a “fantasy” feeling. Zoom
magnification of over 10X is not available.
23
GR-SXM745/540U_EN
23
02.7.19, 9:25 AM
USING THE REMOTE CONTROL UNIT (GR-SXM745 only)
Make sure the remote control is pointed at the remote sensor p.
5) To begin Insert Editing, press START/STOP P.
When the counter reaches “0:00:00”, editing
stops automatically and the camcorder enters
the Insert-Pause mode. To end Insert Editing,
press STOP U.
• During Insert Editing, the original audio will be
heard from the speaker.
• After step 4), “Retake” ( pg. 13) can be
performed.
• The tape may stop slightly before or after the
designated end point, and noise bars may appear.
Neither indicates a defect in the unit.
Playback Zoom
To magnify the recorded image up to 10X at any
time during playback. Make sure that the TBC
mode is activated.
1) Press PLAY T to find the scene of interest.
2) Press ZOOM (T/W) R. Pressing T zooms in. To
end zoom press and hold W until magnification
returns to normal. Or, press STOP U and then
press PLAY T.
• Due to digital image processing, the quality of the
image may suffer.
Animation And Time-Lapse
Audio Dubbing
The remote control lets you set/release interval
time and recording time without setting REC TIME/
INT. TIME ( pg. 21) in SYSTEM MENU.
You can record a new soundtrack on a
prerecorded tape (normal audio only). The sound
is recorded from the built-in microphone.
Animation
Each time ANIM. O is pressed, the recording time
changes in the following order: 1/4S, 1/2S, 1S, 5S
and no indication (off).
Perform steps 1) and 2) of the Insert Editing
procedure.
Time-Lapse
Each time REC TIME O is pressed, the recording
time changes in the following order: 1/4S, 1/2S,
1S, 5S and no indication (off). Each time INT. TIME
f is pressed, the interval time changes in the
following order: 15S, 30S, 1MIN, 5MIN and no
indication (off).
Insert Editing
You can record a new scene onto a previously
recorded tape. Only the video signal is recorded in
this mode.
”.
1) Set the Power Switch @ to “
2) Play back the tape, locate the edit-out point and
press PAUSE s. Press and hold COUNTER R/M
) for more than 1 second to reset the tape
counter, then press it again for less than
1 second so that “M” appears.
3) Press REW Y to go a little beyond the beginning
of the scene you want to replace, press PLAY T
to view the recorded tape, and press PAUSE s
exactly at the edit-in point where the new scene
should start.
4) While holding down INSERT I, press and
release PAUSE s. w appears.
3) Press REW Y to go a little beyond the beginning
of the scene onto which you want to dub the new
audio, press PLAY T to view the recorded tape,
then press PAUSE s at exactly the point where
dubbing should start.
4) While holding down A. DUB d, press and
release PAUSE s.
5) To begin Audio Dubbing, press PLAY T. When
the counter reaches “0:00:00”, Audio Dubbing
stops automatically and the camcorder enters
the Audio Dub-Standby mode. To end Audio
Dubbing, press STOP U.
• Do not press REW Y or FF a during Audio DubStandby, or the edit points will not be accurate.
• If the microphone is too close to the TV, or if the
TV’s volume is too high, whistling or howling may
occur.
For Insert Editing/Audio Dubbing
• Insert Editing and Audio Dubbing may not work
correctly if the tape contains blank segments, or if
the recording speed was changed during the
original recording.
• To edit/dub onto a tape, make sure the erase
protection tab is in the position that allows
recording.
• Do not press STOP U during Insert Editing or
Audio Dubbing, or the edit points will not be
accurate.
24
GR-SXM745/540U_EN
24
02.7.19, 9:25 AM
TROUBLESHOOTING
Before consulting your JVC dealer, please check the following to see if you can correct the problem yourself.
Vertical white lines appear when shooting a very
bright object.
• This sometimes occurs when the contrast between the
back-ground and the object is great. It is not a defect of
the camcorder.
Bright, crystal-shaped spots appear in the LCD
monitor and the viewfinder.
• Sunlight is directly entering the lens. This is not a defect
of the camcorder.
Colored bright spots appear all over the LCD monitor
or the viewfinder.
• The LCD monitor and the viewfinder are made with highprecision technology. However, black spots or bright
spots of light (red, green or blue) may appear constantly
on the LCD monitor or in the viewfinder. These spots are
not recorded on the tape. This is not due to any defect of
the unit. (Effective dots: more than 99.99 %.)
Animation or Time-Lapse is not available.
• Before recording in the Animation mode at the very
beginning of a tape, set the camcorder to the Recording
mode for about 5 seconds, so that the tape runs
smoothly. Using the Fade-in function at this point is a
good way to begin an animated program
( pg. 21, REC TIME/INT. TIME in SYSTEM MENU).
The tape is running, but there is no playback picture.
• The TV has not been set to its VIDEO mode or channel.
• If A/V connection is used, the TV’s VIDEO/TV Switch
has not been set to VIDEO.
Playback picture is blurred or interrupted.
• The video heads are dirty or worn out. Consult your
nearest JVC dealer for head cleaning or replacement.
The tape stops during fast-forward or rewind.
• The Counter Memory Function has been activated
( pg. 14, “Counter Memory”).
The date and time displays disappear.
• If you remove the power source from the camcorder
while the power is on, all settings and selections are
erased. Make sure to turn the camcorder’s power off
before disconnecting the power source.
The tape will not eject.
• The battery pack is running low.
• If the LCD monitor is not open over 60 degrees, the
EJECT switch t does not function.
The camcorder is a microcomputer-controlled device.
External noise and interference (from a TV, a radio,
etc.) might prevent it from functioning properly. In such
cases, first disconnect its power supply unit (battery
pack, AC Adapter, etc.); and then re-connect it and
proceed as usual from the beginning.
Warning Indications
(high)
(exhausted) : Displays the battery remaining power level. As the battery power comes
close to nil, the battery indicator
blinks (battery power warning). When the battery power is exhausted, power
turns off automatically.
:Blinks when no cassette is loaded, or when the erase protection tab is not in the position that allows recording.
TAPE END: Appears when the tape ends during recording, playback or fast-forward.
LENS CAP: Appears for 5 seconds after power is turned on if the lens cap is attached.
CONDENSATION OPERATION PAUSED PLEASE WAIT: These 2 warnings appear alternately every 3 seconds
if condensation occurs. In this case, all functions except tape eject and power on/off are disabled. Remove the tape,
turn the unit off (without removing the power supply), wait a few minutes for the warnings to clear, and turn it on again.
HEAD CLEANING REQUIRED USE CLEANING CASSETTE: These 2 warnings appear alternately every 3
seconds if dirt is detected on the heads during recording. In this case, use an optional cleaning cassette. If the
warning remains after cleaning, consult your nearest JVC dealer.
E01—E06 UNIT IN SAFEGUARD MODE REMOVE AND REATTACH BATTERY: The error indications (E01 — E06)
show what type of malfunction has occured. If an error indication and warning appear, turn the unit off, remove the
power supply (battery, etc.) and wait a few minutes for them to clear. When it does, you can resume using the
camcorder. If the indication remains, consult your nearest JVC dealer.
25
GR-SXM745/540U_EN
25
02.7.19, 9:25 AM
CAUTIONS
When using the AC Adapter in areas other than the USA
• The provided AC Adapter features automatic voltage selection in
the AC range from 110 V to 240 V.
USING HOUSEHOLD AC PLUG ADAPTER
In case of connecting the unit’s AC Adapter to an AC wall outlet
other than American National Standard C73 series type use an AC
plug adapter, called a “Siemens Plug”, as shown.
For this AC plug adapter, consult your nearest JVC dealer.
Plug adapter
.... avoid prolonged uncharged storage.
.... remove from charger or powered unit when not in use, as
some machines use current even when switched off.
• It is normal for the battery pack to be warm after charging, or
after use.
Temperature Range Specifications
Charging ................... 10°C to 35°C (50°F to 95°F)
Operation .................. 0°C to 40°C (32°F to 104°F)
Storage ..................... –10°C to 30°C (14°F to 86°F)
• Recharging time is based on room temperature of 20°C (68°F).
• The lower the temperature, the longer recharging takes.
Cassettes
To properly use and store your cassettes, be sure to read the
following cautions:
Video Light
DANGER:
• The video light becomes extremely hot. Do not
touch it either while in operation or soon after
turning it off, otherwise serious injury may result.
• Do not place the camcorder into the carrying
case immediately after using the video light,
since it remains extremely hot for some time.
• When operating, keep a distance of about 30 cm (11-13/16”)
between the video light and people or object.
• Do not use near flammable or explosive materials.
• It is recommended that you consult your nearest JVC dealer for
replacing the video light.
General Battery Precautions
If the remote control or cassette adapter is not functioning even if it
is being operated correctly, the batteries are exhausted. Replace
them with fresh ones.
Use only the specified batteries pg. 2 “PROVIDED
ACCESSORIES”
Please make note of the following rules for battery use. When
misused, the batteries can leak or explode.
1. When replacing batteries, refer to page 2 for the remote control,
or read the cassette adapter (C-P6U/C-P7U) instructions.
2. Do not use any different size of batteries from those specified.
3. Be sure to install batteries in the correct direction.
4. Do not use rechargeable batteries.
5. Do not expose the batteries to excessive heat as they can leak
or explode.
6. Do not dispose of the batteries in a fire.
7. Remove the batteries from the unit if it is to be stored for an
extended period to avoid battery leakage which can cause
malfunctions.
Battery Packs
The battery packs are nickel-cadmium or nickel
metal-hydride batteries. Before using the supplied
battery pack or an optional battery pack, be sure
to read the following cautions:
1. To avoid hazard . . .
.... do not burn.
.... do not short-circuit the terminals.
.... do not modify or disassemble.
.... use only specified chargers.
Terminals
2. To prevent damage and prolong service
life . . .
.... do not subject to unnecessary shock.
.... avoid repeated charging without fully discharging.
.... charge in an environment where temperatures are within the
tolerances shown in the chart below. This is a chemical
reaction type battery—cooler temperatures impede chemical
reaction, while warmer temperatures can prevent complete
charging.
.... store in a cool, dry place. Extended exposure to high
temperatures will increase natural discharge and shorten
service life.
1. During use . . .
.... make sure the cassette bears the S-VHS-C or VHS-C mark.
.... be aware that recording onto prerecorded tapes automatically
erases the previously recorded video and audio signals.
.... make sure the cassette is positioned properly when inserting.
.... do not load and unload the cassette
repeatedly without allowing the tape to run at all. This slackens
the tape and can result in damage.
.... do not open the front tape cover. This exposes the tape to
fingerprints and dust.
2. Store cassettes . . .
.... away from heaters or other heat sources.
.... out of direct sunlight.
.... where they won’t be subject to unnecessary shock or vibration.
.... where they won’t be exposed to strong magnetic fields (such
as those generated by motors, transformers or magnets).
.... vertically, in their original cases.
Main Unit
1. For safety, DO NOT . . .
.... open the camcorder’s chassis.
.... disassemble or modify the unit.
.... short-circuit the terminals of the battery pack. Keep it away
from metallic objects when not in use.
.... allow inflammables, water or metallic objects to enter the unit.
.... remove the battery pack or disconnect the power supply while
the power is on.
.... leave the battery pack attached when the camcorder is not in use.
2. Avoid using the unit . . .
.... in places subject to excessive humidity or dust.
.... in places subject to soot or steam such as near a cooking stove.
.... in places subject to excessive shock or vibration.
.... near a television set.
.... near appliances generating strong magnetic or electric fields
(speakers, broadcasting antennas, etc.).
.... in places subject to extremely high (over 40°C or 104°F)
extremely low (under 0°C or 32°F) temperatures.
3. DO NOT leave the unit . . .
.... in places of over 50°C (122°F).
.... in places where humidity is extremely low (below 35%) or
extremely high (above 80%).
.... in direct sunlight.
.... in a closed car in summer.
.... near a heater.
.... in dusty places such as a beach.
4. To protect the unit, DO NOT . . .
.... allow it to become wet.
.... drop the unit or strike it against hard objects.
.... subject it to shock or excessive vibration during transportation.
.... keep the lens directed at extremely bright objects for long
periods.
.... direct the eyepiece of the viewfinder at the sun.
.... carry it by holding the viewfinder or the LCD monitor*. Be sure
to hold the main unit with both hands or use the grip.
* Applicable models only.
.... swing it excessively when using the shoulder strap.
26
GR-SXM745/540U_EN
26
02.7.19, 9:25 AM
• Avoid using strong cleaning agents such as benzine or alcohol.
• Cleaning should be done only after the battery pack has been
removed or other power units have been disconnected.
• Mold may form if the lens is left dirty.
• When using a cleaner or chemically treated cloth, refer to the
cautions that came with it.
• When removing the eyepiece, be sure to hold the viewfinder
securely.
LCD Monitor
1. To prevent damage to the LCD monitor,
DO NOT . . .
.... push it strongly or apply any shocks.
.... place the camcorder with the LCD monitor on the bottom.
2. To prolong service life . . .
.... avoid rubbing it with coarse cloth.
3. Be aware of the following phenomena for LCD monitor use.
These are not malfunctions:
• While using the camcorder, the surface around the LCD monitor
and/or the back of the LCD monitor may heat up.
• If you leave power on for a long time, the surface around the LCD
monitor becomes hot.
How To Handle a CD-ROM (for applicable
models)
Declaration of Conformity
Model Number
Trade Name
Responsible party
Address
Telephone Number
• Take care not to soil or scratch the mirror surface (opposite to the
printed surface). Do not write anything or put a sticker on either
the front or back surface. If the CD-ROM gets dirty, gently wipe it
with a soft cloth outward from the center hole using a circular
motion.
• Do not use conventional disc cleaners or cleaning spray.
• Do not bend the CD-ROM or touch its mirror surface.
• Do not store your CD-ROM in a dusty, hot or humid environment.
Keep it away from direct sunlight.
:
:
:
:
GR-SXM745U/SXM540U
JVC
JVC AMERICAS CORP.
1700 Valley Road Wayne, N. J.
07470
: 973-317–5000
This device complies with Part 15 of FCC Rules. Operation is
subject to the following two conditions:
(1) This device may not cause harmful
interference, and (2) this device must accept any interference
received, including interference that may cause undesired
operation.
Change or modifications not approved by the party responsible
for compliance could void the user’s authority to operate the
equipment. This equipment has been tested and found to
comply with the limits for a Class B digital device, pursuant to
Part 15 of the FCC Rules. These limits are designed to provide
reasonable protection against harmful interference in a
residential installation. This equipment generates, uses, and
can radiate radio frequency energy and, if not installed and
used in accordance with the instructions, may cause harmful
interference to radio communications. However, there is no
guarantee that interference will not occur in a particular
installation. If this equipment does cause harmful interference
to radio or television reception, which can be determined by
turning the equipment off and on, the user is encouraged to try
to correct the interference by one or more of the following
measures:
Reorient or relocate the receiving antenna.
Increase the separation between the equipment and
receiver.
Connect the equipment into an outlet on a circuit different
from that to which the receiver is connected.
Consult the dealer or an experienced radio/TV technician for
help.
About moisture condensation . . .
• You may have observed that pouring a cold liquid into a glass
will cause drops of water to form on the glass’ outer surface.
This same phenomenon occurs on the head drum of a
camcorder when it is moved from a cool place to a warm
place, after heating a cold room, under extremely humid
conditions or in a place directly subjected to the cool air from
an air conditioner.
• Moisture on the head drum can cause severe damage to the
video tape, and can lead to internal damage to the camcorder
itself.
Serious malfunctioning
If malfunctioning occurs, stop using the unit immediately and
consult your local JVC dealer.
For Your Maintenance
1. After Use
1 Set the Power Switch to “OFF” to turn off the camcorder.
2 Open the LCD monitor to an angle of over 60 degrees. Slide
EJECT to open the cassette holder, then remove the
cassette.
This Class B digital apparatus complies with Canadian
ICES-003.
3 Close and lock the cassette holder by pressing the Close
button.
Cet appareil numérique de la classe B est conforme à la
norme NMB-003 du Canada.
4 Close and lock the LCD monitor.
5 Slide BATTERY RELEASE to remove the battery pack.
6 Attach the provided lens cap to the camcorder’s lens.
2. Cleaning The Camcorder
1 Wipe gently the exterior with a soft cloth. Put cloth in diluted
mild soap and wring it well to wipe off heavy dirt, then wipe
again with a dry cloth.
2 Open the LCD monitor and wipe it gently with a soft cloth. Be
careful not to damage the monitor. Close the LCD monitor.
3 Blow the lens with a blower brush, then wipe it gently with
lens cleaning paper.
4 Turn the eyepiece counterclockwise and pull it out.
5 Remove dust from the viewfinder using a blower brush.
6 Re-attach the eyepiece and turn it clockwise.
27
GR-SXM745/540U_EN
27
02.7.19, 9:25 AM
SPECIFICATIONS
Camcorder
LCD monitor
General
Format
Power source
: S-VHS/VHS NTSC standard
: DC 11 V
(Using AC Adapter)
DC 6 V
(Using battery pack)
Power consumption
Viewfinder on
: 4.0 W
LCD monitor on : 4.5 W
Video light
: 3.0 W
Signal system
: NTSC-type
Video recording system
Luminance
: FM recording
Color
: Converted sub-carrier direct
recording
Conforms to VHS standard
Cassette
:
/
cassette
Tape speed
SP
: 33.35 mm/sec. (1-5/16 ips)
EP
: 11.12 mm/sec. (7/16 ips)
Recording time (max.)
SP
: 40 minutes
EP
: 120 minutes
(with TC-40 cassette)
Operating
temperature
: 0°C to 40°C (32°F to 104°F)
Operating humidity : 35% to 80%
Storage temperature : –20°C to 50°C (–4°F to 122°F)
Weight
: Approx. 930 g (2.1 lbs)
(GR-SXM745 only)
Approx. 910 g (2.0 lbs)
(GR-SXM540 only)
Dimensions
: 200 mm x 112 mm x 118 mm
(W x H x D)
(7-7/8" x 4-7/16" x 4-11/16")
(with the LCD monitor closed
and with the viewfinder fully
tilted downward)
Pickup
: 1/4" format CCD
Lens
: F1.6, f = 3.9 mm to 62.4 mm,
16:1 power zoom lens with auto
iris and macro control, filter
diameter 40.5 mm
Viewfinder
: Electronic viewfinder with 0.5"
black/white CRT
White balance
adjustment
: Auto/Manual adjustment
Speaker
: 3.5" diagonally measured, LCD
panel/TFT active matrix system
(GR-SXM745 only)
3" diagonally measured, LCD
panel/TFT active matrix system
(GR-SXM540 only)
: Monaural
Connectors
Video
Audio
Digital
S-Video
: 1 V (p-p), 75 Ω unbalanced,
analog output (via Video output
connector)
: 300 mV (rms), 1 kΩ analog
output
(via Audio output connector)
: ø3.5 mm, 4-pole, mini-head jack
: Y : 1 V (p-p), 75 Ω, analog
output
C : 0.29 V (p-p), 75 Ω, analog
output
AC Adapter
Power requirement
U.S.A. and Canada: AC 120 V`, 60 Hz
Other countries : AC 110 V to 240 V`,
50 Hz/60 Hz
Output
: DC 11 V
,1A
Optional Accessories
• Battery Packs BN-V12U, BN-V20U, BN-V400U
• A/V (Audio/Video) Cable
• Compact S-VHS (
) Cassettes
ST-C-40/30/20
• Compact VHS (
) Cassettes TC-40/30/20
• Active Carrying Bag CB-V7U
Some accessories are not available in some areas.
Please consult your nearest JVC dealer for details
on accessories and their availability.
Specifications shown are for SP mode unless otherwise indicated. E & O.E. Design and specifications subject to
change without notice.
28
GR-SXM745/540U_EN
28
02.7.19, 9:25 AM