1
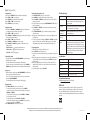
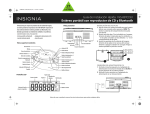
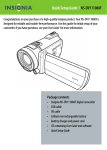
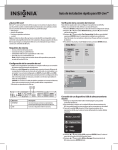
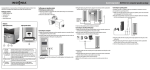
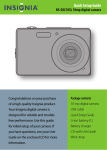
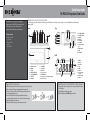
Quick Setup Guide
NS-PRCL01 Projection Clock Radio
Congratulations on your purchase of a high-quality
Insignia product. Your NS-PRCL01 represents the state
of the art in projection clock radio design and is
designed for reliable and trouble-free performance.
Step 1 Get to know your Projection Clock Radio
Check out the front, side, and back panels to familiarize yourself with button controls and connection options. See your User Manual for more information on
buttons and LED.
Front
Top
1
2
3
4
5
6
7
TUNING+/TIME+
TUNING-/TIMEPRESET+
PRESET–
VOLUME+
VOLUMEBackup battery
slot
8 DCIN 6V jack
9 ANT
10 SPEAKER
Package contents
• Projection clock radio
• AC-DC adapter
• CR2032 x 1 battery
• User Guide
• Quick Setup Guide
LED
1
2
3
4
5
6
7
RADIO ON/OFF
AM/FM
SLEEP
PRESET MEMORY
SNOOZE/DIMMER
TIME SET
ALARM 1
8
9
10
11
12
13
14
ALARM 2
PROJECT
ROTATE
Projector lens
LCD DISPLAY
Projector focus-adjustment ring
Projector unit
1
2
3
4
5
6
7
8
9
RADIO
SLEEP
SNOOZE
VOL
MEM
Alarm 2
Preset station
number
Main display
Alarm 1
Step 2 Install the backup battery
Step 3 Plug in your Projection Clock Radio using the AC adapter
Install the backup battery to maintain the correct time in case the AC power fails.
1 Make sure that the AC adapter is unplugged from the power outlet.
2 Turn your clock radio around so the back is facing forward, then unscrew
the circular backup battery cover.
3 Insert one CR2032 button cell battery (included) into the battery
compartment. Make sure that the + symbol on the battery is facing out.
4 Reinstall the backup battery slot cover.
5 Plug the AC adapter into your clock radio and a power outlet.
1 Place your clock radio in a convenient place near a power outlet within range
of the AC adapter.
2 Plug the AC adapter into the power outlet.
3 Plug the AC adapter into the DCIN 6V jack on the radio.
Step 4 Using your radio
Setting the time
1 Press and hold TIME SET until the hour blinks on the display.
2 Press TIME+ or TIME– to set the hour.
3 Press TIME SET. The minutes blink on the display.
4 Press TIME+ or TIME– to set the minutes.
5 Press TIME SET to store the setting.
Setting the alarm
1 Press and hold ALARM 1 (or ALARM 2 depending on the alarm you
are setting) until the hour blinks on the display.
2 Press TIME+ or TIME– to set the hour.
3 Press ALARM 1 (or ALARM 2 depending on the alarm you are setting).
The minutes blink on the display.
4 Press TIME+ or TIME– to set the minutes.
5 Press ALARM 1 (or ALARM 2) to store the setting.
6 Press ALARM 1 (or ALARM 2) repeatedly to set the alarm mode.
Settings include:
• Wake to buzzer— appears below the alarm icon.
• Wake to radio— appears below the alarm icon.
• Alarm off—Alarm icon disappears.
Turning off the alarm
• Press any button other than SNOOZE/DIMMER to turn off the alarm
while the alarm is sounding.
The alarm will be set for the same time the following day.
If you do not want to set the alarm for the next day, press ALARM 1 or
ALARM 2 repeatedly until the alarm icon disappears from the display.
Using snooze
• While the alarm is sounding, press SNOOZE/DIMMER. The alarm turns
back on automatically nine minutes later.
• To cancel snooze (the alarm will not turn back on), press any button
other than SNOOZE/DIMMER.
The alarm will be set for the same time the following day.
Playing the radio
1 Press RADIO ON/OFF to turn on your clock radio.
• To select the radio band you want to listen to, press AM/FM.
• To tune the radio up or down and select the station you want, press
TUNING+ or TUNING–.
• To auto search for stations, press and hold TUNING+ or TUNING–
for more than two seconds.
• To adjust the volume, press VOLUME+ or VOLUME–.
• To tune to the next preset station, press PRESET+ or to tune to the
previous preset station, press PRESET–.
2 Press RADIO ON/OFF to turn off your clock radio.
Setting and using station presets
1 Press RADIO ON/OFF to turn on your clock radio.
2 Press AM/FM to select the radio band you want to listen to.
3 Press TUNING+ or TUNING– to tune the radio up or down and select
the station you want.
4 To save the station as a preset, press PRESET MEMORY. “MEM” and “01”
blink on the display.
5 Press PRESET+ or PRESET– to select the preset number you want to
assign to that station.
6 Press PRESET MEMORY again to confirm the setting. The station is
stored in memory.
7 Repeat Steps 3 through Step 6 to store as many as ten AM presets and
ten FM presets.
8 To select a preset station, briefly press PRESET+ or PRESET– repeatedly
until you reach the station you want. “MEM” appears on the display,
along with the preset number selected and the station frequency.
Projecting the time
1 Switch off the room lights to darken the room.
2 Press PROJECT to turn the projector on.
3 Turn the projector unit slowly to aim the projected image on the wall or
ceiling.
4 If the image appears to be upside down on your wall, or upside down
on the ceiling when you are lying in bed, press ROTATE to rotate the
projected image.
5 If the image appears fuzzy and out of focus, slowly rotate the focus
adjustment ring clockwise or counter-clockwise until you obtain the
sharpest image.
6 To turn the projector off, press PROJECT.
Troubleshooting
Problem
Solution
The display is off
Make sure that the AC-DC adapter is connected
to radio and the AC-DC adapter is plugged into
a power outlet.
No sound
Increase the volume and make sure that the radio
is on and tuned to a radio station.
The sound has
interference
Make sure that the radio is not too close to a TV
or other appliance.
The LCD display
is too dim
Adjust the backlight.
Radio reception
is weak
The AM bar antenna is inside the cabinet. If AM
reception is weak, change the position of cabinet
until the internal antenna picks up the strongest
signal. The FM antenna is at the back of the cabinet.
If FM reception is weak try varying the position and
direction of the FM antenna until you find the
strongest signal.
Specifications
Power supply
DC IN 6V/0.5A
FM band
87.5 - 107.9 MHz in 200 KHz steps (USA)
AM band
530 - 1710 KHz in 10 KHz steps (USA)
Output power
1W
Speaker
2.25" x 1
Operating temp. (Max)
14° ~ 104°F (-10° ~ 40°C)
90-day limited warranty
Visit www.insigniaproducts.com for details.
FCC Part 15
This device complies with Part 15 of the FCC Rules. Operation of this
product is subject to the following two conditions: (1) this device may
not cause harmful interference, and (2) this device must accept any
interference received, including interference that may cause undesired
operation.
© 2009 Best Buy Enterprise Services, Inc. All rights reserved. INSIGNIA is a trademark of Best Buy Enterprise Services, Inc.
Registered in some countries. All other products and brand names are trademarks of their respective owners.
ENGLISH 09-0796