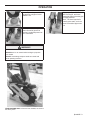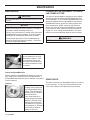
1
Operator’s manual & spare parts list.
It is the owner’s responsibility to ensure that all operators of this
machine have read and understood the content of this manual before using the product! Careless or improper use of this machine
can cause serious or even fatal injury! Allow only competent adults
to operate this machine!
K 750
SpeedMill
IPL, K750, 2007-01, 544 93 62-01
SpeedMill TABLE OF CONTENTS
Section
Page No.
Table of Contents.............................................. 2
Section
Page No.
Uses................................................................... 7
Contact Information.......................................... 2 Tools.................................................................. 7
Symbols............................................................. 3
Assembly...................................................... 7 - 8
Introduction....................................................... 4
Operation...................................................... 7 - 8
Safety Instructions...................................... 4 - 5
Maintenance.................................................... 10
What-Is-What (Part Identification)................... 6
Spare Parts............................................... 10 - 11
CONTACT INFORMATION
Husqvarna Construction Products, North America
Corporate Office
17400 West 119th Street, Olathe, Kansas 66061 USA
Corporate Office: 913-928-1000
Corp. Office Fax: 913-438-7951
www.husqvarnacp.com
For local service, please contact your local Husqvarna Construction Products representative.
Para efectuar un servicio local, póngase en contacto con su representante local de
Husqvarna Construction Products.
Pour toute réparation, contacter le représentant local de Husqvarna Construction Products.
Für Service vor Ort wenden Sie sich bitte an Ihren örtlichen Vertreter von
Husqvarna Construction Products.
Neem voor plaatselijke service contact op met uw plaatselijke vertegenwoordiger van de constructieproducten van Husqvarna.
Per assistenza, rivolgersi al rappresentante di zona della Husqvarna Construction Products.
För service på platsen, kontakta din lokala representant för Husqvarna Construction Products.
Para obter serviço técnico local, contactar o representante da Husqvarna Construction Products
Husqvarna Construction Products, North America
17400 West 119th Street, Olathe, Kansas 66061 USA
Toll-Free Telephone: 800-288-5040, Telephone: 913-928-1300, Fax: 913-438-7938
SpeedMill
KEY TO SYMBOLS
SAFETY SYMBOLS & DECALS
Key to symbols
WARNING! The machine can be a
dangerous tool if used incorrectly or
carelessly, which can cause serious or fatal
injury to the operator or others.
Please read the operator’s manual carefully
and make sure you understand the
instructions before using the machine.
Stop, in the fixed position.
Operator must wear head protection such as
a hard hat!
Other symbols/decals on the machine refer to special
certification requirements for certain markets.
Operator must wear protective footwear such
as safety shoes or safety boots!
Always wear:
•
Protective helmet
•
Hearing protection
•
Protective goggles or a visor
WARNING! Dust forms when cutting, this
can cause injuries if inhaled. Use an
approved breathing mask. Avoid inhaling
petrol fumes and exhaust fumes. Always
provide for good ventilation.
WARNING! Sparks from the cutting blade
can cause fire in combustible materials
such as: petrol (gas), wood, dry grass etc.
The operator must wear protective clothing appropriate to the work he is doing.
Never wear loose clothing or jewelry. Keep
long hair tied back. Keep your hair, clothing, and gloves away from the rotating tool!
The working area must be completely clear,
well lit and all safety hazards removed.
Any persons not involved in the work, should
leave the area.
Switch off the engine by moving the stop
switch to the STOP position before carrying
out any checks or maintenance.
Operator must wear eye protection!
Always wear approved protective gloves.
Operator must wear hearing protection!
Regular cleaning is required.
Operator must wear respiratory
protection!
(Reference OSHA 29CFR 1910.95,
1910.133-138)
Visual check.
Protective goggles or a visor must be worn.
Run position.
Stop, with the return spring to the operating
position.
FOR INFORMATION ON DECALS FOR
THE SPEEDMILL, SEE THE SPARE
PARTS LIST SECTION OF THIS DOCUMENT.
FOR INFORMATION ON DECALS FOR
THE K 750 POWER CUTTER, SEE THE
SPARE PARTS LIST FOR THE K 750.
SpeedMill SAFETY INSTRUCTIONS
Introduction
Thank you for purchasing your new machine from Husqvarna Construction Products. We have provided important
safety messages in this manual and on the machine.
Please read these messages carefully. A safety message
alerts you to potential hazards that could hurt you or others.
Each safety message is preceded by a symbol or the safety
alert symbol (
) and one of two words, WARNING, or
CAUTION.
These signal words mean:
WARNING: Indicates a hazardous situation which, if not
avoided COULD result in death or serious injury.
CAUTION: Indicates a hazardous situation, which, if not
avoided, COULD result in minor or moderate injury. It may
also be used to alert against unsafe practices.
Each message tells you what the hazard is, what can happen, and what you can do to avoid or reduce injury.
Safety Instructions:
WARNING!
Before starting up machine make sure you
completely read these instructions and the
power cutter operation manual. Be familiar with
operation of the machine before operation!
Your SpeedMill comes with two Operator’s
Manual’s. This one for the SpeedMill attachment and one for the K750 power head. It is the
owner’s responsibility to ensure that all operators of this SpeedMill have read and understood the content of both manuals before using
the product.
WARNING!
NOTICE: Indicates a hazardous situation which, if not
avoided, COULD result in property damage. Your machine
or other property can be damaged if you don’t follow this
instruction.
NEVER use a SpeedMill as a standard power cutter. A
SpeedMill is ONLY for USES listed in this document.
If the label is worn, damaged, or is illegible, it should be
replaced.
Use ONLY High Speed Reinforced Abrasive Blades with
this machine.
Contents of Package
DO NOT use carbide tipped, wood cutting, or circular
saw blades with this machine.
Verify the contents of the package:
• SpeedMill Power Cutter.
• SpeedMill Bowl Assembly: 100mm (4”), 150mm (6”), and
200mm (8”) Bowls with Hub and 2.00” Nut.
• Document Package. Operation Manual for Power Cutter, Spare Parts List for Power Cutter, Operation Manual /
Spare Parts List for Speed Mill Accessory (This Document).
If these items are not included in the package, contact our
customer service department at the telephone number
shown in this document.
Cut only PVC plastic pipe with a machine equipped with
a SpeedMill Accessory! DO NOT cut other materials.
DO NOT use diamond or rescue blades with this machine! Cutting plastics with a diamond or rescue blade
can cause kickback. The heat produced melts the
material and it sticks to the blade.
DO NOT cut ductile iron pipe with a SpeedMill.
DO NOT touch Bowl when machine is running. SpeedMill Bowl Rotates with Blade.
Before performing any maintenance, ALWAYS locate
the machine on a level surface with the engine / motor
OFF and the start switch in the OFF position, and the
power source disconnected.
EVACUATE PIPE CONTENTS before cutting; else EXPLOSION may occur. Static electricity from the cutting
operation may cause sewer or other gas within the pipe
to explode.
The working area must be completely
clear, well lit and all safety hazards
removed.
Any persons not involved in the work,
should leave the area.
SpeedMill
SAFETY INSTRUCTIONS
WARNING!
Read, understand, and follow all warnings and instructions in this and the K750 manuals. Failure to do so may result
in serious personal injury as well as damage to the equipment. It is not possible to cover all possible risk situations that
can arise in conjunction with pipe cutting and beveling within these instructions. Use common sense and caution at all
times.
Remember: “If you don’t know – don’t do.”
The SpeedMill may not be modified from its original design without the manufacturer’s approval in writing. Unapproved
modifications can result in serious injury.
All operators must be trained in the proper use of this machine. It is the owner’s responsibility to explain the content of
this manual to all operators and ensure that they receive the necessary training to safely operate this machine.
PERSONAL SAFETY
Stop, in the fixed position.
Stay alert; watch what you are doing, and use common sense when operating this SpeedMill or any other
power tool. Do not use when tired or under the influence of drugs, alcohol, or medication, or any substance that could
affect your judgment. A moment of inattention during operation may result in serious personal injury.
KEY TO SYMBOLS
or
s or fatal Keep proper footing and balance at all times. Do not overreach or operate from a ladder. Do not operate above
Other symbols/decals
on the machine
to special
chest height. If necessary
use proper scaffolding
to reachrefer
a safe
operating height.
certification requirements for certain markets.
Use personal safety equipment. Always wear eye protection, hard hat, hearing protection, non-slip safety shoes and
gloves. Respirator mask must be used when dry-cutting. (Reference OSHA 29CFR 1910.95, 1910.133-138)
carefully
Dress properly. Never wear loose clothing or jewelry. Keep long hair tied back. Keep your hair, clothing, and gloves
e
away from the rotating blade.
ine.
ng, this
an
haling
lways
g blade
erials
ass etc.
The operator must
wear protective
clothing
appropriate to the
work he is doing.
Do not use the SpeedMill if the ON/OFF switch does not turn it on or off. Have the switch replaced before the
SpeedMill is used again.
WORK AREA SAFETY
Keep the work area organized. Maintain a firm grip of the SpeedMill and have a proper footing and balance at all
times.
Do not operate your SpeedMill in an explosive atmosphere. Sparks may ignite flammable liquids,
gases, or dust. This is a concern when old pipes are being repaired.
Keep all bystanders at a safe distance. Bystanders can be a distraction that can cause you to lose control.
e stop
carrying CHOICE OF BLADE
gloves.
be worn.
Use only 12” high speed abrasive concrete cutting blades for cutting specified PVC pipe with the SpeedMill.
Use only blades designated High Speed blades with a minimum speed rating of 6300 rpm. Many blades are not made
for hand held high speed saw and they all have a lower speed rating (marked on their label) Such blades might brake
at higher speed with possible severe injury as a result.
Diamond blades shall not be used while cutting any plastic pipe due to the increased risk of “kick-back”. (Regarding kick-back see K750 operation manual).
Use of carbide tipped blades or any blade with cutting teeth, is a violation of OSHA regulations and shall never be used.
SpeedMill WHAT IS WHAT
WHAT IS WHAT (PARTS IDENTIFICATION)
A. SpeedMill BLADE GUARD: Designed specifically for
the SpeedMill. One side is open to allow mounting of the
SpeedMill Bowls. Read this Operation Manual for more
information. See SpeedMill Spare Parts List in this document for part number.
F. 150mm (6”) SpeedMill Bowl: Designed specifically for
the SpeedMill. Use for beveling 6” (150mm) plastic pipe.
Read this Operation Manual for more information. See
SpeedMill Spare Parts List in this document for part number.
B. Inner Flange: Used to support Abrasive Blade. See
K750 power cutter Operation Manual for additional instructions on this item.
G. 100mm (4”) SpeedMill Bowl: Designed specifically for
the SpeedMill. Use for beveling 4” (100mm) plastic pipe.
Read this Operation Manual for more information. See
SpeedMill Spare Parts List in this document for part number.
C. Blade Arbor Spacer: Used to support Abrasive Blade.
See K750 power cutter Operation Manual for additional
instructions on this item.
D. SpeedMill Hub: Designed specifically for the SpeedMill. Acts as an outer flange for the Abrasive Blade, and
a mounting arbor for the SpeedMill Bowls (E, F, G). Read
this Operation Manual for more information. See SpeedMill
Spare Parts List in this document for part number.
E. 200mm (8”) SpeedMill Bowl: Designed specifically
for the SpeedMill. Always install 8” (200mm) SpeedMill Bowl before using machine! Use for beveling 8”
(200mm) plastic pipe. Read this Operation Manual for
more information. See SpeedMill Spare Parts List in this
document for part number.
SpeedMill
H. SpeedMIll Hub Nut: Designed specifically for the
SpeedMill. Holds SpeedMill Bowls (E, F, G) in position.
Read this Operation Manual for more information. See
SpeedMill Spare Parts List in this document for part number.
J. Arbor Bolt Washer: Used to hold SpeedMill Hub (D) in
position. See K750 power cutter Operation Manual for additional instructions on this item.
K. Arbor Bolt: Used to hold SpeedMill Hub (D) in position.
See K750 power cutter Operation Manual for additional
instructions on this item.
Note: See K750 Power Cutter Operation Manual, and
K750 Spare Parts List for information on any other
parts of this machine. High Speed Abrasive Blade Not
Included.
USES, TOOLS, AND ASSEMBLY
Uses: Cutting and beveling of 100mm (4”), 150mm (6”),
and 200mm (8”) PVC pipe of the following types; ASTM
D2241 IPS Gasketed Pipe, and ASTM D3034 Gravity
Sewer Pipe (Type SDR 35, and SDR 26). Note that this
machine, as supplied, is not designed for cutting AWWA
C900 Municipal Water Pipe, or any non-plastic material.
WARNING!
ONLY CUT or BEVEL PVC plastic pipe with a machine
equipped with a Speed Mill Accessory!
DO NOT cut other materials with this machine!
DO NOT cut or bevel ductile iron pipe with a machine
equipped with a Speed Mill Accessory!
DO NOT use machine as a standard power cutter without proper power cutter blade guard.
Tools: 12” (305mm) Diameter Abrasive Blade, with a 1”
CAUTION!
Always install the 8” SpeedMill Bowl (P/N 542 19 6189) before using the machine! The 8” SpeedMill must
always be installed even if the machine will only be
used to cut and bevel smaller diameter pipes. Besides
serving as a beveller for 8” pipes the 8” flange is also
designed to cover the area between the guard and the
flange and to prevent unintentional contact with the
blade.
Install and Re-tighten the 2”
(50.8mm) hub nut. Torque to
130-215 in-lbs. (15-25 Nm).
NOTE: Do not tighten excessively – nut will tighten during
cutting process – making disassembly difficult.
(25.4mm) arbor (Not Included).
WARNING!
Use ONLY High Speed Reinforced Abrasive Blades with
a minimum speed rating of 6300 rpm.
DO NOT use carbide tipped, wood cutting, or circular
saw blades with this machine!
Loosen and remove the blade
shaft screw & washer from the
power cutter. Use the combination spanner supplied, and
a Screwdriver to lock the blade
shaft in position, if required.
First Time Assembly:
Tools Required:
• Screwdriver (for Arbor Lock)(Not Included).
• 2” (50.8mm) Socket, and Socket Wrench (Not Included).
• Combination Spanner (supplied with machine).
• Torque Wrench.
Unwrap SpeedMill bowl / Hub
Assembly from the packaging.
Initially all three sizes of SpeedMill Bowls (4”, 6”, 8”) are assembled to the Hub Assembly.
Change the mounted bowl
sizes if desired. Turn the 2”
(50.8mm) hub nut CounterClockwise to remove.
Lift off the smaller bowls, and
configure the bowl / hub assembly as desired. Example:
6” and 8” bowl combination is
popular. ALWAYS mount the 8”
bowl, it may shield operator in
case of blade breakage.
Use a Screwdriver to lock the
blade shaft in position. Push
the screwdriver into the slot
(see picture) and rotate the arbor until the screwdriver stops
the rotation.
Verify that 1” (25.4mm) adapter
(P/N 506 37 96-25) is pushed
onto blade shaft so it contacts
the inner flange. The mounting surfaces of the flange and
bushing arbor must be undamaged, clean, and free of debris.
Verify that the flange (P/N 506
02 87-01) has a diameter of
4.13” (105mm).
Mount a 12” (305mm) diameter, 1” (25.4mm) arbor High
Speed Reinforced Abrasive
Blade (not included) on the
blade shaft.
SpeedMill ASSEMBLY AND OPERATION
Mount the SpeedMill Bowl
Assembly. Align the slot in the
SpeedMill Hub with the face of
the shaft. Make sure the flange
face of the SpeedMill Hub contacts the face of the blade.
Install the blade shaft bolt into
the Hub Assembly.
OPERATION:
WARNING!
Before starting up machine make sure you
completely read these instructions and the
power cutter operation manual. Be familiar with
operation of the machine before operation!
WARNING!
EVACUATE PIPE CONTENTS before cutting; else
EXPLOSION may occur! Static electricity from cutting operation may cause gas or other pipe contents
to explode (for installed piping).
Using Combination Spanner,
Supplied with machine, tighten
blade shaft bolt by turning it
clockwise. Torque to 130-215
in-lbs. (15-25 Nm).
Position plastic pipe so pipe end is
off the ground. Secure pipe in place
if required. Example: Set plastic
pipe between two of the boards of a
wooden pallet.
Before starting machine,
verify that when SpeedMill
Bowl and blade is positioned
to cut / bevel the plastic pipe,
that it clears all objects in the
cutting area.
Before using the assembled machine, completely
read the power cutter operation manual supplied
with this machine.
Start machine per instructions in K750
Power Cutter Operation Manual.
Position machine at top of plastic pipe to begin cutting through
the pipe wall.
Move saw forward while
maintaining a “square cut”
on the end of the pipe. This
means the cut should always be perpendicular to the
length of the pipe.
SpeedMill
OPERATION
Rotate Pipe and repeat this cutting process until pipe circumference is cut.
Align proper SpeedMill Bowl
with end of pipe, and move
toward the pipe so that the pipe
is slightly beveled.
Note: The bevel required is
usually quite small, so do not
remove excessive pipe material.
Bevel Pipe: Position SpeedMill
Bowl near end of pipe to be
beveled. Accelerate power cutter to full throttle.
WARNING!
HOLD MACHINE ONLY at front and rear handles!
NEVER bevel or cut material while holding the pipe with
your hands!
DO NOT use blade guard pivot handle as a hand hold
while operating machine!
HOLD MACHINE ONLY at front and rear handles, as shown in
the above photo.
SpeedMill MAINTENANCE
MAINTENANCE:
CONVERTING THE SPEEDMILL TO A REGULAR POWER CUTTER.
CAUTION!
Allow SpeedMill Bowls to cool before performing any maintenance.
NOTICE!
DO NOT hold SpeedMill Bowls using a screwdriver or
other device through the slots in the bowl. Damage to
the bowls or abrasive coating could occur.
DO NOT use a screw driver or similar in the slots of the
SpeedMill Bowls to lock the blade. If you do it is likely
the flanges will be damages and become unusable.
Use the proper procedure to lock the blade when attaching or removing the blade or flanges – See below,
or see K750 Operation Manual.
The guard on the SpeedMill is designed to work together
with the special outer flange and SpeedMill Bowls used
on the SpeedMill. The 8” (200mm) SpeedMill Bowl must
always be installed when the SpeedMill is used and the
SpeedMill shall not be used for any other purpose than
those mentioned in “USES” section of this document.
Should you desire to convert the SpeedMill to a regular
power cutter you must replace the cutting head with an
original 12” or 14” cutting head attachment. We recommend you have an authorized dealer do the conversion.
WARNING!
NEVER use the SpeedMill as a regular power cutter!
When removing the Hub nut,
use a Screwdriver to lock the
blade shaft in position. Push
the screwdriver into the slot
(see picture) and rotate the arbor until the screwdriver stops
the rotation.
Inspect the SpeedMill Bowls
Always inspect the SpeedMill Bowls before you start cutting. Small nicks or scratches can be sanded smooth. If
the SpeedMill Bowl has been bent or distorted in any way it
must be replaced.
Cleaning
Plastic debris from a smaller flange often lodges itself
in the bigger flange during
cutting. This can easily be
removed once the flanges
have cooled down.
Use compressed air to
blow shavings from SpeedMill Bowl. DO NOT scrap
shavings from bowl using
a screwdriver or any other
hard metallic tool. Damage
to the bowls or abrasive
coating could occur.
10 SpeedMill
SPARE PARTS:
The parts required for the SpeedMill Accessory are shown
on the next page. For any other parts used on this machine see the power cutter spare parts list (included).
SPARE PARTS
SpeedMill 11
115 07 95-27
12 SpeedMill
2007-10