1
Howtogetthebestfrom
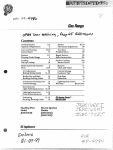
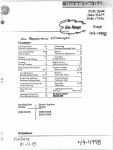
conten~
Anti-TipBracket
Appliance Registration
Care and Cleaning
clock
Control Panel
Features
—
3,5
2
Problem Solver
Repair Service
15-20
10
SafetyInstructions
Surface Cooking
15
6,7
Burners
Burner Grates
Flooring Under Range
Leveling
5
5
Control Settings
CookwareTips
Lift-Up Cooktop
Minute Timer
16
10
Drip Pans
Flame Size
Model and Serial Numbers
Oven
2
9, 10
Air Adjustment
Baking, Baking Guide
21
11,12
Broiler Pan and Rack
Broiling, Broiling Guide
16,20
14
Control Settings
Door Removal
23
23
use
andcare
of
gasmodels‘-
2-5
8
RGB744G
RGB746G_
r-.
16,20
15,20
8
8
16,20
8
8
LightingInstructions
Back Cover
Warranty
9
17
Light; Bulb Replacement
Oven Bottom Removal
10,17
17
Oven Timer
Preheating
10
11,12
Roasting, Roasting Guide
13
Self-Cleaning Operation 18, 19
I
/7;”
J-)\(/[ ,.
““ /’”
,,.,/
I
Read this bookiCarefllllye
It is intendedto helpyouoperateand
maintainyour newrangeproperly.
Keepit handy for answersto your
questions.
If youdon’tunderstandsomething
or need more help, write (include
yourphone number):
ConsumerAffairs
Hotpoint
AppliancePark
Louisville,KY40225
write down the model
and serial numbers.
You’llfind them on a labellocatedin
theburner box under the cooktop.
Seepages 6 and 7.
These numbers are also on the
Consumer Product Ownership
RegistrationCard that came with
yourrange. Beforesendingin this
card, please write these numbers
here:
fvlodelNumber
Serial Number
Use these numbers in any
correspondence or service calls
concerning your range,
If you received
a damaged
range . . .
Immediately contact the dealer (or
builder) that sold you the range.
~~.~~ ~i~@ ~~~ mOn@Ye
Before you request
service. e*
Check the Problem Solver on
page 23. It lists causes of minor
operating problems that youcan
corret;t yourself.
The CaliforniaSafeDrinking
Water and ToxicEnforcement
Act requires the GOvernorOf
California to publisl~
a listof
hOW~ to the state
substartces
tocausecancer,birthdefectsor
otherreproductive
harmand
Iequiresbusinessesto warn
customersofpotentiaIexposure
tosuchsubstances.
Gasappliancescancause
tinor exposuretofourofthese
substances,namelybenzene,
carbonmonoxide,formaldehyde
andsoot,causedprimarilybythe
incolnpietecombustionofnatural
gasorLPfuels.Properlyadjusted
burners,indicatedbya bluish
ratherthana yellowflan~e,will
minimizeincompletecolnbustio]l.
Exposuretothesesubstancescan
berninitizedfirther byventing
witi anopenwindowor usinga
ventilationfanor hood.
.+.% De not
removethe rou~~d g:~$ g~~~~~~~gp~Q~gfrom the plug. If
“w’’”
in doubt about the grounding of’
the home electricalsystem,it is
yourpersonalresponsibility
and
obligationtohaveanungrounded
outletreplacedwitha properlygroundedthree-prongoutletin
accordance withtheNational
ElectricalCode.Donotusean
extensioncordwiththisappliance.
and-
Can tip
injury could
result.To
prevent
aceidenhl
tipping
of
the
range,attach
it tothewall
or floorby
installingthe
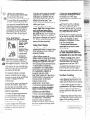
.4NTI-TIP bracket supplie&To
checkif thebracketis installed
and engagedproperly,removethe
drawer(onmodelssoequipped)
and inspect the rear lev;li~g legs.
.Makesure they fit securely into
the slot in the bracket.
For models without a storage
~rawcr, carefilly tip the range
forward to checkif theANTI-TIP
bracketis engagedwiththe
levelinglegs.
If you pull the range out from the
is
for
@BeStlre
yourrange eorr&c$!y
adjt~stedbj a qualifiedservice
technicianor insmller the
type gas (NaturalOR’LP)on
whichit tobe used.Your
rangecanbeconvertedforuseon
eithertypeofgas.
@Afterprolongeduseofa
rangeshighfloortemperatures
mayratllt and manyfloor
coveringswillnot Withswnd
thisMndofuse.Neverinstil the
rangeovervinyltileorlinoleum
thatcannotwithstandsuchtypeof
use.Neverinstallitdirectlyover
interiorkitchenca~eting.
of
is
Vsiw
Your Range
@Don9t leave Children alone or
unattended where a range is hot
or in operation.Theycouldbe
seriouslyburned.
~D@n9t
allowanyoneto
cbb9 Shnd or hangonthe door~
dmw7eror rangetop.Theycould
damagetherangeandeventipit
overcausingseverepersonalinjury.
@CAUTION:ITEMSOF
mTEwsT To CHILDMN
SHOULDNmBE smm~
@Neveruseyour appliancefor
Gr heatingtheroom.
warming
Prolongeduseoftilerange
withoutadequateventilationcan
behazardous.
e DonotlISQ
waterongrease
fires.Neverpickupa flaming
pan.Turnoffburner,then
smotherflamingpanbycovering
pancompletelywithwellfitting
lid,cookiesheetor flattray.
Flaminggreaseoutsidea pancan
withbaking
beputOUtbycov~ring
sodaor,if available,a multipurposedrychemicalor foam
typefireextinguisher.
oDonot storeflammable
materialsin an ovenor near
the Cooktope
e Donot let Cookinggrease
or other flammablematerials
aecwda@ in or new themgeo
when
Cooting
pork9
follow
e
thedirectionsexactlyandalways
cookthemeattoaninternal
temperatureofatleast170°F.
Thisassuresthat,intheremote
possibilitythattrichinamaybe
presentinthemeat,it willbe
killedandmeatwillbe safetoeat.
INcABImm
mow A
MNGEORONTm
surface Cootiw
BAcmPLmH
OFAmGG
CHILDREN
CLIMBING
ON
o Alwaysusethe LXTEposition
T14E
MNGEm REACH
whenignitingtopburners and
ITEMS
COULD
BE
SENOUSLY
INJURED. makesuretheburnershaveignited,
e Neverleave‘surfacebur~lers
Qtit
burner
grates
and
other unattendedat
m RameSettiags.
surfacesCoolbeforetoueting
them or leavingthem where
childrenCanreach them.
o N!everwear loosefittingor
hanginggarlmenkwlli~eusing
the appliaE3eee
Flammable
materia]couldbe ignitedif
broughtillcontactwithflameor
i20tovei~silrfacesandmaycause
severebtlrllst
Boilovercausessmokingand.
greasyspilloversthatmaycatch
on fire.
@~dju$t top burner n~m.esiz~
sok doesnot extendbeyol%d
tlke
edgeofthe Cooldngut&?nsil.
Excessiveflameishazardous.
!
.
.
. .
--“3
..-3
bveling theRange
in
off
fire the broilerpan, Iurn
oven,andkeepovendoorclosed
tocontainfireuntilitburnsout.
Se!f-cleanillg o~’en
*Donot cleanthe doorgasket.
Thedoorgasketis essentialfora
g~~dseal.Becarefulnotto~b,
damageormoveit.
9Donot useovencleaners.No
commercialovencleaneror oven
Iirferprotective coating of any
ltind should be used in or around
any part of the oven.
other
Yourrange, like so Kmany
household items,
isIReavyand Can
settle into
softfloor coverings
such as Cushionedvinyl or
carpeting. When movingthe range
on this type of flooring,use care.
Do notinstali the range over
kitchen Carpeting unlessyou
place an insulatingpad or sheetof
l/4-inch-thickplywoodbetween
the rangeand carpeting.
mentheJoor coveting ends atthe
front o~therange, the area that the
range will rest on shouldbe built up
with plywoodor similar materialto
the same levelor higher than the
floor covering.This will allowthe
rangeto be movedfor cleaning or
servicing.
@Rem.Gl’ethe broiler pan and
other eoo!i~~arebefore selfcleaning the oven.
5
LevelingIegsare locatedon each
corner ofthe baseofthe range.
Removethe bottomdrawer(on
modelsso equipped)and youcan
levelthe ~angeorIan uneverifloor.
To remove drawer, pull drawer
out all the way,tilt up the front
and hke it out. To replace drawer?
insert glides at back of drawer
beyondstopon rangeglides. Lift
drawerif necessary to insert easily.
Let front of drawerdown, then push
into close.
Bothof the rear levelinglegswill
engagethe ANTI-TIPbracket(allow
for some side to side adjustment).
Allowa minimumclearance of 1/8”
between the rangeand the leveling
legsto permit installationintothe
ANTI-TIP bracket.
b
ModelRGB744GEJ
6
.,
i Mocleland Serial Numbers
(in burner box under cooktop)
1
2
e
8
4
8, 15, 16
4
2 Surface Burner Controls
3 Surface Burners, Grates and Chrome
Drip Pans
4 OVEN SET Control
9
5 OVEN TEMP Control
9
6 AutomaticOven Timer,
Clock and Minute Timer
10
e
7 Oven “On” Indicator
9
e
8 Cooktop Light
8
18
9 Door Latch
18
10 Door Locked Indicator
I 11
Oven Cleaning Indicator
18
I 12 Cooktop Light Switch
8
[ 13 Oven Vent
9
14 Oven Interior Light
--~ i 15 Oven Light Switch
,.Lsr
.m.$
(lets you turn interior oven light on and of~
@l
9
16 Oven Shelves
(easily removed or repositioned on
shelf supports)
9, 17
I 17
Oven Shelf Supports
I 18 Broiler Pan and Rack
~
19 Removable Oven Door
(easily removed for oven cleaning)
e
9
2
9
I
17,20
17
I
Q
e
@
@
, 20 Lift-Up CooktoP
(locks ;n up position to simplify cleaning
underneath)
21 Removable Oven Bottom
2
17
.-‘~ Storage Drawer
3,5
23 Anti-Tip Bracket
(see Saiety Instructions)
..
3.5
7
@
1.
I
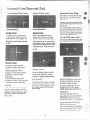
AutomaticIgnition
Yoursurface burners are lighted
by electric ignition, eliminatingthe
need for standing-pilotlightswith
constantlyburning flames.
In ease of a power outage, you can
light the surface burners on your
range with a match. Hold a lighted
match to the burner, then turn the
knob to the LITE position. Use
extreme caution when lighting
burners this way.
Surface burners in use when an
electrical power fai~ureoccurs will
continue to operate normally.
surface
Burner
Controk
Knobs that turn the surface burners
on and off are located on the lower
control panel and are marked as to
which burners they control.
To Light a
I
surface
Burner
1
Push the control knob in and turn
it to LITE. Youwill hear a little
clicking noise—the sound of the
electric spark igniting the burner.
~ Be sure the burners and grates are
cool before youplace your hand, a
po~holder,cleaningclothsor other
materials on them.
size
How”toselectFlame
The flame size on a gas burner
shouldmatch the cookwareyou
are using.
—
Cast Iron: If heated slowly,most
skillets will give satisfactoryresults.
NEVER LET THE FLAME
EXTEND UP THE SIDES OF
THE COOKWARE. Any flame
larger than the bottom of the
cookware is wasted and only serves
to heat the handles.
When using
aluminum or
aluminum-clad s~inless steel
pok and pans,adjust the flame so
the circle it makes is about 1/2inch
smaller than the bottom of the
cookware.
When boiling, use this same flame
size—1/2inch smaller than the
bottom of the cookware—nomatter
what the cookwareis made of. Foods
cook just as quickly at a gentle boil
as they do at a furious rolling boil.
A high boi~creates steam and cooks
awaymoisture, flavor and nutrition.
Avoidit except for the few cooking
processeswhich ned a vigorousboil.
when frying
or warming foods
instainless steei9‘castironor
enamelware~ keep the flame down
lower—toabout 1/2the diameter
of the pan.
when frying
inglass or ceramic
coioiw~me,lowertheflameevenmore.
I-.__.-.
Aluminum: Medium-weight
cookwareis rwommendd bwause it
heatsquictiy andeverdy.Mostfoods
brownevel~lyin an aluminumskillet.
Mineralsin foodand waterwill stain
but will not harm aluminum. A
quick scour with a soap-filledwool
pad after each use keeps aluminum
cookwarelookingshiny new. Use
saucepanswith tight-fittinglids for
cookingwith minimumamounts
of water.
Enamelware: Under some
conditions, the enamel of some
cookwaremavmelt.Followcookware
.
manufacturer’srecommendations
for cookingmethods.
Glass: There are two types of glass
cookware-those for ovenuse only
and those for top-of-rangecooking
(saucepans, coffee and teapots).
Glass conductsheat very slowly.
HeatproofGlass Ceramic: Can
be used for either surface or oven
cooking. It conducts heat very
slowly and cools very slowly.
Check cookware manufacturer’s
directions to be sure it can be used
on gas ranges.
S@inIessSteel: This metal alone
has poor heating properties, and is
usually combined with copper,
aluminum or other metals for
improved heat distribution.
Combination metal skillets usually
work satisfactorily if they are
used with medium heat as tl~e
manufacturer recommends.
The light comes on automatically
when the oven door is opened. For
model RGB746,use the switch o~~
the upper control panel to turn t!~e
light on and off when the door is
closed.
n
..
,’
:
13Mrner
on your rangetirelighted
The ovenand
by electricignition.
be operatedinthe
broilercannot
eventofa powerFailuree
To light the burners, push in and
turn the OVEN TEMP knob to the
desired temperature. The burner
should ignitewithin 60 seconds.
CAUTION: DO N~ MAKE ANY
ATTEMPT ~ OPERATE THE
ELEaNc
IGNITION OVEN
DUWNG AN ELE~MCAL
POWERFAILURE. Resumption
of electrical power when OVEN
TEMP and OVEN SET controls
are in any position other than OFF
will result in automatic ignitionof
the ovenor broiler burner and
could cause severe burns if, at the
time, you were attempting to light
the burner with a match.
A burner in use when an electrical
power failure occurs will continue
to operate normally.
Before using
Your oven
Be sure you understand how to set
the controls properly. Practice
removing and replacing the shelves
while the oven is cool. Read the
information on the followingpages,
and keep this book handy.
Oven controls
The controls for your oven
are marked OVEN SET and OVEN
TEMP.
BA~—Use this settingfor ali
normal oven operations—for
example,for cookingroasts or
casseroles. Only the bottom oven
burner operates during baking.
BROI&Use this settingfor
broiling. Only the top (broil)
burner will operate.
TWD BA-Use
this setting
to turn the oven on and off at
specified times when you want
cooking to start and stop. See
AutomaticOven Timer on next
page.
CLE~—Use this settingfor the
self-cleaningfunction ody.
0~—Shuts off power to the oven
controls. Oven will not operate.
The OVEN SET and OVEN TEMP
controls should be turned to OFF
whenever the ovenis not in use.
The O~N TEW control
maintains the temperature you set
for normal oven operation as well
as for broiling.
For normal oven operation, push
in and turn the knob to the desired
temperature which is marked in 25°
increments. It will normally take
30 to 60 seconds before the flame
comes on.
After the oven reaches the selected
temperature, the ovenburner cycles
—offcompletely, then on with a
full flame-to keep the oven
temperature controlled.
~~~~ “~n”
Indicator
Light on upper control panel glows
when oven is in operation; it goes
out when the OVEN SET knob is
turned to OFF.
oven
.
.‘1.
sheIR~es
The shelvesarc designedwith
stop-locksso when placed correctly
on the shelf supports,they will stop
beforecoming completelyout of
the ovenand will not tilt when you
are removing foodfrom them or
placing food on them.
When placing cbokwareon a shelf,
pt~llthe shelf out to the “stop”
position. Place the cookwareon
the shelf, then slidethe shelfback
into the oven. This will eliminate
reaching into the hot oven.
‘~or~movea shelffrom the oven,
pull it out to the stop position, lift
up on front and pull out.
shelf Positiom
The ovenhas five shelf supports—
A (bottom),B, C,D andE (top).Shelf
positior~sfor cooking are suggested
on Baking and Roastingpages.
oven vent
Youroven is ventedthrough ducts
at the rear of the range (seepage 6).
Do not block these ducts when
cooking in the oven—itis important
that the flow of hot air from the
oven and fresh air to the oven
burners be uninterrupted.
~ vent openings and nearby
surfaces may become hot. Do not
touch them.
@Handles of pob and pans on the
eooktop may become hot if Reft
too Closeto the vent.
This Timer will automaticallystart
and stop your ovenfor you. Here’s
what YOU
do:
.
1. Make sure both your rangeclock
and the STARTdial showthecorrect
time of day.
MOdel
RGB746GEH
Nlodel
RGB744GEj
Radial clock
To set the clock, push the knob
in and turn the clock hands to the
right to the col~ecttime. Then let
the knobout and continue turning
to OFF.
Push in the center knob of the
Minute Timer and turn the knob
in either direction to set the digital
clock numerals to the correct time.
(The Minute Timer is the large dial
to the leftof the digiti clock.)After
settingthe clock, let the knob out
and turn the Minute Timer pointer
to OFF.
2. Set the STARTcontrol. Push in
and turn the STARTknob to the time
youwantthe ovento turn on. of you
w-antit to startoperatingimmediately,
do not set the STARTtime.)
3. Set the STOP control, Push in
and turn the STOP knob to the time
you want the ovento turn itself off.
Minute mmer
The Minute Timer has been
combined with the range clock.
Use it to time all your precise
cooking operations. You’ll
recognize it as the pointer which
is different in color from the
clock hands.
To set the Minute Timer, turn
the knob to the left, wi~hout
pushi}zg
ill, until the pointer reaches the
number of minutesyou want to time.
(Upto 60).
At the end of the set time, a buzzer
sounds to tell you time is up. Turn
the knob, withoutpushil}gir2,until
the pointer reaches OFF and the
i>uzzerstops.
————-.——
.—
.-
Minute mmer
To set the Minute Timer, turn the
center knob clockwise, withou~
pushi~zg
irz,untilthe pointerreaches
the number of minutes you want to
time (up to 60).
At the end of the set time, a buzzer
sounds to tell you time is up. Turn
the knob, withoutpushingin, until
the pointer reaches OFF and the
buzzer stops.
Note: There must beat least a
half-hour difference between the
START and STOP dials for the
automatic control to work.
% Set the OVEN SET knob to
TIME BAKE and the OVEN
TEMP knob to the desired oven
temperature.
The oven will turn itself o~~
immediately, or at a later START
time that you set if you have set
the START control. It will operate
at the temperature you selected,
and it will turn itself off at the
STOP time you have set.
After oven operation is completed.
be sure to ttlrn the G{EFJ TEldP
and OX=ENSET knobs to OFF.
-.
..
Baking
2. Close ovendoor. Turn OVEN
SET knobto B~
or TIME BA~
and OVEN TEMP knob to desired
temperature,Preheat ovenfor at
least 15minutes if preheatingis
necessary,
3. Place food in ovenon center
of shelf. Aliow at least 2 inches
between edge of bakewareand oven
wallor adjacent cookware.
If cooking on two shelvesat the
same time, place shelvesabout 4
inches apart and staggerfood on
them.
4. Check food for doneness at
minimum time on recipe, Cook
longer if necessary. Switch off
heat and removefood.
Preheating
Preheating is very importantwhen
usingtemperatures below225°F.
and when baking foodssuch as
biscuits, cookies, cakes and other
pastries.
Preheating is not necessary when
roasting or for long-time cooking of
whole meals.
shelf Positions
Most baking is done on the second
shelf position (B) from the bottom.
When baking three or four items,
usc two shelves positioned on the
second and fourth sets of supports
(B& D) from bottom of oven,
Bake angel food cakes on first she~f
mps
cAms
cake riseshigheron One side
@Followa testedrecipeand
measurethe ingredientscarefully.
If youare usinga packagemix,
followlabeldirections.
@Do not open the ovendoor during
a bakingoperation—heatwillbe lost
and the bakingtimemightneedto
be extended.This couldcausepoor
bakingresults. If youmust openthe
door, open it partially-only 3 or4
inches—andcloseit as quicklyas
possible.
@Do not disturb the heat circulation
in the ovenwiththe useofaluminum
foil. If foilis used, place a small
sheet ofit, about 10by 12inchesat
the most, on a lowershelf several
inchesbelowthe food. Do not place
foilon the ovenbottom.
~Batterspreadunevenlyin pan.
~Ovenshelvesnotlevel,
* Usingwarpedpans.
@Incorrectpan size.
Cakescrackingon top
~Oventemperaturetoo high.
~Battertoo thick, followrecipe
or exactpackagedirections.
~Check for proper shelfposition.
* Checkpan sizecalledforin recipe.
~Improper mixingofcake,
cake falls
@Toomuch shortening,sugaror
liquid.
~ Check leaveningagent, baking
powderor bakingsodato assure
freshness. Makea habit to note
expirationdatesof packaged
ingredients.
@Cake not bakedlong enoughor
at incorrecttemperature.
@If addingoil to a cake mix, make
certain the oil is the type and
amountspecified.
common Baldng Boblem
and PossibleSolutiom
pm
Burning
around
edges
@Oventoo full; avoidovercrowding.
@Edges of crust too thin.
~Incorrect bating temperature.
crust is hard
Bottom crust soggyand unbaked
~ AIIOW crust and/or fillingto COO1
sufficientlybefore fillingpie shell.
@Filling may be too thin orjuicy.
* Filling allowedto standin pie shell
beforebaking. (Fill pie shelis and
bake immediately.) ~Ingredients and proper measuring
affect the quality ofthe crust. Use a
tested recipe and goodtechnique.
Make sure there are no tiny holes or
tears in a bottom crust. “Patching”
a piecrust could cause soaking.
cake hassoggylayeror Strealw
atbottom
@Check temperature.
e Check shelfposilion.
~ Undermining ingredients.
~ Shorteningtoo softfor proper
creaming.
~Toomuch liquid,
eooHEs
&Blscmm
Doughycenter;
heavy cruston
surface
@Check temperature.
o Check shelf position.
QFollowbaking instructions
carefully as given in reliable recipe
or on conveniencefood packag~.
QFlat cookie sheetswill give more
evenbaking results. Don’tovercrowd
foods on a baking sheet.
~ Convenience foodsused beyond
their expiration date.
He fillingruns over
QTopand bottom crust not well
sea~edtogether.
QEdges of pie crust not built up
high enough.
GToomuch filling.
QCheck size of pie plate.
Bro}vning more noticeable on
oneside
QOven door not closed.properly,
check gasket seal.
~ Check shelf position.
...... .. .
— —.. .
“
.-
—-.
.—
——.—_
__———.
._-.
—
.———
..—-—
—..—.———. .—.——-—
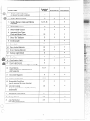
1. Preheatingisvery important 2. Aluminumpans conductheat
whenusingtemperaturesbelow
quickly.For most conventional
225”F.and-wheIibaking foods
such as biseuits9aookies9cakes
and other pastries. Preheat the
overtfor at least 15minutes.
Preheating is not necessary when
roastingor for long-timecooking
of whole meals.
baking, light, shinyfinishesgive
best results becausetheyhelp
preventoverbrowning.We
recommend dull bottomsurfaces
for cake pans and pie plates.
Shelf
Wsitions
Oven
Temperatures
~me,
Minutes
ShinyCookieSheet
B, C
400°-4750
15-20
B, A
350°-4000
20-30
B
B
400°-4500
350°
20-40
45-55
Preheat cast iron pan for crisp crust.
Muffins
Popovers
ShinyMetal Pan with
satin-finishbottom
Cast Iron or Glass Pan
ShinyMetal Pan with
satin-finishbottom
ShinyMetal Muffin Pans
Deep Glass or Cast Iron Cups
A, B
B
400”-425°
375°
20-30
45-60
Quick loaf bread
Yeastbread (2 loaves)
Metal or Glass Loaf Pans
Metal or Glass Loaf Pans
B
A. B
350°-3750
375°-4250
45-60
45-60
Decrease about 5 minutesfor muffin mix.
Or bake at 450”F.for 25 minutes, then at
350”F.for 10to 15minutes,
Dark metal or glass givesdeepest
browning.
Plain rolls
Sweetrolls
Cakes
[withoutShofiening)
4nge1food
felly roll
sponge
Zakes
lundt cakes
;upcakes
‘ruitcakes
ShinyOblong or Muffin Pans
ShinyOblong or Muffin Pans
A, B
B. A
375°-425”
350°-3750
10-25
20-30
For thin rolls, Shelf B maybe used.
For thin rolls, Shelf B maybe used.
41uminum~be Pan
WetalJelly Roll Pan
Metalor Ceramic Pan
A
B
A
325°-3750
375°-4000
3~5°-3500
30-55 Twopiece pan is convenient.
10-15 Line pan with waxedpaper.
45-60 —
tietal or Ceramic Pan
;hinyMetal Muffin Pans
detal or Glass Loaf or
/ Tube Pan
;hinyMetal Pan with
atin-finishbottom
hiny Metal Pan with
atin-finishbottom
4etalor Glass Loaf Pans
A, B
B
A, B
325°-3500
350”-375°
275°-3000
45-65
20-25
2-4 hrs.
B
350°-3750
20-35
B
350°-3750
~5-30
B
350°
40-60
fetill or Glass Pans
‘ookieSheet
B, C
B. C
325°-3500
350”-400°
25-35
ookie Sheet
ookie Sheet
B, C
B. c
400°-4250
375°-4000
A, B, C
B
350°-4000
300°-3500
B
325°
Food
Bread
Biscuits(%-in. thick)
Cookware
Coffeecake
Corn bread or muffins
Gingerbread
Layer
I
3. Dark or non-shinyfinishes, also
glass and Pyrocerarn@cookware,
generallyabsorb heat which may
result in dry, crisp crusts. Reduce
ovenheat 25°F.if lightercrusts are
desired. Rapid browningof some
foodscan b=achievedby preheating
cast iron cookware.
r
Layer,chocolate
Loaf
Cookies
Brownies
Drop
Puddings, rice
:indcustord
lass or Metal Pans
Glass Custar[iCups or
Casserole (set in pan of hot water)
Glass Custard Cups or
Cusserole
E’ies
l~rozcn
N4erin/]uc
Foil Pan on Cookie Sheer
Spread to crust edges
A
B, C
Ghiss or Satin-finish N4cQIPan
Gl;lss or Satin-finish Metal Pan
Giass or Satin-finish NletalParr
A, B
B
B
Bfikcci~pp{CS
Custard
! one crust
‘~w’o
crust
shell
I R]stry—.—.—-—..——
1=,1!2,,,,),15
Baked potatoes
Scollopcd dishes
souffles .—.—
I
Set on Oven Shelf
Gi:lss or fvictall>an
Glass Pan ——.
10-20
Comments
Canned, refrigeratedbiscuitstake2 to 4
minutesless time.
Paper liners produce more moist crusts.
Use 300°F.and Shelf B for small or
individualcakes.
If baking four layersuse
shelves B and D.
Bar cookies from mix use same time.
Use Shelf C and increase temperature
25 to 50*F.for more browning.
6-12
7-12
30-60
30-60 Reduce temperature to 300°F. for large
custard.
50-90 Cook bread or rice pudding with cusmrd
base 80 to 90 minutes.
—
I
400°-4250
325”-350°
45-70
15-25
400°-4250
400°-4250
45-60
40-60
13-16
450°
1
A. B. C
A, B, c
IB
I
325°-4000 60-90
325°-375” 30-60
300°-3500
30-75
Large pies use 400”F. and increase time.
To quickly brown meringue use 400”F. for
9 to 11minutes.
Custard fillings require lower temperature,
longer time.
Increase time for large amount or size.
~,
~,
E
p.
~=r
. ,i~+
.,.
s..” ,7 R+$
....!.
?: Roastingis cookingby dry heat.
. ,-; .,“...,..--- Tendermeat or poultry can be
::-, w-:&>--—:
-:
roasted uilcoveredin your oven.
?-----7+
--.
%$A, Roastingtemperatures, which
,—:
..-c “=~@should be low and steady,keep
.
spatteringto a minimum. When
—-----i
roasting, it is not necessary to sear,
baste, cover, or add water to your
meat. Roastingis easy,just follow
these steps:
~G-
~- ;::-,:.?
Step 1. Position ovenshelf at
sec;nd from bottomposition (B)
for small size roast (3 to 5 lbs.) and
at bottomposition (A) for larger
roasts.
Type
Step 2: Check weightof roast.
Place meat fat-side-upor poultry
breast-side-upon roastingrack in a
shallowpan. The melting fiatwill
bastethe meat. Selecta pan as
close to the size of meat as possible.
(Broilerpan with rack is a good
pan for this.)
Step 3: firn OVEN SET to BAKE
and OVEN TEMP to desired
temperature. Check the Roasting
Gu;de for temperaturesand
approximatecookingtimes.
Oven
Temperature
Doneness
Meat
Tender cuts; rib, high quality
sirloin tip, rump or top round*
325°
Lamb leg or bone-in shoulder*
325°
Vealshoulder, leg or loin+
Pork loin. rib or shoulder*
‘I~nI,pre-cooked
325°
325°
325°
Rare:
Medium:
WellDone:
Rare:
Medium:
WellDone:
Well Done:
Well Done:
To Warm:
-iam, raw
‘For boneless rolled roasts over 6-inches
hick, add 5 [o 10minu[cs pcr lb. to times
iven above.
325”
Well Done:
325°
375°
WellDone:
Well Done:
325°
Well Done:
Poultry
chicken or Duck
~hicken picccs
rurkcy
..—
Step 4: Most meatscontinueto
cook slightlywhilestandingafter
being removedfrom the oven.For
rare or mediuminternaldoneness,
you may wish to removemeat from
the ovenjust beforeit is done if it is
.—=W
_=._...
.to stand 10to 20 minuteswhile you -...
makegravyor attendto other foods.
If no s~nding is planned, cook
meat to suggestedtemperature.
mozen
Roasts
Frozen roasts of beef, pork,
lamb, etc., can be started without
thawing,but allow 15to 25 minutes
per pound additionaltime (15
minutesper pound for roastsunder
5 pounds, more time for larger
roasts).
Thaw most frozen poultry before
roasting to ensure even doneness.
Some commercial frozen poultry
can be cooked successfullywithout
thawing. Followdirections given
on packer’slabel.
Approxin]ateRoastingTime
in Minutes per Pound
6 to 8-lbs.
3 tO5-lbs.
18-22
24-30
22-25
30-35
28-33
35-45
20-23
21-25
24-28
25-30
28-33
30-35
30-40
35-45
30-40
35-45
17-20minutes per lb. (any weight)
10to 15-lbs.
Under 10]bs.
27-35
24-27
3 to 5-!bs.
35-40
30-35
10 to 15-lbs.
18-23
Over 5 Ibs.
30-35
Over 15lbs.
15-20
Internal
Temperature“F
130°-1400
150°-1600
170°-1850
130°-1400
150°-1600
170°-1850
170°-1800
170°-180°
115°-1250
170°
185°-1900
185°-1900
In thigh:
18s0-1900
Broilingis cookingfood by direct
heat from abovethe food. Your
range is designedfor waist-high
broiling.A speciallydesigned
broiler partand rack allows
dripping fatto drail~awayfrom the
foodsand be kept awayfrom the
high heat of the gas flame.
The oven ~OOF ShOU~~ be c]osed
during broiling.
Broiling
Guide
Food
Bacon
How to Broil
1. If meat has fat or gristle near the
edge, cut vertical slashes through it
about 2 inches apart, but don’tcut
into meat. Werecommend that you
trim fat to prevent excessive
smoking, leavinga layer about
I/$-inch thick.
2. Arrange food on rack and
position the broiler pan on the
appropriate shelf in the oven.
Placing food closer to flame
increases exterior browning of
food, but also increases spattering
and the possibility of fats and meat
juices igniting.
3. Close the oven door but do
not latch it. If the door latcl~is
mO~edtOthe Fi~~t ~U~i~~ ~ ~~Oi!
the door may lock and
o~~F~tio~,
you may not be able to open it until
the oven cools.
4. Turn OVENSET knob to BROIL.
For most foods, turn OVEN TEMP
knob to BROIL. Note: Chicken
and ham are broiled at a lower
setting in order to cook food
through without over-browning it.
5. Turn most foods once during
cooking (the exception is thin fillets
of fish; oil one side, place that side
downon broilerrack and cookwithout
turning until done). Time foods for
about one-half the total cooking
time, turn food, then co~~tinueto
cook to preferred doneness.
6. Turn OVEIYSET’and 0~/EIKT
TEltiIPkrlobsto OFF. Remove
broiicr pan from oven and serve
food immedi~tely. ~.eavcpan
outsi~c
the oven tO COO].
@steak and Chopsshould he at
least 1 incl~thick for best broiling
results. Pan broil thinner ones.
pierced m~atlosesjuices.
GroundBeef
WellDone
Beef Steaks
Rare
Medium
WellDone
Rare
Medium
WellDone
Quantity
andlor
Thickness
IA-IL).
(about8
thin slices)
l-lb. (4patties)
‘/zto %-in.thick
1stSide 2nd Side
Time,
shelf
Time,
Position Minutes Minutes
Comments
Arrangein singlelayer,
D
I
I
Spaceevenly.Up[09 patties
takeaboutsame time.
c
+
c
c
c
B,c
9
12
13
B, C
B
1whole
(2t02Yz-lbs.),
split lengthwise
Steakslessthan l-inchcook
throughbeforebrowning.
Panfryingis recommended.
Slashfat.
15
25
7
5-6
8-9
6-7
9-12
16-18
B
25-30
25-30
Reducetimes about 5 to 10
mim~tesper side for cut-up
chicken.Brusheach sidewith
meltedbutter. Broilwith skin
sidedownfirst.
2-4 slices
1pkg. (2)
2-split
D
2-3
D
3-6
hbster Tails
(6 to 8-oz. each)
2-4
c
14-17
Do not
turn
over.
Cutthroughbackofshell,spread
open. Brushwith meltedbutter
beforeand after half time.
Fish
l-lb. fillets X to
1~-in,thick
c
5
5
Handle and turn very carefully.
Brushwith lemon butterbefore
and during cooking if desired.
Preheat broiler to increase
browning.
B. C
8
8
Increase times 5-10minutesper
side for 1‘/~-inchthick or home
cured.
Chicken (450°)
Bakery Products
Bread (Toast)or
ToasterPastries
English Muffins
l-in. thick
(1to 1X-lbs.)
l~_in. thick
(2to2‘h-lbs.)
Ham Slices (450°; l-in. thick
Precooked
Pork Chops
Well Done
timb Chops
Medium
WC]!Done
Medium
WellDone
)Vieners,
similar precooked
sausages.
bratwurst
2( fiin. )
2 (1-in.thick),
about 1lb.
c
c
2(1 in.)
about IOto 12-oz
2(l%in.).
about 1lb.
B
B
l-lb. pkg. (10)
C, D
10
10
13
1/2-2
4-5
11-13
Spaceevenly.Place English
muffinscut-side-upand brush
with butter if desired.
Slash fat.
—
B
B
8
4-7
10
10
17
10
4-6
12-14
Slash fat.
If desired, split sausages in half
lengthwise; cut into 5 to 6-inch
pieces.
Proper care and cleaningare
importantso your range will give
youefficientand satisfactory
service. Followthese directions
carefullyin caring for it to help
assuresafe<andpropermaintenance.
Beforecleaningany part of your
range (exceptfor operatingthe selfcleaningcycle), DISCONNECT
ELECTRICPOWERTo THE
RANGE at the fuse box or circuit
breaker panel, or pull the range
power cord plug from the electric
outlet.
control
mneb
It’sa good idea to wipe the control
panels clean afier each use of the
oven.For a more thoroughcleaning,
the control knobs can be pulled off
the knob stems and the glass upper
control panel can be cleaned on
both sides.
When the range is cool, wash the
enamel finish with mild soap and
water or a mild abrasivecleanser
applied with a damp cloth. Rinse
the surface with clean water and
dry with a soft cloth, If you wish,
occasionallyapply a thin coat of
mild cleaning wax to help protect
the finish.
There are a number of precautions
you can take to avoidmarring the
surface of the range and to prevent
it from becoming dull. Don’t slide
heavy pans across it. If you spill
foodswith a lot of acid (tomatoes,
sauerkraut, fruit juices, etc.) or
foods with high sugar content,
clean them up as soon as possible.
If allowedto remain, these foods
could cause a dull spot. Also, no
matter how stubborn the food stain,
never use harsh abrasive cleansers.
They could permanently damage
the enamel surface.
surface Li@t
(ModelRGB746GE~
1
To remove the glass panel:
1. Disconnect power to the range.
2. Removethe screw on each end
of the backsplash.
3. Removethe black metal strips
on each end that hold the glass in
place,
4. Remove the control knobs, clock
knobs and screws securing the light
switches.
5. Carefully remove the glass and
place it on a smooth, fiat surface.
Clean it with mild soap and water,
~i~]sewith clean water and dr--with
:i soft cloth.
CaEItio12:Do not use abrasive
cleansers. strong liquid cleaners or
~>vencieaners on glass or enamel
~’~ntrolpanel surf~ces-—theywill
~jalllagethe tlnish.
1
WHEN CHANGING A SURFACE
LAMP, DO N~ ~UCH THE
METAL AT ENDS OF LAMP.
Yoursurface lamp is easily
replaced with a fluorescent tube of
the same wattage. Make sure power
to the range is disconnected at the
main fuse or circuit breaker panel
or pull the power cord plug from
the electric outlet.
To replace, place fingerson top
near each end of the 1ight tube.
Press the bulb gentlyinto the slots
and rollthe top of tubegentlytoward
the back of the range until it stops.
Then mo~~e
the lamp cover down.
Grates should be washed regularly
and, of course, after spillovers.
Washthem in hot, soapy water and
rinse with clean water. Dry the
grates with a cloth—don’tput them
back on the range wet.
To get rid of burned-on food, soak
the grates in a slightlydiluted
liquid cleanser.
Although they’redurable, the
grates will gradually lose their
shine, regardless of the best care
you can give them, This is due to
their continual exposure to high
temperatures.
Do not operate a burner for an
extended period of time without
cookware on the grate. The finish
on the grate may chip without
cookware to absorb the heat.
When replacing a
pair of grates,
the irregular
sides should
interlock in
the middle as +
shown at right.
Range‘FopBurners
Lift-up cookto~l
The holes in the burners mustbe
keptclean at all times for proper
Clean the area under the cooktop
often. Built-upsoil, especially
grease, may catch fire.
i~nition
flame.
and an even,
unham~er~d
I
/
I
~lean the burners routinely and
es~ecially after bad s~illo~ers
\vhich could clog these holes.
Burners lift out for cleaning.
Note: Two screws hold each burner
pair in place to keep them from
wobblingaround during ship~ment.
Removeand discard the shipping
screwsand lift the burners up and
out. This disengagestherrlfrom the
mountingbracket under each
burner pair.
Toremove burned-on food, soak
the burner in a solution of a product
usecifor cleaningthe insideof coffee
makers. Soak the burner for 20 to
30 minutes. lf the food doesn’t
rinse off completely, scrub it with
soap and water or a mild abrasive
cleanser and a damp cloth.
Do not attempt to clean burners in
an automatic dishwasher. Loosened
foodsoil can clog burner holes,
:~ndthe caustic action of the
dishwasher detergent can damage
[he bulner heads.
Bef{>reputting the burner back, dry
it thoroughly by setting it in a warm
~>ven for SO minutes. Then place it
I)acki~~the range, making sure it is
~}roper~y
seated on the mounting
~lr:~ckct
and is level.
Removethe grates and lift out the
chrome drip pans. Washthem in
hot, soapy water. Rinse them with
clean, hot water and polish them
dry with a cloth. Never use
abrasivecleaner or steel wool—
they’llscratch the surface. Instead,
soak the drip pans for about 20
minutesin slightlydiluted liquid
cleanser or mild solution of
ammonia and water (1/2cup of
ammonia to one gallon of water).
Afier soaking, wash them in hot,
soapy water. Rinse with clean water
and polish with a clean, soft cloth.
Do not attempt to clean the drip
pans in the self-cleaningoven.
When replacing
drip pans, the
notch on the rear
pan and the notch
on the front pan
should meet in
the middle. +
To make cleaning easier, the entire
cooktop maybe lifted up and
supported by lockingarms that
catch and hold the top when it’sall
the wayup.
Be sure ail burners
are turned off
before raising the eooktop. Then
removethe grates and drip pans,
grasp the front sides of the cooktop
and lift.
After cleaning under the cooktop
with hot, mild soapy water and a
clean cloth, put the cooktop back in
place. Lift up a little to release the
locking arms and push them in
while guiding the top back down.
Be careful not to pinch your fingers.
Broiler
Pan & Rack
After broiling, remove the broiler
rack and carefully pour off the
grease. Wash and rinse the pan
and rack in hot, soapy water.
If food has burned on, sprinMe the
broiler rack whalehot with detergent
and cover with wet paper towels or
a dish cloth. Burned-on foods will
then soak loose while the meal is
being served.
Do not store a soiled broiler pan
and rack in the oven. Never attempt
to clean them in the oven during the
self-cleaning cycle.
,..
. ,.,~
Ovenshelves may be cleanedwith a
mildabrasivecleanserfollowing
manufacturer’sdirections.After
cleaning,rinse theshelveswith
clean waterand dry witha clean
cloth. Toremoveheavy,burned-on
soil, soapymetalpads maybe used
followingmanufacturer’sdirections.
Aftersc~ubbing,washwithsoapy
water,rinse and dry.
E?emovable
OvenBO~~Om
YOU
can removethe ovenbottom
to clean any excessivespillovers
beforestartingthe self-cleaning
cycle.
To remove the oven bottom:
1. Removethe ovenshelves.
oven Li@t Bulb
The light bulb is located in the
upper left corner of the oven.
Beforereplacing the bulb,
disconnect electric power to the
range at the main fuse or circuit
breaker panel or unplug the range
from the electric outlet. Let the
bulb cool completely before
removingit. Do not touch a hot
bulb with a damp cloth as the bulb
will break.
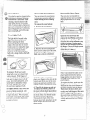
The ovendoor is removableto
makethe interiormore accessible
during replacementof the lamp
bulb.
2. Removethe two knurled holddown screws at the rear of the oven.
If they are too tight to removeby
hand, use a coin or screwdriver.
Open the ovendoor fully and
removethe two Phillips screwsthat
hold the door to the hinges. Then
close the door to the automatic stop
position (at about 3 inches open),
and lifi the door straight up and off
the hinges. (Dueto the large amount
of insulationand the construction
of the door, it is heavy.)
I
To remove: Hold hand under
lamp buIb cover so it doesn’tfall
when released. With fingers of
same hand, firmly push down wire
bail ul]tilit ciears-c~ver.Lift off
cover. DO NOT REMOVE ANY
SCREWS TO REMOVE THIS
COVER. Replace bulb with a
40-wa[thome appliance bulb.
ToIreplace cover: Place cover into
groove of lamp receptacle. Lift
wire bail up to center of cover until
it snaps into place. When ii]place,
tvire holds cover firmly. Be certain
wire bail is not below depression
in center of cover.
3. To lift out the ovenbottom,
place your fingers in the slots in the
bottom and lift the rear of the oven
bottom up and back until the oven
bottomis clear of the lip at the front.
4. Then lift the bottom up and out.
To replace the bottom, place it in
the oven with the back raised about
6 to 8 inches or until you can insert
the front of the ovenbottom under
the hold-down lip at the front.
Then push the back of the oven
bottom down fully into place on the
metal flanges and insert the holddown screMJs.
Note: Care should be taken not to
place hands between the spring
hinge and the oven door frame as
the hinge could snap back and
pinch fingers.
To replace the door, make sure the
hinges are in the “out” position.
Position the slots in the bottom of
the door squarely over the hinges.
Then lower the door slowly and
evenly over both hinges at the same
time. If hinges snap back against
the oven frame, p~ll them back out.
When the door is in position, open
it fully and insert tl~etwo Phillips
screws.
Recommended cleaning Time:
Moderate soil--2 hollrs
(thin spills and Iightspatter)
ExcessivelyHeavy soil—4 hours
(heavygrease spills and spatter)
fiepare
setting
tile oven
the
Before
controls
step1:
Removethe broiler pan, broiler
rack, other cookware and any
aluminumfoil from the oven. (Oven
shelves may be left in oven. Note:
Shelves will discolor after the selfclean cycle.)
step4:
Close the ovendoor and make sure
the oven light is off.
caution: chrome drip pans from
the top of yotilrrange should
never be cleaned in tile self’cieaning oven.
1
How to set the
oven for cleaning
step1:
Settheautomatic oven timer:
About 30 minuteslater, the
LOCKED light comes on and the
door locks. The glowingLOCKED
light indicatesthat the oven is hot
and the door cannot be opened.
The ovendoor and window (on
models so equipped) get hot during
self-cleaning. DO NOT TOUCH.
step 2:
Removethe oven bottom panel (see
page 17)if it is excessivelysoiled.
Clean it and put it back in the oven.
step 3:
Clean spatters or soil on the oven
front frame (A), the oven door
outside the gasket (B) and the small
area at the front center of the oven
bottom. Buff these areas with a dry
cloth. Do not clean the gasket (B).
Do not let water run down through
opening in the top of the door (C).
Make sure the oven light bulb cover
(D) is in place. Never use a
commercial oven cleaner in or
around the self-cleaning oven.
step3:
slide tile self-clean LatchUver
tothe right as far as it will gO to
lock the oven door. The
CLEANING light will come on.
FollowThesesteps
after
Self-cleaning
~ Make sure both the range clock
and the STARTdial show the
correct time of day.
~ Decide on cleaning hours
necessary—twohours for moderate
soil or three to four hours for
heavy soil.
QAdd these hours to present time
of day, then push in and turn STOP
dial clockwise to desired stop time.
step2:
hrll theOVEN
SETknob’
to
CLEAN.
About 30 minutes after cleaning
is completed, when the oven has
cooledand the door can be unlocked,
the LOCKED light goes out.
step1:
Move the latch lever to the left as
far as it will go to unlock the door.
step2:
Turn the OVEN SET knob to OFF.
r
.g_&;
3P?*
*$
&
,.A
d :-IF
3>
~A*~+
Questiom Bnd Answers
a! a later tire than shown-onthe = dimital
.gg~$
& clock, push in and turnthe
c‘ws-Y
STARTdialto the time youwish to
shrt. Addthe hoursneededfor
cleaningto this “start” time,then
pushin and turn the S~P dialto
thisdesired time. The ovenwill
automaticallyturn on andoffat the
settimes.
If You Have to InterruDt
the
Step 1. Turn the S~P dialuntilthe
pointeris at the correct timeof day.
Step2. Push the self-cleanlatch
leverto the leftas far as it willgo. If
the LOCKED lightis on, youmust
waituntilthe lightgoes offbefore
movingthe latch lever.This will
unlockthe ovendoor so it can be
opened.
Step 3. Turn the OVEN SET knob
from CLEAN to OFF.
ImpQrtint: Any attempt to
unlock the door by force
while
the CLEAXING
light ison can
result indamage tothe door
Q. why won’tmy ovenclean
immediately even though I set
tile time
and OVEN SET
l~nob
Correctly?
A. Check to be sure your START
dial is set t~ the same time as the
range clock. Also check to be sure
LATCH LEVER is movedto the
right as far as it will go.
Q. If my oven ‘clockis not
working, can I still self-clean
my oven?
A. No. YourAutomaticOven
Timer uses the range clock to help
start and stop your self-cleaning
cycle.
Q. can I use commercial oven
cleaners on any part of my
self-cleaning oven?
A. No cleaners or coatingsshould.
be used around any part of this
oven. If you do use them and do not
wipe the oven absolutely clean, the
residue can scar the oven surface
and damage metal parts the next
time the oven is automatically
cleaned.
Q. can I clean the woven Gasket
around the oven door?
A. No, this gasket is essential for
a good oven seal and care must be
taken not to rub, damage or move
this gasket.
Q. What should I do if excessive
Smoking occurs during Cleaning?
A. This is caused by excessivesoil,
and you should switch the OVEN
SET knob to OFF. Open windows
to rid room of smoke. Allow the
oven to cool for at least one hour
before opening the door. Wipe up
the excess soil and reset the clean
cycle.
Q. should there be any odor
during the cleaning?
A..Yes,there maybe a slightodor
during the first fewcleanings.
Failure to wipe out excessivesoil
might also cause a strongodor
when cleaning.
Q. what Causestile hair-like
lines on the enameled surface of
my oven?
A, This is a normal condition,
resulting from heatingand cooling
during cleaning. These lines do not
affect how your ovenperforms.
Q. why do I have ash left in my
oven after cleaning?
A. Some types of soil will ieave
a deposit which is ash. It can be
removedwith a damp spongeor
cloth.
Q. My oven shelves do not slide
easily. ‘Whatis the matter?
A. After many cleanings, oven
shelves may become so clean they
do not slide easily. If you wish
shelvesto slide more easily,
dampen fingers with a small
amount of cooking oil and rub
lightly over sides of shelf where
[hey contact shelf supports.
Q. My oven shelves have become
gray after the self-clean cycle. Is
this normal?
A. Yes. After the self-clean cycle,
the shelves may discolor and lose
some of their original luster.
Q. Is $he “crae!iling” sound I
lnealrduring Cleaning normal?
A. Yes.This is the soundof the meti
heating and cooling during both the
coolting and cleaning functions.
..——
.—
.—
MATERIALS~ IJSE
GENERAI.131
RECT10NS
Broiler fin and &ck
@Soap and Water
@Soap-Filled Scouring Pad
* Plastic Scouring Pad
Drain fat, cool pan and rack slightly.(Do not let soiled pan and rack stand in
ovento cool.) Sprinkle detergent on rack and pan. Fill pan witi~warm water and
spread cloth or paper towelover rack. Let pan and rack stand for a few minutes.
Wash; scour if necessary. Rinse and dry. OPTION: Clean pan and rack in
dishwasher. DO N~ CLEAN IN SELF-CLEANING OVEN.
Control Knobs
@Mild Soap and Water
Pull off knobs. Washgently but do not soak. Dry and return controls to range.
Outiide Glass Finish
0 Soap and Water
Washall glass with cloth dampened in soapy water. Rinse and polish with a dry
cloth. If knobs are removed, do not allow water to run downinside surface of
c
glass while cleaning.
Metal, including
Side Rims and
e Soap and Water
Wash, rinse, and then polish with a dry cloth. DO N~ USE steel wool,
abrasives, ammonia, acids, or commercial ovencleaners which may damage
the finish.
o Paper Towel
~ Dry Cloth
@Soap and Water
Avoidcleaning powdersor harsh abrasives which may scratch the enamel.
TrimStrips
OuterPorcelain
EnamelSurface*
.-
If acids should spill on the range while it is hot, use a dry paper towelor cloth
to wipe up right away.When the surface has cooled, wash and rinse.
For other spills, such as fat smatterings,etc., wash with soap and water When
cooled and then rinse. Polish with a dry cloth.
Hinted Surfaces
e Soap and Water
LJsea mild solution of soap and water. Do not use any harsh abrasives or
:leaning powderswhich may scratch or mar surface.
Inside Oven Door*
~ Soap and Water
Removeovendoor (see page 17). Clean with soap and water and replace.
Avoidgetting ANY cleaning materials on the gasket.
:001 before cleaning. Frequent wiping with nlild soap and water will prolong
the time between major cleanings. Be sure to rinse thoroughly.
—
Shelves
~ Soap and Water
Shelves can be soaked in dishwasher or cleaned by hand, using soap and water.
Rinse thoroughly to remove any soap after cleaning. Shelves may also be
cleaned in self-cleaning oven, but may lose some luster and discolor.
C13rome-Plated
Drip Pans
@Soap and Water
* Stiff-Bristled Brush
~ Soap-Filled Scouring Pad
Clean as described below or in dishwasher. DO NGT CLEAN IN SELFCLEANING OVEN as they will discolor. Wipe all chrome drip pans after each
cooking so unnoticed spatter will not burn on next time you cook. To remove
burned-on spatters, use any or all cleaning materials mentioned. Rub ligltrl)’
with scouring pad to prevent scratching of the surface.
(Non-met:i]lic)
—.—
Q Soap and Water
~ Soap-Filled Scouring Pad
(Non-mcta]lic)
Lift out when cool. Soak 5-10minutes if desired in warm solution of dishwasher
dctcrgeni. Scour with materials mentioned hereto remove burned-on iood
particles. DO N~ CLEAN IN SELR-CLEANING OVEN.
~ Solution for Cleaning
Inside of Coffee ftiakers
~ Soap and Water
QMild Abrasive Cleanser
~ Damp Cloth
Wipe off burner heads, If heavy spillover occurs, remove burners from range
(see page 16)and soak them for 20 to 30 minutes in Soiution
of hot water and
product for cleaning inside of coffee makers, such as Dip-It brand. If soil does
not rinse off completely, scrub burners with soap and water or a mild abrasive
clcanscr and a damp cloth. DIy burners in a warm oven for 30 minutes before
returning them to the range. DO NOT ~~~A.N IN S~~I~-C~~A~~llN~ OW~N.
‘SpillaSc ofmarinacies.fru uices. ;indbas[ing mfit~:rialscon[ainin: acids may cause discoloration. Spiliovers should be wiped up irnmcdiately. with
Iallyhot portion of the olen. IVbcn the surfaceiscool.clean and rinse.
(--?,,
I
LL /’
....-.
/.-,
\
\~-.
‘--,’
&~ePea~e~ ~Pen~~g~ and closings
yqp
‘~’~an cause the oven door to work
itself out of adjustment. One side
Air adjustmentshuttersfor the
broil and ovenburners regulatethe
flowof air to the flame.
mayclose higher than the other,
and the door maynot seal properly.
To adjilstthe flow ofairtoeither
burr~er,loosen the Phillips head
screw and rotate the shutter to
allowmore or less air into the
burner tube as needed.
“foadjust the height ofthe door:
1. Removethe door (see page 17).
I
The air adjustmentshutter for the
top (broil)burner is in the upper
right-handcorner near the rear wall
of the oven.
The flame forthe top@roil)
burner should be steady with
approximately l-inch blue cones
and should not extendout over the
baffle edges.
The shutter for the bottom (oven)
burner is near the back wall of the
oven behind the storage drawer or
panel under the oven.
To determineifthe bottom (oven)
burner flame isproper, remove
the oven bottom (see page 17)and
the burner baffle. The flame sho~]ld
have 1/2”to 3/4” blue cones with no
yellow tipping. When the baffle is
back in place, the flame will resettle.
2. With a thin-bladed screwdriver,
e.. urn the screw in the opening at
G?e top Ofeach door hinge. Turn
=clockwiseto lower,counterclockwise
‘ 3 raise.each side of the door.
Replace the door, close it, and
check alignnlent and door seal
.-..=
.,i\
..
‘.._._J-
......
‘-,
;.,
‘-”. . -
~~~~~ ‘~~~~~1~~~~~~~
Adjustment
The temperaturecontrol in your
new ovenhas beencarefullyadjusted
to provideaccurate temperatures.
However,if this oven has replaced
one you haveused for severalyears,
you may notice a differencein the
degree of browningor the length of
time required when usingyour
favoriterecipes. Oven temperature
controls havea tendencyto “drifi”
overa period of years and since
this drifi is very gradual, it is not
readily noticed. Therefore, you
may havebecome accustomedto
your previousoven which may
haveprovideda higher or lower
temperature than you selected.
Before attemptingto havethe
temperature of your new oven
changed, be sure you have followed
the baking time and temperature of
the recipe carefully. Then, after
you have used the oven a few times
and you feel the oven is too hot
or too cool, there is a simple
adjustment you can make yourself
on the OVEN TEMP knob.
Pull the knob off the control shaft
and look at the back side. There is
a disc in the center of the knob skirt
with a series of marks opposite a
pointer.
Loosen only the
locking scre~vs
G Note position of
pointer to marl(s
before adjustment
Note to which mark the pointer is
pointing.To make an adjustment,
carefullyloosen (approximately
one turn), but do not completely
removethe two screwsthat hold the
skirt to the knob. Hold the knob
blade in one hand and the outer
skirt in the other hand.
To raise the oventemperature,
movethe pointer in the direction of
the arrow for RAISE. To lower the
temperature, movethe pointer in
the direction of arrow for LOWER.
Each mark will changethe oven
temperature approximately20°F.
We suggestthat you make the
adjustment one mark from the
original setting and check oven
performance before making any
additional adjustments.
After the ad~ustmentis made,
press skirt a;d knob together-and
retighten screws so they are snug,
but be careful not to overtighten.
Re-installknob on range and
check performance.
Note: After an adjustmenthas
been made, the OFF and BROIL
positions will not line up with
the indicator mark on the control
panel as they previously did. This
condition is normal and will not
create a problem.
.&.
~~;: ;
.~:.~.
@
1
I
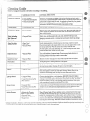
PROBLEM
POSSIBLE CAUSE AND/QR WI*ATTO DO
TOP BURNERS
@Make sure the electricalplugis plu~ed intoa live,properlygroundedpoweroutlet.
DO NOT LIGHT
OVEN DOES NOT
COOK PROPERLY
* Burner holes on side of burner maybe clogged.Removeand clean tl~em.
~Btlrnersnot fi~ed correctly onto m~unting brackets. Rer~ove and reinstall
burners properly.
@Make sure thermostatcapillarybulbs (locatedin upperportionofoven)are securely
held bythe mountingclips, are nottouchingovensides, and are not coatedwith anything.
~Aluminumfoilbeing used improperlyin oven.
* Oven ventblockedon top of range.
e Incorrect cookware being used. check
each cooking
sectionfor cookwaretips,
~Oven bottomnot securely seatedin position.
~ OVEN TEMP knob set incorrect}y or not turned on.
~ Check common baking, roasting and broiling problems Onpages 11-14.
I DOOR WON’TOPEN
/ DURING BROILING
CLOCK DOES
~ Door latch movedto the right duringbroilingcan causedoor to lock when ovengets
hot. Turn ovenoff and let it ;OO1beforeattemptingto open door.
@Rangeelectrical plug must be securely seated in a livepoweroutlet. Check for blown
fuse or tripped circuit breaker.
~Bulb maybe locse or burned out.
* Electrical plug must be pluggedintoa livepower outlet.
e AutomaticTimer not set or not set properly, The ~~~
!
SELF-CLEAN
dial mustbe set and advanced at
least half an hour beyond the time noted on the STARTdial.
I
~ OVEN SET knob must be set at CLEAN setting.
~ Oven door latch not movedto the right as far as it will go.
I STRONG ODOR
~ Improper air/gas ratio in oven. Adjustovenburner air shutters—seepage21.
If you
needmore help.•• Call,toll free:
GE Answer centeP
800.626.2000
consumer
information
service
Toobtain service, see your warranty
~}nthe back page of this book.
tVe’reproud of our service and
want you to be pleased. If for some
reason you are not inappywith tile
service you receive, here are three
steps to follow for further help.
why you are no~pleased. In most
cases, this will solve the problem.
NEXT, if you are still not pleased,
write a~ithe de~ils —including
vour ~hone number—to:
NIan3ger, Consumer Relations
“’
L
FINALLY, if your problem is still
not resolved, write:
Major Appliance
Consumer Action Panel
20 North Wacker Drive
Chicago, Illinois 60606
FIRST, contact the people w!l<)
:~ervicedyour appliance. Explain
I
1
1
I
~{~~~
~~~p~~~~
~~~G~
NiARRANTy
.
(
Saveproof of original purchase date such as your saies slip or cancelled check to establishwarranty period.
—.
—.—.
.—
———
.—
-——
WHATIS COVERED
iNHAT is NOTCOVERED
FULL ONE-YEARWARRANTY
For one year from date of original
purchase,we will provide,free of
charge, parts and service labor
in your home to repair or replace
any part of the ra~?gethat fails
because of a manufacturing defect.
This warranty is extended to
the original purcilaser and any
succeeding owner for products
purchased for ordinary home use
in the 48mainland states, Hawaii
and Washington, D.C.In Alaska the
warranty is the same exceptthat it is
LIMITED because vou must pay to
ship the product to~he service shop
or for the service technician’s travel
costs to your home.
All warranty service will be provided
by our FactoryService Centers or
by our authorized Customer Care@
servicers during normal working
hours.
Look in the White or Yellow Pages
of your telephone directory for
HOTPO!NT FACTORYSERVICE,
GENERAL ELECTRIC-HOTPOINT
FACTORYSERVICE or HOTPO!NT
CUSTOMERCARE@SERVICE.
@Service trips to your home to
teach you how to use the product.
Read your Use and Care material.
If you then have any questions
about operating the product,
please contact your dealer or our
Consumer Affairs office at the
address below, or call, toll free:
GE Answer Center”
800.626.2000
consumer information service
@Replacement of house fuses or
resetting of circuit breakers.
A
,.
@Failure of the product if it is used
for other than its intended purpose
or used commercially.
@Damage to product caused
by accident, fire, floods or acts
of God.
WARRANTOF?
IS NOTRESPONSIBLE
FOR CONSEQUENTIAL DAMAGES.
~ Improper installation.
If you have an installation problem,
contact your dealer or installer.
You are responsible for providing
adequate electrical, gas, exhausting
and other connecting facilities.
-.—
Some statesdo not allow the exclusion or limitation of incidental or consequential damages, so the above limitation or exclusion
maynot apply to you. This warranty gives you specific legal rights, and you may aiso have other rights which vary from state to state.
To know what your legal rights are in your state, consult your local or state consumer affairs office or your state’s Attorney General.
ififQFYaniof:
Genefa!
Eleeiria
Gampany
if ‘;tJ!ribe? ;%i~:p i% ileee!ec: {:oneerning
i!lis 9warvant\?9 [$’rite: ‘
~~lisY/aQer—aoE35L!mer
i~fiaik%~yC+rf tQ.pp1ianGes5 LouisLfilie7
i<~f 4=0225
-i
.s