1
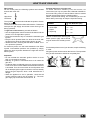
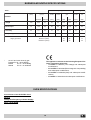
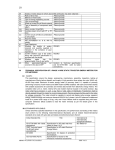
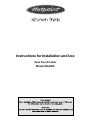
Instructions for Installation and Use
Dual Fuel Cooker
Model EG600X
CONTENTS
Introduction
For Your Safety
Know your Cooker
How to use your Hob
How to use your Oven
Know your Timer
Cooking Advice
Cooking Chart
Care and Cleaning
Troubleshooting
Installation
Electrical Connection
Burner and Nozzle Specifications
and Oven Specifications
After Sales Service
Hotpoint Guarantee
Key Contacts
3
4
5
6
7
8
9
10
11
12
13-14
15
16
18
19
Back Cover
Retention of this Instruction Book
This Instruction Book must be kept handy for reference as it contains important details on the safe and proper use of
the appliance.
If you sell or pass the appliance to someone else, or move house and leave it behind, make sure this Book is also
provided so the new owner can become familiar with the appliance and safety warnings.
If the Book is lost or damaged a copy may be obtained from:
GDA LTD., Morley Way, Peterborough, PE2 9JB
2
INTRODUCTION
Your new dual fuel cooker is guaranteed* and will give lasting service. This guarantee is only applicable if the appliance
has been installed in accordance with the installation instructions detailed in this booklet.
To help make best use of your cooking equipment, please read this booklet carefully.
The appliance is designed specifically for domestic use and responsibility will not be accepted for use in any other
installation.
Note: When the appliance is first used, an odour may be omitted - this will cease after a short period of use.
To help remove the 'new' smell, heat the empty oven to maximum temperature for a minimum of two to three hours,
keeping the door closed. Ensure that the room is well ventilated (eg. open a window or use an extractor fan) and that
persons who may be sensitive to the odour avoid any fumes. It is suggested that any pets be removed from the room until
the smell has ceased.
This odour is due to any temporary finish on oven linings and elements and any moisture absorbed by the insulation.
* The guarantee is subject to the provisions that the appliance:
(a) Has been used solely in accordance with this booklet.
(b) Has been properly connected to a suitable supply voltage as stated on the rating plate, attached to the
appliance.
(c) Has not been subjected to misuse or accident or been modified or repaired by any person other than the
manufacturers authorised employee or agent.
(d) Has been correctly installed.
IMPORTANT INFORMATION
on the rating plate (situated underneath the appliance)
correspond to the mains electricity and gas supplies.
- check that the capacity of the electrical system and the
power outlets are suitable for the maximum power of the
appliance (indicated on the rating plate). If in doubt,
consult a qualified technical engineer.
- check the condition of the gas pipe regularly and have it
replaced by a qualified technical engineer as soon as it
shows any signs of wear or anomally.
- under no circumstances should the user replace the power
supply cable of the gas connection pipe of this appliance.
In the event of damage or the need for replacement,
contact an authorised service centre only (see Key
Contacts, back page).
- DO NOT leave the appliance plugged in if it is not in use.
Switch off at the mains electrical switch and turn off the
gas supply.
- During operation, the oven glass door and adjacent parts
of the appliance become hot. Make sure, therefore, that
children do not touch the appliance. For greater safety,
an additional child-safety device is available from our
Head Office and our Authorised Service Centres (see
enclosed list). When ordering this, please give the code:
BAB - followed by the appliance model. The model is
stamped on the rating plate affixed to the rear of the
appliance and at the back of this booklet.
- this appliance has been designed for private, nonprofessional domestic use in the home.
- read this instruction book carefully, as it provides
important advice regarding safe installation, use and
maintenance. Keep the instruction book in a safe place
for future reference.
- the oven accessories that may come into contact with
food are made of materials which comply with the
provisions set forth by the EEC Directive 89/109 of 21/
12/88 and the applicable national norms in force.
- after removing packaging, check that the appliance is
intact. If in doubt, DO NOT use the appliance and contact
a qualified serviceman.
- some parts are covered with a removable scratch-proof
film. Before using the appliance, the film should be
removed and the underlying part cleaned with a cloth
and a non-abrasive household cleaning product.
- when switching the appliance on for the first time, we
recommend you heat the oven on maximum temperature
setting for about 30 minutes with nothing in it, to eliminate any residue from manufacture.
- all installation and adjustment operations should be carried
out by a qualified serviceman in accordance with the
applicable norms in force. Specific instructions are
provided within the installation section of this instruction
book.
- before connecting the appliance, make sure that the data
3
FOR YOUR SAFETY
When used properly your appliance is completely safe but as with any electrical product there are certain
precautions that must be observed. PLEASE READ THE BELOW PRECAUTIONS BEFORE USING YOUR APPLIANCE.
NEVER:
- use steam cleaners.
- attempt to install or repair the appliance without the
assistance of qualified personnel.
- store items above the appliance that children may attempt
to reach.
- heat up unopened food containers, as pressure can build
up causing the container to burst.
- use the appliance to heat up anything other than food.
- use the appliance as a room heater.
- dry any items on the hob.
- install the appliance next to curtains or other soft
furnishings.
- allow children to play with or tamper with the controls.
-leave children unsupervised where cooking appliances are
installed as all the cooking surfaces get hot during and after
use.
- store chemicals, foodstuffs or pressurised containers in
or on the appliance, or in cabinets immediately above or
next to the appliance.
- use plastic items on or near the appliance.
- use flammable liquids, such as alcohol or gasoline etc.
near the appliance when it is in use.
- use adapters, multiple sockets and/or extension leads.
- fill a deep fat frying pan more than 1/3 full of oil, or use a
lid on a deep fat frying pan. DO NOT LEAVE UNATTENDED
WHILE COOKING.
- pull on the appliance or the supply cable to unplug it from
the electrical outlet.
- allow power cables of other appliances to come into
contact with hot parts of this appliance.
- expose the appliance to atmospheric agents, such as rain
or sunlight.
- operate the appliance with wet hands.
- allow anyone to sit or stand on any part of the appliance.
- remove the oven shelves whilst the oven is hot.
- burners and cast iron pan supports remain hot for a long
time DO NOT touch them.
- use the oven for storage purposes.
- use the grill to warm plates.
- dry items on the oven doors.
- fry too much food at a time, especially frozen food. This
only lowers the temperature or the oil or fat too much,
resulting in greasy food.
- use misshapen pans which may be unstable.
- use round base woks directly on the gas pan supports.
- use fish kettles or large preserving pans across two gas
burners.
- operate the appliance when barefoot.
To maintain the efficiency and safety of this appliance, we
recommend you do the following:
- only call the Service Centres authorised by the
manufacturer.
- always use genuine spare parts.
ALWAYS:
- make sure you remove all packaging and dispose of safely.
- make sure you understand the controls before using the
appliance.
- keep children away from the appliance during use.
- take care to avoid heat/steam burns when operating the
controls.
- check the shelves are in the correct position before
switching on the oven.
- make sure the controls are turned off when you have
finished cooking and when not in use.
- ensure the door is closed when using the grill.
- disconnect from the power supply, and allow to cool,
before cleaning or performing any maintenance.
- keep the door closed when the appliance is not in use.
- refer servicing to a qualified appliance service engineer.
- keep the appliance clean as a build up of grease or fat
from cooking can cause a fire.
- follow the basic principles of food handling and hygiene to
prevent the possibility of bacterial growth.
- keep any ventilation slots clear of obstructions.
- grip the handle in the centre when opening the door.
- stand back when opening the door to allow any build up
of steam or heat to disperse.
- use dry, good quality oven gloves when removing items.
- dry food thoroughly before frying and lower it slowly into
the hot oil or fat. Frozen food in particular, will cause frothing
and spitting if added too quickly.
- keep outside of pans clean and free from streaks of oil or
fat.
- place pans centrally over the cooking areas making sure
handles are kept away from the edge of the hob and cannot
be heated by other heating areas/pans.
SAFETY ADVICE
IMPORTANT - As with any cooking appliance there could
be some fire risk attached to the heating of oil, particularly
for deep fat frying. Cooking utensils containing oil must
not be left unattended (eg. to answer the telephone) on or
in close proximity to the cooking areas.
IN THE EVENT OF A CHIP PAN OR ANY OTHER PAN
FIRE:
1. Turn off the burners.
2. Cover the pan with a fire blanket or damp cloth, this
will smother the flames and extinguish the fire.
3. Leave the pan to cool for at least 60 minutes before
moving it. Injuries are often caused by picking up a hot
pan and rushing outside with it.
NEVER USE A FIRE EXTINGUISHER TO PUT OUT A
PAN FIRE as the force of the extinguisher is likely to tip
the pan over. Never use water to extinguish oil or fat
fires.
4
KNOW YOUR COOKER
F
E
A
B
C
D
E
F
G
H
M
R
P
S
Auxiliary gas burner
Semi-rapid gas burner
Rapid gas burner
Triple crown gas burner (wok burner)
Ignitor for gas burners
Flame Failue Device - Activates if the flame
accidentally goes out (spills, drafts, etc.), interrupting
the supply of gas to the burner.
Function Selector
Temperature Selector
Control knobs for gas burners
Pan support for cookware
Timer
Electric heating element indicator light
5
HOW TO USE YOUR HOB
Gas burners
On the control panel, the following symbols are indicated
around each knob "M".
Off
Practical advice on using the hob:
To obtain maximum efficiency from the burners, we
recommend you only use pans with a diameter suitable for
the burner being used, so that the flame does not extend
beyond the pan base (see the following table).
When a liquid starts boiling, we recommend you turn the
flame down just enough to keep the liquid simmering.
High flame
Low flame
The symbols near the knobs indicate the position of each
burner on the hob.
The burners are fitted with a flame failure device. This device
interrupts the gas supply should the burner flame go out
during operation.
BURNER
A. Auxiliary
B. Semi-rapid
C. Rapid
D. Triple ring
To light one of the burners, proceed as follows:
• turn the appropriate control knob anti-clockwise until the
pointer is on the high-flame symbol.
• press the knob down fully to activate the automatic gas
ignition.
• keep the knob pressed down for about 6 seconds with
the flame lit to allow the flame failure device to heat.
• release the knob, checking that the flame is stable. If it is
not, repeat the operation.
For minimum power, turn the knob towards the low flame
symbol. Intermediate positions are possible by simply
setting the knob anywhere between the high and the low
flame symbol.
O Pan Diameter (cm)
6 - 14
15 - 20
21 - 26
24 - 26
The hob is fitted with a reducing pan
stand (shown right) which should
only be used on the auxiliary burner
'A'.
For the best performance of your burners, keep the following
in mind:
All types of pans can be used on the burners. The important
thing is that the bottom should be completely flat.
Important:
• Do not activate the automatic ignition device for more
than 15 consecutive seconds.
• Difficulty in ignition is sometimes due to air inside the
gas duct.
• If a burner flame accidentally goes out, the gas continues
to exit for a few moments before the flame failure device
is activated. Turn the control knob to the off position and
do not attempt ignition again for at least 1 minute, thereby
letting the gas disperse, which could otherwise be a
danger.
• When the appliance is not in operation, check that all
control knobs are set to the off position " ". The main
gas supply tap should also be turned off.
6
HOW TO USE YOUR OVEN
The 'Multi-function' oven combines the advantages of
convection ovens with those of fan assisted models in a
single appliance. It is an extremely versatile appliance that
allows you to choose easily between 7 different cooking
modes. The various cooking modes are selected by means
of the function selector 'G' situated on the control panel:
“Fast cooking” Mode
Position the temperature control “H”: between 40°C and Max.
All the heating elements and the fan come on, guaranteeing
constant heat distributed uniformly throughout the oven.
This mode is especially recommended for cooking pre-packed
food quickly (as pre-heating is not necessary), such as for
example: frozen or pre-cooked food) as well as for a few “homemade” dishes.
The best results when cooking using the “Fast cooking” mode
are obtained if you use one cooking shelf only (the second
from the bottom), please see the “Cooking Chart”.
Interior light
the interior light is
By turning the function selecto to
switched on and allows you to observe the food in the oven
without having to open the door.
Warning: Never place anything on the bottom of the oven
when it is in operation because this could damage the
enamel. Always place your cookware (dishes, aluminium
foil, etc.) on the shelves provided with the appliance inserted
along the oven shelf guides.
Multi-cooking Mode
Position the temperature control “H”: between 40°C and Max.
All the heating elements and the fan, will come on. Since the
heat remains constant and uniform throughout the oven, the
air cooks and browns food uniformly over its entire surface.
With this mode, you can also cook various dishes at the
same time, as long as their respective cooking temperatures
are the same.
A maximum of 2 shelves can be used at the same time,
following the instructions in the section entitled: “Cooking On
More Than One Shelf”.
This Multi-cooking mode is particularly recommended for
dishes requiring a gratin finish or for those requiring considerably prolonged cooking times, such as for example: lasagne,
pasta bakes, roast chicken and potatoes, etc…
Moreover, the excellent heat distribution makes it possible to
use lower temperatures when cooking roasts. This results in
less loss of juices, meat which is more tender and a decrease
in the loss of weight for the roast. The Multi-cooking mode is
especially suited for cooking fish, which can be prepared with
the addition of a limited amount of condiment, thus maintaining
their flavour and appearance.
The Multi-cooking mode is also perfect for baking leavened
cakes.
Moreover, this mode can also be used to thaw quickly white
or red meat and bread by setting the temperature control to
80 °C. Defrosting - this mode can be used to thaw more delicate foods,
The Cooking Modes:
The grill
Position the temperature control “H” between 40°C and Max.
Your oven is equipped with an electric grill. The extremely
high and direct temperature of the grill makes it possible
to brown the surface of meats and roasts while locking
in the juices to keep them tender. The grill is also highly
recommended for dishes that require a high temperature on the surface: such as beef steaks, veal, rib steak,
filets, hamburgers etc...
The grill is controlled by a thermostatic device that regulates
its operation.
Important: when using the grill, the oven door must be
kept shut.
Convection
Position the temperature control “H” between 40°C and Max.
The top and bottom heating elements are used. In this mode,
the coolest part of the oven is the centre. The convection
oven is best for cooking dishes made up of several ingredients, e.g. tender veal strips with rice, braised meats,
stews, goulash etc.) and dishes that need to cook slowly
and require basting or the addition of liquid and cooking
using covered casserole dishes for oven baking. When
cooking in convection mode, only use one baking tray or
shelf at a time, otherwise the heat distribution will be uneven. Using the different shelf position available, you can
balance the amount of heat between the top and the bottom of the oven. Select from among the various shelf
positions based on whether the dish needs more or less
heat from the top.
set the temperature control to 60°C or use only the cold air circulation
feature by setting the temperature control to 0°C.
Pizza Mode
Position the temperature control “H”: between 40°C and Max.
The bottom and circular heating elements, as well as the fan,
will come on. This combination rapidly heats the oven due to
the large amounts of power used by the appliance (2800 W),
which results in the production of considerable heat coming
mostly from the bottom.
The pizza mode is ideal for foods requiring high temperatures
to cook, like pizzas and large roasts. Only use one baking
tray or shelf at a time. However, if more than one is used,
these must be switched halfway through the cooking process.
Refer to the 'Cooking Advice' section.
Baking
Position the temperature control “H”: between 40°C and
Max.
The rear heating element and the fan come on, guaranteeing
delicate heat distributed uniformly throughout the oven.
This mode is ideal for baking and cooking delicate foods especially cakes that need to rise - and for the preparation
of certain tartlets on more than one shelf at the same time.
Here are a few examples: cream puffs, sweet and savoury
biscuits, savoury puffs, Swiss rolls and small portions of
vegetables au gratin, etc…..
Fan grilling
The fan grilling is extremely useful for grilling foods rapidly,
as the distribution of heat makes it possible - not only to
brown the surface but also to cook the bottom part.
This mode can also be used for browning foods at the end
of the cooking process.
7
KNOW YOUR TIMER
This feature allows you to program the oven and the grill
to:
• delay start for a specific length of time;
• immediate start for a specific length of time;
• timer.
Button Functions:
A
4. After the button has been released, the current time will
be displayed after approximately 4 seconds:
A
: timer - hours and minutes
: cooking time
The letter "A" will light up reminding you that the length
and end cooking time were programmed in automatic mode.
At this point, the oven will turn on automatically at 12:30
and then turn off after 30 minutes. When the oven is turned
: end cooking time
- : set cooking time - backward
+ : set cooking time - forward
on, the
symbol will be displayed for the entire cooking
time. At any time during the cooking process, the length of
the cooking time can be displayed by pressing the
button, and the end cooking time by pressing the
button.
At the end of cooking time, a buzzer will sound for
several minutes, to turn it off, simply press any of the
How to reset the digital clock.
After the appliance has been connected to the power supply,
or when the power has gone out, the clock display will
automatically reset to 0:00 and begin to flash.
and
buttons at the same time and
• Press the
then reset the time (within 4 seconds) using the
buttons except the
- and
Preset cooking time with immediate start
By programming just the duration (points 1 and 2 of the
“Start delayed cooking with preset duration” section),
cooking will start up immediately.
+ buttons.
The + button sets the time forward.
The - button sets the time backward.
To cancel a preset cooking time
and
buttons at the same time.
Press the
Whenever the time needs to be reset, repeat all of the steps
listed above.
Timer Feature
The timer feature allows you to enter a given amount of
time from which the timer begins to count down. This feature
does not turn the oven on or off, it only emits an alarm
when the time has expired.
Manual operation of the Oven
After resetting the time, the program automatically switches
to the manual mode.
Note: To reset to manual mode after each “automatic”
cooking, Press the
and
buttons at the same time
When the
button has been pressed, the display will
read as follows:
Preset cooking time with delayed start
The length of the cooking program as well as the time at
which the cooking program ends must be set.
If we assume that the time displayed on the timer is 10:00
1. Turn the function selector to the required cooking mode
and turn the temperature selector to the desired temperature (e.g. conventional oven, 200°C);
2. Press the
button and then set the cooking time
(within four seconds) using the
- and + buttons.
Then use the
- and + buttons to set the desired time.
After the button has been released, the timer will start to
count down and the current time will be displayed.
After the time has expired, an alarm will sound, which can
be turned off by pressing any of the buttons (except the
- and + buttons. Let us
suppose that we set the cooking time at 30 minutes.
The display will read as follows:
and
+ buttons) at this point the
-
symbol will turn off.
A
Changing and cancellation settings
• The data entered can be changed at any time by pressing
Release the button and after 4 seconds, the current
time will be displayed again, along with the
and the letter "A" (AUTO);
3. Press the
button and then use the
the corresponding button and the
symbol
•
- and + buttons
•
to set the time for when the cooking program should
end. Let us suppose this time to be 1p.m.
8
- and + buttons.
When the data for the length of the cooking time is
cancelled, the data for the end cooking time are also
cancelled automatically, and vice versa.
If the oven has been programmed, it will not accept end
cooking times which are before the start of the cooking
process.
COOKING ADVICE
The oven offers a wide range of alternatives which allows
you to cook any type of food in the best possible way. With
time you will learn to make the best use of this versatile
cooking appliance and the following are only a guide, which
may be varied according to your own personal taste.
The pastry sticks to the pan
Grease the pan well and sprinkle it with a dusting of
flour or use greaseproof paper.
You used more than one shelf (in the fan assisted
oven mode) and they are not all at the same
cooking point.
Cooking on More Than One Shelf
If you have to cook food on several shelves, use either the
“baking” mode
or the
“Multi-cooking” mode, as
these are the only modes that allow you to do so.
When cooking delicate food on more than one shelf, use
which allows you to cook on 3
the “baking” mode,
shelves at the same time (the 1st, 3rd and 5th from the
bottom).
Some examples are included in the “Cooking Chart”.
When cooking other food on several shelves, use the “Multi-
Use a lower temperature setting. It is not necessar y to
remove the food from all the shelves at the same time.
Using the 'Fast Cooking' mode
Functional, fast and practical for those of you who use
frozen or pre-cooked food along with other food items. You
will find useful suggestions in the 'Cooking Chart'.
Cooking Fish and Meat
When cooking white meat, fowl and fish, use temperature
settings from 180 °C to 200 °C.
For red meat that should be well done on the outside while
tender and juicy in the inside, it is a good idea to start with
a high temperature setting (200°C-220°C) for a short time,
then turn the oven down afterwards.
In general, the larger the roast, the lower the temperature
setting. Place the meat on the centre of the shelf and place
the grill pan/baking tray beneath it to catch the fat.
Make sure that the shelf is inserted so that it is in the
centre of the oven. If you would like to increase the amount
of heat from below, use the low shelf positions.
cooking” mode
keeping the following suggestions in
mind:
• The oven is fitted with 5 shelf positions. During fan
assisted cooking, use two of the three central shelf
positions: the lowest and highest shelves receive the
hot air directly and therefore delicate foodstuffs could
be burnt using these shelf positions.
• As a general rule, use the 2nd and 4th shelf position
from the bottom, placing the foodstuffs that require
greater heat on the 2nd shelf from the bottom. For
example, when cooking meat roasts together with other
food, place the roast on the 2nd shelf position from the
bottom and the more delicate food on the 4th shelf
position from the bottom.
• When cooking food that require differing times and
temperatures, set a temperature that is somewhere
between the two temperatures required, place the more
delicate food on the 4th shelf position from the bottom
and take the food requiring less time out of the oven
first.
• Use the baking tray on the lower shelf position and the
shelf on the upper position.
Cooking Pizza
For best results when cooking pizza, use setting
for “
Pizza Mode”:
• Preheat the oven for at least 10 minutes
• Use a light aluminium pizza pan, placing it on the shelf
supplied with the oven. If the baking tray is used, this
will extend the cooking time, making it difficult to get a
crispy crust;
• Do not open the oven door frequently while the pizza is
cooking;
• If the pizza has a lot of toppings (three or four), we
recommend you add the mozzarella cheese on top
halfway through the cooking process.
• If cooking on more than one shelf (up to 2), we advise
Baking Cakes
When baking cakes, always preheat the oven. Make sure
you wait until the oven has preheated thoroughly. Do not
open the oven door during baking to prevent the cake
from dropping. In general, if:
you to use the Multi-cooking Mode
as the Pizza Mode
would heat the bottom shelf more than the others.
Pastry is too dry
Cooling ventilation
In order to cool down the exterior of the appliance, it is fitted
with a cooling fan that comes on when the function selector
"G" is turned. In this case, the fan is always on and a normal
flow of air can be heard exiting between the oven door and
the control panel.
Note: when cooking is finished, the fan stays on until
the oven has cooled down sufficiently, even if the
function selector “G” is set to “0”.
In "Fast cooking" mode, the fan comes on automatically
only when the oven is hot.
Once you have removed the food from the oven, we recommend you leave the oven door ajar for a few minutes,
this will drastically reduce the duration of the cooling cycle.
The process is controlled by an additional thermostat and
can consist of one or more cycles.
Increase the temperature by 10°C and reduce the
cooking time.
Pastry has dropped
Use less liquid or lower the temperature by 10°C.
Pastry is too dark on top
Place it on a lower shelf, lower the temperature, and
increase the cooking time.
It is cooked well on the inside but sticky on the
outside
Use less liquid, lower the temperature, and increase
the cooking time.
9
COOKING CHART
Cooking
Function
Type of food
Duck
1.
Convection Roast Veal or Beef
Pork Roast
Biscuits (shor t pastry)
Tar ts
Weight
Shelf
Preheating time
(in kg) position from
(minutes)
bottom of the
oven
Temp
°C
Cooking
time
(minutes)
1
1
1
1
3
3
3
3
3
15
15
15
15
15
200
200
200
180
180
65-75
70-75
70-80
15-20
30-35
2.
Baking
Tar ts
Fruit cakes
Plum cake
Sponge cake
Stuffed pancakes (on 2 shelves)
Small cakes (on 2 shelves)
Cheese puffs (on 2 shelves)
Cream puffs (on 3 shelves)
Biscuits (on 3 shelves)
Meringues (on 3 shelves)
0.5
1
0.7
0.5
1.2
0.6
0.4
0.7
0.7
0.5
3
2/3
3
3
2-4
2-4
2-4
1-3-5
1-3-5
1-3-5
15
15
15
15
15
15
15
15
15
15
180
180
180
160
200
190
210
180
180
90
20-30
40-45
40-50
25-30
30-35
20-25
15-20
20-25
20-25
180
3.
Fast
Cooking
Frozen Food
Pizza
Courgette and prawn pie
Country style spinach pie
Turnovers
Lasagne
Golden rolls
Chicken morsels
0.3
0.4
0.5
0.3
0.5
0.4
0.4
2
2
2
2
2
2
2
-
Max
200
220
200
200
180
220
12
20
30-35
25
35
25-30
15-20
Pre-cooked Food
Golden Chicken wings
0.4
2
-
200
20-25
Fresh Food
Biscuits (shor t pastry)
Plum Cake
Cheese Puffs
0.3
0.6
0.2
2
2
2
-
200
180
210
15-18
45
10-12
4.
M ul t i Cooking
Pizza (on 2 shleves)
Lasagne
Lamb
Roast Chicken and Potatoes
Mackerel
Plum Cake
Cream Puffs (on 2 shelves)
Biscuits (on 2 shelves)
Sponge Cake (on 1 shelf)
Sponge Cake (on 2 shelves)
Savoury pies
1
1
1
1+1
1
1
0.5
0.5
0.5
1
1.5
2-4
3
2
2-4
2
2
2-4
2-4
2
2-4
3
15
10
10
15
10
10
10
10
10
10
15
230
180
180
200
180
170
190
180
170
170
200
15-20
30-35
40-45
60-70
30-35
40-50
20-25
10-15
15-20
20-25
25-30
5.
Pizza
Pizza
Roast Veal or Beef
Chicken
0.5
1
1
3
2
2/3
15
10
10
220
220
180
15-20
25-30
60-70
6.
Gr i l l
Sole
Squid and prawn kebabs
Cod fillet
Grilled vegetables
Veal steak
Cutlets
Hamburgers
Mackerels
Toasted sandwiches
1
1
1
1
1
1
1
1
No.4
4
4
4
3/4
4
4
4
4
4
-
5
5
5
5
5
5
5
5
5
8-10
6-8
10
10-15
15-20
15-20
7-10
15-20
2-3
N.B.: The cooking times shown in this char t are approximate and may vary according to personal taste.
10
CARE AND CLEANING
Replacing the Oven Lamp
• Disconnect from the mains electricity supply and ensure
the appliance is cool.
• Remove the glass cover of the lamp-holder.
• Remove the lamp and replace with a lamp resistant to
high temperatures (300°C) with the following
characteristics:
- Voltage: 230/240 V
- Power: 15W
- Type E14
• Replace the glass cover and
reconnect to the mains electricity supply.
Before cleaning or carrying out any maintenance on your
appliance, you must disconnect it from the power supply.
To extend the life of your appliance, it must be cleaned
frequently, keeping in mind that:
The hob:
• The enamelled parts must be washed with warm water
without using any abrasive powders or corrosive substances which could cause damage.
• The removeable parts of the burners should be washed
with warm soapy water, making sure to remove caked
on substances.
• The end of the electronic ignition device must be cleaned
carefully and frequently, making sure that the gas holes
are not clogged.
• Stainless steel may become marked if it comes into
contact with very hard water or harsh detergents
(containing phosphorous) for long periods of time. After
cleaning, rinse with water and dry thoroughly. Use a
specific non-abrasive product to remove tougher stains.
It is also recommended that any spills be cleared
immediately.
Disassembling/assembling the oven door
To make it easier to clean the inside of your oven, the oven
door can be removed, by proceeding as follows (fig. 3-4):
• Open the door completely and raise the 2 levers "B" (fig.
3);
• Now, shutting the door slightly, you can lift it out by pulling
out the hooks "A" as shown in figure 4.
Inside the oven
We recommend you clean your oven each time you use
it, especially after cooking roasts. In fact, it is advisable
to prevent food residue from building up during cooking:
the residue would be re-cooked each time the oven is
used and would char and release smoke and unpleasant
odours.
To reassemble the door:
• With the door in a vertical position, insert the two hooks
"A" into the slots;
• Ensure that seat "D" is hooked perfectly onto the edge of
the slot (move the oven door backwards and forward
slightly);
• Keep the oven door open fully, unhook the 2 levers "B"
downwards and then shut the door again.
Oven exterior
Clean the stainless steel exterior surfaces of your oven
using a sponge soaked in soapy water, making sure you
rinse and dry these thoroughly, without using abrasive or
corrosive products which could damage them.
DO NOT use aluminium foil to line the bottom of the
oven.
To avoid having to clean the bottom of the oven, you may
be tempted to line it with some aluminium foil. We strongly
advise against this. The aluminium foil sheet in direct
contact with the heated enamel coating could melt and
damage the enamel coating inside the oven irreversibly.
Oven rubber Seal
There is a rubber seal surrounding the oven opening which
guarantees its perfect functioning. Check the condition of
this seal on a regular basis. If necessary, clean it using
warm water and dry thoroughly.
DO NOT use abrasive products or objects to do so.
Should the seal become damaged, please contact Hotpoint
Service (see KEY CONTACTS, back page). We
recommend you avoid using the oven until it has been
repaired.
fig 3
fig 4
11
Troubleshooting
If your oven releases alot of smoke during cooking.
Check to make sure that:
• You have selected the correct cooking mode for the type
of food and the dish is in the correct recommended shelf
position.
• The temperature is correct for the type of cooking
required.
• The oven interior is clean. Food residue encrusted onto
the enamel coating inside the oven becomes charred
and creates both smoke and odours.
• Dish is placed onto baking tray, splashes of grease or
overflows onto very hot surfaces create smoke.
Before calling service for assistance, check through the
following list, there may be nothing wrong.
First of all, check to see that there are no interruptions in
the gas and electrical supplies, and, in particular, that the
gas valves for the mains are open.
If the burner does not light or the flame is not uniform
around the burner.
Check to make sure that:
• The gas holes on the burner are not clogged.
• All of the movable parts that make up the burner are
mounted correctly.
• There are no draughts around the cooking surface.
If the flame does not stay lit.
Check to make sure that:
• You press the knob all the way in.
• You keep the knob pressed in long enough to activate
the flame failure device.
• The gas holes are not clogged in the area corresponding
to the flame failure device.
If, despite all of these checks, the cooker does not function
properly and problem persists, call Hotpoint Service (see
KEY CONTACTS, back page), informing them of:
- The type of problem.
- The abbreviation used to identify the model (Mod. ...) as
indicated on the warranty.
If the burner does not remain on when set to "Low".
Check to make sure that:
• The gas holes are not clogged.
• There are no draughts near the cooking surface.
• The minimum has been adjusted correctly (see
Installation section, "Minimum Regulation").
IMPORTANT:
Never call upon technicians not authorized by the
manufacturer, and refuse to accept spare parts that are
not original.
If the cookware is not stable.
Check to make sure that:
• The bottom of the cookware is perfectly flat.
• The cookware is centered correctly on the burner .
• The support grids have not been inverted.
12
INSTALLATION
The following instructions are provided for qualified installers
so that they may carry out installation, adjustment and
technical maintenance operations correctly and in
compliance with the applicable norms in force.
Important: Disconnect the appliance from the electrical
and gas supply before performing any maintenance or
repair.
fig.7
The cooker has the following technical specifications:
- Cat. II2H3+
Class 1
In a chimney stack or branched flue
(reserved for cooking appliances
Kitchen ventilation
The air flow into the room where the appliance is installed
must equal the quantity of air that is required for regular
combustion of the gas and for ventilating the same room.
Air must enter naturally through permanent apertures made
in the outside walls of the room or through single or
branching collective ventilation ducts in compliance with
the norms. The air must be taken directly from the outside,
from an area far from sources of pollution. The ventilation
aperture must have the following characteristics (fig. 8A):
• total free cross section of passage of at least 6 cm² for
every kW of rated heating capacity of the appliance, with
a minimum of 100 cm² (the heating capacity is indicated
on the rating plate);
• it must be made in such a way that the aperture, both on
the inside and outside of the wall, cannot be obstructed;
• it must be protected, e.g. with grates, wire mesh, etc. in
such a way that the above-mentioned free section is not
reduced;
• it must be situated as near to floor level as possible.
Class 2 sub-class 1
The dimensions of the appliance are given in the figure on
page 5, 'KNOW YOUR COOKER'. For trouble-free operation
of appliances installed in furniture cabinets, the minimum
distances shown in fig. 5 should be observed. Adjacent
surfaces and the wall at the rear should also be able to
withstand a temperature rise of 65 °C.
min. 700mm
fig.5
min. 100mm
Directly to the outside
Detail A
Adjacent
room
Room to be
ventilated
95÷155mm
fig.6
Prior to installing the cooker, the 95 - 155 mm high
supporting feet (provided) should be fitted into the holes to
be underneath the cooker (fig. 6). These feet are screwadjustable and whenever necessary should be used to make
sure the cooker is level.
A
Positioning
This appliance may only be installed and operated in
permanently ventilated rooms in compliance with the
regulation s in force. The following requirements must be
observed:
Examples of ventilation
holes for comburant air
Enlarging the ventilation slot
between window and floor
fig. 8A
fig.8B
The air inflow may also be obtained from an adjoining room,
provided the latter is not a bedroom or a room where there
is a risk of fire, such as warehouses, garages, fuel stores,
etc. and is ventilated in compliance with the norms. The air
flow from the adjoining room to the one to be ventilated
may pass freely through permanent apertures with a cross
section at least equal to that indicated above. These
apertures may also be obtained by increasing the gap
between the door and the floor (fig. 8B). If an electric fan
is used for extracting the combustion products, the
ventilation aperture must be increased in relation to its
maximum performance. The electric fan should have a
sufficient capacity to guarantee an hourly exchange of air
equal to 3 ÷ 5 times the volume of the kitchen. Prolonged,
intensive use of the appliance may require extra ventilation,
• The appliance must vent flue gases into a special hood,
which must be connected to a chimney, flue pipe or
directly to the outside (fig. 7).
• If it is impossible to fit a hood, the use of an electric fan
is permitted, either installed on a window or on an external
wall, which must be switched on at the same time as the
appliance.
13
INSTALLATION
e.g. an open window or a more efficient ventilation system
by increasing the extraction power of the electric fan if
installed. Liquid petroleum gas descends towards the floor
as it is heavier than air. Apertures in the outside walls in
rooms containing LPG cylinders should therefore be at floor
level, in order to allow any gas from leaks to be expelled.
Do not store LPG cylinders (even when empty) in
basements or rooms below ground level; it is advisable to
keep only the cylinder in use in the room at any one time
and connected far from heat sources which could raise its
temperature to above 50 °C.
Check the seal
Upon completion of installation, check for leaks from the
gas circuit using a soapy water solution (never use a
flame). Make sure that the natural gas pipe is adequate
for a sufficient supply to the appliance when all the
burners are lit.
Adapting to different types of gas (instructions for the hob)
To adapt the hob to a different type of gas from the factoryset one (indicated on the rating plate at the top of the
hood or on the packaging), the burner nozzles should be
replaced as follows:
• Remove the pan supports and slide the burners off their
seats.
• Unscrew the nozzles (fig. 9, using a 7 mm socket spanner
and replace them with nozzles for the new type of gas
(see table 1 "Burner and nozzle specifications").
• Reassemble the parts following the above procedure in
the reverse order.
• On completion of this operation, replace the old rating
label with the one indicating the new type of gas used.
This sticker is available from Hotpoint Service (see KEY
CONTACTS, back page).
Gas connection for the gas hob
The hob should be connected to the gas supply by a
CORGI registered installer. During installation of this
product it is essential to fit an approved gas tap to isolate
the supply from the appliance for the convenience of any
subsequent removal or servicing. Connection of the
appliance to the gas mains or liquid gas must be carried
out according to the prescribed regulations in force, and
only after it has been ascertained that it is adaptable to
the type of gas to be used. If not, follow instructions
indicated in the paragraph headed, 'Adapting to different
types of gas'.
In the case of connection to liquid gas, in a cylinder, a
pressure regulator, that conform to the regulations in
force, must be inserted.
Important: for safety, for the correct regulation of gas use
and long life of the appliance, ensure that the gas pressure
conforms to the indications given in table 1, 'Burner and
Nozzle Specifications'.
A
fig.9
Adjusting the primary air of the burners
The primary air of the burners does not need to be adjusted.
Connection to non-flexible tube (copper or steel)
Connection to the gas source must be done in such a
way as to not create any stress points at any part of the
appliance. The appliance is fitted with an adjustable, 'L'
shaped connector and a gasket for the attachment to the
gas supply. Should this connector have to be turned, the
gasket must be replaced (supplied with the apliance).
The feeding connector of the gas to the appliance is
threaded 1/2 gas male cylinder.
Adjusting the low flame
• Turn the tap to the low flame position;
• Remove the knob and turn the adjusting screw, situated to
the right of the tap (fig. 10) until you obtain a regular small
flame, using a screwdriver (loosening the screw increases
the height of the flame, tightening decreases it).
N.B.: In the case of liquid gas, the regulation screw
must be screwed in all the way.
• Having obtained the low flame setting required and with
the burner lit, change the position of the knob several times
from minimum to maximum and vice versa and check
that the flame does not go out.
• In appliances fitted with the safety device (thermocouple),
should the device fail to work with the burners set to the
low flame setting, increase the low flame setting of the
same on the adjusting screw.
Once the adjustment has been made, remount the seals on
the by-passes using leak detection fluid.
Connection to flexible steel tube
The gas feed connector to the appliance is a threaded,
male 1/2" connector for round gas pipe. Only use pipes
and sealing gaskets that conform to the standards
currently in force.
• it should be as short as possible, with a maximum length
of 1.5 metres;
• it should not be bent or kinked;
• it should not be in contact with the rear panel of the
appliance or in any case with parts which may reach a
temperature of 50°;
• it should not pass through holes or slits used for discharging the oven flue gases;
• it should not come into contact with pointed parts or
sharp corners;
• it should be easy to inspect along its entire length in
order to be able to check its condition;
• it should be replaced before the date printed on the
actual pipe.
fig.10
14
ELECTRICAL CONNECTION
Those ovens equipped with a three-pole power supply cable
are designed to operate with an alternating current with the
voltage and frequency indicated on the data plate (located
on the appliance) and in the instruction booklet.
Connecting the supply cable to the mains
The appliance must be connected to a double pole isolating
switch having a minimum contact separation of 3 mm.
The supply cable must be in such a position that no part of
it can reach a temperature of 50°C above room temperature.
Before connecting to the power supply, make sure that:
• The electrical safety of this appliance can only be guaranteed if the cooker is correctly and efficiently earthed,
in compliance with regulations on electrical safety.
Always ensure that the earthing is efficient; if you have
any doubts call in a qualified technician to check the
system. The manufacturer denies all responsibility for
damage resulting from a system which has not been
earthed.
• Before plugging the appliance into the mains, check that
the specifications indicated on the rating plate (on the
appliance and packaging) correspond to those of the
electrical and gas mains of your home.
• Check that the electrical capacity of the system and
sockets will support the maximum power of the
appliance, as indicated on the data plate. If in doubt,
consult a qualified technical engineer.
• If the socket and appliance plug are not compatible,
have the socket replaced with a suitable model by a
qualified technical engineer. The latter, in particular, will
also have to ensure that the cross section of the socket
cables are suitable for the power absorbed by the
appliance. The use of adapters, multiple sockets and/or
extensions, is not recommended. If their use cannot be
avoided, remember to use only single or multiple
adapters and extensions which comply with current
safety regulations. In these cases, never exceed the
maximum current capacity indicated on the single
adapter or extension and the maximum power indicated
on the multiple adapter. The plug and socket must be
easily accessible.
WARNING: THIS APPLIANCE MUST BE EARTHED.
The wire for earthing the appliance is yellow-green in colour.
The appliance should be installed by a qualified
electrician in accordance with the latest edition if the IEE
regulations.
Fitting on a power supply cable
Opening the terminal board:
• Using a screwdriver, press on the side tabs on each
side of the terminal board cover.
• Pull open the cover of the terminal board.
To mount the power supply cable, proceed as follows:
• Remove the wire clamp screw and the three contact
•
screws L-NFasten the wires beneath the screwheads using the following colour scheme:
•
Blue (N) Brown (L) Yellow-Green
Secure the supply cable in place with the clamp and
close the cover of the terminal board.
15
BURNER AND NOZZLE SPECIFICATIONS
Table 1
Liquid gas
Diameter
(mm)
Natural gas
Thermal Power kW
(H.s.)*
By-pass
1/100
Nozzle
1/100
Flow *
g/h
Nominal Reduced
(mm)
(mm)
G30
Nozzle
1/100
Flow *
l/h
G31
(mm)
G20
BURNER
C. Rapid
100
3.00
0.7
40
86
218
214
116
286
B. Semi-rapid
75
1.65
0.4
30
64
120
118
96
157
A. Auxiliary
55
1.0
0.3
27
50
73
71
71
95
D. Triple Ring
130
3.25
1.3
57
91
236
232
124
309
28-30
20
35
37
25
45
Nominal (mbar)
Minimum (mbar)
Maximum (mbar)
Supply pressures
*
At 15°C and 1013 mbar-dry gas
Propane P.C.S. = 50.37 MJ/Kg
Butane
P.C.S. = 49.47 MJ/Kg
Natural
P.C.S. = 37.78 MJ/m3
20
17
25
This appliance conforms to the following European Economic Community directives:
- 73/23/EEC of 19/02/73 (Low Voltage) and subsequent
modifications;
- 89/336/EEC of 03/05/89 (Electromagnetic Compatibility)
and subsequent modifications;
- 90/336/EEC of 29/06/90 (Gas) and subsequent modifications;
- 93/68/EEC of 22/07/93 and subsequent modifications.
OVEN SPECIFICATIONS
Inner Volume of the ELECTRIC Oven:
56 litres
Voltage and Frequency of Power Supply:
230V ~ 50Hz 2800W
16
NOTES
17
After Sales Service
"No company is better positioned to offer an after sales service on a
Hotpoint appliance than us - the manufacturer"
As part of our commitment to you, all Hotpoint appliances have the added benefit of a fully inclusive parts
and labour guarantee for the first 12 months. In addition to this you also have the advantage of free
replacement parts for the first 5 years when fitted by a Hotpoint engineer.
When the 12 months parts and labour guarantee expires we offer the following after sales service options:
Repair Service and Information Help Desk
UK: 08709 066066
www.theservicecentre.co.uk
Republic of Ireland: 1850 302 200
Note: Our operators will require the Model number and the Serial number of your appliance
Available 364 days a year with a fast, effective and value for money service. We have the largest white
goods repair service in the UK with over 1200 of our own fully trained engineers. All repairs include a parts
and labour guarantee for 12 months from the date of the repair.
If you require any information or have any questions about your appliance, our operators are on hand with
help and advice.
All this ensures that you will receive the best available after sales service possible.
Extended Warranties
UK: 08709 088 088
www.theservicecentre.co.uk
Republic of Ireland: 1850 502 200
Whether you have just one or a number of Hotpoint appliances in your kitchen, we offer two service cover
plans to give you total peace of mind.
• Repair Protection Plan
-
FREE service repairs for a single Hotpoint appliance during the
period of cover.
• Kitchen Cover
-
FREE service repairs for all your Hotpoint appliances less than 8
years old.
Genuine Parts and AccessoriesUK: 08709 077 077
www.theservicecentre.co.uk
Republic of Ireland: (01) 842 6836
A wide range of genuine parts and accessories are available from our hotline or through our web site.
Genuine parts and accessories, extended warranties and service repairs are all
available on our web-site at:
www.theservicecentre.co.uk
GB
18
Guarantee
"Satisfaction guaranteed or your money back"
We give you a unique 'satisfaction guaranteed' promise - valid for 90 days - after you have
purchased your Hotpoint appliance. If there is a technical problem simply call Hotpoint Repair service or
visit our web-site at www.theservicecentre.co.uk and where necessary, we will arrange for an engineer to
call. If the technical problem is not resolved under this guarantee, we will replace your machine or, if
you prefer, give you your money back.
All Hotpoint appliances carry a fully inclusive 12 month parts and labour guarantee as well as free
replacement parts for the first 5 years (except microwaves, selected integrated appliances and cooker
hoods, which have a one year guarantee) provided that they are fitted by a Hotpoint engineer.
Guarantee terms and conditions
Your guarantee is only applicable in the United Kingdom or Republic of Ireland and is subject to the
following provisions that your appliance:
•
•
Has been installed and used correctly in accordance with this instruction booklet.
•
Has been properly connected to a suitable electrical supply voltage as stated on the
appliance rating plate.
•
Has not been subject to misuse, accident, modified or repaired by anyone other than one of
our own service engineers.
Has been used solely for domestic purposes and is located on domestic premises (ie. not
for commercial or trade use).
For pre purchase information on any other Hotpoint product call: 08701 50 60 70
or visit: www.hotpoint.co.uk
Recycling & Disposal Information
As part of Hotpoint's continued commitment to helping the environment, Hotpoint reserves the right to
use quality recycled components to keep down customer costs and minimise material wastage.
Please dispose of packaging and old appliances carefully.
To minimise risk of injury to children, remove the door, plug and cut mains cable off flush with the
appliance. Dispose of these parts separately to ensure that the appliance can no longer be plugged into
a mains socket, and the door cannot be locked shut.
19
GB
Key Contacts
After Sales Service
Over 1200 trained specialists, directly employed by us, ensure that you can have complete confidence in
both the appliances and services we offer.
Repair Service and Information Desk
UK: 08709 066 066
(Open 8 to 8 Mon - Fri, 8 to 6 Sat, 10 to 4 Sun & Bank Holidays)
www.theservicecentre.co.uk
Republic of Ireland: 1850 302 200
Note: Our operators will require the following information:
Model number:
Serial number:
Extended Warranties
UK: 08709 088 088
(Open 8 to 8 Mon - Sun)
www.theservicecentre.co.uk
Republic of Ireland: 1850 502 200
Genuine Parts and Accessories
UK: 08709 077 077
(Open 8-30 to 5-30 Mon - Fri & 9 to 12 Sat)
www.theservicecentre.co.uk
Republic of Ireland: (01) 842 6836
General Domestic Appliances Limited, Morley Way, Peterborough, PE2 9JB.
CODE: 195038723.00
May 2003 Part no. FP190 - 01