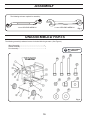
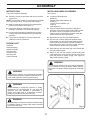
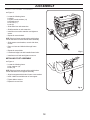
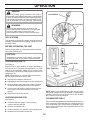
1
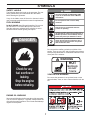
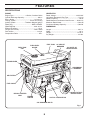
Portable Electric Generator
Owner's Manual
MODEL: PPG 6000
IMPORTANT - Please make certain the person
who uses this generator thoroughly reads these
instructions and all other instructions provided to
ensure proper safety, use, and care of your new
portable electric generator.
420344 Rev. 1 05.05.08 CL
Printed in U.S.A.
TABLE OF CONTENTS
INTRODUCTION .................................................................................................2
SAFETY RULES ............................................................................................. 3-4
SYMBOLS ....................................................................................................... 5-7
FEATURES ..................................................................................................... 8-9
ASSEMBLY ................................................................................................. 10-12
OPERATION ............................................................................................... 13-15
ELECTRICAL ....................................................................................................16
MAINTENANCE .......................................................................................... 17-19
STORAGE .........................................................................................................19
TROUBLESHOOTING ......................................................................................20
WIRING DIAGRAM ...........................................................................................21
REPAIR PARTS .......................................................................................... 22-26
WARRANTY................................................................................................ 27-29
PARTS ORDERING/SERVICING ................................................ BACK COVER
INTRODUCTION
This product has many features for making its use more pleasant and enjoyable. Safety, performance,
and dependability have been given top priority in the design of this product, making it easy to maintain
and operate.
In the State of California, a spark arrester is required by law
(Section 4442 of the California Public Resources Code).
Other states may have similar laws. Federal laws apply
on federal lands. The muffler is equipped with a spark
arrester; it must be maintained in effective working order.
Replacement spark arresters may be obtained by calling
1-866-237-1049.
WARNING
The engine exhaust from this product contains
chemicals known to the State of California to cause
cancer, birth defects, or other reproductive harm.
IMPORTANT!
FILL OUT ENCLOSED PRODUCT REGISTRATION CARD AND MAIL
2
SAFETY RULES
DANGER
WARNING
Running generator gives off carbon monoxide,
an odorless, colorless, poison gas.
Breathing carbon monoxide will cause nausea,
fainting, or death.
Fuel and its vapors are extremely flammable and
explosive.
Fire or explosion can cause severe burns or
death.
• Operate generator ONLY outdoors.
WHEN ADDING FUEL:
• Keep clearance on all sides of generator for adequate
ventilation.
• Turn generator OFF and let it cool at least 2 minutes before
removing gas cap. Loosen cap slowly to relieve pressure in tank.
• DO NOT operate generator inside any building or enclosure,
including the generator compartment of a recreational vehicle (RV).
• Fill fuel tank outdoors.
• DO NOT overfill tank. Allow space for fuel expansion.
• Keep fuel away from sparks, open flames, pilot lights, heat, and
other ignition sources.
DANGER
Failure to properly ground generator can result
in electrocution, especially if the generator is
equipped with a wheel kit.
• DO NOT light a cigarette or smoke.
WHEN OPERATING EQUIPMENT:
• DO NOT tip engine or equipment at angle which causes fuel
to spill.
• National Electric Code requires generator to be properly
grounded to an approved earth ground. Call an electrician for
local grounding requirements.
• This generator is not for use in mobile equipment or marine
applications.
WHEN TRANSPORTING OR REPAIRING EQUIPMENT:
DANGER
• Transport/repair with fuel tank EMPTY or with fuel shutoff
valve in the OFF position.
Generator produces powerful voltage.
Failure to isolate generator from power utility
can result in death or injury to electric utility
workers due to backfeed of electrical energy.
• Disconnect spark plug wire.
WHEN STORING FUEL OR EQUIPMENT WITH FUEL
IN TANK:
• When using generator for backup power, notify utility
company. Use approved transfer equipment to isolate
generator from electric utility.
• Use a ground fault circuit interrupter (GFCI) in any damp or
highly conductive area, such as metal decking or steel work.
• DO NOT touch bare wires or receptacles.
• DO NOT use generator with electrical cords which are worn,
frayed, bare, or otherwise damaged.
• DO NOT operate generator in the rain or other forms of
precipitation.
• DO NOT handle generator or electrical cords while standing
in water, while barefoot, or while hands or feet are wet.
• DO NOT allow unqualified persons or children to operate or
service generator.
• Store away from furnaces, stoves, water heaters, clothes
dryers, or other appliances that have pilot light or other
ignition source because they can ignite fuel vapors.
WARNING
• This generator does not meet U. S. Coast Guard Regulation
33CFR-183 and should not be used on marine applications.
• Failure to use the appropriate U. S. Coast Guard approved
generator could result in bodily injury and/or property
damage.
3
SAFETY RULES
CAUTION
WARNING
Exceeding generator’s wattage/amperage capacity can
damage generator and/or electrical devices connected
to it.
Unintentional sparking can result in fire or
electric shock.
• See “Don’t Overload Generator” on page 16.
• Start generator and let engine stabilize before connecting
electrical loads.
• Connect electrical loads in OFF position, then turn ON for
operation.
• Turn electrical loads OFF and disconnect from generator
before stopping generator.
WHEN ADJUSTING OR MAKING REPAIRS TO YOUR
GENERATOR
• Disconnect the spark plug wire from the spark plug and place
the wire where it cannot contact spark plug.
WARNING
CAUTION
Running engines produce heat.Temperature of
muffler and nearby areas can reach or exceed
150°F (65°C).
Severe burns can occur on contact.
Improper treatment of generator can damage it and
shorten its life.
• Use generator only for intended uses.
• If you have questions about intended use, ask your dealer
or contact customer service at 1-866-237-1049.
• Operate generator only on level surfaces.
• DO NOT expose generator to excessive moisture, dust, dirt,
or corrosive vapors.
• DO NOT insert any objects through cooling slots.
• If connected devices overheat, turn them off and disconnect
them from generator.
• Shut off generator if:
-electrical output is lost;
-equipment sparks, smokes, or emits flames;
-unit vibrates excessively.
• DO NOT touch hot surfaces.
• Allow equipment to cool before touching.
CAUTION
Excessively high operating speeds increase risk of injury
and damage to generator.
Excessively low speeds impose a heavy load.
• DO NOT tamper with governed speed. Generator supplies
correct rated frequency and voltage when running at governed
speed.
• DO NOT modify generator in any way.
4
SYMBOLS
Some of the following symbols may be used on this generator. Please study them and learn their meaning. Proper
interpretation of these symbols will allow you to operate the generator better and safer.
SYMBOL
NAME
DESIGNATION/EXPLANATION
V
Volts
Voltage
A
Amperes
Current
Hz
Hertz
Frequency (cycles per second)
W
min
~
no
Watt
Power
Minutes
Time
Alternating Current
Type of current
Direct Current
Type of current
No Load Speed
Rotational speed, at no load
Wet Conditions Alert
Do not expose to rain or use in damp locations.
Read The Operator's Manual
To reduce the risk of injury, user must read and understand
operator's manual before using this product.
Eye Protection
Always wear safety goggles or safety glasses with side shields
and a full face shield when operating this product.
Safety Alert
Precautions that involve your safety.
Electrocution
Failure to properly ground generator can result in electrocution
especially if the generator is equipped with a wheel kit.
Electrical Shock
Generator produces powerful voltage. Failure to isolate generator
from power utility can result in death or injury to electrical utility
workers due to backfeed of electrical energy.
Electrical Shock
Unintentional sparking can result in electric shock.
Toxic Fumes
Running generator gives off carbon monoxide, an odorless
colorless, poison gas. Breathing carbon monoxide can cause
nausea, fainting, or death.
Fire
Fuel and its vapors are extremely flammable. Fire can cause
severe burns or death.
Explosion
Fuel and its vapors are extremely explosive. Explosions can
cause severe burns or death.
Hot Surface
To reduce the risk of injury or damage, avoid contact with any hot
surface.
Ground
Consult with local electrician to determine grounding requirements
before operation.
5
SYMBOLS
The following signal words and meanings are intended to explain the levels of risk associated with this product.
SYMBOL
SIGNAL
DANGER:
MEANING
Indicates an imminently hazardous situation which, if not avoided, will result in death
or serious injury
WARNING: Indicates a potentially hazardous situation which, if not avoided, could result in death
or serious injury
CAUTION:
Indicates a potentially hazardous situation which, if not avoided, may result in minor
or moderate injury
CAUTION:
(Without Safety Alert Symbol) indicates a situation that may result in property damage
SERVICE
Servicing requires extreme care and knowledge and
should be performed only by a qualified service technician.
For service we suggest you return the product to your
nearest AUTHORIZED SERVICE DEALER for repair.
When servicing, use only identical replacement parts.
DANGER:
To avoid death or serious personal injury, do not
attempt to operate this product until you thoroughly
read the owner's manual and understand it completely.
Save this operator’s manual and review frequently for
continuing safe operation and instructing others who
may use this product.
WARNING:
Observe all normal safety precautions related to avoiding
electrical shock.
WARNING:
The operation of any product can result in foreign objects being thrown into your eyes, which can result
in severe eye damage. Before beginning operation, always wear safety goggles or safety glasses with
side shields and full face shield when needed. We recommend Wide Vision Safety Mask for use over
eyeglasses or standard safety glasses with side shields. Always wear eye protection which is marked to
comply with ANSI Z87.1.
SAVE THESE INSTRUCTIONS
6
SYMBOLS
SAFETY LABELS
The following labels are found on the generator. For your
safety, please study and understand all of the labels
before starting the generator.
You will be KILLED or SERIOUSLY HURT
if you do not follow the Owner’s Manual
instructions.
If any of the labels come off the unit or become hard to
read, contact an authorized service center for replacement.
Do not expose to rain or use in damp
locations.
FUEL WARNING
DO NOT SMOKE when filling with gasoline. Do not over
fill. Full level is 1 inch below the top of the fuel neck.
Stop the engine two minutes before refueling to avoid
the heat from the muffler igniting fuel vapors.
Risk of Fire. Do not add fuel while the
product is operating.
Exhaust contains poisonous carbon monoxide gas that can cause unconsciousness or
DEATH. Operate in well ventilated, outdoor
areas away from open windows or doors.
Generator is a potential source of electric
shock. Do not expose to moisture, rain, or
snow. Ground the system. Do not operate
with wet hands or feet.
$!.'%2
HOT MUFFLER WARNING
Do not touch the muffler or aluminum cylinder of the
engine. They are very HOT and will cause severe burns.
Don’t put any flammable or combustible materials in the
direct path of the exhaust.
WARNING
HOT
MUFFLER
DO NOT
TOUCH
#HECKªFORªANYª
FUELªOVERFLOWªOR
LEAKING
3TOPªTHEªENGINE
BEFOREªREFUELING
VENTILATION WARNING
Do not use the generator in an enclosed area or near
open windows, vents, or doors. Fumes from the unit can
kill.
ENGINE OIL WARNING
You must add oil before the first operation of the generator.
The oil reservoir capacity is 1.2 quarts. Always check the
oil level before each operation. The oil level should always
register on the dipstick.
7
FEATURES
SPECIFICATIONS
GENERATOR
Rated Voltage..................................................120V/240V
120V/240V Receptacle Plug Type..........................L14-30
Rated Frequency......................................................60 Hz
Rated Maximum Continuous Load Current........50/22.7 A
Maximum Rated Watts.........................................6,200 W
Continuous Wattage Capacity..............................5,800 W
ENGINE
Engine Type..............................4 Stroke, Overhead Valve
Cylinder Discharge Capacity...................................389 cc
Bore x Stroke..................................................3.5 x 2.5 in.
Cooling System...................................Forced Air Cooling
Ignition System........................Transistor Magnet Ignition
Spark Plug................................................NGK or BP6ES
Spark Plug Gap..............................................0.28 - .031 in.
Engine Oil Volume...................................................1.2 qt.
Oil Type (API-SG-SL).....................................SAE 10W30
Fuel Volume...........................................................6.6 gal.
Compression Ratio....................................................8.0:1
FUEL TANK
CAP
DIMENSIONS
Length...................................................................26.7 in.
Width........................................................................20 in.
Height..................................................................21.25 in.
Dry Weight............................................................187 lbs.
FUEL TANK
FUEL LEVEL
GAUGE
AC CIRCUIT
BREAKER
120 VOLTS AC
RECEPTACLES
CHOKE LEVER
GROUNDING
TERMINAL
AIR FILTER
FUEL VALVE
RECOIL STARTER
GRIP
120/240 VOLTS AC
RECEPTACLES
ENGINE
SWITCH
OIL FILL CAP/DIPSTICK
OIL DRAINAGE BOLTS
Fig. 1
8
FEATURES
KNOW YOUR GENERATOR
RECOIL STARTER GRIP
See Figure 1.
Before attempting to use this product, familiarize yourself
with all operating features and safety rules.
The recoil starter grip is used (along with the engine
switch) to start the generator’s engine.
FUEL VALVE
GROUNDING TERMINAL
The flow of fuel through the generator is controlled by
the position of the fuel valve.
The grounding terminal is used to assist in properly
grounding the generator to help protect against electrical
shock. Consult with a local electrician for grounding
requirements in your area.
AIR FILTER
The air filter helps to limit the amount of dirt and dust
drawn into the unit during operation.
RECEPTACLES
Your generator has the following single phase, 60 Hz
outlets: four 120 Volt AC, 20 Amp, and one 120 Volt/240
Volt AC, 30 Amp. The receptacles can be used for
operating appropriate appliances, electrical lighting,
tools, and motor loads.
CHOKE LEVER
Use the choke lever for starting a cold engine.
OIL DRAINAGE BOLT
When changing the engine oil, the oil drainage bolt is
loosened to allow old engine oil to be drained.
AC CIRCUIT BREAKER
The circuit breaker is provided to protect the generator
against electrical overload and can be used to turn the
generator’s power on or off.
FUEL LEVEL GAUGE
Consult the fuel level gauge to determine the amount of
fuel remaining in the generator.
ENGINE SWITCH
The engine switch is used in combination with the recoil
starter grip to start the generator. It is also used to turn
the generator off.
FUEL TANK
The fuel tank has a capacity of 6.6 gallons.
OIL FILL CAP/DIPSTICK
Remove the oil cap to check and add oil to the generator
when necessary.
9
ASSEMBLY
The following tools are required for assembly:
10 mm BOX-END WRENCH
12 mm OPEN-END WRENCH
Fig. 2
UNASSEMBLED PARTS
The following assembly hardware items are included with the generator. (See Figure 3.)
Wheel Assembly..............................................................1
Handle Assembly.............................................................1
Foot Assembly.................................................................1
13
6
ITEM NUMBER
QUANTITY
Fig. 3
10
ASSEMBLY
INSTRUCTIONS
INSTALLING HANDLE ASSEMBLY
This product requires assembly.
See Figure 4.
Carefully remove the generator and any accessories
from the box.
NOTE: The generator is heavy. To avoid back injury, lift with
your legs, not your back, and get help when needed.
■
Locate the following items:
Handle (5)
Left and right handle brackets (2)
4 bolts (3)
4 square curved washers (14)
4 nuts (6)
4 flat washers (4)
■
Align left handle bracket with hole in left side of
generator frame. Insert bolt through handle bracket
and frame. Slide curved washer on end of bolt,
making sure the cupped side of washer faces the
frame. Assemble nut; finger tighten. _
■
Repeat above step with right handle bracket.
■
Put one side of handle inside left handle bracket.
Slide washer over bolt, then insert bolt through the
bracket handle and bracket. Push bolt through so
that it exits on the other side of the handle, then add
another washer and the nut. Finger tighten.
■
Repeat above step with other side of the handle and
the right handle bracket.
■
Return to the first bolt installed. While holding bolt
head steady with 10 mm box-end wrench, use 12 mm
open-end wrench to tighten snugly. (See Figure 2.)
Repeat with remaining bolts.
■
■
Make sure that all items listed in the unassembled
parts list are included. (See Figure 3.)
■
Inspect the generator carefully to make sure no
breakage or damage occurred during shipping.
■
Do not discard the packing material until you have
carefully inspected and satisfactorily operated the
generator.
■
If any parts are damaged or missing, please call
1-866-237-1049 for assistance.
PACKING LIST
Generator
Wheel Assembly
Handle Assembly
Foot Assembly
Container of Oil
Warranty Card
Owner's Manual
WARNING:
Do not attempt to lift the unit by the handle assembly.
If it is necessary to lift the generator, always grasp by
the frame. Use proper lifting techniques to avoid back
injury.
WARNING:
If any parts are missing, do not operate this generator
until the missing parts are replaced. Failure to do so
could result in possible serious personal injury.
WARNING:
Do not attempt to modify this generator or create
accessories not recommended for use with this
generator. Any such alteration or modification is
misuse and could result in a hazardous condition
leading to possible serious personal injury.
WARNING:
Do not attempt to operate the generator until assembly
is complete. Failure to comply could result in possible
serious personal injury.
Fig. 4
11
ASSEMBLY
INSTALLING WHEEL ASSEMBLY
See Figure 5.
■
Locate the following items:
2 wheels
2 square curved washers (14)
2 flat washers (4)
2 hex nuts (11)
2 nuts (6)
■
Slide wheel over axle extension.
■
Slide flat washer on axle extension.
■
Install hex nut on axle extension and tighten to
secure.
Repeat for second wheel.
NOTE: Block up frame securely with wood blocks to
provide clearance for frame bolts & wheel assembly.
■
■
Slide square curved washer, curved side down,
on bolt.
■
Place on frame and slide bolt through frame
hole.
■
Repeat for second bolt.
■
Lift axle and align hole with installed frame bolts.
■
Install nuts on 2 bolts and tighten to secure
Fig. 5
INSTALLING FOOT ASSEMBLY
See Figure 6.
Locate the following items:
2 foot supports (12)
6 bolts (13)
NOTE: Block up frame securely with wood blocks to
provide clearance for foot support assembly.
■
■
Align foot support with 3 holes in frame cross member.
■
Insert 3 bolts into welded nuts on foot support.
■
Tighten bolts to secure
■
Repeat for second foot.
Fig. 6
12
OPERATION
GROUNDING THE GENERATOR
The National Electrical Code requires that the frame and
external electrically conductive parts of this generator be
properly connected to an approved earth ground. Local
electrical codes may also require proper grounding of
the unit. For that purpose, a GROUNDING FASTENER
is provided on the generator end (Figure 7).
Grounding
Fastener
Fig. 7
Generally, connecting a No. 12 AWG (American Wire
Gauge) stranded copper wire to the grounding fastener
and to an earth-driven copper or brass grounding rod
(electrode) provides adequate protection against electrical shock. Be careful to keep the grounding wire
attached after connecting the stranded copper wire.
However, local codes may vary widely.
WARNING:
Consult with a local electrician for grounding
requirements in your area.
Properly grounding the generator helps prevent electrical
shock if a ground fault condition exists in the generator
or in connected electrical devices, especially when the
unit is equipped with a wheel kit. Proper grounding also
helps dissipate static electricity, which often builds up in
ungrounded devices.
13
OPERATION
DANGER:
OIL DIPSTICK
Failure to properly ground generator can result in
electrocution, especially if the generator is equipped with
a wheel kit. National Electric Code requires generator
to be properly grounded to an approved earth ground.
Call an electrician for local grounding requirements
OIL FILL HOLE
WARNING:
Do not use any attachments or accessories not
recommended by the manufacturer of this generator.
The use of attachments or accessories not
recommended can result in serious personal injury.
APPLICATIONS
This generator is designed to supply electrical power for
operating compatible electrical lighting, appliances, tools,
and motor loads.
Fig. 8
BEFORE OPERATING THE UNIT
Position the generator on a flat surface before checking
fluid levels or adding fluid.
RES
CAUTION:
Attempting to start the engine before it has been
properly filled with oil will result in equipment failure.
FUEL
CHECKING/ADDING OIL
See Figure 8.
FUEL LEVEL
GAUGE
Engine oil has a major influence on engine performance
and service life. For general, all-temperature use, SAE
10W-30 is recommended. Always use a 4-stroke motor
oil that meets or exceeds the requirements for API service
classification SJ.
NOTE: Non-detergent or 2-stroke engine oils will damage the engine and should not be used.
■
Unscrew the oil dipstick and remove.
■
Wipe dipstick clean and reseat in hole. Do not rethread
■
Remove dipstick again and check oil level. Oil level
should fall within the hatched area on the dipstick.
■
If level is low, add engine oil until the fluid level rises
to the upper portion of the hatched area on the
dipstick.
■
FUEL TANK CAP
Fig. 9
NOTE: Always use unleaded gasoline with a pump octane
rating of 86 or higher. Never use old, stale, or contaminated
gasoline, and do not use an oil/gas mixture. Do not allow
dirt or water to enter the fuel tank.
Replace and secure the dipstick.
CHECKING/ADDING FUEL
OXYGENATED FUELS
See Figure 9.
■
Check the fuel level gauge. If fuel is needed,
continue with the next step.
■
Remove the fuel tank cap.
■
Fill the fuel tank to 1 in. below the tip of the fuel neck.
■
Replace and secure the fuel tank cap.
FUEL TANK
Some conventional gasolines are blended with alcohol or an
ether compound. These gasolines are collectively referred
to as oxygenated fuels. To meet clean air standards, some
areas of the United States use oxygenated fuels to help
reduce emissions.
14
OPERATION
If using an oxygenated fuel, make sure it is unleaded
and meets the minimum octane rating requirements.
Before using an oxygenated fuel, try to confirm the fuel’s
contents. Some states/provinces require this information
to be posted on the pump. The following are the EPA
approved percentages of oxygenates:
Ethanol (ethyl or grain alcohol) 10% by volume. You
may use gasoline containing up to 10% ethanol by
volume. Gasoline containing ethanol may be marketed
under the name “Gasohol.”
MTBE (methyl tertiary butyl ether) 15% by volume.
You may use gasoline containing up to 15% MTBE by
volume.
Methanol (methyl or wood alcohol) 5% by volume.
You may use gasoline containing up to 5% methanol
by volume as long as it also contains cosolvents and
corrosion inhibitors to protect the fuel system. Gasoline
containing more than 5% methanol by volume may
cause starting and/or performance problems. It may also
damage metal, rubber, and plastic parts of the generator
or your fuel system.
If you notice any undesirable operating symptoms, try
another service station or switch to another brand of
gasoline.
NOTE: Fuel system damage or performance problems
resulting from the use of an oxygenated fuel containing
more than the percentages of oxygenates mentioned
above are not covered under warranty.
RECOIL
STARTING
GRIP
ENGINE
SWITCH
CIRCUIT
BREAKER
Fig. 10
OFF
ON
FUEL
VALVE
WARNING:
Fig. 11
On a level surface with the engine off, check the oil
level before each use of the generator.
MOVE CHOKE
LEVER TO "ON"
POSITION TO
CLOSE
STARTING THE ENGINE
See Figures 10 - 12.
NOTE: If location of generator is not level, the unit may
not start or may shut down during operation.
■ Unplug all loads from the generator.
■ Switch the circuit breaker to the ON position.
■ Turn the fuel valve to the ON position.
■ Move the choke lever to the ON (closed) position.
NOTE: When starting a warm engine, leave the choke in
the OFF (open) position.
■ Put the engine switch in the ON position.
■ Pull the recoil starting grip lightly until you feel a
resistance, then pull it briskly.
NOTE: Do not allow the grip to snap back after starting;
return it gently to its original place.
■ As the engine warms, slowly move the choke lever
to the OFF position.
Fig. 12
Switch the AC circuit breaker to the OFF position.
Put the engine switch in the OFF position.
■ Turn the fuel valve to the OFF position.
To stop the engine in an emergency situation:
■ Put the engine switch in the OFF position.
■
■
STOPPING THE ENGINE
See Figures 10 - 12.
To stop the engine under normal operating conditions:
■ Remove any load from the generator.
15
ELECTRICAL
DON'T OVERLOAD GENERATOR
WARNING:
CAPACITY
Do not overload generator's capacity. Exceeding
generator's wattage/amperage capacity can damage
generator and/or electrical devices connected to it.
Make sure the generator can supply enough rated
(running) and surge (starting) watts for the items you will
power at the same time. Follow these simple steps:
1. Select the items you will power at the same time.
2. Total the rated (running) watts of these items. This is
the amount of power the generator must produce to
keep the items running. See the wattage reference
chart at the right.
3. Estimate how many surge (starting) watts you will
need. Surge wattage is the short burst of power
needed to start electric motor-driven tools or
appliances such as a circular saw or refrigerator.
Because not all motors start at the same time, total
surge watts can be estimated by adding only the
item(s) with the highest additional surge watts to the
total rated watts from step 2.
Additional
Surge
(Starting)
Watts
Light Bulb-75 Watt
75
−
Deep Freezer
500
500
Sump Pump
800
1200
Refrigerator/Freezer - 18 Cu. Ft.
800
1600
Water Well Pump - 1/3 HP
100
2000
Window AC - 10,000 BTU
1200
1800
Window Fan
300
600
Furnace Fan Blower - 1/2 HP
800
1300
Microwave Oven - 1000 Watt
1000
−
Tool or Appliance
Essentials
Heating/Cooling
Example:
Tool or Appliance
Rated*
(Running)
Watts
Rated (Running)
Watts
Surge
(Starting) Watts
Window Air
Conditioner
1200
1800
Refrigerator
800
1600
Coffee Maker
1500
−
Deep Freezer
500
500
Electric Stove - Single Element
1500
−
2500
−
DVD/CD Player
100
−
VCR
100
−
Stereo Receiver
450
−
Color Television - 27"
500
−
Personal Computer w/17" monitor
800
−
180
−
Kitchen
Television
500
−
Hot Plate
Light (75 Watts)
75
−
Family Room
3075 Total
Running Watts
1800 Highest
Surge Watts
Total Rated (Running Watts)
= 3075
Highest Additional Surge Watts = 1800
Total Generator Output Required = 4875
Maximum
Allowed
5800
6200
Other
Security System
POWER MANAGEMENT
To prolong the life of the generator and attached devices,
it is important to take care when adding electrical loads
to the generator. There should be nothing connected
to the generator outlets before starting the engine. The
correct and safe way to manage generator power is to
sequentially add loads as follows:
AM/FM Clock Radio
300
−
Garage Door Opener - 1/2 HP
480
520
Electric Water Heater - 40 Gal.
4000
−
Quartz Halogen Work Light
1000
−
1. With nothing connected to the generator, start
the engine as described earlier in this manual.
2. Plug in and turn on the first load, preferably the
largest load you have.
3. Permit the generator output to stabilize. (engine runs
smoothly and attached device operates properly.)
4. Plug in and turn on the next load.
5. Again, permit the generator to stabilize.
6. Repeat steps 4 and 5 for each additional load.
Never add more loads than the generator capacity.
Take special care to consider surge loads in generator
capacity as previously described.
Airless Sprayer - 1/3 HP
600
1200
Reciprocating Saw
960
960
DIY/Job Site
Electric Drill - 1/2 HP
1000
1000
Circular Saw - 7-1/4"
1500
1500
Miter Saw - 10"
1800
1800
Planer/Jointer - 6"
1800
1800
Table Saw/Radial Arm Saw - 10"
200
2000
Air Compressor - 1-1/2 HP
2500
2500
*Wattages listed are approximate. Check tool or appliance for actual wattage.
16
MAINTENANCE
WARNING:
When servicing, use only identical Poulan Pro
replacement parts. Use of any other parts may
create a hazard or cause product damage.
Only the parts shown on the parts list are intended to
be repaired or replaced by the customer. All other parts
should be replaced at a Poulan Pro Authorized Service
Center.
GENERAL MAINTENANCE
Keep the generator in a clean and dry environment
where it is not exposed to dust, dirt, moisture, or corrosive vapors. Do not allow the cooling air slots in the
generator to become clogged with foreign material such
as leaves, snow, etc.
Do not use a garden hose to clean the generator. Water
entering the fuel system or other internal parts of the
unit can cause problems that will decrease the life of the
generator.
To clean the unit:
■ Use a soft bristle brush and/or vacuum cleaner to
loosen and remove dirt and debris.
■ Clean air vents with low pressure air that does not
exceed 25 psi.
■ Wipe the exterior surfaces of the generator with a
damp cloth.
Fig. 13
OIL FILL
TUBE
CLEANING/REPLACING AIR FILTERS
OIL DRAINAGE
BOLT
See Figure 13.
For proper performance and long life, keep air filters clean:
■ Release the upper and lower retaining clips and
remove the air filter cover.
■
Remove the outer filter element and the inner
precleaner element.
■
If the filter elements are dirty, clean with warm, soapy
water. Rinse and let dry.
■
Apply a light coat of engine oil to the elements, then
squeeze it out.
■
Put the filter elements back together and replace
in the air filter compartment, being careful to place
the outer filter element closest to the air filter cover.
Replace the cover and snap retaining clips back in
place to secure.
■
OIL DIPSTICK
NOTE: Do not run the generator without the air filters.
Rapid engine wear will result.
Fig. 14
CHANGING ENGINE OIL
See Figure 14
■
Remove the oil dipstick.
■
Place a container underneath the oil drainage bolt
to collect used oil as it drains.
■
Unscrew the oil drainage bolt and remove.
■
Allow oil to drain completely.
■
Reinstall the oil drainage bolt and tighten securely.
■
Refill with oil following the instructions in the
“Checking/Adding Oil” section on page 14.
NOTE: Disposal of used oil should be at an approved
disposal site. See your local oil retailer for more information.
17
MAINTENANCE
CLEANING FUEL SEDIMENT CUP
See Figure 15.
The sediment cup prevents dirt and water that may have
gotten into the fuel tank from entering the carburetor. If
the engine has not been run for a long time, the sediment
cup should be cleaned before use.
■
■
■
■
■
■
Turn the fuel valve to the off position.
Remove the sediment cup using a 10 mm wrench.
Remove the o-ring and filter.
Clean each of the parts in a high flash-point solvent.
Reinstall the filter, o-ring, and sediment cup. Tighten
with 10 mm wrench to secure.
Return the fuel valve to the ON position and check
for leaks.
SPARK PLUG MAINTENANCE
See Figure 16.
The spark plug must be properly gapped and free of
deposits in order to ensure proper engine operation.
To check the spark plug:
Fig. 15
SPARK PLUG
Remove the spark plug cap.
Clean any dirt from around the base of the spark
plug.
■ Remove the spark plug.
■ Inspect the spark plug for damage, and clean with
a wire brush before reinstalling. If the insulator
is cracked or chipped, the spark plug should be
replaced.
NOTE: If replacing, use the following recommended
spark plugs or equivalent: NGK, BP6ES.
■
■
■
■
■
Measure the plug gap with a feeler gauge. The
correct gap is .028 - .031 in. Correct, if necessary, by
carefully bending the side electrode.
Seat spark plug in position; thread in by hand to
prevent cross-threading.
Tighten with spark plug wrench to compress washer.
If spark plug is new, use 1/2 turn to compress
washer appropriate amount. If reusing old spark
plug, use 1/8 to 1/4 turn for proper washer
compression.
Fig. 16
MAINTENANCE SCHEDULE
Before operating
each time
Check Engine Oil
After 100 hours
of operation
or annually
■
■
■
Change Engine Oil
Check Air Filters
After 25 hours of
operation
■
Replace Air Filters
■
Clean Fuel Sediment Cup
■
Replace Spark Plug
■
■
Clean or Replace Spark Arrester
■
■
18
MAINTENANCE
CLEANING SPARK ARRESTER
See Figure 17.
■
■
■
■
■
Remove the eight 5 mm screws from the muffler
protector, then remove muffler protector.
Remove the 4 mm screw from the spark arrester and
remove the spark arrester.
Use a brush to remove carbon deposits from the
spark arrester screen.
Inspect the spark arrester for breaks or holes.
Replace if necessary.
Reinstall the spark arrester and muffler protector.
SPARK ARRESTER
DRAINING CARBURETOR
See Figure 18.
■
■
■
Loosen the carburetor drain screw.
Allow gasoline to drain completely into suitable
container.
Retighten drain screw.
Fig. 17
TRANSPORTING
■
■
■
■
Turn the engine switch and fuel valve OFF.
Make sure engine and exhaust system of unit is cool.
Keep the unit level to prevent fuel spillage.
Do not drop or strike the unit or place under heavy
objects.
DRAIN SCREW
Fig. 18
STORAGE
STORAGE
When preparing the generator for storage, follow the guidelines below.
STORAGE TIME
PRIOR TO STORING
Less than 1 month
■
No special preparation is required.
1 to 2 months
■
Fill with fresh gasoline and add a gasoline conditioner*.
2 months to 1 year
■
■
■
Fill with fresh gasoline and add a gasoline conditioner*.
Drain fuel from carburetor.
Clean fuel sediment cup.
1 year or more
■
■
■
■
■
Drain fuel tank.
Drain fuel from the carburetor.
Clean fuel sediment cup.
Remove spark plug.
Put a tablespoon of engine oil into the spark plug cylinder. Turn the engine slowly with
the pull rope to distribute the oil.
■ Reinstall spark plug.
■ Change engine oil.
After removal from storage:
■ Fill with fresh gasoline.
*Use gasoline conditioners formulated to extend storage life. For recommendations, contact your nearest authorized
service center.
19
TROUBLESHOOTING
PROBLEM
POSSIBLE CAUSE
SOLUTION
Engine will not start
Engine switch is OFF
Turn engine switch to ON.
AC receptacle does not work
No fuel
Fill fuel tank.
Oil level is low
Check engine oil level and fill, if necessary
Check spark plug condition
Replace spark plug.
Fuel is not reaching carburetor
Clean fuel sediment cup.
Fuel valve is in OFF position
Move fuel valve to ON position
Circuit breaker is OFF
Turn ON the AC circuit breaker.
Item plugged in is defective
Try a different item.
Generator makes a “spark knock” or An occasional light “knocking” or
“pinging” noise
“pinging” under heavy load is not
a cause for concern. However, if
the knocking or pinging occurs
under normal load at a steady
engine speed, the problem may
be with the brand of gasoline
being used.
Switch to a different brand of gasoline,
making sure that the octane rating is 86 or
higher. If problem continues, contact your
nearest authorized service center.
If problem persists after trying the above solutions, please call 1-866-237-1049 for your nearest authorized service center.
20
PORTABLE ELECTRIC GENERATOR- -MODEL NO. PPG6000
WIRING DIAGRAM
21
DECALS
PORTABLE ELECTRIC GENERATOR- -MODEL NO. PPG6000
10
9
8
4
10
1
7
5
6
2
3
KEY
NO.
1
2
3
4
5
6
7
8
9
10
––
––
PART
NO.
419397
419938
419939
420413
420820
420821
420822
420823
420824
420825
420344
421023
DESCRIPTION
Decal, Logo
Decal, Rewind Cover
Decal, Control Panel
Decal, Danger Label
Decal, Fuel Valve
Decal, Air Filter Maintenance
Decal, Choke
Decal, Fuel Level
Decal, Danger
Decal, Hot Surface
Owner's Manual, English
Owner's Manual, Spanish
22
PORTABLE ELECTRIC GENERATOR- -MODEL NO. PPG6000
CONTROL PANEL ASSEMBLY
KEY
NO.
6
7
8
14
16
17
18
19
20
61
204
205
206
213
218
219
220
221
222
223
PART
NO.
Td2000-c03-2000
Td2006-c03-0100
Td9001-c03-0000
B057890006002070b
B061770006000060b
Td2310-c03-0000
B000970206000000b
B000930006000000b
B057890006002070b
Td2611-c03-0100
Td2410-c03-0100
Td2410-c03-0200
B06170004000060b
Td2016-b92-0000
Td2611-c03-0000
B000930004000000b
B000970204000000b
B061770004000060b
Td2018-c03-0100
B057890006001470b
23
DESCRIPTION
Control Panel Assy
Control Panel Comp
Case,control Panel
Bolt hex m6×20
Nut hex m6
Circuit Breaker 23a
Washer plain w6
Washer spring w6
Bolt m6×20
Harness Assy B., Wire
Socket,120v
Socket,(120v 240v)Plug Type L14-30
Screw M4
Switch
Harness Assy A., Wire
Washer, Spring, W4
Washer, Plain, W4
Nut m4
Diode Assy
Bolt m6×14
PORTABLE ELECTRIC GENERATOR- -MODEL NO. PPG6000
MUFFLER ASSEMBLY
KEY
NO.
35
36
37
38
39
40
41
42
43
44
45
46
47
48
231
230
241
242
PART
NO.
18000-qc03-0000
Td5004-b98-0000
Td5003-b98-0000
Td5002-c03-0000
Td5006-b98-0000
18100-pb52-0000
18066-mb32-0100
18066-mb32-0000
Td5001-b98-0000
B000930008000000b
B057890008002570b
B061700008000060b
B057890006001270b
B057890008001670b
18000-qc03-0100
B057890005002070b
Td5006-pb50-0000
Td5007-pb50-0000
24
DESCRIPTION
Muffler Comp
Muffler Side Protector
Muffler Outer Protector Comp.
Muffler Inner Protector Comp.
Protector Muffler Seal
Exhaust Pipe Comp.
Exhaust Pipe Gasket (A)
Exhaust Pipe Gasket (B)
Muffler Stay Comp.
Spring Washer W8
Bolt M8×25
Nut 8mm
Bolt M6×12
Bolt M8×16
Spark Arrestor
Bolt M5×20
Lock Plate 50mm
Lock Plate 60mm
PORTABLE ELECTRIC GENERATOR- -MODEL NO. PPG6000
AIR FILTER ASSEMBLY
KEY
NO.
21
23
24
25
26
27
28
30
33
31
34
PART
NO.
12104-mb32-0000
16101-mb32-0100
16106-mb32-0000
16127-mb32-0000
Td4121-c01-0000
16105-mb32-0200
16109-mb32-0000
16102-mb32-0000
B061700004000060b
B061770106000060b
B061770106000060b
25
DESCRIPTION
Breather Tube
Air Cleaner Element
Air Cleaner Separator Plastic
Air Cleaner Case Rear
Air Cleaner Stay
Air Cleaner Cover Case Front
Gemel
Air Cleaner Seal
Nut 4mm
Nut, M6
Nut, M6
PORTABLE ELECTRIC GENERATOR- -MODEL NO. PPG6000
FRAME & FUEL TANK ASSEMBLY
KEY
NO.
49
50
51
52
53
54
55
56
58
59
60
63
65
66
67
68
217
218
PART
NO.
Td6110-b98-0400
Td6008-b98-0000
Td6120-b98-0000
Td6130-b93-0000
Td6140-b93-0000
B057890006003070b
Td6003-b93-0000
Td6002-b93-0000
B090740005001000b
17020-jc79-0200
T2999706300130185
Td6007-b98-0000
Td4111-b98-0000
Td4112-b98-0000
B061770010000060b
B061770008000060b
Td6040-b98-0400
Td6121-b93-0100
219
Td6122-b93-0100
KEY
NO.
226
226-1
226-2
226-2a
226-3
226-4
226-5
226-6
226-7
226-8
226-9
226-10
226-11
226-12
227-13
226-14
226-15
226-16
226-17
226-18
DESCRIPTION
Tank Comp., Fuel
Fuel Tank Seal
Fuel Filler Cap Comp.
Fuel Filter
Meter Assy.,fuel
Bolt, Flange, M6×30
Tank Cushion Washer
Bush
Screw, Flat, M5×10
Tube Clip, (B8)
Fuel Tube, W3.5×W10×165
Fuel Tank Mounting Rubber
Bottom Rubber l
Bottom Rubber r
Nut M10
Nut M8
Fuel Cock Assy.
Fuel Filler Cap Packing
Rubber
Fuel Filler Cap Packing
Plastic
26
PART
NO.
Td4010-c03-1200
Td4010-c03-2100
Td4013-c03-0200
Td4013-c03-0300
B057890006004070b
B000970206000000b
Td4011-c03-0200
B061870006000000b
Td4015-c03-0400
Td4014-c05-0400
91302-91002030000
B0009300010000000b
B009230006000000b
Td4012-c03-0600
B094410006001870b
Td7051-c06-0000
B057890006005570b
B057890006003570b
Td4113-b98-0000
B094410006001870b
DESCRIPTION
Wheel And Handle Assy
Frame Kit
Left Gemel
Right Gemel
Bolt,m6×40
Flat Washer, W6
Handle
Nut, M6
Axle Of Wheel
Wheel
Flat Washer, W10
Washer, Spring, W10
Nut, M10
Foot
Bolt, M6×18
Tile
Bolt, M6×40
Bolt, M6×35
Rubber Bumper For Foot
M6×18
U.S. EPA Emissions Control Warranty Statement
The U.S. Environmental Protection Agency and General Power Products Company are pleased to explain the Emissions
control system warranty on your equipment. In California, new engines must be designed and built to meet the state’s
anti-smog standards. Elsewhere in the U.S., similar standards must be met that are set forth by the U.S. EPA. GPP will
warrant the emissions control system of your engine for the time periods listed below, provided there has been no unapproved modification, improper maintenance, abuse, or neglect of your product.
Your emissions control system includes parts such as the air cleaner, ignition system, muffler and carburetor.
Where a warrantable condition exists, GPP will repair your engine at no cost for parts, labor, and diagnosis.
GPP Emissions System Warranty Coverage
Engines are warranted with respect to the emissions control parts set forth by the U.S. EPA for a period of two years. If
any emissions part is found defective during that period, it will be replaced or repaired by GPP.
Owner’s Warranty Responsibility
As an engine and equipment owner, you are responsible for the required maintenance listed in the owner’s manual.
GPP recommends you retain all records associated with the maintenance and repair of your product, but GPP cannot
deny the warranty solely on the lack of receipts or your failure to produce records of the performed maintenance.
You are responsible for presenting your product to an authorized repair and service outlet as soon as a problem arises.
The warranty repairs should be completed in a reasonable amount of time. The time should not exceed 30 days.
You may be denied warranty coverage if your product has failure due to unapproved modification, improper maintenance,
abuse, or neglect.
An authorized GPP service representative can perform warranty or service. For more information on those service representatives see your local yellow pages or contact General Power Products at 1-866-237-1049.
GPP Emissions Control Warranty Provisions
The warranty explains your rights and responsibilities under the emissions control warranty which is provided to you by
General Power Products Company. Poulan Pro provides a limited warranty for purchasers of new products on a separate
sheet. The emissions control warranty applies only to the emissions control system of your product. If there is a conflict in
terms between the emissions control warranty and the Poulan Pro Limited Warranty, the emissions control system warranty shall apply.
It must be an authorized service representative that performs warranty work. Evidence of the purchase date to the original
purchaser must be presented to the service representative at the time of request to perform warranty. GPP is not responsible for service calls or transporting the product to the warranty service location. The purchaser is responsible for any loss
or damage in connection with transportation of the product or parts thereof submitted for inspection and warranty work.
This product is not available for sale in California.
The following are provisions related to the Emissions Control Warranty Coverage:
1. GPP warrants the product to the initial owner and any subsequent owner that the parts are free from material
and workmanship defects, which causes failure for a period of two years from the date the product is delivered
to the retail purchaser.
2. Warranted parts are as follows:
a. Fuel System
i. Carburetor
ii. Fuel Pump
b. Air intake system
i. Air cleaner
ii. Intake manifold
c. Ignition System
i. Spark plug
ii. Ignition Module system
d. Muffler System
i. Muffler
ii. Exhaust manifold
e. Other components
i. Crankcase breather tube
ii. Flywheel
3. Warranty coverage shall be excluded where unapproved modifications, improper maintenance, abuse or
neglect exists.
4. Any part that is scheduled for routine maintenance replacement will be covered up to the time for that part to be
replaced or repaired under the scheduled maintenance period. The owner is required to perform all scheduled
maintenance.
5. The owner shall not be charged for any diagnostic labor that leads up to the determination that the part is
defective. An authorized General Power Products representative must perform the work.
6. Repair or replacement of a warranty part shall be at no charge to the owner when done by an authorized
General Power Product representative.
If you have any questions regarding Emissions Control warranty rights and responsibilities, contact General Power
Products Company at 1-866-237-1049.
27
WARRANTY
EMISSIONS MAINTENANCE SCHEDULE AND WARRANTED PARTS LIST
Emissions Parts
Inspect Before
Each Use
Clean Every
5 Hours
Replace Every
25 Hours or Yearly
Clean Every
25 Hours or Yearly
AIR FILTER ASSY
INCLUDES:
FILTER...................................................................................X.....................................X
SPARK SCREEN.............................................................................................................................................X
CARBURETOR ASSY
INCLUDES:
HEAT DAM
GASKETS
FUEL TANK ASSY
INCLUDES:
FUEL LINES.......................................X
FUEL CAP...........................................X
FUEL FILTER
IGNITION ASSY
INCLUDES
SPARK PLUG................................................................................................................X
ALL EMISSIONS–RELATED PARTS ARE WARRANTED FOR TWO YEARS, OR FOR THE PERIOD OF TIME
PRIOR TO PART'S FIRST SCHEDULED REPLACEMENT—WHICHEVER COMES FIRST.
28
LIMITED WARRANTY
HOP (The "Manufacturer") warrants to the original consumer purchaser that this product as manufactured is free from
defects in materials and workmanship. For a period of two (2) years from date of purchase by the original consumer
purchaser, we will repair or replace, at our option, without charge for parts or labor incurred in replacing parts, any part which
we find to be defective due to materials or workmanship. This Warranty is subject to the following limitations and exclusions.
1.
Transportation charges for the movement of any power equipment unit or attachment are the responsibility of the
purchaser. Transportation charges for any parts submitted for replacement under this warranty must be paid by the
purchaser unless such return is requested by the manufacturer.
2.
The Warranty period for any products used for rental or commercial purposes is limited to 90 days from the date of
original purchase.
3.
This Warranty applies only to products which have been properly assembled, adjusted, operated, and maintained in
accordance with the instructions furnished. This Warranty does not apply to any product which has been subjected to
alteration, misuse, abuse, improper assembly or installation, delivery damage, or to normal wear of the product.
4.
Exclusions: Excluded from this Warranty are normal wear, normal adjustments, standard hardware and normal
maintenance.
5.
In the event you have a claim under this Warranty, you must return the product to an authorized service dealer.
Should you have any unanswered questions concerning this Warranty, please contact:
Poulan Pro
HOP Customer Service Dept.
1030 Stevens Creek Road
Augusta, GA 30907 USA
1-866-237-1049
giving the model number, serial number and date of purchase of your product and the name and address of the authorized
dealer from whom it was purchased.
THIS WARRANTY DOES NOT APPLY TO INCIDENTAL OR CONSEQUENTIAL DAMAGES AND ANY IMPLIED
WARRANTIES ARE LIMITED TO THE SAME TIME PERIODS STATED HEREIN FOR OUR EXPRESSED WARRANTIES.
Some areas do not allow the limitation of consequential damages or limitations of how long an implied Warranty may last,
so the above limitations or exclusions may not apply to you. This Warranty gives you specific legal rights, and you may have
other rights which vary from locale to locale.
This is a limited Warranty within the meaning of that term as defined in the Magnuson-Moss Act of 1975.
29
SERVICE NOTES
30
SERVICE NOTES
31
● SERVICE
Now that you have purchased your tool, should a need ever exist for repair parts or service,
simply contact your nearest Poulan Pro Authorized Service Center. Be sure to provide all
pertinent facts when you call or visit. Please call 1-866-237-1049 for your nearest Poulan
Pro Authorized Service Center. You can also check our web site at www.poulanpro.com for a
complete list of Authorized Service Centers.
● MODEL NO. AND SERIAL NO.
The model number of this generator will be found on a plate attached to the motor housing.
Please record the model number and serial number in the space provided below.
● HOW TO ORDER REPAIR PARTS
When ordering repair parts, always give the following information:
● MODEL NUMBER
● SERIAL NUMBER
PPG 6000